Transcripts
1. Class Introduction: People seem to be
okay with doing these as long as they
appear flat, 2D. But as soon as they start
to be something like this, turning and twisting,
then the problems that, however, during leaves doesn't have to be difficult or you need is some practice and
some tips and tricks. I can do the practice for you. That's something you
will have to do, but I can help you
with the tips. Hi, I'm Kathy. I'm an artist and online teacher and I'm based
in Sandy, Sicily, Italy. In this class, I will
show you two methods to draw leaves bent or folded. As usual, we will start with the materials you
will need and show you how to prepare the leaves from the templates
I've provided you with. I will explain why it's
important to draw leaves in different positions and how this has a positive
impact on your artworks. I will then show you
step-by-step how to draw a bent or folded leaf using
two different methods. The first method will be by
drawing the mid vein first, and the second method will be by drawing the
shapes that you see. Once you practice with
the paper leaves, you will then be able
to move to relieves. By the end of the class, you will have learned
two different methods to draw leaves. And with practice, you
will be able to apply these new skills to your
future paintings and drawings. This class is for you, if you are struggling to draw leaves in a
more realistic way, whether you are a beginner
artist or even a more experienced at this but still having trouble wintering leaves. So if you're ready,
let's get started.
2. Class Project: The project for this
class is to draw leaves, of course, lots
and lots of them. So you can start with the paper ones that I
gave you, the template. And just twist and turn them
and try different shapes. And then you can move
on to the real ones. Tried to choose some
leaves or they're nice and twisting and turning, they have some nice bend. And you can also try
some dried leaves. They tend to care quite a lot. By doing this, you can build a library or leaves
that you can then use in the future for your
drawings and paintings. Don't forget to post pictures of your project in
the project section. If you would like my feedback. And also if you
have any questions, don't hesitate to ask
because I'm here for you.
3. Materials: I have here a selection of materials that you
need for this class. You will need to necessarily
everything here. But I'm just going to
show you what I've used. First of all, you will need
some pencils to draw with. So you can use a mechanical
pencil or you can use just a normal
to or HB pencil. Doesn't have to be
anything special. Then of course you
would need some erases. Either a plastic eraser or
one of these is also quite good to erase in this
more details, e.g. but if you don't have
it, don't worry, just a normal eraser would do. And then if you printing this, so I will give you this
in your downloads. If you're printing it,
you will see that he has, um, different colors sides. So red and green side and
then the mid vein is blue. And this will become clear when we start
doing the exercises. If you don't have a printer or if you can't print in color, you can always use a pen with different colors
and do this yourself, like I did here. Just use a pen. And I have one of these
old fashioned pens. I didn't know there were still doing them,
but there you go. And you have green,
blue, and red. So you can do the sides
and with the black, you can do the
veins if you want. I'll just use any color
pin that you have handy. And you can use acetate for
these exercises if you want. So just this is I
think, 180 micron. So you don't need
to thick acetate, you can now, this
one is quite good. And it will look like this
when you, when you draw on it. And if you want to use acetate, you, if your printer allows it, you can print these
leaves directly here. If it doesn't, you
can use a marker and just sort of trace your
shapes of the acetate. You can trace the veins as well, and then you will be able to see this through the acetate. If not, you can just
use normal paper. And if you want, you can use a when. It would be good. If you have some wire, it doesn't have
to be thick wire, some delay, this is quite good. You can have this I
think is for gardening, e.g. and it's okay. And you can have florist wire, I think it's called so something
that is not too thick, so it's easy to bend it. If you don't want to use wire, I can show you a
little trick to make the leaves bend
without the wire, but with a way or you can
give different shapes. Alright? And if
you use the wire, you will need some tape. So I like to use the Magic
tape because it's transparent. So if you using acetate doesn't really impact your
view to match. So they use paper tape because it will sort
of get in the way. And then if you're using wire, you will need some wire cutters. So I have this small ones because the way
it is quite thin, so you don't need a
very big wire cutters. And you will need some scissors
to cut out your shapes. And I think that's all. So when you have gathered
all your supplies, we can move on to
the next lesson.
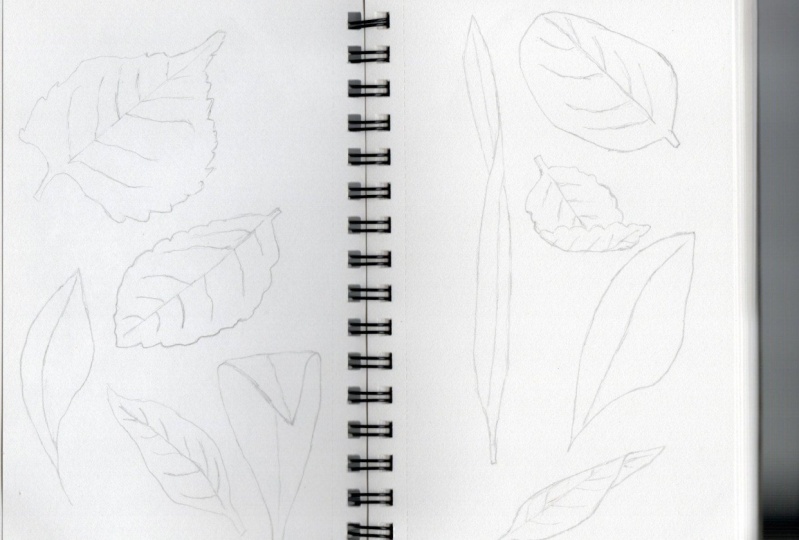
4. How To Use The Template: In this lesson, I'm
just going to show you how to do something like this. So I have drawn here
a leaf, a leaf shape. I traced this one, but you can do it
however you like. And then I'm going to use the
colors here from this pen. And I'm going to do
this side green. This table is a bit
rough underneath. If you have some delay that use something underneath
which I should have done, then I'm going to
do this side red. And then the mid vein. I'm going to do blue. If it works, this
one doesn't work. I'm going to use another pen. If you want. Now you
can add a side veins. And then we can just cut this. All right, so we
have a leaf here. And then we need some wire. So I'm just going to use this. It's some normal household wire. And as I was saying,
is not very, very thick and just try to make it as
straight as you can, but it doesn't have
to be super straight. And then just check
how much you need. I usually leave a
little bit as if it was the the petiole of the leaf. And off it goes. I'm just going to get it. All right, good. The way back. So this one was alive. Okay. So I will turn the leaf and put the wire where
the center vein is. And then with some tape. What I normally do is I put as more pieces first
to keep it still. So just put a few pieces. Maybe I'll put another
one in the very tip here. And if it comes out of the tip that you can just
turn it over on this side. Okay? And then what I'll do is just
to make it a bit stronger. F were a longer piece that came a bit sideways,
but that's okay. Then you have your, your live. And where you do
next is to bend it to mimic the real leaves. So you have some
leaves like that. And you have leaves that
come towards you like this. And it could be
turning like that. And of course, if you
have longer leaves like this one, um, you will be able
to do some turning like this or even
something like that, which some leaves too
if I can bend it. So some delay this. So it will, if not,
of course it will do. It will be different when
you can actually put this leaf in front
of you like that. But I can't show you
this on the camera. So it will be it will
be a different view. This is how I set up the leaf. And of course you can
do that with the, with all of these leaves. And I'm actually, I'm actually can show you the other method. Now, since we're talking about the templates, the
lifting plates, and what you want to do
is you do like this, where you live or the video. Fingers don't pull too
hard or it will break, or just like this. So when you do that is the same sort of
principle that when you do this with a piece of, um, ribbon, when you do that
for the Christmas presents. And as you see, the leaf starts to bend. So especially this long
leaves, it works really well. So it will bend. And then you can look at
it from different angles. And you don't need to have, uh, the, the wire in it. So if you look at it this way, you will see that
the list has two distinct when he's bending. Okay, so that's all
for the leaf template. And I will see you
in the next lesson.
5. Tips For Holding The Leaves: Something that I didn't mention
earlier is one of these. Because not everyone
has got one of these and they're not real expensive, but you might not
want to buy it. But in case you have, one of these is one of
those things they use to wield things
together, I think. But I find it quite useful
for holding your specimen. So if you have a leaf, maybe this is too long and
it wouldn't need the wire. But if you have one of
these leaves with a wire, you can put it in, in the little hand
here and holding it. And then you can bend your leaf and then you
will have it facing you. So you would have
this sort of view. And then you can move your leaf and you can look
at it, endure it. So if you have
something like that, um, even a simpler
version of this, there are some,
some were just won a branch saluting one hand. And it's quite useful. But as I say, not everyone has one
of these at home. So you can just find
something to rest your leaf or you can just hold it with your hand but it
needs to stay still. So even maybe a kneading eraser and you can just put it like
that and you rested on your, um, on your desk
and you can look at it and you can put it in
different directions. So that's the cheap
and easy and quick fix if you don't have
a dissolute thing. But there's lots of way you can sort of fix this somewhere.
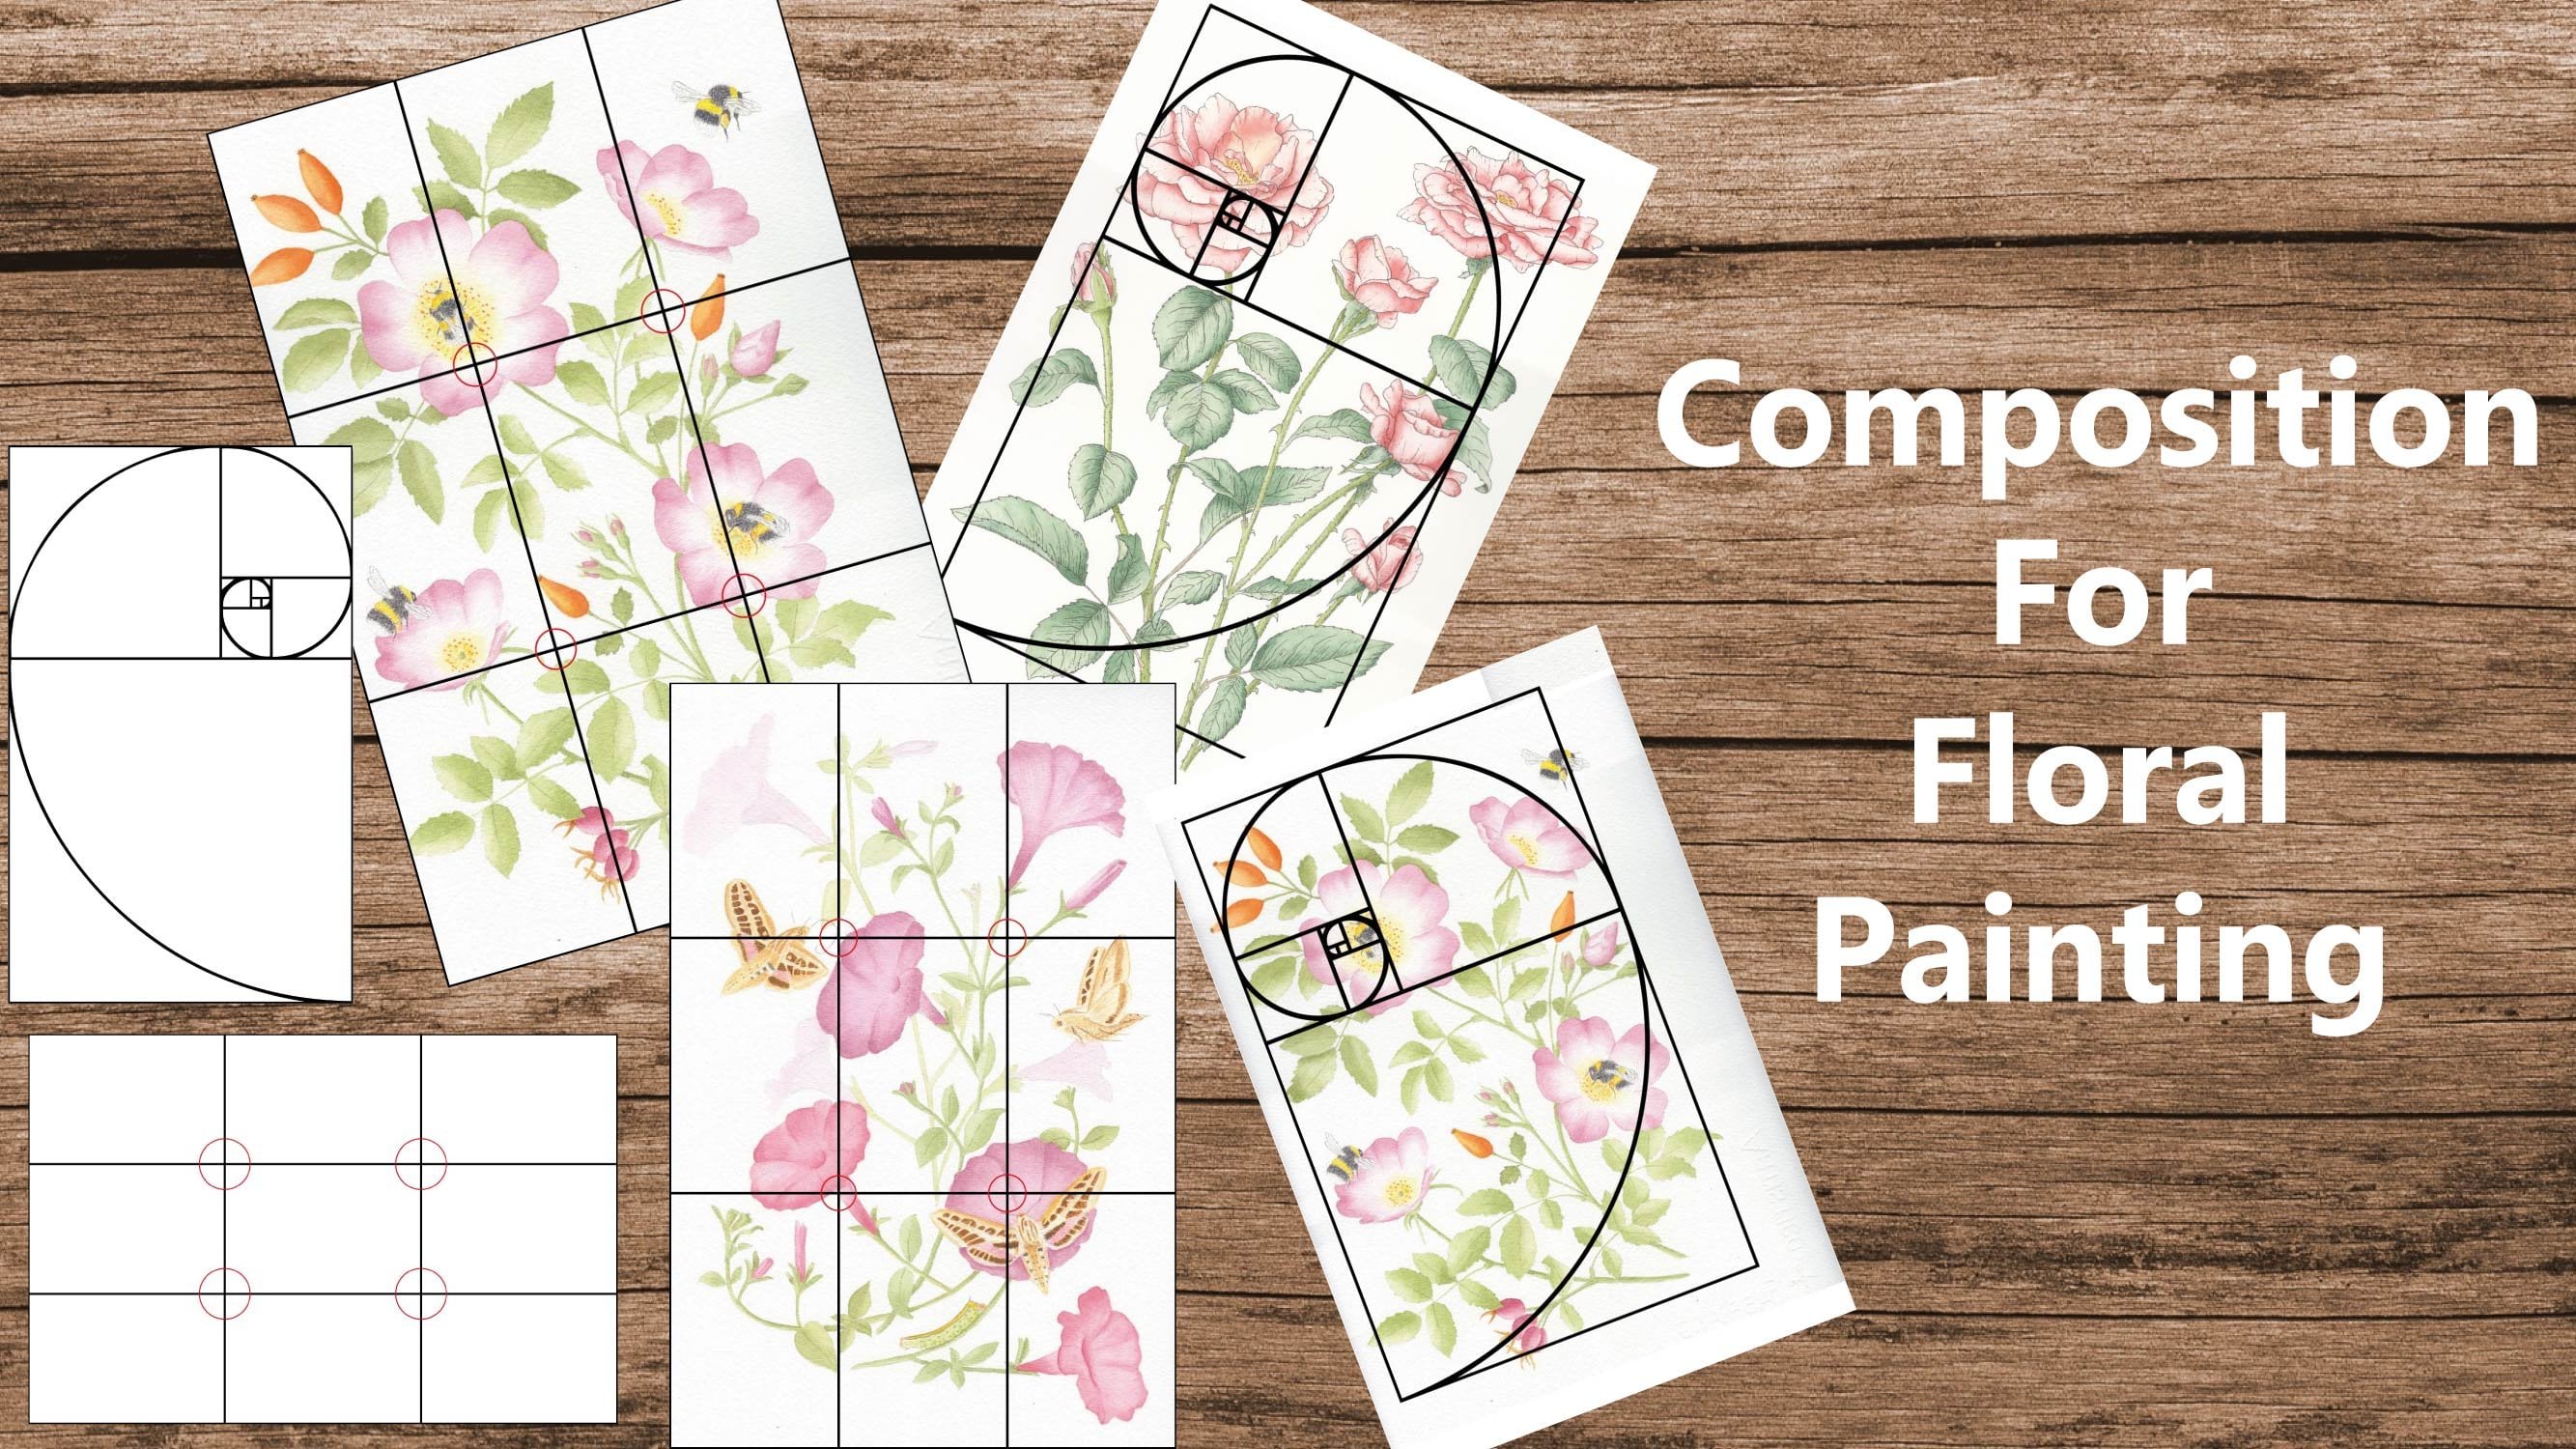
6. The Importance Of Movement: So why should we
draw this leaves, the leaves that are
so difficult to draw? Well, here are some
examples of my work, and I just wanted to
show you how they killed the leaves are actually quite important when you do
something like this, even a simpler version of this. Because when you have this leaves the move like this, e.g. the curve or like this
one in here, e.g. that this leaves
the curl around, uh, this one here,
this one here. So even this one. And here you don't see the move, the leaves actually
curling or folding, but they still have
some movement. And here we have this
one that is folding, and this one here
that is folding. So when you have
leaves like this, they actually give movement to your paintings
or your drawings. If you draw in graphite, it doesn't have to be
a colored painting. But it will give
you that movement that gives a sort of
realistic effect. So if you have all the leaves, simply, Let's say you have a flower here and the leaves
are just all like that. Like flat and, or towards
you or looking like this. It's kind of a
flat, almost naive. I'm painting, drawing,
whatever, whatever you do. I mean, it can be a style, so I made it a bit smaller, I think, for the camera. So I'm going to make
it a bit bigger and a big, a bit darker. There we go. That this, you can
see it better. So it can be, I was saying
a style, of course. And you can now very, very stylized flower there. But as you can see, is very flat and static. So if you like this sort
of thing, it's like, I'm almost like a
graphic design, e.g. it could be good
for pattern design. But if you want to do something a little bit more realistic with a little bit more
flow and more life to it. Then as soon as you
start adding leaves, that sort of care. And I'm gonna do something
like really easy here. I'm not going to use much time. So some delay this and some delay that C, As you can see, this is already giving the idea of movement. So I'm going to put
it a bit closer to the camera so you can
see the difference here. And even with the petals, I'm not sure if I have an
example in here, but here, e.g. this, this petal is
sort of curving. These ones are seen by the side, so they are curving. This petals here. You can see the side of it. I'm going to put it closer. So, and this petal here. And let's see. These petals are also curving so you can apply
what I'm going to teach you, um, when you, during
flowers as well. If you have e.g. the petals like this for
the rows or this one e.g. is also conveying. And this one a little
bit, but not too much. And if you have, um, like a daisy or something
where the petals, you can see them like
a foreshortened. So it's not face, face on, like simply seeing from
the front like this. But you can draw them
where the front ones are a little bit shorter and then it looks as if it's
tilted a little bit. Well, this is not
the best example, but you know,
something like that. And then one of these petals
could be sort of have a little bit of a moment and could be
something like that. So it can be funded. So as you can see, you can apply what you learn
for the leaves, for the petals as well. So let's say this is
the back of the petal. Depends what flower you doing. So this is why it's important to learn how to draw
leaves like this, because it just gives you a sort of a different
look to your work. It will give you this
flow and movement, um, and make everything a
bit more realistic as well. Okay, so that was just a little explanation
why this is important. It's an important
skill to learn. And now we can move on
to the next lesson.
7. First Method - First Example: Okay, So we are finally
going to draw the leaves. And I have two
methods to show you. One of them is to use the
midrib and draw that first. Now, it would be
a bit different. You'll view from my view. So if you see different drawing on the page From where you can
see the leaf is, it will be for that reason, but hopefully I will
show you how to, I will explain probably
out to do this. So you can start with bending your leaf in
a way that you like. And then I could do this one, which is maybe the simplest
one to start with. So you will see that way. I have to tilt it a
little bit because otherwise I won't see
properly when I'm drawing it. But this should be the view. So the point pointing towards you when you have it
upright and facing you. I hope this makes sense. Okay, So here we go. So I'm going to start. So the first method I'll show
you is using the midrib. So when you look at the
midrib, just draw that. And so if I do it a
little bit like this. So you don't have this midrib
coinciding with this one. So it's less confusing
to start with. So you need to draw this curve. Some delay that. And then the green side, the side on the left, it goes like this and then
he turns and he comes down. Then you have the side here. And then the red
goes on this side. So it does this curve. Again, it will be a little bit different from your
view in my view. So something like that, maybe a little bit
less pronounced here. The eraser is your friend here. And of course, light touch. And then here you
have this part. So let that, and then
when you finish that, you erase where you don't see
or you can't normally see, which is this line here. With this method,
you will erase, you would do all
the line and then erase the ones that you
don't normally see. And you have your,
your first leaf, which is more or less some delay that it will always be a little bit different from what I see, but more or less is that it's all a matter
of following the lines.
8. First Method - Second Example: If you have something like that. So let's say in front of you, the leaf will be looking
something like this. So I'm going to position
it in a way that I can see the curve. And again, we're going to
draw the midrib first. So you will see, see probate around like this. So draw the curve of the midrib. Okay. And then this red side. So it goes on a curve and
it crosses the midrib. Bit more light that
goes on a curve, crosses the midrib around here. And then it goes on the right
side of the midrib, right? So thus the red line, the green line is at the back. So again it goes into a curve. So you can see this curve
here, sort of like that. And then it crosses the midrib and the side that is facing you. So sort of like this. And then you can see
it from the bottom. All right. Now this part here, it's behind and
we cannot see it. So that's why I tell
you to draw lightly. Because then we can delete that. And then we can sort
of adjust this a little bit like that. And we have the leaf
that is, I'm turning. Okay, Just always observe
it really closely. You can see here that the
leaf is sort of slanting. And of course, as I said, there will be different
because I see it more, more like this way, um, and it's very
difficult to show and gamma exactly the
same way I see it. But the principle is this. You just observe it. See where the lines
go, follow it. The back one goes
down like that. So it says that curve. So this curve and then just delete
whatever you don't need. And this is important to
start with the midrib. Because if you have a midrib starts and carries
on in a weird place, then it would show. So e.g. if you do the leaf first and if you do the midrib that starts here, and then you carry on here. You can see that it's
not quite right. So this midrib is
not continuous. And an expert, I will see straight away
that it wasn't don't, um, as a one continuous line, it wasn't done properly. But you just did something
just to do a midrib. So it's important that is continuous is a continuous line. I will show you
another method to do this without doing the
midterm professor. But you still have to
make sure that he's a man, he's got continuity. Okay, so then you can just keep moving your leaf and
do it from the other side. Uh, you know, put it sort of
like like a different angle, select these different ways. Maybe seeing from the back,
it makes a difference. Also, the way the, the leaf is stilted. And if you have a leaf that
is stilted, that way, e.g. you can see this a
bit larger than this, a bit smaller this side. So if you have the site, if you have a
midrib here and you want to show the leaf
that is a bit tilted. You draw this side smaller
and this side bigger. And as you can see, it looks already like a stilted. And of course it's the same
if you do the other side. So this side is a bit bigger and
they said is a bit smaller and it's kind
of tilted another side. And the same if you
do it horizontally. So you can always have a look
at your life in your hand. You can pick a real
leaf if you want. But if you put it in front
of you and you tilt it, you will see that one side
looks bigger than the other. So e.g. if we are decides
molar and this side bigger, it looks like it's
tilted a little bit. So just the only way to keep in brewing a drawing leaves that attorney and bending
is just to practice. So practice a lot. Try
different shapes if you want. Once you must have one shape, you can try a different one. Try different positions. And you can try with the acetate so you can
draw the mid veins. You will see also how turning
affects the mid veins. Okay, and then
when you're ready, just pick a real leaf
and try that one. E.g. you can pick some died, dead leaves that tend
to kill a more easily. Or you can just, some
plants of leaves that the sort of curling
and folding naturally.
9. Drawing Long Leaves: I just wanted to show you how to draw a longer leaf as well. So if you have this one, this leaf printed, or you can just draw it and
you are the wire. You can turn it like that. Or I suppose you can use that
method I showed you before. When you do this
with your fingers and it's sort of, um, kills. But to do this sort of moment, I think the wire is
probably better. And then where you see the front of the leaf and
the leaf, I'm turning. So let's see if I can show you on camera more
or less what I see, which is something like that. And then I would
move it a little bit so that I can see it that way. And again, what
you need to do is to draw the the mid vein. So always start with that
when using this method. Then this is the red
side of the leaf. Okay, so as you can see here, it starts from the right
and then goes down. And then it sorts
around this side here, this point here, it crosses
the midrib and goes down. Okay, so that's the red side, the one side, which is
the left of the leaf. And then the other side,
which is the green, which we can't really see
that much on this side, but is the, the buck
say that the moment. So it starts from this side. So the left here. And it goes down. And then more or less
with the other one, the other side crosses. It also crosses on
the other side. And it comes down on the right. This here. Okay, So you have this
turning of the leaf. And now here we just have
to make a little bit of an adjustment like this and then we delete
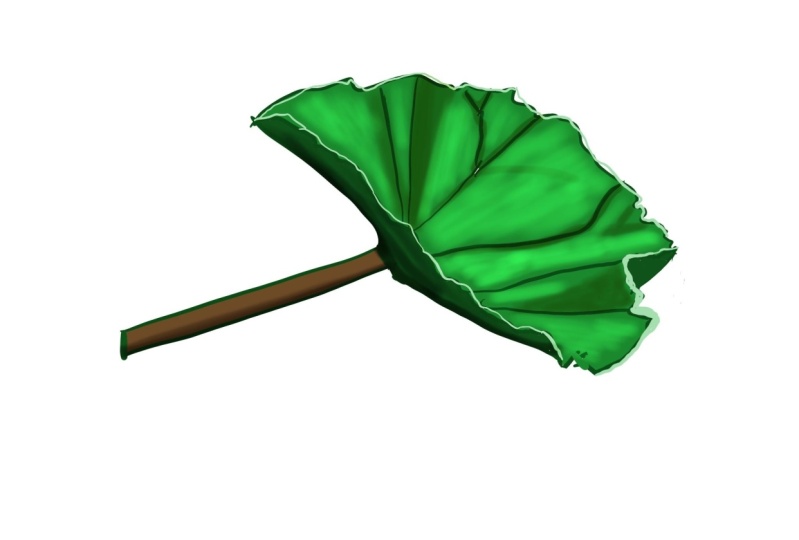
what we don't see. And we have the leaf that is turning, as you can see here. And then this is the
back of the leaf. So when you paint, you can, you would need to look
at what color because normally leaves are
different colors. Usually isn't always the case, but usually I'm maybe he's a lighter color compared
to the front of the leaf. The top, which is
called a duct cell. I think the top and the
back is called axial. But thus a technical talk. You don't need to know
that if you don't want to draw a botanical paintings. But if you just want
to do some flower, I'm a flower painting
than a top and bottom. That's a quite enough to know. Okay, so thus, the back, which will be probably
a lighter color, and then this would be
the front of the leaf, which will be a darker color. And it's the same principle
as you did before. Just follow this,
make sure you follow the lines of the
perimeter of the leaf. So if it's turning this side, than just do the same thing. And you can adjust it. Of course, this sooner
or later they will start steering and braking, but you can always print another one or we can
just draw another one. It's a good idea to
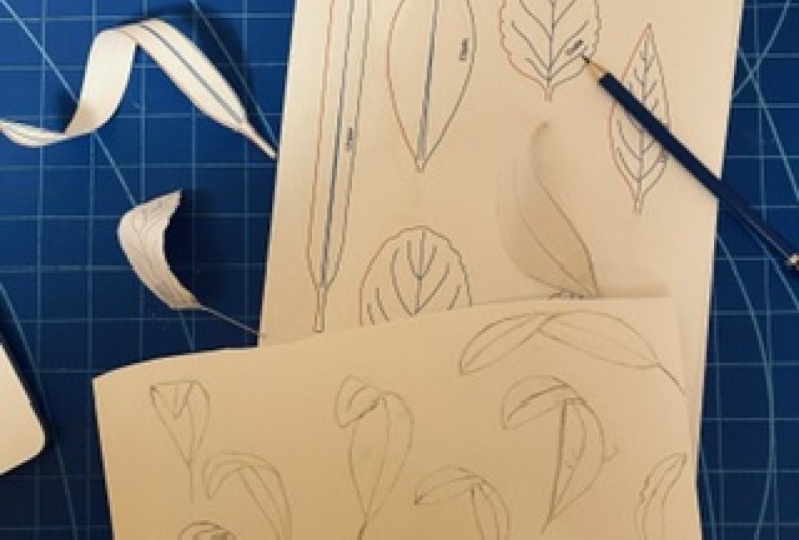
keep a copy of this. So instead of cutting this, uh, just trace it. If you want or make more copies. That's up to you. And I actually added the name of the
shape of the leaf. I'm just if you're interested. So this, this type of
shape is elliptic. This is linear. A lengthier lead
because it's, um, the smaller the top 08 when he's a bit more
round like this. And oval is because it's
all sort of rounded. Instead they overweight
as the smaller OpEx here. So just a little
extra information. So you can practice this
lobed leaves as well. And it's always the
same principle, just follow the lines. And in the next lesson, I will show you another
method to draw the leaves. I'll see you in the next lesson.
10. Second Method: In this lesson, I'm going to
show you the second method to draw leaves that are
bending or turning. And this method is more
to do with the shapes. So I'm going to bend
this as I did before. And again, I will look at it sort of more or
less this week. Okay, but I need to
turn it a little bit. So when you look at this
leaf, I'm that way. Then where you can actually look at the
shapes that it forms. It forms a triangular shape
in here if you have a look. So it's like a triangle. And then the rest of the leaf, It's kind of goes
sort of like that. So this is one shape. And the shape is
like a triangle. So you divide the
object into shapes. And some people
prefer this approach. So with this approach, you draw the triangle. So I will look, you're
always observe you live. So I'm going to try and look at the camera while doing this. Let's see if it works. So it's sort of
pointing this way. So I wouldn't have to
move the leaf for you. And you can observe
something that is more similar to AUC. We see if it's working. So we have a triangle here. And then in here, it's a bit rounded. So he goes down. And then it sort of girls
bit narrower down here. And this and move
it a little bit. Otherwise it will
be the same line. It might be confusing. So if I'm always a
little bit like that, of course you always
should try not to move you leave while
you're doing it. This is just for demonstration. Just put in one position
and don't move it. So this also is rounded
here on this side. And this, uh, this space. It's less than this space
because it's a bit turned. So because I moved it, this one should be
a bit more now. So this space here
is less than this. Always look at the
shapes, the form. And this is also going a
bit narrower at the bottom. Right, so that's the leaf. And then a, for the midrib. Again, try to make
sure that it's a coherent and is
not just anywhere. So it starts from the point
here and it goes down. But then I'm not going
to lift the pencil, but I'm going to draw
the rest of the midrib. And if you look, you live, you can see that comes out sort of in the middle of this line. So this line here around
the middle, probably. So without lifting the pencil, you just draw the midrib. Now, this bit here,
you don't see it. It's this bit here. Okay? So it's this
triangle here this year. So because we don't see it, we can erase it all. We have to erase it. And there you go.
We have the leaf. And sometimes the leaves are a little dip, sort of like that. It depends on your life.
What are you doing? This is quite flat
because paper, um, but just observe the leaf
and this detail here. You can do it afterwards. First, you can just
draw it straight, and then you can
add your detail. Okay. And the mid rape, it's, uh, it's
where it should be. So don't do something like this, so we don't know the one quick. So we have the triangle. We have this here, this here, some delay there, and then the midrib. And let's say you
do it here. Okay? So that's wrong. If you have a midrib
that is going this way, it can just suddenly
come up around here. So that's one of the
most important things. Once you must do this, then you're okay
with doing leaves. Just remember not to guess where the imagery
base and the one side and then do the other one because you can see afterwards something is wrong with it. So thus, the second
method where you draw using the shapes instead
of the midrib first. And that's all for
the second method. Again, practice, practice
both methods if you want to. You never done this before and see which one you like most, because you won't know
which one is best for you unless you
tried both of them. And then after this you can get a real leaf
and try that one.
11. Let's Use Real Leaves: I have some lives here that
I took from the garden. These are from orange trees and this is from a queen's, a tree. So as you can see,
some of these leaves, they have this natural sort
of bending and turning. And if you find
something like this, it's really good for
you to practice with. So this one is not
really turning, but it's got this little bend here and you can turn it
different ways and see, find some interesting
points of view, e.g. here you can see this. You can see a little bit of
the back of the leaf and then the other side of
the back disappears. So you can choose one
of these, these ones. They don't really turn too much, but they have this
shape, this a V-shape. So they are quite good if
you want to draw them. This way, e.g. um, it's difficult
to show on camera. But you can see here
this side for somebody, you can see the underneath of this side and then you can see the other side of the leaf. And this one is a bit like that, but it's a bit bending. So maybe if you put
it in front of you, you can see it like the example we did
with the paper leaf. So there is that, um, triangle shape at the
frontier with this. So the triangle shape and
then there's the other shape. So you can find a leaf like that and practice
with real life. So n is the same thing. You can draw the mid vein first. So let's see one way
that I can put this. So this is turning
away nicely laid out so you can draw the
mid vein first. So let's have a look. We could do something more
or less Sunday like that. Okay. And then this
could be our red side. So you have the leaf
that goes up here. And then it crosses the midrib. So it's a bit dark on this side, but it's just because the
light comes from here. But the midrib is there. So the, this side
crosses the midrib. Let's see around here maybe. And then you can do this, um, the contours straight at first, and then you can add
any detail afterwards. So once you're happy
with the general shape, you can sort of add the
details afterwards. And if you keep the
pencil line late, it will be easy to do. You can just erase it. Okay? So that's this side. Now we have the bottom side, which I see a bit more than
the ones you see on camera. So it's something like that. Then it goes down. It crosses around here. And I'm going to
draw this bit too. And then sort of goes like that. And then we have
the petiole. Okay. And then here, just before the mid vein we have
a little bit of a bump. And then this side here, it's a bit like that as well. So we don't actually see the mid vein in
here and this bit. Okay. We don't see this which is the which is the bottom side,
the side that the back. So it's a bit like that. So once you delete, you do you erase the lines
that you can't actually see, then it makes more sense. Okay. And then if you
can see the veins, you can also do those in. So if you want to do
a botanical drawing, then you would have
to measure this. But if you want to just
do some Florida during, then you don't need to
measure this. This vein here. Can't really see it much, but I'm just going to sort
of do a little bit of a shape there. Okay. And then at the back
you have veins as well? They're in there. Okay. So maybe this one was a bit shorter but you can
adjust that afterwards. So you do the general shape and then you look at it again
and then your adjusted. And, uh, that's why you should always
keep the pencil late. Did I say that already? I think I did. Okay. So get some real
leaves and observe them and see where
they sort of the band. And, um, you can use
the shape methods, you can use the midrib
method, but just practice. And you will see that
you will improve. And this here is sort of, um, let's see, maybe I
can put it that way. It's probably a
little bit easier. You can still use the
midrib like that. And then this would be, let's say the, the red side. So it goes like that. And then that's the green side. Goes like that. May just shorter,
doesn't matter. And then you have a little
bit of a dip here and there and decided a little bit as well. And you can see some of what I can I can see some of the veins. So it goes up and does
something like this. So if I turn it, Let's see. You can see the veins because they are quite
pronounced at the back. And also it does
this little bumps. But these, you'll be able
to reproduce them only with the light and shadow when you actually use color
or you use pencil. So let's see how it was. And in here, I can see
some of the veins as well. So the midrib is actually this. So you don't see where the veins start because they
will start from here. But if it's easier for you
to draw them like this, then you can do something
really light and then press a bit more. And the veins are, you can see here they are the
ones at the back, from the back of the leaf. Okay, so there we go. I hope this is helpful. And I hope you're going to have fun during lots of leaves.
12. Final thoughts: Congratulations on
completing the class. I hope you've enjoyed
it and I hope you found my tips for
drawing leaves useful. Your next step is to
practice, of course, Joe, lots and lots of leaves
build your lease liability. Remember, I think give
you the guidance, but you're going to have
to put in the work. Don't forget to post your pictures in the
project section. And also don't forget to hit
the Follow button up here. If you would like to be notified as soon as
I post a new class. You can also check out my profile to see
my other classes. If you like to connect, you can find the social
media links down here. If you have enjoyed the class, please leave a good review because that will
be really helpful. Thanks again for watching the class and I'll see
you in the next class. Bye.
 Katia Galante, Botanical Artist and Illustrator