Transcripts
1. Trailer: Welcome to this beginner's
guide to drawing horses. This is an introductory class to the world of animal
illustration and painting, starting with one
of the most popular animal subjects, the horse. This is a rather challenging
animal to start drawing. So throughout this lesson, we are going to
break the concept of the horse down into small, manageable pieces
in order to get us drawing as
quickly as possible. We're going to have a look at the horse's general shapes
and structures first before taking a close look at each body part one
area at a time, starting from the head and making our way all the
way down to the hooves. Throughout this lesson, we'll discuss shape, form, gesture, positioning, articulation, and a couple of other
topics as well. At the end of our lecture, there'll be a series of draw along demonstrations
for you to follow. And at the end of
it all there'll be a timed exercise assignment
for you to complete. So as tricky as the horse is, it can also be
really fun to draw. So if you're up
for the challenge, then let's get drawing.
2. Challenges With Drawing Animals: When we start with
any type of drawing, the things we
usually cover first, the basic principles of
shape, form, and gesture. When it comes to animals. On top of those basics, we also need to learn a
little bit about movement. Why do we want to
focus on movement when we are drawing
a still image? Well, animals are a
challenging subject to draw because we don't have a good mental library as to how they should
be positioned, how their bodies articulate. When we start drawing
the human figure, we've got an intuitive
understanding about how the body is supposed
to look and move. This is not the
case with animals. So on top of the usual basics of shape, form, and gesture, we need to add in a
little bit of movement to the list of things
we have to learn about. So we can be sure that we are
drawing animals and poses. Their bodies can actually
make things that might even more complicated
with an animal like a horse, where its body is far
less dynamic compared to the likes of canines,
cats and birds. The horse also has
very unique strides and body articulations, which makes it a rather challenging animal
to start drawing. How do we create
gesture and rhythm for an animal whose body isn't
as dynamic as others. How do we ensure
that we are drawing poses the horse
can actually make? These are just a couple of the questions we are
going to have to answer. Now, you might be
asking yourself, well washed out
with the host then if it's such a
complicated animal, well, as tricky as the horse is, it's a good animal to start
drawing for two reasons. Number one, horses tend to be a very popular subject
metaphor artists, and usually for good reason because outside of
the domesticated dog, our relationship with the
horse as a close one that has spanned many thousands of years and inspired many artists. And to the horse has
the advantage of being an animal with very
little hair and foot. This means that we get an unimpeded view of
its shapes, forms, and muscular anatomy,
which makes it not too dissimilar from
drawing the human figure out. Now, with regards to this list, and there's going to be
a lot of information presented in a lot of tricky
concepts to contend with. It's recommended that you work through this lesson
in small pots, or at the very least
watch it a couple of times to really
absorb everything. So with that out of the way, let's move on to doing a
brief overview of the horse.
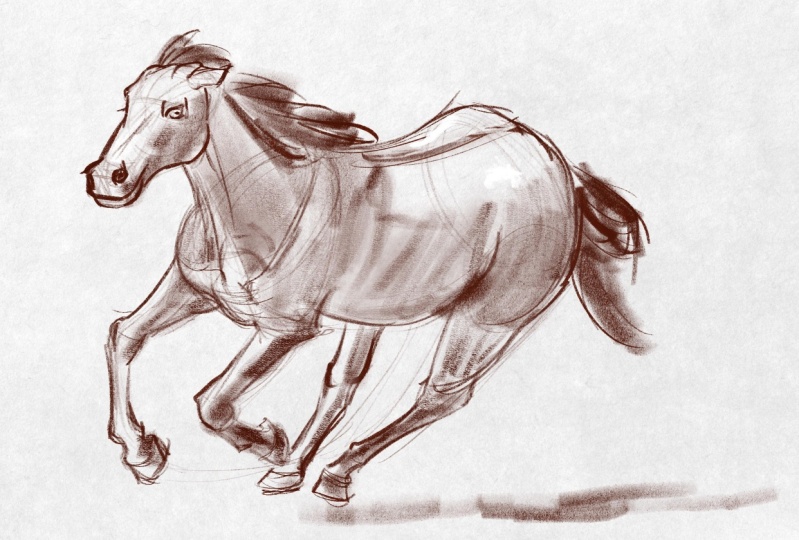
3. Simple Shapes and Forms: When we start any
new subject and up, what we always need
to be looking for is a process that makes
life easier for us. Normally, when confronted
with something like a horse, our minds immediately
get overwhelmed by the sheer complexity
that we're now facing. So how do we start to
overcome this daunting task? Well, alphas step is to pretend the horse
doesn't actually exist. For all intents and purposes, the concept of the
horse in this context isn't original idea that we
ourselves have come up with. The reason we pretend this is our original idea is that it starts to eliminate a lot of the complexities
we see before us. And if it's our original idea, means we are able to dictate
how everything is shaped. In other words, we
don't want to look at the horse's head and
think of it as a head. We want to think of it as
a shape that is far easier for us to remember and more
importantly, easy to draw. In this instance, we can
say that we are looking at something that is
roughly box shaped. But we don't want
just any old books. We want a box that
is characteristic enough for our original idea. In this instance,
we want a long box that diminishes in
thickness at one end. This starts to make the process easier and more
manageable for us. Instead of having to
worry about muscle and bone and all sorts
of lumps and bumps. We've reduced our original idea down to its simplest form. What we're ultimately
looking for throughout all these parts of our
original horse idea or shapes and forms that are not only easy to
draw and remember, but also characteristic of regular long box sort of
works for our horses head, but a tapering box gives
us a far better outcome. Simple and recognizable shapes
for each area of the body, from the head all
the way to the tail. That is what our
process needs to be. So with that in mind, let's have a broad look at
the best shapes we can use for our horse that are both
easy and characteristic. We're going to start very
broadly first and gradually work our way down as
the lesson progresses. When we start to
think of the horse, we want to be thinking
of two shapes, or more specifically to
letter shapes to help us out. The first is the letter L and
the second is the letter S. Let's talk about
the L-shaped first. Now, it's probably obvious
way this L shape is, and that is of course, the horse's head and neck. This L shape is the shape
most with the horse. In fact, it's so synonymous with a horse that in
the game of chess, not only as the night usually designed with
this shape in mind, you also see it in how
the naught moves across the chessboard will come to the connection between
the head and neck shortly. But for our foundations, this is the shape we
want to be thinking of. But it's not just
the horse's head and neck that has this shape. The front legs of the
horse also have it. Now in truth, the front legs
in its simplified form, fan-out more like the letter J. But for the purpose of
making life easier for us, we're going to consider
this a thin curved L-shape. There's a lot more
sophistication going on here that
we'll cover later. But for now, this is a
good enough place to stop. So that's how L-shape areas. What about this S-shape? The torso is where
this shape is formed. It's not immediately
noticeable at first, but the more you draw it,
the more obvious it becomes. This is generally the
area where beginners tend to make things a little
too straight and boxy, especially around the area
where a writer would sit. This is a very tubular area that has a very subtle S-like
curves that flows from the chest all
the way to the re what about the hind legs? Well, again, we have another S-shaped formation taking place. But this one starts out
very big and bulgy at the top and gradually thins
out as it reaches the ground. The hind legs are generally the area where
there's going to be a lot of changes in shape and positioning depending on
how the horse is moving. But in this type of
neutral standing pose, this is a good enough
idea to work from. So L shapes at the
front of the horse, S shapes towards the back. This is our starting point, but obviously we want
to do more than this. So let's start to break all
of these areas down one at the time and start doing
something a bit more refined.
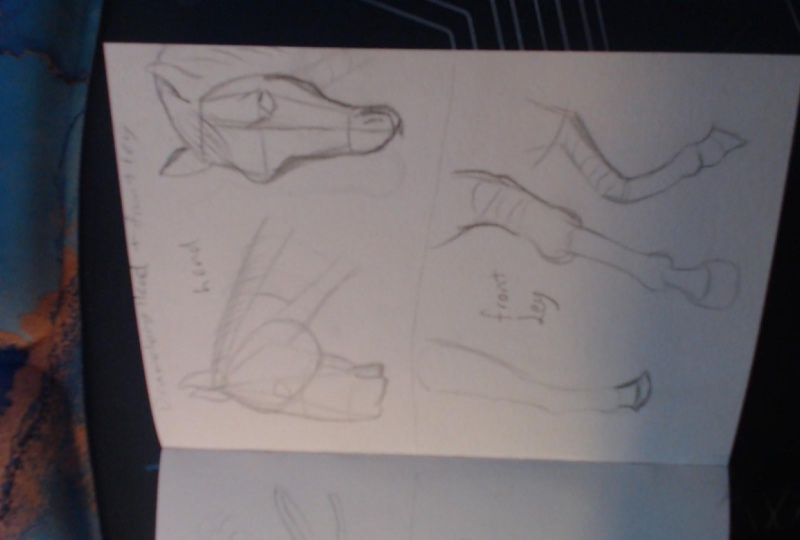
4. Head and Neck Side: Let's build upon
our foundations. We want to now take out
L-shape and split it in two. We of course, have
already established our tapering box idea for
the head, for the neck. We're going to consider this
as a tapering cylinder, but let us first pay attention to the head
and start refining that. What we're going to
find, what the head is, that there's another box-like
shape that's present here. And that's around the mouth, nose, and chin area. So the muzzle of the horse. This is a sort of rounded
box structure that bulges out a little and
tilts down slightly. We'll see when we look
from the front view, it also is a little wider than the main trunk of the nose. So now things are
starting to look even more characteristic
of a horse's head. But let's take it one step further and add in
the horse's eye. Now, in terms of
positioning for the eye, it sits about a third of the way from the
top of the head. So that's a pretty
straightforward landmark along a long axis here. The main problem many
of us fine however, is placing the eye
along the short axis. Where exactly does this go? Well, fortunately, the bottom of that tilting box we just
created gives us the answer. If we take the diagonal
direction from the bottom of this box and link it all the way to the corner of their head, will find the
intersection between our first landmark
and this diagonal, more or less gives us
the position of the eye. You'll also see this diagonal implied in the horse's anatomy. If we look at this
image, we can see this diagonal
indentation in the head more or less aligns
with this ID. Now, moving on to the
horse's jaw area, we're going to find this a very bulging and rounded area that takes up approximately half the length of the horse's head. We want to get this feeling
of roundness that flows all the way around the eye down and around to the
back of the neck. Almost like it's one
big teardrop shape. We'll see when we
move to the front. And this is also going
to be a little bit wider than the main trunk of the nose. We've got a few other
more noticeable shapes and forms going on here, but we'll take a look
at that more closely later on when we look
at the facial features. Moving on to the neck again, we start with a
tapering cylinder. From the side view, it almost looks like
a flat triangle. So we have to keep in mind that there is roundness
and volume here. Adding in cross contour
lines like this is going to help avoid making things look too flat and two,
two-dimensional. Now, normally, this form is usually a good enough
starting point, but we're going to
develop it a little more. We've got a couple of noticeable
muscle group structures here that we're going to have to consider as they are
sometimes quite prominent. So we're going to
evolve our idea from being one big tapering
cylinder up into three tapering cylinders
are red cylinder is the biggest of these three and is part of the trapezius
group of muscles. This extends beyond the neck and into the shoulder girdle. The green cylinder is part
of the brachial group. This one is a little
bit thinner in width, but it is a little
more box shape and connects to the front
of the horse's leg. Both of these cylinders type of towards the top of the head, the brachial group fall Lisa, our last cylinder
is a thin one that embeds itself into
the horse's sternum. You'll note that this one type is in the opposite direction, which is an important
differentiation to make. So that's the main structures for the head and
neck on the side. Let's move it around
to the front.
5. Head and Neck Front: Alright, the front
view. Now, when we get to the front perspective,
all of what we've seen, the profile changes instead of nice clear indications of
shape and directional change, everything starts
to flatten off. So what we're going to
do is separate our head and neck in this instance to help understand what's going on. Well, we're also going
to do in this part of the lesson is add
in the front of the chest area to
help us understand how our NIC connects and relates
to the rest of the body. So starting with the headfirst, a narrow rectangular box
is a good place to stop, but we can do something
better than this. First thing we're
going to do is take notice of the lung
indentation in the head. This is a great visual
landmark because it gives us a natural long
axis line to work from. For all intents and purposes, from this perspective, this will be our default gesture line. But what about the short axis? If we take special attention to the horse's eyes and
how they're positioned. We're going to find that
they extend a little wider beyond the main
body of the head. We're going to find
that from the eyes, the shape of the head cuts back towards the end of
our muzzled books. So instead of using a rectangular
box Ralph foundations, we've got something that more
resembles a coffin shape, which is giving us a far
more recognizable outcome. The beauty of this
cross axis is that it makes life a lot easier for
creating this coffin shape, not just for the front view, but also the three-quarter
view as well. We finish this off once again
without rounded box for our muscle that bulges out a little wider than the
main body of the head. Moving on to the neck, we're going to find that again, it's a tapering cylinder. As the neck approaches the head, it starts to get narrower. As it begins to embed itself into the chest, it gets wider. You want to think
of this as almost being a rugby ball shape. Now in the previous video, we talked about
subdividing our neck into three cylinders to represent the most obvious muscle groups. From this perspective, we
really need to only add in that front muscle structure
that connects to the sternum. This is going to be
the most prominent of those additional
cylinder shapes and is more or less going to
be visible regardless of which direction the
horse's head is in. This sternum muscle
connects more or less directly into the middle
of the chest area and also acts as the transitional landmark from the top of the chest
to the bottom. We'll talk more about
that in a moment. One challenge we are going to
face from this perspective is how the head and
neck are positioned. From this perspective,
the head tilts away from the viewer and the neck
tilts towards the viewer. The head in particular is going to prove more
challenging because of the amount of
overlapping that takes place with the
facial features. Not only are we going to
have to pay attention to how the different facial
features overlap? We have to be aware that
these facial features in most instances tilt in the opposite direction
to the head. We can see this much
easier on the side, the head tilts backwards and the facial features look as
if they are tilting forwards. From this perspective, we
lose all that dimension. So what do we do
to help us here? Well, what we're going to
do is use a pencil to help. Whether it's a pencil, a pen, or a graphic style is
most drawing tools. We have had some type of graphical stripe that
wraps around its surface. This is great because it gives
us not only something we can use to work out
angles for each subject, but we can also use
it to figure out how our subject tilts either towards
or away from the viewer. This graphic stripe is going to act as a cross contour guide. In order to try and figure out the relative tilt of the head, we simply need to tilt our cross contoured pencil and align it with some type
of landmark on the head. In this particular image, on looking to the curvature at the top of the head
as that landmark. Tilting our pencil in a
single direction will give us the approximate
tilt position of the head. Which subsequently means
we can now draw in foundations on our page
that match that tilt. This little trick is useful not just for
the horse's head, but for any feature that is giving us positional
difficulties, especially areas that are moving towards or
away from the viewer. So when in doubt, usual pencil and that
graphical stripe as a god for the tilt position. That's a breakdown for
the main structures of the head and neck. Let's move on to the chest area.
6. Chest: Onto the chest. This is really three parts that we are
combining into one. Generally speaking, the main
shape we can use here is either a boxy wedge or something like a tombstone shape that
tilts away from the viewer. So pretty
straightforward so far. But in order to fully
understand how to develop this, we need to look a little at the underlying mechanics
to see what's happening. Because how the
horse moves is going to affect how this has shaped. What we're really
dealing with here is an area that
incorporates the chest, the shoulder blades,
and humerus. Now, you're probably
saying to yourself, What do you mean humerus
that relates to arms. Horses have legs and clearly the front
leg stopped low up. Structurally speaking,
animals have a lot of commonalities with
our own physiology. The front legs are really
the equivalent to our arms, but their humerus
bone is hidden within this main tombstone shape
under layers of muscle. Not only that, but
unlike our arms, the horse's humerus is fused
with its shoulder blade. This means the main pivot
point for the movement for the front legs is not
coming from the shoulder, it's coming from the center
of the shoulder blade. As the leg moves
forward or backwards, the humerus and shoulder
blade swing together. These two bones make a distinct L-shaped that we can't
necessarily see. But one we do have
to be aware of. This is because the corner these two areas make together create two noticeable lumps on the front called
the shoulder point, which is going to align with the landmark that we
mentioned in the last video. If we move around
to the front view, we mentioned in the last video that the insertion point for that sternum muscle marks the start of the
bottom of the chest. What we'll find is that both of these shoulder points also
align with this landmark. This gives us a natural
horizontal axis line along the width of the chest to work with for positioning, as well as a natural corner
landmark for the transition from the top plane of our boxy tombstone
to its bottom plane. As was mentioned in its
neutral standing state, our boxy wedge or tombstone shape tilts
away from the viewer, which means it's bottom plane is going to be visible to us. Things change though, when
the horse starts to move. When the horse's legs are
in different positions, we need to split up
this boxy shape. And think of these as two
independent structures that are going to shift in shape depending on the leg position. In most cases though, all we really have to do to accommodate this
is to simply curve our front axis line here up or down accordingly to help
us get the right shape. So in this example, the horse has left
leg is being lifted, which is simultaneously shifting its left shoulder point up, which is subsequently changing the overall shape
of our tombstone. So that's the basic shapes and movement for our chest
and shoulder area. Let's now continue on from this with the rest
of the front legs.
7. Front Legs: Front legs, pretty
straightforward with this shape as they are pretty much just cylinders due to the lack of
muscles in this area. It means we are seeing a lot more bone
than anywhere else. So we are going to evolve our cylinder foundations
to reflect this. The upper part of the leg, which is the equivalent
to our forearm, has more muscle and
tendon structures here, so it's going to be thicker
and less bone-like. Its shape is going to be closer to that of a tapering
cylinder up, relating to what
we just covered in the last video with regards to the chest and shoulder blade, the connection point that we see here is the horses elbow. We're going to find the
elbow is aligned almost directly underneath the pivot point in
the shoulder blade. Will also find our tapering
cylinder shape will skew in the same diagonal
direction as the humerus. So it will look like
the upper part of the leg is inserting
itself into the chest. Not unlike what
you would see with your classic chicken leg shape. The angle at which
the elbow pivots depends a bit on what
stride the horse is making. But generally speaking, 45 to 50 degrees is around the limit
for how far it bends. Moving on to the lower leg, this is more of your
classic bone shape. Thick, rounded
bowl structures at each end with a cylinder
compressing inwards. You can think of this as I sort of hourglass shape as well. So that's a pretty easy
structure to remember. Putting it altogether, we
can usually get away with one big cylinder foundation
when the leg is straight. When it's bent, we have to
do a little bit more work when the horse's leg
bends and curves on that, we're going to get this
noticeable zigzag pattern forming from the shoulder blade all the way down to the hoof. Again, even if we can't
see these hidden parts, we have to be aware
that they relate directly to how the
front legs are moving. The more their leg bends, the more this zigzag appears, whilst the shape
of the leg isn't going to change significantly. And I more curl position. The knee joint between the upper and lower parts of the legs is going
to shift in shape. In a standing position. This joint is moralists just
stay stretched, bowl shape. When curled, we get a very distinct change as
the leg curls more and more, we're going to see the structure become more and more box-like. In fact, it almost becomes a perfectly straight
line at the front. The back of the joint, however, becomes more and more curved. A very noticeable
straightening and curving as the horse
bends its leg. As small changes. This is, it's what helps to characterize the
horse's leg even more. So this is definitely an area
we do not want to overlook. We'll talk more about
hooves a little later on, but for now, this will do
us for the front legs. Let's move on to the
rest of the torso.
8. Ribcage and Pelvis: So the last two areas to
complete for the torso, we've got the ribcage
and the pelvis. The ribcage is another
easy to remember shape and another
cylinder structure. Although we want this to be a cylinder that is
bulging at the bottom, there's more mass at
the front of the horse. And so our ribcage needs to be bigger and bulkier underneath. An alternate to the
bulging cylinder is to combine a regular cylinder
with a stretched egg together. This is a little more work, but it tends to be a
bit more characteristic InDesign if we take a
look at this image, we've got this implied
combination of cylinder and egg with the egg feeling like it is merging into our cylinder. One thing many
beginners miss with the torso is its positioning. When we start out, many
of us just draw it very flattened even across the
top when in actual fact, the front of the
torso sits lower, whilst the back sits higher
as it reaches the pelvis. Now, moving on to the pelvis, we've got a bit of an odd shape going on here from
the side profile. It's very much shaped
like a letter D, but a D-shaped that is a
little bit triangular. If we want to make this a
little more characteristic, what we can do is
take a small slice off the end of this shape. You'll find that in many poses
where the horse is moving, a small straight edge develops, turning this from a
three-sided shape into a four-sided one. I have a tendency to put that straight edge in
regardless of the pose. It feel free to add it in
when you think it's needed. We turn this around now to
a more three-quarter view. We'll see our pelvis turns into something that resembles
a rounded box, very curved at the top, a lot flatter on the sides
in terms of positioning the pelvis gives us
the illusion that it is tilting away
from the viewer, similar to the chest. And if we turn it around
to the back view, we're going to see it's
quite boxy in the re, the tail protrudes from
that very round the top plane whilst the side and
reapplying a quite flat. Now the last thing
we have to do, he isn't sure that
these three parts of the torso connect and
relate to each other. This becomes a lot
more challenging as the host moves around
closer to the viewer. In order to handle
the foreshortening, we have to keep in mind that our three forms
will be gradually overlapping each other the more the horses front or
rear faces the viewer. So we very much want to have these three structures in mind as we draw our foundations. That said, it's one thing
to consider them as separate shapes as we
draw in our rough sketch. But when we start to put it all together and want
more definition, we have to be sure
that these pots merge into each
other seamlessly. This is what's called
intersecting one object, merging itself into another. The best way to think of this
is to think of a mushroom, how the stem inserts itself
into the mushroom top. This is the top of transition
we want for our torso, the chest and the
shoulder blade areas need to intersect
with the ribcage. The ribcage needs to
intersect with the pelvis. Now, if you've ever drawn
the human torso, you know, the rib cage and pelvis
is quite a flexible area. This is not quite the
same for a horse. Looking at it from above, we'll say it gets a little
bit of compression between the two areas as the horse
transfers its weight. But for the most part there's very little bending and
twisting that haben Sie. The challenge we're going
to have is trying to make this rather rigid area as
dynamic and fluid as possible. We'll talk about that shortly. So that's the torso. Now if we go back to the
very start of the lesson, we can see now due to how we've positioned in
shape these pots, that initial S shape is still
very much being retained. So that's the development
of the torso completed. Let's move on to the hind legs.
9. Hind Legs: I found most
challenging area and now hind legs are
probably going to give us the most difficulties
because this shape and gesture changes depending
on how the legacy position, as well as how the
horse is overall positioned in relation
to the viewer. The first thing we
have to do though, is work out a few landmarks. In the same way that we had a hidden humerus
bone at the front. We've got a hidden
thigh bone at the back. If we look under the surface, will see the horses pelvis tilts down at about an
angle of 45 degrees. This hidden thigh
bone then connects at this end and tilts in
the opposite direction. The end of this bond will cause a small lump to appear on
the surface of the skin. That bump is the horses knee. This nice, It's almost directly under the
peak of the pelvis. This gives us a
fantastic landmark. Not only do we now know how the pelvis and then they
relate to each other? We now have a starting point
for the rest of the leg. The next structure down is essentially the equivalent
to our shin bone. And this is a much flatter and
boxy shape and connects to our pelvis structure
from the knee at an angle of about 45 degrees. This is going to be a
gradation of thickness here, starting very round and
volumetric at the base of the pelvis and thinning out as it progresses
to the next joint. Well, you might notice here
is a very distinct bend in the shape that curves towards
the back of the horse. You can get away with using a slightly more box-like
structure here, but making it more
curved is going to give it a bit more
of an organic field. In a standing position. The edge of this
curve aligns itself almost exactly with the back
of our pelvis structure. Where things get tricky
is the next part, which is the equivalent to the base of our foot
in terms of shape, this is very similar to that
traditional bone shape we see at the front leg,
albeit slightly longer. In terms of position. It tilts in the opposite
direction to the bone above. It's the connection to the pot above where things get tricky. Where either going to get a noticeably sharp transition from the upper leg to the low leg
or a far more gradual one. As the leg bends and
compresses inaction, we are going to get a number of very sharp corners developing. This isn't even more
noticeable zigzag then what happens at
the front of the leg? In fact, it's so
noticeable that are hidden thigh bone shape starts
to protrude from the skin, becoming way more obvious. Take notice of how much more prominent this thigh
bone structure and knee is compared
to a standing pose. Things change as the
leg stretches out, either towards the front
or beyond its reach. The widest leg can
stretch out means that in some instances we can almost get away with one
big giant see CU, Foundation at the
front with a couple of smallest C curves
structures at the back. These different positions
become even more challenging as we move the horse around
to the front or to the back, because a lot of
foreshortening and overlapping is going
to take place. If we are having real trouble with these more
challenging positions, are best bet is to look for shapes that best
represent this pose. So for instance, looking
at this reference image, I'm going to say my foundations are one big tapering cylinder. So ask yourself what
simplified shapes work best for this pose? Remember, we want easy to draw yet recognizable shapes and
forms for all our body parts. So that's gonna do it
for the hind legs. Let's move on to the hooves.
10. Hooves: We finally made our
way to the bottom. Now, luckily for us, hooves are the same
across all four legs, that makes life easier. The initial structure for the hoof is thankfully
quite simple. We want to think
of this as almost like a tapering funnel shape. From the bowl of the joint above the front of this shape
flares out gradually, whilst at the rear, it curves around a lot more. To make this a little bit
more characteristic though, we need to take a few
corners off in a few places. From the joint, we
want to cut out a square piece to create that obvious gap
in the structure. It almost feels like there's a piece of the
body missing here, but that is exactly
what we want. From there. We also
want to cut off a little bit of the corner
from the back of the nail. And we want it to
be cornered off in the same direction as the front. This back corner is
also going to double as the marker for where the
front of the Nile ends. If we draw a line exactly
90 degrees from here, we're going to get
the landmark for where the front
of the Nile ends. You may also notice that
this landmark sits almost exactly in the middle of our initial funnel
shaped foundations. So choose whichever landmark
works best for you. The Nile is a very
rounded areas, so we want to think of this as almost like a cutoff cylinder. This is especially true for when we move around to the
front view again, the main structure of this tooth is a flared funnel shape. The main issue is the Nile. Because of the Niles tilt
and the perspective we are viewing it from means the Nile starts to
give off the illusion. It's a cylinder that's
being bent backwards. If we look at it from a
cross contoured perspective, we get the sense that the
hoof is initially tilting towards us and then gradually
shifts away from us. In most instances, we won't have to worry about
being this precise, but having this extra positional knowledge
can come in handy because the Nile in particular can start to throw our legs off. The back, thankfully, is
a lot easier to manage. It's essentially a series of overlapping balls
structures with a boxy base on the side. And if we quickly
look underneath, an oval shape is
really all we need, but a rounded heart shape is a little bit more
characteristic. And that of course, will
change depending on whether or not the
horse is wearing shoes. But overall, that's the main
structures for the h2s.
11. Creating Gesture: If you've done the Figure
Drawing series of classes, feel free to skip this
part of the lesson. But for those of
you who haven't, we have to talk about creating
gesture for the horse. Before we do, let's first
explain what gesture is. Whenever we start
drawing, there are two concepts we
have to consider. The first is called
construction. Construction is defined as being the individual parts of something That's something
can be two-dimensional, it can be three-dimensional, but the main concept
is that it's a series of individual
components. The majority of this lesson has been a construction
will listen, breaking down and looking at the individual body
parts for a horse. So if construction is the pots to a horse
than what is just Joe? Well, gesture is how those
parts relate to each other. Another way to look at
it is that gesture is the implied directional movement that connects one
pot to the next. Construction pots
by themselves on not much use to us unless we have something
that unifies them. So gesture can be considered the glue that holds
everything together. But what does imply
directional movement main. Let's look at this example
of circles to find out each of these circles
represents a construction pot. So that's pretty
straightforward. But what about the gesture? Well, if we are saying that gesture is an
implied movement, then if we follow the direction the circles
are making together, we get this sense S-like
path is being formed. Individually. The
circles don't mean much, but as a team, they've created a very fluid directional movement
between them. Construction is the pots. Gesture is the connection
between these pots. Now the thing about gesture
is that it's not easy to see. In fact, it's something
that we have to look for. Normally when we
are taught gesture, we are often told to
look through the middle, but that isn't
always a convenience for us because it
doesn't give us a tangible starting point. Instead, we're going to use
a tangible starting point. So where is this point? Well, luckily,
everything organic has natural asymmetry to its design. If we look at our
horse's head again, we can see quite clearly one side is longer
than the other. Instead of going
through the middle of trying to find gesture, we're going to use the heads longest axis line
that's available to us. We want this long axis
line to be the foundation, not just for our gesture
from one part to the next, but also the foundation
for our construction pods. We want to draw arrowheads
gesture in first and then build the rest of the
structure around this. And we want to
continue this process from one part to the next. So in this instance, starting with the head, we have created
gesture number one followed by construction
number one. The neck then follows
with gesture number two. Construction number two, the torso is gesture
number three, construction number three
and so on and so forth. This is the process that
we want for ourselves. Now, as neat and
tidy as the sounds. The moment we start to build construction pots over our
gesture means I'll pose, starts to become more
stiff and mechanical for an already big and bulky
animal like the horse, this is the last thing
we want to happen. So we need to do two things
to try to offset this. First, we need to
try and capture as many body parts as we can
in a single gesture line. The more we can get these
parts to relate to each other, the more we offset
this stiffness. And two, we want to exaggerate our gestures to be as
curved as possible. Construction needs
to be considered not only the parts
of our subject, but also the thing that creates
corners for our subject. Gesture then is not only
the connection between our pots and needs to be considered the curves
for our subject. Corners and curves. The more we curve out gesture, the more fluid and dynamic
our host starts to become, the more corners we add in the more mechanical and
rigid l horse looks. We want to push these
curves as much as possible. We do have to consider the limitations of the horse's body, but we still want to bend and twist things as much as we can. In most instances, we are much better off putting
in way too much gesture than white, too
much construction.
12. Facial Features: So there's been a
lot of concepts thrown at you throughout
this lesson and having to deal with facial features after all of that probably
feels exhausting. So consider this loss
pot as something of a bonus lesson that you can
come back to it a later date. It's more important getting used to the main construction of the body first and
worrying about this additional
layer of anatomy. But with that said, let's take a look at
the facial features. Starting with the ears first, because they're quite easy. They are basically
rounded triangles, both from the front
and from the side. They are more S-shaped on the inside and more
C-shaped on the outside. These can right-side almost
a 180 degrees to the back. Usually it happens when the horse is not
particularly happy. So if you're looking to draw a more intense looking horse, you might want to consider
pinning the ys backwards. A more relaxed horse has, it's more towards the sides. Moving on to the eyes, as we've already seen, the horse's eyes bulge
out quite a lot, giving us that coffin
shape for the head. They are grazing animals, which means their
field of view as much water in order to
look out for predators. So the structures reflect this. The best way to describe
this whole areas that it kinda looks like an
old-fashioned telescope, like those old style
parts spy scopes you see in film and television. The eyeball being wrapped around by the more
cylindrical structure. But in this case it's a font. Pick a structure at the top
than it is at the base. If we want to know that
concept to relate to this, as silly as it sounds, we can compare this
to an ice cream cone, not necessarily in
terms of shape, but more the idea of
a spherical object being encased by a
more cylindrical one, we are sometimes going to get a very noticeable dent in the middle of
the cylinder also, which makes it look like the eye is protruding a lot more. If we take a closer look
at the eye socket area, we'll say it's far
more box-like. At the top end, we'll
rounded at the bottom. In fact, it can almost look like a sharp 90-degree turn from its top plane to the
inner corner of the eye. It's a subtle
thing, but it gives us more characteristic horses. The overall shape of the
eyelid area is not too dissimilar from hours straight up and lower on the inside, more rounded and
higher on the outside. Turning to the side, we'd
get a really noticeable brow bump as the forehead transitions into the bridge of the nose. And as was mentioned earlier, the eyes are positioned approximately 1 third
from the top of the head. Now moving on to the nose, this is a little
bit of an odd area. The best way to describe
this is that it's a thick piece of fabric
that wraps around itself. If we take the thickness
of y for a moment, we'll say it's a bit like a
strip of fabric that conduct twists around and turns
over in on itself. If that's a little
tricky to remember. Another option is to look within the negative space where
the nose cavity is. He will find that
the whole creates a sort of number six shape. We can use that as a bit of
a guide it and then wrap in the more tubular structures of the nose in and around that. So a couple of options there. Next up the mouth. This is a very flexible area. If you've ever seen how
a horse's mouth moves, it can sometimes look
very rubbery and elastic. So in terms of expression, it can get a little
wall around the muzzle. In a neutral, relaxed state. The horse's lips are pretty much one big tube that wraps around
from the base of the nose, curves around in on itself, and finally, wraps around
the chin to the other side. From the front own view, we normally will
get a little bit of that tubular structure
peeking through. That will depend of course, on the tilt of the head. And finally, the
cheek and jaw area. We've got a series of cylinders shapes due to the
muscles underneath. These muscles are
the police systems that control the various
facial movements. We're going to find
this whole area of cylinders overall
compresses inward, making a very noticeable
dent in the horse's head. These cylinders, however, are then going to pop out a little. If we look at a cross-section, it almost becomes a series of hills and valleys
in this area. That valley then steps up quite sharply onto
the horse's jaw, which becomes a lot
flatter in comparison. So a little bit of a
network of tunnels he that then transitions
rather harshly to the larger flat
plane of the jaw. So that's the entire
structure for the horse from the head all
the way down to the hooves. It's an awful lot to cover. So the best advice is to take all of this
one step at a time.
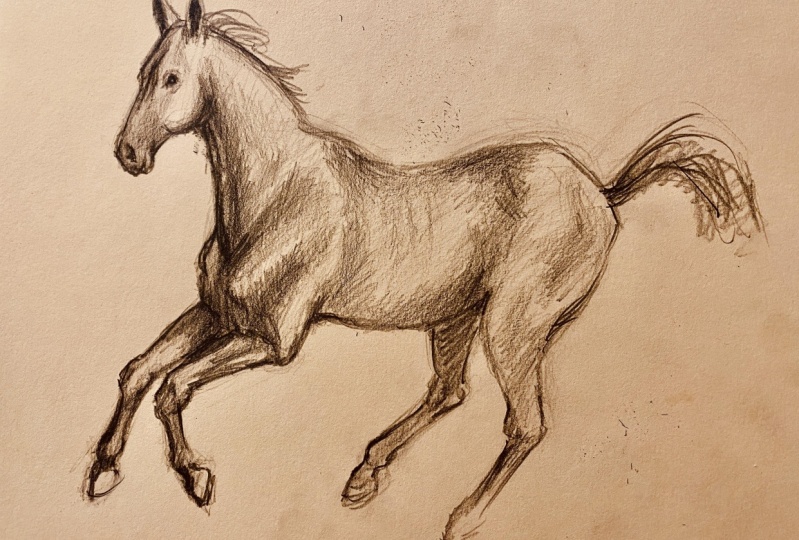
13. Draw Along Demo - Head: Okay, We'll start
with the head first and starting with the
profile is usually a pretty good place
to begin with because the shapes are
pretty easy to identify, at least the initial foundation. So getting that big gesture line in first and then
starting the rest of the construction heat that nice tapering box idea that we
talked about in the lesson. There are a couple
of different options we can use as well. We'll talk about
those in a moment and just splitting off fail
head and neck area. So our basic foundations
in place now to start developing
things a little more, adding in that rounded
box for the muzzle. And we have to remember
that this tilts down ever so slightly here. And that's also going to
give us that landmark that we want for our socket to. So just adding in a little bit of the coffin shape that we talked about here. It's almost a side on
image, but not quite. So we still need a little
bit of that top plane. So that's the coffin, coffin type of shape there. But we've got other options too. So maybe we can look
at this and say, well, maybe it's just box is a perfectly good place
to start with this one. So another couple of options, as well as that we could
use a cylinder to, we could make a
pretty good argument actually that this
looks a little bit more cylindrical at this
slight three-quarter angle. But we could also break this up into a couple of
different pieces as well. So maybe starting with the
boxy a structure first, and then breaking it
down into two parts. Especially the rounded part
here where the jaw is. So it's really going to be
dependent on what you feel. You see, what shapes and
forms that you think that work best for you because we are going to
have certain biases, but When in doubt, the box is probably going
to be your best friend because we get a sense of
the which way it is leaning, which way it is facing, and which way is Chilton. We don't necessarily get that with a cylinder or a bowl shape, at least not to the same degree. So the box is always your best
friend in most instances, if we're having trouble
with positioning and shape, but we, as I said, we aren't going to
have biases to S2, which shape that we fibers. So some of us are
going to prefer the more cylindrical shapes
and that's perfectly fine. So it's really what
our preferences are. These are just tools
at the end of the day, no different to hammer
or a chisel or soul. And he taught a practical
tool for building things. So these are our artistic tools. So getting these rough
shapes in for the ears, just keeping it as
simple triangles and sort of locking how
everything's coming together now. So putting in that noticeable
bridge of the brow, merging into the
structure of the nose. And trying to keep that a
little bit more curved as well. It's gonna be very
important to try to push a lot of the curves
here that we see, as we mentioned in the lesson. We've got two ideas that
we have to contend with as we are drawing our horse here,
construction and gesture. And the moment we start
to build any type of construction will parts on
top of gesture will think, starts to stiffen
up a bit there. So one of my things is curved as possible without
it becoming elastic. So getting this cheek
structure and now that's the halfway
point for the head, but it also helps to mark out where that eye
is going to go. So we mentioned that lesson that the diagonal plane
that goes from the bottom of that chin all the way to the
top of the head. That's one landmark,
but also that rounded implied
roundedness of that, of that cheek area is also
another landmark for us. So it's these type of little things that
we should look out for to help us
identify what's going to make life a little
bit easier for us, the more things that the most
shapes rather that we can simplify the bone landmarks
that we can point to. The easier the process starts to become more or less happy with how the
head is looking now. So it's just going to
start working on the neck, getting the initial
cylinder structure. Now let's just breaking it into those three separate cylinders. So this one, of course,
as we mentioned, the lecture, going all
the way to that sternum. Got the other two here. One is just hiding behind
where the hair is. You can just get the sense of that cylindrical shape there. Now I mentioned a couple of anatomical names
during this lesson. They're not 100% accurate. These are just sort
of rough ideas. We're not going
to worry too much about getting anatomical
names, right? We're not vets were hardest. We don't have to really
think about things. That in-depth. So this is coming together. Got just a little bit of
hair at the top here. Just to add that in here
is gonna be important. Actually when the
horse is moving, we'll talk more about that
a little bit lighter on. But again, just taking
things back to the idea of simple shapes and forms to
get these foundations in. And as we get to smaller
shapes and forms, keeping the same ideas going. Alright, moving on to a slightly
more three-quarter pose. A little bit more challenging. Our horse's head
is tilting down. So we've got that
cross axis in here. We've got the long
axis line that's, you can see quite visibly in the indentation in the head that is a fantastic
landmark for us. That's gonna be our
default gesture for the head in these
types of positions. So there's a couple
of those type of markings as in denotations
throughout the body. And they're gonna be super
useful for when we stopped to turn the head around
because we don't just want to work from photographs. We also want to work from
imagination as well. In the same way that
boxy or structures. Again to help us so
these cross axis lines. So again, we can use
the argument that this is almost more cylindrical. So if we do a little
example here, we can use the cylinders
are foundations and then start to build
in the rest of. This is what we really want. Options available to us. We should never really be
married to one shape or form. Could also do just a regular
old typing box as well. So arguments for a couple
of different options here. So just adding in a little
bit of the neck structure now it's really curving
over in this position. We've got a lot of
overlapping that's going on. And so that starts
to throw things off. So all those nice clean
shapes and nice position, positional MCAS rather that we learned about suddenly become
a little bit less useful. So we have to do it a
little bit of thinking here and to figure out the hierarchy of all these
different shapes and forms. So we need to break each component of the
head down, for instance, piece-by-piece And then
workout or what's overlapping, what cost using this
cross axis here, that's gonna be a super
important foundation for helping with that. It's adding in the ice structures
now keeping it nice and cylindrical where that
bony protrusion is. This is the part of
the drawing way. You really do have to stop and think before
you commit to anything. And say, well, I've
got my shapes right? Am I proportions looking okay? You have to track
your progress as you go because you
don't want to get to the stage where you've put an oil foundations and
then you've started doing the light and shadow,
the color rendering. You want to take a
little bit of time, maybe every 3540 seconds or so, just to sort of
track your progress, ask yourself a
series of questions. Does does the shape
look correct? These proportions looking, okay? So you just take it
one step at a time. So these foundations are
looking alright, so far. Start to work on the neck now. And of course, that's coming
down into the sternum. We'll cover that with
the chest demonstration in a moment. I really want to feel the
roundness of this nick too, especially in this position. We lose a little bit of
that cylindrical shape. So we want to really try to reinforce this and
we want to try to find markers on the horse
that help to do this. So shadows and little
creases of skin, little folds of skin. Any type of visual
market to help us reinforce the idea that it's
a cylindrical structure. So this is looking
relatively okay so far. So we might leave this one here and we'll start to
move on to the legs.
14. Draw Along Demo - Front Legs: Okay, front legs. So for the most part, they are just cylinder shapes, so it makes things
a lot easier to manage as many muscles or
tendons here to worry about. Especially compared
to our, our own arms, because these are, the horse
is equivalent to two ohms. So very boney, very bony areas. Certain they're carrying
a lot of white as well. There's an awful lot of white
the front of the horse. So these legs as thin
as they are doing. A lot of work here to
keep this horse going. Really emphasizing that
bone shaped structure, especially in that
lower part of the leg. Fanning out our fanning
out the who's here. Just adding a little
bit of the torso as well just to help reinforce the id and
position of things. But again, mostly keeping
it nice and simple. The upper part is a
little bit thicker. There's a little bit more muscle and tendon going on there. So bit of a bulging
cylinder for that APA pot. Hello, part of this leg,
traditional bone shape. You could think of it as either
hourglass shape as well, or even do something
that's a little bit more squarish and in box C, but for the most part you want to keep this
pretty rounded. It does get a little bit
flatter towards the front. So it's not a perfect
cylinder by any means. But this is still the
best shape for the leg, especially in this position. So it's nice and easy
shape to remember here. Nice big gesture. Nice easy, cylindrical shape. I'll just emphasize the elbow here as well because
that is going to sometimes look like it
merges into that chest, but we always it'll be sure that it's sticking out
just a little bit there. That's all move around
to a more front on view. And again, a lot of overlapping happening
with this image. It's just want to
get a little bit of the chest structure in as well just to give us some idea
as to where things are. So that's always good
too, especially if you're doing things like lakes
to have a little bit of a little bit of
the torso in there to just get a feel for where
the connection points are. So try to avoid doing parts of the body just on their own as if they're
floating in space. You always wanted to
have some sense of the next body part
connecting to it. So again, that sort of
bony structure here. And for both of these parts really,
it's a little thicker, of course at the top and a lot thinner
down the bottom here you get a real sense
of just how thin this lower part of the leg is. Still trying to keep
it very cylindrical. And not only cylindrical, but we want it to
feel as if it's merging into this upper part. So we talked a little bit during the torso section about
the idea of insertion, and that's the
idea of one object inserting itself into another. This is this sort
of mushroom idea. So the stem of the
mushroom inserting itself into the top
of the mushroom. We want that same concept for these overlapping
structures. So adding in the hoof now I'm making sure
that flares out. We'll have a look at those in more detail a little later on, trying to ensure this
roundness as well. So we want to avoid straight
lines as much as possible. There are a couple of
straight areas and the side of the who's
actually is one area which gets quite straight. But for the most
part, we want that organic. Got the Nile there. Of course, that's
not too dissimilar actually from the
shape of our own nail. And it's a little bit tricky sometimes in certain
poses to remember. So if you ever get
into any sort of trouble with remembering
the shape of the, of the Nile and the hoof. You just look at your
own nail because it's not too dissimilar
in its structure. So it's almost the
equivalent to this. Let's move on to doing
something a little more curved and angular. So we're going to get a
little bit more boxy like structures happening
here and lot more corners than what
we normally would. So again, getting a little
bit that Chest Foundation down and that's
cylindrical structure for the upper part of the leg. Now, when the leg starts
to bend over like this, this is where we
get this nice long straight at the front here. So for the most part, it's when it's in a standing position or
it's not quite as bent, it's still rather
bowl-like structure. But once it gets to this point where the leg starts
to curl under, then it does become
very box-like. And as was mentioned, it helps to just characterize the horse a little bit more. If we just do a
little sketch here of roughly what this
shape looks like, it's sort of flat at the top, becomes more curved behind. So it's almost like
a wedge shape or keystone shape would
actually probably be a more accurate
description for it. So again, moving on
to the who's now. Now, just to show
how different this can look without that boxy edge, Let's just do a
version of this with out that straight edge at the front just to see
what it looks like. And you can kind of start
to see here is that something doesn't
quite look, right. There's just something about
it that doesn't look like it's from a horse is too
many sharp angles here, so just flattening off the
leg right at that joint at the front and curving
it ran a little more at the back is going to make things look a lot more characteristics. So just keep that in mind.
15. Draw Along Demo - Torso: Okay. The chest and torso. I'm going a little bit
of a rough outline for our head and neck just
to save a bit of time here. So having to think about really three separate
structures that we're going to have
to merge together. Looking for that tombstone
like shape or that boxy, rounded boxy shape for the
front part of our chest here. And looking for
these key landmarks, we've got the corner
landmarks for our hidden shoulder
blade and humerus bone, that little bump that occurs from those two
bones being fused. And of course, the
other landmark day, the sternum with a
neck meets the chest. That gives us that
nice long axis across the across the top
plane about tombstone. That's the transitional
marker for the bottom of our chest. And we want to start to
swing this down now. So It's actually quite noticeable how flat
this top plane can get. And it sometimes it looks as if the horse's head is kinda
stuck on here compared to other areas where there's lots of shapes and forms
that feel like they merge into each other. The neck and this top
plane of the chest sometimes looks like it's
just simply stuck on. So I've got the bottom plane of that tombstone
shape sticking out. And this is our top plane. Of course. We want that
noticeable change in shape here. And sometimes it's a little
bit difficult to figure out where that side
plane is to this. But we can usually
find it when we find that shoulder point marker for about two bones underneath. So that little
protrusion that happens. So that's not always
an easy thing to find in certain poses. But if you find the elbow and then measure up 45
degrees approximately, you'll generally find
where it should be. But as long as we
keep this idea of a rounded box or a tombstone shape as our
simplified ID in mind. Then we can usually
figure it out. So this is why we want to eliminate from our minds the idea that we're
looking at a horse. We want to break this down into the most easiest and obvious
ideas that we can see here. Because if we're able to
control the shape of things, if we're able to imagine that
this is our original ID, then all of a sudden, all of those difficult
anatomical structures become far less daunting for us. So that's why we
want to approach it as if it's an original idea
that we've come up with. Because if it's our idea, that means that we control
every aspect of it. What it looks like,
what shapes it is, how it articulates, makes life
a lot more easier for us. So got the initial foundations for the chest looking
reasonably okay, right now I just
want to put it in a little bit of the
tubular structure for this muscle as they
sit during a lecture, this front muscle
that embeds itself in the sternum is usually going to be visible
most of the time. The other ones that
we saw further back, they sometimes become a little more subtle
in their appearance. But this front one we
always want to emphasize. So moving on to the
ribcage and getting that nice tubular shape in. We don't want this
to straight at all. We want this sense of
roundness in this area, particularly around the
bottom of the ribcage. You might be able
to see there in the reference image is this
real implied egg shape, which seems to be
forming from the bottom and into the main trunk
of the torso there. So that's a little
bit more work, but it tends to be a little bit more characteristic as well. Moving on to the pelvis
now the pelvis is tilting over towards the
camera slightly. So we have to look at the
position of things as well, not just the shape, we
have to get a sense for. What is this tilting towards me? Is it tilting away? What angle or things are in? That's where this pencil trick that we talked about is
going to come in handy. So using that as a guide
to help figure out the position things is going to go a long way to making things look a lot more accurate. Keeping things nice and rounded at the top for the pelvis, although it's more of a
chiseled look at the moment. So chiseling things out that are rounded
as perfectly fine. If you having real difficulty with the position of something, something rounded in particular. Then making small
little straight edges all the way around to try to. Get things accurate is a
perfectly fine way to go. You just want to smooth
it off afterwards. So generally happy with how this is looking
now we're just putting our landmarks here. For our legs and
torso structure. We've got the pelvis and the knee which roughly
align as well as the elbow at the front with the center of the
shoulder blade in the back. So keep those in mind, especially because
they're going to be super useful landmarks for
pretty much all positions. And just changing the shape
of the head a little here, a little bit disproportionate. So you've got to find
this along the way that you'll have to
make these adjustments. So I think we're done
here with this one. Move around to a more
challenging pose. It has a lot more overlapping, far more challenging pose here. We've got a lot of
overlapping going on here. So our torso, we've broken it down into three parts like
we talked about earlier. And we look at this
simplified diagram here. We've got out chest
at the front end, ribcage in the middle, and
our pelvis at the back. And so the more the
horse faces towards us, the viewer or the camera, the more this overlapping
is going to take place. So we're going to have a very challenging task ahead of us here to try to make it look
as if each of these parts, not only are
positioned correctly, but also that there's still merging into each
other correctly. So again, keeping things as simple shapes for the moment
because that's going to be the key to ensuring that everything starts to
be positioned correctly. He got that long axis across horizontally
for at chest muscle. But notice also how we've got that indentation right in the
center of the chest there, which acts as our vertical
axis line as well. So that's another instance
where we've got indentations throughout the body
that can help us with getting positioning right? It's almost like a natural
cross axis is being formed. They are through those points along the horizontal
and the vertical. Again, getting the underside of that plane of the chest in FOMO, noticeable here as well. And getting these
legs structures in not going to worry too much about these in this pose. So now thinking to myself, Well, I've kind of got this
chest foundation in place. And now have to
think about, well, how do I connect
that ribcage in and make it look as if it's
not bulging out too much, but also making sure that it feels like it's
connecting correctly. So this might take
a couple of goes. If you're not really
used to doing foreshortening type of work. So just be a little bit patient
with yourself here too, because it is rather
challenging to try to get this overlapping
looking correct. Just drawing in the rough
structure here for the ribcage. If we need to make adjustments, of course, we'll
do that as we go. Trying to feel that
roundness here and making sure that it feels as if
it's merging correctly. So it got the ribcage
more or less done. Now, move on to the pelvis and start to
piece that together. So just following the sort of straight edges that are
being formed here and try to ensure that the back of
this pelvis feels like it's wrapping around
behind that ribcage. So that's gonna be
the biggest challenge with this type of pose is ensuring that these
pots feel as if they are sitting
behind one another. And really it's just a, another form of what we
saw during the lecture about intersecting our forms. So this is just a more extreme
version of that really. Now the reason may have is fun. This type of pose
very challenging is simply because we don't have a decent enough
understanding of how to translate three-dimensions
onto a flat 2D surface. So we sort of have to
envision that we are sort of wrapping our hand around
the shapes of this horse. So as odd as this sounds, you want to try to imagine that you are actually drawing over the surface of that horse's
chest or that figure, all that bowl of
fruit, whatever it is you might be illustrating. This is a decent
enough starting point. So we'll just reiterate. We said earlier that we have to again think of these as three
separate parts that are overlapping that we then have to merge together without
gesture and our rhythm. So I'll shoulder blade
merges into the ribcage. The ribcage merges
into the pelvis. We want that flow
and rhythm present. That's what's going to unify
these three areas and turn it from being three
individual parts into one big flowing whole. Finish this one
up here and we'll move on to the hind legs.
16. Draw Along Demo - Hind Legs: Okay, Onto the hind legs. So it's a good idea with
these wants to always put the pelvis structure in first
and get out landmark CIA. So that's how landmark
for our knee. So as we mentioned, it's almost directly underneath
the top of that pelvis. So the peak of the pelvis there. Now we get a pretty good
look with this image. Just how wildly different these legs can be
shaped in position. So our frontline, a very
much that zigzaggy pattern, whilst the back one is got that far more gradual
cylindrical curve. So we get a real sense for just how different
things can look here. So going over this nice shape here and getting that
structure in first. And we can see pretty
clearly here as well with how this front
leg is being raised. Just how prominent
that thigh bone muscle now starts to protrude. So we get that nice
big indentation there that hopes to work that out. So zigzagging out way down to the lower part of the leg here. Just keeping it nice
and cylindrical again, very similar to the front leg, this pot, it is a
little bit longer. So that's the only thing that
we have to really change. Other than that, it's
pretty much that classic bone shape as well. Now you might notice
it's a little bit flatter on the top of
that pelvis here, r2. And that's because of the way the horse is white is
being transferred. Got that back leg which is
carrying a little bit more white and so it's pushing the back of that
pill was upwards, which is subsequently making the pelvis tilt a
little towards us. So again, that nice big C curve at the front of
that straight leg. So nice big gesture
right down there. In comparison, we've got
that zigzaggy pattern which is happening
at the front leg. So at the hind legs
do move in a way that are a little bit more
tricky than the front legs. And it's made even more
difficult depending on the type of movement
the horse is making. So at a gallop, you'll see that the legs can stretch out even more so
than what we see here, where it almost becomes a straight line in
some instances. So we need to observe those
type of poses in particular, because these back
legs here are going to sometimes proved to be a
little bit problematic. And so we'll take
a look now at a fought trickier
posed to deal with. And that's from a
more front on view. And we can start to see
with this image here just how much everything
starts to flatten off. So all those positional
ideas that we talked about seemed to
start to merge together. But we still want to keep in mind that there
are parts that I'm moving backwards and
moving forwards here. So we have to remember
that this main part of the leg is pointing
backwards here, or tilting towards whichever way you want to look at it as. But the main idea is that
we still need to have an awareness of how things are positioned even in
these type of poses. But having real trouble, we can just simplify things down to the shapes that we see. So I'm looking at this
and I'm saying, well, it sort of looks like your classic chicken
drumstick look. So that's an easier idea we go. So maybe think of it as sort of a light
bulb shape as well. So I'd like to try to
find things in the world around me that I can relate
to certain shapes like this. And so at a drumstick or a light bulb is a
pretty good option. Because these more
front arm positions start to really confuse
our mind a little bit. But we just have to
do a little bit of analysis along the way and
a little bit of logic. So if we have an understanding of how things are positioned
on the side view, which is far easier
for us to remember. Then we can start to
apply a little bit of that logic with these
types of positions two. So we just have to
imagine that, well, that leg is going in one direction and then it comes towards us in another direction. If we move to this
leg on the right, far easier to work out the position of
things here we've got very sharp corners,
clear indications here. So much smoother here,
more cylindrical. Fomo, positional changes
here, nice and sharp. Alright, let's move on
to our next body part.
17. Draw Along Demo - Hooves: We've finally reached the
bottom now onto the H2S, which are sort of the
fingertips, I suppose. I don't know the exact
anatomy of the horse. So I don't know exactly if this is a one-to-one comparison, but I like to think of
them as the fingertips and mostly because of that
Nile at the end there. So that now we want
to swing around. He just wanted it
as a straight line. We wanna get that sense
that it's wrapping around from one
side to the other. That's an important
thing to remember, although in most instances
we're probably never going to be drawing the
hooves this close up. But it's just additional
information for us to have in case we get into a little bit
of positional difficulties. Because surprisingly, the
hoops can be a little bit tricky sometimes
in certain poses because of the way
they are structured. They are sort of a
cutoff cylinder shape. But in certain poses, they can start to
look quite boxy. So it's going to depend
on a few things, what shape they make. In most instances we
want the front and back to be very straight edged. Move on to a more
tricky up pose now. So just getting the
classic bone structure in the upper part got a little bit more
overlapping happening here. Is you have to think about the different shapes that we've got overlapping
each other. Who got the bowl of
the joint above? Overlapping that funnel shape. So it's a sort of a squashed funnel shape
here from this angle. Getting that to wrap
around that way. Then moving on to
the Nile again, you might see very
flat along the side. So a slightly different shape
here compared to the side. It almost looks like probably what you'd best
described as a crescent moon. So that's just one small
positional change here. And it's sort of shifted the entire structure
of that nail. We do want that
sense of roundness towards the front and
straight edge on the side here you could probably
see it here is almost a very straight line
on that left-hand side. So a surprisingly
more challenging area than probably what
you would imagine. But we always want to
keep in mind that even if there are the
straight edges that do a p.sit from time-to-time
that at its core is very much a cylinder shape. So we do want that
roundness there, that feeling of the front
going all the way to the back. So let's move on to
one more and we'll do the hoof from behind. So again, putting it
in bony structure. So we've got a lot
of overlapping this time happening the
opposite direction. So we've got the main funnel, which is now
pointing towards us. And that's subsequently
going to be overlapped by the main body of the hoof. So we can usually get away with just a simple circle,
oval shape here. But I like to make
things a little bit more characteristic and
create a heart shape, which is probably
the better option. But again, in most
instances you probably won't need to go to this extent. Even running or galloping poses. You'll probably never
really have to go to this extra level of detail. But always just Tandy details
to have in the back of our mind on the off chance that we need to do something
a bit more refined. So again, an overlapping
structure here we've got L hoof overlapping
our funnel, got the funnel which is
merging into that top bone. So always thinking about the hierarchy of shapes
that we've gotten, how they relate to each other. So finish this one
off here and we'll move on to the facial features.
18. Draw Along Demo - Mouth/Nose: Okay, Onto the facial features, consider this as something
as an optional extra to do for your exercises because
there's been a lot of info, it's been thrown your way. So take this one step at a time and do the facial
features whenever you feel like it's so starting with the mouth and the
nose area first, we want this mouth to really swing around here and
go down a little bit. We don't just want it to
go straight across here. A very tubular structure
that's wrapping around in on itself in a
neutral position at least. And we want that
curvature there. So we can wrap it
around properly. Under the chin area here. You can call it a considers say triangular shape,
rounded box shape. I like to think of it more as a triangle shape because it has that diagonal which goes all the way to the
top of the head, which of course gives
us that island mark. So again, sort of a
tubular structure that's wrapping around that surface
is getting to the nose here. We've got the little pic of
the nose coming from behind. And it'll just get
the rough foundations for the nose structure here. Now, I tend to look to
the negative space where the nasal cavity is to get
the initial foundation. So it's sort of number
six or apostrophe shape. We then wrapping the
more tubular structures in and around that. So there's a couple
of different ways that we can approach this. We can look at it through the negative spice or
we can look at the, the main tubular structures first as the starting
point for us. So we'll cover this
again in a moment. Just want to get that feeling of that cylinder wrapping around the horse's mouth that
you can see it in some of the cracks of the lips
Actually for the horse. So that very much helps us
natural cross axis lines. So this is the tubular structure wrapping around the nose. So we can think of it that
way is that it's almost, almost similar to how our E
is a shaped here we've got that network of tunnels that
sort of curls in on itself. But again, we've got
the other option here of looking towards the nasal cavity is the
foundational point that we then build the rest of the
structure from the mind. Why you can kind of think
of this nasal area, because it is a little
bit tricky to sort of figure out sometimes, is that you can look
at it as almost being a really thick piece of fabric. So it's something like a
really thick piece of towel, leather or something like that. And drawing it in a way where it's wrapping
around in on itself. Now if doing it at this
thickness is a bit tricky, then you can also
try doing it as if it's a piece of paper that's wrapping around itself as well. So a couple of options there
for tackling the nose. Try a few of them out and see which one works best for you. So we'll finish this one up here and we'll move on to the eyes.
19. Draw Along Demo - Eyes: Okay, Onto the eyes, we've got our eyeball
foundation in place, which is always a good place
to stop with to start from. And we want all of
these structures to really be wrapping
around this. So we have to envision
this as almost being a lens of a camera that's being encased by a whole bunch
of other shapes and forms. So working on the lid first, it's always a good
place to really just get the initial
foundations in place and making sure that we've got that
bony protrusion, that cylinder shape thrusting
out from the head here. So we very much want to
think of this as being almost that old school
style telescope shape with the rounded lens being encased
by the cylindrical body. So that's the general idea that we want for this area here. It is a little bit more
refined than this, but for the most part we
want that round this. But you may see here on the
inner corner of the eye, it starts to get quite
straight in comparison. And subsequently, there's a side plane which
also develops heat too, which is quite straight. So it's not perfectly
cylindrical. We do have a few edges, corners here, but
for the most part, the rest of the eye around the top in particular
got a whole lot of roundness here that
needs to feel as if this whole area is wrapping around to
the back of the eye. So there's a few tricky parts, but we'll go into
the lid first and we want almost that
tubular structure, again wrapping around
to the back here. And that's gonna
be the tricky part to get that feeling right. Now the way to look
at this is that it's kind of like a doughnut which is being wrapped around
some type of sphere. So we just do a little
bit of a sketch here. We kinda got that
rough doughnut shape, which is encasing that
mine lens of the eye. So that's another way
to think of this area. Again wrapping around
to the back of the eye. But we've also got a
few other areas that we have to take note of and we'll
get to those in a second. And they refer to the
structure of the lead. Now the top of the
eye is gonna be a little bit more
bulge yet and rounder. We're still going to have
a sense of round this at the bottom here, but it's gonna be a
little bit flatter. It Fosse saw Tula shapes and forms here compared to
this top part which does bulge out and surround
that I a lot more. So just working on
the inner corner of the eye now just trying
to get this structure right. Now, luckily for us, the horse's eyes aren't too dissimilar in shape from owls, they just tend to
have areas that are a little bit
bulkier and larger. And it's a little bit
more rounded as well. Our eyes tend to be
a little bit more rectangular shapes
and comparison. Most of the time for horses, it's far more rounded
in its structure. But fortunately, if we're already used to
drawing human eyes, this isn't that big of a leap. So the inner corner of the eyes tilts a little
bit lower, just like ours, the outer corners up
a little bit higher, exactly like ours as well. So there's not a great
deal of difference here. Overall, structurally,
it's more of a proportional difference
more than anything else. So just looking now to the secondary structures
hidden little Chu Beulah area that's just
poking out underneath here. So we want to look for
these little subtle changes of shape and form. And always asking yourself, well, which direction
are these going in? What's the best option
for the shape here? So a lot of tubular
areas around this part. So now I just want to
work on the eyelid here because there's this
actually a top plane here. And you might be able to see
in the reference image with the little highlight right at the bottom of where
the eyeball is. That's the top
plane of the lead. So we have to remember that
this structure here as well. So it's not just flush up against the surface
of the eyeball. This is an actual
path that we have to traverse all
the way down here, straight edge, and then
down again and around. And just one final
landmark here, that diagonal plane, that's AL market that we
talked about earlier.
20. Draw Along Demo - Ears: Onto our last body
part, the ears. Now, thankfully,
in terms of shape, these just rounded triangles, for the most part is
a little bit more S shaped on the inside, little more C-shaped
on the outside. So you can also think of this
as sort of a sale shape. So the sale of a boat. So that's another option too. These are almost fabric like
but this form here as well. So taking notice of
that little bit of tubular structure that's
merging into the ear itself. And of course we've got
that ear cavity which is also developing so simple
rounded triangles. We can also really think of this as being something of a
cylinder shape as well, a very fluid cylinder shape. So if you can see in
the reference image here with how the ears turned, it very much has going for it than just
that triangular shape. So we want this to fan
out into the head. We want to use these
shadow parts as well to help define that two, such that a little bit of the head structure
here and actually just to give a little bit
more context too, how everything is positioned. So this is coming
along nicely here. I got that nice
triangular roundedness and that nice
cylindrical base here, which is merging into our head. So we'll do the
phi E in a moment. But just going back
to the idea of it being a piece of fabric, if we were to imagine
ourselves with a triangular piece of
fabric with a couple of square edges here that
we then twist around. This is kind of the ID
that we want for the e. So it's very flexible area. This is the idea that we want. But we can also look at it as being that sort of cut
off cylinder as well. So it'll probably depend
on the pose as well, which direction you go in. But that's the general idea is that very fluid flexible area. But generally speaking, you can, in most instances get away with just simple
triangular shapes it in the same way that we probably will never really go into that much
detail with the hooves. We probably won't go into
this much detail for the a's as well unless
maybe we're doing a portrait of a horse,
just the head shot. Then we want to consider little more about
how these shapes and forms up wrapping around and how they are
connecting into the, to the main body
of the head there. So this is a alpha e, again, almost a sale shape. So whichever option
triangles or sale shapes. So choose whichever works best. But again, thinking of
this as very fluid, very flexible, almost
fabric like in this area. So nice big curves and
gestures for our ys.
22. Assignment Demonstration: Okay, so 20 minutes
on the clock, I'm going to do the
running pose here. Nice actually pose. So hopefully you got as
much as you could get done in that 20 minutes
for your own exercise. If you didn't get the
whole of the horse in, or if he had struggled a
little bit with certain parts. Don't worry about it
too much because this is a rather challenging, challenging animal to draw. So we have to just
be a little bit con to ourselves in a
little bit patient. Just build things up
slowly and eventually, speed and accuracy
will come with time. So 20 minutes is a long time compared to
some other drawing classes. But if you didn't get it all
in, don't worry too much. Just developing the
torso structure here. I'm going for a more
structured approach here, which is pretty much just
building the shapes and forms. First, there's two methods
that we can use when drawing. We discuss them a little bit,
construction and gesture. So it's not just about these two ideas that
we have to balance. It's about which
of these two ideas are we going to favor? And in some instances, it's going to make more sense to work from an
instructional perspective. And that's going to slow
you down a little bit. Because we're trying
to measure directions and angles and trying to develop shapes and
find corners as well. Whereas gesture is a bit
more free and expressive. And that's grateful for
shorter time periods. If we're only doing, say, a two-minute pose or a
five-minute pose for our whole. So for human being or whatever, it is withdrawing
than gestures going to be a little bit more handy because we can get
things down quicker. The downside is that we tend to lose a little bit of accuracy. Whereas the more
construction will approach, we get to slow down a bit and
analyze things a bit more. So there's going to be
trade-offs for both of these. Just getting this
ligand and trying to find the relationship between this fall leg and the one that's closest
towards the camera. And it's sometimes a good idea to treat the legs
almost like fingers. So if you've ever done a
hand drawing class before, you'll often be told to group
the fingers together as a single shape or as a
couple of shapes together. And it's not a bad idea to do that for the
horse's legs as well. Because sometimes
the legs get into some really strange positions and it's easy to lose
track of things. So consider grouping
the front legs and the back legs together
as a single shape. If you're having real difficulty
or at the very least, looked to the joints, the knee joints, for instance, say what the angle
is between them. So I've got that little guide there between my left
and right front leg. Give me the approximate angle. What I see in the image,
the reference image. So again, just working in the
head, fixing this up a bit. I've a tendency to make the
head a little bit too small, not just for horses
and other animals, but for humans as well. So it's good to be aware of your weaknesses like that too, because it means you can
plan accordingly for it. We are struggling
with certain areas of the body or certain types of shapes and forms or gestures. If we are aware of that, it means we can start
to offset this or at the very least plane for
these mistakes to happen. So these are good
mistakes in a way which sounds like a little bit of
an odd concept at first. That means we know how to fix those problems
when we face them. One of the main
problems we have is that we draw something
for the very first time. And we can say that
something's wrong with it, but we can't always
decipher what exactly is wrong with it. So analyzing your progress and analyzing your strengths and weaknesses is going to really helped develop a
process for yourself. That's sometimes a little
bit of a dirty word. And having a process because ADH is supposed
to be expressive. We're supposed to put all sorts of wild and crazy ideas down. But we do need some level of structure they
have for ourselves. So a little bit of an
assembly line approach is actually really required. So just starting to
develop the head now, I got one ear in this pose. I consider putting the other one in just for the sake of
having both in there. So we can change
things if we want. So when we start to get
a better understanding of the architecture
and the articulations. Then we can start to really maneuver things
around and make alterations to
multiply our taste or make things look
a little bit more dynamic and action packed. So something like the
hair, for instance, on the back of the
neck or the tile. We can make that
look a lot more wild and flowing in the wind
of free really wants to. Just speaking of
that in particular, because we actually
haven't touched upon the hair at
all in this lesson. That's gonna become a
super important part for, in particular, the Gallup pose. You're going to
find that when you draw the horse galloping, it can sometimes look
a little bit strange. But what you'll find is that the moment you add the hair and the tail flowing in
or flowing behind, you will start to say that
it really comes together. So if you're drawing
a gallop pose with the legs spread out in
either direction with the whole stretching out its
neck and head stretching out more pelvis and rib-cage
stretching out as well. And it just looks
a little bit odd. There's a good
chance that putting the main and the
tail flowing behind, it's just going to elevate it to the point where it
looks like it's moving because it's gonna be the most difficult part
for us here is how do we capture that animal looking as if it's moving
at a fast pace. So it's just that one
little thing of having the hair flowing behind and
the tile falling behind. That's really going to do a
lot to help sell that idea. I'm also thinking about
positioning here. I'm looking for relationships for different areas
here to try to ensure that all my horizontal areas of flowing along in
the same direction. And the same goes for
the vertical as well. So these are the type of
relationships that we want to look out for because
that's going to help with their positioning. If we've got sum of L, horizontal landmarks going
off in different directions, then it's going to start
to throw everything off for our horse
and its positioning. So we want to find
these relationships both horizontally
and vertically and make sure that they are all converging towards
the same direction. We need to reinforce
a lot of positional and three-dimensional ideas
as we draw this stuff. And we have to find
as many relationships as we can find to help do that. So that might be a
positional one with regards to horizontal and
vertical landmarks, or it could be something
like overlapping as well, that helps to develop depth. So what we're trying to
do, he is very difficult. We're trying to interpret three-dimensionality
onto a flat surface. And that's not easy to do. We're going to have to look at reference images and try to find ways to help get across the idea that this thing we're looking
at is three-dimensional. That this leg in particular is pointing down
in this direction. That the torso is facing, this particular direction that the head is leaning
this direction. Just getting in the bony
part of out front leg here. Trying to merge these
shapes into each other. We don't just want shapes to
end and have click corners. We want them to merge
into each other. So again, that
intersecting idea, that mushroom idea,
about halfway done now, focus on this front leg and what put a little bit of
shading in here. We'll see how much
time we've got left. Again, that nice box is structured there at
the front of that leg. It's just a slight alteration
of very simple alteration, but it changes the
dynamic of the leg. It really turns it into
a horse's leg here. I've emphasized this a few
times throughout the lesson. That's for good
reason because it's definitely a small little shape that you don't want to overlook. The horse has got a couple
of unique shapes to it, especially that rather big L-shaped for its neck and head. But those front legs are also
pretty distinct as well. So just thinking about
this top plane of the chest here, that
tombstone shape. It's emphasized a little
bit in the reference image. Just so happens that the patent. Doc patent on the horse
habits to follow that, which is again handy. So that's an example actually of a very good landmark for us. They we can use as
a bit of a guide, swinging the bonum
of valve ribcage up, starting the transition
into the pelvis. So you don't necessarily
have to start from the top and work your way
down to the back. If there's area that's giving you a little
bit of trouble, just move on to another area for the moment and come back
to it at a later time. Because you don't want
to get into the habit of drawing something, erasing it, drawing
it, erasing it again. We need to get out of
the mindset of just trying to get this
right as it were. Especially if you're, especially if you're
new to this as well. Many of us have a tendency
to try to be perfect and try to get accuracy
the first time round. And we have to be a little bit con to ourselves,
as was mentioned. If an area is
giving you trouble, just move on to something
else for the time being and come back to it
a little light at night. Sometimes you just
wake up one day and it just suddenly
comes to you. It's like, oh, that's
how you do it. Well, this is what I missed. You can have good
days and bad days. Some days you'll wake
up and everything would just go ride or the
proportions will be fine. The shapes and forms
will look great. Just stand back, no gun
man, this was really good. Then the next day will
be completely different. And sometimes it's the
same image as well. So you might be drawing
something one day and think, this is the best
thing I've ever done. And then you wake up
the next morning, look at the same image and say, What the heck has happened here. So just wrapping around the
backside here of this pelvis, you can see it a little
bit of an indentation where the spine is two, so we didn't actually
really cover that. So that's another good sentinel
landmark to look out for. Its probably not one
that we'll see too often unless we're looking overhead. That utilize that to
if that's in the pose. I'm moving down to the
legs and the knee. All the while thinking very
much about the gestures, still trying to relate these different
parts to each other. Having the merge from
one to the next. And that's a little bit
of a tricky thing to try to juggle because we're also trying to figure out
what the shape of things are. We trying to win
multiple hats here. And it takes a little bit of
time and practice to really start to get the hang of it, a little bit of dirt
kicking up here as well. So I'm going to add that
in to the pose as well, because that's just going to add a little bit of
movement as well. So another think to look for is things in the environment
to help sell out image. Whether it's something
like this for movement or just in terms
of positioning as well. Because sometimes we
need a little bit of the ground somewhere in our sketch just to help sell
the image a little bit more. So in this instance though, using a bit of that dirt that's been kicked up and
that's really going to help make things
look as if it's moving. So again, going
back to the Gallup, if we are having
difficulties with that, if things are looking very stiff and sort of weird at first, think about adding in the not just the tile and
the half long behind, but also as something like kicking up or even
just a piece of the ground somewhere
in the background to give it a little bit
of a reference point. Because we got a very
difficult task of trying to create movement
for a still image. But if you do want a little bit more knowledge
to maybe help you with, it's recommended that you watch some videos on how horses move. They can usually find some videos online that demonstrate there's some animation videos. I know this isn't an animation
lesson, but they're odd. I'm pretty good tutorials out there online that you can find. The horse has a couple of
movements that it's nine-fold. These are what are
called gates. Git. Not like gate at offence. But it's got well, it's got several
types of movements. But the ones that it's
probably known for, the walk, which is
pretty self-explanatory. The trot, the
gallop, and canter. The trot is kinda
like the horses jog. Gallup is pretty self-explanatory as
well. We've all seen. Rice horses gallop along day. The canter is sort of in-between
the trot and the gallop, sort of a rocking motion. Think about these different
gates is that they've all got a very specific and
unique legs sequence. So the walk lake sequence is slightly different
from the trot. The trot stemming
from the Canton, Kant is different
from the Gallup. Also found that the Gallup, it's probably the most
dynamic of the poses. And you'll find that
the horse stretches out a lot with the gallop or at least
gives off the illusion. So I wanted to set when
it's rising at full speed, you'll notice that the the
neck and the head stretch out, the pelvis and the rib
cage stretch out as well. And all of a sudden
the proportions of the horse start to
change a little bit. Within that Gallup action, the host also
compresses as well. So it stretches and compresses when it's running
at full sprint. So think of it a little bit like a beanbag idea that you can pull out and then
pushed together again. So if you want a bit
more info on that, I recommend looking for
some courses on animation. That's definitely
going to help give you an additional level
of information. And even though
we're only working with still imagery here, having a little bit of
extra knowledge for how these different
gates happened and what they sequence of
leg movements are. Well, it means we've got a better knowledge to be
able to draw the horse from imagination and
get a better feel for how the body
should be positioned, where the weights
should be distributed. Putting it a little
bit of highlight here at the moment
because we've got some very bright light that's hitting our hosts on
its left hand side. This is coming together
reasonably, okay, right now. So as we start to
wind this lesson up, I hope all this information
wasn't too overwhelming. So if you need to take
it in small parts, by all means, take
one step at a time. Being designed to be quite
manageable and easy to digest. There are going to be some additional images available in the resources section, as well as a couple of other notes and pictures
for you to look over. There'll be a little bit of
a horse cheat sheet there. You can reference. So if you're having
trouble remembering some, some of the shapes and forms, a little bit of a cheat
sheet there as well. So as we start to
wind this down, I hope you've enjoyed this class and hope you've learned something
from it as well. Something isn't 100% clear or you're a bit confused
about something. The discussion section
is always open. And by all means, please post your projects. I'll absolutely
love to see them if you want feedback
more than happy to provide some for you if you're having some
difficulty some way. So if all of that
out of the way to finish this up now,
keep practicing hard. And I'll see you in
the next lesson.
 JW Learning, Drawing the Body, Head and Hands