Transcripts
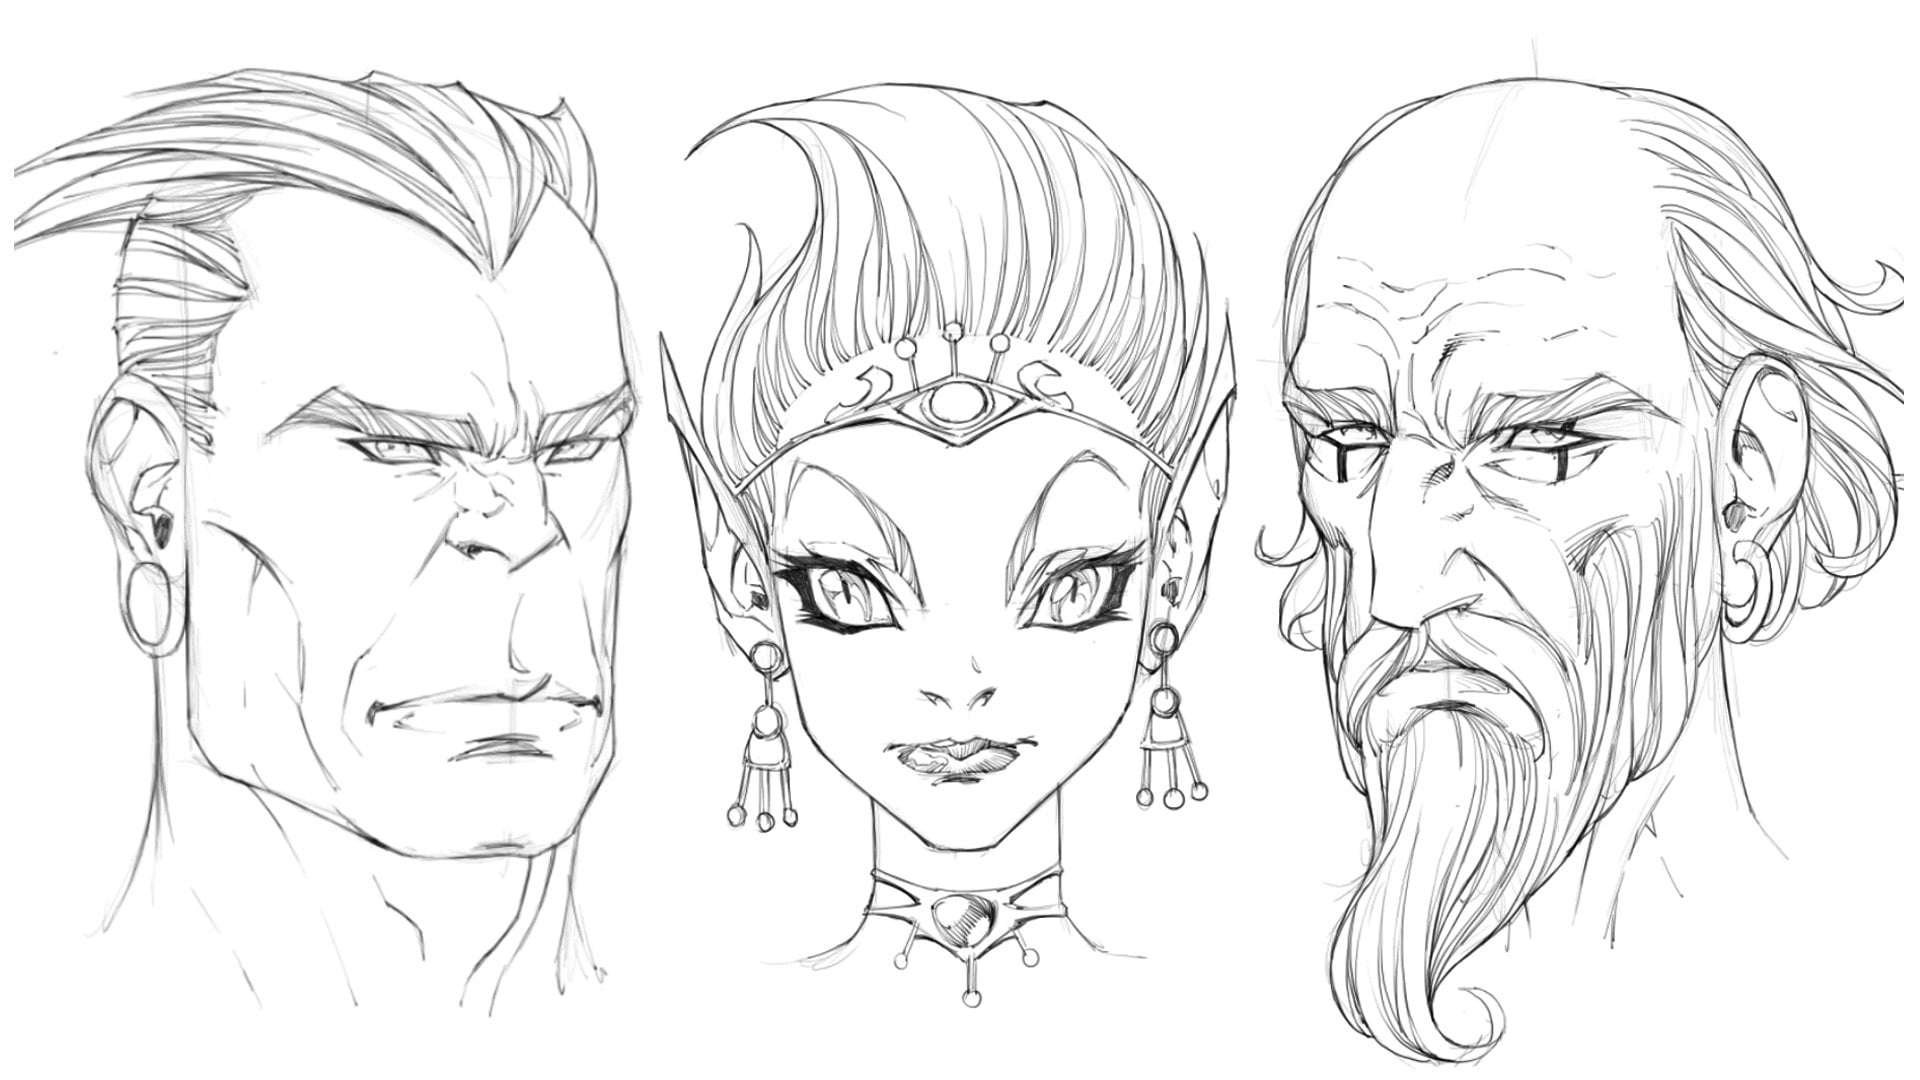
1. Introduction: Hey, it's Clayton in this class, you're going to
learn how to draw both the male and
female head from the front side and
three-quarter views. Specifically, we'll
be focused on learning about the
proportions of the head. It's basic overall construction and also the placement
of the facial features. Not to mention how they're drawn from the standard
points of view. Alright, let's jump
straight into it.
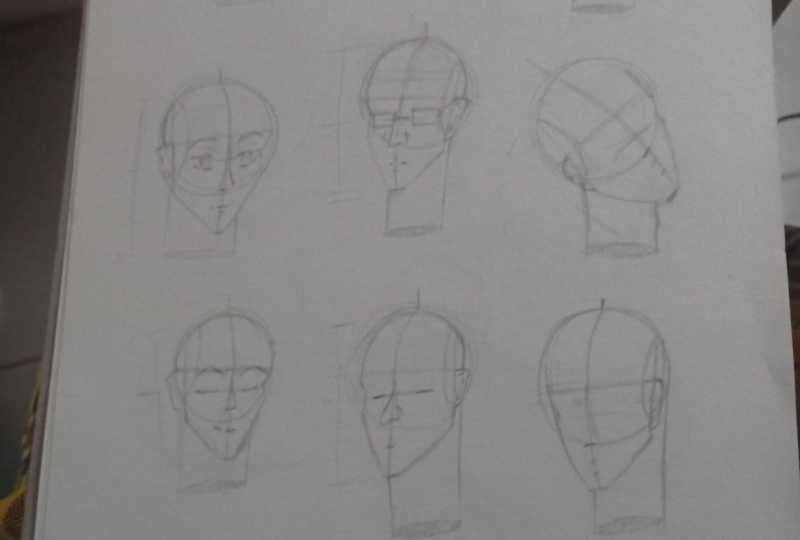
2. Portrait View Of The Male Head: Let's just jump
straight into it here. To begin with, we're
going to be drawing the front view of the male head. So I'm going to start out with a very lightly drawn circle. This circle will ultimately
provide the foundation, the basis for the
cranium of our head. This is a really great
place to start when it comes to drawing
the head because it gives you a visual
representation of how large the head will be on the page where it
will be positioned. And even though we're just
looking at a circle here, it actually holds a
very important piece of information which is exactly that the placement and
the size of the head. So if you are going
to be drawing the head of a character
in a comic book panel. That's something that
you want to know, especially if you've got
multiple characters in there. So just by the size of this circle alone and
it's positioning, we can work out where
characters are going to be and how large they will be in comparison to one another or in
relation to one another. Once we've got the circle drawn, it's time to establish
the axes of the head. And because we're looking
at the front view, an eye level representation
of the front view. We're just going to place
it straight through the top and the bottom. Next, we will lay in the horizontal guideline that
wraps around the belly of the sphere that try to make this as neat as you possibly can. Use a loose grip on your
stylus, press down lightly. And then that way,
when it comes to refining some of these lines, you'll be able to
easily do that with a slightly darker outline
that knocks all the light, roughly drawn lines back and
makes them less noticeable. Once we've got the horizontal
guideline drawn in, we'll lay in the
vertical guideline. And this vertical guideline that runs from the top of the
sphere to the bottom is going to represent
the front of the face, the middle of the
front of the face. So when we started to
turn the head in space, this line that I've just laid in will actually indicate to us what direction the
head is looking in. And so will the horizontal
guideline as well. Although that'll usually
be showing us whether or not we're looking up at the head or looking
down at the head. Next time we are
going to chop off the sides of our sphere. Now I'm just going
to draw those in, but try to remember that
ultimately the height of the side planes should equal
two-thirds of the cranium. So overall length. The reason that I like
to do this by eye is because sometimes when you're measuring this out to the exact specifications that it's supposed to be out according
to the luminous method, which this is actually based
on this construction method. I find that it just doesn't always lead to the best result. I think that in the end, although these methods
can really help you out, you've got to develop
your artistic intuition. You've got to develop
your eye to know what looks good and what
simply doesn't look good, what's not going to work. One of the most difficult things about drawing the head in the front view is ensuring
that it's symmetrical. So what I want you to do once you've drawn in the side planes. Because I want you
to go ahead and just make sure that the center line here is actually
situated in the middle. Okay. I think mine is pretty spot on, so I'll leave it at that. I'm going to erase away these off cuts that are left from adding
in the side planes. And then we'll continue on here. Now, I'm going to
drop the face down from the middle
line to the chin. I'm going to place
it about here. Now keep in mind that if we're looking at the top
two-thirds of the head, which you can find by
simply drawing a line from one side of the side planes to the other boats at the
bottom and the top. What we wanna do when we're
dropping down the face is essentially drop it
down one more third. Now that is the standard, the standard Loomis
method would tell you. For me, I like to simply just drop it down as far as I
think it needs to come. Sometimes that changes. Sometimes either side that
I've either got to take the face backup to be higher or I've got to make
it even longer. And it depends on
the kind of head that you ultimately
want to draw in the stylistic
representation of them that you want to have
within your work. So just keep that in
mind that if you want, if you find that
your heads are just either too long or
too squash looking, then keep the two-thirds
in mind at the top. Drop it down one
more third to really nail that correct measurement. And then once you've
got that sorted, simply go ahead and start to. ********, bend the rules to get the desired result
that you're after. This is the way in
which I normally work. I don't bother measuring
out the thirds. I just tried to drop it down to what I think
it's going to be. And then I draw in the jaw line at a
drawing the jaw line, what I'm first going to
do is create a middle or a vertical guide line that runs down the middle of
the side planes. That'll show me where the
sides of the head would be. Remember that when we're looking at the head
from the front, the reason that
we're able to see a foreshortened
representation of the side planes is because, well, the face is actually narrower than the
back of the head. So we get this very
foreshortened. Put in perspective. Visual of those side planes. Of course, because we
know that the jaw line actually comes back to sit at the middle of the side
view of the head. We need to know
where the middle of the side view is going to be in order to draw
in the jaw line. So once I've got that placed in, I'm going to drop
the jaw line down. And remember that because we're
drawing a male head here, this is where one of the key considerations
going to need to be kept in mind in
order to actually make it look like a
masculine jaw line. And the first key
consideration is to ensure that the corners of the jaw
just that little bit sharper, that little more chiseled and square than they would be
on a female character. So rather than rounding it out, we're going to leave
it quite sharp. But a very reasonably
sharp corner there. If we wanted to make this
head look more meat head ish, like a buff dude or
hokey looking character. Then we might actually bring the jaw line out so that it's, it's, it's the
opposite of tapered. It actually widens
at the corners. Now I don't want
that. I actually want a character that looks, I guess you could say,
would be the standard for a male character rather than a big buff meet
head looking bruit. This will do once I've got the corners of the
jar established, which you'll notice
almost aligns with the bottom of the sphere there
that we initially laid in. I'm going to bring the jaw
line down to the chin. And keep in mind that one of the other major
distinctions between male and female
heads is going to be the broadness of the
wideness of the chin. And for a male head, we do want to keep
that fairly broad. What do the same thing on the
opposite side of the face. You'll notice that I'm adding a little bit of extra shape to the bottom edge of the jaw
that I'm drawing in here. And that's just to give
it some character. Now, again, I think that the length to which I've
drawn the phase down to, I think that it's working really well and that it
looks pretty good. But keep in mind
that there are times when I start adding in
the facial features and I simply think that it
ends up looking too long or too short and
I will customize it, I will change it up. So that's why it's important to always make sure that
when you're working, especially a desk, this
foundational stage, keep it light, keep it loose, and know that everything
is subject to change. That's the point as to why we're coming up
with these foundations. They're supposed to be
the rough blueprint. Sometimes that blueprint
is going to be a little bit off and you'll need
to make corrections. So don't always stick to the blueprint if it's
simply not working. Okay, great. So we've got the
jaw line lady in. We've got the cranium,
established that on a very basic level completes the general
shape of our head. Now it's time to plot out where the facial features
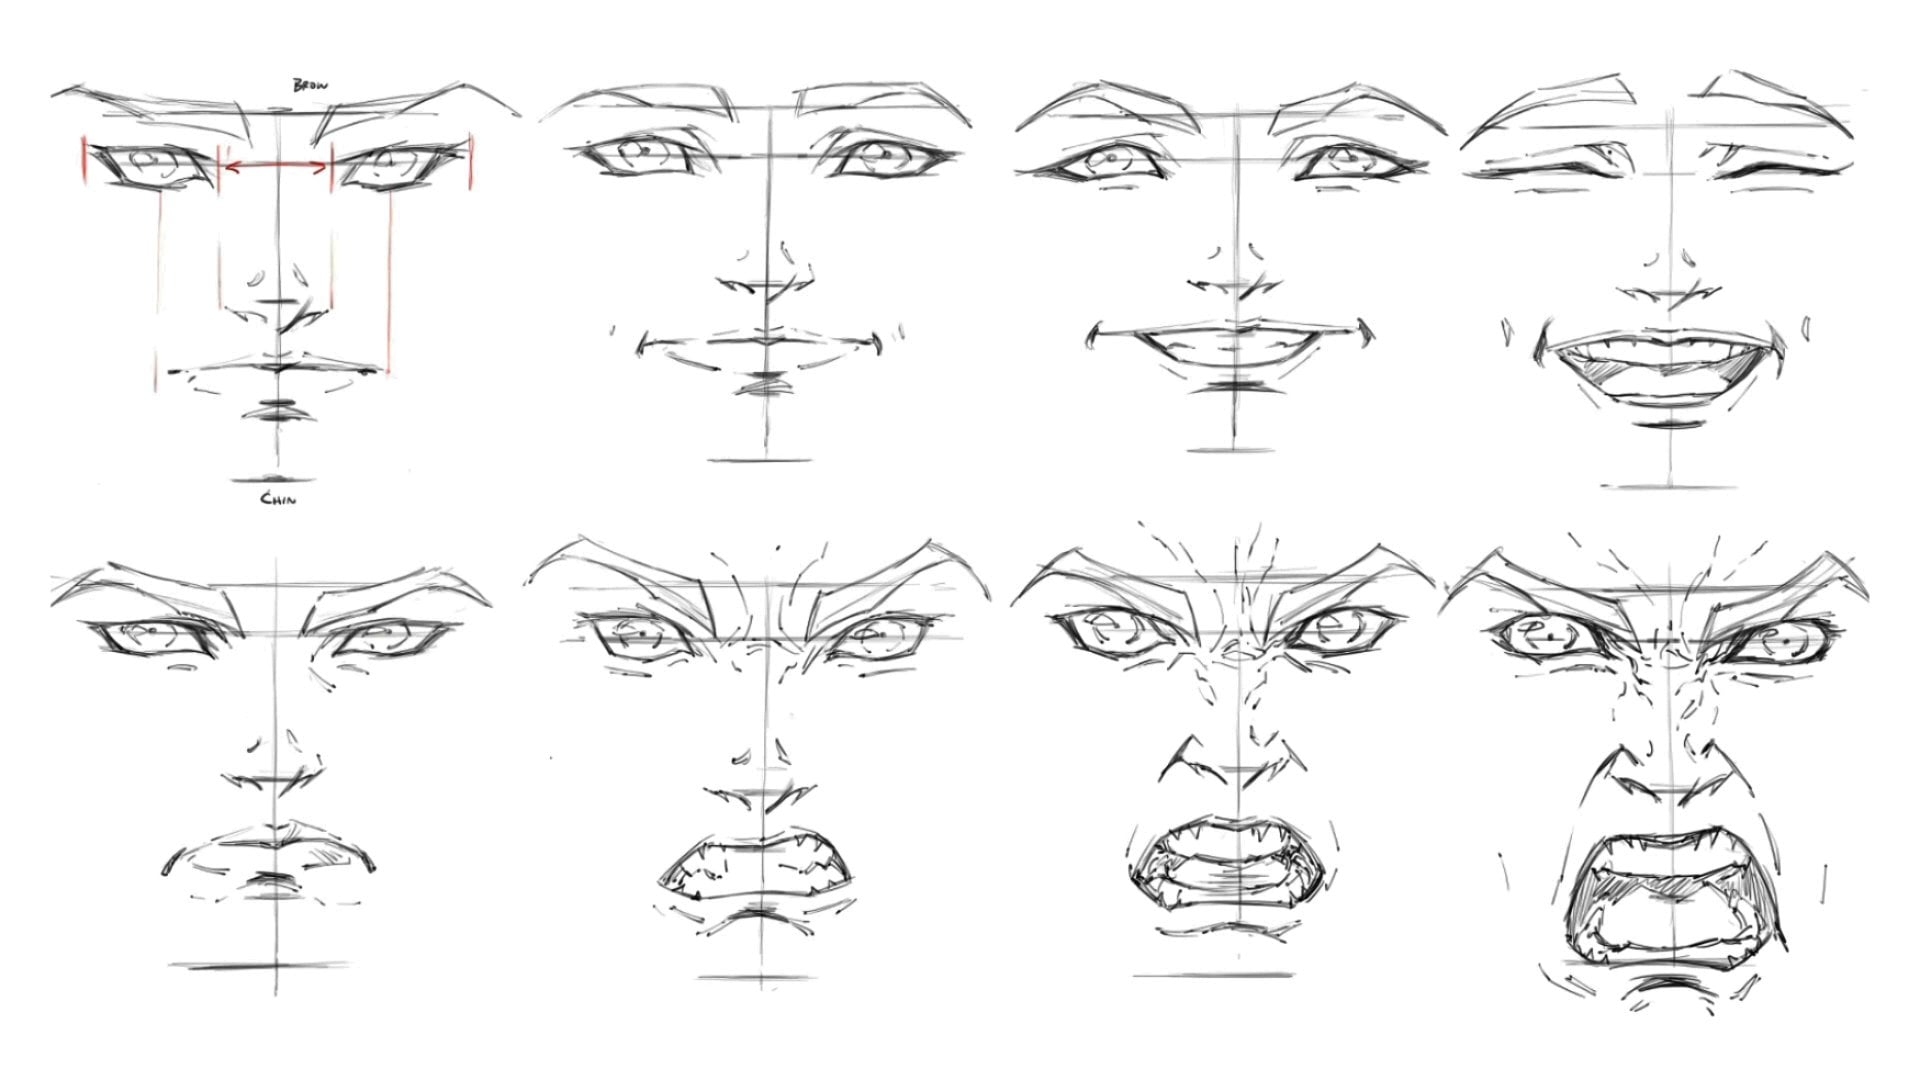
are going to be. Now if we take the distance
between the brow line and the chin and then we
divide it in half. That's where we're
going to find the nose. I like to make sure that i'm, I'm making those
connections throughout the face that are making
those associations. So that when I start to turn the head and space and
represented on a different angle, even though it's going
to be foreshortened, finding the positioning
of the nose is still fairly
easy because I go, Okay, well, I know that it just sits between the
joy and the chin. And so even when it's for
sure and that's going to be an easy anchor
point to establish. Next up. When we're looking at
the distance between the nose and the chin, were able to find them out by dividing that space
up into thirds. So I'm going to add a line here. I'm going to add a line there. Now you'll notice that
those thirds are unequal, so I'm going to
undo that or how? I'm not just going
to leave them there. I'm going to actually
make some corrections. I don't usually get this
right first time around. Sometimes they'll go
to do the wrong thing in order to do the right thing. So also be sure to keep that
in mind that it'd be very, very careful to get these
proportions correct. Do not skimp on the amount of attention and time that
you give to doing so. You'll find that you're
able to get ahead. That looks correct,
that looks accurate. Certainly take the
time to make sure that those thirds are equal and that the noise really is placed in between the
brow line and the chin. So we've got our thirds
placed in there. And I still think actually that I could raise that top
third up a little bit more. Remember, even though we're
making these measurements, if in the end the mouth
looks like it's sitting too high or the nose looks
like it's sitting too low. I'm going to make the
adjustments that I need to make in order to make the
two make it look correct. Okay, Wonderful. So we've got the
nose figured out. We've got the mouth
placed in there. Next up. It's time to lay in the ears. Now remember that it's the
top third, by the way, in this area below the noise that we are going to
be placing the mouth. Okay, so let's get
those ears drawn in. Now the ears are quite simple. We can just go for a
very general shape here. And the key things to keep
in mind is that the top of the ear will align
with the brow. And the bottom of the ear
will drop down to the nose. And that'll give us
the full length of the ear now as far as
the width of the year. Well, that in a
very similar way to the side planes is going to be a foreshortened
representation of the general ear shape because they do angle outward somewhat. So I was still able to see the interior ear anatomy
even in the front view. It's just a very, very
squashed and very, very skewed in comparison to when we're observing
the ear in the side view. Okay, great. So we've got most of
our facial features figured out as far as
where they're going to go. The final facial
feature, in fact, that we need to place in is
a very, very important one. It is of course, the eyes. The eyes are going to sit right in the
middle of the head. Again, a very,
another very easy way to figure out where they support
they're supposed to sit. So if we take the top of the head and we take
the bottom of the chin, and then we divide it in half, which I believe that
it'd be about here. This is where our eyes
are going to be placed. Just underneath the brown line. Again, depending on your style, those eyes may sit a
little bit higher, they may sit a little bit lower. It really is
completely up to you. You know, you think
about an enemy head for example, or a manga head. And you'll notice that their
proportions d2 are far away from what we're covering
here in the Loomis method. And so stylistically, those proportions and
the shapes that you pick for your characters is completely up to you
to start with this, if it's all you've
got, for sure, use it as a base, but then branch out and really
make this method your own. Except what I'm going to do
is placed in the hairline. Now the hairline will run on the top of one side
plane to the other, right across the head. You'll notice that
my site side planes aren't completely level, so make them level
if you need to. I'm just going to draw
it straight across and pretend that they're level. There we go. I don't get a perfect and
that's completely fine. That is just the nature of
being a comic book artist. I think that's the conclusion I've come to because nothing really works out
100% of the time. Right? Once we have got the
hairline placed in, let's run the neck. Now this is another
key difference between men and women is that men will typically have a little more muscle
mass around their neck. Especially a fit man. Simply because That's the way that their bodies are designed. So we'll draw in the neck here, and they've also got larger
trapezius muscles as well. So the trapezius muscle usually I look at
the midway point of the bottom edge of the
jaw and I know that if I draw a line down
like so from that point, that's usually
where the trapezius muscles are going to begin. Now this is a heads workshop, not a neck workshops. So I'm only going to be showing you minimally what you need to think about when it
comes to drawing in the neck. But I do think that the neck
is still very important for heads because it can change the vibe of the
head very much So, especially when it comes
to drawing men and women. Now keep in mind, of course, there are different
representations of the head beyond just
male and female. You've got a lot in between. You've got younger
looking people. You got people of different genders and
different sexes and whatnot. And there's a large variety of different sorts of heads
that you can work with. So keep in mind that all of these proportions and all
of these head shapes. You can change to
suit your needs. We don't have time to cover
all of them, of course. But the idea is to give you
the standard ones so that you can push and pull those, those basic measurements
that we've come up with here to create something
which is more unique. Okay, so we've got our
basic head Foundation established now. And by the way, in the later
lessons of the workshop, what I'll be showing you is how to throw this out the window and completely customize the head in order to come up with
something very different. So we need to know what the standard defaults are to begin with in order to
give us a place to start. Once we've got the foundational
head generally drawn in, it's time to establish the facial planes
of the head planes. Now, I'm doing this in a
very basic and simple level. Okay? Not to the degree
where you would you'd be able to I guess, like the head effectively. I'm mostly do this to just get fairly simplified
understanding of what their heads
geometry consists of so that I can just turn it in space a little
bit easier to figure out where the face will
sit in comparison to the side of the head
and that kinda thing. It helps me to be able to turn
it around inside 3D space mentally inside my mind so that I can project it down on a page a little bit easier. So I'll place in the
side planes of the face. Now, in this division
actually separates the front of the face from
the side of the jaw there. Once I've added this,
these n, Again, you can see now
where the face area of our character is going to
be thanks to these planes. And this becomes especially
important because later on when we start to view the head from above or below, what's going to happen is that we're going to see
this general area where the face is going to be. Let me shade it in
very roughly for you. We're going to see how that
starts to foreshortened, how it starts to
shrink or stretch, depending on the foreshortening
that's applied to it in the viewpoint
representation that we're going to be
presenting it on. Wonderful. So this completes our foundational head
model planes and all. Next up, let's go
ahead and actually draw in the facial features. So I'm going to
start with the eyes. I always like to
start with the eyes because they are the
windows into the soul. And so, because we pay the
most attention to them, they intrinsically tend to have more importance
placed upon them, even for us artists. So for male eyes, I tend to keep them
fairly small actually, and that is a stylistic choice. I'm a bit of a nineties
fan of comic books. And if you think
about artists like Rob life field or
max over history, you may or may not be
familiar with their work. They used to draw
very small eyes for their characters that
were set far apart. So I'm going to go ahead and
draw out some small eyes. Something like this
will work well. And I'm just going to start
out with the outline now, as I said before, if you do nothing else, in order to practice
drawing eyes, simply use this shape and draw it over and
over and over again. We've got a line
here for the NRI, a line here for the outer. I. Put a line for the
top, slightly curved. And when we've got a line for the bottom of the eye-opening, see that it curves up
and around to the duct. Now, that basically
consists of 1234 lines. Practice that basic
shape and what you can do once you've
got that shape down, you can very easily start placing in some darker
lines around it, some eyelashes in order to bring more attention
to the eye and embolden it and really bring
it through to completion. Even with my male characters, I like to indicate
some eyelashes. And it really depends on the distance to which
you're looking at the head. Sometimes you'll
find that you're just going to darken up
the outline rather than actually define
individual eyelashes simply because you may not
see them from a distance. I'm going to go over the top of the eye that I've drawn up here. Real quick to show you how it
might look when completed. And I'm refining the
shape here, of course, as I go over the top of it, just to really polish it up. But that's about as the amount of additional definition
that I would give it. So let's do the same thing to the opposite side of the
face will lay an I in here. And it's going to be an
exact mirror representation of what we drew up on the
left-hand side of the face. So we'll get the
opening generally drawn in using our four-line, very basic shape that
we've been learning about. It. I just loved this, simplifying it down because it makes us so
much more easy and because it's thinking about
it in a very non-complex way, it makes it a whole
drawing experience so much more enjoyable. Because all of a sudden
you're not overwhelmed. You're not really overthinking anything and you're
not guessing. I think having to guess, leaving this stuff up to chance every time you
put pencil to paper, it can be a real problem. It can be discouraging
because you don't always get a consistent outcome
from doing that. So what we were
trying to create for ourselves as a default library
for the facial features. And of course, the, the fundamental edge structure itself so that we can focus on the more creative
aspects later on of what goes into a
memorable looking face. Okay, so we've got our other eye-opening place
down there now. I'm going to just as
with the other one, embolden it a little bit, indicates some subtle
eyelashes on the sides. Now keep in mind if
you do thicken up the eyelashes on your
male characters, they'll tend to look a
little bit more feminine. That's completely fine if
that's what you're going for. In fact, sometimes you can, you can add thicker
eyelashes or darkened eyes. I outlines to villain
characters, male or female. And that will tend to work
pretty well actually. Some reason, I've found
it does anywhere. You think of GFR from
a Latin, for example. Okay, Cool. We've got the
eye-opening placed in. Now let's go ahead and draw in. I'm going to yeah. Okay. Let's go ahead and draw
in the pupil and the iris. I was going to leave
that till later, but I think we can
draw it and now I'm going to start
out with the iris. I'm going to very lightly
just sketch that in there. Then I'll lay in the pupil. And what else I can
add to the pupil is a reflection within the eye. That reflection, specular highlight will give
the eye a wet look to it, which the eyeball tends to have. Certainly don't want dry eyes because that'll make them heard. So it will do that
for both eyes. And again, one of the
biggest challenges when it comes to the front view, the head is just
maintaining that symmetry, not just within the
shape of the face, but also the placement of the facial features
and their shape. Now, usually what
you're going to find is that you want to have an eye width
between each of the i's. And so looking at mine, they're probably set a
little too far apart. So what I'm going to do
is I'm actually going to erase this one and I'm
going to move it in. And the reason that I'm taking the time to erase it
rather than just making a selection around it
and moving it in Word is because I want to show you that it's actually not that much of a big deal to just
redraw something in their incorrect it,
it's totally fine. It's, it's certainly worth going back and correcting things if you see they need correcting. Don't ever just leave it. Because if you just leave it, you lose out on a
very valuable lesson. But even more than that, the outcome of your work. Well, in my opinion, it's only as good as
its worst aspect. And so the reason I say that is for your
sake because you'll always be able to see
the mistakes within your work even if
other people don't. And so her make sure
that you fix them. Otherwise, they'll always be
there when you look at it. At least that's my philosophy, so I'm sure you can
relate with it as well. I know that one of the worst
things in the world is when I go back to an old piece
of artwork and it just, it's, I knew that I could have
done better, but I didn't. I was lazy. Never be lazy with your work. Value. The fact that you're able to do something that most people
can't do very well, which has actually draw
especially faces in this case. We've got that shape
drawn in there for the I will redraw back in iris and the pupil. Little reflection and see that that really
took no time at all. Now, you also want to bat an eye width between
the eyes in the ear, the outer ear as well. At least that's the way I'm
gonna try like to measure it. But sooner or later you
won't need to really measure anything because you'll
just lay it down on the page a little look
right, or it won't. Next time what we're going to
do is draw in the eyebrow. And the eyebrow. Like the eye, is made
up of four sides, essentially, maybe
with a fifth corner. But what you'll notice
is that on men, typically the eye
brows will be set down lower on top of the eyes and they'll
also be a bit thicker. So what I'm going
to do is start off by drawing in the bottom
edge of the eyebrow. Taking it down from the actual initially
established eyebrow guideline, setting up closer to
the top of the eye. And then I'll draw in the
top edge and the outer edge. Once again. If we go over here to the side and do an
example of the eyebrow, if you just practice
this shape alone, you'll get used to it's
general structure. You'll notice that even
though it's four sides, those sides are
actually quite curved. While the edges or the corners are left
very sharp rather. Okay, so that's the shape
that you want to practice. That's the shape
that you want to capture as accurately
as possible, because it all really
comes down to shape. Ultimately as far
as the solidity of your drawing and how good
it's actually going to look. Everything is really
dependent on shape. If you capture a good shape, it doesn't matter
what you add into the interior of that
particular element. It'll look good. You think about those more
simplified styles that really don't have a
whole lot of rendering applied to them or
anything like that. Getting manga would be
a really good example. I mean, even get very complex
styles of monger of course, but you get what I mean, like sometimes it's just
the silhouette alone that really makes a
piece look amazing. So we'll do the same thing on
the other side of the face. Boring in that eyebrow. Sitting at very low
down to the eye. And I'm also adding in that additional corner
on the bottom edge. To finesse the shape a bit. I'm going over the top of
the outline of the eyebrow here to define its shape with a further
amount of vividness. And then after I've done that, I'm going to start placing
in some eyebrow rendering. And this eyebrow
rendering is going to represent the clumps
of eyebrow for on the, I give it some texture
and some additional, I guess you could say value because the rendering that
we will be placing in here will actually
darken the tone of the eyebrow to an extent. Now because we're dealing
with here, essentially, we want to make sure that we make it look as
natural as possible. And the way in which I do that
is I tried to ensure that these render lines
aren't too uniform, that some of them
are sitting close together and some of them
are sitting close apart. Now that dark rather close
together and far apart. So I'm trying to mix up the amount of distance that I'm placing between them. And in generally
ungrouping some of these lines together,
separating others. The idea is that
we want to also, as far as their
direction is concerned, comb the eyebrow
rendering back into the into the direction that the hair is supposed
to be flowing in. So you'll notice that actually combing it back toward
the end of the eyebrow. We'd go wonderful. So we've got our eyebrows
store on in them mixed up. Let's go ahead and
place in the noise. Now. I'd like to drop the bottom
of the nose and just below the noise guideline
that we've placed in rather than
sitting right on top. So usually I'll start out with a very simple line on the
dark side of the nose. Say Look, my light source is
coming from the top-left. Well, that would cast a shadow
on the bulb of the nose. So that is what I'm representing here with this single line. And again, I'm dropping it
just below the point at which I establish the positioning
of the nodes initially. Next up, I'll draw an a nostril straw look a little
bit like this. Natural opening. And then I'll leave it at that. And I'll place in
the other nostril, the dark side of the
tip of the nose. And that's really as
complex as a hey, I make the base of the nose. This is where most
of the detail, mostly articulation of the nose is going to come into place. So over here to my
left-hand side of the head, if I was to draw out the base, that knows, he is the most
simple way of doing that. The openings on either side. Now, if the light direction is coming from the
top-right instead, well, I would simply
placed this contour, this line on the opposite
side of the nose. So it would start here. I draw in the nostril
opening on the light side. And draw in the nostril
opening on their dark side. Because what's
actually happening in this area is we're getting a slight shadow contour being created from
the bulb of the nose, which anatomically it
looks a bit like that. As far as the underlying
cartilage is concerned. Again, just something
to keep in mind. Those which will help you to
draw the nose accurately. It's very stylized
looking nose, of course. You may have your own way of drawing noses that
works for you, that captures the
look you're after. You don't necessarily
have to draw in my style, but I am showing you how
I executed for sure. Next up, what I do is
I add in a little bit of an indentation around the
top of the bulb of the nose. Like so. Ends. I'll also add in another
one on the opposite side. Just to indicate on an extremely subtle level the anatomy that's happening within
that region of the face. Then I'm going to start to add some subtle rendering around
the eyes and the brow, where it leads into
the top of the nose. So I'm going to drop a line down from the
underside of the brow, which intersects
with the front of the eye and the inner area. And I'll do that on both sides. I like to tackle both sides
simultaneously because again, we want to maintain
that symmetry. And if I do something
on this side, I want to do it as
soon as possible on the opposite side so
that I don't forget. And I'll add in some subtle, I like to double up
my lines sometimes. And all that that really means
is if I lay in one line, may lay in another line
right next to it just to give an appearance
of thickness. You'll notice that
I did that with the indentations of the
nose and the dark side. Again, it's just one line and then another line just to create an indented
appearance or look of thickness to a single contour. Next up, I'm going to indicate the eye sockets by drawing a
very light and subtle line. Now, this is an
extremely light line. Keep that in mind. I'm barely touching the stylus
as I draw that in, but it is enough to indicate an indentation within the form. Okay, great. And I may add in a subtle
line here as well. One that's not doubled up just to indicate the eye
socket on that side. And that's really
all that you need to add in to the male face. Now if this was an older
looking character, one that was a little
bit more chiseled. Or sometimes if you add too much detail to a face that can actually cause it to look. You could almost say
unattractive or, or disturbing in some cases, a lot of the time with monsters, for example, or villains, you'll notice that
they have a ton of detail added into their face. I tried to keep it as
subtle as I can now for somebody who loves
rendering as much as I do, that can be tough sometimes and I often find that I overdo it, which is why I intentionally tried to hold back
as much as possible. Wonderful. Now that we've got the nose and the eye is drawn in there, let, let's place in the
opening of the mouth. What's so cool is
because we've already plotted out the placement
of these facial features. We really don't have
to think about it. There's no guesswork that
goes into it anymore. We figured it out. And so now we can
completely focus all our brainpower on just
drawing the facial features accurately rather than trying to figure out the
proportions of the head and where they need
to be positioned. And we freed up mental RAM by putting in the planning first. Alright, so we've got
our mouse opening here. And I'm just going to
start from the middle. You get out into the
corners of the mouth. Now, I should mention
that the width of the nose is going to be
about one eye width as well. So it's going to sit directly. Between the eyes and as far
as the length of the mouth. Well, I like to bring the
corners out to line up and just short of the
middle of the eye. Okay, and I'm going to
do that on both sides. So it almost, almost lines
up with the pupil and the iris or the
middle of the eye. So if I was to draw this up over here to the
side of my head, Again, I start out with
the middle of the mouth, which has a little dip in it, right in the middle of
the top lip that I draw out the corners where I draw
out the rest of the mouth, leading them into the corners. This actually
determines the shape of the mouth trajectory
of its opening. Sometimes it can be sad, sometimes it can be happy. And ultimately this
contour here is going to represent
that either all. Once I've got the opening
of the mouth drawn in, I can start to draw the outline
of the lips and I'll do it up here in this
larger example just so that you can see it
really easily add in a little indication of the top lip outline right
at the top in the middle. And then I'll add in light outline indication of the lips outline toward
the corners of the mouth. And then placing a much
darker outline fraud the base of the bottom lip. And that's because
a lot of shadow tends to collect underneath the bottom lip as it leads into the underside
plane of the mouth, muzzle, which
ultimately connects onto the top of the chin. And sometimes you may add in, once again a little bit
of an indication to the outline of the bottom
lip around the sides. But I really don't make it
any more complex than that. Or to find on that, especially
on a male character. Because again,
defining the lips is more of a feminine attribute that you would add into
your female heads. Because women tend to look, tend to wear makeup. Lipstick starts as mascara, which is the reason by the way, for them doing that is to accentuate those
facial features, the most expressive facial
features on the face. And so it's, it's actually a really good thing to add
in there if you want to draw attention to the features
of your female characters. For our dude's though, we really don't want
to focus on that. We want to focus more on shape. Anything else. So I'm going to add
a little indentation up here at the very
top of the mouth. I'm going to darken
up the corners of the mouth opening and lead the outline of the top lip
down into those corners. Same thing on either side. And then we'll place in that nice dark outline
into the bottom lip. And we can add in some rendering
directly underneath it. Just to show you that
indeed the anatomy within that area does recede
into the top of the chin. And now I'll play C an, a subtle indication of
the bottom lip outline. The bad. Does it? Great. Next up, let's draw in
the anatomy of the ear. Just going to
outline the shape of the ear a little bit more. And I'm going to basically just copy what you see me doing here to begin with. Because when we jump into
the facial features lesson, I'll be going over
the ear anatomy and much, much more detail. Now. I'm inviting
you to learn it in the same way that I learned
at which is just a copy what you see and redo that
many times over, as simple as that sounds. So we start out
with the outline, with the outside
shape of the ear. And then we've got some
interior anatomy going on. And one of the first areas that you're going to see when it comes to observing the
anatomy of the ear, is this, it's almost like the inner frame of the outside shape of the
ear that you're placing in, which actually leads into a
Y shaped piece of cartilage. And in this view, that's going to be
extremely foreshortened. Now we'll get a better look at the interior anatomy of the ear and the side view,
most definitely. But for now, we're going to
be looking at a very skewed, very squashed appearance
for the ear anatomy. Next up we've got
this other line that that completes the Y-shaped
piece of cartilage, which will lead up into
the ear opening cover. Then we've got the ear hall that actually sits just
underneath it. And then the reason that
this is a y-shaped piece of cartilage is because it's got a little indentation in the top, a little dip that will
articulate there as well. Great. Next up, let's do the same
thing on the opposite ear. So you kinda get extra bang for your buck when you're
drawing the front view of the head because you're
doing everything twice over your drawing
the eye to eye or so, you're drawing a note,
the nostrils twice over, the ears, twice over. So we'll start out with
the basic year shape. And then we'll draw in
that interior frame, which partially makes up the
Y-shaped piece of cartilage, leads down into the ear lobe. And then we've got
the interior of the Y-shaped piece
of cartilage will draw that down into
the ear opening. There's a few bumps along
the way, of course. So we want to add in there to the ear is a very
organic looking, strange piece of anatomy that
we're adding to the head. Probably the most
complex of the mall, but also one of the less
observed facial features, which is why the
eyes and the mouth, even though they're
fairly easy to draw, can be quite difficult to
capture completely accurately, sometimes jus
3. Portrait View Of The Female Head: Alright, so let's
move on to drawing up the female head from
the front view now, let's male head his jaw line. It's probably a little
bit sharper than I actually would normally do. But I guess it's serves as the example that I was
trying to present anyway. Okay. So female head going
to start out very much the same way that male
head started with, you guessed it, a
circle, sphere. And I'm going to lightly
sketch that out. Again. It's, the sphere is a very wonderful
warm-up techniques that really gets you
going with the head. So thinking about drawing a head in its entirety
right off the bat is something which makes
you a little bit nervous, gives you a bit of stage fright. But if you break it down
step-by-step and you go well, it really just starts
out with a circle. Well that's not
too hard to draw. That's not going to
be too stressful. It takes the pressure off. So if you're procrastinating
about drawing a head, just start with the circle
and then before you know it, that circle is going to snowball
into a full-blown head. Alright, so we've got the
axes established now. Let's draw in the
horizontal guideline that wraps around the
belly of the sphere, dividing it up into four pieces. Much like you might slice up an apple pie or a small pizza. Try to make those quarters as equal as you can
possibly get them. We've got another vertical
guideline that all run from the bottom of the
sphere down to the bottom. That's going to represent
the front of our face. And then we will
chop off the sides. It will take those
in a decent amount. From the side view. Of course, those planes would actually
be completely circular. But because we're looking at a foreshortened representational
them in the front view, they become very narrow ovals. Once we've drawn them in there, we'll add a vertical guideline that runs from the top
of them to the bottom, showing us where the side
of the head would be. Then we are going to drop this middle line
here that represents the front of the face down to where we think the
chin should sit. Now once again, as I
mentioned with the male head, you can of course measure
out the top two thirds of the face by drawing a line from one side of the
head to the other, starting at the top of the side planes and then drawing another
one at the bottom. Again, if I was to actually go ahead and demonstrate
that for you, we can draw a line
across the top of the cranium at the very
top of the side planes. And we can do another
one at the bottom. This would be one, two-thirds, and then we simply drop the
chin down one more third, which I think I'm actually
going to do here. That would give us
the full length of the face with the
proper measurements. Sometimes you can just eyeball it and that's completely
fine as well. That'll work out just just
the way you want it to. Usually. If you do need to adjust it,
that's totally fine. Just adjust it as needed. This is all very customizable. Push it, bullet, squash it
in whatever way you want. Think of this foundational
hedge structure as Plato, essentially. Alright, so once we've got the length of the
face established, let's go ahead and
draw in the jaw line. And because we are drawing
a female head here. Well, what does that mean as far as the Julian is concerned? It means that the corners
of the jaw are going to be much more softer
and curvaceous. While at the same time, the sides of the jaw are also
going to be tapered inward. More they're going to have at an angle applied to them are more steeper angle applied to them as opposed to the male jaw, which comes across as
a lot more square. So we're going to start
with the sides of the jaw line, pulling them in. And then once we get
down to the corners, which as I said, I like to usually align that
with the base of the sphere. I'm going to keep the corners
of the jaw nice and curved. And then bring the bottom edge of the jaw down to the chin, which will be narrower. So the chin of a woman is not as broad as
the chin of a man. So what we end up with, if you really wanted
to simplify it down, the differences between men and women as far as the
jaw is concerned, is men square looking
jaw while women have. A triangular looking jaw
on a very symbolic level. Okay, Wonderful. So
we've got our draw, a line drawn in. Excellent. Let's go ahead now
and pull it out with a facial features
are going to sit. And here's the thing,
the proportions of the head don't really
change at all, regardless of whether or not you're drawing a man or a woman. Woman. So we take the distance between
the brown line and the chin and we
divide it in half. That's where the noise
is going to sit. And if we divide
the space between the nose and the
chin into thirds, one, 23, that gives us the
positioning of her mouth. And their mouth opening
will sit on the top third. The top of the chin will
sit on the bottom third. Sometimes you're going to lift
or lower that depending on how their face is looking as you draw in the
facial features. But I think that's going to
work out just fine for us. Next up, we'll
place in the ears. The top of the ear is going
to line up with the brow. While the bottom of the ear
will sit on the nose line. The distance between
the brow and the noise equals the
length of the ear. I am drawing in the general
shape of the ear here, but it is a foreshortened
representation of its full shape, which we will get a much better look at when we're looking at the profile side view
of the female head. Okay, fantastic. So now we've got the
ears drawn in and let's get the eyeline established. You take the top of the head, the bottom of the face,
we divide it in half. That's where our eyeline
is going to sit. So I think that
would be about here. Going to the eyeline in-links, running it from one side
of the head to the other. Next, we'll get the
hairline stablished. Morning a line from the top of one side plane
across to the other. Then we've got the head planes. So we're going to add
a diagonal line that runs from the top
or the brow down to the eyeline on either
side of the face. Then we'll create
another division between the front of the face
and the side of the jaws, which run along
the cheekbone area and around the
sides of the mouth. I'm keeping that
nice and curved. And on a male character, this would be usually
if I was going to wear, I would define the cheek
bones of the character. But on a lady character really these guidelines are
only going to serve the purpose of giving me that basic three-dimensional
representation of general structure. Okay, next up, we'll
draw in the neck. Now this is another key
difference between men and women. The neck on a woman is going to be thinner or less muscular, less of a tree trunk. So it's going to have some, some elegance to it that you just can't see
them in a male head. The trapezius muscles
are also going to be much lower, less puffed up. As I mentioned in
the previous lesson. The female head
shares in common with a younger looking head, is some of these
characteristics, which is the smaller neck,
the softer features. In order to get a more
mature looking woman well, you then you may start adding in some of those more
masculine attributes. And the neck isn't completely
symmetrical right now, so I am going to bring
it in just a bit. That symmetry can be quite difficult to capture sometimes. So always be wary of it. Always be paying
attention to it. Wonderful. So we've got the
basic structure of the female head now drawn. It's time to place down
the facial features. And the eyes are pretty much going to have the
exact same shape. It's just that
they're going to be a little larger,
slightly larger anyway. However, they're not going
to be that much bigger. So don't go too crazy. With the size of the eyes. We're going to start out with
the NRI place in the top. And we'll draw in the bottom. And you can see that rather
than making these eyes wider, I'm actually making them longer. Opening the eye
more essentially. I'm going to do the same thing on either sides of the face, just establishing the
opening of the eye before I started going
in and adding in the eyelashes and all of the other details and really bringing that high
through to completion. The reason that I want to sketch both of them out first is just so that I can get
the positioning correct, the amount of space
between them accurate, as accurate as I
can get it anyway. And if it ends up being inaccurate because I haven't really gone ahead and
refined anything. I can just erase it and
start again if needed, without having invested
too much time into it. But that looks
about right to me. So what I'm going to place
in now is some eyelashes, and I'm going to
make these eyelashes are quite large and brushy, which will bring additional
attention to the eyes, but also make them
look more feminine. And keep in mind that
you're going to have different kinds of eyes
for different kinds of characters or something
male characters do have eyes that are less wide and actually more, more closed with a greater glare and they look a little bit more, well, less cute, you could say, like wide eyes tend to
look more innocent, whereas sincere looking eyes tend to be closed
a little bit more. And so, depending on the sort of vibe you want
your character to have, you want to play around with the different visual
interpretations and associations that
you can incorporate into your art work
that other people, onlookers are going
to relate with. Because make no mistake. Especially in comic books. What we draw is all
visual communication. And so we want to make sure
that the interpretation that our readers
or viewers have, what it is we're
showing them matches up with our Aaron tensions. We want to get the ideas to come across and are very clear way. And that's why as
cliche as some of these decisions you
might make when it comes to presenting male and
female characters. Cliche is really
just a bucket of pre grouped ideas that
everybody can relate with. And so incorporating them into your work is
certainly not a bad thing. In fact, if you try to do
anything too new to unique, that is unfamiliar
to the audience, they'll tend to
shy away from it. They'll tend to not
find it as appealing. Unfortunately, I wish
that wasn't the case, but it does tend to be. And you'll learn that not
only with comic book, but in all forms
of entertainment, that tends to be the case. People generally don't
like to think too much. They don't want to
sit there and try to work out what it is
you're showing them. They want it to be as clear as possible so that the message
gets across in an instant. So always be thinking about the clarity of what
it is you're drawing. Whether it be a face, whether it'd be a full-on character. But it especially with faces where most of the
attention is going to be placed with someone who
is looking at a character. You really want to incorporate the message as clearly as
possible right from the get-go, because the head, the face, is the first impression
of your character. And if you want to leave
a good first impression, a memorable first impression, then you really
want to nail it as, as much as possible. So you can see that
I'm actually outlining the eyelashes before I go
ahead and fill them in. So I'd suggest you
do the same thing. Again, break it down into steps. Establish the eye-opening first, and then draw in the
eyelash shape around it and then fill it in. I think that capturing
a good shape for the eyelashes
of your characters is certainly worth
paying attention to. And in giving the time. As I said before, it's
shape is everything when it comes to stylized
comic book artist, especially with the
added no amount of rendering or detail, will actually help to make your artwork look
vivid and look, look solid. You've got to have that shape. You've got to have
that strong silhouette because that's what
people take in first. Visually, they only pick
out the details later on. I have had a general overall taking in of what it is
you're showing them. Great. So we've got the
outline of the eye is now drawn and we've got the
eyelashes placed in around them. Next up, we'll draw in
the iris and the pupil. Going to try to make these eyes. So I'm thinking one slightly
bigger than the other here. So I'm going to go ahead and just give this one
some extra width. There we go, a little
bit of tweaking. That's a game. Alright, so it would run
the iris and the pupil. Starting with the iris. And you'll notice
that I'm not sitting in the iris right in
the middle of the eye. I'm actually setting it up underneath the eyelid somewhat. Rest because the top eyelid
is always going to rest over the ice somewhat. What does the same thing
on the opposite side? In fact, if you were to place the iris and the pupil right in the middle of the eye. What would happen is you'd get a very surprised
looking character, is when someone's surprise, their eyes widen, that
upper eyelid comes, sits higher and reveals
more of the eye. Okay, Wonderful. So
we've got the iris and we've got the
people placed in. Now let's build out some of the anatomy around
the eye itself. I'm going to place in this
line here that intersects with the top contour
of the eye-opening. And I'm going to draw
another line above that. And that's what's going to create the top eyelid
essentially right here. We'll do the same thing
on the opposite side. And it's good to show the top eyelid of
a female character sometimes especially
if they are wearing some form of backup like
eye shadow, for example, you can really, with the
help of a colorist that in enhance the feminine
quality of the head. Next up we'll draw on
the eyelids, eyebrows. Eyebrows on a woman are
going to usually sit a little higher
and be less bold, less brushy.
There'll be thin up. Now in funnily enough, in fashion these days
are thinner eyebrows isn't necessarily in Still, in comic book art being
a stylized format. You want to get those
visual associations as established as
possible within your characters so that
you can enhance them and really push the idea of
what it is you're showing. And so if we're making the male characters eyebrows
nice and bold and brushy, then in order to
create a distinction between your female characters
in your male characters, then you want to do the
opposite on a woman. Once again, you'll
notice that if you do give your characters
secret her eyebrows, which is totally and
absolutely fine. If you're doing that for
your female characters, they are going to have a more masculine appearance
associated with them. And that may not be
the case for you. You may look at them and
go, Hey, you know what? I think it still looks
like a female character, but it's not just
about what you think. It's also about
how your audience is interpreting what it
is you're showing them. So no matter what it
is you're drawing, try to always keep that in mind. So just as with the
male character, we were drawing out the overall shape of
the eyebrow first, giving that a nice defined
and vivid outline. Then we're drawing in the more subtle render lines
to indicate eyebrow texture. And for combing those
eyebrow strands back in the direction that we want them to be flowing
on the eyebrow. Next, let's move
down to the nose. Once again, if my light direction
is coming from up here, then I'm going to
cast a shadow on the tip of the nose based
upon that light source. So I'll start out with a
lion that drops just below the positioning of
the nose that I established in the
foundational stage of his head drawing. And I'll draw out an opening and nostril opening, the nose. And remember that the width of the nose should equal
the width of an eye. So it's sitting right
in-between the eyes here. I'll do the same thing on the opposite side
of the nose tip. Alton knows bulb if you will. Placing in another
nostril opening. Next up, we'll lay in a slight indentation to show
the top of the nose bulb. And some indicates some of the anatomy around that
region of the nose. And then another little
subtle indentation on the opposite side. As far as female noses go, I'm pretty much not
going to add in any additional
detail there either. On a male, as I said, I might go ahead and articulate some of
the anatomy around the bridge of the nose and
whatnot, but not here. Not with a female character
is otherwise, as I said, it just ages them or causes them to look
more masculine than. You may want your female
characters to look, or it can simply make
them look more blemished. And we might add a little
bit of a Nika detail here just around the bottom
edge of the eye socket. But that's about it. You're going to get rid of some of some of these
rendering up here. Okay, Wonderful. So that's the nose, the eyes, and now what's
left is the mouth. So we'll start out with
the opening of the mouth. Right in the middle there. We got that dip. From the dip will pull out
the corners of the mouth. You'll notice that
the darkest area of the outline of the mouth
opening is in the middle. And also add the corners. I'll thicken up the outline
again and make it darker. So I am applying some
line weights here. And although line weight is, is just a variation thickness along the contour of the lines
that you're laying down. So in some areas it's
going to be thinner. Some areas it's
going to be darker. As I said, usually when
it comes to the mouth, I like to really
a nice dark line happening right
around the middle. In-between the middle
and the corners are usually send it out
as you can see here. Now, another major
difference between men and women is the boldness or the apparent boldness and
definition of the lips. We want them to look plump. I want them to look juicy. I used to draw
really thick lips on my female characters
funnily enough. I've actually seen
them out a little bit over time to
give them more of a realistic look rather
than a stylized look. So we got this little
dip in the middle, right above the middle
of the mouth opening. Then I'm going to pull that back into the
corners of the mouth, creating the outline
of the top lip. And I'm going to do
that on both sides. It's I've done that. I'll lay in a line for the bottom lip in place in
some rendering underneath it. I'll also outline
the bottom lips somewhat around
the sides as well. Now what you can do is
add in some lipstick or imply that there
is some lipstick there with some
additional rendering. The way in which I go
about that is I just start laying in some cross
hatches on the lips. Now you don't have to do
this. You really don't. If you look at the art
of Michael Turner, for example, he'll leave lives of his characters
just bear like this. And that will work
perfectly well. I'm me because I'm a bit of a render feigned and I love
adding in those details. I will usually try to darken
them up with some rendering. I still try not to go
overboard, of course, you can also add
in a reflection to the lips as well just to make
them look wet and shiny, similar to the eyes. Okay, Great. So
that's the mouth of our female character
looking pretty good. Next up, we'll tackle the ears. Will focus on defining the
outline of the ears first, creating a nice vivid
shape for them. Before we start to tackle
the interior anatomy. We've got the outside
frame established now, let's draw in the inner frame. She's going to curl
back inside the ear. And we've got the Y
shaped piece of cartilage that leads down
into the ear lobe. And then the interior contour. That y-shaped piece of cartilage which leads up into
the ear opening. The ear hole itself
right underneath that would do the same
thing on the opposite side. Now, again, curling that interior
E for airframe back into the underside of the wedge-shaped
piece of cartilage. I call it a Y shaped piece
of cartilage, as you'll see. I call it that for a reason. And it's especially
in parent when you're drawing the erupt from the side. But you could also
think of it as like a wishbone or twig. Once we've got the
ears drawn in though, it is time to define the outer shape of the head
and really polish that up, bringing the head
through to completion. Once again, I'm going
to curl the sides of her head around back into
the top of her ears here. Just so that we don't have this weird dome shaped going on. Okay, great. Next up, I'm going to outline
the top of her head. A nice dark outline around it. And again, what I'm
adding in here is essentially what you might
think of as a line weight. The certain areas that
you're going to want to really thicken
up over others. And it's a stylistic choice. It just add some
additional interest to the line that you're
laying down onto the page. So especially down
here where we're leaving it down into
the back of the ears. We can see can it up a
bit? Around the top? Again, we can think
in an up a bit. And it just makes
everything look. It takes it to that pro level. I remember when I first started incorporating line weights, it was a total game changer. It completely changed
the way in which my locked never went back. Okay, So now we'll define
the jaw line here. You don't have to click
completely covered out. You can also, you can still
add some sharp lines. It's just, you're adding
a few more there to fill out the sharpness
of the jaw line. And some people, they add
a very sharp jaw line to their female characters and that works sometimes
very well to like. For example, Mark
Sylvester, ease out work. Another very well-known
comic book artist. He uses very sharp Joel
lines for his ladies. And it looks great. I love it. So it just depends
on your style, although a lot of the time
and what works best for you. Finally, we'll darken up
the outline for the neck, going back over the top of it. And that completes
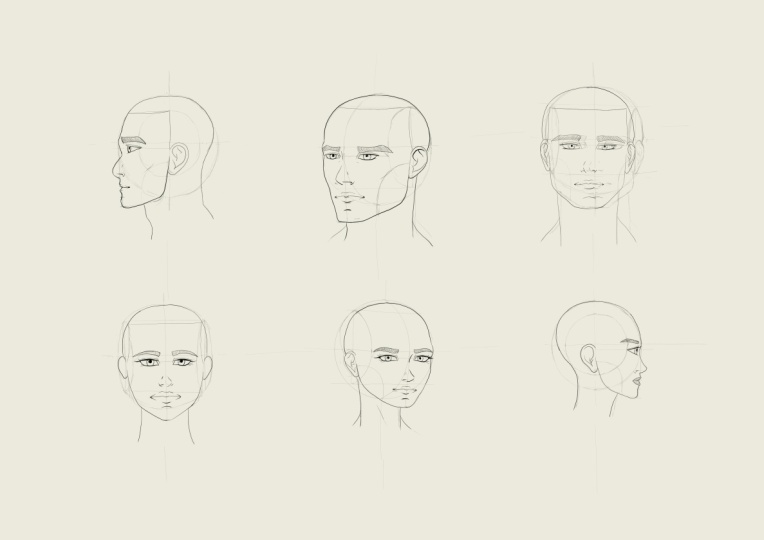
how female head as observed from the front. So what we're looking at is the front view of the female
headed and the male head. Differences between them. A few that are very
distinct and will either make your head look more feminine or masculine
depending on what it is, you're intending to
capture all your drawings. So just keep them
in mind and also focus on learning
the proportions of the head from the front view. Especially because
not only do you see where the facial features
land on the head, on the vertical axis? So how far down or how high up the facial features of place, but you also see how
far apart they are. So the eye is how much distance
is sitting between them, and the width of the nose, the width of the mouth,
that kind of thing. So it's something to
certainly take note of and study and practice,
practice, practice.
4. Profile View Of The Male Head: Now let's draw up
the profile view of the male head or the side
view of the male head, which is also known as aka. But it starts out in
very much the same way as the front view, which is the basic
circle to begin with, which we're likely going to
draw down onto the page. Take your time to get this circle as circular as
you can possibly get it. If it looks like a squashed
pancake or it looks like a balloon that's had all
the air sucked out of it. Then you want to try
to neaten that up and recollect is that it looks more like a bowl,
perfectly round ball. Now it won't be
perfect of course, but to try to do your
best. Okay, fantastic. Next step, what
we're going to do is I'm going to reposition
this head here. So it's a sitting
a little lower. Next up we're going
to place in the axes. That's just going to be, well, this head will be rotating at an eye level view and
straight up and down. So it's going to be
spinning vertically. Rather than on an angle. Next up, we're going to divide this head up
in the quarters, slicing it up like pumpkin pie or an apple pie or really any kind of
pie that you're like. We've got a vertical line and
we've got a horizontal line that will both intersect in
the middle of the circle. Next, we're going to place in the side
planes of the head. And here in this
particular view, we're going to get
a very good look at the full width of
those side planes. And you'll notice that in fact, what we end up getting is a smaller circle sitting
inside a larger circle. Keep in mind of course, that the side planes of the
head here are going to be a height that equals two-thirds of the overall
height of the cranium. If you need to
measure those out, then by all means do so. I've showed you how to do that
plenty of times over now. So I'm not going to
bother in this example. But it should look like
a car tire essentially. At this point, the
foundations for your side view profile shot of the head should
look like a car tire. When you reach this step. That's how I like to
think of it as any way or a really thin donut
will work just as well. Next up, we are going
to drop the middle of the face down to where we
would like to chin to be. And because the head is
looking in this direction, or I'm intending for it to
look in that direction. In the example here, the front of my face is
going to start from here. Dropped down all the way
down to the chin should be. I'm going to drop it
down to about there. Now again, just use
your eye for this. If you don't necessarily
want to measure it out using the method I was
teaching you before. The side view can be
very tricky in terms of capturing the correct
length for the face. And so that's why I like to
use my eye for it rather than actually measuring
it out because I find that it just comes
out too long locking. But even if I was to measure
out these two-thirds, what you'll notice is that 123 thirds is that I've taken the chin down about
an additional third anyway, so it is the proper length
that it should be really. And over time, what
you'll notice is that you become very good at judging exactly what these
proportions should be anyway, just through practice and
through recognizing via the repetition that
you've gone through what it should look
like on the page. Okay, so once I've got the length of the
face established, I am now going to
draw on the jaw line. Now this is really important. The jaw line is going to start
in the middle of the head. That's going to drop
pretty much straight down. There'll be a
slight angle to it. And right when we get to
the bottom of the sphere, we're going to reach
the corner of the jaw, which will shoot us off in another trajectory
down toward the chin. We go next up, we're going to draw in, well, we're going to start
plotting out where the facial features
are going to sit. Now, just, let's make
a note here with the jaw because we are drawing a male head.
What does that mean? Well, we want the corners of
the jaw to be fairly sharp, and we also want that
jaw to be quite square. Okay, keep that in mind. It's important for male heads in order for them
to look masculine. Next up, we're going
to take the distance between the brow and the chin
and then divide it in half. Usually this will
also be the second, third, the heads of the
faces overall length. But I find it just much easier to divide the distance between the brow line and the chin into two in order to find where
the nose should be sitting. Next up, we're going to divide the area between the nose and the
chin into thirds. So one, make sure that those thirds are as
equal as you can get them. This is really, really important
to keep in mind, okay? If you don't nail
the proportions of your heads than sum
is going to look off. So really pay attention to where you're placing
these facial features, ensure that they are
proportionally correct. Alright, next up, we're going
to draw in the eyeline. Eyeline, of course, sits at the midway point of the
overall length of the head. So it's going to be
about here, I would say. Wonderful. Next, I'll draw the ears. Top of the ears is going to align with the top of the brow. And the bottom of the ear
will align with the nose. And what you'll notice is that the shape that we were
using to outline the ear in the front view has
now been stretched out and is not any
longer foreshortened. This is why the side view is the very best anatomical
representation of the ear that
we're going to get. Once we got the ear drawn in, it is time to actually shape both the face in the
facial features. Because as it turns out, a lot of the heads outline, especially around the face area, is going to be defined by
the facial features and the varying extrusions
and recessions that we see coerced
by the structure of the skull in the
facial features combined. One of the first major ones that you'll notice is of course, the brow as it comes in. And then transitions at the
iron line into the nose. So it changes trajectory
angles inward into the face and then protrudes
back out into the nose. Because we are drawing
a male character here, that noise is going to
be fairly straight. Remember that in our front view, the tip of the nose
actually falls just below the positioning of
the noise that we estab, established during the
foundational stage. Now, once we've drawn
the outline of the nose, we're going to take the
contour into the lips. So this is basically the outline of the face that
we're drawing here, while at the same time we're also drawing the
facial features. So it will lead this line into the top lip and then back
out into the bottom lip, and then back into the underside plane
of the mouth muzzle, which will then
transition into the chin. And that's for the most part, some of the key facial
features now defined. Now we also wanna
go ahead and start shaping the skull a little bit. And what I mean by that
is that the skull is it's not really this
much of a dome. Okay. It's, it's actually
not that round. We're going to bring the top
of the brow in somewhat. Lead the line-up
into the forehead. Then as we continue the contour around into the top of the head are actually going to flatten it
out a little bit. So we're almost going to
shave some of the head off. Now this will change its overall
length ever so slightly. But that's actually
fine in this view because what you'll end up
seeing on the human skull is that indeed the
back of the skull is actually longer than
the width of the skull. Okay, When we're looking
at it in the front view. So bring the back
of the skull down. Once we get to about this point just above the brown line, we're going to bring it back in. Okay. And what you get is this much the sharp point
of bone at the back of the skull which ends up running down into
the back of the neck. So a lot of the
side profile view of the human head is
defined mostly by outline. Then of course
you'll have the eyes that you'll place in later on. But for the most part, this is getting
this outline right. That is the most
important aspect of it. Then of course we've
also got the neck. So let's lay the neck
in here as well. Now what most people find
is that when they're drawing the profile view of the human head is that although start
out with the cranium, it'll be a completely round bowl that leave it as a
completely round bowl, which is the first problem. They don't flatten
it out on top, which is an issue. I don't flatten it out too much, but flatten that out
just a little bit to, to capture the correct
shape of the skull. But the other major
problem that they run into is they'll drop
the face down too far. And so you won't
have the amount of width at the face needs
to have in the side view. So just keep that in
mind if your face is looking like it's too
long and the side view lifted up a bit because that'll give it a
wider appearance. And do that on the
foundational level. Don't try not to do it later on after
you've already added in the facial features
because that'll just be extra work for you. And then of course, after that, go ahead and flatten
out the top of the skull and try to really
get that width happening. That why that's happening
within the side view that so often is not captured
when we draw it, but it makes sure it's there. Otherwise the front of the face can just
tend to look a bit squashed and that's
certainly not what we want. And of course it's just a matter of drawing out the
facial features, cashing their outline
and making sure that is as correct as
we can possibly get it. Okay. So let's
wrap this head up. Lay in the eyes. The eyes are going to come
back and they'll land at this point here. So I'd say that, oh, come back a bad as far
as that side plane, the edge of the side
plane about here. That doesn't have to be exact. Sometimes you might pull
them back further than that or you might leave them more toward the
front of the head. It depends on the character
and certainly in real life, this varies from one
person to the next. Excel will draw on the eyebrow. You can see that the
eyebrow actually pushes back beyond
that side plane, which is totally fine. It may not be accurate,
but it looks good. I usually I usually bring
it back a little bit further and that tends to work. I'll add in some texture for the eyebrows just to
describe the fairness of them. I'm going to tweak
the shape here just a bit to really describe the form that the eyebrows are sitting on in this
area of the skull. In fact, we'll draw in the top edge of the eye socket and also define the upper eyelid
as well while we're at it. Then we'll draw
some eyelashes in CIS or around the eye-opening. Some very small ones because
we are drawing a aloud here. And then of course the
iris and the pupil. The pupil is going to sit
back inside the iris. Next up, we'll draw
in the nostril, which will sit about
this point and then come back to the front of the eye, or roughly the front of the eye. So if we were to
draw a diagonal line down the front of the eye, that's where the back of
the nostril would sit. We can draw a
little indentation, a little nick of detail
there just to show the recession that sits
around the nose ball, but the tip of the nose, if were so inclined,
it's not needed. I like to add it there just for that additional little bit of definition within the
underlying anatomy. Then we've got the mouse
opening. Just as before. I'm going to start
with the front of the mouth. The mouth. Take it back to the corners. And again, that's going to come back to pretty much
aligned with the eye. And I'll slightly
outline the lips. Not to boldly, but just
enough to indicate them. I might even pull it in
his chin a bit more. Like it's coming
out a bit too far. They're going around outlining the rest of the face,
making it darker. Try and really get that
polished finish to it. Just refining what I've already laid down onto the page here. Then finally, let's tackle
the ear because the ear is really an important
feature when we're looking at the
side view of the head, It's the first opportunity
that we get to see the anatomy of its
interior very, very clearly. So I've got the outline, articulate it. Now it's time. Once we've got the
general shape place down onto the page, I want to start to draw
on the interior frame, which is for the
most part going to run around the inside
of the outer shape. It's going to follow it
down into the ear lobe. And what we end up
with is this shape. I like to think of
it as official book. Right? Once we've got the fish
hook drawn in there, we can then go ahead and place in the interior of
that foot facial nerve which will ultimately
be the It'll it'll make up the bottom portion of the
Y-shaped piece of cartilage, the main piece of cartilage that we see within
someone's ear. Go ahead and lead that line down into a little bump that's
going to hook up at the end. Then look back round to sit
on top of the ear opening. It's got a little tail. Then we'll draw, will
continue this piece of cartilage back into
the ear as well. And add a little bit
of an indentation or recession in the top of the Y-shaped piece of cartilage
separating it into two. And that's where the y
symbol comes from there. Now again, you can think
of it as a wishbone. You can think of it as a twig. But it essentially
looks like this. Okay, cool. Once more, we can thicken up the
outline around the ear, polish up the presentation
that we've got our head and bring it
through to completion. There we have it. That is the side profile view
of the male head. Now let's move on
to the female head.
5. Profile View Of The Female Head: Now let's go ahead and draw up the profile view of
the female head. And a lot of what
we've done here for the male head is going
to be quite similar. So it's good because it
gives us an opportunity to recap on some of the information that we've learned
about previously. And repetition is never
a bad thing whatsoever. So once again, we're
starting out with our old friend, the circle, which we've become very well acquainted with so far
throughout these lessons. As I said, I'm telling you
by the end of this course, you will be very good at drawing spheres. If nothing else. The foundation of the human head lay in the axes and a toothpick
right through the top. We'll divide it
up into quarters, just as before, with a
horizontal guideline. And a vertical guideline, which represents the center of the middle of the head
in the profile view. Once that's done, we'll
cut off the sides, leaving us with what
would resemble, at least at this point within our foundational head model, a doughnut or a car tire. But really it's just, it's the little circle inside
of a bigger circle. Pretty easy to remember. Next up, we're going to drop
the face down to the chin. So we'll draw that out here. And I think I'll bring my
chin down to about there. Actually, you know what? Maybe about here instead. That looks pretty good to me. Then we'll draw the jaw line down to the corners of the jaw, curving it out because we are
drawing a female head here. And that's one of the
key distinctions that separate a male head
from a female head. We're going to curve that
right down into the gin. Remember that we do
want to try to capture a decent amount of width
here for the face. Now I'm also going
to go ahead and actually bring
back the bottom of the chin to create a nice curve to the front of the face for
our female character here. And especially for female, you do want to bring the
chin back ever so slightly, not necessarily so much that they end up with an overbite. But it can tend to
make them look. Again. It can tend to enhance that feminine aspect of them. Whereas when you, when
you push the jaw forward, what you end up getting is
something which, you know, it looks a little
bit like this kind of a caveman appearance. And so if you want to push the feminine aspect
of a head, well, you do, you do somewhat
the opposite thing, right? You push the door back. Again, don't give
her an overbite because that's probably not something that
you're after either. But it's about keeping
these things subtle. Alright, Once that's done, let's go ahead and plot out
with a facial features or, you know, the drill
at this point, we'll take the distance between the brow line and the chin
divided into two halves, right in the middle
there, that's where our nose is going to sit. Then the distance between the nose and the
bottom of the chin, we would now divided into
thirds and on that top, so that's where our
mouth is going to sit. So we want to take
special note of that one. Next we will drop in the ears. Top of the ear is going
to align with the brow. The bottom of the ear will
sit on the nose line. Next, we'll establish
where the eyes will sit, which is midway point of the
overall length of the head. So that'll be about here. And now we'll start to, well, we can start to
outline the facial features. So again, it's somewhat of a different approach
that we're taking here. With the side view of the head. We didn't really need to outline any other facial features
in the front views. So this has a little
bit new for us, right? But it's actually kinda cool because we're really just
defining a silhouette, an outline here for
the facial features rather than needing to actually
draw them in separately. In fact, you'll notice
that the nose, the mouth, and the chin, and the brow, they all share this
a single line, which is pretty amazing. Let's do the same thing
here with our female head. And what you're going to notice, especially with the noise,
is one of the most. Another very
prominent difference between male and female heads, which is the curvature
of the nose, especially the noise bridge. So we're actually going to
curve the noise upward here and then bring it
back in the mouth. Hey, So that's something
that I tried to add to my female characters
just to make their nose look a little
bit more cute and adorable. You'll notice that
we've got this nice swooping curved to
the female nose, whereas the dude's knows
it's a little bit more angular and straight down. So again, everything is translated into a
certain softness when we're looking
at the female head, at least everything we did
on the male had previously. Now, once you've
got the nose bridge of our female nose defined, and again, I'm just
gonna do some tweaking. You'll find that you
probably end up tweaking your female heads much
more than your male heads. Just because they
need to be exact. Whereas male heads get away with a little bit in regards to
how they are presented, but will lead this outline down into the mouth
just as before. The top lip there, which will lead down
into the opening, and then the bottom lip, which will lead down into the chin and backup
into the jaw. Alright, wonderful. Again, you can notice that
already we've got a very feminine looking face here just with the
outline alone. Once we've done that, we're
going to start to add a little bit more shape to the
upper region of the skull. So the other thing here is that rather
than giving a bit of an indentation to
the brow where we're just going to have it
curved straight up. Then we'll flatten
it out on top, just as we did before
for the male head. And then we'll bring
it back around. Sit just above the
horizontal guideline. Bring back the skull
to meet the neck. And you'll notice
that we're bringing it back quite far this time around because just
like with the front view, the neck is going to be
less midi list thick, less muscular on a
feminine character than it is on a male character. And there we have it. So always remember
that the shape of the head and the
features and the way in which you represent
them are going to determine exactly how feminine or masculine your heads look. Okay, Beautiful. Now let's go ahead and just
move these down lower. Ahead and draw in
the facial features of our female character. Remember that the eye is
when presented on this side, I really just a
slice of pie, right? Or a doorstop, if you will. Whatever you find
most useful to think about when it comes to drawing
them on a simple level. And that's exactly
what I start out with. Then also thinking about the
size of the eye as well. I don't want it to be too large, I don't want it to be too small. Draw a little line
that runs up into the underside of the eye socket. And we'll give her some
nice big thick eyelashes, which are going to fan outward toward the front of the face. I'm outlining the shape first. That's what I would
suggest you do as well. Try to capture good, solid shape for your eyelashes before
you start filling them in. We'll do that for boys. The bottom eyelids
and the top eyelids. Once we've done that, let's
the iris and the pupil. And in a little bit
of a reflection. Now of course the eyebrows. And we're going to make the
eyebrows nice and thin, elegant looking, bringing them
back down behind the eye. And we'll add in some texture, some eyebrows texture rather. Just to indicate that
indeed the eyebrows, rather than being
painted straight on fact made of eyebrow for wanna give the impression that if we were to
run our fingers along this lovely
ladies eyebrows, which would be kinda weird. But still if we were to do so, it would feel like hair. That's what we're visually
trying to show here. Once we've got the
eye is drawn in, it is time to then establish whether nose
opening would be. So it will draw in the nostril. And remember where in order to find where the back of
the nostril would be with simply drawing a diagonal
line downward from the eye. Next up. Let me go ahead. And the
thing that you want to remember with the
nostril opening is that it's actually going to
start more forward toward the front of the noise and
then come back into the face. Now we'll draw a
little recession in the top here is to describe the anatomy of the noise bulb will drop in the
opening of the mouth. The little little fatty bit in the middle of the lip there
that we've dropped down. And we've got the
sides of the mouth which lead back
into the corners, which pretty much
aligned with the middle of the I pretty much. And then we'll establish that. Define the outline for
the lips themselves. Around the top and
around the bottom. Lead in a little bit
of reflection to both because you want the ellipse to look nice and shiny and wet, especially when you're talking
about a female character. Stylistically, it
just looks good. There's a lot of stylistic
decisions that I make when it comes to drawing
characters in comic books, of course, you'll find that you pretty much
do the same thing. But in your own way, there's this certain stylistic
choices that you may make that I
just wouldn't make. And that's what will make
your eyes look unique. It's important to embrace that. It's okay to be different. You don't have to
be exactly the same as one artist to the next. Okay, next up, let's
draw in the ears. Okay, So once again, in order to get good
at drawing the ears, There's no easy way to say this, but he had just got to practice
it over and over again. So start with the outline, the outside shape of the ear. Get that down. Ex step is to draw in this little curly bit that
runs along the inside, the inside outline of the year, I guess you could think
of it as the inner frame. It's going to run down
into the ear lobe. By the way, everybody
has their own way of drawing ears as well. So that to complicate things. I initially learned how to
draw ears inappropriately from Dragon ballsy because their ear anatomy
was very wrong. And so I learned how to
draw E is wrong first, but you know what, somehow
it still looked okay? Which just goes to
show that no one really pays attention
to ears anyway. Alright, so we've
got our Y shaped piece of cartilage
drawn in there. Let's place in the ear Hall. Then we've got the recession at the top of the ear will
get that drawn in. And voila, that is
our ear completed. Now the final step is to
polish this presentation up. We'll go around the outside
of the head first up, starting at the top. And really defining
the outline that we would like to have in
the final presentation. This is where you want
a steady up your hand and make sure those
lines are looking nice and neat and tidy and
clean. That's the key. Alright, there we go again flattening out the top
of the skull there. I remember don't
flatten it out too much because otherwise you'll shift the height of your head
to a point where it's, it ends up messing with the proportions and placement
of the facial features. Remember you want your eye is to always be as close to the
middle of the head as possible, at least when you're
drawing an idealized head. If you're flattening it out too much on top will
then they will in fact appear higher
in the side view, which is, may not be the desired look that
you're going for. Okay, so now what I'm
looking forward to doing here is just defining the jaw line there
a little bit more. We've got an angled a little bit and we've also got an angled back to take the jaw line now from the corners
into the chin. Staff will outline the neck. That pretty much completes the side profile view
of our female head.
6. Three Quarter View Of The Male Head: Now it's time to draw
a three-quarter view of the female and male head. We'll start with the male head. Okay. So just like with the
front view and the side view, we're going to start out with a circle for the
three-quarter view. And although this looks very, very similar to the
previous two views that I've demonstrated here. There's going to be a
significant difference very early on. And that is with
the guidelines that actually will wrap
around the sphere. And you're about to
see what those are. Just a moment after I've
drawn out this circle. And c, I take very special
care with my circles. I tried to make them as
circular as I possibly can, as accurate as I can. Because I find
that if I can nail the circle on the Vietnam, just leads to a better outcome
for my head's in general. So pay attention to or don't
underestimate the circle. It's deceivingly
important to get right. Now we'll place the
axes in just as we did in the previous
two viewpoints. Now this is where
things get interesting. So we are going to establish a center line that
runs from the top of the sphere down
to the bottom and establishes the
front of the face. Essentially. Except this time, rather
than running straight up and down in a straight line, it's going to curve around the surface
form of the sphere. It's actually following along
the surface of the sphere here as we draw it
down to the bottom. And what you'll notice
is that it's curving in the direction that the
head is looking in. The apex, I guess you could
call it, of the curve, is positioned to the right. And that's the direction
that our head is looking in, at least as we're looking at it. So that's the
vertical guideline. Now we'll lay in the
horizontal guideline. However, keep in mind that if this head was
looking down or up, then e2 would also be curving in the up
or down direction. Wonderful. See that that's in, on a
bit of an angle there, so I'm going to undo it
and keep it straight. I've got a horizontal
guideline placed in there, wrapping around the
belly of the sphere and ultimately representing
where the eyebrows will go on our head. Next, we'll chop off
the side planes. Now, this is where things also start to get a
little more interesting. Because what we're
going to do in order to figure out how wide the
side plane should be, is we look at how much space we've got here on
the far side of the face or the far side of the cranium at
this point because that's all that we
want to work with. So I'm looking at
how much space is on the far side of the cranium. And I want to make sure that
as I lay in the side planes, we leave an equal
amount of space on the side that
is closest to us. However, it will be
slightly more space since the closer things are
to us, the bigger they get. And so that means that the
width of the side of the face, which is closest to us, is going to be a little wider than the far
side of the face. So we can add a little
dot there just to signify whether middle of
the far side of the face would be and how far into it we want
outside plane to come. Judged. Judging. Based on what i've,
I've established here. I'm going to draw
out that side plane. You can see that it
looks symmetrical, even though technically
there's more space here on the side of the face
which is closest to us. Due to the foreshortening. It still looks as
though this line here, the center line of the face
is sitting in the middle. So this is what makes
drawing the head and these dynamic perspectives
just a little bit more difficult is all
of a sudden you've got to take into
account for shortening. That can be tricky. It can be elusive as to how to go about it and what estimations you need to
make in order to nail it. Because unfortunately, unless you're some
mathematical genius, you're just not going
to get it right 100% of the time or exact. And even if you were
to get it exact that it wouldn't necessarily
lead to a better result. Anyway. You've got to develop your artistic eye
with this stuff and use your best judgment while observing what
you're drawing through it. Once you develop it enough, you'll find that you do end up with better
and better results. But for now here what we're left with is our cranium structure. Now, what I'm noticing
is that it looks as though this
horizontal guideline is maybe sitting just a
little bit too high. So I'm going to drop it
a bit ever so slightly. You can see it's just a
smidge too high there. But I'm a perfectionist, so I worry about such
differences. Alright? So once again, I'll do another
little example up here. In order to find out wide side planes overhead
should be in this view. First, establish the
middle of the face. Take a look at how
much space you've got on the far side of the head. And then assuming that you want an equal amount of space on the other
side of the head. Use the amount of space you've got on the
far side of the head to judge how far forward you need
to bring that side plane. Like so. Alright, hopefully
that makes sense. Sometimes it's a little
bit hard to explain, but that's why combine
explaining with demonstration. Alright, we've got our
cranium now figured out. So let's erase these
two little dots and dropped down the
front of the face to where we would
like to chin to sit. Now remember we can measure out the top two-thirds of the
head if we want to 12, and then drop it down
another third in order to find the full
length of the face. That's totally fine. That'll
work out for most people. I'm going to eyeball it. I like to keep it all natural. So I'll drop the chin
down to about here, which is probably going to
equal the final third anyway. Lay in a vertical guideline that runs from the top of the side
plane down to the bottom. Then we'll place
now draw a line. Because we are drawing
a male character here. We are going to give
the sides of the jaw less of an angled trajectory, keeping them a little
bit more vertical with a slight angle to them instead. Then we'll after we've laid that down the
sides of the jaw, down into the
corners of the jaw. We will then place in the
final bottom edge of the jaw, leading it down into
the base of the chin. We want to give some
broadness to the chin since we are drawing
a male head here. Now, as for the far
side of the face, this is where things
tend to confuse. This is where things get, tend to get confusing
for most of us. Because what are we
supposed to put here? Are we trying to define
the outline of the jaw? Are we defining the outline of the face or are we doing both? Well, it really depends on how far away the head
is turned from us. Because it can be both. It can be one or the other. Sometimes it really
is going to be determined by the amount of rotation that has been
applied to the head. In this case, what I'm
going to do is I'm just going to start
out with a very light, very, very loose
outline for the jaw. And then later on,
if I decide to add in a cheek bone or
the mouth muzzle, or the form of the chin in order to articulate that shape
a little bit better. Then, so be it. But for now I'm
just going to add a very light outline there, just to close off the
face shape for now. Once I've done that, I'm going to establish where the
nose would be placed, which is between the brown line and the bottom of the chin. I'll lay that in there.
It looks pretty good. Next up, I'm going to
divide the distance between the nose and the
chin up into thirds. Again, take your time
to really make sure all of those thirds a shared out equally
with one another. Once we've done that, we'll place in the ears,
top of the ear. Is it going to allow with the
align with the brow line? Here will land on the nose line. Again. Make sure that when you're
drawing the ears, indeed, they do line up with these two very
important anchor point for the brow and the nose. Once we've got the
E is drawn in, we will lay in the eyeline. Eyeline is going to sit at the midway point of the
overall length of the head. Now, if you're ever in doubt as to where
the eyes need to go, just simply draw a
line from the top of the head down to the
bottom of the chin. Then using your best
judgment or a ruler, if you feel like you need to simply divide that line in half. And that will give you the
positioning of the eyes. There. We have it. At least when looking at
the head on an IR level. Once we got the
eyeline drawn in. In the neck. Now I'm going
to bring the back of the head again just a little
bit here behind the ear. And then drop the
back of the neck down from below the year. Then drop the other side of
the neck from under the chin. We can draw on the trapezius
muscle as well. Of course. That completes our, our
basic head structure. The only other thing
we really need to add into this is of course
the head planes, so let's not forget about them. And that for me includes the hairline most of
the time as well. So we'll draw that
in from the top of one side cranium
plane to the other. And we'll draw in
a diagonal line that runs from the
top of the browser down to the eyeline on either
side of the head here. Then we'll draw another
division that is going to separate the front of the face
from the side of the face. Bring that down to
the jaw line like so. And we may see the same thing happened on the far
side of the face. This is where I start to bring the cheek bone out
just a little bit. We start to see those forms overlapping on top
of one another. So the front face forms, overlapping essentially
on top of the side face forms and obscuring
them just a little bit. Awesome. So now we've got our
foundational head model done and dusted. Going to enlarge it a bit. Giving us more
room to work with. Here we go much better and we can see
everything much more clearly. Now without further ado, let's go ahead and place in the facial features
starting with the eyes. Now, when it comes to positioning the eyes in
the three-quarter view, remember that we're positioning them along this line here. That the width of
them and the space between them is going to
be somewhat foreshortened. So we wouldn't get
our red pen out here. We could place the
width of one I hear, the width of another eye here. And that would give us a
fairly accurate representation of the sizing of the eyes and where they
need to be positioned. So keeping that in mind, let's go ahead and
start drawing them out. The first thing that I'm
going to do in order to draw them is I'm just going to
outline their opening. Am I going to be using a
very similar basic structure to what we started out
with for the front view. So we've got the NRI. Look at the outer array. And then we've got
the bottom edge, and we've got the top
again equaling four lines. Well the eye all up. We'll do the same thing on the
opposite side of the head. I like to think of the front of the face is just being a plain. Really. That plane is
going to force shorten. Again if I was to
simplify what I'm talking about here are as
planes and concern. I think of the face is
just being a flat plane. Sometimes that plane will have foreshortening
applied to it. If we're looking down onto it. That foreshortening is
going to be pushed in a different dramatic direction if it's turned
further away from us. Right? So you can start to even
add the facial features, those planes in order
to get an idea as to, you know, how the face would look on these different angles. Right? So it just depends how you
think about it ultimately, but that's how I what I'm thinking
about as I'm placing in the different
facial features, especially the eyes
since they are sitting along this phase plane
that I'm explaining. Okay, once we've got the
opening of the eye is drawn in, it's time to lay
in the eyelashes. Now remember it's a male head, so the eyelashes aren't
going to be too extravagant. Just enough to darken
up the outer edges of the eye and give
them some emphasis. These are probably
slightly bigger eyes than I would normally
give a male character. But I think it's still
works pretty well. Usually I don't, I don't draw randomly looking
male characters. Usually they will kind of mean. And so big bold eyes
don't really suit that particular vibe that I usually like to capture
within my characters. So. And it can be very, very
subtle as well. At times. It seems you add into
the facial features and a facial structure of your heads to make the
character feel a certain way. Okay, cool. So once we've got the outline
of the eyes established, it's time to place
in the pupils. And the IRS. I'll start out by outlining the
pupil, the iris first. I'll place the
pupil inside of it. And a little bit of shine to make the eyes
look nice and wet. And again, those eyes are
looking to beautiful to me. So I'm actually going to erase them really quickly and
have another go at them. Yeah, that's looking
much better. So I'm actually going
to close them up a little bit and make them look a little
bit more intense. Looking too friendly. I can't have my dude
character is looking too friendly. Okay, that's better. So again, there was
nothing wrong with the eyes that I
drew in previously. Just stylistically, they
weren't getting the right, right feel across for me that I wanted this
character to have. So, you know, sometimes it's not a matter
of drawing things wrong. Sometimes things can
be perfectly fine. It just depends if the
message is getting across in the right way as
I was talking about before. That's the most important thing. Okay, next up, I'm going to draw iris and the
pupil back in there. Great. Now I'll draw
in the eyebrows. And remember that
for the eyebrows, we want to keep them nice and
thick for a male character. So I'm sitting them down lower on top of
the eyes as well. Whereas on a female character they would probably
sit much higher. I'll run my pencil around the outside of the eyebrow shape once more, just to define it. Once it's defined, I'll then lay in some very light render lines to indicate texture. And further like
tactile appearance. Combing those
eyebrow fors back in the direction that I want
the eyebrows to flow. Again, this just prevents the eyebrows from looking
like they're painted on. You could also fill
them in just for solid black if you wanted to or some other solid color at some artist opt for that
and it looks really good. Stylistically,
you'll explore all of these different options for your own work and hopefully ideally settle
on one at some point. Alright, once the
eyebrows are drawn in, let's go ahead and
place down the nose. Now, just as with these
basic examples over here, the nose is really
just a wedge that sits onto the front of the face. And so that's exactly what I'm thinking about when
I draw it in here. Now, I'll actually define
the tip of the nose first. But at the same time, I'm essentially drawing
out an invisible line down the brow and into the base of the
nose as I lay it in order to find its positioning,
its proper positioning. So I think the tip
of the nose will be found about here. Bring
it up a little bit. Drawer in the nostril opening. Sometimes you can define the bridge of the
nose on this angle. It can work quite well. Just because now with the noise is somewhat turned away from us. But at the same time, you can also leave it
as a broken outline. So I'm just going to do some
erasing here to get rid of the construction
lines and that we can see things a little bit
better, see what's going on. I'm going to redraw in
that nostril opening. And I might just
redraw the noisy and completely altogether
at this point. Sometimes if
something just isn't working out the way
that I want it to work, I will completely erase
it and start again. Hey, that's a little bit better. I'll darken up the top of
the nose bridge and I'll darken up the bottom
applying those line weights, but then I'll just leave it as almost a broken outline
In-between those points. The reason I do that is just
for stylistic purposes, like it just tends to look good. Because the further away that
head is rotated from us, the more defined that nose
bridge outline will become. But for now I think
that works quite well. Next up, we'll
draw in the mouth, starting with the middle
of the mouth opening and then drawing it out
into the corners. And just as with the front view, the corners of the
mouth are going to stop just short of the
middle of the eye. And in fact, I
think I've actually drawn the nose down just a little bit too low
in this example. So once again, I'm
gonna get rid of it. And I'm going to lift it up. Again. The point is not to avoid mistakes, they're
going to happen. You can avoid them. So don't
be afraid of making them. But I think the, the point is that you want to always make
sure that you make your best efforts to fix them and to be able to spot
them in the first place. That's the biggest challenge because you can't spot
the mistakes to fix them, then that's when you're in a
real a real spot of trouble. All right. There we go. Then nose is looking okay. I don't like it as much as
my previous known as butt. We've used Snow's wasn't
positioned properly. And again, I just want to move it back with
the transform tool. I actually want to erase it. Show you that if you're
working traditionally, that's exactly how
you deal with it. Next up, I'm going to draw
the bottom of the bottom lip, placing a darker outline
around the base of it. Because you'll find that a lot of shadow tends to
collect underneath that area. So it does warrant a darker outline to
give it that depth. Once I've got that place tin, it's time to define the shape, the outer shape of the ear. So it will go around the outside of it with a darker outline. And then placing the
interior anatomy. Now, we already have
an idea as to what the interior anatomy of
the ear looks like in the side view and
in the front view. And now we're going
to see an in-between foreshortened
representation of how the ear anatomy now looks
in the three-quarter view. But we'll approach it and
very much the same way, starting with the outline
of the ear and then working our way around with
the interior frame. Leading that down
into the ear lobe. We've got that sorted. We'll bring that y-shaped
piece of cartilage, lead it down into the
bottom of the ear. You would a little bump,
a little hook at the end. Leave that up into
the ear cover, opening, opening cover rather. And then this other
bit of cartilage that leads into the inside of the
ear will draw that back in. And then add the recession to the top of the Y-shaped
piece of cartilage. That just about wraps
up out here in testing. So now all that's left
to do is to refine and define the outline
of our head shape. And the first place
then I'm going to tackle is none other than the far side of the
face because this is the area that warrants the
most amount of attention. In my opinion, I have the
most trouble with that. Many other people have
trouble with this area too. So let's talk about
it for a moment. What we'll do to begin with is bringing the underside plane of the brow into the
outer corners of the eye. Alright, Thanks. From there we will
drop down the top of the cheek bone and then lead said cheekbone
into the face. And this is where
it's going to meet up with the mouth muzzle. Okay, That's this
little bit here. That muscle that wraps around the mouth will out
lightly outline it. Eating it down into the chin. And that's exactly what
we'll define next, is the bottom of the chin. Now of course, we can
still see a little bit of the the jaw on the
other side of the face. So we'll drop that in. Going to be peeking out from
behind the mouth muzzle. It's looking pretty good. And then we'll lay
in a darker outline for the bottom of the chin. And you can see that's
the hardest part of the three-quarter view. Head completed. I'm just getting
this part right is really tough on a male head. Especially because you
do need to articulate the cheekbone and
the mouth muscles and all of that other jazz. There isn't a female
head. You can just join all of this stuff
together into a smooth cheek, essentially because
they usually have more fat in their cheeks with less defined bone and
muscle underneath it, apparent on the
surface of the face. Now we'll continue our
refined darker outline around the rest of the jaw line, bringing our male head
further to completion. The only other thing
we really need to do is go around the top
of the head now, polishing it up, making
it look real quick. In fact, I'd probably even bring the forehead just a little
bit further forward here. So there we go. Now finally, we'll
complete the neck, giving it a slightly
darker outline as well. Then we can call that done. Next up, we're going
to move straight on to the female
three-quarter view.
7. Three Quarter View Of The Female Head: Now let's draw the female
three-quarter view head, starting once again
with a circle. I know I know these circles are getting pretty
old at this point, but you use to them because every time we go to draw ahead, we're going to start
out with this circle. And that's actually
what makes it really, really easy to draw our head. Because circles are very simple
and easy to think about. And as long as we can start
with them while it makes, it makes the whole process
so much more easier because we're just building
off of this circle here. As I mentioned previously, if you've got an entire
illustration that has tons and tons
of heads in a row, tons and tons of people. You can start out
with just a bunch of circles composed within that
panel or within that page. And you can very quickly
figure out how big all of those heads are going to be
and where they're going to be placed just with
those circles. Certainly use it to your advantage and get good at drawing circles
for goodness sake. Because they are,
they are important. They're going to
help you out big time, especially with heads. And isn't it cool that
just because we're drawing a female head here as
opposed to a male head. It's not a completely
different process. It's pretty much
the same approach that we've already taken. Imagine if it was
completely different, how much we would
have to remember. So it's actually, we've got some very fortunate similarities between the male and female head that we can certainly
take advantage of. The differences are truly just minor ones at the
end of the day anyway. Once we've got the
axes established, we will then draw in a horizontal guideline that wraps around the
belly of the sphere. And I know we replaced in the vertical guideline first to last time around
with the male head. But it really doesn't
matter the order of events and how they
unfolded this point. You can use whatever
you can place down, whatever guideline you want around the sphere to begin with. In fact. Next we'll draw in the vertical guideline that
will represent the front of the face and thus the rotation of the head and the
direction it's looking in. And see there that it's curving along the surface of the
sphere. That's what we want. Remember, the side planes, health, how do we figure out how wide they
are going to be? Where we look at
the amount of space we've got on the far side of the face as opposed to the side of the face
that's closest to us. Then we simply bring our side plane out to the
point where we've got an equal amount of space visually on either
side of the face here. Now sometimes you are
going to want to chop off some of the far side
of the face as well. Because in this example, the three-quarter
view of the head is actually looking
a little more toward us that in the previous
example with a male head. So there'll be a
few changes here, but that's not a bad thing
actually because of all, we'll see some of what those minor differences
consist of. This particular demonstration. Alright, great. Let's get rid of some
of those off cuts. Now. Take care of
these two little dots. We don't need those anymore. Then we will drop
down the middle of the face to the chin, establishing the length
of the overall head. Remember that if your head's
coming out way too long, either measure them
out properly using the two-thirds method and
then dropping it down one more third from the cranium. Or just simply if you find, if you find that your heads
are just too long in general, didn't really pay attention to that and remain
conscious of it. So the next time around you can intentionally make sure that
they don't drop down so far. Hey, getting the
length of the face right is pretty darn important. So it's something to
certainly pay attention to. Once we've got the chin
drawn in there though, it is now time to get the
jaw line established. Now the jaw line on a lady or female character is
going to be more curvaceous and softer looking. Won't be as chiseled
and won't be as square as what we've seen
on our male head. And the chin also wouldn't
be as broad either. So this applies no
matter what if you were looking at the female
and male head in, these differences will
still be maintained. All right, so we're very lightly outline the far
side of the jaw as well. The side of the face that's
furthest away from us. See that I've just I've tried to indicate what might appear to be either the cheek or the corner of the opposite
side of the jaw or both. And that's sometimes I don't
even know what's going on. I just kinda drop down
a line that looks good and then read you get later on. Alright, once I've got the basic setup for my
foundation's ready to roll. It's time to blot out the
facial feature placement. So I'm going to
take the distance between the brow
line and the chin. And I'm going to divide it in half where the nose
should be positioned. Then I'll take the
distance between the nose and the chin and divide
that into thirds. So at this point you
should be memorizing the proportions of
the face Quite, quite clearly without any effort because I'm repeating
it a lot and it's probably may
even be annoying you a little bit that I'm
repeating it so much. But I think that
it's worth repeating because it helps you to remember and it means that you won't really have to think about it. It'll be like replaying
inside your mind. Hopefully every time you
sit down to draw a head, it'll make it much
easier to end up with a structurally sound head that's with the
correct proportions. That's the, that's
the idea anyway. Next up we're going
to draw in the ears. Say it with me. Yes, the ears, the
top of the ears are going to align with the brown. Bottom of the ears are
going to align with what? Yes. The nose. That's right. Okay, cool. I should, I should
give you all a quiz at the end of this
lesson on proportions. I'm sure you'll pass with
flying colors, no doubt. Next up, we're going
to place in the eyes, they sit at the midway point of the overall length of the face. So make sure that
they're sitting in the middle of your head. They look like
they're too far up. They look like
they're too far down. It probably means you
have them positioned them properly. Hey, great. Next, lay in the hairline and will establish
the facial planes, at least the basic ones. So we've got apply a plane
division that will run in a diagonal trajectory down from the brow line
to the eyeline. Do the same thing on the
opposite side as well. Then we'll draw in a
division that will separate the front of the face from
the side of the face. And we'll do that on
both sides of the head. Actually. If you are working digitally, become friends with
the undo button. I'm very good friends
with the undo button. I I hit it all the time. You don't have to get it
right every single time. I know some people advocate for trying to hit that Undo button as
little time as possible, but I've already
mentioned before, I don't think that necessarily
leads to the best result. I think you have to read, tweak and modify things
as you go in order to achieve most optimal
presentation possible. That's just my philosophy
though every artist has this. Alright, next up, let's draw in the neck related character, we are going to be drawing a much thinner neck,
sleek and neck. That makes her look generally
elegant and very feminine. Remember, this
could very well be a male character that
we're drawing here, just with a few more
feminine characteristics and that would totally be fun. And is it spiderman is pretty buff looking
character anyway, but I could imagine him being a younger Peter Parker being drawn in this very
much the same way. A teenager, whether
male or female, might be drawn in this way too. So again, just things
to keep in mind. Usually the oldest someone gets, the more defined
the anatomy will become across their face
until it starts to get into old age where all
of that anatomy becomes wrinkly and very sunken
eyes at that point, which also has its place as well depending on the
age of your character. But we've got the foundation
for our female head. Now established. Next up, let's start placing down
the facial features. And again, since we've
got this foundational model ready to roll, it's a, we don't have to think about the
proportions anymore. We can just start drawing
in the facial features, focusing on their shape. And and trying to
get that right. Yeah, then just taking
it one step at a time, optimizes the process and
helps us to distribute our mental RAM evenly without exhausting ourselves, without
overwhelming ourselves. So we're going to draw out
the outline of the eyes here. You'll notice that I'm
working very lightly. Far I will have
slightly less width. The eye that's closest to us. But this head is
looking a little more toward us at this,
in this angle. So that's not a probably a
complete three-quarter angle, but it's close to it. The bit of a halfway a crossing between the front view and a three-quarter
view, I would say. Once we've got the outline
of our eyes drawn in, it's time to really lay
on that mass car DRA, mascara thicken up
those eyelashes. Now it depends,
sometimes I'll draw a female characters
that don't have a whole lot of mess scour or
very thick eyelashes at all. And other times I'll really
push the thickness of the eyelashes two
crore and attention. You can add a lot of
different kind of fashion variables to the design of your character in order
to get them to stand out, in order to add to
their culture or whatever your story consists of and however your
character fits into it. No makeup is one of
the ways in which we express ourselves
as human beings to dress is one of the ways in
which we express ourselves as certainly in order to get your characters
expressing who they are. Given that we're working
with a visual medium, it only makes sense to give
thought to such things. That's the fun part, right? Especially when you get to
design your own characters, will do the same
thing on either side. Once again, I'm
outlining the shape of the eyelashes before
filling them in. So not just scribbling
them in there. I'm being neat with it. Don't scribble. Okay, we don't wanna
be scribbling. We want to keep our
lines nice and tight. We want to make our
lines purposeful. Laying them down onto the
page with energy and gesture. It's intention. Don't make your lines
make, make them strong. And what you'll
find is that you're drawing really comes together
in a much more solid way. Beautiful. We've got some
gorgeous looking eyes here. You'll notice that I'm splitting
off some eyelashes from the main shape that I had
previously established. Sometimes you wanna
do that just to give the eyelashes are much
Brush your appearance. You can see the
significant difference between the eyes of the male, in the eyes of the female here. Really the only difference is, is that the female has bigger eyelashes and
slightly wider eyes. Open eyes, I guess. Next up we are going to
placing the top eyelid. Indicate underside ridge
of the brow and where it meets the way the top
eyelid actually folds in underneath the upper
edge of the eye socket. Once again, I would check with your colorist or you can
even shade it in yourself. The eye shadow you might add
to this region of the eyes. Before we jump
onto the eyebrows, Let's actually draw in
the iris and the pupil. Start out with the
outline of the iris. The pupil adding some shininess, a bit of a reflection
in the eye just to get that wet appearance. Wonderful. Next up,
we'll lay in a shape, a very basic shape
for the eyebrows. And remember that on
a female character, the eyebrows are going to sit slightly higher than
on a male character. They also won't be as bold. There'll be a bit
more thin as well. And as you practice this, what you'll notice is your liner will
loosen up inevitably. But it'll be precise. And that's really the place
that you want to get to. Because as your
linework loosens up, but it becomes more precise, you'll find that it
has more energy in it. And it's that energy that
we want to capture most. That's what makes a
drawing look alive. So it's going to capture
people's intention, attention and engage them. So it's going to stop
them in their tracks. So many artworks they
lack that life to it. And if you want yours
to have life to it, you've got to try to get
to a point where you become completely comfortable
drawing this stuff. You're always going
to think about it. You're always going
to make important considerations with your art. I think that ultimately you will find yourself
in a place at some point if you
really stick with it, where you become less
stressed about it. You're not guessing as much. You're really just rather
than thinking about getting it right and what the destination
is going to look like. You'd just be become completely submerged within the process. And you're really
along for the ride, you're really there
for the journey. And that's great. You almost, at some point you almost
get thrust into a trance when you really find that you're enjoying
what it is you're doing. You're not thinking about it. You're just you're watching
it come together before you. It's a fantastic feeling. And in the beginning it's
a hard place to arrive at. I know it took me a
long time to get to that point because I was
always a perfectionist, always being my worst critic. And really being
hard on myself as, as far as not being satisfied with what I
was able to come up with, I was always looking for that
next point of perfection. And honestly that can
be a good thing that can serve you to an extent. But certainly if you're trying to be a
perfectionist for too long, it can hold you back after awhile from your true potential. So we've got the
eyebrows drawn in. We've got the eye
is established. Now let's go ahead
and lay in the nose. Now you'll notice that
we gave the bridge of the nose what our mail
carriers are very hard edge. We're not going to
do that so much on our female character. Because again, that would cause her nose to look to find
we don't want that. And once again, we're
going to drop it just below the nose line
here just a bit. And also we're going
to keep in mind that rather than drawing
it in the middle here, like I was just about to do. We want to think about the
trajectory of the noise. End. It's blocked formation. And so the point of the nose, the tip of the nose would actually probably be about here. Okay, so we'll lay in the base of the nose there with a slightly darker outline. Then we'll draw in
the nostril opening, which will sit about there. And you might see
an indication of the other nostril openings on the opposite
side of the nose. But it'll only be very small. Most of the nodes
will actually obscure the opposite side of
the opposite nostril, our side of the face. And once we've got the tip
of the nose is drawn in, what we can do is we can define the
outline of the tip of the nose on the dark side. And we'll leave it at that. And we'll add in a little
line here just to show the recession of the nose bulb and where it meets the
outside of the nostril, that little corner section. And then we'll customize will sculpt out the shape of the
noise here with the eraser. Tweaking it ever so slightly. I like to try to give my noses
angular shapes sometimes. Really depends on the style
that you're going for and how you interpret
these facial features, honestly, that's how
I like to do it. And sometimes I'll change
things up as well. Like I think this is a
slightly different no shape to the shape that I
gave the male nose. I'm going to keep on tweaking
it here just for a moment. Again, it's not working for me, so I'm gonna get rid
of it altogether and redraw it back in. I think that's a little better. Leave it at that. Now let's draw an ellipse. So we'll start with the
middle of the lips. Again, dropping them down, dipping the middle
of ellipse down into the at least the top
lip, into the bottom lip. Drawing it out into the
corners of the mouth, going to sit just shorter, the midway point of the eyes. Then we'll draw in the top lip. Again still with a fairly broken outline at
this point until we draw in some lipstick or render in some lipstick rather. And we'll lay in
a darker outline for the base of the bottom lip, where we would see
some darker shadows collect in that region. Then the little indentation
just underneath the bottom lip where it leads
into the top of the chin. Now let's go ahead and add in some reflections to the lips and render them out
just a little bit. Adding a darker
tone that will add some contrast to the lips
and just darken them up. Again. Contrast typically
is going to be a beauty factor within a face. The more contrast there is, the more aesthetically pleasing that face will appear to be. I don't know why that would be, but it seems to certainly be the case where they're being comic book art or in reality. That's what beards do on men, is they add contrast
to the face. They helped to shape the jaw. B, it is like a man's makeup. Okay, so we've got the outside shape of the
ear now established. Let's go ahead and now place in the interior
cartilage of the ear. Leading this big Y shaped
piece of cartilage down into the bottom region and then back up to
cover the ear Hall. Pushing the top of
the Y-shaped piece of cartilage to create
that little recession. And that pretty much wraps up the facial features
for the female head. You'll notice that of course
we can't see the opposite, opposite ear on the far
side of the head because it's being completely
obscured and hidden. On this angle. And less the ears were really, really big and sticking
all the way out. You simply just wouldn't
be able to see it. Now all that's left
to do is to define the outline on the
outside of the face. And once again, we'll start with the underside
plane of the brow, bringing that in to the eye, and then back out again
to the cheekbone area. We've got a few options here. If we were to just go ahead and bring the cheekbone
in like that, well, It's going to look too masculine, so
we don't wanna do that. Instead, what we
wanna do is very softly indicate the cheekbone. And then lead that in. Sadly, the side of the jaw. Noun, and then down into the chin area and the surrounding muscle that wraps around the
outside of the mouth. And then didn't run a
base of it, the chin. It's getting a bit
tongue-tied there. We have a drink
of water, heating that outline in around
the base of the chin. And then up into the
sides of the jaw. Us a nice defined
representation of the jaw line. Once again, if you look at
the corners of the jaw, It's not completely curved. There is some fairly
hard lines there, but rather than
just being square, I have tried to soften
up to an extent. Sometimes if you
round everything out, even on a female character, he can start to steal some of the energy
away from the line, so just be wary of
that, keep it in mind. Next up. We'll lay in an
outline for the head. And I'm going to
keep the forehead. And where it leads into the
upper region of the brow. Barely rounded,
slight little dip. As they joined together. Once more, I'm trying
to make this line as clean and as defined in
well-polished as possible. I mean, I could make
it more polished. I could just create a new
layer and go riding over the top to really make
these lines super, super sharp, but that's unnecessary for
the demonstration. So you can repeat these head
studies over and over again until he could become completely comfortable drawing
the standard views. And not just being, not just copying
what I've done here, either being able to
do it on your own. So try to get to
that point, right? Practice these
standard head views throughout the coming week, throughout the coming
weeks if needed. And really try to get
a handle on them. Learn them off by heart as if you're learning a
script for a play. And that'll be very
important in the long run, especially when we
start to move into the more difficult views
of the head you want to have underpinning
foundational knowledge of not just the basic structure, but also these primary viewpoints so that you're
familiar with the proportions. And once again, the reason
that you want to be so familiar with them
is because when it comes to foreshortening, those proportions are
still going to be intact, but you'll need to be
able to foreshortened than the scale. So they'll still be
relatively correct, just they will be skewed
in lots of different ways. But nonetheless, that does
complete our demonstration for the three-quarter views of the male and the female head.
8. Assignment: Hey, thanks for watching. I hope you enjoyed
the class and that you've got a ton of
value out of it. Now, maybe you've been following along and in front of you. You've drawn up a front side and three-quarter view of the
male and female head. And I applaud you for that. You've really applied yourself throughout this class
and hopefully you're seeing at least some results from going through
these lessons. But what's really going to hit all the information
of imparted to you home is repetition and practice. So for the assignment
of this class, even though you've
possibly already gone through the lessons and
put pencil to paper, is I'd like you to
rinse and repeat the process because that's what's going to build
your confidence. And it's also going to give
you unconscious competence. In other words, hopefully, at some point after
enough mileage, you'll be able to nail the proportions, nail
the foundations, and get those facial
features placed onto the head accurately without
even thinking about it. It's just like
memorizing a script. It's like writing words, learning how to write
for the first time. After awhile, you don't even have to consciously
think about it. Well, drawing works in
very much the same way. So that's your assignment
for this class. Start filling up
your sketch book, dedicate entire pages to the front side and three-quarter views of
the male and female head. And what you are going
to find is that it becomes easier and easier and easier for you to
the point where you don't even have to consciously
think about it anymore. Not to mention, the
end result is going to look better and
better and better. That is my wish to
you and what I really want you to get
out of this class. So good luck and until
next time, keep drawing.
 Clayton Barton, Harness the Power of Dynamic Drawing