Transcripts
1. Introduction: Hey, hey, doing.
It's Clayton here from how to draw comics.net, the how to draw comics Academy. In this lesson, we
are going to be taking a look at how to draw the male figure complete with
the full muscle structure, the pecs, the abdominal muscles, and the legs and the arms
and all the muscles that consist within those limbs
from the front view. So you're going to get
the full low down of exactly how the anatomy
of the human body fits together and why
it's so important that we learn how to
draw it accurately. Without further ado, let's
jump straight into it.
2. Measuring The Proportions: Okay, so here we are
in Clip Studio Paint. I've got my pencil
ready to rock and roll, the Mark Bron legendary
line art brush. And I want a brand new layer. We're going to lay
down a single line. Now, if you want to use a
ruler for this, use a ruler. What I'm going to do is I'm going to cheat
here a little bit, and I'm going to just
click once at the top, where I want the line to begin, and then I'm going
to hold down shift on my keyboard to
draw a straight line, perfectly straight lane line all the way down to the bottom of the canvas, where
I want it to end. Now, that's very faint there. Let me make it a
little thicker so that you can see it better. All right. That's great. Now, this line is going to represent the full
height of our figure. And it's also going to establish where the middle
of the figure will be, which is important here
for the front view of the male figure because we
want to preserve symmetry. In other words, we want to
know where the middle of our figure is so that we can mirror one side of it
over to the other. Okay. This height line is also going to allow us
to be able to establish the head units of measurement that can be used to
measure out well, the head units of measurement that can be used to determine the proportions of the front view of the
male figure here. In order to find
those proportions, we're going to
divide the length of this line up into eighths. The easiest way to do that is to figure out where the
middle is going to be. So in order to find the middle, I'm just going to
create an x that runs from the bottom to the top here on either side of
the line real quick. I'll do that on a
different layer. So I'm going to go down here, I'm going to place an X. So I'm going to have
one diagonal line. Running up from the
bottom to the top, and I'm going to criss
cross it with another. And where those lines intersect, that's going
to be the middle. So that's going to be the middle of our measurement stick there. Now, once I've got that
cross placed down and I know where the middle of the measurement stick
is going to reside, I'm just going to turn that
cross off. Okay, great. So this is the middle here. And then what I'm going to do is I'm going to
create another cross. I'll make a new layer here. What this cross is going to do is it's going to run up from the middle of the height
line to the top of it. We want to try to start these on each side of the line
at the same distance. And then those lines intersect, we're going to place
another little d. That's going to represent the
middle of the top segment. Okay. So we can do the same thing for the bottom segment. I'm
going to go down here. We're going to run a
diagonal line from the middle point down to the
bottom. The same thing here. Now, this is just a
very drawn out way of establishing our proportions, figuring out where
they're going to sit. Of course, you
don't have to go to this much trouble
every single time. You can just eyeball
it after a while, once you know what your proportions are and you
become familiar with them. As you become
familiar with them, that's when you can start to make the right guestimations. Okay, so we've got
that cross placed in. We're going to add in
another little dash. Then we can get rid
of these crosses. Okay, great. So we don't
want to lose sight of where the middle of our
measuring stick there is. So I'm just going to
embolden it a little bit. And once that's done,
I'm going to divide each one of these
segments into halves. So I'm going to divide
this one up here, and now I am i ballan. We could draw xs for
each one of these, but I don't want to spend too much time just
on the proportions here. So we've got enough information
there to figure out where to divide these segments and have those divisions
be fairly accurate. It might not be perfect, but
they'll be fairly accurate. Okay. Now once they are all
divided, what do we have? We have one, two, three, four, five, six, seven,
eight head units. Eight head units is
the average height of most comic book figures. That's the standard that's been used for a very long while. Now, every artist has their own proportional measuring system that they like to use. Most use eight, to use
nine, some use six. It really doesn't matter, and it's up to you at
the end of the day and whether or not it produces the look for the characters that you're drawing that
you like most.
3. Constructing The Mannequin Model: Okay. Now that we've got
the measuring stick down, we're going to go ahead
and we'll convert it. Well, we'll just lower the
opacity of it a little bit. Okay, so we're making it
slightly more C through, and I'm doing that over here on my layer in the
opacity slider. I'm going to take it
down to about 50. What that's going to allow me
to do is just to be able to see more clearly what I'm
drawing over the top of it, which is going to be my figure. Okay. Now we know how large
the head is going to be. We're going to start drawing out the front view
of the male figure, and what that's going to look like at this stage is
the Menican model. That's the form that
it's going to be in, which is pretty much the
most basic form that you could possibly draw
the human body in. Now, there's a number of ways we could draw up the head here. We could draw it as just
a simple oval for now, or we can take it a little
bit further than that. We can go ahead and start out with a circle
for the cranium. Like so, and just very
lightly sketch that in there. So we're keeping
things pretty neat. Then we've got the
middle division of the head established there. So that's running down the top from the top of
the cranium to the bottom. Then we just place in
another horizontal guideline that's going to run across it. That's going to ultimately
establish the brow line. Then we'll chop the sides
of that sphere off. Then finally, establish where the bottom of the
chin is going to be. Now we know that
the bottom of the chin is going to be about here. Then we simply place
in the jaw line. And what that's going to give us is a pretty solid head shape. A pretty solid
head shape indeed. We just erase away these little off cuts at
the sides of the head. We don't need those no more. If we want to, we can
even place on some ears. I'm going to also
divide the distance between the brow here and the
bottom of the chin in half. That's going to give us
the placement of the nose. Now, we're not going to take the head too much
further than that. We're going to leave it as ears and move on to the
rest of the body. Next, we're going to
place in the neck. If I was going to tell you where to place the
shoulder line, I'd say, divide this neck head
unit up into thirds and the shoulder line is going to sit on about
that first third. It's just going to place
it there, like so. Now everybody's different. Every single human has
their own unique quirk. So as far as where
everything sits, there's going to be nuances. And there's not any
hard and fast rule as to how far down you need
to place that collar bone. I just break it up
into thirds with that second head unit because I feel like it helps make it
easier for me to remember, but you got to do what works well for
you and what feels right. So next up, I'm going
to do something interesting here just for
future reference later. I'm actually going to determine where the shoulders
are by outlining them as I pull them out of the collar bone or the collarbone guideline
that are placed in there. And that's just going to help me to think about how wide the
body is going to be here. I'm going to just very
lightly sketch it in like so. And now I know where
the shoulders are. Now that I know where the
shoulders are slow down, Clay. I can more confidently determine how wide the
chest is going to be. So now I'm going to place in a very simplified form for
the Mican model chest. And the Micandeles
is going to drop down and land just above
the three head unit marks. That's going to be about here. I'm going to take
it down. Like so. You can see that I'm keeping this manican model fairly light. That's because keep in mind, we're going to be drawing
the muscle structure of the male body
over the top of it. We're just taking
this step by step. And remember that
we're trying to keep things even on either side. I want to keep
things symmetrical. In other words, we want to try our best to
keep it the same. Now, this shape that I'm
placing down onto the page, it represents the chest cavity, it represents the rib cage. Once we've taken it down to this point just above the three head mark, we're
going to arch it up. Now, how far we arch
it up, it's up to you. It really doesn't matter. I'm going to take mine
up to about here. And I guess that's where
the Sandum would land. Which is the front
of the rib cage. Now that we've got the
rib cage established, I'm going to place
in a cross contour, that's going to curve in a slightly upward direction
just around the middle there. Why is it curving slightly
upward direction? Because from the side
view, if you were able to see the side view of
the male figure here, then you would see
that the chest actually is tilted backward. You know, this is the head here. It's tilted upward, faces
in an upward direction, which actually opposes
the tilt of the pelvis. Believe it or not. Okay, so we've got the chest
laid down in there. Next up, we're going to
draw in the pelvis. Okay? And in order to
draw in the pelvis, I'm just going to drop down the mid section
toward the pelvis. And that'll help me to determine
the width of the pelvis. Now what I'm going to do is draw in the bottom
of the pelvis. Now, where does the
bottom of the pelvis sit? Well, on a male, it sits just below just below
the forehead mark. Because we've got to leave
a little bit of room down there in the base of the
crutch area for the men. Then we're going to
draw in the sides. And then simply take this diagonal line
up from the base of the pelvis into the bottom of the sides of
those walls there. And then finally, we're going to segment it off at the belt line. This is a very neatly
drawn Menken model. I usually keep them
much rougher than this. But we want to make sure that
we do things right here. And then we're going to
cut in some leg holes. Those leg holes are
going to look like this, start from the bottom, and then just curve it up to the top and out to the sides. And as with the chest, we can place in a
downward this time, curving cross con line. And we'll solidify
the mid section of the body that joins the
chest and the pelvis together. Okay, so now we've got the
main torso drawn in there. We can also lay in the neck. The neck is just going to
have a cylindrical trunk with some muscles running out
from the sides of it. That's the kind of shape
that we want to capture for that area. Okay, great. Next, we'll go ahead
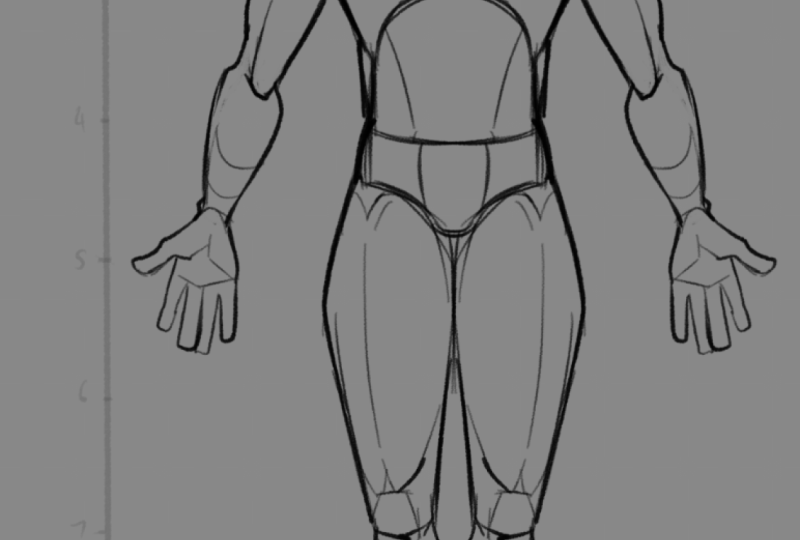
and place in the legs. Now, the legs. How do they work?
Well, we're going to start out with the upper leg. And we're going to run that
down to the knees here. And the knees are going to
sit on the sixth head mark. So the knees are going
to sit right here. Right on top of it. So now we're getting a
good idea as to what the proportions of the base
Minican model figure are. And it's important that
we keep those in mind because if the Minican
model is out of proportion, what do you think that's
going to mean for the muscles that sit
on top of it later on? That's right. It'll mean that the anatomy of the figure as we
lay it in on top of the proportioned Minican model will also not be in proportion. The Menican model, as
simple as it looks, should never be underestimated. It holds within it a lot of vital considerations that are either going to make or
break the drawing later on. It's important to
spend a little bit of time here with
the Manican model, getting it right,
making sure that it's ship shape before we take
the drawing further. You can think of the process of developing a drawing as
working it up in stages. And with each stage, we make sure that we get that particular part of
the process correct, as accurate as we possibly can before we move
on because we know that all the later stages are going to depend on
the previous stages. So the success of your drawing in the end is going to hinge
on this Manican model. And I'm just adding
in some very, very loose indications
of anatomy there. I'm already starting.
Can't help myself. Once I've done that, we
can make our way down into the shin or the lower
leg area of the figure. We're going to use these
very basic shapes. These are stylized
representations of the shape that we're going
to be using for the leg. They do have a
cylinder core to them. But you can see that I've made
a few little modifications to capture the general, I guess, anatomy that resides within
this area on a simple level, even before we start to
add in those muscles. And these shapes are something
that you're going to want to practice as well. You want to get good
at drawing them. Okay. Now we're going to
draw in the feet. Keep those simple. We've got the toes there. We've got the main body of the foot that runs
up into the ankles. It's a simple foot. It's nothing fancy. In fact, what we're drawing here, It's not fancy whatsoever. It's an anatomy diagram. It's supposed to serve
the purpose to learn. So don't think that it's got to be immaculate work of art
or anything like that. It's really something
that's going to teach you where the muscles go
throughout the human body. What scale they're going to be at, how they
connect together. Muscles are important to learn, not just for the visual
aesthetics of your characters. Because of course, when it
comes to drawing comic books, that's one of the
main draw cards, we want to draw these cool
muscle bound superheroes. Either that or we want
to draw sexy hot babes. I mean, I know as
shallow as that sounds. Look, hey, that's what oftentimes I get asked to
teach people how to draw. It's not my choice. I enjoy it, of course,
but it's interesting, you know, the motivations
of comic ocards sometimes. And, you know, sometimes
people want to learn how to draw a very handsome, muscular male
superhero character. So it swings both ways. But anatomy, no matter what kind of character you want to draw, is going to be a big part of it. And beyond the visual
aesthetics, however, what's going to be
important about learning anatomy is when you
know good anatomy, then you can ensure that your character
works functionally, if you put your character
into some kind of crazy pose, and you're not sure if
it's quite working, you'll know fairly quickly when you start to add in the anatomy, whether or not things are string in together properly because the anatomy is really
what allows us to piece together
the human body. I mean, it's what
powers the human body. It's what allows it to move into different positions
in the first place. And so that's what
I've found at least is that even problem
solving oppose, when I'm having trouble with it, if I start to lay
the anatomy on top, all of a sudden, I'm
able to make sense of the situation a
little bit easier. You'll notice that I'm starting
to carve out the shape. Of the lower legs here, and I'm just raising
those calves. The reason I'm taking
so much time here with the shape of the
manic and model legs is because guess what? A lot of anatomy. What gives it its look, its appearance is
going to be just from the outer contours alone. That's right. If you think about even the toughest strongest
body builders, if you go to the
gym and you look at the people working out there, one of the things that you're
going to notice is that Unless they're
very, very low fat. Unless they're like 7%
body fat or whatever. You're not going to see a
whole lot of definition. You're not going to see the
individual muscle groups defined individually. You're going to see mostly the outer shape that those muscles come
together to create. And so that's really
what we've got here. You can see here that
muscle and anatomy, is being implied just with the outer contours
of these shapes that I've used for the
lower and the upper legs. But we've figured out how the lower body is
going to look here, how it's going to be posed
with the manca model. So now we're going to
make our way up back to the top of the chest
and build out the arms. Okay. So in order to do this,
this is very interesting, what we're going to do is we're actually going to start
placing in the side of the pe because the PCs and the shoulders are fairly
closely tied together. Now, where are the pecks
going to come down to? Well, when we're thinking about the proportions
of the human body, the nipples are going to sit
on the two head mark, okay? So the two head
mark is about here, which means the nipples are
going to sit out there. So we're going to place down an angular line that
runs in this trajectory. We're going to place it down
onto the chest like so. In fact, we'll bring it in about there, I
think, should do it. And we'll do that
on either side. I'm going to bring
it down like so. As we lay in this angular line, we might feel that,
you know what? The shoulders of
our male character here could probably
be a little broader. That's what I'm feeling, anyway. Now, once we've done that,
we're going to lead a new line up from where this one
stopped off at the shoulders, and we're going to angle it
up toward the collarbone. I'm going to draw
it out like that. Remember that we want to try
to keep this symmetrical so this pe form that we're
starting to build out, As we bring our focus
in on the shoulders, it needs to have
the same amount of space on the on the left hand side of the body as it does on the
right hand side. So next up, we're going to pull out these shoulders
a little bit further, and I think they're actually
looking fairly okay. We may not need to broaden
them too much more. We just need to maybe tweak
the shape a little bit. Okay. And then create a quick. It's like upside down tick we've created that leads the line
in a downward direction. And Then we'll change the trajectory of
this line and bring it down and finally link
these two together. You see that. And what you end up with is almost
like a hawks head. See that? We've got
a hawks head here. It's good to create those little visual associations because it helps you to
remember the shape of things. And we're going to do the
same thing on this side. We're going to create
another wk head. And we're going to make
sure that we bring down this shoulder the same amount as we brought down the shoulder on the
other side of the body. So, in other words, they need to be level with one another. We don't want one shoulder to be sitting lower than the other, especially in a front
view setup such as this. So we want to try
to get those right. Next up, we're going to
place in the upper arm. So the upper arm is going
to drop down, like so, from the base of the shoulders and also the armpit area
that we've created. And we're going to
bring that upper arm down to the three head mark. Now, the arms are going to
be rotated outward here, which will set the elbow
up a little higher than it would be if the arms were just straight
down at the sides at rest. So remember, this is the
three head mark here. Don't forget your head units. Remember what one you're at, can be a little
confusing when you start to get this
technical wood things. And then what we're
going to do is we're going to have the triceps peaked in from behind
just a little here. It's also partly the biceps that cause the arm to be
shaped this way. And the reason as
well that we're starting to talk about the
muscle groups already, even though we're still
on the Minica model is because look, the MinicA model is going
to take on the shape that is created by the muscles as
they're clustered together. So Yeah, that's the tricep creating and partially forming the shapes that we're using
for the Menkan model. So next up, we're going
to draw in the forearms, and you'll notice that
I'm taking the forearm up actually into the upper arm. This is where I believe it's
called the radio brachialis. I've just learned that name, the sound all fancy throughout
this atomin demonstration. I just call it one of
the primary far muscles actually runs up into the biceps into the
regular brachialis, I guess, and then drops down. And it's going to drop down. I want you to look at the
shape that I'm creating. It looks similar to the calves
actually to the lower leg. And what that takes on is
this chicken drumstick. Shape. Especially when you start to include the
angles in there, takes on a chicken drumstick. Look at that. So that's
really what we're drawing there for both the forearms
and the lower legs. And I want you to
notice that there is a long angle and a short
angle on either side. So here's the short angle. And here's the long angle of
this section, the forearm. And then we're going
to taper it in. Now, where does the wrist begin? It begins at the forehead mark. But remember that we've
taken the arms out, so they're rotated in
an outward direction. So it's actually going to
start a little higher here. Then, of course,
we've got the hands. We are going to connect
the hands on here. We're going to get too
detailed on the hands. How far down do the hands come? I like to think that
they come down to about the midway point
of the upper leg. They actually come
down quite far. So they'll be coming
down to about here. Now, the palm of the hand
is going to be about as big or as long rather
as the fingers. And there's a number
of choices you've got when it comes
to drawing a hand. Either you can break
it up like I'm doing, or you can sort of just create a bit of a shape that
looks kind of like a hand, which is another option I also like to
commonly play with. And I feel like
sometimes it creates a more natural appearance for
the hand in the end anyway. So that's what I'm going to do. I'll just lay that
in a very basic, very rough looking shape there. This isn't really a
hand demonstration, so that allows us to
get away with kind of, you know, not worrying too much about it, not
stressing over it. And that completes
our first arm. Now, the brilliant
thing about drawing up the front view of
the male figure is that we're really repeating whatever we do on
one side over to the other, which means we're getting some extra bang
for our buck here. We're getting some
practice points in. So now that we've already
familiarized ourselves with the construction of the arm
on this side of the body. We can go over here
now, and you know what? I'm just going to round
out that head real quick. Let's just round that out.
Yeah, we're going to go over to the left hand
side of the body now and we're going to start
to draw out the arm for it. It's like to neaten things
up and just tidy it. That's the perfectionist in me. Same deal as before, we're
dropping down the upper arm. We want to angle it out
at the same degree. Remember, symmetry, balance. This is key when you're doing up a diagrammatic representation of the male figure, such as this. You know what, capturing
that symmetry may be the hardest thing that you
have to deal with here. Because the rest is
just a jigsaw puzzle. The human body is really
a jigsaw puzzle, truly. You can have fun with
it. You just need to know where all the
different pieces go. That's the real challenge.
Now I'm adding in a little bit more shape
here to the bicep area. And I'm mimicking it
over to the other side. Next, we'll draw in
the forearm form. And the forearm form, if you want to
nail it, remember. You can either think of it
as a chicken leg like this. Or you can think of it as a tapered cylinder that has a short wedge and then a long wedge that
runs down the outside of it. There's two ways of
thinking about it. These are the ways that I
like to think about it. So now we're still looking at and making sure that we're getting as
close as possible, the angles of all of these different lines that make up the forearm
and the upper arm. We can see that This one's angled out to
a certain amount. So I want to do the same thing
on this side of the body. And I know that the wrist is
going to land about here. So, what do we want to do now? While I want to fix up
the outside portion of the fore arm now? I bring it out there. And then I'll bring it down. Bring it down to this point, pull out a extrusion
for the wrist. Now, we've given him
a tanker forearm somehow on this
side of his body. I actually don't know
how that happened. So he's got one arm that's
bigger than the other. There you go. Symmetry.
It's a tough thing. That's why I actually
do not enjoy drawing characters directly from
the front or the side. For a number of
reasons, it's not a very natural point of view. Very rarely, are you
looking directly smack bang at a front
view presentation of somebody like
this in real life. It's not natural. It's a very blueprint
representation of the human body. But that's what we need here in order to get our
anatomy right. Okay. So next up, we're going to
get those hands drawn in and try to get a bit of an
outline down for the hand. That's all you really
need to worry about here. I'm still keeping
in mind, of course, that there is a palm, that there's fingers
and that kind of thing. But once more, I'm not
getting to flustered, not getting too worried about getting all the details of
the hand looking correct. Not just yet anyway. No until we get
under hand anatomy. Yeah, that'll be a fun topic. Okay, so we have got now the Minican model
established on the page. And it's looking pretty solid. It's proportionally accurate, at least to the degree that
we can get it here. And we've got some
pretty good shape going on for the
Minican model itself, which is going to make laying
in the muscles way easier.
4. Drawing In The Muscles: Okay, so let's jump
straight into this. This is going to be
fairly straightforward. We're just going to
tackle one muscle group after the other taking
it step by step, and we'll start at the
top with the face. Okay, so I'm going
to draw in the eyes. Now, I'm just going to
drop a little line down. A small distance
from the brow line, and that's going to
be our eye line. B eyes roughly sit at the halfway point between the top and the
bottom of the head. So we're going to draw
in some eyes there. And I'm drawing very small here. Just I vaguely represent
where the eyes should go. Okay. We get a rough eyebrow shape
drawn in on either side. Yes, even the face has to be symmetrical in
the front view. And then we've got the nose, which is going to sit at
this little point that we marked out earlier. Now
we've got the mouth. Now, the mouth is going to be found in terms of
its positioning by dividing up the distance
between the bottom of the nose through to
the chin into thirds. And on the first third, that's where we're going
to find the mouth. That's going to be
about that point there. We can, of course, go in and do a little bit
of a racing here. Just extending the chin
down a little bit more. And that'll give us a fairly good presentation
for the head. Went through some basic
facial features there for it too and figured out where they were going to
be placed proportionally. Just something quick. We're really just
doing an overview here of the male figure, and all the anatomy it consists of for
this demonstration, but we will be
getting deeper into each part in another lesson. Okay, let's talk about the neck. Now, the neck is going to
have two bands of muscle that run down from the
bottom of the ear and into the center
of the collar bone. It's going to look a
little bit like this. And we'll do the same
thing on either side. So whatever we do on
one side of the body, we're going to be
doing on the opposite. Remember, we're getting extra
bang for our buck here. And then from the neck muscles that we've just established, we're going to place
in another little angular line that
creates some short of a triangle shape up from
the base of the collarbone, from the top of the
collarbone and into the base of that neck muscle
that we just laid in. Okay. Once that's done, we're
going to now go ahead and we'll place in
another muscle. And this muscle is
going to run down from the sides of the neck
into this section here. And in fact, there's a number of different muscles that are that are going to be placed
down in those areas. So here's how that's
going to work. We're going to place
in a muscle here. All right. And another one here, And we get this sort
of criss crossing of muscles somewhat that
occurs in the neck region. Now, we're fairly
zoomed out here. We're getting an overall look at the male figure.
You know what? Let's zoom in a little bit. Just so that we can see
what's going on a bit better. Okay, so for the neck, we're going to be chowing out. Let's see how this goes. We're going to have
muscle that runs down here and up into the neck. It's going to look
a bit like this. And then another muscle. So there's multiple
muscles here. Like I said, they sort of
criss cross over one another. But the main one that
we want to get down is this band muscle that runs down from the bottom of ears into the collar bone. I call it the band
muscle because it's a big band of muscle
that runs down there. And then we've got the
trapezius muscles. So we've got the minor muscles that sit around the
trunk of the neck and pretty much conform to
its cylindrical overall mass. And then we got the trapezius
muscles that sit around it. So it's important to remember
those primary forms. So again, we've got
the trunk of the neck. Then we've got the
trapezius muscles that sit around it like a hood. And then we got
these band muscles that run down from the
bottom of the ears. And that's really on a
simplified level what you're dealing with when it comes to the anatomy of the male neck. So next, we're going to lay
in the bottom of the pecs. Now, remember that the
nipples are going to sit here, On the two head mark. It's going to draw
one nipple there. And another nipple
here. I'll do. This one again, just to make
sure that it's symmetrical. You'll notice that
I place the nipples out to the side a
little bit more, they don't sit in front O the
pes in the middle of them. They actually sit
off to the sides. Now that we've got the
nipples established, we'll place in the
base of the pecks, and we're going to angle up the following line from the outer edge of the
peck and into the middle. And we're going to angle
it up again and create a nest division that
separates those ps. Then when we get to the top, we're going to separate
the pecks again, creating the lower edge
of the collar bone. Just bring it back
into the shoulders. There's a little plane
shift that occurs as well when it comes to the PCs. Not a little one, but a major plane shift
that is so apparent. We're actually going
to establish it here just on a simple level. We're going to draw it in a
division that shows where the general shape of the ps going to transition
to a different angle. That's why oftentimes you'll
find that bottom area to be quite dark on the peck, especially the light direction
is coming from above. So that's the PCs.
And here's the thing. If you wanted to draw in the striations of
the PCs, you could. So the the individual
muscle groups within the pe We're not going to get too detailed
on those just yet, but just for future reference. This is the general
path that they take. Let me go another a few that run through
the middle there. You can see these striations, what they call them, especially on really muscular
body builders. But what I really want to
draw your attention to is just the general shape of the PCs that we're
drawing in here. Okay. Next up, we've got
the shoulders. Now, the shoulders
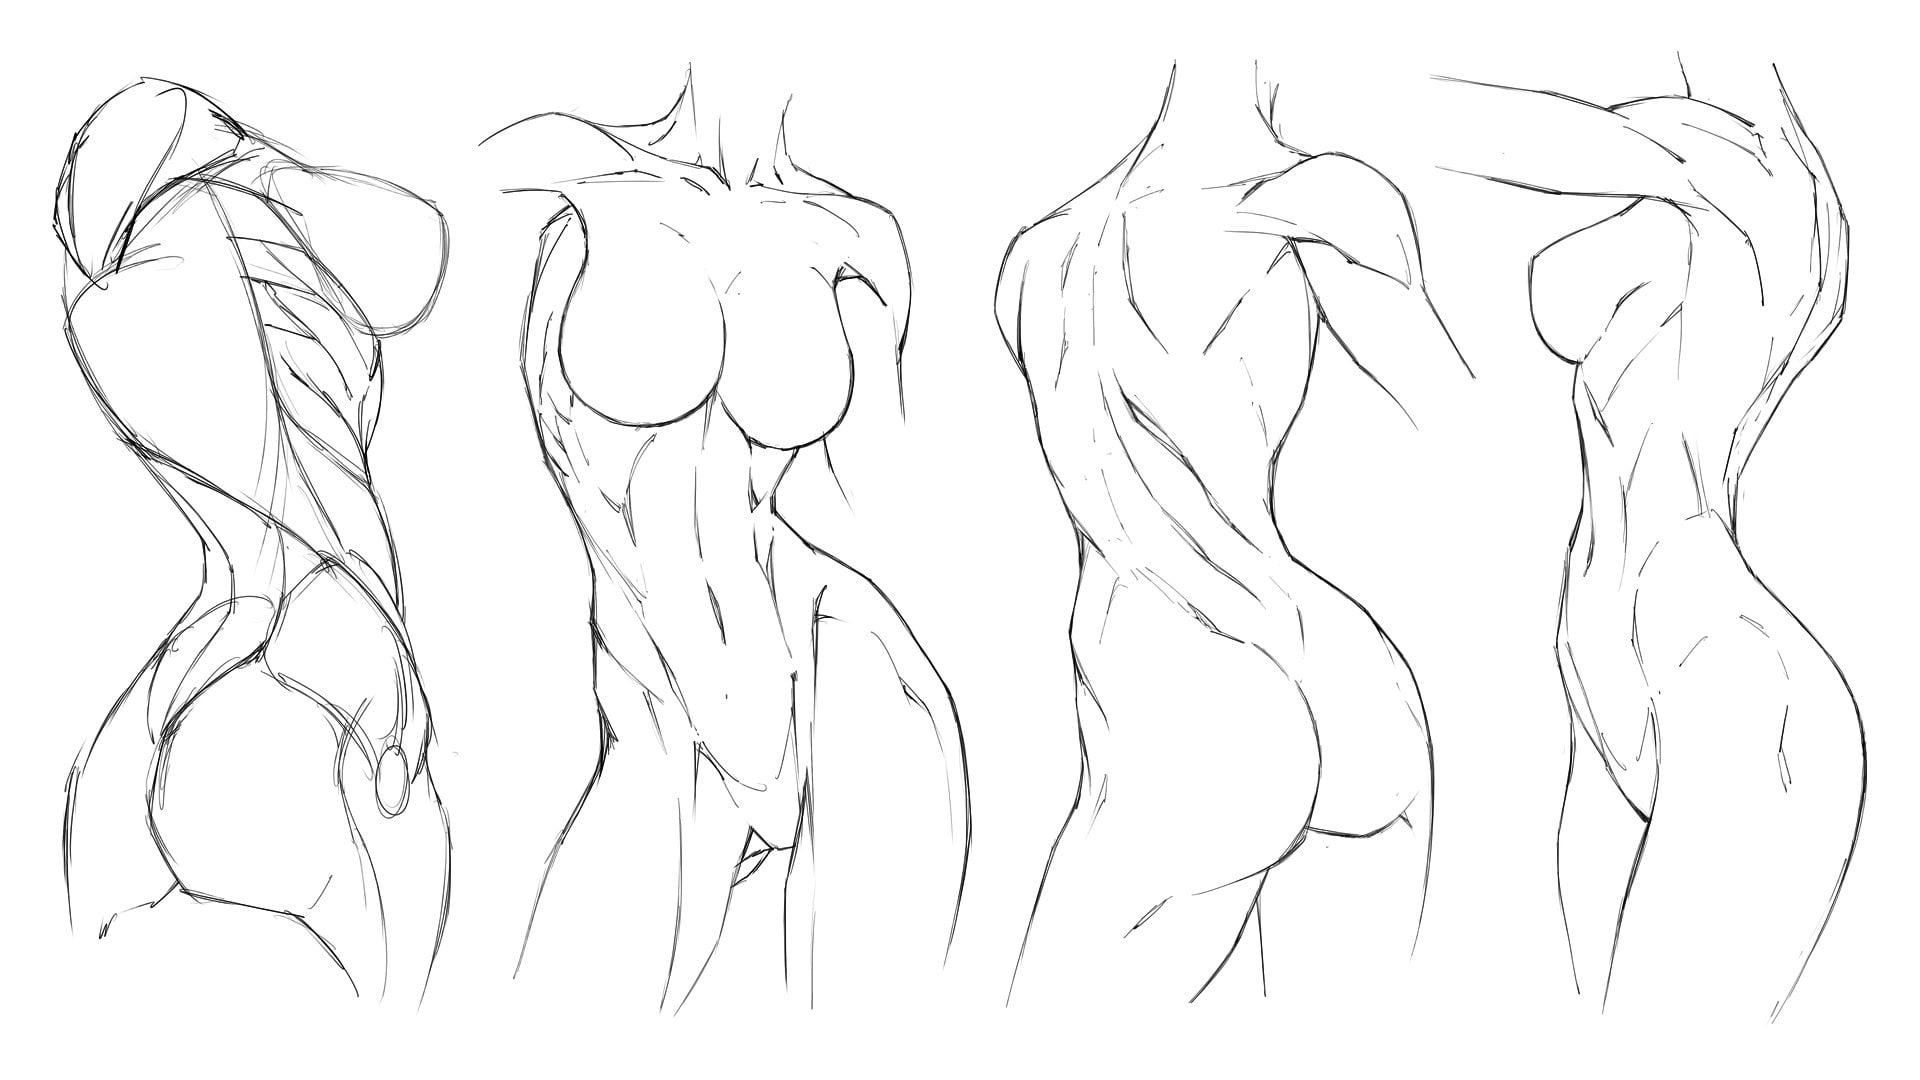
are comprised of three muscles when you're
looking at them from the side. So this is a side view
of the shoulders, and they're broken up into three major muscle
groups that are all encompassed as
the deltoids, right? So that's what the shoulder muscles are called the deltoids. So from the front,
we're going to see one. Let's draw that in. Nice and lightly at first,
get it established. Then go back over the
top of it to define it. Then we're going to
have the outer one. And we're not going
to see the division behind that separates the
back deltoid from the rest. Since we're looking at the
body from the front here. Don't worry. We will
be doing a lesson on how to draw the female figure from the front as well and get all of the muscle groups
drawn out accurately. Now, here's a
thing. We're really simplifying the muscles down here into the most
general forms. There is a lot more detail and a lot more complexity
that can go into them. Like, for example, these shoulders here that
we're separating. Well, let's go ahead and actually make this
a bit more detailed. So I'm just going to
get my eraser here. And I want you to notice how the deltoids are actually
they're almost following the fanned striations of the
pecks as they're laid down. Let's see the sort of angle
that they're on there. So I really want to
try to capture that. And I want to be thinking
about that as I lay them in. Okay, so that's the shoulders. And how they look
from the front view. Next, we're going to
jump back to the torso, and we're going to lay
in the abdominal muscles before we continue
on with the arms. So for the abdominal muscles, we have a little arch
up the top here. Now, everyone's got
different sorts of abs. They can come in all
different shapes and sizes. The ones that I'm going
to be showing you here are typically
what you'd see from, like, Jim Lee or David Finch. So we start at the top here, I like to think of this as, I guess, one of the underside
sections of the ribs. And I'm not entirely sure what they call this section.
There is a name for it. I think from memory, it's called the Greek
Arch, something like that. Some people have it
and some people don't. The people who don't, you
can see their abs actually going You can actually see their abs going all the way up into the
bottom of the pecs, believe it or not, and it
looks a bit like that. But that's not the style
we're going with here. Which way is the right way,
both are the right way. It just depends on the kind
of anatomy that you want to give your character
because in real life, humans can have both. Okay. So once we've got that Greek arch placed
down onto the page. We can go ahead here and start to draw out the
abs underneath it. I'm going to take out the
side of the first set of abs from of the outer
edge of the arch, and then into the middle. I want you to notice the shape
of the bottom of the abs, how that looks, like
a wavy con to it. It's not completely straight
from one side to the other. I want you to try to capture the same shape for the abs
that you draw in here. Hopefully, you're following
along, step by step. That's the easiest way
to tackle this lesson, I would say, follow along. Do the work, put pencil
to paper, make it happen. Don't just watch. You're not going to learn
through just watching. And now here's
what's interesting. We're going to place down
another rib that's going to ladder in just underneath that first set of abs
on the outer edge. We're going to hook
it up on either side. And from that point,
we're going to draw in the second set of abs. The second set of abs are going to come down
to about here. And this is about where
the belly button will sit too at the three head mark. That's the second set of abs. Then we're going to
do the same thing. We're going to create
another rib hook on the side of those abs. And from that point, we're going to lay in the
bottom set of abs. That bottom set of abs is
actually a much longer set. So they're going
to run all the way down into the belt line. I'm just going to take them down to about that point first. Before we move on and start to fill out this section of anatomy in the lower half of the body. Next, we've got I guess you would call
this the serratus. I think that's what it's called. I could just call this
the side torso muscles most of the time
until I need to know the proper names, which yeah. I'm pretty sure there
is the serratus. And then we're sort of
creating this pattern now. This pattern ladder look. This is how it appears. You can almost think
of it as a series of s that we're placing
down on the page here. And they're going to tuck in up against the lateral muscles
that we're going to see popping out to say
hello from the back. Okay. And we're going
to add a little bit more on here for those
lateral muscles. So going to build
them out like that and tuck them back into
the sides of the body. That's what gives us that really obvious light
bulb appearance for the male torso. Now, these lateral muscles, you can really only see from the back what they
really look like, but you are going to get an indication of them
from the sides. Okay. Now, what next? Well, then
we've got the obliques. Can the obliques run
down from, I guess, the serratus and into the top of the pelvis
at that belt line? I go to do the same thing
on either side here. And then we've just
got the hip area. And this hip area
doesn't have a whole lot of muscle action going on. Well, I guess this is
where you start to get the leg muscles happen
in those areas. So we're going to just
before we move down further, we're going to jump back up
to the arms here and fill out the muscles in
those sections. So we've got the biceps, which we get a really good
look at from the front. Because we've already,
for the most part, placed in and
outlined their shape. Well, there's not a whole
lot of work to do here. We just got to place
the divisions in that separate the muscle
groups inside the arm. And then we can call it a day. This are really just
retracing our steps there. And then we've got
the four arms here. Now, the four arms,
this is where we're going to get
to see a little bit more action happening. We're going to get
this radio brachialis. I hope I'm getting
that name, right. And we're going to bring
that down to here. And there's also another major for arm muscle on
the opposite side, which we've already basically
placed down in there. We're going to jump over to the opposite side to the right
hand side of the body now. I'm going to do the
exact same thing. We've got the
radiobrach drops down from the main brachialis
in the upper arm. And then into the wrist. And we've got a bunch
of muscles in there. For now, all we can see
is really going to be a little division that runs down from the middle
of that radio brachialis into the
bottom of the wrist. And then finally, we've obviously got the
trips from behind, but they're already outlined. They're already down. So there's not a whole lot more we
have to do with them. Arms are pretty easy. Okay. So, what about
the legs then? Well, the legs, this is where we're going to have to do
a little bit more work. So everybody finds legs
difficult to draw, but here's how we're
going to tackle them. We start off where
the obliques are. Okay? So I'm going to draw a little dot here at
the bottom of the oblique. The reason I'm doing
that is because there's a long band like muscle that runs down from about this point into the legs. It's going to follow
this curvaceous Trajectory down and
around the quads, which you can see
me outlining there. So that's the line that
we're placing down now. We're going to do
it on both sides. So again, we'll run it
down from this point and down and out and then tuck
it back into the knee. Mike so. And there's a little bit of tweaking that I probably need to do there. Just going to sculpt it out a little, reshape it somewhat. And then on the outer leg, we're going to get
the other quad. Okay? So we're working
on the quad muscles here that sit at the top or around the front
of upper leg. And we're really
trying to capture the correct shape for
them at this point. They sit around the
top of the knees. One sits lower than the other. The inner cod is going to sit
lower than the outer cod. Then we're going
to bring that one back up to about here, and
then we're going to stop. We're going to do the same
thing on the opposite side. Remember this outer cod
is going to sit higher. I'm going to hook it up. And then from that point, we're going to jump up
to the top of the leg, so the very tippy top, and we're going to
draw in another shape. And this is going
to be the top cord. At least I refer to
it as the top cord. I'm sure they all
have proper names, but I refer to it
as the top cord. And you can see that I'm giving these muscles a
little bit of shape. They're not just boring
looking shapes either. They're actually there to
help to stylize the muscles. And every person, every single
artist is going to have their own way of stylizing the muscles that reside
throughout the human body. You're going to come
up with your own. This is just an interpretation. This is the way I interpret the muscles of the human body. You might go ahead later
on and you might look at an actual photo reference
of I don't know, a realistic breakdown
of the human body. You might be like, Wow. What the heck was
Clayton talking about? These muscles don't look
anything like actual muscles do, you'd probably be
right because I'm stylizing the heck out of
this anatomy because I've found a look that I enjoy for my characters that may not
necessarily be 100% accurate. Or real, but that create
an impact on the page. That's usually what
I'm looking for. So What I'm doing here is I'm showing
you where the main muscle groups will reside. But eventually, you will
want to go off and look at actual photo references and figure out ways of stylizing the muscle groups for yourself. Now, you can totally
go with my style if you like to look
of it and it does the job that you want it to do. Of course. You know, you look
at Joe Mad style. There's another
artist, Jonathan Rect a really incredible artist. You look at J Scott Campbell, all of them have
different ways of representing the human body. And they do detour far away from how
muscles actually look. Okay. So we have the leg
muscles drawn in there, great at the top.
These are the quads. And then what we're going to do is place in the inner thigh. We're going to get that
nicely outlined there. Then we'll finish establishing this dividing line
that separates the ads from the inner thigh. And then finally, we're
going to place in the bottom of this
lower set of abs. It's going to look a
little bit like that. That's sort of how we deal with that little area
of the male body. Now, what comes next? Well, next, we're going to have another band of muscle that runs down the side of the
leg, the outer edges. I have a look here, actually. So, yeah, we've got this other band of
muscle that's going to run down the sides. And we're going to
see a little hint of the side leg muscles as well. But really, not a whole lot. Right. What matters is that you're
capturing the shape, the correct shape of
everything rather than the individual muscles that
sit inside the contours. In fact, if you can
nail the shape. A lot of the time if you get
the interior muscles wrong, it doesn't really matter anyway because the shape still
makes it look right. Next up, we're going
to drop in the top. Oh, sorry, we're going to
drop in the top of the knees, but we're also going
to be at the same time establishing the
bottom of those quads. So that's how they're
going to look. And from there, we draw
out the side of the knees. And you'll notice that they
kind of look like skulls. Okay. So this is the
top of the knee. This is the bottom of the knee. And can see how if we dropped
in some eyes and a nose, that that would kind of
like a skull there, right? You know, again, this is how
you remember the human body. You create what do they
call it like a mind castle, a memory castle with visual symbols that
represent the anatomy. And that's how it becomes
easy to remember. Going to do the same thing
on the opposite side. Drawing in this skull shape, And then from there,
go ahead and place in the section of
the leg that runs down from the upper leg
into the lower leg. All of these areas
have scientific names, but you don't need
to remember them. You just need to look at
them and know where they go. Roughly what size
they need to be at, what shape they need to be, and as long as you do
that, you'll be set. Okay. So now we've got the calves
that are going to peek in around the front, sitting around the shin. So again, I want
to do that there. And all of these muscles
on the lower leg, you're not going to really see a whole lot of defined
cuts for them, except for maybe the calves and the chiles at
the back of the leg. For the front, you will see some muscles there on
the surface of the skin. I'm going to add in
some more of those. Because they certainly
reside there for sure. But you're just not going to see them
defined on the surface of the skin very often. Let me draw that in again. Okay, so we got
this muscle. Okay. Can be a little confusing to
figure out what's going on in the lower portion of the legs sometime because in fact, you can see the same thing
about the fore arms, in fact. There's a lot of
different muscles going on in these regions. And because they are so shallow, you know, their forms aren't. You can definitely
run into a bit of trouble there when it comes to figuring out
where each one goes. Okay. And I know that there is one that kind of runs across the lower leg too. As you start to get to know the human body and
you practice it and you figure out how
to stylize it well. What you're going
to find is that you bend the rules a
little bit from time to time every now and
then you'll stylize a muscle in such a way that really hits it out the
ballpark of reality. And, you know, and that's okay, because if you present it well,
then that doesn't matter. If you present it well, then
you're really going beyond. And I think that's what you're supposed
to do as an artist. You're supposed to
really be presenting your interpretation of life. Now, for the feet,
we're just going to leave them as well, I guess we could put in
some toes, couldn't we. Let's not be lazy here. Let's go to place in
some toes like that. And just like with
the hands, though, I am going to keep the shapes here that I'm using for
the feet fairly vague. Because Boy, boy, when it
comes to drawing out feet, I could be here all day
just perfecting them, trying to get them
to look right. For this demonstration,
at least, we just want to get something down that looks
reasonably accurate. Ing like this. Okay, that'll do. Great. We've got the legs. We've got the arms down, and we've even got the head down, if you
can believe that. Which means we've pretty much completed the front
view of the male body. The last thing I'm going
to do here is just add in a little bit more anatomy to the hands just to bring those through to a higher
level of completion. Get those drawn in. Give them a few line weights. Okay. And of course, there's going to be
characters out there that have a bit more
bulk to them than this. There's going to be
characters that don't. There's going to be characters
that look way skinnier. There's regular characters. There's heroic characters. There's villainous characters. There's lots of different
body types out there. There's mesomorphs,
there's ectomorph, there's ectomorphs. Yeah. No, we can talk
about all of those. But this is just the
standard anatomy setup that you're going to see
for most heroic characters. And that really
completes the front view of the male figure and all
the muscles that it entails, how they're structured,
how they're scaled, and most importantly,
their proportions. And the last thing I'm
going to add in here. Yep, before we wrap it up is more defined
outline for the ankle. Okay, that's it. I swear.
That's the end of the lesson.
5. Conclusion: I want to thank you again
so much for joining me in this lesson where
we learned how to draw up the male figure in the front view and place
all the anatomy in on top. We started with the Menkan model where we got the base structure
down ensured that it was properly proportion
that the symmetry was spot on or at least as spot on as we could
make it before adding in the anatomy on top, the individual muscle groups
that make up the human body. We went step by step
through the entire process. What I want you to do going forward is to
repeat the process. So many times that you become 100% familiar with
it and that you know it up by heart
because that's what learning anatomy
is all about. That's how you get
good is practice. There's no easy way to say it. I can't just show
you this stuff once, and you're going to be
able to remember it, and you're going to be able
to execute it perfectly. Unfortunately, it's going
to take a few goes around, just like with any other skill
that you set out to learn. But isn't that a wonderful
thing that you can just through repetition,
master something? That's what you're
going to be doing as you move forward and become master of comic book
illustration in general because anatomy is
a really big part of that. Until next time,
keep on drawing, keep on practicing,
and I'll catch you in the next session.
Bye bye for now.
 Clayton Barton, Harness the Power of Dynamic Drawing