Transcripts
1. Introduction: Hi, I'm Emily. I'm an artist and a drawing teacher
from New Zealand and my goal is to simplify the drawing process for
beginners and improvers. If you've ever tried to
draw flowers or leaves, then you'll know it's not
quite as easy as it looks. And I've designed this
class to break down the process of drawing
flowers at any angle. We'll take a look at
some flowers and leaves, and we'll analyze them to
see the overall shapes. Then I'll take you through some drawing exercises so you can become familiar
with the types of shapes you'll need
to be able to draw. If you're drawing flowers from photos or from imagination, we're going to be drawing lots
of ellipses in this class. It's a good one if you
need to get in some of that practice drawing
quick and loose ellipses. Finally, we're going
to draw two sketches. One of daisies and
one of poppies. Now, just a warning, this
final part of the class is not going to be a step by step draw a daisy
type of project. Instead, it's a
quick sketch to put what we've covered in
the class into action. Because I mostly
want to focus on the skills that you
need to be able to break down the
simple shape of any flower and draw it
at the correct angle. And I hope these
techniques will be useful for your own
botanical drawings.
2. Materials: The materials that you need for this tutorial are very simple. You'll need some
sketching pencil. I would recommend
just an HB pencil. I'm going to use my
mechanical one just because it is nice and sharp. I won't have to stop and
sharpen it halfway through. It's about the equivalent
of an HB pencil. Then you'll need
an eraser as well, just in case you want
to rub anything out.
3. Discussion: Understanding The Angles Of Flowers: This tutorial is
a lot more about understanding how to change the angle of flowers when
you're drawing them. Rather than producing a
finished drawing at the end, we will take what we've
learned and start a more final drawing at
the end as a project. But it's not going to be like a step by step shading
tutorial, anything like that. It's more about understanding the structure of
flowers and how we can draw them so
that they look like they're facing different angles. Now if you have a look
at this photo up here, you'll see that this one
in the front here is facing directly towards
us and it's a circle. This one above it is
pointing up towards the sky. If we draw a line around that, you'll see that it's an oval. And then we've got one
over to the left here, and we draw a line around that, that's like a fatter, an oval. And then we've got this
one up here as well. That's an oval too. Now, it's quite easy to see, especially when I draw
it on the screen, But what I want to
do is just give you a quick demonstration
that will hopefully help you understand what's
actually happening with those shapes when they are changing angle and they're having perspective
applied to them. So this might seem quite
a simple demonstration, but I think sometimes, especially for artists who may be more of a visual learner, then seeing this inaction
can actually help. I guess just make something
click in your mind as to what's actually
happening when these shapes change in space, change direction in space, or change angle in space. And also how we can translate what we're
seeing onto paper. If I take this plate
here, it's a circle. You can imagine
this is a flower, maybe it's a sunflower. And this circle on the inside is that big center
of a sunflower. Now, as I start to tilt this
over in this direction here, you'll see that
our perception of the shape changes when I
hold it at this angle here. It's actually an oval shape. As I bring it back
to the center, it's going to become
a circle again. Now, obviously we know
this plate is a circle. What we're trying to
get our head around is how that circle is changing. Our perception of that circle is changing as the angle changes. You'll notice also
that this circle in the center of the plate
also becomes an oval. Now what happens when we're drawing something
like these flowers is we have such a strong idea
of the flowers being round, especially that
one in the front, that sometimes when we go to
draw these other flowers, we might end up making
them a little bit rounder. We don't get that sense of perspective that is
actually happening there. What we could do if I hold this back up
to the screen again, if you've got a bigger
screen in front of you, actually when I turn this
around here and stop, it may actually just trace
your finger around that shape, that circle that
has become an oval. Now, the more I turn it, the narrower that oval becomes. If you can't actually trace it on the screen
with your finger, just imagine that you're
running a line around it. What we need to do to draw these flowers at
different angles is we need to make that shift from three dimensions
to two dimensions when we're drawing
on the screen. If I draw on the screen now
with the plate at this angle, and you'll see it's an oval. We are converting these
three dimensions and converting our viewpoint
And converting perspective, the angle of this plate
in relation to our eyes. We're converting that into two dimensions,
there's no depth. All we need to do is almost like a silhouette
of this shape. The same thing happens
when we are tilting up. If you imagine this is again of flower and it's tilting
up towards the sky, catching the sun.
You'll see that. You'll see that that circle
again becomes an oval. And the center becomes
an oval as well. Once I tilt it further up, you start to lose sight of
the inside of the flower. You can maybe just see the back of what would be the
center of our sunflower. Now we're not going
to get too much into perspective just because
there's so much happening. Perspective really
only works when things are changing according to
the rules of perspective. One point perspective, two point perspective, three
point perspective. We need to have vanishing
points and all those things. But what's happening
with these flowers is they might be
tilting this way, but also this way
and also this way. There's a whole lot of different
angles happening there. But hopefully this
little demonstration has jogged something mentally. We will be able to
then take a look at these flowers and see them
a little bit more clearly. Imagine how that circle
is tilting and changing and thinking about
how to convert that into two dimensions by
making a shift in your mind. When I'm looking at this, if I was going to draw this and when you're looking
at it on screen, we've got to see
it not as a plate, we have to see it as just a flat shape
on a screen almost. If I draw on top
of this plate now, it's going to be
in two dimensions, because the screen itself
is two dimensions, just like our piece of paper.
4. Exercise: Drawing Ellipses: Now, I hope that didn't
get too technical, but I did want you to understand what we're actually looking at. This flower in the front here. It's just like the
plate that's tilting upwards and we're
drawing on the screen, or even drawing on top
of the photograph. And we can only see that oval shape when it's
converted into two dimensions. Two dimensions is what
our paper is drawing. It's height and it's got width. We're not dealing with
any of this length, this depth going back
or forward into space. Okay, that's enough
with the plate. So what do we have to do
to be able to draw these? We need to be able to
draw some ellipses. Let's go ahead and
just have a go at drawing ellipses in
different directions. I'll leave the flowers up
there so we can see them. We want to start by drawing
just a circle in the center. There's different ways
to draw a circle. You can use your loose ellipses. You'll know what those
are if you've done any other classes
with me where you're simply just moving your hand
with a nice steady rhythm, drawing maybe five or six rotations until
you get something that is even and it
becomes even just because of that natural
rhythm of your hand. The I centrifugal
force of that motion. If we're getting technical, if you don't have
a nice loose flow, then it's going to be even, it's not going to resolve
into an even shape. It's a really good
motion to practice. If you find that difficult, then you could just very lightly sketch with short light lines. You could even draw
maybe like a cross, maybe put a point at each corner or each end
of the cross sections, there'll be a curve at
one of those points, then you can just
work your way around. We don't rub anything out
until we've got the circle. If it's not quite a circle, then you're just
going to edit out of the bumps, go around again. It's a bit flat there. I just
bought it out a little bit. You keep going molding over top until you get something
that looks like a circle. Then you can rub out the
lines that you don't need. If you try to draw a circle
and rub it out, try to draw, rub it out, you're going to have a lot of
trouble getting a circle. At least if we have
something wonky like this. Or we can just work around that area and respond
to it and change it. We can see the change
that we've made and then we can rub out the
lines that we don't need. There's a very quick
lesson on drawing circles. Now as this circle
starts to tilt in space, just like the plate, it's
going to become an oval. Let's tilt it from one side and then tilt it
to the other side. So I'm just going to draw
parallel lines there. It doesn't really matter
how wide your oval is, but we just want to change
the direction of this circle. Let's go ahead and
put a center in here, as well as the plate starts to tilt or the flower
starts to tilt to the left. Center of that is also
going to tilt to the left. And we end up with
this oval shape. As it tilts even
further to the left, we get an oval because we're looking
along the length of it. There's for shortening
happening there. This back edge of that plate appears closer to this
front edge of the plate. I'm very aware of not getting
too technical with things. This center oval will also be narrower then if we
took it right that we're looking at the edge of
the flower or the edge of the plate like this, then all we're going to be
able to see is the side of it, maybe we can see just a hint
of the circle on the inside. Let's tilt it in
the other direction as it tilts towards the right. Again, we're going to
get an oval shape. We're seeing less of the length as it moves back into space, and the center is
going to be an oval. And then again, narrower. I'm using these loose ellipses. Again, I'm actually using my fingers more than
my wrist for this one, just because it's small
enough that I can just keep my fingers going and keep
my hand rested on the page. But depending on
how big they are, you might find it easier to move your hand across the page. Or you might find it easier
to do the short, short lines. Maybe put in some guidelines first that you've got
something to follow. Again, the center
oval is going to be narrower then even now, what we haven't really talked about yet is the fact that this will actually be in a
slightly different place. It's not always going to be
directly in the center when that circle has perspective applied to it, it's going
to be a little bit. Back. It's not something
that we're going to get into with this exercise, but it's something
to be aware of when we go into
drawing the flowers, and we'll talk a bit
more about that. We have to look for the center and we have
to see where it is positioned in relation
to that outer circle. The same thing is
going to happen when the flower starts
to tilt upwards. I don't have enough room
to do mine up here, but I might do mine
moving downwards. As the flower starts
to tilt upwards, we get that oval
shape, has the center, we know it's tilting upwards and downwards and then it's
going to get even narrower. Then it's going to
get so narrow that we can barely see the inside. Now let's go ahead and just draw some petals
over top of this. I know it's very
loose and sketchy, but we could put in some lines here to show
where they're going to go. You don't have to do this, but if you feel like you
need guidelines, then we have a petal coming out around each one
of those guidelines. The guideline is
like the center stem or the center line of the petal. Then we could put
in a few extra ones that is sitting behind
the original ones. And the same thing is
going to happen here. I did those ones in
between the gaps, you could do either
or in the same thing here you can see that when
you put these petals in, they are also changing shape from what they
were over here. Because they also
get foreshortened. These ones at the top stay
long, but they get skinnier. These ones here, they get short and fat because we're looking
along the length of them. Then this one here, we
might only be able to see the ones on the opposite side
with these ones here, go through and just
put in some petals. It's a good idea to put
these guidelines in here, because then you're
not tempted to do all the petals exactly
the same shape or size, because they do change,
we could do the same. Here you can see much more of these petals on this side than you
can on the far side. I just keep
reiterating that this is not perfect rules in
terms of perspective, but we're not going
to get into that. We're just going to go as far as we need with perspective, with the idea of perspective to be able to draw these flowers at this stage. Hopefully
you've already got a sense of how you might change that angle
of your flowers. These are two dimensional. What happens with most
flowers is they're actually growing up in like a cone shape. That's another element
that we need to put in. We're dealing with
flat shapes here. We want to make those
more three dimensional. In the next exercise, you might have
found that you had more trouble when you
came to these ones here, these very narrow ones. You might also feel your
mind fighting itself. You can see the demonstration
that I've done, where I've put these
cross lines in. See that these petals here
are really short and stubby. And that might feel
strange for you to draw, because you're used
to drawing them all the same size,
all the way around. If we do that, we end up with a flower that's looking
directly towards us. We're trying to
change the angle. Don't worry if you're feeling
a bit weird about this. We're going to practice
it a little bit more as we go through. And hopefully that click will happen and you'll start to be able to see them a
little bit more clearly. If we look at them
in the photo here, it's not as clear as what
we've done in the drawing, because in reality,
petals change sizes. They're not all
exactly the same. But you can see that
these ones at the front here are definitely
a lot shorter. And these ones to the side are longer because we're seeing less of those ones that
are coming towards us. The places like this, we can still see the length
of it very easily, but this section
here has changed. It's a lot shorter now, which means the petals on each side are also going
to be a lot shorter. Now if you look at
the photograph, you also see that
they're not all either pointing directly up or pointing directly to one
side or the other side. Some of them are also on angles. This one here, it's the center, and this one here, and
that's the center. Very quickly, we'll
just have to go at drawing one or two
on different angles. This, then we could do this
one over here as well. It doesn't matter if you
get the oval a little bit of a different proportion to the one in the photograph. You just want to
get the sense that it's looking to the
right and slightly up, or looking to the
left and slightly up. We can do the same thing
with our petals here, just dividing them into eight. Either drawing
around each one of those lines or filling
in the ******. When you fill in the ******, you get more of a sense of how the shapes of
the petals change. Each one of those segments is
a slightly different shape. Then we could put stalk on them. Stalks going to be coming
from the center stem and down and around slightly,
usually a bit of a curve, unless it's facing directly
up these ones here, coming out and then
down a little bit, actually drawing over my drawing of the flower to try and get a natural positioning of that stem rather than just
randomly putting it in.
5. Exercise: Drawing Cones: We've got one more
thing that we need to consider when we're
drawing the flowers, and that is the fact that they are usually in a cone shape. So this will start at the
center or the base of the stem, and then they'll
move up and out. So far we've been
drawing them as if they're just completely
flat like this, but we want to bring them up
into a cone shape as well. So we're going to do
a bit of practice drawing some cones. But first, let me just show you what they might look like
or what I'm talking about. If we look at these poppies up here, there's a
whole lot going on. But if we were to
break these down into really simple shapes
and ignore some of the petals that are falling out from the
shape of the flower. Here's the top opening, then you can see the
center of the poppy here. What's actually happening
is the petals are coming up on each side
from that center, we end up with this
cone or dome shape. The same if we look at this one lower down here,
here's the top of it, going around the top edge of all the petals
and opening up. Here's the center.
We can't see all of the center. Some
of it is hidden. And you can see these
petals at the front coming up towards the edge. Then we have these ones
that are starting to fall away from the cone shape. That's quite an extreme example. But even flowers like
these daisies here, you see they're not
completely flat, you've got the center here. Then these petals are not
just coming straight out, they're coming up and over. You can see it more
clearly to the side. Some of the sticking
at strange angles. These ones at the
front, you can see the coming towards us
and curving downwards. It's another tricky one to draw when we've got foreshortening
coming towards us. And this one at the
back especially, you can see the cone shape here. Here's the center, here's the upper edge of those
petals. Something like that. It's a cone, but it's a bit more open than the ones we were
looking at with the poppy. It's getting slightly more
complicated, but don't fear. Let's go ahead and just draw a couple of simple
cones to start with. Get used to the method. We're going to draw
an oval at the top, and then we're going to
draw an oval lower down. These two ovals should
be the same proportions. It's just that one is bigger than the other.
Height and width. They're the same in relation
to the shape itself. This one is just a smaller
version of this one. We don't want this bottom
one to be like this. The way to do that is just to not think too much about it, but get your rhythm going and then do another
smaller version of it. And then we can bring up
the sides of our cone. If you're struggling with
that rhythm, you can again, do four points, draw around. Then you might have to
think a little bit more carefully about this
one at the bottom, you think about how wide it is compared to how high it is. Draw around, but I'd really encourage you to try
and get this rhythm going. If you can just do
one more down here, that's our general cone shape. Now I've got another
demonstration to show you. This is with a funnel. I'm using all the things
from the kitchen today. Here's our cone shape. We've been drawing it on an
angle a little bit like this. Just slightly facing towards us. Now, if that cone shaped flower
tilted right towards us, you can see the center. We've got two circles again. As soon as we start
to tilt that upwards, we start to get two ovals,
the top and the bottom. But see what's happening to
the center of our flower. It's starting to disappear behind the front
edge of the cone. There's going to be some times, like when we're looking
at the poppies, where you can just see part
of the center of the flower. There can be other
times where you can't see any of the center, and then there'll be times where you can see all of the center. Depending on whether that flower is facing directly towards you, maybe it's facing
slightly to one side, on the other side, maybe it's also facing slightly
upwards to the side. Let's try and get your head around what's happening
with that cone shape. We've got the circles
changing to ovals again, but we've also got the
front edge of the cone that is going to hide
some of the center, depending on how tilted, how much of the side of
the cone we can see. We're going to draw
a few more cones and we're going to draw some where we can see some
of the center as well. Let's start with a
cone where we can see the complete center. We can see two circles,
can draw that one. Up here we'll be getting lots of practice
with these loose ellipses. I got two circles. Now,
we're going to start to tilt that cone a little bit, tilting it, let's say up towards the sky as if the flower
is moving towards the sun. We're only going
to be able to see the oval shape of the rim. Then we'll be able to see
just part of the center. It's like it's crossing
over that front edge there. Again, the oval
should be the same. One is just smaller,
it's been shrunken down. And then we can put
the edges of our cone there if we want to make
this edge look more solid. We take our eraser and get
rid of that line there. Then if we start to tilt
it even further upwards, we're going to see even less
of the circle of the top. Our center circle
might be down here. Now it's hidden within the cone. Again, we can get rid of what is hidden inside the cone
there. Let's try this. Going to the right here, starting to tilt
over to the right, you'll be able to
partially see the center. And then as it turns
fully to the right, you'll only be able to see
the side of the cone shape. I'm going to draw the
bigger one first. Haven't changed it
drastically from a circle. It's squished, but it's
not like a really, really narrow one to start with. And then I'm going to put a similar proportioned
oval in here. This is the part I'm going to be able to see inside the cone. I can put the sides of the cone. Or maybe it could even
be like a dome shape. So you might have
something more like that. It's probably a bit more
suitable for a poppy. These lines are a little bit
curved instead of straight. Get rid of the bit
that's hidden There. Will do one more here. Where cone is turning really far to the right and we can only
see a sliver of the opening. Just this part here, we can't see the center. The center is hidden. The center is going
to be down here. Still the same oval.
That's really important. If you start changing
these ovals, there are different
kinds of ovals. One fatter than it should be,
skinnier than it should be. Then you're going to get things that just don't really work. Could have a really
skinny one here. Actually, skinny is probably not as bad as having
one that's fatter. Get perspective, This one has
to be similar to this one. Shrunk down. Then we
can bring a cone, or our dome shape
around to the side. Let's go ahead and
put some petals on these ones and
see what happens. Put a cross section in here and the work within the gaps here. We don't have to
do eight petals, we could do four petals, might do one here. Just thinking more about
ones that are more like poppies on here and one here. Poppies have much
bigger petals here. It's a little bit
harder to figure out where those should go, estimating the shape of the
petals and the width of them. Now as we come here, there's going to
be one or one or two that we can see on
the outside of the cone. With this one here, maybe
I'll put two in here first and then two
in at the back. We can't see any of the
center for that one. You could do the same
if you wanted to, imagine these were
daisies as well. But you could have a lot
more segments coming out. It takes a little while to get your head around
what's happening here. That's the front edge. They're all moving in
the same direction as the ones for the back edge, because they're all facing to the right. That's the center. Maybe we will do the
front edge first. The center for this one is
hidden, We can't see it. These petals are coming out from the stem in the center,
moving to the right. And same with these
ones through here, again drawing from the center. And then out and down to find
the position of the stems. So that doesn't
look too awkward. We could even imagine there's
a couple of extra petals lying down here folding
down from the cone. Or even just a couple extra
ones in behind that are maybe sticking out
a bit or drooping. So you have a play around
with those as well. Everything should lead
back to the center. You notice that I'm
drawing these ones as wide shapes instead
of long shapes. If we go back to our poppies, you can see that when a petal
is falling down towards us, like this one, it's a much wider shape and it is a long shape because it's just
like the plates, just like everything else. When that petal is
moving towards us, instead of facing us directly, we can only see part of it. We can still see the
width, but we can't see much of that length
of the petal.
6. Drawing Leaves: Before we move on to a
more finished project, we're going to have a go
at drawing some leaves. If you have a look at the
leaves in this photo, they're all facing
different directions. I've got some that curl
up from side to side, some that are curving over. I'm going to show
you a few ways to get that effect
with your leaves. Before we get to doing
those fancy leaves, let's just draw some very
basic leaf shapes just to warm up and get used to the symbol shapes
that we're dealing with. All of the leaves are going
to have a center stem, then they're going to have a
right side that curves out. Then maybe it curves in a bit. And then the same
on the left side, curves out, curves in a bit. You can play around
with these shapes, so you might do some
that are longer, you might do some that
don't curve back in. Just have a very shallow
curve on each side. Doesn't matter if the
sides are slightly uneven because leaves are
not always perfect. Or it might just show that they're facing a slightly
different angle. It's draw one that's
curving over a little bit. We're always going to start
with the center stem that's going to help us find
the curve of the leaf. Once we've got that in there, then we can put in the
sides of the leaves. Try fatter leaves. I'm not curving them
over and under yet, we're going to do that soon, but just changing the
direction of the leaves. Try some longer leaves, and you could even put some shape to each
side if you want to. Depending on what leaf it is, just give those center stems
a bit of thickness there, maybe even a little
bit of shading. You can play around with
this if you want to. If they are folding outwards
from that center stem, then there's going to
be just a little bit of shadow close to the center stem, but also there might be
some veins and things coming out as well
from that center stem. Very simple leaves. Let's
look a little bit more closely at these ones and see
what's actually happening. Now, Like I said, for
each one we're going to find the center stem first. If we have a look at
this one at the top, maybe we'll start from the
top and work our way down. Here's the stem of that leaf. I'm following a direction of it. It occurs right at
the top like that. It's a little bit wonky, but just ignore that
bump in the middle. And then we're going
to draw each side, and we're going to look at
the angles of each side. If we're to really
break it down, we've got an angle here and
an angle here, that shape in. Then we're going to look at
the shape on the other side. This angle, this one. Draw little curve
ride at the top. Here's the center stem, a little curve at the top and
then drawing in each side. You see I'm just using
short light lines here to figure out the shape slowly. Rather than drawing a curve. You've been drawing
leaves for a long time. Maybe you can do it
quickly like this. But when you're doing
those free hand curves, it's easier to
just go off track. Whereas if we're using
these short light lines, we can control
what our pencil is doing and then we can join
it all together at the end. Let's take a look at this one. Now, this is where we can start to get more of a three D effect. Look at where the
center line is. Probably just see it. It might be slightly hidden, but it's close enough to be that straight line that comes along the bottom here. And then once we've got that in, we can put in the front
side of the leaf. Now I'm looking at the angles. This angle and then
this long angle here. And then joining those together. Then I'm just going to
look at the other side. I'm going to look
at where it joins up to the side I've
already drawn, put a little mark there. Can fold around like this. My line is going to curve
around like this. From here. Again, looking at
the angle, comes up, straightens out, it's got
another little angle there, and then it joins together. Now if we want to make this
look more three dimensional, it doesn't really look three dimensional at the
moment because it's just a line drawing. We can put in that
darker shading, the inside of where those two sides of the leaf
are facing each other. It's going to be more in
shadow than the outside. It may be a little bit of
shading on the outside too. Then we start to get more of a three D effect when
we put the values in. We could even go a step
further and put in the darkest value down here. Moving along. Let's
do this one here. This one is tricky. Have a look at the center line. We can see the whole center
line. It's quite straight. But we've got this twist in some of that's going
to come from the shape, and some of it that's going
to come from the shading. I'm going to draw
a straight line, or a straight angle for the
center stem of the leaf. Going to draw this top half First it's got a bit
of a point on the end. And it comes up,
it's quite wide. It starts to straighten
out, then it curves down. Then what's happening
here? We've got this long narrow area and then a really nice gentle
curve that might be where you use more
of a fluid movement. Maybe we'll very lightly
sketch it out first. Maybe you can get almost like, it's almost an S shape, something like that
happening with your pencil. And if you repeat that
movement a couple times, you should get something
that feels nice and flowing and fresh rather than having something that's
more scratchy like this. And then we can join it up. Comes out a little
bit here at the end. Okay, nice flowing line. I'm making a movement like this. I'm starting off slow, then when I see where the curve
is going to go, drawing it down,
lifting my pencil off, and increasing the
speed as well. Once I'm sure I know
where it's going to go, then I can increase the
speed a little bit. Just some nice flow lines that you can add
into your drawing. Then we've got this shading here, it's a little
bit stranger, comes across like this,
you see it's darker here. A little bit, right close
to that stem there. And then around the edge, the shading is a big part of it when you're wanting
to get things looking like they are
twisting or turning. Then the darker part
on this edge here, then where it gets
really dark as it comes in towards the main
stem of the plant. I'm just using an HB pencil. It's going to be limited the
amount of shading I can get, but I can still put in
lights versus dark shadow. The dark value makes
a big difference. That shows that the, this part of the leaf is really twisting underneath
that part of the stem. We could put a little
bit of shading on here just so it doesn't
look too out of place. You can see the veins
on that one there. You might put those
in, keep them light. You don't want it to
look like it's got a stripy pattern on it. Treating this rough just to
get something down there. In terms of shading, we're moving down this branch.
Let's try this one. Another tricky one. And it's tricky
because we can't see the center stem all the
way through to imagine it. This is a good example
of the foreshortening. The leaf is coming towards us, We can't see the
whole length of it. It's distorted by perspective. We can see the width of one
of those sides of the leaf. The other side we can't
see very much of at all. So let me just go
over on the screen. Here's the center stem. Then it gets, starts
to get hidden by that side of the leaf on the right that's folding upwards and it's going to
join back in here somewhere. I can see a little
bit of it here. I'm just imagining how it joins together in that area that
we can't actually see. This one here is
not too difficult. We just follow the shape. This one here, we've
got an S shape. Then we're going to
add on this part here, Leave that line there, so we can see the center stems going to have
a little bit here, but don't worry too
much about that. But we can add
that on. Let's raw this side of the leaf.
It's pretty easy. Quite a straight line there. Then we've got this shape. You can see it comes
right up towards the center stem here. Here. I'm going to get
rid of those lines now so we can see it
a bit more clearly, but I want you to
focus on that shape. Starts at the end here, it comes up again and hits the center stem and then heads
out the back of the leaf. Then once you've
got that S shape, all you need to do is put
a straight line in here. Then we can add on
this little end part I had not quite in the
right place there, so I said don't worry about it. And we can add in our shading. This is probably the
trickiest one actually. The one that's coming next
is pretty tricky as well. But it might be a good idea to practice some of those shapes. Maybe draw a center stem, draw another S shape like this, and then putting in the
straight line that's showing the way the side
of the leaf is folding up. And then the other one
we just do normally, let's try drawing some
others with shapes as well. There's a center stem. You got to not just do
the first part of the S, but you got to second
part of the S as well. Then we could bring this here, that's creating
some folded leaf. Then we could draw the other, the other side of the leaf. Just play around with it.
Sometimes you get a little, I get a little bit
lost, like what's happening with this shape here. You could even draw
the shape first. Then you're going to
choose which part is the folded up part. That part is going to have a straight edge to
the bottom of it. Then maybe we could
put the center stem in and then draw the
other side of the leaf. Not totally natural looking just because we're not looking
at an actual leaf. But it's good practice for creating that illusion that
something is curving over. This is the bottom
of the leaf here. The type of you do
can change too. This one is quite extreme. But what if I did just like a really gentle S and
had a straight line? That's the folded part, it looks more natural. This one looks a
little bit strange, like it's got a bit of a bump on the end of
the leak or something. This one looks a little
bit more natural. Moving on to one of
these trickier ones. This one here, you
see the shapes. And that one, we've
got this shape here, we've got another shape as well. Where is the center stem? I can see it here. I can actually see the
back of it there. We're just going to
draw a straight line. Then we're going to draw
an S shape that starts at the bottom and
it's going to come around and join
back up to the top. It's actually crossing over
the center line this time. That's the back of the leaf and this is the
front of the leaf. You see how that works. Back of the leaf and then the
front of the leaf. Then we're going to draw
another shape here. It's slightly different shape, it's a little bit, a
bit of a shallower. Then we're just putting in our shading and
that's going to help. We can also change the shape. Look at this, it's not
quite a smooth S, shape. It's got a bit of
an angle there. Put that angle in the shading. Change the shape if you need to. It's a funny one. Probably won't see leaves
like that very often, but it's nice to try all
the different kinds. Again, we could play
around with that. Let's draw a center stem. Going to draw an shape. Once you've drawn the S shape, then it's just figuring
out what's happening here. Which is going to
be the backside and which is going to be
the front side of the leaf. I could make this the
back side of the leaf. This is the inside of the leaf, here's the opposite side. Maybe that twist over again, or maybe it doesn't
cross the center line. Maybe it just comes
up like this. I think it's good to
play around because then you're having to
figure things out. What happens if I do this? What happens if I do that? Maybe something doesn't work. Maybe something does work. This one, I've just got
this side of the leaf that is curving out and then
curving back in again. The other side is just
staying pretty normal. Play around with
it a little bit. I'm just playing around. I'm not looking at anything. I think generally speaking, you need to be
looking at something to really understand
what's happening. But, you know, starting
with something like that, with a center line
in the S shape, and then deciding
what's happening. Maybe then I just draw another
side of the leaf here. There's more I can
like this one. There is one more there
and that is this one. It's got a nice
gentle curve to it, although there is
quite a straight line across here. Across the center. Then we're going to come out, and then we're going to bring the other side of the leaf that comes
up from this part. Very shallow, very
shallow angle. And then it starts
to curve around. Maybe if we look closely, I think I can see
another little part of this back side of the
front edge of the leaf. It's getting a little
bit confusing. Let's try this one again,
starting with the center stem. I didn't really think
about that too much. In that one, it is
quite important. I can see it coming down
and around, more like this. That's here, then I can
barely see it just in here. I'm going to create
that center stem there. And then a straight line, I'm going to come
out in front of the center stem a
little bit here, that is coming underneath
the center stem. And then we've got another
part that's coming out along the top here and
then joining back in here. It's pretty tricky that one, then we're figuring out
what's happening again. This is the bottom of the leaf. Maybe it needs to
be a little bit th, this is the inside of the leaf, it's got a bit of
shadow in there. This is also the
bottom of the leaf. Don't worry if you found some of these a
little bit tricky, especially with those
S curves and things get a little bit confusing and take a while
to get your head around, but those are some
quite extreme leaves in that photograph there,
we've had to go at them. If you really wanted to
keep practicing them, then I'd maybe download that photo and do
a bit of practice every week for a
couple of months until you really get
the feel of them. You use this photo or maybe find some other
photographs as well.
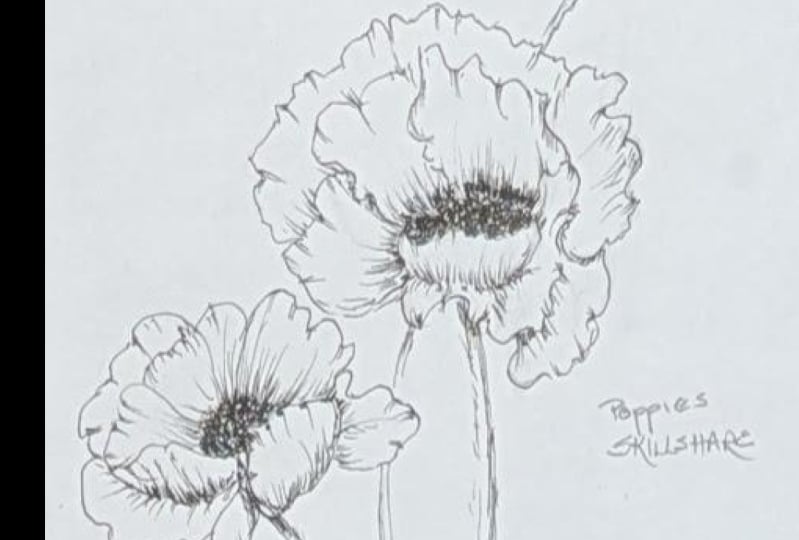
7. Quick Sketch: Daisies: We're going to focus on
these two main flowers here. We've got this one,
I'll just draw around them quite carefully. If you look at the
center of the flower, it's very easy to see when we're looking for the shape
around the outside. It's a little bit trickier. We're trying to find
the main ellipse and not the ones
where the petals are overhanging, falling,
curving downwards. It's probably
something like that. That's a very
shallow cone shape. Then we've got this
one at the top. Here's a center. Look at how that's an oval and not a circle. Then if I find the outer edge, it's something like
that. It is a cone. But we can still see the center. And what's important here
is that we really pay attention to where the center is in relation to
the outer ellipse. Now we're going to use that just to map out where our
flowers are going to go, But once we've put
those shapes down, that's just the first stage. The next stage could be to actually find some
of these angles here. There's quite a strong
angle along there. Maybe from here to here
is quite strong as well, from here to here. That's just going to give us
a little bit more structure to it so that we're not
stuck with the ovals. Okay, let's go ahead. Here's the main oval. It's not facing directly towards us, but it's pretty close. It's an oval, very
round oval. Here it is. Again, something like that. Now have a look at
where the center is. We want to check that it
is actually in the center. It looks like it is.
There's the center. Now I'm going to go ahead
and put this one above it. And think about the distance
between the two of them. I might just make a
little mark there. You could even look
at the angle between the two centers just to
see where to position it. Then I'm going to
do the outer oval, then I'm going to
do the inner oval. It's really close to the edge. Like I said, we have to
really pay attention to where that center oval is. It's not in the
middle for this one. I've got a very
simple sketch there. It's quite small as
well. You see it? Compared to my fingers,
I'm not going too big. Then we can have a
look at the angles. And I'm just going to
put in something here. All of this should
be quite light. You're only putting
in the things that stand out to you as being significant to you. Maybe you can't really
see much there. And then we can start to put
in some of these petals. And now there's a lot
of petals there, right? The main thing is
the direction of the petals and also the
shape of the petals. But if you don't want
to put all of them in, then you don't have to
put all of them in. I'm just looking for the main
12 that's stick up there. And then there's a bit of a gap. And then there's another two. You'll see it's just a sketch. I'm not worrying about
them being perfect. So this one comes up
and over a little bit. Then there's a really long,
skinny 1.1 in between them. If I miss out a couple,
it doesn't matter. But what I am doing is I'm
checking the angle each time. This is about 09:00
on o'clock face. This was almost 12:00 here. And I'm going to work my way around thinking about the angle of the petals now,
as we come in here, this is where they get,
some of them will get quite short because that's that
edge that's closest to us. This one looks like it's
curving towards the floor. Towards the ground
a little bit more. Now, I'm getting close to
03:00 What's happening at 03:00 There's these
three up here. Maybe it's 01:00 It's definitely not perfect. But again, it's just a sketch. I'm just going to add in
a few more under here. There's another one curving
downwards a little bit here. What I want you to
really pay attention to is these few shorter ones. This one. There's another
shorter one that comes out on top of this one here because they are helping
to show the perspective. The ones that are coming towards us are going
to appear shorter. Maybe even this one could
be a little bit shorter. What's going to help
that illusion too, is if we put a bit of a blunt end on the
top of these ones, so it looks like they
are folding over. We can't actually
see the tip of them. These ones we can,
these ones, we can't. I'm just going to put
quite a blunt edge. It's almost like a straight
line to the top of each one. Then that will
hopefully make it feel like they're curving
a little bit more. We could put a bit of shadow
here on the center ellipse. If you look at it carefully, you'll see there's a
little circle in here, but you'll see that this
side is a darker orange. The side still quite light. There's quite a
dark line down here to not really even worrying
too much about texture, You could put a little
bit in if you want to. I'm just going through
and shading some of these petals that are a
little bit lower down. Probably should have got rid of some of my sketch lines first. Like I said, it's just a sketch. And I'm also going through and picking out any of
the darker lines. I can see some of them
will have a darker line. On these two up here don't
really have any dark lines. They have some shading,
a little bit of shading, and a little bit
of a white line. But this one in particular, just here in between
here and maybe here, maybe here as well in this one. Take away those lines so
you can see the dark parts. That's where we
want to be adding just a little bit of shadow. Then we'll move up to
this one at the top here. I'm just going to
lighten my lines at these ones we're showing
through a little bit, but try and keep your
lines as light as you can. Anyway, we've got our
basic structure there. We can see that oval. Mine might be actually
just a little bit too big. A little bit too wide. Any much longer than it is wide. Again, think about a
clock face straight up at 12:00 there
is a petal that joins the center about here to the left hand side of the
center, and it comes up. That's this one. Then I'm
going to work my way around. It's quite small, you might
have to download the photo. I'm going to do these
back ones first because they're easiest
to see what's happening. Really not worrying too much about the shape I'm
thinking about. They're wide or skinny. Whether they're joined
to each other or not. So these two are
joined together. And then we've got a
little bit of a gap. And we're starting, we're
pretty close to 03:00 now. Then we're going to come around to the front
here and have a look at how small
those petals are. We zoom in a little bit. We've got this long oval
here, and then we've got, this one's almost a circle, or maybe like a blob, at least. Then this one and then this one. Again, we're trying to imagine. We're drawing on a
screen, which I am doing. We're drawing on a flat surface. What is happening in
terms of perspective when we outline that shape
or what we can see of it. We get these three
in, in particular. We've got that one and
then we've got this one here. Then this one here. It might feel really strange
to be drawing them like that because you know
that petals are long. But this is how we get them to look like they're
coming towards us. We can't see the full length
because it's foreshortened. There's a little bit
of shadow on that one. We are a little one
coming up here. Then we've got one or
two, a few in front. And then we've got
one comes down here and one that maybe comes
out a little bit as well. It doesn't matter if
they're not perfect. You're just trying
to get that sense of the angle that it's
facing the perspective. Now let's go ahead and reinforce some of these darker areas
darker around there. The center itself is orange, and orange is darker than white. We can shade in
that whole center. Then maybe if any,
need a bit of shadow. This one here needs a bit
of shadow, this one here. And we're wanting quite
a realistic drawing. Then we'd be shading in all of the background because
that's the way we're going to get our white
standing out against our dark. You could try that
if you want to. You see then that those white
petals really stand out. It also means then I don't
have outlines around them. Ideally, we don't want to have these really strong outlines. Putting in that shading
then allows you to find the ****** in between
the petals as well. The shading would have
to be really quite dark. Down here you see a
bit of the stem there. Don't put it in the shading
unless you want to remember, this is not a full on
drawing, it's just a sketch. So this could be even a practice run and
then you have to go in your own time at drawing
them a little bit more. Realistically, the same
with this one here. You can get those gaps in there to define the
shapes of the petals. I don't want to get
too carried away with this just to show you what it looked
like with a bit of a background
around it as well. You could add though is you could add in a few of those
other flowers if you want to. Whether you've shaded or not. Maybe this one over here. Again, just to
practice the angle, they're a bit blurry but that means you can keep
your lines blurry to, it might just be really quick little drawings
of the flowers. Just put that extra one there. I mean, you could go ahead and come up with your own ones. Might have a little one up here. Any of that are at the
back are going to be smaller than these
ones at the front. I could put one here and
follow the same principle. The ones coming
should put my oval. Ones coming closest to us
are going to be wider. And then these ones at
the back are going to be longer or skinnier,
I should say. They still fit within the oval. Then we might have a few
that fold down a little bit. Might have some coming under
carried away there now. Yeah, definitely have a bit
of a play around with that. Going to move on now and have
a go at doing the poppies. Actually, before
we do that, if you wanted to take this
drawing further, then you're just
going to be going, looking at those shapes a
little bit more carefully. Looking for the dark
parts, especially here. And maybe adding a bit of texture on there too,
if you wanted to. That would be one way
to take it further. Defining some of
these petal shapes, adding a bit of black
in there basically, or in your shading. If you want to go
ahead and shade around everything,
you could do that. But I'm going to move along, we'll have a go at the poppies.
8. Quick Sketch: Poppies: Might just do the two poppies
on the left hand side. This one and this one, so that we don't take up
too much of your time. We've put this one here. I'm just getting an idea
of the cone shape also. It's the center
part of the flower. We're not worrying about
these petals that are falling away from
the cone shape. We're looking for the
main structure there, here, both of them. You can only see
part of the center. And that's what we're going
to focus on is making sure we have that center oval in
relationship to the outer. Getting that cone right
in that way we can get the right angle of
the flower and we can also get a three D
shape of the flower. I'm putting in that first oval, just getting an idea of it. And then here's the center, loose two ovals that are
similar to each other. Then this will be the
base of the cone. Keep your lines
really, really light. As I do this, I could start
to put in some angles. Instead of just
throwing a cone and then having to go
over and do angles. We could do it as we go. You can see that angle, Neil, There's two angles in there
at the bottom of the cone. Let's start to put this one in before we do the other one. And it's just so that
we can account for these leaves that fold
over on the side. We've got these
leaves at the front. They've got lots of
wrinkles and stuff on them and it's tricky, but just find some of
the main shapes you see. This shape coming in here. Be really light with your lines. I'm just doing them quite
dark so you can see them. That's like one petal. Maybe it goes along a
little bit further. Or maybe there's another
one that starts here. There's a straight
line down there. Really what we want is we
just want some wrinkles. And then each one of these
parts that stick out a little bit is going
to have a line coming down from it that
creates our wrinkles. We've got another one
that comes around here. Here's our center. We're trying to find where
the petals start and stop. I'm not worrying too much about
them being exactly right, but I'm doing a little bit
of contour drawing here where following my
eye along as I draw, then we've got this
one coming out. If you work that
way with contour, it's quite different from
working with the angles, but it means you're putting things together like
a jigsaw puzzle. Now I'm starting with this
outer leaf up and around, following the shape of it. Might be a little bit bigger or a little bit smaller
in my drawing, but I'm getting the
general idea of it. Then we've got this one here. This is probably
the trickiest one. Going to follow
the edge. It comes right back up to
that center again. Starts here, it comes back
to the base of the cone, and then it starts
to wind its way down and then comes back. It's tricky because we think
of it as quite a long petal, but actually there's a lot of that length
that we can't see. Make sure you don't
come down too far. It just comes down a little
bit, something like that. Then we've got another
one that comes out here. It's going to go all the
way up to about here. What's important is not the
exact shape of the petals, but that we're getting the
angle of the flower and we're getting it looking like
it has an inside as well. I'm going to go ahead
and shade that in black, and I'm pretty happy with
the shapes that I've got. Then just looking for
maybe some wrinkles and maybe some darker shapes, a bit of shading in here. Definitely sum down in here, remember it's just a sketch. I'm working outwards following the direction of the
petal with the shading. I'm just going to
get rid of some of the initial sketch lines
that I had in there. And then I can bring a
little bit of shading up following the direction of the petal and the
wrinkles on the petal. I can bring a bit of shading, maybe see in here, there's a lighter part and then there's some
shading in here, maybe a bit more in there. Then we can see
where the stem is coming down almost straight. If I really want to make
this stand out a bit more, I can come in with a darker
pencil, like a two B pencil. It's going to give me a
little bit more contrast. Now, I can put this
one next to it in, because I can see how far I've come over
with these petals. Let's have a look at the shape coming around the front rim of it to try and get
the top of the cone. Then here's the
bottom of the cone, which is going to be the same shaped oval as the
top of the cone. Look at the angle of it
coming around like this. Quite a bit smaller than
the first one we did. You see a loose drawer? Not trying to get it
perfect to start with. I can see that that's
wrong already. So I'm just going to draw over top until I get something
that's on the right angle. And then I can rub out
the lines. I don't need. That's we've got
our dark center in here now. Let's have a look at some of the shapes I probably should have. Oh, yeah, no, that's okay. Singing. I put the dark center
in where I shouldn't have, but I'm just going to go
ahead and put in this petal. It comes across and
then it comes down. And that's going to leave
a little bit of space for more of the
dark at the center. Zoom in a little bit on that so you can see it a
bit more clearly. I'm looking for
some more shapes. We've got this one
coming down here. We've got this one. I'm trying to divide
this up into, into petals that
makes sense to me. It's quite a lot happening
as we come over here. But again, you can just look for those cut out
shapes of the edges. And we've got the rest of this
one as well to finish off. Let's do that first. We'll
take away the lines, but I mean, if you wanted to, you could pause at this moment and I drew those very roughly
over the screen. But there a good approximation of the shape of each
one of those petals, or the petals as I see them. You can pause the video if you want to start sketching
around those. I'm going to take the
lines away, otherwise. And I'm just going to
start working my way again using a contour drawing
as much as I can. I'm just just following your eye around the edges of the
petals that you can see moving from one
petal to the other. From here I can start
coming further around again and just keep working my way around thinking where you are on a clock face
should be about 12:00 Here, I'm a little bit further over. It's okay. And then we've got that one that reaches
up to the other flower. Then we've got this one that's
sticking out a little bit. This is a good example of me drawing what I know
rather than what I see. It should actually join
up with this part here. It's quite a lot
skinnier than you think. That shape definitely
don't have to be perfect. Let's put this stem in. I think if you're trying to
make them perfect as well, sometimes you'll end up with something that looks a
little bit too forced. It's better to just has some sketchy lines
here and there. Maybe just playing around with your pencil and doing
ripples like this, getting a feel for the loose. You can even hold your
pencil a little bit further back because it gives
you less control. You get a more interesting
mark that way, as long as it's following
those general shapes. It's not going to
matter too much. That doesn't look like exactly
like that poppy there yet. But it looks like a flower.
Looks like a poppy. I'm going to put in
these outside ones, start with this one here. Just thinking about where
it joins on a roundabout. Just an approximation,
looking at the general shape of it
and the wrinkly lines. Then we can put in this one that comes down and around here. And putting in some shading, just looking for the
darkest areas following the direction of the
wrinkles on the petals. I'm going to need to bring in my two B pencil here just to
bring some contrast into it. If you wanted to
take this further, you'd be paying attention
to the lights in the darks. We're just looking at
the main shadow areas, but if I look really closely, I can see there's a little
bit of light along here, a little bit of light
along here as well. Just picking out some of those light areas can sometimes help. Of course, you've got to
have a bit of shading in there before you can
have the light areas. I could put this in and
then just pick out, pick that little light edge there makes a big difference to the shape showing where the petals are folding over or the tops of them are
catching the light. Of course, light and dark
creates form in a drawing, but doesn't need to be
a lot at the same time. It can just be a really
simple, simple quick sketch. I think it's
important to practice drawing this way and these
quick sketches as well. Because if you're drawing
like a whole field of poppies is going to take you a really
long time if you're zooming in on every single one. But we could look
at these other ones here and we could draw
them quite quickly. Or you could draw them quite quickly just by thinking
about that cone shape. This one, you can't really
even see any at the bottom. Then going ahead and putting in general idea of the petals. Moving my hand all the time. There's another one
that comes down there, putting in a really
quick amount of shading, a little bit of dark there. Then you could put in
the other one as well. Again, just like putting
down the shape first, that general cone shape, looking at the way it's facing, how much of the
center is showing. And then going ahead
and putting in petals. I'm doing this very quickly. You might spend maybe
three or 4 minutes on each flower instead
of 30 seconds. But just to show you that you can work really quickly
with things like flowers, landscapes, another thing you can work really quickly with. You still have to be
observant and you still have to look at
what you're doing, but it doesn't have
to be perfect. I've got a general shape, I can put it in a
little bit of shading. Actually, the scratchy
lines and things, sometimes they add to
it and they make it look a bit more natural
and loose, and free. You want that with things
like flowers that are delicate and from nature you
don't want it to look like, I don't know, robots drawn
it well, I don't think so. Anyway, I prefer to have a little bit of
life in a drawing. There's another one there,
Put stems in stalks in. You could even maybe
put the leaves in. A little bit trickier
with this one, because they have
the wrinkly bits. There's one over here you
might be able to see, it comes up and over, and it has bits coming up like this. There is one here. It's a
little bit trickier to see. I imagine that it might
be one of those ones where it's folding back
on itself or folding up. That would be one side, the back side of the leaf, and then this would
be the other side. And the inside of the leaf, maybe I haven't got the
center stem quite in the right place. Does
that make sense? So this is the way the leaf is folded up and over and we're looking
at the back of it. Then that's the opposite side, the stem is coming
through here somewhere. You could play around
with the shapes of the leaves that you can
see there if you want to. There's also a bud down
poppy that's not yet open. Make sure you can see that.
That is going to be all about shading darker down the
bottom, lighter at the top. Now this leaf here, I've put it going in
front of the stem, but it actually goes
behind the stem. Just going to rub a
little bit of that out. If you want to add a little bit of dimension to the stems, they will have a darker
side and a lighter side. Lighter on this side,
darker on that side. I was going to say you can
make up a stem for this one, but I can actually see
it in the photograph. Lighter side and a darker side.
9. Summary: I hope you found this useful. I know we rushed through that
drawing at the end there. It's really more about put in these things that we did with the leaves
and the flowers, putting those into practice and being able to identify
the cone shapes, we did both the daisies. Even in the daisies, there's
a slight cone shape, and then the poppies had
that more extreme cone. If you wanted to
do more practice, you could have a go at
these flowers here. We use those right at the start. But you could try more
finished drawing, maybe just focusing on 1234 flowers or
something like that. I know it's overwhelming. You see all of those flowers and you're not quite
sure how to do them. But maybe even this one. That's an interesting
one at the top there. And this one you choose anyway. Choose just a few flowers and have a go at drawing those
at the correct angle. Remember, even these
ones that look flat will have a slight
cone shape to them. Remember to look
for the position of the center compared
with the rest of the 0, the rest of the cone, this
one here on the right, the center of the flower is in a different position to
the one there on the left. If you're not quite here
yet and feeling confident about doing more full drawings
and quite fast drawings, then do go back to these here and
especially these lessons here where we found
the cone shape and we changed the
direction of the cone, and then we started
putting the petals in. They'd be really good practice. And then of course you've got the leaves that you
can practice too. You do really nice
little drawings, aren't necessarily
a full photograph. So you can take a
little bit from here, a little bit from there, and just come up with like maybe three different
flowers in one composition. Could be nice, and throwing in a few different
shaped leaves, Almost like an illustration. And then if you want
to take that further, you could do it with pen, ink, pen over the top. Could be nice too. Whatever you come
up with. If feel free to share your
drawings with me. I'd love to give
you some feedback and let me know if
this has helped you understand more about how to show the angle
of the flowers. It's really what I wanted
to get across in this one. Sometimes it's a
tricky concept to grasp and it's
just because we're so connected to the experience that we have of these flowers
and what we know of them. We know that they're
round. But when you look at the photo there, and we draw a two dimensional
drawing over top, depending on the perspective. They're not round, they are
oval from our viewpoint. I hope that this
class has helped you to get better at seeing those
changes in the perspective, in the angles of the flowers. Go find a whole lot of other
photographs of flowers and see if you can apply the
same principles to those. Thanks for joining me.
I'll see you next time.
 Emily Armstrong, The Pencil Room Online