Transcripts
1. Introduction: Have you ever wanted to learn to draw but just didn't
know where to start. I bet you even say, I can't even draw a stick man. Well, if so, then I've got
the course for you. Hi. I'm Ed for Chuck, and I
am the instructor for the how to draw
everything course. Welcome to this
exciting journey of learning how to draw everything. In this course, you will learn the fundamentals of drawing and apply them to a wide
range of subjects and styles. We will start by exploring the basics of
sketching and dueling, including techniques for
capturing the essence of your subjects with
quick loose lines. As we progress, you will learn how to draw portraits,
landscapes, and human figures
with accuracy and expression using pencils and other traditional drawing media. You will also learn how to observe and analyze
your subjects in order to create more realistic
and dynamic drawings. In addition to these
core subjects, we will also delve into the
world of technical drawing, including the use of
linear perspective to create 3D illusions
on a 2D surface. By the end of this course, you'll have a strong
foundation of drawing and the skills to
tackle a wide range of projects with over 30
different assignments and personal contact with me. I promise you, you're
gonna be able to draw much more than a stick man. So if you're ready to start
your artistic journey, if you're ready to be able to draw everything,
echo, echo, echo. Then what are you waiting
for? Let's jump on in.
2. Materials: Okay guys, a good place to start off is talking about materials. What you need to get yourself drawing right away.
And you don't like. This can be kind
of scary because there's certain things
that I'm going to talk about here
that can be like, well, I don't have
the money for that. So I'm going to
start with things on the more affordable side. And when we look at materials, we're basically comparing
traditional and digital, right? So we're going to explore
the traditional first. The first thing that
you could get drawing with that everybody
knows is a pencil. Now, what most people buy when we buy a pencil
would be right here. This is an HB pencil. This, when we talk about HB and when we go down the scale on, up the scale, we talk about the kinda the
firmness of the lead. So down, down here
around the six h, the lead is getting
very hard, stiff, firm. So it takes much more pressure
to push down on this, to push down on this pencil and kinda get a line
that you could see. So you'll see it's
very, very light. Whereas in when we move up on this scale up to
the seven B and AB, it's more of like
a softer charcoal. So you don't have
to press very hard. And you could see
how dark it gets. When you're buying a
pencil from a store. Generally speaking,
you're getting an HB pencil unless it's
kinda stating otherwise. That's the standard
pencil that everybody uses in school and all
that kinda stuff, right? The standard pencil that
you see everywhere. And it's honestly, it's my favorite for just
general sketching. Depending on where you live. Buying a pencil, an HB
pencil is the easiest, most expensive way
to go about it. If you don't want a
pencil though and I, or whatever it is, you prefer something different. You can get into pins. And I used to love just
sketching with a ballpoint pen. There's gonna be
a drawback to it. There's not a lot of erasing going on or anything like that, but they were handy because
my mom had them around her office and I could just sit there and doodle
away all day. Whatever you have
access to, use it. It doesn't really matter.
It's just as long as you get drawing and
stuff and realizing that you don't
have to plunk down a lot of money to start
off because you can start with a pen
that maybe cost $1 depending on where
you're from or a pencil or whatever, right? And just some paper. Now, we've kinda got
a few options here. If you're going on the
cheap side of things, well, then photocopy paper will work. Some of the best doodles
I've ever seen has been on like Post-its are
just lined paper. Write the paper matters. I will say that it matters according to when you get
into real nice are working. You start working on sketchbooks because there's a certain grain in that paper that will give your drawings of
really nice texture. So if you can afford $10, $20, $50 sketchbook, do it. I think that's great. Go for it. Don't let it hold you
back if you can't. If you're coming at this
and you're like, okay, I've got $1 pencil and
$2 worth of paper. And now I'm spending $3 for my beginning
investment in drawing. Go for it. That's awesome. That's
what it should be. That's where honestly, that's where everybody starts, right? Everybody starts at around this basic thing
because you're gonna be cranking through a lot of
stuff. Start here maybe. And then after that, go out and buy yourself
a nice pencil sketch or a pencil set rather
and a sketchbook. And then you'll kinda, you will appreciate
it a little bit more. That's my advice on
the traditional route. Nowadays though, a lot of people were even
starting digital. Chances are you are watching this video on some type
of laptop or iPad, or a TV or computer screen or
something like that, right? And so most households
will have something and I guarantee you have something because you're
watching me right now. Whether you can use that
or not for drawing, it depends on a lot
of different factors. The average laptop
or computer is not really conducive for
drawing in and of itself. Even though expensive. They cost a $1,000,
2000 or whatever. I'm using this
little mouse pad for drawing is going to make
your life very frustrating. It's very difficult. So what you often need
is something more than this to create
digital artwork. One option is like a tablet. This is a walk them. I believe it's an
intuitionist model. And they start, some of the low-end models
start around $40. I'm talking US dollars here. Generally. They move all the way
up into the thousands. The starting models is just a pad that looks like
I'm a little mouse pad, but you have a
pressure-sensitive pen. You can do a lot of
things with that. So if you link. Pad like this, a drawing tablet
like this, with a laptop. While you can get
creating digital art. It's just hooks up with a
USB and everything, right? So that's kinda your cheap way to start off using digital art. Next way is if you
have some type of iPad or tablet or something
like that that you could draw on its surface. I have an iPad Pro, I love it. I use it a lot and I think they're running
for around a $1,000. I should probably check on
them now, but they're great. Then you could use programs, the apps within them and stuff. And they come with
an Apple pencil, which is also pretty cool. And you don't need to be linked to a computer necessarily. You can just draw on
it in and of itself. You can get into bigger tablets. The one I'm working on
right now is 27 " and stuff so they get bigger
and they get pricier. And I really don't advise that for any type of
beginner starting off, but I have a Wacom Cintiq and I, it's basically like,
like this one here, but I can draw on the screen
and the screen is giant. So it's fun for me. I enjoy it. But it's definitely
something to work up to. Speaking of digital though, when you are working to delete, you're going to have you need
a program to work within. Ms paint has kinda gone. And there's a lot of better graphics programs
out there nowadays. We've got Procreate,
Clip Studio Paint, Photoshop, and Sketchbook Pro. Okay, Those are the
top dogs in this. You can look and see which one's more affordable
and which one fits your needs as
an illustrator, some of them are better
on certain devices like I know on the iPad, I use Procreate, but on my computer I use Clip
Studio Paint, right? A lot of them are actually
pretty compatible the way they deal with files
and file structure. You can export from one to the other and
back-and-forth again. Okay? So guys, these are the materials that you might need to start
drawing and creating. You can go the
traditional route. And it basically starts
off very low from one or $2 of an investment and then
kinda builds up from there, but still stays on the
conservative side, like under $100 will get you pretty much everything you need to get drawing
traditionally. Or you can go to
the digital route. And that even starting off is on the high end
of this guy, right? Starting off digitally, you either need some type of tablet, some type of computer
or something. And so you're
looking at hundreds, if not thousands of dollars. I hope this is a nice little introduction
to you for materials. It can be scary because
we keep looking at this. Oh my gosh, it's so expensive. But you don't need it. If you happen to have
it around the house, uterus, it utilize
it, It's all good. But for this course, all you need is
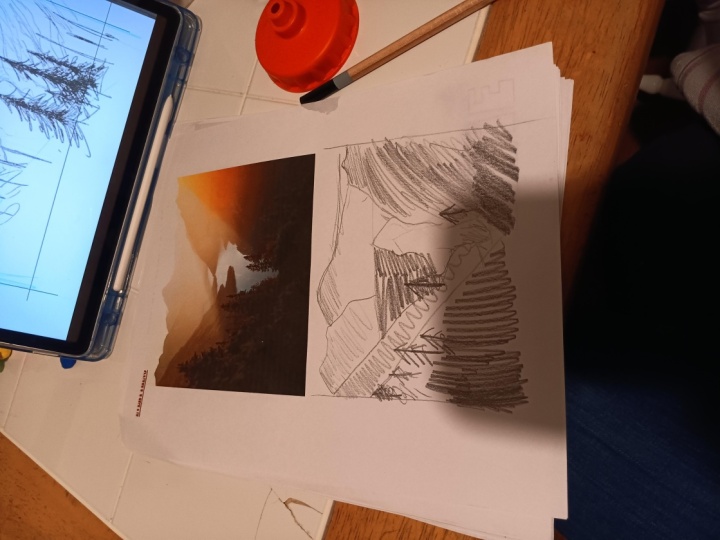
something to watch me on and something to sketch with. That's it. So let's get to it.
3. Outlines and Silhouettes: Okay guys, In this unit
we're going to talk about simple outlines and silhouettes and how
they can show and convey much more than
we really expect. What does this mean
and how is this going to translate
into what we're doing? Well, this is another slightly hand-eye coordination
practice that we're doing. But we're also recognizing how powerful the silhouette is. So let's see. I'm going to grab
red here and stuff. And I'm going to trace over
the outline of this pair. And that's all I'm gonna do. Okay? Now what do you think? Does my traced outline
look like a pair? One and I draw it side-by-side. Come up here. Yeah, that denotes a pair, right? So what I'm hoping
you're doing right now, this is really important, is I'm hoping you're doing
exactly what I'm doing. I hope you're using the reference
material that I have provided to you, the worksheets. And you're doing exactly
this, exactly this. You are tracing
the basic outline of the pair and
it's not perfect. You can see like in some
areas I'm not spot on. And then what you're gonna
do is right beside it, try to draw that outline
again right away. This is helping a
little bit with your mind muscle memory
connection as well, okay, because you just did this pattern and then
you just did it again. Now listen, I'm looking
at my two pairs here. They are not the same. In fact, if I move it a little bit, you're going to see that
there's a difference, right? But you know what's there? The fundamental shape of a pair. It's still there. Okay? So I'm going to move
it on back here. We're going to carry on down. The next thing is a shovel. So let's see if I can do this. The tracing outline of a shovel, I'm going to come up here. Do the handle, comes straight down to the bottom
part of the shovel, come up and you know what, for some reason I
have a better stroke, straight stroke going down.
So I'm gonna do that. Okay. I'm just doing the outline. I'm not doing any
details inside. I'm not going to do
anything like that. Okay. I could cut this out
if I really want to, but let's leave it as
is. So I just did that. Let's try it
side-by-side already. I could see him
struggling a little bit. Right. But by looking at it next to me, I'm getting a pretty
good reference here. I'm going to come
down and I'm going to come straight down. Okay. Now, wasn't perfect. But do they look like shovels? Although this one is starting
to look a little funky. So what went wrong
with this one? Well, I can tell it should
have been more of this. Right. It came out too much in a
kind of arrowhead look. Right. So I can just correct it a
little bit if I want or not. I can leave it and just
learned my lesson. But fundamentally that was what was messing me
up there, right? So I'm learning from
it, saying, okay, well, what can I do to improve
my silhouettes, right? What can I do to
improve my outlines? Next one, we've got a house. Pretty typical American
looking else, right? So I'm gonna do the same thing. I'm going to come up
here to trace along. The outline. Come over here, come
down, come across. And sometimes my lines get a little lazy, but that's okay. What do we think? Does that look like a house? Let's find out, so
I can come up here. Alright, come over down, and this is where it gets
a little wonky, right? I can already see my
hands are starting to go over and I'm starting
to want to erase things. So racing is no problem. I'm going to come straight down, come over, come under here, come up a little bit. Come over, come up. Come up like this. Come up and come over. Okay. Now, did I love that? Not bad. I think they can
still pass as houses. They're still doing okay. It's still workable
and stuff I got, but I'm starting to
get a little wonky. I'm starting to lose
my form, right? So what can I do to help that? Alright, What could I do? Well, like before I can put in guides if I
really wanted to get I mean, if I'm if I'm working
on on drawing something or whatever
and I'm trying to get the heights
right or something, you know, I could put in a
guide here and I can put in a guide down below and that might help guide me, right? So just using a bit of
a guide and we're gonna get into using guides
a lot more later. But that's just one way of doing it is by using some Ruler
Guides or something. The other is just
being more careful using an eraser and start
to clean things up and say, Oh, I know where
I went wrong here and tidying it up a little bit. Alright. I'm kinda not doing that
for you because legit, I just want to show you
how casual and outs okay, to make mistakes because
I guarantee most of you, most of my students are making some type of mistake
right now, alright? And if I show you my mistakes, my kind of ugliness, well, then you get to show me
yours to write the elephant. We're going to come up here, we're going to come around. And what's that old
tale about an elephant? It depends on where you touch it is what it feels like
or something like that. You touched the trunk. It's a snake. If you touch the skin, what would it be if
it's touch the skin? I can look that up. Let's see what that
whole thing was. To the tusk. And I'm not putting a lot, a lot of detail
into this, right? What do we think? Does that
look like an elephant of I kinda disappeared
this back layer here? Yeah, definitely. It looks like an elephant
right? Now Let's see if I can recreate it. I'm going to try to go
with a bump on the back. The big bump. Come
down for the tail, come up, come back
for that back leg. Come forward, come
forward for that plague. Come up here, come back
for that Blake back there. Come up and come up here. It's going to come up for
that ear under part of the mouth and come down
into that little trunk. Comes up here to this, carries over and then
I've got the head. Okay. Not bad. I feel I'm a little bit too stretched out this way, right? And I'm losing it. What's happening
here is I'm trying to use my eyes to
draw a silhouette. And sometimes for simple shapes, for just a circle or something, it works really well. But when we get into
more complicated things that have a lot of dynamic
shapes and angles to them. It starts to fall away
a little bit, right? So practice this exercise, especially for simple shapes
and do it a few times. But in the next unit, I'm going to teach you how
to be a little bit more accurate and drawing
something more complex.
4. Form and Shape: Okay guys, I'm sure you remember
in the last unit we were talking about these
simple outlines, right? And it was met with some varying degrees
of success, right? On the simple shapes,
the simple outlines seemed to work really well. And in more complex shapes, more drawn out things they
seem to collapse, right? So What's another approach
we can use to do this? Well, using these simple
silhouettes worked, but only to an extent, right? I want to approach
it by understanding some, some underlying forms. Okay? So what we're gonna do is we've got the pair in front
of us here, right? I'm going to take a blue, blue pen and just, just draw a nice little circle. Okay, and above it, another little circle,
and then my little tick. So let's see if I draw
that right beside, if I draw a nice little circle. Remember we've been practicing
our circles, right? And another little circle then
above it, that stem tech. Okay, Well, so far so good, it seems to be working so I can kinda do that outline bit. Alright. Kinda just follow this form. And I gotta say, I almost think my
pair is looking better than the original pair. So how did I do it wrong? What did I do? I had this simple circle and
then grabbed another one on top and then did my little stem stemmed
than that right? Then? Well, I did my outline. I kinda just followed
the form around. And so what am I doing? I am tracing my own sketch. Basically, that's what
I'm doing, right? So I'm doing this nice
little blue line sketch which a lot of artists use. And I'm using that to make
sure my form is a lot better, a lot more intact. I'm not kind of guessing.
I'm starting to get shrinkage here and stuff. That happens, but let's see if we can do better
going on here, right? Okay, so what do I
have four shapes. I've got a rectangle here. Ugly rectangle, a spade. And there's kind of
a U-shaped prime. So let's see if I draw
that off to the side here. I'm going to draw this
rectangle, this U-shaped. See if I give it more effort. And this spade come
down to the point, come down to zero
point there. Okay? And now what would I do for the silhouette? And
come around it? Draw over, come down, come over, come
down, come back up. And you know me, I like to come straight
down on this way. And that is a way better shovel than what I was
doing before, right? You can see how much
this has improved by me doing some of that sketch
on the underlying form. And even in these
simple objects, it's helped a lot. It's helped tons. Let's see if it helps me here. So what do I got here? I've got kind of a semi
rectangles square, another square, another square. So why don't I draw that
off to the side here. I'm going to draw some of
your rectangles square. On this side, square and on
this side square already, I can see the structure of
this is so much better. Now I'm going to draw
a triangle above it, a triangle above it. And then I can kinda
figure out the shape of these roof
that comes out. It actually goes up a
little bit and comes over. It goes out, comes
up a little bit, and then goes over, right? Now, heck, looking at
this and how much better? Let me even being sloppy here. But how much better? This looks like it's
intended subject, right? All of a sudden now, my house is looking
way more Lego house. Last time it was kind of looking like an ugly
strip mall or something. Right. But this time it's
looking like a house. Why is that? Because I'm using those
underlying forms, those underlying shapes to really flesh it out,
to give it form. And that helps my
eye in all of this, even though I'm being a little
lazy here and that kind of stuff, right? Doesn't matter. It's still so much better
than when I was just kinda like trying to draw it out. Occasionally that would work for me and for simple things it was but not in starting
to get more complex. Okay, So the elephant, this one is going to
be a bit tougher. I'm going to look at
some basic shapes here. Here's a basic shape.
And look at this. I'm kinda getting a few
basic shapes here. Okay? So I'm gonna go with
that big circle, medium circle, and
smaller circle, smaller. There we go. Okay? And from that, I'm
gonna get a rectangle. Rectangle, our rectangle,
and a rectangle. So let's see if I do this. I go a rectangle back here. Our rectangle going forward. Rectangle here,
kinda coming forward and rectangle coming
from behind there. Okay? Now, this is where
it starts to get into trying to
recognize that say, well, if I'm gonna
do this exactly, there's more details, right? And that's okay
because I've already spaced it out using this form. So I'm going to go
with the hump here, and then the bomb, come
down into this tail here, come over here, come back into this leg and even
this detail of the leg, I can put that toe a little
bit further forward. Come up here, come back here, come from the little
toe, bring it down here. This one's going to come up from this rounded area
up towards here, towards his leg
where it comes back. It comes into the
rounded part. Right. And I didn't space
it quite correctly, but it's still working
for what it is. That comes up here. There's an ear. You know
what I should've done. I slept on that. This should have been a triangle or something like
that right there. That would help me with this ear underneath into the
mouth a little bit, then I can still
freehand the nose coming down up into these guys, the bridge of the nose, into the brow and into the head. And this is so much better. In fact, all of these
are better now that I've started to draw the underlying
form to them, right? So what's the takeaway? Basically, silhouettes
still really show a lot. They show. Our brains are made to
recognize these silhouettes. Like if it's a elephant
heading our way, I don't have to see the
details of the elephant. I don't have to see
it's eyelashes. I know that it's a danger. And as a human, I start to
run the opposite way, right? So our brains quickly
recognize silhouettes. But occasionally
when we get into more complex designs and
objects and figures and stuff, the silhouette, just drawing, it doesn't work quite
as well as we want it with practice it will
get better with and stuff. But this little trick, learning to look for
underlying forms and shapes will help you so much. And it'll help you a lot as
we go forward in this course. So what do you do while you practice those lines and shapes that we did in
the warm ups and stuff. And you practice things like this until you've got it down. And once you've got it down, you move on to the next unit. And it's going to
make even more sense. Have fun with this guys.
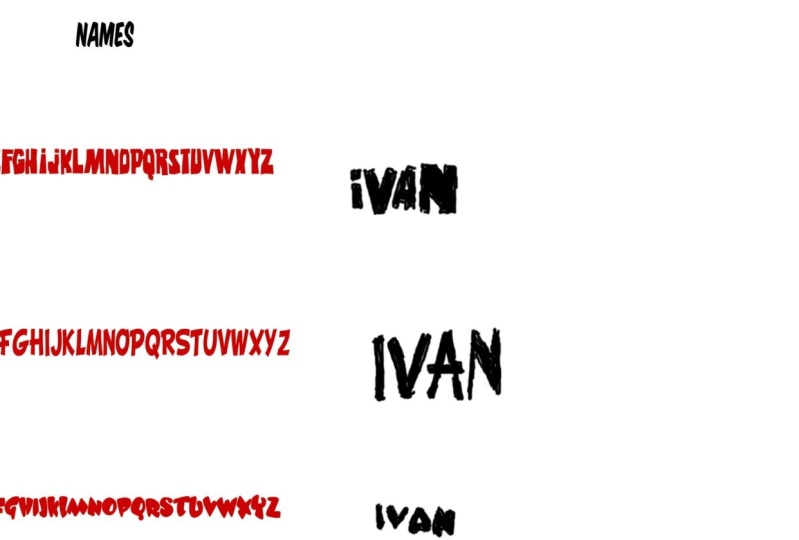
5. Writing Names: Okay guys, we're back and
we've got another unit here. This time we're going to
work on writing our names. Now. Listen, I know. I know. Chances are I'm hoping you're
able to write your name. Like although all right. In a little sloppy,
my name is Ed, right? Or if I really want to,
I can go with Eddie. But this, this right here does not have the
greatest impact, right? Like it's not the
greatest looking. Actually what I, what I'm trying to say is
like when I write it, I can get a little
scratchy and stuff. I know my signature. This
is actually my signature. It doesn't it's not
really legible. It doesn't look like
anything that has no impact. If I was writing like, let's say a birthday
card for a friend or we're trying to do some doodle on a big poster
or something like that. This type of writing here
is not appealing at all. Right, so I want to show
you something that can put some of what you've already
learned into practice. What I've done
below here is I've added a few different fonts. So you hopefully
have this worksheet and you're following along
or you're, you know what? Maybe you're listening
to this all at once. And then you go off
to the side and you hit pause or whatever
and do it on your own, or you listen for a
couple of minutes and hit pause and do it and
listen again and stuff. It's, it's up to you
how you learn best. But I really want you
to take advantage of these worksheets that
I made for you, okay? They're here for a reason
and they're going to make your learning
so much easier. So right away, you
can see I've got one alphabet font laid out here. I'll font is a particular
design of writing. For texts to write in
computer formatting. This will make it easier for what we're going
to practice here. We're going to start with
my name and I'm just going to go with Eddie. So I've got to E, a, D, a D. And I okay. Well, that makes it a
little bit too easy, right? So, you know, I'm doing
this one, this one, and this one, I've only got
three letters in my name. So what I'm going to
try to do is try to draw them like the
written in the font here. So this is kinda a
straight line thing. Right comes up to
here, up to here, goes back, comes back, and then comes out right there. Right. Okay. That's that kinda looks
like that, right? Not too bad. Just a lot
of straight lines right? Next one is a D. Okay, how do I do this? I'm going to come down
come down this way. And I come up this
way, come back. I'm just kinda watching, looking at this as
I'm moving my hand. I'm there. I come
down with this, come up and there. I
can do that twice. Now let's see if I can
replicate it side-by-side here. See if I can make it
look pretty similar. Right? There we go. So d, d, d, i is this kinda
British looking thing. And then another E. Okay. Was that hard for me? Not especially,
but it depends on which which letters you
use for your name, right? For me, this was a
relatively easy exercise, but it might have been tough
for you and I get that. I'm going to show
you how to make it a little bit easier going forward. We're going to take
another font here. And what we're gonna
do is you can take a ruler or whatever you want. And you're just going
to draw two lines. Actually know what I'm
gonna do that in red just to make it a little bit
clearer for us and stuff, I'm going to draw a line
here and a line here. Okay, I'm going to bump back,
bounce back to my blue. And I'm going to do
somebody else's name. John. Let's go with John. Jay. Where am I here? J 0 h n. Okay? So the j is here. I can use this as a bit of
a marker, this red here, and this bottom as a bit
of my size marker, right? That will help me a little
bit in my sizing vertically. So here's my, my J might owe. And this is where
that circle practice comes in that we were talking
about earlier, right? There is my, oh, it's kinda got this weird
little hook thing going on. There is my H, my H here. Alright? It's almost like this goes through it a
little bit. Alright. Comes up to here, rounds out, and then comes up to here
and rounds out, right? Okay. And then n kinda come here, comes up a little bit,
comes up to here. This one comes in here. Down and up, angled again, down. A little knobby here, and
then comes back up to there. So there's John. Not bad. It looks a lot like the
alphabet font below, right? Do I really love it? Yeah, I think I'm doing
really well with this. And I'm hoping that you
are using your name and you're practicing other's names and stuff
like that, right? But there's still something
that's making this possibly a little tougher
than it should be. So I'm going to teach
you yet another trick. We did all get that, okay, just free handing here. Then we had a little bit of vertical or horizontal
parameters, right? We're gonna
do that again. This time. We're gonna do that same thing. We're going to have this line
here and this line here. But let's pick a
name. Girl's name, my daughter's name. Joey. Joey has four letters in it, right? J0, e, y. So I'm going to divide this equal sizes roughly
about here, right? So that would be two
letters and I'm going to divide in the middle,
where's my middle line? Somewhere here? And where's my middle of these? Somewhere here. Okay. So now, not only do I have like a box kind of Caralyn
me and on the top, but I also have a
box on the side. So I'm looking for
Joey. Where's my J? Let's cute. Oh, E and
a Y way down here. Okay, so let's see if I do this. Where's my J? J will come here. Switch, do his little, kinda funny little hook,
and come like that. The 0, you will find
the exterior of this. Oh, see, I kinda kept it
within that bounding box. There is pretty simple. It's kind of an old It's the inside that's really kinda
small and funny-looking. Actually, if anything, it goes a little bit more
like that. Alright? Okay, This E has got a
bit of an angle going on. So it comes down here, it bubbles out, bubbles out. Bubbles are big. And there's y. Omega tackle this, I
would say there's y. And it goes like
this comes down. This is practicing that
hand-eye coordination. Come down here and comes up
there. And there's Joey. Cool guys practicing your
name or anybody's names, people in your family and
stuff like that will help you get beyond these simple, simple writing, printing
techniques and stuff like that, where you're now able
to make it a form. I gave you three letters
or three alphabets, rather three fonts, to use some of these lettering
styles in your writing. And you can practice again and again and use different sheets. Not just a sheet I gave you, but different ones and stuff. And then what I'd really like to see is for you
to make your own. I want to see you branch out
and make your own fonts. Make something different, right? Because these are
cool. I like these, but maybe you've got your own
funky style you want to do. That's your assignment here. I'd really love it if
you could draw your name in one of these styles or your own and send it to
me and just say, Hey, I followed these techniques and this is what I came up with. And I bet it's going to
look pretty darn cool.
6. Starting Exercises: Hey guys, I've got a very, very important
unit for you here. This one is the one to
kick it all off, okay? This is the fundamentals and
the exercises around them. If you do these exercises, they are going to help
you tons going forward. They're going to teach you some basic movements
that are extremely important in everything that comes after as you're
learning how to draw. So I want you to kinda
stay with me on this and have some fun
because actually I'm making this sound way more
serious than it actually is. First thing I want you to do
is grab a piece of paper. And it can be any
piece of paper. It doesn't really matter. Just go around and
make some dots. Okay? So just go around and make a
bunch of random dots on it. Some of them can
be close together, some of them can be far apart. Whatever it doesn't
really matter. I'm using just this much of
the sheet for my daughter. And you know what, I'm going
to switch up the colors just to make it a little
bit easier on you, on your eyes so
that you can see, as I'm drawing on the screen
here, what I'm doing. But you don't have to
don't worry about that. Okay. So I've got all
these random dots. It looks like my screens all
cluttered and stuff, right? And what I'm gonna do
is I'm going to try to put my pencil on one dot and bring it
to this other DOD. Okay, I'm gonna try to
do that in one stroke. What I'm going to try to
do is just go like this. And I could go slowly if I want. And you'll see how my my my line kinda waivers
a little bit there. Especially if I'm going further, I might common well, not bad. I was okay. Looks like I've been
at this for a while. But what I would rather do is see just something like that. And you see how that
quicker stroke has a, has a nice cleaner
line to it, right? So what I want you to do is
come around and start to just draw and
connect these dots. It doesn't have to be
one to another and specifically wanted
to anyone, right? It could be long distance, it could be a shorter distance. And if you want to,
you can start to move your paper around a little bit and see
if that helps you. This exercise is going to help you kinda do this hand-eye
coordination thing. And it'll help you
drawing straight lines. So this is what you're gonna do. I want you to go around and
connect a bunch of dots, 100 dots, and keep doing it. There's no like, Hey, I'm done. There's no point
where you're like, I don't have to do this anymore. I'm a I'm a super pro. No, actually, this
is a great warm-up. Every single time you sit
down and you're like, I want to do a bit
of drawing today. You can practice with this. If the dots are really
far away and I'm going to switch back to my
dark color here. If I'm connecting this dot, it's going off the screen
here with this dot, right? Well, sometimes it's too far for my my wrist to give
a little line. Like if I if I just hold
my palm down on my paper, it's gonna kinda do the
nice little fluid motion of the circumference of the
span of my wrist, right. Not even my rest,
even just my hand. So it's going to bend
that line a little bit. So instead what I start to do, and this is the next level
of this is start to draw with your hand away from the
paper just a little bit. And you're moving your
entire arm and elbow. Okay. So your shoulder
is now in control and it starts to just do that. Okay. So at first, you know, when, when when it's these
clothes, little lines, you're kinda like me. I
can get away with this. Me. Your hand can do this span
in and of itself, right? But after a while, you want to move your hand
away a little bit. So this type of warm-up really only takes 2
min or something. And it's a good one to do. At the beginning of
a drawing session. You can have a scrap piece
of paper off to the side, whatever you want,
whatever works for you. Just keep practicing this. Work on your hand-eye
coordination. Work on your wrist, moving. Work on your elbow and
the shoulder starting to take control for
the longer strokes. Another exercise, I want
you to work on something again that's working on the
fundamentals here is circles. Now if I tried to
just draw a circle, well, that's one's
not bad, right? Very rarely will I ever
just draw a perfect circle. They sometimes look a little
oval and stretch to OAT. They sometimes get
a little wobbly. If I slow down, it gets a little bulbous
in certain areas. So I want you to
do this exercise. I want you to just start to draw a circle and go over it
and over it, and over it. And draw another one and go
over it and another one. And what you're doing
is training your mind. To really get that pattern
of that shape down, you can go over, over and over until it takes that perfect
form of that circle. By doing this. You're exercising your
wrist a little bit. But really, again,
you're exercising that hand-eye
coordination that is so, so helpful and what's needed
when making illustrations. So what you could do is do
this just as you're sitting in a meeting or at school or something and you're just
doodling away with circles. I know you're like, dude, I don't know if I want to draw circles for the rest of my life. Yeah, I get that. I've often wondered that myself. But learning to draw these
circles shapes will really help you when creating
other types of forms. Having this nice
smooth casual line and being able to draw
a rounded shapes. You'd be surprised when we
get onto later subjects, how many have these nice
rounded forms as their base? Okay guys. So make sure you take a few minutes to just do this part as part of your
warm-up exercise as well. It's important, it's
important to get these fundamentals down as something that's not
only in your brain, but that you're
training your body. Consider this like the workout before you hit the gym
or something like that. Alright? There's just these fundamental
stretching movements and warm up movements
that will help you prepare for the real workout,
for the real battle. And that's what this
units about a lot. And the next one that
I want you to do, and I might go back to black
or gray here for this one. Is just relaxing. Just drawing lines and
working on shapes. Just kinda sketching
a little bit, keeping it loose and just
drawing whatever comes to mind. It doesn't really have to be anything that could be circles, can be shapes. It
could be anything. It's just this
loose feeling like when you push hard on
the pencil, right? And I'll get a better
pencil here for us. Maybe zoom in a little bit so you see what I'm doing here? When you press harder on the
pencil, how does that feel? What's I feel underneath here? When I'm, when I'm drawing.
If I'm just sketching light, what does it feel
like for this, right? And how do I build this
up and everything right? All this time. This time in the gym. We call it time under
tension, right? Hi, I'm doing this
will help train you to feel oh, I remember that. I remember what that felt like. It I remember what that felt like when I did that dark line. That's the pressure
I need, right? That's the push I need on this, on this pencil, right? On this pen to get that. If I stay in that spot too
long and then flick it out, that's what it's
gonna look like. I'm just going to have this
feeling and stuff, right? So again, training guys, I know that this seems weird looking when we're
looking at it this way, right? There's these weird
geometrical shapes. There's the circles, there's this ugly sketching going on. It looks like we drew
absolutely nothing. And that'll be a big mistake. It'd be a big mistake to
look at this and think, what did I learn there? Honestly, this is where
it all comes from. This is your warm-up. So save this unit, come back to this unit, come back to this
almost every time you sit down and just do a little
bit of these exercises. Because if you do these, every unit going on is gonna
be that much easier for you. And I don't know if I'd
have a little fun with it.
7. Finding the Circumference Line: Hey guys, I'm back and I've got another
unit here for you. This time we're
tackling circumference. And yes, I know that
sounds a little bit like math from grade six
or something like that. But that's not the
direction I want to go in. You'll see as we get into this. But if you really
understand this, if you understand how to draw circumference lines on forms. Well, this course is gonna be that much easier
for you going forward. In front of us here.
What do we have? We've got a bunch of circles, like got a heap of
them here for you. What makes them a circle
while they're round and they're perfect and I
made them perfectly right, and that was for this practice, but I want to change one. I want to change one and see
if I can change this one. I'm going to come in here, select that guy, come back. And the reason I'm going
to change it is just because I want to change it
away from being a circle. I don't want it to be a circle. What do I want it to be? I want it to be an sphere. Now, we'll get into this later about how to shade and
all this kind of stuff. Okay, So this isn't what
we're doing right now, but we're just going to shade and make this
a bit of a sphere. Okay, so why did this
quickly become a sphere? That's a good look and sphere, I'm going to impress myself because I showed it looking
kind of three-dimensional. I give some form to it. This is a circle and it's
just flat, it's a 2D. Now I made this into 3D
by adding some shading. Don't worry, that's
not the exercise. I'll teach you how to do 3D shading later and
all that kind of stuff. Okay? That's not
what this is about. This is about understanding
that a circle turning into a sphere
has certain forms to it. Okay, and that's
what we're gonna do. I'm gonna come over here to this circle just because I've got a spear right
next to it, right? So it's a nice little
point of reference. And I'm going to draw
two bisecting lines. Let's see if I can get my little line thing going on here. And I'm going to draw one down the middle and one
down the middle. That looks pretty much
like the middleware. So if this is my circle and
I'm drawing it like this, I've just cut it in half. This is a circle that's cut in half this way in quartered. But I want to make
it into a sphere. And to show that, well, I've already got this, this, it's all the
rounding on this side. I want to follow that curve
and follow it around. And follow that curve and
follow it around and follow that curve and follow it around and follow that curve
and follow it around it. That was pretty
ugly, but it kinda does what I wanted to do. I want you guys to
practice this with me. Follow a nice curve, follow a nice curve. Starting point is here, ending point is here. Follow a nice curve, follow a nice curve. Okay? So now, even though this
side, it looks pretty wonky. I don't know what I was
thinking. We're showing that this is a curved surface, right? And so if I want to, if I ever want to show that instead of this
is the middle of this, this now becomes the middle
of this sphere, right? And I could do it this
other way as well. I can start to
follow that curve, follow that curve, follow that. Follow that comes on this side, follows, follows,
follows, follows. It's not the most beautiful
curves I can see. I'm getting kinda
ugly here and stuff. But that's what I
want you to do, is do this for awhile. On all of these. Come to all of them. And just maybe
this one is these. Why don't you set
your markers at the top and the bottom and stuff just to make
it easier for you. Set this and try to follow the curve of that sphere, right? See if you can
follow it around and just get used to
drawing it like that. And then you can come to
the next one and do it. Under practice, this, practice this a
bunch of times, okay. So that you're nice
and comfortable. Just drawing this form fitting circumference
lines around the sphere. They're not gonna be
perfect. As you can see, I'm goofing off here a
little bit on some of these. But just like how
I got you earlier, practicing circles, this will help you practice
drawing spheres. Okay? It's important. It's especially important once we get
into figure drawing, you can switch the
angle if you want here. I'm going to switch it this way, bisected this way, and turn my sphere just a little
bit on its, on its axis. Okay. That's the exercise. It's not a hard one. I printed off these
circles for you. But what I would like is if you just keep
drawing this and use this as a bit of a daily
exercise for yourself. So you can just remember we were talking
about drawing our circles. And you're drawing
are circles and you're practicing them as your warm-up and
stuff like that. Well now you add to it. You just start to get
used to bisecting it. You can even do it
one and another. And hit this mark. Hit this mark and say,
Okay, I'm going this way. And I'm gonna go this
way, something like that. You start to learn to wrap these lines
around these fears. Guys. It's not a hard one, but it's important that
you get this down. It's important that you do this if you're
struggling with it, try it and send it into me. And I can take a look and
see where you're going wrong. They're not
gonna be perfect. We're not a computer program, so we get little weird things like me goofing up over here and stuff I got
and that's okay. That's not what
I'm worried about. What I'm worried about is
that not worried per se. But I'm more thinking
I want to make sure that you understand
what's happening here, right? I want to make sure that
you can do just this. That you can bisect the sphere with some
level of confidence. Not only got ugly, you know, I talk about confidence as soon as I start messing
up here, right? But that's okay. Honestly, this is just a
nice little fun exercise to get you practicing drawing curves and finding the form
of a sphere. Guys, that's it. I wanted to make
sure that you're doing this for your homework. If you can post, post up the exercises, if you don't feel confident
that that's okay. But for sure, do these as part of your warm-up and
have fun with it guys.
8. Tonal Values: Okay guys, let's get
into this a bit. We're going to talk
about tonal value. What is tonal value? What
does that even mean? I'm going to grab a pencil
here and kinda show you. So I'm just kinda, kinda scribble with a
pencil a little bit. You know what, I might even
zoom in a little bit for you so you can see it
even more, right? Okay, So I'm kinda
scribbling with this pencil. Just kinda scribbling like this and you can see, what
does this look like? Kinda nothing. It's just some, some scribbles. And as I'm going
this way though, I'm going to start to press on it just a little
bit more. Right? So what do I see here? I can kinda see
two tones, right? So a tone is the graduation
from light to dark. And it has nothing to do with
colors here or anything. And we're just using black and white and
everything, right? So this one's lighter
than this one, right? What if I keep going? Well, there you go,
That got darker. And let's see if I
can go even darker. Okay, so how many
unknowns do I have here? 1234. Let's see if I can go a
little bit lighter here. It's hard because I'm working on a computer screen with
a graphics program. So that's easier for
me to instruct you. Working with paper. I actually find this exercise
so much easier, right? So if you're working
with paper right now, you've kind of got a maid. I wouldn't do this with
a pen necessarily. It can be done but
with a pencil, this is definitely
the way to go. So I've got 12345 and let's see if I can
do it even lighter. 66 tones that I've got
going on here, right? Not bad. It goes from like pure
white to pure black. I've actually got seven tones here if I really want to count that for me not doing
anything right. So I'm going to back
out just a little bit. 123456, Okay, this
one's gonna be white. I'm going to leave
that and I'm going to go with a bigger
pencil here and just kinda see if I can totally
draw this in dark. Okay. Did that work? Yeah, I would say that
that's pretty darn dark. Right? I think that kinda works. Okay. The next one I'm gonna
see if I can my bed, See if I can lighten
it up a little bit. While I'm doing this, What
do you think you're doing? I'm hoping you're doing
something similar. It could be on a
scrap piece of paper or anything like that, right? But I'm really wanting you to practice this tonal value
scale here with me, right? Okay, so this one is gonna
be closer to medium. And right now what it is, a lot of it is you're
finding is pressure, how hard you're pushing
on your pencil. It will change a little bit depending on the type
of pencil you're using. This one. I'm I'm refund on it over here. And I'm going lighter
and lighter as I go across the tonal
spectrum here, right? Okay. And this one's going to be
even lighter. Area, light. Like I said, I find
this easier to do with an actual
pencil on paper, right? There's just something about the nothing replicative in
digital stuff replicates the ability to have that pencil pressure
in your hand, right? And the grip on the paper
and all that kind of stuff. But I'm doing a pretty
good job here, I think. What have I done?
Well, I've shown you at least 1234567
tonal values here. And obviously we can
work more and stuff. I gotta kinda showing
you with inboxes, we can fill in boxes if we want. Put it across here. I've often done this
exercise like I start light, start pushing heavier,
start pushing heavier, start pushing heavier. Start pushing heavier. Start pushing heavier.
There you go. And it's all in one. I didn't lift my pencil once
off the off the paper there. So that's all in
one motion per se, but one action, right? Go from light to dark. Tonal value guys. Master this a little bit. Do these practices, you can even toss us into your
warm-up sessions. Like we've already got
a few of those already. Through tonal values. Gradients into your practice sessions,
your warm-up sessions. Because I think
that would really help you going forward
when we're starting to get into learning how to do
whether it's a landscapes or portraits or any type of
shading and rendering. This has got to be known. You've got to know
how to do this. One little tip that early on, it is often overused
a little bit. I remember when I first
started learning how to use tonal values. And then I was like,
Oh, I'm going to shade and I'm going to
do this and everything. And you know what I'm gonna do, I'm gonna use my
finger and smudge. That was my thing. I wanted to grab my finger. And just smudge. Sometimes my fingers wet. I'm like, Oh, yeah. Smudge. Smudge, right? Yeah. That can look kinda
cool because you can only or your
smudge and right, and you kinda get this cool
blended effect, right? Do that. Do it if you're working
with paper right now. I got sweaty fingers sometimes and especially as a teen I had and they were
really sweaty. And so I would just like
smudge and everything is just like it was nice to me. Not just looks almost
exactly like that. Alright. Do that a bit. Then once you do it a few
times, you'll be like, I've got dark pencil, charcoal all over my fingers
and this isn't what I want. The next thing that
you might want to do then is either grab like a tissue paper
or down here, you can see these
blenders, right? These are actual
blenders that you could buy a pencil
blenders and stuff, and they're gonna do
this exact same thing. So what they're
gonna do is more of a lighter thing of what I was doing with
my pencil, right? So this could be
something like this. It could just be blending
smoothly or something, right? Sometimes this will work
really well depending on the device you're using
or what you're doing. Right. But let's see. No, I don't like how
that looks either. So you can just
kinda drag it from one tonal value to the next, drag it from one tonal
value to the next. Drag it, drag it. And you can see how I
went from dark to light, but it's more of a smoother
transition, right? So what this is
going to do is just smooth my transition
a little bit. I don't know. I
don't know if it's always needed if you're
blending really well. Honestly, I'm backing out of it. And I like some of
this original look to this original style, but it depends what you want. Some people, and sometimes
when you're shading, you want this smoother edge, you want this nice blended edge and stuff does nice transition. So that's up to you. If you want it. Try
it with your finger, see how long that last year, and then move on
to using blenders and different tissues or whatever you need for
smudging and stuff. Little warning though,
sometimes when you're doing it, it can go exactly how you want and have that nice
blended middle ground. Sometimes it can go weird and
drag other things into it. That maybe there's
bits and particles on your paper or maybe you're dragging a white into
it or something, right? So it might not always be
how you want it to be, okay. Just play around with it and see if this
is a tool that you want or if this is something that you're
like, You know what? Now I know it and it's something I'm not going to do very often. But I'll tell you what those this gradient of tonal
value you will use often. So kinda spent too much time
on this blending and stuff. It's just an option. But in reality, tonal
values are a must. You must really get comfortable
with them, master them. And so that's what
I want you to do. I want you doing that exercise. Push harder, push,
harder, push hardest. Go from hardest. Lighter, lighter. Lighter, and lighter. Okay. Run this exercise so many times. Get good at it because
you're going to need it as we go forward.
9. Measuring Grids and Others: Hey guys, we're
back and I've got another drawing unit
for Horrea here. This one's a little bit
different. It is drawing. We're going to draw, but
I'm going to teach you some little tricks of the
trade and how to measure. When we've tried to draw
from reference before, we did a few
different techniques. We tried the outline
silhouette, right? That really worked
for simple shapes. But it got tough ones
things God complicated. And there were no view
details in it, right? It was just the
outline, silhouette to give shape and form. After that, we started to give
a little bit of shape and form by hunting down the
shapes and forms and saying, okay, well, how does this help us understand the
entire piece, right? And with all of it, it, it worked a lot better. We were able to recreate a lot of what we're
trying to draw. All of that works and all
of that works really well. But I want to show you
a different method that is used commonly in trying to recreate
especially a photo or another piece of work. So you're looking
at another drawing, a painting, whatever, or photo. And you're like, Hey, I want
to recreate this, right? And there's an easy
way to do that. There's lot of skill and bulb, but there's an easy way in
general how to make this work. Okay? So I'm going to show you guys the grid method to
start off with here. So what you can do is
basically rough out a grid and then rough it out next to it and then draw what's in
each of these captions, are each of these
sections over here right? Now that is ugly. I do not like that
and that is that is the wrong way to do it
because what's going to happen is because
my grid is warped, everything is gonna be warped. So whether you're using a ruler, a straight edge, or measurements within an app
you're using or whatever. I want you to try to draw
a nice grid like this. Something that looks
like this, however many partitions you have,
doesn't matter to me. If you're drawing this
on paper and you've printed this out, measure it. Maybe it's 2 cm, 1 " or something like that. And each box has, has that measurement and make
them equal squares for now. Make them equal squares for now. Okay? Once you've done
that on the drawing, I want you to go next to it
and do the exact same thing. Again. I want you to go next
to it and draw out this exact same thing or
a grid rather, right? Okay, so now I've got two
exact grids here, right? But nothing in here. So what I'm gonna do, I'm gonna kinda zoom
in just a little bit so we can get just a tad closer. Is this goes back to that hand. I think I'm going to
keep looking back and forth and looking at this
reference and over here. But because of this grid, I can kinda police things
a lot easier, right? E.g. this, this here on pennants did this here
is grid number one. This is this corner,
this corner. And we can see that
somewhere around here, this is coming down, this roof is coming down. And then it starts coming
down into here, right? So if I'm just drawing
this here, in this piece, this is all I'm drawing
is this one roof here. Then I can see in this next one, this next section, it kinda comes down
here and into there. So I'm kinda looking at
a matching and across the board here, that
kinda comes in. And we can see how the
paneling of the barn itself comes down and it comes down straight down through here. Does it come all the
way to the bottom here? No. It actually comes
up about only one-third into this panel and
then comes over. And it comes over. And it marks about two-thirds for here. So it's going to
come over this way. And this is just a rough sketch. And then it's going to,
I'll leave that for now. I'll let that play out. So I'm going to
continue this roof up to maybe somewhere
around here. Actually. I think I brought
it too far there. I'm going to bring this
roof up to around here and it comes down
to right there. So what does that three
blocks over about halfway, one-two-three, vote halfway,
somewhere around here. So I can do my exercise to draw
straight line going there. I'm gonna come up here, but there's no other
line that does that. The next one comes
down to this corner. So it comes from
here, down to there. This line comes from here
and I can plot it out, comes to vote this point
or something, right? So I can just plot it out there and bring
this down to there. The next one that
I'm looking at right there is going to come
somewhere around here. And so this can come down there. If I'm looking way over
in this section here, there's a line that's
right about there. So does this look really familiar from some of the exercises that we've
already been doing. I'm going to come
here and I'm just now that I've got
that form down, I can bring that that
roof bevel over. I can bring that over there. I can see that there's
a little window here. This is not going to
be a perfect drawing. There's, I didn't plot it out in perspective
or anything yet. Antibody don't have to write. All I'm doing is
plotting things out using this grid,
using the squib, this fourth one,
I'm going to have this landmark about
halfway there. I know what goes into
the next square and about halfway almost
in the middle there. So I can draw, maybe make that a little
bit more connected. Draw this line there. Draw this up, draw this up, and get myself that
logo, roof bevel. And of course, I can put in
as much detail as I want. I can start adding in these
beams and everything right in front of these beams if
I want pacing them out, depending on how
much detail I want. This is just a sketch right now. And back from here, this is going to come down, but where does it come down to? I'm going to mark it and it's
going to come down to about here because that's where
it is, right about there. So it comes down into a bean, come down into a beam. Then on this side of
the beam, it comes up. And of course, that's the
beam underneath here. I can see the next beam is
right here on this line. It's so easy to use
these these grids. Now write this one over here. It's gonna be, I'm
gonna kinda look over here and I'm constantly doing
that back-and-forth thing. I'm jumping back-and-forth
and I'm just plotting out, where are these beams? Where would they be in
relation to this photo? And then I can come
in here and say, okay, well this
one comes up here. This one comes up here. This comes up here,
the support, right? This comes up here,
comes up this way. This one's here, right? Okay. Then the deck is below it. The deck comes in
here to this point. That comes in there. And that's how the house
looks behind there. And of course then
on this corner is that part of the house. The deck can be finished
off and of course we can use whatever else we can put shrubbery and can
put all that in here. Put this window in here, and you can spend a lot of
time adding a lot of details. However many details
you want to add, you can zoom in
and really make it something special.
It's really up to you. The point of this
exercise was to show you how you can
look at even just one square over here and
recreate it over here, right? I can recreate
these bushes coming here or the top of the trees
and stuff like that, right? I'm recreating just
square by square. This is a little different than what I've shown you
for using references. Remember the outline
and the form and stuff. I got this as just using
this grid as a marker. But what it still
does is teaches this Coordination of looking back and forth with your eyes, spacing it, and using
your hands to draw it in. Okay, So what do we think? Not bad. You can see how this could be used for a lot of great
things like this is really a great
technique that can be used in a lot of
different areas. Honestly though, it can
have a little bit of limitations because
if you're not really paying attention
and you don't e.g. understand the
perspective behind it. It's a little bit
limiting. That said, that's for more advanced
classes that we'll get into as we progress through
this course for right now. This is what I want you to do. I've already made
this sheet for you. I've already created it, so you just print
it out or work on your tablet and
start doing this. After you've done
this a few times, what I'd like you to do
is grab another picture. Maybe you've been
in a magazine or a newspaper or
something laying around the house or online or whatever. I draw a grid over it. Okay. I want you to draw a grid over it and then recreate that grid on another piece of paper and draw that same image and
see if you can do this. Once again, see
if you can follow through with this exercise. Something I want to
show you as well. And maybe I'm going to do
this grid thing again. I want to show you
something here. I'm going to bring this
grid over to here, like we had it before. Man as well. Stick
it in the same spot. And look at it this way
and say, okay, well, this is, we've been here at why, why are you teaching
me this again? Like, what's the point right? Now, what I'm gonna do is show you something a
little bit different here. Same kind of thing we've
been working on, right? What I want you to do is just
take one square, just one. But what I want you to
do is take one square, just one, and draw
it next to here. Ok? So basically, what
do we have here? We've got one of
these squares, right? Okay, so in that square,
when am I going to do? Let's see, who should I pick? I don't know. I'll pick a complicated
one, opaque. This one is actually better
to do that in red or black. There we go. I'm going
to pick this one. So in the absolute middle, is this just a little
north of middle, right? And what does it do? It comes down, comes off
the screen this way. Comes back up and off
the screen this way. And then there's a line
that follows along there. I can see also if I
really wanted to, there's got a lot of paneling
going on there, right. I don't have to necessarily
detail all that, right? So below this is this one beam that come
down, straight down. And it goes off the
screen straight down. And this one goes
straight down across. And then there's another
support being below that. And we can see how
this comes up here. Comes up here, comes up. And that's what I'm doing here. I'm drawing this section, right? Okay. I see that it's got one support pillar here and the other
support pillar here. And actually you can't
make it out very much. But they're tracing back
the same as this line. They're following
that line basically. Okay. Below that
in the background, this gets kinda hard. But there is a window actually
touches the bottom here. Touches the bottom and
then kinda comes up here. We can see the window frame and some of the
window beams there. What else can we
see? We can see some more siding or
paneling of the wood. They're on this side of
the door and we are all rather we see a door
that's inside there. Then it looks like the
door itself actually is almost a barn door and it
has its own patterns there. So what am I doing here? I'm trying to recreate
what's in this little piece. Okay. Another way of measuring
and what did we just do? We blew it up. We made it bigger, we made it twice the size,
pretty much right? So that's the cool
thing about grids is what you can do is, let's say this is a 1 " by
1 " by 1 " 1 " this way, or 2 cm, depending on what
country you're living in. What you can do is
as you translate it, you want to keep
the same dimension, this one to one ratio. But it could be a
10-inch to ten inch or 10 cm to 10 cm or
something like that, right? And you want to keep that ratio. But boy, you could take any drawing or any photo and
just blow it up massively. Be able to do a lot with it. But a lot of detail in here, I'm being a little lazy, just kind of skimming
through the detail, but you can see how there's a lot of potential
in that, right? There's another little trick
that I wanted you to do. And this is me doing
it pretty much. If I'm going to draw
something like, let's say I want
to draw this house up here and stuff and I don't have the time to grid
it or anything like that. I can sometimes use my fingers. Okay. This works better. For works well, whether
I'm doing it for a photo or whether I'm doing it if I'm live drawing, right? If I'm drawing something. Sometimes maybe I'm going to a live event where
there's a figure posing for me or something
like that or whatever. I might hold my fingers, my fingers up in front of me and kinda measure the
distance between things. So I'm kinda like, Okay, well, this is this much. And then I bring my fingers down and say this is this much. So this would be, I might be measuring it and
say, okay, well that's that. And then I come
down and I say, oh, well there you go. That's
my measurement, right? And I might go, Well, here's a width and I
come over and say, antagonists say there's
my width, right? And so then I start
to form it out. That way. It's obviously not as exacting or
anything like that. But you can see how there's
potential for measuring, especially on the fly. If you're out on the
street and you're wanting to sketch a building
or something, right? There's no grid overlaying it. You just have to
kind of eyeball it. Eyeballing is tough. So use your fingers, use some people just
pick up a thumb and use the measurement of from one animal to another
or something, right? There's a lot of different
ways you can do this. I'm showing you fingers,
but whatever works for you, use this as your quote, unquote. Eyeballing. Eyeballing
measurement is a tried and true method. Find what works for you in
it and see what you can do. Guys, I hope this unit was
really informative for you. There's a lot going on in it. You know, it seems pretty simple with just grids and
everything like that. But there's tons happening here. I would like to see this
as a bit of an assignment. I'd love to see you handing
it in, sending it in, and showing me that you
can at least at a minimum, copy a one-to-one
same size ratio grid. Drawing. What I'd love to see beyond that is enlarging
and even drawing something that
you've seen out in the street or whatever it is where you
weren't able to grid. So that's your
three assignments. If you can do this one, a one-to-one ratio, do this one and enlargement
and do this one. The eyeballing. Be careful when you're out
on the street eyeballing people might not work as well. But we're having fun, right? So keep drawing.
10. Upsidedown Exercise: Okay guys, we're back
and we're going to continue on this stream of learning how to draw
from reference, right? I've taught you how to look over and grab a silhouette
from an object. I've taught you how to
look for basic forms. I've taught you measuring
techniques of using grids or your fingers are eyeballing
it and stuff, right? And this one well, this one is a little different. This one is That's right. We're going to be
flipping things upside down and we're going
to have some fun with it. So let's see if this
gets difficult or not. Okay, I think it'll be easy. So bear with me. Take the sheet that
I've given you here. It's got a few different animals on it and stuff
like that, right? You can see see the sheet here. And I'm gonna get you
to flip it upside down. Okay? So now everything is just
a little different, right? This is what I want you to do. I want you to try to draw
these things upside down. Now. Why is that? Right now, it's
not going to miss necessarily look
anything amazing. We're just going to kind of draw a little bit of
what we see, right? See what we can see,
what we can see. Just sketching things
out coming here. Sketching the belly, and why am I doing this to you
guys? Any guess why? Well, what happens a lot with
our brains and our vision and everything is that we see
things and we recognize it. And we say, Hey, I've
seen that before, and that's what that is, and that's why that
looks a certain way. And I automatically
fill in the blanks. Right. So if I if I see a car,
I'm like, Okay, well, a car has this many wheels and
this is what it looks like and this is how I'm
going to draw a ton. Do you know? I mean, like my brain wants
to keep doing that already. Instead of just
looking at what it is, just looking at the form, right? It wants to fill in the gaps. And that happens quite a lot. It happens quite a lot
when we're looking at things that our
brain does that for us and to us because we're pretty primal
creatures and stuff, right? So what's happening when that is going on as our
brain is saying, well, that could
be a danger to us. So I'm going to boom, I'm going to recognize
that danger fast, Fast and Furious, and
get out of the picture, right and move off right away. There could be this giant
hippo coming for you. And how does, you know like maybe I don't
have time to recognize. What is that thing that
looks like something I've seen crushed my friend
did before, right? No, I don't have time for that. So instead, the brain says, hey, you know what? I'm going to recognize
that right away, that's a hippopotamus and that's kinda what it looks like and that's what's going on there. I don't want you to do that. That's what this is about, is I'm trying to get you
to get away from that. And just recognize that
there's something here. And I've got to
draw it over here. I don't know what that is like. Of course I know what that is. I know it's a hippo right
now and stuff I got. Right. But I'm trying not to I'm trying to let my mind just kinda go and draw what I think is a little
bit over there, right? Just following
some of the forms. And if I wanted to, I
could do this way better. Like I could be like, hey, now I can use some of the techniques that
I learned earlier, right? I can use maybe some type of circle forms or something like that to
try to figure this out. I could do something, some type of measurement, but I don't want to, That's the point
of this exercise. I want to just be looking and just bouncing back and
forth and just saying, okay, well, what do I see? What do I see? What do I see what's going on here
and stuff I got right? And to see how well
this works for me, this is not to make you an amazing artist that you
can do this every time. That's not what this
is about. Okay? This is about an exercise. This is about
training yourself to be able to kinda
take yourself away from what your mind thinks something should
look like, right? That you're used to seeing it in a very particular pattern. And instead you're just
drawing shapes and flow. And just what you see, instead of recognizing,
this is tough. Because your brain wants
to say no, no, no, no, no. That's, that's this mouth
guard and that's how it should be and it should be this way. I don't want
you to do that. Okay? I want you to be
able to just say, no. I'm going to draw it loosely and draw it how I think
it should be gone. And if that messes up, so be it. This is light
sketching right now. I'm not that worried
about it being perfect. I'm, I'm actually really curious about what
this is going to look like by the time
we're setting done. I'm really curious about how this is going to look when we start to bring it on
and flip it back over, especially even stuff
like this right here, I'm obviously drawing some
type of I know what it is. It's a letter, right? But is it will look better
because I drew it upside down. I don't know. I don't know. All of this is a
big I don't know. And that's how I want
it to I want it loose. So I'm just kinda like what
what's going on here, right? Okay. I think I'm almost done. And
this was pretty fast, right? Let's there's only like a couple of minutes of drawing here. Okay. Well, why
don't we switch it and we'll go back up and
tell me what you think. Does that look like a bird? Is it off? You know what? The only thing that
I think is off that really bothers me here is the I I think I would have lifted the eye up
like up this way. It would have been more rounded
or something like that. But overall, this kind
of worked. Alright. It's a bird. It looks like a bird. It's got the shape of a bird. It's just the true
PI that kinda throws me. Let me see my hippo. What do I think that
the Hippel, He's cute. I might give them a
little bit of peach fuzz here or
something like that. I shouldn't be editing it, but yeah, this hippos cubed. It's again, what's
bugging me on this? The eyes. Now, one little detail. Other than that, I think the form of it is
actually working really, really well, surprisingly
well actually, I don't do this
exercise very often. It's been a few years
since I did this, right? But this is really working. I think this is cool. This helps me kinda jump
back a little bit, right? And this last one
is this helmet. And you know what? This, I
think also worked really well. In fact, I think it will work
better than the other two. And why did it work
better than the other 21? There's no eyes. I didn't have to
draw an eyeball. And that's an interesting thing actually because not
just with humans, but when we're
looking at animals. When we look at other people, where do we often look like? I may not look a
hippo in the eye when it's coming at me
or anything like that. But our dogs or cats, any animal that's in our lives, we relate to them
through the eyes. The eyes are so important to us, that window to the
soul type of thing. And that's why one, I didn't really pay much
attention to eyes in particular. And two, I didn't really clue, and I knew they
were AI is per se, but I didn't focus on them. I wouldn't get I
didn't give them the focus that I would've if I was drawing them
straight on like this, if I was drawing them
like a portrait, when we have a portrait,
we punch those eyes. I didn't do that because I was just drawing
the form of it. And that's why I think these two worked but fell a
little bit short. Whereas in this one, well, that kind of work
out exactly perfect. And if anything, I
think it's kinda better than I might have done just doing it straight
like this, Right? Like just my sweeping
form is nice and casual. I'm just having fun with
it and everything, right? Guys. This is what I'm
hoping you will do. I made this worksheet for you so that you could do
an exercise like this. Okay. I want you to, you're not going to have my
drawings on there. You're gonna have your
drawings on there. And whether you
sketched along with me when I was drawing right now, I was going pretty fast rate, but that was part
of the point of it. Alright. This is a five to ten
minute exercise where you flip that paper upside down. Alright, hold on.
Where's my song? Let's see if I can cue
it back up. There we go. Okay. Enough of that. I want you to flip it upside
down and have fun with it. See where you hit it correctly and where you might miss
that mark just a little bit. And just realize that this
isn't about 100% accuracy. This is about flexing your brain in a different way
so that it can recognize different
references than what you might normally do. Guys, I hope this was a
fun exercise for you. And some different,
always interesting to try something different with artwork
and see how it works up. In this case. Whereas excess plus we had a lot of fun
going upside down.
11. Mistakes To Avoid: Hey guys, I'm back and I've got another
unit here for you. But this one, we're not drawing in and I know what's
going to happen. You're tempted to skip it. I know what goes
through your brain. You're like, hey, now I
paid for a drawing course. Why, why do I have to
listen to this guy just ramble on, well,
I'll tell you what. I've got over
100,000 students now and a lot of mentor
ships and stuff I got, and I've seen a few mistakes repeated again and
again and again. And I want you to avoid them. And that's why I'm
making this unit. So why don't we jump on in and see if we can step away
from some of these missteps. The first one that
I see that people run into a lot is not
having a learning plan. This is akin to going to the
gym and just winging it. You might see a little bit
of gains or something, but you're really robbing
yourself of a lot of growth. You are lucky. Because in this course, what I've done is I've
set out a structure. I've set out a
structure that has helped us student go from basics and fundamentals and use those skills and move through each of the
following steps, right? So I've got a learning
plan set out here. So I'm kinda hoping you're
going to follow it, right? I know you're
tempted to be like, I want to learn this
and you're gonna jump. Don't. Well, I do but do so at your
peril. It sounds ominous. Know, legit. I think I plotted this
out, stick with the plan. Even if you go through
it really quickly, I think you'll gain from it. Okay, Follow-up plan. The next one is having a boring scene or boring
subject or something, right? And this is interesting
because it's so interesting. What often happens is
when somebody learns to draw something, a building, a car, figure, they just
continue to draw it, right? And they'll draw
that figure standing there again and again and again. Okay, that's nice, but
there's not much to it. That figure is not
doing anything. It's extremely such a
static pose and stuff. So instead, do
something with it. Have that figure in a
power stance or leaning, or have that car racing
around a corner or draw it from a particular Lee cool angle or
something, right? Jazz it up. We're gonna get into this
a lot when we get into things like drawing
portraits and stuff, right? Showing expressions
and everything. So just keep that in mind
that you can study boring. But when you're really
creating positive side. The next one that I
see quite often is really not planning or
plotting the piece out. Alright, so what
happens is like, hey, I'm going to draw this tank. I don't know when they're going to sit there and
they're going to draw a tank. And what happens?
They get the turret, they get some of
the tread in and by the time they're
partway through, they hit the edge of the paper. And then they make a choice. And then say, okay, well, I'm going to tape
on some more paper here, or I'm going to just pretend it doesn't need to be
there or something like I plan this originally. No, come on. Even at this point through this beginner's section that
you've already learned. We've learned that
we can use a lot of our tools to plot
it out beforehand. So we can plan this by maybe using a grid method of
measurement or something, or even like just using some basic forms to
kind of sketch it in, just to rough it
in saying, okay, well, the piece that I want, it's going to fit on this paper, on this page the way
I wanted to write. And then you start
adding details in. Alright, next up. Focusing on the finish or focusing on the
strength, not a weakness. Alright? So if we're focusing
on our strings alone, and I'm going to use
that gym analogy again. Things are gonna get
kinda messed up. Things are gonna get
quite distorted. Weird even. Imagine somebody that only trains one
part of their body. We've seen it. What happens to the other
parts that are neglected? We've seen that too. And that's what
happens in your art. It's really easy to carry over if you're great at drawing. I don't know, let's say muscles, but you can't draw hands. Oh, that's gonna
be pretty glaring. Alright. So what should you do? What should you be doing? I think it's pretty clear. Focus on your weaknesses. You've already got
some strengths. Revisit them whenever it
need be and stuff, right? But bring the rest of
your skills up there. If you were scared of
drawing feet yet on them. If you avoid drawing backgrounds
and buildings and stuff, I get, get on it, get on these weaknesses
until they're not so weak anymore and you have at least certain levels
of comfort with him. I don't know when you
really get into it. I think you might
enjoy some things. Next up. We're talking about
the finishing, focusing on finishing
over structure. And actually I'm going to, I should have reworded this
because it can go both ways. Some people finish every piece and some people never finish. And I want to talk
about the people that finish every piece. What often happens
is they'll show me a piece and say,
Hey, teacher, look, this is like I spend 510, 15 h on this or whatever it is. And I'm like, I look and
I'm like, wow, yeah, that's Swamp Thing is like cool and I love how you
color this and all that. But like, where's this lake? Then the students kinda
like it doesn't have step or if I say,
Where's the eye? Whereas this, what
about this, right? And what could have
happened here? Was this kinda, those kinda really easy
mistakes could have been caught in the sketch stage. So they were in such a hurry to add all the flourishes
to it and everything. Instead of really taking a breath and looking at the
process and the structure. So when you get on each
of the stages you sketch, then you go to finishing lines
and you go on and stuff. I go take a pause and say anything year that
could be worked on, maybe show it to a
friend or something and we'll get to
that point in a bit. The opposite end is forever sketching and never finishing. Honestly. That happens to right. And what that is is almost
goes into point number four of their strength and
their scared of finishing. They're scared of that weakness of not making it
look as dynamic. If they finish it, it takes away some energy or
something like that, right? Don't be scared of any of this. If your weaknesses,
not finishing, make sure you finish one
piece a month or something. If you finish too quickly and you're,
you're catching yourself. Making these mistakes. Take a pause at different stages and maybe take
another look at it. And the last one can take
constructive feedback. I remember one of
the hardest pieces of feedback I received, and it was kinda related to point number five here
a little bit as well. I was bringing my work to different professionals
in the industry early on and they were like, it was the consensus
was almost the same. They always said you're
all cake, icing, no cake. And I was like, yeah, you're always saying no cake. It took me a bit. What that meant was my pieces looked great from the exterior, but the structure, the substance
underneath was not good. So I was like, Come on,
everybody loves icing, right? But my cakes were collapsing. And so it'd be the same
as like being able to draw the best gargoyles. But you set them on a building
that doesn't stand up? No, we're talking about doing
things on paper, right? Where these aren't cakes
or anything, right? But even on paper, what's going to catch
the viewer's eye isn't going to be like
You're awesome gargoyles. Maybe. Cool. But half the time it's gonna
be like what's with the wonky building right there. Gonna be able to see that
something they'd write. And what happens when somebody
points it out to you? What happens when that
was pointed out to me? I had to put my ego aside and really just kinda
sit with it and say, Okay, what do I do? I went back and really went
after the fundamentals. And so whatever
feedback you get, and I'm really hoping sincerely I'm making
this course so that you guys send me
your art and stuff I get when I send you feedback. Take it because it's
a great opportunity. Take it and just really
look at and say, okay, well, does it make sense? Like, what's he saying here? Don't try to
over-explain the wall. I was trying to do this or that. Take it as I'm a
fresh pair of eyes. And I'm looking at your
piece and I'm saying, something seems a little
amiss here right? Now. It's up to you as a mature artist to do
something with it. Now you don't have to change
that piece necessarily, especially if you're, the
person's always finished. Your finished, that
piece is done. But what are you
learning from it? What are you taking into that
next practice structure? That next thing that
you're drawing. This is up to you. Honestly though, if you follow these six points
and learn from them, you're going to avoid a lot
of the pitfalls that I see. So many of the students out
there falling into, right? And that's why just taking a couple of minutes
to listen to these. And yes, I know
we're not drawing, we're not drawing but really
taking it and saying, okay, yeah, that's kinda
rings true for me. I'm going to remember
that going forward. Honestly. That's all I'm asking. I'm just asking you to kinda
look at these and say, I'm going to keep those
in my back pocket as I continued learning
through this course. Guys, I hope this was a
little bit helpful for you. Right now. It'd be kinda like,
Okay, thanks. But if you have these in
your head and you go into future pieces and in future
classes and stuff I get, you are going to be
much more successful. So remember these and remember to have a bit
of fun along the way. See you in the next unit, guys.
12. Setting The Scene Foreground, Midground, Background: Hey guys, we're back and I've got an interesting
unit for you here. We're going to talk about understanding the
planes of a scene, understanding how to separate
these various planes, and understand that as a tool
that we can use as artists. Hopefully you've got this
worksheet in front of you and you can kinda follow along. You don't have to do
what I'm doing here. But maybe even take a pencil and kind of follow
what I'm trying to do. You'll see as I as I go on it, it'll make more sense to you. Okay. So off to the left here, I've got a scene,
a frame, right? That has a foreground,
midground, and background. And listen, I'm sure
for most of you this is pretty
familiar stuff, right? Backgrounds. They're familiar. You've heard that word before. Foreground is the
one closest to you. Background is the
one furthest away, and mid is in the middle. It's really that simple, but I wanted to
make sure we're all on the same page on that right. Now. We know when we're standing somewhere
that we can see this is closer to me and that's a certain distance and that's for even
further away, right? Because we're, our brains and our eyes are good for spatial
relationships. We understand that and write it, computes very well
for us as humans. But when we're trying
to draw it out in 2D, it doesn't always get conveyed as good or as
well as we would like. So we have to use a variety
of tools that we can have at our disposal to try to make sure it curious for the wet with
what we're intending, right? Okay, So I wrote out a list of the four basic rules of this, the four basic separating rules so that we can
understand the planes. The first one is tonal value. And what I'm gonna do is I'm
gonna come down here and use these photo examples below
to see if we can do that. So tonal value, hopefully you already understand what this means to an extent, but tonal value is going from light to less light
to middle, too dark. So when something is dark as an, in its tones, it's
usually closer to us. As things go further
away from us, they fade out in tonal value. There's atmospheric
occlusion, okay, so the air makes, it happened at a distance, the amount of air and
particles and those types of things make it so
that the tonal value, even though something it
could be the same color, right side-by-side, it's not
because of that distance. Okay? So tonal value is one. Another one is color saturation. And this has impacted by that atmospheric
occlusion that we were talking about earlier
with a tonal value. And with this color saturation, It's the same kind of thing. We could have two trees
that are the same, but that tree is further away. It's going to show
less color on it, less color saturation than
the one closer to us. Next one is details, things that are up close. I think you can kinda
figured this one out. We'll be able to see details. You might see blades of
grass or leaves or whatever. As it gets further away, our vision doesn't
work like that. The details decrease
and very further away. Well, we can barely make
out what's happening right? Then the last one is size. We've got nice little trees
and our examples here. So when this foreground, we've got a tree mid ground. The tree is maybe
half that size and background the tree
is half that size, or maybe even a quarter or
something like that, right? So let's take a look at
what we're doing here for, for separating these planes. So I'm gonna kinda use
red and I'm just going to look at these two and say, let's separate the
planes out here. For this one, the
foreground would be basically right here. It's pretty simple.
I'm doing it a read right now on this one, maybe these little branches
or whatever it is. And maybe this thing here,
this is our foreground. These two, what do you think? Do you guys agree? I'm going to let you go ahead
and meet next time, but for now, let's
keep it at that. Alright. The midground, our
midground is here. And maybe a little bit
on that side there. And the midground might, might've been like this, this thing down here, here, and here, right? And then the background. And where are we gonna
do for black background? Blue background on
this is back here. And the background on this would be all this stuff maybe
back here and stuff right. Now. It doesn't have to be an
exact like you could see, like there's a bit of detail
here and that's losing it. And by the time we're way back here, it's really gone, right? That's okay. You can just kinda
separate these planes out. And you can, if you want to. I've got no color them in or whatever to help you separate. But I want you to recognize
that the stuff up close. What is it? Well, the tonal value is higher. Color saturation is higher. The details are higher
and they're bigger, but these happen to
be branches, right? But I think you'll get it. Okay. So let's keep on rolling. We're going to come
down to this next one. First one, where is the
foreground in these two images? Might be a little tough and
we might not totally agree. I think this first one off to the left here, it's pretty easy. I would put, this has
the foreground, right? This one might be
different though. I was going to say this
is the foreground. But if you were to argue and say this, I might agree with you. Okay. Next one, mid grounds. I think the mid
ground on this one. What do you think? What's
the mid ground here? I was going to say maybe
this could be the midground. Mid ground on this one. You can pause me at any time if you want to draw it in first and then here my opinion on
it here, my wonderful voice. Pause me. There's no hurt
feelings there, right? I'm going to say the
mid ground is this one. And again, we're looking
at color saturation. Look at the difference between these two for color saturation. Lot of saturation in here, not so much there. And then the backgrounds, well, saturation drops off, details drop-off, and
there are our backgrounds. Okay? So when we're looking at
these different landscapes, I live amongst mountains. So it's really easy for me
to see this daily, right? This is a mountain that's in my face or the road or whatever, like the building that's
right in front of me. There's the mountains that
are a little bit away and then way down the way I can barely make out
some other mountains. It's kinda awesome. It's awesome as an artist, but not everybody lives
in the mountains. Most people live in cities. Odds. So how do we make
our foreground, midground, and
background in cities? And especially this is tough because when we look at
mountains and nature and stuff, there's often like rolling hills and ridges in the way and
those types of things, right? And that can sometimes
work when we're looking at like a
cityscape, e.g. we can see this cluster
of buildings and then pass them as another
cluster of buildings and stuff. And as if there's some separation,
makes it a bit easier. But there's not
always separation. Sometimes those city
just goes on forever. I lived in one city
of 25 million people. It never ended. It
just kept going. So some rules that I
use when I'm looking at cities and stuff like that is the same stuff that
we've got up here. Tonal value, color,
saturation, details in size. But details is a good one
because if I can read assign, then chances are
it's foreground. So maybe my foreground
is something like this. If I could read the
signage in this one, that would be my
judgment for foreground. I don't think I could
read anything here, but I can definitely
see a lot of details on this fine biking less. Alright? Okay, so then what's
next? Well, midground. And again, this gets
tougher in this one, I would probably do it
somewhere along this way. Some of the details in there, the details in these people, maybe even this poll. And then the details here, something along those
lines that seems to be this middle ground
in this scene. Let's put it at what, 50
ft from the viewer, right? And yes, I realize I'm
sounding very American. Would that even though I'm not I honestly don't think I
can measure that in meters. I don't know. Okay. The next one on this side. Well, what I'm gonna go with, still being able to see
details in a bit of a plane. I would put it somewhere
around there and then somewhere with the
buildings on that side. Then where's the background? Well, the backgrounds,
everything else. That's hard to make out, right? So in this scene,
the background would be some of these buildings and this hilltop in the background
there, right? Guys? There's a reason why
this is important. Because if I've seen so many
illustrations where they only put the only draw
something in the foreground. That's it. Like
you're not really, when you're creating,
you're often not thinking of these planes, these planes of
the scene, right? And so what they do is
they'll just keep drawing, stacking figures and
they're just all on the same plane and that
gets extremely boring. So push, push some
characters back, push something back, pushed
into the mid ground. And when you do push
back, what are you doing? You're paying attention to
things like this. Alright? You're paying attention
to tonal value. When you push it back, that tonal value is going
to decrease a little bit. The color saturation
is also going to decrease. The details. This person standing here or this mechanized warrior or
whatever it is you're drawing, you're going to see every
bolt on that armor. But as it moves
back, you're not. You might see the
general plates of armor. And as it moves back even further, you're not
even going to see that. You're just going to see the
silhouette of that mech. Alright. Guys. Understanding these
planes is not just for doing landscapes,
although it helps, but it's also for when you
go further into the mix, dealing with anything, whether it's characters
or setting a scene, drawing, comic book
pages, anything. This here, this unit. It's an easy one. But if you don't master it, it's going to come
and bite you later. So pay attention.
13. Learning Linear Perspective: Okay guys, this is it. This could either be one of the toughest lessons you've ever had or one of the easiest. Kinda depends on my
skill set here, right? How good of a teacher might. Because I'm going to get
into linear perspective. Linear perspective was not around the entire time
humans have been doing art. We didn't really
think of it this way. If you look at hieroglyphs
and even older, not older, but even middle age paintings and
stuff like that. There's a lot of
weirdness going on, like things were
not in proportion and sizing was all off. There was a lot of
things happening that were just unrealistic, which was fine because sometimes things don't
have to be realistic. But sometimes they do. And this is where this
approach comes in. So linear perspective
basically means that see if I can surmise it. Anything that's close to you, it looks bigger than
anything that's far away. So if the same size
object is close to you, if you move it further
away from you, it shrinks. I think you already know this, so we've probably
discussed it before about sizing and distance
and stuff like that. Okay. So that's one premise is that the closer things
are larger they are, the further away they shrink. But they don't just
shrink, they disappear. Linear perspective shows if
we're using that correctly, that when you have lines that
run parallel to each other. So if I had like a box
and I was to rotate it, that these parallel lines would, if they continued for
as long as they could, would eventually run to
the point of meeting. Usually they don't though, because eventually
it comes to an end. But from our vision standpoint, these two tracks eventually
come to the point where they meet because it's so
far from where we can see that it looks like
they're coming together. We of course know that they run parallel to
each other, right? So they narrow and narrow and narrower
and narrower until it, eventually it looks
like they're touching. So if we've got edges that
are parallel to each other, they will eventually continued to go off into the
distance until they hit a, we call the horizon line. When they hit their horizon
line, they will meet. There are vanishing point. So I've got a horizon line
and a vanishing point. Don't worry, we'll
be getting into this in more detail in later
lessons and stuff. This is just the intro. So anything that's parallel, it's going to keep
on going and keep on going until it hits
that horizon line. Basically, if the viewers, my simple stick man, the viewers viewpoint is going to be that horizon
line on the distance. The horizon line can shift
according to the viewer. If we come up and our
cameramen is up here, kind of where he's at right now, then the horizon
line will be. Okay. So we're kinda taking
a bird's eye view from this point of view and
looking down at everybody. And the horizon line
will seem kinda high in, in this frame, right?
That's where it looks. Okay. We can shift where
we're looking from. We can do a worm's eye view
from down here and stuff. But like I said, this is kinda just all I
wanted to do was just doing a little intro and show you that when we have
parallel lines, they will continue and they will narrow until they eventually meet at wherever that
horizon line is. So this one would go way
off into the distance. This way, one would come up until it finally meets
at the horizon line, the HL, at the vanishing point
of these parallel lines. Every object, these are all
placed differently here. So every object, depending
on where it's sitting, will find its own
vanishing point. Okay, And they'll continue on these little lines that
are coming off of here. They're going to
narrow and narrow and narrow as they get closer
to the vanishing points. So off into the distance, as they come closer
to the viewer, they will widen,
widen, and widen. Really. That's what it's about. It's a way that we can add some realism into our drawings. Because without this, if we were to draw everybody
at the same. If you look at older paintings, you would see everybody
has the same height, everybody the same size no matter where they
are in the scene. And kinda looks cool, but it throws things off, right? Study this, study this
linear perspective, this real simple thing. And I'm going to show
you how to do it in one-point and
two-point perspectives in the following units. Guys, let's get to it and see what this
is really all about.
14. Learning One Point Perspective: Okay guys, so continuing on
with linear perspective, we're going to get into
one-point perspective. What does this mean? What is one-point perspective? And I'll zoom in a little
bit here so we can get some working space on us here. The horizon line, we
talked about that, that's kinda like that. When we stand in an open field
and we see that line where the land we're standing
on meets the sky. That's our horizon line. Will come in here and we'll draw a nice little horizon line
here, nice and straight. Okay? The vanishing point, we can
choose it anywhere on here, but we're going to just
choose right in the middle here and just say this
is our vanishing point. Okay? So that means anything
that I'm drawing in, this particular one is going
to the vanishing point. And I'll explain that
a little bit because things can change around
a little bit more. But when we're talking about
one-point perspective, we're going to keep
it very simple. What I would like you
to do is draw a box. Just a simple box like this. Okay? So a box, or rather it's
a square right now. We're going to turn
it into a box. The square has four
corners right here, here, here, and here. These four corners are going to reach out for that
vanishing point. Now I can use a ruler if I want, but I'm going
to freehand it. But if you guys want to
use a ruler, that's okay. What I want you to
do is draw from this corner to that vanishing
point. And you know what? I might even make
that vanishing point, just give it a little
bit of red there, so it's stands out for me. And then from this corner
to that vanishing point, and this corner to
that vanishing point. And you see how our line warm-up exercise will really
come in handy force here. Okay, so you can see now
it looks like a square that is turned into a rectangle that stretches
on for infinity, right? Okay, I want you to
practice that again. Draw a square here. It doesn't have to
be a perfect square. It can be rectangle. Take the corners,
the three corners, and there's a reason
for that right now. And drag them. And if you
want, we'll use a ruler. Drag them to that
vanishing point. There we go. We're looking a little bit more technical now, right? Okay. So now we've got two
squares that are turned into rectangles that
stretch on for infinity. Alright? But that's not what
I want. I want to make some cubes out of them. So how am I going to do that? Well, I simply cut them. So right now, what we're
looking at is a square that has two vertical
lines, right? So everything that's
going to stay in this path is going
to stay vertical. So I'm going to draw
another vertical line that comes from this point and it's going to come
straight down and makes sure this is where
people mess up. They kind of go like this or they go in angle or
something like that. Make sure it's the same vertical
line that follows this. And you can see now, we've now created that side of the cube. We've also got two horizontal
lines that take this form. So this is going to
follow that same thing. And it's going to be a horizontal line
that comes over here. I can connect it here. And now we have our cube. Okay? So I can shade in one side, make it look a little bit more 3D or something
like that, right? Okay, we're going
to try that again. And this time using the ruler, we're going to go with
our vertical line and our horizontal line. And you know what? Because my original
square was so wonky. I'm going to have to fix it
just a little bit there. Yep. So you can see how using a ruler for technical
drawings really helps, right? And yes, this is technical
and sometimes I'm trying to get you to get away from that technical stuff and just
go a little bit free hand. But in reality, what
we're doing here, working in linear perspective. This is what I
studied in drafting. We're learning how to draw
more technical drawings. I tend to be a little
loose when I teach it, but in reality, it, it should be a
little bit tighter. So what we're gonna do here is we're going to draw a few
different cubes around. And I'm kinda doing
some shortcuts here. And we're going to bring
them on back to that point. But I'm gonna do
something different. Instead of drawing a cube, I want to draw an aquarium. So I hope you're
following along to this because this stuff
just keeps coming. Pause it anytime it can
be a little difficult. Okay? So I'm gonna do the same
thing I normally do, and I'm using a ruler this time, I'm going to drag down
these edges, right? What? I'm going to
make it an aquarium. And by doing that,
I'm going to drag the inside edge down. And that means I'm going to make this whole cube transparent. So let's, let's
do the same thing we normally do. We're going to Cut this along here
and make that our are horizontal and this
are vertical, right? Okay? But inside the cube, we're going to go
up here and inside. So now you can see, and if I draw this, I'm going to draw
it over again just, just so we can see it in
red that you can see. We have a bit of a
see-through cube. I call it an aquarium, but it's not a perfect aquarium
or anything like that. There's no fish in this thing. But you can definitely see how this resembles a glass cube. Okay, little off on that, but you see what I'm
doing there, right? So instead of a solid cube
that we've got down here, we've got this solid
cube going on. We've now got a
see-through cube. And this helps us to
understand that these are three-dimensional forms
sitting here in front of us. Okay? They're not just
these little squares that we're drawing right there. We're giving them
form and substance. And one of the ways
to give form and substance is understanding
perspective. So we're gonna keep
practicing with this. I want you to take
this one over here. I'm going to, Let's see, do
I want to freehand this? If I'm going to freehand,
I'm going to switch hands. Here we go. I'm better from this side. So I'm going to freehand
this a little bit. Come down here, come down
here, come down here. And again, you see how
our earlier exercise of connecting the dots
will help, right? I'm gonna make this a longer
rectangle. There we go. Little wonky there,
but that'll work. And I might even fill
the bottom here. So there we go. Okay. Getting a little bit lazy,
they're little ugly. But that works and
now I can take away the construction lines. And now I've got this
cube hovering in space, space, space, space,
space, right? Okay. Yeah, this is what we're practicing with
one-point perspective. We're drawing a bunch
of different shapes and then connecting the corners
to that vanishing point. Why don't we try that
again and see if we can get something
interesting going on here. Okay, so when I'm doing these, I'm really hoping that
you're following along. That's, that's the
main point of this. Okay? I'm going to put
the vanishing point right here instead of there's really no point to doing this unless you're
following along with me, like just watching it, you'll
be like, Oh, yeah, okay. I kinda get that. But it's way too
complicated for that. Okay? This is, this is one
of those key exercises that you really have to dig
into and get working on. Okay? So one-point perspective
works really well when a flat surface is
facing the viewer. And then we have a
bunch of parallel lines that are heading off
into the distance. Do you remember in
the previous unit, I was talking about train tracks and they get smaller as I go on. But these two, the track
lines are parallel lines. So we're going to
draw, let's see, we can draw some
different shapes. We'll draw our squares. We can have a bunch of
squares. We can have a rectangle here, right? But what about a shape that's
a little bit more complex. So I'm going to draw this, and I'm going to draw
this over top of it and come in and erase. So you can do this by
hand. I'm kinda doing it. There's quicker method just
because it's faster when I'm drawing and teaching
here, right? But what do we do with this? Wasn't a god complicated. It's like a puzzle piece, right? Well, it's really not, it's not that complicated. So what we can do here, Let's see, where's my
ruler again, I want to, I want to teach you
guys with a ruler is take the corners that
this vanishing point, that this vanishing
point can see. Imagine it can't see through
this object right now. So all of this
vanishing point can see is the specific
corners, right? So it can see this corner. It can see this corner, It can see this
corner, this one. And this one. Right? So if I want to make
the eventual form of this, not only do I have my
main puzzle piece here, I'm just doing a little
outline for you. But I've also, I'm following. I've got a vertical, I've got a horizontal. I've got a vertical. I've got a horizontal. And then I'm connecting
those in there right now. You can see how something
like this can be used for creating even more
complex shapes. Right? Here's a little puzzle
piece, but pause. We can go even more
complex than this. So down below, I made
this square, right? But what if I want to
take a chunk out of it? What if I want to make a
hole in the middle of it? Actually, if I want to do this
as not just a square root, but it's a square with a hole
going through it, right? What, what am I going to
do to make this work? Well, I can still
do the same thing. I'm gonna do these
outlines on the side here, right? But inside. I'm going to drag
that one there too. Now you can kinda see how we're looking at that from
the inside there. Then how deep do I want it? Why don't want to
have a really narrow and I'm only going
to make this wide. Alright, so that
means that in here, It's gonna be that same depth. I'm going to make it
that depth there. And then this one comes over. And this one comes over. So not only did we
draw this shape, but we learn to take away from this shape and see
how that makes sense. So let's do that again. What I wanna do is actually
I'm going to take away from this shape right
here and right here. And I'm just going
to erase this. But before I do that, I want to draw a line that's
coming this way. So I'm going to erase
this little corner here. See if that helps. Now I've got this weird gap
that shouldn't be here. What can I put in here that
will make it make sense? Well, this corner now
is exposed to this, so I can bring that over. And looking at the
distance here, if I want to come in
a little bit closer, I can look at that distance
and I could say, okay, well, this would be
that edge there. And then usually
what helps after it's all said and
done is coming over and doing some type of outline over at all that
helps define the shape. So what I'm hoping is that
you're learning to work your, your, your sketch work and stuff is getting
lighter and lighter. And then afterwards you're
learning to throw on some finishing lines that
really punch it forward, right? And then you can get
in there and maybe erase some of your construction
lines and everything. But look at that. We just
learned how to not just create squares and cubes
in linear perspective. We then went on to
creating aquariums, see-through cubes, and
more dynamic shapes, puzzle pieces and subtracting from pieces and
everything like that. This, in a nutshell, is
one-point perspective. The key to understanding
one-point perspective is really when something has a flat surface and
it's facing you, That's the easy one, that's the easy
one to just kinda, it's going to fade off
into the distance there. Okay. So in the next unit, we're going to go
on to something a little bit more complex, a little bit difficult. But it will show you
how you can start to grow off of this lesson
and take it beyond. Hope this was helpful guys. This was actually a
lot of fun for me. I'm, I'm enjoying getting
back to basics here. Understanding how the student can really learn from just
drawing a simple shapes, from taking the lessons that
we've already talked about, connecting lines and stuff
into creating something. Well, I think this is cool. You may not be the most beautiful looking
thing in the world, but the construction of
it is very, very cool. Okay guys, that's it for
one-point perspective. Again, please practice this because this is needed
for everything. Don't think that perspective is just for drawing backgrounds. It's for drawing
everything going forward. It's one of those principles of art that you need to learn. And hopefully I
taught in a way that makes it easy how
fun with it guys.
15. Learning Two Point Perspective: Okay guys, on our last episode
of linear perspective, we handled one point. There's my radio
announcer voice, right? This time we're going to
tackle two point perspective, which is much like one point. But you probably
guessed this by now. It's added another point. That's right. The setup is very much the same. We're going to come in
here and we're going to add a horizon line, that line on the horizon that where the sky
meets the earth, right? Um, then we're gonna
come in and we're going to add a
vanishing point of VP. But instead of that
one that we did last time, I'm going to change it up. Oops. When Lula too far on
that. Here we go. I'm going to change it up
and I'm going to add two. I'm going to put one over
here and one over here. Okay? So when we talked about
one-point perspective, I said it works best
when there is an object like a house or a
block or whatever it is that's sitting in
front of you and it's, it's front face is to
you and everything recedes back from
there to point. Works best when something
is on an angle, when you're looking at
it on the corner of it. And so it's going to make sense when I draw
it out a little bit. Let's see how we can
get this looking here. So I'm just going to
draw a line. That's it. Just a line so far. Let's zoom in to make it
a little bit clearer. Once we've drawn that line, what are we gonna do with it? Well, this is one vertical line. Alright, so I'm gonna
take the top point, drag it over to the
vanishing point here, and the top point and drag
it over to the VP here. That kind of jumped,
may recall much better. Okay, I'm going to take
the bottom point here, drag it over to the
vanishing point here, and drag it over to the
vanishing point here. Not bad. Okay? So I'm working vertically here. This is, anything is either going vertically
or you will see. So let's draw some
vertical lines right now. I'm going to draw this
vertical line here. I'm going to draw this
vertical line here. So anything that's
kinda matching within this area is going to
be a vertical line. And then we're
going to take that, drag it over to this corner and this and drag it over there. And look what I have. I made a box. I feel so accomplished. That's right. I made a box. And
you can see how it's a square root cube like we've done before
with a one-point, but it's not facing us before. It was quite simple. It was like this, right? And then it would drag off into the distance and we would have r cubed that away or
something, right? In this case though. What we've got is
something on an angle. And because it's on an angle, it's gonna be a
little bit different. And I'll draw this here. I can make this one longer. Bring it down to here,
bring it over to here. And so where is my box? Here? Here, here. And of course, you can
always use a ruler. I like free handing it
sometimes because it gets a little loose
and stuff, right? But how does that look? That
looks pretty darn cool. And you can imagine being able to do a lot of
things with this, right? But for now, I
don't want you to, all I want you to do
is go around this, draw a line and with your
ruler if you want, it's fine. Draw a line and then drag the corners
to one vanishing point. Drag the other corners
to the vanishing point. Decide how long
you want your box, how narrow you want it maybe. And then grab that
corner, bring it on over. Grab that corner,
bring it on over. And then you have your nice little thin
rectangle, right? Okay. So when do we use this? We use this when our
primary object is not flushed to us or anything when it's
on a bit of an angle. Right? Okay. And you can see
how good this looks. This is, I don't want to say it looks more
realistic than the one point, but there's cases
where most things are not flush and
flat facing us. And just like before, what we're gonna do is we're
going to continue on and make this just a
little bit harder. We're going to draw our
horizon line again. We're going to draw
two vanishing points. Little hint with. But two point perspective. You'd like the
vanishing points to be as far away as possible. If you ever are working on
paper or anything like that, put them off the screen
if you can off the paper, like even put a little tack or Something so that you can
drag it out to there. So we've got our, we know what we're doing with our vanishing
points here, right? But let's do something a
little bit more complicated. Just like we did with one point. We're going to make this a
little bit more difficult. Okay? So let's draw our
little shape, right? I really hope you're
following along with me here. Follow along with a
ruler if you like. It doesn't matter to me. I don't care if
you've freehand it. If you're that good nowadays. Okay. So we've got a little
off from that. There we go. So we've got our basic
outline right now. Maybe I could even throw those
vertical lines in there. But what if I want to start
to take away from it? What if I want to e.g. cut a chunk out of
it here, right? Like normally, I'd say, I'm going to come here
and this is my cube. I'm going to come here and
this is my cube, right? But I don't want that. I
want something different. I want it missing something. So I'm going to come here and do a dividing line along
the middle of this circle, or a square or rather cute. And I want to cut
it apart somehow. So where should I do this? Why don't I do it right here? I'm going to do it right there. Okay, and I'm gonna kinda zoom in just a little
bit so I can make this be a little bit
more visible for you. I'm going to drag this
corner over here. And let's see, I'll drag from
here, bring it over here. Bring this down. And
because anything that's within this part
is staying vertical, going to keep this,
drag it over there. Keep this, drag it over there, and go straight up here. What did I just make? What does that look like? Let's see if I get it. Sketch
it out a little bit more. Now it's not precise
because I'm being a little quick on the draw on
some of this stuff room. I didn't even plan this for
what it kinda looks like, but I can kinda see
it taking form a little bit right there. Back to their back, to their balance out again. That looks like it could
be the corner section of a sofa or
something like that. Alright, especially
if I come in here and take away a lot of
these construction lines. Wait too much. What do you think? You see? How you could start
to make a bunch of different things
by being able to draw a normal cube block, whatever it is, and then
starting to hack away. I'm going to teach you
another one that's a, maybe, I don't know if
that's more advanced, but it's going to
help you coming up in some future units. I've got planned here, okay? So I'm going to just erase all this and we're going
to start again. Like I said, I'm hoping
you're following along. Don't just watch this. I want you guys to follow along. I want you guys
to be doing this. Oops, wrong one. On your sheets of paper. If you do it on the ones
that I've provided, cool. If you don't, that's cool too. You can do it on a
blank piece of paper. Whatever really works
for what's in front of you and stuff.
Do it on a tablet. And if you've got, what is it? If you've got some
ruler function within that tablet,
that's cool too. Alright. Okay, so I've got
a bit of a flatbed here. And I'm hoping that if I'm
going too fast for you, you just kinda pause it. Okay. Halfway through this
flatbed though, I'm going to cut it there. And then I'm going to
bring it over to here. So I just kinda
bisected that way. Then I'm going to draw
a vertical line here, a line back to there, and align back to there. So this is what
I'm gonna do here. I'm actually going to come
in and do one more line. And this is just me
kind of Fortran around having some fun here and seeing what I could
come up with. Okay, what did I do?
I made stairs here, right, but I'm going to
change it even more. I am going to Draw an angled
line from here to here. So it's no longer
stairs, it's a ramp. I've now angled this
ramp and then it comes up into that step or
whatever, that little ridge. Right. You can see if I back, how does it help when I do the red over
top? I think it might. Another one you
could do would be, let's say we want to do another one
that's kinda like that. Have a vertical, they're
going off to the side. This coming back. This will go over there. So I kinda created
another step here, right? You can see it's a ramp, a step, and then this one, I
don't want to step there. What I actually want is a curve. So if I go like this and curve into here and
take this same one over here and curve into here. Well, let's see how this looks. I'm going to just draw on top of this and see what
I've got going on here. Can come down to here. Come over, come down to here. Come over. And you know, when I'm doing
this in a more legit way, what am I actually doing? I'm being very precise
in corners like this, making sure that they attach really, really nicely, right? Okay, so I'm gonna come
here, follow my arc. And I'm gonna come over here, fall on my arc. Then I'm going to continue on. Bringing this line back to here, bring this guy down, bring this one down and over. Okay, Then I'll come on up, bring this on over. Come on over to this side
and bring it on over here. And now, what do I have? Well, I can, if I want to, I can take this away
and take a look. Basically scoop nose with
a rounded bump, right? So get used to not only making basic rectangles and aquariums and all that
kind of stuff, right? But also being able to
subtract from them, being able to take
away from them, being able to go inside of them and see what
makes them tick. You know what? That's what we didn't
do for this two point. Why don't we do that
at least once here, just so you guys
have got it down. We're going to do a
two-point Aquarium. Okay. So one more time, and this
is what I hope you're doing. You're kinda just
going like this. You're drawing a line. You're drawing a line. You're drawing a line and now you start to make
shapes out of it. Alright, I'm going to
use this middle one. Bring it on over here, bring it on over here. Bring it on over here. Bring it on over here. And then I'm going to draw
the walls of it, right? The exterior walls,
bringing them over. But I'm also going to
bring the insides over. There we go. Okay, so now I've got that internal aquarium
thing going on, right? And if I want to, I can kinda make sure it looks
a little bit better here. And you can see I kind
of messed up there. I should actually be zooming in and being a little bit more careful with my lines as I
start to put things together. Here. There we go. Now, one thing that I
forgot on this cube, you can see there's something missing and
let's see if you can catch it as I kinda
semi finish up here. What am I missing? What's going on here? Pause it and take a pause
and think about it. What am I missing? There's one line
that I'm missing here that will
connect this all and make it into that see-through cube aquarium that
we're striving for him. Have you figured it out
yet? If you haven't? It's this one. But my measurements are
off because what should be happening is that
should be straight down. So why don't we try
it again and make sure that I measure a
little bit better now. And so it doesn't
look like an ugly, wonky thing like that. Okay, we're going
to try this again. We're going to use this
one. I'm going to come down to here and I'll
do it in red this time just to make
it a little bit clearer for me and
make sure that my lines are a bit more precise from here to the
vanishing point from here. Because if you're off on
that vanishing point, things can get a little
strange sometimes. Okay. So now when it
comes down there, I'll make it a very narrow just because I want to
fit it in this space. This back one is going
to come over here. And this back one is going
to come over here. Okay? This top one. And I'm grabbing all the corners
and bringing them to their opposing
sections. Okay. And now what do I have? I've got this one that
goes straight down and behind it actually
worked out almost perfect. Just slightly off behind it. Is that other one? Does that make sense? Okay. So this one went wonky all up in here because I really wasn't paying close attention
to what I was dragging it. You can see if I come
over here and zoom in, how so many of my lines were
just slightly off, right? And that will impact
what you're doing here. And if you do it on
the other side to all, these weren't on, alright? And so that'll really throw what you're
trying to achieve here. Guys, work on this
two-point perspective. It's a technical
drawing to an extent, and sometimes you can
try to wing it, right. But just realize that
when you're doing it, you might get a broken
wing once in a while. If you want to be real
technical with it though, bust out the ruler. Measure it up a little
bit and make sure you're heading exactly
where it should be. What I'm hoping you
started with was designing simple
formed rectangles, squares, cubes, shapes like that,
three-dimensional shapes. Then you can go on to cutting
away from those shapes. You even doing what
we did before, like cutting a hole in the
middle over and seeing how that would
look for something chipping away at it, right? And then you can do see-through who's
doing those aquariums? Guys. There's a lot
to be done in here. And honestly, this is
a really big subject. And so don't be ashamed or bothered if you have to watch it a
couple of times, both one-point and two-point. Sometimes they take
hours to really learn and digest.
Worst-case scenario. What you do is you just keep coming at it and
you're just drawing a bunch of lines and
just practicing away. You just keep, keep practicing
and just keep rolling in. And then looking at it and say, what looks wrong here. And if you can figure
out what looks wrong, if you can't figure out
why something's not connecting, send it to me. That's what I want you to do. I want you to send it into me. And I can look through it and we can discuss it and we'll say, okay, well, here's
where you went wrong. Watch out for XYZ, right? Literally x, y, z
is another day. Have fun with this guys, and
let's see what you got it.
16. Perspective Tips: Hey guys, welcome back. Listen, we're working
on perspective here and it can be
a little tricky. And even though you have
the option of pausing me, rewinding, watching it again, and then watching it again. It can still be a little tough
to totally get it right. So I wanted to do another unit
just to kinda wrap it up, put a bow on it, and make sure that we spend enough time on
understanding perspective. And that there's some things you could do to
kinda make it easy. So one thing that I did here, and you can kinda see it
is I grabbed my Lego. I grabbed my Lego and set
them out in front of me and use them to kind of say, okay, well, what what can
I see out of this? Can I see different perspective
markers and stuff, right? So why don't we draw over
this. Maybe the camera has skewed it a little bit so you can see they're
bending a little bit. But basically, what's happening here is I've got this
Lego piece, right? And it's going off into
the one-point perspective. And I've got this Lego piece and it's supposed to
be vertical, right? Because like I said, the
cameras kinda skewing it here. And then it goes off into
this one-point perspective. All right? Okay. I realize I'm getting kinda
ugly with these lines. You can see how they get a
lot more vertical as they get away from the
edge of the camera. But look at that. I can use Lego to help me plot drawing a city block or
something like that, right? Pretty darn cool. Like this is something
that you can do to just kind of have it
sitting in front of you. Like I said, the camera around the edge of it warps the
lens a little bit, right? But you don't even
need the camera. You just need to
set these little pieces up in front of you. Look at them and say, Okay, well, how does this look? What would this look like if I'm drawing and seeing where
it would go to, right. Where do these look
like they're going off into that one point? I could be a lot more accurate with this if I want, right? So use household items. It could either be Legos
like I've got here, or a cereal box or
any box or any shape. Plunk it down in front of you and see if you can
figure it out. And if the face is
facing you, right? If, if the face of it is
facing you, then chances are, you're gonna get away with doing that one-point
perspective, right? But if it's not, if
it's not facing you, then what can we do? Well, then we learned about
the two-point perspective, right, that we've done. So we can see once again, again the cameras warping it
just a little bit, right? But we've got these
parallel lines going off in one direction. These parallel lines are all shooting off in this direction. Okay? And then they're shooting
off in this other direction. So use am I call this the Lego hack a really
use whatever it is you have at your disposal to play with and measure
and draw and just say, okay, well, how does this work? Where would this all
be going off to? Where would my one point B? What would be the one point
that it goes to, right? And you can see how
these start to line up. We're actually probably
up here somewhere. Okay, you can just practice this and see how well it works. The one thing that I am
going to advise you though, is that even on this, like let's say my horizon
line is right here, right? I've got all these
blocks centered here and they're sitting
here and they're being drawn and all
of this in there, they're going from this. This is one of their
vanishing points and the other one must be,
if we're looking at it, the other one must be
way over there, right? So actually this vanishing, this horizon line
might not be flat, it might be turned
and we can see how the table behind it as
kinda turned right? So it might be
something like this. You can see how these lines would bring our
horizon line there. So the first little tip
that I want you to do, the first one is use
whatever is in your house. Use it as a reference
and see if you could play with it and draw it and manipulate it and understand it and
all that kinda stuff. Take photos if you need. But either way, use
what's in your house. The number two lesson is
what I just showed you here. That horizon lines can be tilted and don't always
have to be just. Straight horizontal
on your page, right? So let's say I'm
drawing a comic panel and I'm going to make this
a little bit bigger here. But I'm drawing a comic
panel that's like this. Well, I might want that
horizon line angle minute. So every building inside of it is made of a certain way
or something like that. Alright? Do you understand it? Not everything always has to be so strictly lined
up horizontally, but realized that every
building inside of this will follow this pattern of that horizontal line and off
to the vanishing points. The third point that I just
showed you here is I want, whenever possible, have the VP, the vanishing point
off the screen. This building looks
so much better because there's no VP
within this panel. Okay? So you want to get rid of that. You want to push it as
far away as possible. If you're working traditionally, sometimes use your desk and just stick little
things there that are like a little not
permanent marker dab. So you can use your
ruler to measure out to it or something. Digitally. There's a few tricks
that you could do and exactly what I did here, my panels inside here and then I'm drawing off
the panel and stuff. Right. And number four
that I want to show you. Number four, is that just
because you've got something set up where everything's going to certain
vanishing points. Not every piece has
to follow that. Every piece should
follow the horizon line, but it doesn't necessarily
need to follow this. So let's say I have this
is my vertical here. Let's say I have
all these buildings and they're being
stacked and they're following this and their
VPs are way off here. Why might have one building here that goes
against the grain. And it, It's vanishing
point is right here. Okay? And so like if I
was to draw it in, It's on a separate block. Meaning like, maybe this street has a windy road that comes around here or
something like that. And this other building
might be that way. And then it goes off to a main
street here or something. But this particular building has its own special path, right? So it can, it still works
within this perspective frame. It's still working within
this because it's following this horizon line. Guys. I hope this helped you. I hope these bullet points, these key points
helped you a lot. And the thing that will help
you the most is if you keep practicing and working
on this perspective. And just a reminder, one, use what's
available to you. Whether it's a cereal
box or whatever it is, if it's gone hand, use it and study it to
horizon lines can tilt. Use that too. It adds more dynamic
field to yard work. Three, make sure to set the
vanishing points off panel, especially if you are using two-point
perspective or something. It helps in designing
your shapes, they don't look so warped. And for your last little hack is when you have multiple
objects in the same scene, it's okay for them to have
different vanishing points. If they're not parallel
to each other. If you've got an
assortment of brick sitting around in front of you, like if you scatter
your Lego bricks, you're going to see they all create their own
vanishing points, but they keep following
that horizon line. Okay guys, I hope this
was helpful for you. And really if you don't
have this mastered, rewind and watch
these units again, because it's super
important that you have it down to go on.
17. 3D Names: Guys, do you remember
a little while ago how we were practicing
and writing our names, were doing it in different fonts and styles to try to
give it a little bit of impact instead of
just writing it in little printed
chicken scratches. And like I do, we're fleshing it out a little
bit, so to speak. We were in like thickening it up and giving it a little bit of
funk in the designs, right? Well, now we're
going to take that and add a lot of what we've been doing with prospective work. So what I'd like to show
you here is a horizon line. Because we're used to
horizon lines by now. We've drawn so many of them. I'm going to zoom
in here on my name. And I'm going to
say, okay, well, what we're gonna do
here is what we've done worth some of those
basic shapes before. We were learning
about how to use kinda 2D shapes and turn them
into 3D full shapes, right? So we're going to assign
a vanishing point. And then we're going
to come here and start drawing our corners
to that vanishing point. The only thing I'm
going to say is we're going to keep this full. Imagine that this is
going to be full. We're not going to
draw through it. Okay? So I'm going to draw and I'm
going to be a little bit better with my, my lines. First thing I'd like to
do is do this bottom row. And anything that if
I was standing on this vanishing point in
looking in this direction, what would I see? What would I be able to see
from that vanishing point? I'm going to draw this
all down into here. And how cool is that? Right? Now? I'm going to go along the outside here and see if
I could draw something down. And don't worry, these
vanishing points are gonna be erased after a while. So I'm going to
come from this one, going to see this one. And there's a whole lot of construction lines going on here right now and looked a little
off, I want to do that one. There we go. Much better. Even from inside here, maybe see if that
works from back here, that little tail
hook inside here, right back here, that little
tail hook from the points of this ie all coming through. Right now this is pretty dark. It's actually overpowering
my letters, but that's okay. I'm not that worried
about it because this is all just kinda
rough construction. What I'm gonna do
is I'm going to back this way just a little bit. And you can't do that if
you're working traditionally, and I understand that right? But don't worry about that. Instead of doing
this digital trick, just kinda lightly sketched, just do it a lot lighter. That's how I do it when
I worked traditionally. Right? Now what we're gonna do is
see if we can use a red. We want to use black. Let's do red just so I can make sure I'm going to start to draw it as if I'm going over it. But there's one thing I
should do before that. I'm going to come back to this
and I'm going to show you, I want the cut-off
line of depth, so I want to make
it about that long. That's how far
they're going to be. Okay. So it's with that in mind, now that I'm going to come back, I'm going to start to
go to there, right. So I'm going to start to
bring this to here, to here. And look at that,
that's that plane, that bottom piece
of that, right? What I'd like to do, usually do this bottom section first, just because it kinda sets the foundation of my
figure here, right? And you know what, I'm
going to hold off on this. I want to come back to that
and show you guys something. They're going to just set the bottom foundation
first on all of these. Ok? And there we go. So the base of this whole
figure is drawn here. Now there's a few things
that are going on here. You can see this is
not flat like this, so I've got to follow that and have it on
that same angle. So it's that same type of plane. I can do that and follow that same angle here
until it hits this line. What do we think? Because at the right angle and comes down from there. Okay. Also from this corner
here, it comes down. And this one kinda
comes up this way. Shape like that. This one's going to come down, drop straight down,
comes up this way. This part of the E comes down
and it's about this thick. So it's still, you know, it'd be hidden behind there. Actually, I should make that
a little more. There we go. Okay, so now you can see how these are starting
to flesh out here. This one's going to come down. This one hooks down. This can go straight in there. This E will come down here. This guy will come along there. I can fix that a little bit. My name, Eddie, seems to
have a lot of edges to it. Alright. There we go. And this one is going
to go straight up. Now you can see, especially if I take this away, eddie, in 3D, right? Using one-point
perspective approach. So it looks pretty good. I say, I don't know. I think that worked really well. And you can see all of the construction that
went into it, right? If you can erase all
that construction, it looks even better. And imagine doing this for a birthday card or a poster
or something like that. It just gives a lot more
impact of things, right? So when you see people,
you're like cheese. I wish I was artistic
like that person. Actually just learn this
and this to be artistic, but it's also pretty technical. Okay, So let's move on. Let's see if you can guess
what we're doing next. I've got Eddie down here, and I'm gonna do something
different with it. I did one point up there. Can you guess
what's coming next? You betcha. Two points. Okay, So this is a lot tougher
because I can't just be taking this and
drawing it out here and then drawing
it back here and stuff. This gets really weird because
if you remember correctly, what's really going
on here is something sits between these and it's a vertical line that sits here, right? Let's see
if I connect that. And then it goes up here. So Eddie would actually
have to fit in this box. That's going to make
this a lot tougher. I'm not gonna be able to do my little quick quick
thing here, okay. To be able to move
it around and stuff. So I'm going to set
it off to the side here and just use it as
a bit of a reference. So let's say e.g. I've got this off
to the side here. And I'm going to use it
as my reference point. I'm going to come in here
and I'm going to write, because I've already
got this box. I'm gonna kinda, right. Let's see. Right, these bricks. Just a rough with the
funky style, right? I'm coming in here and I'm using this as my kinda guide as I'm coming through, right? I can be more precise. I can measure it out and everything, but I'm not gonna that's not
what I wanted here, right. Okay. So I've got Eddie there. Now. This is not the
exact same as this, but I just wanted a funky style. It doesn't really
matter what font. So now that I've got
that Eddie there, how am I going to make
this into that 3D thing? So first I had to draw the base of this to
two point perspective. And now I'm going to come off to the top and I'm going
to do the same thing. I'm drying off these all
of these letters and the lines that are all up
here and dragging them over to this vanishing
point off to the side here. And then I'm also going
to come down below, draw some of these other points that go off to this
vanishing point. And just any corner
that looks like it is not going to
be drawn through. That's what I'm dragging. You can see that I'm going along and I'm dragging
tons here, right? Depending on your name,
how complicated this is. It can take awhile,
but that's okay. We're in no rush.
We're just going along looking through here. There we go. Okay. So we've got this and there's like a big smorgasbord
of lines here. So it gets really confusing. So we can kinda sticker faces
in a little bit closer. And actually no, I'm going to
backup for one quick second here because I want to set how much depth we've
got on this, right? So I'm going to set
this depth from this vanishing point and
I'm going to put it, Let's call it right there. Then this one goes
straight down. So this is the box. If you remember. All I really had to do here
was draw a rectangle box and then start to fill it
in with my various. Things that make
up my name, right? So let's say if I want to, what I could do is I'd come
here and I would draw that. And I would draw that. And maybe I would
freehand it because it's kinda bent there, right? I could draw that in there. This one would follow that line. This would follow that line. This would follow that one
that would come to there. So that's my e. Pretty cool, right? That works. My d
would be right here. Okay. Maybe this would go somewhere there and then
it's going to round up. This would go back and
if I didn't draw it in, if I didn't go and I could use some of
these as a bit of a guide. There. There's already so many guides
here that I can be like, I know this is close. I know this is working for
me right about there, right? So I'm just starting to draw
some of these these points in going to draw it all
the way to where I had it. Right. Here we go. Now we'll see if I'm
going to follow this one. I can freehand this
in a little bit. This is following this. And so this is going
to follow that curve. This follows that one, that follows that angle. And maybe even a
harder ankle here. There we go. Okay. I'm just going to keep
following it along. Drawing in bit by bit. Sometimes it's nice to just
like I did up top there, just do this kinda flat surface here and see if
that works first. And then be able to
comment and give a little bit more detail from
the parts that are missing. Okay. There we go. Okay. I'm going to bounce out and
I'm going to come down. And you can see how Eddie, now we came two-point
perspective. Which one do you
think was easier? The one-point or the two-point? Pretty clear. The
one-point because we really didn't have to
do anything to it. We just used what
was the flat image? The flat front-facing 2D, and then dragged it into
one point and made it 3D. That's what makes one-point perspective the easier
one to deal with. That's why everybody uses it. That's why you see it being used everywhere from highschool on
and stuff like that. Right. Like it's it's just,
it's just easy to point. It gets a little hint here. We could not use
this flat Eddie. And we could not do
that unless we want to digitally warp it and drag and stuff. I got I
didn't wanna do that. I had to redraw it. So instead I used this
flat 2D as my guide. And then what I did
was plotted out, I had to kind of plot out
making a mini rectangle and then filling in
that rectangle with the word or letter
blocks, right? And that's what you're
essentially doing here. You're basically
making big blocks, 3D blocks of letters
and stuff, right? It's a cool effect. And whether you
noticed it or not, it's a nice way to practice some of the skills that we've already
been learning. We practiced doing our
names and all that. I'm hoping you didn't
just do Eddie. Now, I provided that sheet for you so you could if you
really want to write. But what I'm really hoping
for is you do your name. I want you to do your name. And then I want you
to send it to me. Especially because
I know there's gonna be a couple
of little hiccups. I know you're going to have troubles in a couple of areas. That's what I want you to do. I want you to do your name, send it my way and I
can look over it and just circle a couple of spots and send
it back to and say, Hey, watch out for this little corner or something like that. Because no matter what,
there's mess ups. But the key is to learn
from those mess ups. And guys with how much we're practicing here and
how much I mess up. We're learning a lot. I'm glad you're joining me
for this learning adventure.
18. Drawing Vehicles: Okay guys, this is it. This is where we're going to put a lot of our skills to the test. This is a pretty tough unit. So if you want to
kinda take it in sections and see how
that goes for you, okay? Don't stress about it. You need to get it all
done in one sitting or anything because there's
gonna be a lot here. We're covering four
different vehicles. Then my guess is this
is gonna be a long one. So let's get into it and realize that a lot of what I'm
learning is applicable. So the first thing
we're gonna look at is this nice Porsche, one of my favorite cars, and
I sketch this out before. So there's kinda my
construction lines I probably should
have got rid of, but we're going to use those
a little bit as our guide, as we're starting to draw. So what we're gonna do is I'm gonna do it in red just because that blue is already
there, right? I want to do it in green. Let's go queen, doing a bit
of a different color here. So I am going to find
some corner markers. So that corner of the
headlight there and use that as my markers for a box. Okay. So I don't know the
backend of this box. I can't see it. I don't know. So I'm kinda, kinda guess a
few things are at, right. I'm gonna guess that this tire goes to this
tire and it comes out this way and comes
back into the distance. I'm going to guess
that it kinda goes. Tires are about the same height. And this line seemed to go straight across the headlights. Okay. If I want to, I could draw it
this tire straight across as well underneath. If you look, I'm drawing a
bit of a box here, right? Like if I was to
follow this back, I would be following it
back along this way, creating my little
perspective box, so to speak. Okay, that actually
it follows that fine. I'm making this kind of cube. These extra lines aren't
helping me though, so I'm just going to stick
with the surface lines here. Okay? Now let's see if I
can recreate this. Going to have one line here
that's gonna be that front. I'm gonna kinda see if I can use my fingers to
measure it out a little bit. Have another line here. Okay? And then my fingers are
going to use again. They measured this back here. So remember when
I talked to that finger measurement thing, right? Well, that's what
we're doing here. And listen, you don't
have to use a ruler. You can get kinda loose with it. You know, kinda go like this. And it's going to
change the dimensions of the car just a little bit. And that's okay too. Okay, So this is, this
is my box, right? This is my cube somewhat
so far and I'm going to back it out just a little bit because it's a little too
punchy right now, right? I can tell that hears
here's my tires. So right about this spacing and I'm looking for
some landmarks in them. There's my tires and
I also know that this tire line seems to be right about in
the center there. Right. So I can do that in the center and I'm kinda
looking all over to see where I can find
certain little landmarks. Like there's a that's where
the bumper starts here. So it must carry straight across and the
bumpers going to start there. So I'm kinda just
designing a box right now with recognizable
little ticks in it. That hopefully when I start drawing and filling
in the blanks, it's gonna make a lot
more sense if I want to. Well, Here's one more. That top top of the door
there on top of the headlight k. So if I look at a little bit above this line, it's going to come
back into there. And if I want to
bring it across, it'll golden top the
headlight on this side too. Okay. Now, what I'm gonna do is I'm
going to start to sketch. I'm just going to
roughly sketch with my pencil and see what I
can start to come up with. Okay. So this is, let's see. I'm just going to have
it a nice sketch. And I'm looking here and
I'm thinking, okay, well, somewhere around here, this corner is going to
be my headlight, right? I was kinda doing my headlights and that I don't like
that pencil at all. Going to switch up. There we go. I'll just do it with this one. Okay, so here's, here's my head light and I can even
match it on this side. Now I've got two relatively
familiar landmarks. Alright. I know that below
this line here, below the headlight
line is my hood. So I can kinda sketch
that in there, right? I know below that. Hello, that is
this midline here. So I can kinda go from below the headlight to overhear and kinda start
to bring it over. This is really rough
sketching right now. This grill comes back into
here, touches this line, and then comes all the way over, comes past this line. Then there's a bit of
a spoiler upfront. It comes in the front. And of course I can start
to add these details in and do this if I want. It's really not
worried about it. I'm just sketching here, right? Actually, now that
I'm looking at this, This had to come further past. This has to come further out because it comes back and there's headlights
in the wrong position. This headline should
be more around here. You can see there's a lot
of adjustments and I'm kinda looking at what's
going on here and saying, what feels right,
what feels wrong? This hood comes
over top and back. And it's headlight
rounds out here. Rounds, and then comes back
into the hood as well. Why don't we go
along the side here. We've got this spoiler
coming up here. Halfway between these two, starts to go up and
cuts back down. Then we've got an, an oval
here. It only comes into here. You gotta be careful with that. An oval Here. It comes to this point and then cuts in as the
tire, they're right. And that midpoint
is about there. What I'm looking at this, and it's too short, it's
gotta be that high. So what do I do?
Redo it, It's okay. I'm gonna do this again.
This tire comes up here. So if I'm gonna do this oval, that's how big the tires. And that's how big the thing is. The tire guard going around it. And then this is going to
come back to about here. It's gonna do the same thing. It's going to come up
and around that guard. That tire is going to be
an oval there to Midway. Was that center kappa rim? Okay. I hope you're
following along right. Along this headlight here. Just along this way is going
to be that side window. Right? Now if I want to, I can
start sketching things in. That window is
going to come here. It's going to angle back, right? Can put that kind
of sporty there. And it's going to come
back and maybe dip a little bit more and then round around the
bottom back here. Okay. So there's doors here. The hood, I forgot
to flesh it out. And it comes up here, right? There's gonna be a bit of
erasing going on here. Come back and erase
and kind of clean up a little bit of
what's going on here. Make it a bit
sportier. There we go. I'm just using my box that I drew here as
a bit of a guide. Right? Okay. And the mirrors are
off either side. And then this comes down into the back here and we've
got the car door. I comes and follows the form. Okay. Actually, mine looks
more like a muscle car than the original
Porch does here. It's kinda got an amine or look, I think it's this gnarly hood that I've got going on here. So what do we think? What are the main differences
between the one that I just drew and this one here? One. This angle, I angled it more. This is more of
an extreme angle. So my perspective box was not the same as
this perspective box, but overall, things
kept the same form. I think if I change the
headlights just a little bit, give it that extra
look like a Porsche. This headlights seem to be
closer to the bumper, right. So I can bring it
down a little bit. Overall. I got to say mine
looks a little meaner. But yeah, looking at it now, if I was to do a direct
copy over, my angle is off. Right. But other than that, I got all the pieces in place. I've got all the pieces. And I just drew a
brand new Porsche, like literally like this is, this is not this Porsche here. I redrew it with my own I write, I redrew it in my own style. And that's why this type of drawing works
very well because I used all the fundamentals and redrew it and
made it my own. Okay, and that's
important too, right? So I could have gridded it and just copied it block for
block and stuff like that. But instead, I now created my
own really important guys. Next up, we've got this
old-fashioned truck. Okay, so what do we wanna do? We wanna do the same thing and this truck has a
little bit more boxy. So it might be an easier
box for us to draw, right? Okay, so I'm gonna kinda,
I might draw it smaller. Actually. I'm not going to
do the same size. I'm just going to
try to keep it. Keep the ratios. This is about that. This is a longer space, then this one here, this one here isn't that
long compared to this. This is the back of the truck, so it's going to take up
a little bit more space. So I'm just kinda looking here
and I'm just kinda drawing in what would be
sections of the box, right? As we look. And then we can
even have the top. Keep in mind though that this
part is way ahead of this. This is actually
back a bit, right? Okay, so if we want, this will come up here. We can use this as
a bit of a guide. So if I was drawing this
actual cube, what would it be? It would probably be something, something like this, right? This would be my my little
two-point perspective box. Now upfront, I would
say the tires are somewhere in that range
looking to space them out. The tires are somewhere
around there. You've got a whole
bunch of details here. A bumper, headlights
and everything. The hood goes back. How far back is this? If I was to measure from here to here, what
do you figure it? This is about halfway. So if I'm going to measure
from here to here, this would be about halfway. And so that's where that back
of the pickup cab would be. Okay. So now that I've kinda got
some landmarks roughed in, I'm going to jump into
lines a little bit and see if I can flush
some things out. First thing I wanna do is
maybe this bumper here. You can do the bumper and
it's going to come this way. And it's going to come
up and over and around. I remember my drawing here
is gonna be much shorter, shorter than this is shorter
than the actual truck. I've shortened it a little
bit and you know what, even now though, I'm feeling
like it's too short. So I'm going to bump it past
this just a little bit. Oh, no, that bumps
up too much there. I want to bump it to
here because this is the top of this
section here, right? Okay, So I'm kinda doing that. I can see at this point, this is my landmark for
where this door comes. Remember there's this kinda
groove that's over here. And the door comes down,
follows this form, comes over this way, comes up, but then it
comes back along the hood. So before I get too
deep into that, I'm going to come
back over here. I'm just gonna kinda draw it, draw some forms on this slide. Next one will be this
headlight grill section. And I can put those in here. Guys, I hope as I'm doing this, you guys are following
along on your sheet, right? This is not super easy. I get that. This is, this is now
testing a lot of the knowledge that we've
been putting in together. Okay, so now that
I've got this here, I'm going to kind
of bring it across. How far across, until this
follows up perspective line. There we go. So there's the
hood of the of the truck. A little bit less. Windshield is going to come up. It's windshield is
going to come up. It's gonna kinda come across here into the window of
the door. Back again. And there we go. So that's the back of that. Alright. The wheels, partially
hidden by the wheel. Well, but I can still, this is where all our practice of drawing circles and
stuff has come in, right? No matter how many
times we draw them, we're still finding us drawing more and more ovals and
circles and all that. Right? There we go. Okay. This is starting to look
like back in the '70s, they used to have these fat
trucks and muscle cars. And they were just kinda
these cool things. And I feel like I've
kinda drawn it like this stout little little thing. Right. So even though I elongated it, even though I pushed it back, I still feel like
it's 22 vertical. And two short this way. But cool. I just made My own truck, right? Like that's pretty darn cool to be able to draw
something like that, right? But lesson learned. This one I stretched
a little bit too much in angled it too much. This one I shortened up. Still pretty funky
looking though. I gotta say I enjoyed. It looks if I threw some big oversized
rubber on this, alright. Starting to look like one of those weird '70s kinda
know, hippy muscle cars. It was a cross
between muscle cars. And then when they got into the fonts of the late
'60s. Okay guys. So right now there's a
car, there's a truck, and we're probably kicking around 15 minute
mark or whatever, That's not too bad. What I would do is
if this is going too fast for you or you're not liking the look
of your drawings. Pause it, stop it, rewind, and head back
and do it again. Do it on another piece of paper. You don't have to do on
these sheets, right? Just put another piece
of paper down right next to this and draw it out
again and say, Okay, well I know what, what I liked and what I didn't
like on this and I know what I liked
and didn't like on this and what can I do about it? Like, what's, what's
going on here? What can I what can I
make a little bit better? Take the time. You're in no rush. There's no
rush to finish this course. You bought the
course, it's yours. Have fun with it. You know, enjoyed, get into it, play around with
it, spend time on it because it's not
going anywhere. The only place it's going as
your skills are improving. We're gonna do a
fighter jet next. And this is interesting
because the perspective, I kinda, you can see it in
a lot of the forms here. You can see how everything
kinda tapers back. Tapers back. So why don't we
do it even smaller though? I'm going to go like this and just spread it like actually
I want to spread it out, but more, even more than that.
Now I'm thinking about it. I want to really push this. Okay? So here's going to be
the center piece, right? And then I'm just going
to have this guiding me. And this is, this is
gonna be my guide. What's different already? The angle. This angle is very
different than these ones. This is, I should have
kept it going this way, but I'm going to
draw a different type or not a different type, but just the same
the same jet here, but just a little bit different. I'm going to just sketch it out. I'm going to have this
first tube right here. So what did I do?
I just basically drew a cylinder and you can even give some form to
it or whatever, right? And it kinda goes
like that, right? Okay. So I drew that cylinder
and then I'm just going to bisect it or cut through here. What do you think
this is gonna be? It's gonna be the
wing on this side. The wing on that side. Alright. And so I can kinda just aim
it down this way if I want a mud down that
way and then throw some more details into
it, I can come here. But this further come
here. Put this further. I can use this. Maybe back here a little bit. Use this, bring it on back, bring it on over. And this could be my cockpit. You can use this and that
can be nose of my jet. I really feel like though, that these wings are
ridiculously short. So even if I start to add in some missile systems and stuff I got I'm like something's
happening here. The this thing
ain't going to fly. If I throw on some on
the back tales first. You can see I'm just kind
of winging it a little bit. Keep them in line
with this missile. Go back a little bit and then come up this way,
come up this way. Draw down this
central line here. I'm going to draw
this final fin. But you know what? I feel like this has
gotta be carried out, put out even further. And let's see if I
can be consistent my line here, bring
it out one more. There we go. So what do we think? This jet, if I start to
do the outline of it, does it look the same as the one that was
previously drawn here? I can start to add details and bolts and things like that. But it's different enough
that it's my creation. I took the reference. I've taught you guys how to
copy references exactly. And now I'm teaching you
how to make them your own. Alright? This is important. This is important that you learn how to do these on your own. I still think, although
I really like it, I could have cleaned up
the nose a little bit and these wings are still two
stubby and everything right? But overall, that was fun. Yeah, I think it worked
out pretty cool. I might have been
able to bring this a little bit more on this
side or something, right? But yeah, I think this
worked out really cool. And imagine pushing
this even further. Where you have
something like this. And you're just sketching that, you know, having the cylinder in here and then you've
got the wings, right? And you're like, oh,
that's cool looking. You start to bring them
in, right? With that. And you could have so much
fun creating different ships, flying in these angles
and stuff I got with, with guns and missiles
on them in all. Whatever else you want to put
on them or whatever I like. There's just a lot of potential
once you start to combine form and the perspective
that I've taught you, right? Then just double-checking, bouncing back and
forth with references. Okay. Last one here, this helicopter. Let's hunt down, see if we can find some, some basic forms. I think it looks
pretty simple already. Like we've got kind
of what looks like maybe some type of
slanted rectangle here. So let's see if we
draw that from here, down, here, and back. And then it's kinda
hear maybe even more of a slant here and back. Does that look relatively right? And then behind it
is going to be, even though this continues on this way, is gonna be that tail. Then we can just put
midway markers on it. And use this now as Our, maybe I want to make
them vertical like this is have this crossing over. So now what is this? This is just what we've
practiced so many times. It's just a drawing of a modified rectangular
cube type of thing, right? And so what am I
going to do with it? Well, I'm going to come in
maybe just a little bit closer and then see if I can start to
play around with it. So maybe from this point, this is where I'll bring the
nose up and out and forward. And I start to work on
these details a little bit. Alright? So this is going to be, knows. Maybe it's got a camera lens out here or something
like that, right? And it rounds out into here. Then it's got this bottom
section comes all the way back, but I don't want
to draw it in yet. It's got the skis here.
We'll leave that for now. Here's a wing that I
can use this marker at. I think it's going to follow that same perspective pattern. Can drop down and add a
second flap to it if we want. And under it can be a payload of various tubes or missiles
or gunships or whatever. We want to put it in there
and stuff right up here. We can use this as
another landmark. And this could be a bit of eventing system or
something like that. Comes up to here. The cockpit will come from
maybe here and back, come up. And if I want to, I can
just kinda angle it. However I want. Start to add these
these parts in. Draw this across. I'm just going to follow
these angles that I've got here. There we go. Up top here. I'm going to carry it on back. Maybe up top here is
some sweeping part for this this engine, for the rotors and stuff, right? I'm just really
roughing it in here. And then I'll draw those rotors when I back out a little bit. More intake or events or
whatever I want up there. Maybe this can be a bit of a turbo push that's
coming out the back here. We're going to come
back into this tail. And it's a simple shape. Back into the rear rotor. It's on the other side here. And it's, let's say
in this position or whatever little mini wing. And you can see like this is
not that hard to do, right? Like everything
we're doing here at kinda make sense already. Of course you can
add more details. You can add bolts, you can add panel breaks
and stuff like that. You can add whatever you
want in there, right? Okay. We're going to come
forward a little bit. And let's see. We want to add this machine gun. So, uh, what's a machine
gun is chain gun, right? Is basically a cylinder. So if you can draw cylinders. We already know the
angle that it's on. And we draw a little, you know, where it shoots out over
whatever and stuff, right? We can make a housing for it. And there we go with that. Then we can back out
just a little bit, throw the rotor into the mix. And now we have our helicopter. What do we think? I
think I changed the oh, I forgot to do something. There we go. I forgot to add the teeth on it. Do we like this helicopter
honestly? Yeah. I think it worked
out really well, especially for being a loose
measurement and stuff. I get this worked
out really well. We turned it slightly. I don't know if you
noticed this, but this one is slightly this way. And our helicopter has
turned slightly this way. Just a little rotation in
how we did that box, right? Guys, this is a tough unit. We covered so much here. But what it is really a bit of a culmination of the things that we've been working on so far. We worked on hand-eye references earlier and stuff I got
being able to look at an image and recreate
it to a certain extent. We also worked on perspective and
understanding how we can make really basic
three-dimensional cubes and then start
subtracting from it. And so what did we do? Well,
that's exactly what we did. We drew these vehicles
by basically making these three-dimensional
blocks and then hitting reference points in them and then adding to it, subtracting two it, pushing,
pulling it and stuff, sketching over top of it and coming up with
some pretty cool. Now are these exact replicas. Know, if I wanted
to do them exactly, I would measure them out and
measure the perspective. Do it exactly how it is, or just do the grid thing. But that's not what
I wanted to do here. What I wanted to do was show you how you could
recreate something. A quick sketch of a reference
using the tools that you already have and
make it your own. I think that's what
we've done here, guys. I would love it if you could
send me your vehicles. I am hoping you didn't
just watch this. I am really emphatically pleading that you
actually follow along and do it with me. Okay? Now listen. I say that Do it with me. But what I mean
by that is do it. If you watch one section
and watch the car and then put it on pause and then do it yourself on your
sheet or whatever. That's fine. I just want you doing this and I'd love to see it
because I want to make sure that you're
on the right path and you're following
the right things. And even though it's not
perfect, you're working at it. Because that's the name
of the game, right? Guys. I hope this
was fun for you. And like I said, this
was a tough one. It's a bit of a long unit, but I'm glad you stuck with me. Now. Get drawing.
19. Drawing Spaceships From Household Items: And I've got another
unit here for you. This time we're
continuing on with our constructing vehicles
little bit, right? But we're gonna be
making spaceships. And we're gonna be doing it in a little bit of
a different way. I've kinda started
doing this for design of all things and stuff is grabbing something
around the house. That is familiar, right? Just grabbing something
and saying, okay, well, what can I do
with this, right? What could I make of this? And so I've pieced together, I shall bone sets out a few different items,
household items. And we're looking at it
and saying, okay, well, what can we do with
these things, right? Like what can we construct? So why don't we do just that? Why don't we play
around a little bit. You've got your sheet,
I've got mine here. And maybe are things
will be similar, maybe there'll be
a bit different. What I'm gonna do
is just kinda look at some, some things here. Like I kinda feel like this has maybe some type of
wing or something. It's coming out to
here like we've got maybe a shape,
a cylinder shape. I'm kinda thing of the jet
thing that we just did, right? We've got wings that maybe
come out on either side here. Alright, I've got this. I can kinda go with
this plane here. Maybe it comes like
that. Alright? What do you think of that? That kinda encapsulates
our basic shape here a little bit.
Alright, blank. I think that kinda captures part of what I want
on that. Alright? So you know what, I'm just
going to draw a straight line. Just if I could draw
a straight line. And just kinda, Here's
going to be that cone, right off of that
cone is going to be this claim that
comes up into a bit of a fin or something
right through that is gonna be two markers.
Maybe two there. This can come back. Come back. It comes back again. It comes back again. And now, well, here
I've got a basic, almost looks like a battlefield
type of thing, right? Like so what I can
do is zoom in on it. I'm going to just kinda back
that a little bit and make my sketch a little
bit lighter I think. And see if that
helps a little bit, then what am I going to do? Well, I, I kinda think of like, what's on a on a ship
like this, right? What would be some of the
things that might be on a ship? Well, I can put put that cockpit if I want
on the frontier, right? But I think I might
make it a little bit different, stuff like that. It's gonna go with
like a two tier thing. Right? I can have a little
bit of different designs here or something. The nose might snarl it, do something different here. Starlet and have this, this hook make it
look like a bird of prey type of thing with some type of laser pointer
or something like that. Some armor plating here. And listen guys, you
can be following along and doing exactly
what I'm doing here. Or you could be doing
your own thing, right? Like it's, this is just kinda, we're sitting here brainstorming
together and saying, well, what does this look like? What could we do here? And I'm kinda playing
with this wing here. It's not really a wing,
It's more I don't know if I would call it a fin
or anything like that. I feel like my rotation
is a little bit off, like I should have
brought this and this kinda like
that a little bit more because this seems
very vertical, right? I'm going to bring this back in, bring this in, going to bring this back
and bring this in. I wanted to shorten it up on this side and lengthen this
way because like I said, I felt like I had rotated this from my original
reference a little bit, I rotated at a little bit more. And so I want to
put more in there. So what I can do
here is, you know, like you could put
a big jet engine on the back here that has
a boom if I want to, I can do it this way. Propulsion Dr.
thing, that's kinda splattering some some energy out here, something like that. Okay. There's all kind of know
if that looks good. I can have What do
these guys have? I could have some type of force, rockets or something like that. It's a lot of armor
minton stuff, right? This is a beginning
to look a little bit too much like a fighter jet. And I'm trying to think
of how I can shifted up. So that doesn't look
like a fighter jet, maybe backing out just
a little bit, right? It's starting to look like
a bit of a fighter jet. And I don't want it to. So maybe some weird
and antennas going on. Alright. To receive signals, I could
have a graded system in here. And this is where like just
starting to play with it, see different
things that I want. I can start to Oh,
you know what? As per our discussion on on being able to cut
pieces away and stuff, right? What if we do this? What if I cut this away? And I just kinda
shape it like that. So that means this would
also be cut away and kind of shaped like that. Then
what does this do? Well, it creates just
some, some extra little weird detail here. And you can start to play with these shapes and
have fun with it, creating something
bizarre, different, whatever it is, right? But what did it what
was it based off? An actual form of something. It was based off of a couple of pairs of kitchen
scissors or whatever, right. So play with it. See what you can come up with. See what's there in
your mind, right? We're going to jump onto
the next one here and see if we can do with this. Okay, so this is my massage gun. And the shapes are pretty
simple here, I think, right? Like we've got two cylinders and you look at the
perspective here, right? Like I can already see
what's going on here, right? So if I was to draw
that right here, and let's say I draw right
beside here a little bit smaller. This is down. This is up. And the mid, the horizon line for
this thing is probably somewhere around
here because this is starting to bend below. And anything above here is
a bending, bending above. Okay? And then we've got
another cylinder. Not sketching very well here. And listen guys,
well you could be doing is doing exactly
what I'm doing. I gave you the sheets
so you could be drawing over top of
things and stuff. And I can, and doing what I'm doing here is just kind of drawing beside if you want. I'm drawing the back of it here. And copying me stroke by stroke. If you want, it's up to you. You can not copy me at all
and just say, You know what? I'm gonna do my own thing
using this base form, I'm going to create it into
something totally different. The only thing I really
would like is if you kinda look at the circumference, see if you could find those, those lines, those
circumference lines, right? See if just from the
perspective that it's in, if it makes sense
to you, this one would be something like this. Alright? Okay, so now
that I've got this, what am I going to do with it? You know what, I
kinda like this, these lines, I like the
circumference lines. So what if I continue this down? Just gonna kinda play
here a little bit more. What if I do a ring around
it like a doughnut? And then, okay,
so I'm gonna just kinda that you could sketch
in the form a little bit more and come up with some
ideas and stuff, right? Or you can just go
straight into the sketch. Now if you look, this
line comes up here, and then it comes down. And it comes into something
interesting here, right? Like it's just kind of
a beveled thing, right? And what we could
do is have this as some section of the what I think I'm going to
make this a space station. And I can have this as some section of the
space station here. So I'm going to have,
I want to follow the circumference lines a little bit that I've already
laid out here. Alright. I'm gonna
come down into here. I'm going to make this
an ugly circle there. I'm going to make this into, I'm going to make my
doughnut into something. What I'm going to make it into is maybe a port. So that little ships, little ships like
the ones that I drew above are coming and
going and stuff I got there coming and
going in and out of these ports, right? And then maybe this
can be a big one. And I can show inside the donut. Now there is maybe a wall there or
something like that and then show some effects of how there's a
larger ship coming out with rings on it or
something like that. Right? So I can come down
here, finish us off. And you can play
around with this. It depends on what's
on your mind, right? Like, what are you thinking for? For a design feature, right? Like is it, is it a
place where there's rows upon rows of windows and
bit of an observation. Area where there's
tiny little people and they're looking
outside or something like, what is this thing
going to be to you? Is it more of it doesn't
have a propulsion system, doesn't just sit in space and use some orbital power
or something like that? Or does it have some type of light propulsion system as it pushes itself
through the galaxy, right? What else might need? It might need some Bridge Tower with a communications array or something like that, right? What could be on top
here and stuff, right? When I color it, I can put red beeping lights
or something like that. Alright. Maybe e.g. disk systems or
whatever, right. Okay. Speaking of disks, if I wanted to could I put something on
the front end here, right? Like some kind of big some kind of
big disk that has, and I'm going to go down
the central line here that has a variety of antennas
or something like that. Today, there's so
much you can do. But if you look, what did we do? Well, we just used that little my
little massage gun and turned it into something
interesting, right? Like why I think
it's interesting. It's a little spaceship or
whatever space station, right? So it has some
propulsion system. It has communications
that has commanded, has ports of access
and stuff, right. Okay. So what else could we do here? Well, we've got a can-opener. What's the basic forms
of this can-opener? Seems to be one
semi cylinder type of thing going on here. And another semi
cylinder type of thing going on here with a
structure over top, right? Okay, so what if I
did that beside here? Draw two overlapping kind
of cylinders, right? With some type of command structure over
top, right? Okay. Now I'm just kinda, kinda do
some little bit of markers on it just to kinda measure
it out and stuff to say, well, maybe I want
something else on here. I don't know. I haven't quite decided yet. Here we go. I want to follow them.
Perspective just a little bit. Sketch it out a little bit
that way, right? Okay. So what would I put on
here to make it look cool? No, no. What should we make this
into? I can put wings. Wings are always kinda cool. Right? But wings, I can put
massive amounts or make it a nugget chain gun type
of thing that has like a machine like Gatling
gun type of thing, right? Has a center and maybe these
spin around as they fire. Alright? And everything is
just, it's coming out of. It. Got to be careful with this because
it can kinda look like as if that's the
propulsion system, right? So you can put little bits
flying off of it or something. Then what, what do you want
to have as maybe some, some power source
for that, right? And you can even have
hosing, like some, some piping coming
in or something like that from the power source. Depends. This could be either something small like
or one man fighter like. This could be a one man cockpit that has a bit of a
swivel here underneath. And he's swiveling around. And then inside here
is maybe some webbing so this can split and
it can have not know. What it could do is
maybe these could split open and be able to shoot multi-directional
things or whatever. Here's maybe some
more armaments. And on the backend here, this is just a fast,
fast flying machine. And inside this
machine is this guy. He's happy. And right behind this as the
propulsion system. Something like
that. Alright guys. It doesn't really matter which way you're wanting to design, whether you're wanting
to design gunships or space stations or anything. What I wanted to show
you here was how easy it is to use something
around your house, understand the basic form of it, and then transform it
into something else. I transformed it
into kinda goofy looking first
concept, space ships. Okay, that's fine. They're not the most beautiful
things in the world, but that's fine with me. The question is, what
are you going to do? And so this is your
assignment at least once. But maybe a couple of times. Take some everyday household
item that's in your home, draw out the basic
form of it and then modify it into something. Want to make a spaceship?
Cool? I'm happy to. I mean, like
spaceships are cool. Wanna make new design of a car or something
like that. Do that too. Want to make it into a
character or something even? Yeah, sure. Whatever works for you. The point is that
I want you to see the potential in all the
shapes that are around you. Whether it's a blender, scissors, camera,
anything, headphones. I'm kind of looking around
on my desk right now and no, I do not have a
blender on my desk. But you just kinda look
around you and say, Okay, well, let's kinda interesting. I wonder what it
can make with that. Take a picture of you on or don't just have it sitting
beside you on the desk, scheduled the raw form of it. So I'm going to teach
you how to draw, like massage guns and
blenders and whatever. Yeah, we can draw that right. But now you're taking
it another step, right? Were wavering back and forth between understanding and
drawing what's in front of us. And then being able to take
that to the next step. And this was a little exercise
and doing exactly that. Taking it to the next step. If you can master this, it'll help you go on to
bigger and better things. And your art is going to
be that much more awesome.
20. Drawing Still Life: Hey guys, we've got
another lesson here. And this one is for any of those who have
taken an art class, probably in high school or
maybe starting in university, you would be doing
still-life drawing. And I got to say, I never really appreciate it because it
was never taught right? Whenever I was taught
still-life drawing, I was taught this. Here's a bunch of
stuff in front of you. Draw it. And I was like, Okay, I
was pretty good at it. Actually, I always got A's
and stuff I got right. I thought, Okay, well, I
just draw what I see, right? And I'm just people get
really good at that. I think to an extent, like people were just
drawing what they see. But it doesn't really do
it justice for what it is. There's just this warped
photocopy approach to things that doesn't really
encapsulate what it is. So I'm going to teach you a different way to do
still-life drawing that's still follows what
you're used to there, but just a little bit different. The first thing I'm
gonna do is kinda start to measure things out. Like if I'm, if I'm drawing a
box or something like that, alright, I'm gonna
kinda frame it. Just say, okay,
well, here's my box. I'm not going to necessarily map it out as in like I'm
not going to grid it, but I'm just going to make
a box just so I can have a reference point of where
things are a little bit. Okay. Roughly the same size
box I guess. Let's see. I can measure it
with my fingers. Maybe come down a
little bit on it. There we go. Okay. So that's the first step, but I hope you guys are
following along with me because I'm imparting
amazing knowledge here. So what we can do here
is we understand that Here's a bowl, right? The bolt is three-dimensional. So it's like it's
going around, right? We have, we have a bowl with
rounded edges and it sweeps down and down near the bottom here is the bottom of our right. Okay, so again, I want to make sure this is a little
bit more even here. This is just a rough sketch. This is not, I might be doing the occasional erasing
on and stuff like that, but really not much. Okay. Then I'm looking at it
and I'm saying, Okay, well, I might as well start to draw. I'm drawing through, you
can see how I'm drawing through a lot of
these images, right? A lot of these shapes. I'm just drawing
through them right now. There we go. Okay. And then I'm going
to set the rough shape of the manana stems in and
then have them coming in. So you can tell how this, what we've done here is
a different approach to how we normally do still
life drawing, right? We sketched it out
and we looked for basic forms. That was different. Normally we're just kinda
like we start at one end and start drawing and rendering and doing it all and
stuff I got right. Okay, The next thing
I'm gonna do here is I'm going to zoom in here. And imagine these are your eyeballs zooming
in a little bit. Alright. Pause. What I'm looking for here
is I'm looking for bit of the light source. I want to see where
my light sources. Okay, so I'm to, I'm going to say my
light source is here. Light source kinda rims it. So what do we think? Where's this light
source coming from? Right? Light source rooms, it a little
bit of different things. It's definitely coming
from above here. I would almost wager it's almost straight
from above, right? Okay. So I want to know that
as I get into this. Okay, so I'm going to back
out just a little bit so I can kinda look at
what I'm doing here. And then I'm going
to start to use my pencil and see if I can
find a pencil I like here. Pause. So I like to play around with the different
pencils I've got, whether it's in digital
form or or whatever. Like whether it's maybe you're doing something
traditional. I kinda like that. I think I might use
this one for shading or something a little harsh for me. Yeah, I think I
might try this one. Okay, So we've already gone over in different pencils
and stuff that you can use. Talking about the equipment
and supplies unit that we already
talked about, right? Which one works best for us? I'm gonna be hoping
that you already have a pencil that
you're liking. Alright? So I'm gonna come in
here and you'll see, I'll just be popping
back and forth. I'm going to come down and I'm
going to draw this orange. You're going to find that
I'm drawing a bit of a harder line as I'm
closer to the viewer here. So I'm just kinda going to follow those rough tin forms that I've
already done, right? You know what, this one is the
closest one to the viewer. So I'm going to rough
that one in right now. Sometimes I go over
it a little bit to make it a little
bit darker, right? Depending on what
what you're using for this is a bit of
a ridge on it, right? But you're using for a pencil, it might want to be very dark. I'm not shading yet. I'm
not gonna get into that. I'm not gonna get into tonal values or anything yet, right? What do we got here?
This next Apple here. And at a certain point, I might just be doing my own thing here. It's kinda looking in
bouncing back and forth. This orange seemed to
be next in its order. And this one seemed to have air. You can see how quickly, like I'm just kinda
going back and forth between my reference and my, what I'm doing with my
drawing here, right? Doing in different forums. Here we go. Now the bananas. You know, it's funny
because we always think we know what
everything looks like. You don't you think you know
what something looks like until you tried to draw
it and then you're like, Hold on Now, what does
that actually look like? Right there you start to second guess yourself
and everything, right? Because this banana is the
closest to the viewer. This one is going to
be the one in front. And then there's actually this one next to it
that comes in front. Then this one, this one. And there's another
one behind here. Then another piece
of fruit back there. Okay, so roughing it out so far, this is what it's looking like. It's looking pretty good, right? I like how this looks. I think that I'm going to finish off the ball
here just a little bit. And maybe it'll come down with the bottom
base of this bone. There we go. Now
I've got a choice. Now that I've done this and
I've done this outline of it. Alright, we got a choice of
how do I want to render? How do I want to shade? Okay? Do I want to really busted
out and start doing each one? Or do I want to do is do a
light once over with it. We'll try a few different ones
just so we can kinda say, okay, what, what
did that look like? So with this one, what
I would do is use a small pencil and throw the
texture into this orange. Remember that the lighting
is coming from up top. So as it comes into
that lighting, what happens is there's a
kinda gets washed away. Alright. So I'm not going to put
a lot of effort into rendering the texture on
the orange up in that area. I'm just gonna do a
little bit down there. And I can render
that away, right? So, so far there's
no tonal value. This is just some details. I'm going to cut
them back up and see how it's kinda
pockmarked, right? Okay. I'm doing this little pock mark. Pause. I can also scooch up and just see where my
next oranges that. But this one's further away. So I might not add a
lot of detail in here. I just might add just
a little bit if you compare it with the orange
over on the bottom, that bottom left for us, right? This one's got a
lot more detail. This one's gonna
be further away, so it's just going to have a
little bit of detail to it. Now with apples, I've
got a choice to make. You can see how Apple's
have a little bit of a green going on, right? But it's very light
and it has more to do with the coloring
that's on there. So I gotta be careful
that when I'm doing it, I'm not doing too much. If I do heavy lines, it will start to look
like a watermelon, right? So I've gotta be careful about doing that
type of thing on here. And I've also got
to keep in mind that there's a light source coming in from the
top here, right? So I've got a couple
of apples there. What else have I got it? Oh, there's an orange
sitting right here. So I'm going to add
a bit of texturing, but keeping in mind
that up on top here is that light source. Right? And let's see up
top more apples. So I'm going to come on down. I'm just going to add give them a little bit of
circumference lines. Okay? You know what, at this
point I can get rid of my blue and see how
this is looking. And I can see that like e.g. this one looks plane because I haven't
done anything on it. Alright. This is almost like those circumference lines on spheres that we've
practiced a few times. Okay? Now has a very light. So we're getting there.
We're getting there. Think that I want to do next is add in a little bit
of shading and stuff. So I'm going to just lightly come in on these
guys and start to outline my my my son direction,
right? Okay. My light direction. So I'm just gonna kinda
start shading a little bit. And you can be smudging
with a pencil or something. I'm just doing this
really lightly. You're going to see, I'm
going to lighten it up even more just to get a little bit of form
and value in this. Then what I'm gonna do
is get my eraser out. You can use whatever
eraser you want. And just start to work. Where that, where I think
that light source would be touching around the
ridges of the fruit, especially up top here. Alright. Okay. So I'm gonna kinda bounce around in the
stems may be a little bit. There's some shading going on right in between the
bananas underneath here. Then come back and make sure I add those
highlights in there. So you can see a lot
of times this is bouncing back and forth with maybe your eraser
or something, right? And then getting into whatever pencil you're
using or whatever. Okay. So how we look at oh, we got the light
source down, Correct? Right. Well, we didn't do was in the grooves in
between the fruit. There's a lot of
that shadow too. I want to darken that up there. See if I can move over
there a little bit. And all these little grooves, There's some shadow that's being put down
there a little bit. Yeah, there we go. Okay. Now, I want to do
the same for the bowl. I can bust out Tom
kinda using like imagining if I have a big charcoal thing
or something, right? I'm using kind of a
bigger charcoal brush. So you can use like if you're
doing this traditionally, you can use literally charcoal or really, really soft pencil. We go. Okay, So again, without
any color value, we've now gone in and
done a still-life with just the forms and the Some of the tonal value. Alright? The other thing you can do
is what I do sometimes is I, I've got a white pencil
crayon that I will sometimes use to just add highlights
onto things right? Now this can work sometimes on paper better than
a can on others. But it just kinda, you know, if you use white
on black paper or something, It definitely will work better. Here. It's not doing too much, but I don't want
it to do too much. You just want to use white, just as a little bit of a highlight in certain
areas and stuff. And maybe I can run the ridge of the ball
a little bit there or something shining through. Imagined the light's coming
through there a little bit. Just a little bit. Because if it's breaking through the barrier between
those couple of fruits, oh, oh, I need to do is
look at my reference. And that would help. I can actually see in
that reference that light goes over most of this hole and then it kinda lines some of the edges
of these guys as well. Right? So when in doubt, look at your reference,
see if that helps. Guys. I'm kinda doing this up so that it can be
very general for you. So if somebody was sitting
here with a digital tablet, a ballpoint pen, one HB pencil. They'd be able to do what
we're doing here, right? Like, if you want to
spend more time rendering something else, that's awesome. That's great. I think it helps. I think your pencil crayons or colored pencils and you want to color this all in. I think that'd be awesome to, that would be the
next step here is to start to add color to it. Realized that some of the lessons that we've
talked about already is that any of the colors
that are closer to us, you can punch them
a little bit more than the ones
further in the back. That's one way, one
approach you could do. But this is how you
do a still-life. This is how you do a
still life drawing. It's really about using some of the skills that we've
already learned in that just having a base form of measurement to relate one piece, like one object in
the piece to another. And then looking for light sources and then just
starting to lay it down, laying down basic shapes, laying down the
shades and rendering, all of that depending
on the materials that you have at your disposal
and how much time you have. I wanted to keep
this around 20 min, so I'm not going to render
it up the wazoo to make it like this beautiful painting
or anything like that. This is exactly where
I want it to be. So they can instruct you
on all the steps you need to start off your
still life drawings. If you want to spend more
time on it, I'd love that. Send it to me. And if
it's not a bowl of fruit, if it's like no. Anything sitting around
your house that's just sitting there
and being still. Draw it, send it to me. And let's see how you
do on this project.
21. Drawing Landscapes: Hey guys, I'm back and I've
got another lesson here. This time we're going to talk
about drawing landscapes. And we're going to use a lot
of what we learned so far to see how we can make landscape
illustrations even better. Okay? So the first step that
we have been getting into is a very light
sketch and you know what, whether you're using
a pencil or not. What I like to do is
use a blue pencil. Now, this is traditionally,
just so you know, traditionally a blue
pencil was used in illustrations so that it wouldn't show up when
it went to print, it was easier to ink
over it and do things. And then when they were scanning and printing and all
these types of things, the blue was able to
not copy through. Alright, so that's where
blue sketches came from. But now we often use it as just something that helps separate the
mind a little bit. And at least for me, right, even digitally, I can
just take it out. But for me mentally, light blue is just
the sketch, right? So that's what we're
gonna do here. So light blue, I'm
going to sketch in what I'm looking at up
here in this landscape. And right now I can see some, I'm just going to
rough in some trees. This is on a bit of a hill. Here's my framing slightly
bit of a hill and there's, there's more trees
going on here. Then I can see, why don't I defined my frame a little
bit slightly better. And I can see some
mountains coming in, various peaks coming over, jutting into this lake down
below, winding through. And you can see how these and
I'm not following it exact, but I'm going at it
a little bit. Okay. So there's my my very
rough sketch, right? And I'm going to what
I would do is if I was sketching and I would
do it extremely lightly. And then I'm gonna
come in with a pencil. Now, what pencil I choose is
and always easy sometimes I, I kinda like certain
ones more than others, Some days and stuff and I kinda play around
with it a little bit to see if I can find the pencil
that I like for that day. I don't know if I'm loving
these pencils right now. That's a little bit too dark. It takes a while, and this is the experimentation
you wanna do to see, okay, well what pencil on my, my feeling like
working in today. Alright. What, how heavy
do I want my hand? I want something that I can
push down a little bit on that gives me a
little bit too dark. There we go. And then I can
get in there and darken it operates so I can
go light if I want, really light, then get out and then really darken it
if I really want to. That's what I was looking for. Something that allows me to kind of sketch like
that. Alright. So the first thing I'm gonna
do is I'm actually going to start a really light in
the background here. Just start to pencil this in. And I'm going to pencil
some of these ridges in here, following my guide. Just giving it a little
bit more, more detail. Okay, and occasionally
I'll lookup to see, can I really see much, Not much like as I start to
get into this one though, you can start to see a lot more. So this is going to be a
slightly heavier line. Has like comes around. And I'm going to start to see a little bit more
details going on. Remember, I, I guess I
could have blocked this out here and put
a frame and just, just for my own sake
of knowing where, where I'm drawing to kind of blocking it out
for that right now. And go back in here in them. Know, I'm just kinda
slightly drawing in here. Looking up at my
reference on occasion. Noticing there's a little bit
more detail going on there. Of course, this one
that's a little bit closer comes around. I'm going to lose it in the
trees, but that's okay. I'm going to start to there's a few bit more details of bold patches where there's no trees and everything, right? We can even draw off the
screen a little bit. It's sometimes good to
do that, to bring it up. So it's coming off. If you can, like
draw off the screen. So it's not like you're
oftentimes we get stunted and we don't bring it all the way
to the edge of our canvas. I'm going to come in
a little bit closer. Come in even closer. Just kinda start to end. Even at this point I
might there might be some detail the beach
that I can see, some of the water
just a little bit. You can see how as
I'm doing this, the, the details are getting
much punchier here, right? Like back here. We're going to barely
notice anything but up here, oops, wrong pen. There's gonna be a lot more. We'll see as we go
through this even more. So we're gonna be adding in. And I keep going over
different parts to darken it up because this is gonna
be so much closer to us. So I'm using this light pencil. I'm having a gourd a number of times to really get to
the level that I want. That's okay though. Because that's how
I chose it, right. Like I wanted it like that. Especially when I'm coming
into the backgrounds here. I want it to keep it really
light and barely there. Okay, so now I'm
going to move over to this other side
just a little bit. Here we go. Roughly
drawing the coastline. There's really not going
to be much detail here. If I keep looking up, it's not a lot of detail back there. All that atmospheric
occlusion, right? But there is maybe just starting to come a little bit
on this side, right? There might be some details of some trees or
something just starting, right and it's just going
to fade as I get in there. But coming down
with this side now, you know what I gave and switch my pencil
just a little bit, darken it up just a little bit. Or get a little bit of
a thicker one going on here. There we go. We can see how the
contrast between this one in the previous
look of things, right? How it's starting to
separate these planes. This is now more into the mid ground of
what I'm doing here. And again, we, you know, we we're going to see
details of things going up and down this ridge, right? You can see where the sun's hitting it at
different points. I'm going to just
keep drawing through because what's going
to happen here is I'm going to, this front part is going
to be a very heavy line. So I'm not that
worried about it. Okay. So do you think now, looking at this, does it look like darken this up even more? Does it look like we
have a background? Maybe even coming into now
hear more of a mid ground. If I was to define
it into these. And then here we're going
to go into our foreground. Might as well get
moving on these trees. I'm going to see if I can
darken myself up a bit. I'm just going to plot out
number of different trees. That doesn't mean they're
going to be like in, it's going to be all over here, but it's not gonna be
in all of these rows. And these trees
obviously, like they, they do is they start narrow and start coming
out like this and this, this takes a little bit of time. Just make sure you flush it out off of the page a
little bit, right? Just keep keep working at
I hope while I'm doing this that you're also
working on your sheet. It doesn't have to be the exact
same one. I'm doing good. I mean, if you wanted to pick
a different one or if you wanted to change things
up a little bit. And that's up to
you. You can see I'm going to really darken
this into the middle too, because I want this
to punch forward. Get it to punch
forward a lot ahead of anything else that was there. I can just scribble
it out a little bit. As I'm moving along here. Like I said, it's important to be drawing off of
the screen here. Because we want it to
look like there's, there's more happening here. And I'm just going to
rough in with a mountain is kinda hatch that slightly. Gonna be filled in with trees. But I'd like to
have that done in. This one's going to be
a little bit narrower. Not all trees are
the same, right? Maybe this one can be bent
towards just a little bit. Missing a little bit irregular. You don't want too much
symmetry in nature. It looks a little, looks
a little weird and wonky. Actually. Nature loves just a
little bit of chaos. I think I've been
watching too much of the, the Jurassic Park
movies of labor. Jeff Goldblum in his
talks on chaos right? Here we go. So we're going in and I'm trying
to do this really quick. It's not going to be
the prettiest thing in the world or
anything like that. But the fundamentals are
what's really important here. What we're working on
is making sure that we have lots of fundamentals in place here about
the blocking it in understanding that the different planes of the illustration, the foreground, the
midground, the background. Putting more details,
being able to see those details in this, in this plane that's
closest to us. It's important to have that.
Not every illustration is gonna be an absolute success. Some will be better than others. Some you could spend
hours, days, weeks on. You'll still be frustrated. Others you'll be like, Hey, I want super-easy. Why did, why did that work? And that's what you want to explore it a little bit and say, Why did that work
so easy, right? Okay, So already what
do we have here? I'm gonna get rid of
that background sketch because it's in my way. You can see this is what
I've done so far, right? Like I've already created this quick separation
of the planes, this background, mid
ground and foreground. If I wanted to, I could start
shading this in even more. Really, depending on what I
want to use as my medium. Do I want to have do
I want to use inks? What do I want to use, right? If I want to use charcoal or
start smudging and blending, That's also going
to change this. You can see how the light source here is really smudged out. So what I would
normally do is take a very light pencil color this in smudge it in color
this one and darker, Do you I mean, and
then take an eraser. Let's see if I can
grab an eraser. And just kinda like start to do these very light beams over, over top of things and stuff. And I'm just kinda of
erasing a little bit. You can see cutting through
the mountains and everything. You could do that and it'll
kinda cut through and change, just changed the illustration
just a little bit. If you want to, you can
get into details too. And just start to use a very small eraser and put highlights in
certain points, right? Be careful with
this. It could look a little bit like snow. But if you've got the
sun coming into it, you can have these
highlights coming in here. And that will show where
the sun's hitting on these, these particular trees or whatever details
are going on here. That helps. So you can use the original
techniques of sketching in the basic shapes
and the forms with a very light pencil or
even a blue pencil. Then coming in and adding
some more details. Varying the strength of whatever pencil or medium
you're using, right? So make sure that
the details and the line width and everything is very light in the background. Medium for the mid, harsher in the foreground. Then you start adding
in more details. And I could come in
here and I can still like I could spend hours
here just adding in. Let's see what am I gonna do? Adding blades of grass
or something like that. I mean, like just adding, adding a lot of details in
here to try to make it look. You can hear me grasping away here to give it that feel of
what I want it for, right? You could also, if you want, even come in and take
a bigger charcoal or something like that
and just start to really going in on everything
and blacking it all out. Depends on the look
that you want to have. Once you've done that, then
you can start to finesse it. Play with the lighting, see if you can use an eraser
or if you're using ink, like if I've done these
with just a ballpoint pen, you can use a little bit
of white out and just dabbing it and playing with
it a little bit and stuff. It'd be hard to smudge whiteout. Obviously it wouldn't
work as well, but you can see
where it might work in the trees and
then the highlights. So we took this composition of this landscape photo that
is already here, right? And that's okay. We're just working
from a reference. But you could design
your own going forward. You can say, Hey, this is what I want to have in my drawing. I want to have these, these set pieces in there, or this composition or whatever. It's all about you, how you
design your illustration. There is a lot of
things that you can add or subtract
and put in there. E.g. if this is a gift and it's for your grandpa and you want to put a cabin in there,
something like that. Put that in there too. I also didn't really touch on color. And we've talked
about color before, about saturation, how it gets. You can see here how these, you could see reds and
everything in here. That could be something to be played with going forward two. So guys, this is
your assignment. This is what I'm hoping
to get from you. I was hoping to keep this unit, most of these units
under 20 min and so, um, I think I'm banging on here. What I want for you is
to draw me a landscape. You can use this one
that I've included in the course as a reference and just kinda sketch it out
on this piece of paper. Or you can draw any
landscape you want. What's most important to
me is that I see that you're following some of the principles that
we've been learning. Principles of drawing these
types of scenes, the details, the tonal values that color saturations,
the sizing, right? All of these things to separate different planes
in a scene like this. Guys, I'm looking forward to see what you're gonna give me. And I'll be extremely disappointed if you
don't give me anything. So send it on over to me and make sure that you
make the most of this, right, because there's a
lot of opportunities here. And my feedback with you want to hear
more from me or not. My feedbacks. It's one of the bonus parts of
this course, right? So take it if you got it. And most of all just have fun creating illustrations
your loving hear something you enjoy. Alright, good luck with it.
22. Drawing The Best Stickman Ever!: Hey guys, I've got a unit here for you that I think you're
really going to like, Well, at least I'm
going to have fun. So I'm hoping you have
some fun with me. We're going to talk about
drawing a stick man, right? This is interesting because this is a common phrase
people will use is like, I can't even draw a stick, man. You probably can, but it might not be the prettiest
statement in the world, but let's explore
that for a second. Let's, let's draw a stick man. Okay, Usually when we
play the Hangman game, we have a head, a body, legs, legs, arms, arms. And possibly he's happy, right? Unless he's being
hung from Hangman. But there's a problem. The problem is most people
don't look like this. In fact, I don't think anybody
really looks like this. There's a lot of
limitations when we're drawing Stickman
this way, right? Like let's say I want to want to do I want to
move this arm, right? Okay. So I want to move this arm. I'm going to show
you the arm could maybe move this
way, which is good. But He's gotten no elbow. Right. Like there's no joint
here. Is missing a joint. He's missing a joint here. He's missing his knees,
is missing hands. He's missing like
the meat of it. All right. So I'm going to show you a system that I made
a little while ago that solves all these
questions, okay? It's going to make this snazzy little stick man into something
that's actually usable for figure drawing. So let's go on over into
it and check it out. I'm jumping around
here a little bit. I actually know
what I'm going to back out just a little bit. There we go. The rule of eight. Okay, The rule of eight is quite simple really in my mind. I think it's simple. And I think you're gonna
find it pretty simple too. Okay? So what we're gonna do
is just draw from top to bottom a straight line and you've got your
sheet in front of you. I hope. So. I'm
hoping you're going to follow me with this, right? So I'm going to draw a straight
line from top to bottom. They're kind of just
bisecting this skeleton. Then I'm going to draw
a line across the top. I'm going to draw a
line at his ankles. Okay. Not bad. Pretty easy, right? I've got one section that is from ankles to
the top of the head. He fits inside. But now I'm going to
do something here that's really important
is I'm going to cut it in half and now
I can measure it out. If I want to have a
ruler or something, I can eyeball it. But I know if I squeeze it from this side
and this side is going to come to the exact same
spot at pelvic bone. So this side, the lower
half and the upper half is going to be pretty
much identical. It changes per
person and we'll get into that variance later
and stuff like that. But for right now, we'll just say this is a
one-to-one ratio. It looks pretty good. That's two sections. Now I'm gonna do the
same thing again though. I'm going to cut this in half. So I'm kinda looking in the
middle here and I'm going to say right around here. I'm going to cut this in half. I'm going to say it's
right around here. Okay? Now on the skeleton, we
can't really tell very well where this line is, but I'll give you a little hint. It's kinda pointing towards
something over here. Okay, so now I've got how
many sections I've got 1234? Well, that doesn't match my
rule of eight very well. So I think you can guess where I'm going
with this, right? So I'm gonna do, cut this one in half and it's right there. Okay, cut this one in half. And it's right there. I'm going to cut this one and-a-half. It's right there and cut this one in half and
it's right there. And now we have our 12345678. We finally have
our rule of eight. The first section here is the
head. The second section. So the head goes from the top of the head to the chin, right? The next line comes down and that's that
nipple line, right? Then it comes down again. And it's actually hard to see
here because it's skeleton, but it's a belly button. And then if we go down
further, it's the crotch. This one, man, I don't
usually use it actually, but it's good to have
a here from my rules. This one's the knee,
mid shin, ankle. So if I was to
draw my stick man, I remember my goofy
little guy, right? Well, I'm going to
draw them here and I'm going to use
this same thing. I'm going to have the head here. Then I'm going to draw, I'm going to use a straight
line and I'm just going to draw it straight
down, straight down here. Just so I've got that
center line again. If I wanted, I guess I could have drawn it
straight to the head. There we go. Okay. So now I'm going to try
to recreate what I'm seeing on this side over here. But what I do is do it
in a simplified form. So the first thing I'm gonna do is have a circle
for the hips. So this circle for the
hips is gonna be there. Next thing I do is
I make a bit of a chevron for the
ribcage and scapula. Scapula is in the backyard. Okay. So how does that look for? A little bit, maybe
one-quarter of the way down. In this section here, I draw this chevron and I'm make it Come all the way down here and it could come
all the way in, touch the hips if you want,
it doesn't really matter. So we're working okay right now we've got
this head section. We're good to go. We're working on the chevron. We're going to put in shoulders. I'm going to add
in the shoulders. And they're right along
this nice collarbone line. The elbows actually fall
on this belly button line. So I can draw my elbows
down to here as well. And then the wrists
depending on the person, but the risks usually fall
here on this pelvic line. So the hands will
fall that as well. Okay. Okay. So now I've got a nice
upper body going on here. Looks decent and it's
still my stick man, but it's a little flushed out. He's got some points
of articulation here and some joints where
he's kinda naked. So what I'm going to put on some underwear on him, a little, superman tights, my bikini
briefs, my tidy wide ease. And with these tiny white is, I'm actually going to
come and just from a almost a 90 degree
angle from that, I'm going to do these
little alien antennas. And then I'm going
to draw a straight line all the way down from them. Okay. And then guess what those are? Those are the legs. And at the bottom of those legs, I'm going to put a little
tick for the ankles are already there and
just put a little triangles for the feet for now. Believe me, we're gonna be going over feet and different
things later and stuff I got. Right now, we'll just make
them a little simple shapes. And right above that knee line, we're going to put in that. Okay. So I went from
having this little simple stick man to something that's actually
pretty workable here. It has the proportions
that I'm aiming for and the articulation
that I'm aiming for. But let's see if we can
put it into a physique. So what I'm gonna do is this bodybuilder is surgeon
who brave and you know, humans have variants are not always symmetrical and all
these types of things. So I'm just kinda, kinda measure things out a
little bit, right? This, this camera angles
looking down at him, just a hair, but I
think we'll be okay. And let's see if I
kinda go top to bottom, middle of somewhere
around there, right. Look actually his
legs look a little short compared to
what I'm going for. I'll make it a
little bit higher, but I don't want to discount what's happening in that region. Want to pay attention to
what's going on there, right? So then what I can do is
cut it in half again. I am maybe I'll go up on that. Just a hair up on that. So we've got one
section, one section, one section, one section. You can see as I'm
cutting through here bisecting these lines. Some of them are not equal. Surge is a person and he's not. Even though he's an
amazing bodybuilder, he is still going to have
some things that are not exactly lining up
to this, right? And we all will, some of us will have a
little bit longer legs, a little bit longer arms,
those types of things, right? But I'm showing you how
you can look at this, how you can look at
this person and pretty much use this model, right? So we're going to just
draw over him a little bit and I really hope you're
following along at this point. Draw the head in here, right? But draw this chevron type of ribcage torso and everything. And if you want to
add that crest to the ribbon there as well,
that kinda fits nicely. Draw the shoulders. He's
got great shoulders. Come down here. Look how short
his upper arms are though. You see how his elbows are high. Come down here, long lower arms. And then he's got his hands. Alright. Okay, I'm going to
draw the hips in here. He's got tiny hips with that little superman
underwear going on. It's a little alien thing
down to my pelvic line. Then I'm just going to draw
this down to the ankle. Right? Now. Give them little nice
little feet here. Those d's. And now what do I got? I've got roughly the
proportions of search new Bray, let's see if I carry
this line over for us and see if I can recreate this right and
next to him. Okay. So I'm gonna kinda just
carry some markers over all of them. Some of them. I kind of messed up there. Most of them. Let's let's call it that. And see if I can
recreate this just a little bit and get his
proportions down correctly. While we've got his
head. Good enough. We've got this chevron
that comes down to here. It's seems a little
wider, right? I want to make sure
it's kinda lining up on both sides that it's got to equal space a little bit, right? He's got big shoulders. Big shoulders that come down
to hens that are about here. So I can just draw that
line if I want right now, nothing's bending so much. But his elbows are a little
high, higher than normal. Here's his pelvis. Superman underwear, and down in to those little alien hips are
going to come down here, drawing the knees and
draw in the feet. And there we have a very
happy simplified stick man. Honestly guys, this is an
amazing way to start to draw. To understand how
to draw figures. We can play with proportions. We can make the upper body this tall and the
lower body this. But no matter what. This is now going
to be in your mind. In regards to figure drawing, It's really important
that you guys get this down because it's, once you get it down like this, it is so simple to
do and it's fun. Okay? So listen, pause at this point, and if you feel you understand
what I'm talking about, pause a little bit more and then we're going to continue on. If you don't get this, I want you to rewind
because we're at about the 12 to 15 minute mark or
something like that, right? And this is a bit
of a longer lesson. There are some exercises
we're gonna go through down, down below here. I want to make sure you get it. I want to make sure
that you are really confident in doing
this stuff here. Just this measurement, there's
just this rule of eight. If you don't feel competent
with the rule of eight, stop. Do it again. It's okay. There's a reason why I printed
off these sheets for you. Why I have them for you, why you're doing it
on video is because you can make as many
copies as you want. You can go through it as
many times as you want. Grab a blank sheet of paper
and go over it again and again and again until you
get this pattern down. Once you've got it down, press play again, and
we're going to move on. Okay, so we've got some
people in motion here, right? And we're going to
try to use this rule to simplify these people
as they're in motion. I'm gonna do, I'm gonna try to follow his backbone
a little bit. His backbone is like this and his backbones like this. Okay. And I'm going to cut it at as what seems like
a crotch, right? I'm going to cut at
the top of his head. And I'm hoping as
I'm doing this, you guys are following along. Alright. I'm kinda doing two
at a time here, but it'll make sense. So what do I do at the midpoint? I draw another line. Alright. And do you see how
these are kinda angled? If it's like this, then
that line is going to kind of go like
that, right? Okay. So what do I do again? Draw some more lines, the head and the belly button, maybe somewhere
around there. Okay. So at this point
because the legs are bending and they're shorter
and there's things happening. Why don't I just draw
in the upper body. I'm going to come here
and trace in his head. We're good to go on that.
I'm going to come over here and do that big torso thing. This is actually looking at
it from the top slightly. So there's gonna
be a little bit of a downward look at that. And I can even throw
in this do shoulders. So I'm gonna do it here too. I'm going to put in that ribcage and scapula and everything. And it goes a little
bit over like this. And we'll throw in his
beach ball shoulders. Down below. We're gonna put in the hips. Okay. He's leaning slightly
forward on his so as he he's overlapping the hips and z I just did
something there and I want to explain that a
little bit further to you. What I did was I drew a
center line that's following the center of this form. Actually this one might be
exaggerated just a little bit. It's probably more like
that how I had it. Now, why why is it
like that there? And when we go up, it's straight down
the middle, right? It's straight here
because it's straight on. Right. But as soon as
you turn to a site, like as soon as I if I have a ball and it's straight on it, it looks
like this, right? But as soon as I
rotate it to the side, it starts to wrap itself
around that center, same center line wraps itself
around that rounding form. And that's what's happening
here. It's wrapping itself around rounding form. Okay. So I just wanted to point
that out, make sure you are. Pretty comfortable
with it. Okay, So from here then we can do our
little Superman things, right? Little
superman underwear. And this actual line should
have been like that. So it's going to come to here, it's going to come back to here. It's gonna come out to his knee, down to his ankle
and then his foot. This one's going to
come to his knee, down to his ankle and then as foot we'll try it on this side. It's going to come to his knee, back to his ankle, back here, and then his foot. This is going to
come to his knee, to his ankle, and then his foot. Okay. Not bad. Let's do arms, elbow, wrist and
back to the elbow. Back to the wrist and the
hand trying it over here. Elbow, wrist and elbow. Wrist, hand. And now the test comes into it. Can we recreate this in a simplified skeleton
next to it if you want to throw it on pause
so you don't have to hear my voice as I'm
talking you through it. If not, let's get going. I'm gonna do this nice
same curve, right? I'm going to say, okay, this is the crotch
pelvis. Here's the head. Here's that midline, right? Here's the chin, Here's
the belly button. So from this midline, eyes will put his head in here. Kind of doing the circumference
thing there. Again. He's got his shoulders here. Big chevron thing going on here. That middle
circumference line here. The hips are back here. And then they come
out two legs here. This leg comes down here, comes out here, and
then hits the foot. This one comes to the knee Here. It goes back to the ankle.
It's the foot there. Does elbow comes back this
way and comes forward, and then the hand is there. And this one comes over here
and into this character. And there we go. So what do we think? If we, again, we remember that the circumference line is
something like that, right? And even works on the face because his
head is slightly turned. Right. Let's go on to this next one. Let's see if we can
recreate it again. We've got this line
flowing like this. Let's see if we can follow
that line right beside. Here's that crotch,
here's that head. Here's the bisecting line, the nipple line.
Here's the headline. Here's the belly button line. Okay. So I've got his head
in here and I don't know, he looks worried, but he's kinda not too far off centered
there or something. Maybe looking down a little bit. Then got his shoulders
are his clavicle here. That's a pretty big ribcage. It's coming around this way. He's got pretty big shoulders. They're sitting
over here and here. His hip are here. And the center line,
remember it goes like this. And then like this we can kinda see a little
bit of movement there and goes up into his underwear,
something like that. Alright. Everyone
staying up top. We can come down to his
elbow is ankle, his hand. Back to his elbow, wrist. And as other hand, There we go. This head looks a little small. That'll work. Okay. So now what we could do is
do a little alien thing. Alright. We're bringing
it down to this knee. Back to the ankle,
out to the foot. This leg gets planted. This knee down to the
ankle, down to this foot. There we go. I made them a little taller
than I should have had. Probably cut this leg a
little bit shorter and stuff. But that's working. Our rule of eight, our stick man is starting to get moving a
little bit, right? Just remember that once we
start to rotate things, we've got that rotation
going on here, right? Okay. Okay. I hope you guys are
following along. I hope this makes sense for you. I really enjoy this. This is really, it changed how I approached figure drawing once I learned all of this stuff. But it can get kind of
complicated sometimes, right? So I like to follow the spine. This one's not too bad. But this spine is wonky. Here's the head. Alright. Here's the pelvis area. Belly buttons here and
the breasts are here. Look at that bend
right from here, here, here, here, here, like you
would a gymnast, right? And that's why I chose her so that we can
practice on something difficult. Okay. So why don't we start easy and draw the hips in there. But this is the underwear
line from the back. A little different
but it still fits. Then we've got below the chin, we've got our chevron. We're looking at it
a bit from the side, so it's not exactly
how it should look. But we can mark it by
doing something like that. If we want to go
back and you can even mark those and have
this as the ribcage here. This is it gives us a
nice little form to it. I used to do it when I was starting off,
I kinda dropped it. Now, I should remember that people appreciate seeing
that in there sometimes. So here's a shoulder, there's one shoulder
back there and there. And then this head, instead of leaning
back, this head is looking straight on. She's looking back but
the head is straight on. Okay. So this upper body, Let's, before we go into lower body, why don't we try to recreate
this, something like that. And there's the head, the top of the head,
there's the pelvis. We're going to go up
through the middle here. That'll be the breast line, the chin, and somewhere around
the belly button, right? So we're going to
try to recreate this and put that pelvis in there with the back
end of the underwear. We're going to come
below our chin line, draw in some type
of ribcage here. And you can see like if we
were to follow her center from the collarbone
down through that rib, it would look
something like that. I can use that as my marker
to draw that that piece. Shoulders are set back. Head is here. Okay. So now we'll continue
with the upper body. Back to the elbow,
back to the wrist, back to the elbow, back to the wrist and then the
hand and then the hand. This one back to the elbow. We can see it back
to the wrist and hand Back to the elbow. We can see it back to
the wrist and the hand. So that's the upper body. That's a complicated pose, but we're doing it. What's interesting
though is on this one, we could see her front and
then she's twisted around. So we can see the back. That's, that's a gymnast, right? That's the flexibility. We're seeing the bud crack
back there or whatever, right. So that's how much
she's able to contort. Now from here, we can come and draw our
little alien things. And this is going
to come down to the knee, down to the ankle. And you're going to see
that this measurement and this measurement from here to
here is pretty darn equal. Not for everybody, not
to everywhere, right? But for a lot of
people that upper leg, the lower leg ratio
is about the same. So if I was to draw
that over here, I might just come down like this and then cut it in half
and say that's the knee. Right. Then I can have the foot. I'm going to bring
it back to the knee, up to the ankle, and
then up to the foot, back to the knee. To the ankle, and
up to the foot. Not an easy pose, but if you're following along, I'm hoping you're
getting it by now. Last one, guys. Okay. So what are we
going to do here? We go top to maybe midway mark. That's the easiest marker. Can we do the bottom? Yeah. But the knees
slightly bent but that might still work. Top to bottom. He
doesn't seem to be two legs bend more than the torso. So I always like to do the
top and just measure it out. Midway is that nipple point, belly button, chin
measurements strong here. This one is messing
up because he's bending his knees,
but that's okay. So why don't we do the hips. He's got a big hips here with the is Superman thing going on. We've got a big torso here. Alright. He's leaning
forward just a little bit, so there's some some extra on their shoulders are
back coming down to the elbow to the wrist
and the hand back to the elbow to the wrist and
the hand is head is here. There we go. Now if we're going to do legs, bring it to the knee,
down to the ankle. And then the foot is when
it comes to this knee, back to this ankle
and then this foot. If I'm looking for the
circumference of the, everything seems
pretty equal here. He's kinda got this
twist going on here, slight little twist,
and it straightens out. Let's see if we can recreate it. Pretty simple. He's
going like this, right? I'm gonna go top
here, midline here. Cut, cut, cut. Pause for a second as
you catch up with me. Alright? So this is the waste. This is the top of the
head. Here's the head. I can add his head
roughly in here. I can add the hips in here. I can add that big
Chevron torso in here. It's going to have some some top of it
because we're looking down and those shoulders It's big boulder
shoulders there. If I wanted to, I
can make sure I add this little bit in here. Okay. So he's got his
underwear going on? Because we put under our wear
on all our stick people. Then. Now how do I want to measure out the legs? It really depends. I can just ones in the front, so I'm going to come down here, hit a knee, it's
going to come down to the ankle and then a foot. This one's going
to come this way. It's coming forward actually, then this is going back. It's smaller than the
foot goes behind. This comes out to the elbow, back into the hand
and the wrist. This one plants down. Alright, and if I wanted to, I could just planted, here's
a hand halfway as the elbow. How cool is that guys? I've made the sheet
for you so you can practice and bring it
from the stick man that we started with into a stick man that uses
the rule of eight and has tons of movement and points
of articulation to them. So that you can now use this, bring it forward, and start
to draw figures of your own. My advice, make
sure you go through this sheet at least once. Feel comfortable with it. And after that, start grabbing
other references and have another sheet of you just
practicing exactly this, looking at something
and trying to recreate it in the simplified skeleton. This little simplified
stick man rule of eight. Dude. This is what I want you to do. This is a big unit and it's
really important to get this down before you go
any further in this class. If you can't get this right now, stop, pause, step away from
whatever you're working on. Take a breather and
come back to it later. Do not progress in this course until you really feel
comfortable with this stage. But once you do, once
you feel good with it, well, we're going
to have some fun.
23. Understanding Line Of Action: Hey guys, I'm back and I've got another
unit here for you. This time it's a continuation of our stick man and we're going to talk about line of action. Now. Hopefully, I'm really hoping by now you spend a lot of time
going over and over again, getting used to that rule of eight in that
simplified skeleton, that's simplified stick man. If you don't have it, do not do this unit. I can't emphasize that enough. I need you to really
have that to be able to grasp and to roll with what
we're about to do here. So please, please, please,
There's no reason to rush. This is video lessons. You've got this less than
you purchased it, right? So just take your time. Make sure you've got it. Okay. So the line of action, we already hinted to it
when we were doing those exercises in
the previous unit. Basically following the spine, but it's a little
bit more than that. On the worksheet
I'll provide you. You're going to see how I
just did that little line. I want you to do the same thing. Try to find the action
with that line. Okay, so do it a few times, see if you can like there's
that spine and the head. Let's see if you could
do it for like from the heel all the way through. See if you could find that. Actually, you know what, why
don't we go through all of these and kinda find that spine. This one's a little
different though. This one's going to
come up. Okay, and I'll explain that
in a little bit. This one comes this way. This one also comes this way. And rondos doing this way and she's kinda
doing this, right? Okay, so that's the first step. This is a line of action. And what that is
doing is saying, well, this character
is moving this way. And you can play with it, you can bend it, you
can move it around. And especially when we get
into illustration work, and especially cartoons,
you're going to see how far the line of
action can be pushed. So one thing is like kinda
finding the line of action. Next thing is drawing within it. So we do the same thing
as we were doing before. We go top to bottom. The middle point, the
middle point of that ahead, the belly button,
the nice, alright. And if I'm going to
go in here and I add the hips while I
can almost pretty much go here to the knee and then down to
the ankle and the foot. Like I can measure it off this way and measure
it off this way. Alright. Same things
happening down here, down to the knee, to
the ankle and the foot. Up here. I've got that Chevron, but from the side it's it's kinda looks a little
bit more like an oval right shoulder
here and a shoulder. They're L2, the elbow to the
wrist and up to the hand, back to the elbow, to
the wrist and the hand. And then the heads
from the side here. Alright. So that is my line
of action, right? It's, like I said, it's
going like this, right? What if we bend it
a little bit more? What if we push that just
that little bit more? Let's see how that looks. So I'm going to go top
to bottom and mid. Cut it again and cut it again. Right? Now on the top half will do the belly
button and the head. And what are we gonna do? Well, here's the hips.
Previously the hips. Listen if you want
to just recreate this one first and do
this exercise after. But I'm trying to show you how to push this line of action, but we just angled it a
little bit down further. And what we're gonna do
with this hips is we can have this knee
coming back further. And there's leg
coming up this way, coming down like that. Okay. So do you see how we
just exaggerated this? Actually, I want that foot
to go back like that. And he's running now. I've got the torso in here. I'm going to put this shoulder here in the shoulder
even further back. So I'm going to
punchy like that. I'm going to put
the hand up here, connected halfway and
put this like that. And his head, I'm going to have like this. And there we go. So now look at the speed that, that shows this was speed and now this
is even more, right? So we're understanding
the line of action, then we're pushing it
just a little bit more. And that's what this
exercise is about. I'm going to come in here and zoom into her
just a little bit, see if I can move it on over. There we go. And we're gonna do the
same thing we always do. We're gonna go on top to mid point maybe and
maybe even bottom here. There's one that
might work right slightly bent legs
but that's okay. Breast line or a middle line. Lift that up for her
just a little bit. All the bisecting lines there and the
bisecting line there. I'm going to bend
that even more this time. Drawing the head. Why don't I do that here? The bisecting lines. Half, half, half and half. So I'm going to draw the head. I've got chevron here with
the shoulders, right? I've got that Chevron here. With the shoulders. I've got hand here, hand here, and I can
just connect if I want. But I'm going to put these higher up and connect this way. There we go. And then
we go in here we've got her crotch area with some
underwear on her. Right. So I'm going to go here given
the girls some underwear. And then her knee is here
and it's digging into the ground like it
comes out to here, to here and there's the foot. I'm going to put it out
here a little bit more. Come back here and see if I
can square it away, right. This comes to the knee, back to the ankle and the foot
is about to kick. I'm gonna put this
back here, wind it up. So you can see I'm
actually using a bit of a directional thing. It's going further back here, winding it up. And there we go. So she's here and she's looking down at this ball, right? Okay. This is what I want
you guys to do. Master it, to be
able to copy it and then play with it
just a little bit. See what you can do. See if you can bump that
line of action, just that extra little bit. See if you can get
anything funky out of it. Okay. So how would we divide this? Well, we've got this
light of action. We can go here for the
crotch, I guess, right? I'm looking at the landmark. It's actually goes
more like this. Now I look at it. That's the midline,
midline, midline. And you can see how once again, we're learning how the line
of action bends like this. Then these partition lines will fan out and
splay out like that. Okay. So we've got the ankle, we've got the hip
here halfway is the knee even if I can't
see it through these pants. Here's the hip here, right? Here's the ankle,
halfway is the knee. The hips are in here. The torso Chevron is in here. The head obviously
right here. Alright. So what would I do to
punch this harder? Maybe the difference between
these, I don't know. What I could do is hook it
up this way more, right? And just say, okay, well, here's my my top and bottom. And then the bisecting lines, the ankle up here. And then I'm going
to have the hip. I'm down here, so roughly
equal length, right? I'm measuring this out. So I'm going to say, okay,
well, that's about here. Foot foot. Knees are about halfway. The hip is here. Torso, Chevron is here. And I can draw that
circumference line if I want. It's going to be like this. Maybe her underwear will
be something like that. Right? Okay. I'm going to bend the
head and even more. There we go. Then I can
add in the shoulders. I'm going to take this hand down and bring this one up like
this. So it's kinda like this. It's going behind her
and it's hard to see. But yeah, look at
that. Now I've got this power up that high. Again. Sometimes it works,
sometimes it doesn't. I don't know if I would, uh, once I draw it in, it
might look a little bit. Actually, as soon as I did that isn't connected that
with the pants, with the pens here
in this coming down and coming like this. That would actually be a
really cool shot, right? But right now we're still
playing with skeletons. So I want you to goofing
around with this, getting used to finding it. And it really, it should
be this fast now guys, it should be like bang,
bang, bang, bisecting. Bisecting, right. Searching for the landmarks
of shoulders, hips. Bring it out to the knee,
bring it down to the knee, down to the ankle,
out to the foot, back to the ankle,
out to the foot. Like this should almost
be like nothing. Now, you get what I'm saying. Like it really should be
pretty easy for you, okay? That's what I want you to do and then see if you can
push it over here. Come over to this next slide. Same type of thing. Top, mid. Here's your bottom.
Where's your, Where's your bisecting parts? Right? Here's your midpoint. There's your midpoint.
There it is. There it is. Right. It seems like he's got
a longer lower leg or could just be the
angle here, right? And what do we do? We start to draw. We
start to draw in his, looks like his circumference
is kinda more like this. If I was to draw what's
happening here a little bit. And then his head is right here. So the circumference on that be something
along those lines. And then I go in. This got the shoulder
to the elbow and he's kind of being all cool
back in the days, right? Back to the ankle. To the knee, to the ankle, foot. And if you take away
some of this stuff, you can see what these
poses are showing, right? You could see clearly this
person is running and in fact, this one looks even
better, right? You can see clearly this person
is kicking a ball, right? Lining up the kick.
And you could see how just a little
bit of movement, a little bit of extra
push on that line of action helps sell it even more. And we've got that over here. This one we haven't
done yet though. I'm part of me wants to do it and part of me wants
to leave it for you. I don't know. I'm I'm kinda
I wave around that sometimes because I feel like sometimes when I walk the students
through too much, it becomes not that it's too
easy for them or anything, but it just becomes like the
teachers leading it, right? So I want you to do that bend. Here's this bend and we
just bent it even more. I want you to do that Ben there. What do we do in here? Do this bend more? Alright, I give it, give it
more of a bend with Rhonda. Bring her forward. So how would you
do that? How would you bring this forward? Just kinda did it, right? It's she's already
pretty forward here. Right. But do you see how this this intersecting just
punched it forward, right. So if I was to do this, I'll have to do is find that. Here's the mid and here's
her crotch, here's the head. Here's the midpoint, right? Something along there. There's the head there's
the belly button. Where do you rough it in now? Right. Well, I'm going to say
torsos right around here. Roughing it right now. The head is gonna be
right around here. Shoulders coming forward,
is shoulders coming back. We can see this
circumference lines here, so it's actually
going to come here. Then. This is how that part looks. Hips are straight
on it actually. So it's kinda going like that. And the circumference
lines may be around the front here somewhere. Then we bring this forward. One to me that hadn't
really big, alright, bone. Okay. This one is going to
come back. It's caulking up. There we go. So this is what I
want you guys doing, whether it's on the sheet
that I've given you here. I hope you go through
it at least once. Once that I want
you to doing this, doing it once, copying the line of action
that's presented here. And then once again, pushing that line of action into something just
a little bit more. You know what the
funny thing is though, when you push the
line of action, eventually it's going to break. That line is going to
bend it way too far and you're gonna get
something that's way too far out there and you're gonna be like, Okay, Hold on. This is taking away from what
I was trying to do with it. But that's what you
should be doing. That's what I want you to doing. Exercise on a blank
piece of paper is to take this line. And here's one. Actually, I'll do it in red. Here's one, here's
two, here's three. Right? Bend them all the way forward. In that full lien, what would it look like
with our stick man? With these lay eggs
being moved up and he's just he's just running the road runner or
something like that. Right. How would that look? How does it look if you
really bend that for Michael? Push the line of action
until it breaks. Push it every time
until it breaks. And then you start
to learn and say, Okay, well that's how far
I can push that, right? But you don't know it
until you push that far. So guys, I've laid
it out for you here. This is the line of action unit. You can play it safe and just do the things
that I've shown here. Or you could take
it to the next step and do what I'm talking
about right here. Pushing as much as you can and really seeing where it
can go until you break it. And then once you break
it, once you broke it, you just back it up and say, Okay, well, that was 100%. I'm going to backup back to A25. And yeah, there you go. Looks freaking awesome. This will take the static out of your static
and stiff poses. This will add much more
than static into it. There'll be electric
guys, okay guys. So that's your homework. Please, please, please please
please do this because I don't want you doing the next unit without
having completed this. These units we're really
building on each other. Okay, So get this down, get comfortable with your rule, elevate your line of action. And then you can move on.
24. Figure Drawing Speed Exercise: Hey guys, I'm back and I've got another
unit here for you. This time we're going to work on some quick poses
for our figures. Okay, before we get into that, this is my little disclaimer
that when we're doing figure drawing and especially using a lot of pose
references and stuff. Occasionally know, often
will run into nudity. There's gonna be a lot
of nudes going around. Now you can do certain things to avoid
them and stuff like that. But the best way to draw the human form is to
see the human form. So if nudity bothers you, I'll show you a little
workaround for it. But in general, this unit, most of it is not
going to be for you. So just keep that in
mind that it's new, that he's part of this, this part of the
learning process. Okay, So I'm going to show
you a couple of websites here that are going to eat
us in what we're doing. You're going to, you're
going to need to visit them to do what
we're doing here. After you're done
this unit TO case, to sort of continue
on these studies. Don't worry, don't have to pay for them. They're
nothing like that. I'm not promoting another
website or anything. You can actually do this
type of stuff in person. But that's even
harder to coordinate. So first one, let's just work
with this is quick poses. Quick poses.com
allows you to pick different types of challenges and the intervals
that timing, right? So 60 s, 30 s, whatever it is. I like the Warriors, I like the femme fatale files. Let's do femme fatale us know warriors going
with lawyers. And all I have to do is
click warriors and start. And there you go,
I start drawing. Okay, Now I'm not gonna
do that on this session. I'm going to use
this other website. But now you know, that's
how easy it is to set it up on quick poses. The website I'm going
to use for this is line of action.com. Okay. And it's very similar. It's just a matter of
preference, right? Which one you want to work with. But this one gives me a
little bit more variety. In my opinion, I get
to choose things so I can choose the
covering clothing. Nude models, covered
models are all models. So of nudity is your issue. You should probably
just go to this website and click on only
covered models. And then stop
watching the rest of this unit because I guarantee there's gonna be
some flesh coming your way. Okay. Also, do I have only female
models are only male or both. And ages. Obviously, this, we
won't see nudity, but whatever I can do, the class mode are
different lengths. So this could set up the time of the intervals and how
long it goes for. And so here my 60 s, 30 s to minutes, five or I can Determining
myself, right? So there's a lot of
options going on here. And yeah, we're
gonna get into this. I hope I'm going to
set at 30 s here. Sorry that thirty-seconds. And we're going to get
drawing here, okay? Okay. So all you need is a blank
canvas in front of you, whether it's a piece
of paper or whatever, whatever works best for you, and a pencil pen,
whatever is going on. We're gonna do
these pretty fast. So when I say go, it's only 30 s, right? So what you're gonna do is draw your quick line of action line, then start to fill in
the simplified skeleton. Ready? Let's do this. Okay, so we've got this. I'm going to cut it. Right. Thrown her hips,
throw in the torso, shoulders here,
rough roughly there abouts her head's
leaning back, right. One hand is here
when a hand is here, and bring it out
here and connected, bring it up here and
connect it over. This is where her stances, her weight her foot's
coming up this way. There we go. Oh, and that's how quick
I didn't get to do that. Next. Bottom, top, mid, leaning back, leaning way back. Shoulders are relaxed. They're hanging
down, straight down. There's a hands,
there's the elbows. 1 ft is here, the other foot is here. And look at that
simplified skeleton, but she's looking
this way, right? Okay. But one I can start to add in my body details
or something right? Next one is a Spider-Man. This one's tough. Okay. So I'm going to do hips, torso, head, over
into the shoulders. This is going to come down
into a hand here, right? This comes over into a knee, back into a foot. This comes up into a knee, back into a foot. Hand is here, comes
up to the elbow and over the head is here, and that's the center
line of the head. There we go. That actually
worked out pretty good. Tough one. Especially because
it's on a bit of a like it starts to
taper down here as it gets closer to the bottom
part of the camera. The shoulders are a little
bit more angled here, so it's up like this. This one comes over,
comes up here. This one reaches up to the sky. She's looking up there. Okay. This leg on the hip came forward and I
didn't even finish next one. Pretty simple. Hips, torso, head, leaning back. One leg comes up
and down this way. This leg comes up and
down and it's off screen. The shoulder comes down arm. And likely the other shoulder is see-through and its
arm back there. You can add certain
lines, division lines. Oh, this one's interesting. Torso. I usually start with
the hips because they're kinda that midsection. Their shoulder are coming
up to the hand up here. Right? This one's coming down, splayed out to the
hand down there. He's got this one that comes up and attaches on
to the foot there. This one comes forward
and it comes in, attaches to the foot there. And he's got this rope
that's dangling there. This is too simple, so
I'm going to skip it. There we go. Guy with a
bit of a Lean going on, sitting on a chair here, right? He's got his Chevron up here. Look how quick we get to be able to do these after awhile, right? Should be really this quick. His hands here means other
elbows here, coming back. This leg comes forward
here into the knee, back onto the chair. This one comes forward down
and then back onto the floor. And if I wanted to, I could flush out this
chair a little bit, no time coming down. This one's kind of interesting. The Chevron, the hips. This one comes up to ankle and then the foot
is out this way. That foot's missing, can't see it right now, so
it's out of view. This is the head here. This is the back. I'm going to place
both hands here. Elbows, back to the shoulders. Right? This has her back,
her bum. There we go. This one is a seated so
dude is just in there. I could do legs first. This one's crossing
over to the foot. This one's coming up to the
knee and back down again. His both hands are
gonna be here. His torso is here, shoulders. They come down to the hand, down to the hand as head
is resting on their right. These are tough guy is
like if you're keeping up with me, I'm super impressed. I'm not in love with that one. Let's switch it up. Switch it up again. There we go. Nice and classic, right. So line of action. Here's the shoulder, shoulder, head, looking up this way. Knee comes down this
way into the foot. His elbows here, so it's here. And then his hand hangs down. This comes forward, this leg and then hooks the foot behind here. This hand is here for support and that's
how easy that is. Okay Guys. Cool. That was fast, Fast and Furious. And some of them I kinda
didn't finish right. Like they were getting a
little tough at times. I get to say
thirty-seconds is fast. But if you get really comfortable with
your simplified skeleton, you should be able
to do it, okay? There's not a lot
of detail here. What do I do first? Determined the line of action, basically looking
for that spine, that angle right
after I've done that, while you see 90% of the
time I hit the hips first, there are the midpoint
just above the mid point of halfway when I do head
to toe and then middle. All right. And then I start
saying, okay, well, we're where's the Chevron of the torso and stuff
where their shoulders. I sometimes even plotted
the hands and saying, okay, the hands are
here and here and here. And then I start
connecting things, right? Whatever works for
you, keep doing it. If you can keep up with 30-second poses like
this, it's working. If you've got to start at 60 s. That's cool to like honestly, nothing wrong with
going at 60 s. Do that for awhile. Then see if you can bump it. Do 60 s and if you're
finding it's too slow, but 30 is too fast while at 60, what you start to do is start
to add in more details. So you start to say,
Okay, well, here's my, my chest line, Here's
the belly button line. Here's this. You can start to
add in a little bit more of what you
like some important, Here's the underwear line
or something, right? So here's the
underwear line, this, and you can add in these details that when you're
drawing it later. This was a female Spiderman. You can start to add in musculature and all
that kinda stuff, right? Okay. So if you have these
kind of landmarks going on, then you can start to oh, another one would be
like the ribcage. Right? Where's the where's
the ribcage on this? Right. So guys, if if you get longer
than than thirty-seconds, make the usto use of it. Like if if you got the chance, add more stuff, right, nothing wrong with that. Put more stuff in there and
then see how much you can pack into 60 s. This is a
bit of a tough exercise, but it's so much fun. Honestly. I haven't done this
in a few weeks. I'm kinda rusty here. But really, if you're
gonna kinda throw one fun figure exercise
into your weekly regime. Go to those websites. Do this for one was
that it took us about 5 min maybe or
whatever once we got going. Alright. Okay, 1 min per figure
if you're doing it and do six to ten figures, right? So there you go, six to 10 min. And doing that almost every day, you're gonna get so
comfortable with quick, quickly drawing figure
work and stuff again, and especially, especially
this simplified skeleton. Guys. I hope this was helpful. If some of you are lucky
and live in bigger cities, well then you could
do this live. That's right. They have figure drawing
sessions like this. Live, even timed like this, 1 min, 2 min, that
kind of stuff, right? Personally, I prefer photos because give me a better angle. Sometimes sitting at
the same drawing desk. I don't always love having that same
perspective and stuff, but having a live
model in front of you. I've enjoyed that lots of times. It's really interesting and it's a different
type of challenge. So if it ever pops up,
take the opportunity. I hope you enjoyed this and I really hope you're going to
send some of these off to me. Whether it's the ones
you did following along with me in this class. Even if you paused, it's okay or it's ones you've
done beyond that, I just want to make
sure you're doing it. And I wanted to see
some of these fun, funky looking skeletons
have fun with this guys.
25. Drawing Characters: Hey guys, I'm back and I've got another unit for you here. This time, we're going to tackle drawing some
familiar characters. Okay? We're gonna take a
lot of what we've learned up to this point and just play with some basic shapes and see how it works for us. Let's see who do
we got first up? Johnny bravo. You can see already, I've
kinda drawn this out. You can see some of the
shapes I used, right? I'm going to draw
over top of it and I hope you're following
along with your sheets. So I'm going to draw
this chevron here. Kinda, kinda look for a bit of a weirdly shaped
rectangle, right? Gonna come down here and
use a bit of a tube. And then some quick little
rectangles down here too. Let's see if I can recreate
that on either side depending on what feels
comfortable for you. See if I can wider
than that. Right? Okay. And I hope you're
following along. I'm going to have this head
coming up above here, right? I'm going to have this weird
bell-shaped coming here. From there. It's going to come down
into two little sticks. If I want to. Sometimes
what I like to do is just kinda lock in the hands. I'm gonna kinda
block in that hand and block in that hand. Then I can look
at his shoulders, look at an elbow, kinda hunt down
from there, right? Maybe an elbow would be here
in this helpful would be up. So it's gonna kinda go like
this. What do we think? Are we? Does this look
like Johnny Bravo? Well, I've got it all
plotted out, right. So let's see if I come
into it a little bit more. Okay. So I'm going to add
some details in here. Why don't I start with the face faces and easy place to mess up. So I'm gonna see if, if I don't mess it up, right. Come here and right
along this line here. He's got these cool
little sunglasses, right? Nose, ears come off
of that line there. He's got this cool hair
that starts to go up. I'm going, it comes
up even more up here, sweeps up here and
starts to swoop on down. Okay. So I've got Johnny bravo there. It's going to come
up from his neck. I feel like his head is
a little bit too small. Maybe I should've enlarge
that a little bit. Comes down to its neck here. And it goes out like that. Then the traps come from
behind out to the shoulder. And I'm going to use this kinda sleeve here that comes in. And he's got a nice bending, bending line here, right. Here's the tricep,
the upper arm, come down into a
simplified shape. Maybe I'll clean that
up just a little bit. Simplified forearm into his hand and comes like this and I'm
kinda following that form. It's got one finger
that coming forward. Back like that, comes out
to the thumb. There we go. Okay. I'm going to use this sweeping
part of the rib-cage. Comes here. Then it drops down into his hip. This part sweeps all
the way over to there, is t-shirt seems to
follow that line into this little hip line that
comes down to kind of bends down into this cuff
and then pens up crotch. This one does much
the same actually. Sometimes after I've
roughed it out like this, it's good to just kinda do it for me for use it as
a landmark, right. Comes down to there.
Come down to there. Might as well come on this side. Straight arm down to their
forgot that little cuff here. Up and over that shoulder, upper arm, lower arm, forearm. And it comes into the hand. And he's got these weird finger positions
and stuff, right? The hands kind of
blocked in his shoe. The shoe is kinda wide one. And this one has this little
snazzy type of look to it. Okay, so what do we think of this version of Johnny Bravo? Right away? I think
what I should've done is widened it out more. He looks a little too slim. My original bravo that I drew. He was a lot wider. So I want you to take a
look at yours and say, Well, what did I do, right? I think overall this ape-like
features are pretty good, but I actually think
I did it too much. I think I angled him
down too much in this coming down to his his knee. A little bit too far from me. It should have been closer
up somewhere around here. Right. So I think my angle my initial angle
was off a little bit too. It's always good to
look at it and say, Well, what did I do right?
What did I do wrong? I'm hoping that you took my original sketch there and it better with
it than I did. But really know, if we
zoom out, it looks fine. We're just being a little bit hypercritical here
and stuff, right? So no need to get too
worried about at all. So we're gonna go to
Charlie Brown next. We're gonna do that
same kind of thing. We're looking for shapes. So what do I say? I could even measured
if I want this. And you know, sometimes
those circles are hard, so do it until we've been
practicing circles, right. So do it until it works. Then he's got a little
neck coming down below. I like doing a piece
by piece sometimes. Then he's kinda got this, this triangle thing
going on, right? He's got this and
it cuts off there. But that's the general form. It looks like a simple null. Then it comes into pigs below. Nice simple rectangles below. And then these flat no beaver
tail feet type of thing. Okay. So I've kinda roughed in Charlie Brown if I wanted to, I could rough it in even more. His eyeline is
somewhere right here in that middle middle
piece goes there. And now I start to
come in and say, Okay, well, this is supposed
to look like, right? I could start with some
details like that. Swirl. Swirls are kind of funny, right? Sometimes they got it
back it out a few times. So I'm gonna come
over on this side. Come around, come up. And around this side. I think I caved in his
skull a little bit on this side a little
bit. That's okay. I can come up at night.
Just bump it out. Then his ears are going to
be right about here. Right. Okay. So then we come from here
down into the neck and then we've got this shirt color going on and that
gives us that break. Because like I said,
we did this blue form, but that's actually
not the entirety. That's not really
his form, right. It just kinda is the
outline of this form. Comes on this side, comes
out to a sleeve and up we can stick his hand
and a little pocket here. And we're going to
come down out there. His shirt. It's
going to be there. And then if I want, actually, I think a shirt goes a
little lower than that. Here we come. And
then if I want, I can start to add
those details into it. The squiggle, that little Charlie Brown Shirts
squiggle, right? Okay. I'm gonna come
down here and add as little ankle socks and then
that weird beaver tail, beaver tail shoe with
a little loops in it. And come out here and
had the same here. Maybe I'll clean that
up a little bit. There we go. Okay. So what do I think of my secondary Charlie
Brown? Not bad. I think if I was to
rework anything, I'd probably reworked
the nose a little bit. He looks a little bit
too angry and stressed. Right. So maybe
I'd come back in. Maybe it's the eye position. I think the eyes could
go a little bit. You know what, I think it's
the size of the eyes to see. Smaller eyes seem to be
the Charlie Brown thing. I also don't love the
squiggle I gave them. I think that's
making them angry. I can play with this a lot. They're right. Charlie Brown looked
like Charlie Brown. Generally speaking, I'd say yes. I think I should have
went with more of a circle rather than oval, like I can see right now, this is looking this way, whereas it should have been
looking more circular. Backing out can sometimes give you that nice perspective on it. Okay guys, our last character of the day is the lasagna loving
man himself, Garfield. And what shapes do
we see in here? What shapes are we
looking at with Garfield? There's kind of two particular
shapes right there around. So we've got a round head here. Alright. And then another around body. So I'm gonna do this
around head here, and then another around body. And then he's got
these kinda around sausages for feet going on
here, something, right? So if I kinda track this down, it's right below here. It's going to cut this large
round sausages for feet. And he's got his
hand here and there. What do you think? Is that kinda you think
this is gonna give us our, our main pieces of
what we need from Garfield that we're able
to draw him, right? Let's get into it and see. So sometimes I like to start on certain
features with Garfield. I think if we start on the eyes, being a little wobbly here. No, see, I think coming around. There we go. Coming around making
sure you've got that nice round shape.
And he's got this. I'm extremely bored of
u expression, right? That's what Garfield
is famous for. Okay? I think right there, we've already got Garfield. Then we can come out here and draw one ear a
little bit rounder. One ear, one here. Kinda have this connection. That's the depth of the
ears. They're right. And Garfield seems to have these noting hair or something. They're coming on this side. And it actually, if I can follow that a little
bit better at all, follow it all the way
in and give them a bit of what would pass as
a neck for Garfield. And then it bumps into the
back of the neck there. Couple little stray hairs. We've got the back of
the neck and then we've got his bum following that. We've got the belly, which is also hanging here. And then we might as
well come here and have the one finger
or two fingers, three fingers, and then
the back of this poem. And you see how I kinda
follow the hand on that. That was nice and
easy to follow with. It's going to come back up
here and give it a little bit of I don't know. But Chubb around the armpit. I think that's what
Garfield has got going on. They're going to bring
that leg down, down. So I didn't actually
have to draw the legs in here
because they kinda connecting to the foot. Alright. So I liked doing the
top of the foot for Garfield, was a
little bit too far. Maybe here, here. Then here. Then this other one
is this other leg is here, comes forward and
does the same thing. It's gonna go 123. And then what? Garfield the cat, sometimes we forget
that there is this tail comes out the back. Then we can start
adding in all of these effects for Garfield, the famous Garfield
squiggles, right? What do you guys think? How is your Garfield looking? Is it looking close to mine? Closer to my original one? What do you think? I think this one worked out? Well, I think I'm missing a
little bit on this side that that head could I came a little bit more this
way or something, right? There's there seems to be a little bit something
missing there, right? But overall, I think we did a pretty good job on these characters,
recreating them. Alright guys, this was a lesson in looking at some
of your favorite characters. Then using lessons
from before of hunting down shapes within them. Whether they're kind of a basic circle or a
little bit of an oval, or even a Chevron or rectangles. If you can hunt down the basic shapes
within the character, you'll be able to recreate them. I hope this was fun
for you and I'd love to see what you've got. Take your work here,
send it in to me, and let's see if you can
point out without me even where you kinda went right and where you
might have went wrong. And if you can't, don't
worry, that's what I'll do. Just like I looked at my own here instead of me. It's good. I can always use a
bit of a nudge here. Hope this was fun for you guys. And you know, even if you want
to take it a step further and grab one of your
favorite characters. We draw them and send it to me. I'd love to see him.
Have fun with it guys.
26. Drawing Figures In Perspective: Hey guys, we're back and I've got another unit here for you. This time, we're going
to talk a little bit about drawing figures
with perspective. Okay, so we're gonna take
some of what we learned in our lessons on drawing things and objects and perspective
and apply it to our stick figure in front of us. We've got a little
bit of a figure, a figurine or like
an action figure, whatever we want to
call it and stuff. And I think that having
live models is great. But having something like
this at your disposal, it's a nice little
trick to have, right? Okay, So what we're gonna
do as we normally do, is we're just going to draw
a line from top to bottom. And if we want, here's the top. Here's the bottom, right. And I'm gonna put a
line of that hip there. Okay. So I've got that. And if I really want to, what I can do here
is make a bit of, a bit of a box around it, right? I can do something like this. Right? There we go. And that basically means Here's the upper part and
there's a lower part. And if we look at the
sizing difference, we've already talked about this. This is basically
one-half and one-half. This figure has got a
little bit shorter legs than, than the top. It's got a little bit of
a fatter head actually. But that's pretty common with
action figures and stuff. But St. Louis, it
still works, right? It works for what
we're doing here. Now, why don't we head
back into the next figure here and see if we can
do the same thing. So I'm going to draw a
line down the middle. So if I do the same thing and I kinda drag it over and I go from the head over from
that marker on the crotch, they're down towards
the ankles down here. You're going to
find that because it's angled slightly this way. We're going to have
a slight difference. Now these legs are gonna be longer and this upper body
is going to be shorter. Did the length of
these items change? No. But because our
cameras sitting a little bit lower and looking up, it makes this part look much
larger. And you know what? When we go over here, I bet you it's gonna
be the same thing if we cut this across, cut this across, cut
this at the ankle. We can see this is
even more extreme just because the camera is probably a more extreme angle right? There is the upper,
There's the lower right. So shifting the
camera angle around can definitely change how
the proportions play out. And so if I was to do
that in a larger scale, I want to show you
guys something here. Going to make a new layer
here. Get rid of these guys. And let's just draw a
box or rectangle, right? So this is a rectangle. How do I divide this
rectangle in half perfectly? Do you guys know? Well, it's actually
easier than you think. All I do is go like this
from one corner to the next, and this from one
corner to the next. And this here is my
eggs a little bit off. I was just about to break. This. Here is my exact middle
of this rectangle. And what's the middle? Well, we know that's
the crotch line, right? So what if I do it
again up top here and I divide? I divide. I hope you're following along. Why can do that? And that's gonna be that
nipple level, right? So I'm going to divide
again, divide again. And this will be the chin. This is another way to make
that rule of eight, right? So guys, I hope you didn't have to follow
along with the figure, but I hope you're
following along here because what this is doing, this measuring style is
measuring our rule of eight. And you know me, I like
to kinda skip these. So this would be
12345678, right? How does our figure
fit in there? Do you guys remember? Maybe we could back it
out a little bit here. You remember how we would
draw the figure in? Why don't we actually
have a central line here and just to make it, make it a little bit
easier for us, right? Okay, so how do we
make a figure in this? Well, what do we do? We have the head here, right? We have the head here, we have the hips here. We have that Chevron here. I'm hoping by now you
guys are so good at this. We have the shoulders
on either side. Right? We have the hands down
below that pelvis. Bring it down, the elbows, go right on top of that. We put the little superman
underwear in there and the cross-section there, right? Bring it down. Bring these all the way down. Have our feet below and
our knees will go halfway. So there's our figure within the perfect proportions of
a measured rule of eight. But what if I want to switch the camera angle like we
were talking earlier? Well, one thing I could do on
what I'm doing digitally as I could kinda cheat and do that, right,
and just angle it. But I don't wanna do that. I am going to do the same thing. Going to have a ruler
down the middle. I'm just going to draw a
ruler down the middle here. And I'm going to draw
a bit of a base. But I want it looking up. So this, the top of
his head is going to be it's going to be shorter. This box is going to
be narrower, right? And I can just draw
it out like that. Okay? So now, how do
I find the center? Well, I'm going to go
from this corner to this corner and this
corner to this corner. Look at that difference. This is actually, I should
have drawn my center line, waited to draw, but it's actually a little
off-center there. This is now the center. Look at the bottom
half of this body. This is gonna be the lakes. So then I'm going to
go again up top here. That is going to be the chest. I'm going to draw that
across, draw it across. This is going to be the chin and this is going
to be the belly button. Why don't we find the
knees while we're at it? Needs will be off of
here and off here. So let's say I want
to draw this in. Well, how's this going to look? Easy one, I can put in the, the hips right here. Right? I know the
Chevron is gonna be somewhere maybe as
why does the hips, but it's going to come
something like that, right? The shoulders are
gonna be off of there. I know the head is
going to be here. Okay? I know that the Superman
triangle underwear is gonna be there and
it's going to come down. And then I know that the legs come all the
way down to here. Look at the difference. The hands will be here. And they can connect
elbows, right? This is an extreme worm's
eye view of this figure. And remember when we're
drawing this figure, then we're going
to have to realize that everything is
going to be looking up. So we'll be looking, even if he's looking straight at all, it'll seem like that. Whereas in this one would be looking straight and looking
straight at us, right? So everything will be the
under part of this character. How crazy is that just from
this slight variation? This is an extreme angle. Crazy. Okay, So the next
one we're going to try is working with a little
bit of a bird's-eye view. So we're gonna do the
same thing at the bottom, but I want to do it in blue
just to stay consistent here. We're going to do it
across the top here. And I'll come down to that
and come down to that. Doesn't look quite even. There we go. We're going across
the top. And then we're going to
connect these two. This is an extreme angle. Look at that. This is now the waste or the
the pelvis area. That's gonna be the knees. Right? This is the knees here. What's this next
section gonna be? Halfway in the
upper half is what? That's right. The PECS. This is going to be the chin. And here is going to be the
last one. The belly button. So how does this look Then? If I sketch it out?
Well, the head is going to be this big. Right? The hips, you know, I like to draw the
hips and right. So the hips will go in here. The Chevron will come up here. And you can see if I wanted to, I could draw some
guides in here as it as it increases in width, right? The shoulders are out here, the hands are down here. And they can connect with
the elbows right there. This guy, even if he's
looking straight, we'll be looking down slightly. We've got the
underwear is going to come down down to the feet. The legs will come down here. And there'll be feet down there. The knees will be there. How cool is that, that you can now
draw a figure from, not just straight on as
we've been doing all along, but from a worm's eye view. This is the worm's eye. And a bird's-eye view. The bird's eye and get it so that it's
measured correctly. This is a game changer. If you want to start
to switch things around in your figure drawing and really push
the envelope of it. Alright, practice this a lot. What I would love to
see is you guys drawing out just even roughly drawing out some some
grids like this. Like let's say just, just sketching it up
and saying, okay, well, here's here's what
this is looking like, right? This can be rough. It's just boom, boom. There's that midline. Boom, boom. There is that
midline, boom, boom. There's that midline. There it is there. There it is there. And then coming on top of it, I'm just saying, okay,
well, there's the hips, There's the chevron, There's
the shoulders. There's that. It's coming into the legs, right down into here. Down into here. And just
having fun with it. Alright, and then seeing, well, how would this look in a pose? How would this look
combined with some of the action shots
you've already done? Alright, guys, part
of this unit is just playing around with
that little figure at first and stuff I got and measure things out
and stuff like that. But most of this unit, what it really is is being able to draw a rectangle
and then distort it, and then start to learn
how to divide it. So you'll notice that even
this slight distortion of perspective will
make it look like, Wow, that's a giant. We've got, we're looking at a real worm and we're
looking at it as giant. So play with that. Have a normal box where you draw your stick man or stick
lady. Have another one. Same bottom, but just
slightly smaller top and say, Okay, what does that look like? And then same top and
slightly smaller. Autumn. And see what does
that look like? You really don't have to
push it far to be able to move the camera one way or
the other that much, right? And that's what this
lesson showed you is that pushing the camera a
little bit really does it. And also in this lesson, the most important part I
think is learning how to measure the center perfectly. Guys, this was a great
unit for learning. Not just a reminder
of the proportions, but being able to angle them
and put them in perspective. So make sure you
send it off to me. I really want to see
what you guys have got. And I want you as always,
to have fun with it.
27. Simplified Muscle Anatomy: Hey guys, we're back and I've got another
unit here for you. This time we're going
to start beefing up our simplified skeleton. You can see here that
I've added a few. I don't know. Well, I've got a few simplify
skeletons that I've kinda drawn out following our
rule of eight, right? I tried to do it from a
few different angles. Here's the front,
here's the side. We're gonna get
into the back and then we'll get
into a little bit. I find a lot of people
run into this problem with the arms raised, right? So and I like bodybuilding, so I'm going to focus on
that as a standpoint. Getting into muscles
is tough because there's a whole lot of
muscles going on, right? Generally speaking, there's
more than I can count. I tried to find a way
to simplify it for us, something that makes it easy. Alright, so that's what I do. I'm going from the front here, we're going to start
and work our way down of this front piece. I stay with this circular
part for the shoulders. So we're going to keep
these as the delts, the deltoids and
just kinda circular. Then from the deltoids
insertion out to the bicep, I'm going to draw just kind of a simple circle
like that. Okay? I know this is gonna look
kinda beefy at first, but we'll figure it out. After that. Going down the arm. In the
lower part of the arm, I draw a circle that only goes about halfway down
that forearm there. Okay. So I've got that so far. All right. Let's go back up to here. The neck, you can come
depending on how wide, but if you want it fairly wide, it can come straight down from the outside
of the jaw, right? And then there's this band
that comes from behind the ear on either side and meets
right at the clavicle here. So it kinda goes like this and that's called the
sternocleidomastoid. So we've got that. Then. The pecks, we're going to bring it from the
clavicle down to the ribcage or down to that little arc that
we put in there, right? Come up and it's going to come and I'm going to make
it a little bit darker. Come up to where this part inserts in the shoulder
and then come up this way, actually splayed out like a fan. So that's how that
kinda looks, right? So we're going to
come down, come over, come up, and then
come over this way. Okay. So we've kinda got
it looking like that, right? I think this
site looks better. Maybe it's display.
Before I go down too far. What I like to do is added
and the traps and the lats. So I kinda like almost a turtle shell
depending on how big my, my person is that I'm drawing. I can use that as, here's the top of the traps. Now these are giant
traps and here's the lots that are coming under
here. These little lines. Next is gonna be the abdominals. And
we've already got it. This top part of it. All it's gonna do is
continue down into almost an eggshell into the crotch that I'm
not going to draw. This line is the
belly button line. Okay. So above the
belly button line, There's usually the six-pack goes above the
belly button line. Okay. So that means there's two lines, the line of the belly
button and then this lower portion
is usually an APAC, But I've seen people divided
up into a tan and stuff. And when I say they divided up, they don't their genetics do. Alright. Okay, so we're
working our way down. We've got the hips here, right above the hips or the obliques, and they run like this. So think of it like, kinda like the top
of a triangle, but we don't draw this part. I'm really trying to
simplify this out for you guys so far. Okay. Going on down the legs, what I want to do is
just simplify it. And draw two giant circles like that are not circles,
button ovals right? Going down in the lower leg. It's going to treat
it like the forum. You're going to have a circle, but it's only going to
go about halfway up. Okay? And if we look, well now, That makes
a lot of sense. Just simplified like this. This is looking pretty good. There's a lot going
on here, right? But a lot already formed out. Explain if I was to just
draw an outline around this, kinda connecting it. All right. Now, it would look like it
would look like a bodybuilder. Why don't we go and don't worry, I'm gonna get a little
bit more in depth. I tried to balance this with how we could do it for
speed and how we can touch on the
major muscle groups that we need to touch on. Okay, so again, I'm gonna go with the deltoids
here, right? That upper arm. The lower arm, the chest. You remember we
talked about it in asserting coming this way and we can even draw that nipple
line straight across. And then it comes like
this on a big plate. That neck coming from behind the ear, the
sternocleidomastoid. And here's the trap. Okay, So the
sternocleidomastoid comes here, the jaw comes over top of it, so it kinda
looks like that. Alright. So that trap, this part of it. It'll be better once we
get into the backhaul. I'll show it more. Kinda comes on and
like imagine a shell. Here's the abs from the front leading up
into the wall here. Unless the person is hunched
over, you won't see, but I'm just kinda drawing in the lines like this would be our top six pack and then
they go down into the pelvis. We're gonna get really
easy and just draw that circular thing to
represent the upper leg. And again, below the knee is that lower leg the only
differences we're starting to see the glutes and nicely they fit on top of our
big old booty on him. Again, what are we looking at? Well, that makes sense
from the side now, we can see how just using
these simple forms over top of our simplified skeleton can all of a sudden
make it look like? Yeah, that's a muscular
body type. Pause. Moving on down. I wanted to take a
look at the back because even though everything looks the same like
even the skeleton looks the same as
the front right. I've just kinda flipped
and reversed it. Let's see if there's anything
that looks at different. It will look different
once we start to add in the actual muscles and I'll show you a simplified
version of that, but the delts look the same. I'm going to do the same thing because these forms
are the same, you know, doing the
forearms the same. I'm going to do
that turtle shell on the back there and this
is the back of the head? Right? Okay. Here's the hips. Bum. Obviously, depending on
how you want to do it. You can have it wider
than the hips depending. You can play a lot with this. But basically the
fundamental thing is find the bug crack
and then go from there, find the butt crack and
then go from there. The muscle itself when
it flexes in dense, pushes in from the side a
little bit and we'll get that, get into that a
little bit more as we get working on the
individual muscles. So for right now
without any of that, the most simplified
form is just this. Use the, the outline of the hip. Come down, find the bug, come down, find the bug crack. So almost make it think of a square that's not popped
out or anything, right? Then we have those obliques
on this side here. It's going to come up into
our turtle shell, right? Okay, again, simplified. For now. We're going to draw in those simplified upper legs and the simplified lower legs. And then we're going
to come on over. And everything is the same. You know, again, I
don't draw this, but here's that
belly button lines. So that means there's
gonna be this many divisions above it. Here's the abs that we've got
in here and stuff, right? All that is the same. Notice I'm kinda doing
the lower body first here because it's the same, right? Not changing anything up here. Just kinda doing that. The upper body changes
slightly though. The deltoids are still the same, like how I keep
them in the place. And the pec still come from that clavicle down to the top of the rib cage where they touched the abs and they come over here but then they
come up this way, look at how this is the same. It's going to come up this
way, but it's going to come to this little insertion
that I've always been drawing where the shoulder meets the upper arm
and the stick man. Right. Okay. So watch I'm going to
leave this how it is. I'm going to draw in my upper arms and I'm going
to draw in my lower arms. Okay. And then I can have the neck
here and whatever I have for that turtle shell traps
and everything. Okay. When I am drawing the PECS
in here and I'll get in, this is where I start to
get into more details. The pecs we'll come across
like they normally would, but they lift up and they
wrap over the shoulder like the PEC itself is coming
out of this insertion here. But it kinda just blends
into the front deltoid. Okay? And then the bicep
comes out of there. This is where I'm going to
stop the simplified process. Now, we're gonna get into
a little bit more details. Again, I'm going to
hesitate to say, well, this is going to teach you all the muscular anatomy. But we're going to form details
on top of what we've got here so that you can at least
have some basics going on. Like I said, I could
sit here for hours and I've got an entire course on every muscle group and all
this kinda stuff there. There is this entire course. That's not what this is. What I wanna do here is show you the Fast and Furious way. Adding muscles to
a physique instead of breaking it down into
every body part and stuff. So with this fast and
furious technique, I'm going to draw
over top of this. The pecks come from here
and the xor r in front. So that's why I'm
starting with them, even though normally I started
with the delts and stuff, right the PECSA in front. Now in front of these next
is gonna be the bicep. The bicep comes under the PECC, but it's in front
of the shoulder. The deltoid then
comes from there. The deltoid comes from there. Behind this, on this side of it, you will see a bit of a tricep coming from behind and you will
see it from the back. It'll look better. Now come down here
into the elbow, will come down here
into the elbow. The forearm flexors, that's
the lower part of the forum. Come here. Or I'm flexors come here and the extensors come
out on this side. The extensors come out
on this side and they usually have something visible. This part of the extensor of the radio broadcasts
kept the abs again. We've got them outlined. This is the belly
button here, right? Okay. So we've got that. We've got the obliques
showing just a little bit. We've got the lats coming down here and coming into
the waistline, right? If we want, we can put more
of a rounding of the abs. It depends on Europe,
stylistic choice. Some people don't even
draw on these upper, the upper two there
or whatever, right? So you also see kinda
following this ribcage, we're just going to
do that just a little bit like our original
little chevron, right? I'm going to follow
that slightly. That's the lats. And then in from the lats, serratus muscles, they
look like little ringlets. They look like they're
your ribs but they're not. Okay. We've got the groin, the crotch in here that we're
not going to draw, right? Then we've got this big sort. We've got the glutes
from the front, maybe a little bit in the hips. Then we've got this
big outline, right? We can just keep kind
of with this outline to an extent on the
inside of this thigh. It'll sweep like this. There's actually, this
is from the front, it's called the
quadricep, right? And there's four major
muscle groups in it. Quad us. Alright? So this is on the outside here. On the outside of the, inside of the quad is the vastus medialis. On the outside of it. Here. Because the vast,
vastus lateralis and then inside is this split. And this is another, if I was to draw it in,
it would look like this. And that's the rectus femoris. Okay. So we've got a knee and I'm I like drawing
my knees just as a simple little little
triangle, right? And what I often
do is bring this in and form this down the shin. So I'll bring in right
down the shin here. And then behind it, I go into the calf. So behind it I'm going into
the calf and you can see how I just kinda can form
around this calf a little bit. Alright. I can bring
it in and form around and coming up from
the bottom though, the calf on the
inside usually has more of a a bit of a hook, a peak to it or something
like that. Right. You can see an indent, whereas in the calf on the outer side of the calf has a nice
round or sweep to it. Okay. Then I have my ankles and we're going to do hands and feet
in another lesson. So, oh, one thing I forgot. The muscles of the neck I kinda roughed out here already, right? The traps, you don't have
to have them like that. Here's your insertion
for the traps and here's their insertion. But if you want
to, they can just come straight down, right? They don't have to. They can even come like this. They don't have to be this giant hulking bodybuilders
thing, right? They just bring them
on straight down. And that's fine too. It just helps for where that
insertion is and stuff. Hopefully this has a
nice simplified look for learning muscles so far. Going from the side, I want to emphasize
that any changes or anything that's
different from the front as we're moving back and
forth between these. The number one thing I'm
going to focus on is the The deltoid. So that's
this shape here, right? This, I actually
think of it like I've always thought that
deltoid as a garlic clove. And so what it does
is it has this part of it and this part of
it and this part of it. So this part here
that's in the middle here is actually called
the medial deltoid. It's the same muscle, but it's just got
different heads to it. So this is the medial deltoid, the deltoid and then
the rear deltoid. The deltoid usually actually sweeps a little bit more like, more, more in like
this or something. Okay. You can see how this all fits nice
over this skeleton here. Simplified skeleton. So here's the bicep, that circular thing right here. And then the tricep
is actually bigger. We can think of it coming
off the midpoint of this deltoid and coming back
here and it comes down. Now what I like to do is draw the elbow and bring it up
this way because the tricep, as we'll see from behind, is kind of a horseshoe. It has an underlying
from the elbow, it kinda comes up
and we'll see this. But it has this
underlying horseshoe laying over top of it. So I could draw this under overlay horseshoe type
of thing over top of it. From the side again,
We're working on, this is the extensor
part of the forum. It comes down to here. And I often bring some
of these bands and from the elbow and
the flexor is not so visible from what we're looking at in the side here
and that much PECS, I've already kind of rough
them in for you, right? Here's the jaw, that
sternocleidomastoid, the traps this part, right? The traps come up here
and then it comes up into the neck and behind
the lats will come in. It's very hard to see
from the side here, the lats and the back muscles will see more from the front. The obliques are
blocked by this arm, but they're kinda
this triangle here. This comes down into the glutes. I didn't, I shaved a
bit off his booty here. The quads from the side. Looking at the outside of it. This is the the vastus lateralis and it basically is
shaped like this. Kinda has this
insertion here, right? Then the hamstring has
this somewhat rounded. I kinda blew it out here, but it's somewhat rounded like that. Okay. Then we have the knee, the front of the calf. The lower leg has
a little bit of a slight bit of
give to it to you. I mean, like a slight
bump on the front there. There's some muscles and
tendons that actually lie in the front leg and come down
into that back of the knee, comes out to the
calf and then back down into nice little triangle for the ankle or
something like that. And you could draw some
details if you want. Alright. So look, what is that? We're only at like 20 minute
mark or something like that. And we've already fleshed out
this this physique. Okay. Coming back up here though, I didn't really give justice.
I'm looking at it now. The back usually sticks
out a little bit more, especially with somebody
that's muscular. There's some muscles that
we're about to get into that are really
protruding from the back. The ribcage on here, depending if it's flexed or not. If it's not the
abs are not flex. You won't see them. It'll
just be tucked like that. Now into the back. I told you we've
already done a lot, so I'm not going to focus too much on what's
going on here, but I will focus on the
back muscles themselves. The first one I want to
focus on is the traps. What we've talked about. Remember these ones from
the front we were talking. They're kind of shaped
like a bit of a diamond. Not exactly. There's a little
bit of an indent here and an indent here. And they come down. But this is the general
shape of the traps. So you can think of it like
just basically this diamond that lays on the upper
part of the back. Okay. So think of it that way, right? If there's each
there's a little bit of a different look to each
person's traps slightly. But this is roughly
how it's gonna look. It's going to come up this
way and in come up this way. And then you might even get a little bit of a bump going on depending
on muscular development. We could actually draw
this line pretty much all the way down, down
to the bud crack. The next major muscle back
here is gonna be the lats. So it's going to come out
here and it's going to tuck. Now how big it is, it can be really small. Depending on the
muscular development. Bruce Lee's lats were great. And what it is is actually the, Let's start roughly about here. And you could think
of them as fanning. One of those Asian fans, you get a lot of muscles that
kind of fan out like this. Okay? So they fan the fan like this. And then they attach
into round about here. So here we've got
another triangle. Again simplified casual thing of this is think of them
as a spinal erectus. So you can think of how the
lats are attaching into here. Okay, let's all
attach back here. There's a bunch of smaller
muscle groups that kinda actually overlay the
lats a little bit. And that's really complicated. So I'm going to leave
that alone. They just kinda looked like this for now. Like I said, I'm trying
to choose which ones will work for how important
all this is to you. The triceps, remember
how I told you they're they're kind of a
horseshoe looking. Well, here we go. The
triceps look like this. Then the rear deltoid, that rear part of the garlic
sits on it like that. So again, tricep. Let's see you maybe I wanted
to do it this way instead. Then the rear part of
the deltoid there, then we've got the elbow. Depending on how you
want to draw it. I always use little
triangles for my knees, elbows and ankles. So you can think that this then comes down into the tricep. The bicep is coming. We're looking at it from
the other side here. We're looking at the
bicep from underneath, from behind or whatever. Okay. So we're moving on
down this behind. And here's the behind. We can come in here
and draw the bump. The bump can kinda come up and over that hip line
to an extent, right? And then it kinda
just comes like this. And it works into the
hip a little bit. And then we've got those
obliques from behind. Okay. Guys said if they're
flexing the bum, then you've got
an an indent push that pushes in this way. From behind we can
see the flexors of the forearm more
so than anything. There. They form this kind of
tight little ball here. The extensors are not
absolutely visible. And there's often a lot of connective tissue
lines going on there. Moving on down the
back of the knees. We're going to draw as a bit of a bigger triangle or even
an extended triangle, something, something
along these lines. And the hamstrings that are
at the back of the legs. They're going to form and
they're going to come down as bands splitting
all over this. This is how the hamstrings look. The hamstring is
kinda come down as forms splitting across
the back of the knee. From behind. You can often see a bit
of the front the leg, either depending on which way it's turned or
anything like that. But you can often see
the hamstrings are imagined this size
and the quads, the outsides are a little bit
wider so you can see them from behind sometimes depending
on the angle of the leg. It just depends. Moving on down to the calves, we're gonna do another
triangle there, triangle at the bottom
of this circle. And then the calf kinda
goes and wraps around that. And there we go. And that's how the back
of the leg would look. Accounting for the knee
there if we can see it. Alright. Come back into
the back of the leg. Look at that. We are storming through this. I can't believe. Honestly, this is hours worth of anatomy in a very
condensed form. This one, everything is
the same from the front. But remember what
we talked about. This is what's different
and we come in here, the PECS are different
than PECS get lifted up and then the front deltoids, the front of the shoulder, come into it and they come
like this and they lift up. The biceps are then like this and come in from this
shoulder point and like this. So the biceps come up here. That's an ugly-looking bicep. And then come like this into. So imagine there are kinda like footballs or
something like that. Depending on the type
or size of the biceps. Some people have them that
looked long like this. Some people have them
That's shortened out. Underneath the bicep is this little muscle that makes up what we would
think of as the armpit. Now, we're also going to do the bottom part of the
tricep from the elbow. It follows that form and then
comes up into the armpit. When the arms are
raised like this, the lats are exposed and
they'll often flare out. Okay, So probably if I want to keep it symmetric or they could be something like this. And so you will see,
remember those service, there'll be out here
kinda ridging that where our rough Chevron was of showing the ribcage
and stuff like that. They'll come out like that. But all of this area is lats. Then we'll still have the neck and still have the traps here. The flexor part of the
forums will come in here. This will come to the elbow
and the extensors are on the outside and they will
come up something like that. That's the main difference
I wanted to show you when arms are raised, his head looks tiny now. Wow guys, I don't
think I've ever taught anatomy that fast. That is crazy. A 30 minute lesson on. First, just recognizing what, how much we've accomplished with that simplified skeleton. Then using some simple ovals, some simple bubble shapes
and stuff I got filling in that simplified
skeleton and then laying some of the major
muscle groups over top of it. Guys, I would love
to see you do this. I'm going to send
the sheet off to you so that you can fill
this in as well. What I would honestly
advise as looking at bodybuilding magazines
and different anatomy covers and
stuff like that. And there's always room to
get more in depth with it. There's a lot of room to work
into it a little bit more. But this, this here is the building blocks
of everything else. This will help guide
you on your first steps toward understanding
Muscular Anatomy. Hope this was fun, and I can't wait to see the homework
you guys are heading in.
28. Drawing Hands: Hey guys, I'm back and I've got another unit here for you. You know, I like to spend a
fair bit of time on hands. It's something that no matter
what your skill level, you're going to find
frustrating, right? It takes a lot to master hands. And I honestly don't
think I am a master. I think I've drawn some
really good hands in my days and some not-so-good
hands and my days, right? So I'm going to teach you guys a few different
methods that I use. For some this might be an
easy review for others, this will be like, Cool. Let's see, we'll get into it and we're
going to start with going off on the structure
just a little bit. Okay. So I've got the sheet that you can follow along
with me if you'd like. I'd like it if you did. But watch it first
if you want and then do it after or just do
it as we're doing it. Made no sense. Okay. So I'm going to start
with this hand and how do I approach a basic hand? Well, the first
thing I do is I draw a circle because that's
kinda what I do. I like to draw circles. And then this, just so you know what I'm thinking
of a circle here. Here, I'm actually
thinking of a 3D circle. Kinda like a hockey puck
because I'm Canadian. So I'm actually thinking that
there's some depth to it, not from this angle necessarily, but as soon as we start turning the hand, I'm thinking of depth. So I'm going to draw this
circle and I could draw another one right
beside here if I like. I'm going to cut this circle
and a half bisected right. On the top of that. I'm going to draw a
circle. I like circles. Off to one side of that. I'm going to draw off to each side of that rather
a circle and circle. And then I'm going to draw
one going down this way. And then instead of
matching it on this side, I'm gonna go down further and
I'm going to draw it here. Now let's see if
you can figure out what I'm drawing here. So you can think of this
as like the 90 degree cut. What's happening here? Well, I've got a circle, I've got my four main knuckles and then I've got that that
fifth one for the thumb. Right? Okay. So this kind of makes
sense so far, right? Now, if I'm drawing my circle
here and I'm gonna kinda, sometimes I like to kinda arc
it this way at the bottom, almost like a little ribcage, but it shows like the
palm of the hand. You can put a bigger arc
in here or whatever. You can see, this is already taking form of a hand, right? And it's gonna
kinda start to come in from this side and come
in from this knuckle. So slightly coming in,
slightly coming in. There's a little bit
more detail to it. But so far this will work. So I'm hoping you've done
this back palm, right? The back hand of the hand. Okay? Now what we're gonna do is we're going
to measure from this point and this point
and make it double. So from here to here, you measure it from the
bottom of the circle, if you like, somewhere
around there to here. And going to double it up
somewhere around to here. I can carry this one finger all the way to the top and
that's gonna be my top. Now, each of these fingers
are not going to reach up here because we're
not aliens, right? That would look
extremely strange. But instead, what
we're gonna do with this tippy top pointing here is follow the
curve of the hand, follow the curve that
we've already established. We've already
established this curve. Okay, so we're gonna kinda
see if we can follow that circle almost as if we're drawing a bigger circle here. So we can see it on the model
beside us here if we want, we're drawing a bigger circle. And we're doing that again
at a midway point here. We're going to draw this,
this kinda nother circle, looking away circles I've got here, it's getting ridiculous. Guess I could have done
this in different colors, but this is how
it's going to work. Now what I can do real simple is just carry this finger up, carry this finger up,
carry this finger up. This one is going to be
that middle knuckle. Halfway through the next one is going to be another knuckle. Kinda not really
doing my thing here. And then this is
going to be the tip. So you can see how so
far this is working, except for when it
comes to the thumb. This is where it gets weird. This works out for the
tip of the thumb morsel. So here's going to be the
thumb and halfway through that is gonna be the
knuckle of the thumb. It's hard to see
here, but halfway through that is gonna be
the knuckle of the thumb. Okay, so we've got a whole
bunch of circles here. It's semi ugly at this point. But we can have this
make a lot more sense. All we have to do is draw
a fat finger in here, fat finger in here, a fat finger in here. And I'm doing them because I like doing that ugly
little fingers right now. A fat finger in here,
it's going to come in. That's going to come
down that away, right. This one comes into that. And depending on how I
want to draw the thumb, but this is the nuchal. It's going to come
to that and uncle, and it's going to
come into that thumb. I can put my little webbing
in here if I want to. This is where I can
start to put in like little details of the knuckles. If I depending on what
I want to add in there, the fingernails up
at the top here. Depending again, how
much I want to add in. And I can kind of
follow this form. I can even put the bit of the tendons going
back this way, right? Okay. Nice and
simple construction. I'm hoping that you're
following along with me because we're gonna do it
a little bit faster here. We're going to do our
little hockey puck. Don't do it smaller
off to the side here. We're going to this
one's kind of off to the side here so we
can come off to the side. We're going to take this
measurement and mark it off like the length
of the circle. Basically, even if I
do cut it like this, I'm still taking the length
of this circle, cut it here. And then what do I do from here? Kinda make a larger circle
that follows this one. Kind of make a larger circle that follows this one
that's actually bigger. Then halfway through that
point and make another circle. Halfway through this point,
make another circle. And you can see I've
just got like circle, circle, circle type
of thing, right? It gets a little
messy and stuff. But then from Hera, just start adding in. And then my knuckle off
to the side here, right? I can do the same here. Adding those knuckles and
then halfway through point, this halfway through
point come off to the side and make my knuckle
there, come up here. And I can splay them.
However I want. I can have them
coming up this way, this way out here, out here. And I can have, this one is gonna be halfway
of this mark. So I can have this
knuckle coming out this way even if I wanted
more or something. Okay? Just realize that
it's going to curve out just a little bit there. Then what do I do? Well then after that
I start to come in here and I start to add a little bit of the meat
of what's happening here. Alright, can come in and add. My fingers. Start to add them all in here. Depending on how fat fingered I'm starting
to run out of room, I really should have plotted this out a little bit better. But this comes nicely into here and then down
into the wrist. So you can see how you can wrap yourself if you want
to bulk your knuckles, going to wrap yourself around
the knuckles here and then around it that way. Okay, so looking at this, this is how to
construct the hand. And I would love it if you
went through the rest of this and tried to
construct hands this way, like I think it would
be really great if you are kinda
like, Okay, well, here's the, here's
my hockey puck. Here's, here's my hockey puck. And here's the middle
of the hockey puck. And it comes off
to the side here. Here's the knuckle, little
bit of foreshortening there. Here's this Nicole, Nicole
knuckled going back right. Then. Kinda keeps going with this way. It comes out to this right
about halfway through this. We've got another knuckle here. This is a little bit off
because what's actually happening is this
hand is bending in. But you can see how, if
I was to construct this, I would just go like this, get my hockey puck going on, cut it in half, put
my main knuckle here. My thumb knuckle here, comes off to the side here. And then I can start
to add it from there. Alright. I can have this
finger coming down here and you can start to build, build it just out of
this wireframe, right? Maybe this one's
coming in behind. This one is coming even
more so back there, right? So what I'd like you to do is just like we've done before. We break it down
to a simple thing and try to recreate it. Okay, we create a, using some type of
structure like this. There's another thing that
you could do with this because this is kind of like the structural tutorial of it. But what about just tracing? What if I just decided to trace? How would it look? I can construct it, but I can just trace it. Like, why not? Why not just trace
on? Let's see. If I just trace. Let's not even a good trace job. I'm kinda following
the lines here. Going up this way. We're talking about references
like using these as tools. And some people are
wondering, well, can tracing via tool?
Yes, it can be. It absolutely can be. But something gets lost in it. I really do think that something happens here when we just trace. Instead, what I would
like to see what I think happens a lot better is if we start to build the
construction of it, right? That's kinda comes here. And we start to say, okay, well, here's the, here's the construction that
we've got going on here. What does this look like? Right? Like how would, how would this start to splay
out and everything, right? We can have this nice, nice construction going on. Then once we've got that, I think we can make a far
better drawing over top of it. We could start to sketch
it out and say, Okay, and you know what, It might
not be absolutely perfect. But it would seem
to make a lot of, a lot of sense for the
construction wise. When we're looking just
at a drawing like this, what often happens is the
construction is being missed because of we're not
looking for those lines. We're just looking
there's an article there, were just looking at the outline and we're filling in with our brains what we
think should be there. But instead, if we follow the actual construction that we're doing, we're doing both. We're we're paying attention to the things that
we already know. And we're filling in details according to what we
know should be there, how it's placed, right? And so to me, this one becomes the stronger
one we learn from it. And we can, we can also
go beyond tracing. Then what I can
do is I can shift and bend one finger down, right. And see how that would
impact things, right. Okay. Whereas if I'm just tracing, I'm pretty limited that way. So guys, like I wanted to say, using references is important. Just tracing them in when it especially when
it comes to hands, I feel is a bit of an abuse. Right. Like I don t think it works as well as we would like it to. Instead understanding some of the underlying structure
and then breaking it down into a simplified
form that you could recreate even if
you're going to draw it side-by-side like I just did. That's cool. Use references. You can have this sheet
of photos that I just did up or make a video for yourself. Like what I do is
I record a video and I'm doing all
these different hand poses from different motions and stuff are rather different, slightly different angles and a little bit of
foreshortening as I come in and out of the camera for depth and everything
right now I've got a video that I can pause at any moment that I
can freeze-frame and take a snap of and just
use that as my reference. It is extremely hard
to always construct hands just from nothing, right? You'll get good at
a few poses maybe. But what would really help
is just like everything. Good artists will grab as
many references as they can. And using yourself as a
reference is awesome. Use that plus on underlying knowledge of
some basic structures. And your hands are going to be well better than they were. They're still going
to take practice. Take practice, and use whatever you've got
at your disposal. If you have to
trace a little bit, but realize what you're
looking at underneath. Use that knowledge
to really bring the best piece forward. Guys. I hope this was helpful for you. A nice quick little unit on
hands drew up this worksheet. Take pictures of
your own hands or videos and send them to me. I'd love to see what
you've got going on and have fun with it guys.
29. Drawing Feet: Okay guys, we're going to work a little bit more on feet here. Spending some time on the feet because so many
others ignore them. It's a little artists joke
about people ignoring feet and ignoring hands and I get it because sometimes it
can be a little tough. I believe, 26 bones
and the average human foot and drawing two
of them, that's a lot. It's not just the bones
though it sits the ligaments, It's the structure of them. The tendons, everything. It's, it really adds up to what could be a very
scary thing to draw. I get that. I'm going to
make it less scary for you. And let's see if we can
do something with that. Make it a little bit more. I don't know if the
word is digestible. Let's go with digestible. I like that word. And what I make
things digestible, I tried to make them in
their basic shapes, right? So hopefully you've got
this sheet of my feet. The sexy things that they are in front of you and you're able to work on them a
little bit, alright? If you don't have the sheet,
you could just draw it on your own piece
of paper anywhere. Follow along with
just the video. But it helps if you have the sheet because we're
going to draw a little bit on them and then trace over
them just a little bit. Let's see what we've
got going on here. What I generally do is I
start with basic shapes, like so I'm going to just outline a very basic shape here. I'm just going to say the
heel is a basic circle. If you remember, whenever I'm drawing the legs coming
down or anything like that, it's a straight line
into the ankle. The ankle and into the ankle. So where that ankle, that medium line is is
where this is circle is. Okay. So I usually say
something about there and something about their care where the top of that
circle is, right? I've done this before, but you can see my ankle. I just kinda make
it really simple. Like it'd be kinda like a basic little diamond or
something like that. Alright. Obviously from the sign it kinda goes a little
bit like that. Right? Okay. I know the ankle is not
necessarily part of the foot, but I think this helps. Once I've got this
heel roughly in place. And then I can add another
little shape here. This is gonna be
the foot pad and then another little
shape as the toe. So another shape as the foot pad and another
shape as the toes. From the front. It's going to be one
shape as the foot pad, one shape as the toes. So let's see if we could
draw this down below. I'm going to draw the
heel in front of it. I'm going to draw a foot
pad in front of that. I'm going to draw the toes. Let's say that's coming in here. And where do I know the ankle
line is the ankle lines? Right above it. Right. Okay. Does that look like a foot? Will find out once we
start drawing a little bit more, if it was. Let's actually, let's
do this a little bit. I want to see if I can show you what I'm
talking about here. If we start to sketch over top, maybe I'll use a red so it
can show up a little bit. If I'm doing the toes,
five little toes. And then I've got them
going into the foot pad. And this is very
rough obviously. I'm just kinda sketching
that in here, right? Little tools that goes into the foot pad and then
up, this goes up. This comes down into the heel. Intellectual mentors,
just a little bit. This comes up into here
and up and the foot. So you can see how that
shaped kinda works. Let's see if I do a
down below again. So I've got this my foot
pad or rather my heel here, the pad and then maybe
their toes beyond. And if I want to, I can
add in the ankles here. So how would I draw it over top? Well, I've gotten the
bottom of my heel here. We've got the outside
tracing that foot pad right. Then I've got my toe just
coming on either side of that. Now, the back of the heel obviously comes up into
the Achilles heel. And then this comes
into the ankle. Come down to the ankle. It comes up, starts to
come unto leg there. So that's how it would
look from behind. And see if I can start
to duplicate this. So my ball, no ball and chain, just kind of drawing
these from opposite ends. One thing you'll notice once
we start to get into this, it's kinda just three
balls in a row, right? Bisecting that if you want, you can drive it
straight through the circle. Are little ankle. It can be right
there type of thing. And then now, how do we add in the foot wall from this angle? This will come down
into the heel. The heel will come over. It'll come out here. And then my rows of toes
start going in this way. I've got a big toe there, right? This can come back over
top up. And backups. Obviously, I can
put in the ankle their income from
the inside though, inside of the foot. You're going to have
more of a bit of an arc that is going to
follow the bottom of the heel and then the bottom of the toe up into my big toe. And then same kind of thing. And, you know, it depends if
I'm looking down on this, whether I see the row of other toes there,
something like that. Coming back up in here
and up into there, right? A lot of it is the angles. This one, I'm looking
down at a little bit more than, than this one. I'm kind of looking at
more from the side. Alright. Let's see if this makes a little bit more sense when
we're looking at it from, from any angle, right? Okay. So here's, here's that
ball of the foot. Here's the, here's the heel, here's the ball of the
foot, Here's the toes. See if I do it with shoes
on. Here's the heel. Here's the ball. Here's the toes, right? Here's my ankle line. My ankle lines a little
bit different here. You can't see it on
the other side here. Now if I was to draw over this, what would it look like? Well, I can just come like
this and you'll see that the, the instep coming
this way whereas in the outside of it
around a little bit. So the instep comes like this. And with a shoe, it
comes forward on it. So you can see that shoe comes forward and then back around, comes out and our surrounds the heel comes around and same type of
thing comes this way. The shoe gives us illusion. See if I switch it to purple
little bit of giving us a little bit more
room at the front of our toes are and stuff. But you can see how this still gives us a little
bit of that shape. For, you know, where the ball of the foot lands here and then
the shape of our toes here. So the ball of the foot
would be here and my toes would be their name. You can drop the side. Let's see. Let's say this is coming down. And I've got my
ankles going on here. I'm going to put my heel here, ball of the foot here, and pose just beyond it. Well, all I have to do
is follow the instep here and follow
that back around. So it kinda goes like this. You can have the bigger
toe coming inside more depending on
how you want it. And coming back around this way. And here's that comes
down into here. Okay. Backing out. We can see sometimes works out a little bit
better than others for how beautiful
they look from. This one's a little
different though. This one's going to
be Where's the heel? Little bit different
than when do you expect the heels actually up here. The ankle stool
high above it but the ankles a little
bit angled here. Heels high. And no, I'm not
wearing high heels. This and that's like this. So the heels high
ball of the foot, somewhat raised and then the toes are in
front of it, right. So it's still going
to come like this. We can have the toes, something like that, right? The ankle up here. And
then what do I do? I can come over top of it. Let's see if I bring
my leg down into it. There's this part this part
coming off on the foot. It's going to come down. This
part is going to come down. Might see a hint of the
heel here that's up. Might see a little
squishing us of the, this part that's here. And then what do I do? I come draw my toes, a little squished toes
and draw them that way. Depending on how squishy, squishy they they might
appear and stuff right there. That's what it
would look like if I'm standing on my
tiptoes, right? The nails here, the nail
bed is on top here. If I wanted to, I can even show a little bit of
the heel there at this, this ball behind really helps you kind of plot out where
that heel is going to be. And I love outlining where the heel is to
start to heal the ankle. Give us so much more of a base. So there's the foot pad from underneath and there's the toes. You can see you can almost
space it if you want. Heel, space, foot pad, toes. This space, we're not really
counting as anything. So what we want to
do is we want to draw this coming here. Draw this coming around. Then I can roughen my little
toes on to three or five. Depending on the big toe. There we go. And then I can
come out here and draw, I like to draw the bumps
of the toes first or something and then kinda connect them down into the pad. Right? So we've got this,
the heel here. What I want you guys to
do is practice these, practice them with a shoe. And ****, if you want
to just, you know, try to draw it rough and then see if you could
actually draw the shoo. Shoo. Shoo go on this right? And the shoe obviously
would come around the foot. But what about the
base of the shoe? The sole of the shoe, right. How would that start to look? You can see it coming
under the heel here and under the toes and the ball of the foot starts to come forward. You can see how maybe this part something along
these lines and this would be good
practice for you for drawing clothing
and everything. Quantum verse. All stars. Start to do the laces
here and stuffer. So you can practice
with or without shoes. You could see how the shoes would have some folds
in them and stuff. I'm going to admit
something to you guys here. This is not my foot. I know. I know you kinda
thought it might be, but it's not what
I want you to do. The same thing with it. Here's the heel, here's
the ball of the foot. Here's the toes.
Look how that goes. Heels, all of the foot. Toes. Now, what is the outline here? Right? Ankle still going
to stay the same. I'm still doing that same
simple triangle, right? St. or diamond rather. Legs is going to
come in like this. It's going to come around
the bottom of the foot. Right? Come around the
bottom of the foot, come down to the foot pad. Come down to the foot pad. Comes under the foot
pad and then whether it's the toes on whether
it's inside or outside, how that line the toes, maybe a big toe
sticking up here. Coming up here, and
coming that away. Depending on how deep
do you want your foot, you can start to cut into
it just a little bit. There you go. And then you can add, you know, your your big old heels
to it or whatever. Make sure that these are grounded on the same
platform and stuff right. Straps in here or whatever,
that kind of stuff, right. It's up to you guys how you
want to study anatomy, right? Like like I said, 26 bones in the foot. You can really get into it. Really start to understand. And this simplified look
might not be for you. I enjoy the simplified
look because half the time I'm drawing characters and
shoes and stuff like that. So I want to draw
it really fast. And being able to break
down the form of it really fast is important to me to
be able to recreate it. You can always delve into more, I've got more courses
that delve into feet and spend more units on
and stuff like that, right? But the point of this
particular one was giving you a bit of a crash course
in how to simplify feet. So how would we do that? Circle, circle, circle. It's that simple. This would come down
and it's the ankle, That's the review as we
start to just simplify it and then we can start
to outline them. Something like that.
Maybe comes in, comes out for the foot. And that's how easy it
would be to start to draw a foot, right? Just using these simple, simple shapes, simple circles to be able to draw this foot. Warping this one, knowing now, because I'm drawing
from a massive distance hold zoom down and
everything, right? But you can see
how easy it is to just have the
simplest of shapes. Starting to really help you form whatever it is
you're wanting to create. Alright, here we go. Guys. I hope this was a
little bit helpful for you. I hope that you are drawing lots and lots of
toes and so on, right? I hope that this
has inspired you to draw more feet and
not to ignore them. But don't stress about it. Don't stress about
all the ligaments. Don't stress about everything. Go with the simplified
version that I'm showing you, circle, circle, circle, and
then just plot them out. Have fun with it.
Do it this way. Do it this way. See if you can connect and make feet randomly
with your circles. Your homework is two-fold. I want you to follow this sheet and see what you
can come up with. And then maybe do what
I was just doing. Randomly draw a ball of the foot and then
connect a couple of the other pieces to it and see how you could
make your feet look, see if you can make it
into a foot just by using those simple shapes just
off the top of your head. Hope this was fun for you guys and hopefully a
little bit helpful. And remember, it's not
my foot knows heels.
30. Rendering Muscles: Hey guys, We're back and I've got another unit here for you. This time we're going to
talk about rendering, in particular, rendering
Muscles, the human form. When we're shading,
we've already talked about shading and different
things like that. We're looking for
very specific things. And when I start
rendering any form, that's what I'm hunting
for and I think you know what I'm
going after, right? I am going after a light source. I want to find my light source. So I've got this figure
here that I sketched it. It was originally Marvel
artist's rendition of clauses, and I've used it
a few times for, I've redrawn it and use it for inking practice and
these types of things. And I want to show you
how we could use it for our rendering
here in this unit. Okay, so I've included this in the materials and hopefully it'll help you
find your way through. What we're able to do. What I do initially
is I tried to find a light source or
assign a light source. So in this case I'm going to assign it from straight above. And of course you can vary
it up wherever you want. And with it being straight above, then I'm
kinda like, okay, well, where where might it fall? I think it would fall
somewhere around here. It would fall on the chest. This should be a little
familiar for you, right? You would probably
fall somewhere here and other top
of this forearm. You can see I'm just kinda
it would fall at the top of the knee and the top of the leg here and maybe the top here, maybe a little hook there. You can see I'm just kinda
lightly going over here. It would fall somewhat
on the top here, here, maybe the top of the shoe here in the
top of the shoe here. Definitely the top of
the shoulder here. And up into the hand here. A lot of light would
be there, right? Maybe the rest of his chest. Maybe just a tad in there and
maybe a tenant, the crotch. Okay. So that's where I think if light was falling from above, that's where it
would generally hit. You gotta get used to looking
at forms like this, right? Like if we're drawing
it out and we have a cylinder and the light
is coming from above. Well, where's that
light going to hit? It's going to hit
this part, right? This was part of our
practice in previous units. Now on the opposite end of that, where it's going
to be very dark. Let's think of something
that's very dark. Where would it be dark? The contrast right
under the chin here, maybe maybe right
under the PECS, maybe under this form and under this bicep,
somewhere in there. Maybe right under
this hand, right. Maybe under this chest and in that bicep there and
maybe parts of this hand. Again under the PEC here
and under the PEC here, right under the crotch. Under this knee. Like where's the darkness
going to hang here. Right. Maybe these are the main
spots that I would say would be probably the darkness or the darkest parts
and stuff, right. Maybe under the knee here, somewhere in the
shoe a little bit. Folds the SOC maybe
down in here. But these would be the
parts that I would say I'm going to be the darkest. I'm going to back this away. You don't have to do this. Like there's different
ways you can do this. I'm doing this digitally,
so I'm assigning. You can just have it in your
thought or your memory. Or if you want, print out two of them and kinda do this off to the side on one copy and stuff, right? And say, okay, well, that's where that's
where the light is going to come and this
is where the dark is gonna be and stuff, right? So this kinda guide can help you when you're
approaching rendering. I do this every time
I'm shading rendering, whether it's pencils that
I'm doing right now, insulator or anything like that. I always do this. But sometime in my mind, I mean, like at this point
when I'm rendering, I'm able to look at simple shapes like
this and just say I know what light is going
to fall and stuff I get. For most figures, I
can kinda do that too. But this has really
good practice to be able to look at it, lay it down and see where
this light would fall. If this is where the
light's going to fall. I'm going to come in and I'm
going to start penciling. This is colossus and
he's got metal skin. I am not going to do that
for this first section. Okay? I'm not going to
do that right now. I'm going to do that a little
later on right now what I wanna do is just imagine that I'm doing it with a pencil. I'm sitting at home. And I'm just kinda
like, Okay, well, I'm going to grab
this pencil and start to draw this over a little bit. Then I'm going to follow this line and we're
going to enclose it. And then I'm going
to shade into it. And that if you remember Was where I said a lot of that shade is going
to be falling right where that shadow is. I'm just gonna keep on
drawing with my pencil. Just getting the form down. I can be as tight
as I want to be your loose or whatever, right. And sometimes if there's
There's contouring like I can put a
little line in there. Just help with the
contour of it. Okay, so what I'm gonna
do is draw a heavy line. So I'm pushing down harder
on my pencil, right? Maybe I can even use a softer
pencil for some of this. Okay. And then I'm going to see
where does it attach. It goes all the way up
into the bicep here. Then I'm going to come
and follow that flow. I'm kinda just following that where I would drop
that shadow, right? And I can come and
shade it all in. I'm trying to right now. I'm trying to have
it an even blend. So for now I'm trying to
have it an even blend. I'm just kinda rotate my
paper just a little bit. See if I can keep
within the lines. That's always handy, right? Coloring within the lines. You remember practicing
that as a kid, right? Okay. So right now, I've got just the form of
clauses in here, right? Okay, of the chest. And all that is
showing is right now. It's showing that
here's the main shadow, not a drop shadow or
anything like that. That's just the main shadow. Now if I want to have the
drop shadow from this chest, I can come in here, kinda follow the form
of what's happening under here and do
the same thing. Alright, I can
shade it and maybe I'll go a little
bit of a lighter. A lighter bid for that
drop shadow, right? I can go a little
bit lighter in here. I'm just follows some
of the muscular forms. I kinda go through and do the muscle forms as I'm
shading, as I'm rendering. So you can see that's looking like here's light and
there's the dark, right? It's kinda working really well. Something else that can help
signify light and dark. And I've already kinda
started doing this. As you can see that
any line that's on the lower end of it
where there would be shade. I can make that line
thicker, heavier, darker. Alright. Okay, so if I'm contrasting this
line with this line, I want this one because it's in the shaded area to be
heavier, darker, thicker. Up here is gonna be thin, lighter, and maybe even
a little inconsistent. So I might break it up just a little bit
or something like that. Alright. Okay. Does
that make sense? Let me get rid of these
so I can come through and I'm just kinda doing again, I'm I'm up here, so I'm
going pretty light. I'm just kinda I might
darken it down in some spots and make it light
as it as it goes up here. I'm not going to render
out this whole physique. Not right now actually, I just want to show you
some different techniques. So the first
technique is blocking out understanding
light and dark. If you want to do
this even more so on the chest. Here's the light. So maybe I might, for example, have that really lead light
shading in this section. If you see once I
start to get rid of this, well, there's the forum. If you remember the
spheres that we were working on, we can have, we're working on our tonal value going from light
to medium to dark, to really darken
that kind of stuff. So the first thing we're doing, we assign the light source. Then we started darkening lines. Then we started applying
tonal value to it, right? What you can do if you want
is say something like this. Let's say I come in here and
I'm gonna do the same thing. I'm going to show you two more
advanced techniques here. So I've got this
bicep, I come in here, I'm going to make
it dark underneath. And I'm going to
come in here and really make it shaded up. Alright. So I'm shading it
all up in here. This is without any smudging. We can smudge. We
can always come back and smudge it
later and stuff, right? You and your little
sticky fingers smudge and things income. So then I come in
here and make sure that this line is darker. What I can do is go and lightly
shade this entire thing. Right? But then what? I've got this spot here
that I want light. All what I could do
is grab my eraser And just start lightly
going over it. And let's see if I give it
to this a little bit better. Might be able to see
what I'm doing here. There we go. So I can start erasing and focusing where that light
might be landing, right? Sometimes I like taking
away from the dark instead of just focusing on
where to apply the dark. So that's, that's one
way to do it to show this where the light's
hitting their right. Another one that we
could use the eraser for is use it in the
bounce lighting. Remember when something hits the ground and kind
of bounces up? Well, we can do it
right here as well. Because it's bouncing up
towards the darkest area. You could see how that
kind of gives it form. And if I want to,
I can come into the pecs and do the
same thing there. Give just a little line. You can see I'm keeping
my original line there and adding some
bounce lighting to it. There. We can see how there's a
lot of form taking place. Now. Another technique I want to show just a little
bit more about is hatching. This is a Comic Book technique. What you can do is you
grab your pencil or pen and start patching. It doesn't work that
well with adult pencil. You have to really keep
that pencil kinda sharp. But hatching like this, like just using, see
if I could do it here. Using simple lines
like this will help. Give a little bit of form because they're
going to follow the contour or the shape
of whatever form it is. But they're not going to totally color it out like
what we've done here, that we're not going to shade it out all the way and stuff again. Sometimes you could do
it along the border, like what I did here
of the shading. You can do it just by itself. If it's really light. You can come up here and
do it on another border, on the border of the highlight. Just a little squiggle. I really prefer to do
hatching with, with pen. Okay. So what you'll see
here, what I just did was kinda give almost a
circle highlight, right? You could do that to
even without doing that, you can come in and give it
like just a little as if it's got a little white reflection off of it or
something like that. Alright? Okay. The main thing with
rendering Muscles is that you're looking at them
in the each of their forms. So first it's about
drawing them correctly, which we, we've
covered a bit here. Next is about
realizing that, okay, well, Here's one muscle. Alright, here's one shape,
Here's another shape. So if I'm looking at it,
it's kinda goes like this. And you can see I even drew
the contours over top of it. Alright? So if that's the shape and the light is
hitting right here, well then this would
be the darkest spot. And then it slowly,
slowly comes up to here and starts
to lightening up, lightening up and wraps
around that, right? Okay. So really rendering Muscles or rendering anything is about
understanding that shape. The nature of that shape. Understanding where the
light's coming from, and then just choosing
how you want to apply your shading techniques. I've shown you some stuff
here with a pencil. And now I want to take a
little breakout because I also recorded some
stuff with inks. So why don't you check
it out for a moment. The first thing I do when I'm approaching a piece like this, especially inking
it digitally as I am with Clip Studio Paint, is looking at a light source. So I'm going to assign
a light source. I'm going to say it's
coming from this side. It's going to come from yeah. Let's just put it to light
as is from the top left. And dark is gonna
be from down here. Okay, so if I've
got that going on, what does it do? Where where do all the
where's the light going to fall while the light's
going to fall here, right? Especially here might be
a little bit up here, might be a little bit here. And in through the fingers
might have a band down here. And here. This is where the primary
light is going to fall. Anywhere else?
Well, that's mainly word that light is
going to touch. Now, what about the dark where it's gonna be the
darkest points? Well, in some
shadows here, maybe, maybe somewhere
around this point in this crotch area, lights
not going to fall there. Maybe just under the
arm a little bit there, right under the knee here. It's gonna be shadowed and maybe just a little
bit under here. Okay, so in somewhere
in these points, maybe down into the apps, you can see how this is
the primary light source. This is basically going
to be the darkest spots. What I'm gonna do is back
this layer away even more, just so I've kinda got
it there and I just got it as a bit of
a reference for me. I'm also going to
back my pencils away so that they're
not quite as punchy. So what I'm doing right now is lowering the opacity
just a little bit. And now, after all that setup, now the inking actually begins. I'm going to grab a pen. The Clip Studio Paint pens. There's a whole bunch
of different ones. G pen, real GPM. Some of these are really good. I downloaded this Japanese one, but I kinda like
there's something about just the way it flows. Just kinda flows
with how I like it. First thing I'm going
to do is kinda pop into this area over here. It's the highlighted part ripe, coming to maybe around
15, testing my size. Something like that. What I'm gonna do weirdly is put a couple of little
highlight circles in. Okay? So I could do this after. I can do this before, but this is going to show kinda like where the sun is hitting, right? This is going to be like
some blank spots for, for showing that basically this is a pure white
that's gonna be in there. So now that I've
got that I'm like, Okay, where do I start? Well, why don't I
started in the shoulder. It's the first thing that's
out on the side here. And just kinda moving
around a little bit here. Okay, So I'm gonna do a simple
outline of the shoulder. Not always love in
that first stroke. And you going to see I'm
bounce back a little bit. I'm going to do the metal
bands and they're gonna be, and you can see they thicken
and thin as I go through it. Going to do the chest here. Little bit of a
thicker line there, even though it's
up against here, usually I try to have
thinner lines going on. Now as I'm coming
towards this band, I'm gonna just kinda make sure that I don't
incorporated that much right? Right now, I'm just kinda
doing some outlines and this can seem a little bit
not that exciting. And I get that because it doesn't seem that
exciting right now. It's going to get a lot
more exciting really quick. Let's see if I get
attached to those lines properly or not even
attached to them. Just bring it close. Here we go. Okay, so I'm gonna
bring this across in. This Peck is kinda coming
up here under his chin, into his neck there. And I'm kinda getting it all put together a little bit here. Just do some little bit at
here to show this band. And why am I doing? Why is there some taper here? I like the feel of the stroke. That feeling of how this has a natural kinda thickness going
through the middle of it. But see, what do I have here? I've got this drop shadow here. So you know what,
I'm gonna do, this drop shadow that
comes from his jaw. I'm going to just
outline it for now. I'm going to come in here and this is where that drop
shadow is going to be. Now I'm going to kinda come in, not because I want to draw
ink as face yet or anything, but because I want to
show that in here, now, there's some
things that I can do. I've got this drop shadow. And I'm just gonna
kinda pop it over. And there's a few
things I could do. I could do it hatching, right? I could do that. I can darken it up underneath
even more if I want. Guess when accent there, right? You could do another line
through here if I want. And again, what
does that do now? Well, that grabbed
onto that dark blue that I wanted to show has a
bit of a drop shadow, right? We're else is there some blue? Because right now I'm doing all these highlights and stuff. Why don't I come, come
down here and show the difference in an arm
of how this might look. So here's the bicep coming
in on this point, right? And in theory, we would just have these bands coming
straight across, but they're being blocked a
little bit by that highlight. I'm also going to have this
line coming in and that's going to follow
roughly what I did for that, that block shadow. For that section that
I want to block out. I want to block
this whole thing. I'm not so sure right
now. Let's see. I'm all also do a
light one with the Hi light, hits a little bit. Kinda come in there. I can
even accented a little bit, a little bit of a
lineup this way too. But this one is darker in here, so I'm going to thicken this up, make it a thicker line. Just to show that this not a lot of light
is catching here, right? Maybe even another line coming in here and thick on
the border. Underneath here. There we go. Okay. Even go a little bit thicker. Some of that bended metal look. Okay. If I wanted to, I can
do a few other things. I could put a little bit, a little bit of
abandon their right. I can also come in and this
is what I'll do quite often, is remember when we're talking about the tip of the ridge, just having a little bit
of a highlight on it. All I have to do is hit that. That kind of follows this
highlighted average here. I'm just erasing
it a little bit. So that looks like it's got
that highlight on the band. Okay. So what I did there
was you can use white if you're thinking
naturally, I guess, right? But what I did there was just use a little bit
of black to her, transparent to the black set out from underneath the pec here. I think there should also be
a bit of extra black here. I didn't quite do it in there. Here we go. But I think it'll
work really well. So anything else that we
want reflective here, maybe another little circle, sometimes a little bit of, actually I want more
wiggle in that. A little reflection swirl,
right sometimes. Okay. Now some people like hatches, other people, they like
a little squiggle. Like I said, what
that squiggle I might just put that little
band in there. Right. Okay. Just cleaning it up a
little bit as I go through, you can see how this has
already coming together, right? This looks pretty good already. I could do this. And these are sometimes want to go black. These can be some light
lines coming through here. And it's my choice whether
I want to do that, highlight and get rid of it. I can even just come
down to transparent and do it as a highlight. Let's see if I want
to get rid of that. That can kinda give that same appearance a little bit, right? What do we think? It's
getting there? Now? As I come down into here, there's gonna be some
some darker spots underneath here and a real
dark underneath here, right? So I'm going to really
darken this up because this is that area that I said
would be mostly in shade. So I can come here. Maybe do this line here. If I want to. What I can do is actually coming fill it depending on
the program I'm using. I'm trying to avoid
fills in this. I I sometimes use a bucket fill that can
sometimes work right? Like can sometimes
work really well. Other times, I might use
lasso tool a little bit. Let's see if I just have
this banded in here. Okay? So this is looking
alright, so far, I want to have something that comes along here a
little bit more. We go and I wanna do
this transparent. I can always go in and clean it up a little bit more if I want. Right. Looking not too shabby. If I do say so myself. See if I sent her this just
a little bit. There we go. Yeah. You can definitely see that this is the lighter area right underneath here is darker
and that's what I'm showing in my inks that
there's gonna be some, some areas of where the sun is hitting and
some areas where it's not. Alright. So keep on going here. Keep on doing the bands Okay, so what I'm gonna do here is I'm going to
actually show how I use a selection tool to fill instead of dragging
all the way through. Alright, so I'm just
going to select that then fill with
my assigned color. Now that might be a little
heavy for what I want. But of course, what can I do? I can come in here and get rid of a little
bit of it if I want. Alright, just notch it out. Come back and do some of the
detail on the other side. Again, like I said,
I wanted this heavy on wherever I was
laying this blue, right. Wherever I was planning
on laying the blue. That's where I wanted to put some extra emphasis
into any part that I was putting down
this light source. All I wanted that a little
bit lighter, right? So there's gonna be
not as many heavy inks going in these areas, right? I might just put the occasional band
underneath here or something and carry some
consistency with it being away from the light source here might just be a little
bit under there something. Just a little bit their income. So like I said, I'm trying to respect this
light source a little bit, not a little bit as much as I can while still being able to play around with
some of these lines. So if I want to, I can even play. I can even do it off of using
the select tool and stuff. Right? There we go. This is modeled a lot after the The reflection that we saw on my hinges at the beginning of
this video, right? The bathroom door hinges might be a little bit
of black down there. So what do we think? Is that looking like there's contrast between
this bright spot here and this dark
underneath belly here. Definitely, I'm definitely
seeing the difference. If anything though,
I want to show a little bit more form
in this piece here, just to have it give
the form that I want. There we go. I wanted to give a little bit more formed that bicep, right. Let's see if we can move
on to another area that maybe we can totally
blocked out. This area, the crotch. Block out the crotch. There's a few things
that we could do here when we're blocking
out a big area. So one could be simply
select it and fill it. I want to fill with this. There we go. Select it
and fill it, right? That's one way to do it. Another way to do it is
to select it and use our brush and kinda fill it with a hatch
and then maybe even outline that
selection a little bit. Alright. So it kinda works well. Sometimes it depends on the style that you're
using and stuff. I like it that here, I'm going to really add
some heavy darks down here. I like it that it frees me up to be able to do a lot
of different things, right? It kind of unknown for me. It gives me a lot
more time to focus on being able to just
add in details after. So a selection does
not have to be an automatic full-on fill. A selection can be
something that'll just help you gather that space. And just say, Hey, okay, what am I doing in this? You can see on this
side of things, I'm gonna go heavier
with the blacks. Maybe even a little bit of
occasional hatch, right? On this side, other
than like this, this Hands part that might be heavy underneath
it because that shows like The Shadow of the
shorts up top is gonna be kinda like income. So there we go. That's one way to do with that selection
is we could do it with a fill or we can do
it as just this kind of selection and see what
we've got in it here. Let me show you another way. Or it let me show you
more examples of that. Maybe I'm going to come
in, select this again. Like I said, what I
can do is kinda maybe grab a larger brush and
fill the outside of it. Okay. Then I can come inside
if I want and just kind of go back and forth. Kinda slid on that one. Something like that.
There's a lot of different patterns
that you can use here. So I'm just going to use this and see if I like that. Come back down to a ten here. I'm showing you a little bit of the the sizing I'm using for my brushes just off
to the side down here. So you can see how
this can be used. Alright. Then I'm going to
come off the leg. Maybe even in here, I can do this same kinda swirl. Come in this side. Now why did I leave this
space under here? I kinda I came here but I didn't quite see if I ankle
this little bit better. I didn't quite come to here. Well, I'm using this this
thin section here as thinking there's a bit of a bounce
light so that there's a little bit of a
bounce coming to their that I'm gonna leave it as is. And I might even come in black this part out
a little bit more. Okay, so we can
see like already, these are the dark spots. Alright. So I've got a few ways sued. I can go in and
dark fill it right. Just with autofill or I could fill whatever
program you're using. I could come in, do
it as a simple hatch. I could do it as a bit of a
combination of those things. It really is up to you and
how you want to do that. Okay? Hopefully that was
helpful, you know, like using a pen I find is
better for certain techniques. Having that heavy ink, it gives us certain look
to rendering out a figure. You don't have to do it. You don't have to have a pen for this course or
anything like that. You don't have to
do it digitally for this course or anything. But what I wanted to
give you a glimpse into just different approaches of
how to render IEEE shading. This muscular figure. Of course thinking one had, I added in the metal bands
and all that kinda stuff. But really fundamentally,
it's the same principles. We look for a light source. Number one. Number two, we try really hard to understand what form
we're looking at. Number three, we make a choice of how we're going to
approach that rendering, shading, blending,
hatching, inking. And we tried to be
consistent with it. So those three steps
are going to help you be more consistent artist
in your rendering. Guys. This is the assignment. You can actually do a
few assignments here. You can do it once in
pencil, once in ink. You can do it five times if you want to
use different mediums. You can do it just the
muscles with shorts on, or you can do it with
the steel bands. It's really up to you. It's your choice, guys. I'm like, I'm really open to it. The main point is I
want you to do it. I really want you to
start to practice and render and shade and do all this stuff and
then send it to me. I would love to see
what you send my way. It's important because I want
to make sure you're making the right progress and not
making really simple mistakes. And the light source or the
form that is going to hold your masterpiece back from
looking how it really should. Hope you guys have
FUN with this. And I hope you learned a lot
because there's a lot here
31. Facial Structure: Okay guys, this is a big one. This is where we really start into doing
portrait drawing. In case you haven't noticed. I have been getting you to do
this already in some ways. I'm all tricky like that. Do you remember way
back when I gave you the exercise of
drawing circles, I'm hoping that you've
been doing lots of it. So many circles that you're
getting sick of them. Not just circles though, if you remember what I
asked you to do next was finding like that, bisecting the circumference
and seeing if you could adjust it just
a little bit, right? You could adjust the angle
of that sphere or something. Well, look what I
got in for us here. I've got giant spheres. We're going to do exactly
that. We're gonna do these. We're going to try to
draw circles here. And you hopefully have the
sheet right in front of them. Then we're going to
bisect bisect it. And you can see, because
it's a basketball, it's already got these
circumference lines done on it. We can add a little bit more in. Notice how they
they come from that that kinda got an all pole.
Yeah, let's call them poles. So we'll put another poll
on this side and one have the circumference lines going
there as well. There we go. Practice on top. I gave you these bowls for
a reason. No jokes there. And just keep practicing. We were practicing
on smaller bowls and now we're just seeing
on bigger balls. There's a reason why
I'm making you do this, not just because of the
lame jokes I've got, because this is going to
help you tons, right? So just keep practicing this
again and again and again. Until it looks pretty
reasonable that you can reasonably draw the curvature
of those spheres, okay? You know what? If
you can't do it? Well, Like legit, I
don't really want you going on to doing more if you can't do this
type of exercise. Okay. I know that sounds mean, but I mean, I mean,
kinda mood right now. I really want you
to be able to do this so that you're more comfortable when we
move on to this. Okay, so we've got circles, we've got circumference
and we're feeling a little bit
better about it now. Now I'm going to show you how we work that into a human skull. In fact, I worked it
into a human skull. I put the ball superimposed on this skull
and we're going to bisect it. But I'm going to carry
that line further down. Okay. Okay. So I can, if I wanted to, I could still do my little circumference
lines on the ball, but that's not what's
going to happen here. Now that I've got this shape, this becomes my form. And it depends on the skull
might be something like this, but as we're coming in here, it stays pretty even. Because if we look, this is
rounded, but this is flat. So we've got this rounded part, that's this first
half of the bowl. So when I draw the ball, That's, that first half is gonna
be fairly rounded here. So our circumference lines will come like this
over top of it. Or even I can do them this way. But once they get to
here, they're going to drop straight down. And then they just would be markers, markers going across. Now what are the markers? Well, we'll explore more when we get into
the faces below. But it's pretty easy
to just measure. Just like we have
different rules of proportions and stuff, the rules of eight and
stuff like that, right? One easy one for the head is the top of the head to
the bottom of the chin. If we bisect it in half,
just cut straight along. That's where the eyes go. Okay. And it's starting to look
like little eyeglasses there. So again, if we go
from the bottom, halfway, is where
the eyes are. Okay. This looks a little
goofy on scrolls. So let's try it on this
hideous looking man. Fellow Canadian, I can
say that about him. Okay, so what we're gonna
do is look for the forms. We're going to look for the form and just
say, Okay, well. Here's that circular
form, right? Here's down to the chin. So if I carry this over, you know what,
maybe what I'll do now that I'm thinking of this, I might just get my ruler going on here and carry it
right across the top. I kinda works. Luckily I made this
sheet to work that way. It's not perfect, but it kind
of works that way, right? Okay. So I've got that. And if I
look from top to bottom here, from top to bottom, halfway is about the eyes. Okay. The upper half here. Not a lot going on inside
of Ryan Reynolds up there. Sorry. I feel like I gotta get revenge on him for things
he said about Hugh Jackman. From the lower half though, usually what happens is
we can divide in threes. The first third is
gonna be the nose. The second third is nothing but halfway through
that is his mouth. Okay. So this is the I right
above it is the eyebrow. The nose is one-third down. And then one-third of
that half is the mouth. These are Ryan
Reynolds proportions. These are not
everybody's proportions. Some people have smaller chin, some people have
larger chins, right? Everybody is gonna be
different, but this is a pick this face because
it's kinda easy. He's got that standard kinda Western male Hollywood look
to him and stuff like that. And so this works really well, and that's
why I picked it. But realize I'm teaching you
this just as a basic rule, then you can have
variations on top of that. Okay, so here's some rules
and structure going this way. There's another one though,
from that eyeline to the ear and from the
nose line to the ear. The ear starts there and
comes down to there. Okay, so the ear usually starts roundabout that
insertion of the eye, the corner of the eye and
comes right about to the nose. It also obviously comes up above the brow or to
the brown depending on, again, how big and
floppy ears are. If we're looking
vertically here, you'll find the corners of
the mouth and you know what, I'm going to switch colors
for this just so we can add some variety in here. The colors of the mouth, usually colors
corners of the mouth usually align with the
pupils of the eye. Okay. So there's some balance there. The outside of the
nose will often align with the starting
of the eyeball. But again, this is really dependent because some people
have really big nostrils. Some people don't try it, So it really depends. This melting is also
fairly dependent, but a lot more consistent. I don't love this
rule for noses. I think it only works for
really narrowed nostrils. People. I like to set these corners of the eyes
and then start going off of there and then
plotting everything else with the corner
of the eye though, I usually just hook
a little angle N, and that's where the
eyebrows will start. So we eyebrows,
we'll start there. The hairline is often indented right above this
eyebrow in this section here. Then comes up to whatever
it's gonna do up top. I've got a bit of a
receding hairline, so I'm a little jealous here, but, you know, that's an
average hairline or something, something along those lines. Okay. So what do we think? Do these proportions? Do they make sense
if we were going to start plotting them out a
little bit as we go through, as we're drawing
things and everything. But let's see if we can recreate
this just a little bit. I left room for you down below. So let's see if we can do
this actually, you know what? Why don't we do that
Master line over top, all the way across. And then other one down. Just below. There we go. Okay.
So if I want to, I'm going to have
that bisecting line. And I'm gonna kinda See if I can have circle that's
almost as wide. Here we go. Hey, there's
a circle that's wide. Chin, jaw comes
comes up and over. I'm looking for that's kinda equal sides on either side of the
center line, right? That's comes up and over. Okay, so now that I've got that, well, what do I wanna do next? I want to bisect
this in half, right? So if I'm looking at
half, what did we figure? Somewhere around here? Does that seem half that
seems a little low to me. I'm gonna go with it. Yeah. Rolling with that as my half. I'm going to go with it so much and I'm carrying
it to every other one. Okay. So I've got that and then one-third of the
way down would be, let's call it right here. And again, I'm going to
carry it all the way across. I have a lot of confidence
in this measurement. I probably shouldn't. And then half of the next one-third is going to be
somewhere around here, right? And that's actually maybe
a little bit higher up. That's going to be as mouth. Okay, so what do I do now? Well, I'm going
to pretend that I sketch this really lightly. I'm going to fade it
back because it's digital and I'm
cheating a little bit. And then I'm gonna come
in here and see if I could do some of these things. So I'm going to come in and add the markers
for those eyes. Then down below it on the mouth. I'm going to have the
markers for the mouth. So he's kinda smiling here. I've got that. I've got
the markers for the eyes, so I'm gonna kinda
go up on that. And he's got to this sloped brow thingy, Right? He's got a nose that comes down. Nostrils come up this way. Remember from this point I
was measuring his eyebrows. He kinda come up this way. Little thick but that's okay. He's got the bridge of the nose, is a little bit dominant on him. He's got that cleft. He's got a nice
rounding chin here. In fact, his chin seems to find its way up in some
details into the face. Right? Now I can roll up with a jaw. And then up towards that I think we're all up with a jaw and
then up towards the eye line. And then I'm going to draw
that up from that island. And then down to that here, down to that knows, there is hairline
and kinda comes, comes like this, right? Let's come up a little bit. Kinda comes around
and around this way. A little sideburns. And then his head
kinda comes up. He's kinda got this hair. Pushes over. Here we go. And then I can start
to add the details of the eyeballs going up from here. And do I like this? Oh no. I honestly think
his jaw should be lower if I was to make this
a little bit more accurate, I think actually I'm
going to erase this part. If I'm looking, his jaw
comes way down from the ear. So it didn't come way down from the ear and then come over. Maybe a little softer. I'm Angela. And this is where you
can spend a lot of time trying to measure
it out and get it. Get it absolutely correct. Okay. So what do we say? Does that look like
Ryan Reynolds? Barely. I think what's going
on as a little bit in the eye as if I
was to watch this. If I punch up the eyes
just a little bit more, just clean them up
just a little bit. Chances are I can make it look a little bit, a little bit better. What do they say? The eyes
are the windows to the soul. So if you can get the
eyes down on a subject, that would help tons. And of course I can go
through just cleaning up a little bit here and there. Not bad. I think the head of hair
could use a little bit, a little bit of work here to kinda wasn't really paying
attention as I'm doing that. But you can see how much
potential there is to use these measurements
to get the look. Urine you're going after. Okay. Okay. So
that's one drawing. Now, what would we do? We would go and recreate
this a bunch of time. So I would come
here and I would go over Ryan Reynolds
here. If you notice. I'm drawing this again. There's a slight angle. It hits here and then
it drops straight down. But he's not he's not
exactly straight on. This is closer to
being straight on. He's slightly skewed. Maybe not even that much, maybe maybe something
like this, right? It comes up and is a skewed because we can see that the ears aren't even,
even this side. He's a little turned on
this side and that's why the neck is coming out a little bit more on
that side, right? So what I want you to do is
kinda rough these guys in. First on the model up top here. Seeing, actually is looking
down just slightly, but here we go. He's even more turned. Coming up to the jaw, knowing the ears somewhere
around there and then that side
profile there, right? So if you wanted to, you could sketch all these in first and then start to
add details if you want. The key point is
making sure that the measurements are
staying roughly the same, right? Does that make sense? Hopefully it does
what I want to see, a whole bunch of
sketches like this. And then taking your time and filling in lines
if you want to, they can look exactly
like the person. They can look a little bit off. It's really up to you. I wouldn't stress too
much about it either way. Depending on how much
time you want to spend in your
construction, right? It's important to get
the construction right. Likenesses are going
to take awhile longer. So if I was looking at
this likeness, well, I know what I could do to
figure out where the issue is. This is a digital trick. But because I'm doing
it above and below, what I would
normally be doing is maybe drawing it side-by-side and bringing the
image back-and-forth and taking a look at it. So what I'm gonna
do just quickly, move it and see
where I went wrong. Phase isn't long enough.
That's one problem. So if I just go and transform
it just a little bit, Let's see, I'm
going to transform and just do a free
transform here. If I just made it just
a little bit longer, There's my proportions
that are a lot more in line with Ryan Reynolds. It's not perfect, but
that fits a lot better. You can see how
then what was it? What was wrong with
it originally, my original thing was his
my measurement of the head here from here to here was not high enough
for what I had here. And I went with the
width that I had, which was pretty reasonable. Actually, I think I got
to edit that a little bit more to give them
some of that width. But what happened
was fundamentally, I just didn't give
them enough space. I was too crunched
in. So that means the rest of these,
I've got a choice. Either I go in and edit them up, which I'm gonna do actually, to give them a little
bit more headspace. I think the reason I did
that was because it's just too close to scar,
scar Joe here. Right? And I was feeling
a little crunched. Nothing wrong with just transforming it a bit or
rescheduling it, right? Like if I'm noticing
something's wrong, sketch it out a
bit, change it up, see if I can correct
the error of my ways. I can even digitally bring it up here and see what I'm doing
that's wrong. There we go. So my sketches
were pretty close. They just needed to
be a little bigger, Much better, and look how much bigger they need
it to be, right? They need it to be a little bit bigger and that was
slowing me down. Okay, guys. So what I want you to do is for Ryan Reynolds to
do exactly this, go through and sketch out and measure it
out if you need to, if you really want to get exact. It doesn't really matter
to me whether I'm doing exactly like Ryan
Reynolds or not. I just want to do it close enough that the measurements and proportions are
close enough to it. Because next up is scarlet JO. I want to see what's
going on with Kargil. Okay. So I'm going to do
the same thing. I'm going to hunt. For the shape, and then just find the contour of her skull. So I'm gonna do that again. This is a nice
exercise actually, I find this very relaxing
just going through and hunting for the features, the basic form of it. All right. Actually I think
that's a little bit off. I think I'm to hide
notice how I'm not really following
the circumference, the shape of her head at all. There we go. That's
a better one. Then I'm going to
follow the shape. And once it hits right
around her eyes, It's just going to
drop straight down. And the eyeline there. And the port side
profile rather. There we go. If we want to measure scar
Jill, on what did we say? Here's the top. Here's the bottom. Here's the eye, halfway,
pretty proportionate, whereas the nose, one-third,
where's the mouth? That's interesting.
Different than the man. The man had a bit
of a bigger chin, bigger, bigger, lower down Here. Okay. The ear is still going
to stay in this side. We just can't see it
because of her her hair and stuff I got That's
really interesting. And if you look, she's got
that narrow thing going on. But her mouth is narrower. Her mouth has this
very narrow look to it doesn't go
to the middle of her eyes like what we
were expecting earlier. So this is where we get into
individual variance, right? This is, this is
why we talk about all these people having
different features, different proportions and stuff. That's why we like them so much. That's why some people are so popular in Hollywood
and others are not. I'm doing a quick hack here because it's just so much
faster than doing it. Doing it manually. And I'm already looking and we're heading
towards 30 min here. And I like to keep these
units not crazy long. So what would I do if I could copy and just
copy these proportions? This is basically as if
I measured them out. What would I start to do?
Well, I could take her eyes. I'm going to zoom in a
little bit more even. I could take her eyes and have this nice almond shape
to them. Alright. Take the eye. Nice almond shape to it. You know what wrong line there? That was the center of the eye. This highest starts here. There we go. I
wonder if how wrong. We can see she's got
a double eyelid here. For eyebrows are quite simple. Nose is also simple,
not a lot to it. I'm going to give
her her pupils and stuff. Here we go. Our mouth. So with women, actually, her mouth, her upper
lip is quite full. Alright, so there's,
there's the mouth and then very rounded and look
at even a lower lip here. If I zoom in, I can clean
this up just a little bit. Struggling at a distance. Like I said, her the distance between here and the
eyes are a little bit different than what we were
looking at at Mr. Reynolds. Okay. So what do we think? Pretty decent looking
so far, right? We've got hair. Starts to come at about this point and starts
to wave itself over, cross across her face
a little bit and fill out philip that away, right? She's got a heart there. And maybe it's coming
down this way. Okay. Now I'm also going
to come in here. Draw out this chin. Bring it up. If I wanted to, I can draw
the bottom on this ear, maybe in this hair, the neck. If it's there. And
there we have it. A picture of scar job. I don't like the eyebrow.
This is this is coming in and fixing things when we see some things a little bit
of MIS and just saying, okay, well, what can I do to make that a
little bit better? Looking a little bit more like the reference that I'm wanting. Right. There we go. Guys. This can take a very long time. I wanted to show you guys the structure of what
it looks like to really draw a well-constructed face and the proportions
that it needs, right? I think we did
that. I think we've got a lot of proportions that are perfect in
front of us here. Right? Now it's up to you. You want to construct portraits that are
exactly like somebody. You want to do. Character caricatures
or comic style. Know what's, what's your style? What's your style gonna be? What, what are you
aiming for? I'm curious. This was tons of fun. Oh, I can see where I
went wrong to the hair. Look, it's coming
on this side here. Always. What helps sometimes
if you are in blue and you roughen a bit of a hairline, and then in your lines, you come in and you're
like that. Alright? And that helps you
follow it up. Guys. I hope this unit on understanding portrait drawing
and proportions helps you. This sheet has a lot
going on for it. We only drew together
two phases, right? Just the construction
loan on these, if you're really going to take the time to measure them out, would take a very long time. I want you to do that. One time I want you
to go through this, maybe even with me as
we were just doing it right now and play it loose. Just play around and say, Okay, well how does this
feel and what, what faces can I come up with? Then go after the sheet again, see if you can recreate
it exactly like or as close as you can do to the reference
material provided. This is an exercise
in both understanding the fundamental forms
underneath the face, in understanding the proportions
and where everything, all the important
bits and bytes of the face are laid out in
relation to each other. Understanding the
unique characteristics of one face compared to another. And then putting
it into practice. Seeing where you find individual variation
within your own self, within your own
measurements and stuff, and seeing how close
you can get it to the actual
reference material. Hope this was fun for you guys. And if there's any
takeaway here, the main thing is I
told you to practice drawing circles. See
how much they helped.
32. Face exercise Don't Lift The Pencil! : Okay guys, I've got an
interesting unit here for you. I kind of paused a
little bit because it's something a little
bit different, right? It's just a bit of
an exercise for us to just have some fun
with and see what we can come up with.
It's gonna be weird. So be prepared to be weird. I'm going to show you
two different ways to maybe go about this. The first one I'm going to
show you that you can do is use the reference and do
exactly what we normally do. Have this in our circle, find the form, and
find the face. Right? So draw it right beside. Find the face nice and smooth. Nice and smooth. And find the outline.
When we do that twice. And we'll just kinda see where this takes us for a second here. Okay, so do it again here. Find that square jaw
that this nude has, and see how it plays out. Do it again here, right beside. Bring it down, find that
square jaw that this dude has, and see how it plays out. So we can do it that way. But that's not what
this exercise is. We've done this a few times
and hopefully you're, you've been practicing
and stuff, right? What this exercise
is, is what's next. I don't want you to
pick up your pencil. So I want you to, once
you put your pencil down, it's going to continue
in a continuous line. I don't want you to pick it up. I want you to put it
down and see if you can draw this hair. See if you can draw whatever
it takes. Enlisted this. Don't don't expect this to
be good-looking or anything. And I just picked up my pencil. I wasn't supposed to.
Don't tell anybody. Try not to make it
up. Okay. And so how do I then go in here? To the mouth? Do the
lips. Do this, right? Come back up. Do the eyes. Come back over to the eyes? Okay. That was tough and I'm going
to admit something to you. I picked up my pencil
and I didn't want to. It was just so instinctual to
bounce off the page, right? But that's what
we're working at. We're working at just
not doing exactly what our instincts are telling
us to like we're working to fight that just a little bit. And to see if we can
fight it, right. It's a little bit different.
So let's try it again. This time I'm gonna be better. I swear I will going
to try this next one. And I'm going to try hair. Nice jog, going to come
up here, do this here. I'm going to come over
and do this eyebrow. I don't want to do
the I come back over to this eyebrow
and I come and do that. I come into this, knows what am I looking for? That's it. Interesting, almost
looks like a bit of a caricature right?
Now, here's a question. When we did this
first little bit of an approach high roughed in a bit of a sketch with
with that green, right? What if I tried it without I
expect us not to be pretty. Let's see. You can
see how I'm still kind of aligning things in the way that like there's still that line for the ears and the eyes
and stuff I got right. Is it ugly? Absolutely.
Does it bother me? No, I don't think so. I think that what's important
is that I'm just doing this exercise by pushing
away from my comfort area. I'll tell you
honestly, my comfort isn't usually like I'm I'm a very sketchy person
and I keep it pretty light and I don't wanna do this. So this grounds
me frustratingly. So that's what I'm
hoping it does for you. Is it grounds you? It helps you think of
basic forms, right? Helps you push past
comfort that things are supposed to be good looking
because she obviously hasn't. It makes you think, well, would this be better
if I was drinking? And then how can I
make this better? Is it better to start in one
area and work my way over? Or is it better to just go with the flow and make it
more of a caricature, right? I put these faces here because I found them like
super interesting. You might recognize
some of them, right? But it's just, it's interesting. So if I start with what's
interesting here, the eye, the brow, the head, the folds, the neck.
On There we go. Hold on. What am I doing here? This almost looks, looks interesting. Alright? And how simplified as
this, this is like. I find this fascinating
for me because this is so difficult for me, right? How am I gonna do this? How am I going to keep getting texture down here?
This is interesting. I don't think I want to
spend too much time in this section of the hair. It's just, I think I can spend way too much time
that way wrong. That went south fast. Yeah. But that's the
exercise, right? Guys. Like I'm really
I'm trying to keep this kinda fun with it, not getting hung up in
and being pretty right. Because I think all too often when we're
doing portraits were scared to make it
look not perfect. It doesn't always
have to be perfect. With measurement techniques,
you can practice perfection. That's cool. There's a skill in
that direct skilled at copies from one to the other. In fact, I'm pretty sure there's a machine that does that. But this is a step beyond that. This is pushing our
creative juices into areas of discomfort. And believe me, looking at these drawings I just did
is very uncomfortable. There is a certain level of discomfort here and
you're looking at these. But I also realize that
there's a lot of growth here. There's a lot of
interesting things and not necessarily growth in my line quality or
anything like that. But growth in me pushing bass, pushing past rather
comfort areas. And that's what I want for you. I teach a lot of technical
units in this course, a lot of measurement and making things so that you
can make an exact. And I wanted to teach you
something very, very different. Something that helps you push
in the opposite direction. Something that helps you be
creative, more artistic. And a little goofy. I think that's what
we accomplished here, right guys, when I look at
some of these, I'm like, Yeah, I would've never
drawn this normally, but that's exactly
what it should be. These should look exactly this way because that's what
came out of my pen. Guys. This is your exercise. I hope you can take
this sheet and draw these faces and
just have fun with it. Push out of those comfort zones of wanting things
to be beautiful. Keeping the pen or pencil on
the paper the whole time, no matter how much you
want to pull it off. And then seeing what
you come up with. And when you do send it to me. Yes. I'm seeing because
because I also need a laugh. Fun guys.
33. Rotating The Face: Okay guys, I'm back and I've got another
lesson for you here. This one is about heads. Well, I think that's pretty
clear. Ads and faces. But in particular, turning them. You can see this handsome
devil in front of you is me and my winter beard. And yeah, I, I sketch
these out earlier. And to prepare for
this lesson here, I'm hoping that by
practicing more and more, you get comfortable
drawing faces, getting used to the measurements,
all that kind of stuff. What we're gonna
do is just kinda reviewed some of how we measure things and see how
that holds true. Measuring it and drawing
it from different angles. Okay, so the first thing
we're gonna look at is I've already got some blue lines that
I wanted to keep him here and there on your
worksheet to write. So this will help
you as a bit of a guide as we start to
us, as we're learning, we're studying, we're
moving on and stuff I get construction lines
are important so that you have that overlapping form of
the face and stuff. I'm going to switch
it up though and just go a little bit green and my sketch just so I can
see what's going on here. So we've got our top to bottom
and we've got our midline. But that's not where
things started. Where things actually
start is a circle. I can make my
circle really ugly, really rough or whatever. I can make it prettier,
whatever I want to do. But I'm just going to
draw a rough circle, bisect it, and drop it down. I think this is pretty
familiar so far. So I've got a bottom and
a top here right now, halfway through this
bottom and top. I'm going to come off. Yeah, I'd say that's
pretty close, so maybe maybe
somewhere around there. I'm going to draw a line
on either side of that. You know what, I
might even keep this, see if I can get get consistent
in my drawings here. So there's my line,
There's my top line. There's my bottom line, right? And like I said,
I'm really hoping you're following along. Okay, so I'm going to bring this scroll down,
bring the skull down, use my chin and my manly beard, a jaw, and draw it up that away. Okay. So I've got I've
got this going on. What's this halfway mark
here? What does this signify? Signifies the eyeline.
Let's start with the I. So I can either put my
eyes in as I'm looking, alien ask or kind of robot or something,
or just leave it be. Now if you look at my nose, is about one-third
the way down my face. If I do this and I
divide it into thirds, this is where my
nose is going to be. Right below that circle. My mouth is about halfway
between those points. And there's my mouth.
That's me. There we go. That's this rough
sketch of me, right? No. What do you think? Does
this does it look like me? Well, hopefully it
does If we start to add stuff over top. So I can come here and do the, the, the eyes a little bit. I can come and do
the eyebrows above. Alright. I can come down
here to the nose. I'm just kinda practicing little bit and come and
do my angry snarl. I'm going to come out here, follow the eyeline across the ear from the eyeline
to the nose line. Do the ears start up, comes down from the nose line. And then I don't know, I think I'll start
drawing my beard and do the do the under section
of the beard here. Do the over part of the beard, the upper part, do the
hairline a little bit. Comes around here and my nice receding hairline comes around. Then I've got this this part that goes there,
something like that. Actually, I don't
know what what I drew there are why I do it, but I'm the beard is going to be here at the
lip underneath, right? There's that little tuft under the lip and it
comes over and down. Comes over and down.
And then I've got this. Okay. So what's the difference between the one that I just drew up here
and the one up here. This one looks a little wider, like I feel like
this one is wider. This one I drew a little
bit too narrow on, right? Yeah, that's the
main difference I'm noticing like a much wider in the cheeks and everything and my eyes
are a little wider. If I wanted to go in,
especially the eyes, I get clean them up a
little bit and see if. See if that helps. Just a little bit. Helped a bit. But you know what,
here I've just got chubby cheeks and
here I'm thinner, but the structure
is there. Right? Okay. Let's see if we can
go on to the next one and see if we could do
something similar, right? So I'm going to, I'm actually
going to keep these, these lines that I've roughed in here and I'm
doing a really rough. And there's a reason
for that because I just want to keep
it nice and loose the way that I'm hoping
you're sketching as well, right? So there's that. I'm going to bring this
central line kinda curving. Remember we've got a ball here, It's kinda curving the ball. Here's my top, here's my bottom. Halfway is the eyeline, right? So that's gonna be my eyeline. Their central line is
going down to the chin, comes up, comes around
for the ear roughly. And this one's
going to come cheek there and roughly come
down and come around, and then my neck
and into the traps. Okay. So that's a rough
should probably do the nose. We go one-third. One-third. There's my nose. Half of that is my mouth. Okay. You guys like
sketching like this? Like I mean, like doing the roughs first because
sometimes what I honestly do is I just
kinda go to all of them. I noticed I'm doing much smaller here than I am
up here, but that's okay. Maybe I didn't give
myself enough space. Kind of go in here. And
this is my high lines, so my jaws just going to come, it's going to come
up the side here and back into the year,
roughly around there. And then again, one-third, one-third and half of that. That's my mouth. That's my nose or thereabouts. Okay. I feel like the head. Yeah. My circles
are not big enough. Once I've got this all laid out. Well, I can come in
and start sketching. Going to come in
and maybe I'll just zoom in just a little bit more. There we go. So what I like to do is
maybe start with the nose, bring it off of here, have it come down to where
that nose line is? There? Have this eyebrow
come off of the nose, come there to the side
of the head here. Bring this up, right? This eyebrow is going to
start there. Kinda come back. My eyeline is going
to start there. Sweep under this one's probably a striking
somewhere there. Sweep under my mouth. Give me unhappy
expression again. Under the lips, right? I can come out here. Draw that cheek coming down. Here is gonna be,
I can see already like I've got way more
space here than I do here. So if I, if I wanted to
make an accurate portrait like then I would measure
it a little bit better. I don't, I just want to have
the fundamentals here of what my face kinda
looks like, right? So I'm going to bring
the beard up this way. Bring it around, bring it over, up into the ear. I'm going to have that
top of the year there. It's kinda the shapes
or whatever, right? Back to the hair. This is going to come up
with the hairline. Come up top here. Watch my center a little bit, and have my row.
That's not that cool. Inside here. I want to make sure I have
another lip that comes up, comes up above the
lip from my beard. This comes up and there we go. Okay. So again, what I'm noticing
is as I'm recreating it, all of these are narrower than the ones that
I'm copying and stuff. And that's just because I'm not carrying I'm not taking
the time to draw it exactly as that is because that's not what
I'm trying to create here. What I'm trying I'm
not trying to create an actual exact copy portrait. I'm trying to teach
you guys how to do some of these
measurements correctly. So I could start with
the eye here if I want. And that's the
bridge of the nose. I'm going to come down. I'm around. The brow comes over and it bumps up over
here, the hairline. And look how I'm just kinda
filling in almost like a puzzle piece or
something, a mask. Where's where's it
all coming from? And I can go in any direction. I can start on the back
here and work my way over. I can start on the front, whatever features you feel comfortable with of where
you're coming from. Okay, so I'm gonna come there. I might want to draw the
mouth in the mustache. He's gonna go over top
of it, comes down. This beard thing that
comes down in here, the lip mustache goes this way. And how we're does it
look without an eyebrow? There we go. Okay. Let's back out a
little bit and take a quick look here and see
what we think of it as it. Is it looking the way
that we want it to look? Construction wise?
I'd say, Yeah, yeah, if we back away some of these sketch marks and stuff
again, I'm drawing a face. I'm a little little squished, so I might want to
make sure that I don't pay attention that did. I'm not loving how, how, how narrow these art. I don't know. I kinda like it
because it's a bit of a comic book feel
to it and stuff. But it's also a little
bit too narrow. I think here I should have. If I'm gonna do that, I got
to play out and flesh out the back of the head here just a little bit.
And I bet you did. Just that change will give it the chains that
I was wanting. Yeah, Much, much better. And you can see how
there's a lot of space back here in
the back of my head. That space needed
to be added there, right? So continuing on. Now, this is where it gets
a little, little trickier. We're going to talk
about facing down. Okay. Do you remember a while back we were practicing with spheres. Weird. I got you drawing
a whole bunch of them, were practicing drawing
circles and then doing bisecting
circumference lines, right? So if this is the midpoint and then it
starts to rotate down, we can see how that
circumference line would rotate down with it. Alright? And so even though it
starts at that midpoint, it would rotate down even, even more or whatever as it's
rotating downward, right? Well, that's kinda
what we're doing here. We're going to have a
base. And you know what? I'm gonna see if I can draw, I should bust up the
ruler a little bit more. Kinda. See something
like this. I don't know. You don't have to write. Just doing it. Just for fun. The thing is I call fun in this and doing
this stuff, right? So I've kinda got this rotated face and
I'm going to measure it and say, okay,
here's halfway. So this is the halfway mark. From this halfway mark, the eyes are going
to rotate down. In my skull is being
rotated right. Then one-third from here. My nose is going to rotate down and then off of that again. So tick, it's going to be my mouth is going to be rotated
down from there as well. It's going to come
to that point. I don't know if I like there we go a little bit
more even there. Okay. So why don't we do
that again over here. And this is a kind of a
downward three-quarter angles. And so this is tough guys. This is not what everybody, everybody tries to avoid
some of these angles. And if we were looking
at it, this is halfway. Well, here's my, my
bisecting Hobbes fear, but it's, it's, it comes
to this point and so it's turning this way, right? And so this is going to be, imagine it's, I can start to
measure it this way instead. So this is my
halfway point here. And this is my one-third. This is one tick of that. Does that make any sense? Because there's two
things that happened. One, I turned and
started angling it. Right. So that turn that angle of my head change things
just a little bit. And I almost want to redraw it for you
because I don't know if I explained it exactly. But instead of measuring
from this way, which I can, I can also measure
from this way because my face is pointing
in this direction. So I could rotate the screen
backup this way if I want. But in reality I can also take these measurements and
measure along this way. Okay. Let's see this one. Yeah, my circles were
much bigger up here. This one's going to come down. It's going to come up. But how do I measure this? Well, again, this
is a slight angle. Almost as hard as this one, but not quite as it's
a little bit less, It's more like that. And so if I was to cut
it halfway and then it rotates from there and it rotates their
rotates from there. And there's my
measurements. Right? Okay, so once I've got
those measurements and let's see, what do I do? Well, I started to sketch it
in just like I did before, just like I did above. Alright. I can look at
the markers for the eyes. I can look at the
marker for the nose. The ears will start
here and come up. Start here and come up and down to where that NO
strikes the eyes. I won't be able to see much of them because I
should probably zoom in because I'm
looking down at them. So there might just be a
little bit going on there. The eyebrows will be
fairly close to them. The hair receding hairline
will come something like this. Jude Law ask hair
line. I got going on. I'm just doing whatever
hairstyle comes to mind here. Whenever I made my nose known as pointing
as it is up here, maybe I should change
that just a little bit. The mouth is here with
the lip below it. And then that beard
coming out of it, right? Comes around and I might as well draw on that part of the goatee. Comes up this way,
comes up the face. The side here, comes up the
face and up the side here. This comes down flares
a little bit for the jaw and I carried
it too far down. But that's okay. I'm measurement was slightly off
but it still works. If I want to, I can add in some, some cheek definition here. But a broad definition. Little bit of stress I get
from teaching and add that in. Let's see this next one. I'd like to start as usual, round the marker of some
familiar marker, right? So if this is where my
eyes are and look at this, here's kinda going, here's
my top, here's my bottom. Highs are gonna be somewhere
around here, right? But they're following
this curve. So they're gonna be
something like this. My nose is going
to be coming from here and it's going
to come down there. My eyebrow will be
something like that. So come up to my eyebrow there. The other side. I can over. I liked the center line
for plotting my hair. I just kinda plot it from
back here, coming around, going down to the jaw, around to the ear,
drawing it in. Like I said, guys, I've
said this many times. You don't have to follow exactly what I'm
doing at the pace, I'm doing it or something. But try to follow along. If you want to just
pause or whatever. I'm going to put my my
mouth in here. Lower lip. The thing that goes
under the lower lip, making that goatee. There we go. Sternocleidomastoid
with that part. And again, you know what,
I'm looking at it and I'm thinking I'm too
narrow this way. So all I do is take the eraser and just make
a slight adjustment. Cool. Okay. And the next one, this is kind of
down into the side. This one's tough
though. So my eyes are on that line, still, right. Eyebrow to the eye, back into the nose. Seeing a bit of my
beard here, things, certain things become
not so visible. Certain things start to
disappear a little bit. Alright. The brow up into the
skull a little bit. I'm going to come
back. The hairline. Comes on down. This follows the skull around back. Come over here. Draw that
here in a little bit. Just some awesome
little squiggles. Well, I can tell I messed up. Messed up with a beard.
Was it a little bit? That's going to come
I can do there. Just comes down. Comes in
that way. There we go. Okay. So what do we think? Yeah, What? Oh, I like the
evil look down on this guy. We drew it straight on. And it looks pretty good. Noting that it's not an exact
replica because we didn't measure it out exactly the size of our little
sphere, right? But structurally it's
how we want it to be. We came on down. Exact same thing. Structurally. It's
how we want it to be. We can get rid of some of
our construction lines and see what's going
on here, right? If we ever feel something's
a little off, well, we can just go in
and say, Okay, well, I feel like this should
maybe be more like that. Because no matter how much we're constructing
to begin with, we can still go in
and make a few edits. Just to make it that little bit better for what
we're looking for. Let's see. There we go. Okay. Last one. Looking up. This one can be tough to whole lot on nostril
action going on. It's not easy, but what happens is exactly what we
were talking about before. We've got our circles, right. Our initial circle
is straight on. With those points. Those points can remain. But instead now this person
is looking up, right? So our skull is looking
up and we have to make sure that our features do that as well, that
they're looking up. So what do we do? Well, we start off with our sketch. As usual. We just started making a circle. We draw a central
line because we're not looking off to
the side right now. Alright. We can draw our base chin and
we start to go up with it. This, this centre or this type
of simplified skull should be pretty familiar to
you at this point. We can then come
off to the side. We measured and
halfway, halfway mark. Now at this halfway mark, this is going to be
roughly are eyeline. One-third of that is going
to be our nose line. One little tick below that on this particular character
is the melt line. I can already see, jeez, am I ever narrow? You got to follow my model just a little bit better there. Now, they're not winds it out. And we know that if this is the eyeline and this
is the nose line, then this also will
be the airline. Like that's where the ears
will stay within that form. Let's see if we can have this
lesson over here as well. We're going to draw our circle. Draw our basic form, GoTalk, Go bottom right, and carry this over. So that means our, our eyeline, our nose line, multiline war, somewhat conform to
this standard, right? So the eyeline is going to come out to the cheek
and come down there. Like I said, I feel like
I've been lacking in the back of the skull and
some of these sketches. And on the side, the truth is the back
of the skull has got a bit more meat to it depending
on the type of skull. Now some people have
skulls like this. Others are kinda like this, like they have
this bigger thing. I call it the alien head. And I have one. That's why Why I don't
want to go fully bald. I'm just going to hold onto
my receding hairline for now because I just don't
want it to happen. So we're going to just going to continue this line
across this eyeline, nose line, which is
our measurement here. Eyeline one-third
and just tick down. And realize that it's gonna kinda go like this a little bit. Because again, we're somewhat looking
up at this, this figure. That's the point of it, is that we're somewhat looking up at it and you can see how
the ear fits in there. Okay. So now we're going to keep going with a bit of lines
and listen like, I'm kinda guessing you
guys are taking a break, whether it's a break between
each head that we're going at or whether it's
a break for each. Each row or something like that, take a break because this can be kind of tiring with the nose. We're going to see the
underside of the nose. Maybe some details there were, these eyes are going
to start here. Start here. And they can either follow the line like that or
there can be a little bit, little bit of role under
like a little bow, but it won't be like this or anything like that because
we're looking up at it. So even this line would appear straight by
looking up at it. Okay. So we're going to have
that We're going like that. The brow and the middle. I kinda like a long eyebrows. You want to try to have an
equal, right? My mouth. Still unhappy about life. And just a little
goatee beard thing. I'll keep that there. The hair can hide the
hairline on this angle. You can see the hairline talks a little bit by the eyebrow. They're going to come down, comes into the face slightly. When it comes up
into the moustache. So I can I can approach
it from either side, you know, I mean, I
can do the mustache. Then. Habitat away from the exterior
of the head and the hair. It's coming up this way. Given myself way more hair, even though it's not there. I really got the beard and
the outline of the ears. You can see how well this
is all measured in right? Like everything's in proportion
of where it should be. Good enough. So on these angled ones, especially this
three-quarter angle, I often like to
start with the nose. You'll probably notice
that as my marker, everybody is a little different where they'd like to start. But for me, the nose kinda
starts to center everything and have it have it where
I want it to be. Okay. You know what? I started to low on that. I'm going to back it out a
little bit. No, hold on. Here's my I didn't
sketch this. Correct. So I'm gonna jump in. My eyeline should
have been right here. This is actually my eyeline. There you go. Why didn't I do that? Weird. I put a brow in there but
I didn't put my eyeline. That's that's my eyeline there. So sometimes you can find yourself a little
bit off and you're like, where did that come from? Why am I doing that? Right? Look it up, try
to figure it out. Where, where did you go wrong? Why did things look
wonky all of a sudden, see if you could track it down. And occasionally it's
because while you just kinda forgot something or
messed up or whatever. Here we go. Can go back to this
ear. And you know what? Even there I can see, I, I want the ear to start
here and come down. Right. That's the eyeline.
I wanted to start there. There we go. Okay. So that
the hair is going to be like this. There we go. Much better. Now I've got
my mouth on this line. Not that angry. I've
got my mouth here. The underside of that lip. And the underside lip
makes it a little goatee into the beard.
Top of the lip. Give myself a
little beard there. Coming on this side, down
and over. And there we go. Now I can clean it up the eye. It looks a little wonky
and stuff, right? And this I is actually
should be drawn through. And then I could come just
clean it up a little bit. Any reason. But that is the three-quarter
slightly up angle. This one's gonna be tough to and hopefully I did this right. Yeah, I'm looking
at my measurements. I've got my my eye
in the right spot. So I could actually start
with that if I want. Start with my high and
then it arcs over, my ear is going to start
a little high there. I'm kind of paranoid
about drawing my eye in the wrong spot now
and so I mean, extra cautious with it. Here's my beard. I'm just going to leave
that there for now. I'm going to come back
up to the eye and have my brow above it with
the actual brow brow. Come in here, my nose come down. Never realize. Shape your nose until
you're actually like, I have a big bulbous nose like this where you can
play with a little bit. Do I have a cute little ski
jump? Oh, there you go. Wow. I just make
myself better looking lip thing under the lip, right, that little tuft of hair. This is going to come down. Come around and hen you can trace your hairline either from the bottom
or from the top. Here. There we go. Wow, guys. That's about 30
min worth of work. But so much was done here. I'm hoping you kinda took it in ten minute chunks and just made it a little
bit more digestible. If you want to do
exacting portraits. Like exact as it looks exactly like the
person measure it out. I was doing this quick and on the fly because it's
a teaching lesson. And I didn't want it to
be double this time. But if you do care about that, you want to draw my
face specifically. I don't know why
anybody would want to, but just in case in case you want to draw
me specifically, then measure it out, whether it's a ruler
and you're kind of bouncing back
and forth on that. Whether you are like e.g. you are doing stuff like maybe doing
straight measurement, straight down, right? Like if you're kind of
going like this and this right from here to here you can see where my
measurements are way off where my quick sketch did not
do my reference. Justice. Do that if you want,
it's your choice. But either way, you
need to do this sheet, this is really important. It's an important process, it's an important
lesson and it's an important assignment, okay? So whether you measure it out, It's a portrait of me, or whether you're doing it
just to do what I did here and show how the measurements
work in angles. It's really up to you. It's up to you how you
want to approach this, but it needs to get done.
I'd love to see it. So if you can, after you're
done at all, send it in. And I get to look at these
wondrous versions of myself. I expect to be both
impressed and terrified. Guys. Just have fun with this. And if you're not
getting it, do it again. There's a lot of
exercises on how to draw the face here
that I'm providing. And this is just one of them. And it's designed to just throw that extra practice
into having you feel comfortable
with your tools. You guys will catch you
in the next lesson.
34. Faces Comparing Styles: Hey guys, we're back and I've got another
unit for you here. This time we're going
to take a few minutes out to kinda compare realistic proportions to
more of a comic book style. Now, I want to be clear
on this when we talk about comic book styles. And then we move into realism. I would say a large portion
of that is rendering. What does that mean? Well, when we look at comic
book style is we often have simplified forms,
simplified lines. It's just nice and simple. It's one line. That's all it takes, right? When we get into realism, we see that it's been painted in blended and everything
has been smoothed and then even color is applied and all
these types of things so that we have a
very realistic look. It's painterly like when we
look at realistic paintings, all the definitely add form, shape everything through
every means possible. Comic books started off with simple print and they
couldn't print like that. They couldn't print where
that high-definition detail. So instead, simple lines. If you look at early
comic books and stuff, I got just simple ones. Newspaper print, very simple lines to show a
very simple form. As you start to get more
detailed in collagen forms, you start to add hatching and different types
of rendering, right? That's a little bit different. What I want to cover
here more so is when we talk about proportions, we have a realistic face
and then a comic book face. Are they really that different? Let's find out. Okay, so here I've got a
few faces done up here. The girl on the left is
a good looking woman. I know this because
she is my girlfriend. Yeah. She's she's a
good looking girl. The girl on the right though, is much more comic
book style, right? There's, there's more of a
comic book style to her. And how do we capture that? What's the difference? Well, let's break it down and see if we can figure it out. What I've done here is I've
put the top and bottom lines, right, top and bottom there to kinda show where
their heads would be. Right. So we've got that. That's that seems
like it works right? But what about where
everything else is aligned? Well, we can take a
look horizontally here and see this head is
slightly tilted forward, so there's a slight variation. Here's her eyeline. Here's her island. That can be part of it. Here's the nose,
Here's the nodes. We can see already. Here's the mouth.
Here's the mouth. If we look at from top
to bottom here on this. And again, there might be
some slight head tail, but we'll take a look into it. This compared to this, this top is just a
little bit bigger. This one's almost
perfectly equal, or the bottom half is
a little bit bigger. And where does that spaced
out in the bottom half? If I look at these
proportions between the eye to the mouth,
It's almost all the same. Actually, this looks
really similar, right? The eyes to the mouth. Almost perfectly comparable. It's this chin area. Look
at the size of the chin. Real people have a bigger chin and we'll get into a little bit something
different there, but bigger chins are
one of the factors. The other factor
is, like I said, I think this characters might
be slightly tilted down, so that could be a factor. Another thing that I think is
important once we get into, Let's zoom in a little bit. Once we get into we'll
take a look at her eyes. She's got a wide spacing
between these eyes. So if I was to draw her eyes, her eyes are fairly wide spaced. This might be a little bit of the camera playing
tricks on it. It might be flattening
out the face just a little bit, right? But we can look at this face, and this is five to six
eyes across here. Alright. When we look at where
the eyeball would sit, we'll look at her eyeball. Maybe. This one's more like
just under five. So you can see that when we're looking at the
more realistic proportion, the eyes are a
little bit smaller. Make sense as we get into
comic bookie things, the eye is get a
little bit larger. And then when it comes to Manga and all that
kind of stuff, they can get really animated, could get really
exaggerated, right? So that's one thing, right? Anything else that
we're noticing here? Look at the nose here
versus the details here. So on this one, when
I put the outside of the nostril on this one, it's not even there.
And if it was. It would be much smaller. So a smaller feature, nose, bigger ellipse, even though my girlfriend's
got pretty big lips. These are these are lower lip has a lot of
weight to it, right? So bigger eyes. The eyes are bigger, bigger, lips. Smaller, knows. Yeah, we're looking. This is the cartoon or
comic book look, right. Let's see if this
carries through as we go into another one here. Okay. Might not always. These are different
artists, different styles. So I'm going to carry
her eyeline over, nose line over a little bit further and her mouth line over. Okay. Because we're kind of even
top to bottom here, right? Eyeline over, nose line
over, mouth line over. These are lining up
pretty **** close. Right? But there's some difference
in proportions here, right? Here's her eyes. A little bit bigger space there, but five eyes across. Here's her eyes. Make that a little bit bigger. And of course I can measure
this a little bit better. But look at that. That's like maybe one to
three with some spacing. They're three-and-a-half, four. Maybe this is for eyes across. She's definitely Five
Eyes across, right? So the, the spacing of the eyes, the width of the eyes, the size of them, the width of the head. That's one factor, right? The lips, I don't know. Ruby Rose has got some
pretty good ellipse here. I don't think any
comic book character is going to do her on that. But look at the taper of this
jaw, look at that angle. If I was to have that same
angle, be shaving off. A fair bit of Ruby Rose
is face here and it would come from
maybe the nose area, somewhere around the nose. So look at how pointy
that would be. Huge difference there. Of course, to bring this up, but surgeries and stuff I
get tried to emulate some of these different
proportions, different looks. Don't recommend it,
but we have to study it and understand where
are the differences here. So if we're looking to make
a comic book character, the eyes will be bigger, nose will be smaller. Generally less
details on the face. Lips. Big, right? What about if we look at men? Well, here's a picture of Chadwick Bozeman and here's
a picture of Superman. Superman is a little
too tilted here, but let's see if we can
carry some of this across his nose is going to cross. Let's call that the mouth. Chin is over here, right? His eyeline is here. Okay. So we've got an
eyeline here. Already. Small nose. Then we've got the chin there. Small nose is one feature. I think that's a
different small nose. And again, very limited
details on that knows. Now, this can also
be played into ethnicity and how we draw different ethnicities
and stuff like that. So let's toss that one aside. Let's also take a look at when
we're drawing ethnicities. Whether it's details like
the nose or the lips. Those can be important in that character and important
in their ethnic makeup. So whichever Boltzmann, I'm going to put those
aside right now. I don't like yellow
circles look. But what I will say is
look at this **** chin. Boltzmann's a decent
looking dude, but he'd have to have a
chin as wide as his mouth. And then jaws that
come out straight in, straight down, straight down. Right? So that's one thing that
we would change on men. Maybe if you're looking for that certain type is at
squared, square root off jaw. You can even have that suctioned in look that come down from
the cheekbones, right? And a little bit
of details here. Now with men, you can add
more lines with women. When we're drawing women,
realistic, we see lines. I'm looking at
myself and I gotten lines all over my forehead
here and stuff, right. We do have lines no matter what. But when we draw a
comic book women, we take away the lines. So I'm going to say
no to lines, right? We take away lines
on women's face. On men's face though. We might give a little bit
extra, little bit extra focus, especially the chisel in the
face and everything, right? Okay. So guys, to
recap, for women, if we're drawing comic book
style, we've got gentleness, which is bigger eyes, smaller, nose, bigger lips. Let's see if I can
write that better. Taper jaw. Anything else? No, I think taper jaw line. Okay. So that's for women? For men. We've got the chin,
stronger chin. We've got that suction cup. Jaw line. I'm gonna stay away from
the ethnic features. So I'm going to say maybe
more details, more details. And this is a nice and easy comparison
between not rendering, but just looking at the
structural difference between Realism and
comic book style. So if you're wanting to get
into more comic book style, look at some of the notes here. If you wanting to
have your characters look a little bit
more photo-realistic, even with simplified lines. Stick on doing what
we're doing, guys. It's up to you and your
stylistic choices. How do you want
your book to look? How you want your
portrait to look, how you want your art to look. My job is to make sure
that you understand the difference and you're able to achieve
those differences. And then the choice is yours. Enjoy guys, have fun with it.
35. Shading and Lighting Faces: Hey guys, I'm back and I've got another
unit here for you. This time we're talking about
lighting, how to shade, kind of listen when we talk
about shading and rendering, there's a lot of different
techniques you can use. You can talk about
like hatching, crosshatching, blending, coloring, all that
kind of stuff. That's not what we're
talking about here. This is not a rendering course. I want you to understand
instead how the face is lit. And then from there
you can choose your running style so
where the planes of the face are even
right now you can see where the light
is hitting me. This light is kinda
like a straight above me here and look
where am I looking at? Right above there. That's where the main light is and it's highlighting here. Highlighting here maybe a little bit too many highlights, right? But if I was to change it, move that lighting around. Well, how would that look? Right. Let's talk about that
and see if we can understand the planes of
the face a little bit. Okay, So what I've
got here is Hercules. He seems angry. I'm going to go with a simple
way of explaining lighting. So what I've done is covered in grey or like a
greenish blue here. And I'm going to explain how, where that light might hit. Let's say e.g. I'm going to just switch this up
for one quick thing. Let's say e.g. my my lighting is coming from this side. Right? Well, that seems
pretty simple, right? So what would happen is it
would kinda come here and it would wrap around some
of the form, right? And if I wanted to, I
could just go straight. Let's just say I'm
going straight on this. And it would look like this. But that's not
really true, right? Because what would
happen then is like there's shading in here. There's shading in his
mouth from the shadow and that that part of the beard and stuff
there might be shading a little bit
of a shadow there. And again, it's not straight. It kinda wraps around some
of these curves, right? It might wrap around the tooth
a little bit or somebody might wrap around
the nose and have a little bit of fun
with these ridges. And it might even touch on
this side just a little bit because certain things are protruding when when
when light's hitting, it's not, it's not just a, It's not just a sphere right
into it's not playing. We've got bumps and bruises and he's got on his face here. So I can get in here and do the, do the rest of this part and
there's gonna be shadows. This is a little bit easier
because these are half, half spheres and stuff, right? That type of thing. But I'm just, I want
you to realize that when we're when we're
looking at light, It's not as easy
as you'd expect. There's crooks and crannies all over the human
face and body. Occasionally, depending on
how far his cheek protrudes, there might be a little bit
of highlight on this side. Okay. And so you can see how when, even when coming from
just what would seem like a simple side side
lighting thing. It's not that simple. So why don't we do
the lighting that I have right now over my head. That's a little bit of slightly slightly overhead
but not too much, right? Like it's just it's just coming forward and
overhead here, right? Okay, so let's
take a look at is, what I'm gonna do is selected, then there'll be a plane right here that's
on his forehead. There's the eyebrows, right? There's the ridges of the nose, there's the cheek ridges. And I'm just doing this really simple and really fast right? There is again, the nose, these parts, the lip, the chin. A little bit of a job. Well, maybe a little
bit on the ears. Of course, I can come into
this band a little bit more if I want to grab the light
a little bit more, right? And then it's going
to come here. I'm not too worried
about the rest of this. This is just kind
of gravy, right? Okay. So that's what it
would look like. And I can go in and add a
little bit more details, maybe a little bit
of highlights here, a little bit a little
bit clean it up and stuff around the teeth
and stuff like that. Right? Maybe there's a little
bit under the nose here. There's some wrinkles
that are happening. But you can see where I
hit the planes, right? It was the forehead
is the eyebrows, it was these cheeks
and it was the jaw. Right? So again, forehead. The brow. Kind of almost
a triangle in here. And the jaw and the
chin here, right? You can kinda see how that's
working on me right now. Alright? Alright, we're
gonna go for another one. And what I hope you're
following along, you can be either doing something simple like
just, I don't know. You'd just be coloring in
white or something like that. Using a highlighter
that could work. If you're working traditionally, you can be doing
the opposite and working that shadow
and everything, right? It really depends. What equipment you have. This is I'm just trying to like I said, teach lighting here. Why don't we go
with an under View. So basically it's
lit up from below. Okay. How would that look? Well, the bottom ridge here
would be lit up, right? It would light up
under the nose. And remember the
triangle, it would kinda be more like this. It would light up under there. It would light up the
bottom part of the brow. Right. And maybe a little bit here and maybe a
little bit on here. Okay. So it might be like
this, it might be just a little ridge line there. The bottom of the lip
might hit a little bit, the bottom of the teeth, maybe just catching
just a little bit. Maybe a little bit
up into the beard. The lower lobe. Right. Okay. Then of course, I
can do the chest, the shoulder, this part, right. That kind of stuff. So
how does that look? It looks like it would be
if it was lit from under maybe a little bit of the back of the eye or
something like that. It depends. But something along those lines. This is coming up
from underneath. Okay. Why doesn't it come up here? Well, look if it's
coming like this, right? The light is not
hitting up there. We're talking about
just when we look at like one main light
source, right? Okay. Do we want to go from this side? What about straight on? Yeah, let's do straight on. Straight on would
almost be simple. Like let's say I'm going
to select everything. And it almost looks like this. Right? That's kinda straight on. Only it's not even straight on. There's gonna be some
kind of angle to it. So you're gonna have like maybe a little bit of
a ridge line here. A little bit of oh, maybe that's too much
actually a little bit of shadow in here. Even with there's gonna
be shadow cast and the grooves and everything of a person's face is
going to be shadowed, deepen his mouth, right? There's gonna be a
shadow in the beard. The hair is going to cast
them just a little bit. Everywhere. There's going to be
just that, just a hint. It can almost always be
exactly straight on. It's going to cost somewhere. So it won't be much. But you can see that
we're still going to have just a little bit of
little bit of shadows, even if it's directly
straight on right there. We've got too many
grooves in our faces to have it white it out
completely, right? Okay. Another one that is really typical in mood is a
rim light from behind, like let's say I'm being lit
from that part from behind. So what does it do? Well, kinda just you can line
the outline of the back. Let's see if that works. That type of thing. But once again, we use
that as a simple thing, but then it starts to come into certain grooves like it
might catch the cheek here depending on how
far that light or how powerful the light
is behind, right? If that light behind
us, omega powerful, it almost wraps around figure sometimes or
something, right? It can cast itself a little bit. Even more, can go on any plane. But then you want
to go in and add in a little bit of detail like, you know, maybe that NO, or in the ear has got some
groups there, right? So not bad. Let's see. What do we got? We've got from the side, we've got from the front, we've got from the bottom, we've got kinda
like straight on. I don't even know how I
want to do that arrow. Straight on. We've got from behind everything is coming
from behind there. I'm wondering if there's any one that I'm missing
for you guys. I feel like this is this is so some of the basic lighting. Once I know what
I'll do, last one, I'm going to do
two primary ones. So e.g. from the I'll do the rim light in the
back like we just did. And this is often
what happens is we get a number of different
light sources, right? So this will be our rim light. Nice, nice and easy, right? It's from behind, right? Then what we'll do is like let's say there's a little
bit of bounce, some things hitting a table or some kind of reflective surface and it's coming up like you
can be standing in water, it can be staying on
concrete, anything. Right? And what you can do then let's see if I can shrink
the size just a little bit. Is just a little bit. It just something bounced up and it's just a little
bit light there. Okay. So that's a nice little
to two types of lighting. The harsh light, the harsh
behind overhead light, and a softer secondary
source, right? Guys. Lighting is important. How you choose to render lighting is up to your
style. Like what? Like I said, when you're shading and smudging or something like that with your
crosshatching, right? Whether you're using
colors, whatever it is, it's your choice and your
medium and everything, right? It could be
watercolors, whatever. I wanted you to understand, the planes of the face. And so as soon as you
start moving that light around and see if I can even do that just
a little bit for you. This is, I experiment
with this sometimes. With this. Alright, I start moving this around and you can
see how, okay, Well, half my face is dark, but as soon as it comes
up just a little bit, it starts to catch right there. Right? Starts to catch it a little bit more and a little
bit more, right? If it's from behind, you
know, I've got that. And this isn't a
very powerful light, but you can see how
it's rimming, right? If it's from over top, I've got all that going
on right from below. I'm doing evil
storytelling right now. Guys. I think it's important
that you have fun with it. But you also learn
that the face, even though we started with
this, that's not all it is. Understand those planes and you'll have a
lot of fun with it.
 Ed Foychuk, Making Learning Simple