Transcripts
1. Hi!: Hi, everyone. I'm Carla. I've been an illustrator
for nearly ten years now, and while I've done a
lot of editorial work, one of my absolute
favorite things to draw is people and
expressive faces. Faces are storytelling machines, and in this class, we'll focus only on
facial expressions. How tiny changes can
completely transform mood. I'm going to share my
favorite quick and easy ways to draw emotions
using simple shapes. In this class we'll not only practice drawing fun
facial expressions, but also build confidence
in your doodling. Create a simple system
you can replicate anytime and learn how to
tell little stories through expressive faces. By the end, you'll create your own mini comic script
told only through expressions, no words, just emotions. So wrap your pencils. Let's loosen up, and
let's do some feelings.
2. Materials: For this class, you'll only need three simple things paper, any sketchbook or even
printer paper works, simple drawing materials,
pencils, markers. Feel free to use
any digital media. That feels more comfortable. We'll also need a mirror or your phone camera to reference your own expressions,
and that's it. Keeping it simple takes
a lot of pressure off. You don't need fancy tools
to have fun and experiment.
3. Anatomy of Emotion: Before we start, I would like
to say something important. Don't worry about
getting emotions right. Emotions are not as
intimidating as they seem as humans were built to recognize
and understand emotions. It's literally how we
connect with each other. If our brains can spot
faces and clouds, toast or coffee foam, that means we already
have the instinct to see and express emotions
through simple shapes too. Alright, let's break down what actually makes a
face expressive. There are three new
features to pay attention to eyes, eyebrows, and maths. That's it. Those three things do all the heavy lifting
when it comes to emotion. The eyes set the tone. Let me show you what I mean.
There's an experiment by Richard Weissman in which he showed the photo of a
smiling man to a group. He wanted to see if people could identify a genuine smile
versus a fake one. I'm going to show you the
photo. Tell me what you me. So this is the photo. Which one do you think
it's a genuine one? If you said that the left one is a genuine one,
you would be right. The man is smiling
in both photos. So what's the difference? It's just the eyes. A
real smile also called a Duchenne smile engages the
muscles around the eyes, creating a sub squinting. A fake or social smile doesn't
really change the eyes. So even a tiny little thing can tell us a lot
about emotions. Now, here are some tips
to draw expressive eyes. First, focus on the eyelids. Let's start with a
neutral expression. Notice how by just
adding eyelids, the expression has
completely changed. Is this character bored
or perhaps tired? Now, notice what happens when we draw the eyelids a
little bit smaller. Even that changes the mood. My second tip would be
to think about the size. Big eyes would make us think that we're looking at
something appealing, or perhaps our
character is just cute, but it can also indicate sadness if we have
the right mouth. Smaller eyes could indicate tension as if our character
is shocked or scared. Medium sized eyes could indicate that our character is
attentive or alert. The next step is to
consider asymmetry. You could draw eyes
of different sizes. For example, this character
could be shocked or scared. You could also create
asymmetrical eyebrows. For example, is this
character tipsy or confused? You could also think of
asymmetry and position. I really like this character. It could be silly or dizzy or just be
showing contentment. Play with different positions and shapes and see
what emotions come up. Now let's do a little exercise. I'm going to show you some eyes. Try to guess the emotion.
Okay, first one. If you said bored
or uninterested, you will be correct. Okay,
what about this one? If you said scared or
shocked, that's also correct. And lastly, this little guy. If you said happy or Ah,
that would be correct. But if you also said
that is a Duchene smile, that could be also true. Now, eyebrows, they
usually show us intensity. Paul Ekman did a study and concluded that all humans
from people living in remote, isolated islands to people
living in big cities, share the same
micro expressions. In 2022, he confirmed
that we humans shared 16 conflict
microexpressions. Eyebrows are incredibly
powerful because they control the
intensity of an emotion, and go down can show us anger, high and arch, surprise, flat and low, tire or serious. Think of eyebrows as
emotion amplifiers. The same facial
expression can go from mild to extreme just by
changing your eyebrows. Here's how to draw
them expressively. Pay attention to the angle. The angle of the eyebrows
tells the emotional story. We usually have three main ones. When the angle goes down, it usually tells a story
of anger or concentration. Usually, our characters with an angle down eyebrows will
show us intense focus. The second one is when
the angle goes up, and we usually think of
sadness or a softer focus. Lastly, we have arch. And usually we show emotions of surprise or curiosity with
this type of eyebrows. Use the distance
between the eyebrows, how close or far apart the eyebrows are create
different feelings. Pinched together could
mean intense focus, anger or confusion, separated,
surprise, fear, openness. Normal spacing is just
relaxed and neutral. Don't forget asymmetry. Asymmetrical eyebrows create complex,
interesting expressions. When eyebrow raised, could
be skepticism, curiosity, uneven angles, confusion, mixed emotions,
internal conflict. Now, a few common eyebrow
mistakes to avoid. Making them too
symmetrical, imperfect. Real emotions are a bit messy. Drawing them the
same on every face, vary the angle and shape. Forgetting, they can
move independently. One brow tells a
different story. Now, let's do a quick exercise. We're gonna drop three
simple faces with the same eyes but only
change the eyebrows. Okay, this is the expression
we're starting off with. Let's add asymmetrical eyebrows. It seems that our
character is saying, I'm not sure with an skeptical
undertone, isn't it? What if the angle of
our eyebrows goes up? Now it seems that the
character is saying, I'm not sure while
being sad or tired. Now, if the angle of
the eyebrows goes down, it seems like he's
saying, I'm not sure, but he's not amused by what
he's being told to do. Okay, New expression. Let's use asymmetrical eyebrows. It's like the
character is saying, You did what in an angry way, but also curious.
Wants to know more. Now, if the eyebrows go up, it seems like now the character
is saying you did what? As if it's been told something really sad and the
characters in disbelief. And lastly, if the
eyebrows go down, now the character is saying, You did what in a
very angry way. Okay? This is the last one
with asymmetrical eyebrows. It's like a character is saying, I've got a plan, and
it's determined. Perhaps a little bit hesitant. Now, eyebrows up. It's like the character is saying
clease and fawning over. Now, if the eyebrows go down, the character is showing
the termination. It's like it's saying, I can
do it with an intense focus. Notice how the
eyebrows completely change the intensity and
meaning of the same face. And lastly, the mouth. This one sets the tone. The mouth is the mood dial. I think it gets a
lot of context, a smirk, a green,
a trembling line. I one changed the story. Here are some practical tips to help you draw more
expressive mouths. Start with a simple line.
Before adding detail, sketch the basic curve
or angle of the mouth. This sets the
emotional foundation. The corners of the mouth
are emotional anchors. Lifted can show
warmth, positivity. I barely changed the
curve in the mouth, and I just changed the corners. Just by drawing them
downwards has really changed. Again, it's just in
the little details. How you draw the line
affects the emotion. If it's a smooth,
confident line, it shows genuine strong emotion. If it's broken or trembling, shows vulnerability or sadness. A sharp angular line will show amber, aggression,
or determination. Now, let's do a quick exercise. We're going to draw the
same face five times, and we're only going
to change the mouth. I am going to choose a
pair of eyes that shocked. Now, let's draw a straight line that has a confident stroke. This mouth emphasizes the motion that I want to communicate. And a word mouth will
communicate surprise, but in a positive way. A trembling line could also indicate pain
in this context. A trembling line
definitely depicts a feeling that you're not
expecting to experience. Like when you hit
your little toe? Something like that. What
about a downward mouth? To me, this is like the
character wanting to buy, I don't know, maybe
some doughnuts, but his favorite flavor
was already sold out. An angular mouth could
depict aggression. So maybe this character
is about to scream. Notice how dramatically
the mooth shifts with just this one feature. Now, when you start mixing
and matching the three eyes, eyebrows and mouth, there's
endless possibilities. So the eyes will set the tone. Think of the emotion
you want to depict and considered eyelids,
size, and asymmetry. Brows and the mouth
will create context. They can support or contradict the emotion that the
eyes are depicting. So consider the angle
and the stroke, and remember, it's all
in the little details.
4. Center of Gravity: I talked about this briefly in my expressive portraits class, but I would love to revisit
it here because it's honestly one of my favorite tricks when throwing emotions. I like to think of the nailse as the center of
gravity of the face. Everything, the eyes, eyebrows, and the mouth, kind
of orbit around it. Now, here's where it gets fun. I also like to imagine
that emotions have weight or even also
think it as energy. Some emotions are
heavy, like anger, frustration, determination, and they cool everything inward. The eyebrows pinch together,
the mouth tightens, and the whole face sits
to collapse toward the nose as if gravity just got stronger
right in the middle. Other emotions are light, like sadness, surprise,
or curiosity. Those heel looser, more open, the feature drifts
away from the nose. The eyebrows rise or separate, the mouth drops or open softly. It's almost as if gravity weakens and the features
start to float outward. And then there's mixed emotions like disgust or confusion. These are fascinating
because parts of the face pull inwards
while others push away. It's like the face can't decide, so there's tension and release happening
at the same time. So when you're drawing,
try thinking of your nose as your
emotional compass. Before you start, ask yourself, is this emotion heavy, light, or maybe
somewhere in between. Are the features pulling in or drifting away from the nose? That simple question
helps you find the right gravity
for your emotion. No need to overthink
anatomy or complex details. Now, we're going to draw three
simple heads side by side. One heavy with features
close to the nose, one light with features
floating upward, and one mixed with one side pulling in and the other
side stretching out. Let's start with heavy
emotion like anger. I'm going to draw smaller eyes indicating shock or attention. And here we have our nose. Now, there are several ways in which we could
draw an angry mouth, but let's just go
with a downward one. But let's have the central
part close to the nose. Again, let's imagine that gravity is pulling
that part inwards. Now, the brows angular
and pushing downwards. This face looks
pretty upset already, but what if we add this
little detail here? As if the cheek muscles
are also pulling inwards. Notice how most features are
pulling towards the nose. Now let's go with a light
emotion like sadness. I'm going to change the
size of the eyes here, and the mouth, it's going
to drop really, really low. As if the nose didn't have enough gravitational energy
to pull it close to it. Same with the browse. Notice how the features are far
apart from the nose. And finally, let's
try a mixed one. Again, I'm going to change
the size of the eyes, and they're not going
to be big or small. I want my character
to look unsure, though the right side of the face is going to
be pulling inwards. The left brow is going
to be pulling outwards. As you can see, the
closest part to the nose is the one that is
drifting away a bit more. Same thing with the mouth. The left side is going to be dropping a little bit
more than the right one. Now let's look at the
faces side by side. We can clearly see that
it's the same character, but it's experiencing
different emotions. This wasn't difficult
to do at all, right? We could even create a narrative around these three
emotions if we wanted to, but let's not get
ahead of ourselves. We'll do that in
the class project. But before we get there, let me share with you a couple tips. Before you draw anything, think of the emotion you want to draw first and not
only think of it, actually feel it and make sure your face is feeling
it and showing it too. Hold the face and grab
your mirror or your phone. A huge integral part
of art is observation. So notice your face and pay attention to your
eyes, brows, and mouth. What are your eyelids doing? What's the angle of your
brows and your mouth? Is the emotion you're
feeling heavy or light? And what are your
features doing in relation to your nose or
the center of gravity? Considering these elements whenever you're drawing a face, we'll create a system
that will work anytime. No need to look for references
or overcomplicate things. Now you're ready to add a
narrative to any emotion, which we will do in the
next part of this class?
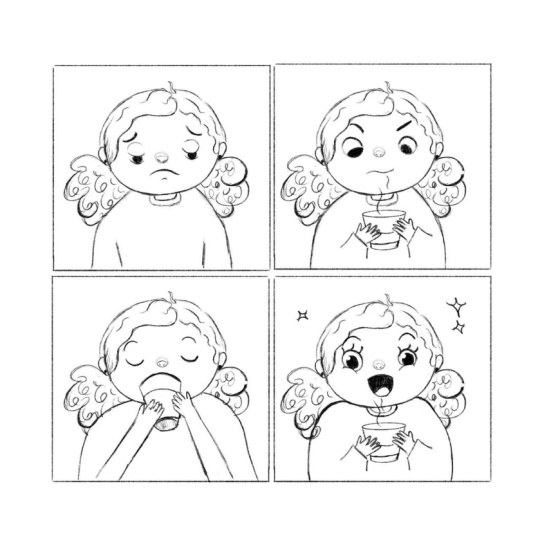
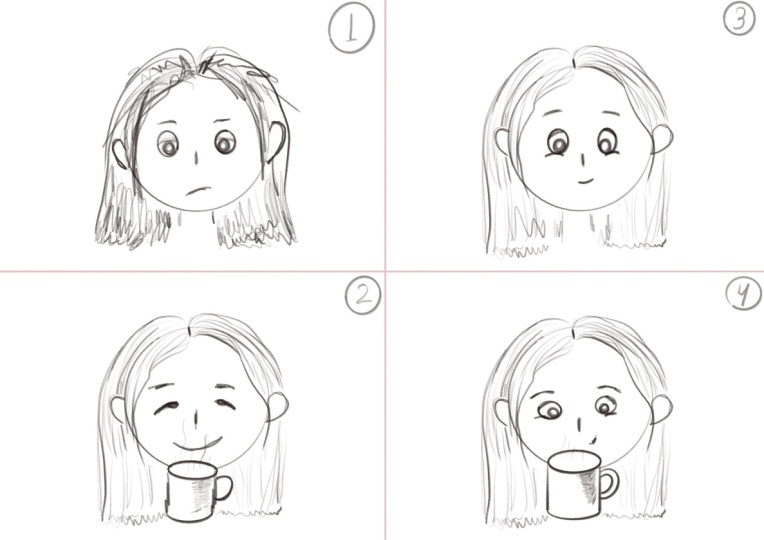
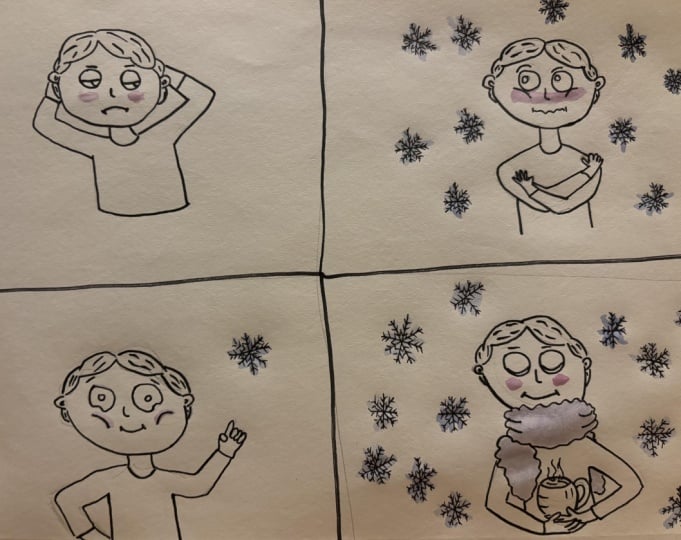
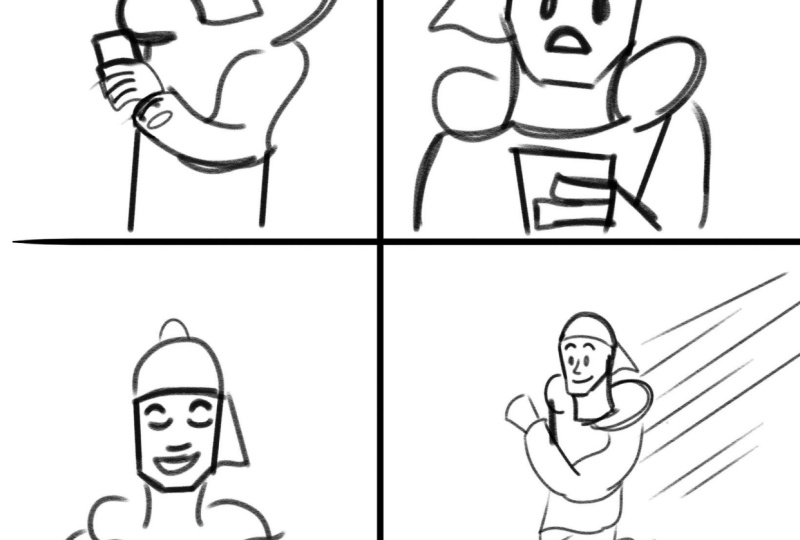
5. Class Project: Alright, it's project time. For your final project, you create a three to four per comic strip that tells a story only through
facial expressions. No words, just emotions. You can choose one of the story pranks or you can make your own. We have the ice cream disaster. You can create any
narrative around it, but the emotions that
I would like us to portray are devastation,
hope, and joy. Next idea is waiting for a text. Again, it could be any story
that portrays anxiety, surprise, relief,
and then excitement. And last one is a
little bit more free is before coffee
and after coffee. Or you can invent
your own story, too. Remember, the goal isn't
to draw perfect faces, it's to make us feel something just by looking at
them. Oh, but wait. I nearly forgot to say something really important before
we start our project. Don't worry too
much about style. Let's try to see this
project as sketching. You can refine it
later if you want to. Let's focus on simplicity
and exploring emotions. I think that sometimes
we may worry too much about how
beautiful something looks, and we forget about communicating
a message effectively. So let's keep it simple for now. Personally, I am going to go with a waiting
for a text one. Let's start with our first
emotion, which is anxiety. Let's start with the eye. I want to draw a smaller
pair of eyes because anxiety makes us feel more
attentive to our surroundings. And now let's draw our nose. Is anxiety heavy or
a light emotion? I would say it's a mixed one. I think the eyebrows curve
upwards a little bit, but there's also
a slight tension. So I'm going to
draw an eyebrow a little bit lower than the
other one for the mouth. I think it needs to be closer to the nose because
there's tension there. And I also think that
a squiggly line is perfect for anxiety
because when it happens, we cannot usually sit still. Think of anxiety and feel it in your face. Where
are your eyebrows? Where's your mouth?
I'm now going to add a few little details
to my drawing just to give it a little
bit more character. And now, since she's
waiting for a text, maybe I'll draw her
head resting on her hand with her arms crossed. And maybe her hand is
pushing her cheeks. Upwards a little bit. So let's draw that. Okay? This is it. We have our first panel. Our next emotion is surprise. I'm going to use
the same drawing as a base just to show you a little bit
better what I'm doing. Let's start with the eyes. I think that I
would like to draw them a little bit smaller than the previous ones just to
show that shock factor. Okay, here we have our nose. So now let's think
about our features. I think surprise is
a light emotion. So let's draw the
mouth a bit lower, and the eyebrows are
going to go way higher. Now let's draw some details. I'm going to draw her
hands a little bit lower as if she's no longer resting her head
on her hands and as if the character is ready
to perform the next action. I'm also going to
draw the phone here. She just got the text,
so she's looking at it. Maybe she's thinking, Oh, the text is finally here. And this is our second panel. Next up, we have relief. Once again, I'm going to
use the same character as a base to show you what
I'm doing a bit more clearly. As usual, let's
start with the eyes. I think it's time to
add some eyelids. How does relief
feel in your face? Even the eyelids relax
and drop a little bit. I'm going to go for a
medium sized eyes because the character is not
experiencing a strong emotion. Now, relief is a light emotion. Definitely don't want
to show any intention, so the mouth is gonna go a bit lower and the brows higher. In relation to the nose, I decided to draw the mouth as a little circle as if the
character is exhaling, and now I'm going to
add some details. She'll be holding her phone, feeling relieved that she finally got the text that
she was waiting for. And now we have the third
panel of her comic. Okay, we're nearly
there. Let's do our fourth emotion. Excitement. For this one, I want to go
a little bit over the top. And let's go with the eyes, and I think that I want the size of her eyes
to be quite big. Now, excitement is an
interesting emotion, because if you feel
it in your face, it kind of makes you feel that everything wants to
collapse towards the nose, but the rest of the face is fighting actively
against them. As in, it feels a little bit different from
surprise, doesn't it? Now, since there's a
little bit of tension, I would like to make the cheeks tense pulling
a bit towards the nose. Now, let's draw the
line of the mouth. I want her screaming
almost of excitement. So this would be my
guideline to draw the mouth. Let's emphasize the corners
of the mouth a little bit. And once again, the
brows will go up. Now, we can tell she's excited just by looking at her face. But why don't we just draw her body a little
bit differently? As in, she is too excited, so her arms are going to go up and she'll be
holding the phone. And my personal narrative here is that she's excited
because she got a text saying that she just got the cat that
she was hoping to adopt. And that's definitely a reason to feel very excited about. And this is our Ford panel. Now, place your
panels side by side. What do you think of them? Do
you think they communicate a story effectively or perhaps
little changes are needed? Please loc your comic strip
to the project gallery. I would love to see it.
I love to see processes. And, of course, feel free to do a more refined version if you
have a very defined style.
6. Bye!: Alright. We are at the end. Congratulations for
finishing this class. Let's do a quick recap of the
things that we've learned. So today we work
confidence through clay. Expressive faces don't require anatomy Mastery, emotion
and exploration. We also created a
repeatable system. Eyes, eyebrows,
mouth, and nose as gravity center can
tell us any emotion. Storytelling through
faces because every expression
is a tiny story. I hope that you walk away from this class with
more confidence, feeling that you can
draw expressions. With clarity, now that you
have a system that you can repeat anytime and
feeling more creative, knowing that you can
draw any emotion through a simple system
and simple steps. And, of course, a
comic strip that gathers everything we have
talked in this class. Forget to upload your expression comic strip to the
graphic gallery. I can wait to see your
emotions come to life. This is my favorite
part of class is just seeing your pretext. And if you have enjoyed this class, please
leave a review. It really helps me plan future lessons and keeps
our community fing. Thanks so much for joining me, and I'll see you in
the next class. Bye.
 Karla Alcazar, Illustrator and Teller of Tiny Stories