Transcripts
1. Welcome To Creative Calisthenics!: Hi everyone. My name is
Carla Kassar and I'm an illustrator who does work
for books and magazines. And I'm super excited
to be here today. Perhaps you've heard
1 million times that the only way to improve your drawing skills is to draw daily. You know, just grab
a piece of paper and a pencil and just do it easy. But in reality, things can be
more complicated than that. Before we even start
drawing the line, we might feel fear of failure, lack of inspiration
or motivation even. Or just feeling overwhelmed
by the black page. You know, all those lovely creative blocks. I
understand the struggle. This is why I want to share
with you my top three as warm up drawing exercises that can help you overcome
those creative blocks. Consider them your
creative speings. By starting with simple
structured exercises, we can ease ourselves
into the creative process and overcome any initial
fear or hesitation. Today we'll be doing
line versus line, which I love, symmetry drawing and non dominant
hand exercises. Now what I like about this
exercises is that they can help only overcome
creative blocks, but also improve our
drug skills over time. This exercises can improve our observation and
analysis skills as well as our
overall technique, allowing us to create more
dynamic and expressive work while getting out of the funk. And you won't even notice it. Whether you are an
aspiring artist or an experienced illustrator, this exercises can help
you to get things moving. So why don't we just
get things started? Thank you for being here and
I hope to enjoy this class.
2. Materials And Class Project: It's really difficult to feel inspired when all we
have is a blank page. Perhaps we feel that the
next thing that we need to draw has to be something
polished or finished. Perhaps we think that our lines must be
really clean and we have the colors just
right for us to feel happy with our, our
drawing skills. It's really easy to
be hard on ourselves. I would like to change
that in this class. I want us to approach
this class with playfulness and curiosity
for experimenting, and more importantly,
getting things wrong. For this class, I
would like us to use simple materials,
nothing fancy. Maybe a pencil and a
regular sheet of paper. We'll do for one particular
exercise, we will use color. Anything you have laying around. We'll do, we will
use regular paper. Nothing fancy, like
fancy sketchbooks. And we're going to
use something that you feel comfortable
drawing with like a pencil, a thick marker crayon pen. The simpler the better. Actually, for line versus line, we will use color markers,
Crayons, colored pencils, Nothing that is too complex, and our project will be all the images that
we produce today. Please upload them to the project gallery. I
will love to see them. And if you'd like to share
them with me on Instagram, please tag me and I will love to see your images
over there as well. But the most important thing for this class is for
you to have fun. Remember that playfulness is a key ingredient for this class. Okay, so let's go to
our first exercise.
3. Line Vs. Line: Sometimes we tend to
be so precious about our drawings that
we might forget that playfulness is key. Not only to enjoy the process, but to have more dynamic
results as well. For this exercise, we will need a new sheet of paper
and some color pencils. You can also use
crayons or markers. We will pick one color to do our drawing with and
set aside the rest. For now, I suggest
using a light color. First, I will randomly generate
an object for us to draw. The catch here is that we're not allowed to erase anything. If there's anything
that we don't like and would like a do over, we can try and draw
our corrections over the first drawing we did using a different color and
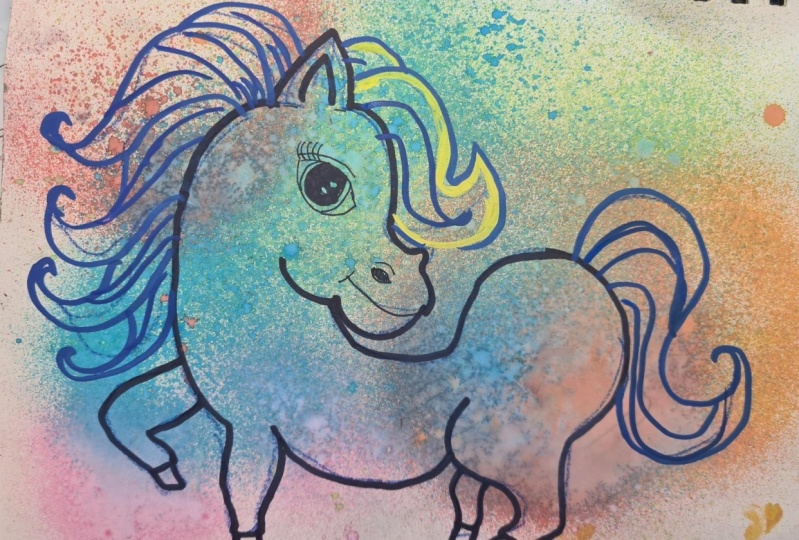
our object is a plush pony. Okay, let's start. Remember to use a
lighter color first and feel free to draw as big
or as small as you'd like. I'm going to be drawing my
pony right here in the middle. And once again, I'm
going to be using this blue color to start with. Just a little reminder, you don't have to draw
something perfect. We're warming up.
We don't need to have something
spectacular right away. We're just trying to
ease our heads and our hands to dress something
interesting and fun. But don't worry too
much about the result. Okay, I'm going to start growing the ears because I think pony
ears are very important. I am not a big pony drawer, but I'm going to try my best. I usually do tend to use
references for this, so I'm just going to rely on
what my head wants to draw. I'm going to draw a lot of hair because when
I think of ponies, I think long hair, long and soft hair,
that's important. Flow, the swell has to be flowy and glow fringe
right here, pony fringe. I'm a little bit afraid of
the body because as I said, I usually tend to do
referencing when I'm drawing. Let's see what my head thinks of pony looks
like. All right. My pony would be
of a little walk. I remember, I remember my little pony toys had a leg
like this with that shape. I'm trying to
replicate that. Okay. This is a funny looking pony, but it needs a really
beautiful tail swell. All right, I think I'm done. Let me show you what
I've done here. Again, We're not going to
be too precious about it. We're just going to do
whatever our brains wants us to do and we're going to
try to do corrections. You saying a different color? Let's have a look. Okay, so I like the hair and
I like the tail. I think it's flowy
and it's nice. But what is going on right here? It just doesn't make sense. The coming out of its neck anatomically
just doesn't make sense. I'm going to try to
correct it or fix it, rather using a different color. Let's try this one. Maybe it's too light and it's not
going to be able to see. Let's try this orange one
because I think we're going to be able to see the
corrections a bit better. Let's see what I
don't like about this pony. Let's try to fix it. For starters, I would like to this bottom bit because it just comes in
really strangely. But now it's looking
like a sausage. So I'm not sure if
that works either. I'm going to try to fix
the legs, especially. This one looks a
little bit better, but probably a little
bit too sausage like, I'm not entirely sure. It's a plush pony. It doesn't have to be
accurate anatomically, but I think it still has
to look like a pony. And I'm not sure if this
one if it was stewing it. But yeah, let's see, What else can I fix? Probably this bit right here. I'm going to grab
a different color. I'm going to keep
trying to fix the body. I'm not happy with it. I'm going to trace the
bits that I did like this. I actually quite
like the second one. I actually preferred the
position of the first one. But anyway, I'm going to make it come in a little bit here. It doesn't look
that sausage like. It looks more like a horse. I don't know.
Probably like a dog. And I'm going to try to add
more flowiness to the hair, and I'm going to draw
a face, a happy pony. And of course, the pony
fringe, it's important. Oh, the ears before that
and the fringe. Okay. I'm going to make it bigger because I think ponies
need bigger hair. I like it a little bit better, but there are still things
that I don't quite like. Remember that this
is just a sketch. It doesn't have to be
pretty or perfect, but we're going to try and
trace what we just did and see if we can come up with something a little
bit more polished. We can use the previous
colors as a guide. What I really like about this exercise is that it
allows us to keep going. Because usually when we erase, we tend to stop in places
that we're not happy with. That keeps us stock
a little bit. This exercise allow us
to do different lines in different shapes without having to stop ourselves for fear
of getting things wrong. Okay, let's now trace our
pony with a different color. Okay, so let's draw
the leg first. I actually quite like the
shape we are going to draw, perhaps the overall
shape of its body. Now I feel more confident of my mark making and what I'm doing now that
I have guidelines, this actually makes me feel more free and confident to wait, I'm cheating right here. I shouldn't have done that.
If this happens to you, just grab a different color
and draw over the lines. Because we don't
want to get confused with two lines of
the same color. It's best just to switch
to a different one. Okay. So I'm now going to
trace with this purple color. Now I actually really like it. It does look like a horse, perhaps a longer horse, but looks better than the
first one, that's for sure. And now I'm going to
be drawing the face. Remember that we're not trying
to draw an actual pony, it's a plus pony. There's a lot of freedom there. I'm going to keep the long flowy hair because that's the best
thing about ponies, I think, plush ponies that Okay, see this is what it
looks like so far. I'm actually quite
happy with the results. If you have time or if
you would like to do it, you can use a
different color to add some details because it's
a flush pony after all. So we can drill
flowers or stars, any detail that you would
like to add to your pony. Like here. Do you
remember my little pony? They had stars or moons, or shapes right here. Of course, you can add like a softer texture if
that's what you like. For me, this is my pony. It looks okay. Now it looks finished and I'm pretty happy
with the results. Now let's compare
the both of them. I actually do like both. There's qualities of
this one that I like, but the other one looks
definitely more finished. So it's interesting
and of course, feel free to do referencing. I would recommend you doing this referencing after you're
done with this exercise. And remember that you can do
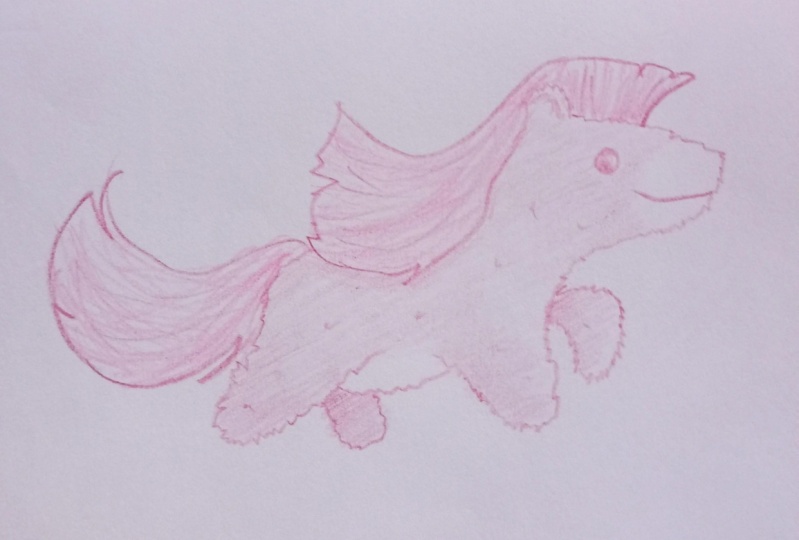
funny faces like this one. And you can also
do different poses like this pony right here
that it's laying down. There's so many things
that you can look out for if you're
doing, referencing. So remember that the sky is line like this
C one right here. There's lots of options. Remember that word
is trying to warm up and have fun drawing something many times
can help us improve our drawing skills by
developing muscle memory. This exercise will also
allow us to create smoother, confident lines and shapes. Additionally, drawing something
multiple times can help you develop a deeper
understanding of its shape and structure, allowing you to capture
it more accurately. Finally, repetition can
help you identify areas where you might be struggling
or making mistakes, allowing you to focus on these areas and improve
your overall technique.
4. Symmetry Drawing: For this exercise, we will draw a line down the
center over page. Then I will select a new object for us to draw with
our generator. And we will draw one half of the object on one
side of the line. Once you're happy
with your drawing, fold the paper in
half along the line so that the drawing is
mirrored on the other side. This will create a mirrored image of your original drawing. For this exercise, we're
not allowed to erase. We can use pencils, markers, et cetera, and of course
a new sheet of paper. The object that we
get to draw is a fly. Interesting one. Let's grab our paper with our line
right in the middle. We're going to fold it and
we're going to draw half of the flywater on this
side of the paper. Now, for me, it's
more comfortable to use one of these clippers, but of course you don't have
to. No, maybe this way. Yeah, I think this is better. I'm going to be drawing half of that object on this side of the page. Now. Let's see. I would like it perhaps
this big I being square, like having that square
shape like in my head. I think of those
plasticky ones and they have a handle right here. They have this thick frame. Do you know which ones
I'm talking about? They have a little circle
down here for you to hang. They have vertical lines like this or diagonal lines
right here rather. Again, it doesn't matter if
they're straight or not, if they're pretty or not. The point here is just to move our hand and to get things
moving, it doesn't matter. Looks so that it's
more important what we do with our lines to have fun. As I've been saying,
okay, this is done. Maybe I'm going to
add a line right here because maybe it's
too short the handle. Okay, we're going to
open up our drawing. I'm going to clip
it. Now we are going to draw the second
half of our drawing. Okay, let's draw the frame. It's interesting because now
that I look at it like this, I think the handle is a bit
short to be lice water. But anyway, let's try to do the lines in the same direction. Same with this one. It's looking interesting and just a little reminder,
we're warming up. It doesn't matter what
our objects look like. We're just trying to have fun
while we get our hands in our eyes and our
brains to move a little and to get
used to drawing. Now we can grab a
second piece of paper, draw the line down the middle, and fold it as well, because we are going to give
a second go to this object, we're going to draw it again. But we're going to do
it a bit differently. This time we're going to start drawing the
object as we did previously on half of the paper. I'm going to try a
different shape, Now I'm going to try
a circular swatter. I'm just going to
draw the lines here. Those grids, It looks
like a lollipop. It has a longer handle, but it looks like a lollipop. But that doesn't
matter. What matters now is they're going
to flip the page and we're going to
try to remember previous shapes
that we just did. I had a circle, but I also had a long handle. That's why I remember the frame. I should remember
having a frame. This is a tricky
part of the lines. We're going to see
if I can make them coincide or I'm just going to make sense of the
object right here. Now let's open this up
for a surprise and see if we actually managed
to make it fit, so to speak, just to see
if our object makes sense. Now let's have a look. This exercise is great for
muscle memory because we get to remember what's on the other side or how
well we remember it. Okay? It's interesting because the handle is
actually quite okay, but obviously the circle is not. Let me show it to you right
there. This is interesting. It was fun. We can
have a third go. We're going to fold
the same page, and we're going to clip it. And we're going to
be doing the same. But I'm going to try to
draw the first shape I did, that square one,
and see if I can actually make it match
to the other side. Okay, I'm going to start
drawing the handle right there. And I'm going to do
a square shape for this one, something like this. I've got the frame and
I'm starting with a grid. As you can see, I actually really like the lines I've done. They look really confident. This is one of my favorite
things about this exercise. It just really warms
you up when it comes to your mark
making and I love that. But yeah, let's continue
with the drawing. Okay, We have to do grit the
grid and this is a fun part. Now let's try to remember. Okay, I started with the handle and the
circular bit right here to hang this water and the frame. I already know that the
shape is going to be monkey. But it doesn't matter because
I am having so much fun doing these lines. That's
the point of this. The important thing of this exercises is
for us to have fun. Because there are warm ups and we get to draw something
else when we're done. Now let's see the results. Okay, I'm actually
surprised that this is actually
pretty accurate. I'm shocked personally
at this point. I just want to grab my markers and my pencils and actually start drawing because this
has been so much fun. And that's the whole
point of these exercises. It's not about drawing
something perfect or nice, it's just about
enjoying the process. Symmetry. Drawing
exercises can help you improve your drawing skills
by teaching you how to create balanced compositions and identify subtle differences
in shape and form. This can help you develop your observation and
analysis skills which are essential for creating accurate and detailed drawings. I would suggest you doing this exercise on your
own and perhaps drawing, drawing something more
complex, like a sine.
5. Non Dominant Hand Drawing: For our last exercise, we will use a pencil that feels nice and
comfortable to hold. We will also need some paper. Any paper you have
laying around is okay. It doesn't have to be
fancy or anything. I will select a new
object for us to draw. We will use our non dominant
hand to draw that object. For me, that would
be my left hand. Feel free to draw your object as big or as small as you like. Okay, the first object we
will draw is a notebook. Okay, I'm going to
start right here and I'm going to draw square. I would like to give it a
little bit of perspective. You can see some of the sheets. I'm now going to draw this
little circles to then draw some metal bounding here. But first, let me draw the
back of the sketchbook, and I'm going to allow this bit. It looks like it's a notebook
with quite a few pages. Now, I'm just going to draw
this little bits here. I think it looks pretty
complete so far. Let me just draw the
pages, the inside pages, I'm going to try
and write notebook. Or maybe not I think
will just fit better. A little smiley face, it's a little bit
wonky, but it'll do. Personally, I
actually quite like how it turned out, the lines. I'm happy with the
circles or the curves, not so much, but I
think it looks okay. I'm happy with it. Now, why don't we try to draw
a different object? The object would be
a book of matches. I don't think I've
seen a book of matches in such a long time. Let me try and remember
what they look like. I'm going to draw it open
so you can see the matches. I'm going to start with
the box itself first. I remember that they have this little thing right
here to light them up. I'm going to try and
color it a little bit. Okay. I'm going to try and see if I can do some shadowing. No, I don't think this pencil allows me to do that, but okay. Now let's actually
draw out the matches. Once again, as a
little reminder, you don't have to be perfect. Be quick and playful. Remember that we're
just trying to warm up. Okay, so let's see. I'm going to draw the top it
of the matches right here. I'm really struggling drawing
circles at this point. I'm not sure if it's the pencil, it's comfortable to
hold this pencil. But I am struggling
a bit with curves, but I think that some interesting
shapes can come about. It's okay, and this is it. I would like us to
draw a third object, and it's a broccoli. Now, perhaps this is going to be a little bit tricky
for me because I'm having issues
with, with curves. But actually actually I think
I have warmed up and up. It's not that difficult. Or maybe because the circles or the curves are a
little bit bigger, which is important
to analyze as well. Because sometimes we can't
struggle with certain things. And it's not necessarily about our abilities
in and of itself. It's more that we're
more comfortable drawing certain shapes in
a different size. Perhaps you prefer
drawing certain things in a smaller or bigger size that's perfectly
fine and normal. But if you would like to get
out of your comfort zone, you can try this exercise and try drawing in different
sizes as well. I love this exercise
because after a while you feel really comfortable
drawing with your left hand. For example, I did the sketch for this illustration
using my left hand. I drew this little monkey
using my left hand as well as a warm up exercise,
and I quite like it. Drawing with your
non dominant hand is a great way to challenge yourself and improve
your drawing skills. Using our non dominant hand to draw can help us
reduce pressure. We understand the results
won't be grandiose and we can predict
how the drawing will turn out, which
is actually great. It just takes the pressure off. While it might feel a
bit awkward at first, the drumming with our non
dominant hand can help us develop better hand
eye coordination and fine water skills. We will be also forcing our brain to work
in a different way, which can help us to see things
in a new way and generate fresh IDS and breakthroughs that you might have not
otherwise discovered. Overall, drawing with
your non dominant hand is a fun and challenging
exercise that can help you improve your drawing skills and break out of
creative wreaths. Give it a try and see how
it can benefit your work.
6. Thank You!: Hope you had fun during this session and I
hope that you feel more inspired and more confident to overcome
your creative blocks. When it comes to drawing, I think it's fair to
assume that we will all have to struggle with creative
blocks at some point. The process of creating art
can often be intimidating, and it's easy to
feel overwhelmed when staring at a blank page. By starting with simple
structured exercises, we can ease ourselves
into the creative process and overcome any initial
fear or hesitation. Also, by incorporating
one or all of these exercises into
our daily practice, we can develop our observation
and analysis skills and our overall drawing skills. I hope you had fun today. Please don't forget to
upload your drawings into the project gallery and
also please leave a review. This will let me know when
you enjoy it the most and I can keep incorporating more
of that into future classes. It was lovely to
draw together today. Hope sees it. Bye.
 Karla Alcazar, Illustrator and Teller of Tiny Stories