Transcripts
1. Introduction: Hey, welcome back from one Rob here from Ram Studio Comics. When today's class I'll be teaching you how to draw a fight scenes for comics. I will first start with exploring gestures and talking about the benefit of using your rough thumbnail sketches and your gestures to explore ideas rather quickly and keep things moving forward. Then we're going to jump into three different iconic poses are scenes. And we're going to talk about why those are popular, what works for them, what doesn't, and what to do when trying to develop these on your own. And I think this is important because there's just so many things to look at and comics and really pay attention to what works and why. Then the final two examples will be time-lapse versions. It's same information just repeated and done with some different poses. So we'll talk about that and then also be adding new content to this class. And there's just so much to cover as it pertains to fight scenes. I would love to know what you think and I can't wait to see your work as always, keep drawing, keep having fun and bye for now.
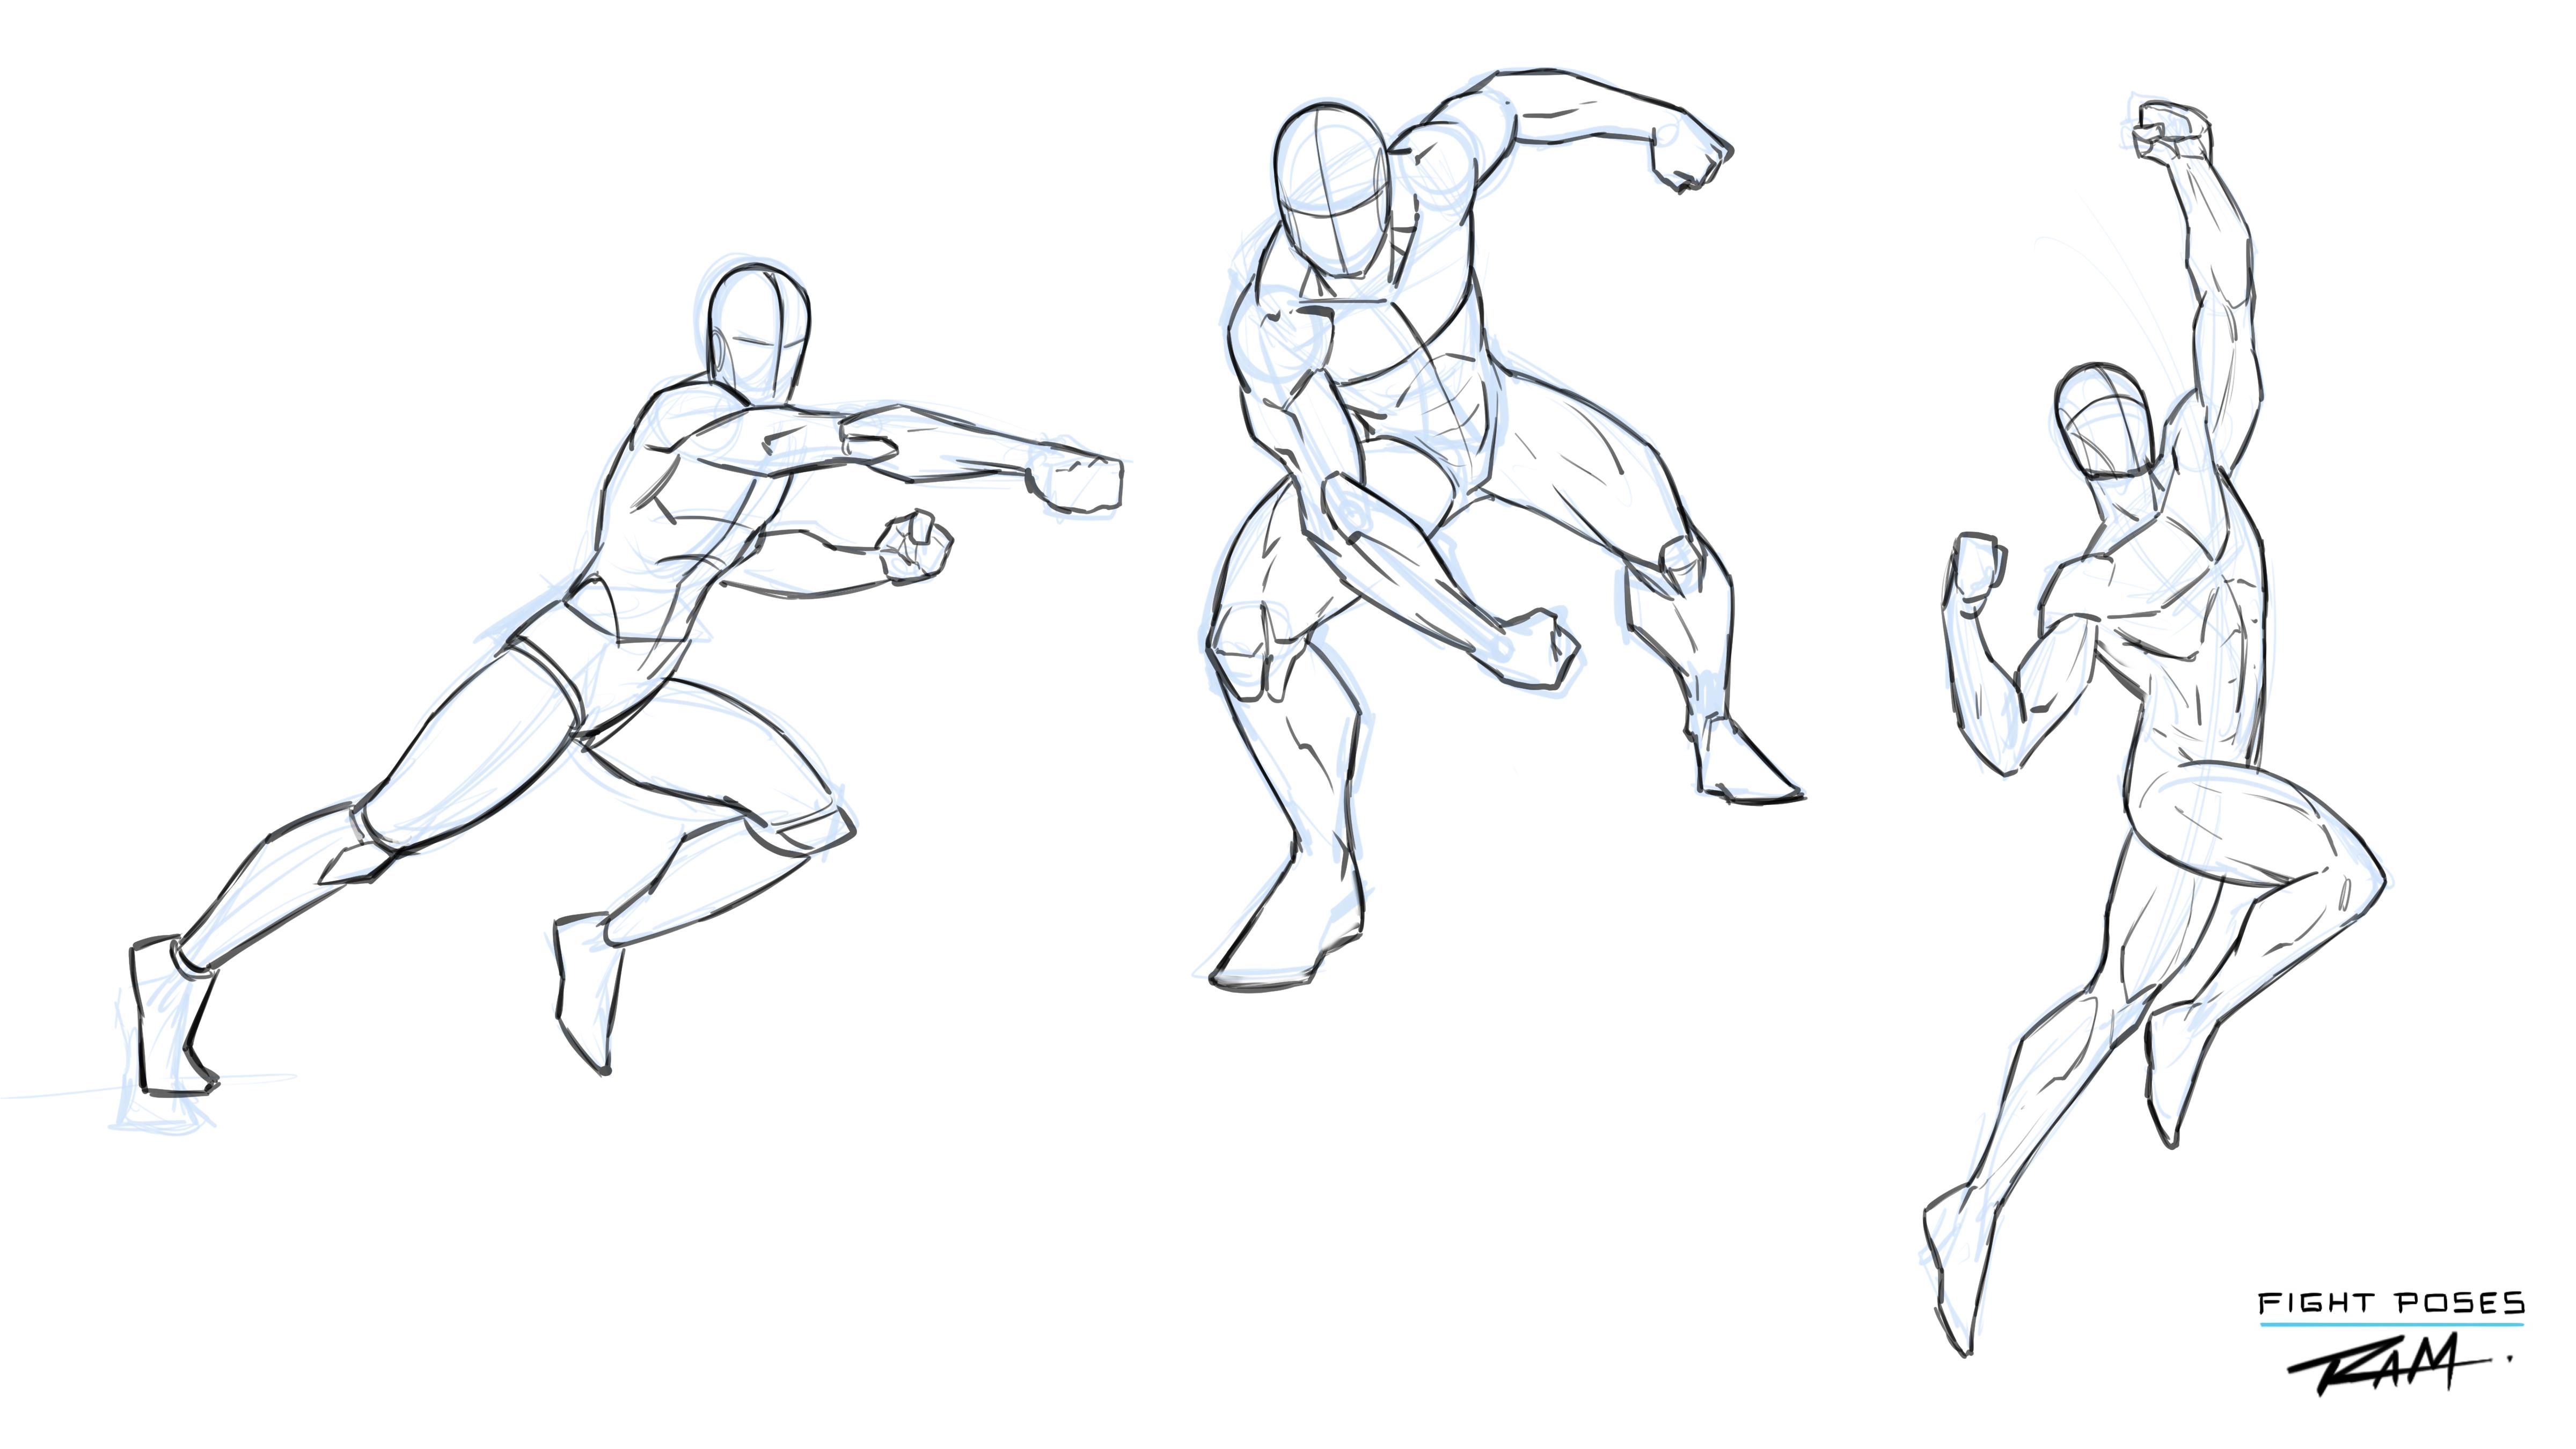
2. Focusing on the Gesture: Okay, so now let's just warm up on some gesture and some basic poses. Let's start with crossing over the body even so the head, we have an arm crossed over the body like this. Remember you can establish your lengths of the upper arm, lower arm, forearm, hand, and we'll do a fist. And then the body, Let's bring the head over here a little more. And the body, Let's really have that leaned over like this. On this one I'm going to show more of the mid-section, the center line to the chest right there. So there's the upper torso. Let's put the pelvis even further back. Remember the pelvis generally has a tilt down on a wave from the torso, right. So you've got that arch of the back, the spine goes like that. Write down the neck, lower back. It's more like that. So we want to get some of that in there. And let's just have this other arm. I don't know. Let's just have it over here. See if that works, but doesn't, it'll change it. The main thing is that we really throw this stuff n with just basic primitive shapes. It doesn't even, it doesn't have to look as good as you think it does to get the idea down. So let's try that and then let's bring this opposite leg up, this leg back. Remember again, you can use your little stick man, stick woman links to kind of figure out your proportions a bit more. And use cylinders or silhouette shapes over the top of that. Remember to, at this, at this level, to really throw lines and lollies lines to be imperfect. Okay, then you're not trying to be a perfect lines and a perfect rendition of your character. Speed is more important than extreme clarity at this point. If we want this character to really look like they're pushing off the ground plane. You know, get that quick kind of read on that. Have the other foot, lift it up. And you don't remember punching or extreme plunging or I would say kind of super hero punching really is more of a falling. So it's almost like you're getting more of a run into that pose. Where if it's Bach, same, they're planted generally when they throw that punch. And it's good to pay attention to that. But then also, yeah, I'll think about it like UFC, you ever hear of the Superman punched while that's jump up in the air and they look like they're getting ready to fall and it deliver a Pontiac Superman. It's almost that kind of concept where you really want, you know, if you were to draw a more traditional version, you'd have a character that had their guard up. And usually their legs are on a l like shape. Okay. So the first foot's like this, other ones like post, there's more bend to the knees. It's more of a stance. Okay. Ready stance of, of balance. Who balanced line goes through like this. You try to distribute your weight evenly across that balanced line, right? Well, when you're, when you're trying to draw action. Think of, think more like somebody running a sprint. You know, they're leaning into it. The action of running is as repetitive falling but you catch yourself. And so I like to think of that more when I'm drawing a character punching for comics, let's do one where they're punching up one other kind of iconic Pontus, one going way up to the sky, right? So my bows, again just using basic crude versions of the anatomy and the male the pose. And then also think of like action lines. But then I also like to just really work out from the most predominant area. And then think about the spine. To me, the spine is really important for the way that I draw to get in there. And so sometimes the action lines to me fight that. But you want to try everything you want to use both a lot of artists are going to tell you. You've got to have action lines, you're going to have characters. And I do believe that there needs to be, like for instance, if the overall action line of this so far would be something like that. I just don't want to eat. I didn't want to show it to quake and then you hinge upon it too much like you have to allow yourself to draw Passat. Okay, so draw through that, I should say. So now let's print this alarm back and over this way, again, we'll establish those links. Cross over this leg, bring this one down and back. Really pushed that back. So we're really getting that stretch and that we want to really test how far we can take the pose. And then sometimes you're going to break the character, they're going to look broken and, and that's obviously not what you want and then you pull back from there. But you really need to test the, the barriers, the limits. Foot to foot here. Here. Again, nice quick poses. The main thing that we're getting done here is we're generating lots of food for thought rather quickly. And that's the most powerful aspect of doing it this way. Get perfection out of your mind for a bit. Just have some fun. Think more about energy and movement and all that nice stuff and then we can refine these as we see fit. Let's see another one. Let's get some downward punching action. And so this form, let's try. Let's try it in a sterile metric approach just because you want to try a few things but still rather quickly, okay, so I don't want you to think too much about this, but sometimes drawing in a, a cube or a rectangular shape, especially for the upper body, can help you to think a little bit more about the perspective that you're getting ready to do. So we've got a picture that this lower portion of the pelvis is gonna get hidden by the upper portion of the body. We gotta remember too, that there's a lot of ability to twist that. Portion of the body and that's why the bean shape. You'll see a lot of people do that right there. I've done videos on that. The bean shape is really helpful for stuff like this. But let's say something like this. And then let's bring this arm down. So it really punching downward. So the cameras maybe above them or they're really leaned over to swiping into it. I mean, you could even say that they're leaned over, they punched what looks like down to the ground, but their heads up. Okay. So if you do that, now all sudden it looks like they punch something over here. They just swamped so far past that. But they're looking up and making sure they hit their target or whatever. Keep your eye on the prize right now. Another one. You could just tilt the head down like this. And you could get away with the same thing. You can still have a character over here and say they got punched. But it almost looks more now like we're looking down on the two combatants and you're going to see the other person maybe over here more like that. So again, all of these things kind of change the possibilities and then the dynamic nature of these poses. Let's pick elegant with the head up or punching down and pass the character and its arms back. Maybe it's, you know, I want to fight the urge to do stuff like this too much. It's okay to do that, but you want to challenge yourself to do, I think is instead of just going well, I'm gonna draw an arm that's completely visible up here. If we could just play around with the upper arm getting hidden a little bit in the form. So you're going to see most of that form. So it's still going to have its length, but you want that overlap right there. I think that's important to practice because if not, you'll really get in the habit of always having those limbs right out to the side of every pose. And that's kind of kills it. And it's not like it's much more work to just get those overlaps in there. So it's about the same amount of work. So really kind of explore that. But the NEA and the leaned over pose contorted. Probably have the yeah, I think the pelvis needs to be pointed down like this, so they're leaned over. They gotta have some, you know, it's got to come down and connect to the ground. I don't I guess we could bring it to the side. It's comics, right? We could try it both ways because again, I think this is helpful to see how you could work through these different concepts. So you can say the pelvis here and they're punching through so much for kinda flying through the air, right? So you could have a leg up like this one, like Back in this MOOC, get really small and it's always phone draw tiny little leg, Tamil foot. And all sudden the perspective is you get kind of this going on, right? And then this is easy. Just throw like a little oval there and a foot back here. Make sure it's noticeably bigger than the other one. And you kinda get that perspective going of like now they're flying and punching, which kinda makes more sense with the way that the body is. But let's try it another way just to try to mix it up a bit. Let's try to bring this layout and over this way. And maybe still back, just some ovals. So like the photos really forced that leg is forced right there. Let's bring it out even more. Sometimes you can get away with putting like a square run on the front of the knee. It almost does that as legs bending in certain ways. So let's keep that in mind. Kinda angle the knee down like that. So I find in this part of the leg to be kind of tricky. So a big part of it I think, at least for me, is getting the overlaps this right. So I like to draw a lot of these poses really focus on the overlaps. I was two proportions play a big role as well. But one of the things you start to realize is that when you take these different shapes and you kind of sandwich them together or you overlap them in different extreme ways, you start to get a little bit more of a foreshortening and that coupled with making sure it gets smaller as it recedes way from our view. Now this pulls, looks a little wonky, but sometimes I'll keep moving forward upon like this. Yeah, So I actually kinda like that. It's, it's awkward. But sometimes awkward poses are fun to you just gotta, you gotta see into it a bit more. But I think, I think I actually like that. So let's go to another one. Spent a little bit more time on that, but we were able to explore a couple of variations of it, which again, that's really the power of doing this, that you're going to be able to lots of ideas on the page and figure things out as you go. All right, here are the poses with one more level of refinement. Just some quick reference for. And so now we'll head over to the next lesson and continue another pose, but some foreshortening techniques. So with that, let's move on.
3. Editing the Pose: All right, So for this next one, I want to do something with a little bit more foreshortening. So kinda tried to incorporate a little bit of that into these, but you see it's not very much foreshortening. Something that's a little bit more extreme. I generally will start with a little bit of a representation of perspective. So you could use a single vanishing point and it doesn't have to be perfect, you Sam, just sketching in lines. But it gives me an idea of some perspective. And then also if you need the helping hand, you can also draw and a box. Again, it doesn't have to match exactly the perspective because one of the things that happens if you're drawing a building and perspective, then generally it's going to converge exactly to these points. And even so you can kind of break the rules a little bit, but because I always find it looks a little stiff if you make everything go right to the exact perspective, but that's, that's something that generally as a rule. But what the human body, it's not because it's still falls under the perspective. But if you've got a torso up here and then a pelvis is tilted, It's still receding in getting smaller and a space. But, you know, I'm a lake and come this way. So since these limbs are all over the place, It's not like every one of them is going to converge to a vanishing point. They can converge own vanishing point to the horizon line. But they also have a huge range of movements. So I find that it's really important to just kind of start with a container box or some kind. So in this case I'll say something like this, just as a starting point. And that's about it. And the rest of it, I'll kind of let my my judgment decide what goes where. But with this idea that the overall body is receding into space like that. So let's just draw over this thinking. One of the iconic kind of poses where you've got a fist coming out towards the screen. I've gotta head back here somewhere. And those are work bag. You're going to see more of the forearm, lot less of the upper arm, pretty good amount of the shoulder just because of the way the shoulder connects to the side. So something like that for an arm and perspective, I'll go ahead and make this a female superhero, super heroin. And so something like this. Now this is the tricky part in probably already noticed that with what I'm doing, I'm starting to go, I'm starting to work down more. So say I keep working down and put in the bras like the ribcage, pelvis down here. And all sudden, I'm not really in that perspective anymore. It could still work. I don't think it's a, it's a horrible shout at this point. But i've, I feel myself drawing down more than, than I am drawing back like that. Okay, so that's something that we just have to practice and be aware of. And it's almost like you don't want to start down the wrong rabbit holes. So for instance, you, you start doing it and then you're liking what you're doing. So you continue on and all sudden, you kind of know mentally that you were making that mistake, but you do it anyways. At least that's the way I feel about it. Like it's one of those things where we commit to what we are doing. So even though. In the back of my mind, I'm thinking was really not going the right way. But let me just see if I can make it better and I keep doing it. So that's a habit, you know, it's kind of a bad habit. So we'll have kinda have to just find those bad habits and Nick them, put out a way to get rid of him. But so yes, so I really want to push the perspective a lot smaller and receding into space. And a lot of times, that means omitting parts of the body. It also means, like I mentioned before, overlaps. Overlaps are probably the biggest thing. So for instance, this is the stomach right there, the abdomen area. And look where I'm putting the hips way back there. I mean, I might even be gone too far with those, but I need to do that because my force of habit is to draw them way down here as a connection point. And that would just be silly. So as the body leans over, we start to get a lot more of this going on. So say this was the stomach muscles. Traditionally. I'll, I'll do one off to the side. Words more traditional and those can be very boxy by the way. So your stomach muscles do something like this. Your hips come up, lower pelvis, obliques. It's something like this, right? And poorly drawn, I was saying. But as we lean over, those hips, have to go way back here. Stomachs kind of still point down here. And it's just kind of a different orientation. The stomach is going to be one and side. You're gonna see a little bit of the obliques. For the female. You're going to see still more that bell-shaped. And actually what even happens here is instead of drawing the obliques to the side, or I should say to the side like this. And then the hips, they start to cut in front of even the hips from a certain angle. So that's kinda what we gotta think about that overlapping and shift in perspective essentially. So that's what I'm trying to do here. And then as one leg will do, the opposite leg comes downward. It's going to look like it's relatively the same size in relationship to the next connection point. Okay. So it shouldn't be relatively the same size to her shoulders? Should be relatively the same size to the connection point of the pelvis. And then this one, we can really push that back. I mean, we play with all sorts of things like drawing a little tiny leg that recedes into space. But lot of times you can get away with just kind of this part of the leg and then maybe shade, shadowing it bag or something like that. So just like that, you've got a little bit more of a foreshortened perspective, and I feel like it's still match the perspective. Now we can also play around the head orientation. We could put that lower and then it's almost like she's going to be flying more intensely. They also, if you bring the head down, let me make it more clear here. So right now it's like she's got her her neck back, she's looking up. I would say a little bit more of a heroic feel. Orientation of the head can do a line. Now it says one just makes it feel a little more heroic. And then if we put it down like this, you have to lower the brow. And then all sudden it's like super-fast speed or you can almost picture. You could put the other hand up here and work back. You've got your orientation with the other arm to kind of guide you. And you can really make it look glaciers is flying really fast and delivering maybe a dual punch or whatever. So since we're just going for punches right now, we'll get rid of that one arm. Do kinda like that downward head. It is tricky though because I feel like you don't want to go too far with it. Like the shoulders can only go up so far. I think they usually line up to about your ear aid if you lift your arm up and kinda look but the ear. But then let's print this other arm down. I got, oh no. So now this can be tricky as well because we have to make sure if we bring it down like this, like, look, I almost put it out to the side then over. Okay. And it just doesn't feel right. So let's go back and need to always think about it like you need to either commit or get off the fence. Like either go with it and let's put it way back here and then bring this arm out. Because if you're if it's kind of on discernible, you're like right on the edge of it being understandable and readable, it's almost defeats the purpose, especially in comics like you really have to just kinda overdo it if you, if you can't just deal with the subtleties of it, and every time you try to draw subtleties, it gets lost on your audience. And you'll know people comment and I'll make it a little remarks, right? Well, then get away from the subtlety and just go for the action. Like another thing. If I had to analyze this pose, which I typically do it right, I analyze everything I do over analyze it. I would I would say that I like it, but I could hopefully get a little bit better. Let's do it comparatively. The main thing I'd want to change here is the orientation of her hand. I just feel like it's too straight. Okay. And it's not bad. I think that would still look good as a finished illustration. But let's just see, it's a relatively quick fix. And like I said, we've got a comparatively so a big deal if it doesn't work, we'll just go back. But I do like the bigger fists love that kind of extreme feeling to the foreshortening. So I'll go with that. But I'm just going to try to bring the form back in this direction first. It's still significantly bigger. And then I still want a really noticeable amount of taper her shoulders pretty big to bring that down a bit. Yeah, I think I like that better. And again, you got to kind of look into these. So I'm sure it looks a bit odd at right now, but there's other things that cert you start to work down like the wrist comes into the forearms. So that gives you that kinda another stage of of definition of the arm. Kinda looks, well, you don't want it right there by the thumb, middle and tangents, but so partly get rid of that one, but so little things as you render it. And you'll see as we do some more finished versions of poses. What I mean there, but this is, this is essentially where it starts and then I would do a shape for the hair. Generally even that would match the perspective or action flow. But I've just kinda throw it in like a loose shape like that just for now. And there we have it. So that's how it would work through a more foreshortened version. So with that, let's stop here, head over to our next lesson and continue exploring pulses.
4. Drawing Iconic Poses: All right, so now that we've warmed up on a few concepts, I want to do some of the more iconic and ones that you're going to use to seeing. I probably already used to seeing and those are generally the ones that you kinda want to start with. I think because it's good to look at what successful and being done. And you can elaborate from there. So learn from what saw popular and then make it your own change it experiment with new things. But it's usually a safe investment of your time, right? So one that I like, that you'll see quite a bit as where a character is punching. And there's other extended pretty far out. So you've got a shoulder up here. Remember you can use this little lightning bolt from the arms. Always hubs. They bring the other shoulder way back here. And maybe this is kind of enlightening bowl is kind of tucked back in up and you get a fist over here. Oh, throw on some basic shapes. Established, you know, get your lengths going. Okay, so by itself it looks like the character is just kinda punching, punching the air, right? But the one that I see this used a lot for hertz, maybe just the ones I remember is where the punching pass the character. So for instance, let me scale this up. So now it's out about drawing the small gestures were still thinking gesture. I obviously, but I'm trying to explain again more of the iconic things that used to sing. So you're seeing him punch right? Pass a character who think this is a really good one for, you know, again, you're getting the action sequence of them drawing pass the character or I'm sorry, them punching horn, drawing them punching pass a character. So there's, the impact would be over here. They're swinging for the fences and, you know, there's the aftermath ahead, turn sideways and then you figure out from there where the body is going out to that. So I'm probably bring the body back this way. And we'll figure out where the limbs are. Actually. Let's do this. Let's get this character completed first. So really have them lean over and again, try to think if you can incorporate some twist in there so the shoulders are oriented here. Let's bring the abdomen bounce straight, but we don't want to leave it straight because it takes, takes away the potential power of this character. So we'll bring this leg over those. And then you start to envision some of that twists. So you can, now I'll rotate this bag. So at the center line would do something like bad hips. And the leg attaches more to the side. So Mike that I can bring this leg back, you know, that kind of crisscrossing that you get. And you can take that a lot further. But just for this example, we'll do something like that. You can also play around with how much the person's head is tilted. Character's head is tilted towards the target there. Okay, so now over to here has tilted away. You know, and you could play around with this. You could have the word the top of the head is here and their faces covered. And then really traumatizing their arms up here. They're almost falling right over. Lay here. Like back here. It's I know it's pretty messy, but I just want to show you that you can, obviously you can change this quite a bit. But what I do think should happen is that they're getting hit. You know, let's do this. This is another one you may see, let me get this out of here. Like the heads to big anyways. So we're really seen this side of the head of this character, more of a profile view. Let's get this out here. A little distracting. It's muscle tremor. Farewell to play some of the characters. Okay, again, had tilted to the side. That comes down. Let's put a shoulder over here. This arm will get head and the shoulder. We'll go ahead and have the arm coming out in this way. I'm so that we can have spit flying or plot or whatever you want to do there, but you can show that as a prop or whatever other effect. And less trust hands on different gestures and positions of those. Let's see. And have them really leaned over. So the main thing is I find myself wanting to like draw the same body. And it's almost like because I characters right there, I'm trying to line them up or something. So be careful of that because I find myself fighting that urge right now. I don't want them to be too similar at all because that's not how would happen, right? I mean, there is a relationship that happens when two people occupy the same space and they were like fighting for space. But again, that's not really what's happening or this person is dominating the space. So the other person needs to look like they're just losing control of that space. Shouldn't be any, any kind of evenness, I think. So let's take that. We can even bend this leg back. We've got to remember, legs can rotate in the hip socket pretty well. So you can bring this leg back like this. And I think I like that better. So one mine's going back for balanced and kinda kicked this Lego to try to catch themselves. Again, you know, action lines here of impact. Just like that. We've got another what I think I feel pretty decent about. So, you know, again, like I think I've mentioned, these aren't always going to be winners. Some are going to be better than others. But if we keep it, I mean, look how bad that sketches are as a very rough, loose sketch. But I can see into it because I've done enough of these. So let's do this. Let's go ahead and stop here. We'll head over to the next lesson and clean this up and see if we can make sense of all these messy lines. So what that, let's move forward.
5. Refining the Poses: All right, so in this one I just want to show you how to clean this up. So we'll take our rough sketch. That's pretty loose, pretty gestural, pretty rough obviously. And just go in here and clean it up a little bit. So this is not a hard thing to do. I always think of connected out. So whenever I do this, it's like the information's kind of there. So I have to use my imagination to bridge that gap. But drawn enough of these poses where if I'm warmed up, this usually isn't that big of a deal, but I do have to be warmed up. So a lot of times with pauses, I really recommend starting the day and drawing a good 10 or 20 of them. And I know that's not always a oh, easy to do or whatever. But at the same time, it's almost like working out. I've never done it and then said, Wow, I wish I wouldn't have wasted that time doing that. Like something about drawing poses for your storytelling to warm up for your day, is just like just a great use of your time. And if you get to where you're drawing them in a simplified version of your own style. Then they, they just, they're so functional like you can use them for so many different aspects of your work. Obviously, all your character concepts, but you don't have to just redraw everything from scratch once you get a nice assortment of poses. And you're not to a point where you keep changing things over and over again because your style is going to develop as you progress obviously. But there's, there's even times when I can pull an old polls and just update it with the new way that I'm drawing shoulders or anatomy or something I've changed. So that information is still good. So again, it's never wasted time to practices. And something happens when you draw enough of these and you've learned to loosen up. And again, think stylistically about your own characters and you're drawing from your imagination, not from, you know, you might be looking at comics or you might be remembering a cool scene you read in a comic, that's fine, that's totally natural. But a lot of times you'll get to a point where you loosen up. And you can just draw from your imagination. And it feels natural, it feels easy. And once that happens and doesn't happen overnight, but it will happen. Once that happens, your storytelling really opens up. You can start to do a lot more things. Now, it doesn't mean you're not going to run into stumbling blocks. I do it every day. I draw a certain pose and it looks good in my mind. I get it on the page and the arm is weird. Legs were whatever. I'm not saying that's gonna quit happening, that I don't know what that ever stops happening. You just get better at working through it. And you also learn a lot of cool techniques to adjust and cover things up when they're not right. So a popular term by Hollywood's, which I absolutely love is when in doubt black at all. And so helpful when you're drawing these scenes that are pretty complex and you get some weird little overlap or something and you start to pay attention and realize that you can just black that out and come back with some highlights or whatever. Some things you can really save the day with even silhouettes. And so it's just being creative with your process and thinking on your feet. And, and kind of like not allowing yourself to feel like you're backed into a corner because you never really are just our arrays. There's always a way to make it better. There's always a way to get through it. But at the time when you're trying to fight through it, it seemed very frustrating. It doesn't seem that easy and I can totally relate to that. So what this one, I'm just having fun with it and cleaning it up. I'm making the character pretty stylized. I mean, that leg up close to us is pretty large, but I still like it. There are certain things that I don't mind when I'm doing like I've made the arms pretty massive and that's pretty much one of my signature aspects to my style. And so overall, there are certain things I allow myself kind of a pass on. Where could it be better? Yeah. Is it perfect? No, but it's fine. It's the style I like and other people seem to like it too, so I'm okay. I like it. So, um, but, you know, it's it's mainly because I don't want to have to go back and try to make everything the best I can draw it every single time. That is such a frustrating way to produce art. Don't even want to improve. I do improve and you'll improve daily as an artist. But through repetition, through actually completing work, that's how you improve. Getting frustrated over every aspect seems like a very counter productive way to complete work. And if you don't believe me, just take a job for a client, you'll realize that you have to shed that really quickly. So hopefully the impact here is showing through or like I really wanted the feeling that this character was just punching right through the other individual and other individuals leaned over and falling into, you know, essentially that energy is falling with that energy and trying to catch themselves. But you see what the harm positioning and the awkwardness, the balls that is not really doing that. Now, probably a more traditional way to draw this would have been the character's head completely up where you see just the bottom of the chin, the arms flailing way back. Right There's just just falling right off their feet. Okay. So there's there's lots of ways this could have went down. There's lots of ways that you can adjust this. The main thing that I want you to see and hopefully have a takeaway with this is that the process for developing a couple of characters with basic shapes and then assembling some anatomy with that, and then getting a feeling of action there. Now over top of this, you could draw anything that's going to be Superman and kinda looks like maybe Superman, the flashers, I want to really be bad guys, a little too skinny maybe, but, but it could be anybody, right? So you can have fun with it and draw whatever you want it over. You can put all the fixings and a trimmings and the clothing and all that jazz and a cool background. But the main thing is, is that first you have to get comfortable with drawing these poses rather quickly and in a timely manner. And in a way that you're not just stuck drawing, but same thing, you're not drawing this because I know I can draw this particular pose. I know it can draw an arm this way. Again, we all fall habit to that, but that's where you stag me in your growth. But when you can learn to simplify the forums and simplify the bodies and a stylistic way in a fun, energetic way. Then you really start to experiment and shift the bodies and characters all over the place. And then you start paying better attention to your composition overall, not just your characters, but you start there, or at least I start their journey and workout from there. But there's probably different ways to look at that. But you start paying more attention to the overall composition of your panels and your scenes. And that's where the magic happens. That's where you really start getting cool storytelling and neat panels and neat pin-ups and all fun stuff. But to me, the, the figures of the main part, you gotta get that right first. And once you feel strong, confident there, the rest can, can work together a lot better. But I spend majority of the time on the figures, the posing of them, learning how to draw the anatomy, how to, how to assemble all this. And then pass that are probably above that would be faces. So where do we identify with the characters the most, the face. So I spend the most time drawing faces over and over again, trying to give life and energy into the expressions and the characters. And that doesn't happen overnight. Like it's a, it's a nonstop battle to try to get better and better looking characters that look like they have real expressions that have rural energy and life on the page. So right here at this stage, just so you know, I'm just dropping in value. It's another, hopefully another little. Illustrate a process to help you to see the volumes of the anatomy a bit better. So no real reason other than that, I will oftentimes do this and then go right over an ink that but I'll still kind of adjust my inks accordingly. Like I feel like this is a, I always tell people this is like me going over it with a Prismacolor marker. When I would work traditionally, I would do it this way. Anode, light rule-like Gray, I drop that in. I could ink and I could see into the inks better. But it seemed like whenever I didn't do that and I just started inking the shadows, I always figured out a way to mess it up and I don't know why that is. It's almost like the light gray allows me to slowly build up to that strong, powerful, harsh, solid black ink. So just keep in mind, that's another little technique that I like to do and that's what I'm doing here to hopefully just give you a better idea what this could look like as you progress to the next level. So that'll wrap this one up. I hope you've enjoyed this lesson. Let's move forward and continue illustrating some poses.
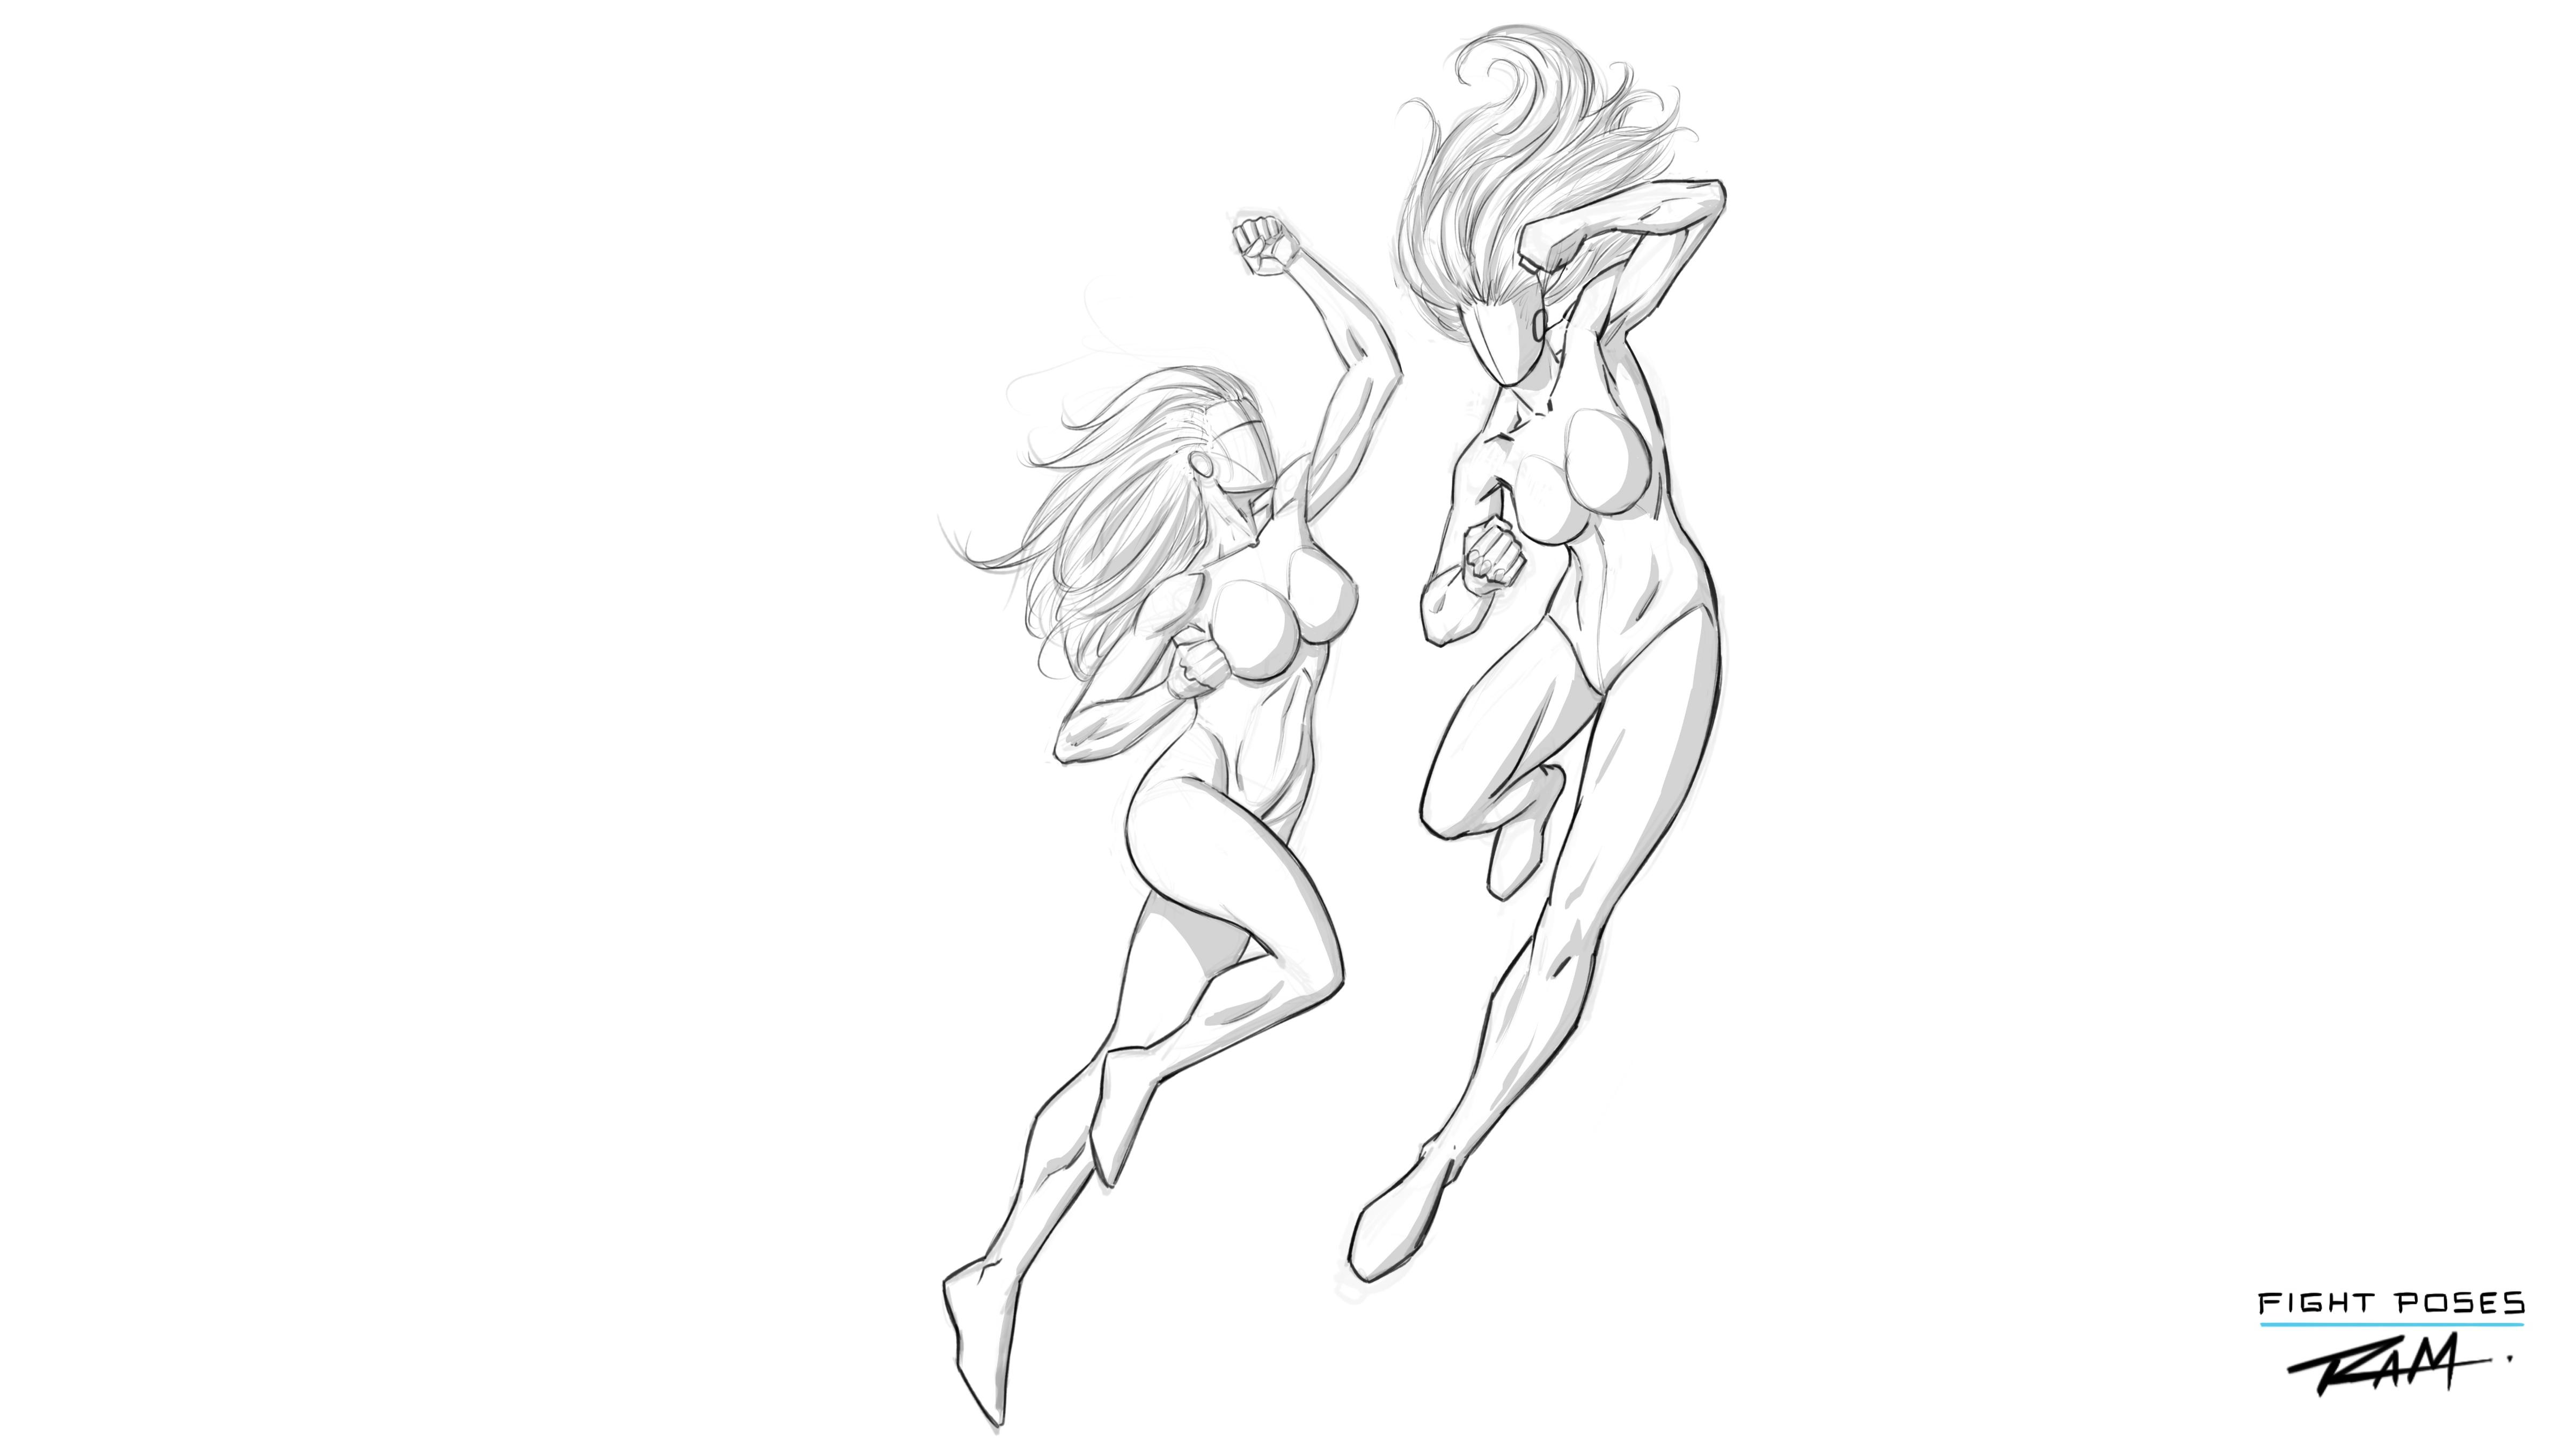
6. The Upper Hand Scene: All right, So for this next iconic pose, I like to call those form the upper hand. What I think is neat about this is when you see the two characters battling it out. But you can't really discern other than the high or the level ones higher than the other, that one's really winning. Like there's not a significant punch, the phase Shea, you don't see this action where one's really her. They just look like they're almost both swinging or in the action of fighting. So this to me is more something that you would draw for the middle of the sequential fight scene, but or series of scenes, I guess, but at the same time, it's it's kind of a neat cover pieces wall so that you can start to explain some of the narrative. Characters are battling, but you can't really discern who's winning or losing at this point. I'll start with the head. And at this point I'm just thinking about one person being more the aggressor and the other one be a little bit more on the defensive side. We'll put a shoulder here. So let's get the collarbones and they're one shoulder up, one shoulder bag. And then and I'm actually bringing this one forward just a little bit. And so I'm going to use the lightning bolt methods. So just remember that's a curve here. Curve back here. Here it's back and forth. It's a nice way to really start thinking about how to place the anatomy. It does jump, you pass the cylinders, but if you need the cylinders to get the forums go on first do that. By all means, they can be the cylinder, but I like to really use a couple of curved lines so I don't draw it too awfully straight. And so the head just a circle up here, dropped down with a curved line. I'm just starting very, very mannequins structural approach. And at your back here, I'd like to get that little plane change those side of the head and the cheek. And then this curve is weight to those and there's a drop-down. You know, I have to think about the line of sight. So a lot of times, I guess we could even wait to really fill in the hat as much, but we really want there to be a relationship to where the characters punching just kinda block in a shape for a little wedge off to the side for thumb. Very block you just, again, this can be loose and suggestive. And this arm, I want to bring this up and this is kinda why I think of us as the upper hand. Kinda Paul's, which we already did this a little bit in the other one, but I like this word, the other arm is ready to fire down. And then what we're gonna do here is actually children twists of the body. So again, here's the alignment of the shoulders here. So let's go ahead and twist this even further. So if you're to look at this off to the side, think a little bit like those. And even in this kind of asymmetrical or symmetrical tee, up and down, symmetrical one or even that. Try not to think of it just like that. And that's why you use different size spheres. So our ovals IS, but this one is closer to us and thus one. And then hopefully with that coupled with the collarbone, this starts to look that way. So vice versa here I'll use a smaller one here, larger one here, so that my mind's eye, I'm starting to see, well, if you look at a cylinder and perspective, right, It's something like that. So that I'm not, I'm not constantly drawing things and a flat 2D way all the time. I've really need to play around with the twisting contorted on the body. Certain things being closer, certain things being further away. And then let's bring this forward and we're going to bring this one back. And with that lower leg down. And let's just drop in some representational forms. See if this is all working. Okay, and I'm like cylinders but a little bit more shape and feeling to the anatomy than just cylinders. I'm also having the leg gets smaller. It's also perceiving those going away from us a little bit and are trying to convey that anyways. So I'll run out of room air. Now I, I really should have already filled on part of the other character. Bottom, just concentrating on this pose. But keep in mind, sometimes it's, a lot of times it's good to go back and forth so that you don't get too far ahead of yourself on one particular pose. And then all sudden you go to draw the other character or seen everything really, and it doesn't all fit together. Then I put all this time into a particular polls, but it seems to be harder to work backwards. So now on this one, this guy is on the receiving end, okay? And I want there to be that very noticeable hierarchy are the ones got the upper hand. And again, that's why I call this one the upper hand. It's very noticeable if somebody's kind of winning it this portion, even though we're not showing that connection and that strike to the phase. It almost looks like a swing and a miss. But you know what the right expression you could really tell a lot by this. She could have fear on this face and extreme anger on, on this one over here to the right. And then all sudden you're going to have that conveyed that, you know, that one is definitely the aggressor in one's more on the defense and maybe that's even a better, better one for this is defensive stance, but let's bring this hand out away from the body. So my neat thing about these is you just kind of drop a fist right over the oval and the opening of the wrist works out pretty well, pretty easy to do that gives you a little feeling of foreshortening. And then for this one over here, we can hide it behind the other character, me bring it back this way. He could do another clenched fist. And depends on the character types. Obviously there's a powered character then you might do a little bit less of a clenched fist and more of a Wielding power kind of hand poses that you see. Ok, So Now for this one, I want to really bring out some of that curve of the back. Either way really I could say, well, they're extending forward like they're trying to combat the aggressor from a lower defensive position. Or they could be getting knocked back. If they're getting knocked back. I need to take this curved line here and I need to do something like this. We have to remember that the torso has a lot of range of movement. And it's not just this way and this way. No. Oppose am says that just the spine going this way or the spine going this way. It's also the twists. And that's why it's one of the more complex answer to draw. And again, that's what I'm really point out, this illustration over here. You really want to do this a lot of different ways. And then think about these areas and different perspectives and play around with that. And you really want to twist and contour the body and just remember another technique is the bean. Alright, so really play around with the bean-shaped minus probably that part right there. But it does kinda do that, but it's, you know, it's a lot more rigid look in that. Okay. So over to here probably bring is where it gets a little tight because I've the way I've got the poses gone. But I do kinda like this. I like were there kind of, you know, they're fighting over the same space right there. They're fighting. So the fact that there are kind of aligned, you don't want too much of these tangents obviously, but, but they are fighting over a similar space. And so there is going to be some bit of congestion there, I guess, of the forums. So yeah, let's try. This was kind of searching for what might look good at this point. I've laid down this way. So now there's a definite feeling that the one is got the upper hand. And actually let me do this. Let's take this here and not over. Okay. And then if I gives us enough room for this leg, still barely so when we scale it down a little more. So this is why it's good to work small, but I always feel like I've mentioned before, it's hard for me to work too small or it will be able to see what I'm doing here. But think in terms of when you are doing this portion of your work, generally, thumbnails, the smaller the better within reason obviously. And that way you're able to flesh out and change things really quick. And you're not getting bogged down with the big shapes, big forms, big ideas have big ideas, but big ideas can be expressed in little sketches for sure. A lot of times they're expressed more easily and again, you get it done so much faster that ideas flourish through that process. I can't stress that enough. Thumbnailing is a lifesaver. Let's just kinda, you know, sculpting out some of the anatomy here or shapes of the form shapes that are not, are not really defined anatomy yet. You see it's pretty messy. So let's do this. Let's let's told us back and clean it up just a little bit. And let's do this. Let's go ahead and stop here. We'll head over to the next lesson. Clean this up, really bring it all together. So with that, let's move on to our next lesson.
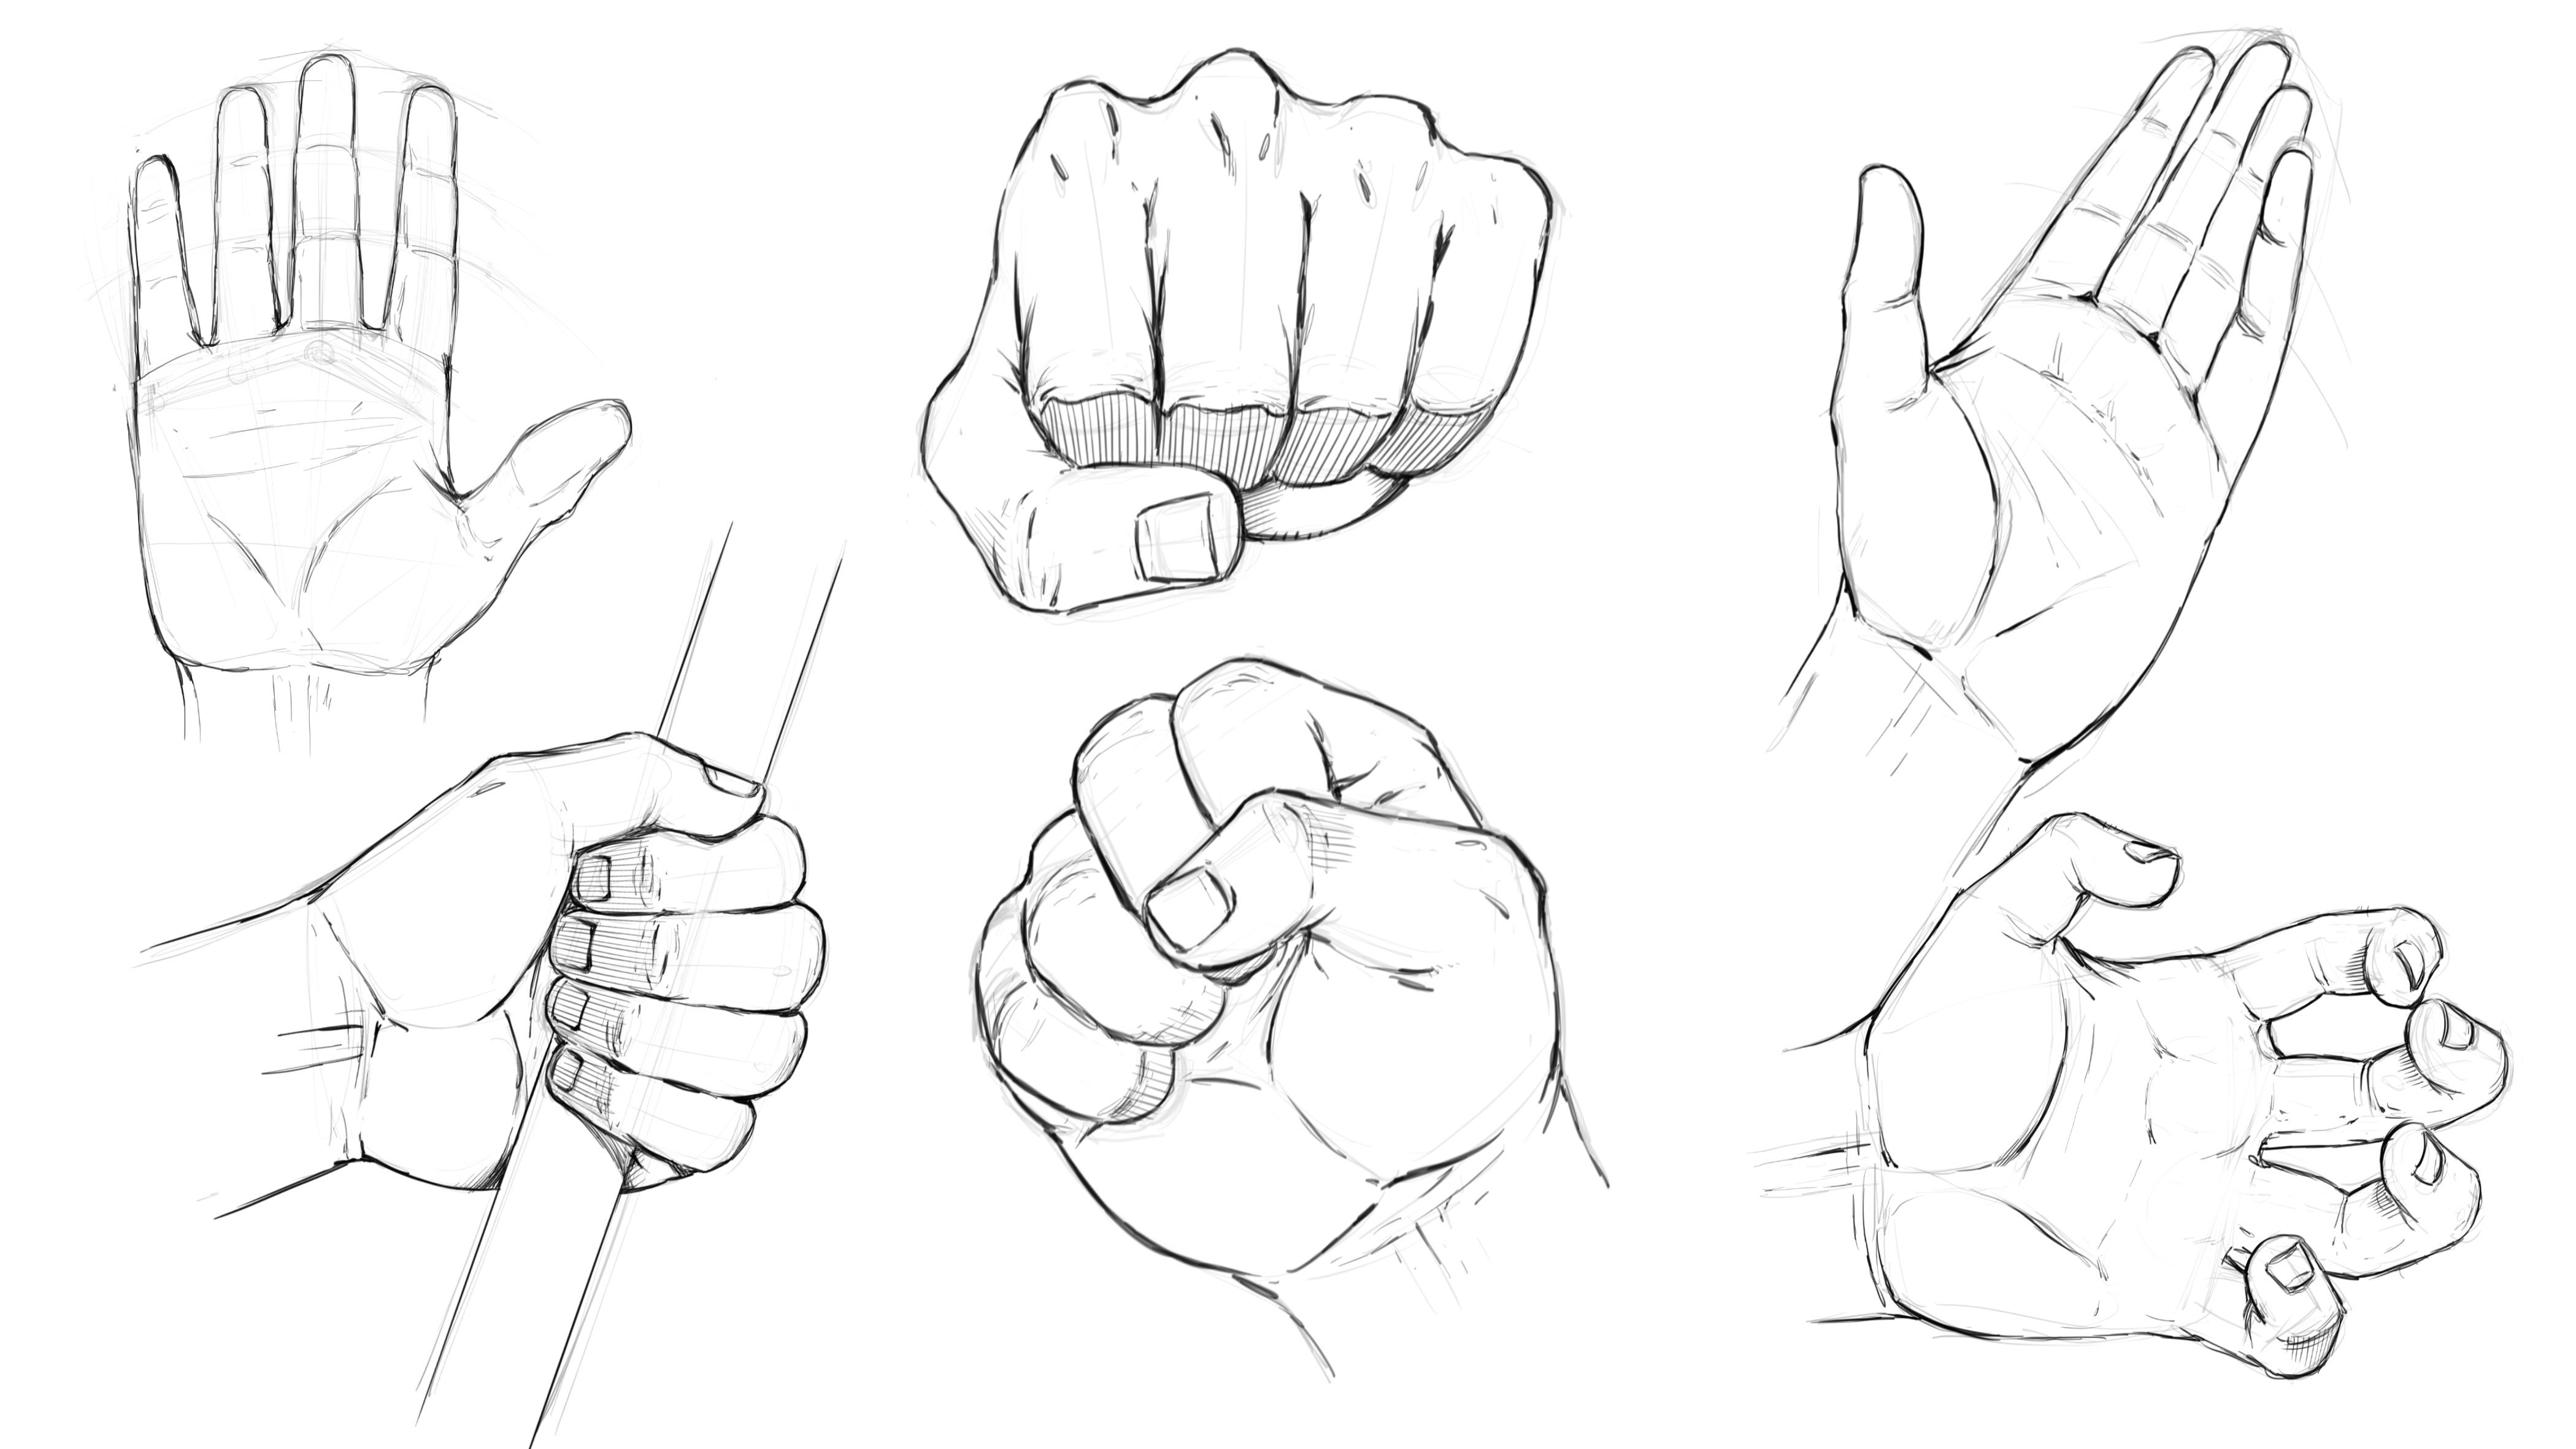
7. Refining the Pose : And we'll get rid of the little diagrams off to the side so we can focus on this. Let me softer races back just a little bit more. I like to be really light. Again, these are meant to be gestural, meant to be loose to interpretation. So that hopefully you can get in here and really cleaned it up and make some even better decisions. Now, that doesn't always happen. Sometimes you go to work over a sketch and the opposite happens. You know, it's like the sketch was better. That does happen, but the main thing is that you just allow yourself to finish it. Okay. So I can't tell you how many artists I speak to. Not a ton, but enough to want to bring it up, I guess. And they they're constantly frustrated with where they're at and how they're not improving. Now, generally it's a couple of things, one of which is maybe are not drawn enough. Some people I think, might underestimate how much it really takes to get better. I would say that I draw on average eight to 10 hours a day. And there's definitely days I do more and there's definitely days I do less. So I'm sayin an average because there's times that take time off just to visit with family and reset the batteries. And that's very important as well. You can definitely get burned out, so you have to make sure to take some breaks. I just don't recommend very long breaks. And plus I generally just love this stuff. So it's kinda hard for me to take massive breaks anyways, even when I go somewhere, generally bring a sketchpad. So that's just me. So one aspect of it may be that you're not dry enough and the other aspect may be that you're just not allowing yourself to be patient with yourself. So taking the time that it takes to really get good, and that's years, it's not days, it's not even months. Sometimes you'll feel like it's months because you'll see that divide in your, your workflow. You'll, you'll be doing something also nude figures on Mao. And it seems instantaneous. It seems overnight almost. But that's not really the case. What I think is from my experience is that you actually acquired a series of techniques and knowledge. But it was very noticeable once you finally learn to implement it properly in the workflow. So that seems like a parting of the water, but it's really not that immediate. So I really just want to stretch real quick and I'll get back to talking about this. Be patient with yourself. And there's a reason it's called an art journey. And it will take time, but it's worth it. It's worth the effort. If it was easy, there wouldn't be, you know, if it was easy, everybody would do it right. There's that. And then also you'd probably take it a bit for granted because it was so easy, you would think that just this amazing individual, I don't need to work hard. So there's a lot of ways to look at it, but essentially just allow yourself to take your time and learn. You can do it. I promise you that this has been said from an artists that couldn't draw. And I think this is a lot of artists that I couldn't draw very well when I was younger. You know, let's just couldn't do it and it took lots and lots of books and EFR and drawing like a mad person. And then I eventually started to learn. So that's just the way it is and I'm still that person still trying to get better daily. Okay. So back to this, I just wanted to share that, but essentially, I'm really I've got everything in front of me and I'm just laying in what I like to draw from my own anatomy style. Little tips again that I've kind of already mentioned, but I'll say again, is this really this lightning bolt effect? So you'll see even as I land the anatomy to this arm, I'm really repeating that, that idea. Okay. And there's different ways you could do it. So for instance, the shoulder, I could say ultimately shoulder looks like this. Or to me a shoulder looks more like this. Let's kinda the same way as automated shoulder looks like that. And the biceps here and the triceps there, you know, it's all kind of works. It's just basically, you know, the series of forms that you see that you think look the bass at the given time. But the main thing really is that the shoulder connects a little bit like this. Okay. It's not a it's not a straight downslope are even It's hard to explain, but it even connection point. If you draw everything to straight, it really kind of starts to get flat. But if you look at it like, well, the shoulder kinda comes in like this. This deltoid had is at a different orientation. Actually gonna do this one more time. I like it like saying I'm struggling because I've changed my process a little bit. Just to show you has something like that. But again, it's one of those things were you're going to mess around and change that. You're just not going to draw stacked anatomy, okay, it's the best way to put it. And that lightning bolt of fact really helps you to see past that. Also you're not stacking it. So again, I got an angle here. I've got an angle curve, they're curved angle there. And that back and forth rhythm usually makes a better looking arm. So sorry, I know I struggled to get that out there, but that's some of these concepts are easier to explain than others. I just want to make sure that I identify with a mind. Hopefully, you know, Tom to you in a way that makes sense. Basically. The knuckles are a bit of a curve, so try not to draw the knuckles to straight. I think that's a big one. Also the main, you know, the big NOCl, you can start with that sometimes their work over and work back here. 0, that big knuckles, the predominant one, right? So you could start there, usually will help you kind of figure it out. The thumb comes thumbs, part of the hardest parts. So for instance, after I get the fingers like this and I try to fan these over as I start to hide them because you've got to remember they're receding away from our view. In that little pocket of skin in-between the knuckles usually points back like little. And she does like this. Take a y. So we got a knuckle y or I'm sorry. Well, this is an uncle, that's the lower number, but I was thinking like I was pointing out this level. So you've got the big no-go here, the y, the middle finger, the y. And you'll see in a lot of my illustrations I over illustrate that just because I think it really helps to show artists how easy, easier hands can be if you do this. Yeah, that's a bit of word hand, but hopefully you get the idea there. That repetitive kind of pattern is what I use. But I also couple that thought process with fanning the fingers, condensing them down and again, hiding them. When I'm thinking about something like perspective, they're getting away from our view. So we can't just have them all straight across. In fact, I'll see certain illustrations where people do that. And it's a really good look in hand. But it's so flattened, so evenly dispersed with the fingers that it just looks like the I don't know, like a cardboard cutout of a hand, even though it's drawn and rendered really well. And you know, some people might like that for their styles. So it's totally up to them and up to you. But just one of the things that I do tend to notice, like if you can get away from that general outlook better. Alright, So the dominant muscles. Now remember what I said about trying to twist and contort this, the shoulders definitely coming out more. And this hip joint is way over here. So this legs here. And with leg poses like this, I'll generally draw this and again, and i'm, I'm still kind of searching for the right shapes. Well, something like this. Oblique here. But I don't feel like I'm getting enough of that twist. So I'm going to do is really use the center line and the twisting of the abdomen and kinda like an accordion thick know that there to get that more evident. Minima hide this side. So a lot of ways this is like the other polls that we did, but I just want to and do a few of these. And we'll get into a lot more variation in the next few. But I think the iconic ones are really important to pay attention to. This is what I always tell people. Go for what's popular, go for what's working, learn that, learn why it's popular and why it's, it works on your storytelling, on your pages and then develop your own over time pass that. I think that that's a lot more efficient way to work. Because you can really spend a lot of time trying to reinvent the wheel. Trying to figure out what's your message. You know what your particular Style and interpretation of cool comics is, and that's a great thing. There's nothing wrong with that. But you've got to also realize there's nothing wrong with taking ideas that work and putting your own spin on them. We all grow from watching other artists were all emulating pieces of, of other artists and other Aras. I can't say how many artists that I admire absolutely love and covet things by people like Jack Kirby. And you know, they, they looked at that and grow from that and study that. And we do the same thing as the next generation. The next generation. It's just part of the process. So you don't have to reinvent the wheel, you don't have to be entirely inventive. You can definitely pay attention to what's around you and what's in comics, and then develop it further. And I do think that once you understand what works and the more iconic and repetitive panels, then you'll, you'll be able to elaborate from there. But yeah, it's it's there's a reason it works and there's a reason that, well, there's a reason like you've seen pulses like this before in comics. And there's a reason why there's poses that are, have the label of like a almost like a superman punch or that you'll see a pause and somebody who comments, they all, it looks like Sparty. It's just a feeling and energy to these pauses that is recognizable. And that's okay to utilize that and learn from them. And the best way to do this, pay attention to comics and see what they're doing. So the legs feel a bit small there. And this one right here especially looks weird. So I'm going to fix that first. I'd like to go for the most. A portion of the illustration first thing is just because it's 2 open has probably proportion. So for me, one of the things that I always kind of repeat problem, problem area and my work is proportions. So knowing that about myself as shown and what I'll try to fix first. I also feel like the feet are too to even like they just don't look uninteresting or premium on this one poem more. And I feel like it needs a little bit larger. Also just feel like they look a little too skinny when trying to wide node performs a little bit as I go here. Checker from a distance. I really think it's the length of the legs push us back one, even though I was trying to get the effect that it's receding away from our review. It doesn't have quite that feeling. But let me come back to it. Said that my times we got to look at something for a minute to really cage it was recommend coming back to something. So let's work on this other character now. So let's go ahead and wrap it up here. We'll head over to the next lesson and work on another character. So with that, let's move on.
8. More Refinement: All right, So now we'll focus on cleaning up this next pose and just going through and finding some of these guidelines again and tightening up the work. And will be for the Mac. Remember the head is basically a circle with a rectangle and a wedge, right? It's like circle rectangle, wedge. That's kinda the most simplified way to look at it. Trapezius is kind of a triangle. Are bones of opposite triangular v. Remember what I said about the deltoid is kinda connect them down and you know, you kind of focus on more of the middle of the bicep and tricep. But I don't know. It's kinda hard to always throw that right in the middle and make it look right. But the main thing is that it connects on a bit of a curve. And then always pay attention to your overlaps for your foreshortening. Really a great way to easily get better at foreshortening is 2 over segment the work when you know the form is significantly in front of the next form. So form in front of the upper arm, you're going to really just put a line through there. And what helps you really notice that is when you draw characters with suit designs, pretty significant suit designs. Start realizing that even those suits harder to draw. The suit design itself makes the perspective and the the foreshortening and stuff like that a bit easier in my opinion. Because they're always guidelines to work with. Remember those little y's and between the fingers. And to shorten that, the height of that index pair. Going to make sure the middle knuckles the highest drop and some anatomy there and get the lat over here. This would be a little bleak. Gluteus medius would be somewhere in there and won't get too much into the anatomy really at this point, you could, you can focus on a couple of things. You can focus on what you know about anatomy, the stylistic version that you'd like to draw it. And, or, and I would say, and you focus on the silhouette of each of these. So one exercise that I find to be very helpful is not only do you figure drawing, which I absolutely love to do when I want to do it. Always walk away, feeling very accomplished. But also make silhouettes of really cool poses that you like. Imaginative and, or figure drawing realistic. You know. It's really study the silhouettes and even take the time to just trace out the silhouette and pay attention to it. It's, it's pretty neat like the were actually really good at spotting things based upon this Lil'wat. And it works extremely well for comics because not only will you have scenes where you want to implement good silhouettes, it helps you to spot errors in your more advanced renderings. So yeah, you'd never underestimate the silhouette. Same thing over here. Get the role of the knuckles in their middle knuckles. Kinda the the hinging point for me. I'll put that one in there and then work over like I've already mentioned. And just think of the pinky is really squeezing and pointing in to the center of the poem are relatively to the center of the poem. So if you look at your hand and you clench your fist and really, really clench it kinda hard. And then look at the difference of what your, your pinky does, the curves more this way. And then it sorts the point right into basically the middle of the poem. So if you remember that you quit, quit drawing. Visit or two rectangular I think. And there we go. So there's the upper hand poles again, it's kinda hard to tell if there's any real impact like to just kinda falling into one another and trying to hit each other. But there's definitely that the aspect that this character that's higher up has the upper hand and can be a cool dynamic for your storytelling. All right, so that'll complete this lesson. Let's head over to the next and continue on.
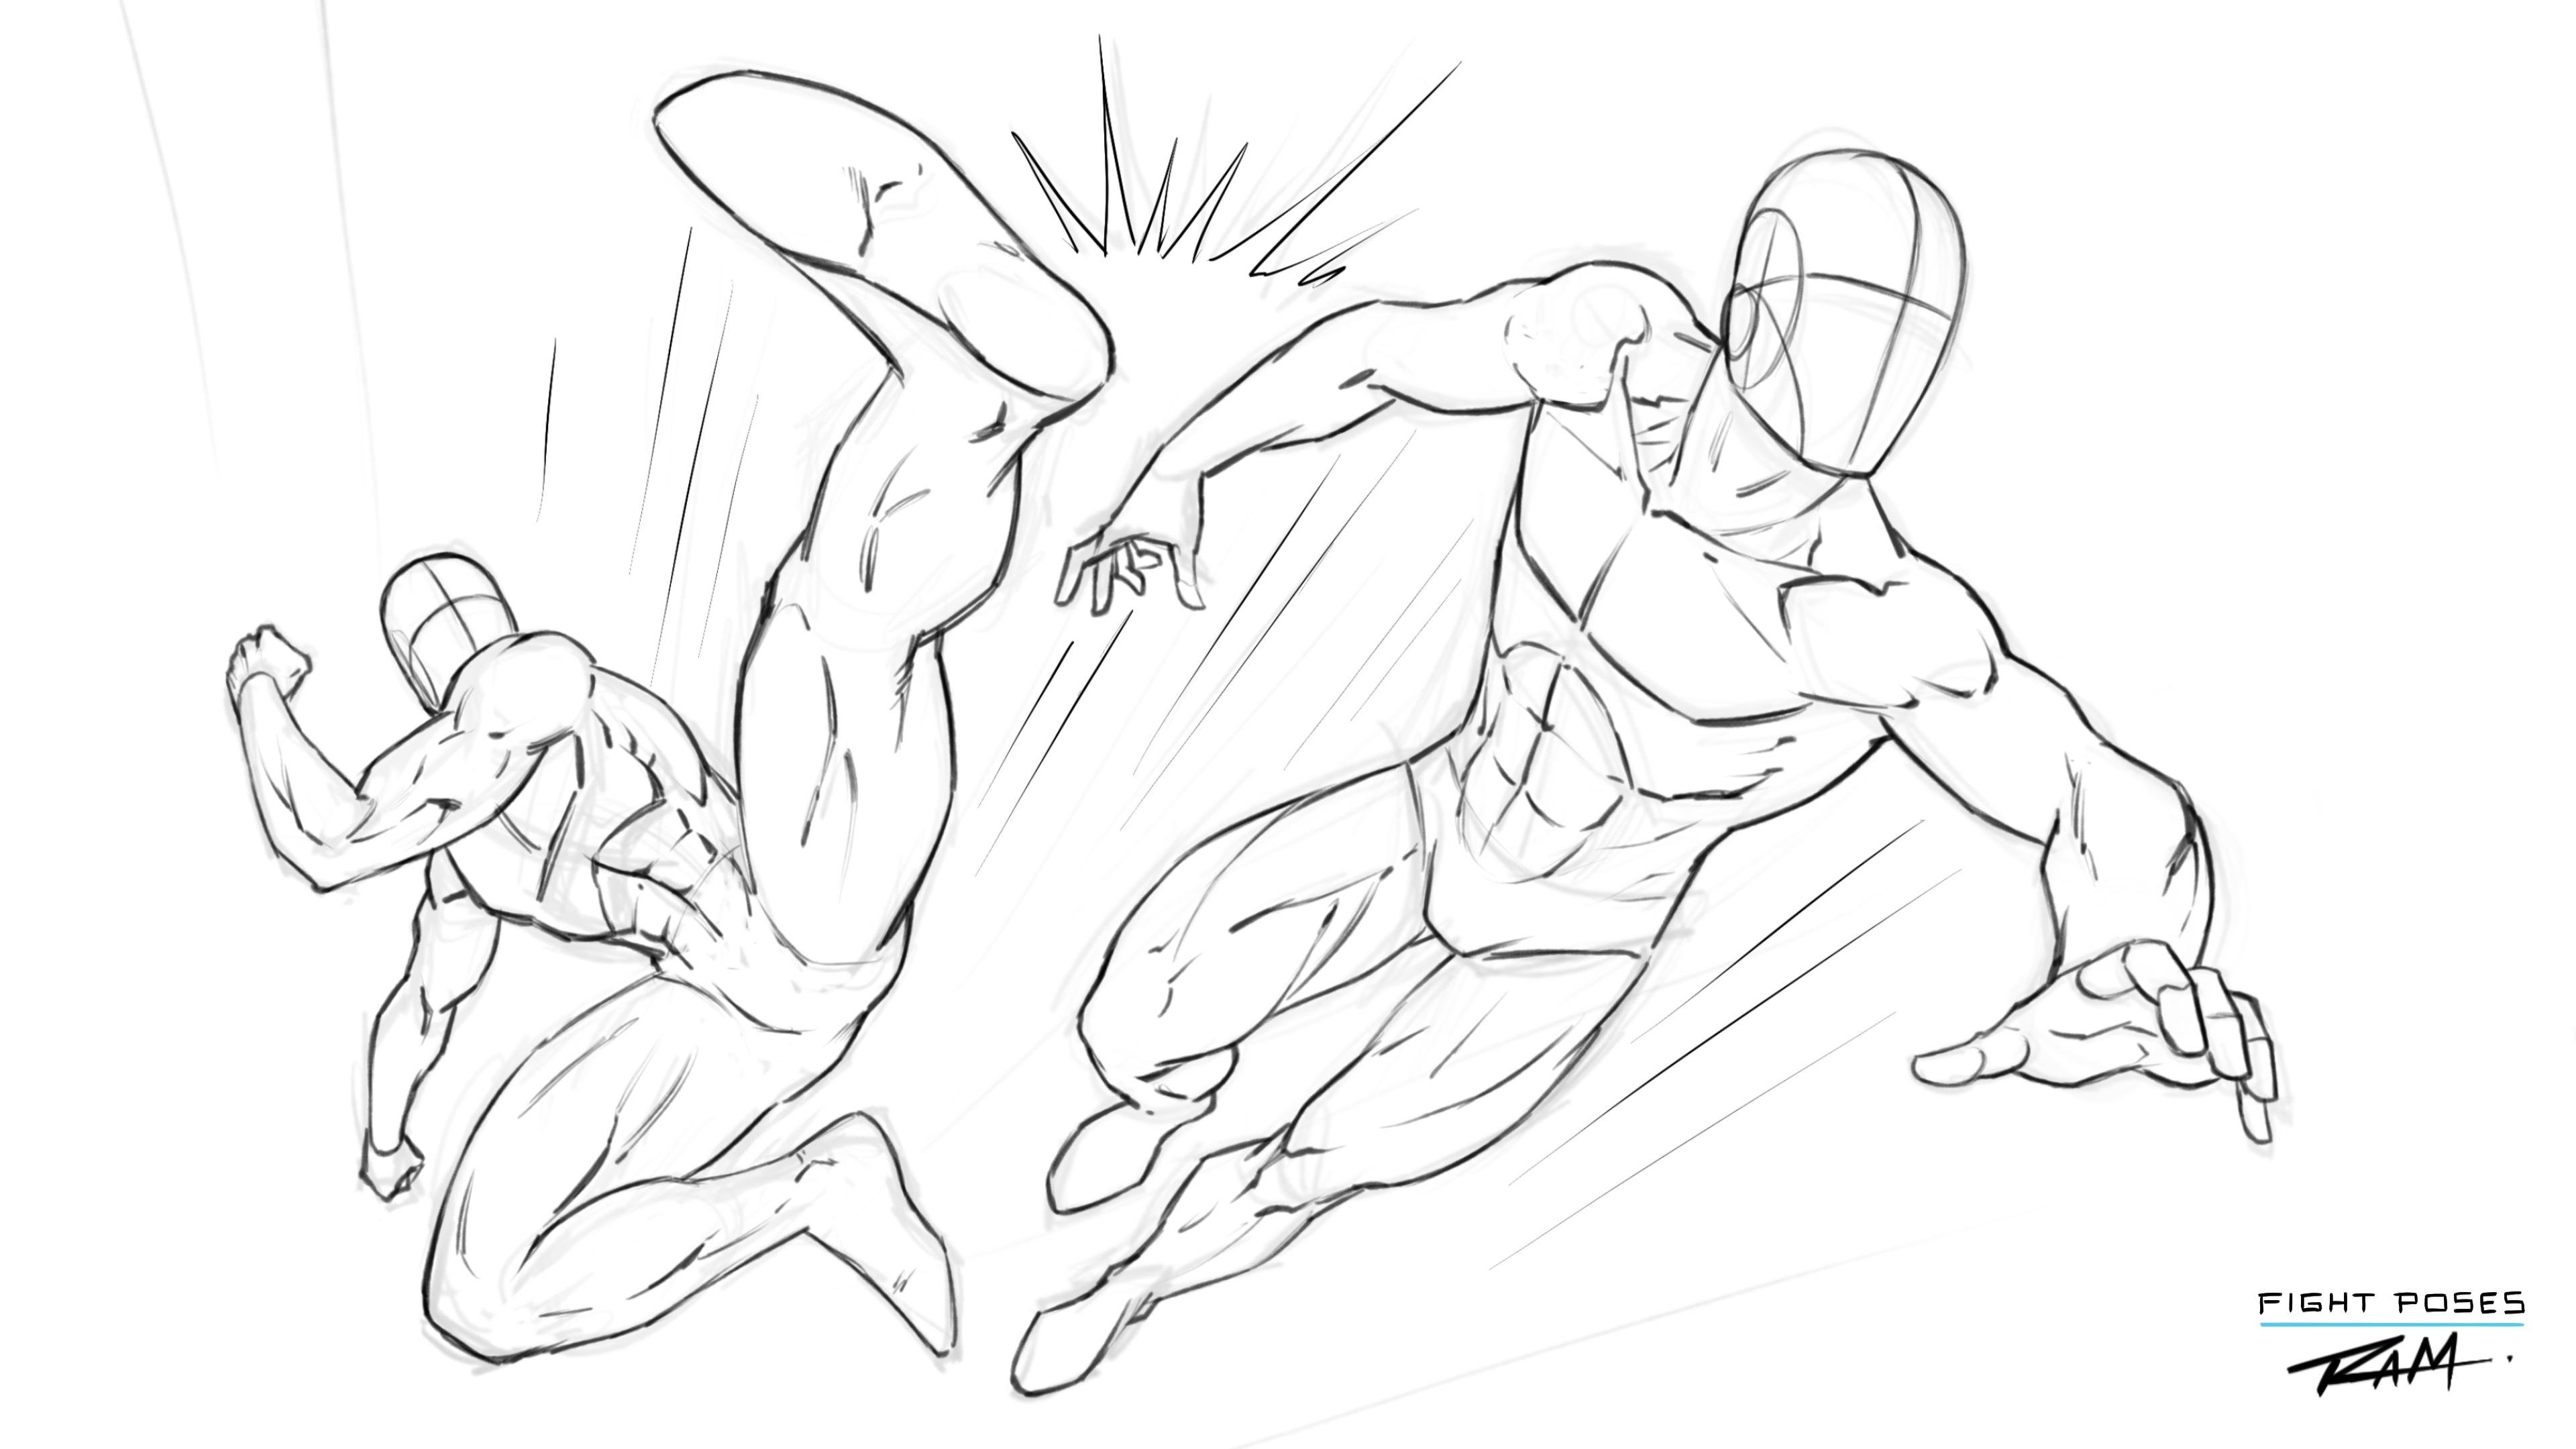
9. Up Close and Personal: All right, So for our next iconic pose, fight poses I should say, is going to be up-close and personal. Okay, so for this one, I'm going to want some kind of frame, panel border. Now, keep in mind, I'm going to reiterate certain things over and over and I would draw the smaller. But for your viewing pleasure, I want to make sure you can see it better so I don't want to draw it too small, but establish some kind of frame and some kind of rough sketch, thumbnail sketch to quickly glance through the overall idea. So with this one, well, let's see, I'm thinking the overhand kind of crossover punch and then some foreshortening. So I'll have these bigger shapes coming out towards us and put a fist on the end. It can look clunky at first, that's fine. A lot of my sketches look clunky at first and then kinda looking over their shoulder. So a little cross-section there. And then the something I really want to kind of go through right here is I think the next most important step besides head placement, because you really kinda wanna try different head placements as well. Let me go back and show you what I mean here. I'll figures I kind of bounce around to mudstone. I so let's go back and I'll just erase that had real quick. And to show you the difference. So again, you really want to challenge yourself to move these shapes around so you see the different impact that you get if you tilt the head down a little bit more versus up a little bit, you know, you're gonna get a different kind of feeling and intensity. So you want to really play around with that. And then also, like I mentioned, you know, different orientations of the head. Maybe it's really low. Maybe they're just barely peeking over their shoulder. And I think that's a bit more extreme, maybe too extreme. But it could be fun. It could be something that really helps sell the idea in intensity. So with that, I kinda like it was roughly at originally, but with that, I do the same thought process to the entire thing. So for instance, when I go to do the lower body here, it's very easy to want to say, draw like this and say, well that looks about right. But it doesn't look very intense. It doesn't look very energized and not a lot of impact there. But if I take that same shape basically and I just really bring it back here, we've got the light here, chest or ribcage somewhere like does my ribcage is kinda like a W center line of the body. All sudden they're leaning into that punch a lot more. Least I feel that way. Hopefully you see that and fill that. So yeah, just like that, we've got more of that motion and that energy. So they're definitely swinging like this, but their body is going like this. And I kinda like that. Like I could also make the argument that I want to see the body receding into space more like back away from our view. So I could do a lot more. Like I could stack these forms going backwards. Let's just try that. I think I'll end up like in the other version. But again, you never know, you gotta experiment, you gotta try to innovate. Mess around with some new ideas, be creative. So here's me trying to let me drop that pelvis back even further. So you really have to overlap these forms. So the belly should come shouldn't have a belly I guess, but the abdominal should come in front of the pelvis, the ribcage should go in front of the abdominal area, stomach muscles, abs, and then the pectoralis major should really be over in each one should be stacking, kinda been or locking in a sense, but really in front of the next shapes. And then what happens is like the obliques would connect more like this. Like you'd barely Sammy probably wouldn't even see him. Maybe a little bit, but that pelvis would be way back here. Look how high up at we want to connect that to make it look like it's receding. So you have to kind of think in terms of that, like really overlap, taken advantage of those overlaps and really pushing that concept so that by the time you get down here to the legs and you're barely seen those upper legs. Knees would be really little and also things like that. And you get this overall perspective working like this. So just keep that in mind. And so now I'm going to analyze this a little bit more. And I don't know, I don't think it's bad. I mean, you can definitely keep pushing this. We could bring a layout like this. One leg back. You want to focus on that twisting, but you could kind of even with the, the pelvis beam like this, you can kinda see it. This does have a little bit more of a different orientation. I don't know if it's extreme enough. Let me go back to the other one I pick, I like the other one. Now if you're really unsure what's the best thing to do, probably save a copy of it and then compare them side-by-side. And that's really the power of doing these loose refer, sketchy designs is that you can really, you can really check your work because you go. So not as much foreshortening here button I think, I think this is what I want to see. Let me try to push this information back. Really want them lean and over. I just, you know, it's comics. We were just really want to try to push, push and stretch the pose. Now, typically I always want to bring the other leg forward. So you see this arm will say his left arm on our right and obviously is up and delivering the power upon tripe. Well, then I'm generally not going to bring this leg up. But there are times I do like, I know it's probably a bad rule to break, you know, contrapposto contour, positioning. I think it's contra pasta, is basically where you swing one arm and then the opposite leg. And you know, it's how we run, right? It's how we just are balanced. And punching the same way you twist and you basically push off the back leg. But I guess there is a part where you kind of would bring the other leg forward. Let's just try it both ways. Again to technical a bottle, it's just implement it. So for bringing this leg forward. And it's like bag. So they're pushing off this back leg and they're extending and delivering power this way. So that's one way to think about it. And the other would be almost what I think almost looks better, more visually as far as a composition, but not necessarily what's as correct. Now we're not going to see a lot of this information. I'm actually just testing the poles here just so you know, and I'm gonna bring in another arm down like this. So I think they both kind of work. I think this one feels a little more awkward, so I'm gonna go with the other. But again, I just want you to see that a lot of times you want to really practice it, feel it out. And if you keep these shapes really loose and gestural and loose to interpretation. And you can really experiment rather quickly and figure out these interlocking shapes and overlaps and things like that. So again, what I mentioned about not really needed to film this other leg is the reason I call this up-close and personal. And it's very again, very popular shot. And comics is we're going to just tick there. We're going to bring this guy over. And we could, you know, being it's digital, we could twist and contorted or whatever, but something like that. And then I want to bring this other one where getting punched in your head is really kind of flying bag. So I'll get a bit of a head shape and hair circle here. Establish an ear roughly in the center, closer to the back of the cranium, usually a bit better. A line here down to the Chen bit of a wedge shape at the bottom of the chin. Brow line should wrap around but meet the top of the ear, and so on and so forth leg. So if you study the Andrew Loomis method, you see I'm kind of using cues from that, but I'm really just thrown it in there. Okay. Because because essentially I don't want to spend too much time cleaning up some head pose. I might not even like this, this orientation as the body. So I don't want to spend too much time in there. I mean, I don't want it to look too poorly drawn either, but but right now I'm still trying to figure out the orientation of the body. So neck here. Remember the collarbone and the trapezius kinda make a V like shapes. So you could do that. Sternocleidomastoid points down to the center of the collarbones from the back of the ear. So I'm like that shoulder could be in here somewhere. The back of the character could be something like this. Again, I'm using very simplified versions of all of this. So I don't get too bogged down. We can even bring an arm up and over this way, maybe get like a stressed hand poles. And there was a bit too long. Let's try that again. So for something like this, that really is just a good idea to draw out of it and then come back in Niger, just really guessing. So let's say that arm comes down like this and it's back up into frame. Even though it's a bit long, this there's a relationship to the rest of the shoulder. So you can generally map that out. From doing it over and over, you'll figure out where you want your lengthier forms ago based upon their style. But what I would do here is more of a stress out hand. Paul's would only get a finger and thumb in there. But we could still make that low clades really kind of, I don't know if we call it cringing. But you see some stress there in the fingers. A little bit of finger through the veins on the back of the hand, whatever. And then you can get rid of this information. And you do that with the selection. There'll be a little quicker. Okay, And just like that, we've got a raphe of that concept. And I'm not looking at the clock here are probably should be, but I don't think it took 200 for long. And there's some refinement. There's connecting the light back here. There's putting that other hand we talked about form, maybe another phase. So like doing the other fist ready to go for Punch Number 2 of this one, then do its job. And he can even have this arm smaller for this character out this way. And again, another kind of stress and anxiety written and bowls. And then you could do the impacts, all that fun stuff, action lines. But just like that, we've got that up-close and personal rough sketch. And if you don't like it, you keep maneuvering these shapes and these forms, but it gives you something to start with and therefore hinge upon and keep elaborating on. So yeah, it's generally will help you to get to what you're looking for. But let's stop here. Let's head over to the next lesson, clean this up and talk a little bit about that. So with that, let's move on to the next lesson.
10. Refining the Scene: All right, So now I will make this even larger. But keep in mind there's a lot to be said for visually checking your work as small as possible. I don't know what it is. I think it's I think it's easier to get proportions, right? When you're looking at a smaller image. I noticed that when I draw things really large, I like to work on some really big sheets, a pulsar paper every now and then. And I usually have a hard time gauging my my proportions. So just be aware of that. So what we're gonna do here is just go through and clean this up, tried to get the most out of this. Obviously, there's a lot of things you can do with expressions as well. We're not gonna get into that because I really want this to be specificly focused on the the larger forms so that you can get better at drawing these types of scenes. And then you can apply all the cool design elements and details that you want. But right now we're really focus on shapes, forms. And it almost like a bit of a composition that goes into this. And just, whenever you draw these, just really save these different poses. I think it's really helpful. Look back and say, okay, maybe it was doing this one thing right here. Oh, wow, I had the anatomy really skew here, whatever it is. And as it's really nice to be able to grow from them. And you can definitely recycle poses. There's a lot of them that are just pretty common. And maybe you just need to change male to a female or changed the character to somebody else. And you can really utilize that work so that you're not constantly reinventing everything. So again, just kind of picking some of these forms. Thick overall, like I think this hands too large or maybe the maybe I need to show the other side of the wrist so it doesn't feel so massive and comparison. Because keep in mind as far as prospective goals and foreshortening goes. If the shoulders here, and this is relatively in that same kind of linear areas, it's hard to give it the right name. I guess I'm thinking it would be in the same area as far as the distance from our eye, from the camera to this character. So if this form isn't receding dramatically away from us, It's where you see it looks like it's just kinda level what the shoulder then the risks is going to be what it would be in the same perspective. And comparison to the shoulder, likewise with the hand. So it just when things go further away like this hand over here that we're really going to try to push that perspective. And that pulls off forms receding away from us into space. They'll just kinda think of it like that. It's, I think foreshortening is intimidating at first. But then as you start to realize that each connection point is really your Your reference point. So the way that a shoulder connects to an upper arm needs to make sense even in foreshortened perspective. And that's really what kind of makes it much easier. And then the other thing is the overlaps, like I've been stress on a lot because they're very like right here. If you want the feeling that this hand is moving away from us, then this risk is probably going to look like it connects a little bit above it or in front of it. And not obviously like when you look at your, your hand in your wrist, it doesn't look like this, but for comics, It's really helpful. And then if they have a suit designing and bring the suit design way up over here, or say they have like a glove piece or something. It really helps to push that perspective for you. So I think I've mentioned probably a few times I love suit designs for stuff like this, but we do have to be able to draw them without that so that we're getting better. We don't need those devices to draw something well, because you will get those characters that don't have the suit designs that you're always drawing. So you can't be too reliant on that. So I could set you up for disaster a little bit. So I'm like That's a bit of a weird finger, but I like to get through all of this as kind of a pass and passing through the work evenly. And then I can go back another time if I need to. Keep in mind these little lines here, you can really go all over the place with them. He's cross-sections. I find them to be extremely helpful for visualizing these characters on the page. So if there's a line in there and it doesn't make sense to you as far as like anatomically, you're looking at like an anatomy piece of anatomy. It doesn't make sense. It's probably just because I'm I'm drawing an extrovert guideline in there to aid me in the visualization process. And I love all these rough sketch lines because they just give me a little bit to think about while I'm trying to clean this up. And I can pick and choose which ones I want to, want to use in my illustration here. Even though I am filling in the anatomy, I'm trying to keep it a bit loose. So if I go back through and I go to start inking this, I don't want something different, not a big deal. It's not like I'm I guess what I'm trying to say is I'm not sitting under drawing a line like this and being so intent on it being a perfect line. I'm still serve change, still sketching. Was looking for the best best shapes I can get it right to the very end. And some poses, they just are going to come out weird regardless. Hey, I just worked on one Where I thought it looks so cool. And the next day I walked up and took a look at it and I was like, whoa, that is a bad pose. I'm so glad I didn't share that. But it's bound to happen. Sometimes we touch excitement of what we're feeling to the illustrative process. So, so you think, Wow, this is really good. And then we get fresh eyes on that, usually another day away or something or we share it and we realize that people aren't responding well to it. And then over time, you'll just start to see the flaws. It's kind of a scary process for an artist, but you still have to, you gotta be bold and brave and, and know that about yourself and still share the work, still grow and realize that some of these just are not going to be perfect. In fact, none of them are perfect. That's, that's the real deal about it and nothing's perfect. But you can, you're definitely going to feel better about certain illustrations and others. And that's natural. So focus on what you're happy with her. Yes. And and realize the things that you're not as good at, you're going to be better at it over time. So now this is a trickier right here because we've got the tricep and I feel like the tricep needs to pick up like that. So almost like the split of the tricep is somewhere there. But I'm not going to draw it like that. I'm just just want to show you that's kind of my mental thought process. Even though I don't tend to draw every bit of that. In fact, I really want to focus more on how, how big the form is and the relationship to the forearm to the rest. So I feel like that's just going to be a lot more of a dominant shape set of shapes in this part of the illustration. So I kinda get that m first and then I move around the tricep like that. But it feels to linear if feels like it all this is just way too straight. So I want to be careful of that. And the other thing is the form. I've got this very symmetrical. It's almost like a cylinder here and a big oval right there. And that's just not how form looks in any perspective. So I gotta push all this back, okay? Okay, Where am I making this mistake? Let's bring this farm even back further. I'll start with the elbow this time. Elbow kinda lines up to the back of the hand here. So that's your that's your Allman right? Radius is on the thumb side. This would be the ulna. So let's say we've got the elongated, stretched out kinda version of the anatomy of the form here. And we get the more abrupt version of the anatomy on the top. I'm like man, and get those muscles that kinda spin out from under the O. What does this sucker that the brachioradialis, I can't remember that one. I know this one here. This bulk of muscles or the digitorum extensor digitorum. And the only reason why that's so easy to remember as a span out to the back of the hand which controls the fingers. And your fingers are called digits. So extensor digitorum, so that's pretty easy once you kind of connect the dots there. But but yeah, the main thing is on the form that you have one side that's more abrupt. So if I was drawing this straight one side and then side, it's more abrupt. And then the outside is more elongated and then you put a fist on there, whatever. So yeah, the form just like the leg in the air, the body really, there's just not a true symmetry. There are symmetry if you were to split it down the middle of a character and even that is a bit, yeah, you're never going to see a symmetrical character. You're looking at one of those, you know, those pull sheets or whatever, the power sheets, a camera with their colon, character ability, traits and all stuff like that. They shown that even now have noticed a lot more. They don't even draw them straight up the middle and a lot of many more, but the old school ones, I remember there was a set that you could get. I think it was a marvel side and there was, they were all standing very, very flat against the screen. They were great. Don't get me wrong. Loved them, but, but now looking at the way they do a lot of them, they'll show the characters in a bit more of a dynamic poles, which I think is a more fun. Okay, so now the head again, remember we could really play around with the positioning, but I think they kinda like this. I might move the brow line or up and down a little bit. Now generally this is the brow line to me. Okay. Not the actual eyeline. But at this point it really doesn't matter. These are just loose construction lines, but I tend to like play around with the placement of this line before I dropped the eyes and the nose, it might have it pointing downward. Right against, make sure not too low. So I don't have a tangent there but b-a, something like that. And then again, it's, it's all to the power and effects. So maybe show where the impact occurred, but the characters now getting slammed back. You could do perspective lines that go to the middle. You could do ones that kind of go with the character falling. Lot of times you'll see ones to where they're kind of angled and now it's almost like, you know what, I think I would rotate this to get those in. Let's try to shoot them from the other way. So you might see some that are very like wavy like that, but I think that kind of fights. It does fight the perspective. So what I would probably just go with are ones like this. And pushes that perspective that he's closer to the camera, closer to us. And the other character is a little further away. But delivering that high impact punch. And there you have it. So let's go ahead and conclude here we'll head over to the next lesson and continue to explore more impact poses. So with that, let's move on.
11. Female Fight Scene: Okay, so for this next one, it's really kind of a similar polls are set up. And what I'm doing here is just showing you a time-lapse that you can follow along with and pause when needed to catch up. I've just some female characters kind of duking it out. And the main focus of this particular one is to pay attention that it's really the same exact process. It's just the shapes and forms are going to be a little bit different in the way of proportion. You know, obviously for a female character, you're going to go for more of an hourglass type form. Longer, slender arms and legs, things like that. But for the most part, a lot of it's the same. In fact, I even find it helpful too. Take some of the is that I have that are male or female and flip them back the other way, just so that I have more reference, more materials to work with. So if you've got a good pose and it's a male characters, no reason you can't just shift it and change the proportions into withdrawal over, especially if it's your own stuff. I mean, I just think recycling our own art as just smart and really helps us out on, not only on those days that we're not feeling as creative and drawing as well because those definitely happen. But also just when you're trying to be faster, you know, you're trying to really meet a deadline and you're not trying to again, you always hear me say, stop trying to reinvent the wheel, you know, kinda thing but which does almost sound counterintuitive to being creative. But there's times you're more creative and times that you just need to be smart with your time and your effort. So essentially something like this. Again, I didn't want to do another world time of it because it's just so it's going to get redundant. And I do feel that it's helpful to try lots of different poses and show these different variations. But you do have to just practice breaking down these forms and seeing what shapes make sense to you. So I see a lot of like diamond shapes, a lot of sweeping ovals and it just different areas kind of resonate differently with me. So for the calf muscles on the male or female, I usually see a diamond on the medial inside side of the leg. And then on the outer lay more of an elongated stretched out diamond shapes. So they're, they're kinda the same, but obviously they're not asymmetrical. And same thing with It's like the top of the leg, you know, the femur area, a big sweeping curve on the outside. And the curve is widened at the hip connection point. The word leg connects to the pelvis. And then on the inside, It's a little bit more straight, but I definitely show more of the curve to the top and then another little sloping curve by the knee. And those are things that are kind of consistent now that it's more evident on the one on the right and on the left. It's a different kind of a bell-shaped curve from her glue going down to the inner portion of the back leg, butt. Again, a lot of these shapes are just third. They're memorable and once you remember them in a way that makes sense to you, so simplified forms and shapes, it makes sense to you. It becomes a lot easier to connect all this. So hopefully this lesson is beneficial for yeah, I'm going to bring in some more of these two and the next few lessons where we do some different poses. So let's jump over there and continue on.
12. Foreshortened Kicking : So here we have another time-lapse and just remember you can pause and stop the video to catch up. But again, I want these to be a little bit faster. I want you to be able to see into these and develop your own characters. So hopefully the beginning lessons of this class, we're able to warm you up to the concepts. But now it's implementation, now it's trying lots of different poses, things that maybe aren't comfortable with. And just notice that I'm moving things around a lot quickly rose CSI on there. Just try to remember to, with figure drawing, you can really relate parts of the body to CSI and what that is just big strokes. So if you've ever studied figure drawing, and I've said we've got other classes on that. We're explains more of that, but it's just realizing that certain sweeping lines throughout the body can conform to CSI. And what happens there is you start to learn to simplify. And again, simplification of the work is very, very important, especially when you're drawing these complex poses or maybe this isn't complexity you, but if you're a beginner, chances are it is. And so learning to simplify parts of the body and understand things in a way that aren't so complex. Really just speed you up and allows you to have more fun and ultimately express more creativity. So with something like this, this isn't the type of poles that I'm even the most comfortable with. Like someone throwing a kick out towards camera isn't the easiest one for me. It's actually the hardest and I'm okay with that. It's good to know that about yourself and then say, okay, well, the good thing is I know what I need to work on more. So when you do happen to see those shots and photography or good comic shot or whatever, that has those elements that you know that you're struggling want stop what you're doing. Do a quick sketch of it. Pay attention to the overlaps and the proportional differences of those forms because that's really the part that we don't understand. Like when we're, when we go to draw something and we can't pull it from memory. It just because we didn't really pay enough attention to that area of our study. And that's, that's okay. It's good to at least be armed with that knowledge so that moving forward, we can do a bit better and be more deliberate about that. So yeah, for me it's the light coming towards camera. So right here as I start to refine this, I really started to feel like LOL the calf muscle. I'm not exactly sure. Proportionally. And again, the overlap if that's exactly the way I want to see it. But the other thing I tend to do, and I probably reiterated this countless times, is I will still make sure to just draw through it and make the best decision I can make for today. But then make it a mental note. And sometimes a physical one on paper doesn't hurt as well. And say, I don't need to go back and study that specific area sooner rather than later. So just again, don't let yourself be hindered by it in the way that you freeze up and don't complete your work. You still gotta get it done. You still gotta be productive. But yeah, it's always those things were okay. I'm not really sure what the underneath of the legs look like from this low camera angle? The way the pelvis towards and twist. And so again, I have to make a note of that. I have to go back and I have to study. And in the tricky part about that is that good luck finding reference for that specific shot. And that's why I really stress learning to draw this stuff from your imagination. It's not that every bit of it is going to be correct. And I'm sure you can look at this and find flaws in the work and that's fine. But the thing is, is there was no reference here. And the reason being is, again, good luck finding this type of reference right when you need it. So you're better off learning some techniques to be inventive and develop your own imaginative characters. But couple that knowledge with when you do see a really good shot. So it could be in a movie, it could be in a series, you like an animated series. Those, those tend to be really great reference shots, especially to because there's simplified, so it's kind of easier to convert, I think then grabbing from a photo. But then when you see those, really just, I think you need to stop what you're doing and drum. Now, you could stop what you're doing and catalog the poses. If you're good at organization, maybe that'll work for you. I I've heard people say they do that. I've tried to do it myself. It's not really one of my strengths. My my strength is actually trying to commit it to something I can remember. And again, that relates back to simplified forms and allowing it to not always be perfect as well. So that'll bring these lessons to a close. Hopefully you found this to be informative. Keep in mind, I will be adding more to this so you can check back and see additional lessons past this one. I think there's just so many different fight pulses to be covered that I will constantly be coming up with new ones and sharing those with you. So thanks very much for watching and let me know what you think and good luck with your art.
 Robert Marzullo, Online instructor of Figure Drawing and Comic Art