Transcripts
1. Class Intro: Let's talk mandalas. Beautiful, intricate,
calming artwork. They're fun to look at, but they're even more
fun to draw. I promised. Hi, I'm Danielle Bruner. I am an artist, illustrator and graphic
designer from Pennsylvania. In this course, I'm going
to teach you how to use the symmetry tool and drawing guide to draw a beautiful
Mandela of your own. We're not just going to
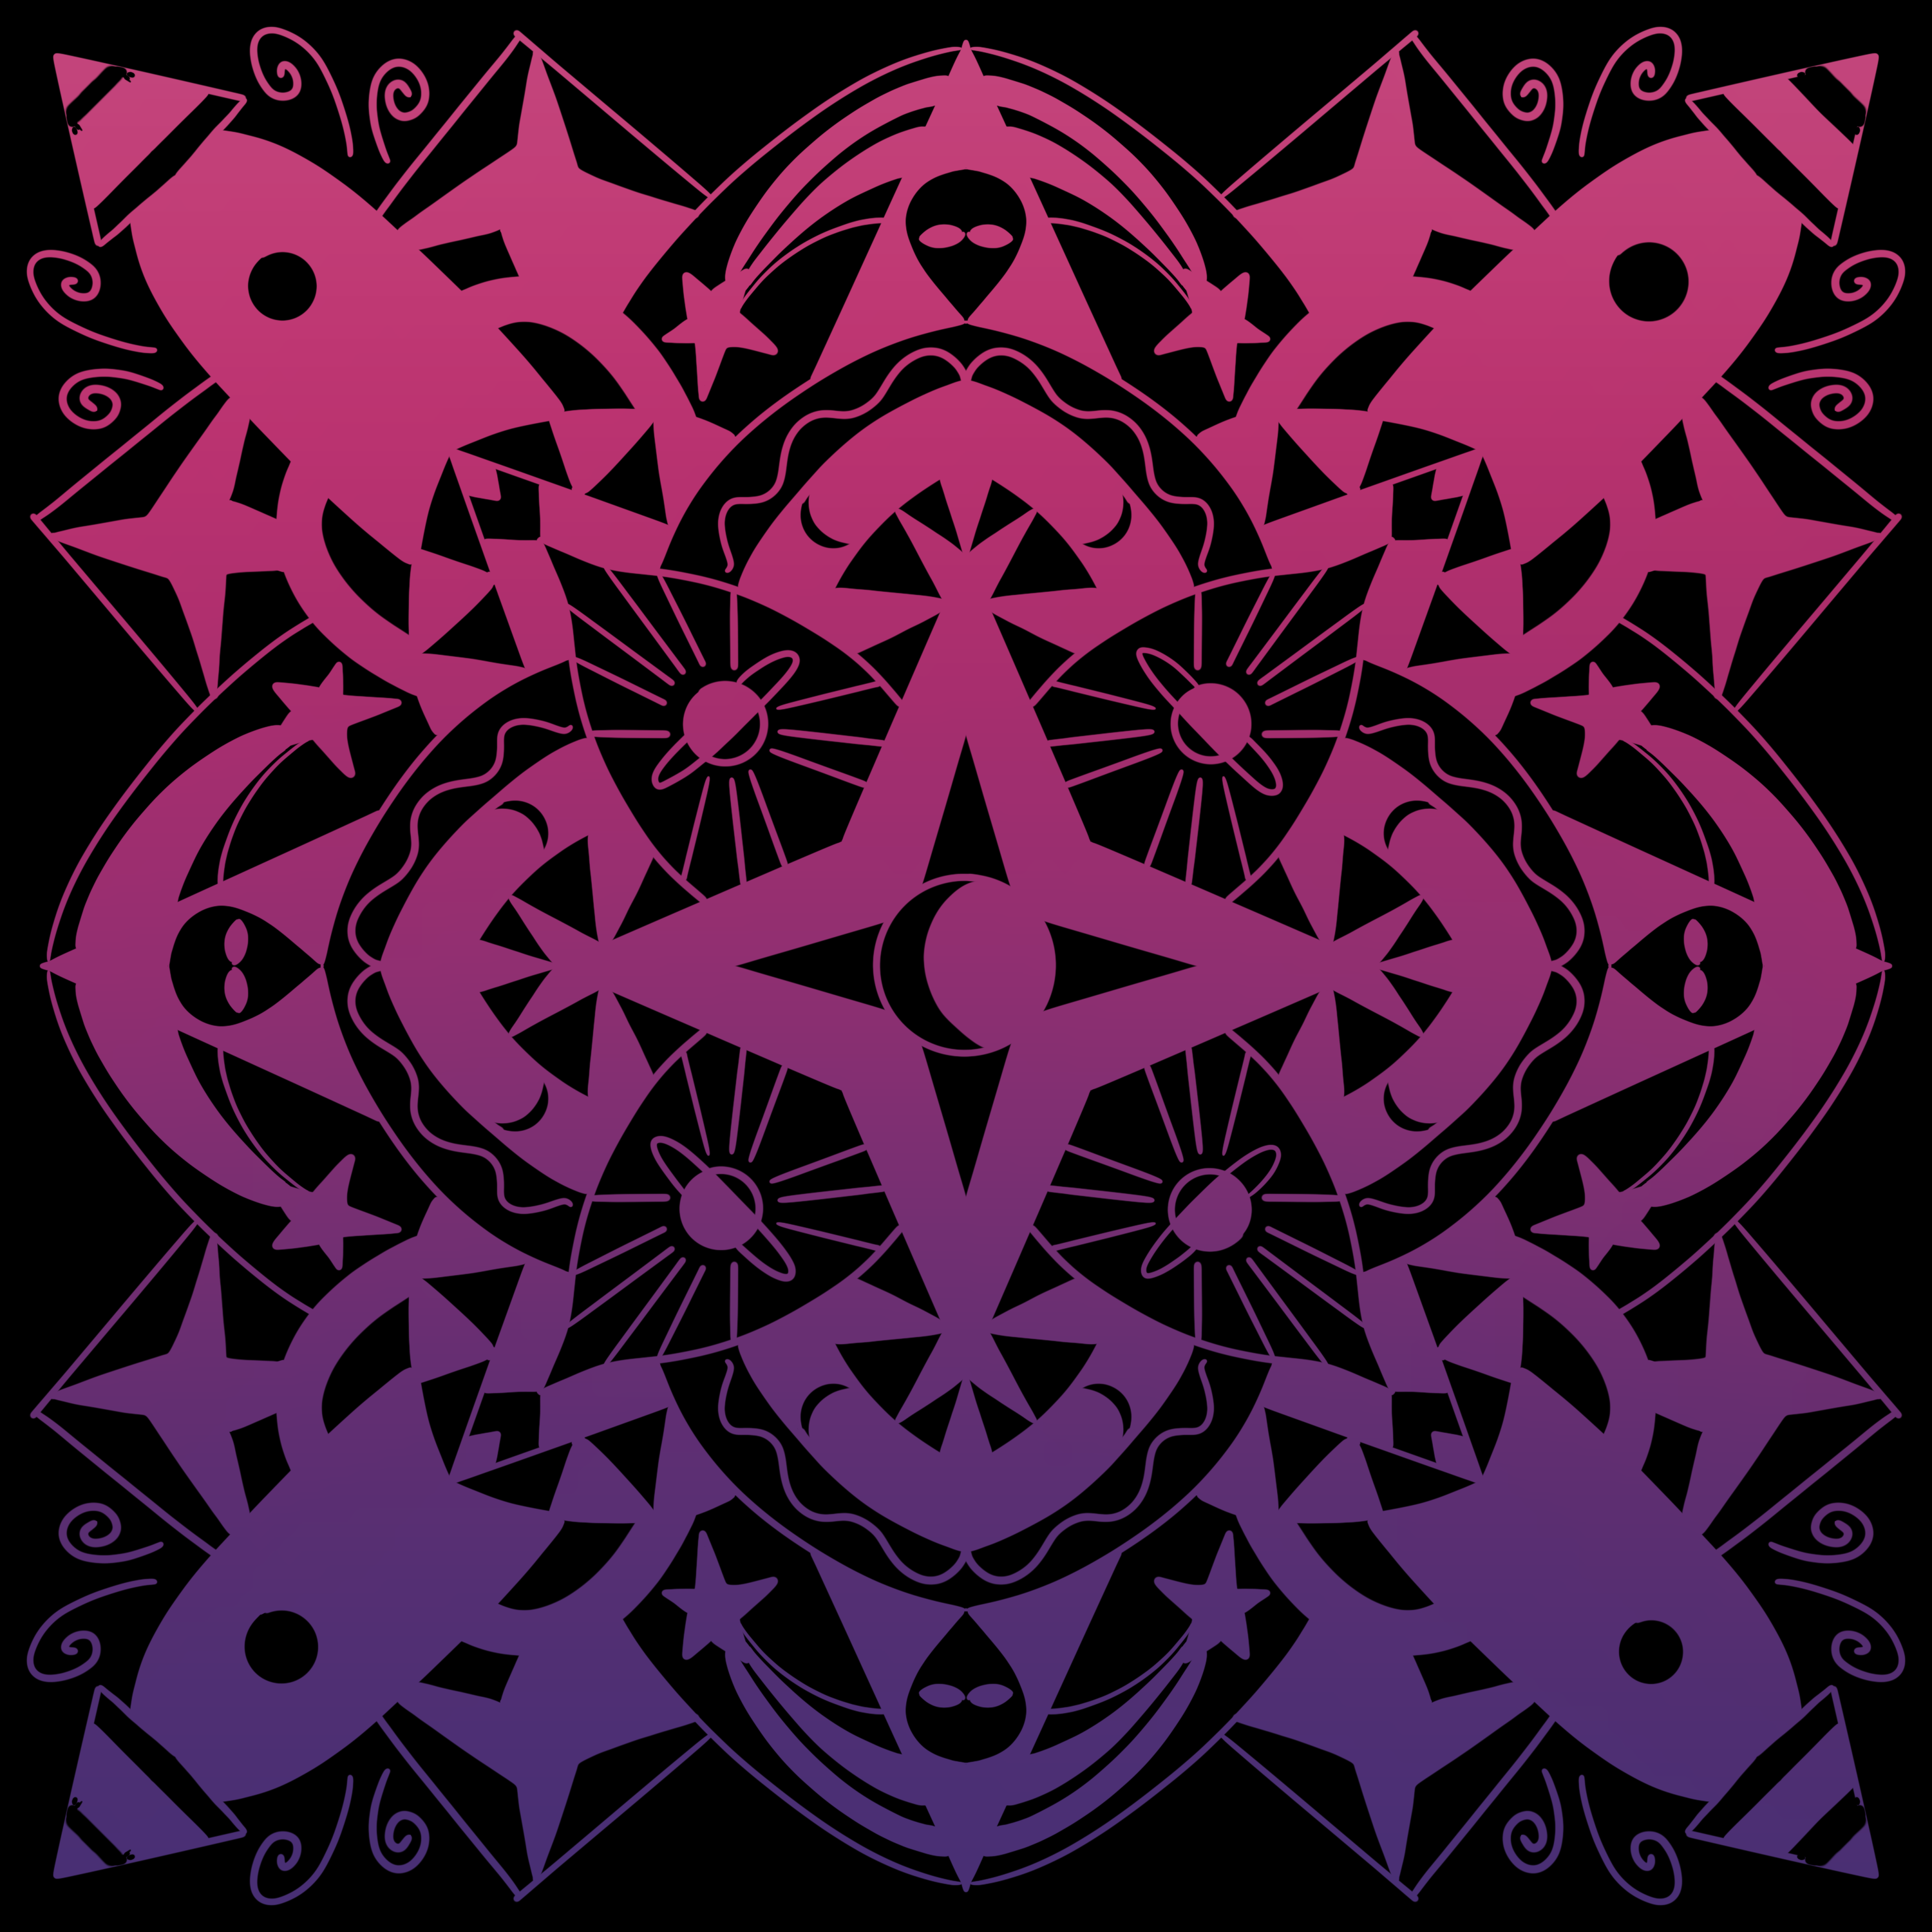
draw any Mandela though. We're going to make ours
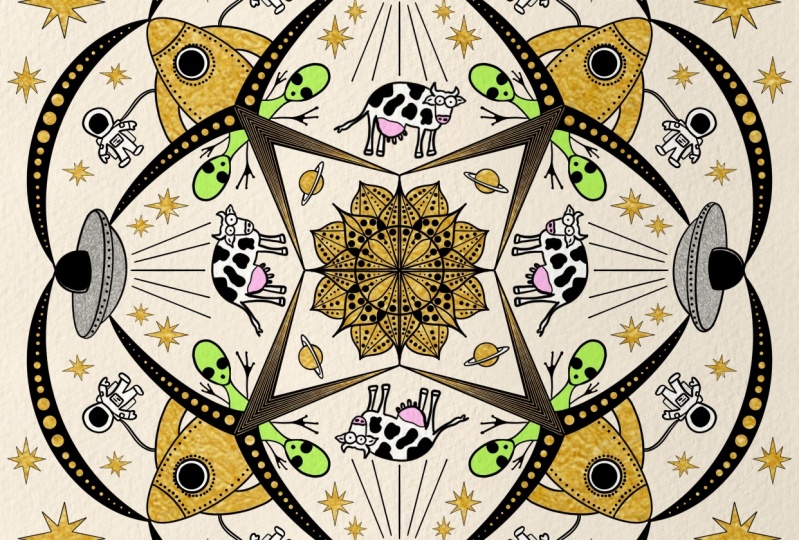
and outer space theme. Once you learn how to use the symmetry tool
and you're drawing guides and clipping masks
to create a Mandela, You can do anything you want. I've drawn Mandel is based
on woodland creatures, lunar moths, movies,
music, and more. One-way color inner mantle. Us. Also going to show
you how to use a brush in procreate that will create a glitter
effect just based on its texture that
it already has. And we will be using
color palettes and brushes that are already in
the default Procreate app. You don't need to purchase
or install anything new. So let's get started.
2. Resources: I wanted to complete
this course. You will need an iPad, Apple Pencil, and the procreate app installed
on your iPad. We're going to use the default
color palette, ascend. And the default
brushes we're going to use are the Procreate pencil, the technical pen,
and bonobo chalk. As a bonus, I will
show you how to create an extra different colorway at the end using a gradient
with the soft brush.
3. Canvas Prep and Sketching: First, we're going to go
to this plus sign and the top right hand corner
and create a new canvas. I'm going to make mine
3,000 by 3,000 pixels. It should be some
sort of square. Next, we want to edit
the drawing guide. Go to the Actions menu, which is the wrench. Turn on your Drawing
Guide and Edit it. So down here where it says
symmetry, click on that. And it will give you
different options. A vertical tube the same on each side in a mirrored effect, the same with horizontal. But we're going to choose
radial and hit done. And be careful not
to hit the white. This color bar here changes
the color of your guide. So sometimes it's easy
to click the white. So if you accidentally do when you see that your
guide is missing, it's probably not
missing, it's just white, so make sure it stays as a darker color
so you can see it. And hit Done. Next, go
to your color palette. We're going to select
a dark grayish color. And for your brush, we're going to do sketching. Pencil brush that you would typically sketch an
art project out with. I like to use the
procreate pencil. And here's where you can
start drawing your Mandela. I prefer to start with
a circle in the middle, but it's kinda hard to draw
a circle with the guide. So I am going to making new layer above the
assisted layer. And I'm going to
sketch a circle. If you draw a circle and hold it and put your finger down, it will create a perfect circle. I'm going to move this. I'm sure snapping and magnetics, magnetics are turned on. And I just want to make sure
that it's centered in there. Centric. Now you can actually
get there this center now. You can fuse them together
when you're done with that. But I actually just
realized I wanted to create a moon, crescent moon. This is just the sketch, so it doesn't have
to be perfect. But now I'm going to
fuse them together. And you do that
just by pinching. Now that we are sure we're on our assisted layer,
Let's continue. Next. I'd like to create
a star shape so you can two fingers tapping will
undo what you just did. And three-finger tap
will bring it back. If you hold it down, you'll get a more precise line. Maybe one star within a star to. Next, Let's start
building out our sides. You can draw whatever
shapes you want. But if you're following
along with me, I'm just kind of
filling in this space. Anything that's sort
of blooms out like a flower works well
with a Mandela. Here we're going to do, I'm just going to sketch this out. It'd be a planet. When we do the actual inking
will make it cleaner. Maybe some ray coming up out of this town. Pretty good. I think. I want to close this
shape a little bit on what some warm crescents and will probably fill these in some of these
shapes and what black. We'll do that after our sketch. Now, let's see. Is it an outer space Mandela? About 8 million. We will put. This shape here and do a little some eyes and fill this space in with
an interesting element to not like that. Next, we'll create
another dome shape here and have a
spaceship rocket ship coming out of this sort of area. So the course, window, legs coming out. Shapes. Sometimes I don't have a plan and I just sort of
draw what comes to mind. And honestly sometimes those are the best outcomes because you're just drawing
what you feel. Another shape here. Shooting star. Looks pretty good. I think we need to fill in
this space with some sort of geometric or organic shape. Something something
sort of celestial ish. I don't know. And then maybe on attached, we can just do some swirls. It looks pretty full. You can fill in some more pieces here and
there if you like. This will probably work.
4. Inking: Now we're going to start
with a very top layer, which is the one
that is unassisted. And we're going to
draw our circles, the ones that intersect with the lines, moon shape. I'm actually going to drag and drop the color and fill that in. This one will also
intersect a line. So we're gonna do our
little space planet shapes here really quickly. Now, these ones are
not over a line, so we should be
able to draw them just fine with the
symmetry effect. These will probably
give us some trouble. So let's put, actually put this window on this
layer as well. If you miss something, you can always switch back to the layer. I think I'm going to go
ahead and fill in a few of these items just while
we're on this layer. So I want to fill in the thing I'm gonna do the top portion of
these planets and leave the bottom light color rim of this window and leave
the center open for now. It didn't fill this in. Again when it doesn't connect, it will just spread out
and cheerful herpes. Now, let's go back to our
Layers menu and we can start working on
our assisted layer. So all you're gonna
do here is just start tracing over all of your lines, scholar of your pencil
lines and feel free to add and adjust as needed. And I'll see you
when we're done. Okay, Now, let's start
filling in some of our blacks that we want
to have filled in. I'm gonna go ahead and
go to my Layers menu and actually turn off this
bottom sketch layer. We don't need it anymore. Make sure on this
assisted layer here. See, I think we make
sure this is closed. Make sure your lines are closed. And I start dragging
and dropping. This one is not
closed somewhere. Oh, it's because these
are on separate layers. You can go ahead and
merge or top two layers. I always forget
that. There we go. Okay. Now you can do
whatever you want. I just sort of take
a look at the piece and see where it might look
good to fill stuff in. Sometimes you can do
every other section. This is black, this is
white, this is black. So this, I'm actually going
to add one more thing. This is pretty,
pretty empty here. Instead of leaving it white. Why don't we add some shapes? You can add something
celestial or just some of these little zigzags,
something mosaic. And that way you can do something like this and it will add more interest to the piece. Let's see, we've got
some more moons here. I'm going to fill in
the space around it. Actually, let's fill it all in and just have two crescents. Since we already have one
that looks like this. I like that better. If that is solid the spaceship, and again, do whatever you want. But you'll find as
you create these, you'll change your mind a few
times as you're filling in pieces and you can pre-plan it out as
much as you need to. But sometimes, once you're
actually putting it together, you'll notice where you may
need to fill in and where you don't see something's
not closed here. And then this actually
I like this because this almost looks
like a mosaic kind of smoke coming out of the bottom where fire
out of the bottom of the rocket ship will fill in the legs and not closed. The alien. I decided to
fill in his eyes and Black Hand triangle behind
him, also in black. Fill on this star. This part I can tell isn't
closed, close that shape. And let's see, we'll
do every other here. It looks like that's
all of our pieces.
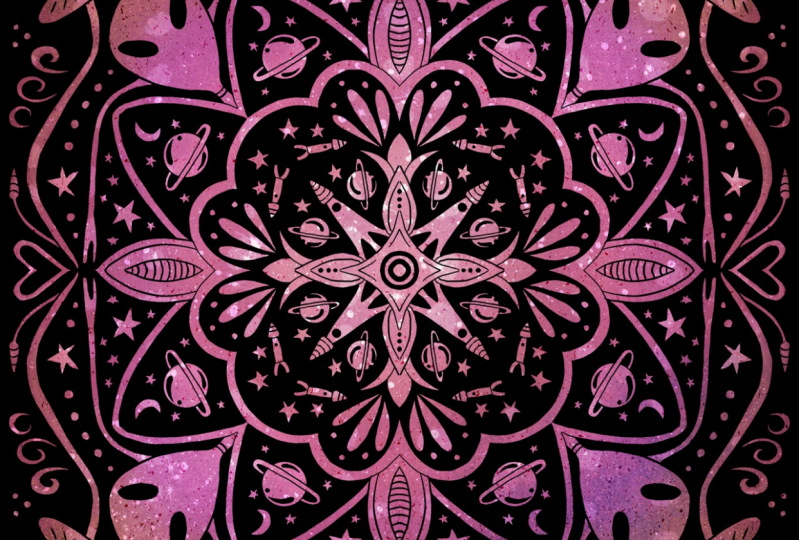
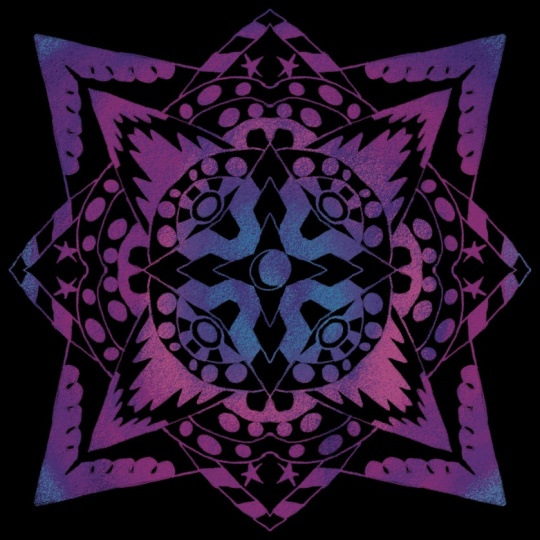
5. Color, Texture and Glitter!!!: Next, go to your layers, add a new layer above. And we're going to tap and
create a clipping mask. Turn off your background
and your colors. We want the ascend
color palette. You can choose
palettes over here, and you can see it up here. You'll just tap of color to choose in there and
go back to the disk. If this is how I view, There's different ways to
view the color palettes. This is how I do my top layer clipping
mask for the brush. We are going to sketching. And we're going to choose
this bonobo chalk. It has an awesome
texture for the color. I'm going to start with this
darker purple shade here. And I'm actually going
to tilt my iPad. I draw better at an angle. So let's do full
opacity, full size. And we're just going to
start coloring in slightly. And it doesn't have
to be super perfect. Go ahead to your layers and
turn the background back on. And we're going to change the
background color to black. Now we'll be able to see
it because a black man, Dala isn't on a
black background. So let's choose a new color. We're gonna go a
little bit lighter. Still the same brush. And I'm very lightly pressing in just doing random circles. In the center. I just noticed our the tops of our rocket ships are different
on each of these sides. You can go back to
that if you understood that I'm going to choose the eraser and I'm going to choose the eraser to be the
inking and the technical pen. And I'm on the
assisted layer here. And I'm just going
to erase it shape. It doesn't have to be perfect, but that'll work. Okay. Back to our top layer
and back to the chalk. Next we're gonna go even lighter and stick with
this purple again. Lighter purple. Concentrating on the center. And let's go to this light pink. And focus really
lightly on the center. Actually even turn my
opacity down 65 ish, come out here to fit random. And then I'm going to tap
the eraser and a fold. And it'll change the eraser to the current brush you are using. The eraser will now
become the bonobo chalk. And I'm going to just lightly
to some of the edges, turn up the opacity. And this will give the
illusion that it's fading off into the distance
around the edges. But you can see if
you zoom in and has this amazing sparkly
dimensional glitter effect. You can go, go even
lighter a little bit here, just up into the left a
little bit. Add some more. Maybe I'll go back
to the darker and do like maybe we want some blue. When you're adding in
darker and dimensions. It allows it to be tonal. And that's what's giving you your glitter effect
because glitter has some shadows and
different looks to it. It's so pretty. I think this will make
an amazing sticker, even like a holographic sticker. And maybe some of this
glitter will show up. But what you'll do is go to the Layers menu and click
assisted layer tap in, turn off your drawing assist. And we're going to turn off the drawing guide because
I could still see it. There. There you go. You have your awesome glittery
space themed Mandela. And I'm actually going
to show you as a bonus. One other way that I like
to color my Mandela's.
6. Bonus! Ombre Shading: So another way I
like to shade in my mandalas is within
ombre, a nice gradient. So come up here one layer above. Turn off your sparkly
glitter layer. I'm going to still use
the same color palette. And we're going to go in intense pink brushes and we're going to look
for the air brushes. A soft brush would be good. I'm going to make it
large and full opacity. And I'm just going
to color in softly. And I'm gonna go down and
just head into purple. Little bit darker and medial, make it a little smaller here. And, and do one little lighter, pink at this end a little bit. And then one more step is if you go to your adjustments
and go to Gaussian Blur, put down your Apple Pencil
and slide to the right, and it'll blur that
a little bit more. The airbrush has already
a little bit soft, but this will add it
a little bit more. And then there you go. This also would make
an amazing sticker. But you can try all
different kinds of themes and shapes. I have. This one I was working on
that has mushrooms and little lunar moths and kind of creepy trees
and other shapes. So you can really have a lot
of fun with this and making your own themes or
just general designs. This one, I had zero plan and I just started
drawing and I really love the deeper orange to
coral ombre in this one. But there you have it. I hope you enjoyed this class
and I hope you'll be able to use these skills to
create more mandalas, glitter effects on any project. And please share yours in
the comments I would love to see down below in the projects
where you are with this, if you follow it along, if you created your own, as you keep creating them, please keep sharing
them with me. I think this is a lot of fun.
7. Final Thoughts: We did it. You've just created your very own glitter space
themed Mandela in Procreate. Make sure you share your
projects in the project section below so that I can see
everything that you've created, whether you followed
along or major own. And if you're creating any
mandalas in the future, come on back to the
class and put them in the projects so I
can see those two. I hope you enjoyed
this course and absolutely loved making it. And I'm looking
forward to making some more classes for
you in the near future. So stop on back. Thanks again.
 Danielle Brunner, Illustrator, Designer, & Dog Mom