Transcripts
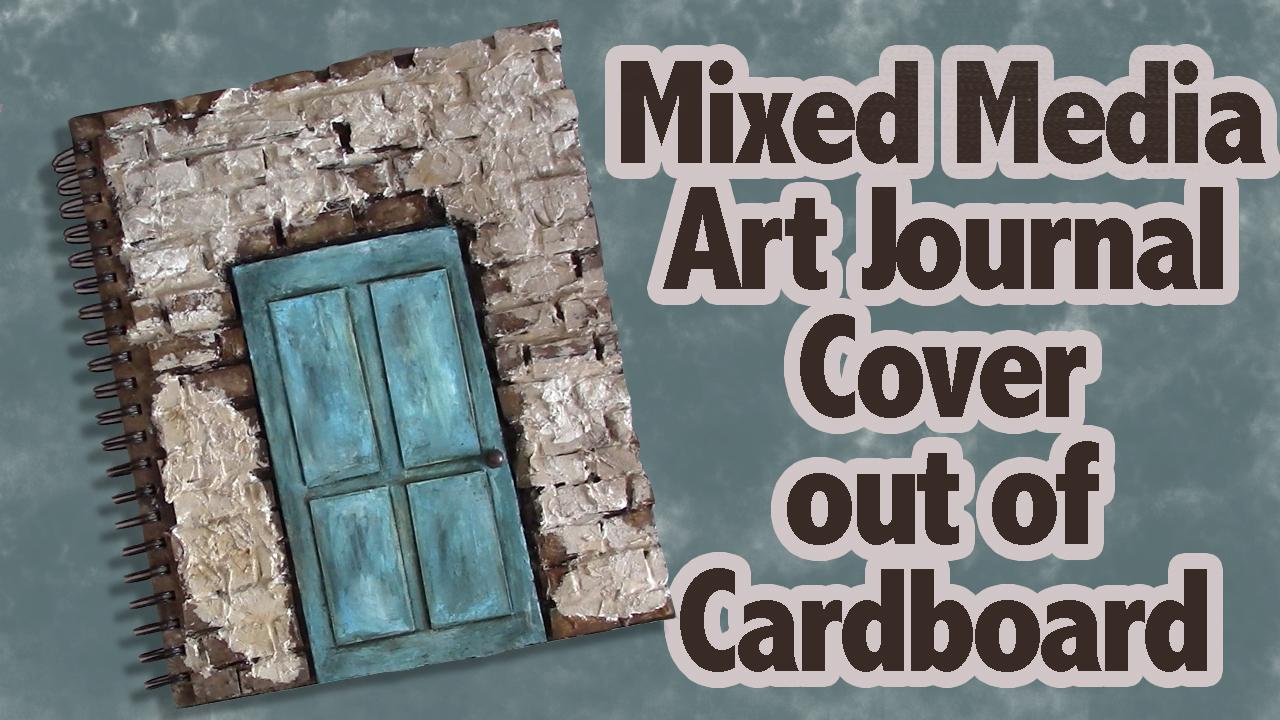
1. Intro: Hello there. My name is Erica Henry, and I'm a self taught artist that creates a wide range of types of art. I create photo realistic pencil art all the way to my more abstract mixed media pieces. I read an Etsy shop called Art by Erica H. And also a YouTube channel, where also teach tutorials and do time lapse videos as well. Have published several adult coloring books, and I love to teach my techniques to others. Make sure to hit the follow button so you will be notified every time I upload a new class . Please feel free to comment in the discussion section with any questions or thoughts about today's class. So in today's lesson, I'm gonna show you how to take everyday objects like card stock and cardboard and create this awesome looking our general cover. Now for this lesson, you don't have to do just in our journal cover you can do all kinds of things. Were using these same techniques, you could use them on a canvas on some heavy duty paper. An old book. The options are endless. This class is well suited for beginners as well as more advanced students because you can make this as easy or as complex as you would like. This is a totally customizable project and you can do whatever you would like to make it suit you. You also don't have to have all of the materials that I cover within this there just to give you ideas. My slogan is Always use what you have and just create something beautiful. So I hope that you hit follow and you join me in this class.
2. Materials Needed: materials needed. Hi there. Welcome to editorial. So I'm about to show you the materials that you're gonna need. Now, hang with me because I'm going to show you a bunch of materials, but you don't necessarily need them all. I just want you to be able to have some ideas of things you can look for around your house that you might want to use. So if you've never seen one about tutorials on YouTube or school share, I usually do not have a plan. No, I just go with the flow and see what happens. So while you're watching me work, I'm a pullout materials that I'm not listing here, but I just want to give you an idea of what you can use. So let's get started. Out of all the materials are about to show you, there are two items that I think every person who's gonna do any kind of mixed media should have. First up is Jess. Oh, you can have white just so or clear. Clear is more expensive, way more expensive. But it does have its purpose. The next thing I suggest is mod podge or some other kind of glue. I don't really care what kind, but you're gonna need some kind of glue. There's not much more. I would say that you have tohave, but these two things are top top on my list of things that you'll need a sketchbook of some sort or an old book that you want to turn into an art journal. Um, it's really up to you what you use. There are lots of options. Scissors might need some tweezers. So I keep those handy. Gonna need some paintbrushes. I have lots of different paintbrushes. Keep handy, easy within reach because I don't ever know what I'm gonna need. So I have to keep different, um, knives, watercolor brushes, um, general purpose brushes at her watercolor or acrylic. Just lots of different things because I don't know what I'm gonna need. Also going to need a palette of some sort. Whether this is a piece of paper, palette, paper and actual palette. Some kind of acid Tate. Just something to mix paint on. We're also going to need some cardboard today. I had some cardboard laying around and I thought might be fun to try to incorporate this into something I always keep my cutting mat handy as well. I also like to keep Matt gel handy. This could be pretty cool to make different effects and to glue with so the other things you might see me use our colored pencils. Charcoal gets used quite a bit in my pieces on both the sticks and the pencils, though I prefer the pencils because they're less messy. Baby wipes these get used all the time. You're gonna need a cup in some water, and this isn't completely needed. But I definitely highly suggest having some kind of final fixative, especially for using some kind of materials that could easily rub off little spray of this . It's very stinky stuff. I suggest doing it outside. But it was that protective coating on there for you kind of acrylic paint. Depending on what you're working on, paper tells another must have in your art room and gloves and on various out. I'm running so low on gloves I've got to get some more because I hate getting things in my hands and this keeps that from happening. But today is probably gonna get messy. I'm a firm believer in just using what you have and having fun. You may see me use some other materials that I haven't listed yet, but in my creative process, a lot of times I don't know exactly what I'm going to need until I get started. So if I pull out something extra, I'm sorry. That's just the way that I work.
3. Lesson 1 - Preparing the cover: lesson one preparing the cover. So in today's lesson, I'm going to be creating a new cover for this sketchbook. I'm not sure if this is one that I'm going to keep or what I'm gonna sell in my shop, but I will thought it would be cool to show you my process that away you can make your own as well. So this is a hardback. It has a hard friends and a hard back here, and I would suggest taking it off the spirals if you can. If you don't have one, that is a spiral bound. That's okay. But the spiral bound does make it easier to work with, so it's very simple. You just pull these spirals apart and your covers will come off. Try not to have been these spirals because it makes it a little bit harder to use down the road. So I'm gonna put this to the side, make sure the pages don't get damaged. So the very first thing that I'm gonna dio is prime these to get ready for them to take whatever medium I decided to throw at it. So how am I gonna do this? Well, the answer is just so now if I wanted to keep these black, I would use clear. But I think I'm just gonna go ahead and do white because I have a feeling that I'm going to cover a lot of this. So I got my water cup ready. Got some paper towels handy. This is a bigger area. So I'm actually just gonna squirt some Jess. Oh, directly onto it. Not too much. And then I'm probably gonna use what about bigger brushes. Now, you don't want this brush extremely wet or the Jessa isn't gonna take very well. It's gonna thin it out too much. So just something to keep in mind. I definitely squirted way too much. Just so on that page, which I'm bad about. So I'm just gonna take this lid off, just kind of scrape it back in there. There's no sense in wasting it. No Jessa will show your lines and your brush strokes. So that's something to keep in mind. If it's something that bothers you, you can take a little bit of sandpaper and lightly go over it. Once you're finished with your layers of gesso and I will send it down and make him less visible. I don't know what I was thinking. What? They amounted up it on here. Goodness, I'm not being too careful because chances are most of this is gonna get covered up. That's just how I work. But if you're the kind of person that thinks that you're not gonna cover everything up, I don't want to be a little bit more methodical with your brush strokes. Now, I'm just going back through and lightly getting the sides. Which is another reason I like to have the coffee paper there. And I'm just gonna squeeze as much of this Jessa back in here as I can. Now we need to let this dry. You can let it dry naturally. You can put a fan on it or you canoe my favorite method, which is to take a heat gun or a hair dryer and let it dry that way.
4. Lesson 2 - Preparing the Bricks: Lesson two, preparing the bricks. So I tried to think about what I could use with the cardboard when I tried to think of, you know, something that would look pretty cool. Something that would look old because I really like that old, grungy textured look. And I thought about a brick wall. An old brick wall. Never done it before, but we'll see what happens. So since this is gonna be an old wall, I don't want to worry too much about everything being straight, but I'd like to try, so I think that's probably gonna be a good size. Okay, So I'm just gonna use this as a guide. Go ahead and cut some more. They don't have to be perfect. And the less perfect they are, probably the better it's gonna turn out. But the imperfections make it so much more interesting. I don't care. So let's see if we're anywhere close enoughto having enough of these. Yeah, just way from. No, you can see me. Okay. Pills. I need to start deciding how big all of these to be that one's death. This one feels too big. I think I like that means up. Cut these too big. But this just feels too big now that I've started breaking it down into bricks. So what I'm gonna do it was take a pencil and just lightly mark what I need to cut. Okay? Hopefully we have enough bricks now. If not, we can always cut more. But hopefully that should be enough to cover it. Now I'll see in the next lesson.
5. Lesson 3 - Preparing the Door: Lesson three preparing the door. Welcome to the next lesson. So, in this lesson, we are going to be preparing a door. So we're gonna have bricks, and they were gonna have a door. So I just need to get a feel for how big I would like the door to be. So to do this a piece of paper and just start kind of folding it and trying out some different sizes, that's gonna be too big, huh? I just keep playing around until I find the size that I would like. Just keep playing around, making this different sizes toe get kind of what I think will look right. I think that'll work. So now it's time to build our door using this as the guide once you cut this out, scissors aren't working too well right now. So get out, Exacto knife again. You know what? Also might look cool city Using the cardboard would be to actually using card stuff because then it would look like it's sunk in looking a door frame. That might be cool. I don't know. Something to keep in mind to see you have lots and lots of options. Just keep experimenting, You find out what works for you. All right. So I don't want this to get too big and bulky because it's gonna go in front of an art journal. So I think I'm going to use card stock Now someone take some mod podge. This is one of those times that my credit card will come in handy. Breyer also works. So just whatever you have on hand, so let's see it. That's gonna give us enough dimension. I think it will. I think it'll add dimension without being to lick. I'm just gonna square this up a little bit. I'm not really want to stay here in Nigeria. Measure. Just eyeball it. Maybe right about here. Completely guessing. I think I'm guessing. So when I don't need to redo this, I don't know. And I intend. Did you usually have just a, you know, getting idea of something when I start? How we don't even have an idea. To be honest, it just kind of depends. But I just keep messing with it. And still I find something that I really, really like. And once I like it what I find it. I know it to not that didn't like that. There's something that still fills off about this. Maybe this next door needs to come in some. Maybe it's just a tiny bit too wide. So now we're gonna glue this in place. Use a mod podge. I apologize if you hear any extra noises. My family is home right now, so it makes it a little bit hard. We try to keep it down for me, but thank you for a while. So we'll take the Breyer. It's squish it down. Sure, it stays good with that. Are Doris started? All right, keep going to the next lesson.
6. Lesson 4 - Attaching the Door & Bricks to the Front: lesson for attaching the door and bricks to the front. Welcome back to the next lesson. So now we're going Teoh, put the door on and start getting that together. Now I'm gonna be using Matt Gel Joe, Medium glossy Joe, whatever you got on hand to put this on with and the reason is is because this will have a very good hold and I don't want to risk the mod podge not holding it well enough, So I'm just taking a paint knife, just putting all over the back here. The good thing with this using a paint knife is that when I put too much, I can actually scrape it down and put a nice, consistent layer. Could have also used this for the card stock portion. But I tried to use it on the front of things sometimes because it kind of draws weird. It kind of it's not supposed to yellow, but I found that in certain conditions it kind of does so I don't usually put it places that it can be seen if I can help it. So just want to make sure that I can't all of it really good. So we won't risk it coming up and then I'm gonna stick it And probably gonna take my Breyer to it is to try to get a good seal. And now we're going to start laying out our Brooks. You don't have to be perfect with us. We're just laying down the foundation here. We're going for an older brick long, so they're not perfectly lined up. That is totally okay. Or I could do more spread out ones, which I think is what I like better See, this is what I like to play around first. Before I start gluing from I was gonna give me a chance to experiment. Yes, I like how this looks much better than this to now. We know kind of what we're wanting to do. Gonna do the same thing that we did with the door. I don't have to be perfect. All those imperfections just make it that much more interesting. I like it. I like I was looking. It's never had do something very similar over here. Just the last few finishing touches to more. Okay, so that was a long process, But it's looking awesome. So this lesson is complete. It's time to move on to the next lesson.
7. Lesson 5 - Adding Modeling Paste to the Front Brick: Lesson five adding modeling paste to the front que Welcome back again to your next lesson. So we've already gotten our board together. It's dried. So now we gotta figure out what We're going to do it next, cause we can't leave it like this for me. You could, but I don't want to. So what? I think I'm going to do his takes on a homemade modeling paste. If you want the recipe for this, let me know. I'll try to do a video on it. My store bought as well. I like to make my own so I could make my own consistency because I use it for a lot of different things. I need different consistencies. Let's go down through these just like if I was actually putting bricks together and we're going to use this modeling paste as the mortar. I don't have to put it extremely thick. I'm just kind of given that illusion as I'm doing this. There's some bricks that I'm gonna cover up completely because I really want that old look to it. So in some places I'm actually gonna cover it up completely. But dont know, probably feels like we're just wasting work. But we're not because we're just building those layers of texture, because underneath this mortar, it's gonna be like somebody tried to cover up and repair. Maybe, No, I just think it's gonna give it a really cool effect. I may be totally wrong, but we'll never know till we dry. And if you don't like this idea, you don't have to do it. This is just how I'm going to experiment and try. I may hate it, and you may hate it and you may say, Yeah, I don't do that. So we're just gonna experience. I'm really liking how this is starting to look. It's really starting to get that decaying feel, which I really wanted. Another option that might have worked pretty well for us was to use the modeling paste is a glue. All right? Might have worked. So if you do get that a try, let us know paying attention all these fun, little details It's gonna make all the difference, I think said, looking a little bit too textured. So I'm just going back through and adding some more modeling paste. I don't want it to be too terribly texture, because this is gonna be the front of the book, but I do want some texture. Okay, So while this modeling paste is trying, we're gonna move on to our next lesson.
8. Lesson 6 - Painting the Door: Lesson six. Painting the door. Okay, so now we're gonna work on this door. Now, we need to prep the surface. And to do that, we're going to use Jesse. Jesse makes it where you're surface gets ready to take on difference. Medium. Since I want to be paying this, I'm gonna go ahead and use white just so gonna wet my brush and then pat it dry on a paper towel. We just got a smooth this just all around. No. If you're afraid, you're gonna get too much, just so on here. You can also, um, put the dress on a pallet instead of directly onto the subject matter, and that will keep you from putting too much on there. Now, at this point, I'm Meiling paste. It's still wet, so I'm not want to mess too much with it, but I'm gonna dab it. I have my extra Jess. Oh, onto some of these bricks that are a little bit, uh, less covered just to kind of get some of the excess Jessica off. But I don't want to get the modeling paste inside of my brush. So being selective on which ones I dio because later on. We're going to just a this whole thing anyway, so it doesn't hurt to just go ahead and do it now, you can either wait for this to air dry where you can take a heat gun or a blow dryer to it . I did want to add that this modeling paste takes a long time to dry, so just keep that in mind. It will fill dry to the touch, but then underneath isn't dry it. So you may have to look this dry overnight. It just coming depends on how thick you made it, which modeling paste you have or have made. So just something that kind of think about now for my door I'm gonna be taking a mixture of some island blue, some deep see blue and also some white That's gonna be gorgeous. If some gets on the bricks, it's OK because we're gonna be covering that up shortly. Anyway, If he did this on that ideo, watch out for the paint collecting in these groups. Now, as you can see, this door several different colors mixed in. And I wanted that because this is gonna be a older door and I kind of want that to show through all the different weathering. So now, while the paint still wet, I'm coming through and putting some different colors that way. Toe mix right there on the door. That's just last mixing. I have to do later. So my card stock was waiting to come up a little bit. So I came back through with some pressure to kind of push that back down. I'm coming through with some nutmeg brown, which isn't all that door, and I'm also gonna come through with some raw umber what I'm trying to do. It's just paint in these shadows, so I don't really mess up my door, and I can fix it if I go over because I'm a messy painter. I really am. I'm just trying to get in there and getting these grooves to really make that door pop out . But if I get some of the door, it's OK. I can go back and fix it, and I still have the paint mixed up, so that'll make for an easy fix. So I'm still trying to avoid this. Modeling pace is still wet. It gets on my brush in washing it off immediately because it will destroy my brushes. I'm really liking this. Okay, So now to help make this look a little bit more aged, gonna come through with this raw over, and I'm gonna paint around these lifted parts to help make some shadow. And I know it looks really funny right now, but I promise it'll it'll end up looking really good when I do mixed media. A lot of layers and layers and layers. Each layer causes it's own. Just helps. So even though something may feel like you messed up, the peace wouldn't look the same without it. Well, the reason I don't try to do realistic painting, it's just not my thing. Color pencils? Yes. Graf, Yes, I could do realistic in those. I can not do realistic with paints. No matter how much I try, I'm just too messy. I'm just gonna spread around some of that paint that's left just a tiny bit here, there. So I'm gonna stay with my smaller paintbrush because I don't want to get anything on these bricks again. So I'm trying to be more careful. I'm coming through with the sea foam blue, just putting it wherever I feel like it's needed not trying to cover all that work we just did with the roar or drink. But I'm wanting it to look a little bit more natural. More like just a shadow or not painted on. Sure. A little bit of a trick. Just gonna put down some blobs of different colors here. Okay, take my baby white. Well, scrubbed that color in. Be careful not to get it on the bricks. Oh, I really, really like that. I really like all the different layers. It really Is it a age to look? Oh, that's gorgeous. This little brass door knob is gonna look so freaking cute. I think I'm gonna go for it. It's too cute not to just look at that. I love it. A really, really fine detail brush. We're gonna detail these shadow out even more. We're gonna be very, very careful. All we do it, we just really want to go. We don't want to ruin that paint job. Just worked so hard to blend out, you know, like so I didn't like how that was looking. This needs to dry some more. I love it. So, in addition, depending the charcoal around here I went through and kind of just a little bit in some select places. It's just a kind of complete the look. So now our door is finished. Let's move on to the next lesson.
9. Lesson 7 - Building the Back: Lesson seven. Building the back cover. Welcome back. So now we're gonna work on our back cover. And I debated on what to do here because, um, I wanted to be able to easily use this notebook, so I don't want anything that's too bumpy, so I can still right on it. So I think we're going to do the brick wall in the back. But with, um, this part where we have the modeling paste, we're not gonna go nearly as textured as we did here. So I'm gonna start off paying this brown. Um, I'm gonna try the difference between doing that here. And I didn't do it here, but I knew I was going to putting a lot of modeling paste, so I just didn't. So it's all about experimenting and trying to figure out what's best. And for this one, I think I'm going to go with a pretty dark, um, raw number just to give a lot of dimension. And since I'm painting the whole thing the same color, I'm just going to squeeze it directly onto the camp onto the back here. This pain is getting a little bit old, so it's time for some war. Those bottles last meal, while especially in certain colors, give a paint brush wet because we need a little bit wetter than normal. And that's because this paint is a little bit drive. So that makes a little bit of water. And to make it a little bit more usable, had a little bit more water, like a little easier to use at this stage. I'm gonna pick it up and just do the edges. They don't have to be perfect, cause we're gonna do some stuff to, um, just go ahead and get that little base coat down. If you find you've gotten it to four on the side, you can take a brush. It doesn't have any color on it. And just I put away. Like I said, we're not worrying too much about having it perfect. We're just trying to get a little base color on there. All right, I'm going to do dry this. So I use the same process of putting Matt gel down, but we're gonna do the whole thing here, so I'm just gonna work in sections and just put Matt jail down directly on this. Since we're doing big sections And this way you can also see the difference. Now, Like I said, this does dry a little off white. So that's something to consider. You may want to work directly on the bricks like we did earlier. Gonna leave that up to you. But you're in this process. You have to work fast. So make a decision and move on. Your brakes aren't all gonna match up perfectly. And that's okay. It's fine. Just like it was on the other side. You don't have to go extremely heavy. Just wipe it away. Just make it thin enough, layer toe. Hold it all down Because this is gonna be our glue. I do suggest continuing to work from, like, the bottom up. That a way you can keep everything in a line decently. Well, I'm not going for perfection. I still want some resemblance of realism. It's looking so good. Do a little bit bigger area, since there's a little bit more down now. Got a better feel for it. He's good. That ever had a teeny tiny piece there? Uh, it's looking so good. All right. I think I'm gonna flip this around and work this way now, so just, you know, rotated as you feel necessary. Remember, don't stop to think too much or your stuff's gonna dry. Just keep moving. It's an old ball is gonna have imperfections, which gives it character. Depending on how you work, you may find it easier toe work certain ways, so you might find it easier to go ahead and pretty paint your bricks. Um, I didn't want to do that because one I didn't know what we need to. I didn't know exactly what I'd be working on today. I had an idea of what I wanted. But when it is change as I'm going and I just kind of listen to my creativity and switch up the plan if needed, he said, it's moving faster for sure. But we're not having to worry about that door. Try to get it all the way to the edge or however far you're gonna be putting your bricks so they stick good. Oh, I love it. And we're gonna let this drive and we're gonna keep moving
10. Lesson 8 - Adding Gesso to the Back Bricks: less than eight, adding, Jess Oh, to the back cover bricks. If it's, um, Jess. Oh, on my palette here when he's my big brush again just to cover the big area. We're just trying to cover these two. Prime. Um, So somebody's gonna get down where we had already painted, and that's okay. We're gonna go through a touch up anyway. But the main thing are worried about is just to get this just a one year and get this ready to be painted ready to take some different mediums. So I do still have quite a bit of Jesse left. Somebody use my little paint knife and just scrape it back in. All right, we're gonna wait for this to dry.
11. Lesson 9 - Painting the Front: Lesson nine. Painting the front bricks. Okay, so while the others dry and we're gonna go ahead and work on this front. So I'm just going to squeeze out some different colors of browns and whites and probably a little bit of black. I think it's called Melted Chocolate. And this is CNN natural. It's a little bit yellowish, so I don't use a lot of it some white. So what? I'm thinking iss that I'm gonna keep this very textured part pretty light. I'm gonna make the bricks darker. You know what? My brush and got it off. And I think I'm gonna go through and just start painting in where I feel needs to be pregnant. Someone do darker and the creases. So I'm gonna be using more of that. Remember like we did on the other side. And I am using a smaller brush to do this more of a detail brush. And I highly suggest turning it and turning different angles so you can really see because this is three D. So it's gonna have lots of creases and crevices. And if you get paint on the bricks, it's OK. We can paint over it. So At this point, you don't have to be too terribly precise. It's just easier if you try to be. Because then there's last clean up later. But watch the door because we don't wanna have to repaint that. I'm gonna go with the smaller brush around this door so I can really get in those cracks. Because depending on the angle you're looking at, you can see some of the white beneath. So I'm gonna go through and just work on pushing some color down in there. Like I said, remember to do some different angles with its You can really see everything going on, and this brush is just around zero rush. I can't tell you what this one is because it still has the number on it to New Rush. A lot of my brushes don't have those numbers anymore. This part's gonna take a while. Any time you're detail ing something, it's gonna take a while. So just take your time. Don't stress. Okay, Gonna flip this around, Flip this room. Do these lower edges. I don't have you noticed, but I use my fingers quite a bit whenever I'm grating art, which is one reason I like to wear gloves, but I'm out If you find you've done a little bit too much since this other paints dry, we can take a baby, wipe your wife a little bit of it away around door knob to give a little shadow. So we're just going to continue to work on these bricks just going along. I love working three d, making lots of textures, but it does make a lot of places where you have to come back through paying attention of all these little details. No, make a big difference in your piece. And you may be the kind of person who likes that showing. If you are great, if you're not, try to remember these things and a lot of this dark is gonna covered up anyway. But to really add some debt, the shadows need to be there. All right, So for this part of my switch back to my bigger brush, I need to write down a little bit since I can use my bigger brush on these larger areas, and that's how I work. I just kind of worked back and forth with whatever tools I need, and something may end up getting covered up later on. But that's okay. It still adds to it. It still adds to the depth, and your piece may not look the same if you hadn't done that step. And if you find your pain is starting to get hard to work with, you could spritz it with a little bit of water. And on these, once again, I'm trying to get I know it's hard to see, but I have to be able to see it, and my camera's not the writing go to be able to show you. But I'm just working at end of those visible parts of that carp word just to make it camouflaged in. So at this point you can see a pretty good comparison between being able to see the bricks on this side and then kind of all being one thing together. So all of this that we're doing is just adding that depth and making some separation between the bricks. We don't want to be too separated, but we do want someone to be able to tell that these air individual pieces because if not, we wouldn't went to the trouble of putting individual pieces, so I'm gonna add a little bit of water to my number because it's starting to get a little dried out because it was already dried out to begin with just to kind of get reactivated here. So once again, we just start working, putting in shadows where we feel there needs to be shadows. And every time I change angles, I look over what I just did and see if there's anywhere that I missed before. That I feel like could benefit from a little bit more of this color. And as you add more, more layers, those places will get covered up anyway. But, um, it's just gonna add that much more life to your piece. It's really hard to believe that, uh, this was just a regular old sketchbook. Not that long ago. We just took some everyday cardboard from a box from something I had shipped from Amazon. Probably Now we've turned it into something really gorgeous already. We're not anywhere near done, so I can't wait to see what this is gonna look like. And I can't wait to see what yours is gonna look like because your class assignment is gonna be to make one of these and put your own spin on it, and I just couldn't thought we'd stay. Zoom down a little bit. Um, just so you could see the whole roll composition since we're so zoomed in a minute ago, Um, it's good to see things from different angles. Sometimes you can get so caught up in the tiny, tiny details that it's hard to focus on the overall composition in the overall look. So it's good to step back and just not be so focused on the details sometimes. So I'm just going through and doing the edges of the cardboard like we did previously and getting the edges of the book because my goal with this is to be like, Yeah, I made that with cardboard. Symbol of it. Be like what? That is not cardboard. I love taking everyday objects and turning them into art things, especially things that would be thrown away normally because I don't know about you guys, but my family creates way too much trash. So any time I can kind of reduce that easily, it's awesome. And to be able to create something out of trash were a recyclable and to create something gorgeous just amazes me. Um, if you do like this tutorial and you want to see some more videos on using everyday objects I currently have at the time of reporting this one other video on school share, um, it's called. It's called Creating Art out of clothing tags and other trash. I think trying to think are titled it, But in that video I've taken every day clothing tags and I create an art journal page on of it, and I absolutely loved it. The process was so fun, and it felt good to be, you know, using something that normally I would have thrown in the trash and not about twice about. But I wanted to challenge myself, and that was another thing. I was really fun about it. It really challenged me as an artist to use items in a manner that they're not supposed to be used are not meant to be used. I guess it's the better way to put that and you create something gorgeous. So if you're gonna check that out, make sure to head over there and check that I don't look that up and then take that class as well and is there anything that you would like to see me create out of everyday objects . Leave me a comment in the discussion area, and maybe I'll get that done. So I'm pretty happy with how this is turning out. So far. You're going to see me pick it up and turn it a lot of different angles. And that's because I want to make sure that I get a fresh eyes on it and I can hit all of those areas that I feel like need to be hit with this particular color deep shadow, even though have won over it like crazy. There's usually still something I can find that I missed before. So that's what I advise you Dio is. Once you're pretty satisfied to pick it up and just take a look at it again, turn in all different ways, just fill in those gaps. A little bit of gaps is okay. I mean, chances are if you haven't seen them by now, you might not see it, but we're going Teoh the process of taking our time and, you know, creating something. So if you're like me, I would like to create to the best of my ability and I don't usually stop until I have exactly what I love. And I try to listen to Ma himself as where does that sound? I try to listen to my intuition and let it tell me when something is done when something needs a little bit more. So I think we're about good with that color. So now gonna come through. We're just gonna start putting some color down right now. I'm trying to focus on paying the bricks, not this mortar stuff that I've created. So it's OK if it gets on there, but I'm avoiding it when I can. And if you're worried about this step, then whenever you do yours, you can wait to put down the modeling paste until you're ready until you've already painted the bricks. I just felt like, for me, this was gonna be an unnecessary step, so that is not what I did. But if it's something that you want to try, go for it. My way isn't perfect. Nobody's is. It may give you a different look than what I have, which is great, because how Warren would it be if everybody's stuff looked exactly the same? So I'm just coming through and dabbing in some colors, and I can come through with some of the darker color and dab it and, well, it's wedded to start mixing. There's no real Rama reason to what I'm doing. I'm just going until it feels right. So now coming through with that, remember? No, I'm sorry. Uh, nutmeg. And the reason I'm kind of doing more of a dab is just a little mix and maybe create a little bit of texture. If it doesn't, that's OK, but that's my thought on it. Now, when I come through with the more yellowish color just kind of mix a little bit of that end to some of these bricks. I'm gonna come through with my very wipe on wipe this down a little bit cause I want to make sure to have that showing. And I'm afraid if I don't like that down, I will forget. So now I'm gonna come through and put a tiny bit of white to blend that in. And with white and black, a tiny, tiny bit will go a long, long way. Do you want to come over here to this side and kind of do the same thing. So it kind of blend in because all something that paint is if you decide you don't like something paid over it. Oh, I'm loving this so much. Oh, my gosh. Look at that. Oh, and I know it might seem a little silly that I'm getting so excited put as I create these classes, I don't know what's gonna happen. I'm just along for the ride like you are, and I just go with the flow and listen to my creativity and just experiment and try it out . So I have no idea. I've never done this before, have guns and techniques similar. But every single piece is different and everyone is unique. So I never know what's gonna happen, which is scary, especially when I'm trying to teach a class. But it's the truth. I know I've used the techniques before. I have an idea of what's gonna happen, But I never know what's gonna happen until I start digging in and just doing it. So all right, so for this one, I think I'm gonna grab a slightly smaller brush and dab in a little bit of the texture here . My other brush was getting a little bit was getting too much on the door for this particular area. I'm just going with another round brush and just mixing those colors in. Switch back to a bigger brush now. I love it. I cannot wait to get the, um, mortar, I guess, is what we would call it painted. I'm just going back through with my technique from earlier and just dab dab, dabbing power, grabbing different colors as I go to start creating some texture. Now we went ahead and went my brush again, starting to get a little bit drive. You says you're going, you'll be able to tell the colors won't be blending as easily. Your brush kind of starts getting stiff, so just add more water as you feel as you feel you need to, and then you can always, um, dab it off on a paper towel. It's looking amazing. Flip it around and I still need to work on this mortar, so I'm gonna rents my brush out pretty good. It was a mix up, a pretty light tan color, I think, and some variations of that because I really think I want this to release, continue to stick out, but I feel like this white is too much. So I'm just gonna go through. I don't remember. My piece is still wet in some spots, so I'm just trying to remember to hold on to places that but And if you get it on the bricks, it's OK, Go is gonna look like it's meant to be there because of the way that we designed this. It's covering some of the brick already, so if it covers it too much, it's okay. Nobody's ever gonna not one meant to be that way. So same thing is, before you're gonna need to work all different angles, its three D and very bumpy. And while that creates lots of yummy texture also could make it very hard because gonna look like you miss spots and you may miss spots. But if we create enough texture with color, put enough variations, I think we will be in good shape because it's gonna be hard to tell where the color is wrong, or I guess, not wrong, Um, possibly misplaced. So adding a tiny, tiny bit of the well under to the color that I have here just give a little bit of a variation of shade. I had a little bit my other color as well. And I just keep working with it until finding the right combination, just like I did before with the bricks. Just keep mixing those colors in until it's perfect for you. Exactly what you want. I think we are almost there for me. We'll take a tiny bit of this raw umber straight. Just mix that end to what we've already got in spots. Oh, man, it looks amazing. So same thing. We're just gonna keep throwing colors on here, checking it from all angles, movement or brush in lots of different ways. We can really dig in there. And if you end up not liking something, remember, it's paint. We can just paint over it. So don't stress. Just enjoy the process and just keep moving. That is looking awesome. I love it. Do you guys think? Are you enjoying it? Is there anything that you would change about it? Think about these things as I'm going through, because when you make yours, you have a better idea of what you think that you will want. Because I'm definitely not like my way is not the best way. It's just in my way, and it's how are enjoy things and you may not like it. You may be going, Oh my gosh, I would have kept that white and if so, great, make us that way. That's the beauty of it. Art is art, and no two will ever be alike now. Also, I did want to say, If you don't have things like Meiling paste and you don't stress over it, you could easily easily create the same look without any modeling paste. I guess I shouldn't say same. You can create something similar by using this process of dotting the pain on like I am a mixing these colors together. I can easily create texture by lifting that paint and that the nature of just dotting it on it's just naturally happens that way so you can create the illusion of it being textured. Even if it's not so. Just keep that in mind, though my homemade modeling paste super easy. If you want a tutorial on it, then just comments and I'll try to do it. I try to do what you guys want and what you're looking for. Oh, my gosh, I love it. Oh, I love it. I love it. Love it. Love it. Love it. So my friend is finished. I'm gonna let this dry. We're going to let this dry and we're gonna work on the other side.
12. Lesson 10 - Painting the Back: Lesson 10. Painting the back brakes. All right, so now it's time to work on the back some more Now on the front. I should you ways of painting it and doing the modeling paste. But saving all the painting for the last on the back. I'm going to show you how to paint the brics first and then add the modeling paste. So it's just gonna give you another option so you can decide what way will work best for you or what way you think will work best for you. And then you can just experiment with it and see, you know what happens. So very first I'm coming through. I'm going to brush in some dark around in the middle here. I still had quite a bit of light on my brush. Apparently, why you wash your brushes out? Guys, I didn't listen to my own advice. That's we'll still build up the layers and get the look we're going for. So since we are painting liver experts and we're not doing the modeling paste, I don't have to worry about how sloppy have being because gonna get covered up anyway, So that is one of the advantages to this way. I don't like this way as much because I like to see how my whole compositions look And I find that hard to do this way because I don't know where all the text water I want the paste and those comes a thing. So this way for me while it although it is faster because I don't have Teoh worry about the detail brush too much and all that, it's just not the way that I prefer to work, But you may love it. So for something to keep in mind, one of the awesome things about mixed media is that you can experiment and there is no right or wrong way. Just do it now. You maybe you want to see some of this just so in between these bricks, it's still quite wet because it went on pretty thick. That's okay. I'm just gonna smooth around, just kind of squish it out. So little cry. You have to worry about it as much. I was gonna essentially kind of work like white paint would just give us a different variations in color. Anyway, the majority of it was Dr. But if you find this is happening and it bothers you. Just take a few minutes. Take herto are Do it. That'll be drive very quickly and even daven a little bit of black. I really want Teoh. Emphasize those. I'm turning around. So I didn't see it from another angle. Make sure about everywhere covered that I want covered. I think we're looking pretty good. So now gonna come through just these randomly. I absolutely hate that. I'm not wearing gloves. It drives me nuts to have paint on my hands and Joe Medium on my hands, all of that. But that's OK. I'm not gonna let not having gloves. Keep me for making art. Go back to just adding lots of colors everywhere we end up getting a color we don't like. We can always cover it back up something different. And I'm just randomly putting colors just like before. Wherever I think it'll start to look good mixed in. I'm just testing it out while some of the color will get into the creases and crevices. It's OK, um but I'm trying to keep it from doing that as much as I can. Okay. Gonna clean out my brush is gonna let this dry, and then we're going to start the modeling paste
13. Lesson 11 - Adding Modeling Paste to the Back: Lesson 11 adding modeling paste to the back bricks. Probably some spots I could use a little bit more, but we're gonna go ahead and put the modeling paste on here now for my version. I'm going to use more of the paint colors to create more texture than I'm going to use with the paste like I did on the other one, because this is the back. It's going to be sitting on their laps or their table or whatever, and I don't want to interfere with someone's ability to draw or my ability to draw. If I'm keeping this book, um, so I just want to give the illusion of it, but do a really thin layer versus how we doing the other one in creating a lot of texture. We're gonna use more of the paint to create the illusion of texture on this side. So I'm gonna take my paint knife, take my modeling paste, see if it's the right consistency for me. I think I might put a little bit of white paint in here to thin it out just a little bit, so this may have gotten a little too thin. We'll see. So I am so gonna create some texture with it, just not nearly as much. I'm just squishing it, and I feel like I need to squish it. I'm just getting that base layer down first and then I'll go through and have the details. I'm loving it. What do you think? What do you like about it? What do you don't like about it? You would be thinking of these things. While you're watching me, you can decide what you think will work for you. I think that's gonna be good. I'm gonna bring the old one of the other side back in. It's a frame here so I can zoom in and let you see the difference. So, as you can see, this side is much less dimensional. Is this side? Um, but that's not necessarily a bad thing, because this is not be laying on the table or someone's lab or wherever it's gonna be. And we don't want it to interfere with someone's ability to draw or my own ability to draw . If I keep it so just some things to keep in mind. It's time to dry again. No. Why? I know this is not completely dry. You can see it bubbling up a little bit. There it is, drawing up the weekend paint our next layer on, I believe.
14. Lesson 12 - Sealing and Finishing Up: lesson 12 ceiling and finishing up. Now, Uh, I love how this has turned out. So I got the front here in the back here. Now we could stop at this point, but I want to put a fixative on top of this because I want to steal everything down. It would probably be OK, but since I plan on this being handled quite a bit, I just feel like that little extra measure to protect it will be worth it. So I do have a couple of options. I could use mod podge to seal this off, but sometimes mod podge can remain a little bit tacky. So if I do have other options, I do like to use those you like to use mod podge, more of a glue versus something that's gonna have something stuck up against it. So in this case, this book may have other books pushed up against it, so I don't want to risk that being tacky. So instead, I'm going to use a fixative. Um, this particular one is a final Matt fixative. I do advise using the final one if you're wanting to use it as a sealer, Um, this one is good for charcoal pastel pencil? No, I have used this one on some various mixed media works. So I do feel comfortable using this one. If you don't feel comfortable, I advise making a little small sample and testing it out on their But I'm very confident that this is gonna work because it's worked for me before, So you're gonna want to follow the directions that are on the can. This particular one wants you to keep it 12 inches. Shake vigorously, keep it 12 inches and put a light layer. You want to try to keep, um, it very even. And then if you want another layer, then it says to wait five minutes and then put on another application. I do suggest doing this outside. It is very, very stinky. It'll be extremely chemical smelling and will choke you up, and it's just not good. So I highly suggest doing this outside if you won't. If you won't or can't do it outside, please, please, please do it in a well ventilated area. Windows open those kinds of things because it is very stinky. Now, when I do things, if I'm doing a larger piece and I was spraying it. I'll put it on an easel, take it outside and spray it. Whereas thes air smaller, they would fall through the particular easel I have. So I will lay them on cardboard and spray on while they're on the ground. So I'm going to go do that. I'm not going to take you guys with me because I don't want to risk the fixative getting on my camera and is quite windy today, so I will be right back. All right, I'm back. So these have been sprayed with two coats. I decided to go ahead and do two coats since I was headed out anyway, just to give it an extra layer of protection. So now So the final lesson is to put this book back together. So if I wanted, I could also paint the insides. I don't think I'm gonna worry about it. I can always paint it later, and then just keep the book open and then let that dry flip to the back. Same thing to get this back together. You need to think about how the book needs to be placed. So I advise keeping these in the back. So this part is gonna end up looking like this in this part will go this way. So what you're gonna need todo is put the 1st 1 on facing you, and it can be a little bit tricky to do. But try not to bend the Bronx too much, just getting started. If you're finding your having trouble, you can also lend them a little bit. I wouldn't been them too much because it's gonna be hard to get the book toe look OK and not look messed up. So this part's a little bit tricky. It's much easier to get it off than it is to put it back in. But once you get it going, it shouldn't be too bad. So I did flip the book over so I could get at it that way and get that a try. So just whatever you find is more comfortable for you do that. And then once you get this going, it does tend to get a little bit easier. It's just that getting it started part that's the But you're here part. Just take your time and it's on. Okay, so we've got a front now I gotta get back. So I get to the same process and this is going to go like this. So we're flip it over so it goes right side in. Sometimes it takes a minute to get it back together. Richest, keep working it and eventually it will go. But look how it's horrible. This is a And I was worried about that little knob being there. But as long as they're writing on the right side, I think it'll be okay. They're drawing on this side. It might be a little bit wobbly, so it's gonna have to be up to whoever uses this. Maybe me. I may be keeping it so it's so awesome. And if you're finding it hard to kind of manipulate these pages, you can always kind of squeeze these together, and it will work. I love. So your assignment today is to get some cardboard, grab some supplies and make something out of that cardboard. You can decorate a notebook like I have here to make an art journal. You can put it on a canvas you could put on a piece paper, I don't care, but just use that cardboard to create a mixed media piece I cannot wait to see what you have created. And thank you so much for staying with me during this fun experimental tutorial. I hope you really enjoyed it. If you have something that you would like to see me dio or see me teacher tryout or whatever. Please, Please, please leave a discussion and I will try my best to do it. If you have any feedback for this class, please make sure to leave that I cannot wait to see your projects. Happy experimenting and go create something beautiful today by
 Erica Henry, Create something awesome today!