Transcripts
1. Joanna Intro Minestrone Pt 1: Hello there. My name
is Chef Joanna. And today, I want to
show you how to cook healthy and how to use your knife because I get the question a lot and
people are like, you know, how do
I hold my knife? How do I cut properly? So I just want to give you a little quick tips
on how to do that. And hopefully by the end, you'll feel more comfortable, confident cooking
yourself healthy meals and just get into.
2. Joanna Minestrone Knives Pt 2: So the first step, I want
to show you the knife, how to hold a knife and
which kind of knife to use. We'll start with
the paring knife, the small one here,
just for, you know, small jobs, strawberries, jalapenos, deveining
some things. Then we have the Santuco knife, which is, like, a
Japanese style, and that's used for a
lot of chopping stuff. And it's really practical
when you want to scoop up food and put it
into the pan or pot. So this one is a go to
for a lot of people. My favorite is the chef's knife because it's kind of
the all around knife. For all jobs, it's
a little heavier. So if you have to
cut through, like, a skin or something,
it's pretty practical. And so now I want to show you how to
hold the knife because a lot of people don't hold it correctly and you
can get injured. If you don't hold it right,
you'll get tired faster. So let me show you
how to hold it. So whatever hand you're going
to hold the knife with, you get the last
three fingers here. You wrap it around the handle, and then you pinch
this part right here. And once you do that, you should have a lot
better control and kind of have this extension
of your arm here, and you can see you can really
maneuver it really easily. But a lot of people
hold it like a club, and when they start to
cut, it kind of moves. That just kind of
makes you more tired because you're constantly trying to try to make it straight. So just pinch that, and you should feel
like a lot better. It might not feel as comfortable at first because you
have to get used to it. But in the end, it's
safer and easier. Now, with your other hand, this is now more dangerous because it can get chopped
or sliced, whatever. So you got to tuck this hand, whatever the non knife hand. And you always want to tuck it, never have your fingers
flat like this on the board if this slips at all, you know,
these can get hurt. So always tuck that behind. And then, before we get anything
to chop, just practice. You can either touch this
kind of knuckle here. Some people will do
two knuckles here, but it depends on your hand
orientation and everything. You just want it flat. So if you slip, you
don't cut anything or, you know, it'll just glide past your fingernail
or something. And this is really
going to tell you how small or big your food
pieces are going to be. So this is kind of the brains
here of the operation, just showing you like guiding
you how big or small. And then lastly, the movement of the knife when you're
slicing and chopping. The easiest way that will
guide through your food is kind of tip to heal and you kind of want to move
it away from you like that. And that will just, like, slice through the food
instead of smashing it, which can bruise, the
onions and everything. So just try to do this movement, and you can practice this before you cut anything so
you feel comfortable. Now I want to show you
with some veggies here, we're going to get
into the chopping so you can see how it's done.
3. Joanna Minestrone Veggies Pt 3: So the most fun way to
learn how to chop is, you know, to have a
result at the end. So I don't want to just go
through all the chopping. I want to have something
to make at the end. So we're going to
make a minestrone soup so we can practice all these chopping
different veggies and shapes and sizes. The ingredients we
need, we're going to have onion, we're
gonna have garlic, some celery, carrots,
zucchini, and some kale. So we're going to start with the celery just because
I find it's probably the easiest to practice
on because it's flat and we can go over. So this has been washed. And we'll just remove
the leaf part here, and then we will trim
off the ends here. Okay. So we'll start with just one just so we can practice
the technique of chopping. Remember, have this kind of hand tucked and
then pinch there. And then it's up to you. If you want to have contact
with the knife, you can. I feel comfortable with that, but some people want
to hold it over here. But try to, you know,
do this here and uh what you want to do is you want to focus on
getting the same size. So if you start at
one size, you know, stick with that size
because that's going to be the same cooking
time for that veggie. So you don't want
to do some small, some large, some will overcook. So will get too soft. So stick with the same size and see how I am
kind of rocking, you know, front to back here and kind of making
it go away from me. And it's also really important. I see this a lot that either people don't have a
cutting board that is stable. So you always want to make sure you have a good cutting board. If it's a plastic one, put a damp paper
towel underneath, and that will hold your plastic
cutting board in place. So hopefully, this is a
good practice for you. You can get a whole bunch
of celery and chop it up. We got our celery ready to go. Next up, we're going
to do the carrot, which can be dangerous because it's very unstable and roly. So I always like to cut it in, you know, half or thirds. And then there's a
couple ways to do this, but I think the safest
is kind of, like, make a divot into
the middle there. And then slowly kind of
just whenever you do this, keep your hand up and not
curve down or anything. And you cut it in half so that now you have
a flat surface, and it's a lot
safer to work with. And you want to do that
for anything that is kind of roly in nature. And then we'll cut that in half. And now we can cut it
into a little chop here. I have nothing to say. Okay, so now we have our carrots ready. That's going to go into
the bowl with our celery. And we're getting some
nice colors here. Okay, next up is the always
talked about the onion. Everybody wants to know how
to chop the onion correctly, and they're scared of it, 'cause now this is, like, super ly. So how do you do this safely? Well, the first cut is
always kind of the hardest. I don't tend I don't
peel it first. I cut it into it
and then peel it. So, again, I kind of, like, get a divot there
and then can kind of just smack it down like that. Um, and now it should
be pretty easy to peel. And so you just kind of peel off any of those the
brown layers on the top there. Okay, so once you have
the onion like this, we're going to just trim
it up a little bit. So trim this part
off and this part, but keep the root intact because I'll show you
in just a second here. So starting with one half here, you need a very sharp
knife for this. Otherwise, it's
kind of hard to do. So make sure you're
sharpening your knives. Like a sharper knife
is a safer knife. So just make sure it's sharp. And we're going to
start like this. And do horizontal
cut into the middle, but we don't go all the way. We just kind of go to the edge of the root,
keeping it intact. So as far as you can go there, you bring it out and
see it's, you know, still very much intact, so it's easier to work with. And now we're going to
do little cuts this way, but also don't go
all the way down, so you want to keep it intact. And this is where a
sharp knife really is necessary to go into this onion. And so you have
those cuts there. So now we've cut it in half, and we have all
those little cuts. And now this is the really
cool part, but also tricky. You have to really
hold it together with your hands as you cut
because it's a little more, you know, movable, unstable. And then you know, gently, you start cutting all this
way and and your onion is perfectly chopped up
because you've cut it both ways horizontally, vertically, and you
get these nice, perfectly little uniform chops. Okay, so once you get
to this root area, you can, you know, just cut around the root. And there's not a
great way to do this, but I just kind of like to
chop like that, you know, one way and then we're just going after
the same size here, so then I'll kind of scoop them up like that
and do another cut like that. And people always ask, you know, how do you not cry when
you cut the onion? And there's a few techniques, but none of them have
really worked for me. But refrigerating your onions
kind of help a little bit, when they're colder, the odors don't come up to your eyes much. I've also heard if you put bread in your mouth
while you're chopping, it helps as well. But I know one of the main things is the
sharpness of your knife. So if you have a dull knife and you
keep bruising the onion, you're just releasing more
odors into your eyes. So, a sharper knife
where you can do it quickly and get it done fast is going to be better for your eyes
and not make you cry. So now we're going to
put this all together. And I put these in a bowl here because this is the
foundation of cooking, especially for French cuisine. They kind of were the ones to make cooking the
formal way that it is. And this is what's
called a mirepoix. So, it's basically a mix of
onion, celery, and carrot. And it's always like
two parts of onion to one part carrot
and one part celery. And this is going to
be the base of, like, everything, especially
French related cooking. A lot of Italian too, where you start a soup, you're going to saute this
first or you start a stew, and then you add
meat or veggies. This is kind of the flavor
base of everything. So if you have this, I always kind of have
these in my fridge, and then I can add
whatever else to it. So it's kind of a good thing
to know your mirepoix here. And then we have a little
garlic we're going to do. So we need two cloves. And the best way to
do the garlic here, I know people have
garlic presses, but they are just take
more time to clean anyway. So I like to do it like this. I put the heel of my hand here, and the knife is
touching the garlic, and you kind of just do one hit. And once you smash it, you can take off the papery
skins pretty easily. And you do that for here. Maybe twice and the
skin's removed. And then you can
kind of, you know, do small cuts one way and then kind of shovel them up here and you can
do it the other way. But you can also, smash it, too, if you feel comfortable. Uh, you know, you kind of have to maneuver the
knife a little more. But that's also one
way to get them. We're just kind of
getting them to a mince. We're going to put
this to the side, we're going to saute that after. Otherwise, it will burn
with the mirepoix. So next up, we
have the zucchini, which is probably
going to be a breeze for you to chop
because it's soft. So we'll just cut off
the ends first here. And we're going
for a small chop. So you can kind of cut
it in half first and then kind of do some
planks like that. Remember, anything that
is kind of rolling, you'll just put on
its side once it's flat and it's a lot
safer that way. So I kind of like to just kind of lay them out
on the flat side, and then just go through
you cut them all that way, and then we'll put them
in little bundles here. And we'll just go
for this small chop. So, you know, do what's
manageable to you. If you want to do less at a
time, that's totally cool. Just always keep safety in
mind and go slow if this is, like, a new cutting technique or holding the knife is new. So that's our zucchini here. Finished up. Lastly
is our tail here. Okay, that's gonna be the last
thing to go into our soup. So you can get this already, you know, chopped
up and everything. But this is how I like
to do it from the stem, 'cause the stems
are pretty tough. So you can just kind
of discard that. Just get the leafy parts. I mean, you can
also eat the stems, too, and if it's, like, the top part, I'll
just leave it on. It's just the bottom parts
that are really kind of tough. Something kind of very
satisfying about this. Okay, so once you got some
nice kale leaves there, you can kind of bundle them up. And we're just gonna do, like, you know, little pieces here. So now we have all of
our veggies ready. Now this is I'm going to throw
out another French term. This is called the meson place, which basically
means put in place. And it's just a French term, meaning that you want
to prepare everything, all your chopped ingredients
before you start cooking or turning on the heat a lot of
people start cooking, and then things will burn
'cause they're chopping. So, you know, this is how
the chefs do at restaurants. Everything is step by step. Have all your stuff prepared before you start the
next step of cooking. So now we're ready
to turn on the fire, and I'll show you how we
get this cooking here.
4. Joanna Minestrone Cooking Pt 4: Okay, so let's get cooking. We got all of our stuff ready. We're going to turn on the
heat into a large pot, one of the larger ones you have. And we're gonna put a
little olive oil, maybe, like, a tablespoon
or two in there. Yeah, this is an Italian soup, so it's a mix of, you know, all these
a bunch of veggies. There's some beans in
it. It's super healthy. It's something that they eat
in, like, the Blue Zones, Sardinia italy where
people live 90 to 100. When the oil's hot,
so I like to test it. This is kind of a
cool little trick. I'll put like one piece
of onion in there. And when it sizzles, then I'll put the rest of my veggies in there a it'll tell me that
it's now hot enough. Okay, so once it's sizzling, we're going to add the rest
of our mire point here. So get all those nicely
chopped veggies in there. And, you know, we're
just going to cook these a couple minutes until the onions start to look
a little translucent. And you kind of
want to, you know, stick around and move
them around a bit. It's kind of like a higher
flame and just move them. For a couple minutes. Okay, so once our veggies
are nice and, you know, the green is bright green, the onions are looking a
little more translucent. Been a couple
minutes, we're going to add pretty much
everything else. We're gonna add our
zucchini in there. We're going to add our garlic. We're actually going to
hold off on the kale. We'll add that a little later. And we're going to add
our red kidney beans. These were canned. I just drain them and
rinse them a little bit. And stir that around. And then, 'cause I wanted
to make it very simple. If you have veggie broth or chicken broth,
whatever you want to use, but this is just water 'cause it's still gonna
be very flavorful. I just put enough to
cover and a little more. Look at that beautiful
colors there. We're gonna add
some pasta in here. This is elbo macaroni. You can use any pasta you
want or leave it out. This is a three fourths cup. So we're gonna put
that in there. And then we got some nice
Italian spices here. I have the measurements
for everything, but I kind of just go to eye now because I made this so often. So, um so the thing with spices is that you add spices towards the
beginning to middle part. This is some oregano in here. The spices are kind of
thinking them as a tea, like you're brewing the stock. So that's when you add
them now versus herbs, which would be fresh
parsley, basil. You add those at the end because those are fresh
and they have, like, essential oils that
would just get kind of, you know, boiled out if
you added them right now. So we'll add the parsley
at the very end. And there's some thyme here. And last, we have some basil. So you know, this is
about a teaspoon or so. And very importantly, because we didn't use a stock,
we're going to add salt. Okay, so we're going to
get a little salt in here. This is to your taste, but probably at least
a teaspoon to start. And it's, you know, a good soup definitely needs, like, a good amount of salt. That's what makes those
restaurant soups you like. So we'll taste as we go. And then we'll get a
little pepper in there. You can do red pepper
flakes, too, if you want. Well, we got the pepper. And what we're now doing is just going to bring
that to a boil, and then we're going
to cover it and simmer for about 15 minutes. Okay, so after 15 minutes, we got this beautiful
soup looking like this. We're going to add
our kale in here. And I did taste for a
little salt along the way, so I added a little more. It's all really
according to your taste. So we'll just stir this in. You could use spinach, as well. Whatever you like.
Yeah, this will be, you know, another minute or two. But even if it cooks a little longer, there's no harm there. Stir that in. And then we'll just cover it for
a couple minutes here. Okay, so it's been
a couple minutes. It looks beautiful.
Tasted for seasoning. And now I'm gonna plate it up, so just ladle into a
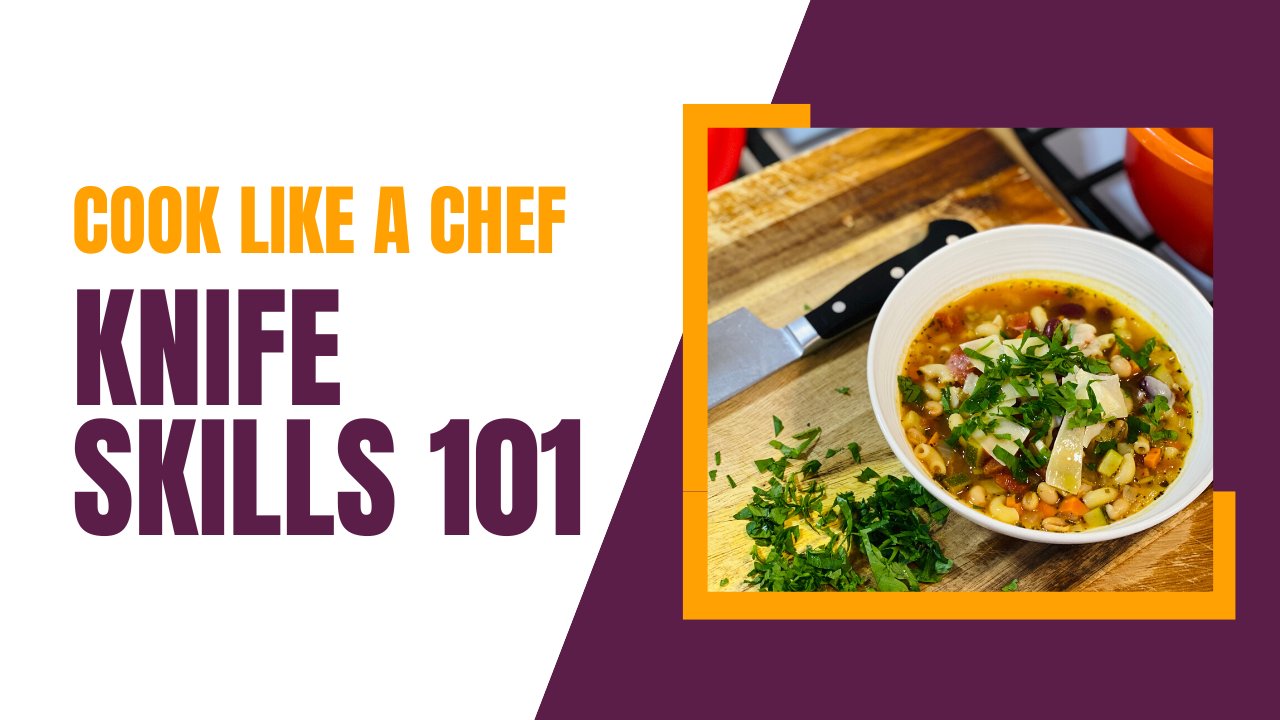
nice big bowl here. Alright, so here's one
way I love to plate it, give that little extra boost of flavor, but it's up to you. So I just got nice some aged
parmesan here and a grater. And this just adds a little salt and a little crunch also. And then some really
good extra virgin, some really good extra
virgin olive oil just to drizzle and give a little
flavor and a little shine. And that is your
beautiful minestrone soup that you made with
your knife skills. Okay. Let's get in there. Mm. So good. Yeah, actually really nice. Thank you so much
for joining me. I hope you learn some really valuable knife skills
and are enjoying this beautiful minestrone
soup until then take care, and I'll see you
in the next one.
 Joanna Barajas, Wellness Chef