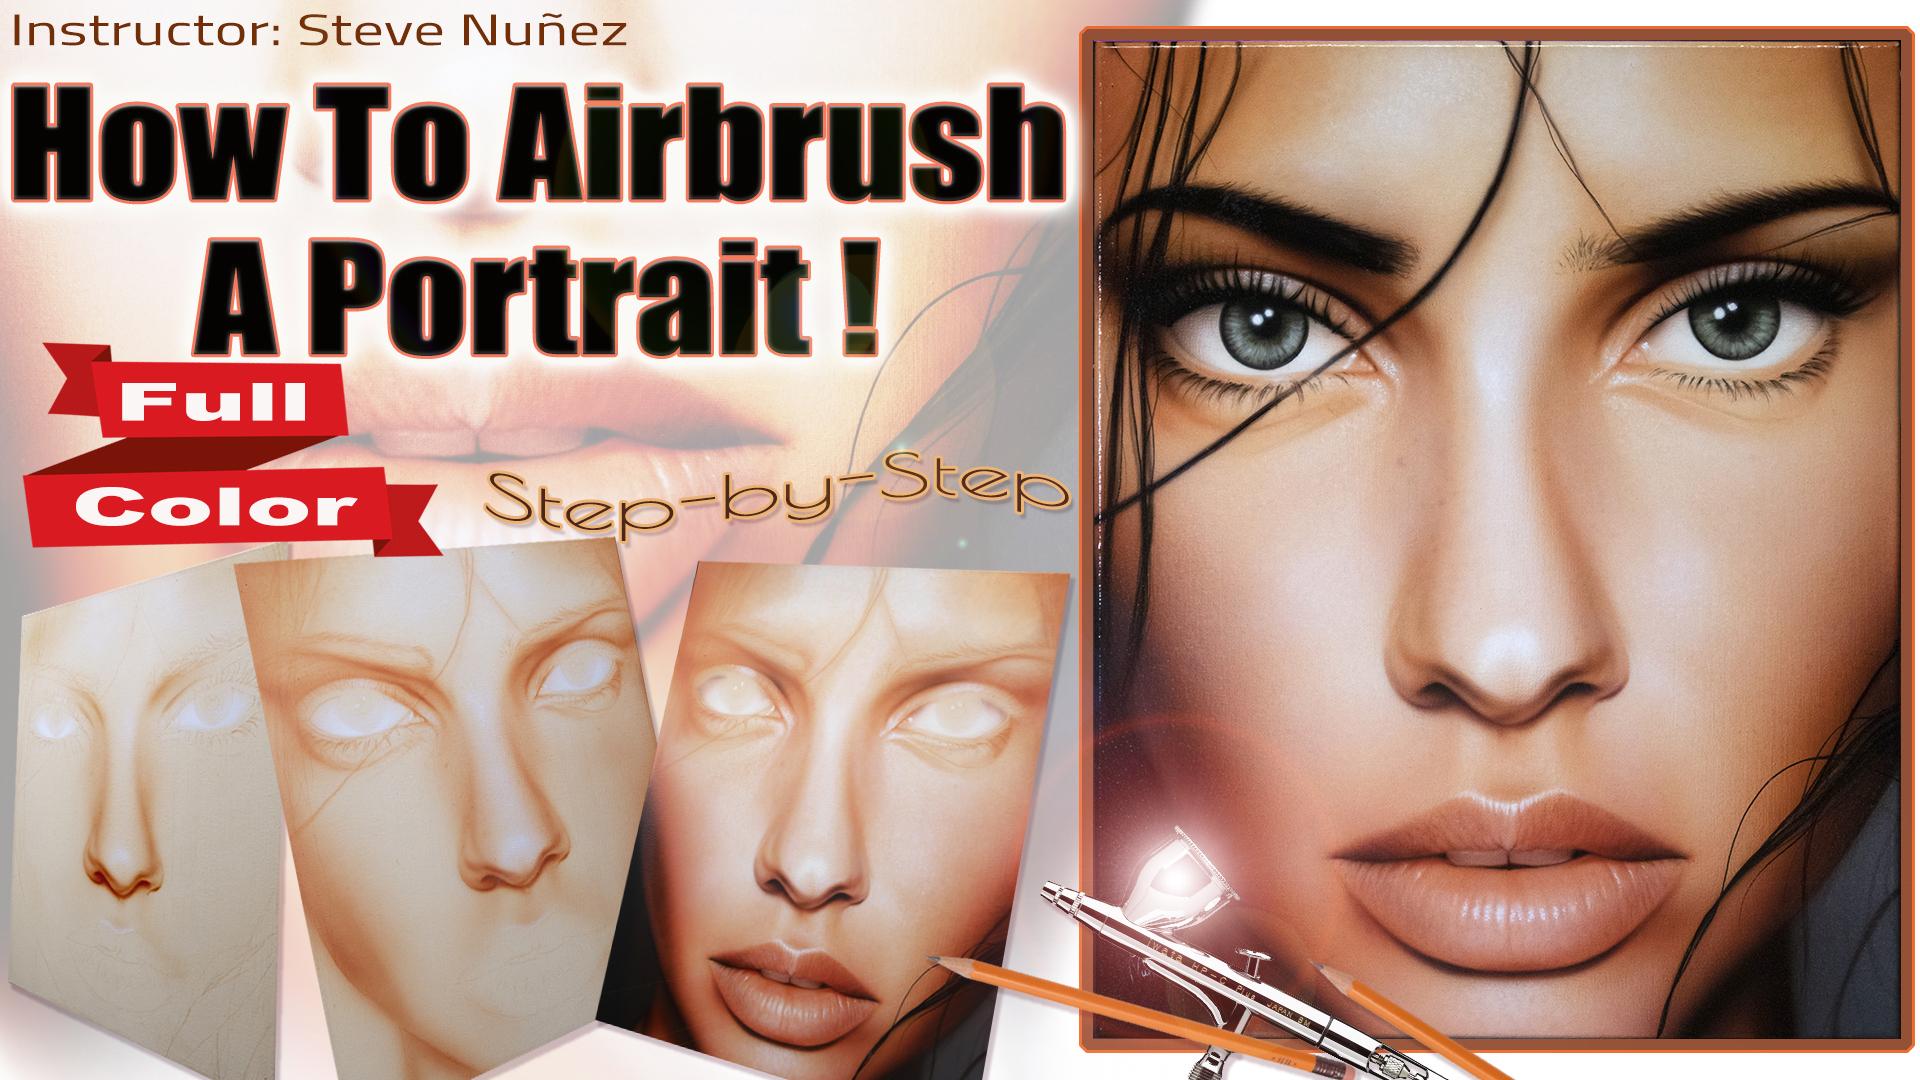
Transcripts
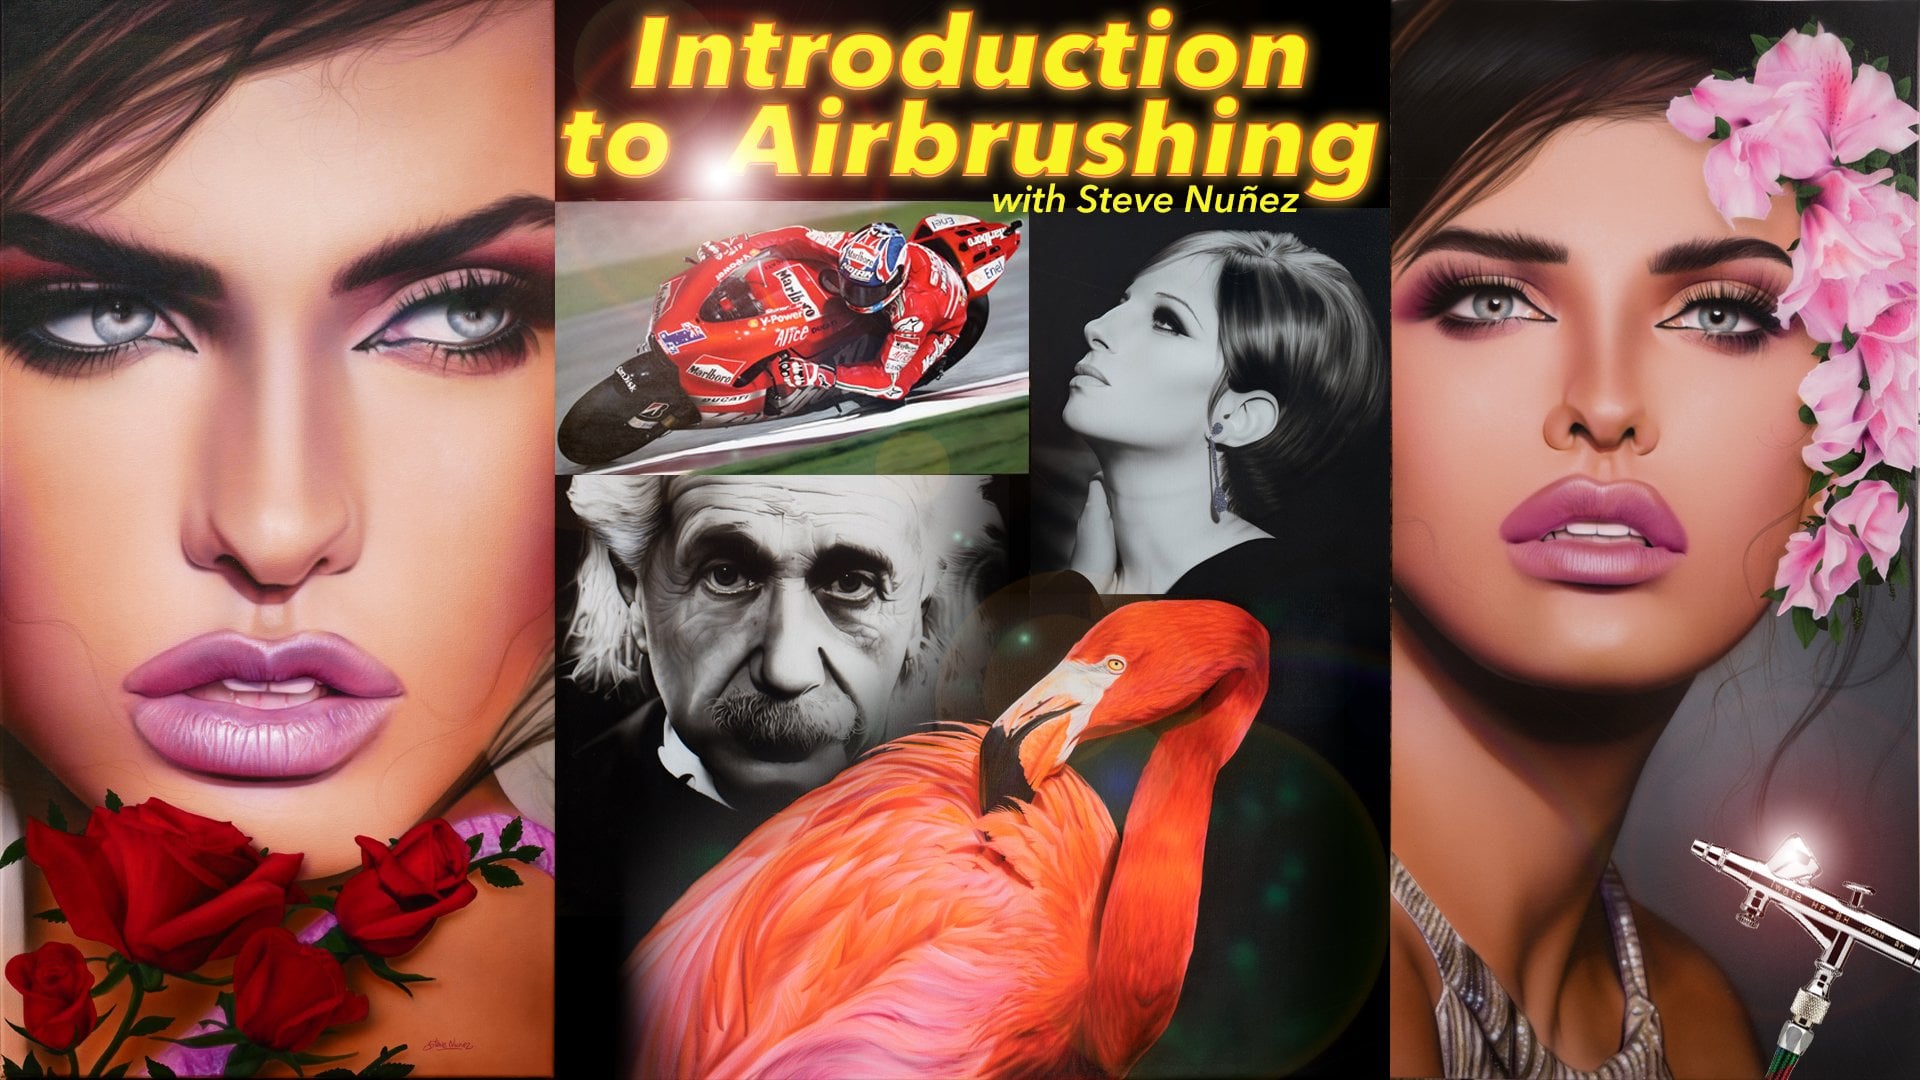
1. Trailer: welcome to color portrait with the airbrush. My name is Steve Nunes, and so I'm excited about this particular painting, cause, as you could see, it's a very start painting. It's a close up. It's a it's a tight crop of a woman's face would very start details, and you're gonna see shading around her eyes and texture around her face or knows her mouth . So this is sort of like a gnat advanced class. So you totally new the airbrushing. I recommend that you check out one of my previous videos, which was introduction to airbrushing and am brushing Portrait's in black and white. Those are classes will help you get started and get to this point. But for now, if you knew, I suggest you try one of those classes because they will get you up to speed before you jump onto full color. But if you've been airbrushing for a while and you've tried portrait, maybe your portrait didn't come out quite right. Or maybe you already air birth portrait's and they're very good. But you just want to learn the technique that I use when you're in the right place, so I'll explain. The materials were going to use the process, studying the reference image to so to see if we could identify any challenging points. And I'll explain toning the canvas and why we want to paint highlights first and then shading and then our final touches and then are clear or matte finish that we do in our final thoughts on this particular painting. So I really welcome you to try this painting. I think that you're gonna find it very exciting. That finished image looks quite quite stark and they think that most of you will be pleased with your final results. And if you don't achieve the results that you expect that you could always try again, that's the great thing about video. You can rewind and give it a second shot. But anyway, I think most of you gonna find this exciting and you gonna find it somewhat challenging. And that's part of the excitement. That's how you learn by sort of like doing something you've never done before and finding little problems and how to overcome them. So I think hopefully this will challenge everyone you know in that in that regard with your airbrush. So anyway, I'm excited. I hope you are too. So let's go right into it. Let's jump into our first lesson
2. Materials Needed: looking at the reference photo, we could determine what we need to complete this painting. One. We're gonna need a canvas in this case. And when you use a 16 by 20 stretched canvas, we'll also need some Jessel to prime the cameras and sand it down smooth so that when you paint that we have a nice smooth surface because we're painting a canvas here. The pain we want to use is acrylic paint. Now I highly suggest you got and get some air burst specific paint as they're made for airbrushing, and they spray very smoothly. But if you don't have access to air bar specific paint, you can use standard acrylic paint and just make some Airbus medium into it. That will allow it to thin out very smoothly and spray smoothly in your airbrush. Let's take a look at this image, and we'll see what paint will need to create this painting because of the highlights in her nose and around her eyes, with definitely gonna need some white paint here. In this particular example, I'm going to use badges spectra text white. You could use any acrylic white that you happen to have on hand When we studied our reference image, we were able to determine what was the overall base color. That base color is the color we're gonna paint our entire canvas. That's the next color that you're going to need to paint this campus. You could easily makes it by just taking a brown and mixing quite a bit of white, adding a little bit of a pink or arms to push and pull the color the way you want. But we're gonna need this color. This image has a lot of this color throughout it, and this is what we're gonna be using for a lot of our Freehand airbrushing. Artists continuously call this color sepia. It's sort of like a brown mixed with a very light red, and it's available in transparent and opaque. You could use either version but have used a transparent vision. You'll have to build up your tones to get the opacity you want. Either way would work well, but you want to step. You're sort of tone for this particular image. The next color we could identify is just deep red brown Now. Many manufacturers have different names for this color. Some would call it earth red or deep Earth red for the red number. So this is the color we need to mix. You don't necessarily have to look for this specific color. You can actually just makes it. It's basically like a brown with a little bit of red and some sepia mixed in. We're also gonna need some black paint. It's shown here in the background. It's also used in her eyes and for her eyebrows. So we're gonna need some black acrylic paint. We're also gonna need a touch of violent to push a teeth back and recess it in her mouth. The great you see in her eyes, you can simply mixer black and white. Or if you choose to make a different color, you can make them hazel or green or blue. That's up to you. Beside paint. We're gonna need a pencil to draw our image. We're gonna need some clear varnish. Maybe you might want gloss or matte to protect your painting walls and any various brushes . If you want to use them to paint our eyelashes and to prime your canvas. And of course, you're gonna need your airbrush. Other than that, that's all the supplies you're gonna need to create this painting. If you have an assortment of paint, chances are you can actually just mix these colors. Don't feel that you have to go out and buy these specific colors and look for these exact names. If you're good at mixing, you can just mix them. And if you're not good, this is something that you should practice because you want to be able to have the ability to mix whatever color you want, you're
3. Surface Preparation: all right, so preparing your surface So we're going to start with the canvas. And because we're painting on canvas, they traditionally come primed and cameras itself is a cloth. It's That's what it's called, the cameras cloth. Now when you buy these cameras is in the store. If they're pre made and there stretch, usually they come prime, which means they already have a layer of Jessa wanted and they're supposedly ready to paint . But I found it. Usually they're not, and by that I mean they're very rough. So this roughness, if you run your hand across it and you feel sort of like a roughness, that's what I mean. So before we ever we kind of want to get away from that and get a smooth surface, because when you spray any of those little hills and valleys in that roughness, that's in the surface. When you spray your Overstreet catches that and you're gonna see that you have like up. There's a sort of dullness to it, because everything's catching the the airborne spray. So what you want to do is you want to get a nice, smooth surface, so the way to do that is the way artists have been doing it for years. So you get your canvas, you ate out and you get something like a sanding block. Some people, your sandpaper, whatever you have handy. I like the sanding blocks because they last a very long time. They're easy to hold rather than holding a piece of paper, and they're basically have a sponge in the middle. So it's very soft, and it it conforms to your hand easily. And it goes over the surface without leaving your finger like impressions into the surface . So I recommend a sanding block like this with foam interior because that's that's the most comfortable and gives the nicest results that I found. So now, after you stand your cameras, you're gonna need to re prime it. And you're gonna need something called Jess. Oh, so Jessa Is this like chalk based white? Um, well, it's usually white because most artists want to start with white, but they actually come color. I know. They come in black, they come in white, and they may come in other colors, but I think the most common is the white. So what you want to do is after you send your surface. You would prime it with Jessel. And, like I said, just was a very chalky white sort of paint, almost, and it it seals the fibers inside the cloth so that it except your pain. Now the nice thing about using Jesse's that you can use, like oil based paints or water based paint. So in our case, we're gonna be using acrylic, which is water based. But anyway, so the first step is let's sand it down to get it smooth. You're gonna hear some roughness because it's gonna be sanding literally away. That layer Jessel, that the factory puts on these prime pieces of cameras that they self. You can hear that roughness up off the clothe now. Already, that's a huge improvement. It only takes not even a minute to really smooth out a Jessel surface. Now, in reality, if you want to get an ultra smooth surface, you could Sand is quite a bit, and what some people do is they put just on it. They sand that they put another layer of just so they sanded until the cloth is like that cloth texture that you see inside the count. It's almost gone. I don't feel that you have to go that far, but it's a matter of taste. If you want that the campus green to disappear, they put multiple coats and sand it. It's gonna take a little while because you have to wait for every coat to dry and then sanded. You could use a blower to speed up the process, but that's what a lot of artists do. You can do that if you don't like that, the campus sexual so you could do that. Now this is the Jets, so that I use I use the brand I use, I think is liquid texture golden. I just put it in these jars because they come in big gal until the way I bite has been gallons and I don't like toe open the gallon just to get just so I take jars like this, filling with white Jess. Oh, and I thin amount a little bit of water and I cap it. And the reason is it's just easier to get to this and open up the gallon each time. So when you prime it is, you could use a brush. They make birches specifically made for prime ing, and this is one. This is a very popular style. It's a wide berth, very flat and narrow, very soft bristles, and it allows you to wipe off the camps and then and then prime it. The negative with wood brushes like this is that it sort of leaves the brush strokes when they dry. So you want to be very thorough and put a thin layer so that you're not putting a thick layer and leaving those those brush strokes. An alternative is to use a phone brush. Normally, I like using phone birches, but at this time I only have the skinny small ones amount of my affect wide ones. So again, it's up to you. This is a matter of preference. I do prefer him a phone brush, but because I don't have it, I am going to use my primer brush in this particular case. So I'm going to stand it a little bit more, put some Jessa wanted, and then that's how you prepare your surface. Now. Once you sand your service, don't forget you should blow it off or wipe it off because it's some. Jessel is very chalky, so it leaves a powder. You run your fingers across that you'll see you'll have white powder in your hands. You want to remove that powder, so just take your airbrush and blow it off or brush. And just I think it's better to use a brush so you don't get it all over the air with an airbrush and get it all over your stuff. So doing it like that Now, I feel that I have a smooth surface. This is ready to paint. So now I'm just gonna take my Jessel and apply a small amount just enough so that I think I can cover the campus with it. That should be enough. And then you're just paint the entire surface with your Jess. Oh, make sure to cover the entire surface so you want to make sure you cover it, and you also want to do your edges. So don't forget to go around the edges. Now do this several times so that you have a nice you know surface, I would say 23 times is enough sand in between your dry coat so that each new coat you put on is on a drive surface and it's smooth and then you're gonna be ready to paint it. Okay, so I've sanded the cameras a few times. I put two coats of Jessel, very thin coats, and now I have a very smooth surface. So this is fantastic. We can actually paint directly on the surface. So this is how you prep your canvas in the future of your canvas Ever sags and it's not doesn't stay tight because cameras is sort of like cotton based. You could wet the back of your canvas with water. You take a rag and you're just a damp rag and you wipe the backward and you'll see that it tightens and it the cameras gets really nice and tight again, and it won't wobble. So that's just the tip in case your cameras wobbles in the future. But this is how you prepare a campus. You just put your just so on that you send in between dry coats. You can use ah blower to speed up that process, and once you have your coat, you know few multiple coats and you sanded it. You should have a very smooth surface. Now, this is a matter of taste. You do this some people put 456 layers suggest, so that's entirely up to you. I don't think you want to put so much to the starts. A cake on the surface, you shouldn't see it. I think the limit is when the cameras texture starts to disappear. When you're at the point where you could barely see the cloth, you know that that texture that the close ties, I think that's about the limit that you want to get. Now, have you really striving for that ultimate campus? Maybe you're gonna do a very high end job, and you're gonna do a a portrait for someone that's very exacting. And they want to, you know, maybe put it in a gallery or museum or in their home. They sell other types of cameras. Now this is canvas, but they sell Belgian linen, which is an alternate to campus, but it's it's much more expensive, but it's very smooth at the even before you painted the we've is very, very tight. So when you prime it, it gives you a very nice, smooth, almost like paper. So, you know, for those of you that wish to do a painting, maybe it's a family peace, and you really want that ultimate smoothness in your canvas. Think about getting Belgian linen and other types of linen. So that's those are just some factors that you might want to consider before you doing your painting. Now, another thing is these store bought camera says they all tend to be cotton duck, and they're sold according to wait when you buy cameras itself. But when you buy them pre made, they're pretty much always the lightweight. You know the lightest week version of cameras you can get because they want to do it economically. Now you got an art store. You can buy these in. A higher quality, like Fredericks is some, and they make a bunch of. There's other companies that compete in that space. Typically, when you buy a high end art store canvass, the surface is already smooth. It's been sometimes will say, double prime triple prime. That means they did this process already, so you know you could just use your hand test once you feel it. If it feels very smooth and you don't see heavy like cloth texture, then that's probably all you need. You probably don't have to go through this process. But if you buy inexpensive canvas at a like a discount store, or like a mega art store, there's something five packs of cameras. Chances are inexpensive. They put one of two layers of thin just so that's why it's rough. So, you know, you kind of got Expect that with the price. So that's about it. This is your cameras practice. This is ready to paint, and now we could move on to our next step in the painting process.
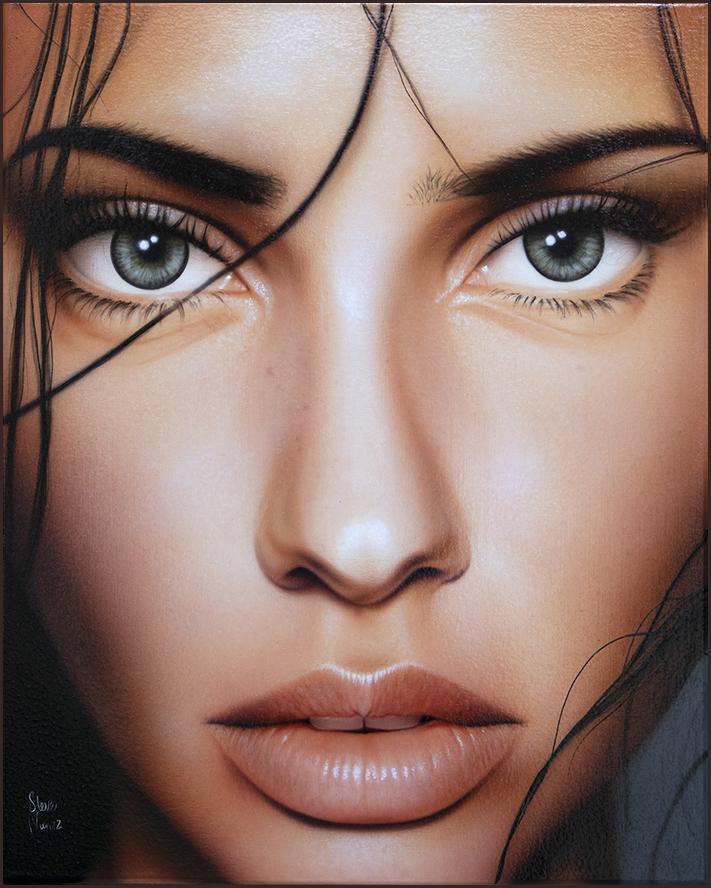
4. Reference Study: it's always a good idea to study your reference image. It will gain you some familial Abati with the image, and you'll identify any areas that might be of concern or maybe might pull some difficulty for you in this particular image, with screams out the most to me is that it's just basically one tone of a skin tone with a little bit of a reddish brown added to it. Soas faras color Portrait's go. This one is quite easy now. The eyes were definitely an offset of a grey, but you can use an alternate color, perhaps a haze of blue or green or whatever color you want to make your eyes and further studying her eyes, I could see that the outside perimeter has a very uneven line that goes around it, which actually works well with the airbrush. But this will make the portrait look a lot more lifelike than doing a perfect around line that goes around it with same uniformity. These eyes definitely uneven as far as a uniformly that goes around that circle. Find it that circles the eyes. Another thing is that we see to speculate highlights where the eyes are catching the photographers umbrella or soft box so we can make those. And you could just make him into a daughter. You could you could modify those slightly. But here we have sort of like a round circle, then triangular Just above that, we have speculum highlights on her upper eyelid. You can see that the light is catching it right at that point on both the left and right sides. Now, underneath that, that's her eyelashes, and they're very stark black. You can actually hand paint those eyelashes in, or you can airbrushed, um, whichever you feel more comfortable with. The area surrounding the eyes is painted with that same red tone that we see around the cheek area so we can use that both for the left and right eyes. It also moves up to the shadows on her hair, right around her forehead. Now looking at her eyebrows. The interesting thing I see here is that with the here's enter her skin there, actually a deep red. So we'll use the black moment when we get to that point. But then we'll make sure that we tone we make red wisps. We showed the here is going into her head with that deep red color moving a little bit south, we can see that the nose area has some very soft gradations around it, and we could airbrushed this part freehand without any problem. The only area that will have to be really sharp with this right below the nostrils will have to draw it out really carefully with the airbrush. That's some of the darkest shading that you'll see in the nose. There's a little bit in the shadow area, but definitely under the nostrils, so we'll pay close attention to that. When we air brush that part moving on to the lips, we can see that again. That reddish brown tone that we're using on her skin is also here in her lips so we can use that same color to paint our upper lips and then sort of like in it a little bit with some white to do the bottom lips. So this makes it very easy color wise, because this model has thick lips, it's causing, or a brow on the top of her lip that that is catching light so that those speculum highlights. We're gonna have to make sure that we paint the men. We also see speculum highlights in the bottom of her lower lip, right in the central region, you can see that there are various small little spots that are catching light. This is very common with images that are front lit, so we'll have to make sure that we paint these speculum highlights in. She also has a fairly large speculum highlight in the middle of her nose, so we'll make sure that will take note of that so we can paint that as well. Underneath her lower lip, we can see the disquiet, a heavy shadow there. It's primarily brown, with just a ridge of it being very dark, maybe a darker brown. So we'll take note of that when we paint that moving on to her teeth. You could only really see two teeth here and there, recessed in her mouth, so there's a sort of, ah, violet cast over it. So this would be somewhat easy and will make sure that we spray a light violet to push this back and look like the mouth is casting a shadow on her teeth. Moving to her neck area, we can see that the neck is not sharp or well defined, its because the photographer is using a lens that has some Balkan it, and it makes the background sort of look soft. And this is done on purpose. So we'll paint that freehand and make sure that we make her next somewhat soft. This is true of the left and right side. There is a uniform tone to this image, and if we can identify this light color that isn't white, we can paint the entire cameras this one color, and that will set down the entire base that we need to establish a base tone for the entire painting. The brightest parts of our painting here is going to be the speculum highlight on her nose and the white areas surrounding the iris of her eyes. As the white fades back into our eyes, you can see that the eye itself cast a shadow, so we'll just make the area around how Irish really bright white and as its fades will let it shadow out looking at the shadowed areas we could see there, her cheeks are shadowed in fairly deep, and we could see that her chin is causing a shadow on her neck, so this will be easy to replicate. We also have to observe that her hairs are casting a shadow on her face. But the hairs are not casting a black shadow. It's more of a deep red. So we'll keep noted that when we air brush that the highest level of detail in this portrait is definitely the eyes. So we have to be very sharp and very precise. When we do the hairs around her eyelids, we want to make sure that we do those and we want to do her bottom eyelids very risky because they're a lot less prominent than her upper eyelids. There's also start details in her eyebrows. So aside from that area and the shadow under her nose and some detail ing her lips, I think that this painting is going to be very straightforward and shouldn't cause too much of a challenge for us.
5. Toning the Canvas: So now we're gonna tone our canvas. Remember, we identified the lightest skin tone that exists in this painting besides white. So the reason why you want to do that as one you're putting another layer off soon with paint on it. And it's not just this is gonna be white acrylic mixed with with a skin tone. And if you're wondering how to make a skin tone, just start with something very simple. Take like a brown, mix it with some white, put a touch of pink, a touch of orange until you get that nice skin glow that you see in the photo. And then when you have that base color, you're gonna mix it with quite a bit of white to get that light, that super light color. That tone that we identified in the reference picture so that reference base is what we're gonna color this entire campus. So once we painted, now we'll have our base that we can airports everything on top, and then we'll add white highlights at the end to bring back those small areas of white, like in her eyes, a little bit on her nose and anywhere with this speculum highlights. So for these cameras, what I'm gonna do is I'm gonna paint it that base color that we identified this rate, that's our foundation. So I went ahead and mixed it. All I did was take white acrylic and take like, a skin tone that identified in the photo, like Like what you're going to do. And it's a very pale, almost like a super light gauge color. I'm gonna paint the canvas that coming. That's how we're gonna begin. - Don't forget to paint your edges so that when you wrap your image around the edges, you know it goes all the way around. Acrylic dries very quickly. You may even drive while you're doing it. That's normal. Just get a nice even coat and let it dry in. There you go. Your bases established. This is the base color. We're looking for a very light Beijing, and that's it. Now you can actually pencil. You're drawing on top of this and you're ready to begin airbrushing. So this is it. Very simple toning stage. And once we get this, we're ready to begin painting
6. Painting the Highlights: all right. So typically we start with our lightest tones, So obviously her eyes have a bit of white. And the thing to be the important thing to remember here is you could use bright white to paint the eyes, but we are gonna end up shading it. So don't think that eyes are always like bright white in this particular photo. She does have some bright spots, but they sort of fade out. There's a little bit of a pink you to it, so we're gonna paint the white, and then we'll go on with the tones later. But the parts that were gonna pay now are the brightest parts of this image. So her eyes are going to be white. There's there some highlight in her nose here a little bit here and some on the top. There's a small amount of bright area under her chin. So those areas we're gonna paint first now, normally you'd want to paint your background. But in this particular image, we're not gonna paint the background because the background is it gray. But it's her face has a very sharp line over it. So repainted gray. Now, chances are you're gonna When you air marshal the skin time, you're gonna a birth right over that. Great. You're gonna see some over spray, so we'll end up doing that later in the painting. But keep in mind that for most for most paintings, you do end up painting the background first. But this is why you study the image, because and I mean, you could paint the background first. But in this particular case, I think it's it's Benedict painting afterwards because of the sharp line of the rest of the face. So let's go and start with white pain on the eyes. So what I'm seeing is that the brightest areas are in the dark on the bottom part, and as it fades, it gets progressively lighter. And when I say lighter and lighter and value that it's not as bright white, the brightest white is at the bottom, and as it fades out, the white gets less strong. Same thing here on this side for this side. It's basically the same thing, and you're gonna find that the case for most people with when you're painting eyes and the reason for that is when light is on them, there's nothing really blocking the lower portions of your eye. So you're going to get that part bright as you go up. You have your eyelids, your eyelashes. That's casting a shadow. So in most paintings, you're gonna find it. The brightest white is usually on the bottom part of the eye. - Now we're gonna have to paint the center portion when you're painting white, A lot of times you're gonna end up having to paint over it again. This is not like the one and done, you know, painting of white. After you start airbrushing and putting your tones in, the white will get a little over spray. It'll del down the back, but it's fine it's there. It helped. You know where your place is Out of helps you build your values. And if you have to go back and place white and that's fine, - offer lipsticks. Um, white, speculate high nights and speculate. I mean, that's usually what happens when something is curved in its shiny and reflect back. So that's what speculum highlight means. It's like the edge, like when you look at like the chrome bumper, the very edges are gonna have White shines on. It's just the reflectivity of the surface that you're painting. - So this is what the white stage looks at. You work on your pain until you get all your highlights the way you want and it will move on to the shading. For now, let's go to our white. Done.
7. Shading: so let's begin by painting the knows. The reason why we want to start with the nose in this case is because it's the central location of the painting and it will set the tone for the rest of the painting. So we want to use a medium to somewhat like orangish brown, which is the predominant color of this painting. We're going to use this color to duel the toning, and all you have to do is add some shading where you want it darker and a little bit of highlight to make things lighter. So this is always a good way to start. I'll build a form of the nose and start shading the shadows, which you see me doing here underneath the nose. I'll then start doing the form of it and doing the shape, and then I'll move up to the crevices where the eyes are at. This will help me form a nice visual for the rest of the painting. We're going to continue doing this until the entire noses is shaped out, because we're going to use this color to tone the rest of the canvas and set set our shading with it. You want to make sure that you mix enough of this color so that you have enough to tone the rest of the campus. Now you could use this color and actually just darken it with a little purple too deep in this color when you start to do your deeper shading, so make make sure you make enough of this color to complete the painting. I know that come to practice but usually announces nearly sufficient to do an entire painting. So make sure you continue to build. Don't worry about being so precise because you're gonna end up painting over this again. But this is good to establish where your tones right in the shape for the rest of the painting. All right, so we begin to flesh out the nose and stop putting in some tones. What I suggest you do is if you want to use your phone and sort of pinching and see the details, and you're gonna see that she has some skin texture and some blemishes and sort of like fate or eight spots or face spots. You kind of want to put that in because it gives it some life in some character And then when we do our white highlights that really pop that out. So right now continue to build up your your shades and it should look something like this. Don't worry that it's a little bit reddish. We're gonna put brown in a darker like like black mixture brown to really pop that out and turn it into brown. But for now, this reddish undertone is perfectly fine. Now, a little trick is if you've drawn the hair strands, you're gonna notice that there are very, very slight shadows. The coolest thing to do is take this. This Brown does this gold color and put the shadows behind it really lightly because a true shadow wouldn't be black when it's on skin to be sort of like a reddish color. So this will give you a really nice illusions. - Continue to tone up your painting so that you're bringing the colors back in, All right, so, being that I have a lot of the turning of the nose done with that sink, that single one color, I now want to move up to the eyes. And when I'm gonna do that, the eyes a little high for me at the position that I have it, and so I'm gonna flip it upside down, and that does a couple of things. One. It puts the eyes at a level where it's easy for me to airbrush because you always want to airbrush at eye level and below. You don't want to airbrush appear because you can't really see what you're doing on the top , so you sort of want to see it. I love and below this range is the optimal range to airbrush. So these eyes are in a good spot for me, and what that also does is that gives me a brain disconnect. So I'm not using my memory of what an eye looks like, and I'm actually looking more of the reference for the details that I need, so that's a good habit to get into. It's one of the reasons why I started flipping. My campus is over. It does help with accuracy because you're gonna paint what you see and not what you know by memory. So and it makes it convenient to that. I have to lower raise and lower my my my easel to accommodate the cameras. It's a lot easier just to flip it around. So now I'm just gonna begin with toning and trying to match. I'm only using that same one tone color to sort of bring the cameras together, and then I want the other color. So let's continue toning the rest, and we're gonna move to the IRS right now. - As you could see with the eyes that this is a very heavy color here, coloration is very deep and intense. So follow that. Don't go by. You know what you think would be right? Go by. The reference image, - I think to observe is that little nuances make your picture your final painting. Very photographic. And if you observe, even the eyebrows are casting a shadow on her skin. So she has intense red shadow underneath her eyebrow because even that even know they're hairs bunched up that creating a red shadow. Be very aware of things like this, because if you don't do it, that you're painting sort of looks like something's missing, and it's often the small little details. - All right, so we've established a lot of the tones. We're not completely done yet, but you're should look similar to this. If it's not start building up the tones around the eyes. That should be like a deep red color. That tone that we've been using and what I'm gonna do is now I'm gonna move down to the bottom of the lip so that I could establish this lower part and then start working on the lips themselves. So hopefully yours will look like this. Don't forget that. She sort of has, like, poor. So you want to put like, little pores? She has shadows beneath, you know, underneath the hair and the shadows are not like gray. They're actually a dark red because it's on her skin. So, you know, just be aware of these things and make sure that when you shaded you put him in, we're gonna go in, of course, and do a more, you know, fine detail. But for now, your shading should look somewhat like this. Now here a few observances by doing this. So if you look at the reference image there, sort of a shade from this portion in this portion that's being drawn on because there's obviously a light directly illuminating forward. That's why you see highlights here in the bottom of her eyes are very stark, so there's a little bit of a shadow cast here and there's a little bit because she has thick lips. So it's casting a shadow here. So be aware of those small things and make sure that you put him in. Let's keep on working on the painting and developed his portion. - Okay , so are painting has development? It's come some way, and now we have a lot of the toning off the highlights. You start to show out if you're highlights have died back a little bit. You can always put some more. It's OK, you could go back. That's kind of normal, where your original highlights will fade a little bit, but you put them there so you can always come back on them. So this is where we at with just that gold. And what we're gonna do at this point is normally you'd airbrush this the face and then you do the background last. But in this case, what we're gonna do is let's do this background, and then when we do the toning for the chin area, what we're gonna do it that's going to soften, sort of look like the lens is slightly out of focus, which is actually the look we're looking for. That's called Boca and Photography, and it makes everything look soft. So we're gonna put this black and this great you could you could airbrush it in, but I think the best way is just a hand painted it. It's very easy and fast and doesn't take a whole lot of skill. Don't forget to go around the edges in case you your painting on a gallery rap, even if you're painting on a thin one, that looks good when you go around the edges. Now, if you notice in my particular paint, this is very like flaking you don't really see. It's not very opaque. I'm gonna have to do a few layers of that and then I'm gonna put black. You guys just do the same thing. Put as many coaches. You need to let solid now, in the reference photo, it's sort of cool gray. It's on the bluest side. You could do it a warm gray if you want, cause she has very warm tones. But either way it's up to you. If you want to stick close to the reference and do it a cool gray now that I've done the background And of course, we're gonna airbrush this a little bit heavier to match the tone. But for now, we have our black background in and we have the gray. And so what you're gonna notices in the actual reference photo, this part is actually very, very soft, but well, Airbus that towards the end. So now I'm gonna move on to talk to toning the lips and getting the tones and the look and the lips correct. So be aware that the lips have sort of a brown sort of tone to it. So it's like a reddish brown. So be very careful of the color that you make that should be very close to the lip color. And then that's what we're going to use to start toning it. - Now that the faces developing, we're gonna have to put texture into the face because, you know, people have some texture and you could see invisible in this photo off course, you're not going to get the tiniest, tiniest pores and things like that. But you want to get an overall sense of texture. So the way to do that is get a very, very light color. Um, it's like just slightly darker than the base. Look at the color on a post. Now get a color like that, and then take an in very gay like spray it very, very light subliminally around these areas. You want to create that sense of texture so you could see, like underneath the lip, like she has on the sides. That's the texture that you want throughout the painting, but you want to do a very light you shouldn't see. Like modeling. It should just be very, very almost subliminal. But you need to be able to see it. And as you could see, I'm shaking the Airbus I can sort of get very irregular. Very. When we do a close up, you'll be able to see it continue to build your painting, put texture underneath her chin. She should have some there. There are some of the nose, and she has almost like the beginning of like. Freckles are very light, like maybe they almost look like age spots. So you want to put that in there because it gives it some character makes the painting look somewhere riel, So be very soft. Don't go overboard with it, but make sure that you know you have to. Tom's right, and you're adding this texture in. - All right, so now that we started building texture, what I've done is I flipped the cameras side raise because it's easy to work lengthwise and spray across. And I've also rotated my reference photo to match that orientation. So we're gonna do now. As you can see, as you spray your color, your white has faded back somewhat, and that's normal. So what we're gonna do is you could see this bright spots in the photo and white sort of texture from her skin. You want to build that in and put that in, or else you'll lose the photo realism of your image. So at this point, I'm just gonna go with White. And because this area of the news is white, I'm gonna start building out now. What you want to do is you want to sort of shake it Airbus, you don't want to add, like just a stark area of what you just want to add a little textures and so did get it to fade out the same way you see fade out. This rate you do the same, your replicated. All right. So at this 0.1 adds some texture to the face, Doesn't we added our white texture, which is good and give us the highlights in the pores. But now we have to go back and do the pores for her skin color. So what you do is makes up a little bit of her skin color the same color you were using before. And it should be something like like this reddish color here. And you want to sort of, like vary ated and showed a shakthi Airbus. You don't want to see individual air brush strokes. You just want to see, like, sort of, ah, irregular pattern, and that'll give the sense that's yes texture. - Don't forget, she has Frecklington her face, so you kind of want to add that at a little bit frightening. It gives it up a nice, realistic appearance. Continue to add texture to the entire painting till you replicate her skin texture. Then we'll move on to doing white highlights and then eventually during our dark shading and we're approaching the ending of the painting where it's going to get more complete. All right, so now that we're going to start to add our texture, we gotta add that brown texture that that basis the very ending off her face airframes it and it's not so reticent, a little bit more brown. So what you could do is take the skin color that you've made this reddish color and add a little bit of sepia to it so that you achieved this brown, that golden brown color. It should look something like this brown, and it should be somewhat watery. And then what you're gonna do is start adding her facial texture there. I know we did it before in red, but now you have to do the underlying brown. So you want to put it There should be very light, very speckled as we've been doing it. And you want to replicate what you see in the photo. So at this point, you're beginning your sort of dark shading. So this is what we're gonna do here. We're gonna add this brown spec cling so that we can replicate what we saw in the photo. - Now , when you doing this, you don't want to just cover brown. You want to leave some of this red glow showing because she does have a tinge of red to her . And that's what makes that the image look less flat. It gives it dimension because it sort of shows what happens to skin color when it's get when it gets dark, and then there's like hitting it. She has a nice culture, so we want to preserve that read. So yes, put your brown over it, but make sure that you don't just completely cover it. You wanna have some of that that reddish color coming through? - Continue to do this to your painting and build up the brown areas so that it replicates would you see in the photo and that you you're enriching the color that's there and you're making it look as faithful to the photos you can't All right. So if we observed the lips, this sort of like almost a very faint black ridge. It's the shadow to very sharp shadow that her lips are casting on the bottom. So if we want to do that now, if you if you don't feel secure, you can use a frisk it or or like a shield or something like this if you have it, but I encourage you to try to do it freehand. I know it's a little bit tough, but once you get used to doing things like this, that nothing else is going to surprise you and you'll have the ability to do it. So this is a choice for you right now. You know, you could do a free hand or with that shield, I'm gonna go ahead and do a free hand. I'm gonna put a very thin black line in there and sort of shaded to match the poodle. But it's important that you put the shading where it's supposed to be all rights. Another. Your painting is progressing quite nice in your doing this area. You might want to add the hair at this stage. We're gonna add the rest of the hair later, but because we're working here, I'm gonna add this here. Now we observe it. We see that the hair restored clumped up because it looks like it's wet. But where she's sweating, there's a lot of moisture, but appears is know what sweats? What's clumping up? So for that you want to use a brush. Now you could freehand airbrush it. But then the here is gonna be very soft because the Airbus leaves a soft that we want a really hard edge. And then in the background there's hairs that are back there. But those who wanted Airbus because it will give the illusion that there out of focus and there in the background. So just take like a liner brush. Something very thin like this, and what I typically do is I put a few drops on top of, Ah, just any surface. I have this clean or has some pain on it, and I just wet the brush and just follow that contour. Onley do the hairs that are together and wet, and then don't forget that there's actually a little shine on them because they're wet. So let's attempt that now, and the way I typically do is I sort of do like a dry run, too. Like I get a feel for where the hair is, and then I go for it and it looks like she has, like, two groups of hair that split, so you wanted to look like wet hair. So this is how you accomplish that. So that's what it should look like. And then she has, like a Singlish friend. You have to be super detailed about that one, all right. I'm pretty happy with that now. Airbrush some of it in because not all of it, Israel Sharp saw, airbrushed the black and then now airbrush black in the background, out to give the illusion that she her hair is wet. I'll put it some speckles of shine in it, and it gives the painting a real nice step. So you want to do something like that. All right, phenomenon. Start working on the lips. Put the lips. It's important to realize that there's a lot going on the lips. There's speculate highlights that we have to render. There's small like variations in color, theirs white on top of it. So the lips are The key is one of the key elements to getting this this image looking really right and photographic. We gotta nail the the lips, the nose and the eyes. I mean, I know that's every portrait, but, you know, these lips really set the tone for how this girl is going to look. So I'm gonna go ahead and right now Oh, I have, like a like a bubble gum sort of a color. And I'm going to start putting in those little variations that she has in her lips that they're just like skin, because lips skin is very transparent. So you could see, like, Thea your epidermis skin underneath it. So you kind of want to put all those little subtle colors. Don't just paint the lips like a solid color, cause it just won't look right. So, you know, blow up your lip reference, take a really good look at what's going on there and try your best her to replicate it. And that's what I'm gonna start doing now. Like you could see that this top of the of the lip ridge it sticks out the most. It's a little bit paler than the rest. Those little small little observations that you have to replicate to make these lips look sort of full and real point with Tony has progressed a bit, and I want to put in the white highlights to the sort of killed back a little bit. I added some, but it's just not enough, and you guys may notice that you're in the same predicament where, as you airbrush your your white sort of comes back and it dies down a little bit, that's fine. So this is why you want to put the indication of where your white is so that when it does die down, you know where to put it back, and you've already figured out the locations. So in this particular image, you can see that there's white, sort of here in this era, in her nose a bit. Here, there's some around this part of the nose, and it sort of trickles around. So you want to make sure you take your airbrushing, you sort of squiggle it and get like this the texture of white into the paint because that makes it look very realistic. - And I find the best way to do it is by taking air birth, getting close and then sort of shaking it so that you're not producing a line, but sort of like a squiggle, and you want to do it very faint. You shouldn't visibly see squiggles. You should just see like white, almost like pops of small like irregularities. Howard Stern. I flipped the cameras upside down and I clicked my reference, even image upset now. And I want to do the dark shading. So this is when we're going to start getting in here and intensifying the darkness here. Now, this is not pure black. It's like a very deep brown. So we want to make that deep brown color and start doing our shading inside here. Be very aware off where it is and be very light. You know, it's better to start light and build up your toned and blast it with, you know, a lot of dark color, cause then it's hard to go back. So let's start this airbrushing with our dark brown and ah, well, we'll build it up, All right, so we're up to the eyes now, and this is actually a very vital part off any portrait. I mean, the eyes really put the spirit of the person into the painting. So I've started doing the dark areas and you're gonna have to do the same so we can see that there's sort of a ridge and that the shadow is on one side. You've got to be very observing where shadows full. So if you see the the wrinkle here, all the shadows fall on this side and then she actually has white highlights underneath it . So we're gonna end up having to put that in there. So be observing of it and replicate this shadow and then know that you're gonna be using almost a pure black for the eyebrows. And over the better choice would be to mix black with dark brown or dark red. And the reason is, as it tapers, you almost see the red shadow that's cast by the skin itself. So what I've done is I've mixed a black with a little bit of ranches, like a deep reddish black. And that's what I'm gonna do my eyebrows with in my shading here. So of course we're gonna end up doing the eyelashes and the eyebrows with the same car. Now, when we were first painting it, I had mentioned about putting the red shadow. As you could see, there's a red line there. And the reason is, as the hairs go into her skin, it cast a red shadow. It doesn't cast really a black shadow more red because the skin has a reddish tone to it. So these small little things add that realism to your portrait, so you want to make sure that you do it. - Now , what you don't want to do is do like a big blurb. I've seen people do that when they just spray like they sort of feel like the whole eyebrow is one shade of black or brown. And that's really not right, because it is comprised of a lot of hairs, as you know, So you kind of want to show that because this is bigger than life, like so you want to see that? - So go ahead and build up your eyebrows. Follow that the shades here, move onto this eye, and then we'll progress with our shading from All right, So now we've got to the point what? We're gonna do the eyes. So of course, you know the eyes are very important, and we're going to do the eyelashes. So what? I've done it. I've done a few strokes here, but now I'm going to shade them in with the airbrush. You guys gonna do the same thing and follow this This lead and I put the black just so that I know you know how to measure it out. I'm gonna air birth over that anyway. But you could do that with a paint brush if you want. With the airbrush. I just like to know where my things are at. So this is sort of shaded in, and that's what we're gonna do now, continue to shade this in getting the details so that we can build in the I. Once we do this, we're gonna flip to the other side. All right? So as you can see, how I progress quite a bit. You guys probably have done the same. I started filling out the eyes. They're not complete, but at least they're in place. And I know where everything is supposed to be. Hopefully, you guys are around this point. If not, you know, progress. Until you get to this stage. And now what? I'm gonna do it. There are a lot of, like wrinkles and stuff under her eyes, and we kind of have to get that another in order for it to look very photographic. It's getting to that point now, but now I have to do these small details, so I'm gonna take sort of like a brown color. I'll show you what color that is. and I'm gonna actually go in there and start shading it all in because this is more reddish brown. So I want more the brown to come back. That's what I'm gonna do. You could even use a transparent color to layer it. If you have transparent colors, you could do that if you're not familiar with transparent colors. Basically, if you put it over an opaque color it since it so it's nice to mix the two. Golden makes a nice set of transparent colors, but there's a lot of companies and make transparent paint. So for this I'm going to use a brown. I have a golden's off transparent brown, and that's what I'm gonna paint with what I like about using a transparent So they're very , very thin, and they're very precise because they're not really like a FIC paints very watery, something to go in here and start shading and all this stuff so that it looks more realistic and you guys follow and do the same. All right, we've gotten quite foreign to painting. I've already started doing the eyes and put everything where I think it should be, and I have to make it look a little better so you could see the eyes aren't as bright white as I'd like them. At least on the bottom parts, they faded back. And that's kind of normal. That is gonna happen while you paint. So I'm gonna intensify the eyes, put the white reflections a little stronger, and go ahead and go around the painting and breaking up areas that need to be brightened up . At this point, you're painting should look something like this. Maybe you didn't get to do the eyes yet, but that's that you're next hurdle to overcome and an important thing you're doing the eyes make sure that the circles of the same size if you want to use, like a rulers card or something that you could, you know, make sure little circles in the same size as it looks really bad in the eyes are the same size. So you could Freehand circles or use a template or whatever you have around. And it's important inside the ice to duel those little like striations and a little like marking because it makes the eyes look really interesting. So I'm gonna go ahead now and start intensifying mind. I'm gonna work on the nose and the highlights here and brighten them up because right now there's little bit yellow. - What I'm doing is you could see that this is sort of dull in comparison to the reference image. It should be a little bit more brighter. And we want that intensity so that when people look at your painting, there's something that screams back out. And often, if you don't have those intense like reflections, a white highlights your painting looks like it's lacking. Are you with the final stages of the painting? And I'm gonna put some highlights here. As I see you know, there's a yellow tone here and there should be more speculator high highlights inside her pores. So I'm gonna highlight that. And then we're almost just about done. So you guys do the same. Follow the patterns as you could see it right here. You're adults. I want toe at some highlighting here. Make sure that this area is brighter than the rest and we're almost done. - All right, so that ends the painting. What I'm gonna do now is I'm gonna put this background the black so they could be solid black. This gonna use all like French. Kurt, You could freehand it if you want it soft. I kind of want a hard line here, so I'm just gonna go like this, That painting you could go ahead and sign it, and then now we can put our clear on it. So if I keep it around, painting looks like and hopefully you've enjoyed this painting. I found it very enjoyable. I know. I couldn't spend every single second show you every little thing, but hopefully you saw the process, and you saw what I go through to create the painting. And if you follow the steps, you can create painting similar to this. So hopefully you enjoy this. If you have any comments, feel free to post. Um, and you can email me at Steve at Stephen years dot com, and I'd like to see what you guys make with your airbrush until the next lesson.
8. Final Thoughts: congratulations on finishing your painting. Hopefully you've been able to achieve the results that you wanted to achieve. Now this is your first time painting within airbrush, especially painting a portrait. They could be quite daunting. So you know, you gotta be easy on yourself if you weren't able to achieve the results that you wanted. Painting a portrait is very tough on their visa wise. Everyone has two eyes, a nose, a mouth. But the thing is, it's the small little differences that make us look different from each other. So it is sometimes very hard to paint from a reference and make your painting look like the reference. So that's the great thing about video learning. You can always go back, rewind and practice again Now if you were able to achieve your results. This is fantastic. Now you could move up and you can try other portrait's and other projects. And when people give you custom jobs, more than likely you can do it. And that's one of the goals of a lot of a lot of airbrush artist is that they want to be able to paint anything that comes across their way. I know for myself being a custom painted for many years, I never knew what I was gonna get one day to the next. Sometimes people get pictures of dogs off. It could be a boat up off a car. You know, it's just been so many different things that people have given me even animals. So Portrait's have always been one of those things that it's a sweet spot. It's very difficult to master. It's easy to learn to get into it, but to master it it's somewhat difficult. And it does take some practice. So give yourself some leeway. If you try to do the painting, it didn't come out as good as you wanted it to. So, having said that, I like to encourage you to keep on trying. I am gonna post some new videos, and hopefully those videos will help you try all the genres of airbrushing. I'm gonna do motor sports, art and some wildlife art and some other like mixed media our project. So hopefully you'll like those as well. No, during this project, you may be some questions popped up that I didn't cover in the video. You know, I only have but so much time to really put into the video, and there might be areas that I might have missed. So feel free to email me. My email address is Steve at Stephen dot com, and I'll try my best to get back to you as soon as possible. I do get quite a bit of email, so it might take me a day to get back, but But I will get back to you. So you know, I just want encouraged to keep on going. And another thing is, when you airbrush these paintings, you know there's a certain level of expectancy from yourself now for this particular painting. I didn't go to crazy in the skin texture, and I really could have. I could have dove into the skin texture in her face and really got into it. The thing is, you kind of got a balance. That level of how much detail do you want to put in Vs? How nice will the painting look at the end? So from myself, I sort of play that balance where I put enough detail where I think the painting looks nice and it's time effective. So on certain project you may have a very exacting customer that wants every small detail in. And of course, you can take as long as you want. But for us to speed up this classic for me to get this video out to you, I didn't go reading deep into the texture like I could've. So if you if you guys want to go ahead and even more texture and maybe you know, paint, do the same painting and get but add more texture that time, that's a fantastic thing to do. You know what? Maybe at some point all posted advanced color class where I'll do a lot of detail that I could visibly see. And if you guys want that, let me know and I'll do another class and other bands portrait class For now, this is sort of like a medium level is for people that have maybe tried airbrushing portrait or for someone that knows how to use an airbrush but has never tried a portrait. Hopefully, you found is very helpful, and I'm really appreciative to the guys and leave the comments and to the number of people that watch this video, I really hope that has helped you. I tried my best to make it where I went along sort of quickly. But I showed you the key elements. Of course, you know you can't spend every single minute on every detail because it's just not enough time in the video. The video would be super long so that, you know, there are certain areas that I kind of gotta go really quickly. But I know I hope that you found it very enjoyable and that it was informative for you. And if there's any sort of comments by by all means drop off to me, I'd like to see them. And I hope you enjoy this project. And I hope that it opens up doors for you and you can try other things. So anyway, that was it. Those final words. Congratulations to you guys even trying it and keep on going. And I can't wait to see what you guys make with your airbrush. So until the next class, this is Steve Nunez. Thats video wouldn't be complete until I show you how we varnish it. So typically you want a varnish. Your painting should have protected from the elements. Now. Technically, acrylic paintings don't need to be varnished because they already impervious to most chemicals there just a basic type of a rubber. But anyway, most people do put a varnish on it, and you have a choice of a clear varnish that's usually very glossy. Or they have matte finishes, which are non glossy, and then they have some in between. And this particular one I've picked a glossy finish, and if it's made by liquid tax and here, all I'm gonna do is roll it on and make sure that I roll it on evenly so that the entire canvases covered. Now you might want to do this two or three times, and although it looks milky at this point, it does dry clear. You want to lay down a wet enough coat so that when it dries, it's nice and even, But once it dries and it dries very quickly, that's it. You have a nice finish that's impervious to most chemicals, and you can display just like this. It also sealing your signature if you're putting your signature at the end, so that's it. Enjoy your cameras painting and get ready to the straight
 Steve Nunez, Professional Airbrush Artist