Transcripts
1. Introduction: Hello and welcome to this course. My name is Pooja, and in these goals I will share and dad process to make this fusion are bees to provide contemporary look to the traditional art forms. I have done Gothenburg with the bold colors. The design I have used is known as Leon burglary is one of the oldest form of Indian Folk up. Traditionally this is prepared by traveling. People do showcase their day-to-day chose using geometrical shapes like triangles, circles, etc. So it is also known as trialed, but aren't. They used to decorate their houses with this beautiful art using natural colors of Glee. And here are the few examples. In this course, I am going to share a step-by-step process to make this work. Let's see Vault or you are going to learn in this course, can one's reputation making sediment loans at home with easily available materials? How to do the day gone work on canvas, painting with acrylic colors, highlighting artwork to give an D-glucose. And lastly, how to see your artwork with some tips and tricks for baking of these goals. You don't need any experience in art. And after completing this course, you can use this technique on different surfaces like glass, wood, and sediment. I hope you will take up this goals to explode your creativity and we'll share with others as well. Thank you.
2. Preparing Canvas: In this video, we will prepare canvas for the painting with the easily available materials. The materials required for preparing Canvas would be DR. BOB plaster of Paris via glue. All fair, we call motor tape, brush, measuring spoon, and a bowl. Let's start bake one tablespoon of blue and add those bones of water to it, mix it properly using wooden stick, odd school. Gradually add BOB to voter glue mixture to make smooth faced. I am adding two spoons first and they mix it to check the consistency. Afterwards, add one spoon at a time and mix it again. The base should not be too runny or do take as well. Totally. I have added four spoons of BOB, but it depends on the blue you are using. If your glue is tick, you might need less. Bob. The finally, the base should be like this, with no lumps in it. I am using stretched canvas of 16 by 20 inches. We can start applying the based on the Canvas revolt starting if you want. You can go over the tabletop with some plastic sheet on board, tablecloth to avoid any mess. Using brush, start a blank The based on their Canvas, make sure you apply only in one direction so that when it dries, it will look clean. Applying this based as a base will provide some strength to the canvas. And also Canvas will not absorb too much of color when we being dude, applied all over. And you will notice at few sports you have to apply another good. It should be evenly applied all over. By doing, if you see any bristles of the brush, just take it out before it dries. Do a blend this based on the sides of the canvas. Just keep same height objects on the gardeners to elevate it. Do not put anything in the center because it might make your GAN was lose. Apply it on all the sides of the canvas properly. The mixture should be enough for preparing one GAN was of this size. Let it dry, it wouldn't night. And then we will move to the next step.
3. Cone Preparation: In this video, we will learn to prepare ceramic goals for this art piece. Here is the list of the materials we need. Dry plaster of Paris, white glue, acrylic, white fiend. Be, wooden stick all spring for mixing. Cup or bowl for baking feast. Plastic sheet, rubber band, our thread and scissor. Firstly, we will prepare gone deep rectangular shaped plastic sheet or lead from the center point with one hand and start folding it in a cone shape using other hand folded and build it. Then I can show it one more time. I have shown detail video for making goals using three shapes in my henna art goals. Once ready, sticking with the deep. I am sticking VN deep insight gone as well, so that it will not move when we feel that BOB based goal is ready rereading move to the next step of preparing BOB based acre, small, Gulp, all bool and one tablespoon of white glue into it at same quantity of white acrylic paint as well. And drive BOB gradually in the mixture and mix it properly using wooden stick to check the consistency of the feast. Do not add water because it might result in Greg's after drying. You can add more, BOB, if required. The base should not be too runny. Otherwise, it will flag them after drying and will not look like 3D. The best way to check the consistency of the beast is when you drop it should look, it should be in the same form, at least for a few moments as shown in the video. To fill the base neatly. You can use any job or glass for support. Keep gone into the jar and transfer the end diet based into the cone. But as it from the DO, DO move the base to boredom. For if the Goan from DOT nicely and died it with a thread or a rubber band. You got deep bone into desired thickness, stamped with the small bird first so that you can adjust the thickness later.
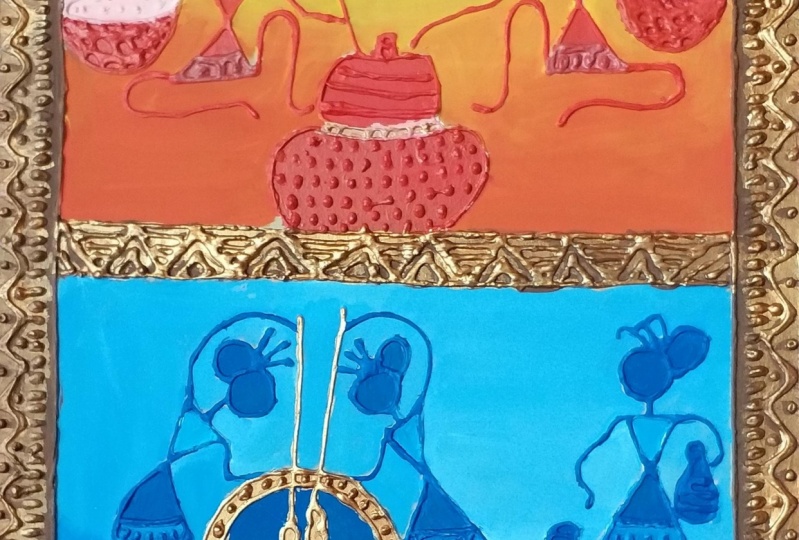
4. Outline with Cone: In this video, we will do the groundwork on the canvas. I have chosen worldly are designed for this fusion, our piece, you can choose any design of your choice. I drew this design free hand. However, I will share the periods of the design in case you want to do the same design, use carbon paper, preferably yellow color and crazy neatly on the canvas, we are ready to start going work now, start slowly to check if you're gone is running smoothly. If the lines are breaking too much in-between, you can get it slightly. It should not be very thick also. So be careful when you look on work. Try to complete the lines in one go so that there are no cracks afterwards due to in-between gap. The based we'll shrink elliptical bit once it is dry. So make sure the lines are not through 10 as well. If the line break in-between, think that gap properly. It is really fun to do this work and provides are distinct look to the art base. I have dried Goldberg on various surfaces like wood, glass, ceramic, and even on vandals. And it comes out really when once you get hang of working with gone, you can use your creativity to enhance your defects with this technique. I'm making this border on so and we'll cover the detailed border design in the next video. Once complete, we let it dry for a couple of hours and then move to the next step.
5. Detailed Borders using Cone and other Filling: In this video, we will make the game designed in the boulder. Start withdrawing another outline on the outside of the border. I am drawing different patterns on the border. Basically I'm using for designs and repeating it. You can change the border design as per your liking. The Goldberg on the border provides very rich look in the painting and looks very pretty too. Similarly, I will finish all the other three borders in Busan. Be that long and just play your favorite music or audio book. And it will be over in no time. Do the same in the middle border as well. Before doing the boat and on boarding. Once all the borders had completed, let it dry. Now we will start filling the designs inwardly and mostly the different shapes like a circle, triangle, and street lanes are used. That's why I am using those shapes all over. Also, this is a tribal land. They don't use any complicated designs. Feel free to use your creativity fulfilling their designs. If you observe, I have used lots of dots because it gives very nice 3D look. Just filled very avant to highlight the design with the small effectors. The current based be prepared should be good enough to complete all the Gutenberg. If you have to leave your own work in between, make sure you see the whole of the cone with the tape every time. To avoid it from drying. The convert is completed and begun start coloring in the next video.
6. Base Colouring : In this video, we're going to start painting the design. First, we reload the base color. Let's start. I am using combination of yellow and red at credit failures for the top design. And since this is the base coloring, I'm using little big brush. So we can do it efficiently. Encode little bit of yellow color in your palette and start from the top corner. By doing on corners, do it slowly so that it doesn't go out of the border. I'm just using yellow color for now and painting it in one direction. I'm not using any water for coloring. Once I have completed 133 of the design, I have mixed red with a little bit of yellow color, and we'll start it from the bottom corner of the design. Do it similarly up to 138. From boredom. You can choose combination of any gallows as per your liking. I'm doing light-colored as obese and want to do bold colors for highlighting the main design. Now, we have two colored in such a way that both the colors get mixed and it will look like lighter to darker shade from top to bottom. Use lighter shade of the bottom color and cover them with the part. After this, just beamed it wherever you feel the colors and not mixing with the other, as shown in the video. Just make sure not to apply too much dark color because it takes time to make it lighter. If the color is lighter, you can make it darker easily. It really need little bit of dryers, but keep doing it until you are happy with your shape coloring. Now we will start with the bottom part of the design. I'm going to use blue and white color. Pick out little bit of both the colors separately in your ballot. I have mixed little bit of white colored in blue, and we'll start from the bottom corner. I want to have darker shade in the boredom. If you feel that color is dark, you can do the white on top of it and the color is still red so that it will mix properly. You can see while painting two words top part of the design, I'm using moral, right to make it a lighter shade. This is the, another way to do shading in colors. It might look difficult for the bigness in the painting, but it is really fun to see how the colors reflect when it is mixed with the other colors. So just enjoy the process without thinking too much of the outcome. Once it is complete, let it dry completely.
7. Fine Colouring (Red): In this video, we are doing the find coloring of the main design. I'm using red color for filling the designs because I have used red and yellow color as a base color. They put ten brush and start painting red color without using water. I prefer using small brush because I can do the colors on the border simultaneously. And it helps in doing it neatly. If the color go outside border, it takes really long time to fix. So just on a safer side, I'm using 10 brush. You can use brushes as per your choice and comfortability. And by doing coloring on convert, you might have to check again once it is dried. If you notice any white colored in-between, just do another group. As you read little bit of variation in the colors. I am using different shapes of red color by mixing it with black. And later on we divide. You can use your creativity to make combination of colors. I didn't want to use multiple colors, so I am just using differentiates. So for read, when I was basically for the various objects in the painting, I am using military differentiates of the red. Do not worry too much about the sheets of the colored, as we will be highlighting these colors with the mightily goal later on. By doing the borders, you have to be a little patient and use very thin brush if you're not comfortable. Do not worry if the borders are little bit tick also, just make them smooth so that it will look neat. Now, I am mixing white with the red color and we painted on the remaining areas of the painting. Lastly, we have to complete the outlines of the designs. I haven't done the border with just the red color because it looks very vibrant and beautiful. And I'm just applying brush randomly using white and Benkler to give little shading on some idea. Once you are happy with it, the overjoyed coloring of the top part, let it dry for some time. And then we will move with the coloring of the bottom part of the painting.
8. Fine Colouring (Blue): In this video, we will do find coloring of the bottom part of the painting. I have blue and white as a base color. So I will use blue color directly. Do it in the same V as we did the red color. This is not a difficult task as we are not doing any shading here. So even the bigness if art can do it easily, just be a little bit slow when you're doing the outline part of my plan is to use blue color all over except for the border of the drum. However, you can choose multiple colors as well. Right now, I am doing blue color over, but I will highlight convert with white later on once it is dried. As you can notice, I'm doing outline as well with the same brush. Menu. Do the outline. Do not press your brush, just hold it firmly and do with the light hand. You might have to repeat on the same spot again and again to make smooth line. But that's okay. I'm doing double quote of the blue color to make it little darker. I am painting drum also with the blue color. And I'm doing double golden API to make it smoother and literary darker. I will use golden color for the border of the drum. Paint the bottom part of the dress as very big, the same color. Hi, I'm using little bit wide now to make the top part of the dress lighter. And also highlighting the bond designs with the white. Traditionally in this art form not do many colors are used as search and really bold colors like green, red, blue, white, and black are used. I wanted to paint it in a similar way with some variations to give a contemporary look. Feel free to use your creativity to select different colors. Now I'm going to use goring my Delete color to make the border of the drum and drumsticks. This metallic color may provide contemporary look to the painting. Once this is complete, we will move to the next step of border coloring.
9. Painting Borders: In this video, we will color the borders of the painting. I'm using burnt umber color for the borders, which is similar to brown. You can choose any color of your choice. Start coloring the borders. Be a little careful when you do the corner line. Just try to finish corner line in one goal and then you can do the remaining part freely. You might need to do double quote once it is dry because there is lot of Gothenburg on the borders and there will be some space left out. I've been doing all the borders similarly and have shown the entire process here. I have colored the sides of the canvas do with the same color while doing the middle part go very slow. Ones on the border, coloring is completed, let it dry for an hour or so, and they move to the next step of highlighting the columns.
10. Highlighting with gold metallic: In this video, we are going to highlight the borders and other designs of the painting. I am using spun gold color for highlighting. You can use the same Magdalene worlds as well. Take very little color in your brush and painted with very light hand just on the Chromebook. Highlight on the convert, on the borders and even on the designs. Just remember not to take too much of color in your brush and do it with very light hand. Highlighting it with my Delhi colorway provide can take look to the painting and will also enhance other colors we have used as a base. Camp would advise you do use medium-size flat brush for highlighting and do not use water. To make this being dean, I have not used any expensive or blended. If you are a beginner in odd and don't want to spend too much money. You can easily buy only art supplies on the budget to make this art piece. Once it is complete, we are almost done with this art piece. Finally, we would be varnishing it in the last video.
11. Varnishing: In this video, we will be doing the final step of varnishing that being done, let the painting dry for at least one hole will be before doing varnish on it. I'm using gloss varnish here, but even the matte finish wall initially look nice. Date little bit of varnish in a small gap and preferably use a very thin and broad brush, start from any corner and do it all over without leaving any space. Varnishing the Outbrain think is very important to protect it from dust. And it provides very beautiful you look so do not skip this step. If you wish, you can apply double coat of varnish, but it is not necessary when it is complete. Check from all angles if it is properly coded to cover the sides of the building with varnish, I am keeping for seem size objects to elevate it as we did well preparing and was Do not put anything in the center of the canvas for elevating him a Bible and niche or lowered on the site. Do and let it dry completely. Here I would like to share one to clean the brushes after varnishing. If you do not know, after finishing varnish, just dip the brush in needle paint remover for a few minutes and wash it thoroughly with soap and water. If you do not clean the brush immediately after varnishing, you will not be able to use it later because it becomes very hard. So I hope this DEP will be helpful. No over painting is complete and ready to hang on the wall.
12. Conclusion: I made one more painting like this and would be happy to share it with you. I'm sure you have enjoyed gelato learning process and you need this odd 4002 as the, thank you for taking up this goods and let me know your valuable feedback on if you have any questions in the discussion section. Thank you.
 Puja Modi, Visual Artist