Transcripts
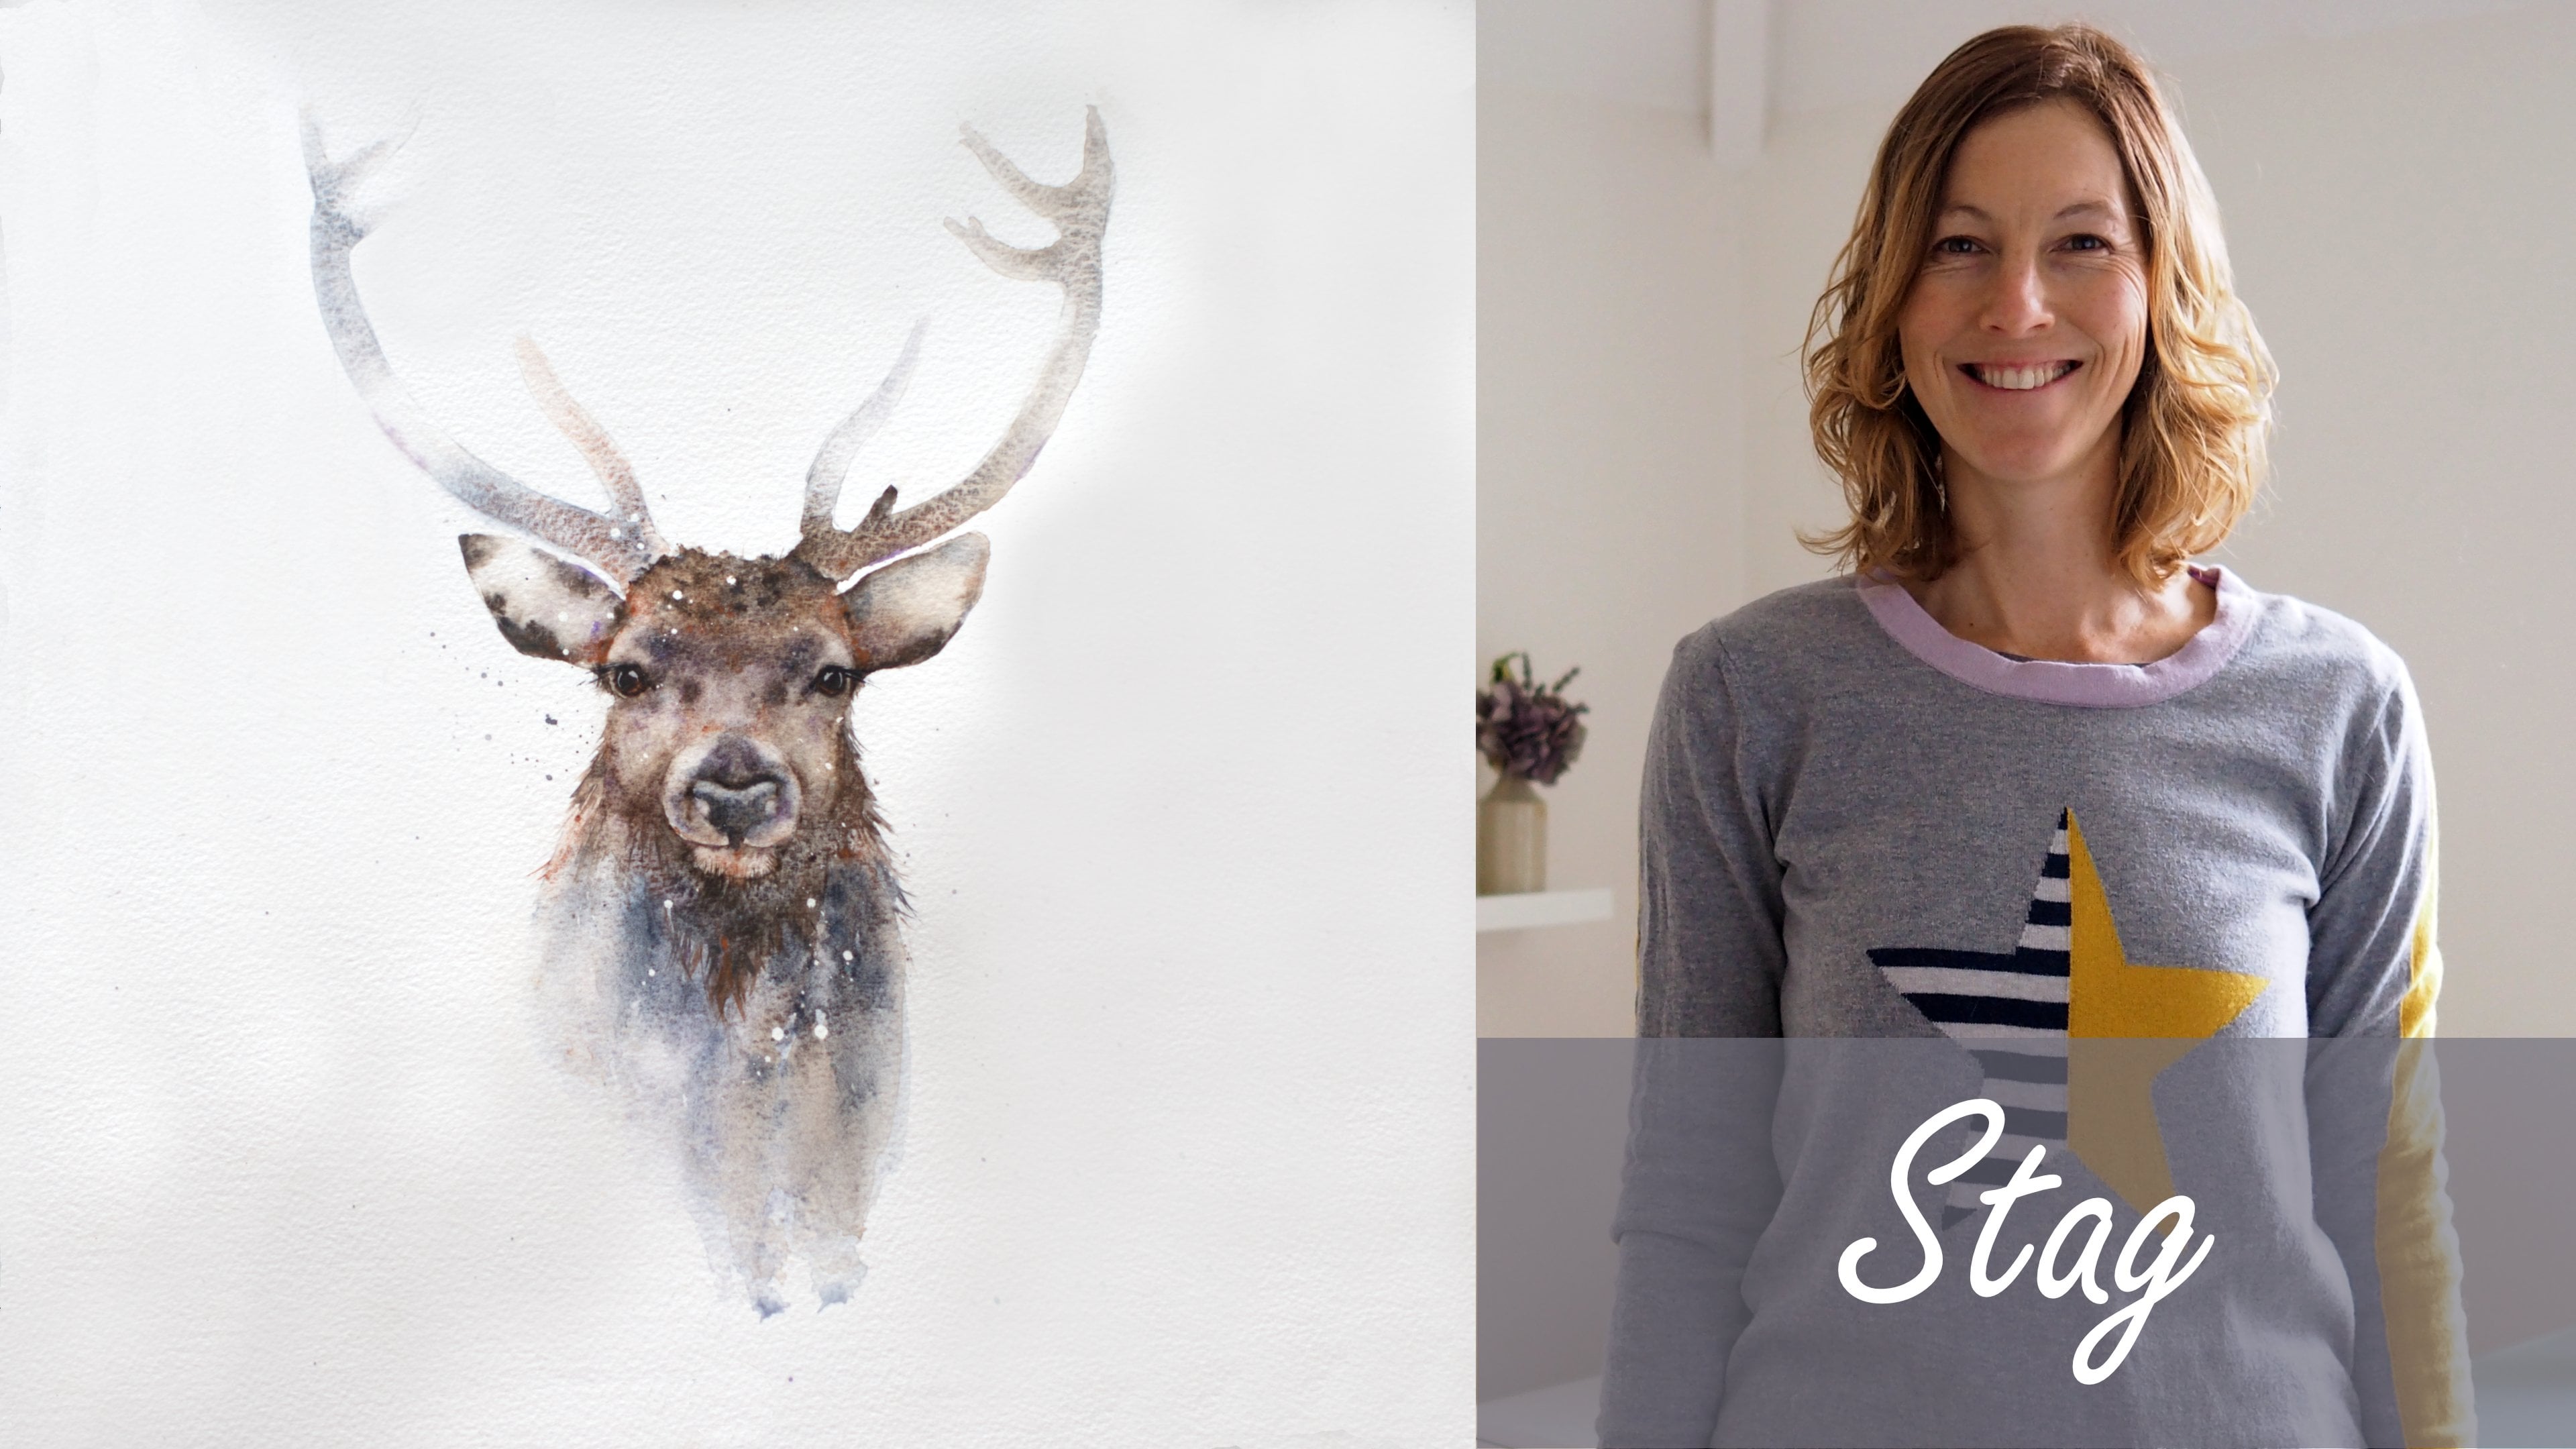
1. Introduction: Hello and welcome to this intermediate watercolor class, where we're going to be painting these very tranquil gray heroin. We're going to add a background and pop him sitting on a branch. I think you got to love these loose techniques. If you just starting out, you know, watercolor journey and haven't done my beginner classes are suggest going back and looking at those first. These will break you in a little more gently to my techniques before taking the plunge and painting these gray hair and on Jane Davis, I live, paint, teach, I walk my lovely spaniel in the beautiful South Downs National Park, England. Over the last 10 years, I've taught myself the watercolor technique that you see today. Not having been to art school, finding my own way, it has been fun. Sometime don't think that's allowed me to develop my own style. This has led me to teach the others, either on a one-to-one basis or as part of a group in a wonderful studio in the heart of the South Downs. I also run a successful commission-based business, painting pet portraits and wildlife art in my own home studio. In all my classes, you will follow along in real-time. Or I can guide you to keep your work loose and fresh without over fussing. I'll be sharing lots of tips and tricks along the way too. High. I provided you with a template, beautiful reference photo with a gray hair. And in the Projects and Resources page is the template is well-worth using as this class is all about painting and not drawing. We'll be exploring many techniques in this class. These include many are used in my own work, and a few that I don't often get to play with, like the soft light giving background and that twisted normally old branch. These are wonderful to create and incredibly easy. And I'll be showing you how we will be painting his Heron using several soft layers. And the very useful technique of sectioning areas of this helps to create some lovely depth where we want it. I'll be sharing with you some of my thoughts, tips and tricks on taking the time at the end of your painting to bring these wonderful calming her into life. If you'd like to learn more about me, all my work, please pop over to my website at Jane Davis watercolors dot co WK. This can be found on my profile along with links to my Instagram and Facebook pages. I'm very active on my social media pages. I love sharing my art, especially on stories with many ideas, works in progress and tells the studio life. I really hope you will share all your paintings on the project pages. Has a love seeing them are species. And don't forget, I'm here to help if you get stuck or have any questions. I want you to experience that buzz of painting in this liberating, wet-on-wet, loose style. So come and join me.
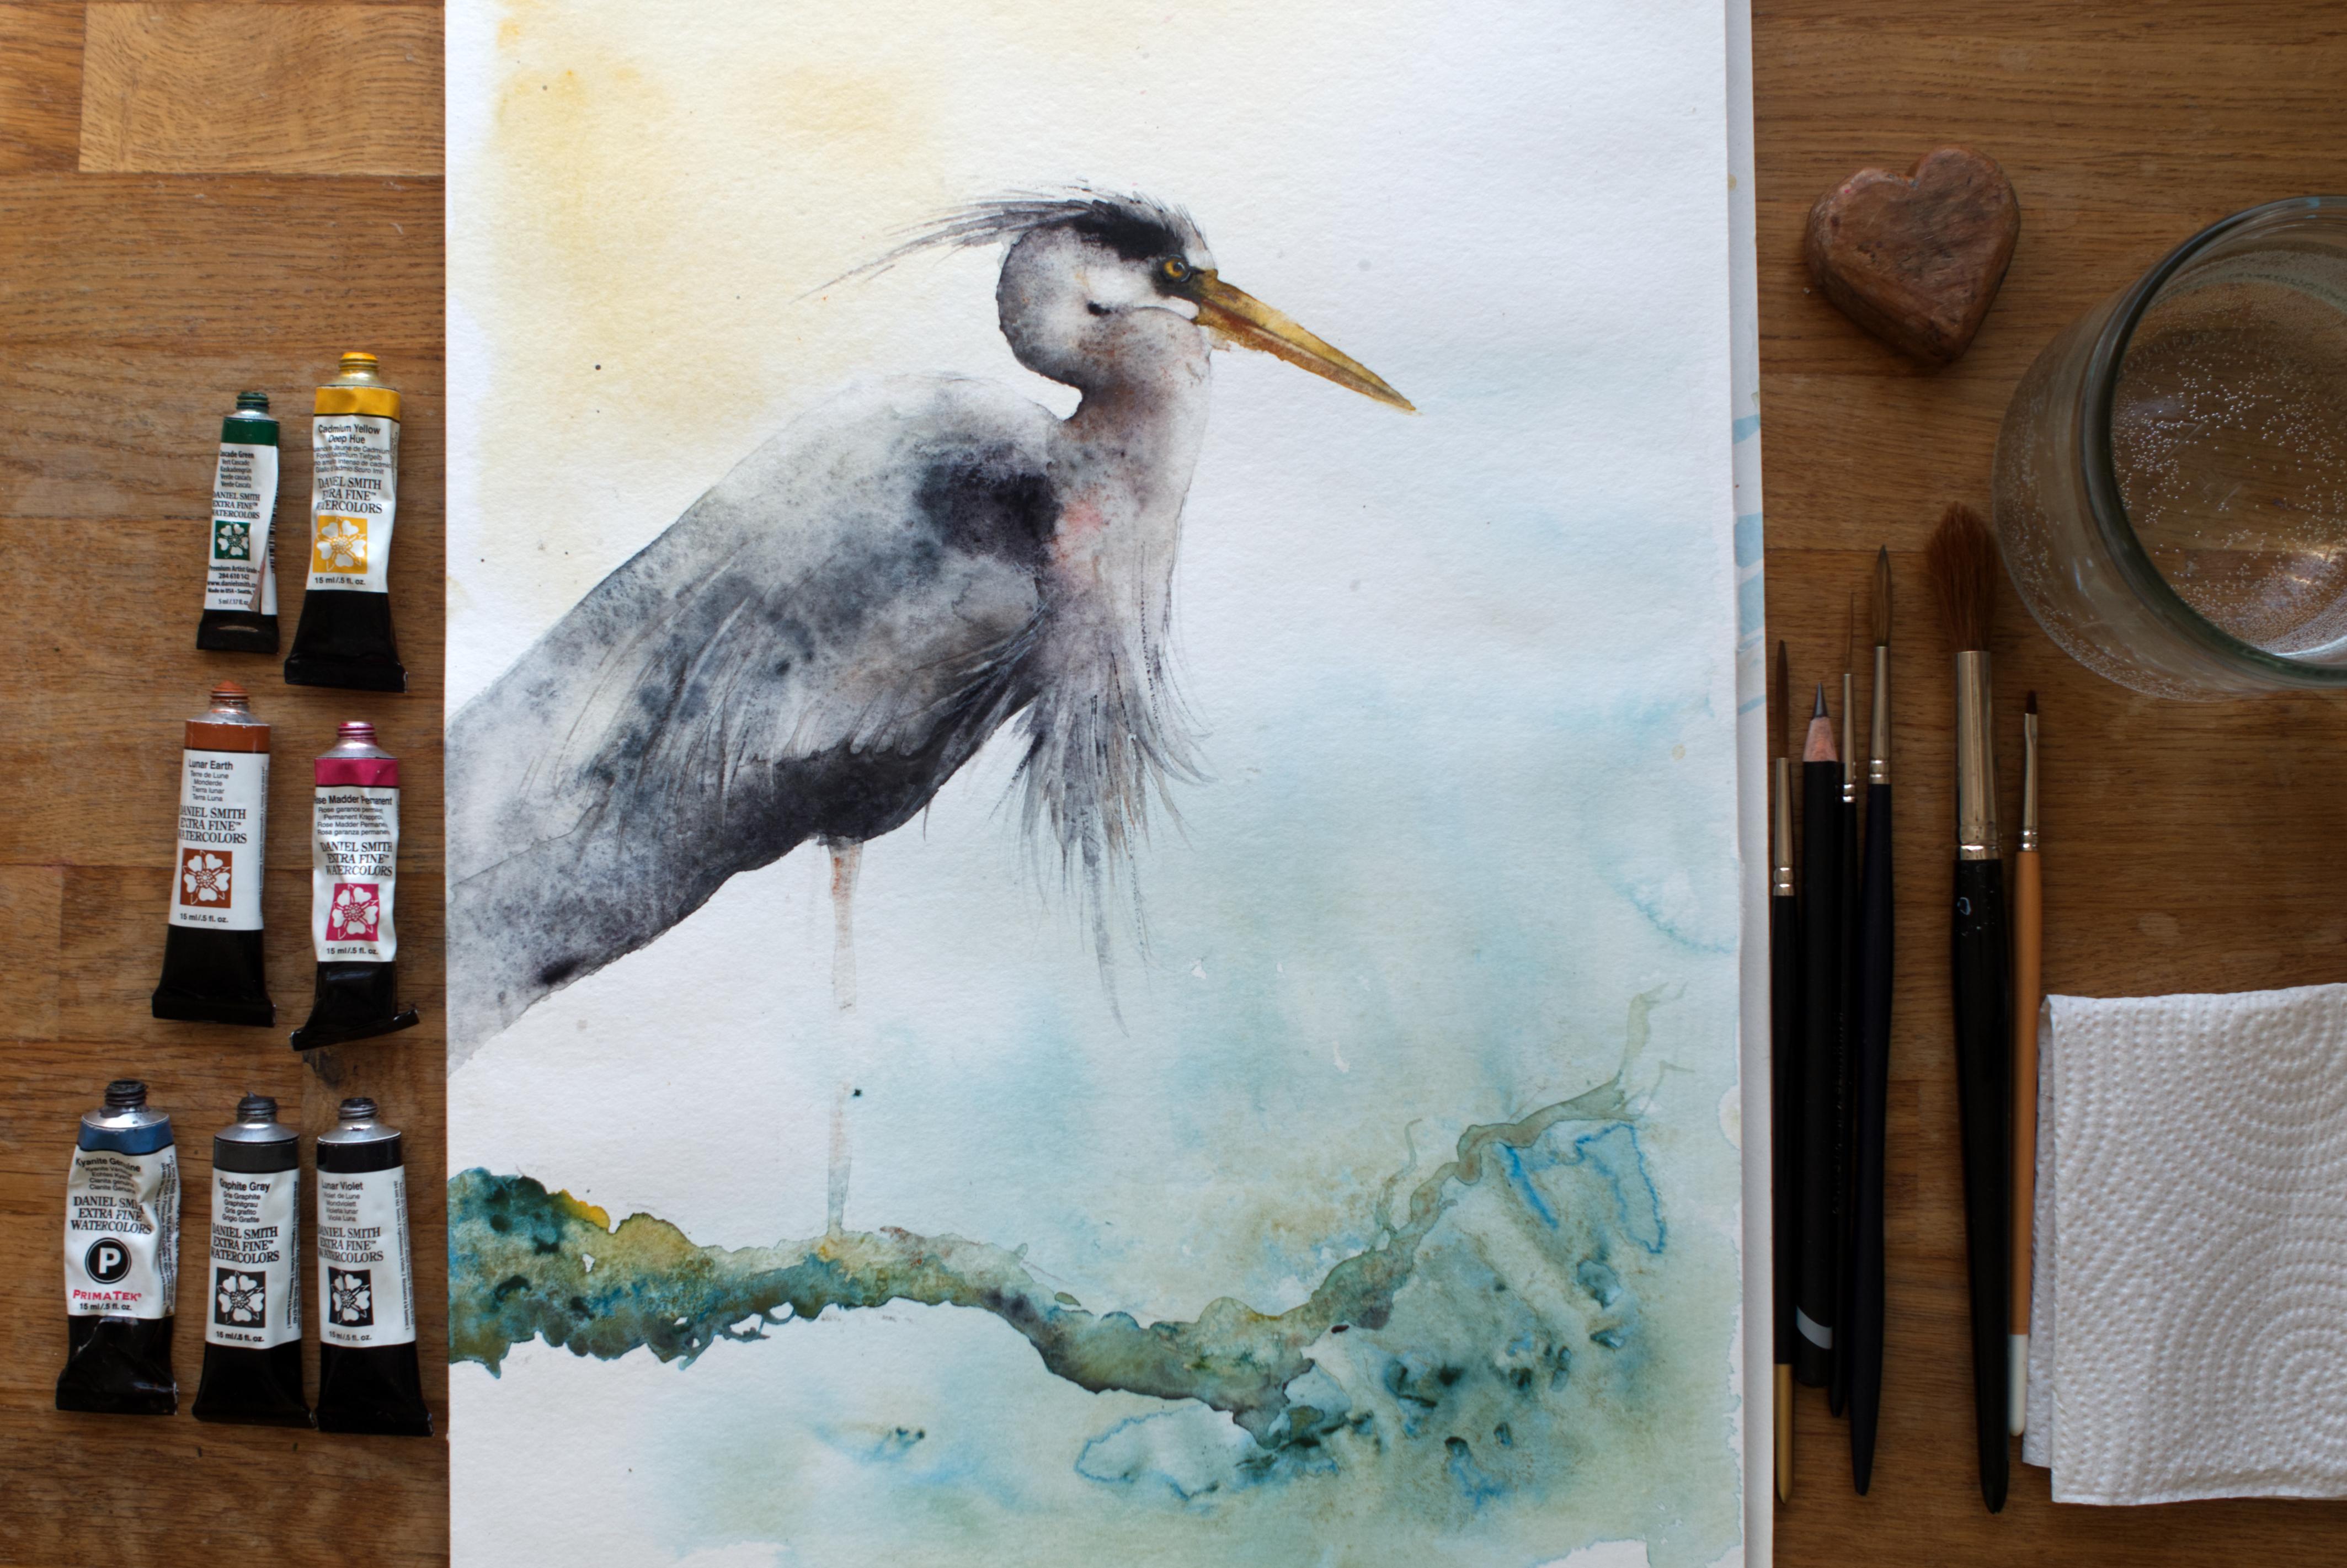
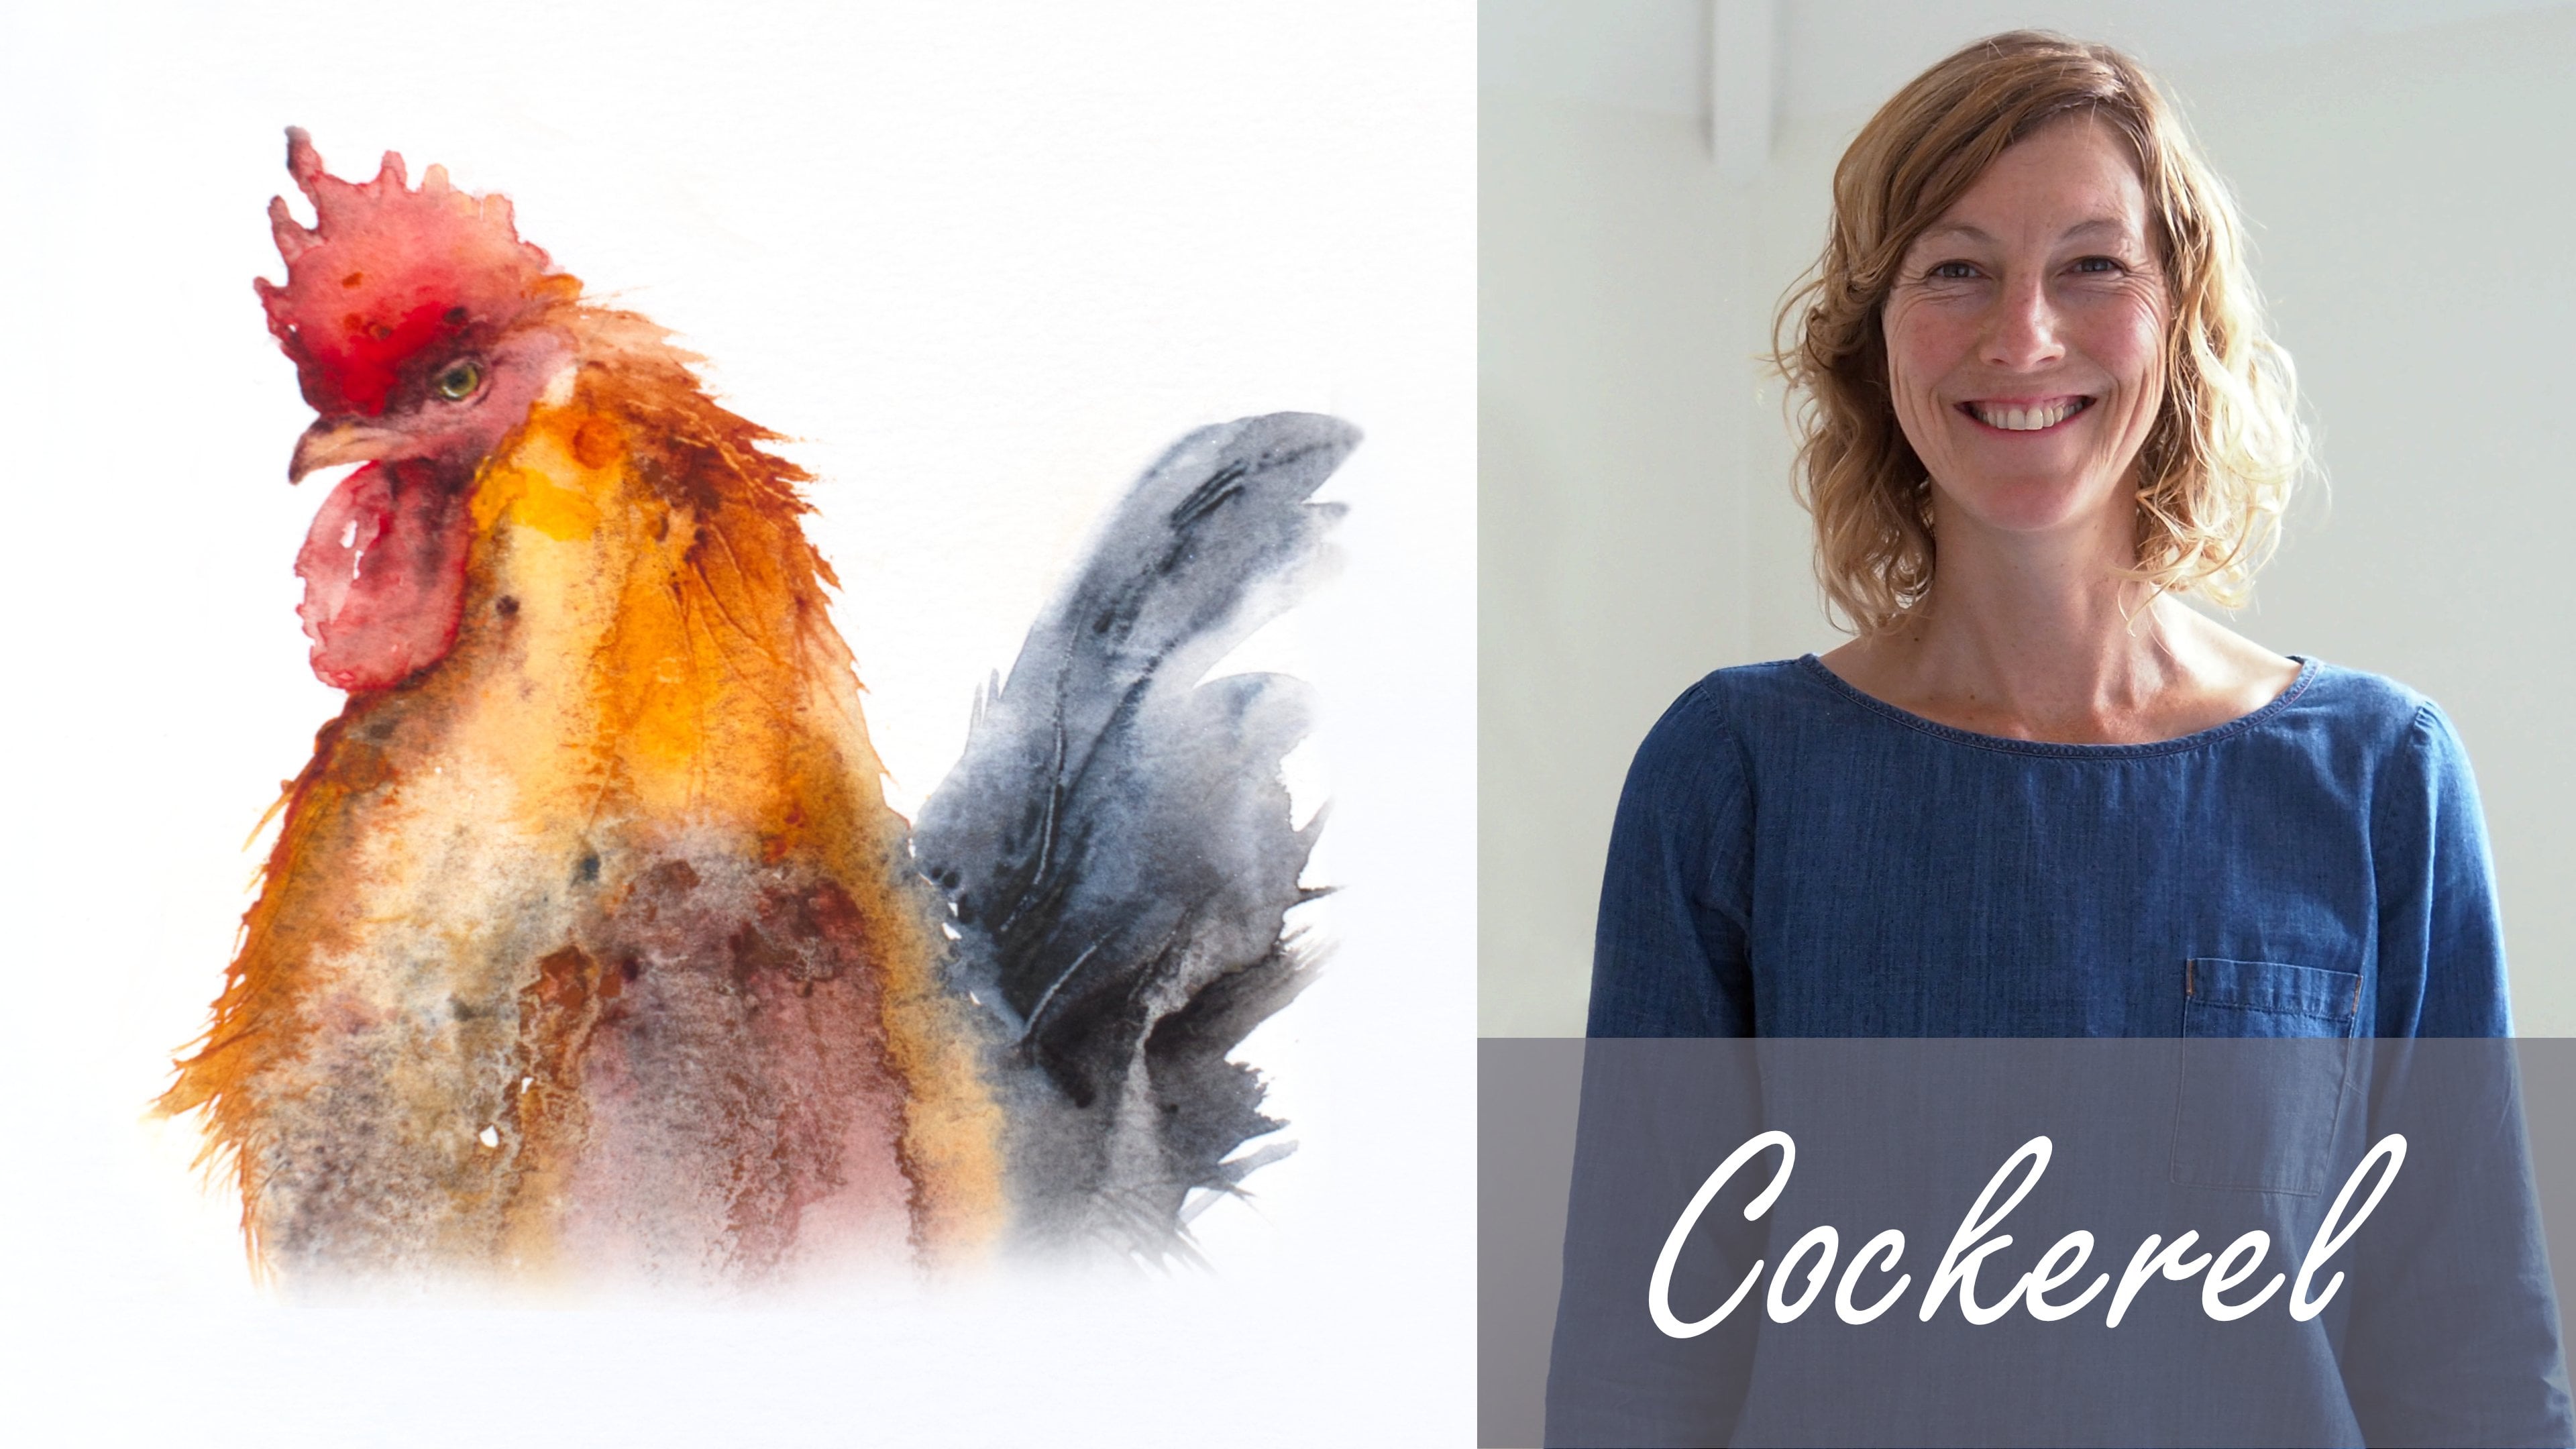
2. Materials: So welcome along to this rather handsome Mr. Heroin. I don't know if he's really going to be called Mr. Haran percent and he may not be a mister I'm not sure if you are having sex or having somebody might be able to tell me. Okay, so I'm going to run through all the material which again to me needing today. If your class am, I got a lovely selection of Daniel Smith paints, but again, I appreciate you may not have these colors, so please, please don't be, don't be a slave to the colors I've chosen. But I should work from the top and give you what are chosen. So we've got a lovely cascade green. And if you haven't tried, this is an amazing color. This gives you this sort of split. Greeny blue. It's definitely worth in investment. I've got a cadmium yellow deep you and any yellow would be fine, honestly. And that's just in the backwash and a little bit of its bill. Lunar Earth, she's loving is only a hint when his chest, I'm going to call him a him where his or her or him who were going with mail. I've got a matter permanent and that's again, just a little hint on on his chest. Graphite gray and this is lovely. It's like liquid Pinto. It some quite new to me and I use it with Lunar Violet for the darker areas. And I've also got a kyanite genuine and that's cropped up a couple of times in my classes and I'm really enjoying these net. And that's mainly for his body. Tiny little bit of white gouache and that's for just the highlights again. Only on his eye. Now going a little bit of salt here, and that's just an option if you haven't got the cascade green. So I'll show you how to apply that. The paper I'm using now for show you another pad. I've got. An alert is a new one for me is our golf bold color Pena paper. And it's a really interesting, it leaves me some lovely, so textures and marks I'm enjoying using it. And the pad I'm, I've got either 30 by 40, so it's a little bit bigger than the one I've just showed. You know, there's a lovely stencils or to a template in the resources pages along again with a list of your your paints that everything's listed. You've also got a nice reference photo. You'll see the hair incest definitely worth if you've got an iPad or something separate from what you're watching me on that It's definitely worth having that open. And I'll pop a picture of the finished piece up there as well. So it's all in the reference for the project and reference pages. If you if you need to find that. What else have I got? I've got my little trustee heart and I use that. It's probably better with the guy. And I use that just to pop onto my pieces of paper and let that run. And just share just a quick note going back to the paper. All my practice pieces have been done on this pad and it's just gummed that I've actually got a piece, a stretched paper, watercolor paper, exactly same. Prof. stretch it and taped it in. If you want to know how to stretch your paper, I suggest going to Mr. Google because I'm sure he would do a better a better job or somebody else would do a better job than me of explaining. So if you've never done never stretched your paper is worth a little look at Nick leaves you build a lovely flat surface. You get, you don't get any buckling or cochlea, which this has done. So when I did these practice pieces, I did have quite lots of dips. Just makes it a little harder, is doable, but it makes, it makes the whole process a little, little more trickier and you don't need. So Pashas, my train of thought. So I've got a little older selection here, versicolor, my pencil for sketching them out. I've got a big brush and that's for doing just a wetting this backwash. Okay. And you don't necessarily need it if you haven't got a big bushy would just take you a bit longer to cover the paper. I've got a size 5 rigour. A lot more we go, Zach got a nice balance to them in a site, this one and this is think it's probably a 43 or four is lost. This number on the on the handle, Melissa is colonized spring and I I I use them a lot more work. Very, very old, was once a brush. And that's I've used just to put some little bits of gum on this hasn't actually this piece here, but I, I may well, at a few flicks a gum on our piece. I've got a tiny little brush here, and this is basically flat brush and it's just for taking out color. It's the longest is Bill particularly and this lovely fixes feather. So these are really tiny little brush. If you haven't got something as small as just as a little small brush, we'll probably do, but it's got a nice gift actually. One of my lovely students gifted it to me. I find it quite handy, so, so that's a nice little brush maybe to add to your collection. And I've got a very, very tied rigger brush it only because I haven't got a smooth sides, a size too small brush. So I'm going to be using my wig and that's just to do an ugly details on the I obviously got a little pot of water. We've got just a rubber kitchen roll or perhaps how many wet. And I've got a little bit of gum. I'm still, I'm sure website you use this in my main piece, but it is, we're trying to use it for you so you can see it. So that's just some gum. I've also got a hair dryer which is off-camera. Not essential. You just, if you have got one, it just quickens the process up between, between your lessons. But it's not necessary. You can just step away income except cup tea and do something while while it dries naturally, sometimes it's the best way for the hairdryer can blow pigment around and you lose some of these lovely sort of moocs and pushes it, pushes it where it shouldn't be, right? I think I might have gobbled enough, so I think we need to go and sketch them out first.
3. Sketching Out: So here he is, 0 sketched out for you. So I'm going to run through just a few tips that will help you again. Definitely find that that template in the projects and resources pages. You can then make sure you get that lovely shape. Just write a lot of this painting is quite loose. So the, almost sometimes the looser the work is, the sharper the outline needs to be, so we get that really nailed. So if I work from the top hunk of you, a few hints and tips, make sure you get this I write in the right place who really just take the time to observe that really lovely reference photo. Make sure you get everything placed in. So once you've drawn around your, your template heavy, you do it. Just, just take the time to get these. Sharpen up the bill with the trouble is if you sometimes you use a stent with you due to cut out a stencil, you can be left with some squat, rounded edges. So make sure you shop on all your edges up. I would one down this line of his bill just so when you come to paint another section that we do, you can see where that line is. It's always worth sketching whom I lost that sketchy. Where he's, it'll block. I'm going to call it a mosque. It's got quite a mask is it doesn't go reside that I've you know what I mean? And then we sketch this in as these little black mark and there's a line, who muscles or natural line that runs down here. And we section it off at 1. So it is worth putting that in line in there. It makes you got a lovely sort of rounded, slightly rounded neck and his feathers. And take the time here to get this right is quite an unusual shape and I kept trying to make him Buddha. So yeah, make sure that's nice and awkward. And I did actually a little bit of extra feather here just to break up that line a little bit. Legs. If you follow some other class, you know, I'm Aquino Lakes butter, we're going to have to put them in. So I've, I've sketched in, I've got to call a nice chunky Nochlin S on hoping to to incorporate that. It's fitting nav I'm just going to probably when I'm painting with just take a little bit of color out there. So just got the one. Claw. Sketching is lovely bow and can we make it really denotes a gnarly same layer pencil with an agent. Colleges twiddle up. But make sure when you sketch out the, you would imagine this, heaven. He's going to be attached to take that espouse, going to take you to wait. So I was doing I was practicing these pieces. Smaller amounts, got a bit flimsy and blessing mother and you'll actually be able to sit on a sit on some of my bouncer. Make sure it's nice and chunky that bow. And we're running this, is this painting off. So if you were to mount your piece or to frame it, then it would go something like that. So what we're doing, we're letting a lot of that paint to run off the, off the paper. So you don't have to worry too much about these n-bits here. Again, just make sure the shape tool all lovely. But is it will be feathers on his neck, feathers, head feathers. I think you're good to go then. So what we're gonna do, I'm gonna actually get char and political bit of a sum. Come on, give it a little shake. Because the kidney is not necessarily always seem to pop somebody already. If you haven't got gum, honestly, don't worry, it doesn't matter, but it might be fun to try a little bit. So when my really, really old brushes, I don't ever use your good brushes because you were in so quickly the way and you just wanted the I'm going to just do a couple of myself already. I'm just going to do a free flicks. He says they can tap push the bow. I'm not sure if I want to purchase a cup down a couple of nice because it's quite nice. We need to lock them all factor the wash. You left with this who was a kind of sparkly effect as base. Think that would do me that this needs to go needs to dry completely before you do that Washoe, I'm going to let that dry. And we're going to start that lovely washy. So it's a really fun, really fun way to paint. You're going to love it. So do make sure that it's largely enjoyed before we get onto the next, next class or lesson.
4. Background Wash: Okay, so once your masking fluid or gum has completely dried, make sure it is really dry. Again, you can probably head up and down. You'll be able to see where the dots look wet still. Now before we start the, the wash, I'm just dumb. Sometimes it's quite nice to have a bit of a warm-up exercise before you start. So I don't know if any of you guys have done the simple trees, but it's quite a nice little exercise to do. It's really quake, probably 10 minutes max. But he sometimes just gets you sort of into the flow. It's a really loose piece. You sorts of tilting and it's quite estimator to him without all the detail. So if you, if you're feeling a little bit nervous about doing this, reads back and find simple trees or upper link as well on the projects and reference pages. But it's a, as a nice little warm-up exercise, I quite often do it myself or Etsy Christ, also a main piece. Let's get rid of that. And I was also going to show you, if you haven't got that, that cascade green at gave me a lovely mottled effect on the, on that piece that I showed you. The beginning. Here's a few little bits of how to play with. So this is actually undersea green. Now what I've used here is some salt. And that's where my little soapbox come into a mentor. And you see these were written exactly the same process that we're going to do here. So this paper was lovely and wet. I dropped the undersea green little blobs and just let that run and then just added the salt. So just literally over the sprinkled it down and shut up and leave it to completely dry. But it leaves you some lovely, sort of interesting marks. Or you could try some cling film. And this is, this is where you get a little bit of shrink-wrap as well. Excretes known as See you take off a little bit and you just concrete around. And if you've done Sydney the squirrel, we use that in the leaves, get that effect. Say it's just a couple of ideas. If you haven't got that cascade green and you wanted that sort of interesting, sort of fascination and just interests texture that the cascade green gives you. Then you can always try those or you can just go on a trail and just not worry too much about that. Or they're sort of effects and that's, that's equally fine. White. Grab your big brush. And let's get this. It's got this chap going. So what we're gonna do, we're gonna wet everything down over the bird. Haven't heard Mr. Mr. Haran going say, I've got my taped board here, So can I make that all nice and wet one over the tape? This is actually laying flat at the moment is board, sir, when we I'm going to eat any Tilton it limit. Say you can use a little brush, is big brushes only just to quick in the process. If you haven't got a big old junky brush, then just can take a bit longer. And you want to all nice and wet. So what you'd need to do is just ducked down a little bit, wobbly, head up and down. You can see if you've left any dry patches you want to really lovely and wet, properly soaked. And just soon as you've got that lovely and wet, you can discard your, your big brush. You don't need that anymore. I'm going to pick up on a molecule rigors. We're the ones disappear leaderboard. Work with additional 10 minutes. So I'm going to start with the cascade green. Say I've worked, I always work out straight out the tubes, but that's just me. So if you, if you haven't done it, It's really fun to try better. You don't feel you have to. Like I feel I can get a lovely amount of paint and I'm just going to just talk about them. Don't think about it too much. The more you think about these things, the more rigid it becomes a few drops here and just let that run. Now unfortunately, my camera stopped recording here for about 15 seconds. In this time, I allowed the cascade green to flow. Nieto then picked up the yellow and have just started dropping it on the opposite corner. You may want to pause the video briefly to get to the point you can see here. Then we're back live painting in a few seconds. So if it's not running and just add more water. Founded a lot of, uh, when I was teaching students, I'm on a one-to-one basis. A lot of a lot of people wouldn't just just didn't get enough water down. So don't be afraid to look that way. Pick up the edge here. You just want a nice pie soon as you've got something you think is interesting, just leave it, just let it, let it do its thing and let it dry naturally and flat. So I'm quite like that of see it dries lighter. So if you've gone a bit heavy, cautious as a, as a bit heavy, you may well find it dries quite nicely. Actually, I'm not too heavy. Ideally, you want to go have kept this almost without any paint on. It needs to be just get a sense of like then once it dries so you want to heavy areas here. And now we just need to let that dry completely. So hairdryer, you can do it once it starts to dry a little bit more, but at this stage is absolutely stopping. So if I put a hairdryer and now I will just diffuse the whole lot in apolitical bit muddy. So just in a debate, it could be patients into and let it dry.
5. Body First Layer: Mighty host. So I've allowed this to dry when downstairs, maybe seven us kappa. So I'm ready. So we're going to start Mr. Harrington. And I'm going to be using my little hearts, say some, find something that is an inch, how I can clean some of our brushes away. So I'm not tempted to pick up the one brush. So I'm just going to pop that there. So we're going to allow the paint to run in that direction. So I'm going to pick up a slightly larger rigor, nice and wet. And we're going to go straight. Again too wet. All his body won't go over me missing out the legs and we're missing the bill, and we're going around the eye. So if rationalism wet and just painting the water hurriedly, say go, go carefully round that. I have to do this a bit of a distance so I don't get my, my hidden. It was a bit trickier teaching these glosses are some like to be a bit closer, but I am standing, so i've I tend to stand in my work or don't very rarely sit. I find if I see it, I just saw the camp up if things become a bit tighter. So if you can if it's comfortable for you to do, even if it's for a short time, then try standing. You maybe try one of those little tree exercise and see how you feel when you stand and maybe sit and try that exercise and see if it yes, if you feel more comfortable, little bit looser. Now as I'm going around here, I'm going to join to be as careful as I can't stay within these lines. Again, it's important to to keep the shape really nice when our a will go a little bit into. So if you've got your reference photo open, you can see, can I add a little bit down into here? Not, not too far down because we're going to do this. I'll be flicks with later on. We'll write down here my Danny's body in and out. If you've I've probably drawn him a little bit close to the edge, if I'm honest. So I'm gonna make sure I don't get it wet the end. Make sure we find those as a couple little feathers there isn't sticking out. So the angle, we don't want to see my hand. Actually capture those. Make sure it's nice and wet. If you have a little sneaky head you I I must admit just to finish joining him off. But what it does do, it warms the paper. So you find your wet stuff down again. You'll pay your your paper dries. Just make sure it's nice and wet. And this is where the fun starts now. So I'm going to pick up function we're going to start with first. Let's have a little bit of the lunar Earth and the pink. So I'm going to grab them in my hand at same time. It's a nice thing about working out as tubes. It's quite spontaneous. I'm just going to say my idea. I want to keep this area little bit, again, referring back to our other classes, but we did a hair where we kept it very simple. We didn't add too much color. On one side is a little bit similar. This heroin. He said, it's a little bit similar to this heaven. I don't want, I don't want too much color here. That will probably be it for the entire picture. And again, up here, just going to put a little bit. I just want that won't thing you see by tilting it, we're allowing that paint to run. Just one that's sort of pinky blush that they have on their neck. And that's just combining the two colors. Just, just doubling down to try not to think too much about it. All to be as loosen, say, try to hold your brush towards the end so everything is nice and loose essay by standing, everything stays loose as well. Such Nepal those to crack down. And I'll pick up the coordinate. I'm going to put. And I spit down here on the neck, back of the neck. And we do over this area three layers. So don't worry if it doesn't look strong enough at this stage. And don't, don't worry just because we got to say we have the opportunity to go over and do several several more or less dark knee down again. I had another camera blip here, happily the last I've just put down my kaolinite, picked up the granite gray and Lunar Violet. And I've just started on the chest area, as you can see here. I'm doubling both colors down together with a good amount of paint on my brush. And you'll see what I mean when the video resumes in a few seconds. Maybe pause the video and catch up again. It's only a few seconds we've missed, then we're all good for the rest. We just want a nice impression is just all lovey lease. Pick up a little bit as well. Just deepening that carina is lovely and see how it pushes other colors out. So sometimes I paint and add paint, knowing what they will do and what they will give me. In regards to the texture, you can see how that's pushed, push that lunar and the graphite grain out. So he just have to build up your knowledge of your paints, I suppose. And get a few favorites and you hear you there. So just got a little bit kaolinite to kind of stick a little bit there as well. Little bit of the first laser is the scariest because it's white papers in it. So I'm probably more nervous at the beginning. Once I get into it, it becomes clear where you need to go. Then for these first layers can be a bit daunting. I still get scared starting things, especially a specific courses were a bit scary. So when I start my, say, an important pet portraits, it takes me a little while to get into it. So if anybody, if you think artists in maybe our tissue particularly more, don't have scary days, they do. Certainly IT. So I think that's probably it for the tilt. So what I'm gonna do is we're going to lay these flat again. I've done and I'm going to pick up the kyanite. I'm just gonna do a very rough kind of s-shaped, really loose. I know this round shape him, but it just gives a little bit of texture, long as it's lovely and wet. I think we are probably familiar with that with that layer so that, again, that needs to dry. You can visit along with the hair dryer if you want to speed up the process is a little bit, but make sure it's a started to get to more of a tacky stage. We really don't want to be blowing these pigment around. We're really relying on the paint making some nice textures. So by blowing, you're going to mix it all up together. So make sure it's nice and dry.
6. Bill: Okay, let's get on with this bill. Now. He's I'd given him a little hair dry just so it's nice and dry and I don't go and put my hand in the wave and smudge anything. So it's worth making sure he's dry before you start the bill. Okay. So picked up my smaller the biggest, and I'm just going to fill all nice and wet. Stay within those lines you've created. It's nice and wet. Make sure you really take the time to make sure you get those. Don't go over the lines. You need to keep at lobby increased. And I'm going to pick up my cadmium yellow. I'm literally just going to drop that, allow it to run. Just tease it down. If you find this is we are working quiet little here. You may find you a little bit of a bubble at the end. So just gently teasing. Maybe you even worth setting the stage. Any small stuff I tend to sit or disengage little bit closer. Can't quite do that here. So I'm standing still some craning my neck over the camera. Make sure I see when I'm doing that. And that's, let's say we do another layer over himself up. So I picked a lunar, lunar of them. Just determining a little bit underneath. Just making sure that I really love increased. Just take your time. This is there's no hurry with this. Nothing else is wet. You can be very precise on this little bit. And what we're going to do, pick on your pick up my kainate kaolinite. And I'm going to pop a little bit of the top. You can see where it's dark and blue colonies. And we run that very carefully. Romney, I have a very hard for me. I'm working for a long way away from here. So that looks all right. Just what some witty to blend down, but not all of it. I'm just just gently teasing up, up, back up again. Just use your paper, your paint. How you've applied this will just very slightly to how I've done it. Just, just look here, looky here I'm reference photo. It's really nice to sort of flick UIs between the two. So if the cue eyes at your painting and then back to your reference photo. And I find that's quite nice, almost superimposes itself. I think that looks all right, Just to spend your time with it. That's working working quite well in the skull, his knees, and make sure you get that nice. Sort of. You don't wanna go too high up in the hair up interviews is of head there. We can see what I mean. So you want to make sure we keep that sort of intense look. And that's mainly achieved by this area here. I think. What do you think I want to fill anymore? And that is to say, we do another layer over there. So I think that's probably enough for that. So specced it again, select that little area dry before we go on to the next lake. You don't want to when we went this again, you don't want to sort of touch this and let that run backup into the, into the body. So let's make sure that's nice and dry.
7. Body Second Layer: Okay, so my, my middle peak or Bill Cersei is nice and dry. I'm going to pick up my little love heart and we're gonna do almost exactly what we did with that first layer. I'm gonna get at nice tilt on that board so we can run them. I'm going to pick up, I pick a brush. And exactly the same, exactly the same as number as at first layer we did over hidden. So carefully go around the whole of him and go, go, you want to go eat leaves. You can either want to do is to pick up any of those that, that first layer sit nice and gentle, has no hurry this stage again. And his head with your game missing the bailout. Okay. If we ran the round is over and you can touch that kaolinite that we put in and that's okay because that will just gently bleed out. And I did when I switch the camera off, I got a little closer to my head, Mr. Harrison, and just tweak the tweet little bit so I couldn't quite see from this distance I'm working. So if it looks a little bit differently, It's just I spent a bit of time just making sure that's nice and crisp. And this distance I'm working on quite see. One down here. Gain Off, Off you get off my page of my board. Follow those lines again. This time. Now look at your reference photo and maybe look at its core. Ice society will put a picture of the finished piece there and see where you're at. You may have gone a little bit stronger somewhere, you may have gone a little weaker. So this is you, as you start building the layers up this way, you have to look at your own piece and go, yeah, that needs to be a little bit stronger than CMO BET week there. Or ESA, vice versa when Noah's Ark, that's nice and strong. Now I, I don't feel I need to add anymore to that part. So I want to perform looking at my list to get a little bit stronger now, she can pull that one down. I've got my Luna, Earth, Lunar Violet, do nerve and Lunar Violet, too many unions. And the lunar worth just going to turn to be a little bit darker. So almost want to be more contrasty than the actual reference photo is just makes it pop a little bit more. Just say, Oh doublings all nice and loose. I'm just allowing it. Painter move. Lovely dark area here if it were odd, looks The Odyssey on the reference photo, but it does work and you and you follow it. That he's also got a little bit of shadowing. Coming up here has any just very gently. So it's a little bit like if you did the hair is not dissimilar to doing the head. All very small movements. We want to make that a little bit longer. Is no brushstrokes going on. So good. Oh, very loose. And again, have a bit of that pink. Keep a nice blush in front of the chest. Just tiny bit. So I think the nice thing about standing is you tend to look over it a little bit more so you're not looking so closely at your, at your piece and OCV. When you hang your work, you don't, you don't ever see it genuinely is close as you will when you paint, it's a noisy so step away from it. Moves back down again. I knew the graphite gray. I'm going to strengthen this up a little bit more. Just doubling, just like we did with that first layer. Just having is loose and just touching and moving on its own. As you start building the layers up, you'll find the paint won't move as much on that very first line, it will waste the causes is chest. With this, as you build them out, it doesn't move as much. So you, you gain the detail is going to eke out there a little bit down or pick up that kaolinite. Hi, scoped in my reference photo bit too tight and you can see where I was at. So all the colors together. And I have a little bit to pay that coin. I love the S-shaped and always will that down again, actually outlined in blue. You squint. See where you think you need it. As you paint begins to dry with C, then you, you paint is not going to move as much either. So that's a lot. So it's worth remembering. Little bit of pink. Someone just tells me what a little tiny bit of pink of the backend say, trust your instinct is someone tells you you on something there and sometimes hear. His subconscious knows more than your conscious brain. Yes. Just just carry that little bit of pink over here. And you sat down just by moving that off, thus allowing that to flow a little bit more. I think I'm going to somebody's colors, there are too many to 1. Now once you get this big black marking on his chest, I'm going to start in the middle, divide this tap in the middle. And it was spreading out honey to just dots in the middle and allow it to move out. I think what I'm gonna do, I'm gonna take my weight out. Wait to get my medical support. And now that's laying flat and some of that will just, just spread. I think he's looking quite nice. I'm liking this moment. So I'm going to pick up my smaller of my biggest chunk, get somebody's flicking the kyanite as well. So it's kyanite in the blue violet. Hold your brush quite at the end. You can rest year as you wish, your hand there. And you've got that sort of movement. And we're just going to stop somewhere up here and just flick out. Taking always. We start to try on a, on a scrap piece of paper and just get that nice movement and when it's flowing. So imagine he's dialing the enlist, the wind blowing through those feathers. Look, you want to get too rigid. You all nice and loose. A little bit more into here. And you can use some of the color, you can use some of the color from the body. And that's quite strong. I think that's probably we do some more of these. So don't worry, if you don't think you've been bold enough. I think that's probably enough. Now this is just beginning to dry quite nicely. In fact, mighty draw it a little bit too much. Tablet down a touch. Just a little bit I don't want is sopping wet. Just wanted a little bit damp. And I'm going to put that down. And we just kinda put his, I say according a mosque is quite a mosque. You know what I mean? Again, it's similar to that marking there. You just sort of going in doing a steroid and that would just gently blend, given on that nice reference photo as well. Now I'm gonna do these in the next layer. So I'm not going to do is it will hit fast, is a fascinating thing, has a word, isn't it? We're just gonna do, we're gonna do that because that's not a word. In the next layer. And then look at all the while is damp. You still got time to sort of tinker and fiddle with it. If you feel you needed a new little bit more, something. I've just picked out that lunar averages. One is pop something in there is fill our needs, something there. I know it's loon Earth is nice and granulating, so it gives me some nice texture as well. Just keep you on that reference photo and fix your eyes back and forth on a family need like going, I just mix it together. So line here has nice shadow in there as well. You get to a really nice stages just starting to go, just starting to dry it a little bit tacky. As a noise stage is where you put the paint down. It moves a little bit and not, not too much. And actually going to pop a little popular water in here. And hopefully I'm not give push some of that paint out too. So I want to try and keep some of these packages neck, top, back of his neck and in places anyway, a little bit white light. So you can use water again TO effect just by dropping a yo-yo used to clear the area again. I think he's looking, looking nice with this layer. So let's tackle these. Let's tackle this leg. While this is just a little bit tacky steel, so that's sort of perfect. I've got my lunar earth. And I'm going to add a wet. And some of these color from the body isn't always down his leg. And that might eat almost be enough. No, it's not. I'm just going to earn down and I'm going to put the tidies little bit of, you know, f. Just want to say or not, you may love legs and you might be your thing and you could get really carried away. They're making just perfect. It's not my comfort zone. Homeless, isn't it? So I'm going to do a minimal amount. I can just want the impression of a second one back here as well. Just a tiny little That's a very washed out. You could just do that or you push down, sometimes gives you a very natural to look. Just a hint. And this Lulu earth and graphite will gently run down hopefully. Smart plan. Yeah, I think that looks all right. Actually, I want to do much more to overfill. Yeah. I think he's right. So I'm going to allow that to all dry. And we'll do the next layer.
8. Branch: Voyage home and it's got this lovely bronchi and this is another fun technique. So pick up, yeah, yes, slightly bigger brush. And I've got my cascade green. Again to do a little bit like The Raven. We're going to pop a nice amount of paint here. Who really, really scoop up on a nice, a nice amount where they've just Russell the worst we are pans up, we're using you want a nice amount? Looks lovely. Pop. It'll be a lunar from the top there. Now, think big old gnarly branch when you come down to this. So a wet my brush again, it's really nice and wet. And touching this lobby big pile of paint. I'm just going to just kind of keep any minor pick a punch down wherever you wanted to go there as well. And what you can do if it's not money, very well, pick up a little sika under there that says just going to allow that to one again. Sometimes if he's not moving very much, you just need to be an encouragement that you can add more water if it's not moving, just add more water. Only reason it's not really quite sure you go pick up his feet. So he's actually sitting on it, sitting on its Daniel niches. I just allow it to come down. Lovely, isn't it? Might have even been a over T, T, little bit too much scoop some of that off again. Allowing that lunar worth to him. Moving is it's pulling the way. You can use your fingernail sized little bit like the simple trees, you can do that and get too carried away. Almost regressing this one now, but yeah, sometimes you have to go with it. She can take on a little bit carried away even though I've got a link to vote, to kinda just take a little bit kinda out with the kitchen. Well, don't be afraid if you've gone to bow, like I have done panic, just suck it up. Long as it's wet, you can keep on maneuvering around. Give you quite a nice pagination as well engineered using that new again you can use. And so if you wanted to cling film just to give you some different marks and patterns, I'm not going to just move more time because they both take a little while longer to dry. So I'm also going to add just a little bit, just so it marries the two colors up together. So we've got obviously got the lunar earth and the heavens. I just want to make sure that the colors bounce back and forth. It's just underneath that is whatever color you're just one of those dark colors you've chosen for the Heritage property will be under the barrel as well. Desktop to look quite nice, you can add water droplets. Again, that will give you some nice interesting marks. And what we can't do show you. We can just run that straight out the back and go through ij cos you're painting. And then we can really add some more water. And that can just run off his watch. One here. That's kinda go to you saying that. And you know, to focus. Oops. And again, soon, as, soon as you got something you like Lakoff, just lay it flat and leave it empty to, never normally works to over fiddling. Feign word colorism. I'm going to leave it on. It's only still support, just allow that to keep on running in that general direction. Step up, stand up if you're, if you're sitting, just step away from a little bit and see what it looks like. See if you need another color, if you want to fancy another color. She says about not overfitting. A lunar Earth has shown a little bit as well. Say, I don't know why I always tell you why I do things which probably isn't very helpful if you're trying to learn with me, but it's trying to space, you can't listen to your instincts. I like that. I think that's right. Actually are probably once this is dry out for between loser, it'll knock them over keen on that, but I think it's worked okay, so again, we need to let that dry and I need to get rid of these problems. And then we will work do the final layer one on Mr. Haran there. Yea. That's dried. Okay. Isn't it? I like that. I'm just gonna get rid of that little bit. I'll show you how I clean my wall to even freshwater scrutinizing. It's surprising how muddy water cooler slightly affect the color of your pieces you're working on. Now, ideally, I need a bit of a synthetic brush radiator. Again that out with us. So to digital chat. So East is just scrubbing. So if you have made a mistake, but just be just be warned if you've got a lovely wash. Don't you don't want to be scrubbing your washes. This the only trouble with backwash is navy gone, not quite stopped and started little paper for more careful. So I think that will be what it will be that little mark there.
9. Body Third Layer: Right onto the next layer. So we're going to do Section little bit soft side. So we're going to do that pencil line I, I mentioned when we sketch them in. So we're going to go down here. And hopefully you can just about see your feather marks here. And you're going to go very carefully when those marks you made. And then out to the body cavity, taking those feathers will be made and upon his head. So we're basically missing out a lot of the main body and is built around these, I think places as we did on the first, second layer. It easier to tell you. We're just missing out the body. So the top, top part of the body. So once it's lovely and wet and I'm laying, I've working flat so I took my it'll halt outside. And I'm going to pick up Molina Earth and the graphite gray. And we're going to get that lovely sort of try and find those marks underneath these feathers. Told me that heavy underneath he said this just to give a little bit of strength, bit a detail. Okay. You can just take you tell him now going, how are we going to do it boring? I'm going to have a little bit coin I can get away with a little bit flat for me. I do not use other colors. Recently did I am a black Labrador and I think I counted 18 different colors I was using my black Labrador is amazing. Amazing how you can build up colors of depth with different colors. Really subtle. Not doing it off. Really great job going around these feathers. But hopefully if you're sitting on, get a bit closer to your work, you'll be able to just go really nice and carefully when there's feathers. It's worth taking the time to get those points. Really nice. Apical push down, pick-up medical, smaller one. Just wanting season wing Mark's company. We're not trying to say is not going to be very precise or just ideas. It's just a nice flick of the wrist. I don't want to get too precise into painting feathers. That's just enough I feel as I look at your shapes up here, when you wet this down, you may have like may not done a very good job of getting That's a nice shape. I've gone a little bit too high here. He's fed it comes down a little bit further down, doesn't it? Just go around it? I do another flick up here as well. He has actually got a little bit of white. Just here has to have picked up, I think it was Lunar earth. So I learned about it tomorrow it up in my head. So it's read in obvious strong here. And then what I want to do, I'm going to pick up tiny little brush. Just want to take a little bit of color out. By taking out when it's wet, it would just be nice and soft. I have a very strong hard line. Just tinkering with your own piecing way. You need stuff taken out or strength putting in this stage are pieces are probably quite different parties by now. Gauge your own pace. Now, I think the rest of his neck looks quite good and quite pleased you. This reason these back down again, can hold onto the graphite gray. I just want to make his Moscow little bit stronger. Lunar Violet didn't wait for the top layer, so posing concentrated. So I'd want it to be a little bit heavier, little bit darker. We could have done a paint gray would be quite nice in here. We're in indigo, Sir. Toby for it. And if you haven't got with my, haven't got the same colors as makers. Experiment is over the fun of it. I didn't want that to be that. I'm just going to try and do some little flicks, just a little bit of colors. Peek, see that in the camera. I'm just using the color that's here. Now, we can do these nice. He's head feathers is almost struggling to find the word for My didn't put yeah. Yeah. Your mind you have that you're handing in the bird. And I'm struggling farmer which nervous about doing this I think, right? Just keep everything nice and loose. Practice on a, on a piece of paper if you want to. Just get that movement right. So we're just going to say, so you don't get too carried away. It's very easy to fix a nice to-do think that's probably enough. And while we're doing the fixed, we need to come back down here and do a few more again, I'm just using a little of the color is really nice. Chest. The graphite, graphite, clutching his pick up my kaolinite. But then again, lunar Earth is done. Just want a little bit more here. And it's all about especially this last layer analysis. And it's no more layers. So it's just about strengthening. Any, adding any extra QALY you think you want all the extra shadowing strength? We do need to go do I need to get fined? It's nice line here is Nick, Nick creases. Just that, not just use the universal again. Just let it bleed just very gently. Own, suck it up. Just be mindful. I see sometimes you just a little bit and say, I just want to leave you today. Some are called little blob here have an idea. Lunar Violet. Very much stronger for me to want. To squinting my eyes and just want a little bit. Look at your own pace. Just a judge. She gonna do a couple little tricks here just to break that body up a little bit. So you know, it hasn't gotten epoch. Sometimes you need to artistic license isn't on this feather up here as well. So it's all about trying to get little by little with the detail in there. Pick up the kyanite and we're going to try and get some, a little bit of some of these markings here. So we're not going to go. That's just a quick flick. Second, there's a couple of nice, nice some feathers on your way to finding it. You can soften it and go with COVID lubrication wall feet. And it's going to be hard just to establish, needs to take some of that strip out. So it's not to come to bold. In here again. I'm just, just observe in mind peace rating, just looking. And let you got this little white bits underneath here. And we only bill. So I'm just going to move, just going to wet that down. Or it's going to do is just allow some of these Kelvin here to learn. Just enough. Let's take a little bit here about adding and taking out these stages. A little bit more quantitative, exciting as it is easily tweets that really, really, actually do political. I think he's making noise. I think he's for me. Knowing how I do legs. I think I've I'm happy enough with that lake. I think I don't think I want to do any anymore with it. Better. You're more confident than you can go back over that leg again, strips and some of those areas up because a lizard or a pencil mark there. So if I once I roped up pencil mark out, there's not going to be a lot. It's a lot left. Just going to psyche is we did that first layer, first town down the leg, which is going to work that lake down again. Think that's enough for me. We're going to get a reputation for myself onto the osseous. It can't do both legs. Okay. I think I'm pretty, pretty pleased with that hurts that sum. Let's come together. So we need to let that dry. And then we do the classical bits would do is I finish off the bill and any other gold pickle tweaks, but we're enough.
10. Bill and Eye: Okay, that's nice and dry. So what we're going to do is the bill and nice. I know what I must admit on that. Lastly, I just made his eye a little bit rounder, were high. I'd have a struggle to get that close to doing these. I kind of makeup on that very first layer. I've just made it a little bit rounder, say, made a bit more sense to us. So what we're gonna do, or actually just going to pick up the cadmium yellow. Actually just going to paint, we're just going to go round and round, round and yellow. So this is where it would be really nice to be sitting and just taking your time with it and get nice and close to its workers. See what I'm doing, what you're doing. So so don't be afraid to sit and get a little portion is the little I in the bill is where you can be really quite precisely. Little bit more bouncy all make it really nice and sharp through this is quite loose really in a left to the imagination, but we get that nice and sharp and spend your time making it look really crisp, that will put it all together. So while that's drying, I'm going to just do the lower part of the bill. So wet brush. I'm just going to run right down there. The bill and he's got this kind of peak is right up here, doesn't it say to study line up that yellow clutching, clutching these colors today, I'm with my Luna Earth. Just going to go underneath, just touching it and that all sort of genuine dance, a neaten cut, encourage it down. That's a little bit. And he's to be a little bit wider. And say hopefully if you've drawn that pencil line in, you'll be able to hopefully see that pencil line still. I pop it out, pick up my unit violet. Oops, oops. Oops, get rid of after trying to find my very little bush. Okay. And he's my very tiny little tiny brush. If you've got your number 10 or two brush, that's probably a good time to pick it up. And we're going to with Lunar Violet. Are your dark color test. Very carefully go up. That kind of small, is it because that sounds a bit roll that yeah. It'll dock area there. And you can run just round down the top and all the way down just little bits of it. That whose beautiful word carnality set just leave a little bit of imagination. Great one for doing fifties AND gates and stuff. And I can see the now and he would only do you have tiny portion to the gate, but we'd say affected. Look at your reference photo. Just q m minus this guy down here is known as a little bit my tried to get in its velocity, have an ICER and that last layer and try to decrease so he can pick up, paint it in just minutes. Absolutely fine. You want to get this nice and crisp at the end as much as you can see, the little details like this will really make it pink. And again, it's always worth, once you've, once you've got that we've finished, is worth looking at. Next day you'll see things that you won't have seen while you're painting this and then you can caught on, I never finish a painting, a commission in one sitting. It's always over several sittings and tweaking when you when you say we have a fresh pair of eyes. Okay. I'm I'm I'm pretty pleased with that so we can just pop a little bit of a lunar. We're still just put that little notch to is nothing, people. Yeah. Good. Hopefully, that eye is dry and make sure it is dry before you start on it to see if I can see I think it's dry. Now I want to do is to I know it sounds silly to make sure which drawing them which again, but it's just like doing another layer. C. Wet again. And we're going to take a tiny little bit of lunar Earth. Tiny bit, right? You wanna, we wanted a tiny little bit of shadow. I'm not pick up the new, newer do it. I was never good idea to do now Earth and Lunar Violet. Easy for me to model them up. I'm just trying to get very gently. I'm seeing this from a distance, so it's very hard for me to actually see what I'm doing if I'm honest. I'm just trying to get a little shadow underneath the eyelid. Hopefully that looks right. Yeah. Look away. It's just I think that's like a bacteria. You big, big bill pure is a bill. Us, it's drawing you. Some of these lines is immediate needs a little bit stronger. Yeah. I think that's I think that's looking good. Just need that to dry and then we can put that people in as well. But it needs to do I first. I'm just going to let that dry first and then we'll put 50 people in assassin dry. So I'm going to grab my little brush again, pick up my Lunar Violet, and we're going to put that needle. Pupil in note. If you do it a little dot and then work outwards if that makes sense. So he's looking down, he's built his knee. Just go right into statistics. I take your time, get a little brush to be really mindful and just ride around. Little bit ovaries. Really only strengthen the heat. I can go around the eye around. And he made that ping. Is forward and Alpha coming right too loud. This is little mosque. Come a little bit too far down that she's what I'm going to do. Still with ultraviolet. I'm actually going to put these back on again. You may have done a lot better job than me, but I do it would be nicer to have got free to go in the right place at the beginning for leaving soften down enough. Down a little bit more. Tweaking. A little bit better. All right. I quite like to get rid of SAT. They spit a white hair, is going to make it back and forth. But a kitchen towel and dab. And it's a tiny little things that that really will make it work. And again, for sleeping, stroke, say would it be a better effect? Just blended Latin and little bit more, but we've rescued it. Still looking a bit. It's not looking close enough is easy to capture that so I can just needs to be heard if he did when we did the cocoa, there's kind of a line across the top of his. I wasn't in some people made him very angry. There's always that sort of look tiny. Naval Bosch. And this would be a fantastic subjects do larger than you wouldn't be working. So tiny. And you have a little bit more to play with my tiny brush and I wanna take a little bit light out. If I can do this. From where I'm standing up, some of the people making excuses for myself on tight, I can get close enough. Okay. So that's that taking the color out. And I hope you can see in the reference photo that's a lighter area then that's dark. And so that's what you want to achieve. So I'm just going to now go back in. Be careful if you still keep adding luck I'm doing now. Painting paint off and while it's damped, can all get a little bit pear-shaped sometimes if it's not the eyes not going light, just take a take a break, let it all dry, and then go back in and look at it. That's better. Slightly in the eyeballs. It's an oval, isn't it? And i'm I'm probably going round too much. But I'm pretty pleased with him actually. I think I'm going to leave that for the eye and Bill, I'm going to put those little catch, that little catch light on on the very sort of loss it will pass of these. So let that, let that completely dry. I'm going to just get a little bit close that off cameras so I can tweak that Vetter and then we will finish him off and we're almost there guys.
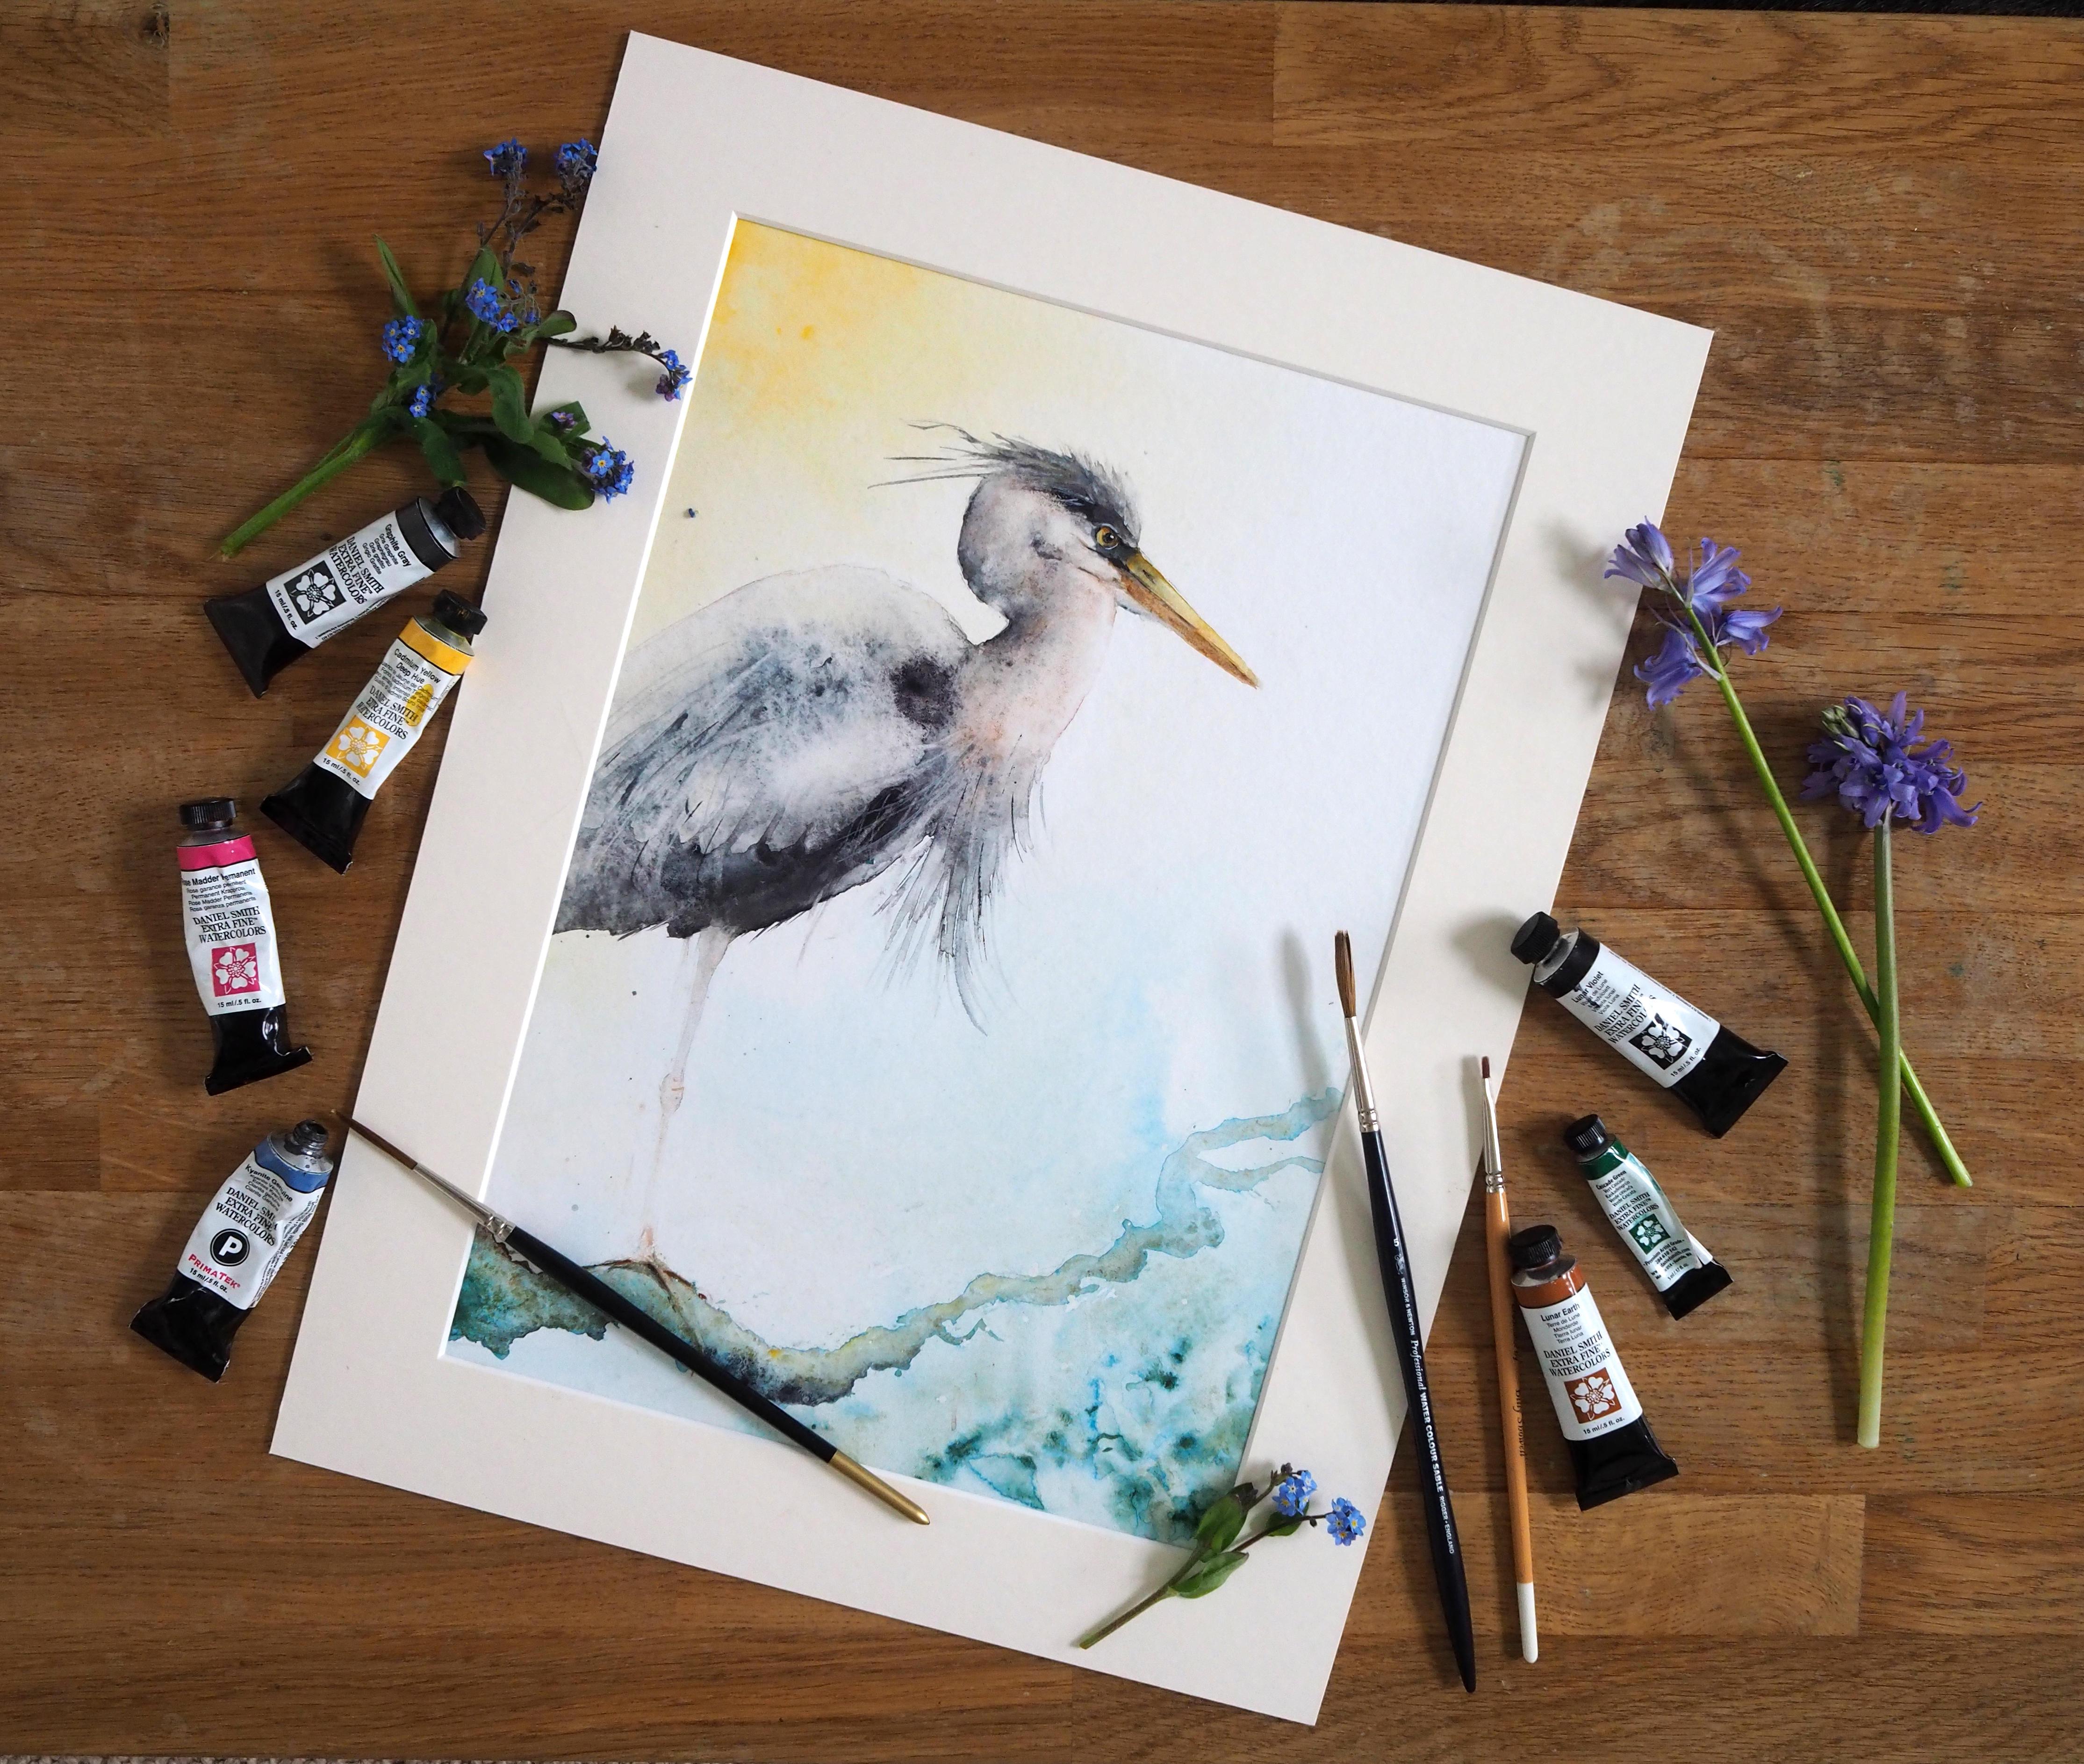
11. Finishing Off: Okay. So I had a little tinker while I let off cameras. So I just like to get a little bit closer to to him and that I so if I explain, I just put tiny little bit of that kaolinite just around the eye. I think I lost a little bit in just a little bit here and took color out all with these brushes. Just tiny little things when I could get just a bit closer. So what we're gonna do just to finishing off really going to start from the top and we're going to work down and just, just tinker. So whatever little bit shoe think, mainly taking in or out and it's all going to be done dry. There's no no wetting down anymore. So firstly, I would take a little bit of car out that bill. So with my little brush, just going to go back, I'm just swapping out. The noise line on the hair is named as well. So have a look at your reference photo. This is a fun because there's really no pressures, no, nothing drawing on you. You can really take your time. And sometimes these stages nice done the next day actually, or at least of Chief stepped away from it and had a bit of a break. Because you'll be amazed at the different things you see when you come back in again. So I'd managed to, thankfully kept most of these light Round heads face, but you could take a little bit out if, if you'd if you'd found you painted a little bit too much, a little bit too much paint brushes. So there's a nice little bit of light here which I've, I've lost a little bit. So I might just very gently, and you, and your power, your paper reacts and just very gently. Take a tiny little bit out. For different paper reacts differently in some lift out easier than others. Actually quite play to that. I've managed to keep them quite light. I might just take a tiny little bit more. I think that's that. So the head and quite, quite pleased with the rest of the head. Yeah. I guess I could say I could spend another two to ten minutes just sharpening some of that up. Yeah. As I close the angle will close arrange the nomad. So yeah, take your time. And we can take a little bit as I'm working my way down, I'm happy with who they serve, I'm honest. I don't think any take any out. And if you had any bits, we've gone over your pencil mark, you can very gently take those out, but just be aware if you take color out, if you've got a very strong background, by taking color out, you may well go back to background. So that's why it's quite nice to leave this white when you do that wash. My feathers went a little bit high. I could take little bits out and see if I can regain some of that FedEx or no, these papers quite nice to lift color out, but I don't want to do too much of it if I'm honest. That might manage to keep some of that white there. So that's, that's quite nice, but you could. Loop, it's out here, which I'm going to fascism and go back to this little tiny could brush. We're going to put some of these fixing over, say, Well this is cool light. So you can just a nice kind, same, same psyche, same wrist movement. So we take out listed for Nina and work your way around. Try not to buy in to regimented. You wouldn't just loosen left. To make sense. They need to make sense, but they don't, you don't need necessarily a loin. Just a little bit square. Here in theories is called the light a little bit. Then look at your own pace. A little bit of edge to break that line up the body. Okay, we can go over the body as well as that same movement, saying wrist movement. And you want to feed and get them to take highway. And if you bought yourself a Posca pen off to the last clause, you can put, use that. I'm just going to step away. Have a look, see what you think. Yeah, I think that looks quite good. So I'm going to swap brushes and go back to the satellite was my number 3 or 4, I reckon wasn't it. And we're going to think lunar again. Just want to just a few flicks, just a few, few in here. You can always have a dry brushy get a nice, such a continuous line. I don't go there. Go to Mad. Varies to the stage to think that's enough up there. And I think I want to do anymore. I will, uh, will actually scooting, scooting back up to the top of the head. Mind you don't feed doing this. We've made them a hand in the fix. You've just done what? Just take a couple of those. So he is well, indeed a 100 to paint back over that again. It's made it the heavy for my liking. Is going to break that line up a little bit more. Actually going to almost certainly be to come up here. We call it a tad. Hiv is some of these earlier. If I can soften a little bit more, I need a nice piece, a clean kitchen roll, which I don't seem to have hand. All right. Almost almost there. I just wanted to put that little catch light in his eye and just find my gosh. So I need a brush here, number 102. A week this up, it's going to have lead off it for too long. Okay. My iPad. Okay. He's got very tiny little white line here has an E. So if I can get in, I've already taken the color out, then when those cameras that's done and the catch light is just a tiny little dot. You can, you can use us to do a few flicks as well. It does, it does tend to disappear. Not very strong. It's another way of getting some of these as citizen as well. So we'll just a bit of variation that breaks it all up. Little t What pay as well. You think is great for things that the law under the head must forget to do is to wrap some of that company. If you put the gum on as well, he must pay today that little bit of white line down here. Fiddling probably too much. So I'll continue down some of that term as well. So make sure your hands are clean and you've got no which surface. But depending on how much you put down, the minds really going to show an awful lot to really put it down with as much paint. Some in there was painted. It might have been particularly effective for if you've been going to him or heavy handed with it, you'd have had those little white dots and you could have against spattered days are over him. Okay. I think we're almost there, so I'm just going to grab my little rubber. Make sure everything is dry at this stage. We really careful and I'm going to wipe out some of these pencil marks. And again, careful if you've got pencil marks running through your wash cars, you could work that. Well, we never put that chlorine, the base of most do that as well. It's going to work that pencil mark at Ryan, he's just avoiding illness wondering, you know, about when he's chair. He said, suggest. Ideally, try and keep the pencil marks is as light as you can when you actually sketch them out in the first place. Okay, to do, I'm gonna do that. Jumping around a bit. Antony's is very typical of me. Just try and get that foot in. So as I said at the beginning, I'm just going to take color out. I'm not going to make too much of it. Again, you may feel a bit more confident and want to put a nice big L chlorine. I had a French, I think a maze in a previous class. She loved doing feet and she was brilliant at them. Used to get the burst so much character. Just scrubbing a vivid color out. You can put a little bit a lunar with the little hint or somebody in the back. Just the mere list of ideas is the foot to the side. I'm looking forward to your projects. So please, please do share your projects. Paintings on projections. And I think that's enough for me. And I like to see some nice chunky feet from you guys. Show me, show me how it's done. I think he's he's not too bad. I say I would happily spend released another day and come back to him and look at them again and just just using final tweaks. But I think for now, I'm pretty placed on Skype amount. Just see you can see what it would look like if you were framed or mounted at least. And you can always quite hard when you've run pitchers off to sort of visualize what they would look like. So I think already know, I think he turned out pretty well. So I I genuinely hope you enjoyed this and say Please, please do share them on the My Projects and Resources pages is a lot of work to put these together and it's just amazing to see your work. So I look forward to seeing them.
12. Final Thoughts: So I hope you enjoy painting these gray hair and he put you in a calm state of mind to normal modeled one. How do you creating that lovely backwash? Go? Remember, it's a pain. Didn't move. Just be bold and add more water. Did you branch go? Okay. It's fun, isn't it? But as with the background, if your paint didn't run, add more water, it really is your friend. Did you enjoy 16 areas of is a great way to add that strength shaw eighties where we need them. I hope my tips at the end helped. It really is important if you're painting is lovely and loose to get those good sharp details in at the end. Who manage your painting out? Remember, is helpful to look at it the next day with a fresh pair of eyes. So we look forward to seeing you in the next class.
 Jane Davies, Professional Artist and Teacher