Transcripts
1. [INTRO] - Hands-On Mixing in FL Studio (FabFilter Plugins) : Hey, what's up, guys,
gratuitous here in this course, you guys are gonna be
learning about how to get hands on mixing. Now, this is a motorized fader and we're not using
this in this course. We are actually getting hands-on mixing with
a midi keyboard. Okay, I just want to quickly put this at the beginning
of the intro video because I have always wanted to get hands on
mixing and FL Studio. And I even went to the point of buying an expensive
unit like this, thinking I can get
hands on mixing with motorized faders and I
thought it was so cool. But something like this
is not set up very well for a good
workflow in FL Studio. I always found like I kept
having to go back to my mouse. This course is going
to teach you off of your midi keyboard how
to get hands-on mixing. Like no, we do not have motorized faders on
our midi keyboards. But the approach I teach you, you just switch over
your different banks. You're gonna get a
great experience. So let's hop into the
course intro video, where I break down
above the midi keyboard and how to get hands-on mixing. Okay? Alright, welcome to
my course here about hands-on mixing and FL Studio. So right here I have the M Audio oxygen
pro midi keyboard. This is what I recommend if you are using FL
Studio at the moment. I'm creating this course, July 14th, 2022, just
to give you an idea. But every midi keyboard works
pretty much the same way when it comes to hands-on
mixing with fl Studio, when it comes to your
different banks. Okay, So let me just
break that down for you. So mainly what we are
going to focus on is on fab filter plugins. But I will also make another little bonus video about FL Studio stock plug-ins. It's essentially the same thing. Essentially, we are
learning how to set up a global links to our
sliders and our knobs. And you can use your banks to go across multiple
knobs and sliders. Okay? I have 12345678. But what happens is when
we go to the next bank, and again, I just have
them color coded. So now I know I'm on
the second bank, now. I'm on the third bank now.
I'm on the fourth bank. Okay. So we're on
the first bank. And again that's one to eight. We go to the next bank,
that's nine to 16. Go to the next bank,
that's 17 to 24. We go to the next
bank that's 25 to 32. So you actually have 32 knobs. And then these midi
keyboards have what's called soft takeover. And if you just look right here, we're just going to
zoom in right here. And so what that's gonna
do is when we go to the different banks
and I'll just use this knob as an example. You can see that I'm moving
this slider right here. It's still moving, but
there's a little bit of a grayed out part and I'll try to zoom
in a little bit more. But you can see that
there's a great part and then there's here. And so this is what's
called soft takeover. So in order for this
midi keyboard to work, and I'm now I'm
just going to pull back so you can see my knob. So once I reach that, now the, now this knob kicks in. Now you can actually
see the numbers moving. If I go to another bank, you can see that when we
increase and decrease this, the little grayed
out part right here, it's a little bit of
a different color. You can see that the
38 is not moving until we reach what it was
previously on the other bank. And there you go. Okay. So don't worry, I'm going to break down
everything you need to know for how to get hands-on
mixing here in FL Studio. It's a really, really
enjoyable workflow. Again, I am going
to be focusing on fab filter plug-ins because
that's what I use to teach. You do not need fab
filter plug-ins because the approach is going to
work for most plugins. Every single plug-in is just
a little bit different. But yeah, I really think
you're going to get a really good fun experience in FL Studio if you want
the hands-on mixing. Now the con of this is these
are not motorized faders, and that's why you have to use that soft takeover,
which I just showed you. And most midi keyboards
have that built-in. Again, this is the M
Audio oxygen pero. You do not need
this midi keyboard, but that is just for you to know as we go along
in this course. So if you're interested in roll, and I will show you how to set
this up inside the course.
2. 1-1 - Hands-On Example: So before getting further into this course and talking about
how to set everything up, I just wanted to first show you a little hands on workflow. And just for you to see like, oh wow, I really can
see how that can help. So again, I, I'm
gonna be teaching you through the filter
plugins in this course. So if I just open up the pro C2, this is a single
band compressor. What makes it so powerful
is you have different, different styles of
compression built into the single one compressor. Which means I don't
need to be opening up tons of different plugins. I can still open up
this same plug-in. And if I want to be
unique on a certain, a certain sound or whatever, I can select a different
style of compression. So it really only have to learn one compressor and I still
get different sounds. Now check this out. I can actually go through the different styles of
compression from my slider. So watch this slider. You can see it's
going from pumping to punch the bus to mastering. Okay, So this is all off
of the midi keyboard. Now again, every single plug-in and is a
little bit different. And in order to
find out what you can setup with your sliders. And again, I'm going to break
this down in the course. You just click up here and
you go browse parameters. And so this is the FAB
filter proceed to. And you can see these
are all the things that we can set up to a
knob and a slider. So only up to here, so host bypass, up
to here to style. But what I want to show
you is check this out. So my very first knob
is the threshold. And if you look here
in the top left, you can see it's blue. The blue is unique because it is called override global link. Now you can go link
to controller, but that is only per project. Overall, global link
means that even if you open up this plugin
and a different project, new or old, you can keep using these settings and this
is why it's so powerful. Okay, So check this out. The next knob is the ratio. The next knob is the attack. The next knob is the release. The knob after that
I have as the knee. So again, this isn't gonna be a mixing course in a sense of teaching you
how to use a compressor. But I will fill you in as we go. So the knee is
essentially if you want to be more into the body of the audio or if you just
want to hit the peaks, OK, So Check this out. If we were, let's say
mixing this piano. Again. Now we have
two hands with a most you're restricted just
to one thing at a time. And so you can really
get the hands-on mixing that you always
see in the studio. And you can really start
hearing what you're doing. And that's why I just wanted
to create this course and share it with you because
it's really so powerful. Now again, every plugin
is gonna be different. And I'm just going to again show you off the
fat filter plugins. I will be creating a video about some common FL Studio plugins if you want a similar workflow, but I can't promise you're
gonna get the same workflow. Okay. So let's say we go
back to that knee. We have the knee here again, I'm using my knob and you can see it's moving
right here. Okay? So depending on the sound
that we're working on, let's just say, let's say we're a little bit more
aggressive on that ratio. Let's say we want to
just hit the peaks. So we just kinda dial back a little bit and
then we can hit, hit our threshold and look, I can do two things at once. All right. So I'm just gonna kinda
keep walking through. So again, that is the knee. This one here is the hold. Now, actually you can see that
the hole is a bit choppy. So if I right-click on that
and go override global link, I actually didn't
have smoothing on, so I actually want that enabled. I'll go accept and
you can see it's much smoother now and I'll break
all this down for you. Don't worry, it's
not too intense. This one is that the look ahead, but one thing you
can notice is it's disabled like it's grayed
out compared to these ones. But watch this, if
you right-click, you can, you know, not everything is as automatable like through
an Albert slider, but in this case the pro C2. So again, I'm just going to
right-click the look ahead. You can see I haven't checked
off and I have it too. Slider. And again, we're
also going to talk about the mapping formula
just a little bit. I'm not an expert
on these at all. I was just playing around
with it to fine tune them and I'll share what I
discovered as I went along. Okay, so this is called
your Global Link settings, and this is the
mapping formula, okay? So you can be putting in different numbers here
to get different setups. Now, what I wanted to share
with you was with the output. So again, I had a special
mapping formula there, which is kind of a
little bit funky, right? But what it's allowing me to do, and also I don't have
the smoothing on which I usually
like the smoothing. It looks a lot. It just looks better. So you can see that
when if I go full, it allows me to go to plus 11. And if I put it to the bottom, I don't have any it's always
not giving me any volume. So if I go up, it gives me a
boat plus 11, give or take. Again, your midi
keyboard is not perfect. K, That's one thing
to keep in mind that they are a
little bit cheap, but you still get a
pretty good experience. But what I'm trying
to say is when we are using compression, right? We using the threshold,
the ratio again, if you understand how
a compressor works, right, we are reducing
the volume of a sound. Therefore, we want to use
some makeup gain, right? And so I just have
it like plus 11. And maybe I just want
it like a plus four. And I have it just
so I can fine tune. And then check this. So off, on, off, on. Do you see how it's going red? So this allows me to quickly
mix and get the hands-on, often unfair volume comparison. So watch if I right-click and I'll move this up
just so we can see it. So again, this is
the on and off knob. If you are using fab
filter plug-ins, it's highly recommended
to use the often on here, not the often on here because this is ethyl Studios often on. This is fab filters own
built-in off and on. And they have special code to prevent kinda glitches and pops when you're
turning it off and on. Okay, So this way I
just right-click, go override global link. And you can see that I've
set it up just like this, and I'll break all this down for you and why I've set it up. Okay, so again, I can turn this compressor
often on and let me just hit play and I'll play with this compressor
and I also have it set up on the EQ as well. So check this out. We can go left and right, we can go up and down. We can adjust the Q,
K and make it tight. And the pro Q3 even allows
you to do the dynamic. So let's just make this
a little bit smaller. So it also has the
dynamic compression, which you can see I
can do right here. And all you have to do is
you just right-click any of these things and
you go overwrite global link and you set it up. And because you have
the different banks, you go to your different banks. Now, the next bank is
actually the second one. So right now it's orange. It's controlling the green
band to go to the next bank. You can see that now it will
be controlling this band. And it's this, I set up
the exact same way in a sense of up and
down, left and right. If we want to narrow
a narrow or wide Q. And again, I have
the compression. And so let's just hit play, and I'll just give you just
a quick little example. So here is this track is
called piece for my family. It's a pretty powerful
little, a little b. So we're gonna go to
this, this piano. And again, so I can fine-tune
this Pm however I want. So this pianos bit loud. So again, that's
where I can turn down the volume again.
Look right here. That's the master volume
of this compressor. Switch. If you turn
it off, turn it on. You, I need a little bit louder. Now, check this so we can really fine tune our
attack or Elise whenever we want to do to get hands on mixing more aggressively
on the ratio. I open up the
attack maybe again, I'm not saying that
these settings are good, but I'm just showing you
that this is what we can do with hands on mixing I
can do to look ahead. I can do the whole eye. Can we even have the range? So in other words, it's just not allowing compression
to happen as much. Kevin kind of dial it back. Now, every compressors
different, but this is why I suggest the fab filter plug-ins because you can see that we can access pretty much everything
when it comes to compression with our
audio, with our piano. Super, super powerful, right? If I load up the EQ here, you can see that I have the very right knob to change
the type of bandage is. And again, you just
right-click and go overwrite global link. And you can go through all of these different shapes when
it comes to your band. So if I want a high cut, if I want a notch, if I want a bandpass, again, it's a little sensitive, so I just got to move
that knob slowly. But yeah, you can get
all the different bands, shapes, whatever you wanna do when you're
mixing your music. Again, we have the dynamic EQ. I have it set up where I can
do upwards and downwards. Again, this is only
towards the pro Q three. So this one here,
this knob right here, I have it set up where
I can adjust how aggressive I want
the slope to be. Alright, So for example, I even have the pro Q3 set up that if I want
to create a band, again, we can only do four bands off of this because
we have four banks. And that's just how
I have it set up. I just selected one bank per band and it allowed
me to get really, really customizable when it
came to the pro Q3 here. So right now I have three bands, which means that this one
is the green one, right? So bank one is the green one. Bank to, I guess
is this blue one. Bank three is this
purply pink one. And if I want to create a band, I can just move this
knob and I had it set up where you
can see that now the red one appeared and
I can go up and down. Okay, so again, this is that soft takeover and this is where you'd have to
look at your screen. And then now once it reaches a certain value, then it works. Okay? So again, you're not getting the best experience as if
like you're at a real studio. But this is a really, really good mixing experience. And you can get hands-on
with two hands. And again, you can. So this is just like the EQ. I'll show you one other
one I have here as well. We'll talk more
about this later on. And I just created a
special one inside a patcher because this
is the pro and B. And so how I like to use a multiband compressor
is I like to adjust each band the same k. So you can use multiband
compressor however you want. Like for example, if
you just wanted to use one band, right? So if we just delete these ones, if you wanted to
set it up this way, you totally can do
that kind of stuff. But what I like to do is again, because this is in
patcher and I'll talk more about the pro
MB in another video. But you can see, Watch this. I can control the
threshold, the ratio. So again, the knobs aren't
laid out the same way. So you really gotta
read and i'll, I'll just do this so that we
can see a little bit better. Okay, so we have the
threshold, the range. Now the range again is really, really powerful because
it just determines how much compression
happens like so even if we're really, really aggressive
on the threshold and the ratio which
is down here. If we're really,
really aggressive, the range only limits us to a certain amount
of compression, which is really,
really powerful, okay? Also the proceeds to have
that built-in as well. But you can just see I
can do it the attack, I can do the release. Now, again, this is doing it for every single one and this had to be done through patcher. And it is created just like
a little setup like this. And I'll show you what I did
further on into this course. Okay, So again, this was a
little bit of a long video, but I just wanted to
show you it's powerful. Alright? And I just, again, I really think this is
course worthy to teach you guys if you want that hands-on experiences,
how to FL Studio. This is something that
I've always wanted and I finally took some time out
to learn how to do it. And it really allowed
my mixing to be way more fun to
get more hands-on. And really listen
and try to find the sound I'm listening for
rather than my mouse always. The most is by far the easiest way to do
things in FL Studio. So when you're doing this, one thing I will talk
about in just a moment in an upcoming video is I always talked to
you about a and B, and I talk to you about
copying and stuff like that. But you'll notice Watch this. If I move the slider, it doesn't allow us to go back. Watch if I open up a
new instance here. Okay, so this is a
brand new compressor. I just opened up on the piano and let me just bring
the piano over here. Sorry, I space is a
little tight here. Okay. So if I want to move knobs
and stuff like that, you can see that it
actually doesn't register it as a mouse movement. And so that's one thing. That's actually a huge drawback
towards this approach. Another thing I couldn't
get to work is the a and B. You can see I'm right-clicking
and nothing's popping up. But whereas if I watch
even the oversampling, you can automate
the oversampling. Or if you wanted to
automate the look ahead, you can automate the look ahead just like I
showed you before. Watch if we have the look
ahead look look aheads on, look aheads off, on, off. I even have it set
up where again, where I can go to the different
styles of compression. It even has an auto on and off
and you can automate this. So look, I have auto on, off and then I think
I even have the, So that's the look ahead, that this is the auto gain. So sometimes these
plugins have auto gain, which means that when
compression is happening, it's helping compensate for you, which is really,
really powerful. And then you can just fine tune. Again, look down here
at the master volume. You can fine tune and
then turn it off and on. So when you're
mixing, you can get a really fair volume comparison. But there's some things which
you've just can't automate. And I even reached
out to fab filter and it's not possible. So that kind of sucks because I always like to do a
and B comparison. But that's just one thing
to be aware of that when you are moving your
knobs and sliders, the fab filter plugins do not register it as a most movement. So watch if I delete this
loaded up again and I get, I'm going to stress this
again in another video, but if you've made it this far, I just want to share that
with you to be aware of. So you can see I'm
moving any knob, any knob, any slider
off my midi keyboard. And we're not getting
a before and after. Okay, watch if I move my mouse. Now, we've got a
before and after. So watch, boom, boom, boom. Okay. So that's it for this video. I just wanted to show you the hands-on experience
that you can be getting with FAB
filter plugins. I even have this set
up with the pro L2, where again we have the gain. So this is actually often on
and then this is the gain. Alright? And with the fab filter pro L, it has a really cool
one-to-one feature, which means that
as I'm increasing, it's actually
decreasing the output, which is very similar to if you hold on Alt, you can see it. You see how it's
moving the output and the input at the
same time, right? Because I'm holding on Alt. Again, always look
in the bottom left. You can see my
keyboard shortcuts. So this is really important
because for example, if we hit play here
and this piano, let's just turn off my
Effects I did there. So if we're mastering this track and we want
to listen to limiting, so I would be increasing
it like this. And we can listen
to how our peaks sound being limited
and a fair volume, because you can see
it's increasing the volume and
decreasing the output. And we're getting some
limiting going on. And we can go before
and after, right. And so all I'm just trying
to share with you is I even have this setup where
I can just enable this. And again, I can right-click. You can see I can
right-click and I have that set up as a slider. And so let me just
find that quickly. So let's just see
here. So again, this is the this is
the main volume. This is the on-off. I've always tried to set
these two up the exact same from plugin to plug-in with these
fab filter plugins, this is the volume,
this is the on and off. That way you can
always have your hand here to go on and off. And you can adjust volume. Very, very important
for workflow. The next one is, again, there you go. That's one-to-one. And that's really
important because if I want to hear that limiting, I'm good to go, then I probably set up the oversampling
and other things too. We'll talk more about
that in upcoming videos. But there you guys go. Hands-on mixing experience. Keep watching. I'll show you how to
set it all up again.
3. 2-1 - Backing Up Your FL Studio Mapping Settings: Alright, so the
first thing you need to do before you do anything regarding this hands-on
and global linking is backing up FL Studio. And I'm going to show
you how to do that. So for me personally, I use what's called
the stream deck. And I have FL Studio set up all within here and
it's super powerful. And so I have one called
mapping FL Studio. And we'll just pull
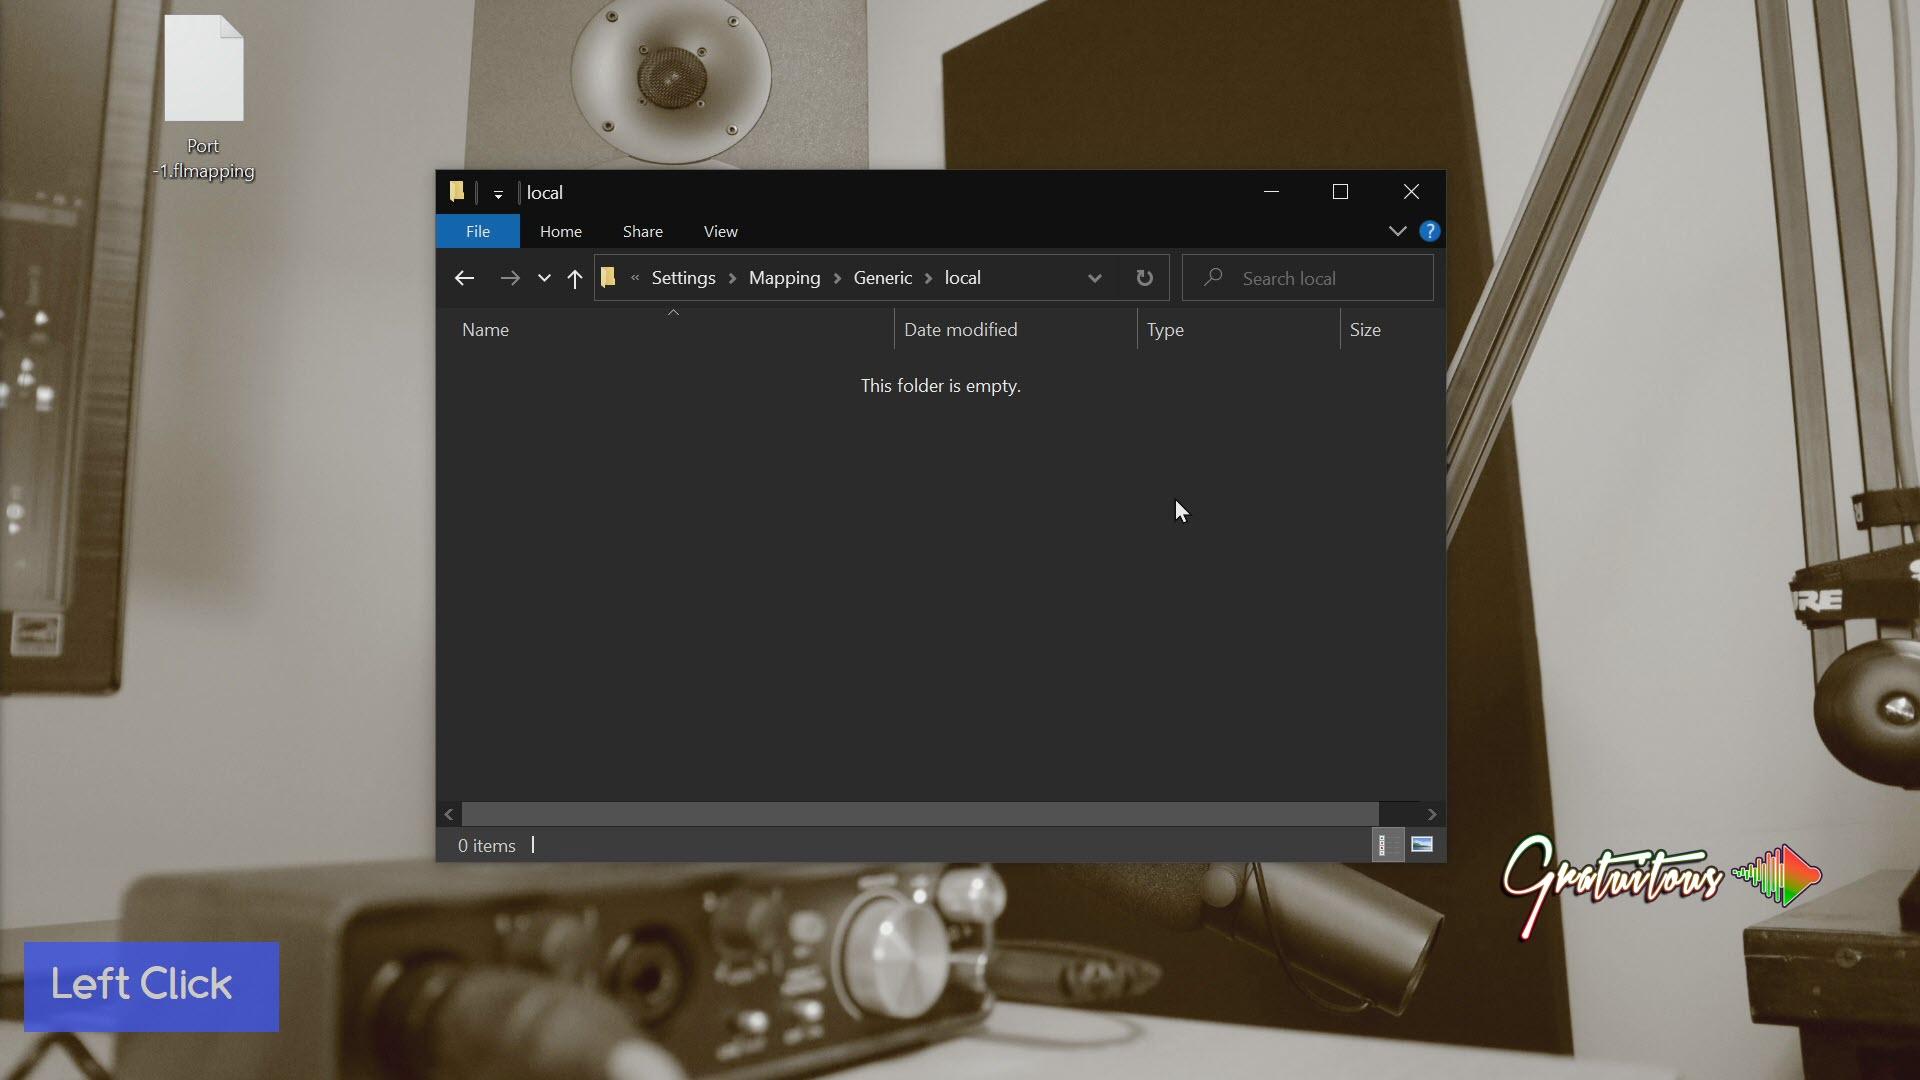
this up right here. And so this is the file that you want to back up and where
this file is located, it's located in your documents. This is both for
Windows and Mac. You're going to
go to Image line. You're gonna go to FL Studio, you're gonna go to Settings. You are going to go to mapping. Okay? It didn't generic, it's in local, and there you go. Now, this file is different for each midi controller I
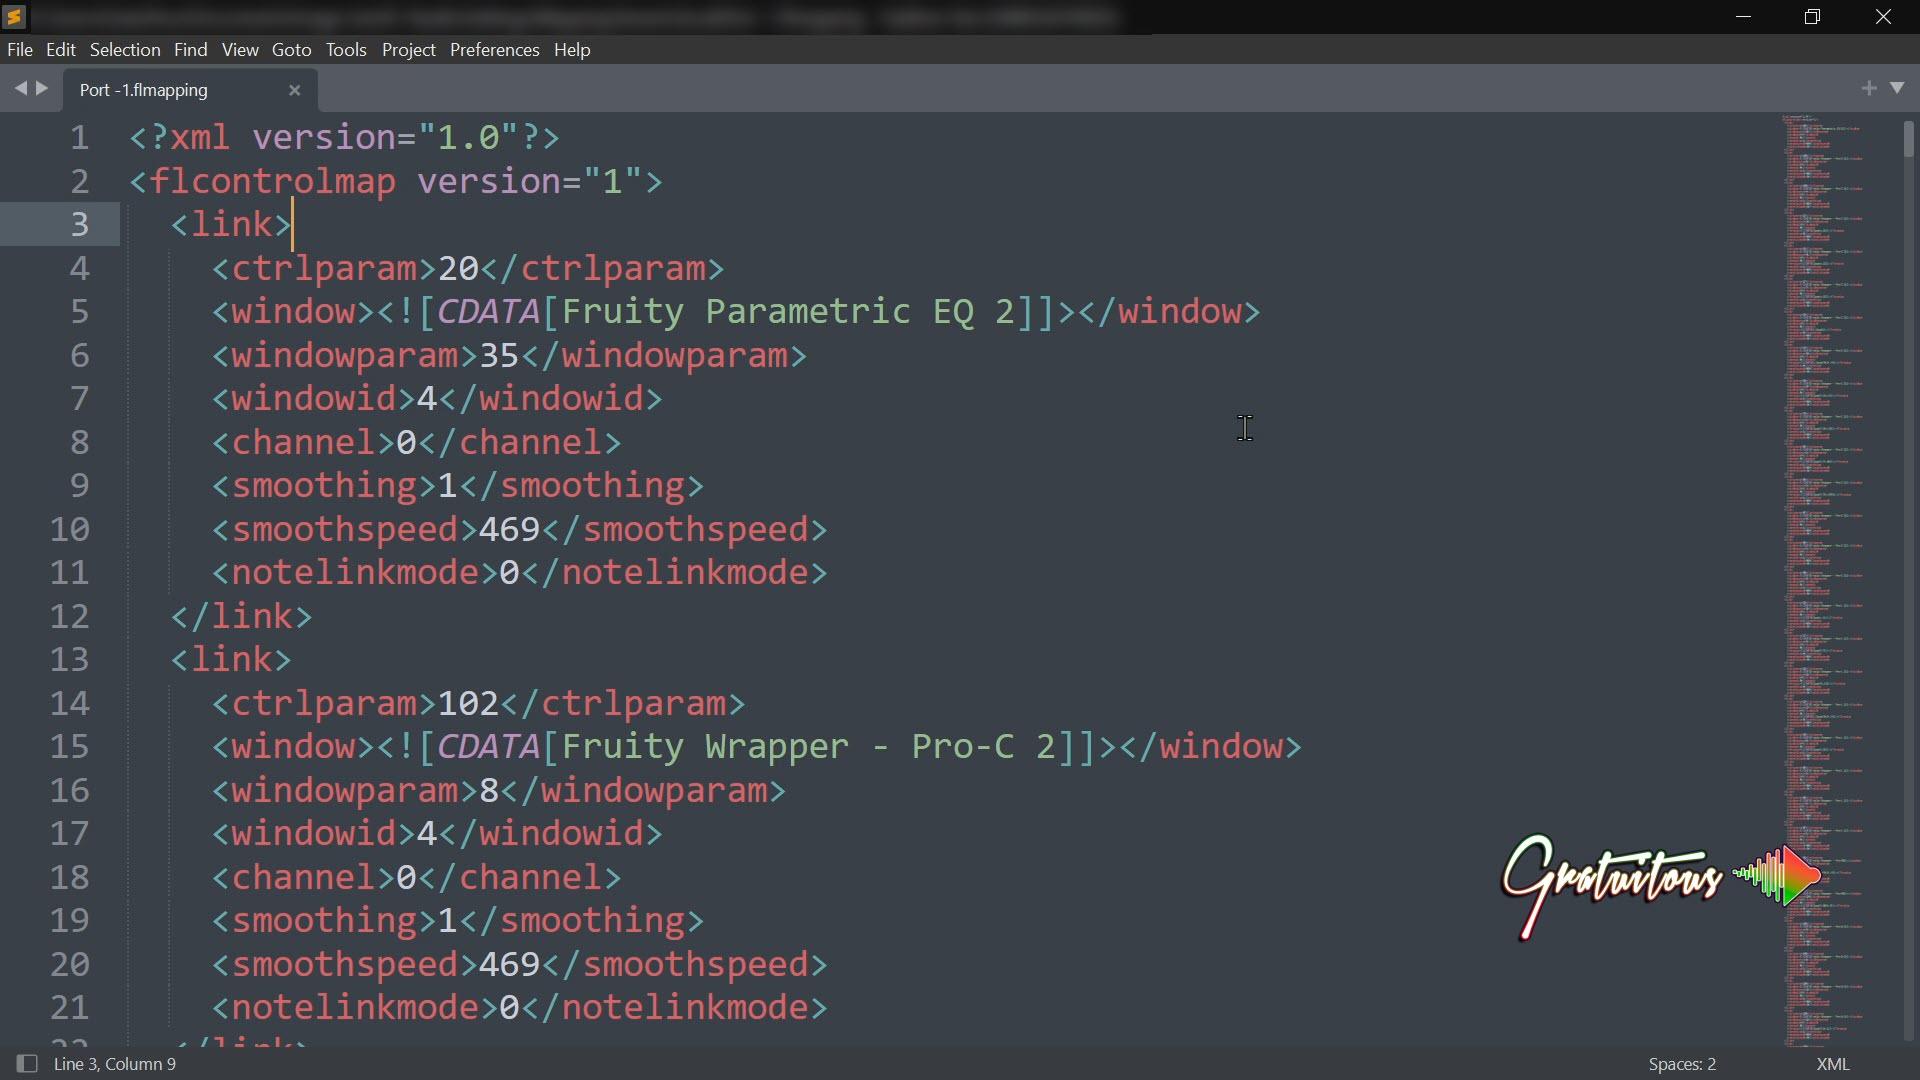
believe that you use, okay, and if we open it up, you are going to see that FL Studio stores
it all in what's called XML language, okay? And again, you don't have
to look at this at all. But if you are having
some problems in terms of some
routing or whatever, this is where you can fix it. Fl Studio does recommend to like not really touched this because it can get really, really messy. But just one thing to note is this is just
essentially code. And whenever we're talking
about code usually has an opening and a closing tag. You can see the closing tag
has that forward slash. That's all I'm going
to talk about though. But I'm just showing you that this is what you want to backup. So if you have that
custom music folder, which I always
talk to you about, and if you don't
check out my course, It's called a specific
music production folder. This, you want to
take this and you want to copy this
somewhere and back it up. Because what happens is if you get overwhelmed or if you have too many things set
up and you're just like, Oh, they get you write this. If I delete this, okay, I will delete
this right now. What we will do is we will
go into FL Studio and what you have to do
is you actually have to close FL Studio. And then we have to
reopen FL Studio. Now when I go to move a
slider or a knob or anything, right, you can look
in the very top left here and it's green. So green in FL Studio
means that the, the actual knob or slider
is not mapped to anything. Okay, whereas watch this. If I, so right now
if I look in here, we don't have that file that it said port
something, right? We don't have that file anymore. But if I right-click and go over our global link and this
little window pops up again. I usually like to have
smoothing enabled because I'm going
to show you what it looks like without smoothing. So all you have to do
is just move any knob. So whatever knob that we want to set up to this threshold. So for example, the threshold, I right-click it, go
override global link. And if I do this
without smoothing, you can see it looks like it's like my computer can
barely even handle it. But my computer is
pretty powerful and so it can definitely
handle and make it smooth. So all you do is enable
smoothing and now you're back to that nice kinda look. You can play with the smoothing. I don't suggest it. And the reason I say that is because usually in FL Studio, if we move a knob a certain way, you can right-click and
copy the value, right? And so what I'm trying to say is if you go
over I Global Link, you are not able to right-click
on it to copy the value. You can see on the bottom left,
I'm right-clicking right. So left-click, right-click it, so it's doing the same
thing, so we're not able to copy and paste that value. And so watch, I'm just
going to reset that. I'm going to enable smoothing and I'm just going
to move this knob. And now we get a
nice smooth feeling. Okay? But the thing is what I
was finding when I was mixing is a bit sensitive. And that's where I'm
going to talk to you about the mapping formula. So if you want to edit
what you've done, you just right-click
on it and you go override global link. And then this is where you
can adjust it differently. So here's the mapping formula. You can click right here. And here's a whole bunch
of different ones that you can look at to get an idea. Again, I'm not a professional when this is like
heavy math stuff. I will show some examples
of what I've done. And I'll just do it like
this just so you can kinda see some of those
a little bit more. But again, you can select
the different ones and see what they look like. But one that you may want
to look at is inverted. So for example, if you want the knob or the slider to go
in the opposite direction. So for example, if
you want up to be off and down to be on
or something like that, That's where you
just go inverted. So I just went inverted. So this is the default. And one thing to say. So watch if I just go inverted and I'm just going to copy that. And one thing I'll share before we get into
the mapping formula later is if we type in
something like that, you can hit Enter. And what it's gonna
do is it'll show you what it looks
like right here. And then it will also tell
you if it accepted it. It compiles. Okay? So for example, watch if I use the
slider or this knob. So if I'm going left, you can see it's
actually going right. Okay, So again, it's just
inverted and I right-click it. But in this case, I would
want it to be like just, just like the default,
I just went default. They're going to have
the smoothing on. And that allows us to
get that nice look. But what I will show you in upcoming videos is when
I'm using a compressor, I'm usually never going down
all the way to minus 60. And so that's why I use
the mapping formula because it probably
around maybe 48. That wouldn't be too rare. And if I'm using a
super low threshold, I would also be using a super low ratio or
something like that as well. Okay. But very, very rare
would I be going minus 60? And if I would, that I would probably just use
my most for it. But generally when I'm mixing, I kinda liked it
from anywhere around here to maybe around, maybe like minus four
or something like that. Minus four would be for like maybe a really extreme situation where maybe I'm being really
aggressive on my ratio. But all I'm saying is
in upcoming videos, I'll show you how to fine tune this knob so that you can
kinda limit the range. Okay, but now let's look
at this port and you can see that now I
have set up one knob. I'm going to right-click. I'm just going to open it up. And you can see that it looks
like there's a lot to it. But really I only
have one link swatch. If I close this, we
only have one link. And that was just
the one knob that I set up for the threshold.
There was this one. Alright, let's just
open that up again. So again, whenever
it comes to this, There's an opening
and a closing tag. Now, FL Studio does this for us. We do not need to do this. Okay. I highly suggest
that you do not do it. But what I'm trying
to tell you is we want to make sure
to back this up. So right now this one is the bad one and this
is the one that I just kinda quickly
set up with you. I'm going to delete this. If I drag this in, you can see FL Studio doesn't
load it in right away. You actually have
to close FL Studio. So let's close FL Studio. I will reopen FL Studio. And now that I have
my good one loaded n. Now we can see when
I load this up, we can move our
slider, it's blue. We move our ratio is blue
or attack our release. So this is really,
really awesome. Now, again, you're
going to want to take some time and figure out
what's your workflow. And over time you will discover
the way you like to work. But it's really important
that you keep a backup of this so that if you screw up, you can just come back
at a certain time. And that's really
going to help you. So just make sure
to store this into your custom music folder. And then if you want to set
up your knobs and sliders, which I'll show you
in another video. But you can do it up here.
You can move this one, this one, and you
can right-click and go overall global links. You can do one at a
time, nice and fast. You can do it that way. Or honestly probably
when it comes to this global link
stuff because it's a little bit more potent array. In other words, that
once you set it up, it's across all your projects. You would just right-click
and go override global link and then just do what I showed you there is you would just move it an example. You can see that this
is the mapping formula. So I kinda set it up different. So what this is saying is that if my mouse is
right down here, this is absolutely 0. So this is like that,
minus 60, for example. But because of how I've set
up this, this number here, we're saying that, okay, I only want you to go down
to like maybe minus 40. And I will, we're
actually going to see, so if I turn it
all the way down, you can see I maxed
out at minus 39. So at the moment that's
kinda where I like it. But over time sometimes
I as a mixing, sometimes it might Dino, I'm going to adjust
that a little bit. And so what I would do if
I want to adjust that, I would just go like minus 0.5. And if I hit Enter, you can see that it adjusted
it up there, okay? But I guess it's
back here, so 0.3. So you can see that now it
will go a little bit lower. So it was 0.35, right? You can see it went up.
So if I go 0.3 and if I go except you can see
that our threshold pinging, I'll go a little bit lower
than 39 now it's 42. So I am going to put it
back to the way I had. And I just wanted to
show you that just so that you can kinda
see what's going on. So when you're putting your
numbers in, you hit Enter, it, compiles it for you, and then you're good to go. Okay? So as you can see, I
have a limited range from minus six to minus 39, which is quite adequate
for mixing your music. If you want to go a little bit
lower, you definitely can. Let's just look at
the ratio here. You can see I also set up some
mapping formula in there. Again, you're maybe just
to not be as aggressive in certain ways or I'll
break that down as we go. So again, this video was just making sure you keep
a backup of this. It's just going to
allow you to be really, really aggressive and figure out how you want to work
inside of FL Studio. And then again, in
order to load that, you do have to load it in
close FL Studio and reopen it. Okay, so that is just backing
up this FL mapping file.
4. 2-2 - Understanding Your MIDI Keyboard: Alright, so again,
if you didn't watch the introduction
video to this course, I'm just going to break down
how a midi keyboard works. When it comes to FL Studio, how we find our parameters, and just kinda like
how it all works. Okay? So again, a midi keyboard
has no sounds in it. Alright? When it comes to our
knobs and sliders, it is just like a number. So it's a CC number. And as you can see, if
I move this right here, it says knob one. It's in Bank one, but really it's sending out a
different number than that. And if I load up the
audio preset editor, when it comes to our
knobs and sliders, you can see that it's
actually a CC number. So for example, this one
could be C7 or CC 71. Now this software right here is pertaining just to this
M Audio oxygen pero, not all midi keyboards
allow you to, allow you to set up the
knobs exactly how you want. So sometimes you are kinda stuck with how the company
has set it up. But what makes the
oxygen Pro so powerful is that it comes with this
preset editor software. And you can actually set up
any knob the way you want. Now one thing I do just want to quickly share with
you is I just typed in Midea.org CC lookup and I
click this one right here. It's always nice to go to
the actual official website. There's tons of other websites which have just copied
and pasted what they did. But this is the midi
website, monday.org. One thing to mention
is that when we have the different
numbers here, this is essentially what these different uses
are for these knobs. Okay, So for example, like if we're talking about, let's say 11 or 12, these are already set up parameters which are common
towards certain things. But you can see that there's
ones like undefined, like 14, undefined, undefined. All I'm trying to say
is best, quote unquote, best practices is to set up the midi keyboard to
undefined values. So which means that you
will never conflict because developers have to follow this kind of lists
kind of thing, right? So this is the reason
that there's the list. And you can see that
if we keep going down, there will be like, for example, general, General
Purpose or undefined. Those are the ones that
we can technically use. You want to try to
take advantage of them as much as possible. But if you were to
end up using one of these other ones
within FL Studio, I really don't think
that you're going to run into problems where that where do you might run
into problems is like for different equipment
or a different dog. Okay. I just wanted to get
that out of the way. And with this oxygen Pro, I actually have
123456789 sliders. So again, if I go
to the next bank, then it goes to the next bank of nine sliders is the same
thing with the knobs. This just lets us, when we are getting
hands-on mixing, it allows us to control different parameters
off of different banks. Alright, so again,
we have a 32 knobs. 36 sliders, allows you to get a really,
really good workflow. Now inside FL Studio, there's a couple of things
we got to talk about. The first one is understanding that each
plugin is unique in a sense that 11 plugin might give you a really
good hands-on experience. And then another plugin may not give you as good
of an experience. Okay? And so for example, let's just load up a stock
plug-in just for you to see. So let's just go
the parametric EQ to if you want to adjust
any of these tests. So why should we just
right-click any of these? And you would go override global link and you can
set it up that way. Now, another way to
do it is if you can't right-click the actual knob
or anything like that. Or if you want to try
to find something creative to set up your
knobs and sliders to. You just go up here and you
just go browse parameters. And so as you can see, we have band one,
band two level. Now, usually it's kinda
nice if they would have had banned one all together. But you kinda gotta look
a little bit careful. Okay, So we have band one level and so watch if I
right-click and we go. So watch what I will do
is I'm going to do this. I'm going to bring this over. I'm going to copy it and
I'm going to delete this. And I'll close and
reopen FL Studio. And I'll just open
up the EQ here. And so again, we're just
going to click up here. We're going to browse
the parameters. And again, if you
wanted to go with a band level, you
just right-click. Now again, my suggestion
to you is if you want to set up this hands-on mixing
across multiple projects. So for example, a new
project or an old project. And you want to get
hands-on mixing no matter where you
are in FL Studio, that's where you're going to
do the overall global link. I will talk about this
in our next video. Okay, so let's just go over our global link
and I'm just going to get smoothing as nice. But again, you can
do level there. My suggestion to you
is to try to use what you can visually see
for the best experience. So for example, when
it comes to this band, or I'll move it over here
so we can see it better. I would right-click here. If you want to move
the frequency k, go smoothing, we're
gonna go like this. And now we can go into go
left and right and up and down if you want to
adjust your cue. So for example, let's
just put like that. You want the queue, you go over overall global link smoothing. And so now we have up and down. We have left and right,
and we have the queue. And so watch if I were to close or open up a new instance. That should be stored into the pyramid to EC2 and
that's called a global link. So watch, I'm just going to move it and we can't actually
see it moving there. And I'm going to move the queue or the band over here, and
then we can adjust the q. Okay? So if I go up higher, you can see that
the tighter, right? And so that's how you
find your parameters. So for something like the FAB filter plugins and I will make a separate
video coming up here, like specifically just for the fat filter plugins and then specifically just for
the FL Studio plugins. But I just wanted to
show you what's going on so that you kinda see
what's going on, okay? But all you have to do is
you just select any plug-in. It doesn't matter if it's fab filter plugins a stock plug-in, or if you'd like different
third-party plug-ins, you just click up here, you go, browse parameters
and you can see that it has everything
available to you. So sometimes something that you like if you can't
see something on the screen or if you can't
right-click on the screen, this is where this comes
in value, tons of value. But in this case, what I did was I get, I want my threshold, I
adjusted enabled smoothing. We move the knob and what the ratio we enable
smoothing and I move the knob, okay, so now we
have threshold and ratio setup and that is set up. But again, if you
look here because I deleted and I brought, and I just, I'm
creating a new mapping, one with you right
now as I'm speaking. And as you can see, so the threshold works,
the ratio works. It's blue. But now I move the
other ones and they're not working because
before I showed you, I was I had like the nice setup. And when I set up these knobs, I just kinda try to think, how do I want it set up
in terms of real mixing? So I'll just, I'll focus
on these first four knobs. Okay, So when it comes
to mixing, right, we have our threshold while that makes sense because
it's the first knob, our ratio, that's probably the next knob that's
most important, right? Threshold ratio. Next one. I put it as attack because we have
threshold ratio attack. And then the next
one was released. And so now we have
threshold ratio, attack and release.
There you go. That's how easy it is. Now again, look in the top
left, we see it's blue. And then the ones
that aren't set up, you can see that they are green. Okay. Now, again, so that was just a little overview
of your midi keyboard. So now watch if I
go to another bank, you can see that it's
going to be green. Because now this is
essentially a different knob. And if we go to
that preset editor, you can see on bank one It's C7, but on bank to its CC 78. So it's actually a
different parameter. And so that's just how it works. Okay? Now again, this right here
is just like a default. So for example, if
I'm on bank one, again, don't look at the colors. Just imagine more
on bank one. Okay? So imagine bank one is C7. We go to bank two. Now, it would be like see C7, C8, for example, this knob. So it's no longer see C7. Once you understand how that works when you have
your different banks, is essentially if you just have a different knob in
the same location. And then again, we just
have to be looking at, we have to be looking
at that soft takeover. So again, you can see right here that in order for me
to use this knob, it has to reach this a value. And if, see, if I
don't reach it, it's not going to work. If I load up FL Studio, you can see that it
is not going to work. Okay. So let me just do this,
close out of this. So look in the top
left, you can see what? I'm moving this knob. And you can see that
it's great up to there, but you can also see
it's increasing rate. So sorry. You can't see my
knob at the moment, but you can see that
it is increasing. Okay? You just got to believe
that moving the null Hub. So it's down and
then now it's up. But you can look in the
top of FL Studio and it does not see the
NADH being moved. So you actually have to reach this value in order for
the knob to kick in. So watch, I'm, I'm
so close and watch, I'm gonna do it right now. Now. You can see, look,
look up there. So now it works. So that's what's
called soft takeover. And if I go to the bank
over, you can see that. Okay, so let's just go back. So you can see that I have between the various 0 up to 37. So I have to reach the value of 37 in order for it to kick in. Now because I'm on bank to which you can see by the blue pads. And if you look up
here in FL Studio, it's going to be green because
I don't have that set up. Go to the bank before you can
see it's going to be blue. So blue color the next bank, it's green because
it's not set up. Now. Let's just set it up to let's
say the heart, the knee. But again, usually I
like to try to set everything up on that one bank. So as you can see, this is
all orange and I'll just pull back a little bit so
that it's easier to see. So now let's just say we, on bank two, we're going
to move this knob. And so now we're going to bank
one and it's blue, right? Twerking. We go to a bank to you can
see that now the knees there. But again, I would not
suggest this because now you have two goes
between two banks to be using this single plug-in. Something like the EQ. If we load up the parametric EQ, or sorry, the fab filter pro Q3. So something like this. I tried to only use one
bank per band because that allowed me to get the
full features of the pro Q3. So for example, in
order to create a band, I set it up and I'll show
you that just quickly, but I will show you that
in the upcoming video. So watch browse parameters. It shows us everything that
is pertaining to band one. As you can see, it's a
little more organized. Everything's band
one, and this is everything that we have
pertaining to a single band. Okay? Now, even as you can see, if I'm going up, you can see that it adjusted
different things. They're just doing it for us. But you can see used, okay? And so if we want
to create a band, because with a mouse we just double-click that
creates the band right? But with a midi keyboard, you can right-click the used
car override global link. And for example, if
we want this knob, you can see that it will
create the band for us. Okay? So one thing you
have to be focused on the plugin window, okay? So watch this. Boom on. Now if we wanted
to get hands on. So again, I click here, we go override global link, we want smoothing on, right? You want to adjust the frequency is the next one,
and move it over. And then let's just quickly
do the Q and we'll do that. So I'm just going to
move to the next. Okay. So watch. We
have up and down, left and right, and
then the tight queue. I think I actually
had it the other way. I think I did it. And I'll break that
down in the next video. But I think I did it this way. And then this one
was the up and down. And again, see no smoothing. So you won't have
this smoothing on. It looks way better. But what I'm trying
to say is I liked, in the case of the pro Q3, try to just do one bank as much as you can based off
of what you're doing. If you're having to go over to two or three different banks, it really slows
down your workflow. But in the case of the pro, pro C2 again, so we
have the threshold, we have the ratio, we have
the attack, the release, and then whatever else that would be in your workflow order. That's what I suggest to you. So for example, if you want that knee going to right-click it after the release, we are I would maybe go
like the knee or something. And again, you can see
it's kind of choppy. So again, I didn't do
the smoothing. Okay. And again, I wouldn't suggest
moving this smoothing, just leave it where it is and everything will
look good, okay? So you can see this
looks way better. And there you go. Alright, so again, that's
just your midi keyboard, that is your banks. That is how to find
the parameters. You've got to be
focused on the window. That's where global
links is unique. So if you're using
linked to controller, which is called a project link, are going to talk to
you about that next. It doesn't matter,
even if you're not focused in the window, you'd still be able to
move your knob and slider. So watch so you
can see it's green because I'm not
focused on the pro Q3. If I'm focused on
it now it's blue. So that's one thing
to keep in mind. The window has to be focused. So if I remove that,
you can see watch, I can add that band back in. And now we can get back
into their hands on mixing. Again, I like to
always have my off. So let's right-click that off. So you can see off, on, but you can see
that this is opposite. So watch, I'm just
going to do this. See, up was off and
then down was on. And so that's where again, I'm going to talk
to you more about the mapping formula
in just a moment. But that is where I would go
inverted and watch we go up. So up I went on
down, I went off. To me, that makes more sense. And then here where
the master gain was, because again, you
want to compensate Django smoothing so that
that knob looks better. And I'm going to move that
knob right beside it. Now again, you can
see that if I go up, it's like plus 36, like that is a huge
number, right? Like if we're doing
EQ before and after. And so that is where
I was starting to use the mapping formula stuff. So again, this mapping
formula just allows you to fine tune the
slider or the knob, essentially adjusting the range. You can get way more
complex like with the knob, like what you wanna do
in the mapping formula. But I just kinda set it
up to limit the range. So for example, if
this is 0 to 100%, I would put maybe like
20% to like 60% or however you want
to set it up for that particular knob for
whatever you're doing. Okay, so in this
case of this master, you know, like probably, I want like maybe 12. And the thing is, you can see that the slider, let me just zoom in
on this quickly. You can see that
the slider is full. Okay, So what I'm
trying to also say is if you set up the
mapping formula, it allows you to limit
your range and it allows your slider
to be more precise. For example, at the
top would now be 12. And then again, if you want
to limit it to minus six, and I'll break all that
stuff down for you. But it's just really
important that I explain this stuff to you because these are
the things that I discovered as I went along. And if you just have the
knob and the slider as full, you're not gonna get a very good experience like
you're never going to want to decrease by
infinite, right? Okay, so let's hop to the next video and I'm going
to talk to you about link to controller
and overall global links. Okay? Really, really important to have your head wrapped
around that concept.
5. 2-3 - Project Links vs Global Links Troubleshooting: Okay, so before watching this video about
project links and global links and going further on into the course
for troubleshooting, it's very important
that you understand the different colors if you look in the top left,
right here, okay? So the first thing is if
you're moving a knob or a slider and you're not
getting any information here. It could be either
because a soft takeover, which you'll learn more
about in this course, or it's because your midi
keyboard is not enabled. So you can see my midi keyboard, I clicked it when enabled. Now if I move the knob, no color means either
soft takeovers happening or your midi
keyboard is not enabled. If you are seeing
green, that is good. That is saying that your
midi keyboard numbers slider is being detected, but it's not linked to anything. Okay? Now when you see orange, orange is a project link. We're not using these
in this course, but I just want you to see that when we see an orange color, that means that it's
a project link. And what happens with
the project links. If you click to a
different window, a project link will still work. You can see that the
channel rack is not focused if I click
the channel rack, so it's still going to
work no matter what. And a project link is orange. Okay, go to reset that. Now let's say we right-click
and go global link, which is what we wanna
do in this course. You can see that it is blue. So blue is what we are wanting
to see for a global link, but we have to actually
focus on the window. If I click onto the mixer, you can see it goes green, that same knob, because I have to actually
focus on the window. Now, if you right-click
and you go Project link, it overwrites the global link. Okay? So watch, I'm going to move
that same knob and you can see it's going up
and down right here. But I've even have a focus
on the channel Iraq. I can't get that global link back even though it's linked. So look at this, you can see
in the Global Link settings, so 79 is that same knob that I'm using as
the global link. We come here and right-click
and go link to controller. This is the same knob
that I just used on 79. But because the
project link takes precedence over the global
link, that's what's happening. Okay, So I'm moving it. This is the, again
looking at the top-left, that if I do my mouse, you can see it doesn't do
the orange and the top-left. But if I do my knob, you can see it's orange, that's the project link. So I'm going to right-click, I'm going to reset that. That is how you
reset parameters. Okay? So with that reset, again, I'm focused on the mixer. If I move that same knob, it's going to be green
because it's not linked to anything on the mixer
for a global link, but it is still linked to that volume knob on
the channel rack. So if I focus the channel
rack window, now it's blue. Okay, so just a quick recap before we get
into this video. So if you are seeing nothing up here is because either
soft takeovers happening, you get soft takeover
when you go through the different banks or your
midi keyboard is not enabled, you can come up here to Options. Or I always like the keyboard
shortcut F ten, right? Just make sure it's enabled. If you are getting green, that means that
your midi keyboard is sending information,
which is good. And then if it's blue, that is a global link. By right-clicking
going global link, if it is orange, it is linked to controller. Alright, so again, I deleted
what we did to start fresh. So when I open up FL Studio
here, nothing is set up. Okay, and this will just
allow us to keep starting fresh and allow you to see
exactly what's going on. Okay? So the first thing
that I suggest to you is to look up for global links. And so again, this was
the midi keyboard stuff. So I would go project
links versus global links. And this will take you to FL
Studio using a, using this. Okay? So you need to learn this because it's really
important for you to understand. Okay? So a project link is, let
me just zoom in here. And I will do just the monitor. Alright, so a project link is per session and it
saved per project. That's really important to know. So whatever you are
doing, like for example, if you want to have a knob or a slider setup only for
that certain project. That's what a project link is. So if I go to FL Studio,
we right-click here. You can see that there's
link to controller, and this is a project link, and then there's global links. Now one thing to mention
is global links. I think used to be called
override generic links. So if you're using an older
version of FL Studio, they made it now global link. Okay, so it's the same thing. Alright, so Project Lincoln, they have the highest
priority and they override a global link. Let's really important
to know that when we're setting up global links, if we want to get
hands-on mixing, the project links,
override the global links. But what I want to say
is the project link is a per session and it has
priority over the global link, which means that it
doesn't matter if you have a window open and let's
just get into it. Okay. Alright, so let's just
load up something. Let's just, let's
just mix it up. Let's go like FL keys. You can right-click a knob and let's go link to controller. Okay, So let's just
say this overdrive. So I'm going to move a knob. And again, if you want
to enable smoothing, I would recommend
it because it just looks way better. Okay? So if I hit a key. Now remember, look in the
top left, what do you see? It's orange. So this is a project
link and swatch. If I click away
into the playlist, you can see it still works. But if I right-click the release and go
override global link. So in other words, we want, we want to set this up no matter what project we're
working in forever, okay? Depending on this file that
we're gonna be working with. Okay, so now what I wanna do is we're going to again enabled smoothing because
it looks better. And we're going to
move our second knob. Look in the top-left, it's blue, but watch when I focus
on the playlist, it doesn't work anymore. But if I go to the first knob, which is a project
link overdrive, you can see it works. So I'm still focused on
the playlist and watch, so the release doesn't work. And you can see that
it's actually green, which means that it's not
assigned to anything. But as soon as I click on the FL keys is now blue
and the releases moving. Okay? So that is the difference between a project link
and a global link. A global link allows
you to set it up over multiple projects. So watch this. I didn't even save
anything in this project. And if I were to open
up a new project, the release would work and the overdrive would not work
because this is per project. Okay, so let's just go New. And let's just load
up the FL keys again. Because again, how
it works is you can see that they created
a file for us. And if we look at
it Just quickly, there should be one
thing in there only. Okay. And it should be just yeah, it doesn't say any
words that way, but it is for the NFL keys. And maybe like this parameter, maybe this is like the release
or however it's set up for that controller,
right? That plug-in. Just want to keep
filling you in on this because it's
really important. You can kinda troubleshoot. So like I said, this first knob, you can see it's green. It should be controlling
the overdrive. If we right-click it,
there's no checkmark there, but watch the release will work. Okay. And this is why when I was explaining to you about
the fab filter plugins, if we want to right-click
override global link, we want to move it. You can see it's blue, which means that we can
get hands-on mixing, but as soon as we click
away, it's not working. Okay, So that's a global
link versus again, let's go to overdrive and
I'll go link to controller. But let's use maybe
this far knob just to kinda keep it different. Okay, So we have a project link, and again, it's orange. If we click away, it's
still working. Okay? So again, that's project
links versus global links. And again, now when it
comes to troubleshooting, just really look at your colors. That's really going
to help you identify. So first of all,
if you're moving something and it's not working, That's the problem, okay, so you have to see
something up here. Fl Studio really
teaches you a lot. If you look up here, it doesn't matter if you
are mixing your music. For example, if I'm hovered here you can see
this is the panning. We're padding left,
we're panning right? Look in the top-left.
Wait, we have volume. It's the same thing
when it comes to this midi keyboard stuff. So if I'm gonna move it up, you can see it's green. If I move the one knob, which is going to move, it will move the overdrive. You can see it is orange,
so as a project link. And then watch if
I move this knob, you can see it's still green
because I'm not focused, but as soon as unfocused is now or should be blue or sorry, I think it's a
second knob by bad. Yeah, so the release
is global link. Okay? Now, if you are not
getting anything up here, again, you could be on a
different bank, right? And so you have to reach
that soft takeover value. So just like we were
talking about before, if we're going to move slider, you can see that it has
to reach the value. So if you're looking up
here, you're not seeing any light is because this
is called soft takeover. It's when you have
different banks. That's how they have implemented for you to
use the different knobs. Otherwise, what would happen is as soon as you
would move a knob, all your all your settings were just like jump
all over the place. So again, I have to
bring this down again. Look in the top left of FL
Studio here there's no, there's no signal
essentially being sent. Once it reaches, it's going to be green because
that's the first knob. And there you go. Okay. So that is project links,
which is right-clicking. That's a link to controller
that's per project. If you save it, I guess it
stores it into the FLP. The global links are
super, super powerful. The global links store
into this file right here. And again, how you access this file is you're just going
to go to your documents. Okay? You're gonna
go to Image line. We're gonna go to FL Studio
is in your settings, it is in your mapping,
generic, local. And there you go. Now I
believe if you are going to be doing this over multiple
midi keyboards, that I believe that you're
going to have different files, okay, so that's just
one thing to know. So I think that's
it for this video, we talked about project links, global links, a little
bit of troubleshooting. Again, just look up here always. And then also to enable
your midi keyboard, you just got to make sure
that your midi keyboard or controller is enabled, Okay? And you just plug it into USB, turn it on, you
should see it here. You got to make sure that you
click on it and enable it. And then depending on your
midi keyboard or controller, if it's not working good, you can select a
different device. Or if it does have a mini
script or something like that, then you can also load it in if your device requires that stuff. Now in the next video,
I'm just going to talk more about mapping and a bit of the mapping
formulas that's going to show you how to
limit the range. So for example, if we
don't want it to go to 0, if we don't want to go to 100%, If we wanted to
kinda be like this. But obviously the knob is
going to be going all the way. But we just want to kinda
want to limit the range. That's what we're
going to cover next.
6. 2-4-1 - Mapping Formulas Tweaking [PART 1]: Okay, so before getting into this video regarding
mapping formulas, I just want to break down some important things
that you need to know. Again, referenced
this video regarding the mapping formulas anytime
I'm talking about them. But this is all pertaining to linking your
knobs and sliders. Okay, here is how to
backup your global links, but I already showed
you It's just in this file right here. It's this one right here. Now, if you do select a different midi
controller in FL Studio, I believe that it does actually create a
different file for you. And if you are using
different port numbers, I believe it will create a
different file for you too, but that's getting technical. In other words, if you're using multiple midi keyboards are
multiple midi controllers. I'm just going to keep it really simple because I just have one midi keyboard and we're
just gonna go with that. Okay? So this is the
main window that we're gonna be looking at
regarding the mapping formula. But before we get into
the mapping formula, I just want to quickly talk
about what you're looking at. So I'm just gonna break it
down what we need to know. The port number and
the channel number is if you want to get into kinda funky stuff with multiple midi keyboards
and stuff like that. So the port number we're not
going to set the channel is gonna be number
one for the control. That is what's
called the CC number or the continuous
controller number. And that is when I was
talking about your knob, which is C7, T1, or CC 72. And if we have auto detect
when we move a knob, it automatically puts
it in there for us, but you can manually click
and drag if you want. On the Omni, I created a
bonus video for you for this. And then also I'll just below, I'll talk quickly in a second, but there's different modes
if you want to get funky with how the knob
actually operates. The internal controller is
if you want to sit up like a automation clips and can
I wrote them internally? There's really powerful
things you can do with that. Here is the mapping formula. As you can see. It can actually get
really intense. It's all to do with heavy math. But I just broke it
down super simple for myself to get it to
work to how I wanted. And then there is the
smoothing right here. Now, let's just
quickly talk about the mode and then one
other thing as well. So again, this is all the
information pertaining to the port number, the channel. We're just focused
on this controller and the auto detect, okay, here is the area regarding
the whole D-latch. So again, it just
gets your knob or slider just acting
a little bit funky. Or if you want like a key or something to be
used differently. But there are some knobs which are what's called continuous. And as you can see, believed they talked about it right here. So it's called
endless controllers. So if you have an
endless controller, I believe they have some
information here for you, but my midi keyboard
is an absolute knob, which you will see further
on into this video. And in this course, my knob
has a beginning and an end, and I can't go less than the beginning and I can't
go more than the end. Whereas endless knobs, they are always
continuously moving. So you can look
into this for that. Okay, So let's hop into
FL Studio and I'll quickly break down
how this works. Okay, so again,
inside of FL Studio, if it's a native plugin,
you can right-click. And this is how you can access
the link to controller, which is a project link, but we are focused on global links. Okay? So you can
right-click and go global link and set that up. And the window appears. If you are using a third party plugin and you
can right-click, you're just going to move
the knob and you can come up here to
tools last tweaked. And this is where you
can access that menu. You can also do it
just by clicking right here and go multi-legged
to controller. And this is actually a
really powerful workflow. So for example, if you know that you want to set
up decay release, overdrive, an LFO for example. Let's just move those.
So as you can see, decay, release,
overdrive, an LFO. Now, instead of
just moving a knob, that's going to do
project linked. But what you wanna
do, global link. So if you right-click
the multi link, you can go override
global links. Now, what I would
suggest is again, just enable your smoothing. And if you move the knobs now, you can see it's
doing it for us now. I just missed that
one, so I'm gonna go back to the release and
I want the smoothing, but you can see it
actually routed that number that go back to the decay and
routed the numbers. So let's go to the overdrive. You can see that there's
no number in there. So I'm gonna go smoothing
to my third knob and then the LFO rate smoothing
that novel care. So again, if I right-click
and go override, you can see that because
auto detect was on, assigned a CC number off
of our midi keyboard, we don't have to worry
about the port number. We don't have to worry
about the channel. And then again, for the mode, I just leave it on the default. Otherwise you're getting
into funky stuff. Now let's talk about the
mapping formula just quickly. Okay? So when it comes to
the mapping formula, my mindset was always, always trying to set
it up in such a way that it just benefitted me
for my mixing workflow. So let's focus on
the release here. Okay, so for example, let's say we want to limit it to here and here or something. So I'm going to right-click
and you can bring up the same window and you
can adjust it later on. So as you can see, I actually don't have
smoothing enabled. Their smoothing always just
looks a little bit better. This is how it works. So input, I believe, is just like the
value of your knob, like whatever the value
that it is sending. So for example, if the knob
is a bit to the right, it's sending that value. If the knobs a bit to the left, it's just setting that
value into FL Studio. Now if you go, So we're going to just click the arrow
right here you go inverted. It actually inverts it. So in other words, it's
just the opposite. So for example, if
you used a slider, down is now up, up is
now down kind of thing. So again, if we click there, you can click these
and you can try the different ones
to see what they do. And they really allow
you to work off of them. Before I get into that, I get, I just want to quickly
say that on this window, you can see that they have
a whole bunch for us. And again, this is getting
into more technical math. You can actually
even click here. And it will show you all the
different types of like, I guess, variables or
functions that you can use. It can get really,
really intense. Alright? But for me, I just
kept it really, really simple just to
achieve what I wanted. And again, if you see any of these and all that's
exactly what I want, then what I suggest is
you can highlight it, copy and paste it in
and then play with it. But you can see that we
have this one and this one. These are these ones right here. We're really useful to me
throughout the course. And I'll just break down
that just quickly here. Let's say the release. So I'm
going to right-click this, go over I Global Link. And we just wanted
to limit the range. So what I would do
is I would come here and let's just go
maybe first half. And then so what we can,
and then from here, I believe you can go plus, and then we'll go 0.5. Alright, so let's too much. So what I'm gonna do is
let's put that to 2.5. And so that might
limit the range. And then the first
section of it, I believe just kinda does
how aggressive it is. Like kinda like the slope. So what you're going to see that at the very right is
going to bring it down. Okay, so let's just go back. I'm just going to
select default. And so how this works is
the very end of the line, is the very beginning
of the knob case. When the knob is at
0, the very end of the line is when the knob is
all the way at its furthest, okay, at its maximum value. And so if I click here, go first half and they get, and I'm just gonna go plus
and then point or 0.25. And now you're going to see,
even though my knob is at 0, it's actually probably about
like twenty-five percent. So in other words, when my actual midi
keyboard knob is at 0, then it can only put the knob to twenty-five
percent of its value. That's the minimum value
that the knob can go. And then the maximum value that the knob can go
when I put my knob, my actual midi keyboard knob, all the way full is that's about 75% kind
of thing there, right? So again, we can kind of adjust if we wanted to be
more aggressive. Let's put that into six. So again, we can fine tune it, but first of all, I
will just hit accept. I will move my, my, my knob here and you're
going to see when it's at 0, it's here, when it's
a full, it's here. So when it comes to
the mapping formula, It's all about just for me, it was fine tuning it. You can get really, really technical that
you can see you can do all these different things
with sine and cosine. And, but that's really just wanted to
quickly show you in regards to the mapping formula. Okay, So when we
look at this window, don't worry about
the port number, don't worry about
the channel number. This number is important, but when we have auto detect on and when we move our knob, it will automatically
assign it for us. Okay, Again, just look
at it blew up here. So when it comes to
the mapping formula, you just saw how I
customize that and that is how I would suggest
you guys approach it. Again, like I said, I'm not a professional
with this at all, but it allowed me to get
exactly how I wanted. So again, I would use something that they
have already given, something like first
half or last half. Again, this one was
really useful for compression because
as you can see, so 50% is essentially
saying that the knob can't go past
the middle point. So if I go to 0.25, we're saying that the knob, the minimum value
of that knob can go is about twenty-five percent. But if I put it to this, we're saying that
the knob cannot go pass its middle point, would essentially, if we
load up the proceed to, you can see that the
middle point would be 0. And that would be
really good for compression because if
I increase the volume, you can see it goes to a
bolt like that plus 11. You can see down there,
and if I bring it back, then it's a 0 k. So essentially watch if
I right-click this one, you can see that I did
not allow it to go past the middle point because
with compression, if you're not doing
upwards compression, because upwards compression
you would want to reduce the volume because
now it's getting louder. But with normal compression, which is reducing the volume, I don't want it to go past 0, essentially the middle
position of the knob. Because again, that's middle, or we can go minus right? And if we look at
the mapping formula, that's how it works. Okay? So now watch if you come over
here and you go one minus. Now. So for example, it
gets kinda weird. So what I would do here
is article maybe 0.25. And so, nope, that's
not what I want. So what I'll do is
I'll put this to 0.25. Okay, so this is like
the opposite direction now, and it put this 2.25. So let's put this,
put this 275, okay? And we'll put this to like 0.1. And so essentially it's just
the opposite directions. So the minimum value is on K and then the maximum
value is just below 50%. So when it came to setting up my particular knob
for the use case, this is how I
approached it again, you can even remove the plus and that number and hit Enter. And you can just get
different numbers, different styles, and
I just hit enter. You can see it's
kinda like that. Alright, and minus
two, minus one. So let's go like a 0.75. And so what you could
do something like that and put this to 0.5. So watch, I'll bring
it back to five. And so this has limits
it in this direction. Again, that's just how
I approached it and it just allowed me to really,
really work, really, really good in a sense that if I wanted the
knob to be opposite, you can work with it that way. Or in this case, if I just wanted to
limit the range. So 0.5. And so again, this is saying the
middle of our knob. So when our knob is at 0, it's at the middle position.
Watch I'll do this. So when an opposite 0, so
my knob is all the way at 0 and it's the middle
position when it's maxed out, we can get max. But again, if we
are using the knob and we want to have
it to the left a little bit and the right. Well then we can just bring that down a little bit with this. So I'll go 0.25. And then again, if you want
it to be less aggressive, you can go to 0.25
or 0.75 and you can fine tune how aggressive you want that
to be if that makes sense. So let's just go 0.5. And then right here, you can see that if
I move that knob, I can go a little bit to the left and a little
bit to the right. Okay, so again, I just
wanted to quickly talk about the mapping formula before
getting into this video. This is a good reference as you continue on
throughout the course. Again, if you are right-clicking and you can't access them, you can also come here to the browse parameters and it shows you everything that you can essentially mapped to a knob or even automate.
You can right-click. You can create automation clip. But again, we're talking about the global links in this course. Again, the link to controller
is the orange one, which is just per project. But if you wanted to
be able to keep mixing hands-on always
with that plug-in, then this is what the
global link is force. Let's get back into the course.
7. 2-4-2 - Mapping Formulas Tweaking [PART 2]: Alright, in this
video we're gonna be talking about mapping formulas. Now. Again, I am not a
professional at all when are like I don't
really understand it fully. I'm the type of person where
I just kinda keep tinkering. I keep entering in some numbers until I get it the way I want. And I'm just going to show
you examples of how I've set things up and I think it's really
gonna help you along. Okay, so what I'm gonna do is
I'm going to delete the one that we just created
there in the last video. I'm going to copy in the one
that I have because this has all my built-in
mapping formulas. Okay? So what I wanna do is I want
to look at the compressor because this is
just going to give you an idea, the
mixing workflow. Now you go ahead and you
set it up however you want. But what I want to share
with you is again, because what I
want to start with is actually the ratio, okay? So when it comes to compression, we want to be able
to have a very, very low ratio, and
we also want to be able to be quite
aggressive on the ratio two. Now when I'm mixing my music, it's very rare that I
go more than like this. And if I really want to, then I would use my mouse. Okay, if we want to get
up to the limiting, because as they say, like
ten to one is like limiting. But it's very rare that
I'm doing that like am I mixing even 721 is
pretty good or whatever. But you can see down here, I have 1.05 and that's a
very, very light ratio. Okay, so if we are going very, very low on the threshold, we can get away with a
very, very light ratio. And let me just
show you how I set this up in my mapping formula. Because again, watch we put
the knob all the way to 0. It's actually 1.05.
But if I max it out, it only goes to
seven to one ratio. And the same thing
with the threshold, like I showed you before, minus six is the max
and if I bring it all the way to 0, it's minus 39. Now again, you can go more or less depending on how
you want to do it. But the ratio, I'm just going to right-click override
global link. And so if we look here, you can see that this
is the mapping formula. Now, you might look at it and
be like What is going on. But watch, I'm just going
to show you how you can fine tune it and get it
exactly how you want. Because this is all I did. Because again, you can come
here and you can select these different ones
and you can kinda see how they've done things. But I think I
really based it off of the first half
and the last half. And then from there
watched you just call it two and hit enter. And then you might go to here. And you can see that this
one right here kinda limits how aggressive it is. So watch if I go 15,
you can see that it's much more,
much more gentle. Or if I go like 85, you can see it's
going to go way up. Let's go 75 or something. So I'm gonna put
back into one I had. And so you can see 0.05, that was that ratio
of 1.05. Watch this. We're going to take this knob, the ratio one, because C 1.05. And if I take this, if I said, oh, well, let's put this to 0.25. This is essentially saying that the minimum my knob can go. So when I put this
all the way to 0, this ratio knob
all the way to 0. We're saying that this knob can only go to twenty-five percent. So watch you can move the knob, but usually I'd just like to hit Accept once the knob
is already set up. So you can see that
this knob right here is actually CC number 85. And watch if we
come to this one, you can see that this
one cc number 79, where this one is CC number 86. So this one was 85. Okay. So I'm going to show you now
that the minimum that we can go on our ratio when
I move this knob is, again, it's kinda
like a percentage, but 1.3 is the minimum
that this knob can go now. So it doesn't really so
much work like that. 1.25, the 1.05 just kinda
worked out that way. But again, it's kinda like
a percentage up that scale. But when I'm mixing
my music, 1.38, let's, we're kind
of getting into a little bit of a heavier ratio. And especially when
we're into mastering, or if we're just wanting
to fine tune that sound. For example, if we
wanna go right into the body and just be really
gentle in that compression, 1.3 ache, be quite aggressive. So I'll just right-click. I come here and
you're just gonna kinda fine tune what, you know, how, how aggressive or how much control you want
over this, this knob. So again, I'm just
going to hit Accept and now let's try that out. So I'll hover my mouse over it. You can see it's 1.17,
It's a little bit better. But again, when it
comes to mastering, I'm like even like 1.03 could be something
that you could use, but I'm just going to
put it back to the, back, back to the way I had it. And again in this case, so
0.7, if I put this 2.5, you can see that it's
just going to lower down this one right here and it's going to make it
not as aggressive. So in other words, we're
still going to get 0.05 on the low end. But now we have limited
our range in compression. So in other words, it won't
be seven to one anymore. Watch it alone. We can only get to three. And so when we're
mixing our music will typically I'd use like four
to one or six or whatever, depending on the sound I'm
going for and sold this to me. Give me a good
mixing experience. Yes, I get a good light
ratio if I'm in the body, but if I'm not hire, well, then it doesn't allow me
to be very aggressive. Right? So this is where I would
then fine-tune it. And I'd say, Okay, well, do you know what let's split that to 75 and let's just see what
that does for us. Okay? So that one actually kinda looks almost like a max-flow actually, no, I think you
can go up higher. So watch if we go to nine. Yeah. Okay. So see you can go up higher. So let's just show that because
you're going to see that now we can go up way
higher on the knob. And it is a 100 to one. So let's back it up. And let's put that to like 0.8. So again, this is all the I was doing when I was fine tuning. And it took me a little while to figure out a way I liked it. But once you get it
the way how you want. So as you can see, this
is the absolute max. I can go on my ratio
nine to one, right? So maybe that would
be really good for mixing and mastering. Okay, Now, the next one
I want to share with you here is again the volume,
the master volume, because I told you that when
we are mixing our music, doesn't matter if you're
using a compressor or an EQ, we want to be able to increase the max gain or the master
gain of this plugin. And we turn off
and on the plugin. So let's just see what
this slider does. K. So if it comes all the
way down to 0, it is 0. Okay? And if I bring it
all the way up, it only allows me
to get to plus 11. So if I right-click it, go over our global link. So 0.5 is essentially, I think, saying that we can't go past 0, which is kinda like the
middle of the slider. Because 0 is 0.
That makes sense. I don't want it to go to a minus three because
if we go minus, minus, we can go,
we can go infinite. And it's like What was compression typically
we are trying to increase the volume because it's reducing the volume if
that makes sense, right? And again, you just, you've
gotta kinda know how compressor works that when the audio comes into
this compressor, right, the audio comes in, it is reducing the volume. And what we're doing is we are bringing the volume back up, okay, to compensate
for the reduction. So because of that, you know, typically we might
be boosting by three decibels or we might be boosting by five decibels it, but we want to be
able to often on, just like that,
off, on, off, on. And we can quickly here, is the volume fair? If it's fair, it allows
us to mix better. So I'll right-click,
go over a global link. And so the 0.5 is
essentially saying, we don't want it to go past 0, but to watch if I
would go to like 0.35, you're going to see that
it's going to drop down. So just dropped down.
I'm just going to accept that and watch if I
move this slider, you're going to see we're
going to get below. So watch minus 11. Well that's not really
going to help me too much. And now it's, now it's 0, so now it doesn't even
work very good, right? But what you could do is if
you wanted to put it to like maybe just a little bit of gain reduction for some reason. So for example, if
we're talking about an EQ, that's a
little bit different. We'll hop over to the pro Q3, and I'll break that down just
a little bit in a second. So this is just
going up and down. This one here is adjusted in
the slope. How aggressive? So this one right here is, is going to allow us to get
a little bit below 0. Okay? But again, with compression, I don't think you'd ever more really want to turn
down your output. Always, you're always gonna be turning it up just a little bit and then turning off and on for the fair
volume comparison. But now you can see
I can go up to 14. This is going to be
for some really, really heavy compression, right? Like we're going to
have to have tons and tons of gain reduction. So the way how I had it
set up was just like this. I hit Enter, it compiles
it for us right here. It also says it's okay,
you can hit Accept. And so this is how I had
this proceed to set up is off with 0 and then
fully up with 11. Now again, because I've
set it up this way, you can see that as the slider
is actually going full, all the way up or
all the way down. We are allowed, we are
able to be more precise. So for example, I can see that right around here,
like you're halfway. So I can kinda fine
tune just a little bit. And it allows me to
get that number right where I want off on. Now, one other thing
I'll quickly share about the proceed to hear is I on the often on I find
tune that a little bit. Okay, so let me just
copy this over. Let me just reset it. And I will turn off and on. Again. Up was off, down was on. It's like, well, I
don't want that. I want I went down to be
off and up to be on mic. That's just how my brain thinks. So I'm going to right-click, go over a global link in the first place to
start would be okay, well I'm going to invert it. Gets the first place to start. Now we can now watch down. Down is off, up is on. But what I did was about
maybe twenty-five percent up. This is where I said I
want this to be off. Okay. So anything above here is on. Anything below here
is off and I'll zoom in on that just so you can see it a little bit better. Because it might sound is kinda like a
little fine detail, but I'm telling you when
I was mixing my music. So right now it's on, again, just look for that red line. So you can see that it's not
actually all right here. So there's quite a ways
I can go down more. And so all I did was I just override the global
link and I set it up just like this so
you can just copy this if you want to
play around with it. Just enter in a
number, hit Enter, and it will show you
what's going on. Okay? And again, I'm only showing you those things because
those are the things that I discovered as I was
mixing fully on, fully OFF was really
kinda tricky. And you can kinda
limit the range on certain knobs and
certain parameters. And the thing is once you
figure out your workflow, again, FL Studio, it
stores it into this file. So if you transfer over to a new computer and
if you're still using the same midi keyboard, your setup is gonna be the same. And that's why this is
so powerful is because it saves it for you to
again, just make sure, you make sure to
backup this file if you're gonna get a
little heavy into this, because I promise
you, you're gonna get a really good workflow. You're gonna be able
to get hands-on. And so now let me
just quickly open up the a fab filter pro q3 because this will show you again the same
thing on the master. So again, we have the
master right here. And again it's the
exact same thing. So when we are mixing our
music, so for example, if we are boosting an EQ, well, we're going to want to reduce the volume a
little bit, right? If we're cutting the EQ or we're probably going to want to
boost the volume a little bit. Now again, this pro Q3 has an auto gain which
is really powerful. Check this out. You can also wrote
that to a slider. Auto gain just allows
you and your mixing. It's kind of compensating the volume for you so
that you don't really have to do so much
with this before and after an often on. It's not perfect. But what I'm saying
is checked that out. You can just use a midi
keyboard to turn it on and off. You just right-click
and you're good to go. What I really wanted to talk
about on this EQ was again, just the master volume. So when we talked
about the compressor, because when it comes to a
compressors master volume, how it works as a compressor, it's reducing the volume
to keep things more even. It's kinda like reducing the peaks in the
most simple terms, K is reducing the peaks and it's making your audio
actually quieter. And what we're doing
is we're using the makeup gain to
bring up that volume. Now when will we turn
off and on the plugin. And again, you can
do it from here too. When you turn off and
on and you're getting a fair volume comparison,
nice and quick. But I really don't
think you'd want to go minus k doesn't
really make sense. When you're using
an EQ, it going minus does make sense
because if we're boosting, well, you're going
to want to turn down that volume even with the auto gain if it is on and off, because it's not perfect. But let's just say we
turned it off to make it like a fair EQ for everybody. If I'm boosting, I'm
going to want to cut. If I'm cutting, I'm
going to want to boost. And then you could
turn off and on. It's the same thing. Right-click override
global link. And this was the setting
I had for my on and off. Again, don't worry if it looks overwhelming or anything
that you could just copy this what
I've written here, it's like one minus
input asterisk for the multiplier,
0.5 minus 0.4. But then you can enter in your own number if
you want to do that. Now check this. So even with the
pro Q3, you can, you can, you can adjust the
zoom like the actual scale. Okay, so watch this. You can see I have my override
global link right here. So again, I'm just going
to find which one it is. So there it is. It's this one right here.
You can just see it on the camera. So check that. Oh, so I can mix my music. And the reason why you'd want
to use the different Zoom is if you're in the mastering stage,
this is bring this down. If you're in the
mastering stage. If you're in the
three range, is, it's really nice to be
able to see that if you bring the band down here, you know that you're only
cutting by one decimal. And again, if you're
getting hands on, so let's just go hands-on. So if I'm mixing, you
can see that it's like a wall of about
decibel up, right? Which is, could be quite
a lot in mastering. But, or if I want to cut, so now I'm down one, right? Or if you wanna go down to two. So that's where the
range is really handy. But if you're mixing your music, such as on your instruments, sometimes if you're, if you're looking at the three range, sometimes it's a
little too zoomed in. Check it out. You can come back
just a little bit. You can go to the
12th or the 30. But again, you just
gotta be looking that now if you're here, this is ten decibels of boost, or it could be ten decibels
of reduction. Okay? So again, that's pretty much
it for the mapping formula. What I would suggest for
you guys is FL Studio does have a helpful page. And I'll load it up
here just a second. But again, when it came
to the master volume, this was like kind
of like the main one which really was
like okay, this, this makes the difference
because it allows me to, of cut and boost only
within a certain range. So watch again, if I'm
going fully up, it's full. If I'm all the way
down now it's only minus 11 plus 11, minus 11. So again, it just allows
the in-between to be way more precise K and then also when it came
to like the often on, it just allowed me to not have to make this slider go
all the way to the bottom. Because again, sometimes these sliders on
a midi keyboard, sometimes they're not that
precise when it comes to like way at the bottom
or way at the top. Okay, now, the last thing
I'll finish off with in this video is if you ever open up a window and
FL Studio and hit F1, it's always going to
bring up a help manual. Now this actually brought us to the same page I was
showing you before. You can come down here. And this one's
actually pretty long, but I'm just going
to find it for you. And so this is the area that
you want to learn about. So this is the
formula menu, okay? All in this area,
the mapping formula. And there is a
really helpful guide regarding mapping formulas, which is right here
at the bottom. But here is some examples
that they give us. Alright, if you wanted to
look like this, but again, this is more of like aggressively
on, aggressively off. And when I was
mixing for the knob, I was more just kinda
wanting to fine tune that. You can even adjust like
curves if you want it to be rounded and all
this kind of stuff. But you can see that, see, I didn't really use
this kind of stuff. I just kept it really simple and I just tried to
limit the range. So how it works is like if you're knob is all the way at 0, it's down here, right? And if your knob is
all the way at 100%, it's like way up here. So essentially you're
just kind of saying that we want the knob to be more
sensitive kind of thing. But yeah, so I think this is, this is where I got
the example for the inverted for the on and off
and then I just adjusted. So let me just share
that one with you. So this is actually
I think this is where I got it for
the on and off. So I just literally came
here to the help manual. I highlighted it. I came here to the on and off. I right-clicked. And I pretty much just pasted
it in and see it's 0.4. So I just pasted that in
and I think I just put 0.4. You can see that's
exactly what I did. So before you can see that now the slider had to
be all the way at 0. I was like, well no, I want
it to be a little more up. And so that's all I was doing. I I kinda come here, I'd find some information. Then I would come back to
FL Studio IDE right-click and I'd kinda fine tune
it exactly how I want it. Okay? And we'll talk more about setting up the fat cells or
plugins in our next video. But again, you can also read
more about the smoothing or anything else pertaining to
this window off of here. Okay, We'll talk a
little bit more about setting up the knobs and
sliders in the next video. And I hope you guys are thinking
of lots of creative ways that you can start setting
up your knobs and sliders and how you can fine tune
them to get a really, really amazing workflow
inside of FL Studio. All hands-on.
8. 3-1 - FabFilter Hands-On [Overview]: Alright, so in this
section of videos, I'm going to break down the different fab
filter plugins into separate videos when we set them up with our midi keyboard. Okay, so again,
I'm going to break down to proceed to the pro Q3, the pro L2, and the pro MBE
B is a little bit tricky. Again, I had to set
it up with patcher if we want it to get this
global link stuff going on. Okay, So this is called patcher. I opened up a plugin
just right here. And then as you can see, there's
a lot of stuff going on. So I'll make a separate
video on that. And then this is a control
surface where I put some knobs and you can see it's threshold ratio, all
that kinda stuff. So all this will be separate videos and I'll make it really easy to understand. One final thing I want to
quickly say is, again, I use the M Audio oxygen Pro and you want to make sure
that you are in preset modes. So when you turn the
midi keyboard on, sometimes it's a door
where it usually is, you turn it on its on dark mode. You want to be in preset mode. And when it is, then
you're knobs and your sliders will work properly. Okay, so we will be going
over the fab filter plugins. You can quickly reference these
videos if you want to set up pro Q or the procedure
or whatever. Okay. So let's get into it.
9. 3-2 - FabFilter Pro C 2 Hands-On: Alright, so I put my
midi keyboard up here. And this just allows you just to see the knobs
and the sliders. That's all you need to see. You don't need to see the keys. And so I mainly just
use the knobs and I use the sliders for a couple more important
things such as, again, use this main slider for the master volume and then
also for the off and on. So you can see it's red is off and then I've
turned up, it's on. Also be looking up here
you can see it's blue. That means is it
is a global link. Okay, so everything I've
been showing so far, it's going to make
more sense now. Okay? One other thing, also, if you are using a third
party plugin, and again, I am using the VS T3 version that allows me to
right-click this. You can right-click the knob. You can move the knob, come to Tools and you can
go last tweaked. And this is where you
can get to that menu, the overall global link. So it's a little bit
of a workaround. But that's why I
use the VSD three. For the fab filter. You can right-click and
it makes it like it's a native plugin.
Get right into it. So we have the threshold, a right-click
override Global Link. And I put that as
my very first knob. The reason I have it like
this is because I want the threshold to be able to. Again, if I go down,
it's minus 39. If I bring it up, the
max is minus six. And this just allows me as I'm mixing my music
or even mastering. I can get into the body and
I can also hit those peaks. So it's not too often that I
want to go like minus four. So I usually find
written, again, these settings can change, but that's how I have it set up. So just like that. And again, each one of these typically has the
smoothing enabled. I don't worry about that knob. I just kinda leave
them all the same. The next one is the ratio. I've set it up just like this. And again, once you hit that, you can move the
knob and it would actually do it for you. But you can see in this
case of my midi keyboard, it's 8585, just means
that's this knob. This just allows me to
get a very low ratio. So from all the way left you
can see I can go to 1.05. And if I increase it for
its seven to one ratio, which is quite a lot
when it comes to mixing. Again, if I want it to
be more aggressive, I could just use my
mouse or I could just be more aggressive with my
mapping formula here. So for example, if I
wanted it to be more, Let's say I'd go 0.75
and I'll hit Enter. And you can see that
it increased up there. So for example, let's
say we want that. So I'm going to press except you can see that now it
was seven to one. Now it goes to eight to one. So maybe that's a
little bit better. So I can go from
1.05, which is very, very minimal, which is
good to get into the body, so on the threshold. But then maybe I want to be able to compress
a little harder. Now. I'll cover the clean after are the different styles, but
again, it's the same thing. You just right-click, you'll
override Global Link. And I actually set that
one up as my third slider. And I'll explain more
about that after. Because again, I told you, I like the first slider
as the master gain. And I did this for all the
plugins that way master gains, this one, this is often on. That's how I use these sliders. Master gain off and on, and then the sliders to the left for kinda like
special things such as changing the style of the compressor or
the look ahead, or the auto release
or the auto gain. That's kinda the sliders. So let's keep going with
the attack and the release. Okay, So we have the
threshold is the first one, the ratio is the second one. Now we're going
to do the attack. So you just right-click
override global link. So it looks like I did fine
tune it just a little bit. So I just did it
like that again, smoothing is enabled
and there is my attack, the attack 0.11. If I want it to go less,
maybe I could have done that. So for example, if it was 0.45 cases that even brought
it down a little bit more. So who wanted my attack
to be more aggressive? It would be like this. So now it goes to
0.036 or something. Okay, so again, I'm just
showing you how you can set this up and how you
can fine tune this stuff. Again, you can just
enter in a number. So for example,
it's calling nine. And if you hit Enter, you
can see I'm gonna get, I won't be able to go as fast
and my attack k is 0.22. Alright, so I'll just
leave it at 0.5. I think that's pretty good. Or if sulfur the threshold, you can see, again, that's
the lowest I can go. That is the highest I can go. The ratio is 1.05, and then all the way
to eight to one, the attack now is quite fast. And then the longest
it can get is 128 milliseconds,
which is pretty long. If I wanted to fine
tune that again, I could just right-click
and do that. So now onto the release. So I'm just going to right-click
this the same thing. So I have the smoothing on. Again, I didn't
adjust how fast or anything it is, and that's it. So we just want
to move the knob. And then you can see that
I actually don't think I did any mapping formula
on the release. Okay. So there you go. But now I can go
as fast as I want, and I can also go
as long as I want. So threshold ratio,
attack and release. The next knob I have is
I have it as the knee. So as you can see,
this is the knee. And if I go to a bit of a
bigger one here, Let's go 18. How the knee works. And I'm just going to be
very aggressive ratio because that's the
easiest way to see it. So the knee when audio
goes over the threshold. So first of all, you have to understand how a
compressor works. So once audio goes
over this threshold, then it's going to
turn down the volume depending on how
much ratio we have. Okay. Now, as you can see, we
have a very hard knee, which means that
the audio actually has to go over this threshold. Whereas if we have
a softer knee, you can see that
compression would actually have started happening before. This knee. Compression would
actually start happening here now and here and here. So you can get more
into the body. So freight now,
if it's at minus, let's just go to
minus six because that's the max my knob can go. So that means that the
audio has to go to minus five or minus four in order to actually see
some gain reduction. However, if we had
more Ni going on, it's actually happening
at minus nine. Some compression is probably starting to happen a little bit. Okay. So that's just
the soft knee comes in. And again, it just depending on the sound you're
working with. If you're working with vocals, it's this a little
bit more consistent, whereas something like
this might be good with snares or a kick drum or, but it's just nice
to be able to, again, watch can use two hands. I can lower my threshold. I can be I can start
adjusting the knee. And at the same
time maybe you can be like k and the ratio. And you can kind of fine
tune how you want to use the ratio to the soft knee. And you can get a really,
really powerful experience. Okay? So if I right-click
the knee again, that is the fifth knob. I didn't know napping formula and then just
have the smoothing. We go to the next knob and we'll see what that
is. That is the hole. The hole is a little tricky, but it's once
compression happens, it waits for a little bit and then it goes to
the release stage, and then it goes back
to normal volume. Okay, so again, I'm not teaching you how to
use a compressor, but if you know how
to use a compressor, that's gonna make sense. So it holds just for a
little extra second. And a good way to see it
is if we open up serum. So serum is a synthesizer
and we have an attack, we have a hole. Now this hole is very similar to the hold of a compressor. It kinda just like
so for example, it goes to maximum volume and
it holds that max volume, then it's gonna
go over to the k. So what I'm trying to say is the proceed to has
this feature of the hold. And it's really nice
to be able to use it. And you can get hands-on and
take advantage of it all, okay, so if I right-click that, we override the global link. I did nothing with
the mapping formula. I have the smoothing enabled. And you just simply
move the knob. This one here is the look ahead, but you can see that
it's not enabled. Now one thing to say
about the look ahead is it is going to
increase some latency. Okay? So if I come
here and go audio, I want you to look
right here, okay? So you can see that depending on how many
plugins you have opened, it increases the
latency depending on what style of
plug-in that you have. So when we have the
look ahead enabled, you can see that the
latency increased a little bit by 20 milliseconds. So by default I usually
have the look ahead off for that reason because
when I'm making the B, I can have a lower latency. I can play my keys, right? Imagine, imagine these
were my keys, right? I can play my keys
with less latency, which means that it
feels more real. Latency is still a huge
problem with music production. And so it's just
for you to be aware of that if you turn
the look ahead on, it just allows
your compressor to look ahead into
the audio signal. It's a really cool
digital feature of the proceeds to and
you just enable, look ahead and you can
look ahead quite far. And what this is doing
is it's just looking at those peaks a little
bit ahead of time. And in other words, it allows the attack to be
a lot more aggressive case. So for example, if we had no
look ahead and have you had, let's say an attack here and you just found that the peaks, we're just still
quite aggressive. If you enable look ahead, then you will start to hear that the peaks are becoming
way more control. Okay, so it's a
really cool feature. And again, you
can, first of all, if I move the knob
here for look ahead, you can see that it's moving
but it's not enabled. And if you want the
hands-on experience, what I did was I
right-clicked and you can map the look ahead on an off to a global link
this exact same way. But in this case, I
actually used a slider. So I did some little
mapping formula there. But that was just because
like I was explaining before, if when it comes to these
sliders, they're not perfect. So I usually instead
of bringing it all the way to the bottom,
I usually like to ask them. And cushion and I like to
have it just a little bit up just so that the slider
is more accurate. Okay. So let's find where it
had that because again, I had my master
volume, which is here. I had my on and off, which is I do this for every
single fat filter plug-in. So master volume on and off, and I'll cover that
in just a second. I right-clicked here when
override Global Link. And I did it reverse. Because now we're
going to change the style of the compressor. So I clicked here,
I want inverted. And so this is a
stylist compressor, which is what I put
this a slider seven. You can see I can go through all of the settings
nice and easy. Now the next one, you can see that I did that
for the auto release, so I just right-clicked it when override Global Link and I just set it up
like this again, just so that has a
little bit more cushion. The auto releases just kind of like it sets the
release for you. And again, you can just kinda
choose do want a bit of a faster or slower release and I guess it kind
of auto adjusts. Or sometimes just using a static number is
sometimes powerful too. The thing is when
it comes to audio, everything's always
kinda different. And it's just nice to have that feature just to be able to if you want it on and you
could just try it quickly. Number five, the slider, this is on and off
for the look ahead. That's just how I
have it set up. But again, you can set
it up however you want. But you can see when
it's down, it's off. When it's up, there
is on. The next one. I must have done this for the auto gain of
the, of this plugin. So again, when you
are compressing and let's just listen just for a little bit so that
you can hear kind of what's going on and
I'll get rid of this. So I have to turn the plugin on so I'll increase this slider. I'll hit Play. So if we had the look ahead on, I think it was number four. So it's going to increase
the volume for us automatically and get his
hearing a more fair comparison. I'm just dialing in this industry aggressively
just so you can kind of here, Let's go a little
bit of a less knee. So we're hearing extremely
aggressive compression. Again, this is on
the master track, but I'm just showing
you that you can get that hands-on mixing. May pull it back and
go more to the body. Will put up the attack
maybe a little bit. So in this case maybe
it's like we don't want the auto gain
will turn it off. Let's turn off the compressor. We can increase
the volume just a little bit because we need
a fair volume comparison. Turn it back up. So again, you can fine tune how you want and
get their hands on. Okay. So let's just see if I
adjusted anything else. So I'm focused on
the Proceed to, I'm going to move
the sliders so I don't use this first one. On my midi keyboard. My first slider is
kinda acting up, so I just have started
just to avoid it. Here is my second slider. So again, it's green. That means it's
mapped to nothing. Number three is
mapped to nothing. So for was the Auto
game right-clicked. So I just set it up just like that and you just
move the slider. That's all you do as the
auto gain number five. So again, it's blue, which means a habit
set up to look ahead. Right-clicked. There you go. Number six, letters
six is this is the auto release and I have it. I didn't say
anything up on that. And they don't have
the smoothing. Again, that is
just kinda like an on and off kind of thing. So to set it up, as you
see, here is seven. So seven is the different
styles of compression. And I put that rate
beside the often on and the master volume for the fact that I can quickly
able if I'm mixing, I know right away
it's just kinda beside my two common
sliders again. So on all fat filter plug-ins you're going to see in
each of these videos, I have the off and on
the master volume. Okay, so let's quickly
look at the off and on. So I right-clicked, went over a Global Link and I set
it up just like this. So one minus the input, I guess that gives
us our reverse look. Okay? So again, you can just kinda copy what I
have right here. And this allows me
to get off and on. Now for the master volume,
this is what I did here. Okay, So I just have it
set up just like this. And you just, you
just move your slide. Once you have your
mapping formula, again, you can enter
in different numbers. You hit Enter and it'll tell
you if it compiles, okay, and if it didn't, it'll explain
Usually what's going on. But I have it set
up just like this. You can, you can copy that. I'll move my slider again, so to increase it
goes to plus 11, and at the very, very
bottom it goes to 0. And again, that's just
because with compression, you are reducing the
volume of the signal and you want to compensate
with more volume. So it's often on, you can hear before and after to see, does it sound better? Does it sound more even? Does it have more punch? Okay, So just a quick
recap on the knobs here, and then we will go
onto the next plug-in. The threshold. Again, I just have it
set up just like this. This smoothing is enabled and
you can just move the knob. So this is a threshold.
The next one is the ratio. So I'll right-click. And this is what it looks like
for the ratio. And again, I can
get max of eight. And I changed that with you. It was a seven, but I
just put it h is for now. But again, you can just
fine-tune it as you go. If you think you want
more ratio, you go ahead. Here's the attack.
I'll right-click. Here is the settings I
have for the attack. And it gives, you could just
move the attack rate there. The next one is the release. Again, I did not do any mapping. I don't think on there. So it's just a
matter of enabling, smoothing and moving the knob. The next one was the knee. So I'll right-click
over a global link. I didn't know mapping formula. I enabled the Smoothing. Otherwise watch it just
looks really, really gross. See how. Just looks like my computer can handle it very good, right? And so if I right-click, if I right-click
that, go smoothing, it just looks way better. The next knob, this
one is the hold. So I just right-clicked and I didn't do any mapping stuff. Again, smoothing is enabled
and I move the knob. The next one is the look ahead. Now again, that one
I think was to do with thinking it was five. Yeah, it was k. So five is enabling
the look ahead, right? So if it's not enabled,
it's not going to work. So we have to look
ahead right here. And again, it has to be on. And let's just see if I
did anything special. I don't think I did. There you go. Okay. And then finally,
the last one which I did not cover is the range. So the range, I'll just show
you the settings first. I did not do anything at all, and I just have it
that very last knobs. So how it works is, let's say you had really, really aggressive
compression going on. Kayla's just bring
it all the way down. Super aggressive on a
ratio, fast attack, long release the
case that we're, we're compressing
this super hard, it's on the master track. The range knob allows you to pull back how much
compression you want to happen. It just compresses as just
a super steady amount depending on how much
you want it to happen. So right now, obviously we're compressing
so aggressively. But again, just kinda showing
you There's a little bit. Usually you want to
have some balance in your music rate
and your compressor. But the cool thing with the
range is, as you can see, this far knob is adjusting
the range right here, right? And so you can kinda,
kinda say, Okay, I don't want you to
compress anymore than like three or four decibels
of gain reduction. So again, one thing you'll have to remember if you are
mixing with your hands, with the knobs like I just
showed you how you're set up. You can't go like
back-and-forth, okay? You can only do that
if you use your mouse. Let's open up a new
instance of pro C2, just so that we
have a blank slate. And you can see that we can
go forward or back. Good. Okay. And if I
adjust the knobs and whatever or any of the sliders so we can't go forward and back. And that's one thing
just to keep in mind that you can't really
get that a and B, but you can get that on and off, which is what I talked about in that five golden pillars of
music production course. You actually have a C, which is your off and on. Again, look down
here. So off and on, if it's a fair
volume comparison, you will be able to
make a better judgment. But if you want to save it, you just got to use
your mouse and you can just use it to scroll wheel. And as soon as you
adjusted a little bit, then you can start
kinda going back. Okay, so that's just one
thing to be aware of. Okay, So the midi keyboard, this approach doesn't
allow you to go back that way because it doesn't register those changes
and it doesn't register the a and
B or the copy. So it would be really
cool if we were able to be able to
get that to setup, but it doesn't work that way. If you want to save
a certain state, then you can just move
a knob a little bit. You can copy it over, go to B, and then you
can get hands-on again. You just got to remember that. As you can see, I can't copy because the plugin
thinks nothing, nothing has changed because I'm only using my midi keyboard. So as soon as you get a
setting that you like, you can adjust it just like with your mouse
just a little bit. And then you can go before
and after kind of thing. If you want to go between
different states of the plugin or you can
just go off and on. So again, that's
the proceed to hope you guys really enjoy your hands on mixing with the pro C2.
10. 3-3 - FabFilter Pro Q 3 Hands-On: Alright, so in this video
we will be talking about the fab filter pro QE3 and how to get it setup for
hands-on mixing. I'm just going to show
you quickly how I have it set up and then I'll show
you how to actually do it. Okay, so again,
these two sliders, you can see that
this is off and on, and we also have
the master volume. So the only difference on this master volume is
we want to make sure that the master volume is
able to go minus and plus. Because again, like I was explaining before,
if we are boost, if we are boosting, that's because it's off,
kind of threw me off there. Okay. So if we're boosting, we are going to
want to cut right? A little bit. And if we are cutting, then we are going to
want to boost our EQ. And then when we turn
off and on our plugin, that allows us to get a
more fair comparison. Now again, the pro Q3 does
have the auto gain feature. That is the range there. So again, I selected the
third slider here as kind of something that I found really
important that I wanted to remember like an
on the compressor. The third slider was changing
the style of compression, which is something that I found what I was doing
hands-on mixing. I was playing around with more, but when I was using
my mouse, I wasn't. So that's kind of a cool thing, like I was being more creative. So how it works is I am going
to first create a band. And how I do that
with pro Q3 is I set up this knob right
here to create a band. I have my left one to do this. So let's first select it
and you can see the knobs. Okay, So it's a matter of just right-clicking the Navajo
override global link. So you can see, I can
go left and right. So again, look at
this knob right here. Look at the up and down. We also have the queue,
which is how tight? And let me just bring
it down a little bit so you can see it better, right? So how tight we can do
this and check this so you can do it
at the same time. If I hit play, right, you can actually mix
and like real-time. Okay, so just to kinda show you, tighten up that queue if you
want to cut and watch this. If I want to create a new band, I'm gonna go to a bank to,
I'm going to move this knob. And there's another band
for us right there. And again now we
have to make sure that we reach that
soft takeover. So that's where you're gonna be looking at your midi keyboard, has got to reach the
soft takeover value. And once you do, then
you're good to go. Okay? So again, I'm just kinda
showing you so I can get hands on mixing gear. Again if you're making the beat, making it nice and fast, That's how fast it can flow. Now, I'll show you that
you can also increase the dynamic
compressions so we can get upwards and we
can get downwards. And that is just off of
the US slider right here. So actually you
have to select it. And you can see it's
happening right there. If I enable it, it just
does automatic. Okay? So in other words, it kinda
sets the threshold for us, but the pro Q3 allows us
to set the manual as well. So now I can get I can adjust
how much reduction I want to happen and how deep I want it to be into
the audio signal, okay, if you can see that there. So again, this is
like our threshold. This is pretty much our
ratio, if that makes sense. And then this one here
again was to create a band. I'll check out this
one right here. I think this is how, how aggressive I want
the slope to be. So you can see I'm getting
to a 48 dB slope, 36. And then the very last
one I adjusted to do just the different styles. So if we select
it, you can see we can get like the notch filter. And again, it's a
little bit sensitive. But I really did find myself getting a
really good workflow. And I really wanted
to pass this on because I use fat
filter plugins a lot. And I think you guys will really enjoy your workflow care. So I'm just going to go default. We will go default. And I'll just show you
how to set this up. Okay, so I will show you how
to set it up on one band. But if you want to set it
up to the other bands, you have to do the
exact same thing. So you're going to have
to go to the next bank, the next bank, the next bank, and you just set it
up for each band. Okay, so it's not too bad, but there is a
little bit of work. Okay? So you're going to
left-click to create the band. So let's see, I have
the first one as, as left and right, so frequency, so
I'd right-click, I went over I global link. And you can see I didn't do, I don't think it did much
mapping formula stuff in here, but I do have the
smoothing, okay? And then you just move the slider so that's left and right. Now, here is the gain. So we're going to right-click. And I did do a little
bit of mapping formula. And I guess this is
just so that I can have a little bit more
control and it wasn't so aggressive care
so much if I want to decrease or let me
just move that again. If I'm moving it and if
it's not working again, always look in the top here. That's how we can troubleshoot, and that's just because
of the soft takeover. So I have to reach a certain value after bringing it down. And there we go. So I must have wanted
to have lots of cut, but then maybe not
as much boost. So I got about 12 DBs
of 12 db a boost. And I did about 24 dB
cut. So there you go. Maybe when I was
mixing my music, I found that's
kinda how I worked. A little bit more. Okay, so typically
when we are mixing, we'd like to cut more
than, than we boost. But I do like to
boost a lot as well. So again, that is the
setting I had for the boost. Alright, so the
next one is the q. So this is how tight
we are setting it. I think it stands for quality, but it's just
essentially is it more gentle or a room or surgical? And sometimes if you're mixing, you can boost up a little bit like that and
all that's the spot. And then you can just kinda
cut it from right there. And if you wanna kinda
like Wide, widen it up. And so the setting for that, I right-clicked and
I just had nothing. Oops. Sometimes if you move the
knob and it goes away, alright, so again, you just
move them up and that's it. So right now this
band is pretty much set up in terms of
just basic mixing. Okay, so if you're
using just a basic EQ, if you do not have the pro Q3, then you'd pretty much be done. But now the pro Q3, it has the dynamic side to it, which is essentially
like compression built into the EQ, which
is really powerful. Now to set it up is really easy. But before I do, you might
ask the question like, when should you use
dynamic compression over the E single band
compressor or a compressor? I'm honestly, it's just
kinda like if you're mixing the song and
you just feel it, you want a little bit more
control at that time. That's kinda like
where I would do it. Again, I'm not a professional, but I have been doing it
for quite awhile and that's where that's kinda like
how I would approach it. Like, let's say the song's
going on right now. And let's say I was EQ in a little bit and it was just
kinda like didn't want, I want a little bit
more control there. Maybe that's where I would
adjust some dynamic EQ. Or again, you can
also boost as well. That's a really cool technique. It kinda makes
things pop nice and quick and it's not
too aggressive. Okay, so let's look at how we
set up the dynamic section. So all you do is you
right-click over a global link. So I do have the
smoothing enabled. And so I just gotta be careful
on the knob, I move here. So let's just make sure it was
this one, kid is that one. So I'm just going to right-click and you just move them up. And that's it. So you can
see you can get a lot of upwards and a
lot of downwards. Alright, so that is just like the Automatic
Dynamic mode, okay? But if you want to
access the manual mode, you have to select the
Auto button right here. And you can see I
haven't already set up, but it's just a matter
of just right-clicking it and you go
override global link. I don't have anything
set up special on it. And you just move the knob. And then there you go. So now you have the match. So in other words,
you have like, kind of like the ratio. And then you have like if
you want to control how much into that threshold
care swatch of a hit play. So in other words,
select not much, like nothing's gonna happen
and watch all those, increase it just to a bit of
a latter part of the song, just using my number
pad for that. So again, not saying
that this sounds good. But watch now I can go more
into the body and maybe we're pushing it
down pretty hard. So usually we want to have some balance in
our music, right? So you can see it's moving
a little bit more now. I can really hear it sucking
the life out of the snare. But again, just kinda showing
you how we set that up. Now to reset it, you can
just right-click and you can go clear dynamics or
even disabled dynamics. Alright, and so the next knob
here is to create a band, which I'll talk about
in just a moment. You're going to see if I move
this, brings it back, okay? And I'll show you how to
do that in just a moment. Okay. I just wanted to show you how to set up the steepness of it, which you just
right-click override global link added,
nothing special. I literally just move the knob. So the setup for this
pro Q3 is pretty easy. And again, this is really
powerful because if you had like a low cut, so look, you can
adjust how steep you want it to be just from
your midi keyboard. And if I just lord the q, okay, So look like, so here's my two hands, right? So everything is off
of the midi keyboard. And here's the steepness, right? So there you go. Then finally, the very last one, you just right-click here, which is the different
bands shapes and you're just going
to select here. And again, I did nothing
in the mapping formula. And you just move
the knob again. I do have smoothing enabled. And that allows you just to
get your different shapes. Now, I will cover this
third one here quickly. So what you wanna do is
you want to go to band one used and I go
override Global Link. And I set it up like this. And it works really,
really good. Okay, it just allows
your band to be created. So now, remember, like I said, this is all band one stuff
that you have available to you if you would like to do something that I
haven't shown you, you can set it up here, okay. But I have used all the
knobs in this case, and we'll talk a
little bit about the sliders in just a moment. And I usually use the
sliders more for things in common to this plugin, which I'll cover
in just a second. So let's say you wanted to
create the second band. Okay, so again, watch because
I already have it set up. I just go to bank to
I'm just going to move this third knob and you're
going to see there. So it just created it
right over top of it. Okay. But you watch, you
can see I can move it now. And now I could do it again. So let's say I go
to the third bank. I just moved the third knob. And there it is. It's right there. Now again, I manually do this all myself. So in other words,
I just copy and pasted over the same
settings over and over. So when I'm a bank
to, and again, I'm just gonna move this
slider to find out what, which one is actually bank two. So this one is bank TO case. I'm going to click it. Now you're going to have to
right-click and you're gonna have to go through the
whole thing again. Alright, so it's a little
bit of a tedious setup, but like I said, once you set it up, this file right here, like I told you that
you want to backup. This stays with you. And if you use these
fab filter plugins all the time like I do, hey, it takes maybe
an hour to set up. And then from then on, you can always get hands-on. Let's go back to bank one. Because again, remember
if I go to bank to the sliders also change.
So check this out. This does not do
the master volume anymore or does not
do the off and on. So that's something
to keep in mind. You have to be on bank one for the master volume to work
and the often onto work. Okay, So if you are on bank to bank through your bank for
and you're kind of mixing. You are going to
have to go back to bank one and then you can kinda. But I did find it was still
quite a good workflow. Really powerful thing in pro Q3 is you do have the auto gain. Again, it's not perfect. But when you are
mixing your music, if you are adjusting
your band up and down, the pro Q3 is intelligent, so it's kind of
compensating for you. So for example, let's
just go to a default. If I just select a band here
and if I go up and down, essentially it's like this. If I go down, it's
essentially that gives boosting it
up a little bit. If I'm going up, it's like it's bringing it down a little bit. But for you, and that is
what the auto gain does, and that's why these
are expensive. But I'm telling
you if you really, really like beat making, if it's more than a hobby, if you really, really
want to get into it. I'm telling you the
benefits of FL Studio for beat making and fab filter
is just phenomenal. Let's check out number
six slider here. I'm just gonna move it. And so ISI adjusted
that as the range. So I'm just going to right-click
it overall global link. And you can see
that I, all I did there is I actually
didn't type that in. So if it's default like this, I just want inverted. Did it for me. So right now let's say
we're mastering our music. So typically I would
probably go to like the three range here. And I know that I'm only
one decimal, two decibels. So if I come down here to one decimal, appears
to decibels. And you can do it
all on the fly. Rate from the midi keyboard.
Really, really powerful. Okay, Let's see what I
have for the next one. So I didn't set anything
up for the next slider, nothing for the next one, nothing for three and
nothing for there. And that's it. Okay, so that's
how I set up the pro Q3. The main one really
is this master volume and the on and off and the auto gain
is pretty powerful too. I don't always use
the auto gain, but it is a nice
feature to have if you're going to pay for
a plugin like this, it's nice to take advantage. But typically, even
with the auto gain, I am finding myself
sometimes having to do like maybe one decibel of COD
or one decibel of boost. And then often on. And again, you don't
want to be spending so much time going off and on. But like I'm saying,
when you're mixing your music all in
context of the mix, it really gives
you a really nice fast workflow that's consistent. Then again, like I
just showed you. So when you create each band, this is how you
set it up, right? You're gonna go
through each knob. You're going to set up
however you want it. I found that this workflow
is really, really nice. This third knob, I just remember that this is
how I create my bands. So if we want to go to
another bank, I move this. Okay, there it is. And you can start
mixing right away. Okay? The only annoying thing is
just that the soft takeover. So you gotta keep this
off takeover in mind that you actually have to reach the value before you
can use the knob. So yes, so you're going
to have to go through each band and you're going to
have to set it up yourself. But I set this up for four different bands over
my four different banks. Can it gives me a really,
really good workflow. Overtime, maybe I might adjust certain things such
as right-clicking. And maybe I might
fine-tune certain things, but I didn't do much
mapping formula. It was mainly just
this main gain K. So if I click here, you can
see that it's that same. So I just make sure to
highlight, I copy it. And then I'd go to each band and I make sure that
they're all the same. And again, once you set this up, once it saves it
into here for you. So again, make sure
to back this up. And I'm telling you you're gonna, you're gonna
get a really, really good experience
inside of FL Studio. Okay, So let's hop into the next video where I
will talk about the pro. The pro and B is a little
bit more involved. So I'll leave that
for the last video, but this is a really
cool plug-in, okay.
11. 3-4 - FabFilter Pro L 2 Hands-On: In this video, I'm
going to break down the fat filter pro L2, which is a super, super
powerful limiter. You're able to push
your audio quite hard into it quite transparently. And just get a really
decently loud master where it doesn't sound overly processed or too hard or
anything like that. So the first thing I
want to show you here is the first one right here. I was thinking I was going to
put it the very first knob. But then it was like wall. No, I want it to be the same
with the other plug-ins. So as you can see, if I
go to the proceed to I told you that they got the
master volume I wanted as that slider and then
I want it on and off because I wanted them all to be like that same workflow. If you look here at the pro L2, you can see the max
I can go is 7.5. If I right-click it and
go over our global link, you can see that this
was the mapping formula. So typically when we are
mastering our music, we want to have the loudness at the beginning
of the mastering chain. So this is called
a mastering chain. So the order that
your plugins are in. So for example, if
we just opened up, Let's say the fruity limiter. And if you do this, you're just going to want to increase the ceiling all the way to the top and the attack
all the way to the bottom. This just reduces any
latency and stuff like that. And so if you want to
increase the volume, you can increase
it from the limb. So this is not a limiter. I'm just changing into what's
called a gain plug-in. Okay? So we are just, so let's say we've
mixed our music. Let's say it's a
little bit quiet. We're going to come
to our master. We're going to open up a plugin. We're just using this to
increase the volume of our mix. We're not doing any
processing off of this plugin except for
increasing loudness. Okay, That's all we're doing. I'm just increasing again, look in the top-left
of FL Studio. Now what's happening is we have now pushed the
volume of the master up to imagine it that
it's at a decent level. Now, it's going through
our mastering plugins. And then when I hit our limiter, this is where maybe I
might be doing maybe one, maybe two, maybe four
decibels of Boost, which is quite a lot. And all show that with you. Okay, so I'm just
going to remove that gain plug-in. I'm
just showing you that. That is sometimes what
I would do if I mixed my music and I want to push
it just a little bit louder, I would boost it from there. And then when I'm using all my different plugins
and my mastering chain, it's already at a
decent loud volume. Then each plugin can
process it again. We wanna make sure that when we turn the plugin off and on, it's an affair,
decent volume rate. And so let me just hit play
here and I'll show you that this track at the
moment it is not finished. It's a little bit quiet. So honest to turn the volume. I'm going to reset it. And I'm going to walk through
the pro L2 a little bit more with you before we get
into setting up the knobs and sliders just so you can have a better
understanding of it. But right now this is in
the course of the track, and we're only at minus 15 on the short-term
for the loudness. So to me, this track
is probably too quiet, so it does need to
be boosted up and that's where I'm going
to boost it up a bit. But watch if I go
back a little bit. So you can see what
a rho minus 11 now, so this is kinda more
and that the sweet spot of where we want
our master to beat, it can push up a
little bit more. Again, I'd have to listen
a little bit more closely. Because watch. Once it
leaves this chorus, it's going to go into the
verse. We want to be powerful. If I want to turn off and on. So again, that's just
like that workflow. So let's just quickly
walk through the pro L2. So we have our gain,
we have our output. It's at minus one. That's like the industry
standard right now. Okay. What makes the pro
L2 so powerful is it also has a loudness
meter built-in. So you don't need to have an
additional loudness meter. So it's both your limiter and your loudness
meter that you put as the very last plugin to
prevent any distortion. Okay? It also has a true
peak limiter built in. And this is really
powerful because there's something called
intersample peaks. I don't wanna go
too much into it, into this video and
in this course. But essentially, if you
push your music too loud, there is what's called
intersample peaks. And it can cause
distortion on like your MP3 player or on your phone and when
you play it back. And so if you enable
the true peak limiting, it ensures that your master is at that minus one true peak. And this is kinda like
a new industry trend. But all I'm saying is
that the pro L2 has all these all these features built in and that's
why it's so powerful. Okay, so without
getting too intense, Let's just walk through
how I have it set up for you to get going and
get up and running with it. Okay? Again, this gain knob I was gonna put as the
very first node. But then I was like No, no, no. I want to have all my
Often on right here. And I want to have my master
gain kinda right here. So again, I just have it
set up just to go to 7.5. If you are using it for mixing, you can increase this a
little bit more if you want. So for example, if it's 0.25, if that's not enough for you, you can put it to
like, let's say 0.35. If I hit Enter, you can see
it just increased, right? So watch if I go to 0.45. So let's just leave
it at the 0.35. So it was at 0.25. And so if I'm gonna
do that again, so it allows us
to go up to 10.5. So if that's maybe something more that
you want, because if, because again, you
can use the pro L2 in your mixing as well. This is a really,
really powerful trick because you can use it to shave off peaks off of your audio and a really
nice smooth way. But again, I'm just
going to right-click and I'm just gonna
put this back to the way I had it because
I liked that workflow. So again, my gain
slider on the pro L2, I can just max out at 7.5. And then again, I just have
my Often on right here. And again, if you
are turning off the fat filter plug-ins, it is highly recommended to do it from here and not from here. Because again, fab filter
has their special code to prevent glitching and popping when you turn it off and on. This allows you to hear it
often on really, really clean. So if I right-click that
overall global link, and again, I just have
it set up like this. So the 1minus input just
allows like that reverse. But you can just copy this text. And again, that just allows it so that when
it says down here, it turns off just a
little bit sooner. Okay. So again, I
did that with all of the all the fad filter
plug-ins for the often on. Okay, so let's work our way. So again, that was
just the main gain and that's how I
approached that. Now, a really cool thing
about the pro L2 is if you hold down Alt and
you use your mouse.
12. 3-5 - FabFilter Pro MB Hands-On: Alright, in this video, I'm gonna be talking
about the Pro M B, which is a super powerful
multiband compressor. Okay, so when we talk about a single band compressor
versus a multiband compressor, a single band compressor
is watch if I take these, delete them, bring it over. A single band compressor is
essentially just like this. Okay? We have just one band and if our audio goes
over the threshold k, wherever we adjust
our threshold, then it compresses
the whole signal. So if the drum goes over, it even compresses the hi-hat. If the high hat goes over, it will reduce the snare, okay, if this is always
the master track, in other words, a single band. If any of the audio goes
over the threshold, it reduces the
volume and that can cause pumping in not a good way. And so if we look at a
multiband compressor, so I'll just copy this over. Now. Four could be intense, but I really, really
do like four. Sorry, I didn't
mean to delete two. Just wanted to delete the one. I was usually always working with for, as you
can see right here. But typically a normal
multiband compressor is three. I was just like for just kind of allows me to hit just
the different ranges. Now I know a couple
of things I want to quickly say before
we actually get hands-on because the
normal approach too, to doing this like such
as like when I showed you in the proceed to right, if we move just like a
knob and stuff like that, this is just one
interface, okay? And it worked good. But when it came
to the pro and B, we actually have a
threshold on band one, we have a threshold on Bantu and a threshold
on band three. So I was like,
well, how can I get one knob to link
to all of these? And global link
doesn't work that way. Global link can only work on
one knob, on one plug-in. And so in other words,
I wasn't able to use global link on band one,
band-to-band three. Then I was like, okay,
well maybe I'm going to try the link to controller, which is the project link. But the problem with
that is that it overrides these knobs for
every project that you're in. Okay, So again, you
can go back and learn more about project
links and global links. I wanted to, just
when I opened up this plug-in that I can have one knob to control each bands threshold, each bands ratio, and
I'll share that with you. So first of all, what I did was I had to load this
into patch here, okay, and we're gonna
do this in this video. In this video you're
going to learn about how to set up patcher. Now, don't worry, it's not as intense as what it
looks like here. I'm just going to remove
some things there. Okay? So how this works
is we have pro and B, just like you see right here. You can see that this
one is in patcher. And if I highlight it, you can see that watch
if I move the slider. And also here you can
see I have a controller. So if I, if I either double-click
here or click up here, you can see that I
set up some knobs. And this knob, which I had
to do the global link on. So in other words, this knob can be controlling multiple knobs. Let me just show you. So
if I move the threshold, you can see it's moving on pro
NB, Right? But check this. So if I go, if I'm on band one, it's moving here, but it's also moving here as well, right? If we come here to the Bantu, it's moving there
and here as well. Now the best way to see it
is if I move the range, okay, so you can see that the range is actually
moving all of them. And that's essentially what's happening for the threshold, except you just can't visually see what's going on
with the threshold. So for example, you can see
that here is the threshold. I've put it all the way up and all of them will
be the exact same. Because I've set up
patcher like this. Now again, just to repeat, so I had to set it up
inside a patcher to get the global link hand-on experience without having
to use the project link. Because again, the project
link would not allow me to use these knobs for anything
else except for this. So now that you know how a
multiband compressor works, which is now you
have multiple bands. Now you're not getting
that same pumping. So if the drums hitting, okay, it's not pumping
like the high hat. And if the vocal is here, then it's not pumping
like the snare. So in other words, we have different ranges for
compression to happen. Now one other thing I
just want to quickly say is if I highlight these, you can see that the pro MB allows you to get
different slopes. So for example, if we had a 48 dB slope like this is very, very aggressive and each band really honing in
to that own area. But there is a crossover here. Okay. And so for me, I was usually always
working maybe a 24 and even at 66 dB slope is a
very, very gentle slopes. So in other words, you are still getting compression
just in this area. However you can see
it does overlap a little bit like if I bring that range back just a little bit. So I actually have to have the
window loaded up, I think. And so you can see that, you can bring it up. So you can see that when
we have a six dB slope, which is the less that
we can get if I go to 0, it puts it to six and the
max that we can get 60. 4848, very, very aggressive. And six is very, very gentle. So depending on what
you're wanting to do, maybe you want to put
it like 12 or whatever, but I usually find six is
pretty good to get nice, transparent compression and
full control over a sound. But you can just see it kinda
blends into the other band. And again, you can get that
hands-on mixing experience. You can see I have
the threshold, I have the ratio, I have the attack, I have the release. I have the knee. Okay. So again, because
it's not visual. Let's just go back to the proceed to again,
like I showed you. So I'm just going to go to a different range and
we'll bring it up. So watch if we have
a very hard knee. So what this is saying
is that our audio has to actually go over the threshold and then compression
will kick in. If we have a soft knee, compression actually
starts happening here instead of right here. And that could be the difference of quite a difference like look. So I haven't changed any other settings
except for the knee. And the knee is a soft knee. In other words,
the compression is actually happening way
before minus five. You can see compression
is happening like way back here at
almost minus 12. And so that's just one
thing to know that maybe you can actually
pull back on the ratio. I also believe when
you dial in the knee that your compression kinda gradually comes in if that okay. So for example, if
we had like ten to 110 to one might be like
ten to one up here, but down here, it's
a little bit of a gentler ratio and it
kinda gradually goes in. And so this is why it's
really important to have all these different
features on these plugins. And so that's why I have this. So again, I have to be
focused on this window. You can see that the
knee I can adjust, but again, it's not visual. This knob right here. I don't have setup as anything. And then this one
is the look ahead. Now, one thing in
the patcher version, I wasn't able to right-click. Alright. But whereas if we open
up just the default one, so you can see that this
one is on the master. This one is just like a
regular instance of pro and B. This one is loaded up
within patcher, right? So if I click this one,
so if I close this, open it up, okay, So we have two
instances right now. This one is the regular instance that you would just open up as a normal plugin and check
this so you can actually right-click the look ahead and you can right-click
the oversampling. But in patcher, we
are not able again, look in my, my, my clicks so I can right-click,
I can right-click. In other words,
there's some pros and cons to this approach. One thing I also want to
say is I didn't fully like loading and a
plug-in into patcher because if we right-click
here and we look at a boat, you can see that patcher
does have a version number, which means that it is software, it gets updated and hopefully
this works down the road, but I'm sure it does because FL Studio is
pretty good that way. But I'm just going to show
you how to set this up. Okay, so what we're gonna
do is we're going to open up an instance of patcher. We are going to load in
just a couple of knobs. We're not gonna get
as intense as this, but you can follow the exact same thing that
all I'm doing is we're using a control surface to set up knobs so that one knob can
control multiple things. And that's how I had to
set up the pro m b to be able to control all knobs
and sliders from one knob. And it's so powerful, I'm telling you I
got such an amazing workflow when I was doing this. Okay? So what you wanna do is
you want to go to patcher. Now, if you notice in my stuff, I actually don't have patcher because I never use patcher. I actually had to use I actually just loaded
it up and just quickly learned it just to figure
out this pro and B because the hands-on
experience was so good. So in the plug-in database, you're just going to
go to your installed, you're going to
go to your fruity and you can find pattern here. But here's a cool little trick. You just go Control
F google patcher and it finds it for
you right there. So I'm just going
to load this n. And this is what it gives you. Okay? So if you're making
a super complex one, I guess you can have all
these different things. I just like to keep this
super simple, okay? So this surface, I'm just
going to right-click it and just going to
call it a controller. And it just changes
the name up here. The next thing I'm gonna do
is I'm going to right-click. We're going to add the plug-in. And because I have my
effects organized, it's in dynamics
and here's pro MBI. Okay? Alright, so I'm just
gonna hold on Control and just the scroll wheel up and it zooms in on
just a little bit. Now, the size that you
make this, I believe, is like the size
that when you sit because after you
can save the preset and you can load it in
whenever you want to get the hands-on mixing
with this program B. Alright, so we're going to
open up the pro MBA here. And so what I would do is
I would create four bands. Again, this is
what I like to do. You can have it, you can have
three bands or whatever. But I usually like to
have the four bands. That's something that I've
liked to do over the years. It just allows me
to get a really nice balance to my sound. And if I highlight
them all again, you can adjust this however
you want right now. Essentially you're
making a template to use over and over. So let's just say equals
six to one, okay? And then what you have to do
is you have to right-click. A knob and to activate it, okay, So you can do it this way. But the thing is
you're going to have to activate each one. So again, we have, let's
just keep it simple. Let's just say we
only had two bands, but you're gonna do
the exact same thing if there were four bands. Okay? So I'm just going
to click on this one. We go Activate. You're going to see it allows
us to have an option here. And again, you can do
it this way as well. But I'll show you the fast
way because you guys know what I always like to keep
all the shortcuts and stuff. So what we're gonna do is again, I just want to make this
window a bit smaller. And that way everything
will fit on the screen. And whenever you
open up patcher, It's not as invasive
to your workflow. Alright, so what
we're gonna do is we're going to right-click
on the pro NB. You're gonna go to the
inputs and the parameters. And you can see like, Whoa, there's so many and I'll just
get rid of the keyboard. So again, FL Studio
allows you to right-click and enable things. Okay, so if I, for example, I'm just going to left-click and here's
the threshold. So again, there is that. So that's the same
thing as coming here and right-clicking
and it went activate. If I come to the Bantu and
right-click and go Activate, you can see that now we can
take so in other words, we will be able to connect
our stuff in just a second, okay, So we have to activate our knobs to be able
to be connected. But I just want to
show you the fast way. So right-click input parameters. You can see that the
bandwidth threshold is enabled as well as the
Bantu threshold is enabled. So I'm just gonna go threshold, range, ratio,
attack and release. Again, I'm right-clicking
and that's how fast it is. Okay. Let's just maybe
set all of them up. We'll go knee will
go look ahead. And I'll also go threshold, range ratio, attack, release
knee and look ahead. Now if I hit Escape, you're going to see
there's a lot of red dots. It's like, oh man, this
is getting intense. It's not that bad. Okay? So in the controller, we're
going to double-click it. And this is where you can start creating your different
knobs and sliders. I'll just show you some really powerful workflow
tricks that I found. Because again, I've never
used PATRIC before. And this is going
to speed you up. Alright, so to add in
a knob or a slider, and you can decide here, if you would like
the knobs more than the sliders or whatever,
you can do that. So if I right-click,
we're going to go a knob. And here's the trick you
first want to add it in. So it doesn't matter
what when you add in, you can switch between them. So let's just say we
go with the green, OK. Now you can right-click, you go to Styles, and this is where
you can right-click and you can choose them, okay? But if you come here and
if you try to right-click, it, just adds it in. So again, you just want to
add it, add the knob in. You can right-click and then
you can change the style. Now one thing I want to say is, okay, right now I
have to disable this for the knob to be used. But you can see that I like
and I can even edit it. So you have to be in
the wrench to edit. If I right-click and go style, I usually like to have a
knob kind of like this, something where I can see the
amount that is increased. Whereas watch if I go
through a couple of these. So this is a nice one. This is fine too. That one's fine because it
does have like the little like a line to show you
like where you're at. But sometimes there's
certain parameters which sometimes
are a little like, even like this is
maybe a little tricky or something like this. Like I would not recommend
because I watch, I'm just going to duplicate it. Because what if I disabled? You can see that we can actually
move this in this area. So I, I personally like the style to be
something like this. Like, let's just go
with this novel care. I think this will be a
great one to look at. And we can right-click this, you can, in the size, you can make it a little
bit bigger. Maybe. I will just duplicate
this over and over. So we'll go duplicate
you right now. You can see that
when I move it's hard to get things lined up. So you can right-click, you'll grid and you can adjust how big you
want your grid. Okay? So again, I'm just
kinda showing you how to do this nice and quick. Again, if I just duplicate, again, we're just going
to line these up. So one's going to be
for the threshold, one is for the ratio
attack and all that stuff. One other one I just want
to show you is the slider. So if you wanna do
this slider approach, you can do this too. Now again, I'm just
going to move the slider up and you're going to see
that this same idea applies. I like to have this
background color because it just makes it a
little bit easier to see when you're mixing. So watch if I select
the different ones. That one's fine,
this one's fine. This one is fine.
I'm just going to click a little bit over more. Okay? Yeah, so let's just keep
working our way through so that one's good,
that one's good. And I just want to show you some of them are really hard to see. See something like this.
Yes, we can see it's up. But I do like that
little background view. I'm telling you it just makes it like that's good, that's good. You know, all these
are pretty good. They're just like see
something like that. I like to have that
color personally. But again, you do
whatever you want. One other thing to say,
what's the slider is, you can actually make it horizontal orientation and
you can go that way as well. So for example, if you
want it left and right. You can do that. Okay. But I personally just found
I liked the knobs. Oops, I have to delete that. Okay, so let's just
see what I have here. So we have threshold ratio,
attack release knee. Look ahead. And I
think that's it. So 12345677. Okay. So let's just keep going here. So I'm just going to duplicate. And I'll just keep doing this. So I will go rename. And again, I just usually
like to write in capitals. So threshold ratio attack. And as you can see, it's,
it's all about setting yourself up. Slow release. We will go range, knee. And look ahead. I
think it was one. So look ahead. Okay. So as you can see, when I did all my colors and selected
one that I liked, it applied to all of them because of a
highlight them all. And if I right-click,
Let's go style. Okay, That's cool. Okay, good. So C FL Studio
is really good that way. It just allows you just
to work nice and easy. So something like that's cool. Okay, so now we have to link
these knobs to the pro NB. And it's actually
really, really easy. Okay? Alright, so again, all of these red dots are
just the knobs right here. So threshold ratio attack. Now you have to look in
the top-left of FL Studio. Again, there's FL Studio
will essentially teach you how to use the program if you just
look in the top left. So what we're gonna be doing
is if you right-click on it, you can see that you can route them to these
different parameters. Okay, So for example, ratio, while we were gonna wanna
wrote that to band one. So remember this is band
one. This is Bantu. So we're just gonna go ratio here again, look
in the top left. This is how I know it's ratio. It would be nice to
see ratio in here, but it doesn't show it. So that's why you
got to look before. So you can see
ratio, right-click. And we're gonna go to
band one ratio again. Just right-click, nice and easy. Boom. And we're gonna
go to band E ratio. Done. And you can see it
does that for us. You can click and you
can route it yourself, but it gets really,
really tricky. So the next one is threshold. So I'm just going
to right-click. We're going to bend one
threshold band to threshold. And again, if you
had more bands, right, it's just the
exact same thing. You're just adding it on. I'm just going to do two because it's a
little bit faster. Okay? Now let's go to the next one. So attack, attack, attack. Next one is released. So
I'm just right-clicking. We're gonna go
release and release. And again, the
reason why we have these dots, I right-clicked, went input, I went parameters, and these are the ones
that we enabled, right? So I just want, again, if you want to use band three, you can use band three and you just right-click
to add them in. But I just did band
one and band two. And these are the ones I enabled just by using right-click. When I'm done, I'm
going to hit Escape. Let's keep going. So
here's the range. So band one range, Bantu range. Here is the knee. Again, I'm looking
at the top-left, band one and band two. And here is the next one.
So here's look ahead. So I'm gonna go to look ahead on bad one and look
ahead on Bantu. And now we are set up.
So check this out. If I come here and
move the knob. So guess what? This threshold is adjusting, bad one, but it's also adjusting
Bantu at the same time. And again, to see visually, if we move the
range. There you go. Okay, check that out. So now what you do to get the
hands-on mixing experience, I'll bring the keyboard back. To get the hands-on
mixing experience. You're doing the
global links off of the, off these knobs. And so in other words, if I right-click this, I guess I have to activate it. And then I'm going to right-click and go
overall global link. This same little window
pops up and check this out. So now if I got, I'm just going to
remove this because my midi keyboard is kind of
like in this standby mode. So I'm going to hit that. I'm
just going to hit a button, it brings it back. Now we're an operational mode. I'm in preset mode and that's important because if
I'm in dark mode, all of these knobs and sliders
are different CC numbers. If you remember,
when we went way back in the beginning
of this course, I talked about their CC numbers. So right now I'm in Bank one. Could be bank to
bank Treebank for, but I just want
everything just to be off a bank one soap. On the threshold, a right-click, I go over a global link and we're going to move the
first knob because let's say we want to set up this
one as the threshold to keep it consistent with
the pro see. Right. That's what we had for when it came to the proceed
to that was threshold. But you can see when I move it, look it looks kind of
gross again, right? And if I right-click, I just didn't use smoothing. Move it. There you go. It's the exact same experience and it is moving both of them. Okay, So this is Bantu, this is band one. So let me just do
that for all of them. So I'm going to
activate, Activate. And usually when you Work its fastest to kinda do
the same task over and over. And then you're gonna go
and work your way through. Alright, so I'm
just going to route the ratio attack and release, but you guys get the point and you guys can follow along
for the other knobs. So here's the ratio again
over a global link. Smoothing enabled. Just move it. So there's the ratio down there, whereas the pro C2, it has threshold ratio
right beside each other. But I just wanted to keep
that workflow because that's usually how when you're
using a compressor, you're using your
threshold and ratio together and then your
attack and release. And then I tried to
keep it the same. Okay? So again, here's threshold. It's doing that knob. Here is ratio, it's
doing this slider. And then here is the
attack enable smoothing. Here's the attack,
here is the release. And again, if we just
kinda keep working, here is I actually did the range as the
very, very far one. Again, you can see if I
don't enable smoothing, it just looks so like like
my computer can handle it. And when you're mixing, it just looks way smoother,
way better on the eyes. The knee I think I had next, so threshold ratio,
attack release. Let's go the knee. Then. I also did I think I did
the look ahead right beside the range just because
I knew I was over there. And the thing with the look ahead because
it's an patcher, we are not able to right-click
this because before I would use my sliders to change that stuff like you saw in
all the other plug-ins. So this is something
where we have to use your mouse and that's
just the way it is. We're restricted because again, watch if we come back
to the pro and B, we go to inputs, we
go two parameters. So from one all the way to 152, these are the ones that
pro M B gives us to be able to use with
their knobs and sliders. Okay? And you can see
down here these are the ones that are global
to the whole plugin. Whereas band one that only pertains to that one
single band, right? We come down here, there's mics, there's input, there's bypass. I'm right. We have all these different
ones available to us, but there was not the look ahead and stuff available to us, which was kinda like, Oh, because I liked that
hands-on workflow. But because like you can see when I open
up the pro and B, I can right-click these. But again, then we can't get the hands-on mixing
because each of these is a different band and you
can't link the global link to multiple things in the same
plug-in with the same knob. And that's where
this setup comes in, that we want to use
one knob, right? We want to be able
to use one knob to control the threshold
and the ratio. And again, so watch
if I'm maxed, if I'm maxed out here, you can see I'm maxed out here. Bring it back to, let's say
it's 2 one-to-one watch. It'll be 2.01 to one
because one knob, knob is affecting multiple bands and it's just such an
amazing workflow cab. So let me just quickly
show you the one I've done and actually watch
before we do that. You can push in your middle scroll wheel and
you can name this like pro, pro and be like patcher
or just even pro MB. And if you click here and
you go Save Preset, now, you'd want to save
this into your plug-in database if you want
to keep reusing it. So for example, you
can see in controller, I have my own pro
NB controllers. What I would suggest to you, and you can count peer effects. So again, this is
where we can have our own customized user folder. And you can see I
haven't controller, so I saved my own Pro and
b controller in there. But if you wanted
to do that, you can come here and you can go Add to plug-in database
and it would add it in there
automatically for you. Or you can back it up. You can come here and save it. So if I save the
preset, I can just drag it onto my desktop. And if I want to
drag it back in, you can see that now I
have another instance, and there you go. So it'd be all be set up. So as you can see, I
have two instances of this pro MV setup. But let me just quickly show
how I have mine set up. Alright, so this is the pro and b that I personally have
setup at the moment. Again, it can always
change over time, but you can see I also
have the output as a knob. All I did was I just created
another another knob. I just right-clicked,
went duplicate, created another, another
knob and call it output. Now, I could have actually
just right-clicked this and went over a global link and I could have
done it from right there. But I believe what was happening was when I wasn't
focused on this window, like if I clicked over here, that the output wasn't
working very good. And so I think I set it up
this way because it worked just no matter what
and I was able to just get a really good workflow. So again, I have this slider as my volume
just like before, right? I have my Often on and
to do the off and on, I believe I right-clicked and you can see
overall global link. And so I just set it up just like this for the off and on. For the output, I'm going
to right-click go over a global link and you can
see I set it up like this. So in other words,
I didn't want it to go less than 0 because again, when we're doing compression, it is reducing the
volume, right? And so I just wanted to be
able to increase the volume. One gain reduction happens. And so that's how, you know, this one
I have plus 12. And then again, I can always
turn it off and on. Again. I will show you an example. In the very last
video of this course, I will show you how to
use all these plugins in a real-world setting, just nice and quick, and it'll kind of put
everything together. So again, this slider
was the master volume, just like I showed him all
the fab filter plugins. This one is the often on. I don't believe I set
up any other knobs and any other sliders because I wasn't able to right-click,
otherwise I would've. Alright, so let me just walk
you through each knob and how I've set them up because
you can see my threshold. I can't go again all
the way to the bottom, but I did go to minus 60, which allowed for a
lot of compression. You can see my ratio
can't go all the way to 0 and the max I can go is eight. The attack, I can't
go all the way to 0. I just have it. I'd
like to like 3%. And then the max I
can go is like 78. The max. So the release, I'm able to have full control over the knee. I want full control
over the look ahead, full control and then the range. This is, this is where
I maxed out upwards, which is really
powerful because I believe the pro MBA
allows you to do upwards compression and
upwards expansion if you want. That. Three is pretty good
because it's very subtle, but I did want them
the full reduction. So I'll break that
down in just a second. Okay, So let's go through
each one quickly. So the threshold, I've
set it up just like this. Again, this number
can change over time, but I have set it
up just like this. So in other words, this is like that minus
60, I guess, right? So I want to be able to go into the body of the
sound quite heavily. And then let's just
play around with these numbers just a little bit just for you to kinda
see how they work. So again, you can
delete one, hit enter. Okay? So in other words,
on the threshold, I'm kinda limiting how
high I want it to go. So watch this. So right now, if it allows
me to go to minus nine, and if I come here
and right-click, and if I put this two minus five and let me just go one sec, I'll just hit escape. Right-click. I'm just going to copy
this just so that if I want to bring it
back, Here, we go to five. So you can see that this is
probably going to put us to minus 12 or minus 15, but that doesn't really
give much flexibility for mixing like minus 21, that's the max I can go, right? And then the minimum I
can go is about minus 60. But the max I can
go as minus 21. But when we're mixing
and mastering our music, like you know, sometimes you do want it up quite a bit higher. And so that is what
this is doing. If we put it back to seven, this is allowing me, I think, to get to minus nine
over the threshold. So in other words, I can
kinda get within the range. The next one is the ratio. You can see I've set
it up just like this. Again, that's
allowing me to just limit the low end and the
high end of the spectrum. Again, you can always play with these by going like you'll 0.15, hitting Enter and
just kind of playing around and getting it
how you want it set up. And again, the salt
from my ratio, the less I can get is 1.1 and
the max I can get is eight. Now, if you're mastering, maybe you want it to
go to like a 1.05. And if you wanted to do that, Let's just see if we
can fine tune that a little bit. So it's 0.1. So it'd be like 0.05 or 0.08 or something like
that is what you would do. Okay. So watch now I'm
going to accept that. And if we go back to the ratio, so the last one, I can get 1.08 and then
the max I can get is, so it kind of went
down a little bit. But I'm going to
right-click and I'm going to put that back
to the way I had. So I had to 0.1. And so that allows me to get to eight to one ratio
and then 1.1 ratio. The next one is the attack. And I think I limited
it just a little bit. So this, this is
just the settings. Again, you can play around
with it however you want. But you typically sometimes
want to have a really, really fast attack,
but sometimes you want to have a long attack. But it's very rare that my
attacks like all the way open. And so I just kinda limited
it to this so that it will. I'm here hands-on mixing. It's like I'm setting
myself up where I can fully Max open this knob and I know that it's still within
kind of like a sweet spot. And that's essentially
what I'm doing here. And often I like to disable these interactive hints when
you're learning the plug-in, these interactive, the hints
are really, really useful. Okay, So that is
threshold ratio attack. I didn't do anything for
the release except again, just making sure that
smoothing is enabled. The next one is the knee. So again, I don't
believe I did anything. I just made sure smoothing
was enabled because you want to be able
to get the hard knee and the soft knee. And I'm telling you you get a totally different sound
like if you're using your threshold and
a soft knee and then like a super gentle ratio, you can kinda get really, really cool sounds,
really controlled sounds. And that's the
whole goal of this, this knob right here, I didn't do anything with, again, you can see it's green. And this knob here
is the look ahead. But again with the patcher, I was not able to right-click and set that
up as a global link. So you are going to have to
enable that if you want that. Again, look ahead will allow. You'll notice that
most with your attack. Okay, So when you are
increasing the look ahead, if it's enabled, your
look ahead, Just kind of. This plugin looks ahead into the Audio depending on how
much look ahead you have. And you'll be able to hit those transients just
a little bit softer, you'll kinda round them
out a little bit more. And when you do use look ahead, you'll be able to use
much less ratios. And again, when the plugin
has these features, you want to be able to
take advantage of them. Now the range is a sole
powerful on this plug-in. Okay, So yes, the the pro
c also has the range knob. And you can see that I
have the same knobs. So the very last knob, again, I have eight knobs. The very last knob I
have is the range. You can see right here. But the difference between
the pro C2 and the Pro M B is that the range knob allows
you to actually do upwards. Okay, So this is really,
really powerful. And again, you guys can look
up how to use the pro mb. This isn't so much for
teaching you how to use it, just showing you how to set
up for hands-on mixing. Okay? So again, if I am using this multiband compressor
to compress my music. So let's say we breathe, we bring down the threshold
to round here. Let's say we have
half decent ratio, let's say like three-to-one
or something like that. Now, if compressions
happening too much, you can start playing
with this range knob. And essentially what you're
saying is you just want to limit how much
compression is happening, even though compression might
be happening all the time. But to our ear, we are limiting how
much compression is happening and you can
really smooth out a sound, especially like in
mastering or whatever. So again, by having
full control over the, all the knobs and sliders
and getting hands-on. You're really able
to hear what you're doing and get a
great experience. The last two I want
to show you is again, I just right-clicked
the on-off knob and I did it like this. Okay, so again, you are going
to have to right-click, you have to activate it, and then you can do this. And this is a setting I used. And again, that is just so that it doesn't have to be all the way
at the very bottom, kinda gets a little
bit of a buffer. And then like I said, I believe
I tried right-clicking on the output and I tried the overall global link
off of the actual plug-in. But I think it was kind
of annoying that if I would unfocused the window. And so I just ended up
creating another knob here. And I just linked it in
the same way you can see. Let's just, again look
in the very top left. You can see output.
I right-clicked that and you can see I rounded
it to the output level. So in the Pro and B, we go inputs, parameters, and you can see the output
levels right there as well as the bypass
that's also enabled. That is enabled because I just right-clicked and when activate. But so anyway, so we come
back here to the controller. Here is the output. And I went over I global link. And this is the setting I had. Okay, So again, I don't want the output master
volume to go under 0 because we are
reducing the volume. If I was using this for
like upwards compression or upwards expansion and
all that kind of stuff, I may adjust this to be able to reduce the volume
a little bit. And so for example, instead of 0.5, maybe
I'll put it like 0.45. And then maybe I'd put
this to 0.8 or something. And so as you can see, what that has done is it's
allowed me to go under 0. Then it's brought me back up
to that plus 12, so one sec. So I'm just going
to delete this. I'm going to right-click
override global link. Let me just copy this. And then let me
just show you how it's working at the moment. And then let's just try to
fine tune it just to show you. So again, the max I
can go with plus 12. The minimum I can go is 0. Let's just say we
want to start using s
13. 4-1 - FL Studio Stock Plugins Example: So in this video, I'm
just going to break down how to get some
hands-on mixing with the fruity parametric
EQ to now you're, you're gonna get an
okay experience. But the biggest
problem with the, with the FL Studio plugins is that you're not
able to turn the often on with your
midi keyboard, with your global links. And like for example, because the fab filter plugins
has a built in on and off, you're able to get that
really good experience. Okay, So just like I
was showing that when I use my midi keyboard
right off, on, off on. And that's super important to
be able to quickly compare. Fair volume comparison. Again, you don't want
to spend forever on the often on because you're never going
to move forward. But when you are applying
some compression in context of the whole song, you want to make sure that
the volume is similar. And let me just quickly share with you what
I'm talking about. Okay, so when it comes to
many of these plugins, this is a new feature
they added in. And again, you can try this at a later date with the new
updates of FL Studio. Maybe they improve it, but at the moment
this is what happens. Okay? So if I right-click this
and go over a global link. And again, I like to use, I like to use this slider right
here for often on, right? So remember master
volume off and on. That's what I've been doing
for the fab filter plugins. So if we move that, you can see that right now
nothing is happening. And it's kinda like,
Okay, let's kinda weird, but this is what happens. You actually have
to be on the mixer for it to be off and on. So look in the top
left you can see that the global link is like
it's blue right? Monitor. If I move this one, it's green. That means it's not
routed to anything, but it is registering movement. It's reading midi data. But this one, it is
actually linked. And if you can see what's
happening off and on, but check this out. If I move this plugin
down to the next one, it's still off, but watch this. Now it's moving the limiter. So what happens when you, So if I bring the
parametric EQ to backup, what happens when you create
the global link right here? It's essentially
like this button. So it's not even like this button is attached
to this plugin. It's just that they
put this button right here on this plug-in
while it's on slot three, k, because watch if I do this, you can see this is
actually slot three. Check this out. Off, on, off, on. Okay. So I hope that
makes sense to you. So what we did was when
the parametric EQ to was onslaught three and I came here and I right-click
the global link. It was essentially like I came here and right-click
to the global link. So which means that if we are moving the plugin down
or in different order, the global link is
still on slot three. And so that's where
you can't really get the hands-on experience
and it kinda sucks. Okay. But I'm just sharing
with you that that's why the fab
filter plugins give the phenomenal workflow. But again, I am
going to show you how to get some hands-on for similar workflow when
you're mixing your music. Okay? So when it comes to the
parametric EQ to what you wanna do is you want to automate
whatever bands you use. Now, there are different
patcher plug-ins and stuff out there nowadays
that people have made. If you wanna get hands-on
with in patcher, you can do that
with all three like your midi keyboard and
it's all the same thing. You just right-click. Override global link. Make sure you enable that
smoothing to make it look good. And then you just
simply just move a knob or a slider wherever
you want to set up. You can also right-click and I believe that you can disable, okay, so you can
disable certain ones. So for example, maybe we actually want to
bring that one back. So let's just reset it. Let's just say we
have 123, okay? Let's just disable
all these ones. So again, what you could
do is you could save this and maybe you want it for, but you could save this so that you can reopen it
again and again. You can just go Save Preset as and you can either back this up or you can go Add
to plug in database, and it will save it
exactly as you've left it. Like for example,
if I didn't have it boosted up, it would save it. But what I'm gonna do is let's just kinda put it in the middle. Let's just say we want this
setup for our hands-on mixing whenever we are
mixing our musical care. So the first thing we're gonna
do is with the fab filter. What I did was I liked
the left and right. So to move left and right, I like that as the first knob. So I'm gonna go
over a global link. Let us do smoothing
and we can move that. So there you go. You get left and
right, up and down, right-click overall
global link smoothing. And again, this is where you can fine tune how much you want. If you want it to only let go
like down here or up here. This is where you can get
into the formula mapping. And again, you can check
out the other videos for how I was setting
up the global mapping. Again, you can just copy and paste or do you just
open up this window? You hit F1 and it's going
to take you to here. And I believe at the very, very bottom of this page are
pretty close to the bottom. Like here's all the different
ones that you can set up if you want to
totally customize. But again, as you saw
throughout this course so far. I kept it pretty simple, right? So let's go back to novel one. Did this one, this one,
it goes up and down. And then now we want to tighten that q and that's
that, I guess BW. So I guess they're
calling it bandwidth. So we right-click here. I'm going to click here. And now we can get, so sometimes you can only see
it when it's increased. Okay, So there you go. So this is super powerful when you're mixing your music, right? We can get hands on. Boom. Now again, this one is a low shelf and a high
shelf and then watch so for the very first knob is left and right, up and down. Then how tight the Q
is or the bandwidth. Then you can also
right-click the style care. So again, sometimes
I found when it came to something that the style I did not enable the smoothing. I think it gave me a
better experience. So again, you can see whether I can select different styles. So this is like the bell-shaped, this is probably the
most common, right? We want to fine tune it. And what's really, really
powerful with this is you can actually mix hands-on
and you can do, you can do two different
things. So watch this. If we grab this band
and I click it, you can see that I
actually cannot. I'm not able to use my
scroll wheel. I'm clicking. I actually have to
let go of clicking. And then I can use
my scroll wheel and watch if I open
up the pro Q3. If I click this,
you can see, look, I can use my scroll
wheel as a mixing. And again, this is like
that FAB filter workflow, but you can do that
with hands-on mixing. You can do two things at once. Let's just finish up setting up the other bands or be
really, really quick. Again, if you want
to bring a band back to the way it was, you can just right-click
and go reset. And you can reset. Now, maybe instead of two, Let's just reset that one. Let's maybe disable that one. Because maybe enabling like this four would be better
because whenever you reset it, it would put it right
back there for you. As you start to make your music and as you start to
use your plugins, you kinda start to think
ahead and you're kinda like, okay, yeah, yeah, this
is how I work more. Okay. So let's just, and then three, Let's just reset seven. And then three we will disable. So I'll just right-click
that and disable it. Alright, and they
think this would give a really good mixing experience. Again, don't think that four
gives you a different sound. It all that matters
is like when we go to the low end or the high-end, we're boosting the frequencies. It doesn't matter what band. They just give us seven
bands to be able to EQ. But really when you're
getting hands on mixing, you're probably not
using seven bands. Three to four bands is
probably what I'd suggest. So for example, if you
wanted four bands, then maybe you can reset
this one and this one reset. We should see the five K16. So let's disable the
three ones that case. So there's, there's this one and let's just
totally reset it. So there's the three.
Let's disable the yellow. For example, if you want
it to have four bands, something like this
would probably be nice. But let's just keep it simple. I will disable this one, and I will disable this one. And let's bring in the yellow. So three bands, Let's
just work with. And again, the same thing,
so the left and right. Now what you have to do
is you have to go to the next bank. And
then now what? You don't have to, for example, you could stay on the same bank, but now it's the next
three sliders with early, the next three knobs
or you've got to. But I usually find that when I switched the bank,
I just know that. Okay, I want that next band. And again, a band is one is a band for as a band,
seven is a band. And I usually just find that if I go through the
different banks, I can quickly just, I know exactly
that same workflow like it'll let me just show you. So I'm going to enable smoothing.
I want left and right. So what I'm trying to
say is if I go from, I actually did that on bank one. So let's go back to bank one. Right-click overall global link. And we will move this. So let's, so sorry
I screwed up there. So what I wanna do
is let's just go. Oh see, I did link
to controller, and so that's what's happening. So because I went
linked to controller, that's a project link and it
overrides the global link. Alright, so what we wanna
do is we want to come here. We want to go link
to control it. And I think this is
good that you see that just so that in case you're screwing up and
you can't figure it out. So remember there
is project links, which is linked to
controller, but we want to work with
the global links. So everything is
good here, right? So we have left to right. We have up and down, and we have tightened the queue
or widen the queue. Now, in my experience, it's nice to be able
to just reference that quick workflow and you
just go to a different bank. Okay? Again, like I said, you can use your
different knobs, but I think the different
banks is way easier. So here is left and right
over a global link smoothing. And we just moved it up. So there's that one. We're going to go up and down. It will smoothing. And there you go. And then we will do we will
tighten the band right here. And then I'll just go to
the next bank and we'll do the next thing nice
and quick as well. So left and right. Again, if I wasn't talking, it's actually a quite
a fast workflow went to kinda figure
out what's going on. But again, you just want
to make sure you keep that file backed up that port. Because, you know, in case you screw up and it gets really,
really messy, right? So what I'm saying is you
just want to keep a backup of this file and then you can be really aggressive,
Have fun with it. And so now you can see
that if I'm in Bank one, we're in band one
right up and down. You can, again, if
one is over here, It's not going to sound
better than if we bring, let's say like four over here. So watch if we bring
four over here, It's not like it's
going to sound better. It's just that, it's just
as now you have two bands. So there you go. So this is the hands-on mixing. You get a pretty good workflow,
pretty good experience. Again, if I come
back here to four. So right now I want to go
with Bank two, which is blue. And then I want to come
here, override global link. And we're just
going to be able to adjust the different
styles, right? And again, that's a
notch. As many times. Sometimes, it's just easier
with the most sometimes. And they are calling a
bell shape, a peaking. Okay. Let's go to seven. So again, I gotta go
to a different bank, seven and over a global link. And again, I will
just move this knob. And that's this, the
different styles. Okay, So I'll just
right-click and go reset. Or maybe it doesn't
reset the style. I think it usually
does, but anyways, so we will just go
Peking as well. And then now so bank
one does number one, bank to does number four, and then bank three
does number seven. We have left and
right, up and down, and we also have the queue. Then we can also
change the style. Now, the thing I want
to share with you is you want to set up
the master volume, the global link as well, okay? And again, so right
now I'm in bank three. So you have to remember that. You always have to go
back to bank one if you want to set up that up and down. So let's just hit
play on this piano. And let's just say, you know, we come here and we're
getting some hands-on mixing. And you know, it
sounds pretty bright. But maybe you begin
with it often on. And if you leave this open, you can be able to just
work a little faster. So maybe we don't
want that body back. Back. Again. You can see I'm getting the
hands-on workflow again. To get back to that master, you want to go back to the main bank and you can turn up and you can turn it down. Now if you wanted to. Let's see. Yeah, So you're not able to
right-click the compare, but if we come up here and
go to the browse parameters, this is where we can see, well, what can we actually work with with this parametric EQ to? So we can do the main level. That might be everything we're allowed to automate on here. Again, you can right-click
the different things to see the different
settings of the plugin. But yeah, okay, so I think that's pretty much it
for the parametric EQ to. I will quickly show you how
to set up the fruity limiter. But again, all of this stuff just kind of
applies the same way. So you have the limiter and you have the compressor, right? If you're gonna be using
it as a compressor, I'd recommend putting your
ceiling all the way to the top and your attack
all the way to 0. And that way, I believe
it reduces the latency. So again, if you
want to set this up is the exact same way. And if you saw when
I set up the proceed to when it came to using
the mapping formula. If you want to restrict, then you can do
that kind of stuff. But again, we're just
going to smoothing. It's just the exact same thing. So we have the threshold. I personally would do the
next knob as the ratio. So there's a, there's a ratio. I would go attack. The smoothing enabled. Here is the attack,
here is the release. And the sustain is
just like the hold. Okay, So when we have the
proceed to we have the hold. That is like what
like the sustain is. So again, I would suggest
putting that to a knob. And then as you're
mixing your music, just play with it
and just try to get the sound that
you're looking for. So again, threshold ratio,
attack, release, sustained. And then if you want
like the knee or whatever you want to
adjust their right, you just set it up just
just how you want. Now, check this. You can
also adjust the curve, which I would highly
recommend you do. Here's the different
styles, right? So what does the
curve? The curve is essentially just
like in the pro C2. You have the different
styles of compression. You can see over here I have the different
styles of compression. By using the slider, you could
set it up on the slider if you want to follow my
fab filter approach. But I'm just showing
you how to set this up off your knobs if you want
to do that kind of stuff. And there you go. So lytic different styles. Then you also want your gain. So let's just right-click
this over I Global Link, and then let's increase this. So as you can see, like this might be really, really aggressive as you're,
let's say we hit Play. And let's just disable
the other plug-ins. So again, let's just do
this over a global link. And we will go times 0.5 and then maybe
it's plus 0.5. Okay? And then this is where
we can kind of play around with how we
want to do this. I think I probably want
this to be more aggressive. Again when it comes
to the compression, usually we just want to
be able to go from 0 up. And then maybe like 0.25. I think that's kinda
what we wanted. And so I'm going to hit Accept. And so now the max volume we can get as nine and it goes to 0. So or again, you
can come back here and if you wanted
to put it back 45. And then we put this
to like three or something and we hit Accept. And again that's just
like the master volume. So we can go a
little bit minus if we wanted to do
upwards compression. And then with the hands-on, you're actually
listening instead of like because when
you use a mouse, you can only do one
thing at a time, right? But for example, look, I can do two things
at the same time, which is kind of more like
if you're in a studio, like if you're using the
threshold and the ratio, you can kinda do
it the same time. The same thing with
like the knee, right? You can see I'm moving
the knee and you can see maybe I want to
bring up the threshold and have a softer knee
or maybe I want to bring it down and I want
to have a much harder, nice, which means that it's
only hitting the peaks k, So it's not really getting
into the body of the sound. And then, yeah, so it's just like such an
amazing workflow.
14. 4-2 - FL Studio Stock Plugins Example: Okay, in this video,
I just want to cover a couple more FL Studio
stock plug-ins just to get you up and running so
that you can kind of understand if you want to
get hands-on with them. Okay? So with the fruity limiter, I wanted to show
you that you can actually do upwards compression. So when I was talking to you
about going minus and plus, so for example, let's go to
the override global link. What I would do is let's
just go maybe last half. And I just want to show
you upwards compression. Let's go 0.4 and then we
will go like 0.4 as well. So maybe something
like that, maybe 0.35. So because this
upwards compression in the fruity limiter, can you actually get
pretty aggressive? So again, the top-left, I can get minus six
and for a boost I can get plus nine.
Let's just say okay. So again, if we're gonna
do upwards compression, so if we're using
the fruity limiter, I like to take the limiter go all the way full and
the attack to 0. So let's just hit play here. And so now how this upwards compression
works is we're going to bring our threshold just
below some of these peaks. And if you bring the
ratio back the other way, this emphasize some
of those peaks. It makes the peaks louder. You Howard getting distortion. Turn on the volume. Can you hear what's kind
of emphasizing so we can actually bring
the knee back as well. The lower we go. Nice and fast. Okay. So that sounds kind
of weird, right? But what you do is you
can just be blended in. That would emphasize
something like the kicks and the clubs
and stuff like that. Again, I'm just showing
you that if you're using hands-on with the
fruity limiter, you may want to adjust it so you can go all the
way back and you can go all the way forward because normal compression on
this fruity limiter, which is a compressor as well, is something like this. So then maybe you want like
your knee or whatever. So if you put your
knee like that, this would be kinda like
normal kind of compression. You can adjust your
need to fine-tune. But I do find the fruity
limiter quite set. I find it pretty hard to use honestly like compared
to the proceed to, the proceed to is just,
it's more predictable. It's easier to see
what's going on, but the fruity limiter
is very powerful. K, Again, you have your different curves
settings and again, set all these up by
going Link Global Inc. and put it to
a knob or a slider. And I'm telling you when
you're getting hands-on, you can have some tons of fun and figured out the
sound that you want. Okay, so let's just load
up some other plug-ins. Let's load up like, let's
say like the fruity reverb. This is on the master track, so we're going to hear
how it sounds will go into like the verse or
something over here. Okay? I'll highlight
just this area just by right-clicking holding. I hit Play. Have reverb on
the whole thing here, right? This is what it would
sound like normally. And let's turn it on. Crease it. So if you really wanted to, you could right-click this, go to override global
link. Again, smoothing. You can enable it. So we're just keeping like the very high end
of that reverb. Bring it back. If you want to adjust your arm, your wet, you could try that. So one heads up as some knobs, you cannot adjust in real time. So in other words, when
the audio is playing, you can adjust them. For example, this pre-delay, I guess, because it actually has to kinda
like look ahead. And then once you let go, then it reads the audio again. So let me just show
you that will turn this up so it's really audible. Castle watch it. Move this knob. We
have no reverb, right? So as soon as I let go of
the knob with my mouse. Okay. And again, it's a pre-delay
is just delaying that reverb, helping it stand out more, but you want to fine
tune it so it doesn't sound so audible like
that many times for like, again, this is on the master
track, but if it's a snare, let's just go to the clap, for example, or disable that. So here's a snare,
I'll just click this, will drag over this
reverb onto the snare. And if we listen to the snare, guess so if we adjust
pre-delay, watch, if it's too long, you're going
to hear the snare hit and then the reverb. Care. So let's wait too
long of a delay, but if you bring it
back a little bit, okay, still too long. Still too long. So watch, I'm going
to copy this value of what we bring it back. So what's happening
is the reverb will actually kinda
get lost in the mix. Sometimes if it's like this, but if you have some pre-delay, the reverbs is actually louder. And when it's louder, you can
actually have a less tail, which means that the
reverb can be louder, a less tail, making your reverb
more audible but cleaner. Okay. So again, that's just
kinda the hands-on stuff. And again, swatch, if
I come to this clap, you can see that I
can move the look ahead and I can move
the wet, right? And if I come here to
the master and click on this reverbs and obviously the other reverb, Check it out. Here's the Loca, here
is the wet, right? So you could do stuff like that. And essentially any
plug-in that you open up inside of FL Studio
allows you to do that. So as the fruity course, if you want to get
hands-on with this, this is a lot of knobs, but maybe like the
main ones that you might want to adjust
is the delay. So why should we go
override global links? Move it. And again, that's
all you have to do. And then if you want to apply
the mapping formula stuff, again, just go back to the video about the
mapping formula. Can you can select if you
want to do stuff like this. And again, if you want
to limit the range, this is the easiest
way, just like 0.25. And so now we've
limited the range. The less I can get as this, the most I can get is that. So if I hit play or if I write. So again, I just
wanted to break down some FL Studio plugin is
just to give you an idea. It's just a matter
of opening them up. Right-clicking the knob,
going override global link. But mainly in the last video, what I showed you was
the parametric EQ to, I showed you how to get a
pretty good workflow with it. Again, the thing that
kinda sucks that you can't really turn it
off and on in the same way, but you can get your
master volume set up. So that or actually, sorry, what I did was
I didn't move it up. So if I have my my
my actual fader, right, so you can
adjust it like this. And then if you want to
adjust your different bands. So for example, let's just say
for k, So we'll take four. So I'll right-click, we'll go over a global link,
select this one. And so again, if you are
boosting or cutting whatever, you can just kinda
compensate for that. And if you keep your mouse
up here as you are mixing, like you can mix with just
one hand if you want, and then you can disable
this at the same time. But again, it's just not
the exact same workflow is like the FAB filter plugins. But essentially that's it. You open up. Any
plug-in that you want. Could be a stock plug-in, could be a third party plugin. And you figure out,
how is this going to benefit you by using hands on, sometimes it is just
easier using the mouse. What I showed you in this course based off of the fab
filter plugins, I, I truly found that
it really gave me hands-on and the workflow like that I was always
kinda looking for. It allowed me to
listen to my music. It allowed me to turn off
and on the plug-in again because it has that built-in off and on, which is really cool. Alright, so I hope
that just gives some clarity into getting your FL Studio plugin setup
for the hands-on workflow. It's just a matter of
just right-clicking a knob going over
our global link. I do suggest doing
the smoothing. If you want to do
the mapping formula, just check out the
mapping formula video. It'll show you how just different things you
can do with this. If you want to fine tune it, you don't have to do
anything with it. But again, you can click
here and see what they did. Just hit Enter. And so as you can see
that that's an air. So I'll go back, hit
Enter and it'll, it'll tell you if it compiled properly. And that's
pretty much it. Okay, So again, this course was mainly just for the
fab filter plugins, but I just want to
show how you can get hands-on with the
FL Studio plugins. And it's just a matter
of right-clicking, going over a global link. And there you go.
15. 5-1 - FabFilter Mixing Example: Alright, in this video, I'm just going to
go through each of these fab filter plugins
that I've set up with you and just show
you the kind of like a real-world setting of
how I would use them. And hopefully it just helps put everything
together for you. Okay, so I'm just
going to hit Play. We'll open up some plug-ins, will play with them
nice and quick. We'll go to the proceed to
we'll go through the pro Q3. We will also go through the pro NB and I'll load
up the patcher one. And I'll just do
that right now and then I will just disable it. But we'll play with that. And then we'll also
load up the pro L2. Or if you want to use any other third party plugins or any other fab filter plugins. I showed you how to set it up and all the same theory applies. Okay? So let's just hit Play
and let's just listen. Okay, Let's say the snare. So let's just say we
want to bring this over. So I'm holding down
Alt and my left arrow. And I'm going to push
my middle scroll wheel to get that same color. Push this and I will
go snare sub hit F3. Let's just see how
these are routed. So I haven't routed them
to any, anything else. And let's just go quickly
to the drum loop. So we got the drum loop
and we have the snare. So I can see that
they are layered. And so what I will do is I'm
just going to click them, right-click and wrote
to this track only. Okay, So what's happening is these two sounds are
going to a snare sub, and let's just
keep, keep playing. Okay, so let's open up an EQ. If I wanna get the
hands-on mixing. So here we go. So I'm going to
use my third knob. This is all what I
have to create a band. And I do have the auto gain
on which is going to help me just hear a little bit
clearer of what I'm doing. Not to say this is going
to sound good, but right around here it kind
of sounds like box you were to ever write, tighten
it up a little bit. Now on my midi keyboard, I can hit for it
if I want to speed it up, get back
into the drum loop. I'm gonna bring that
back a little bit. Maybe, maybe I kinda like
it around that area. Again, sometimes if I like it, you can left-click on it and
you can just kinda bring it back with your scroll
wheel a little bit that way you don't
screw up anything. If one another band, Let's just say we go recruit
another band, right? Let's just say we
want to bring out, I want to bring out kind of
like little the fundamental. They're tightened
up a little bit. Bring it up, bring it
back just a little bit. So again, my left one
is left to right. And then the second
one is the volume. So let's just turn off and on. Let's just hear how
it sounds that I improve it, that I ruin it. Again. I'm a bank two, so I have to go to bank one. Now
it goes off and on. So let me bring back down the volume just a
little bit on that one. Again, I have to look at the screen right here to
seeable to soft takeover. So I have to actually
reach the value that I can bring it back a bit. So let's just say we're
happy with our EQ. For example, I'm going to
open up the proceed to. And now we can get
hands on compression. So again, the auto
gain is enabled. Let's just disable
the auto gain. So again, the auto master
gain, I'm going to turn off. Let's just go back a little bit. So good, excuse my number pad. Come back to here. So shrunk the volume off. The snare hits a
little bit bigger. Let's try just a different
style or compression. So what we can do is watch, I'm just going to use
my scroll wheel slip. We can copy it over. Let's go to a different style
of compression. Again, I'm just kinda doing
this fast with you right now. Different style compression.
Let's maybe go like the PDO maybe will be more
aggressive on the ratio. Let's bring that knee hard knee. And the actual threshold
will bring down more. It's gonna sound aggressive. But check this out. Maybe we want to bring that range back. We don't want as much
compression happening. Bring up the volume. And just look in the
bottom right here. This is by Ambassador volume. The attack maybe faster
release the hold, maybe losing fluids a whole. So let's just usually
when I'm mixing, I kinda remember where they are. But it's kinda like
a workflow thing. So Chris, just see, so there's the hole gets pulled back just a little bit
in volume, turn off and on. The ad that had more. So now I can go
before and after. So let's hit play again. We're often on. Okay, so let's just do
a quick example there. Let's just load up the pro
and B and delicious work off of that snare again. So I will just load up
the pro MV over here. Again, this is through
patcher or it's, let me just highlight
all of these so we can see just how it's moving again. So when I move a knob, it is affecting each
band. At the same time. Let me just hit play now
not to say that you need to compress your
stuff this hard, but I'm just showing you just
how I work and how I can get hands-on to find the
sound I'm looking for. Again. Let's bring up the
threshold a little bit. Again, we have our ratio, which is just right down here. Again, I have my
master volume off. So as much louder. So let's
put like me like four. Still pretty loud. There is the look ahead. Now
I have enabled look ahead, which allows us to enable
this or work with it. So we have a range which
is super powerful. Again, I just want to be focused in this window, I believe. Yeah, so there's a range. So in other words,
we're just saying that, you know, we can
compress really, really hard if we want to. But then what we're
saying is we want you to bring back that range
and we actually don't want that much compression
to happen without it. Like the snare
sounds like it hits this fuller little
bit more body to it. Hit play again. Let's make that, that releases a
little bit faster. Attack. This compressor harder. Again, I can adjust the knee. Soft or hard Ni. Okay, let's bring
up that threshold a bit. Cramped the volume. Fast release. Guess. So I'm just showing
you that we can get hands on mixing and just really fine
tune our overall sound. I believe the look
ahead is right here. This might be allowed now. Right? So again, just
showing you you can get the hands on workflow. Let's just load up
a limiter on there. So again, I don't
use a limiter too often when I'm
mixing, but you can. And again, I showed you that
we set it up just like this. It looks like it's smoothing
is enabled, right? So we have that, we
have the off and on and I even on this one if you
want like the one-to-one. So for example, once we
hit play, It's way louder. But this is the power
of being able to mix with similar volume. So I increase or I turn this up, which is not one-to-one. So I'm not clicking that
on as a midi keyboard, or I could just click it on, or I could disable it from
the midi keyboard to. So if I increase it, it's
on. So now watch this. If I increase the volume
into this limiter, we're gonna get a lot
of gain reduction. But we're actually
going to be able to hear the impact on our sound. And again, so I have the attack. Sorry, sorry.
There's the attack. I think usually I would
like my attack to be here, but, uh,
but that's okay. So without it, with it. Again, not to say that this is going to sound good at all. I'm just sharing you,
share it with you. Just the example. Right? We turn it off for
back a little bit. So no effects. Pretty quiet. But the effects back on. So it's pretty loud. So what I'll do is we will just turn them out this
back a little bit. Not turn off and on. So what I'm gonna
do is I'm going to turn off and on here. Print their volume. So you can hear when we enable and disable it
through FL Studio, there's a little bit of
a glitch there, right? And that kinda throws off
like you're hearing a bit. But again, not to say that
these settings are good, but it does sound
like that snares a little bit fuller sounding. Again, we can, we can try a different styles and this
is where I would do the copy, then go over to B and we
can try a different style. Again, I'm just being really aggressive just for the
sake of the course. Not to say that I would actually do this in my own mixing, but it doesn't sound too bad. They, I can kind of
hear some kind of like distortion going on right now, but with
a different setting. Moderate done a pretty good. So again, I hope
that kinda gives you an insight to the
hands-on mixing. Again, you can go to your master track and you
could do the same thing. Typically in mastering
were being much more subtle on our moves
and on our stuff. But when we are
mixing our music, you can be super,
super aggressive. And I hope that kinda
just bring some clarity to when I'm using the pro Q3. Again, you could be
cutting as well. I was just more
boosting in this video. The proceed to the pro mb. Again, I had to set that up through patcher in order to get the the knob to be able to control the threshold to that is controlling all
of them, right? So if I come to this one
and I decrease it fully, so minus 90, you can see it. Did that fully, right? But because of my global link, you can see that I
can actually go to 0. So if I want to go to 0, I can just use my mouse right
here and it can go to 0. But when I use my threshold, you can see I can
only go to minus 60. Okay? Again, that was just
like a mixing decision I did so that it's kinda
like the sweet spot. My knobs always like, I'm sorry, that's because
I'm using my mouse. But if I use my midi keyboard, so minus nine to 60, right? Then again, when it
comes to the limiter, I don't always use it
very lightly in mixing, but it is a very powerful tool. It's a very, very aggressive
type of compression. And as you can see at the
very, very last plugin, and I use the loudness meter
that way I only have to use one plug-in for my limiter
and my loudness meter, and I can get their
hands on mixing. And so like I said, when I was using when I
was doing it with you, I think I would like to
set it up over here. So for example, I think I
would like the attack to be on this knob actually. And I would set that up. As you go, you're
going to figure out where you'd like your knobs
and where you'd like things. And I usually find that
if I'm mixing a lot, like if I mix like in a week, if I work on like five
different tracks, I really know where
all these knobs are and unable to
work very fast. I haven't mixed in
the past week or two, but there you go. So that's the hands-on mixing workflow with the
fab filter plugins. You know, you now know
how to set them up. And thanks so much
for watching so far.
16. 5-2 - Omni Mode [BONUS]: All right guys, In this video,
I just want to give you a quick little
overview of the Omni. I don't really fully
know how to use it, but I'll just show you
what I know about it. And it's a pretty
cool little things. So if you want to keep using
the same knob over and over, then you can do the Omni. So again, you can
come to this page, which is the linking and the external
hardware controllers about the project links
and the global links. And if you just search omni, there's a couple of different
sections about omni. And again, you can
read more about it, but I'll show you where
to find it in FL Studio. Okay. So let me just
load up everything here. And I'm just gonna go to a bank. That that's what happens if
I'm not in preset modes. So if I'm in present mode,
everything works normal. So I'm in bank and I'm
just going to use, let's say this knob for omni. Now again, if you use this, I believe it's still like
a project link and it overrides the global link stuff. Okay, So let's just
say I want to use this knob for
what's called Omni. So if I come here, right-click and I go
link to controller, you can see this Omni mode. And if I did that with
the overall global link, you can see omni
mode is not there. So it's only for
the project link. And I believe again,
it's going to take over if this was set up with a
global link. So here we go. So this is omni mode. So you can see I can
move it up and down. Right-click link to control it. Let's enable smoothing, because again, it looks
a little bit better. Now, omni mode does,
is watch this. If I go to nine, boom, it's all set up the same way. Same way. Okay. So this is a cool way if you want to mix just
really, really quickly. And I just want
to quickly again, show you both omni mode. So again, if we come up
here and if we right-click and we linked to controller
and we go omni mode. And if we move this, you
can see that we are now moving the panning on the piano and it's
doing on the mixer. So let's come here.
Linkedin controller, and that's where the remove
conflicts can come in. So watch if we come over here, right-click linked to control
it removed the conflict. Now it's only going to
work on the panning. And if we go to the base, now what does the base panting? Panting, panting if
we want it to be? The volume. Again, remove conflict
is on Omni, remove it. And now this would only do
like the volume for these. So again, you can set this up and I just wanted to quickly
share that with you. That is just to do
with Omni mode. So if you want to use this
one slider for your mixing, you could totally
do that, right? For example, if
there is one slider that you don't use
for anything else. Like let's say, let's
say Is this slider or it could be like this slider
or whatever you wanna do. You could set it up
so that you have one slider for your
volume or something. Again, I don't do that, but I just wanted
to do it just for completeness of this hands-on
mixing kind of stuff.
17. 5-3 - Mackie Motorized Faders [BONUS]: Alright guys, so I'm just going
to do a quick bonus video about the Mackey
control universals. So this is actually the old school Mackey control universal. They now have a USB version, but this is like the
old school where I need the two actual
old-school midi cables. And I need a special
audio interface that allows for in and out
of midi equipment. And so I'm just
going to move this. And so you can see that this is, this is what you call
a motorized fader and check this out
when we go between. So this is a different banks, just like on the midi keyboard when I switch between
the different banks, this is the same thing
and check out this, they move super, super powerful. So again, this is
just how it looks. I just wanted to show you
what nice and big, right? We have our knobs, but the sliders is pretty much
like the coolest thing, like you actually
get hands on mixing. So let's hop into FL Studio. And you can see
that on my mixer. You can see that it's actually
moving and check this out. If I use my mouse to
control that, watch this. So no hands and it's
moving by itself. Okay, So pretty cool, right? But the thing is the
Mackey control universal, just like the way it's set up. I just couldn't get it to work
for a nice, good workflow. Just like I showed you
with the hands-on mixing with the midi keyboard. Okay, so like I said, I really wanted the hands
on workflow when I first got into FL Studio and I put
some money into this thing, this thing I think
was like maybe $800 or something when I
bought it at the time, like 67 years ago, I've kept it around
because it is such a cool little unit and maybe one day I can
get it working. But like I said, I
was not able to get a very good experience
when it came to using this Mackey control
in a real-world setting. But yeah, so you just go
through your different faders. You can see that
they're all just moving things around
a little bit. But yes, like if
I'm in the piano, if you can see piano,
it's kinda like moves. Turn on the piano, solo it out. So it looks cool. Okay, don't be deceived
because I was deceived too. I thought this is so cool. But like I was
trying to tell you, the midi keyboard has by far the best hands-on workflow
that I've experienced so far. And that's why I wanted to
create this course on it. And I just wanted to
share this with you just because I have
it laying around. And you may not have your
hands on something like this. And it's so cool.
Like if we could get a midi keyboard like this, I would be willing to pay for that if everything
else was good. Like if the keys, we're good. If the knobs of the motorized
faders, we're good. I really think it
would allow us to get a super cool
hands-on experience. But yeah, so like you go to
your different parameters. And when it came to
EQ, for example, if we wanted to use EQ, you can actually hit the EQ button. And then if you look down
here, so I'm gonna piano, you can adjust like the built-in EQ and you
can do stuff like this. And in that sense,
it's pretty cool. Let's just see what
I'm doing here. Again, I haven't used
this in a while. I pull it out. I was trying to play with it. But yeah, it's like for me
like I want to use my plugins. I like using the
FAB filter plugins or even the parametric EQ to. But it's like you're kind of
stuck using the built-in EQ. And yeah, just in terms of
workflow, it was tricky. It's always just tricky. Like I always found that as soon as I was getting a good
workflow on this thing, I always found it up
back to the mouse. I just always like that. And with a midi keyboard, typically because it's
right in front of you. You've got your mouse, you go to your midi keyboard, then
you go back to your mouse. And it's just kinda like it's just a way better
experience even though you don't have the
fader eyes, motorized faders. I go back to, I think
track or something. Yeah, I haven't used
this thing in awhile. But like I said, I was deceived. I thought it was really
cool. Don't be tricked. Don't be thinking that, Oh yeah, I need this because I don't think it's
set up very well for FL Studio to get the same experience which I
taught you in this course. If you want that
hands-on workflow. So honestly the best
workflow is just get a nice midi keyboard semi
way to keys the oxygen Pro. I do like I'm telling you, you're gonna get a
really good workflow with the hands-on, with the midi keyboard. Something like this
could be really cool. But in its current state, I see it taking a
lot of scripting, in other words, a lot of code
to get this thing up and running to the point where
it can be so powerful. Because this is maybe this
is built a little bit more for just kinda adjusting
levels and stuff. So as you can see, I can go from my piano to my
base, to the keys. And again, if you are adjusting them all at different levels, you can go through
the different inserts individually or you can go
to the different banks. And again, it looks cool, right? Like this is, this
is what we all want when we're
making our beats. Him were quote unquote
in the studio. Because a mouse, even though always
tell you guys that the most is by far the easiest way
to do things in FL Studio. When you get hands on. Hands on is like you're actually feeling like what you're doing in the music. And again, you can
also use two hands, whereas a mouse typically
like if I load up the parametric EQ or just like the single
band compressor, it's like you can
only use one thing at a time with your mouse. But that's it, That's
it for this video. So the takeaway is something
like this is so cool, this is all what we want. But I don't think it's set
up very good for FL Studio, whereas the midi keyboard, like I showed you, is the approach that
is more affordable. It's easier, it's
more customizable. You don't have to guess so heavy into code and stuff like that. Because again, FL Studio has Mindy scripting which
allows you to set up any midi device
nowadays however you want. But there's a lot of
work involved in that. And by doing it this way, by just right-clicking on a knob and going global link and using the knob on your midi keyboard is like no coding involved. Fl Studio, like the image
line development team, they've done all
that stuff for us. We keep it super
simple, we do that. And then again, you just
want to make sure to keep that this little
file here, right? You just want to make
sure you back up this whenever you're doing
all your global link stuff. Okay? So, okay, I got one final video for you guys
is a little conclusion. I hope you enjoyed this
hands on mixing course, and I'll talk to you
just in the outro video.
18. [OUTRO] - Hands-On Mixing in FL Studio: Hey, what's up, guys,
gratuitous here. Thank you so much for taking
my hands on mixing course. I hope you guys enjoyed it. Alright, so again, when
we use a midi keyboard, it's not like that
Mackey control universal that you just saw for
the hands-on mixing. But the problem with that
Mackey is that it's not really set up for the
fast workflow that I've been showing you
in FL Studio here. Okay, So when it comes
to our midi keyboard, by using the global links, we are able to set up
each knob how we want. We can do it over our
different banks, okay? And you are able to get
such a good workflow. It's more affordable,
it actually works and it's totally customizable,
really, really fast. Again, that Mackey, Yes,
It's motorized faders. I would love to be able to have motorized faders on
a midi keyboard, but the price, I think, would get quite steep. There used to be
one that I know of, a midi keyboard with
motorized faders and I think it was
through Barringer. I think it was I don't
know the name of it. But you can look up Beringia, motorized fader, midi keyboard. I don't think, I think
it's discontinued now. But anyways, so that's
essentially this course. Okay, so I am using the M Audio oxygen
pro midi keyboard here and just a
quick recap on it. So I have a free media script available for you and that
is on the image line forums. Okay? And what that's
gonna do is it's gonna get your transport
buttons set up for you. Your stop your play your record, your backup bar, you're
Florida Bar, and your loop. The loop buttons
pretty important because it switches
between song and pattern mode and not
all midi keyboards off for that functionality. This also has semi
way to keys and I also highly suggest a 49 key. I understand a lot of people
think they want to 61 key or they want a smaller
midi keyboard like 25 key, but a 49 key gives you
tons a playing space. You have your octaves. It's more affordable. I'm telling you this is like the best midi
keyboard which I've experienced personally so far
in my beat making career. It's pretty jam-packed. You have all your sliders,
you have all your knobs. Okay? Now, in addition to that
free media script on the image line forums
there you will also see my premium add-on. Now you don't need it, but it will give you
the exact workflow that you saw me show you
in this course. So for example,
bank one is orange, bank two is blue, bank three is green, bank for is white. But again, most midi
keyboards are able to switch between the bank So you don't have to have the oxygen per row. And again, you don't have
to have the premium add-on. That is just going
to allow you to follow exactly what
you saw in the course. But you can open up the audio
oxygen Pro preset editor. You can set up
different CC numbers for each bank yourself. But again, if you just
open up the preset editor, you loaded my premium template. It just does it for you
and you're good to go. Okay? So if you have
any questions about this course or if I've
left anything out, you guys can send
me an e-mail and high and it's gratuitous.com. I'm just an e-mail away. I typically respond back daily. Okay. I will get back to you
really, really quick. If you could leave a review, I'd really appreciate
that it helps. My courses here
get ranked higher and check on my other
FL Studio courses. I have tons and tons
of FL Studio courses. Okay. So my my real
name is Riley Weller, my artists and producing
them as gratuitous. Thank you so much for taking this course means a lot to me. And again, if you need help, just send me an email. I'm just an e-mail away.
Thank you so much. I'll talk to you
in my next course.
 Riley Weller, FL Studio Trainer