Transcripts
1. Introduction: Then, I wanted to show you
my favorite things to make. It's so, like, textural
and really, like, meditative to make a pinch
pot. And it's all in the name. It's all about the
pinching as you go around. So it's pretty much all you need is your
hands and some clay. They're great because it kind of really gives you a
good intro to the clay. You kind of see,
like, how it cracks, how much water it likes, how much handling it likes. And it just gives you
a really good, like, base to know kind of what you can do
with it in the future, without it cracking or warping on you and
that sort of thing. All clays are different. It's such a simple project. It's super easy for beginners. And the best part about it is, if at the end you don't
like what you've made, you can smush it back up, put it back in the bag, come
back to it later. Try again. When I first started,
my pinch pots were definitely
bowls and not cups, which is what I was aiming for. So it does take practice, but give you all the
tips you need and, you know, get your hands
dirty and just have some fun and play around.
So yeah, let's get
2. Tools & Materials: Okay, before we get started, you need very few
tools for this. Really, you can get away with just your clay and your hands. Other things you
might like, though, is a sponge, or
you can use, like, a dishcloth, any sort of sponge, have a little bit of water
handy, just some clean water. Can also decorate your
pinch pot by, like, making textural elements on it, adding a handle
to make it a mug. And if you're going to be
adding any attachments, you do need some slip
that matches your clay. So just make sure you have that made up already. You tips. Number one, short nails is
like essential for this. You're literally
using your hands. So I'm sure there are
smart people out there who can manage to do
pottery with long nails. I manage to get, like, fingernail marks
in all my things, where I scratch things, when I've just moved
everything over, I'll just touch it, and then there's this huge scratch in it. Short nails definitely
recommended for this one. The other thing is
you want to take off all your rings because you're kind of using your
hands to shape it, so unless you want these ring
marks in your pinch bot, take all your rings
off before you start. Alright, so you can
use any clay for this. I imagine you could even use air dry clay as long as
you weren't using it for, you know, a functional
item, a mug. If you're just gonna put pens
or something in your cup, probably go ahead and use
air dry clay for this. I haven't tried it, but I imagine it would
work quite well. I'm going to be using this new bag of clay that I
haven't tried yet in teens, which is called Stone were nine. Again, I just love to
make a pinch pot to test out a new clay to give me a
good idea of how it works. You'll see as well this
one if I don't list it. It actually has this little
yellow sticker on it. And it says New formula. So if you are really set on a particular clay
and they change something, it's a really good
idea to test it, as well before you start, you know, making something
on purpose with it. So pinch pot is another
great way to test that out. I'm just gonna cut a chunk of this off, and then
we'll get started.
3. Starting Your Pinch Pot: Alright, so I've got
a chunk of clay here. What you want is a
bit of clay that will go into a ball that's a nice fit in the
palm of your hand. So this is too
much, but I'll just put the excess
under a damp cloth. If you're getting clay
straight out of the bag. I find you don't
need to wedge it. If you're using, like,
a reclaimed clay or scraps of clay that
you smush back together, you probably should wedge it before you start this process. I'm not great at wedging, so
I don't have a video on it, but if you have a
look on YouTube, there's plenty of people
who are much more skilled at it than me who can show you how to wedge your clay. So what we want to do is grab
kind of a chunk of clay. Now, this really depends
on your hand size. My hand size is obviously a little bit smaller
than most people, so mine will probably
come out a bit smaller, but what you want
to do is just smush it into a bit of a
bowl to start with. Doesn't need to be perfect. It's just, like, I guess, a baseball size, that kind of, like, good to hold
size in your hand. Now, what you need to think
about is that this amount of clay will stay in your
pinch pot the whole time. It will just expand and grow up basically to make the
shape that you want. To start with, you're
just having a place. Just make sure it's
kind of a good size. You don't want something
too small or too big. It becomes a bit hard to manage. But to think about in the
future for other ones, the size does determine the size you can get out of
your pinch pot, as well. Can also, if you
plan on making, say, a set of cups or
something like that, you can actually weigh how
much clay you're using. So say, this is 100 grams, I would then weigh out 100 grams and start with the same
amount of clay every time. That would just make things a
little bit more consistent. Another thing to note is clay. Sometimes it can be
a little bit too dry or a little bit too wet. You want it to be smushy,
without cracking. When you put into it, you
want it to be able to hold a fingerprint without cracking, and you can see the
fingerprint in it. And that's a good sign that it's the right sort of consistency. If you find it's too dry, set it aside under a damp cloth. I just have my bowl of water
here and just a cloth. I tend to just ring
out all the water. I just wrap this up and then
sit it aside on my desk. And then that means that it's
like soaking in that water. So just leave it
for a little while, come back to it, try it again, see if it's the right
consistency, then. This will depend on
your clay, like, your air temperature,
humidity, so many things, it's really, like a
touchy feelly thing that you just kind of
get to know eventually. It really just takes
practice with that one. Okay, so now we're back
to our ball of clay. To me, this is the most
basic way to make something. And it's also the most rewarding because it requires so little,
you don't need a wheel. You don't really need any tools. It's like, the most basic, and you can literally
say that you've crafted something from a ball of
clay out of your hands. Alright. So you've got
this ball of clay. Mine's a bit lumpy
at the moment. What I tend to do is just bash it in my hands
back and forth. Just give it a pat like this. And just shape it,
smooth it down. Try and start as smooth
that as even as possible. That doesn't really
matter for a pinch pot. I personally think they're meant to be a little bit wonky. It shows the handmade element. That's what I love about them. It's what I love
about hand building as opposed to wel throwing. But, yes, it's
completely up to you. I'm also a bit of
a perfectionist, so I'm not one to
talk in that regard. Okay. I've got a few little cracks
you might be able to see, but you can just
smooth these in if you want to like this. It's more just from
when I smosh the clay together rather than the
clay itself cracking. If I see a little crack, I'll show you what to do
with it as well, and we'll run through
some troubleshooting. I'll just give this
a little pat again. Okay, now I get to go. So the next step from
here is really simple. What you want to do is take your thumb or really
any of your fingers, and you want to just push it into the center of your ball. What you want to do is this, again, is something that
takes a bit of practice, but you kind of want
to feel how far away your fingers are from
each other inside of the clay. So at the moment, I'd say that feels like about
a centimeter between, so about this much
between my fingers. I can't show you
that, obviously, because my fingers inside,
it's so hard to tell. But you do start to
get a feel for it. And this is one of the good
things about pinch pods. All these techniques carry across to other
pottery, as well. Knowing how thick your walls are when you can't
see inside of them, knowing the depth of your
base is really important, especially when you're doing carving or anything like that. You want to know if
you're gonna just cut a hole straight through your
wall when you don't mean to. So it's a good
skill to practice. Mind about, I think,
a centimeter. I'm gonna go a
little bit deeper. You on between a centimeter
and half a centimeter. You definitely don't want to push your finger the whole way through because then you'll have a doughnut and not a cup. And if that happens,
don't stress, smooh it up, make another
ball, start again. This is all about practice. And yeah, I think it's
great to see the progress. When you finally get it, when you get your pinch
pot at the end, you just have this such a
feel of I finally did it. I get it. I get it. And then you can just
keep making them, making them. And
they never get old. You can see this already a cup. What we need to do,
though, basically, is pinch out the walls, hence the name pinch pod. And this kind of thins them out. And we do it really
gradually so you can see the shape come
alive in front of you, but you don't want
to go too hard because then it gets uneven. You can't control it as much. You just want to go little
bit by little bit, basically. So what we will do is
essentially use your hand. You want to hold. You can do this on
a banding wheel if you don't want
to use both hands, but you can see you can just spin it around like this
on the banding wheel, even on your table
works pretty well. What I tend to do is hold
it in my non dominant hand. And then you want to put your thumb back in
that hole you made, and you've got your
fingers on the outside. From there, you essentially just very lightly pinching
around the rim of the pot, and this thins the walls and
also pulls the walls up. So this is what
kind of turns this baseball sized blob into a cup, a bowl, all sorts of things
you can make with these. I'll give you some
ideas at the end on what you can do
with it as well. So, we're just going to
go ahead and get started. It might be hard to see. I'll try and get a
good angle for you. You just pinch your fingers together. You can do multiple. I personally like to do two fingers on the outside
with one thumb in there. And you start at the base where you feel the bottom of
your cup down there, where your thumb went initially. And you literally
just very softly, pinch until you
feel it give maybe a millimeter or two is a
good amount to start with. And you just turn
the pot around. So you basically leave your
hand in the same place, and you turn the
pot around and keep pinching pretty much until
you've done one whole turn. And then you'll see what's
slowly starting to happen is we're opening up that hole more and we're pinching
the walls thinner, so it's starting to
get a bit higher. So then you literally
just repeat that process. I like to do, like,
bottom, middle, top and work my way
up in rows as I go around and then repeat essentially until you get
the shape that you want. There are a few things
just to be cautious of. The rim of your pinch pot tends to dry out a lot quicker
than the rest of it. It's more exposed to air, and you're handling
it a bit more, so you might see little cracks appear in the top of your pot. If you feel like it's
starting to dry out, all you need to do is just
grab a little bit of water. One drip of water on your
finger, barely any at all. Run that around the
edge of your pinch pot, just to dampen it a little. And you can just
repeat this as you go, depending on how long
you're spending on it if you find that
it's drying out. The only thing to
be wary of is that adding too much water
can also be a problem. So that can also make
your clay crack. It can make it warp and bend quicker because it's
got more water in it, so it's more like plastic and malleable than
the rest of it. So you really want to use
as little as possible. Start really small. You can always add more,
but you can't take it away. If you do happen to
add too much water, you can always just pop it
down walk away for 10 minutes, come back to it, check if it's the right consistency,
and start again. The only other thing
I'd say is also, if you need to take a break, if your hands are sore, this is pretty tough on
your hands, actually. It's quite a lot of
pressure going around, especially if you're
not used to using your hands so much and
that pinching motion. So if you need to take a break, you can either wrap it in plastic that will keep
the moisture level good in it or wrap it in a damp cloth like I did for my other bit of clay
that I'll come back to. Depending on how long you're leaving it, just
keep checking on it. If it's getting a bit
dry and your plastic, you can wrap it in a damp cloth, and then the plastic again, give it a little sprits of water, just to dampen it a little
bit again, come back to it. I tend to take days
to do my projects, but I pop it all under
plastic and then just check it every now and then just to make sure
it's still okay, if it's too soft, I uncover it before I want to do
whatever my next step is. If it's too hard, I either
give it a little sprits of water or re damp it a cloth
and pop that in with it. And they're totally fine. But it is all about timing
and your environment. So it is, again,
one of those things that just takes practice, but you'll definitely
get the hanger boat. The great part about clay. This is what I love the most
is that until you fire it, you can reconstitute it as
many times as you want. So you're going to
reuse it. If something cracks or it dries or
whatever, don't stress. Pop it in your slip bucket, or if it's still soft, wedge it back into clay, pop it in the bag, and you
can use it again later. Really love it. It's so low
waste for the clay as well, because it comes from the earth, so it feels like
it's quite precious. But it's not wasted. Something I will mention, when I first started doing these, I always ended up with bolds
and I couldn't figure out why I kept adjusting the
amount I was pinching, how fast I was going, what
sections I was doing it all. I just could not figure it out. And then I realized that
it's actually all about the angle that you hold your
hand and your fingers at. You can swap as well,
so your thumbs on the outside and your
fingers are on the inside. But you can see that kind of makes more of a diagonal angle. So that's where your
wall is going to end up. So if you keep doing it at that angle, you end
up with a bowl. If you, on the other hand, have your thumb on the inside, you can see it's more
of a inward shape, so it keeps that inward curve. It really depends what look you're going for, what
you want to make with it. But to start with, I
tend to try and keep my fingers as
straight and parallel to the walls as possible
because you can always flare it out or play with it later to make
something different. So I'm just going to keep
going in that manner, and I'll keep showing you
little progress shots of how it's kind of thinning
out as I go around. And hopefully, it doesn't
turn into a bowl. Okay, there you can see, I'm starting to get a little
bit of a crack there, and you can see it all these little cracks
coming around here. Now, this clay is
pretty plastic, so it will depend on your clay. Sometimes you can just smooth
them out and keep going. To me, that feels like it's starting to get
a little bit dry. So I'm just gonna do that
drop of water trick, pop it around the rim. I actually need two drops. To dampen that a bit, and
I'll keep an eye on it. If you get a big crack, you can put a little bit
of slip and cover it up. Generally, you want to make sure you're avoiding big cracks, but it really depends on your clay and how much
practice you've had, really. It's all about practice. So you can see this is already pretty much a pot.
A few goes around. That's pretty cute. But you
can keep going and make the walls super thin and adjust the shape as
you need to as well. I just thought I'd
mention as well, really the goal of the pinching around and around is to get your walls and your base and your walls and
even thickness. So if you only
pinch in one spot, you'd have one
very thin wall and one very thick wall, which
wouldn't look ideal. It also won't dry evenly. It'll be prone to cracking
while it's drying and may have issues in firing if you don't leave it to
dry long enough. It's where that
sense of how thick your walls are really
comes into play as well. You kind of want to be
able to feel through your fingers without
being able to see how thick those walls.
4. Refining Your Shape: Okay. You can see at this stage, we've got a really
good shape going on. So now it's really about
really small refinements. Filling around the walls, see if you can kind of even
out any that are too thick. You can't add back to
walls that are too thin, so focus on the thick ones. The other thing
that I like to do is leave the rim a bit
thicker than I intend. Basically right until the end. You can always really easily
thin that out at the end. But if it's too thin, while you're still thinning the walls, your rim can crack a lot more easy and makes
it a lot harder. So that's looking
super cute now. I'm going to keep going,
make it a bit thinner. You kind of want to aim. I mean, it's really a
personal preference. I'm going to aim for
round off a centimeter, which you can see it kind
of is at the top here. But I can feel some
thicker bits in here. So I'm just gonna very
slowly pinch around and just kind of shape it
also how I want it. So you can see, I've kind of got
this like it's sort of bulgy and coming
back in at the top. So if you wanted this
to be really straight, you would hold your hand really straight and just
straighten out those sides. So I'm going to do that. Really straighten this out. While I'm still pinching
and kind of evening out the width of those walls. The thing to be
cautious of when you get close to the
end like this, too, is that your base is probably starting to get a bit
thin. So I can feel mine. It's probably on the verge of being a little bit too thin. So I'm going to have to
be really careful with not making that inside
any thinner and just focus on the walls around the base to kind of
get the shape that I so we literally just keep pinching pretty much until you're happy with it. I'm gonna pinch this.
So it's more of a straight sided vessel. And at this point, too,
I tend to stop going around in circles and go
work my way up the wall. So I kind of shape each
bit of the wall up and make sure that's the same thickness and go
around that way. Gan, it's really
personal preference, how you like to work. Experiment, make a whole bunch, or aim to make some that are exactly the same and
see how well you go, 'cause it's very difficult, more difficult than
you would think. I look really simple. I do take a lot of practice, so don't be hard on yourself, either if you're not happy
with your first outcome. I would say it took
me four or five goes before I really, like, got it and then started
to be able to make them quite easily, I
guess, every time. But I still have some stinkers. Um, so yeah, don't be
hard on yourself at all. Just be happy. Get your
hands in some clay, get to try and make something. And if it doesn't work out, you can always start it again. Okay. I'm really liking
the shape of this now. I'm just going to go around and check the
thickness on my walls. Starting to dry out a
bit at the top again, so I'm just going to drop
some water around there. You can see as well
because it's getting so thin now that it dries
out a lot quicker, too. So you do need to keep an eye on it the kind of further
you've gone in the process. Um And then this one, I think is almost ready. Okay. That's looking pretty cute now. Now, depending on what
you want to do with it. So I've got a few options. You can My base is pretty
much flat already. But if you just sort of, like, flop it on your
table, you kind of just make your own
flat base to it. You can kind of push
the walls down a bit further if you want to kind of accentuate
that a bit more, or if you want to keep it quite rounded, you can
do that, as well. So you can see I've
just popped that down. It's put quite a flat
sort of base on it there. Now, just checking my walls
again. See, I can't help it. I'm a little like, fiddle
and fiddle and fiddle. I just love playing with clay, so I could do this for hours. The same with smoothing
something out. I just absolutely
love that process. I find it so meditative. So now we're at
the point where I will you got a few options. You can thin out your
rim a little bit more. So I can see hard to tell, but mine's a little bit uneven. I actually really
like the look of. I think that's beautiful. That's part of it.
But you can also very gently squeeze the parts of your rim that need
to come higher up, and that will sort of
even it out a bit more. So you can see that's sort
of a bit more even there. Just want to be
cautious that you're not going too thin on your rim. But it is also nice when
you can get a nice, even rim, like the width
the rim is quite nice. So I'm just going to genly
fix mine up a little bit. Um, but it's actually quite quite even,
which is impressive. I do say so myself. You might find that
yours is super uneven. Mine were definitely
at the start. You love the pot and you
don't want to start again, but you really like an even rim. You can just cut the top
off if it's tall enough, take a knife and kind of
slice it until it's even, and then smooth
your rim out again. That will kind of
give you an even rim. The thing that you can do is turn it upside down
and you can kind of, like, just gently tap it on your work surface a few times. And it will kind of square
out that room for you. It can make your clay
look a little bit uneven, but it's quite a
nice finish to get that kind of nice
square room, as well. You can also the options are limitless in
terms of a room. You could pinch
alternating things, so you have a real
ruffle rim on it. A lot you can do with the rim. You could cut out sections, really, depending on what
you plan on making with it. And for me, I'm going to make a little coffee mud because I'm also obsessed with coffee. And no one ever has log
coffee cups, I'm sure. So I'm gonna make my
little coffee cup, so I'm going to
leave it quiet flat, but you want to think about
how it's going to be used. So, you know, this, for example, is going to go up to
your lips, so you want this to be really smooth. Could make this really thin. Then it might get
a kind of sharp edge on it once you fire it. So you just need
to consider sort of its final use, I guess. Now from here, I will show you where we go with this and what
you can do with it. There's so many things you
can create with pinch pots. It's really just limited
by your imagination. So let's jump into that.
5. Use Ideas: I'll give you a few ideas
on what you can do. I think the obvious
one is, like, pen cups, holders, all
that sort of stuff. A mug, I'm gonna add
a handle to this one. I think that's a really easy way to make some beautiful
handmade mugs. The other thing that
you can do with them is think about if you make
two and join them together. So you just need
to fail the rim, put the slip on,
join them together, and then you've got a circle or an oval depending on the shape that you can then add things to. So I've used these before. Two of these joined together
to make like birds. I really want to do a big whale that I've got on my to do list. So kind of think it kind of builds that shape really easily. It gives you a base to jump off. The other thing that you can do is start out with a pinch pot, and then you can coil coil
build on top of it to build, like, vases or, you know, a big tall vessel with it. So you can use this as your
base, get the shape right. You know, I think the base
is so important on pots, but, you know, get that
the real form right. Do it with your hands.
It makes it really nice, and then you can
coil build on top. I'm just going to set this
aside to dry a little bit. And then I might
make a second one in the meantime while I wait
because I am impatient. And then I will come back, show you how I smooth
it out and also how to attach a handle to
make it into a cup.
6. Smoothing: So from here, I would generally spend some
time smoothing this out. So smoothing out all
those little kind of finger marks or
the little cracks. But it really depends on
the look that you want. Like, it is handmade. So having those
little finger marks, you can see it on
the inside there and a few fingernail marks, even though they're
as short as possible. You know, it kind
of adds to it and shows that it's a handmade item. So it's really up to you on
what you want to do with it. I will probably smooth
mine out a little bit. This is one of those
processes, again, that I just love it feels
a little bit endless, but it's very rewarding. My clay is probably a little bit too soft
to be doing this. You can see it's kind of not
quite holding its shape. I would generally leave this for 20 minutes, half an hour, just to harden up a bit, just
until it's kind of holding its shape a bit more and then come back and
smooth it out. You don't want to be trying
to smooth out something and either push your finger rough a wall or completely
warp the shape. Clay does have a memory. So if you, for example, totally squish this and then bring it back out and
try and keep the shape. It's likely when you fire it, it will remember that
squishness and the walls will collapse back in
together when it's fired because it goes
basically liquid. So it kind of wants to go
the easiest path possible, so we'll go back to
what it knows. Okay. These are a little bit dry now, I made another one
in the meantime. It's still a bit dent, but I'll show you a
bit the first one. What the next steps are? So this is still a
little bit soft, but I'm winning
all ahead anyway. Cause as I mentioned port, I am impatient. But
patience is key. You don't want to undo
hard work, but, you know, doing things too soon
and you don't want to wreck this nice shape that
you just spent A making. So from here, basically, what I would do is again, just use my hands, smooth
out all the inside, any lumps and bumps. Again, this is
optional, depending on what you're planning with
it, especially, I mean, if you're going to
put something in it like a plant or it's
going to hold pens, the inside really doesn't
even matter that much. Just want to really make
sure there's no sharp bits. And if, you know, when you glaze it anyway, it kind of fills a
few of those gaps. So it doesn't need
to be too perfect. I like to embrace
the imperfections. So I would just spend a while basically smoothing
this out with my fingers and getting rid of all those little lumps
and bumps inside and out. And just trying to kind of keep that shape that
we've made at the same time. So it looks the same. It
looks like I'm pinching, but I'm not actually
applying any pressure. Basically, what I'm
doing is just bracing the wall so that when
I smooth this out, you know, it doesn't
push the wall out. So you can see if I just do
it with my thumb like that, the wall actually pushes out a little bit,
which is not ideal. So you want to always support the other side of your
walls until it's, you know, dry enough that
it's not going to warp. So when you do support it
with your fingers like this, you can see the wall
doesn't really move. So it's a much safer way
to kind of smooth it out. Now, once I've gone over
it with my fingers, again, depending on the
look that you want, I'll usually wait for
it to dry a bit more, probably too lac
leather hard stage. And then I'll take a sponge. Any type of sponge you'll do. These are mud tools one,
which are my favorites, but you can just use, like, a kitchen sponge
or even a cloth, and you want to get your
sponge damp but not wet. So I dump it in the
water, let it soak up, and then literally squeeze as much water out as
you can as possible. You don't really
want to be adding any more water into your
clay at this stage. You're just kind of using it as, like, it's a bit of a lubricant. It kind of, like, smooths
out all the clay particles, you know, and gives it a
really nice finished look. So that would be my next step.
7. Attaching A Handle: As I mentioned, you've
got so many options in turn for what you
can do with these. I'm going to put
a handle online, and I'll show you how I do that. If you need any more info
on making slip, attaching, joining things, I've
got a whole class on that that I definitely recommend if you're new to joining. I'll just set you up in the best way to make sure that your handle
doesn't fall off, either when it's drying
or even more importantly, when you've got a
delicious coffee in it, you do not want to
lose your coffee. I definitely recommend
that, but I'll take you through the
basics of that for this and also kind of how many options there
are for handles, too. If you have a look through
like your cup cupboard, you'll notice that
all the handles are totally different shapes. I would recommend picking
up your favorite mug and start assessing
what you like about it. Is it the shape of the cup? Is it the handle? Is it
really come feed a hole? Does your hand fit
perfectly in it? You know, these are
all things that you can assess and then incorporate into your
pottery practice. What I will do is set
that aside for a second. And I'm just grabbing my clay
that I wrapped up earlier that I didn't use all of it yet. And I'm just going to squish
off a bit like this and essentially just roll it
into a sausage shape. It's pretty simple, and then you can kind of just
shape it as you want, make it a stick or as
thin or it's even. You can kind of
see if you just go like that. That's
already a handle. So, you know, they're
pretty basic. The hardest part
is attaching them, which I will show you. The other thing
that you can do is roll out a slab of clay with a rolling pin and cut a thin strip and use that
as a handle, as well. So there's a lot of options
have a look around and see. The other thing that
I like to do is, I'm just going to roll
this on the table so it's a bit more even. And if you're rolling
out something like this, you just want to apply
a really soft touch. You can kind of do
it with one finger. Like, that's doing most
of the hard work here. We've already got it
to a good thickness. You kind of just want to even out those kind of
thick and thin bids. This is important when
you're doing coils, too, but if you're rolling
something like this and let me
do it on purpose, you can see it ends up like
a flat sausage and tip. No matter how much you roll it, it does not seem to get
back into a circle shape. So if you put a little
twist in it like this, you just pick up both
ends and then roll it. Again, this turns it back into that circular
sausage shape. Oh, you can see,
look, I just got a finger nail mark
in my cups there. See? That's just impossible. Anyway, you can kind of
roll that back out again. Now, my handle is not
quite too thin yet. It's probably getting there.
It's even out this end. Now, I've done a
big long one here, so I can kind of show you
a few different options. Now that I wrecked it on
purpose, it's not perfect, but we'll fix that up. Just fixing up those
little cracks in there. No. Okay. I'm gonna
smosh this one, start again now
that I wrecked it. Now, it's getting a little bit dry now that I've
handled it a bit. I just put a few drops
of water back in, and I'm just massaging
that back in. You can see how easy it is to, you know, like, I didn't
like the way that was going. Just start it
again. If your clay feels like it needs a rest, just grab a new bed it back. Come back to it later. Okay. It's gonna smooth out
that joint. All right. Now, you can flatten, like, roll out a coil like this and
then flatten it on purpose. So you've kind of got, like,
a rounded rectangle shape, which I think I'll
do for this one. Let's see how we go. Just
gonna flatten that down a bit. Got a bit of a lump
going in there. Okay. Now, you kind of want to
make sure that your handle is sort of the right profile, I guess, you'd call it
before you attach it. It's much easier to get, you know, the
thickness and that. You want that right
before you attach it. Once you attach it, you
really don't want to touch it again until it's
properly adhered, and it's dry enough to,
like, smooth it all off. So I'm just gonna leave
this a little bit. I think I want to
do more of like a kind of like almost triangle, like a soft triangle shape. See what that looks like. Now, so I've kind of
got my shape there. You can see it's a
bit flat on one side, and it's kind of like a very rounded triangle along the top. Now, you can soften
off the edges as well with the sponge
once it's dry us. It doesn't matter too much
about the edges at this stage. But what you want to do is going to be a bit hard
to show you on camera, but I'm just gonna chop
a bit of this off. It's a bit too long
for what I need. So I've just chopped that And then what you sort of
want to do is essentially just very slowly bend it into
the shape that you want. Now, I'm just gonna
cut off this end so it sits nicely
while I'm testing. Fix up that. Now, what I like to
do is get my cup, and it's especially handy when you've got a camera
in front of you. But just hold your hand see this one looks way
too big for this cup, but that could also be the
look that you're going for. You can this same shape, you know, you can smush it down. You can really play
with the handle, and it really changes the
personality of your cup. I quite like that little, you know, smush sort of handle, but I think I'm going to go more like that width but
a smaller handle. So I'm gonna cut some
more of the ends off here to kind
of make it work. So maybe like that much. Hey, keep that under the car. I think that looks
pretty cute. That there. Now, you also need to keep in mind that
your clay will shrink depending on what clay it changes, how much
it will shrink. So I don't remember. I think this one's
like ten or 12%, so everything will get
ten or 12% smaller. So you want to make sure that you've got
enough room in here for your hand to fit
once it's shrunk still. So that's something
to keep in mind with the general size of
your cup, as well. This will add up smaller once
it's been glazed and fired. I'll show you what it looks
like until it has been, as well, so you can kind of
see the size comparison. From here, what I like to do is you can kind of smush your clay a
little bit on your cup. It might be hard to see,
but it leaves a tiny mark of where those handles
were touching. So from there, you just need to take I've got a scoring tool that you can just use a
fork or even a skewer. Like, I got some skewers here. You basically just want to score where it's going
to sit on the cup. And you want it to
be deep enough, it's kind of like Velcro. You want to stick them together and make sure they
really adhere well. I love the scoring
tool cause I can do it very quickly in one go. The once you've done your cup, you just come and do the
same for your handle. So you just score
those seams there. Now, if your cup is your pinch pot doesn't
necessarily need to be a cup is super rounded, you might want to
adjust the angle that you've cut your handle at. So sometimes, you know,
once you hold it up, you'll see, you know, you might need to cut them
at an angle just so it sits firmly against
the cup there. So you kind of want it to
be quite a flat surface. So you can see I've
scored both now. What I'll do you can if this isn't really
holding its shape, you can set this aside to dry in the shape
you want it to be. I personally like to attach
them when it's wetter. I don't know why,
but I just don't get the same feeling
when I attach a soft leather hard sort
of texture to a cup. I like it to be sort
of a bit in between. So I still got a bit of
wiggle room when I attach it to kind of mold it into
the shape that I want it, the men stuck with
whatever it's kind of dried in the
shape on the table. So from here, all you
need to do is get a little bit of slip
that matches your clay, pop that on the end,
you can see that there. It's a bit watery
there. And then you basically just line up
those two bits of velcro. And what I like to do see I just did it
there out of habit. But once you stick one on, I like to give it
a little wiggle. This just sort of like
joins the clay inside. It's kind of like
Velcro sticking. It just sort of joins
it a little bit better. You see, mine's
still a bit soft, so you can see that it's actually quite
attached now before I've even kind of smoothed it out or attached the walls there. It's still quite wet,
so it's a good sign. You kind of want it to be stuck enough that you can't
easily pull them apart. It definitely
shouldn't be falling off without any interaction. And this is where I like to
shape my handle a little bit. So you can see it's a bit I feel like it looks
a little bit sad, a little bit downturned. So I'm just going to make it
look a little bit happier. I'm gonna put a
little bump in it there. Put that up there. And you can see it's
tuck quite well, like, it's really letting
me, play with it. I think that's a bit
better. It's actually looking quite large for the cup, but hopefully that'll
sort itself out. Okay. So now that we've
kind of joined that. You've got a couple of options. You can make it extra secure by wrapping a tiny
little coil of clay around this join and
smoothing it in. I'll show you what
that looks like. So you literally just need
a tiny, tiny bit of clay. One's actually a little bit dry. Hang on. I'll take
another little bit. You just want to roll
it. Again, this is just like rolling out the
handle or the coil. Basically roll it. It's kind of like a worm,
especially this color. It looks very much
like an earthworm. I roll these very small. And then it depends
how much slip you use, but you might need to
add a tiny little bit of slip around here, just to give it a little bit
more surface to stick to. And then you essentially
just put your little worm around break off the end. And then hopefully you
can see that sort of like it's just like really
circled the handle there. And then what you can do, again, you can just do it with your
finger or you can use, like, a tool like this, then, like a spoon or
something from the kitchen. You can use the back end of it. And you essentially
just want to kind of split that coil that you've put there so that half of it smushes down and half
of it smushes up. So let me see if I can
show you that here. It's very hard to do backwards, but hopefully you get the idea. So you can see I'm kind of just, like, blending that in. And I like to do a first pass. Looks a bit messy the first go and blending
that bottom half. These are especially
handy, especially, I imagine if you
have larger hands to get into the inside of the
handle can be a bit tricky. But you can see
that's working there. You do that the
whole way around. Just sort of blend it in. And then once you're done,
you can't even really tell there was a coil there. It sort of makes
it look more like your handle sprouted
out of the cup itself. As you can see the top one
that I haven't blended in yet, it looks more like
it's stuck on. So it really depends
on the look you want and also how
strong your join is. This really This coil
method really secures it. It just gives it that little bit extra to really kind
of secure it in place. So don't need to do that
if you don't want to. Again, you can just also use the clay that's
on your handle to smooth out a bit
harder on this one, because it's a bit dryer,
but smooth out that join, you know, and sort of blend
that into your pinch pot. So you can sort of achieve the same look without
adding the coil. Really, again, is
personal preference and how secure you want to
make sure your join is. So once that's all smoothed, I would go through and kind of smooth all that over a bit more. I am not sure if I'm
liking this handle. I actually think I'm gonna
chop that off, do another one. And that's the best
part about clay. Show you how I do that in case
you have the same problem. But, yeah, you can just chop it off and start again.
Don't like it. You could add another
handle on the other side, so this could be like
a two handled cup. But a lot of options here. He
8. Texture & Glazing: From here, what you really
need to do is let this dry. If you want to
smooth it out more, set it aside until it's like leather hard,
soft leather hard. That's a really good stage, too. If you wanted to, say, carve some texture
into your cup, which I love doing, it's one
of my personal favorites. I don't know why because I spend so long smoothing it out, and then I just
cut away into it, like I didn't just spend
hours smoothing it. But at that stage, it's a really good time to add
some details like that. When it's really soft like this, you can stamp into the clay. So I've got, for example, my like maker's mark. It's a good time to stamp
that on the bottom. So, you just need
to make sure that you're holding, you know, supporting whatever
the other side of that is so that it
doesn't push through. And then, yeah, you
can use little tools. I mean, you can use any pitchen tools you want to add texture, but, like, little tools
like this are my favorite. It's probably too soft, but
I'll give you a little demo. You can kind of, you know,
make little marks in them, and that can really add a lot of personality to your
pots, as well. You also want to think about how you're planning on
glazing it, too. So, for example, I
love personally doing texture and then either having the glaze
meet the texture, and the textures bare
or in the glaze. So it kind of gives you
that contrast between the texture and the clay
itself, which I really love. Could just underglaze
it, you know, paint whatever you
want over it with underglaze and then put a
clear glaze over the top. Um, yeah, it's the options really are endless from here in terms of what you
can do with these. But yeah, let it
dry, smooth it over. And then what you want to do
is let it get to bone dry, which is when it feels like the water's completely
gone out of it. And I do have a class as well on drying your
clay and firing it, which is really handy if you
haven't done that before. But essentially, you want
to get it to bone dry. You need to bisc firstst which is generally to
about 1,000 degrees. And that's your kind of
first firing that sort of, like, sets the clay in
the shape that it's in. And once you bisqfre it, no matter how much
water you add, it won't break back down
into a soft clay like this. Then once it's bist fied, you can glaze it, fire it again, and then you have
your beautiful cup. I'm going to do that with
my two that I've made, play around with these a little bit more, dust the handles. I'll do that on a
time lapse for you, so you don't have to see
me fiddling for hours. Show you what they
look like at the end, as well. U. Alright, my little pinch pot
cups have been biscuied now, so I'm ready to glaze them. You can see they're
much stronger now, you don't have to worry so
much about breaking them. You do have to be a
little bit careful. I'm just going to do a
really simple white, glossy glaze up to
the texture one. And then this bottom bit
where the texture is will be the color of the
clay kind of show off that nice color
that comes out. So I'll glaze these now and then we'll pop them in for
their final fire, and then I'll show
you the end result. A Um Uh He
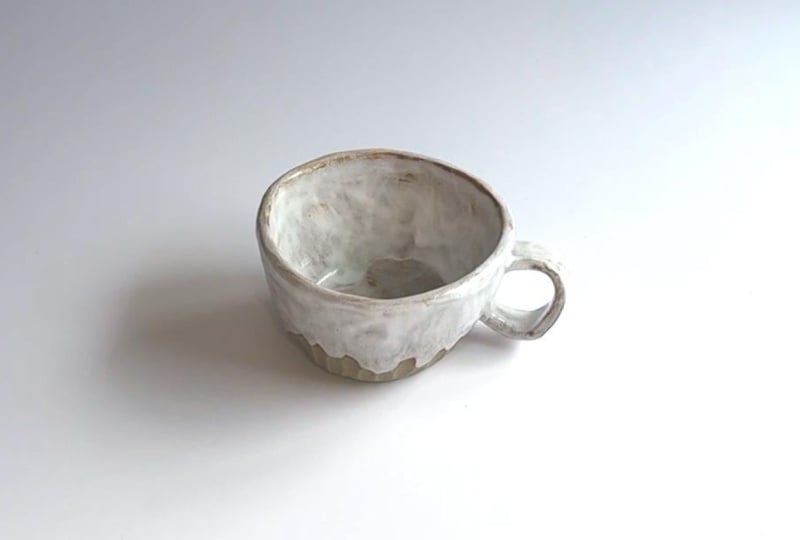
9. Conclusion: Alright, they're all done. Fired, glazed. Look how cute the texture is. Absolutely love it. I love that handmade feel. I'd love to see your
ones that you made, how they turned out, if
you had any troubles. That's all part of the journey. Look forward to seeing
what you've done. You want to dive
deeper into pottery? I've got a bunch of tutorials on kind of everything you need to get
started with handbuilding, joining your pieces, making
slip, rolling out a slab, and the little nitty
gritty on, like, safety and your work
surface, that sort of thing. So check out those if
you want to dive deeper. Or I've got a bunch of hand built pottery templates and tutorials for you as well. So these kind of give you
all the pieces you need to cut out all the bits with instructions and
a video tutorial, so you can kind of
just jump in and do the fun part of pottery without having to
think about the math. You know how you put
things together. So check out those as well. And yeah, look forward to
seeing what you've made. I'm off to make a coffee my cutest little cup ever.
I'll see you next time. What's. Ah, these are all finished.
Look how cute. They look. Um, I love the little texture on the bottom and that real
handmade kind of feel. Um, I'm ready for a coffee in
these. It's a perfect size.
 Megan Clark, Pottery Templates & Tutorials