Transcripts
1. Introduction: Hello and welcome
to this level to class on the fundamentals
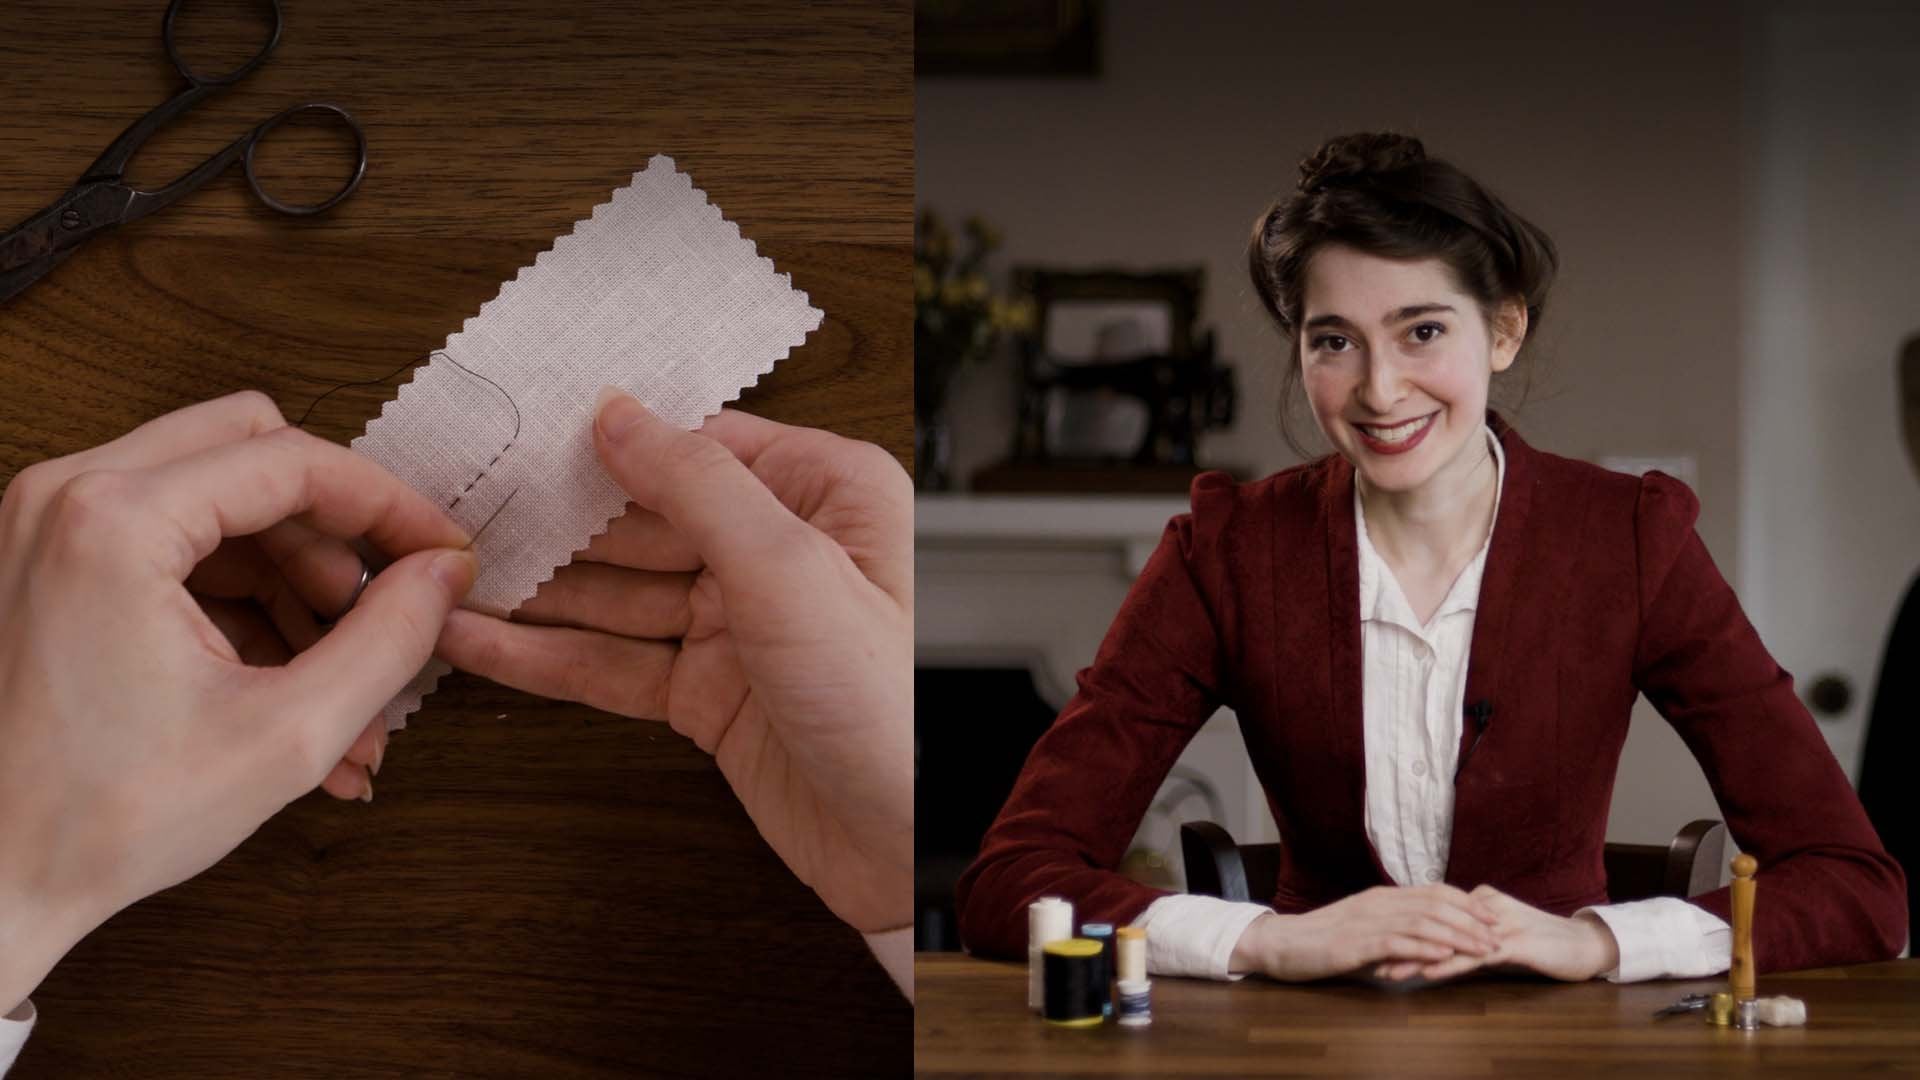
of hand stitching. My name is Bernadette Banner and my job involves
the study and recreation of historical
pre 19th century garments. Throughout my adventures,
I picked up on a number of hand sewing techniques
that have been used for centuries before the invention
of the sewing machine. Techniques that have been
used for thousands of years, been used to craft
garments that would last for a lifetime. Today I'm here in
hopes of teaching some of these techniques
and tricks to you and perhaps inspiring
you to pick up a Sewing or mending
project for yourself. That is the beauty
of Hand Sewing, know, sewing machines
or electricity needed. All you need is your own
hands and a needle and thread it in order to
craft entire wearable, durable garments or to
make the clothes that you have live on a little bit
longer in this class. So we'll learn some more advanced hand
stitching techniques beyond just the
basic construction all stitches that we
learned in part one, the Herringbone stitch, the Blanket stitch, the
English Stitch, The Drawing stitch,
and the pad stitch, as well as where and when
to use each of them. Understanding these
stitches will allow you to choose from a wider variety of
techniques when working on your own
sewing projects, to choose which one might best suit your specific purposes. So if this sounds like
something that you'd like to give a go,
keep on watching
2. Tools & Materials You'll Need: The beauty of hand
sewing is that you really don't need
much to get started. All you need is your project
or a scrap of fabric, tea towel or a
Blanket to practice on a needle and some thread. Keep in mind that anything
you stitch on can be unpicked and return
to its original state. So feel free to use any
piece of cloth for practice. The thickness of your
cloth will often determine the size of stitches
you'll be able to make. So don't be discouraged
if you aren't able to make perfectly
tiny stitches. If you're using a thicker cloth, generally smaller stitches
make for a stronger seam. But this also comes
with a trade-off that smaller stitches make for a
more time-consuming seam. All throughout
history, stitches have had to weigh the
pros and cons of finishing a seam quickly versus
capitalizing on strength. So feel free to do the same
for your own projects. Here's a hint, seems that don't need to take
a lot of strain. Like for example,
long skirt seems or hens can often
be compromised on strength without
affecting the quality of the garment while saving
you some precious time. In terms of thread, any thread will do for practice purposes. So don't let a lack of
the perfect thread to stop you from starting
to so for a garment, it's best to match the weight of your thread to your fabric. You'll want a thicker
threads for heavier cloth, otherwise, a thin thread
might easily snap. On the contrary, a
heavyweight thread used on a very fine cloth will be overwhelming and can
cause it to pucker. Historically, threads were
commonly made of silk, linen and by the
19th century cotton. All of these, as well as
modern synthetic threads, are excellent to use
and Hand Sewing. Silk is generally
the strongest thread with synthetic threads
running a close second, cotton is moderately
strong but inexpensive, and any of these can be used
in a sewing machine as well. Linen thread, however,
it should not be used in a sewing machine to get the full strength
of linen thread, each piece should be smoothed over with some beeswax to stop the flux fibers from catching on the
fabric and weakening. It's an excellent, sturdy and historically appropriate
thread to use for hand sewing, but just requires this
little extra step first. In terms of needles, feel
free to use whichever size needle feels most
comfortable in your hand. Generally, the
smaller the needle, the smaller the stitch. So once again, don't be discouraged if you
aren't able to achieve perfectly tiny
stitches when using a thicker needle for find
sewing on thin fabrics, I personally like to
use a number ten sharp, but these are on the more extreme small side and might take a bit
of getting used to. But anything 4-7 should be
on the more standard size. Longer needles will be
needed for thicker fabrics and thicker eyes will be
needed for heavier threads. So it helps to have a
multi-site package that will allow you to choose which one is appropriate
for the job. You'll also need
something to sniff your threads with some wax if you'll be using linen thread and a thimble for
finger protection, especially if you
are working with heavy or tightly
woven materials. Now that we have everything
we need, Let's get started.
3. A Quick Refresher: Before we jump into
the fund stuff though, we first need to take a
quick minute to make sure we remember the
fundamental Stitches. Since these terms, running
back and whip stitching will be referenced as components of some of these stitches
we're about to learn. These are all demonstrated in more detail in my
Sewing Basics class, along with the instructions on starting and
stopping the stitch. So feel free to pause and
head over there if you need a more in-depth refresher on bees, they're running stitches. You're a straightforward
linear over and under stitch. It's not the strongest stitch, but it is definitely
the fastest. And the foundation
of basic settling. The backstitch is
similar to a running stitch in its
linear travel path, but the needle is
inserted behind the thread for each stitch
and brought up ahead again so that the
thread is pulled in a counter direction and
locked firmly into place. This is the strongest
of the basic stitches. The whip stitch is also sometimes called the
felling or hemming stitch. Historically, it's a
stitch that travels in a spiral and usually spends
two planes of cloth. It's often used on
hens, on patches, or when layering one piece
of cloth onto another. Right. Got that. Now that we're solid
on the basics, let's have some FUN.
4. The Herringbone Stitch: The Herringbone stitch is also commonly known as
a cross stitch. A cat stitch or catch stitch is an excellent option for
heaven's due to its strength, speed, and ease in
navigating curves. And it's, in my own opinion, one of the most aesthetically
pleasing stitches. While rare throughout
most of history, it started to gain popularity in the late 19th century to secure
bones into dress bonuses, and really picked up speed as the 20th century progressed. It should be cautioned though, that it's best not to use
a Herringbone stitch on the handle of a long garment that might be worn with heals. The long exposed threads between each stitch
are prone to caching. So maybe opt for a
more compact felt him, if you're planning to wear heels and do lots of dancing
and you're long gown, start your stitch
with a single box stitch at the point
where you want to begin, it's best to begin on
whichever side will allow you to bury the tail of
your thread, one starting. Sometimes this might be either
the upper or lower side, but sometimes in the case of hems on a single layer garment, one of these sides will
be a single layer of fabric and we'll have
nowhere to hide the tail. The Herringbone Stitches worked laterally from side-to-side and in the opposite direction from which you're
needle is facing. If you're right-handed, the
needle will be pointing to the left and you'll be
working from left to right. Lefties will have their
needle is pointing to the right and we'll be
working from right to left. Bring your needle down to
the other plane of fabric, and a little ways across. The distance is
entirely up to you, but this will determine the
angle of the crossing thread. So be ready to replicate
this height and distance for your subsequent
stitches to keep the seam looking nice and even take a small stitch here
with the needle facing your previous stitch. Keeping in mind that
this may be seen from the front of the
garment if you're working on a single layer, travel the same
distance now across and backup the same
height as the first edge. Once again, we're going to
take a small stitch with the needle facing back towards
our previous stitches. Like the backstitch, this backwards and forwards,
pull up the thread, will help to lock it into place and will make your
seam nice and strong. Continuing this manner
along the remainder of your seam until you've
reached your stopping point. And thus you have a
Herringbone seam. Go ahead and give the
Herringbone stitch to try for yourself
and feel free to leave photos of your
progress on any of these stitches in the
project gallery below?
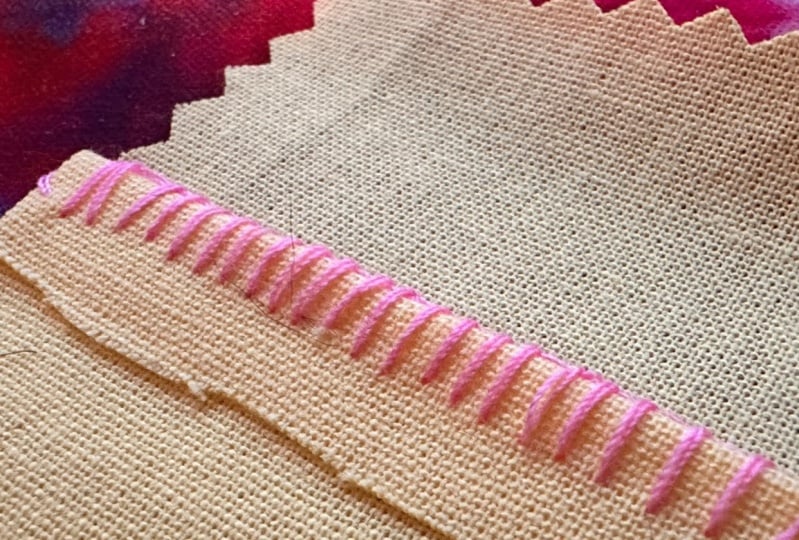
5. The Blanket Stitch: Let's have a look now
at the Blanket Stitch. You might recognize
this one from it's common application on the edge of blankets, hence its name. This stitch is
excellent for either securing two pieces of fabric
together along the edges, as well as finishing, fortifying and
stabilizing those edges. This stitch is primarily used on thicker cloths that aren't otherwise easily
prone to frying, like wolves and fleeces, which are sturdy enough
that the edges won't buckle under the
tension of the Stitch. Blanket stitching is inevitably
a very visible stitch. So feel free to get
creative with it and to use a contrasting thread
color to treat it simultaneously like
a little decoration. Silk thread also works
particularly well for this due to its
nice shiny finish. They're getting at one edge, anchor your thread with a small
between layers of fabric. If your fabric is
only a single layer, this will be visible
from the underside, so try to keep it as
small as possible. Then bring the needle up through the exit point of the thread, wrapping that thread around
the edge of the material. But before we pull the
thread fully flat, we're first going
to pass the needle through that loop and
then pull it flat. Travel a small ways across
your edge for the next stitch, the distance you take
is up to you and this will determine the
density of your stitching. So just be prepared to repeat whatever distance you do choose for the remainder
of your stitching. Once again, we're going to bring the needle up from
the underside, passing that needle
through the loop before pulling it
completely flat. We want to make sure
that we're keeping these stitches at identical
depths so that they all match and don't look varied and chaotic
unless that's your goal, in which case,
absolutely go for it. What we're effectively
doing here is we're building
up a nice a loop, the barrier along the
vulnerable edges of the fabric which will help
to guard it from where. This is very similar to
the buttonhole stitch, which does the same
thing but with knots along the edge
instead of just loops, we did go over the
buttonhole stitch in part one of Sewing Basics. So if you need a
refresher on that, do feel free to pause and
go over there to catch up. To carry on from this stitch. If you've run out of
thread, simply begin your new thread at the stopping
points of the last one. Loop your new thread through the last stitch and continue on. Once you've reached
the opposite end or have run out of thread, you can finish off your stitch. The beauty of working with decorative stitches
is getting to watch this lovely pattern just
grow before your eyes. This is such a satisfying stitch to do and it's very meditative. Once you get the hang of it, give it a try for yourself
and see how you do. Whenever you're ready. We'll
move on to the next stitch.
6. The English Stitch: The English stitch is one of
my secret favorite stitches. While very limited and
potential application, it is extremely useful when you do have the
opportunity to use it. This Stitch was commonly
used throughout the 17th and 18th centuries, especially to Stitch bought
his scenes together. It's secret weapon
is its ability to secure four layers
of material at once, extremely durably,
so that there is no seam finishing
needed at the end. Just one single-step needed to attach out and finish
the seams of a garment. It's a huge time-saver. The English stitch is best employed when
you're wanting to connect the two panels
of a flatline garment. That is, two panels which have both an outer fabric layer and an inner stiffening
or lining layer, which will be treated as one, not made up as
separate fabric and lining components
and connected later, as is very common
in modern sewing. To prepare your
panels for stitching, the layers are first assembled
and the seam allowances of the edges to be stitched folded inwards so that
they're no longer seen. It's generally best
practice to base to these edges down
rather than just pending them so that your
layers are perfectly positioned without the
potential warping of pins. But you might be able to get
away with just pinning if your fabrics are
particularly stable. Once both sides of your panels
have been thus treated, line them up as you
would a normal seam with the right sides
facing each other and the flatlining
layers facing out. After beginning your
stitch on either side, insert the needle at the edge of the lining on one side and bring it up through the edge of the outer fabric on
the opposite side. Make sure you pull your
thread nice and snuggly, especially if you're
working on bodies seems Which will need to
take a lot of strain. Now bring your
needle down slightly and insert once
again at the edge, at the lining on
this opposite panel, bringing it up once again on the fabric layer on
the panel across. Once again, we're
capitalizing on the backstitch style
of backwards and forwards pull on the
thread to ensure that our seam is
nice and strong. Keep going according
to this pattern. Insert at the leading
edge on one side, exit at the fabric
edge opposite, making sure you're pulling
your thread nice and taut. And eventually you'll
have a completed seam. Open your panels out and
give them a good tog. The folds of the
fabric should work themselves fairly
flushed to one another, giving a nice, clean, strong seam without
much seam bulk, you shouldn't be able to
see a significant gapping when pulling at the two panels
when the seam is finished. Otherwise you're seeing
maybe a bit weak. This is really is such a little known but useful stitch to know because who doesn't
want to avoid seam finishing when
at all possible? Take a minute to
pause and give this one a go for yourself
if you like, and I'll catch up with
you in the next lesson.
7. The Drawing Stitch: The Drawing stitch
is yet another little known
historical stitch with such underrated
modern-day value. It's been around since at
least the early 17th century and is an excellent way of invisibly joining two pieces of fabric edge to edge without
leaving any traces of thread. This is great for
long side seams along folded edges
where a running stitch wouldn't usually reach as it effectively functions
as a running stitch. It's best for seams which don't need to take significant stress, although it worked firmly, it can be fairly
strong to begin anchor your thread and then
bring the needle through the folded
edge of the fabric. Insert the needle again
on the opposite fold at the point directly parallel
to the other half. And it's take a small stitch
vertically along that fold. Pass the needle across once again and repeat
on the other side, inserting the needle
into the fold directly parallel and taking a
small vertical stitch. Precise spacing isn't strictly essential here since this
stitch is invisible. But the closer you can
make these Stitches, the stronger and neater
your seam will be. You do want to make sure
that you're matching your fabric hubs as
best as possible and doing your best to keep your entry and exit points
as parallel as you can. This will ensure
that your fabric pieces stay straight and don't want to shift
slightly on the diagonal. Once you've reached the end, you can finish off your thread, test the strength of your seam
by giving it a little tug. The less light you can see between the gaps
of the Stitches, the stronger your seam will be. A gap of more than a millimeter or two might mean
that you have to pull it a bit tighter
next time to make sure that it's super-strong. Keep in mind that with
hand sewing garments, most of the time we're
stitching for strength. There's no delicate needle
work here or lightly talking on the trimmings that
the machines can't reach. We're doing as our ancestors did for thousands of years and building seems that will
outlast the fabric itself. Have a go at this to treat
yourself and feel free to share your progress
in the project gallery below once again, and let me know when you
are ready to continue.
8. The Pad Stitch: Pad stitching is
less of a stitch itself and more of a
technique as a whole. When Pad stitching is employed, It's usually on an
area of a garment that has two layers
of material which needs to be specifically shaped or sculpt it
against one another. So this technique requires an additional element
of fabric manipulation. For example, you might want
to pad stitch the lapels of a jacket to ensure that they
roll back nice and smoothly, or perhaps a color
so that it sits in a nice, perfectly
smooth curve. This stitch and the
technique is a whole is absolutely essential to know if you plan to get
into tailoring, since it's integral in shaping the garments to form around
the curves of the upper body. The stitch itself though, is a very simple. The Pad stitch is worked vertically and
travels horizontally. Anchor your thread
either at the top or bottom of the material,
either will do. Take a small horizontal
stitch in place. Since Pad stitching
is almost always used as a temporary
or hidden stitch, you don't usually have to worry about hiding your knots and tails nicely as this will
be covered up later anyway. Then travel a little ways down and take another small stitch. Continue traveling down the
length of your material, keeping your stitches
and distances traveled relatively uniform
to ensure that your Stitches turn out evenly. When you reach the bottom or the top of your first column, travel a little ways
horizontally and then continue the same
stitching pattern in the opposite direction, either up or down from the direction you
traveled initially. Keep in mind that the
Stitches you take will likely be seen from the
front of the fabric. So it's best to try and make these stitches as small
as you possibly can, while still catching that
under layer of material. Keep traveling
along your columns until the desired area
has been covered, then finish off your thread. Larger Pad Stitches
can be worked quickly to temporarily
base two layers of fabric together and
to prevent them from shifting out of place
before they can be sewn. But smaller stitches are best used for permanent shaping work. That's the basic method
for Pad stitching. But let's have a
look at how to use Pad stitching to add
dimension to your shapes. Theoretically will have
two layers of cloth, the outer fabric and
the stiffening layer, which will help to give
it some structure. Usually this is some sort of horsehair canvas or
non-visible interfacing. The trick is to use
geometry to our advantage. Say this is going to be
a color which we want to fold over and to curve
around smoothly. Tight roles can be worked
into the material by wrapping your fabric layers
around a finger and working your pad
stitch into shape. The fabric layer on
the underside of the curve will need to
be slightly smaller than the fabric curving
over top in order to prevent that underside
fabric from forming ripples. But by melding the
two pieces of fabric together in that non
rippled curved position, it physically won't have
enough material to uncarved. This will ensure
that your pieces of fabric will behave
how you want them to, in their finished warm, working, gentler curves
into panels such as to round out the chest
area of a suit jacket. It can be done by stitching over a Taylor's ham or some other, such a rounded cushion to make sure that the fabric
is positioned in the three-dimensional shape you want it to stay in permanently. Pad stitching itself is super quick and easy
to get the hang up, but the sculptural aspect of it can take a
bit of practice. So do give this a
go for yourself, play around with it
and see what sorts of funny shapes you can
add into your garments.
9. Conclusion: And that brings us to the
end of our lesson for today. I hope you learned some
new stitches that will help you in your sewing
and mending journey, or perhaps got some ideas for some new tricks you can try. Feel free to leave your
questions or thoughts in the discussion
section down below. And of course, to post
photos of your progress in the project gallery so we can all celebrate your hard work. It has been lovely getting
to stitch with you today. All the best on your
sewing adventures. And I shall see you next time.
 Bernadette Banner, Dress Historian & Filmmaker