Transcripts
1. Introduction: Embroidery can
look intimidating, but with the right
tips and tricks, you will have all the
confidence to try out every project
you want to make. [MUSIC] My name
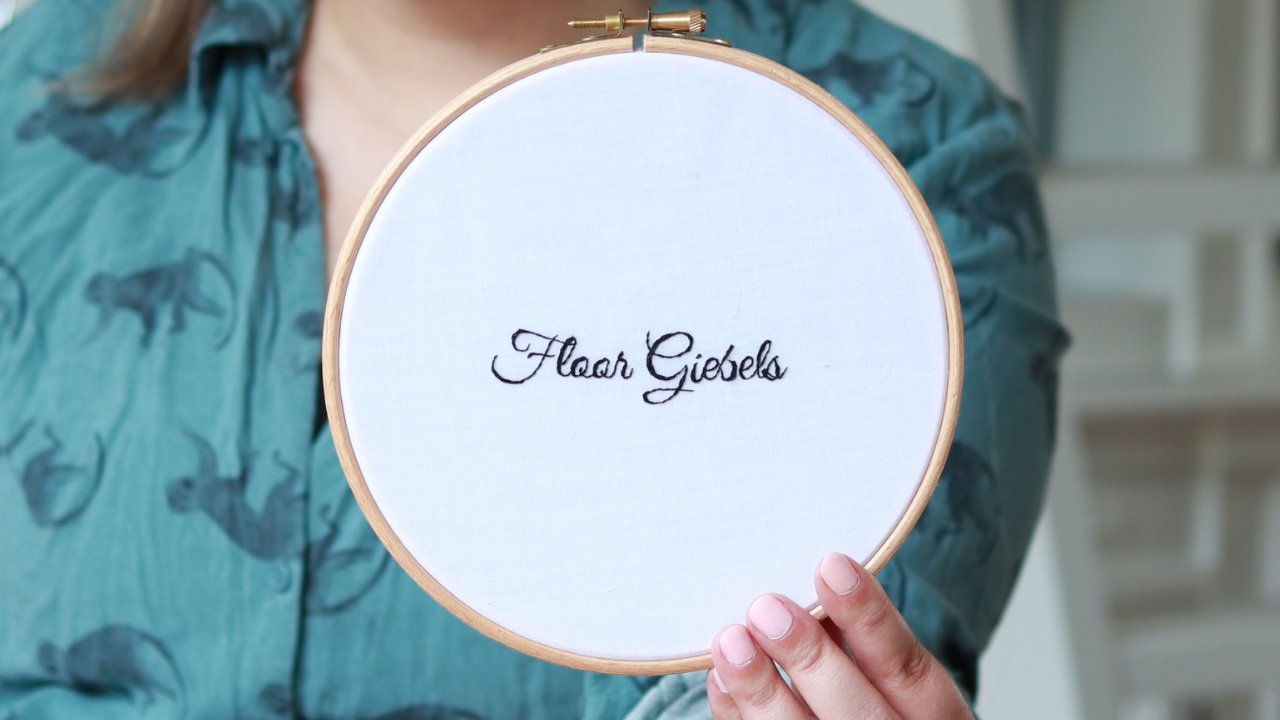
is Floor Giebels, and I'm an embroidery artists
and Skillshare top teacher. In this class, I'm going
to show you five tips and tricks to improve your
workflow with hand embroidery. Over the years I've had many frustrations with
my hand embroidery, and there were always these
simple little tips and tricks that made me want to
pick up my embroidery again. In this class, I want to share those tips and tricks with you. I'm going to show
you how to start and enter stage without
having to make knot, hiding you loose threads and working in a way
that is comfortable. After this class,
you will hopefully feel inspired to pick up your embroidery project with a whole new look and try
out these tips and tricks. This class is for beginners, but also for experienced
embroiders because you just never know when that aha
moment is going to hit you. That moment that you're like, "Wait a minute, now it makes sense. Now, I feel excited
about this again and I want to start and back-up
my embroidery projects." So join me in my
class and let's find out if you're going to
get your aha moment.
2. Class Project: [MUSIC] For the class project, I want you to first try out all the tips that
you think will have value for you and tell me
why you find them useful. I would actually also like it if you would write
down the tips that you don't find useful and why
you don't find them useful. I think there's also
always a lot of value in why you don't
think this is useful. There can be that you want
to work in a way that is really neat and you don't
want to hide things like, I just want to know
what has value for you, but also what doesn't
have value for you. I want to get inside your mind. I want you to share something related to embroidery
that did not work, and you want to have a
useful tip for that. I will show you mine, and maybe if someone has a great tip for me
on how to do this. I always wanted to
use a resin with my embroidery because I
just love that effect. It just does not want to work. The embroidery threads gets
really dark whenever I use resin on it and it just does
not want to stay there. Maybe someone has a
great tip for me on how to use resin
with my embroidery, and I can do an update on
how the tips worked for me. I just want you to have
that same experience to also share something that
you tried that didn't work, and why it didn't work, and there might be someone who is super
experienced in that field because you might be someone like me who loves
to just combine stuff. I like to combine
embroidery things, and then other person might have experience in that field. You never know when someone
might have the answers. Maybe I have the
answer or someone in the Skillshare community
has the answers. To upload your class project, you need to use your
desktop or laptop. It does not work in the app, unfortunately, and let's
be honest, we all know, you on your iPad or phone, because hand embroidery is
just the best on the couch. On your desktop, you will
see a Project and Resources, and underneath
that, you will see a button to upload
your class project. Then you will also see
the PDF that I made to fill and you can upload
in the project section. Let's get over again
what you need to upload. One, share the tips
that have value for you and why they
have value for you. Does it make your work quicker or does it make
your work look better? Share what did not
have value for you, and why did it not
have value for you. Last, what's something you find difficult with embroidery, and you would love to
have some tips for that. Maybe we can all help. In this class, I'm
going to share with you my tips for hand embroidery, and these steps are really for
everything in the process. This can be workflow, easiness, but also how
your embroidery will look. Traditionally, you have so
many rules for embroidery and we are going to break them all [LAUGHTER]
with these steps. I'm going to cover
tips for fabric, thread and needle,
working in a way that has the least amount of strain on your hands and
important, eyes. Ending your stitch and starting your stitch and finishing
your embroidery work. Those are all the topics we are going to cover in this class. Let's start with
our first lesson, and that is all about
the fabric. [MUSIC]
3. Fabric : [MUSIC] In the Netherlands
where I'm from, if I went to any sewing
store or hobby store, they would sell
embroidery stuff, and it would only be
aimed at cross stage. The fabric would also only be for cross stage
everywhere, all the time. Of many different fabrics, I found that cotton
is just the best. I like to use batiste cotton, but any cotton without
a stretch is fine. But one problem,
always stay with me. That was that every time
when I would embroider, you would see all the
threads on the back. This sounds like
such a simple thing, but I realized that if I
use a two layers of fabric, you would not see any
threads shining through. It's really simple but you
just have to think about it. So if you are worried about
your stitch assigning through your fabric and revealing
your messy bag, then just use two
pieces of fabric. I know it sounds so simple, but it's just one
of those things that are just so simple, but make a huge difference. It's time to open your PDF
from the downloads and fill in if this step
was helpful for you. I would love to know why it's helpful and also why you
don't find it helpful. Let me know what kind of fabric
you like to use and why. Now you know a great way to make your backside look
all tidy and neat. Let's go to our next lesson, where I will show you
my tips and tricks for needles and tracks. [MUSIC]
4. Needle and Thread : [MUSIC] Let's go over tips
for needle and thread. I want to start with the needle. If you are beginning
with embroidery, you will probably
have many struggles at getting that thread in
the eye of the needle, getting thin thread or one
thread of embroidery floss in your needle will probably
be not that difficult, it will in the
beginning, of course, every thread you put in
there will be difficult but after some time that
will really go easy. But what if you want to use a thin needle and use
two strands of thread? Because ideally the
thinner the needle, the less of a hole it
will make in the fabric, ideally you want to have
a really thin needle. But the thinner the needle, the tinier the eyelid, the more difficult to
get your thread to. You can make this a little
bit more easier for yourself by using one long
strand and make a double. What is also great
about this trick is when you want to put your
embroidery work away, the needle is secure in
a loop of the thread. I'm sure when you do embroidery, you must have had
this moment you cannot find your needle and all of your blood just rushes to
your head and you're like, "I couldn't step on
it and so I hate it." You know that moment
where we know for sure, we left our needle
in that exact spot, we always put it and for
some reason it's not there and it's a
distress moment. Oh no, did it fall on the floor? This way, it will
always be attached to my hoop and the hoop
covers the needle, so it's safe for my dog. If you have a two-year-old, it will only be safe, very, very high up or in another room. If you have a piece with line work and you only
need to use black. Then, I would advise to buy cotton thread on a
spool like this one. You don't have that fuss
of splitting the skins. It lasts you so long. It's around €4 on Amazon. I have this one now
for around four years. I don't know how this is
with other countries, but in Holland, I know that when someone is
diseased, unfortunately, a lot of times they take his
stuff to the thrift shop, and a lot of times there
are a lot embroidery stuff in it because it's older people and it's not something
that people like, "That has a lot of value. I should sell this somewhere." No, they just give it
to the thrift shops, so it's always a great place to buy your embroidery supplies. I love thrift shops, it goes with the whole flow of having embroidery and give it a second chance and just
letting it live on. Let me know in the
project section, if you have difficult with getting your thread
in the needle. I would love to know where
you get your supplies from. We covered the basics
of the fabric, and a needle, and thread, and now we are going to cover, how to work in a way that
is comfortable. [MUSIC]
5. Taking Care of Yourself: [MUSIC] You might think that
this is not that important. You get a hoop and sit on
a couch, and that's it. But if you work for
a longer period of time or you want to
speed up your workflow, it is a good idea
to look at what you are using to make it
easier for yourself. First off, you have
these embroidery stands that you can attach
to your table. These are great because you
don't have to hold your hoop. It makes it so much easier
to move your thread around. I love to sit at the
end of my couch, so my back is supported and use a little side table for
my embroidery stands. Now, if you want to
maximize your workflow, you can try to use
a bowed heads to have your tread go up and down. I personally can't do this. For some reason it just does not feel natural and
I just don't like it. Before you think about ordering one of those embroidery stands, try asking around if someone has a table clamp
and many crafts require a table clamp where
you can clamp something in, for woodworking
or for soldering. A lot of things required that. The embroidery stand is not something that is
very necessary. It is more of a choice. I also use my embroidery
hoop without a stand. It gives me more
opportunities for some much needed dark
cuddles with Annie. But something that is
necessary and something I learned very quickly
is to use good lights. I ended up having
to wear glasses from using poor lighting
with embroidery. Something that is
very useful to put on your embroidery
hoop or something that is close by is reading light that you can
charge with an USB. I use it to put on my hoop
or my stand and is so lightweight and very ideal to
put a bag to take with you. When I have a project that is very small with lots of details, I like to use a magnifying
lamp like this one. You just put it over your
embroidery work and you make it a little bit more
easier for yourself. I have to say that the
one that you see here that I have also has a light. I just cannot find
a cable anymore. I have to still locate that. You stick in there and then
you can turn it on and then the magnifying lamp lights up and it's even more easier, but I cannot find it. Too many cables. It is ideal because it
also is a light source, but don't lose your cable. Now with embroidery are making the same movements all the time. It can be nice to just have
that relief from your hands. You have these products for carpal tunnel syndrome an
embroider worse nightmare. But the help of these
hand races or bends, make sure you not to get any of that or just to relieve it. Remember embroider stand is not necessary, but it's handy. Save your eyes and use a good lighting with
a reading lamp. Magnified lab helps you with making smaller pieces
and little details. If you experience some discomfort
when doing embroidery, make sure to get something for your hands that relieves
that carpal tunnel syndrome. Let me know in the
project section, how you feel about
using these tools to help you see better or to
just help your workflow. Let's go to our next lesson
where I will show you my tips on starting and
ending your stitch. [MUSIC]
6. Start and End Your Stitch: [MUSIC] When I started
with embroidery, I realized that I hate making knots in my thread. I hate it. When I have to start
with my thread, I just love to keep
on going and not stop to make a knot in the
beginning of my thread. Over the years, I tried out several ways to make
this process easier. I now start with my stitch just letting the
ends hang there, and not make a knot. You will see that after a while, the other threads will
just cover everything, and it is secure. Now, if I want to end my stitch, I do the same. I just cut it off, and the other stitches
after that will cover it. But if I am really
ending my project, so I'm not going to
do anything anymore, I just leave my needle
in the other threads. You can also do this with all of the threads if you
feel more comfortable. But this is, you just have
a nice, easy workflow. This way, you can really
just keep going with your embroidery work and not
stop with making a knot. This will make for such a
great workflow in your work, and just easiness,
and just niceness. Show in the project
section how you like to start and end your stitch and why you like to start and end your stitch in a certain way. Because I am curious to know if you feel like that
knot is really necessary, that you're really
on it, otherwise, it will go out, or that it is something
that is in your system, or how does that work for you? I would really love
to know and find out what your
opinion on that is. Let's go to our last lesson
where I'm going to show you my tips on finishing your
embroidery work. [MUSIC]
7. Finishing Your Embroidery Work: There are so many ways you can finish your
embroidery work, but I want to show you
my way for a nice, clean look on the back. Remember my tip I'm making
the embroidery piece with two layers of fabric? This is a little follow-up, assuming you did that. What I'm going to do is get
another piece of fabric. Don't use your nice
embroidery fabric, but use something that is cheap and you don't use
for something else. You're going to put
that on the outer hoop and then put your own embroidery
work over that fabric. Now you have the advantage
of the two layers you used in the beginning, so nothing shines through, and you can even use a
different color fabric for your backside. There are two ways
of doing this. You can just glue it all down. But what I'm showing you
here is that you can also go with a long piece of strand, a long thread, and just make a stitch going up, going down, going up, going down, all the way around, and then you have two of these threads that
you can just pull, and then you also
have in the backside. It's just an easier way. Maybe if you're not sure if
you want to use that hoop or you don't want
to glue it down. I can imagine that you are like, okay, I just have this piece. I want to have it nicely on
the wall maybe for a second, and then I want to
reuse the hoop. Who knows? Then this is also a really
nice way to do that. But again, you can
also glue it down. Any white glue will
be good for this. Again, I would love to see
in the project section, if you would like to
try these steps and why [inaudible] and also why no. Do you like to see
all the threads, or do you prefer to
actually frame your piece? What do you do with your
piece when it's done? It's time for our final lesson, and I just want to share
my final thoughts.
8. Final Thoughts: I hope that using these
tips will help you with your embroidery projects. Upload your class project,
and I can't wait to see them. If you like this class
or have a critique, then don't forget
to leave a review. You can find me on Instagram,
under fullmetalneedle, and I hope to see you again
soon here on Skillshare. Bye-bye.
 Floor Giebels, Embroidery Artist