Transcripts
1. Welcome to Creative Lettering: Hello and welcome.
My name is Shas, and I'm a teacher
and content creator. I'm thrilled to introduce you to creative
lettering embroidery. This isn't just a course. It's your creative journey to mastering the art of
personalized hand embroidery. In this course, we're going to stitch the entire
English alphabet from A to Z using 26 different unique
hand embroidery stitches. This course is designed
for absolute beginners, but by the time you
finish the last letter, you will have the
skills of a pro. Why learn this? Hand embroidery is incredibly mindful
and relaxing. It's a wonderful
form of self care. Plus, the skills you gain here allow you to personalize
all your clothes and gifts and even start your own creative business selling custom
embroidered products. You'll receive a complete
alphabet pattern and step by step instruction across
all six structured lessons. Stop wishing you could
embroider and start creating. Join me now in creative
lettering embroidery and begin stitching your
first letter today.
2. Tracing Your Letters: Let's get started with our
first preparation lesson. To start, you'll
need a few things. Your fabric. I'm using
an off white cotton, your printed alphabet pattern, a heat erasable pen
or a regular pencil, your floss threads, and a ten inch wooden
embroidery hoop. I've got all my alphabet letters printed on this A four paper. I recommend downloading
and printing this pattern with links
in the course resources. I'm now fixing the fabric
into my wooden hoop. Once the two rings are together, use your fingers to
stretch and tighten the fabric until all
the wrinkles are gone. This step is crucial for keeping your stitches
even and neat. You'll be able to create personalized words
for your garments, home decor, and so much more. For this project, I'm using
an off white cotton fabric, but you can choose any color
or fabric type you prefer. Now, to transfer the design, I fixed my fabric into the hoop, and I'm simply pinning the printed paper to
the back of the hoop. I'm now tracing all
the letters one by one onto the fabric using
my heat erasable pen. You can use a pencil or a regular pen if you don't
have an erasable pen. You could also use
a light source like a window or a small LED light
if your fabric is thicker. Once all the letters from
A to Z are transferred, we can begin stitching. I've already transferred all
the letters from A to Z onto my fabric with each letter about one to 2
centimeters in size. Once all the letters
are transferred, we are ready to stitch. We're starting with the letter A. I've chosen green
and black floss. Throughout this
course, we'll be using either two or three
strands of floss. I'll be using three strands
of floss for this part. Take your six strand length, and carefully pull
off three strands. Remember to separate the
strands one by one to avoid creating knots in
the remaining floss. My needle is threaded and I've tied a simple knot to
anchor the thread. Let's get stitching.
We're excited to start with letter A. Let's jump into the next
lesson and get stitching.
3. Part 1 (A-E): Foundational Fills: We're stitching our first
five letters, A, B, C, D, and E. These letters
will introduce you to foundational decorative
stitches that are fantastic for
filling shapes. We're starting with letter A using green floss,
three strands. We're filling the round shape
with the fish bone stitch. This stitch is
famous for creating a beautiful textured fill that looks exactly
like a fish skeleton. It's perfect for leaves and
in this case, a curved shape. The technique is all
about alternating sides and crossing
the center line with every single stitch. This interlocking method is what creates that signature
textured braided look. Keep your stitches close
together and your tension even, making sure you fully cover the center line as you
work down the shape. This stitch is what
gives the letter A, its wonderful solid texture. Once the main shape is filled, I switch to black floss. I use the rope stitch
for the arm of the A, a decorative line that
looks like a twisted cord. Finally, I secure the outline
with a simple backstitch. Always choose a
darker thread for your outline when your
fabric is a lighter color. It helps the design pop and gives it a clean, defined edge. Okay. Earning these lessons is so important
because it gives you a creative outlet that is
both practical and relaxing. Now, for the outline, I'm stitching some simple
backstitches here. So Our first letter is done, and it looks fantastic. For letter B, I'm
using yellow floss and the fly stitch
to fill the ellipse. The fly stitch is a
quick and easy way to fill an area with small
textured V shapes. It adds a nice airy feel. It's a quick and
easy way to fill a space with a beautiful
fly like pattern. For these letters, I'm using either three or two
strands of floss. Remember, a great
way to separate your floss is to gently pull
each strand out one by one. This keeps the threads from tangling and makes your
stitching so much smoother. I then switch to brown floss, using the rope
stitch for the line and backstitch for the outline. See how we're combining different stitches
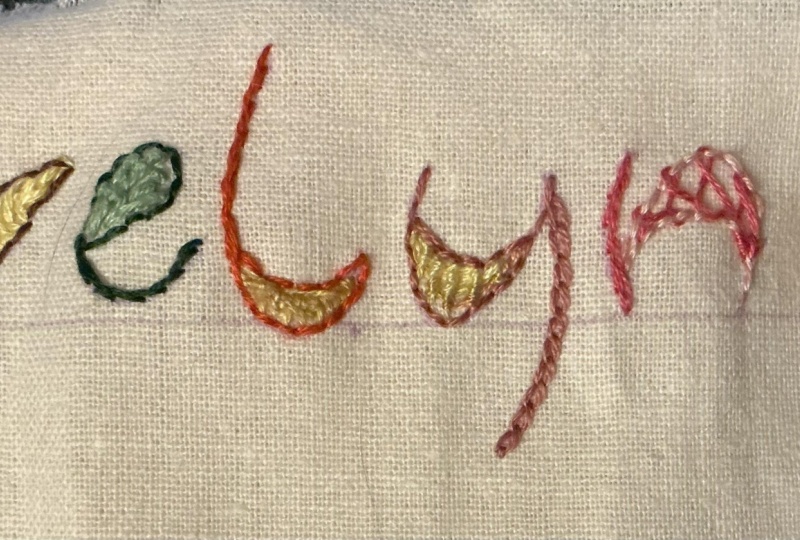
to add complexity. See how the combination of decorative and simple stitches gives the letter a great look. For letter C, we're
diving into the Spanish knotted feather stitch
with orange floss. You are essentially creating
a continuous chain of knots alternating
from the left side to the right side of your shape. This creates a dense, beautiful spine down the center with knotted loops flaring out. Keep your stitches evenly spaced to maintain that
signature zigzag pattern. This is a gorgeous, textured stitch that creates a zigzag line with small knots. It's very decorative
and great for borders or filling unusual
shapes like this crescent. This stitch is what gives the letter C its
unique textural flare. The rhythmic motion of stitching can be
incredibly meditative. It helps you focus, reduce stress, and
find a sense of calm. We finish again with the rope stitch and backstitch
in dark brown floss. A to the letter D, I'm using pink floss and filling the lens shape
with the basket stitch. This stitch creates a woven, basket like texture that's
perfect for larger shapes. With the rise of handmade
and personalized products, your embroidery skills can easily be turned into
a small business. You can sell your
embroidered art, take on custom commissions
for clothing and accessories, or even create and sell your
own embroidery patterns. Once the shape is filled, I'll use dark purple floss to stitch the line of the
D with rope stitch. For our fifth letter E, I'm filling it with
long French knots using light blue floss. This stitch creates a wonderful textured
fill that really pops. For these first five letters, you'll notice I'm using
the rope stitch to create the structural line and the simple back stitch to
outline the main filled shape. This keeps our
foundation consistent. In our next few lessons, we'll introduce some different more decorative
outline stitches. After that, I'll use
a dark blue floss to add the lines with rope stitch and the outline
with backstitch. Congratulations. You finished
your first five letters. Now you know five beautiful
decorative fill stitches. Let's move on to the
next set of letters.
4. Part 2 (F-K): Dimensional Stitches: Welcome to Lesson three, where we tackle
letters F through K. Get ready for some bold
structural stitches. For letter F, I'm
filling the main part with smooth satin stitch
using peach floss. Bring the needle
up at one edge of the shape and take it down at
the directly opposite edge. Pring the needle
up right next to where the first stitch
started and repeat, laying each stitch perfectly parallel and snug against
the previous one. Your short close stitches. If the area is wide, the stitches will droop, keep them tight and consistent for that smooth satin finish. For the lines, I'm introducing the heavy chain stitch
using green floors. This is a bold,
thick line stitch, perfect for adding
weight to a design. Bring the needle up,
go back down into the same hole and come up
a short distance away. Keep the working thread
looped under the needle tip, insert the needle back
into the fabric inside the previous chain loop and pull through to
anchor the stitch. This is just like a
regular chain stitch, but you'll take a
slightly longer stitch than usual for a bold look. Use slightly more
tension than usual. This stitch naturally gives
a raised rope like effect, which looks great for
the lines of the letter. This is a very bold and solid stitch. I'll also use straight and back stitches to
complete the design. We'll finish with simple
straight and back stitches. On to letter G, we're filling the head with
the braid stitch. Just stitch builds quickly. Work methodically keeping your small anchor
stitches uniform. Practice on a strict line first. The continuous action
of crossing the center and anchoring on the sides
is what builds the texture. The braid stitch is a
highly decorative stitch that creates a beautiful, raised and woven
court like line. It's perfect for borders or for adding a strong textural
element to your work. You can stitch parallel rows of braid stitch to
create a dense, woven fill for a shape. For this entire lesson, I want you to notice a pattern. I am stitching the
main structural arm or leg of every letter using
the heavy chain stitch. This gives all our letters
a consistent bold look. We'll also use the
simple backstitch to outline any solid
filled shapes. For the letter H,
I'm starting by outlining the shape with a
backstitch using black floss. First, stitch a single line of back stitches around the
outline of the crescent shape. Yours a blunt tapestry
needle for the weaving. It glides easily through the thread loops and foundation stitches without splitting them, making the weaving
much smoother. Work rows of
buttonhole stitch into the previous row of stitches
rather than into the fabric, the thread should loop around the thread of the row above it. Keep your tension even. You want the weaving to
be dense and uniform, not pulling the foundational
outline out of shape. This is a great tip, as the blunt tip of the tapestry needle glides through the threads
without splitting them. Finally, I'll stitch the line
with heavy chain stitch. I'll secure the
final thread loop with a small stitch
right into the fabric. This holds the beautiful woven
pattern firmly in place. The letter I is up next. I'm filling the half
lens shape with a collection of French
knots using orange floss. Don't worry about being perfect. Just relax and
enjoy the process. You can apply these letters in so many ways to add a personal
touch to your garments, accessories, or home decor. The dot of the eye
will be filled with a smooth satin stitch
using gray floss, and the half lens shape will be outlined
with a back stitch. How a tenth letter in this course is letter J. We're using light purple
floss and filling the curved leg of the letter with beautiful bullion knots. This stitch is fantastic for creating
dimensional texture. Wrap the working thread
around the needle several times depending
on the length you need. You wraps must be equal to the length of the
stitch you just took. If they aren't knot won't
lay flat or straight. Use a needle with a slightly longer shank and a small eye. This helps the needle slide through the wraps more easily. This stitch creates a wonderful
raised worm like texture. I'll then use dark purple
floss to stitch the line with heavy chain stitch and the
outline with backstitch. Hand for the dot of the J, I'm filling that with
a smooth satin stitch. And now we've reached our
final letter for this section. Letter K, I'm using light green
floss with three strands. For the main lines
of the letter, I'm stitching with
the light green floss using the double chain stitch. To form the double chain stitch, we're basically stitching
two parallel chains at once. First, stitch a small
vertical anchor stitch. Then work a regular
chain stitch. For the double effect, you'll take your second
loop on the opposite side, securing it with a
small stitch that passes underneath the
first chain loop. You're creating a
solid linked cord. Keep your loops uniform and your tension even to maintain
that beautiful texture. This stitch creates a bold, three dimensional chain that's
perfect for strong lines. I'll then use the
heavy chain stitch for the rest of the letter, and finally, outline with
a simple backstitch. I hope this tutorial has
shown you how you can use different stitches to create unique and beautiful letters. Try spelling out a word or creating a full
alphabet sampler. But Fantastic. Now that we've completed our foundational and
structural letters, let's move on to the
next section and learn some fantastic
new texture stitches.
5. Part 3 (L-P): Texture & Shading: Welcome back to Lesson four. We've mastered our foundational
and structural letters, and now we're tackling L through P. We'll start with letter
L. For the line segment, I'm using light brown floss
and the cast on stitch. To stitch the cast on stitch,
bring your needle up, then take a small stitch, but don't pull the needle
all the way through. Now wrap the working thread around the needle several times. Once you have enough wraps for
the length of your stitch, hold the wraps down and gently
pull the needle through. This section is all about
introducing unique texture, beautiful color blends, and
fantastic line stitches. It's perfect when you want a strong texture that
isn't a chain stitch. This is a beautiful
dimensional stitch that creates a raised, tight, knot like line. For the lines of these letters, we are using the outline stitch. Outline stitch creates a rope
like slightly twisted line, making it perfect for elegant
borders and fine lettering. To stitch it, you take a stitch, then bring your
needle back up just next to the previous
stitch, not through it. It creates a beautiful, elegant, rope like line that
is slightly twisted. It's often used for
outlining designs, stems, and in our case, the lines of our letters. To keep your lines smooth
when you take a stitch, always ensure the needle stays right on your
marked stitch line. It never goes too far
outside or inside. And finish with the back
stitch in dark brown floss. On to letter M, I'm using yellow floss and the blanket
stitch for the main fill. Bring your needle up on
the top line of the shape, insert the needle down
on the bottom line, then bring the
needle tip back up a short distance directly
below that point, keeping the working thread
looped under the needle. We'll ensure the loops are even and tight to
create a solid fill. While often used for edgings, it's a great stitch
for quickly filling large shapes with a neat
textured appearance. For letter N, we're creating a gorgeous
two color effect. I'm using a blue and pink floss for the fill with the
interlaced back stitch. This is a decorative stitch that starts with a simple
line of back stitches. Then you use your second colour to weave through
those back stitches, creating a beautiful
knotted two tone pattern. Pay close attention to every
movement of my needle. That is the quickest way
to understand the flow and logic of these
more complex stitches. When working with threads, especially for
knots and weaving, always use a gentle, consistent pull. Don't yank the thread. Too much force can cause it to break or distort the fabric. When weaving the second color, make sure to use a
blunt needle so you don't split the threads of
the foundational backstitch. We finish the outline with
a split stitch in blue. Letter O is all about shading. I'm using dark orange and a light orange floss with
the long and short stitch. This is arguably the best stitch for blending colors smoothly, giving your shape,
depth, and realism. To create the blend, stitch one long stitch, followed by one short stitch, following the contour
of the letter. The next row of stitches should then pierce through the
middle of the first row. This overlapping technique is what makes the colors
flow seamlessly. We finish the outline with a clean backstitch
using black floss. Finally, letter P,
I'm filling the shape with red floss using the
Romanian couching stitch. This is a fantastic fill
technique where you lay down long parallel stitches
and then anchor them down with tiny
perpendicular tie down stitches. This creates a distinct
woven and ribbed look. I the small anchoring stitches are what define
the final pattern. Try to keep them
consistently spaced and the same length to ensure your finished fill looks
uniform and professional. Hand stitching is
incredibly meditative. The repetitive action
forces you to slow down, focus on the present, and is a fantastic way to
reduce stress and anxiety. It's creative self care. We finish with the
outline stitch for the arm and wax stitch
for the outer border in dark gray floss. Fantastic work. You have completed
Lesson four and mastered some crucial decorative
and blending stitches. You're building a
truly diverse toolkit. Now get ready for Lesson five, where we introduce even more exciting dimensional
and textured lines.
6. Part 4 (Q-U): Decorative Lines & Knots: Welcome back to Lesson five. We're stitching Letters
Q through today, and we're focusing
on some beautiful dimensional textured and
knotted line stitches. We'll start with letter Q. For the main fill, I'm using a light blue floss and the
beautiful salon stitch. First, I'm going to stitch a foundation curved line of back stitches along the
outer edge of the shape. Now we work the salon stitch. Bring your needle up on
the line of back stitches, then loop the working thread under and over the
previous stitches, creating a beautiful,
consistent twist. This stitch creates a
swirling twisted line that gives a wonderful
dimensional rope like effect. It's perfect for
filling curved shapes. This stitch is often called the spiral trellis
or twisted chain, and it builds a
dense textured fill. I finish the rest of the
letter with chain stitch and a simple split stitch
using a bold red floss. For the split stitch,
we're creating a beautifully clean,
seamless line. Bring your needle up, take
a small stitch forward, and for the next stitch, bring your needle back
up by piercing right through the middle of the thread of the stitch you just made. This splitting action is what creates that incredibly
smooth finish. Remember, this is different from
the outline stitch where we kept the needle
next to the threads. On to letter R, I'm using a lovely popper floss and the lazy daisy
stitch for the fill. So stitch the lazy daisy. Bring your needle up, then
form a loop with your thread. Go back down into
the same hole and bring the needle back up where
you want the petal to end. Pull through to secure the loop, then take a tiny straight stitch over the loop to anchor it. This stitch creates a single elegant loop and is fantastic for
simple light floor fills or for outlining
small curved segments. We finished the lines with split stitch and
backstitch in dark purple. For letter S, I'm using light green floss and introducing the
rosette chain stitch. The rosette chain stitch is a variation of the chain stitch. You start the same way, but before pulling
the final loop tight, you twist the needle to form a small knot or rosette
inside the chain link. This makes the stitch
thick and decorative. This is a highly
decorative stitch that forms a series of
gorgeous knotted loops, resembling tiny
flowers or rosettes. It's a great way to
add delicate detail. Outline the entire letter with the back stitch in
dark green flows. Laraty I'm using
light yellow flows and the knotted
lazy daisy stitch. This is a beautiful variation
of the regular lazy daisy. It's stitched the same way, but before taking the
small anchoring stitch, you wrap the thread
around the needle once or twice to create a tiny knot
at the tip of the loop. This adds a little more texture and makes the petals
stand up a bit more. We finish the lines with split stitch and
backstitch in black. Finally, letter U. I'm filling the shape with
light purple floss using the Cretan stitch. This stitch creates a lovely
open feathered pattern that works well for filling shapes or creating
a stylish border. To stitch the credence stitch, you work the needle back and forth between two
parallel lines, bring the needle up
on the bottom line, then take a small diagonal
stitch on the top line. The needle always re enters the fabric close to
the previous stitch. The result is a series
of interlocking feathered stitches that are perfect for filling
this curved shape. We finished the border
with split stitch and backstitch in brown floss. Fantastic work.
You've successfully completed Lesson five, mastering five more beautiful
and unique stitches. You're building an
incredible library of embroidery techniques. Get ready for our
final lesson where we conquer the last five letters and complete our
alphabet sampler.
7. Part 5 (V-Z): Advanced Finishes: Welcome to our final
stitching lesson. This is it. We are completing the last
five letters V through Z and finishing our entire
26 stitch alphabet sampler. We start with
letter V. I'm using orange floss and filling the shape with the
bonnet stitch. This is a great textured
triangular stitch that's perfect for creating
a beautiful raised pattern, especially along V
shapes and edges. Try to watch the
needle carefully and learn the rhythm of
the stitch to memorize it. Once you master the rhythm, this stitch becomes
quick and second nature. It builds a wonderful textured
fan shape and will use the chain stitch and back stitch in dark gray to
complete the lines. Bring your needle up from
the back of the fabric. Now reinsert the needle back down into the exact same spot, leaving a small loop of
working thread on the surface. Next, bring your needle back
up a short distance away, making sure the needle comes up inside the loop of thread. Pull the needle all
the way through. This forms your first link. To continue the chain, insert the needle back down right where your
last stitch came out. Bring the needle up a
short distance away, keeping the thread under the
needle and pull through. The chain stitch
creates a durable, beautiful series of
interlocking loops, perfect for outlines, lines and structural elements like the
arms or legs of letters. On to letter W, I'm using dark and light green floss for the main fill with
the weaving stitch. This technique is all
about fabric manipulation. First, you stitch a
straight foundation of parallel stitches
across your shape. Then you use your
second thread to weave over and under those
foundation stitches, working across the shape. This creates a solid flat, basket like texture, perfect
for the broad shapes of W. To complete this course and
solidify your new skills, your final project is
to create your name using any of these 26
beautiful stitches. We finished the lines with chain stitch and back
stitch in brown floss. For letter X, I'm using peach floss and the
raised fish bone stitch. This is a dimensional
stitch that creates a dense raised pattern, perfect for adding strong three dimensional
texture to your work. This stitch starts like a
regular fish bone stitch, but you build it up in layers to make it stand off
the fabric more. The key is to keep your stitches close and alternate carefully, allowing the thread layers
to build upon each other. We complete the
structural lines with the chain stitch and the
back stitch in green floss. Oh For letter Y, I'm using dark pink floss
and the web stitch. Start by stitching a basic
straight stitch frame in a star or wheel pattern. Then using your working thread, weave over and under the spokes of the wheel without
piercing the fabric. This unique stitch creates a beautiful spider web like texture and is a wonderful
way to add a unique, lace like finish to your work. As you work toward the center, the stitches pull
closer together, creating that
mesmerizing web effect. We finish the lines with chain stitch and backstitch
in orange floss. And finally, our last letter Z, we're using Bage floss and
the raised chain stitch. To stitch the raised
chain stitch, first stitch a simple line of running or back stitches
as a foundation. This stitch creates a
raised dimensional chain on top of the fabric surface, which is a perfect bold
and textured finish for our very last letter. Then using a second
thread or the same one, you loop the needle under
the foundation stitches in a chain pattern without
ever going into the fabric. This creates a chain that sits on top of the fabric. We finish the lines
with chain stitch and back stitch in
dark purple floss. To complete this course and
solidify your new skills, your final project is
to create your name using any of these 26
beautiful stitches. Congratulations. You have now completed the entire alphabet and have successfully mastered 26 unique hand
embroidery stitches. Mix and match the fills, lines, and knots we've learned. Stitch your name on
a piece of fabric, take a photo, and submit
it to complete the course. I can't wait to see your
personalized creations. Remember, you now have a complete tool kit to create your own unique words, names, and designs on any
garment or home decor item. Thank you so much for joining me on this creative journey.
 Shanas, Embroidery for Everyone