Transcripts
1. Introduction: If you have an interest in personalizing or
upsizing your garments, then I'm pleased to
be able to offer you this course on
making covered buttons. In this class, I'll be
showing you how to create covered buttons to
express your unique, creative style
without the need to purchase a commercial
covered button kit. This class is suitable
for all levels. No experience is necessary. Everything is broken down into easy steps that
anyone can follow. This is the first class
in a series I'll be presenting on easy
clothing embellishments. Hello, I'm Michelle. I'm a multimedia artist
with a love of watercolor, fine line illustration,
textiles and stitching. Over the last few years, I've become
increasingly aware of the fashion industry's
impact on our environment. I was shocked to
discover that in 2024, the fast fashion industry
is estimated to produce a staggering 92 million tons
of landfill waste annually. Not only that, it's also
responsible for creating approximately 10% of global
carbon emissions annually. These figures were
the inspiration for creating this class and the
series of classes to follow. Each of us has the power to make a change and minimize our
environmental impact. Choosing to create
beautiful embellishments for our garments. We can extend their life and
keep them out of landfill. Upcycling not only
sparks creativity, but also increases
sustainability. It's really a win
win as we end up with unique
personalized garments, and we also get to save some
of our hard earned money. I hope you'll come
along and join me taking this first step in a journey to reduce your
impact on the environment. Indeed, I hope
you'll look out for other classes in this
series where we'll continue to explore
how we can use simple handmade
embellishments to extend the lives
of our garments. Are you ready to create
stunning coed buttons? Then what are you waiting for? Let's go grab our
supplies and get started.
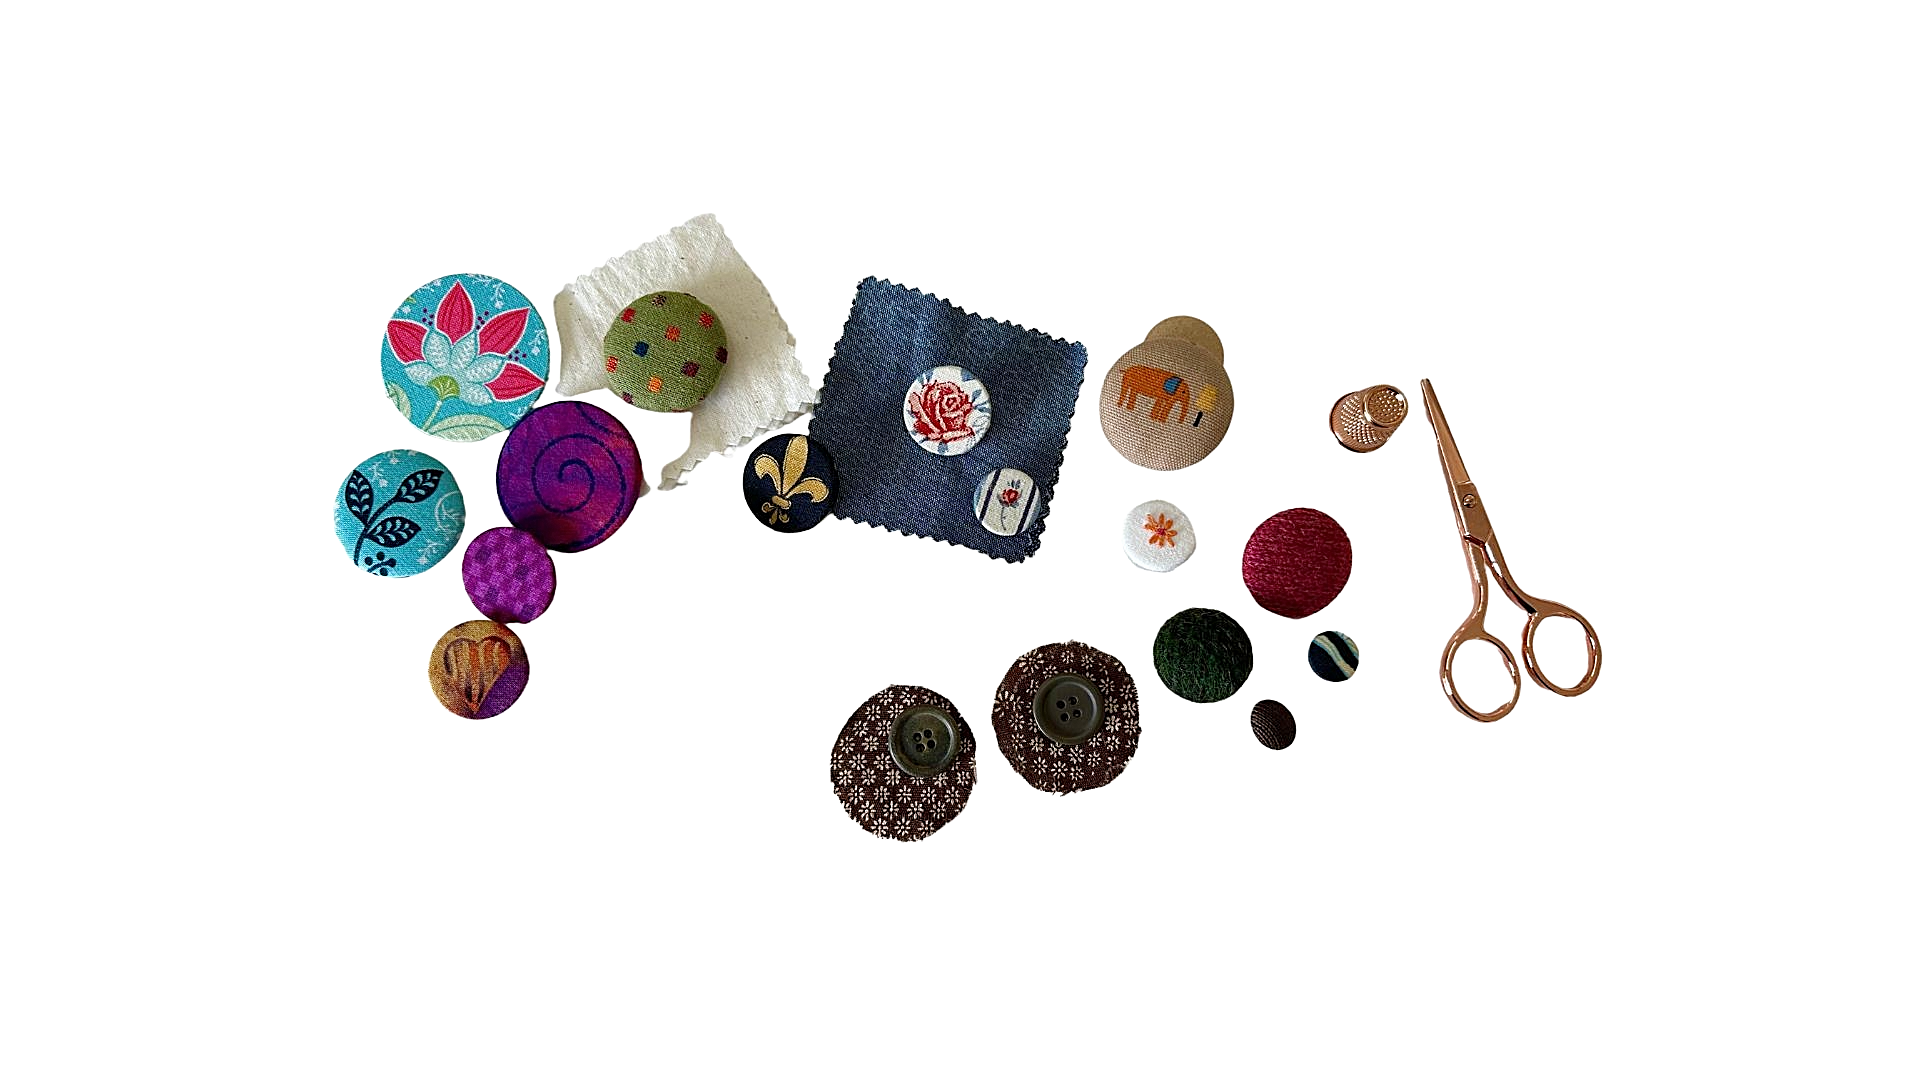
2. Supplies: The first thing to start with would be the blank that
you're going to cover. Now, there's a couple of
things you can use for this. You can use plastic ones. It doesn't matter whether
they have two holes or four holes or whether they
have a ridge around the edge. You can use them upside down or you can use
them that way up. If you don't want that
little lip in there, you can pad it out with a little bit of felt
or some extra fabric. The other thing that
you can use for buttons are these wooden discs. These ones are teddy or doll joints that
I've bought from the craft store at
some point in time. The only thing you
need to worry about is how rough they are
around the edges, and I usually just smooth
them a bit with either a bit of sandpaper or a nail
file emery board. And you can pad them
with a bit of felt if you like a more
padded button. This one is a shank button. Shank really just refers to a little bit on
the back that juts out and you stitch through to attach a
button to the garment. And if that's the type
of buttons you have, I'm going to show you how you
can cover those, as well. Old discards. You don't
have to buy them. I keep all my buttons off any
garments that I throw out, and I store them in
different color ways. You can use mismatch buttons as long as they're
the same size. And that's where
the ruler comes in. You measure your button size and make sure that
they all match. The other thing to
use the ruler for is measuring when we
work out our fabric. That we need to cover
the button with, you're going to
need some scissors, a little bit of
felt if you wish to cover the backs of your
buttons to make them neater, or if you want to pad out your plastic buttons to give
them more of a dome shape. Some thread. Use a
matching thread. Make sure your thread is a
good, strong sewing thread. I have here polycottons, and when I'm stitching, I double them up for strength. You'll need a sewing needle. It doesn't matter
what type of needle, just something with
a decent eye that you can thread your thread
through without any issues. You're going to need some fabric to cover your buttons with. I've chosen this for my buttons because I'm covering buttons
for a white linen shirt. This is old napery that I have picked up from
the second hand store. And I plan on using the little bits of embroidery
to cover my buttons with. These are all hand embroidered, and it's a shame not to
give them a second life. The fabric is a little stained, so I have to work
around the stains, but I've got enough
of these napkins to be able to cut out pieces
to cover my buttons with. So that's going to be
what I'm working on, as well as some of this. This is a cotton
quilting fabric, and it's a scrap, left
off other projects. I plan on using these buttons for a pale blue chambray shirt. When you're choosing fabrics
for covering buttons, you can go plain, but I sometimes like to make
the buttons a feature, so I look for prints that can be used or things
like the napery with the embroidery on or geometric type prints
or bright bold prints. To use this fabric, I have a couple of choices here, probably three choices
just looking at it. If I was covering the
size of button, I could use the roses. I would just find a spot where I could have the rose on the button and cut
according to that. I could actually just use the leaf part of the
design if I wanted to. Or I could go for this side here where there are rose
buds and stripes. We're also going
to need something to mark your fabric with. Choose something
that will show up so you can see it
because we're going to measure and mark
out cutting lines for our circle shapes to
cover our buttons with. You could use just an
ordinary felt tip marker, just a lead pencil. Proper fabric marker or a fabric pencil as long as you can see the line that
you're going to be cutting.
3. The Project: The project for the
class is really simple. I’d just like you to
upload some photos of any buttons you
make during class. You might like to
include the buttons attached to a garment or
used in a craft project. I'm really keen to
see what you create. To upload your pictures, just look for the
projects tab underneath The video player on the browser
version of Skill Share. Navigate to the project page. And you'll see in
the right hand tab, there's a menu that has
the button to click to upload project and just follow the instructions.
It's really simple.
4. Tips: When you're stitching through
your covered buttons, you get them to a
point where you've pulled all of the gathering up. It can be difficult to push the needle through
the fabric when you're stitching
them onto a garment or when you're finishing off that last little
bit of stitching. One of the things
you can do is use a thimble if you have one
to push the needle in. Just make sure it's not
facing into your flesh, because it might suddenly move
and you'll hurt yourself. Get it moving, and then you'll grip it and
pull it through. Another thing you can do is find a tough surface that you can push on the bottom of
your needle with gently. Sometimes you can use the
flat of the scissors. I sometimes use a coaster. I wouldn't recommend
you push it onto any of your
furnishings that you don't want damaged because
it can make a hole in tabletops or arms of chairs. So just like that,
I push down on it. If you have a thimble, use it. If you don't have a thimble, you can use the flat edge of your scissors or
a drinks coaster. When you're choosing fabrics
to cover your buttons with, look for something that
has a tighter weave. These are ideal. These are little pieces of
quilting cotton. And they have a
very tight weave, so they don't fray as much
as an open weaved fabric. If I was to choose
evening fabric, I'd have to handle
them very carefully because they will fray
once they're cut. When you're handling a
looser weave fabric, you have to do it very
carefully because we're stitching around
close to the edge, and we're handling the fabric, it will be inclined to
fray along the edges, and it might fray in
past your stitching. There's a couple of things
you can do for that. The first one is to allow extra fabric while
you're stitching, and then you can
cut it away later. The other thing is to use a
product called Fray Stopper. This is fray stop, and it's like a
very liquid glue. You can pick it up at any haberdashery sewing
fabric store, usually, and it comes out from a
small nozzle in the end of the bottle and
you just drizzle it along the cut
edge of the fabric. That will help minimize fraying if you have a
looser weave fabric or a evening shear type fabric that you want to use
to cover buttons with. The other thing to look
for when you're choosing your fabrics is scraps that have many different designs
on because you could get many different styles of buttons from something
like this fabric. You could use this area to
make some leaf buttons. You could use the rose motif. This flower motif, if you were making one
big decorative button, this area to get these
three little flowers in fabrics that have a lot of design elements on them are very good for covered buttons. The other thing to think about
is using recycled fabric. Any garment that I'm
disposing of that's not going to go to a
second hand shop, goodwill Thrift or opportunity
shop, I dismantle. I save all of the
buttons, closures, and zippers to recycle
into other projects. And I also go through the garment and cut
out any pieces of fabric that still have life left in them that I can use
for other projects. Sometimes I use those
fabrics for covered buttons. It's something to keep in
mind and will help you build a small stash of
reusable fabrics, buttons, and zippers
for future use. If you're going to
be covering buttons for a garment like this
one that has buttonholes, if this didn't already have its buttons and you wanted to cover some
buttons to put on it, you would measure your
buttonhole to begin with. So you just measure from the opening to the
other opening edge, it will tell you how
big your button is, and then you're either
going to purchase some buttons to fit that and
they just need to be cheap, flat plastic, or
you will go through your button supply and match however many you
need to that size. If you have a garment that
already has the buttons attached and you're planning
on covering them, just something to be aware of. Once you cover the button, it adds a little bit to the
diameter of the button, so you need to have
the button hole. Slightly looser than the
button that's already on there to make sure that you can actually get your button
through the hole. The last tip I have for you is when we get to
the stage where we are measuring our button and cutting out our
fabric to cover it with. Once you have the first button measured and the
circle cut ready, if you're covering several
buttons of the same size, you can then use the
first circle you've cut as a template to cut
the rest of your fabric. That way, it saves you time. You don't have to
remeasure the button and remark prior to
cutting each time.
5. Running Stitch : I'm going to show you how
to do the running stitch. This is the stitch
we'll use to gather up the circles that we cut
to cover our buttons with. You just need a threaded needle with a knot in one
end of the thread. When we're doing
our button circles, we'll have a double thread. But while I show you this,
I've only got a single thread. The running stitch
is very simple. It's just taking little
tiny bites of the fabric, working your needle forward, and it's a rocking motion going through from the
wrong side of the fabric, taking a small stitch. If I'm using a single thread, I take a small back
stitch just to secure, even though I have a knot, because when you're gathering
with a running stitch, you'll put tension on it, and you don't want it to pull out because you'll
have to start again. And now we just simply take
a small stitch forward, take your needle through to
the back in a rocking motion, bring it back up to
the front to the back, to the front, and you thread on as many stitches
as you would like. So you can see there I've
got stitches threaded on, and then you take your
needle forward through. I like to use a small stitch when I'm doing the
bottom covers. If you take too big a stitch, you end up with
large pleats around the edges of your buttons
that you're covering, and it can be time consuming
to try and get them out. Again, going down from the top, take a little bite
in the fabric, come up with a little
bite of fabric. So it's the rocking
motion down, up, down. Up, down and back up. And I usually take about that
many, about four stitches. I find it sufficient on the
needle at any one time. And so once you get to
the end of your row, you can then pull your thread, and the fabric gathers up. And that's what we need
to be able to do to cover our buttons trying to keep your stitches as
uniform as you can. Because I'm using it
as a gathering stitch, I'm not going to tie it off because I'm going
to pull up on it.
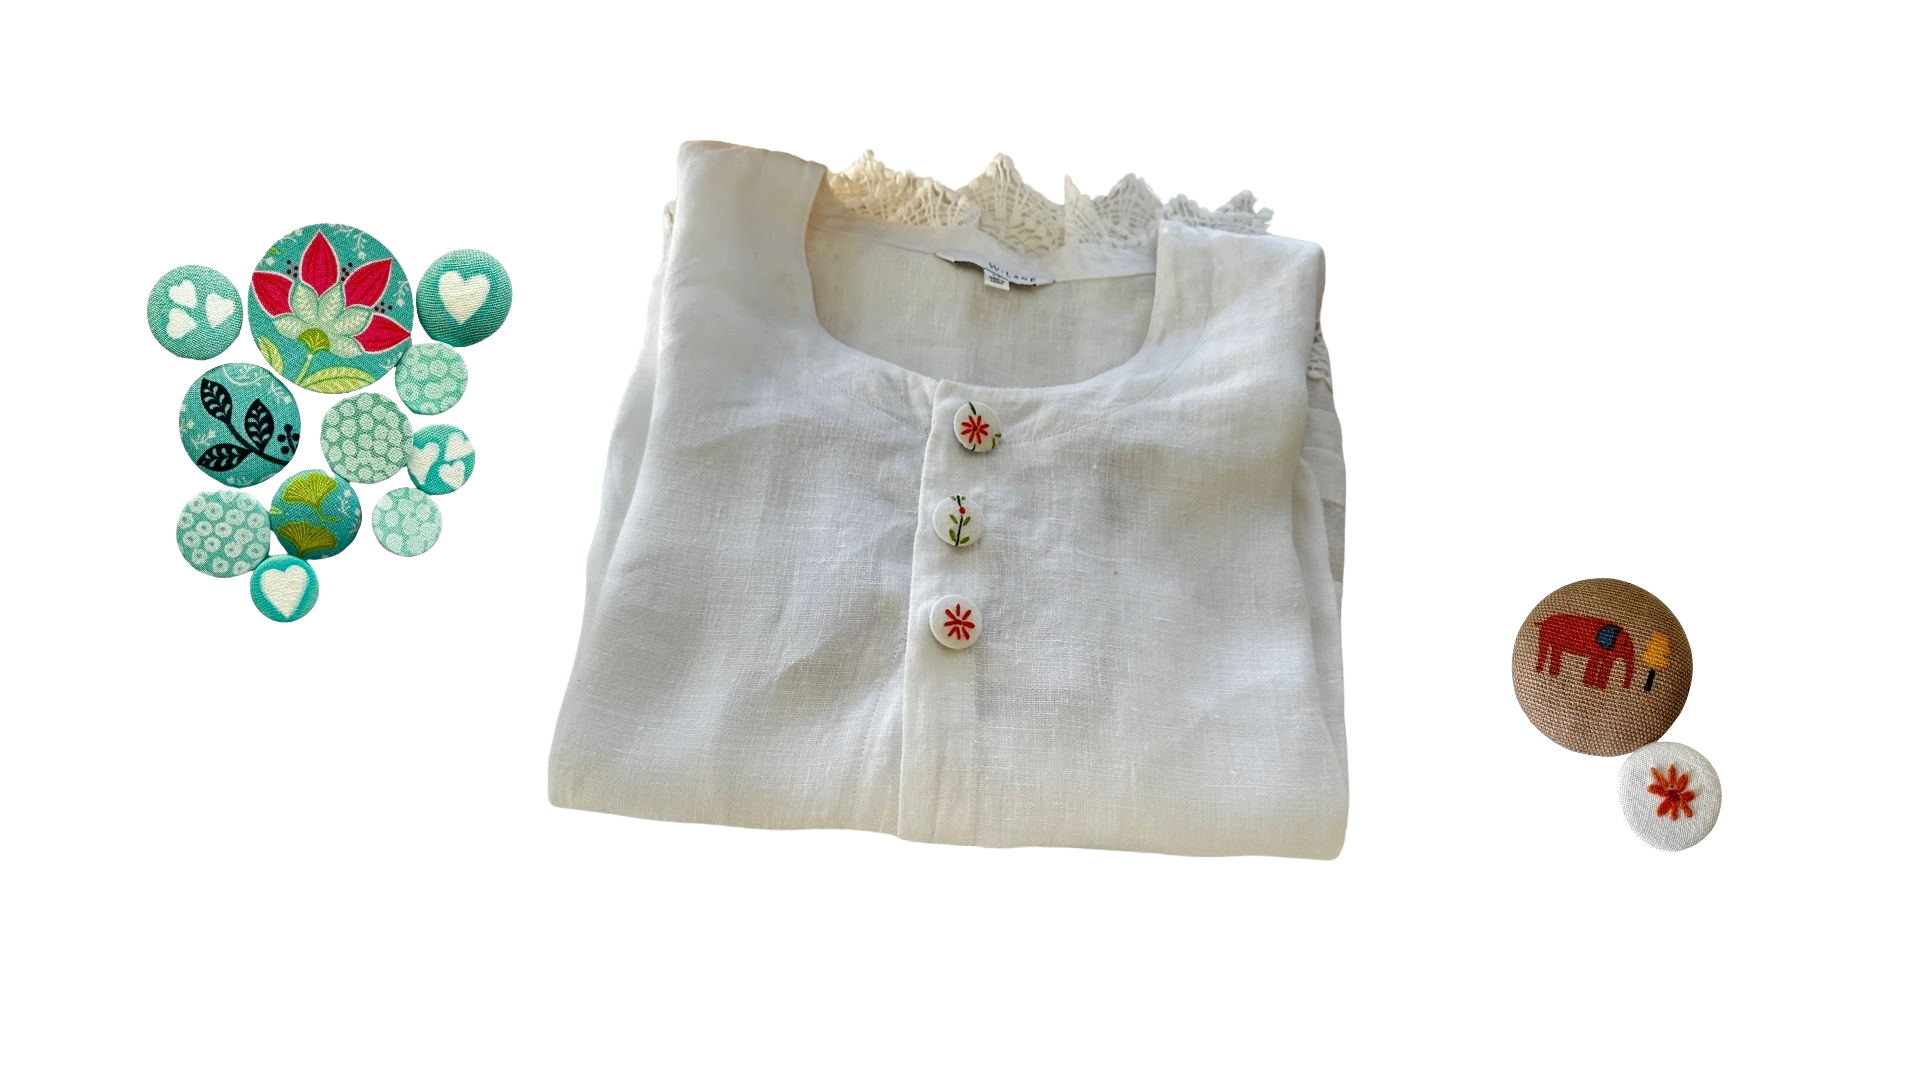
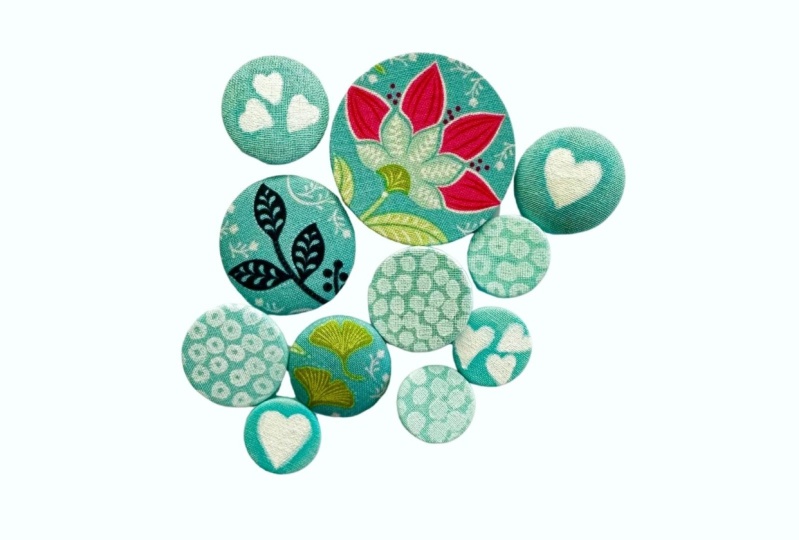
6. Covering Buttons Part 1: These buttons are for my
upcycled linen garment, I want to use these
little daisy flowers. So I'm going to position my button as centrally as
I can over those flowers. On the reverse side
of your fabric, if you have a motif
for a design you want to have on the
front of the button, then centre it where
you want it to be. And using your marking pencil, make some marks
around your button. You don't have to go completely around just enough so that you can see the size of your
button and the position. Make sure you can see your marks and double check that your
motif is centralized. Then you're going to measure your button from the center to the outside edge
because we're going to add that measurement
from the line, the outside edge of the line
we've drawn further out. And that will be your
fabric that will cover the back section
of your button. So with my ruler, the easiest way is to
put your button on the top and measure the size. Mine is around about
21 millimeters, So half of 22.5, that will
be 11 millimeters. So I want to add 11
millimeters around the outside edge of the
circle I've drawn on here. I line my ruler up with
the edge of the circle. Then I just go around and make some little marks and
draw in the cutting line. And now that I have
those marks on there, I'm just going to draw between those lines and join them up. It does not have to be a
perfectly round circle. And then with my scissors, I'm going to cut my circle out. So there's my little
bit of a wonky circle, and I might just go around and straighten it up
just a little bit. Now I'm going to have
to undo these bits of embroidery on here so that
I can cover my button. In the meantime,
I'm going to mark out a button for my shirt. Pick the rose that I like. This one here. What I'm
going to do is cut away the excess so that I only have a small piece of
fabric to work with. I can see the design through it, so it's easy to center it. If you're covering
a button that you would like to show a
particular motif on, but you can't see through to the other side for marking
where to position your button. Then you'll have to work from the right side of the fabric. There's a couple of ways
you can mark the fabric. One is to use a water
erasable fabric marking pen, but you must test first because sometimes things that
say they erase don't. They leave permanent marks. I have heard people
use friction pens, but you would also have
to test that to make sure that the pen actually
disappears off your fabric. And the other way would
be to use Tailor's chalk. You can buy it in a
pencil form like this. You can also buy Tailor's chalk. In different colors for
marking on different fabrics. There is a very simple
option that you can use if your fabric
will hold a crease, and that is to position your blank over the motif or
design that you want to center on your button with the right side of
the fabric up facing you. Hold it together with your fingers and then
bring your fabric around and create, and I'll show you from the
back, a crease line. So it's finger pressing, and you just go around
and press that crease in as best you can
around your button. Works best if you've
ironed your fabric first, so there's no other creases
there to confuse you when you have a look at it
after you've done this. Now, this is a temporary
crease that you've put in. You can just see it there
to check your positioning. Pick up your button
inside your fabric, hold it to the right side, and bring the fabric
around so you can see if you're happy
with the position. If you're not happy
with the position, adjust it slightly on the back. You can run around
with your pencil and marking your button so that you can see it before
you lose the crease. Once you get the
faint pencil line in, you can position your button against the crease line and
you can just draw around it.
7. Covering Buttons Part 2: I'm going to use these
wooden discs for the button. I had a choice with these discs. I could pad them out if
I wanted a dome button, but I don't for this
particular project. I've already been
around the edges and smoothed them a little
bit with an embry board, so it's ready to go. With my fabric marking pencil, I'll go around and
mark around my button. These discs have a convenient
hole in the center, so I can make a little mark in the center, and I can measure. From that mark to the
outside edge of the button, I shall just go around the edge. And add that measurement
as our cutting line. Now I've got my little dashes. I'll just join them up. And with my scissors,
I'm just going to cut the excess fabric away. And now I'm going to
thread my needle, push my needle onto my thread. Even the ends and make a not, I use a double strand
because when you pull up, sometimes a single
strand will break. So starting from the back and about an eighth of an inch or 3 millimeters from the edge, take a stitch and then take your needle
back through your thread. You split your thread
into two and pass your needle between the two
threads to secure the thread. We're just going to run
around using running stitch. Try not to make your stitches
too large because it actually will make pleats
along the edge of your button, which are hard to get rid of. The smaller the stitch
size, the neater, the back of your
button will be the easier it is to do the covering. Once you get around
to the start again, take your final
stitch through to the front of your fabric
to the right side, then start to pull up and make a little bit
of a cup shape. With your button blank, whatever you're using to cover, put it inside if you're
like me and you're covering to show off a motif, get your motif
where you want it. Hold it firmly in position and continue to pull
up your thread. On the reverse side again, you need to anchor this
thread that you've pulled up. So putting some tension on it, hold it with your
thumb, that thread, and then take a couple of small securing stitches
close to where the thread comes out to make sure it doesn't
come undone on you. What I like to do is to take some stitches across
where you're pulling all the edges in together in the center where
the fabric meets. When I get to this stage, I have another look at my
button from the front, and I also check the sides to make sure I haven't
got huge pleats in it. We're going to work on making
sure we have smooth edges, getting rid of some of
these tiny little pleats. And the way to do that is
what I call valley stitching. Where all of these pleats are, you have high part, which would be like a mountain. And then between, you have
these what I call valleys. To pull in these
little pleated bits, you need to take little
stitches in the valleys. So what I do is take my needle into this area here where I
can see a bit of a pleat. I'm going to go in
there straight up, parallel with the valley
and the mountain pleat, and then pull that
area back down, put my thread back in. So you're only taking
a small stitch there and take it across
to the other side. And I'm going to take
a stitch in here, which should be a valley, but it hasn't quite formed. I'm going to take
a stitch across there underneath and then
taking a small stitch there, I'm going to come
back over this side, and I'm going to
take a stitch in between these two pleats
here in this valley. And what we're doing
is we're pulling up all of these looser
bits of fabric, making them tighter to
eliminate the pleats. So another little stitch on top, back through
to the other side, choose a spot to come out. There's a little pleat
there I'd like to remove, so pulling it straight up, taking a small stitch on top of that valley
coming across here, where there's a little bit
of a lumpy bit happening. And I use my fingers to manipulate the fabric
into position, pulling it across, taking that
little stitch on the top. Moving across to the other side, there should be a
valley in here, but the pleats gone
a little crooked, so I'm going to take my needle up in there
where there should be a valley and take that
stitch on the top there, find a spot on the
other side to come out, and you just keep working
around your button. You keep checking the edges. What we want is all of
those little creases or pleats on the side of the button to move around to the back part of the button where
they won't be seen. I'm happy with the
edges of this button now. It's all nice and smooth. What I want to do is bring some of this fabric
down a little flatter. So what I'm going to do is
work through the pleats from where I originally
pulled up my thread, and I'm just going to
go around following this circle around the middle till I get back
to the beginning. I'm going to pull it all
up again and end off. That will help me get a
neater back on my button. You can actually put your needle through a few of these
pleats at a time. And you can see that's much neater than it
was before I started the second row of gathering
back to where I started. And at this point,
you have a look and see if you're not happy with
your finish in the middle, you can take a few more stitches over the top if you like. I'm quite happy with that. I don't see any raw bits
where it might fray. And so I'm just going to take a couple of
little stitches here. One, backstitch, a second, but I'm taking my needle
through that loop. Gives me a little bit of a
knot to secure everything. Then I'm going to pass
my needle back through the fabric and just come
out over the other side. With a pair of scissors, I'm just going to push down against the button as
I snip the thread, and that allows the thread
to pop back inside, and there's the button finished, smooth on the front
and around the edges, and neat on the back. When you come to
attaching the button, we stitch through this
fabric here on the back, this little bit of fabric
where it's all gathered in.
8. Covering Buttons Part 3: To make a domed button, you need something
to pad it out with. You can use toy stuffing. So polyester toy stuffing, you can use bits of
leftover quilt wadding, whatever you have to hand, or you can use extra
fabric or felt. Now, this might sound
counterintuitive, but to create the dome on top, you are going to stack fabric, but you're going to start with the smaller piece at the bottom, a medium piece, and
then a larger piece. That way, you get a
smooth dome on the top. I'm going to do this big button. And I just need the felt to be the same size as the
edge of the button. And I'm going to use a felt
tip marker to mark this one. This won't be seen. It will be cut off.
Using your button or your blank as a
template, draw around it. What I do is cut a
strip of my felt. And I fold it up. I know I'm going to
need three pieces and cut off the excess. Just cut my layers
through like that. Try not to stretch
it like I just did. And then if your scissors
are good enough, you can cut three at once, but if not, cut the top one and then use that as a template
to cut around one at a time. Now I'm going to
check it for size. I'm going to use the
reverse side of the button, and that looks pretty good. So now I need to cut down
these so that I have a large, a medium, and a small. Now, if I fold this and
hold it against the button, line it up with the center. I'll be able to see how
much I want to cut it in. And this is really just a guess, but I guess I'm going to cut it down just a little
bit off the edge. And holding it in
half like that, I'm just going to
trim around it. Just cutting off a little
bit from the outer edge, making it a little smaller, and that will be my
medium size piece. And then finally, I want
one smaller than this, so fold it, line it up
again with the center. Doing the same
again, just trimming down my little bit of padding, watching that I don't
cut my fingers. It's not exactly a circle shape, but I can pull it a
little bit till it is. So here's my stack of felt now. And if I put it onto
the button that way, it will give me a
little bit of padding. You can add more if you
want more of a dome shape. Now, to attach it to the button, you can actually just
put a little bit of glue on to hold them into
place while you stitch, or you can just sip them inside the cup of your fabric as you pull up to
cover the button. Now, one thing when
you do this is you probably will need to leave a little extra fabric than
the halfway measure added on. Because you've increased
the size with this felt, it's a good idea
to allow yourself a little extra fabric so that it will meet in
the middle on the back. For this button,
I've decided I'm going to use some of
this elephant fabric. I like the orange
elephant, I think. I'm just going to go around with my fabric marking pencil. Now, having a little
bit of padding, I want to add just a
little bit more fabric to make sure I get a good
coverage on the back. This button measures
38 millimeters. So I want half of that, which is 20 millimeters
just under. So I'm going to take it
to the 20 millimeters, and I'm going to have
a look at that after I've marked it out to
see whether I think there's going to be
enough fabric to pull around to the center back
once I add the felt. Continue marking out
here at 2 centimeters. Now, if I put that on there and I'm very close
to the edge there, so I'm just going to
use that as a way of checking where I get to. We need to cut these out. If you end up adding
too much fabric, you can always cut off
the excess before you actually stitch the
button to the garment. So if you end up with a really
big lumpy bit on the back, you can actually
hack into it with your scissors and cut it back
down. Just double checking. Everything looks good. Now, the same again, we need to put in
our running stitch coming in a few millimeters, about an eighth of an
inch from the edge. Take one stitch. So I'm working on the
revers side of my fabric, and I'm locking
that stitch there. And now I'm just going
to work my way around the outside edge just in a bit
with small running stitch. When you get to
the end, take that last stitch up to the front of the fabric,
to the right side. Now, I've got a bit of
a cup happening here, so I’ve got somewhere to
put my mound of felt, and I'll just position it
so that it's fairly even, and then put my button in and
holding it firmly together, begin the process of
drawing up my thread. Right. Before I pull this all the way up, I just want to make
sure my elephant is in the position
where I want him. And there's a little bit of wiggle room there to
move him around a bit. Pull up as tight as I can
on that thread at the back. Now, this one's going
to take a little bit of pulling up because I
allowed extra fabric, and I've got pleats. So that's what happens
if your stitches are too big or if you
have extra fabric. But we know how to deal with those by taking valley stitches. So now I've got it all to
the center at the back. I will take a few
stitches to pull it all tight and hold
it into position, slowly pulling it in. This should actually
be a valley here, but it hasn't pulled
up very well, so I'm about to
encourage it where it should be by taking
a valley Stitch. What to do if your thread
breaks like mine just has. Well, the first thing
to do is not to panic. Because you've taken so
many stitches in there, it's probably going to hold. So I simply re thread my needle and start
stitching straight over it. So I'm going to take through
that center section and just poke my needle out up
into the pleat a little. And not going to put too much
attention on that just yet. I'm going to take a little
stitch here and another one. And I'm going to go
through the loop of that thread again just to
pull it nice and firm, and now I'm going to go
back to what I was doing, which is taking valley stitches. When you're checking
on the right side, just encourage the sides around so that you can figure out which pleats you
need to work on. As I go around, I'm
targeting some of these little pleats that I see when I look at the
button from the other side. So I'm looking for the
valleys that correspond with those little pleats that are
showing on the other side. I've left my thread very short. So I'm going to have to deal
with that as best I can. And there's our nice
domed elephant button. Being a little
rough on the back, one of the things you
can do to fix that is to put a piece of fabric
around here and cover it. Now, you can use the same fabric that you
covered the button with. You'll have to needle turn
the edge as you go around, otherwise, you'll have a
raw edge sitting there. Now, this fabric is not going to be really
good for needle turning because it's a very
open weave and it will fray. So I've decided I'll
use a piece of felt. And so I'm going
to measure around my button carefully because I don't want to mark my button. But I'm going to use
the felt tipped marker, and I'm just going
to stay away from the fabric and just
draw my circle around. Being felt, I won't really
have to worry about raw edges. I'm just going to
make it slightly smaller than the
size of the button. So that it doesn't show. On the reverse,
just hold it there, and you can use either
an overcast stitch, a hemming stitch,
a ladder stitch, whatever you like, even
a buttonhole stitch if you wanted, to secure that down. I'll just anchor my thread to the actual fabric that I've
covered the button with. I take a couple of stitches
and go through the loop, just to hold it to
get started with, come up through my felt, and just take a little
bite of fabric. It's a little tight
because, obviously, I've pulled the
fabric on the button tight, but it's doable. I'm just going to work my way around taking a little bite of the fabric on the button and
a little bite of the felt. Being felt, you don't need to worry that it's going to fray. I'll take a little bite of the button fabric and
come up through the felt, go back over and a little
bite of the button fabric, and then bring my needle
up through the felt all the way around to get back
to where you started. And then I just take a couple of horizontal stitches
next to the seam. One more with a loop
to create the knot. Pull it up. Then I thread
my needle back inside, come out anywhere in the felt. And then putting a little
tension on that thread, push down with scissors and snip it and the thread
gets buried back. And here we have our nice button all done with a nice
soft dome on it, all neat and tidy on the back, and you have a spot on the
back where you can stitch it.
9. Covering Buttons Part 4: I'm going to show you how to
do the one with the shank, and we're doing the same again, taking small stitches again, about 3 millimeters or an eighth of an inch in from the
edge of the fabric, and we're stitching on the
wrong side of the fabric. Go all the way around. Bring your needle out on the right side of the fabric
when you get right around, begin to make that
cup shape carefully, especially if you have a fabric like mine which
is going to fray. Pop your button in get it into the center and
keep pulling up your thread. A little pleat in there that I'll have to
work to get out. Once you get it pulled up, keeping tension on your thread. Take a couple of stitches
to lock things in place, as we did before pulling. I'm just going to add a
securing stitch there. I'm going to take it through
the loop in the thread, and I'm going to pull it up, which will knot it. Now you can have a look
and see how you went, and we're going to do
the valley stitching. I'm bypassing the shank because
I don't want to take up the space in there
where my thread for stitching and
attaching is going to be. Just keep working backwards and forwards until you
get to the point where you're happy
that you haven't got too many bumpy bits
along the outside edge. This is a raised bit from
the design in the fabric, so that's going to
have to stay there. What I'm going to
do now is to take some stitches around
the fabric again through those plates that
we already made when we did our initial circle stitching
and just keep working. To make sure you've pulled it up nice and
tight around the shank. The shank has almost
disappeared in there, but I assure you it's still there and you can
still stitch through it. I want to be able to find the shank when I
come to stitching, so I push down as much
as I can around it, taking a little stitch
here to secure my thread and one more where I take
my needle through the loop, bury my thread, bring
it out over here, and cut it off, flush with the fabric so it pops
back in and disappears. So there we have
a button covered. With a shank in the back of it. The next one is going to be a flat button that
we're going to cover. Working on the wrong
side of the fabric, a few millimeters
in from the edge, take one stitch
where the knot is, put your thread and go through. Makes a nice, secure thread
for when you pull up, now go around the
outside edge a few millimeters to an eighth of
an inch from the raw edge, taking small stitches
all the way around. This is a fabric that frays
so I just need to go gently. Take your needle out on the right side once you
get all the way around. And then you can start
to pull up your thread, place your button in
the middle, pulling up. Before you get it too tight, make sure it's sitting
where you want it to. And then pull up your thread, Center your design
on your button. I'm just going to take my thread through and bring
it to the other side. I've probably left a
little too much fabric around this. But that's alright. We'll work with it. It's going to take a little
extra stitching. There's two reasons for that. One is that I made the allowance
a little bit too big for the button and the other thing is that these buttons
are very slippery. So that's also something
to be aware of. If you have buttons that
are a little slippery, when you're trying
to pull them up, the fabric will
move quite a bit. Now, it's not a problem
if you don't have a design that you want to
center on your button. If I was just using
a fabric like that, which didn't matter, the
slipperiness is not a problem, but for this one where I want to try and get it in
a certain position, it's made it a little difficult. So I'm putting in
the extra stitches to make sure everything's
nice and tight. Now, I'm going to start
with the valley stitching. And I'm going to go
through. Come up in that valley and take a stitch and keep working my
way around until I'm happy. Now, I do have rather a
large lumpy bit here, which I'm not too keen on, so I'm going to trim that down. The sharpest scissors you
have is best for doing this. And you just keep trimming down, capturing as much as you can. With your scissor blades, you want to try and get
it as flat as you can. Okay, that's a bit better. Now, I'll double check
everything before I end off. It looks nice and smooth around the edges.
Happy with that. My flowers slightly off center, which allowed me to have a little bit of
the green showing. So now I just need
to end off here. Taking the little backstitch. And another stitch, passing it through the loop
of the thread. And then popping
my thread underneath. And I'm just going to cut
it off as close as I can. And then I'm going to stitch a little felt circle
on the back of this. And here we have the back of
the button covered nicely. When you stitch it on, you'll be stitching through
the little mound, and there's the
front of the button with a little embroidery
design on it.
10. Attaching Buttons: I'm going to show you how to sew the shank
button onto some fabric. When you sew your
buttons onto fabric, you will have two thicknesses of fabric and one of interfacing. So I have doubled up to
simulate that with your fabric. Starting on the wrong
side of the fabric, take a small stitch, I have a double thread
with a knot in it, and I'm going to do
what I have been doing and poke my needle back through
the loop in the thread, and then I can cut
off the excess. Now take your thread through to the right
side of the fabric. To stitch this button on, I'm going to take
my needle and find the hole in the shank and
poke my needle through. You can see it there coming
through the shank and then positioning where I
want my button to sit, I will take my needle
back down through my fabric so that the stitches have a little
bit of fabric between them. And I don't completely
tighten it straight away. I wait until I've
got a few stitches in before I tighten the thread. It just makes it easy
to get in there to work your needle backwards and
forwards through the shank. You can tighten it a little bit, but I'm leaving mine a bit loose so you can
see what I'm doing. And then back through the
fabric to the bottom, keeping control
of your thread so that it doesn't get knotted. And you want to
take four to five double threaded stitches
through the shank. When you have the number of stitches that you would
like to secure your button, then you can begin to
tighten the stitches. So I begin to pull
up and then keep going until your button's
sitting nice on your fabric, and I come back to
the wrong side. And I take a couple
of little stitches to make sure everything's
nice and secure. And then I take one
more and take my thread back through the loop to make that little knot and one more. Then if you're working with
layers that you can open, you can poke your thread through and cut it
off underneath. If not, I take it up to the top, take a little stitch
through there. Cut it off where it's
hidden under the button. And there you've got your button attached through the shank. Now, I'm going to show you
how to attach this one that just has the little mound of fabric at the back for
stitching through. Starting on the bottom
of your fabric, take a little stitch where you want your button
to be positioned. Go back through your
loop and then bring your thread up to the front where you're
going to attach the button. With your button in your hand, take a stitch through the back. Now, if you have a design on your button and you want your button to sit
a certain way, so if this was my shirt, I'd like my roses to
sit facing upwards, and I take particular attention of that when I'm stitching the first couple of
stitches just so that I can keep it in the position
that I want it to be in, I come through to the back of my fabric with my
needle and take that stitch and then I go
back through to the front. Of the fabric. Holding my
button in position, go through the bulky part
of the back of the button. This can get a
little bit hard to sew because of all
the fabric there. Sometimes a thimble will help to push your
needle through. Once you've come
through your button, go back down into the back, through to the bottom, take
a little stitch, across. Coming up on the other
side, take another stitch. Go through your button again. If you come out wider past
some of the thick pleats, it's easier to push
the needle through. Keep making sure that you've got your button facing in
the right direction. Once you've come
through the button, take your thread through to the back of the fabric and come up again where
you're going to take another stitch through
the back of the button, working back through
to the other side. Once you've taken
enough stitches that your button feels secure, it's about five or six stitches. I take my thread to the bottom. Come back across to the other side out underneath the button onto
the front of the fabric. Then I like to make a few wraps around the base
of the stitching there. It gives a little added strength so that when you're going
through the button hole, the button hole is not rubbing right up
against your stitches. There's a little barrier there with the thread that
you've wrapped around. You put your thread
around about four times, take your needle back
through to the back and make your securing
stitches on the back. Usually go across in
the opposite direction to my stitches that I've worked, and then make one,
make the loop. I usually do two of those
to secure everything. Then take your thread
through to the front, and you can take it through some of your stitching,
if you like, or through the fabric, and then cut your thread
close down at the base. And there's the second
button sewn on. With these buttons that I
have covered with embroidery, I'm going to stitch them
directly onto the garment next. I have already attached
two buttons to my blouse. And I'm going to attach
this one up the top here. This is the one with the
little felt backing on it. This shirt or blouse
is easy to attach the buttons to because it has
these snap fasteners here, I can see exactly where I
want to attach my button, and I'm going to put
it there like that. Just deciding which way I
want my button to face. And I think I like it
like that where I have a little bit of green
flecks sitting down here, up here and to the side. I can see exactly where I
want to attach my button. But I can always mark it
with my marking pencil. When you come to stitch your
buttons onto your garment, if you don't have, you know, an easy way of finding
where you want to put them, the positioning for buttons is usually in between the placard, and you would just
center it in the middle. So you could do that by
measuring and marking and then measuring downwards as well and evenly
spacing your buttons. If yourg Garment already has button
holes in it and you're replacing other buttons
with covered buttons, it's easy to work
out the positioning. Where the buttonholes are, you just use a pin and
mark in the center. Of the buttonhole. Then you would very carefully lift the side with
the buttonhole in it over your pin so that the pin remains in the
fabric underneath. And with your marking pencil, then you just come along. And if your pin was in
the center, like here, you would just mark with your marking pencil where
the pin is sitting. And you would go along and do
that for every button hole. If for some reason,
you have to work out the spacings yourself and you don't have
buttonholes to guide you, then you position your button, your first button where
you want it, like here, and you would then hold it, mark it with your
finger, mark that spot. And then you would work out the distance
measuring downwards, how far apart you
want your buttons. Once you have decided how far apart you want your
buttons, then with a ruler, you measure center of that button to where you want the center of the next button, make your mark on the fabric, and so on down the
front of the garment. When you stitch your buttons
onto a garment, you match your thread to
the color of your garment. I'm going to use a blue thread for this so you can see it. I have a double strand
with a knot in the end, as we've been doing for
covering our buttons. Take a small stitch
right over my mark. And as we've been doing, split your stitch with
your needle and thread and bring it up so that it creates that nice,
firm anchor point. Now, because my garment is linen and it's a
fairly open weave, I'm going to take
one more stitch in there before I start
Attaching my button. So I want my button
to face that way. So keeping that in
mind, the first stitch, I'm going to be very careful that I get it into
the position that I want. So on the back side
of the button, I take a small bite through the felt it and bring my button
down to where I want it, making sure it's held in
place with your thumb. Then go through taking a small bite of fabric
from your garment, going back through the fabric side
underneath your button. And now I'm just going to take little stitches
backwards and forwards until I've secured
the button to the garment. Each time I take a stitch, I reposition my button so that it's facing
the way I want it to. Now, it's up to you how
many stitches you take. With a double thread, I like to take somewhere
5-10 stitches, especially if I'm stitching
to a looser weave fabric, adds a little bit more security. That button's feeling
very secure now, so I will make this
my last stitch, bring it back through
to the other side. And now what I like to
do is run my thread, wrapping it around the base of where I've just
stitched a few times. It creates a small space like
having a shank on a button. I'm just going to
end off the same way that we have been.
Take a little stitch, take my thread through my loop. I just make sure everything's sitting where I want
it and I will take my thread either back through to the back
of the garment or you can take it inside the covering on the
back of your button, then you're just going
to snip that thread off. As close as you can
to the fabric that you've come through so that it pops back inside out of the way. I'm very happy with the
way they've come out. You might notice that
I've used odd pieces. I think it makes it a
little more interesting.
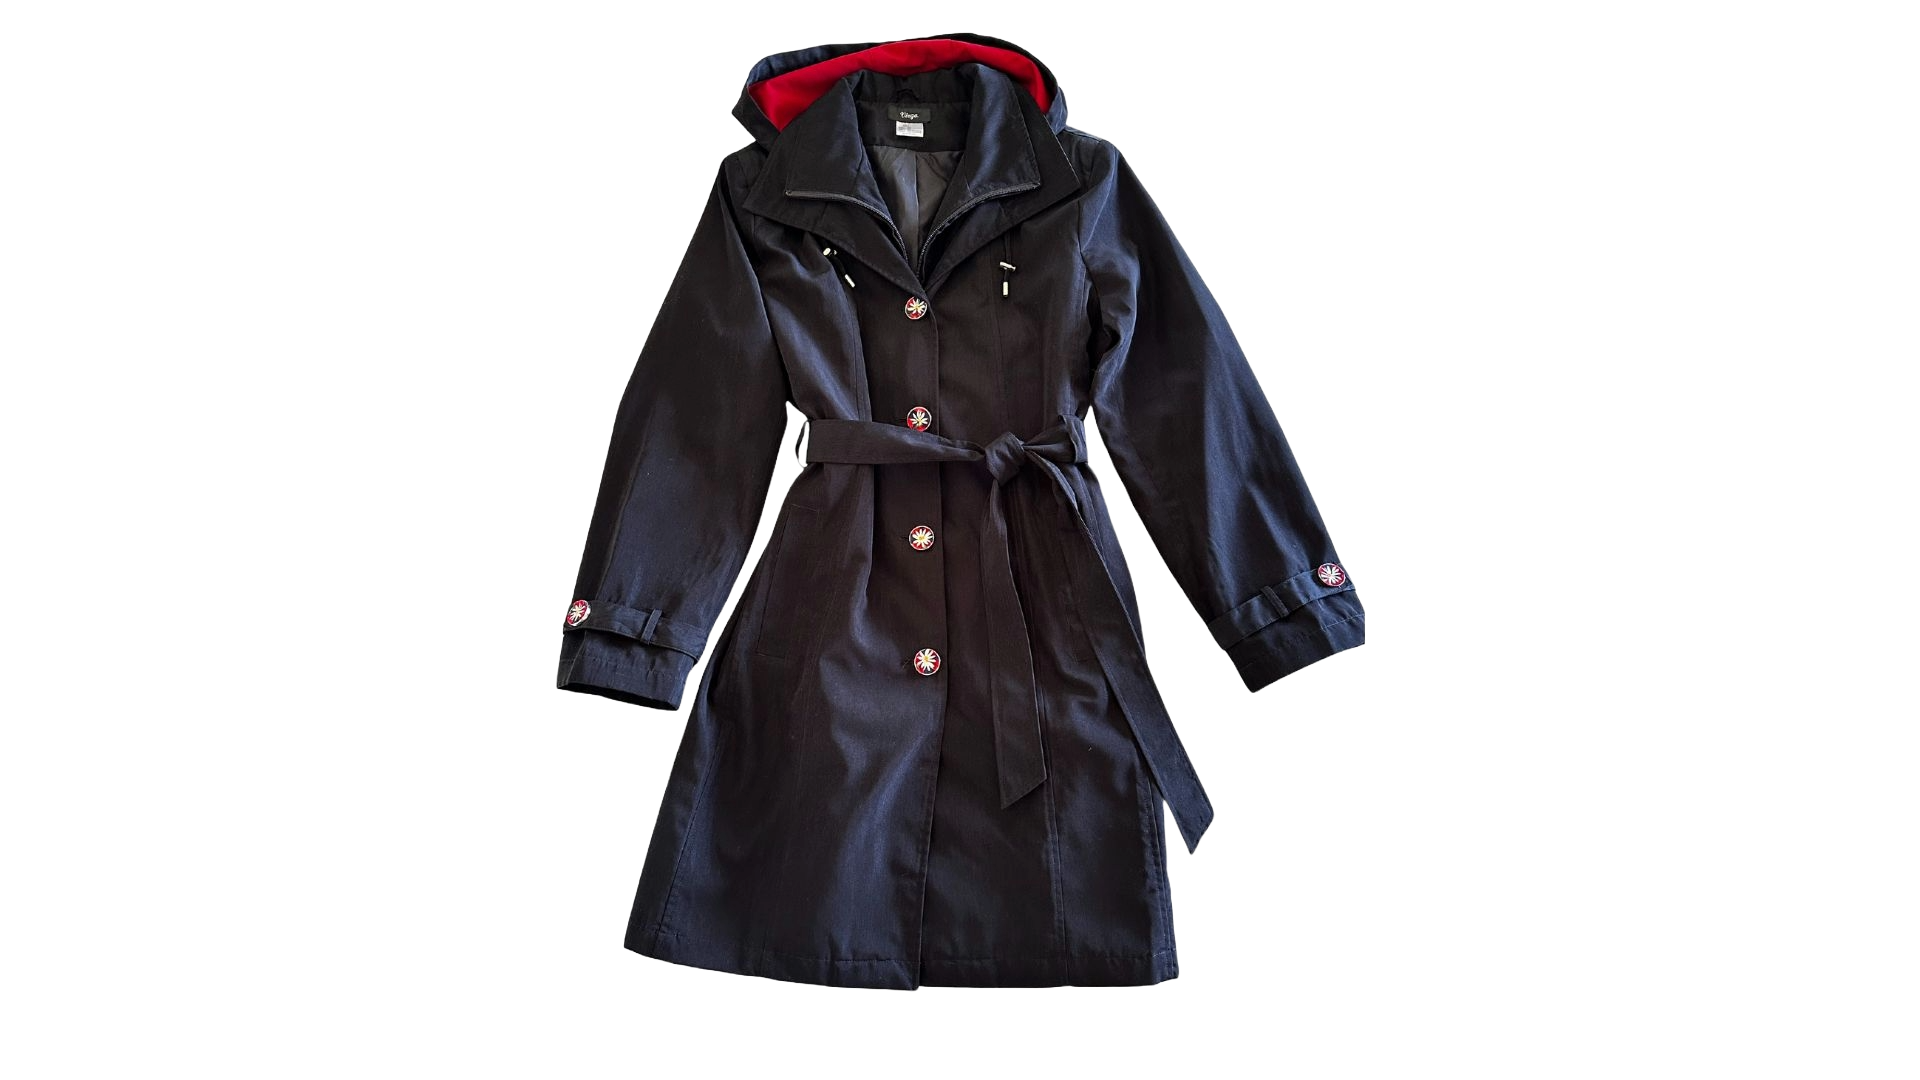
11. Ideas & Thank you: I wanted to show you a couple of coats of mine that were destined for goodwill before I got
the idea to upcycle them. The first is my
black trench coat, which I've had for many years. I was all set to put it
in the bag for goodwill. When I realized I could upcycle
it with covered buttons, I selected a fabric that
had touches of red in it, but I focused on the
daisies in the print, and I'm so pleased with
the way it's come out. It's given the coat
such a different look. The second coat is a boiled wool coat that I've
had for a very long time, and it too was
destined for goodwill. I was covering the buttons
for the black coat, When I realized that the same fabric would match quite nicely
with the red jacket. So I covered the buttons, and I focused more on the strawberry pattern for
the buttons on the red coat. Now, the buttons on the
red coat are oblong, but they still covered
quite successfully. When I finished reattaching the buttons and
looked at the coat, I then decided to
attach two strips of the same fabric to the edge of the pockets by hand
stitching them in place. And I'm so pleased
with the end result. Such a simple thing as using the covered buttons creates a whole new look to a garment. I have here some fun
things you can do with covered buttons other than stitching them to your garments. You can create little
hair pins by attaching buttons to bobby pins or decorative hair
slides, little combs. They're also fun attached
to ponytail ties. And they make great
little gifts as brooches. All you do is just stitch a brooch back onto your buttons. Another thing you
can do with them is gift to friends
who like to upcycle their garments or
who like to sew their own garments by creating a series of
buttons that match, attach them to a little piece of card just with a few
tacking stitches. Then you can hand
embellish your card, or you can put them on a strip. I've sold these at markets, and I've also sold
the ones that are on strips of paper for
people who like to do craft projects and sew their own garments or
upcycle their garments. There's a couple of things
I haven't got here that I also use covered buttons for. One is to make bookmarks, sew your little button to the top of the
bookmark like that. Makes a nice personalized gift. The other thing I
like to do with covered buttons is to attach them to small gift cards
when I'm gift giving. And the button can be removed by the person
receiving the gift, and it can be used
for something else. I hope this has helped
you see that there's more to covered buttons than just
stitching them to garments. I'd really love to hear
if you have any of your own unique ideas
for using the buttons. If you're interested in buttons and would like to do
some further reading, you may find a copy of this. This is quite an old
book, but it's very cute. The button book
by Diana Epstein, and it goes through
buttons through history. It’s got some lovely pictures of different kinds of buttons and some information about the types of buttons that have been
around through history. And there's also this book
called The Button Maker by Sarah Beaman and it is full of techniques and projects
to do with buttons. It has instructions on
making buttons out of different types of
materials woven, wooden, clay, shells, leather. It's a very interesting read. If you're interested in further information on
making your own buttons, I hope you've
enjoyed this class. This is the first in a
series of classes that I'm going to add to my
skill share catalog. The classes will be focused on sustainable fashion
and upcycling items either thrifted or from
your own wardrobe. We'll be looking at easy
embellishments for your wardrobe and some easy alterations
for garments. So keep your eye out for these classes as I upload
them in the near future. I'm looking forward
to seeing the buttons that you create so
don't forget to upload photos of buttons that you cover following
along with the class lessons. And in particular, if
you attach them to garments or if you use
them in craft projects. I'd really love to
see what you do. All you need to do is in the browser version
of Skill Share. Open the project tab. If you look to the
right hand side, there's a menu there
that has a button to click for uploading
pictures of your projects. Click on the button and follow the instructions for
uploading photos. You can also write something about your
project in that area. If you enjoyed this class, I'd really appreciate if you
would leave a review. It's very helpful for
me to hear what you've enjoyed about a class or where you think I might
be able to improve. So if you have the time, it only takes a few minutes to pop along to the review tab
underneath the video section. Click on that, and
there's a place there where you can write
your thoughts on the class. Once again, thank you for taking the class,
until next time.
 Michelle Watson, Brunybear Art - Mixed Media & Textile