Transcripts
1. Introduction: I I I Hi, I'm Heather and welcome
to my class on hand drawn seamless patterns
completely within Photoshop. I am a photographer, digital
artist, illustrator, sist and honestly just
a lifelong creative. I love learning new skills and finding ways to bring all
of those skills together. One of those interests is
surface pattern design. When I started learning
surface design, I noticed that most
tutorials were all about Procreate
or Adobe Fresco. Those are great programs, but my creative home has
always been Adobe Photoshop. I wanted to develop a workflow
where I could draw, paint, and design completely
within Photoshop. One of the best things
about surface design in Photoshop is their
pattern preview feature. This feature allows you to
actually see your pattern develop on the canvas
while you're working. And that's exactly
what I'm going to teach you in this class. We'll start at the beginning,
and I'll show you how to set up your
Photoshop workspace, your working file, all the tools that we'll be using
within Photoshop, as well as how to
upload your brushes. And use the templates that you
will get with this course. Then we'll get into
the real fun part. We'll gather inspiration,
talk about colour palette, sketch our elements, paint them, and learn to rearrange
them into a pattern. I'll show you Photoshop's
pattern preview to test how your
pattern will look, make adjustments, try different color backgrounds
and variations, and export your
finished pattern. Also try some fun
with mockups so that you can see your pattern come to life on
different fabrics, home decor, stationery, and whatever else
you can dream of. You do not have to be
an expert illustrator or Photoshop user. I'll walk you through my
entire process step by step. I want you to leave
this class with the tools to create
patterns again and again. Your own style. You
can find more of my creative artwork online
at Gets Life Creates, where I share illustrations, sewing, crafting, and
other creative projects. If you're interested
in checking out my photography or
digital artwork, you can find that
at Getzlaf Photo. Alright, now open up Photoshop, grab your drawing tablet if you use one, and
let's get started.
2. Class Project: I I now let's talk about
your class project. For this class, your
project is pretty simple. Create your own pattern
within Photoshop. You can follow along with me and create something very similar or just take what you learn in this class and create
something completely your own. Choose a theme
that inspires you, draw the elements and turn those elements into
your own pattern. Now, you can upload
your finished pattern, but I would love to see some
of your creative process. You can share some of
your original sketches, share your colour
palette and inspiration, or you can share
different variations of the pattern
that you designed. And if you ended up making a
mock up with your pattern, I would absolutely love to see your design on some fabric, clothing, wallpaper,
stationery, wrapping paper, whatever you want to share. Remember that this is not about creating the
perfect pattern. It's about learning a process and creating something
that feels like you. Once you've finished,
upload your project onto the project gallery
here on Skillshare. I would absolutely love
to see what you design. So please remember to share it with me and the
other students. Now, let's get into Photoshop and start making your pattern.
3. Setting Up Your File: All right, so Lesson one, we are going to set up our Photoshop and our workspace for
our pattern design. Okay, so the very first thing we want to do in once we
have Photoshop open here, we're going to make a new file. So right up here, it says New File. Yeah, so
we'll click that. And when we're making
a pattern design, we always want to work
in a square dimension. So for this one, we are
going to do the 200 by 200 300 DPI or PPI, I mean. So let's title this one. I think I'm going to work
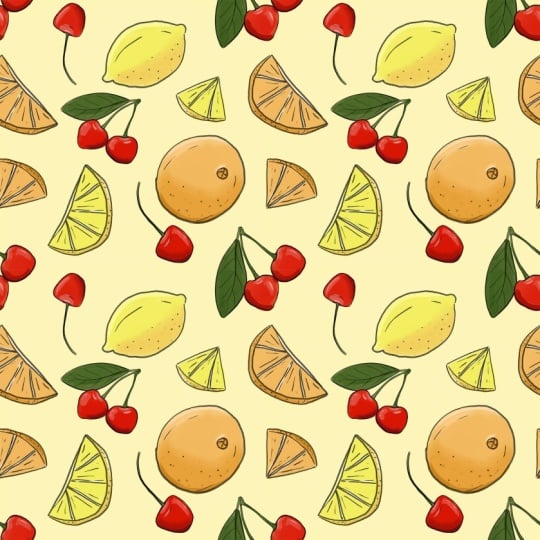
with fruit again today, just like I did with
the oranges and lemons. So I'm going to say, I'm
going to call this fruit One. And it's square 300 pixels. We're going to work in 16 bit, 16 bit versus eight bit. It just gives you a
little more color range. That's why we're going
to work in a 16 bit. It's going to be a
white background, and we're going to work in
the SRGB workspace, okay. I like to do the
working RGB workspace and then square pixels. Okay? So that's the file
we're going to open up.
4. Setting Up Photoshop: Alright, so now we have
our file here to start. Now I'm going to just kind
of go over the workspace. So I have it. If you go up to
Windows at the top, I have the workspace
under painting right now. Sometimes I'll be working in photography because I also
do photography as well. So I will click photography. This is the workspace that
I have set up for that. And then you go up to
Windows. You can change it. So you might when you
first open up Photoshop, if you've never opened Photoshop before, it's going
to look like this. It's going to have the
default settings on here. So to get your workspace
to look like my workspace, you want to just
go up to windows, workspace, and go to painting. And that's going to have the way it's going to have it is going to have your swatches here. This is just, like, a tiny little picture of
whatever you're drawing. So I always keep it on swatches because it'll be
easy for me to say, I want to do a pastel colors. You know, you've got
all your pastels here. It's handy having that up there. The next thing below
that is going to be all of your brushes, okay? So you're going to have
all your brushes here, and here is going to
be your layers panel. So this is your background, and we've opened that up.
5. Photoshop Tools: Et's actually go over
some of the tools that we're going to be
using in Photoshop. So the very first tool that
we're going to be using a lot of is the layers. So I'll explain what
we're going to do here. So I never draw anything
on the background layer. I'm always drawing
it on a new layer. Each thing I draw is
on its own layer, and each paint that I put on top of that is going to be
on its own layer as well. So we're using a lot of layers. So down here in the corner, we're going to add a new layer just by hitting this
little plus button here. And right now, it
just says layer one. We want to rename that. So if you just
double click on it, you can change the title, and I'm going to put this
as base drawing, I guess. The tools that we're
going to be using on the left hand side of
the screen right here, I'm going to go up to my brush. When you're on your brush panel, you're going to have all of the different
brush tools up here. Or you could work
in this panel here. I'm not going to use
the brushes that you get in the pack
because I'm going to show you how to upload those and use those ones in a
different lesson. But I'm just going to click on just a regular
round brush just to show you how we're going
to work at this, okay? So I've got my brush here. I'm going to draw, like, a little smiley face. Okay? Um, so that's the brush tool. We're just going to use
the brush tool here. If we want to go to
the eraser tool, which is right here and say we made a mistake and
we need to erase something. Okay? If you don't like that it's only erasing a little bit, you want to erase
the entire thing. The problem is in this
tool right here, okay? So you're going
to click that one off and it'll just
fully erase it. That's the eraser
tool. Pretty simple. All right, so say
you draw something, we're going to go
back to the brush. Say you draw a
little smiley face. You accidentally draw something
else like, say, a leaf. Okay. You draw this leaf, but it's on the same layer,
and you need to move it. Okay. What we're going
to do is we're actually going to use a lasso tool, okay? We're going to select this with the Lasso tool
all the way around. And then what you're
going to do is you're going to hit Control C, and then you're going
to go Control B, okay? You're copying and pasting. So now you have this
on its own layer. You can go back to
the other layer, get your eraser tool, and erase the other leaf. So now you can move these
things with the move tool. Okay? The move tool here is going to allow you
to move these things around, and it's not going to mess
up your other layers. Because what would
happen is if you drew something on the same layer
and you need to move it. It's going to move
all of those pieces. The next tool we will also be using is
the Transform tool. So basically what
you want to do with transform tool is you click on the layer where your little
smiley face is here. And if you hit Control T, you're going to get
this box around it, and you're going to
be able to resize. Okay? You got to be
careful, though, with resizing because you could scrunch it or you
can stretch it. To avoid that, you would just go up to here and
click this little link, and it will stay like that. Or you just hit Shift
as you're moving it, and it's going to keep its form. It's not going to deform
it or anything like that. One other tool I should
mention is the Swatch tool, which is right in this corner. This is where all of our
paint is going to be. So if you have a new layer, let's just go to
a new layer here, and you want to draw something, but you want to
change the color, you just double
click in the square. And it'll bring this color
picker up here, okay? If you want to say you want it to be the same color as something you've
already drawn, then come up you can see
this little eyedropper here and you can just click on it on the color that
you want to draw. It's going to switch it. It's going to put
it to that color. Or, you know, you can just says you don't
have that color. You can use this little dial
here to go to your pinks, blues, say I want a green color. I already got a green
color. Let's say, blue, kind of a bluish,
a dark blue color. And you can just hit
Okay, go back to your brush and draw a
little thing. Okay? Alright, so that's kind of
the basic tools we're gonna be using if another tool
pops up while we're drawing, I will explain how it's used. If you make a mistake, an easy way to take a step back is you hit Control or Command Z, and it's going to undo the
last things that you did. Okay? Alright. In the next lesson,
we are going to start designing our project.
6. Finding Inspiration: Since I am doing a fruit
design for this one, I wanted to do,
like, some cherries, and I'll probably
bring in the lemons and the oranges that I
had previously used. But I will start by
sketching the cherry just so you guys see the process of
how I draw it in Photoshop. But yeah, so obviously, Pinterest is a great
way to come up with ideas or inspiration
for your artwork. Obviously, you don't want to
outright copy someone else, but you can definitely use
that as inspo or inspiration. And you can also find cool
color palettes and such in Pintst as well or to get inspiration and ideas
of what colors to use. So we're going to
start by talking about our colors
and how to find it. So I'm actually going
to type in here like cherry fruit, colour palette. Ooh. Colour palette. Okay. So I'm going
to hit Enter there. And as you can see, it brings up some colour palette ideas that
you can easily use, okay? Another really awesome way
to find color palettes if, say, you don't really have an idea of what
you want to draw. So sometimes finding the colour palette
can actually really help you come up would give you inspiration of
something to draw. Adobe has this really awesome program here
that you can use, which is a colour palette
colour palette generator. And it's got all the
different types of, you know, they have the what it's called analogous colour palette where they're in the same color range, but just different tones of it, complimentary,
complimentary split. So there's lots of
different options. Once you pick which type
of color range you want, you can hit generate randomly, and it will kind of pick some different tones and different colors
that you can use, which is really fun. Another cool way to
use this is say you're on Pintrs and you couldn't find a colour palette of
what you wanted, okay? And you could just
look up cherry fruit. Um, Or say you wanted
kind of a vintage vibe? Let's just see. Go to spell
it correctly. Vintage. Say you wanted a
vintage vibe, colors, and that um no offense to Adobe, but they don't really have muted tones in their
colour palette. A lot of the times it's
super bright colors. And if you're going
for a vintage tone, a lot of the times,
they're very muted colors. I really like the strawberry
colors here, okay? So what you could do is
kind of copy this color. Obviously, you don't
want to, like, straight up use this
person's artwork, but we're just doing it to
get a color idea, okay? So we're going to download the image
just to do this part. And what you can do is you can actually go to where
was that again? Oh, you can go up here to Image. And you can actually upload
your inspiration image. Who Image. And it will generate a
colour palette for you. We're gonna use this cherry
here as inspiration. And that's a pretty cool
colour palette for that. So, um, what I kind of want, though, is instead of the white, I'm going to bring up more of, like, this yellow in here
because then it'll tie into the lemons that I was
going to add into it, as well. So yeah, let's do that. What we want to do next is
we want to create with this. So what we're gonna
do is we're gonna go create with my
colour palette. Oh, I got to sign in. Now that I'm signed in, it's going to bring up your
colour palette here. You can just hit Save. And it's got this, funny
little design here. But what you can do is you
can click on each of these, and you can change
the color to go with your theme for all
of these things. Okay. Oops. I messed up there. Click on that. There we go. Ah. We already got that red, so we need this red and yellow n n. Sorry,
yes, we need that red. This blue. We need the yellow. Okay, and this orange. Let's change this back to the bright red
because we only have this teeny little palette here. Okay, so this is
the colour palette. And what we're gonna
do is we're going to actually share this. And I'll add this colour
palette into the files as well. If you guys want to
follow along drawing the cherry, then
you can do that. Alright, so then we just
want to download this file. And we'll use the PNG because
if you save it as a JPEG, you won't be able to select
the files in Photoshop, so it needs to actually
be a PNG to work. So save it as a PNG, and
we'll download that. And I'm just gonna save this
on my computer for us to bring up in Photoshop and get
our colour palette set up.
7. Using The Templates: Bring your inspiration
on your board here. We're actually going to go
file and place embedded. Okay? And then you're going to
look for your cherry. Okay. We're just going to use this as our
inspiration. There it is. Okay. All right, so
now that it's in here, we're going to hit
Control T. And we're just going to resize this,
make it teeny, tiny. Just put it off in
the corner somewhere. Okay. Then hit Enter. Alright, so this is
just a inspiration for these cherries here. What I also want to do
is I'm going to make a new layer and
I'm going to bring in one of the templates that I gave you guys in the
files as well, okay? So we're going to go up
to Place Embedded again. I'm going to open up the
square pattern, okay? So we'll place this one. And we're just going
to resize it to fit our screen and hit Enter. And then what we're going
to do is we're going to turn the opacity
on this layer. So make sure you have this
layer selected down here. We're going to turn the opacity down just so we
can still see it, but it's not distracting us from what we're
trying to draw. Okay? In the next lesson, we're going to bring
in those brushes that I gave you in the files. I'll show you how
to upload them into your Photoshop. Let's get going.
8. Using The Brushes: First thing I'm going to do is I'm going to make
sure that I have a new layer that I want to
start drawing on, okay? And I'm going to call
this layer cherry. Okay. So let's bring
in those brushes. So what you want to do is you
want to go to your brushes. So make sure that
you are clicked on your brushes on the panel here, and you're going to go up to this little arrow that is
beside the What is this? The, like, brush
that you're using. You're going to hit
this little arrow, and it's going to open
up your brush palette. It's basically the same
palette as this one over here. Okay. And you're going to
go to this little wheel. And you're going to
go to Import brushes. The other way you can
do that is by clicking the little three thing here
and then hit Import brushes. So once you have those
downloaded to your computer, then you can go into click on the GetSef Creates brushes and then load those
into your account. So then once you're
in your palette, you can see that I have the
new brush folder right here, and you've got your four
brushes that you can use.
9. Sketching Your Motifs: Alright, so now that you
have your four brushes, we can actually start drawing. The very first brush that I like to use
is the pencil brush. So we're gonna click
on the pencil brush. So the way that
this template works is you have got these
larger circles here. That represent the larger
elements of your pattern. Then you have these
smaller ones here that are more like a
medium sized element, and then you have your
little filler elements, that's going to
be the triangles. So it's just a way of
placing your elements to kind of make a cohesive
and well placed pattern. Okay? So what I want to do
is show you how we're going to see the pattern kind
of come together, okay? So what we need to
do is first turn on the repeating
pattern preview. Okay? So when you have
this all set up like this, you're going to go up to view, and you're going to go to
Pattern Preview and click that. This is fine. It works best
with smart objects, hit Okay. And then now you can see our
repeating pattern, okay? And if you zoom out, it just keeps going
and going and going. Within this blue box
is your artboard. Okay. So anything that
you draw on here, um is going to get
put into your pattern over on this edge here. Yeah. I just want to
show you something before we get started is that you're drawing and you draw an element
in the corner here. Sara let's just draw
a heart or something. Okay. And then say you decide that you want to resize
it or move that heart. We're going to hit Control and it's going to
bring up your boxes. But as you can see,
you can't move it. You can't move it because
it's going to split it up. It's going to mess
up your pattern. So when you're drawing
your elements, you want to make
sure you're drawing your elements in the center. And then, you know,
sometimes with patterns, you're going to have one or
two of the same element. So I would copy that, and
I'll show you what I mean. So let's just hit the Control
Z button a few times. So I'm going to say draw
my heart in here, okay? I have my element. I
want to resize it. I hit Control I resize it. Hit Enter. Say I want
to make a copy of this. I can just take this
layer and I can copy it and hit Control Now I've
got two of that element, and I can resize it. I can make it go
a different way. Whatever you want to do.
Okay? The other thing that I'm going to show you
is if you move it to here, and then you say you decide you want to move
it somewhere else, that's also not going to work. So we'll copy this.
We'll hit Control T. We'll put it here, Enter. Now say I copy this one. Hit Control it's going to bring up four of those elements. So yeah, you want to make sure that you're
drawing everything in the middle here and
you're copying the elements from the center, okay? And you can place
them in the corners, but you won't be able to move
those corner pieces again. And we're going to zoom in here. We're going to make
our pencil brush pretty small because
I like to sketch it. Um, with a small brush. Alright, so we're
just going to use this as a inspiration, okay, so that I can get
the cherry shape correct. So let's just start by
sketching our cherry here. Okay. Okay. No loving that. Okay. I'm gonna grab my eraser because I don't love I don't love this part. So I'm just gonna delete that. For now, I may change it. Go back to my pen here. So this is our cherry
sketch so far. Okay. And then we have
a leaf coming off here. Okay. All right, so that's
basically it. So let's put our little
shine spot in here. A little shine spot in here. Okay. I don't love that top. Let's erase that for a sec. Where's my eraser? There it is. Don't love this. I must do, like, a little
knot of some sort at the top. Okay. Okay. That's better. And then we've got some
pretty faint lines from the leaf
coming up this way. Alright. So now that we
have our cherry drawing. Let's go control tea,
and then you can, like, rearrange the size. So, oops. Remember to hit Shift. Okay, so we got our little
cherry drawing here. Alright. And as you can see,
when I zoom out, now I've got a cherry
and all of those things. Alright, we're gonna
draw one more cherry. So I'm going to name
this one cherry one. And then we'll add another one, call it cherry two. And we're just gonna draw, like, a single stemmed cherry. And Just a rough sketch of it. Okay. There we go. We got to our two cherries. Okay. So now we can
actually just drag the inspo cherries to the trash can here in the
corner and get rid of those. Alright, so I actually have this one that I
had done the other day, and I'm going to
actually take some of my linework and elements from this one to put
into the cherry one. So I just wanted to show
you how you can do that. Okay? So we're going to grab our Lasso tool and just circle
one of our oranges here. Okay, once you get these
little marching ants, we're going to go up
to the move tool. And as you can see, it's now
I can move this line work. And all I'm going to do is
I'm going to drag it up to my cherry and then drag
it in and drop it. And it's going to make
a new layer of that. And if you go back, it didn't mess up anything
with your art. Okay? So that's pretty awesome. So we're going to do
the same with Ooh. Control D to deselect. We're going to do the same
with our big lemon here. Oh, I'm on the wrong layer.
Line work. There we go. We want to go to our lasso again and circle our lemon and
get those marching ants, go up to the move tool, select it and drag
it and drop it. Okay. This is my
clean art lines. So yeah. And it doesn't matter
where you place it because right now they're
both on their own layers. So we're going to
call this one orange. Or maybe we'll call
it full orange. Full lemon. And then maybe we'll just
bring in one of the wedges. Like one of these ones
and one of these ones. Okay, so let's select our
wedge. Oh, I can't do that one. It has to be the center one, so we'll select this wedge. Go up to move and drag it
and drop it in the middle. Okay, and go back to last
so, grab this wedge. And drag it and
drop it. Alright. So now we can go wedge we'll call this wedge one. We call this one wedge two. Okay. So now we are able to kind of figure out where we
want to put some of these. So we have a fairly large Oop. Make sure we're on the
right layer, full orange. Click on the full orange
layer to move it. I keep accidentally
selecting the background. Why? Well, I have
to hit Control Tea. There we go. There,
now I'm on it. Okay. So we have
our orange here. Let's kind of rearrange. How do we want
this orange to be? Actually, I think I
liked it like this. Okay? Now, go to full
lemon, control tea. Um, let's put the full
lemon here or actually, let's put it up in here. And you can always rearrange sizes and whatnot later, too. Sad. Go to wedge one. And I don't know. Let's move it that way. Okay. Wedge two, control tea. This one is kind of smaller, and I think I'm going
to make it smaller. Gonna have it going this way. So now that we're
covering our cherries, we need to figure out something
different with those. So let's go cherry two
first. Control tea. And let's move that one here. Okay. And cherry one. Control T. I'm just gonna kind of move it. Um, right there for now. We can figure out what to do
with the other cherry here. Maybe we want to put it, like like that and put
our other cherry here. Just for now, we'll probably
rearrange some stuff. I just want to make sure
that all of the elements are still within
that confined box, 'cause I don't want to
mess anything up there. Alright, so now let's just turn off our template
here and zoom out, and you can kind of see
where this pattern is going. Exciting. Okay. Alright, so let's start by
drawing our cherries here. We can turn this back. We
can keep this off for now. So we're gonna do a new layer, and we're going to say
cherry one, clean lines. I just like to have
all my layers labeled. Because otherwise, I
forget what layer is what? So cherry sketch sorry. Cherry two. Sketch. And we're gonna put another new
layer over that one. So when I'm making a new layer, I'm just clicking the
plus button here. And we're going to call this
one Cherry to clean lines. Okay. Alright, so let's go to our first Cherry
one clean lines. We're just going
to zoom in here. And we're going to
go to our brush. I like to use my
round sketch one. So let's start with that brush and just see
how we're liking it. So, I like to just
make sure that I'm keeping pretty clean. I go a lot slower, obviously. With these when I'm
doing the sketch here. I just want to close off. Yeah. Oh, you know what? I accidentally used blue there. I'm like, Why does
the color look weird? Okay, we're just
gonna hit Control Z a couple of times
to get rid of that. We want it to be on
our black palette. You can just if you
keep making mistakes, just keep hitting
Control's to go back. Um, I'm just gonna do, like, a little line here. Just very subtle little lines for that because
we're going to be, um adding the shine
with, like, the paint. So I'm not really worrying
too much about having that little shine on the cherry. I want to make
sure that this one looks like it's in behind the other All right. And you can turn off
your sketch just to see how it's looking. Definitely looks a lot
cleaner. That's good. All right Yeah, that looks pretty good. Okay, we'll leave that. Okay. That's looking pretty good. All right. So now we want to go to do our second sherry here. That we have our clean lines. We can actually delete
your sketch lines. So we're going to click, make sure you're
on the right one. So we're going to delete this, so we're going to
drag it down to our little trash
can in the corner. And then we're going to find our first sketch and drag that one to the trash
can in the corner. All right.
10. Arranging Your Pattern: We can turn this back on. Okay, so the first thing I'm
going to do is I'm going to copy our first
cherry right here. So I'm going to take the cherry one and drag it to this little
plus sign to make a copy. And we're going
to hit Control T, and we can move it
wherever we want. So I'm kind of
thinking it'd be good, like in this box. Just hit Shift and
make it larger here. Actually, that's putting it
really close to this one. Maybe we want it in
the corner here. Yeah, I think we do. We
want it in the corner. Let's just zoom
out. Before I hit Enter, we'll zoom out and see. I think I like that.
So we'll hit Enter. And then we'll go
to our Cherry two, and again, copy that. We're going to drag
it to the plus sign, to hit Control And what I'm going to do for this
one is I'm going to flip it horizontally, so you go up to Edit, you go to transform, and then you flip horizontal. We're going to hit Control T again just to make sure
we have it selected, and we can drag
this one anywhere. We would like. Let's
do it like this. Or maybe we want it upside down. Can shift to resize it, make it a little smaller. Okay, and hit Enter. All right. Now, I think we
want to add either one more orange or one more
lemon in there. I think we'll do the wedge, the first wedge, copy that. Hit Control T, and we're going to have it going
a different direction. I want to make sure that none of our elements are touching. Okay, so we'll hit
Enter on that. And for the last one, we will use the small
wedge wedge two. Okay, Control T. And
we can make it a little smaller and
hit Enter there. All right, so I'm going to zoom out And let's turn off our template. So we're going to find our
template in our layers and hit this little eyeball,
and it's going to hide it. And you can look at
your pattern and decide how maybe some of the
elements need to be changed. I feel like this wedge right
here needs to get changed. So that one was wedge one. We're gonna hit Control
T. And I'm going to, like, turn it. Ooh. Hit Control Z 'cause I
accidentally like, made it weird. So we're gonna
turn it like this. I feel like it just needs to fill up the
space a bit better. And I think this little wedge here needs to get changed a bit. That one was, Oh, no. We're going to delete
that one because if I try to move it, it's gonna mess up them all. And maybe if I resize it, let's try resizing it just
to see if it's possible. Nope. Okay, so we have to
delete that one and try again. So we'll just copy
wedge two again, hit Control T, and
move it over here. Make it go a
different direction, maybe even upside down. And I'm thinking this
one actually needs to be slightly bigger. So we're gonna hit Shift
and try to just resize it a little. Okay. Now, the next one I'm
noticing needs to be larger is this one
here, the cherry. So go back to cherry
two and the copy one. And we're gonna hit Shift
and make it bigger again. I thought maybe changing
the size would be good, but, um, I don't like it. Alright. So that's looking
really awesome, right? You can see the pattern
is starting to repeat. The other thing you can do is if you don't like all of
this kind of empty space, you could just, like,
go in, add a new layer. And we can just say this. Call this fill fill. And you could fill it in with something with anything
you want, really. So let's get like, maybe we want to do some
poka dots or something. You could just do Like, something like that, right? If you want it. I'm
not gonna do that. I'm gonna delete this layer. Alright. In the next lesson, we will start
painting our fruit.
11. Creating Your Paint Palette: We're going to bring
in our colour palette. We're going to find
it in our files, click it and hit Open. It's going to open a new
tab here at the top. So right now, we got our colour palette
and you go over here, we got our fruit palette. Okay? So what we're going to
do is we're actually going to go into here, and it'll bring up our
little eyedropper, and we can pick our colors. I think we'll start
with the lightest red. Okay, we're going to hit
Okay. It's going to bring up our most recent colors up in the colour palette here. Okay. But what you could do
is you can actually make a new group and say we want to make this called cherry colour palette. We'll just call it cherry,
and we'll hit Okay. And now we're going
to take this color. The color that we're
on here, this red. And we're going to just
hit the plus button, and it's going to bring up
that color the watch, okay? You can name it
whatever you want. Cherry base. Okay.
And we'll hit Okay. And so now it's in this folder. So I'm going to do that
with all of these colors so that I have some easy swatches for us to select our colors. I Okay, so since we also have
oranges and we have lemons, I need to bring up my
colour palette from the last artwork because I
want to use similar colors. I'm just going to bring in
these oranges and this yellow. So I can close both of these. I've got my swatches. As you
can see, they're still up
12. Painting Your Motifs: We can go down here. We're going to click
on Background. I'm going to actually
delete this now. We don't need our
pattern template anymore, so I'm gonna delete it. I'm gonna click on Background. I'm going to add another layer
just above our background. And I'm going to call
this background. Color. Reason I put it on a different layer is because it would be easier
for us to change the background colors
if we want to. So that's why I do it
on a separate layer. So you can now go down to this little ball
here at the bottom, and you can add a solid
color onto this layer. And we're going to just
kind of we're going to be using that for the other one. So I'm going to use this, like, yellow for the background, I guess, right now. And or maybe we could
do a form of this. Maybe we'll go, like,
a little later. Let's start there. If
we want to change it, we can change it later. So let's go to our cherries. We're going to bring up our red. And I want to bring up
the round paint brush. And with this paint brush, because it's going to simulate paint or like a watercolor. So I'm going to show you what would happen
if you say paint, and then you go and paint again. You can see that it's making lines because
it's simulating paint. So when you're
painting a watercolor, you put down a coat
and if you were to go put another coat down. It's going to leave
marks like this. So we're just going to hit
backspace and delete that. We also over top oh, sorry, under our line drawing, we want to make another layer. And I'm going to call
this cherry paint. And we're going to hold our pen down and color in the cherries. And remember, this is supposed
to be, like, a painting. So if it goes a little
outside the lines, I wouldn't worry about it. Kind of adds to the hand drawn
elements of your drawing. So we're gonna do that again. But if you say, do too much of an outline and you
don't want it going over, you can just go to
your eraser and just erase that and say
you don't want it there, I can erase it and go
back to our brush. On your keyboard, you can adjust the size of your brush just
by hitting the brackets. So if you do your left bracket, it's going to make it smaller. If you do your right bracket, it'll make it bigger. So that's how I'm resizing my brush really quickly
if you are wondering. Just go to get some
paint in there. Alright, so now for the shadows, let's go to our darker red
and paint our shadows in. Okay, and then what you could
do with our smudge brush. We have our smudge brush here. Oh. You can then
go in and kind of, like, soften your shadows
a bit if you want to. So I did this on the same
layer, but you don't have to. You could do your shadows
on a separate layer, and if you did that here,
I'll just show you. I'm going to make another layer. I would name it
like cherry shadow, and then let's go back
to our paint brush, and I'll just paint some lines in here
simulating the shadow. And what you could do is you could actually go
up to opacity here. If you don't like
how dark it is, you can always take the
opacity down and lighten it. So that's another option
for the painting. Alright, so for the
highlights on our cherries, I'm going to go into, like, this brighter red. And I'm going to, like, go to almost like a
pink or just, like, a little bit lighter color and paint that in
on the highlights. And you could even
go smaller and lighter and do it again. Alright, I'm going to
make another layer. I'm gonna say stem and it enter. And we're gonna go
with this green color. I'm just gonna paint in the entire leaf and
stem. Ooh, ooh. I made my brush way too big. A And on that cherry picture, there was, like, some
shine right in here. So I'm gonna I'm gonna
add that as well. Go back to the lighter pinkish
color that I was using. And we're just going to add some bigger shine spots
on these cherries. Mm. And just keep doing it
until you like what you do. Okay. And then we want to
go to the really m. Just. Add a bit more in there. There. Actually, I really liked that Okay. And you
know what else? I want to go back to
the linework paint, stem cherry line, and I don't
like the lines I put there, so just these ones.
I'm gonna delete them. Okay. There. All right. So that is
painting our cherries. I'm going to go ahead and
paint the rest of this, and then we can move
on to the next steps. All right. So we have
got our pattern. Yay. It's all painted. And as you can see, it just continues and continues
and continues. Yeah, it's a really
awesome tool in Photoshop, with the preview one. And you can also always
turn the preview off. You just go back up to view
and hit Pattern Preview. So this is what the file will look like
once we export it. And we're going to
export that now.
13. Exporting Your Pattern: Besides the PSD file, we want to save two more. We want to save a PNG, where you can actually save the background to
be transparent. So if somebody wants
to change the color of the background and have something else show
through the back, you want it to be transparent. So a PNG is perfect for that. And then the second file
that we want to save it as, or I guess, third file we
want to save it as is a JPEG. And the JPEG is
going to be the file that you can upload to like Spoonflower or other like product printing places that
use surface patterns, okay? So that's what you
want to save it as. Is a JPEG for that. So let's start
with the PNG file. And what we're going to do
for the PNG is we actually want to just delete
our backgrounds. Okay. So this is our
transparent background. So right now, it's just all
of those little elements, and they can put in whatever
color they want underneath. So like if I was to
add another file here. I could change this background to any color I want,
could be black. It could be pink. You know, you can change
it to whatever you want. So that's why we want a
transparent background. All right. So we're going to go up to file, and we're going to go to Export, and we want to export as and we're going to actually
export this as a PNG, and we want to have this
transparency button clicked. Okay. And we can just leave
all the rest of this alone, and we'll export that file. Right, so now we can actually
go up to our history, which is in the corner here. And before we deleted
those layers, we want to we saved it
as a pattern preview. And by the way, I did end up changing the background
color because the background color I had originally was really
close to this, like, darker yellow, and I wanted to not have them
so close and shade. So I did change the
background color, and we're going to
export this one Export. Export As. And we're gonna have this
one as a JPEG this time. We want to keep the size in
because we want the file to be large enough pixels for people to print it on things and have enough not
get pixelated and weird. Okay. Technical terms there. And save it as a JPEG. Alright, and that is how you
want to export your files.
14. Creating Your Collection: Alright, so the next
thing I want to show you is how you can bring these elements in and make cohesive collection
of backgrounds, okay? So we've got two
fruit backgrounds with oranges and lemons. You can take those elements
and make the new background. So we're going to go New file, same size 2000 by 2000.
We'll create that. Now we're going to
go back to open, and we want to open up our
PNG file that we saved. Okay. And remember, it's got
a transparent background, and we're going to
open up my other PNG. Okay. So now we have
our two PNG files open. So we're going to open
up the other template, and we'll go up to file and then place embedded
and find your template. And we're gonna hit
Shift and resize this to fit and hit Enter. My computer is
making noises at me. Alright. And we're going
to put this layer. We're going to go to opacity
and make it quite light. Alright, so this is basically
how we'd have our patterns. Let's go to view and
then pattern preview. Hit Okay. All right. So this is our pattern placement for what I call a
diamond layout. And we're going to bring
in some of these fruit. And how we're doing
this is we're going to just circle the elements
we want to bring in. So I'm going to bring
in the big orange. Remember, we just drag
it up and drop it on, hit Control and then hit Shift, and we can resize our orange. Okay. And I'm going
to copy this. Control And we're
going to move this. Try to rotate this guy going
a different direction. Place it somewhere else. Okay, and then now we
want to copy that again. Alright, let's bring
over our lemon. Now I'm going to group
these Control G, and we're gonna call
this group lemons. Lemons. All right. And then we are going to
now bring in some wedges. Let's bring this in. And that's pretty
cute how it is, but I want to change
a few of these. Yeah, let's do I'll
do three of these. So over this one, we're going
to go down to the circle here and we're going to
go to hue and saturation, and we're going to change the color of all
of the oranges in here. So we need to right
click on this and bring up your
created clipping mask. So it's just going to
affect this folder here. And we're going to
go to the yellows, and we're just going
to see if we can change them to be orange. And there we go. If we turn off pattern preview, so you go up to view,
turn off pattern preview. This would be our pattern. We need to delete our
template, and there we go. So now you can change the color background
to any color you want, and you have another
pattern to go with this orange
and lemon slice.
15. Testing Your Pattern: I'm going to show you how
you can make your pattern smaller so that when you
are using it on a product, you can have more of
your pattern showing. So I'm going to do
that right now. So I'm just going to
open the 2000 by 2001, again, a new one. All right. So we're going to put our ruler, make the snap in
the middle here. Bring the ruler
over on this side. So I just went up to
this ruler bar here, dragged it down to the middle, ruler bar on the side,
dragged it over. If you don't see your rulers, you can go up to view and then just make sure that this
little checkmark is on here. All right. So now we're gonna
drag or bring in our thing. We're going to place embedded of the fruit that we had done. And we're gonna
hit Control Let's make sure that this little
lock is on at the top here, and we're just going to snap it. And we're gonna copy this, hit Control slide it over. Snap. Control And then to clear your guides, you just go up to view, go to guides, and
then clear guides. All right. And then we have our pattern that is
a little bit larger. So I have it as I'm
going to save this now. Go file export. And then we're just going to
export this one as a JPEG. Okay. Fruit I'm going to call this one fruit one small export. And then you can continue and do that with all your
other ones as well.
16. Ways To Print Your Patterns: I wanted to talk a
little bit about printing your own fabric
with your pattern. So I just printed some cute
little Christmas fabric which I'm going to create a child's
Christmas dress out of. And I used Print tree for that. I'm going to kind of go over how I created my fabric
in the pin tree. So this is Print tree's website, and all you don't even have
to have an account for this. You can just go create fabric. You do have to
click that you own the rights and permission
to upload anything. So we're going to we'll start with the fabric we
created, I guess. We'll stick that
in the print tree. And then it basically
will pop up with what your pattern is going to
look like on the fabric. And you can pick a cotton, and they have all
these different types of cotton fabric that
you can choose from, same with polyester,
and same with silk. You can choose how you
want your fabric to look. But, yeah, you just
kind of want to stick with basic
finishing options. You can add on an
overlock or any of that. But you also don't have
to add those on as well. You say add to cart. And then you can
check out from there. I'm going to then go over
the very popular website, which is spoon flower. If you're into pattern design, this is a huge website that a lot of pattern designers use
and put their patterns on. If you want to upload your
fabric into Spoon flower, you have to have an
account to do that. How I found to create an account was I scrolled all the way to the
bottom on the homepage, and they have this
four artist section, and I went to upload a design. Then you can just
hit Choose Files. But if you don't
have an account, what's going to pop up is
a is create an account. But for me, I've
already done that. So I'm going to
now that I hit it, it's going to pop open my files, so we can add our
pattern in here, read over the terms,
hit Continue. And then you'll get
into your account here. If you're using spoon flour for your own personal purposes, then you can just keep
your file private. You don't need to
put it up for sale, or you can put it on
sale for other people. So obviously, you
do have to verify that you have the ability
to sell this product. Um, but then they
give you all of these options of how
you want it printed. You can just print it
straight up on fabric, which is probably
what I'm going to do I want to test
out spoon flour, as well as pri tree
just to test quality. Wallpaper. They got
curtains, pillows, napkins, like a sheet set, like so many products. And now I'm going to go over to Printifi because I've
used Printify before. I've tested mugs, T
shirts from them. And all of their stuff is, like, very good quality and
they're super easy to use. You do have to have
account to use them. They do have a free, you know, get started for free. I think it's just like a
seven day testing thing, but you can go in and
sign up for that. I do have an account, so I'm just going to
log in real quick. Right, so once you're logged in, um you can go to, like, a created catalog,
and it will come up with all the different types
of products that they offer. They have men's clothes, women's clothes, kids clothes. They have all these different
types of accessories. And you can create
your own catalog. And what's cool about Printify if you have patterns
that you want to put on products and sell those products in your Et C or your
Shopify account, then it links straight up to your catalog on
Printify and basically, people can order off
of those websites, and Printify will automatically just do those orders for you. Once you've got it in your shop, you don't have to
do anything else. If someone makes a purchase, Printify will take care of it. They'll print it. They'll ship it. They'll do all of that. So it's a really cool website if you are wanting
to sell products.
17. Creating Mockups: Now that our product
is finished, tested, and ready to be used, I want to share with you one of my favorite parts
of the process, and that is actually seeing our pattern come to
life on a product. Creating a pattern mockup isn't necessary for pattern
making process, but it is a really useful way to visualize how your pattern
is going to look on fabric, home decor, cups,
all sorts of things. Mockus are a really great way to share your pattern
online on social media. You can add them to
your portfolio or eventually sell it as a
surface pattern design. We're going to get
into creating mockups and you can actually create
a mockup through print bi. How you would do that is you can pick the thing you want to make. I'm going to do a phone
case as an example. So you can just pick
any phone case, really. I'm going to pick, say, this
magnetic phone case here, then you'd scroll down
to start designing. Then pop up with the screen to help you
design your product. You will go over to this
panel on this side. To bring your print in, you're just going to hit Upload. You're going to go my device, bring in your product
that we made. And then you can just
resize your pattern to fit in the center here. Okay. And then what you can do is you can
actually go to preview, and it'll bring up these, like, different mockup pictures
of a phone case. And it's really neat. You don't even have to
actually make this product. You can just download
the mockup here, and you just hit Download
from this corner. And it'll download
it to your computer. If you're just selling
your pattern in Etsy and you just want
an example of what the pattern would look
like on a product, then you have your mockup. So that's how you can use
Printifi to create a mockup. Now, the next mock option
is going to be a little controversial because
I think a lot of artists really hate AI. I do hate AI, but sometimes it can come in
handy for mockup pictures. When you open up Firefly,
it's going to look like this. And you just want to go
to the left side panel here to image and
then generate image. I always just leave these
things alone unless you want a very specific type
of sizing ratio. Then you would hit this
little reference image, and you'd go to your device. You'd click your image
here that you want to use. And you go down to here
where it says prompt, and you're just going to type in what you want Firefly
to create for you. And there you have it. You have your mockup with
your pattern on it. To download this, you just put
your mouse over the image, and you're going to go
to the right hand corner where it says
download right here, and then it'll download
to your computer. I want to create one different
pattern that I made. So I'm going to use we
could use the other orange one that I made
earlier in the course. Because sometimes I like
to use this just as ideas to give myself ideas of what kind of dress I
could create with this. So I'll actually take
this AI thing and turn it into a real dress later with my fabric.
This is super cute. I love the green and pink
and what they did with this, so I totally make this. And honestly, after all
this time of, like, referencing and
drawing and painting, it's cool to really see
it visually on a product. One last thing that I wanted to talk about in this lesson. Is that mockups digital mockups are a great way to
visualize your pattern, but another option
is to actually have something
physically made for you. You could consider looking in your community for other artists that you could collaborate with. Like, maybe you know a
so as who could turn your printed fabric
into a bag or a dress. Maybe you know a ceramic
artist that could apply your pattern onto a mug. You could either purchase
the finished product from them, trade services, or come up with another
collaborative way that benefits something
like this would give you something physical
that you could photograph for your portfolio or social media while still supporting other
artists in your community. When working with other artists, you do want to set
expectations clearly, especially surrounding payment and how the finished product is going to be used and how
you're going to be credited. And you want to make
sure you do all of this even before any
collaboration starts. And don't feel like
you have to do this to be a digital pattern designer. A digital mockup
is perfectly fine. This is just another cool
suggestion of how to actually see your pattern printed on a physical product out
in the real world.
18. Final Thoughts: You didn't. You went from a blank Photoshop document to your own hand drawn
seamless pattern. I hope you've discovered
just how much you can do without ever
leaving Photoshop. More importantly, I
hope I've given you a process that you can
take and make your own. The pattern you created in
this class is just the start. Now you can go try to create another one with a
completely different theme, experiment with
different brushes, change your colour palette. Try a busier repeating pattern
or even a simpler one. Or you could just take
the elements you drew in this class and try creating a completely different
pattern with them. What I'm trying to say is
don't be afraid to experiment. Once you have your
finished pattern, think about what else
you can do with it. Maybe you want to
print your own design on some fabric and sew with it. Maybe you want to
create some stationary, wallpaper or gift wrap. Or maybe you simply just want to learn to create repeating
patterns because it's fun. Before you go, don't forget to upload
your finished project or your process in the project
gallery here on Skillshare. I genuinely cannot wait to
see what you've created. If you've enjoyed this class, please follow me
here on Skillshare. Or you can find me online
under Getzlaf creates, where I share my illustration, sewing, crafting and
other creative projects. If you're interested
in photography, you can find me at
Getzlaf Photo where I share my photography
and digital artwork. Thank you so much for
taking this course and spending some of your
creative time with me. Now go make something beautiful, and I'll see you
in the next one.
 Heather Getzlaf, Artist & Photographer