Transcripts
1. Introduction: Welcome to the magical
world of watercolors. High and just into an artist
and an art instructor. I'm naturally being drawn to landscapes all
along my childhood. And it's been my inspiration
all alone artistic journey. In this class, I will be
teaching you to create, to calm, serene, nice
guys in watercolors. We'll also be learning
degradation techniques using which the class
projects will be created. This class is perfect
for beginners who are looking to have a solid
start with watercolors. No prior knowledge of watercolors as required
to take this class. The class as bite-size
and easy to follow along. I'm so excited for you to be a part of this
journey with me. Thank you so much.
See you on the glass.
2. Class Project Introduction: Welcome back to the class. Let me give you a
brief introduction of the class projects. We will be creating beautiful
night skies in watercolors. My never-ending
fascination for landscapes is what led me to select
this topic for the class. I absolutely love
the Communists. These paintings evoke, and I'm sure you will feel the same to. This class is perfect for beginners who are just
starting out with watercolors. In the coming sections, I will walk you through
degradation technique using which the class
projects will be created. I will also share a
few tips for achieving a smooth gradation for
the class projects. Firstly, we will take a look
at the colors required. Then we will start working
on the background, middle ground, and foreground. Finally, we will finish
off with the detailing. I will be guiding you through all the steps required
to complete the project. By the end of this class, you will be able
to create to calm, serene night skies
and watercolors. I highly encourage you to paint
along with me as a class, as bite-sized and
easy to follow along. Do upload your project
to the project gallery so I can give you a
feedback on your work. Thank you so much for joining. See you in the next section.
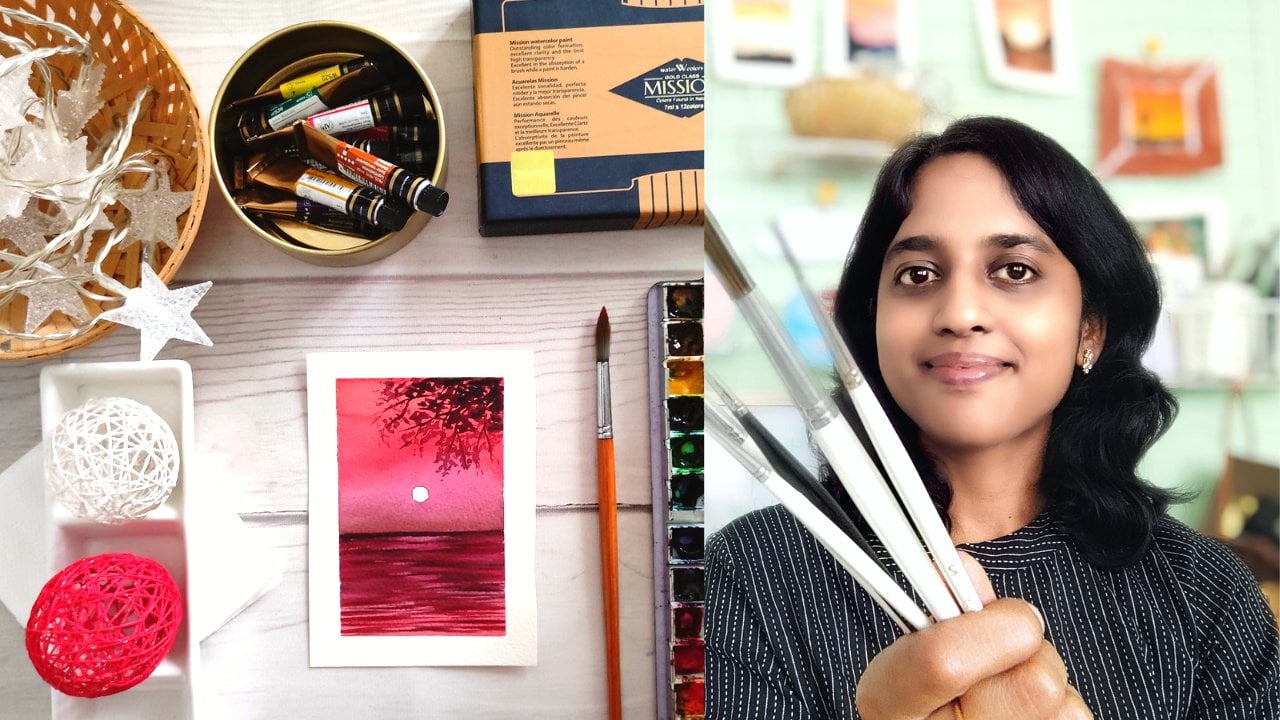
3. Materials Required: Welcome back. In this section, let's take a look at the materials required
for the class. Papers. These are artist grade
watercolor papers from restaurant a 100% cotton and cold
pressed brushes. I'll be using a set of round brushes and a flat
brush for the class project. Round brushes size one to six, and a fine liner brush. And the flat brush is
from a local store. Watercolors. These are artist grade watercolors
from machine Magellan. As quiz amount
depends like this. White gouache for fine details. And a masking tape for
getting clean edges. A boat for taping down paper, two jars of clean water, a ceramic palette, a sponge
or tissue papers for tapping off the excess
water, and two pencils. Thank you so much for joining. In the next section,
let's learn about degradation technique.
See you there.
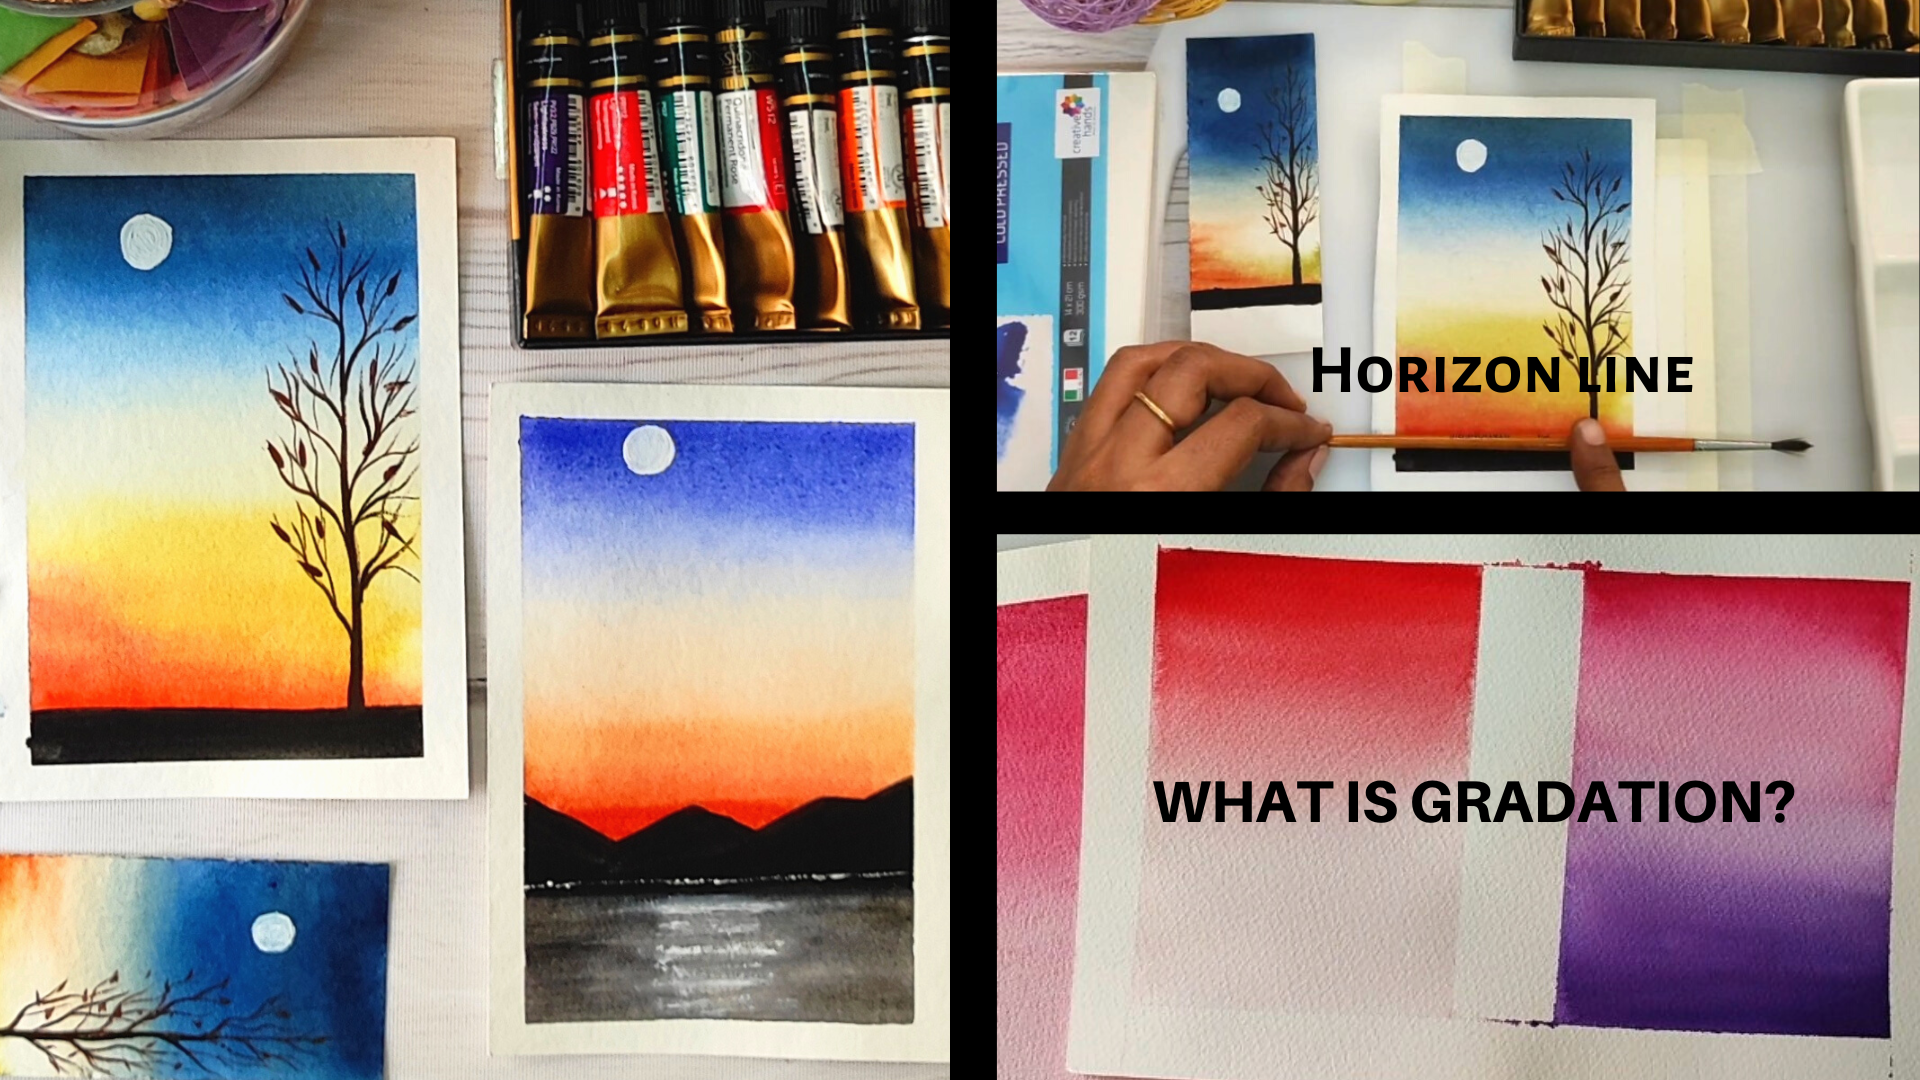
4. Gradation Technique: Welcome back. In this section, let's
take a look at predation. What is predation? It's moving from a lighter color to a darker color,
or vice versa. Wet and wet techniques are the best and easiest techniques. To achieve tradition. As the name suggests, we will be working on damp
paper with a ton of paint. Sounds interesting, right? Let's get started with
an amazing technique. Here I have divided my A5
sheet into two sections. One is for tradition
with a single color and the other is
forward two colors. I have taped down the edges
with our masking tape. Let's start degradation
with single Gallo. Make the entire surface
of the paper wet, making sure that there
are no puddles formed. If there are puddles formed, you can dab it off
with a tissue paper. If there is any water
running off to the edges, you can gently dab it
off with a sponge. Load your brush with
a ton of paint, and start dragging
the brush across the paper with a
back-and-forth motion. Use the belly of the brush to drag the brush across the paper. And now I'm gently tilting
the paper downwards. As you approach the center, you can rinse your
brush in water, released the pigments
with a clean, damp brush. You can continue to pull
the pigments further down. Since watercolors
dry, much lighter, I'm applying a second
layer with the same color, following the same
techniques as before. This makes the painting a little more brighter
and vibrant. Allowed to paper to dry in
the tilted position so that the upper end of the paper is higher than the lower
end of the paper. This helps in gradation. Once the painting is dry, you can allow it to lay flat. Now, let's start aggregation
with two colors. Make the entire surface of
the paper damp with water, making sure that there
are no puddles formed. You can choose any two
colors of your choice. I'll be working with
pink and violet, load or tan of your
first color and drag the brush gently
across the paper. Use back-and-forth motion
to drag the brush. Continue to pull the
pigments further down. And adding a little
bit of extra paint at the top to make
it a bit brighter. As you approach the center, you can stop, rinse
your brush in water with a clean, damp brush. Continue pulling the
pigments further down. I have to edit my board
or little forward. This helps the
colors to flow down. Now load the second
color and start working from the bottom
towards the center. Tilting the board in
the opposite direction. Once you start
approaching the center, rinse your brush and water, tap of the excess water
with a clean damp brush. Start pulling the pigments
further towards the center. Again, drinks the
brush in water, and you can start blending both the colors
together. At the center. I'm loading some more
of my violet and I'm applying in the lower end of the paper to make
it a bit darker. Now, it looks really
nice and dark. I'm continuing to
pull my pigments further up towards the center. Since the papers already done, it is easy for us
to work with it. A lot of painting
to dry completely. And once it's completely dry, you can remove the
masking tape gently. And there we have our
beautiful gradation with one color and two colors. This is the technique
that we will be using to create the background
for our class project. I highly encourage you
to give this a try. In the next section, we'll start with our first
class project. Thank you so much for
joining. See you there.
5. Class Project 1: Welcome back. In this section, Let's get started with offers
class project. Let's take note of a few things before
we start appending. The first step in any
landscape painting is to find out where the
horizon line lies. This put it in simple words, it's the line where this guy
ends and the land begins. In this case, the lake extinct is to identify
the background, middle ground and Foreground. Sky forms the background. The mountains form
the middle ground, and the league forms
the foreground. Will be creating the
background skies using degradation technique that we had practiced earlier. I have chosen and A6 size
sheet for the class project. You can choose a size that you are comfortable working with. Use a masking tape to tape down all the four
corners of the sheet. Take a look at the colors
required for this class. Ultramarine Blue,
permanent red, and orange. I'll also be using
white gouache for the details and a
pencil as well. You can use the colors that are available near set
to start with. Let's start by marking the horizon line a
little below the center. Now, let's begin working
with our background. Make the entire surface
of the background wet. Making sure that there
are no puddles formed. Let's create the
graded sky using the wet-on-wet technique that
we had practiced earlier. Now, load a size six round brush with a ton
of ultramarine blue. Drag the brush across the paper to allow
the pigments to flow. At this point, you can
rinse your brush in water. Type of the excess water
with a clean damp brush. Continue pulling the pigments further down towards the center. Now, let's load our second
color, permanent red, and start working from
the horizon line upwards. Now, load the third
color orange, and continue working from the horizon line upwards
towards the center. Rinse your brush in water and
with a clean, damp brush. Continue pulling both the colors towards the center
and blend them. Let's continue to
add another layer of the same colors to make the background a
little more darker. I'm starting with my
ultramarine blue. I'm repeating the same steps for the other two
colors as well. Let's allow the background
to dry completely, and let's begin working with the foreground to
create the leak. Let's create a gray by
mixing ultramarine blue, orange with a bit of black. At ultramarine blue and orange together in a ballot
in equal quantities. I'm going to add a bit of
blue to make it a bit darker. Add a little bit of black to
make it even more darker. Now let's begin working
with our foreground. Paint the entire foreground with gray moving the brush
back and forth. I'm using a size six round
brush for this step as well. Once the foreground is
completely painted with gray, we'll use a damp brush to lift some paint from the gray to create highlights
on the lake. Press the bristles of
the brush downwards and gently lift the paint
to create highlights. Load a thin round brush
with black paint and start pulling thin lines
from the corners inwards. This will make the
highlights that we had just created stand out. Now that our background is dry, Let's continue working with the middle ground and create
mountain silhouettes. Load around ten brush with black and start drawing
mountain shapes. Continue to paint the
entire mountain with black. Now, a middle ground
is complete and a background is
completely dry as well. Now, let's use white gouache
to create the final details. Let's create the final details with white gouache and pencil. Dip the backside of the
pencil into the white gosh, dab off the excess paint
and press the backside of the pencil wherever you
want to go in the sky. Rest depends on any
part of this guy. You want to place the moon. Let's continue to add some
more details with white gosh. Load a thin round brush
with white gosh and put short lines just
above the horizon line. Now to create reflections. Load a thin round
brush with white gosh. Right under the moon.
Lines across the waters. Use thin strokes
to pull the lines, the tip of the
brush for the step. A lot of painting
to dry completely. Once it's completely dry, you can start building
the masking tape from all the four sides. We have completed our first calm night
skies and watercolors. Looks beautiful and relaxing. In the next section, Let's start with our second
class project. Thank you so much for joining. See you in the next section.
6. Class Project 2: Welcome back. Let's get started with our
second class project. Let's take note of a few things before we
start the painting. Firstly, let's find out
where the horizon line is. A line where the land
ends and sky begins. This is where the horizon line lies in this
particular painting. Let's take note of the colors required to create the skies. Ultramarine Blue,
permanent yellow, light orange, and permanent red. We'll also be using
white gouache and pencil for creating the final
details of the painting. We also need to
remember Skype forms, the background, the land, and the tree form
the foreground, will be creating the sky using degradation techniques that
we have practiced earlier. The mode will be created using
the white caution pencil. Here, I've used the
masking tape to tape down and A6 size sheet. Next, use a pencil to draw the horizon line or
below the center. Use a damp brush to make the entire surface of
the background wet. Make sure that there
are no puddles formed. If any water is running off
to the edges of the paper, you can gently tap it off with
a sponge or tissue papers. Now, load the brush with a
ton of ultramarine blue. Drag the brush across the paper and allow the pigments to flow
gently downwards. Now rinse your brush
in water type of all the excess water
with a clean damp brush. Continue pulling the
pigments further downwards. Now load the second color, which is the permanent red. And start painting from
the horizon line upwards. Load the dark color
orange and start working from the horizon line
upwards towards the center. Load the next color, yellow, and continue working
towards the center. Now rinse your brush in water and with a clean, damp brush. Start blending the
colors at the center. To make the background
a little more darker. Repeat the same steps
with the same colors. Now the background looks much
more darker and vibrant. Now to create the foreground, load a size six brush with black paint and fill the
entire foreground with black. To paint the tree, Let's create
a mixture of burnt umber, permanent red, and black. Use a size two round brush to load the mixture
that we had created and put a thin line from the
land upwards into the sky. You can continue to build as many branches as you
want from the center. I'm adding a little
bit off and then tried to the brown mixture
that we had just created. We'll be using this
to create the leaves. Gently press the backside of the bristles on the paper
to create leaf shapes. Now, you can add as many leaves as you
want on the branches. Let's continue to create final details with white
gouache and pencil. Press the back side of the
pencil into right gosh, top of all the excess paint. And place the pencil where you want to place
the moon on the sky. Once the painting
dries completely, you can remove the masking tape gently from all
the four corners. And we have completed our
second class project. It looks absolutely
calm and serene. The colors and the background
are so soothing to the I. Thank you so much for joining. See you in the next section.
7. Final Thoughts: Congratulations, you've made
it to the end of the class. You would have created to calm, serene night skies
and watercolors. In both the class projects, we created the
backgrounds guys using the tradition technique
that we have practiced. And then continue to
paint the middle ground, foreground and created
the final details. But gosh, pain.
Predation technique is one of the most beautiful
techniques of watercolor. It cannot only be used
to create landscapes, but also portraits and florals. Do. I highly encourage you to
give these paintings and try and upload your projects
to the project gallery. For the background, you
can experiment with different colors to get a
beautiful gradient sky. If you enjoyed painting with me, Do not forget to leave a
review about the class. If you would like to see more
of my watercolor paintings, you can follow me on Instagram. My Instagram handle is
just kinda underscore art. You can follow me here on Skillshare for future
Glass updates. A big thanks to all who joined
seeing in the next class.
 Jessintha Reena, Artist and Art instructor