Transcripts
1. Stitch trailer: Hello, everyone, so
welcome to all of you in my full Master
series on Google Teach. In this particular
Master series, I will teach you that
how can you create a whole website with the
help of few prompts? I have covered each
and every feature in a very detailed manner. This master series will start from the very
beginner level, and after that, I will
teach you advanced things. And the best part
is you don't need a coding background or
graphic designer just you should have basic prompt
engineering skill by which you will explain
what you exactly want. Actually, you can create many
things like you can create your own design system with
the help of Google teach. You can create user
appealing design. You can create different
variations of your design. Even with the help of
prompt engineering, you can do prototyping where you will make your
design interactive. With the help of
this lecture series, you can boost up
your productivity. And this will save lots of
amount of effort and time. Within a few minutes, you can easily create
whole website. Whole website means
including prototyping, and here you will
get infinite Canvas in which you will create infinite page so you can
perform complex design process. This is a feature
of UIUX design. So according to me, AI will not replace your job, but person who are already using AI can definitely
replace your job. Basically, you have to evolve your style time so if you
will not skilled up yourself, then anyone can replace you. So I will see you in the
lecture series. Okay, bye bye.
2. Introduction of Google Stitch: Hello, everyone. So
welcome to all of you in my full master series
on Google Steeg. So in this particular
lecture series, I will teach you that
how can you create your own website or mobile app design with the
help of Google Speech. So without wasting any time, let's start this lecture series. So first of all, let's
discuss about its interface. Okay. This is an area where you
will write your prompt. Now what you can do, you
can type your prompt very randomly or
instead of that, what you can do, you can type your prompt in very
detailed manner. If you will type your prompt in very detailed manner,
then what will happen? You will get very
accurate result if you will type your
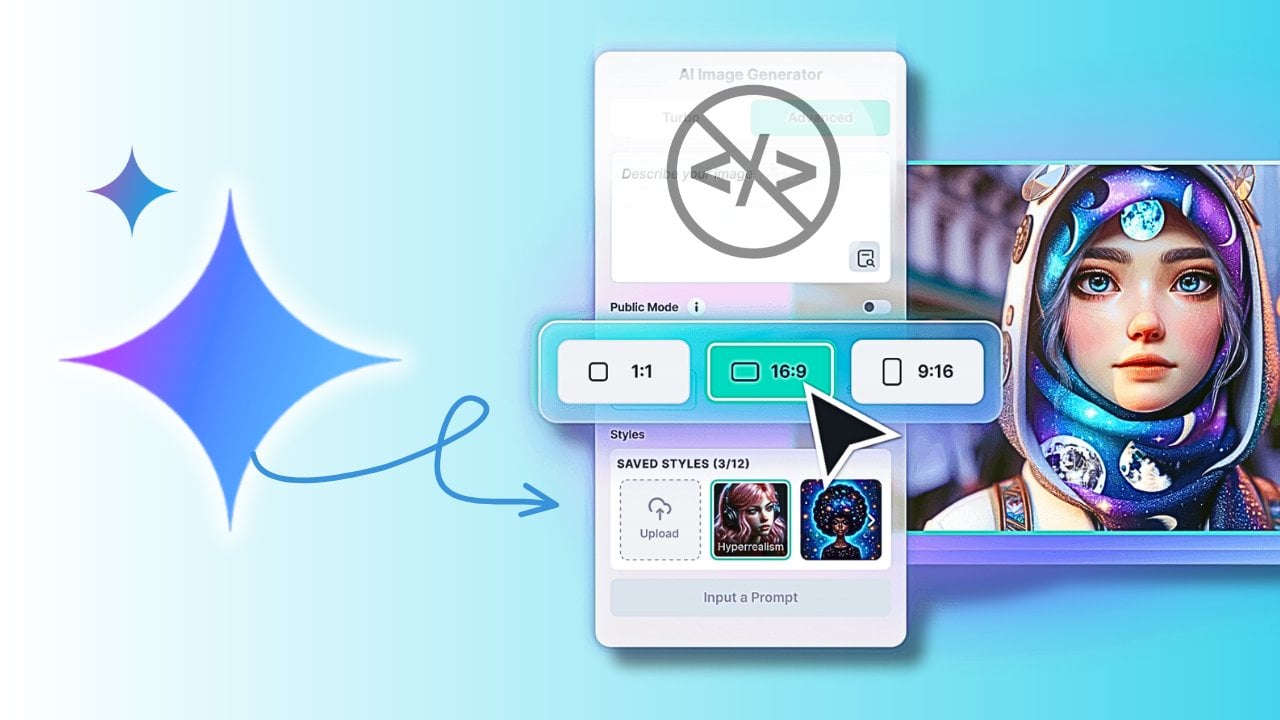
prompt in detailed manner. Here you have a two option
called app and web. Obviously, if you
will click on app, then it will generate
portrait resolution, which is vertical
resolution. Okay. So you will use app opson when you have to create
design for mobile app. Okay. On the other hand, if
you will click on web, then obviously it will
generate landscape resolution, which is horizontal resolution. Okay, so you will use this
option when you need to create desktop application
design, desktop web design. Okay. In such case,
you will use web. Okay. Here you have a
option called attach a screen sort sketch
or visual inspiration. This is a media file option. If you will click on that, then you have a three option called Upload Files website
URL, and enhance prompt. So suppose if you have
any reference image, then you have to
upload that image. And on the basis of
that reference image, it will generate
whole design, okay? Suppose if you have
any reference URL, then you will provide that URL, and on the basis of that URL, it will generate design. Okay. And here we have an option
called enhanced prompt. Suppose you have already
written UR prompt and if you want to enhance
the prompt quality, you can easily enhance with
the help of that option. Here we have option
called use Design System. So if you are a graphics
designer or UIUX designer, then you may already
aware about that. Okay. So design system is nothing
but a predefined template, which brands use? Okay. Uh, each brands has
own unique colors. Okay, so design system is a predefined color
of each brands. Okay. So you can select
from here, okay? From here, you can choose
the model from which model, you have to generate
your design. Okay. And whatever
things you create, it will appear on history page. This is a history
page section where you will see your
previous project. Okay? So you can easily
jump to your previous work. Okay, so this was a basic interface,
which you should know.
3. How to Create UI Design with Prompt ?: So now let's try to
create something. I have already written my
prompt. You can read this. Create a website design
for E learning website. Design should be
aesthetic and modern. Create homepage first where you have to mention popular
courses like UIUX designing, filmura, video
editing, affinity, graphic designing, and
hair GPT master course. Okay. Here I will click on web because I have to
create design for website. I don't have any
reference media file, so I will not attach any file. From here, I can
choose design system. As I have already told you that design system is a
combination of best colors. This will vary brand to brand. Let's choose anyone. Let's choose Neon
Tokyo. Let's start. So first of all, I'm
getting this design system. On the basis of
this design system, it will generate whole website. Okay. So this is my primary color, this is secondary tersary
and we can change this color later on our class. Okay. From here, you can see that
we have a primary button, secondary button,
inverted outline. So this is our whole
design system. Okay? Now it has started
creating screens. And you can see that it has created Elning website for me. Now, suppose if you are
not satisfied with this, you can click on that page, you can click on that
page and you can see that this page have been
mentioned in our prompt box. Now I need to type
change whole lay out. Try something new. Now,
it will create new page. It will not change
anything in existing page. It will create fresh new page instead of changing
anything in previous page. So it has provided
new design system, and on the basis of that, I got this website and it is looking better
than previous one. Okay. Now I need to change
something in this page. So I think here more
courses would be listed. Be currently we have
only four courses. Okay. So we should have
more courses here. So what I will do, I
will go on Mark page, and here I will add this box, and after that, I will write, add many courses of different skills. Now, it will not change
anything in existing page. It will create whole new page instead of changing
on that page. So finally, it has listed
many courses here, but here we don't have
thumbnail for many courses. So what we will do, we will
again click this home page, and we will mention that. Please add thumbnail. In all courses. Whatever change you have
to do on your design, you have to select that
particular page or element. I have to change something here. I will select that
particular page. Now it will generate
whole new design. Finally, it has created
thumbnel for all courses. Now it is looking fine. Similarly, let's create
another website. So this is a my prompt. Create ecommerce website for gaming, Console and hardware. Create systematic layout
according to categories, add many items in homepage. Designs would look
modern look and clean. Okay, so let's click on web
and hit the Enter button. And if you will not
select any design system, then it will automatically
select design system. Okay? So okay, this is
our design system, and on the basis of
this design system, our website is generating now. So currently it is generating
four different page. OMG, look at the design. It has created awesome design. So let's explore each
design one by one. So this is our homepage, okay? This is a banner. Okay. And it is looking awesome. You can see that many products
have been mentioned here. It is looking awesome,
actually, right? Here we have a product detail. If person will click on GPU, then they should
land on this page. Okay. Here we have
a category listing. Okay. Okay, cool. So also here we have a
checkout page. Okay. Now, what you can
do, you can ask to create any different page also. Okay. So currently, it
has created homepage, product details, category
listing, checkout. You can ask for create
any other page too. Okay. Here we have some
suggestion like change the primary ascent
color to electric green. So if you will do that, then primary color of whole design will
automatically change. Here we have another
option called add a mobile version
of home page. Okay. So if you will click on that option,
what will happen? This is our web design, and it will create mobile
version of our whole design. But we will create mobile
verson after some time. Okay. Okay, fine. And suppose if you have to
generate a different version, total different version
of your design, then what you will do, you
will select your whole design. Okay. And here you have a box, which is click to generate
multiple variations. So let's click on that. Okay. Let's click on that. Let's see what will
happen in new vari. Okay, guys, so here we have a different version
of our website, and it is also looking good. 1 minute. This is a new
design. You can see that. It is actually looking good. You can see the quality. If you are a UIUX designer, then you can relate how much time it will take to
create this page. We have created many
pages within a 1 minute. T is a future of UINUX. Here we have another
version of homepage. Obviously, primary color
have been changed here, you can see that it
is also looking good. And here we have another version of homepage with neon effect. Actually, all the designs
are looking good. Now we will go with
kinetic green design. Okay, so we will delete other design so that we
will not get confused. Okay? So let's arrange everything in a very
systematic manner. So let's delete everything. Okay. So we will go with
Kinetic green. Okay. And if you enjoyed this lecture, then don't forget to give me good positive rating and comment so that I
can motivate myself.
4. Lets use MARK tool to Edit Something in UI Design: In this particular lecture, we will explore Mark tool
inside Google stage. Okay. So with the
help of Mark tool, you can mark any element, any object, any text,
any image, okay? And you can ask to edit them. Okay, so let's
activate Mark tool. Okay. And suppose I have to
add glowing effect here. So what I will do, I
will mark that button. Okay? I will mark that button. Now we have marked our
target object successfully. So now let's type here, make this button gluing
hit the enter button. So as I have already told you that this will create new page. Whenever you ask
to edit anything, it will create new page. Without replacing older one, it will provide new image. So finally, we have
a glowing button. Suppose you have to
change the logo, then I will use Mark toool
and I will mark that area. I will mark that area. Okay. And after that, I
will type here, change logo in all page. Ogoname is logo name is Lab NkT lab. Logo name should be UnktLab. So it has created four new pages in which new logo name is
mentioned Unkit Lab. Okay? Ankit Lab. Akilab. Okay, so this
is our four new pages. Now what we can
do, we can delete our previous page because
it will create confusion. So let's delete
our previous page, and let's keep only new design. Okay, let's keep
only new designs. Okay? Fine. Here we can
also add glowing effect. What we will do, we will use MarkTol We will use Mark tool and we will
mark that button, and we will type
add glowing effect. So this is how you
can use Mark tool. You can use Mark tool to
change any text, any image, logo, or even you can change whole layout
with the help of Mark Tool. Suppose you have to change
the layout of this page. Then what you will do, you will select whole area.
You will select. You will select whole area. And you can ask to
change its layout. Okay. But right now, I will not do that,
but you can do that. Okay. And finally, we got glowing effect
very quickly. Okay. And here also, we have
a glowing effect. This is how you can easily
use Mark tool. Okay, fine.
5. Lets use DIRECT EDIT tool to Edit Something in UI Design: Now we will learn about
direct edit tool. In previous video, we have already covered
what is Mark tool. With the help of Mark tool, you can mark any
specific object, image, text or layout, and you can change that. With the help of direct edit, you can directly
edit your design. So let's activate Let's
activate direct edit, and suppose I have
to edit this page, so I will click on
that page. Okay. Okay. So now, I can easily change anything
in this page. Okay. Suppose I have to
change the text here. I will click on that. Okay. And here we
have a two option called edit text
or edit with AI. Obviously, with the
help of edit with AI, you can generate something
with the help of AI. And if you will
click on Edit Text, then you can change its title. Modern board. Okay. So with the help of direct edit, you can easily edit anything. You can change price here. Okay? You can say 199. Okay. You can change
anything here. Modern E board is most popular among AMRs. You can type anything here. Okay? Suppose I have
to change image here. So what I will do, I
will activate direct, edit, and I will
select that image. Now, it will ask me to
enter URL or edit with AI. Okay, so I can do
both the things, either I can enter URL or I can generate image
with the help of AI. And if you enjoy this lecture, then don't forget to give me good positive rating and comment so that I
can motivate myself.
6. Replace and Image in UI Design: In this particular video, I will show you
how can you upload your own image in any
place where you want. Okay, so let's
start this lecture. Okay. So suppose I have to
upload my own image here. Okay, so how I will do that? So first of all, I will
activate direct edit tool. Okay? But before
using that tool, what I will do, I will
upload my own image. So suppose I have to
add this image here. Suppose I have to
upload this image here. So how I will do that? So first of all,
you have to upload your own image in blank
Canvas like that. So here we have an option
called Upload File to Canvas. So if you will click on that, then you can select any
image from Desktop. So I have already
uploaded that image. Okay. Now, what you can do, you can you can rename it. So I will copy unnamed dot JPG. Okay. Now what I will do? I will go on that page, and suppose here I have
to upload my own image. Then I will use direct Edit tool with the help of
Direct Edit tool, I will select this
particular image first with the help
of direct Edit, I can select that image. Okay. And yeah, image have
been selected properly. Now, in prompt,
you have to type. In prompt, you have to type. Change image, sorry, replace this image
with your filename, which you have copied recently with unnamed dot JPG and
hit the enter button. Now, with the help
of proper renaming, you can change any image. Okay. Now let's see
it will work or not. And boom, finally, our own
image have been uploaded here. This is how you can
change any image. So with the help
of proper Flame, you can easily
replace any image. Okay. So suppose
you have created website which has banner. Okay. So you can change
banner in the same way. Okay.
7. How to Create own Design system in Google stitch ?: Hello, everyone. So in this particular lecture, I will teach you
that how can you create your own design system. So as I have already
told you that design system is a combination
of different colors, icons, and text, which
looks good together. Okay, so each company
has own design system. Okay, so design system may
vary from company to company. Okay. So if I talk about what is the primary
color of Instagram, then you will say it is little
bit like pink or purple. Okay, pink, I think. And if I talk about what is
the primary color of YouTube, then you will say red and black. Okay. So this is a color
combination. Okay. And it is called design system. So you can create your own design system
in Google Stitch. So you have a two method. First method is,
you can go here. You can click on design system, and here you will
see plus button. Okay. So either you can create one or you can import from
any existing website. So if you will click on
Import from existing website, then it will ask
you to paste URL. So if you will paste
URL of any website, it will analyze that website and it will extract design
system from that website. Okay. But we will not use this. Here, we will click
on Create New. Okay, so first of all, here
you can choose your own name. Okay, so design system. Okay. And here you can select
dark mode, light mode. And this is a seed color. You can choose any color. Let's say orange. So from here, you can create
your own design system. Okay. You can select primary
color, secondary color. Okay. Okay, so I have
selected primary, secondary tersary
and natural color. Okay. And from here, you can select the typography. Okay, your text style.
You can select it. So let's select Inter. Okay. And here we have
a corner radius. So whenever Google Stitch
will create any website, then it will obviously
create component buttons. So button corner should
be rounded, SRP. Okay. So let's select this one
and click on Save button. Now, it will create
our own design system. And you can see that it
have been added here. Okay. So whenever
I have to use it, I will go here, and here you can see that
this is my design system, so simply I will select that. And now I can ask to create any website
using this design system to create create social
media app design. So now, since I have
selected my design system, that's why it will use that
particular color palette. Let's see it is
working fine or not. Now we have to
wait a little bit. Using the same design system, we finally got this one. And it is looking awesome. Okay, fine. You can see that it has created website using
the same design system. Okay, now we have another way by which you can
create your design system. Suppose you have existing
design and you want to extract design system
from that design, then how you can do that. Okay. So for that, just upload your existing design from which you have to extract
design system. So let's upload 1 minute.
Here is my design. Okay, so this is my design. Okay. Okay. This is my design. Okay. Now, I want to extract design system from
this existing design. Then how I will do that? Obviously, I will select
that design first. Okay, now you can see
that at prompt box, this image have been selected. Now I will type
create design system using this web design. Hit the enter button. Now, what it will do, it will extract design system
from the existing design. It will extract text, colors,
iconography, everything. And finally, it has created design system from the
existing page. Okay. Now you can see that
we have buttons, text, colors,
labels, everything. We have everything which comes
under design system. Okay. Now, best part is, if you will go on design system, then you will notice that this design system have been automatically added in our list. Okay? You can see that. Its name is St. John's Heritage. Okay, St. Joan Heritage. So if you will go
on design system, then you can see that it has listed in our
design system list. So this is how you can create
your own design system. Either you can create your design system from
the very beginning, or if you have any
existing design, then you can upload
that design and you can extract design
system from that design. Okay. Okay, fine, guys. And if you enjoyed this lecture, then don't forget to give me good positive
rating and comment.
8. How to do Prototyping in Google stitch ?: In a previous lecture, we have already created
our social media website. So we have created four
different page home feed, user profile message,
and Explore section. Now it's time to make it live. Okay, so with the
help of Prototype, we can play our design. Okay, so first of all,
let's select all the design and click on Connect and preview with
Instant Prototyping. Okay. Now, it will connect
all the pages so you can see that we
have a preview window. And best part is
inside preview Window, we can edit anything. Okay? Okay, so first of all, let's talk about this
dotted rectangle. This dotted rectangle represents this button is interactive. Okay. If you will click on home button,
then it will not work. If you will click
on Notification, then it will not work because
it is not interactive. Okay. So that means
Explore button, message button, profile button, and Sarah Miller's text. All the things are interactive. So let's click on Explore. Okay. And here we
have a homepage. So it is working fine. You can see that. Okay. So at Message page
at Message page, if I will click on Home button, then it is not working. Then I need to connect
that with home button. Then what I will do,
I will go on profile. Sorry, I will go on Edit. I will go on edit.
Okay. Now I will establish the connection
between this text and homepage. I will click on Message button. Here we have a Edit
connection option. So let's click on
Edit Connection. Since we have existing page, that's why we will not create whole page from the beginning. Okay. But right now
we have a home page. Okay. So now it is asking me
to connect different page. Okay, so let's connect
with Home feed. Okay. And here we have
a apply connection. Okay. Let's reload this page. Let's play our prototype. Let's go on Message Page. Now inside Message page, now you can see that home
button is also interactive. So let's click on Home button. Okay. So this is how you can connect multiple pages
with each other. Okay. Okay, fine. And let's create
Edit Profile page. Okay. So currently, we don't have page called Edit Profile. Okay, so we need to create
that with the help of EI. So first of all, we
will go on Edit, and after that, we will
select Edit Profile button. Now it is asking me to connect a screen or imagine new screen, since we don't have page
called Edit Profile. That's why we can't
connect it with any page. So we need to create new
page called Edit Profile. So we will click on
Image New screen. Now it will AutomaEdit
profile page. Okay. And the best part is it will follow our design system, which means we will see
consistency in all design. If you already have many pages, then you can connect them Okay. But if you don't have
any specific page, then you can imagine with AI. It is creating Edit Profile page because we don't have
edit profile page. So finally, we have
a edit page option. Okay. This is a edit page. So if I will go
on previous page, if I will go on
previous page 1 minute. This dotted line is appearing, which means it have
become interactive. So let's click on Edit Profile. Okay, now it is working fine. Okay. So let's click
on Create Post button. You can see that it is
not working because we haven't connected any
page with that button. Okay. So again, we will
go on Edit section. We will select our button. Now it is asking me
for different options. Either we can connect this
button with any page. So if I have already created
page called Create Post, then I can connect
with that screen. Okay. If you have
to edit the text, suppose if you will
click on Edit Text, then you can change its text. Create post. Okay. Create New post. Okay. So you can change its
text very easily. Okay. Let's see what we
have another option. Change with AI. You can change anything color typography
with the help of AI. And here we have a image
New screen option. So obviously we will use
Image New screen because we don't have any existing
page called Create Post. So we will click on
Image New screen. Okay. So let's click
on Image New screen. Now, it will generate
create post page. And finally, we have a new
page called Create Post. So if I will click
on Preview button, then you can see that
it is working fine. Okay. Create Post. Okay. So you can
see that we have a dotted line above the cross, which means if I will
click on this cross, it will close itself. Okay, so let's click on Post. 1 minute. Okay. So here we have a button. Now let's click on Post. Again, post button
is not interactive because we haven't connected
this button with any page. So again, we will
go on Edit page. Either we can connect it
with our existing screen, but right now we don't have
existing screen called Post. That's why we will click
on Image New screen. It will create new screen. Okay. Now it has created
new page called Post SAD. If I will click on
Preview button, then I can see that home
button is interactive, Explorer button is interactive. Okay. So Babton is
also working fine. So let's click on Post Post. So this is how you can create and connect
any number of pages. Okay. So now let's go
on Preview button. Let's go on preview. I think we should have PL
screen OpsonOpen in New type. Okay, so this is
a desktop verson. You can see that it
is working fine. Click on post post. Okay. Rate Post. And we have both the option
view Post, back to feed. So let's click on viewpost. So view Post is not working. So again, what we can do, we can select that button. We will go on Edit page, and we will reimagine. Sorry, we will imagine
view Post page. Okay. Then it will work. Okay. Back to feed. So this is how you can create prototype of your own website. Okay. And obviously, you can change the logo,
text, color, anytime. So I have covered everything related to the Google Stitch. So if you enjoyed
this lecture series, then don't forget to give me good positive rating and comment so that I
can motivate myself.
9. How to Create mobile app like instagram in Google stitch ?: Hell Hello, everyone. So welcome to all of you in my full Master series
on Google Itch. So in this particular lecture, we're going to create
app like Instagram. So without wasting any time, let's start our lecture series. I have already
written my prompt. You can read this. Okay, so I want to create app like Instagram where
I need a page, sign in, sign up, home
and message Sexton. And app name would be Quicksort. From here, I will
select the button called app because I want
to generate the mobile app. Here we have a design system. I have already covered that
what is design system. So design system is a
predefined template, which is vary by
company to company. Basically, it is a color
combination of a specific brand. Okay. So if you will select
any specific design system, then your app will
generate on the basis of that particular color
combination. Okay. And if you will not
select any design system, then Google Stitch will
automatically detect the best possible design system. Okay. So I will select this particular design system
and hit the entter button. Let's see what will happen. And this is our design system. Okay. So on the basis of this
particular design system, our all page will generate. Okay, so you can see that
we have a sign in page, sign up page, home feed
Sexion and message Sexton. And no doubt it is actually
looking awesome, right? Now here we have a
alignment issue. It should be at the
center of the screen. There is a alignment issue. So what we will do, we will
select this particular page. So let's select this
particular page. Now in the prompt box area, you will see page has been
selected successfully. Now you can write anything, what you want to correct. So here I will type, make it align properly. Make it aligned properly. Okay. So whatever things
you have to correct, you have to mention that
particular page and you have to type your query. Now you can see that issue have been resolved successfully, now it is properly
aligned with center. Similarly, you can create any
page which you want. Okay. So let's type create. Create a uploading page like uploading reels,
uploading story. I want to create
a specific page. On the basis of my prompt, it is creating two page. Upload story and upload Ls. So this is how it
actually works. Okay. Now let's try to
animate our whole design. So here we have a Opson called connect all page Prototype. Okay, so we will click on that. Now we will get New Page. And here the best part
is we can play our app. So this dotted line represents that this button is interactive. Whenever I will click
on sign in button, it will end on any
different page. Similarly, we have a dotted
lines in signup button. Okay. So this dotted button
means it is interactive. Okay. Similarly, let's
click on signup. It is interactive. Let's click on Create
Account. Okay. So after creating account, user will land on homepage. Okay. Suppose I have to make
this icon interactive. Okay, so what I will do? Firstly, I will go on Edit tab. At the top of the screen, you can see that we have
a preview and edit. So let's click on Edit
tab, and after that, I will click on that
particular icon, and here we will get Opson
called Connect to the screen. So if you have already
created such a screen, which you can connect
with any specific icon, then you can easily connect it. But right now, I don't have
that particular Icreen. Okay. So what I will do, I will click on
Imagine new Icreen. Okay. I will click on
Image New screen. But if you already have any specific page
which you can connect, then you can easily connect. Okay. Now, whenever a person
will click on this icon, they should land on
this particular page. Let's see how it will look like. Okay, boom. This is a page where person will land after clicking on
that particular icon. Now message button is
interactive, you can see that. Similarly, you can make
any button interactive. So this is a home button
which is already interactive. Now here we have a three dot. Okay, so let's make
it interactive. Okay. So again, we will click on Edit, click on the T dot and simply
click on Image New screen. Et's see how it will look like. Okay, guys, so whenever any user will click on
three dot of the profile, this would land on
this particular page. Okay, it is working fine. And this is a B button. Obviously, with the
help of Back button, they can go back Okay. So this is how you can make
any button interactive. Let's make setting
icon Interactive. Simply click on Setting button, click on Image New screen, and it will auto generate
that particular page, right. So this is how you can
create many pages. So there are no limitations. You can create N number of page by using this same method. From here, you can change the aspect ratio of your design. I mean, you can view
your app in tablet mode, PC mode or mobile screen mode. Okay, so you can
change aspect ratio. And suppose if you have to
open your app in new tab, then you will click on
that particular button. Okay. And now, you can use
your app very easily. You can see that it is
interactive. It is working fine. Okay. Let's click on message. Let's click on that
particular profile, but it is not working. It is not interactive yet. So now what we will do, we will again go on
our Google Stitch, and I will select
that particular tab, and simply I will click
on Image New IGreen. Simple. Now, finally, we have
a new screen of LX. Okay, chat with LX. So now let's go on Prototype and reload our page. It
should work now. So let's click on AX
and it is working fine. Okay, guys. So this is how you can make
any page interactive. So if you got any
help by this video, then you can give me
good positive rating and comment so that I
can motivate myself. Okay, guys, bye bye.
10. How to Create a Desktop Application From the Designing to Development ( Full Guide ): So hello everyone. Welcome to all of you in my full master series
on Google Stitch. In this particular lecture, I will teach you
that how you can create UI design for
your development work. Okay? Suppose I'm working
on screen recorder app. I want to create a
Screen Recorder app for my personal use. So before development, we
need to create a UI design. Okay? So here we're going to use Google Stitch for UI design. And for development, we will
use Google antigravity. So this is a mega lecture in which you will understand
how you can create UI design with Google
Tech and after that, how you can execute this design into the real world with the
help of Google antigravity. So we will learn everything
in this single video from the designing the UI to the development of
the final product. We will cover everything
in this particular video. And right now I'm recording my video with my own
screen recorder app. You can see that whenever
I will click on anywhere, it will zoom in or zoom out. Okay. So I have already created
my screen recorder app, but I will also show you
how you can do that. Okay? So this is a function, and I have assigned everything when I
screen suit zoom in, when webcame sued zoom in, when Screenshot zoom out, when web came suit zoom out. I have uh return everything. So if you will read this, create IsCriNRcorder app for me with local setup with
following properties. Recorders would
capture IsCriN webcam, and mic give option to select a specific
device respectively, add Auto Zoom effect in Icreen
when we click anywhere, which means whenever I
will click on any area, it will automatically zoom in. For demonstration purpose, let's click here.
So it will zoom in. Okay. But remember,
one thing Zoom should not look like
it around arrow. Okay, so I have
explained everything. Okay? So you have to
explain everything in a very detailed manner so that you will get
desire output. Okay. And from here, I
will select web. I'm selecting web because I have to generate the UI design
for desktop application. I don't want to create
app for mobile. Okay. So here I will select web and let's hit the Enter button and let's see what will happen. Okay. So, finally, guys, our design is ready
to use. Okay? So first of all, let's
download its design. First of all, let's select every design with the
help of Shift key. I don't want to
select this design. Okay. Now, right click on this and you have a option
called Download. It will download zip file
for you. Let's open it. And you can extract
your file with WinRAR. Extract file o. So let's open this folder. Inside this folder, you will get a four different folder. Okay. Each folder consists
design file, image file, PNG file. So basically, I will open antigravity and I will upload all the screen sort that we get. Okay. I will upload all there. So let's open
Google antigravity. And if you want to learn Google antigravity from
the very beginning, then this is a lecture series
you need to follow. Okay? This is a Google antigravity. Okay. Now let's hit
the plus button. And here we have a media option. So let's open media. And now you have to select
all these screen sorts. Okay? So this is
a hot key screen. Again, upload media
file. Go back. This is a dashboard screen. Then go on Media. This is a video preview. We have to create our app on the basis of this
particular design. Now I will simply type
implement this design into my screen recorder project and hit the enter button.
It is thinking now. It is implementing everything. Okay, so let's accept all. Dece high performance 60 apiece recording loops and Zoom
configuration remain perfectly intact and will work seamlessly
out with new loop. Okay, so I think everything has been
completed successfully. So now let's try to
run this run it. I run. Okay, guys. So finally, our own
screen recorder app, and you can see that
it has replicate everything like we have
created in Google Stitch. It is working fine.
Let's go on library. Here you will see your
previous recorded video. If we will click on
setting from here, you can assign a E or start
and stop video recording. Can edit it also. Okay. Okay, right now,
it is not working, so you can ask Google antigravity
to fix this right now. Okay. Okay, fine, guys. So let's see it is
working fine or not. This is a screen area from where you can
select your screen. From here, I can
enable my web came. And see that my webcam
is visible now. Okay, guys, it is working
actually fine. Okay. From here, you can select
different cameras. Here, I can use my microphone. Right now, this option
is not working. Okay. Right now, I'm not able to switch into the
different device, so I can report for that. Simply, I will go on Google
antigravity and type. I am not able to select different screen webcam and Mc. A, I am not able to
sell it hot keys. And also, we have
one more issue, which is this area is
overlapping right now. Okay? Record button is overlapping. Other pattern. Fix it. Okay. This is how you can generate any kind of design
with the help of Google Stitch and
you can implement that design with
Google antigravity. You can create any kind of UI in Google Stitch and you can implement that
thing antigravity. Now let's try to run our web. Let's see it is working fine. The process have been
completed successfully. Now we are able to
select a custom screen, custom webcam, and
custom microphone. Can select anything, I can
turn on or off anything. Each feature is working fine. Okay. And let's see we
are able to set a or not. Patch. Okay, guys, so I'm able to select
a custom hot keys. Okay. Let's hit
the pencil button. I'm not going to do, but it is actually
working fine. Okay? And also the overlapping problem of record button have been resolved successful
and see that. So if you enjoyed this lecture, then don't forget to give me good positive rating and
command so that I can motivate myself to upload more such content on this
particular lecture series. So don't forget to
give me your feedback. Okay, guys, I will see you in
the next lecture. Bye bye.
 Ankit Shrivastava