Transcripts
1. Introduction: Hello and welcome to Git and
GitHub course for beginners. In this course you will
learn the basics of both get as a toll and GitHub is
a software that we can use. You will learn many features from both technologies alike. Commands that get hears
or GitHub Pages and the GitHub desktop tools to
easier manage our projects. By the end of this course, you will get the
necessary knowledge to start using
both technologies. As you will learn the core
concepts of repositories, branches and branching and code divergence next to the
work that we will do, you will also see different presentations as I
wish to illustrate for you, how the code diversions work and how those should
be handled as well. But now, who am I? My name is Stefano matter, which end I have more
than seven years of experience in
web development. I'm also an online instructor. And next to this
course you can find many other courses from
me here on Skillshare. So be sure to check
those out as well. If you would like to see more tutorials outside
of Skillshare, you can always visit my YouTube channel there you
will find many tutorials, crash courses, and whole project for various different
technologies. And if you would like to
get in touch with me, you can always visit
my website there. You can read more about me, but also see all of my tutorials and
courses in one place. Now, welcome once again, and let's learn more about
the code and code versions.
2. Code & Code Versions: Before starting the course, I would like to
talk about the code itself and code versions. You'll see we as developers
will develop, build, and deploy standard websites, applications, mobile applications,
and software as well. All of that requires code and often not just one
person working on it, but many of us in small and
more significant teams. Now, could you imagine just ten people working
on the same application? How hard can it be for
them just to share the latest code while retaining the quality
of that application. Next to that, they will often
work on multiple tasks, multiple features and bug fixes. That is, when we
need to take care of our code and versions
of it as well. To do that, we can use software, a product that can
track our code changes, keep our code versions, split those in the
merger dose as we wish. There are many of those, but in this course, we will learn how to use Git
in combination with GitHub. And I will talk more about
those in the following video. But what can we get
from such software? Well, now that same team of ten people can match easier
handle code versions. For example, each team
member can use similar, maybe even the same
code and build upon it. Each person from that
team can work on a specific task or
fix a particular bug. Once it is finished, the system itself will merge
all those changes together. And if there is any
inconsistency in the code, the system will catch those and present those conflicts
to team members. So they could together fixed dose and not very much
about it as well. Now, let's learn more
about such a system. Let's see what is good
and what is GitHub.
3. What is Git & Github: Now what our Git
and GitHub, well, get itself is a software that help us track the
changes of our code. Next to call the changes, git will trick all other
changes to our files. So if you would add an
image into our project, get will know about it. Now gets primary
goal is to ensure collaboration and coordination
between developers. Next to that gate will
also support us with the speed data integrity in distribution
for our projects. Now, GitHub is
essentially a provider. It provides us with the posting
for software development, which means that now our code and code changes
could be hosted on GitHub. Next to that, the GitHub will support us with
version controls. And it does that by
using Git as a tool. So essentially we can
use git to manage our versions while also using
GitHub to present those, to see those live. Github will give
us the platform to see our project, our code, and all of our
changes next to that, GitHub will have other
features that we can use, but this is not the
focus of this course. For now, we're focusing just
on code and code versions. And the best way to learn about the GitHub is to start
working with it. So before the
following the video, please do me a favor. Go to an official
website of GitHub. Make sure to sign up if you already have an
account on GitHub, this is not a task for you. But if you don't
have an account, be sure to create one, to follow up with
this course nicely. Now, let's install that, get.
4. Installing Git: Get as a tool must be installed. To install Git, you can
simply search for getting your preferred browser or
visitor get-SCM.com website. You will also have the link to this website in the
resources of this course, the website itself could be an excellent reference for
learning about good end. It's yours because good
has its documentation. But we are here to download the gate so
we can install it. To download Git. Click on this downloads button. This should lead you to
the page of downloads. In here you can simply select an option for your own system. For me, I will
select Windows here. For Windows, I will
hear multiple options. But the good enough
option for me is these standalone installer
for a 64 bit system, your system could be different, so be sure to select
the right one here. Once the download is finished, we can simply run it and installation for it should
be quite straightforward. In this first step, just select the next. Now, we should see
different components here. So just go next here as well. This here is a new option in installation entities to
select how to use OpenSSH. So don't bother
with it too much. For now, you can just select
these pre-selected option. The next step could be tricky, but installing will give us
the regular Git version. Wait for it to install now. And once it is finished, we can de-select the bot to Options and just click Finish. Now, I do have a folder that I prepared for this
course, the gate. You can also create
your own so you can keep the whole course in
one place, if you will. Right-click in this folder, you should be
getting options for good gooey and Git Bash. Both tools were installed
with the gate as well. So you can open either of those or you can open your
systems terminal as well. To be honest, it
doesn't really matter. What you want to do
in your terminal is used the command
of the good version. If gateways installed correctly, you should see the installed
version, which is good. If there is no version, you will need to repeat the
whole installation process. Also, diversion can
differ from mine here depending on when
you are watching this course next to
the good version, you can use the command of good, which should show you
the different commands that we can use
with a good tool. And very soon we will start
using these commands. Now about the tools that
were installed with good, if you opened Git GUI, you would see a tool that
could manage our repositories. And we will talk more
about those sore. If you would open Git Bash, you would see a terminal
specific to get this terminal will work with your system and other tours
if you have some installed. But next to that you
can also use your own standard terminal
if you are used to it. And this is it about the
installation process. So we can now start
working with it. Let's visit GitHub in our
next video and create our first project,
our first repository.
5. Creating First Project (Repo): Do you remember that
I asked you to create your own GitHub account
if you don't have one. Well, I hope you did. That, does now we will work
with GitHub it log into your own GitHub account and
go into this main dashboard. Well, your profile where you
should see your projects. Obviously, if your
account was just created, you won't have any projects. Well, any repos here. Now, make sure
also to open this, get gooey here as well. We want to use it, but I wish to show you
something with it. You see this Gui can
handle our repost. We can create the local repos or use some external
reports as well. We'll do the same thing for us, but it will give us more options and more friendly looking UI. And in this video, we will
create our first repository. First of all, what
is the repository? A repository or a repo is centralized place for
our code and assets. So if we wish to build a
website or the application, having a repository for
such a project would be wise because the repository is centralized
place for our code. That means that we
will be able to manage our recorded versions
in it directly. So by debt you will see
how this set of tools, Git and GitHub, could
come in handy to us. Now to create the report, you will have this plus icon
at the top right corner. Just click on it and select
this new repository. Create a new repository. We would need to
configure it for us. First of all, we will
need a name for our repo. It is vital to name your repo
uniquely with your account. As you cannot have two
repos with the same names. I will name my
repo first project you can call yours as you wish. The next thing that we could
add is our description, but this field is also optional, so I will just skip it for now. The next option is to set our repo to be
public or private. If you set it to public, well, everyone will see it. Private will be
available only for you, end up people that you invite. So if you plan to build
something like an open source, the public is a good option. While the private
option is more for personal and projects
in production, I will set the mind
report to be public as I wish that all of you can access these three per
whenever you want. Next to that, I will
add this read me file, but I will skip this
dot gitignore file. Readme is the file that
serve us to describe our repo and additional
information and so on. While this gitignore
file we read, we will be able to ignore
some of our files, which means that those
files won't be tracked, won't be pushed to
our repo later. But at this point, I can simply create my repo. Once you created your report, you will see these steps to get this repo locally
on your machine, which means that now you can
try to do this on your own. But in the following video, we will clone our
report together.
6. Cloning The Repo: We have our repo for
our project now. We can clone it to get our
repo locally on our machine. I want you to get into your
profile on GitHub and go into these repositories section here you should see all of
your repositories. So be sure to select the one that you created
for this course. For me, it is this first
project in my repo. I don't see much. I do hear my readme
file and I can see content from that
ReadMe file below. We will store all
files that we create an update here
inside of our repo, as this will be our central
place for our project, we are able to create
files directly here, but this is not such a
friendly experience. So we will pull our
repo to have it locally as it will be much easier to work
with it that way. The command for that
is called clone, as we will clone our
repo from GitHub into our local machine to
use that clone command. While that's simple enough, the first thing that we need
to do is to click on this, this green button, which
will pop up a menu for us. In this menu, be sure to
select the HTTP S option, which will present
this URL to us. Url is the official
URL of our repo. So you can copy it or click on this icon on the right
side to copy this URL. Now, open your terminal and decide the route into
the folder you wish. Well, where you want
to store your repo, I have a folder of good, so I will use command of CD, get to enter that folder if
you need to go backwards the folder use dot-dot slash or slash for our current folder. Once you are inside your folder, let's check again if good
was installed correctly. So you can use here
GET command for that. As I can see, all
of these commands, I can be sure that it was
indeed installed correctly. Also, in this list of commands, I can see the clone command. And it describes
that it will clone the repository into
a new directory. So we need this command. Here. I will use clear command, well to clear my terminal. And now I can use git clone and paste my URL for my repo
that we copied earlier. Hit Enter and wait
for it to glow. Once it is finished, I can use CD first dash project to get inside of my repo
that I just cloned. We can see that this command did worked because I am inside
of my first projects. But next to my folder path here, I can see this master, then the arrow, then origin. This here refers to a branch, and we will talk more
about those a bit later. Now, I will also
put my folder where my repo is stored to
check the content inside. Well, it seems that I have my README file that was
created by default, and I know that I have the file on my repo
in GitHub as well. By this here we can confirm that our repo was
successfully cloned. Before we finish and start
the following video, you will need something
called code editor. It is a software where we will usually write our
code and there are many options out there for you that you can use
if you wish to use the same one at a time using visit code, that
Visual Studio.com. This code editor is
from Microsoft itself, and it is open source, which means that
it is free to use. So just be sure to download and install the correct version
for your operating system. As from the following video, we will use such a tool.
7. Making Changes and Tracking: Hopefully you installed Visual
Studio Code as we need it. Now, be sure to open your project directive in
this Visual Studio code. Before we start. Just to mention that
your Visual Studio code may look different from mine. As I probably have
more extensions installed and also
different team. You don't need to worry
because this one to block you from
following the scores. As we cloned our repo in the last video inside
of your project here, we should see only
this read me file. If you open this file, you should see some content
written in markdown language, which is not a complex
language to learn. The good thing about this
visual Studio Code is that we can use the
terminal directly inside. That way, we can write
our code while also handling our repo to
open the terminal here, click on this View and then you will have the option
for the terminal. Let's check if everything
works here as it showed. I will use the command of
clear to clear this terminal. Now I will use Git
and then status. Status, or status
is a command that will give us the latest
status of our branch, which we are
currently working on. And as I mentioned, we will talk more about the
branches in the future. Here we can see that our branch is master and everything
is up-to-date, which means that
we pulled all of our latest changes when we
cloned our repo from GitHub. To clarify further, our local directive is
the same directive, same repo as we have on
our GitHub, which is good. But now how Git
knows about this, you'll see get is a tool
that tracks our code. So it will know about our
changes that we make as well. For example, if I wish to
create a file for my website, usually that file is
called index.html. To do that, simply click on this new file icon and the
name your file index.html. Visual Studio Code
is smart enough to color this file in a green. Why does it do that? Well, Visual Studio code knows that good is tracking
our changes here. And now this file is a
change that we made. So our local directive is not the same anymore
as our repo, as our repository that
we have on GitHub. We can also check that
with GitHub as well. In this terminal, we can again
use a command, git status. And now we should see
a different outputs. It still shows that
our local side, our local branch that
we have is up to date, but it shows more. It shows that we have some untracked files
on track changes, which means that there are different files from
our GitHub repo. And it is because
of this index.HTML. We have this index.html locally, but not on a GitHub. And get this at all, will know about these changes even though those are
not tracked changes yet. So even if people to
delete these changes, nothing crucial would happen. The next to that, it
gives us info, well, information on how to properly track these files with good, which is the story for
the following lecture.
8. Commiting Changes: To continue where we
stopped in the last video, we now have our change
in our directory, but that change is not
being tracked by Git that all get knows about this change, but it is not tracking
that change yet, which means that the change
itself won't end up in our repository to make
good track our changes. Well, we must do that manually. Well, for all of the
new files, at least. To do such a thing, I will
first clear my terminal. Now I can use git add
and then we can specify a file that we wish to
track, like our index.html. This will add our
file to track files. But what if we would have
ten different files? We still wish to add one-by-one. Well, instead of
passing a file name, we can simply use a dot
here that will grab all of our untracked changes
and move those into tract. It will kind of
stage those changes. Now, let's use git
status once again. Here what we can see is that our index HTML file is not
red anymore but green. This means that good
Now tracks this file, but this is still on
our local machine, nothing related to
our main repository that we have on GitHub. To let the main repository
know about our changes. We must store, well, we must commit those changes. Where we commit
those changes, well, those will be ready to be published into our
main repository. To do such a thing, we must use this command called git commit. To this commit command, we can pass this flag, which can specify
with the dash m. Flag stands for a message, which means that
after this flag, we could also pass some message. To pass a message, you must use double-quotes and usually views these kinds of messages to specify what our latest changes
are referring to. For me, I will set my
message to be creating the index HTML file because
we did exactly that. Now that we've
committed our code, one change that we can see in our visual Studio Code is that this index.html file
is not green anymore. It is because get refers
to it as attract file, but without any new changes. And we don't have any new changes because
all of the changes that we made are already committed and ready
to be deployed. If you wish to
confirm such a thing. Once again, we can
use git status again. Now we can see a message that
will say that our branch, while our local
branch is a head of our master branch from our
repository by one commit, if you would visit
your repo in GitHub. Well, nothing
changed there it is because our changes
were all on locally, on our local machine. And that is the reason
why git will tell us that our local branch is ahead of our master branch
on our main repo. And yeah, we did track our changes and also
commit our changes, but still we didn't
deploy those to GitHub. And to deploy those, we will do that in the
following lecture.
9. Pushing Code: As you saw, our changes now
are tracked and committed, but still not on our
GitHub repository. To deploy our changes to GitHub, we must push our code and yes, term is called push as
well as the command. So in my terminal I can simply
use command of good push. The result of this
command will hold the information about our
post changes and so on. But this is not so important
as it is mostly automated. But at this point, if we would visit our
repository on our GitHub, we should see the index.HTML file next to our read
me file as well. This means that
our latest changes were successfully
deployed to our repo. And also in this
top right corner, we can see that we
have two commits. If you wish. You can even click on those commits to see those, we can see, for example,
our initial commit. Well, that was our
first committee when we created our repo. And for me, I can
also see this comet here where I added
the HTML file. Here, we could even
enter in this commit. I can see here this empty
HTML file that was added, which was the change itself. Now, how does Git knows
about our changes? How does it know about our commits are tracked
and untracked files. And how did also connect our GitHub repo to our
repo that we have locally. Well, let me show you how Git works in a background
to do that, go into your directory that you have locally on this View menu, you should select
these hidden files. One of those hidden files is this folder called
The Dark good. You'll see when we cloned
our repo from our GitHub, the folder came with
that repo as well. And as we have this good tool
installed on our machine, it knows how to work
with this folder. So in this combination, bolt will allow us to work with our repo and track
all of our changes. But still, this is all nice and quite easy to handle
when you are alone. But when you have more people in your team and you are
working closely together, well, working just on this master branch
can be quite hectic. So let me show you how can
you create another branch.
10. Creating a New Branch: Now I will go back into the
main terminal that they use. Here the plan is to
create another branch. To create the branch, we can use git checkout. Git checkout is the
command that is used to check our
different branches. If we use only this command, we would have an option to
move from branch to branch. But as I wish to
create a new branch, I can pass a dash B. This is a flag which stands for a branch next to this flag. We must also pass
another argument here, and that is the
name of our branch. Well, the brands
that you wish to make for that a
bit of help here. Try to always name your branches By the future that you are
currently working on. And that would be a standard naming convention for branches. As I wish to add some HTML content to
my HTML file by delta, we will name my
branch HTML content. Once you submit your command, you can see that now
my branch is not mastered anymore,
but HTML content. Even if I would visit my Visual Studio Code in
the bottom-left corner, I can see HTML
content as a branch. By this here you can see that
Visual Studio Code is smart enough to recognize which branch we are
currently working on. Just to mention that in
your terminal you can even use a command
called git branch. This command will
give you the list of branches for your
current repository. For me here, I do have
only two branches and these highlighted branch is my current branch that
I'm currently on. Now, let's create some
HTML content for that. Open up the index HTML file
and use HTML colon five here. By using debt, well, automatically we will
create some HTML code, and this is just
another feature, just another great thing
about Visual Studio Code. Now, in this HTML code, in the body of my HTML, I will add an H1 tag, which will say Hello world. So we could have
at least some of the content by this here, as we have this HTML content, we can make sure that we deploy these contents
to our repo. For that, I will
open my terminal in Visual Studio Code and I
will use git status command. Here we can see that index.HTML, our file is red, which means that it
is modified file, but changes are not
staged yet, well, not tracked, sold to
stage these changes, I will need to use git
add and then that. Now again, we can
use git status to confirm that our changes
were appropriately stage. Next to staging our changes, we should also
commit our changes. And to do that, I will use git commit with the
specific message. My message will say, adding content to an HTML file. As the last thing, we need to push this code
that we created to our repo. So here now we cannot just
use git push command because GitHub doesn't currently know about our branch that
we created locally, because this HTML content
branch is my local branch. It is not yet on GitHub. So I will need to make sure
that next time I changes, I also push my branch
directly on GitHub. To do that, I will
use command git, push than dash u flag. And after that I will use Origin keyword and then
the name of my branch, which is HTML content. With this command, we will set the upstream for
our remote branch, and we will create the
same branch in our GitHub, which will be kinda
the origin branch of our local branch. Now in our GitHub, we can see that the new
branch was created. Even if I toggle this
drop-down for branches, we can see that now we
have these two branches. And if you would select this HTML content branch and
go into the index HTML file, we can see some content while
still in our master branch. Our index.HTML file doesn't
have content at all. This is obviously
good because by this we can split our
code, work on it, and once everything is finished, we can also move that code
back into the master. And talking about that, you can see this pop-up
where we are kind of prompt to create a
new pull request. Well, we will work with this
in the following few videos. For now, I wish to
talk more about the branches so that you can understand the term correctly.
11. What are Branches: The term of branches
and the whole future of branches is created
based on a tree. Here the tree, we
could have our main, our master branch, which could
be the body of our tree. This body main or master branch can branch out into
multiple other branches. And next to that, even those
branches can do the same. Now in GitHub, this is
presented a bit differently. We still have our main
or master branch, but it looks just
as a line from it. We can branch out to
other branches and all of those can be moved back
into our master branch. While we work on
those other branches, we would have our
commits and each of those gametes will be
presented on those branches. And each gamete will have its own specific ID that we
can continuously tap into. Now to show this further a
bit with a team of people. Let's say that we have
three people on our team. We started the
project and each of those people will all
work on a specific task. Each of those tasks or features
should be a new branch. So now our team holds the
latest code while working on new features and none of their branches know
yet about each other. Now, let's say that
each of them had at least three commits
while working on their own. In the end, we
couldn't merge back those changes and features
that our team of work done. And at that point, our master branch will hold
all of the latest changes. Now, obviously,
this merging could cause conflicts as cold
could be interfered. Especially if two
people who've worked on a similar or
the same feature, but you see get is smart enough to merge
code accordingly. And if there are any
conflicts, well, the gate will point those to us so we could fix those. One. Also very common use case of our branches, especially
multiple branches. Well, that use case could be
about multiple environments. As an example, let's say that
we have our master branch, which is our production. That means that our latest
code in the master branch is our live code on our website or an app next to this master, which is directly
connected to our website. Well, we usually wish to set up some development
environment by debt. We can also have a
developer branch sitting just next to
our master branch. Now at this point when we
work on additional features, we will branch out from develop and work
on those features and then merge those well-managed that code
back into develop. So this will allow us to test
our code, don't develop. Maybe even deployed to some
development environment with its own server while its
own database and so on. And once the code is thoroughly tested and ready to be deployed, then we can manage
our develop well the code from develop
into our master and debt. We update our live
website or application. This means that our
website or application will never or at least
should not have bugs. Now, this flow they
just saw is also called git flow and it is
highly customizable. Now, that customization, well, that depends on a team scale and also the software
that you are building. So for bigger application, you want to just have your development and
production environment, but maybe some
staging environment, testing environment, and so on. Now, in this video I also
mentioned conflicts. So let's see how those can
be caused and also resolved.
12. Handling Conflicts: Resolve a conflict, we
must first create one. Conflicts usually happen
if the same code is updated from two branches
or the code is deleted? That way, good. One to know which
color should be merged and it is on us to
resolve that issue. As we have our HTML
content branch here, we can create another branch and make similar to HTML content. That way, we will have HTML
content into branches. And when we tried
to merge those, well, that will fail
because of that conflict. So to do that, I will go back to
my master branch and go back to master branch. I will need to use
command of good checkout and then the name of my
brand, which is master. Now from master branch, I will create a new branch. Similarly as we did
for our HTML content, I will create a site
content branch is, sites are usually
written in HTML code. Now in this branch, my index.HTML will again be empty because we branched
out from our master branch. So in this file, I will again use that HTML colon five to create the
starting code for HTML. And now I will make
again HTML element in my body with site
content text inside. Now we have here
our HTML content. It is very similar to our content that we have
on our other branch. So let's make sure
to push this code as we did for our
HTML content branch. To do that, I will
first use git add dot. This way, I will stage
all of my changes. Then we can use git commit with the message of
new site content. And finally, we can use
command of git, push, dash u, then origin, and then our branch, which is site content. This way we will
push our branch and our content in our
GitHub repository. In our GitHub, we can now see that we indeed have
our three branches. Lovely. Let's cause the conflict. Now. To cause the conflict, we will need to go back to
our HTML content branch. So git checkout HTML content. Now we can use git merge
to merge two branches. And I will use a merge, the origin of my
site content branch. And here it is, the conflict exists in this
message that was shown to us, we can even see
where the conflict exists and it is in
our index.html file. So let's open that file. In my Visual Studio Code, we can already see the conflict as it is obviously
highlighted for us, called like this should
not be merged as it can cause many
bugs for us here. Well, we would have
two different titles, but to be honest, I truly wish to have only one. So we will need to
resolve this conflict. Now, I wish to go here with
this Hello World title. So I will need to go
with the current change. Otherwise, I would select
this incoming change. The other title now disappeared because we selected
the current change. And by that we also
resolve the conflict. Now, let's make sure that our latest changes are now
committed and also pushed. So in my terminal, once again, I will
use git add dot. After that, I will
use git commit with the message of
fixing conflict. And finally, I can
simply use git push. Obviously, we don't need to
create the new origin here as we already have our
branch in GitHub repository. In our GitHub, we still
see our branches and now the HTML content
holds the latest code. So how can we merge these
changes into our master branch? Well, we will talk about
that in the following video.
13. Creating Pull Request: As we plan to merge
our changes from HTML content branch into our master branch,
what do you think? Should we do that the same
way as in the last video, kinda manually
merge content from our HTML content into
our master branch. Well, for now, there won't be any conflicts because
we already fixed those. And yes, we can merge
branches like that. It won't be any problem. But also it is not the
best practice as well. When you have your own
main branches like master or a developer
branch for development, or even test the
branch for testing. Well, you don't wish just
to manage the code inside. A much better solution
for that is to create a pull request from your own branch into the
master branch, for example. That way we can review
our code once again, check if everything is okay. Also, we can comment on our
code and we can do much, much more to do such a thing. Click on this pull requests
in your GitHub repo. Now from here, we can just
select this new pull request. Now we are prompted to
select two branches. The first branch is
the branch that, well from where we wish
to manage our code. And the other branch is, in which branch do we
wish to merge our code? So I wish to merge my
code in the master, and I will emerge the code
from HTML content below. Now we can see it committed that is in front of our
master branch, which means that when we
merge these code together, all of those commits
and content that was changed will be also
on the master branch. For now. We don't have any conflicts. And even if we would have any
conflicts than this button, to merge our code, we'll show those that are to us. So let's just simply
create our pull request. Once we do that, we are redirected into
our polar request. Here, we can check our code, kinda review the
code once again. Also, we can add other
people to review our code. Like other reviewers,
we can also label our pull request and
also much, much more. So why these pull
requests are good idea? Well, we could have team members come and review our code. Maybe they could spot
something that we didn't, so we could refactor it. Let's now click on this merge
request and confirm it. It should not take long. But going back into
our code page, we will see that
our master branch holds our index HTML file. If we would enter that file, we can see that the changes inside are the latest
changes that we had. Now that you know about the
workflow with Git and GitHub, Let's practice a bit. What I want you to do is
to create the new branch. This branch must serve us
for making the CSS file. In that file, I
would like you to color our H1 tag or red. Then be sure to stage
and commit your changes. And once you are finished, then you can create your
own pull request and manage all of those
changes into the master. And don't worry, if you are
still unsure of your skills. We will do that together
in the following video.
14. Usual Workflow with Git & Github: So did you have any success? Don't worry, if you didn't, you're here to learn. So let's do that now together. The first thing that we
need to do is to create our branch where we
will make our CSS file. And the code is we are currently
in a different branch. Let's check out our
master branch and ensure that we have our latest
changes from that point on, it should be easy to
create a new branch. So to go to our master branch, we must use command of
git checkout master. Now, as our local master branch is behind our GitHub
master branch, we should pull the latest
changes so our code is the same and we don't
cause any conflicts. That is a really simple, just use Git pool
below now we can even see the changes that were pulled from GitHub repository. And now as we have
our latest changes, we can create our branch
where we will add our CSS. For that, I will use
the command of git, checkout dash B, then name of the branch will
be CSS dash content. So let's open our code
editor and add some CSS. The first thing to do is
to create our CSS file. So I will name a
mine styles.css. I will also import my CSS
into my HTML with a link tag. And finally, what I
wish to do is to color my H1 tag into the red color. So for that, jump
into your CSS file, target your H1 tag, and use the color red on it. At this point, we are pretty
much finished with our task. We can even test it to be sure that everything is alright. To test it, just to
double-click on your index.html file to open
it in your own browser. And here it is. It seems that our title is red, which means that we can
publish our changes now, sold to publish our changes, we have several steps. We will need to
stage those changes, commit those, push those, and finally create
our pull request. First of all, I will stage
those with git add dot. Now I can commit those with
the git commit command, and the message will be
coloring title in red. Finally, we can push these
changes with the command of git push origin CSS content. At this point we have all of
our changes in our GitHub, but not currently in
our master branch. So let's create the pull
request for that here. Now, we can create our pull request and
we should also select our branches from
where we wish to monitor our code and
into which branch. So I will select CSS content from where I
wish to merge my code. And I will select
the master branch into which branch I
wish to merge my code. Be sure to check your changes
and if everything is okay, you can just merge those and that should
be pretty much it. This is the usual workflow
with the Git and GitHub. And don't worry if you don't
get it the first time. Try it a couple of times. And when you work
on a real project than it should be fine. Also just to mention
that working on more significant project
or in a bigger team. Well, at that point, get flow can vary. So this usual git
flow that you just saw could be much more complex, but that is something that
we all need to deal with. Now, let me show you the
tool that you can use. So you don't even need to use your terminal almost at all.
15. Github Desktop: Tool that I wish to show you
is called GitHub Desktop. For that, visit,
the desktop that GitHub.com to get access
to the tool here, be sure to download and also installed the tool for
your operating system. And once you do that, you can
continue with this video. If you have GitHub
Desktop installed, be sure to open it. First of all, let's
talk what it is. Well, GitHub Desktop is an excellent desktop
application that we can use to see our repos. Next to that, we can work
with our repos and we will be able to use all of the commands without using the terminal. So we can just
click View buttocks by entering into
this GitHub desktop, you won't see much,
but you should have the option to
add your own repo. From here, you can
create a new repo or get one from the GitHub or
even at the local repo. In this example, let's add our local repo because that way we will
use the local one, but also we will use
the one on a GitHub as our local repo is
also stored on GitHub. When you select the
local repository, be sure to choose the path to your repo on your
machine and submit that. Now we can already see our current branch
here and also repo. So let's make some changes. I will go into my Visual
Studio Code and I will add a background color
to my body to be green. This will definitely look ugly, but this is not
the design course. What is important
here is that when you visit your GitHub Desktop, you can see your change
very clearly from here. Now, we can commit our code and pass some message
for that commit. When we do that,
that should stage and commit our code in one goal. If you do something like that, after that, you should have
this option for Porsche. And it's obviously
to push our code. So with just this simple
click of a button, we can immediately push
our changes to our GitHub. Once that is finished, immediately we will get the
option for a pull request. So let's do that as well. Clicking got that option will
read electors to GitHub. We can already create
a pull request, so we can just check everything
and merge it together. By this, you can see that maybe GitHub Desktop is the
easier option for you. But still, I would
advise you to learn how to use the terminal
with the commands, because the terminal
won't be used just for a good
many technologies. We'll use terminal with
specific commands to install, update, delete
their own features. So you should get used to it. Now to the next
lecture, forking.
16. Forking: Forking is a particular term
and the future as well. It is used when you wish to
create something public so everyone can see and also
everyone can access that. So as an example, if you wish to allow
other people to clone your code and also continue
working through your code. Well then forking
will come in place. The only thing that you
need to do is to make sure that your repo
is public repo. And with Git and GitHub, you will be able to
fork those reports. That forking is a whole future enhances our development
community quite a bit. Now, let's make sure
to fork our project. Well, as it is so good
to fork the repository, I will first sign out from my GitHub profile
because otherwise I won't be able to fork my own repository as
I am the owner of it. Once I'm signed out, I will be able to see my repo. Well, still see my repo even though I'm not signing
into my account, because my repository, when
I created my repository, I set it to be public. If you set your own to
be a private repository, you can just go into
the settings of that repository and
change that as well. Otherwise, you can keep it as private and just watch
through this video. At the top-right corner, I will have this form button. As I'm not logged
in in any account. And to fork someone's
repository, I must be logged in. Well, I will be automatically
read directed to login. Once again, this time, I will login with another
account so I can fork the repository from
my first account once I select this fork option, well, everything from there, we'll be quite automatic. Sometimes GitHub can ask you about some
specific permissions, but it is straight forward. Once the repo was
forked, it is yours. So you can do with
it what you wish. For example, you can
continue building on it. Or you can commit
your code and create the pull request directly
to the main repo. Also, this is how open
source software will work. We as a community, can take someone's code well, open-source code, we
can fix some bugs. We could add
additional features, suggest additional features. And we can again commit
that code and create our own pull request from our own forked repo into
the main repository. The owner of that
main repository can accept our pull request, which means that we
together improved that tool, improved
that software. And with this forking, we are almost finished. I wish just to show
you one more feature. This feature is related
just to GitHub, and it is called GitHub Pages.
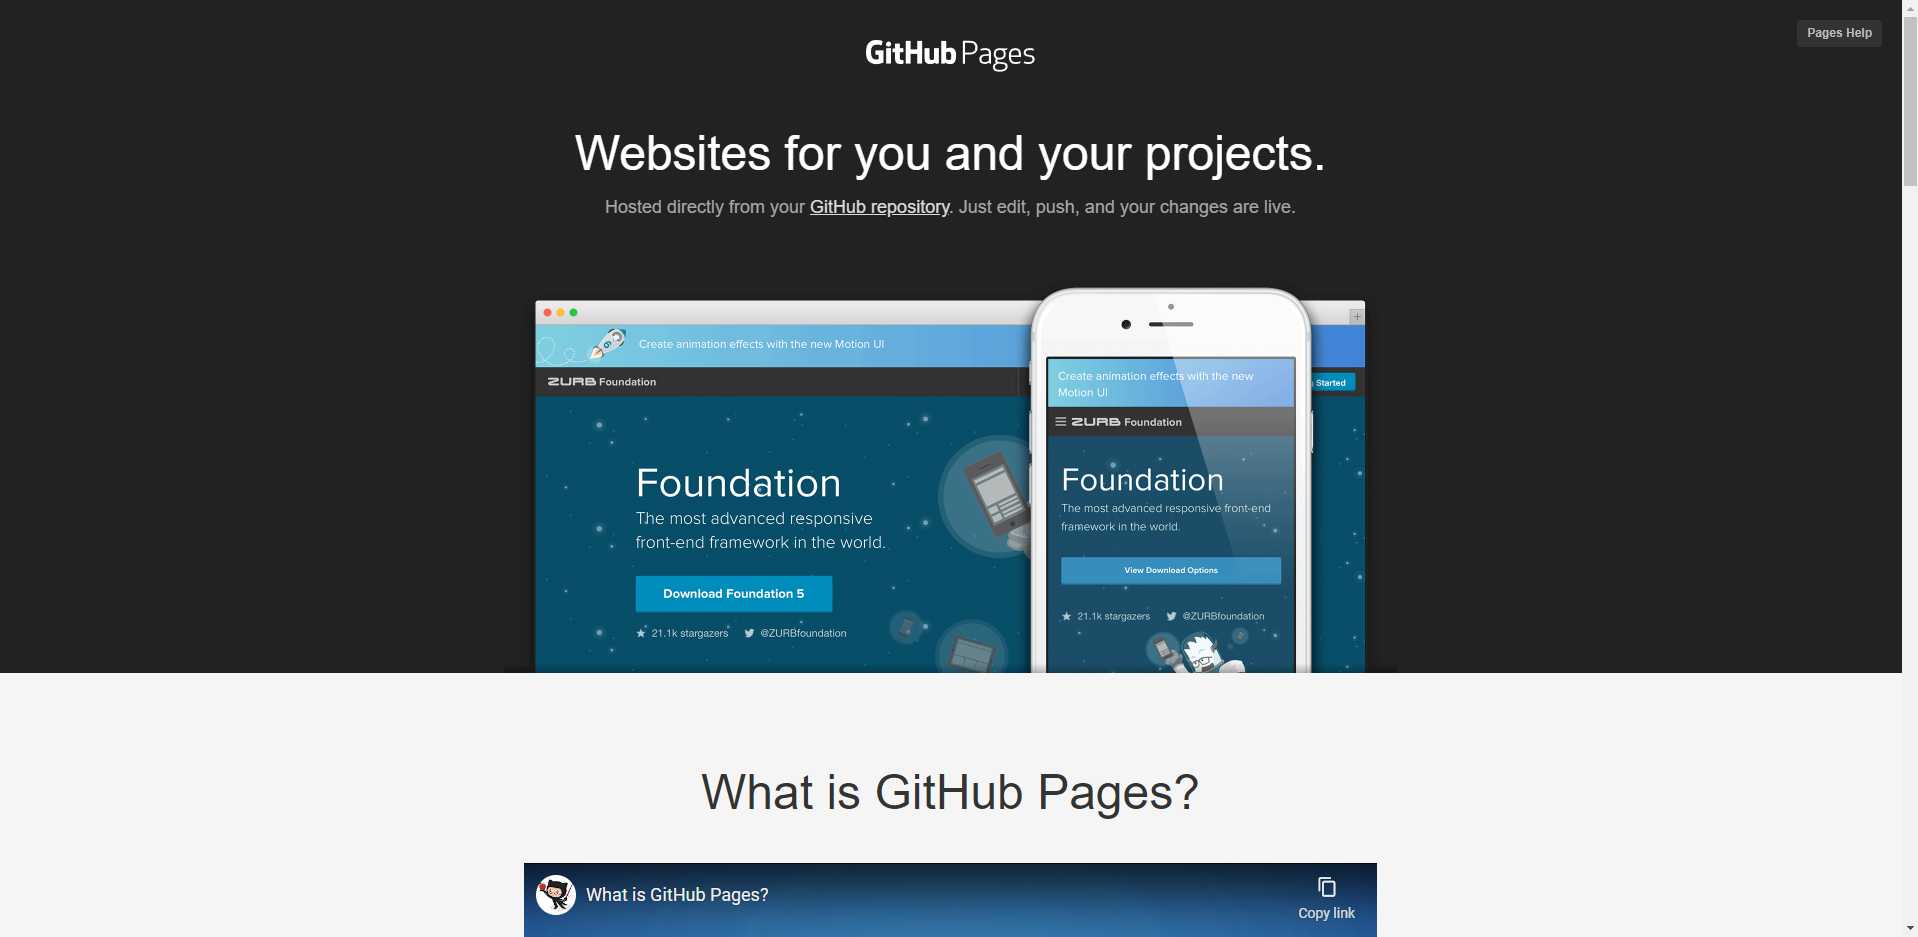
17. Github Pages: One of the best features
that GitHub has, and also one of the
latest features is called GitHub Pages. Github Pages will allow
us to easily host our content on a domain that
GitHub will prepare for us. That domain is usually
named by our repository. And it requires us to have
the index HTML file at the root level of our
repository so that it can read and also pull
the content from that file. Let's now together deploy
and publish our code well, our project that we created
into GitHub Pages to do that, visit your repository and
click on this Settings tab. Now, on the left side
of these settings, there are many
different options, but please be sure to
select pages here. Here we can set up and
configure our GitHub Pages. And to be honest, we won't need to run any script for that. It will do everything for us. The first thing that we
need to do is to select the branch from where we
wish to deploy our content. Well for us, this will
be our master branch. Also be sure to select the
root of the project is our index.HTML file
is at the root of it. Now, just save this and you should see the
link to your domain. The link itself should hold
the content of your website. Also just give it
a bit of time as sometimes it needs a few
minutes to present it live. But once everything is finished and the
website is deployed, you should see what I see here. Well, my content,
and to be honest, it is quite a great website. Well, it's another
tutorial about that, but about Git and GitHub. But with this feature, GitHub pages, we are
pretty much finished. Let's just go into
the following video to say a proper goodbye as well.
18. Thank You and Goodbye: Well, I guess that
this is it guys. We've finished this course together and I truly
wish to thank you. You're taking this course
means a lot to me. Now what you could do is
also leave a review as well. The review itself can be simple and also be
honest about it. Was this course really
careful to you? Also? Was it tailored for beginners? And did you learn anything
useful and about that, I hope that you did or at least upgraded your
knowledge a bit. As we went through
a lot of features. As an example, we
went through Git and GitHub in general will be
installed Git as a tool. And you were also
introduced to it. You saw what it is for
what we can use it, and also the usual
workflow with Git. That usual workflow
included creating a repository, cloning
that repository, staging our changes,
tracking those changes, committing, and pushing
our code as well. Obviously we didn't learn, just get here, but also
we use the GitHub. Github helped us to
manage our branches, also checkout changes
and commit while we were also able to merge
our code when we wanted, you also understood
the term of branches. You saw how can
you manage those? You also saw what
is pull request. We used a couple of
poll requests as well. Next to that, we did fix conflicts and also
forked our repo. Finally, we finished
the discourse with two great
features from GitHub, GitHub Pages and GitHub Desktop. We use desktop to manage our
repo without a terminal. And we also use the pages
to deploy our code, our website to a domain
given by GitHub. Now, if you liked this
course from me and you would like to watch more
content from me as well. Well, be sure to visit my
YouTube channel for that. On my YouTube channel, you can find tutorials for various technologies like
Bootstrap, Angular, nested JS. Next to that, there are crash courses as well
as whole project. Here on Skillshare. You can also find many
different projects from me. So if you're
interested in those, well, be sure to
check those out. And finally, you can always visit my official
website there you will find all of my tutorials and courses that I have as well. Thank you once again for watching and finishing
this course. I hope that I will see you
in other courses as well. Bye-bye.
 Stefan Omerovic, Full Stack Web Developer and Instructor