Transcripts
1. Introduction: Hello everyone and welcome to this angular crash course
here on Skillshare. Through this course,
we will work with Angular and
the basic solid. Next to that, you
will get to know all major features that
Angular has and support. So by that, you will
actually install the angular and build
something nice varied. The features that we
will work with to these scores would
be angular, CLI, components, services
and routing, also http module and
much, much more. Now, what will we build
through these scores? Well, this course next to the features that
we will explore, we will also build a
real life project. The project that we will
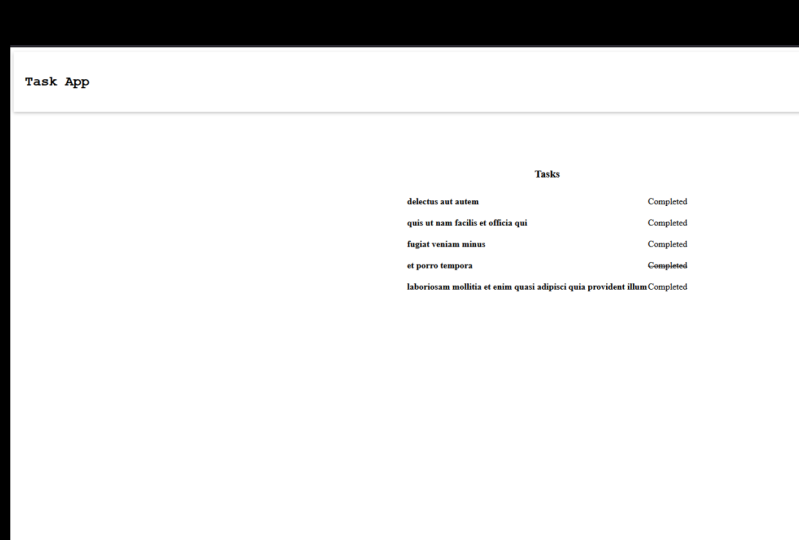
build tasks application, this application that you
can see it right here on the screen, looks
simple enough, but it actually supports
all of the major features that we will build a layout retained lot with also do the routing for
multiple pages. We will also use HTTP
module to pull the data from the server and actually
show that data on a screen. Next to that, we will
work with our data like complete or incomplete
one of our tasks. Now, who am I? Well, my name is Stefano matter, which and I hear more than seven years of
experience in web development. Next to that, I'm also
an online instructor. Next to this Skillshare course, you can find me on
YouTube as well. On YouTube, you can find my
America channel where I post new tutorials in web
development on a weekly basis. So be sure to check that out and also subscribe to my
channel there as well. Now on Skillshare,
next to this course, you can find in many other
courses that I have as well. Those courses that you can find will be on
different technologies. So there is another
course on Angular, but if you would like to
watch the courses for different technologies like
Bootstrap, JS, JavaScript. You can find those as well. Now, I would like to welcome you once again to this course. So let's code.
2. Angular Installation: Hello once again and welcome to the official first
lesson of this course. In this first lesson, we will go through some
basics of Angular. We will install the Angular. We will see what is
angular terminal tool and also we will create our application and
run that application. In the next lesson, we will talk what is
Angular at exactly? And we will go through some of the cool features
that Angular has. Right here on my screen, you are currently looking at Angular official website
and a lot of data IO. On this website you can find everything that you
need about Angular, you can see some of the cool
features that singular, Yes. And also you can see it's
own full documentation. Angular hazard technologies
are vast technology, so it is only natural that the documentation
is big as well. In the left side menu here, we can click on this Getting Started and click on this setup, open up this page and
scroll down a bit. Here the first thing
that we can see and do is install the Angular CLI. By installing this singular CLI, we will also install latest
angular stable version. This CLI is actually
really important. We will use it to
create our application. We will also use it
to create a bunch of different features
that Angular supports. And also we will use it
to run our application. Now to install the
Angular and Angular CLI, we must copy this npm install dash g at angular slash CLI. One more thing before
we install angular, be sure also to have the latest version of
node.js installed. Well latest recommended version. The importance of this
node is not in Angular, but in its own tool called npm. Npm is the package manager
that will allow us to install a bunch of different
modules like angular. And in Angular script, you can see already NPM here, which means that we are already
utilizing on that and PM. So once you have
Node.js installed, it will also install
this NPM automatically. At that point, you can simply
copy this command here. Now in your terminal, you can paste this
command and hit enter. This command will
automatically install Angular and Angular CLI for us globally on our machine
so we could use it. Once this is installed, we can use EMG as
a command here. And g comes from
that Angular CLI. Next to these send g, I will use dash, dash, help, a flag here to present all of the help while helper
functions from Angular to us. Here we can see bunch of different options and
commands that we can do. For example, energy bill
will actually build our project and redeployed can actually deploy our project. There are commands
for generator to generate specific files and also run to actually run or
serve our project as well. Now this here is that
Angular CLI tool that I mentioned already. The tool itself is
really important to us Angular developers because
we use it on daily basis. So let me show you already one cool thing that we can
do with these CLI tool. So the command that
I will do is N G nu, this engine, you must
have a name next to it. And what it will do
relative to create a new angular workspace for us. Well, the new
Angular application. So first of all, I
will use clear to clear my console so you can
see everything clearly. Now, let's together
use this command. I will lose mg, then New, and I will pass the
name of my workspace. Well, the name of
my application. We will build this
task application. Then I will name my
app, task dash app. Now, this here should
generate our application. But before it does that, it will also ask us a
couple of questions. First one would be, would you like to
add angular routing? Angular is a library,
also supports routing. So I will here go, yes, because we will work with the routing in this
course as well. Next thing is to choose a style sheet format that
we would like to use. Angular is a default
comes with CSS, SCSS, Sass or Less. I will simply here choose a CSS for more default application
that we can build. At this point,
angular will create all of the necessary
files installed, all of the packages that, well, the app needs. Once the application
is installed, we could actually start
to working with it. You can see also a bunch
of warnings on my screen, but that is not
necessarily a problem. Those are just warnings. And maybe for you, it doesn't even show
those depends on our workspace and also
it depends on a machine. So once again, I will
clear my terminal here. Next thing that I will do, now that I have my application, I could use cd and then the
name of the application task. By doing this, I
will move myself directly into that
Angular workspace. Inside of this
angular workspace, we could actually
run our project. To run the project. I already showed you one
command which is N G serum. So we can simply run this
project on a local host. Next to descend you serve. We could also use, use dash, dash Open or just dash O to open automatically our application
on our preferred browsers. So I will do exactly that. Now, Engler, we'll
grab our project, compile everything together,
and random that for us. So let's just wait a bit. Once this is finished, we should see this
dummy will default application that was
built by Angular for us. Angular does this automatically and it already has
some coordinate. The example code is just the useful links that
could be helpful to us. You can see the links where
you can learn Angular, also the CLI documentation and bunch of different
features that Angler has. Also you can see the features
that Angular also support. It's like creating
a new component, which we will learn
about a bit later. But this starting code is
not important for us at all. But as I already mentioned it, let me show you right
next to my terminal, I opened another
one because it is really useful to me to
have two terminals open. You will learn to this course. Why? Because we will also
generate and create new components or services
that Angler has and supports. And for that, we will still keep our applications running
on the left terminal, while on the right, we can use it to generate
those features. But here what I will do, I will use code that to open my task app in my
Visual Studio code. So here it is. This is official
angular workspace. And on the left side
here we can see, well, all of the files
that Angler has for now. In the next video, we will
learn more about the Angular and what each of these
files does for us. So let's immediately
jump into that.
3. What is Angular: So what is Angular actually? Well, Angular, simply put, is a JavaScript
framework and it is used to create
single-page applications. What does that single-page
application me? Well, those
applications would be applications that have routing and also different pages without actual reloading those pages. So for example, here on
Angular official website, when I move myself to
the Features page, you can see that the
page was changed but it didn't refresh
the page at all. And that is that
single-page application. Everything is presented
on a single page, but it will re-render the content needed
for a specific page. Now, next, Bangalore, there are many different JavaScript
frameworks that you can use. Some of the most popular next
to Angular, React and Vue. So what makes singular
different and stained from those
like reactant view? Well, Angular is a vast
framework in its own code base. It will also support routing
and even HTTP module itself. Next to that, there are many different Seibel
liabilities of Angular that are already
integrated into angular. And there is even a third
party library light outage JS that comes by
default with Angular. So by debt you can see
that finger is really vast and there is quite
a lot to learn here. And you will be able to build quite amazing applications
from a get-go with Angular. Now because it is such
a vast framework, it is obviously much
harder to learn framework. But let's talk a bit about
the popularity of Angular. Where does Angular come from? First of all, well, Angular was developed
by Google itself, and Google still works on Angular daily to make it better from a year or
two years to come. Every six to nine months, you can expect a major
update of Angular, which will move its own version. Currently we're on version 14. And as I said, England is
right at the top next to view. And yet as the most popular JavaScript
frameworks out there. Now, before we dive into code, I just also wish to
show you some of the cool projects that
were built with Angular. For example, lift as an app, was built with Angular, Tinder as well, and
Snapchat as well. There are many
different projects out there that were
built with Angular. Many of those were
quite successful in it. So by this, you can
see that you can actually build whatever
you wish with Angular. So it is just a new
to decide you wish to build some small application
that we will do, right in this course, or a bigger application
like one of these. Now, let's come
back to our code. Let's talk first of all a bit about the angular and
the code here as well. First thing that I
need to show you are those node modules. This node modules
will be automatically installed when we will create
our angular application. For those node modules, it is really important to
have this package dot json file and the package.json file in this spec
and that JSON file, we can see some simple
information about our app, like the name and the version. We can see different scripts
or commands that we can run, like NG serve to run
our application. And we can see different
dependencies that were automatically
installed with Angular. You can see that
Angular has a core, a module that is
obviously installed here, and that is the core features
of Angular, the rabbit. Quite different features
as well like animations, forms, router, and so on. And I also mentioned this, but adage JS as a library, even though it is a
third party library, not angular library will
be installed here because Angular quite utilized on
this outage JS library. Now if you wish to change the setup of your
Angular application, you can always open this
Angular.js JSON file. Here you will see, well the whole schematic
of your project. Actually you can see the name of the project and the
whole schematic of it. So for example, if you have some external styles
that you wish to use, like importing the
Bootstrap library. Well, you can do
that right here, or even Bootstrap JavaScript. You can do that
in a script here, right here you can also see different configuration for the angular project
like production itself. You can set up your own
configurations right here. Now this is just the setup
of the Angular application. Let's close these
files and go into this SRC folder,
the source folder. Inside of this folder, the first thing that is
really important to us is this main.js file. This means that p is file. We'll grab the main module of the Angular and
Bootstrap that module. The main module of the Angular application is
usually this app module, which you will see soon. In the next video, we will
work more with modules. Angular really uses
these modules and you will see through this
course how it does that. But in this file, angular, we'll grab this module and run the application
based on that module. So it is really important that everything that you have
in your application. Must be important in
this app module file, so the application could
actually know about it. Now in here we also
do have styles.css, which is our global styling. We will come back to that a bit later and also index dot HTML. This is that HTML file which
will be always re-rendered. This is that one page,
single page application. So in here we can see
this approved and by this app route
approach when pulled the current route that we
are currently looking at. And by configuring
correctly our routes, we will be able to weld, present a different content
for a specific route. That is how the magic happens. That is why we don't need to
actually refresh the page. But we will be able to move ourselves from
the route to route, from our page to page, and the content will
automatically be re-rendered. Now in here, we could have different environments
that we wish to set up, like production or just normal our own
development environment. Also, we could have our own
assets here like images, fonts, and so on. And we could have, well, the actual application,
this sexual application. Well, there are quite
a few files here. Let's put us to all start
from the main file, like this app, that
module that P S bar. So first of all, why? Well, peers is an extension
for a TypeScript. And angular by default, uses the TypeScript throughout
the whole application. So it is really important
for you to know at least the basics of TypeScript to
actually work with Angular. But let's come back to
this app module file. In here we can see this
decorator of N G module. By using this energy module, we are saying that this file will be used as a
module basically. And as this is our main
module for our application, our app module inside we should have all
inputs that are needed. For example, our app component, that was the first
component that you already saw in a previous video, that first page that was created
by default from Angular. There is also a browser module which overs plus quite
a nice utilities. And without it, we cannot code through the
Angular application. And there is also
an outing module, which is the module that
we created on our road. Do you remember that we were
asked if we wish to use Angular routing and we selected yes by that command when we
generated our application. Well, that exactly created this routing module and it automatically imported
it for us here. Now, here you can
see that components must be important
in declarations. Modules must be important
to imported in imports, there are providers
like services and bootstrap part stands for what the app should
actually run. And for us it is AB component,
our starting component. So let's open that
starting components. Let's open up the HTML file. And this here is actually the whole code that we can
see currently on our screen. Coming quickly
back to my screen. This is exactly that code. Now, this code is not important so much so we can
actually grab it. And let's use H1 tag here, and let's say hello world. By doing that, I could open
my local host and we can see that content now is
actually just the hello world. Now for this to work and actually reload our
application automatically, you still need to keep these local host running with
that in deserve command. Coming back to my code now, I can see that next
to this HTML file, I can see CSS file, that spec, that ts
file and ts file. These are all the files that are belonging
to one component. Usually when we
create component, we will have four files
for that component. Instead of coding HTML, CSS, and TypeScript all together, angular will actually split
those in different files. So by visiting this app
dot component dot ts file, well here the setup of that
component actually happens. Each component will have its own T as well
TypeScript file. And it will have this decorator
of components inside. We will have a selector. We trivial, well, we can use it to select the debt component
and show with sound. For example, the selector
here is app route. And if you remember, in
our index.html file, we are using that
component right here as an app route component. Now, next to that
selector or weekend, specify the template and the
style for our component, and that would be our
HTML and CSS files. So in a nutshell, that is about the
components for now, we will work with those
a bit later more. Next thing here is this
dot spec that ts file, spec files in Angular. Well, those are
used for testing. So if you need to write
any automatic test, you will do those here well, in its own spec files. And the last thing that
we didn't actually check is this app routing module. These separate routing
module, we just, well, it will use this decorator of energy module to
setup the module. You already know that it is
important in our app module. So our application actually
knows about this module. And here you can see the
setup for the route, which we will learn
more about it later. But those routes must be passed in a router
module from Angular. So the Angular application could actually know about
these routes. Now next to these features
like module's components, there are many
different features that Angular has and supports, like services, pipes,
directives, and so on. But before I end this video, Let's go back into our
style that CSS here. In here, I will style my
application globally. For example, I will
grab all of my elements on my application and put
the padding on those to be, for example, 0 and also
margin to be 0 as well. Next to death or the
grabbed my body. And final set the font family to use as a font family
to be Courier New. And also I will set the color
of my font to be 333333. That's it. Now seeing my application, we can see that our hello
world is indifferent font. We can also see
that there is no, a lot of space in here
at the top and left, and we are ready to
start our application. In the next video, we will learn more
about the modules. One of the main
features of Angular.
4. Modules: Now we already talked
about the modules, but I wish to say
a few things more. We are also able to
divide our modules into our root modules
or a feature modules. Wrote module would be our main modules that we could
have for the application, like this app module. But future modules would
be as specific modules that will be used for a specific future
of our application. Let's say that your application supports authentication and data authentication
can have a lot of different pages like
login or sign-in. Maybe reset your password. And small. With a
lot of those pages, there will be a lot
of functionality that will come as well. So it is only
natural to separate that odd relative indication as a feature and create the
future module for it. Which means that all of the
components that we will have, we don't need to import those
in our app module here, but we could import those in our future module
that we could create. Still, our app module
should know about those. So we could just import
that feature module in the SAP module and the whole application
will still work fine. One cool use case of these
route or future modules is, well, we can see
it when we open up this app routing module. In this separate routing module, we can see this
keyword for root. Well, a method called for road. To this method we're
passing our routes, which means that
these routes are main routes of our root
of our application. Well, the main routes for our application coming back to that authentication future, as that authentication
feature will have its own pages and also
its own future module, it is only natural to create its own future routes
that we can use. One really cool use case
of these future modules. Well, is this shared
module in Angular, we, as developers usually create this shared module where we
have all of our, for example, components, services, and
pipes that are used well, shared, widely used
throughout our application. So in here, I will now
create my shared module. And this is again, we will again use the
CLI tool for that. So to do that, we lose in G, G for generate, M for module. And then I should use the
name of one of my module, which will be shared. Here we can see that the module was actually created for us. Coming back to my application
on our left side, I will have here
a shared folder. Now, inside of that
shared folder folder, I can see my share that
that module, that ts file. We can see that
this shared module has a less code
than our app module because it is not
so important for this shared module to have
all of that starting code. This is the first feature
module that we have. And this module is actually used for shared features
that we could have. For example, in
the next lecture, we will create our top
bar for our application. Instead of creating that top
bar on all of our pages, we will actually create our shared component
of a top bar. Hence, we will import
that shared component inside of this shared
module and also exported. So our application
could know about it. By debt, we can use that top bar component
wherever we wish, and we can always
have it on our screen without reusing it
over and over again. So again, this shared
module is really useful to us because
it can always hold all of our shared features
that we could have like different components or
services or pipes and so on. So now that I mentioned
that top about a component, let's go into the next video
where I will talk more about the components and we will
together create that top bar.
5. Components: Now next two modules, components are also really
important feature of Angular. Without components,
we wouldn't have any pages and even any
content on our screen, right in this video, I will show you how can we create one component in Angular. The component that
I wish to create is that top bar component
that we can use. The top bar components
should be presented on all of our pages that we could
have on our application. So it would be good to create some kind of
reusable components. Well, all components in Angular are actually
fully reusable. But for us here we will go
a step further and created this top bar component to
be in our shared module. That way we will indicate
that the top bar component is a shared component and it doesn't belong to
any specific page. So to create this
top bar component in my terminal by using the
CLI tool from Angular. Again, we will use
command of N, G, then G for generate,
see for component. And I will generate this
component in shared folder, which is our module
slash top bar. Now in my code editor, I can actually open up
that shared module. We'll shared folder,
then top bar. And here I can see
four different files. There is HTML, CSS, TypeScript, and also test
file for this component. I already mentioned this
at the beginning that each component will usually
come with four files for it. These four files will actually
be that one component. So we have divided
our HTML, CSS, and TypeScript, so we don't actually write everything
down in one file. It could be quite a long file. So in this top bar
component, Angular, once it generates
debt component, it also adds this kind of dummy content
for that component. So let's make sure
that we present actually this component
on our screen. So going into top
bar TypeScript file, I can see the selector
of f dash top bar, which means that in my app
dot component where I have, where I have this Hello World, I will remove this
Hello World now, and I will add
HTML5 element of f, f dash top bar. And this should actually
present our top bar component. But right here, we
do have an error. And also, if we would
open up our local host, that same error will be
visible on our local host. This is good because Angular is much easier to
debug this way. The reason why we do have
this center is because our app component doesn't
know about App top bar. And the reason why
doesn't know, well, this app top bar belongs
to this share the module. So inside of this shared
module in declarations array, I can find this
top bar component. But if I would go to my app
dot module dot txt file, there is no such components, that is just AB component. So what should we do here? Well, we should import
this top bar component in our app module so we can use it through our app module
components that we could have. But because we have
this shared module, from this shared module, I will simply export. So I will HIT US exports array and I can hear past what
they wish to export. For me that can be
top bar component. Now, instead of importing my top battery component
in my app module, I can simply import my
share the module here. This way, I will
import shared module and everything that is exported
from that shared module. And with this, we
simply fix that error, which means that we are
now using our app top bar in our app dot component
dot HTML file, checking my local host. Right now I can see the
text here of top bar works, which means that the component
is actually presented on my screen in the content of that component is top bar works. Talking about that content. Let's create some here. So in here, I will remove
this paragraph and I will add one div with
the class of top bar. This class will be
later used for styling. Now, this top bar you
can hear two sections. First section can
be a logo section. The second section can be
an navigation section. So now that we have
these two sections in my logo section,
I will, well, I won't use any
image for a logo, or they'll just use H2, which will say tasks. So task up. So let's use singular heel here. Now for my navigation here, I will create navigation
with unordered list. Then first list item
will have an anchor tag. This H ref can lead to a hash. For now, you will
later see how to do a proper routing in Angular. Here, what I will
do, I will say, whoa, now I will
copy this list item. Down below. And for the second list
item it can say about. So we can have two
pages Home About page for our application checking. Now while our local host,
this is what we here, just some kind of logo, which is task cap texts
and two links here. So let's style this
application is we are writing this code
in a top part component. We are able to open
up the CSS file of it and style this
component actually, to style this top bar, I will grab my top
bar divided by n. I will display that as a flux. Then I will justify content
inside as space between. And I could add some box
shadow, for example, of 02 pixel, five pixel. And let's say it can be
zeros, zeros, zeros, zeros, zeros 0 for D to have
some transparency to it. Also, I can set up the
bedding of 20 pixels. Now this will be our top bar. Now, let's style our navigation. I won't bother with the logo. So top bar, then my navigation section that they have and then unordered
lists that I have. The list style for these will
be none because I wish to present links one next to each other and not
an actual list. Now below, I could again
target my top bar. Navigation unordered list and each specific list item below. For each specific list item, I will display those as inline
to be next to each other. And I will add the margin on the right side to be ten pixels, so they could have a bit
of spacing between those. Now, again, target my top bar, then navigation that
unordered list, list item and each specific
anchor tag in our list item. Here, I will set font
size of 20 pixel. Then I will use text
decoration to be none. And let's change the color here. Color of my links can be 333333. And finally, I will again
target my anchor tags, but this time hover
effect on those. Then also active and also focus. So for all of these, I will just change the
color to be 777777. And with this, we actually
have our content, HTML, styling, our CSS
code for our top bar. In how does this component
knows about this? Well, in top bar dot components, the ts file, we can see where
we declared our component. There is a selector, but there is also a specific template and also specific styles
that is past that template. So this is basically the
setup for our component. On my screen right now
we can see our top bar. There is log on
the left side and home and about links
on the right side. I can even zoom a bit so
you can see it better. The good thing
about this top bar, well, it's a shared component, which means that when
I go to my homepage, I will still see, I should still see my
top bar component. And also when I
go to about page, I will again still see my top bar component once
I set up everything well, my routing and the
pages as well, talking about debt, right? In the next video, we will work with our routing.
6. Routing: So routing in general, well, on a Web is rarely used today. There is almost no website or no application that has
really has no routes. So basically whenever you
wish to move from page to page or click on a specific
article to read that article. That would be the routing. All of those routes must be set up inside of
the application. And also all of
those routes must know which content exactly
to present to the user. And in England, that
is really handy because Angular has its
own angular routing. So why it's important that
Angular has its own routing? Well, many technologies today, even the popular ones, does not support the
routing from the get-go. So you'll need to set up
the routes and the routing. And it is quite
hectic to work with, but in Angular that
is already setup. So if you remember
when we generated our application next
to the angular module, we also had this
app routing module. And this is the place where
we will set up our routes. For those routes, I wish to
hear my home and about page. So I will create now two pages, home and about page. Pages are nothing different
than just components. So what we could do actually is generate here two components. So again, let's
use that CLI tool. I will use N, G, G for generate C4 component, and that will generate
my homepage here. Once this is finished, I will repeat the same command, but this time for about page. Now that we have our pages
without components for a home. And also about page, well, we could set up our routes
here in these routes array. So to set up the route here, I will use the object. And inside of this object, I can use the path
property, this path. Well, we should also declare a pair to where we
wish to lead our user. So as I have that homepage, I believe my user
to a home route. For this home route, I should also create
the component will use the specific component
that should be presented on this home route. And for me, that will
be home component. Just be sure at the top to
import this home component. Visual Studio Code is smart enough to do that
automatically for me. Now, let's create
the next route. So comma here and then the next object for a pet of about, then the component for this
page will be about component. I also used here
capitalised about. I will change that to, well, all letters to lowercase. Well, at this moment, we do have our routes
here in the URL. If I would change my
local host to slash home. Well, home will still be
in the URL, which is good. If I would change it to about. It is still there. So Angular actually
knows about this. There is no content
on the screen, and we also are unable to change the route
by clicking here, you can see just cash here, but we will fix that. So also when I come to
the local host port 8200, there is nothing here
because they have this home page and
also home route. It would be good to automatically
redirect the user to the homepage to set up that re-direct at the top
of my array here, I will create the new route. This new route will have, well, it should have a path which will be just
the empty string, which means when the user
just visits our domain. And once that happens, I will use property
of re-direct to and I will redirect the
user to my homepage. And the last thing, we should also use path match, so how our pet should match. And here I can use full
match for my path. So now quickly
checking my browser, if I would remove
this column from my page and just
enter my domain here, we can see that still we
are redirected to the slash home because that red
direction was in place. Now because I'm
on this homepage, I should see some content here, at least that dummy text
that comes with Angular. Home works, right? But there is no content here even though the
home route exist. And we know that we have
that home component. Well, even though we have
that routing in place, angular still doesn't know where it should show
those components. So in my app dot
component dot HTML file, where I have this top
bar, right below, I will use element
called Router outlet. This route and outlet
will basically outlet our components inside. So depending on which route
we are like home or about, it will grab those
components that are used for those routes and present those right here in displays wherever we use
this route and outlet, if I would use it
somewhere else, it will present those
components there. And now we can
already see a change. We see these homeworks. If I would manually change
the page to slash about, then I would see about works. But I said the manual and right, so we are still unable
to change this by check, by changing the
links here, right? We are just move to that hash, which is not existing
route for us. So for that, we
actually need to go in our top bar component
where we have these links. So in Angular and instead
of using a draft like this, we have something differently. It's called a router link. This router link can
lead us somewhere. For me here, it will lead me to the slash homepage because
this is a home route here, also four down below. I will again remove this
H ref and use hear slash. About. Now we do have some errors here. It's because this
router link is not known property to this
specific element. And it's not that it
is unknown property. It is because in this
top bar component, well, this top part component
belongs to the shared module. This shared module doesn't
know that we actually use routing in some of
its own components. So it is really easy
to face this in the inputs array where we
usually imports are modules. Well, we can just import
module of router module by importing this module and
also be sure to import it at the top from an
angular slash router. By importing it, we
will lose those arrows. Now what does this mean? If I would click on About, it will move me to
the About page. If I would click on home, it will move me to the homepage, which means that we have our pages in the
routing in place. Now, next to this
routing that you saw, the redirection and
also how to set up the links to work with
routing and the pages. That is much more to routing. The routing is a
whole module can be setup also for a child modules, we could have children routes, we could have also
dynamic routes by specific ideas or by
specific slugs as you wish. We could also pass data from one route to
the other route. We could also tap
into our routes and do something specific
with our routes, may be pulled the
parameters from the routes and much
more, much more. But the routing in Angular could be its own course, to be honest, it can take probably an hour or two or three just to
explain it fully. So instead of doing all of
that for this crash course, we will just continue
with this crash course to finalize our
task application. And we will continue
with the services.
7. Services: So another really important feature of Angular,
it's called service. Service or services are
actually injectable features, which means that we could inject each service
wherever we wish, in our different components, in our different directives, pipes, Wherever we wish. And why would we want that? Well, services because
those are injectables. Those are mostly store
our data whenever we wish to tap to our server
to get some specific data, or we just wish to store locally some of the data
in our application. We will mostly do
that in our service. And as the service is
injectable feature, it can be injected
wherever we need it and pull that data from
that specific service. To create one service, we will again use the CLI. So here I will use N, G, G for generate, S for service. And the service is injectable
wherever we need it. We will again generate this
service in our shared module. This time, I will
generate this service in shared module than
Services folder. And then the syllabus will
be named Data Service because we will
actually work with the data inside of this service. So now in my Visual Studio Code, I can go into my
shared folder than services and open up
the Data Service. When we generate the service, it will come with two files. One file is the class
of the service itself, and the other file is a
test file for this service. So we will now focus on these data that
service dot ds bar. At the top here we can see that the syllabus itself
is injectable. And here we can also
see that we are using that injectable decorator
to describe this service. So where can we inject this service by
default in Angular? The service will
be provided well injected on a root level, which means that wherever
we use this service, we will be able to use it if you wish to
provide this service. Just specific module. You can specify that
module here and actually Important debt service in
providers array of that module. That way you can have a specific services for
a specific modules. But there's, this is
a small application. We don't need to
worry about that. We can just leave it as it is to be provided on a root
level so we can use our service wherever
we need it as the service will hold our data. Let's work with some
dummy data here and also share that data to
different components. So what I will do here in
the class of this service, I will create a public property. We don't really need to declare a public or
a private property, but it is a good
exercise to do that because angular is a
TypeScript technology, right? So the TypeScript at the end will be compiled
into JavaScript by doing those specific
keywords like public or private
or specific types. The TypeScript will do
that much more smoothly. So here I will create the
public property of username. And this here will be
the type of string. By default, this username
can be John Doe for example. Now we have this
username data in our service and we can share it from here
wherever we wish. So what would be good
for us to share it here? Well, after my constructor here, I could actually create
public property, which will be get username. This here will be a method and it will return a string back. Why it will return
a string back? Well, we can use here return
and then this username, this means that wherever
we use this method, it will agree about
username and it will just return the value
of that username back. So let's actually try and use this username in
our homepage here. So open up the TypeScript
file of this goal. At this moment, the home doesn't know about
this Data Service. So in the constructor
of the hole, we can create the
private property, which can be data service. And we can set the type
to be Data Service. Just be sure to import that
data service at the top here. Now, the home component does know about
this Data Service. Also, what is the
difference between private and public properties? Well, public properties, you can use those outside of this file, but private properties cannot be used outside of the file. Those can be used just in that specific class that
those are declared in. So now actually in this
Mg on init method, we will grab our username. So for that, let's create here first of all, public property. Again of username,
which will be a string. And by default it will
be an empty string. So now in this engine in it, I will use this username
and set it equal to this, that Data Service
dot get username. And by this, this
get username will return back the string
of username back to us. And that string
will be stored in our username property
inside of these components. But why did we use
this in this NGO? Ngo minute is a lifecycle
hook in Angular. This lifecycle hook
will run whenever this specific component a
loaded, well initialized. Which means that when
we visit our homepage, this code will run. There are other also
life-cycle hooks that we can use N G
on changes in June, destroy, and so on. But we won't bother
with those here just because those are much
more complex to explain. And this is still
a crash course. So how could we know that this username
actually has a data? Well, let's go into
our HTML here. And instead of this paragraph, I will use H1 tag here. Here, I will use property
binding in Angular to do that, use curly braces,
double curly braces, and inside we could
pass our property. For that, we can pass, for example, our username. So this username,
once it has the data, it will be presented here in H1. So we can present that. Well dynamic text. Now, checking my application, we can see John Doe here. If I would go to the
About page about works, come back to home. We can still see this John
Doe, which is really good. This means that we store
our data in a service. Then we move that data into a specific component and
we showed it on a screen. But you can now say, well, that was just the username, that's not actual data. This was just a dummy
data that we created. Well, in the next video we will actually work
with the http, where we will dispatch
kept calling from HTTP to pull some data from a server and actually present some real
data on the screen.
8. HTTP: So HTTP or Hypertext
Transfer Protocol is an application
layer protocol. It is designed for communication between a web application
and web servers. It does that through multiple
methods that we can use. Like get method to get some specific data or post method to save
some specific data. Next to that, it can be used to pass headers to the
web server itself. So we could, for example, authenticate our user
with the proper token. Also, we could send specific parameters
through this HTTP call. And that way, our server could tap into our
database based on those parameters and pull specific data based
on those parameters. Something like that
is mostly used for filtering data or sorting data. And HTTP does all of that with a simple request and
response messages. Now, http is nothing
specific to Angular. It can be used in any kind of technology that is able
to contact the server. So we could use it in, well, other JavaScript frameworks
like React or view, we could also use it
in raw JavaScript. Next to that, we could
use it on a silver with NodeJS, Python, C-Sharp, etc. But Angular has its own
module for the HTTP. Many other technologies doesn't support their own
module for HTTP, but the angular does. With that module. We are able to use HTTP and
all of its features well, through much easier way
which you will see soon. But the first thing
here is that we need to import this HTTP module
into our application. So our application
could actually use it. To do that. I will open up my app data module dot txt file. In the input array of this file, I will add HTTP client module. Now, this won't be
imported automatically. So at the top here, I will import this HTTP client
module from Angular slash, common slash HTTP.
And that's it. With this here, our
application knows about this HTTP client module that we can use and we will use it. So we will use this
HTTP module to pull some specific data
and we will pull the data from our
JSON placeholder API. This API will cost for aswell
many different dummy data. So we could actually use it
to test our application, which is really good example for this course that we
are working with here. If I scroll down this
JSON placeholder website, here we can see different
resources that we can use, like posts, comments, albums, photos to those users. If I would continue
scrolling down, we can see different
HTTP methods that we can use git to get the data
post to save data, PUT or patch to update data, delete, to delete data. Now a link to this
website you will hear in the resources of this course so you can always
visit it and try to work with a specific
data from this website. The data that we will
work with is this to-dos. So even though we are creating
the task application, we will make sure
that these two, those are actually
our own tasks. So let's go back into code. Let's go in our
shared services and open up this data that
service dot ds bar. Now that we work with
this get username method, I could actually remove this
getUser main method and also remove this username from here because we won't
need it anymore. Also, I must go into my
home than home component. Remove the username from here, and actually remove
the call to this get username method related to the input of this Data Service. I will still keep it here
because we will need it. So going back to
my service here, I should be able
to pull the data from that JSON placeholder API. To do something like that, we must indicate to this
service that we will use that HTTP client module. And HTTP has its own
provider that we can use, which is also injectable, which means that we could
inject it here in this service. So I will create private
property of HTTP, and I will set the type
of it to be HTTP client. This HTTP client must
be important from an angular slash,
common slash HTTP. Just be sure that before this, you actually important
this HTTP client module in your own app,
that module file. That way you can use
this HTTP client. Now, let's create the
method that we're going to pull those to-dos for us. So here I will
create public method because we will use this
method outside of this file. And I will name it, get tasks. Even though we are
pulling the two doors from that adjacent
place called the API. I will still renamed those to be tasks because we are creating
here task application. This gets tasks method will
return something to us. It will return the observable. And the observable should
have a specific type here, which I will come back to. First of all, what
is observable? You can see that
observable is something that belongs to
that add extra yes, library that I mentioned at
the beginning of this class. Well, Alex JS library is vast. There are many methods and
many features that it has. So I won't go in depth with it because it can take the whole
course just to explain it. But in a nutshell, observable is something that
will wrap our data for us. It will wrap our tasks. As it will wrap our tasks, we will be able to well tap into those tasks and use different
methods on those tasks. So if you need to
transform your data, the observable is
good option for you because you could actually
map to those tasks, transform those as you wish, and return back just the data
that you need for us here. This must return
observable here, because HTTP client from England always returns
the observable back. Because that way it
is much easier to work with data by
utilizing that observable, which you will see so, but now related to this generic type that must
be passed to this observable. Well, we must pass the actual datatype
that we'll go here. And for now, we don't know
actually what kind of data we will get back from
that JSON placeholder. So I will set the
type to be any here. And later when we
have actual data, we will get that
data and check what, well what actual data we have. And we will create a specific
model for that data, but more on that later. Now, inside of this method, we could actually write
our code to get the task. So here I've used the return and I will return
this, that HTTP. So I'm calling this HTTP model. And only time will have different
methods that I can use. One of those methods
is this getMethod. Inside of this get method, we should pass the
string to the API. Well, the string of actual code that will get the data for us. Going back to the JSON
placeholder website, clicking on these two doors, I could see here that it
will pull 200 to-dos for me. Right here in the URL, I can see the actual URL
that will do that for us. So let's just copy
it Back in code. I could simply paste
these two doors here. And as it will pull too much
to do is like 200 of those. I don't really wish to work
with such amount of data. So I could hear
set the parameter, which is underscore limit, and I will set it equal to five. This way, I will pull just the five to-dos from
that JSON placeholder API. This underscore limit
is not always the same. Every API will have
its own parameter. So if you are building
your own API, you will have your
own parameters. It just happens that the JSON placeholder API
uses this underscore limit. And with this, we are pretty much finished with
our Data Service. Now, let's go to our
home components in the, actually get that data
in this component, in my home component here, in my energy on, in it. I will again use this
dark Data Service. In this time, I will use a
method called get tasks. Now, this method
should return, well, our tasks back to us, but as it is observable, we can use specific
methods on it. As it is observable, it will return that
wrapper of data. So here we could
actually use that subscribe to subscribe
to our observable. By subscribing to
our observable, we will actually get
direct response from it. So here I will use response, which I should set the specific
type of this response. The type will be the actual data that
we are getting back. Currently, we don't
have the specific type, specific model for that data. So I will use any here, but I will come
back to this later. Once I hear my response
back my data back, I could actually use
here arrow method and simply console.log
my response. So I will use console log of
data and then the response. So we could actually see
what we are getting back. The good thing about
these subscribe, it doesn't only
handle the response, it can also handle the error. So here I could actually
pass the error. And console dot log that data. So if error occurs, we will know what this error is. And we could actually
handle it by showing some kind of alert
on a screen, for example. The last thing before
checking our data, I will open up the
home dot component dot HTML file views
here this username. And as we remove the username, we don't know much about it. So I will just move this text to be Hello World once again. So we could actually make these
components well workable. Now, inside of my
application, if I would. Well, check the console
of the application. I could actually, I will
actually see this data log, which will present the
array of five items inside. And all those items are actually the to-dos from that
JSON placeholder API, which means the tower
request for the data was successful and we are actually getting the response
from that HTTP. Now, the last thing before
I close this video, it is already long enough. I will go back
into shared folder and create another folder
is site called models. Inside now I will create
the model of my data. So here I will create a file
called Task Data Model Ts. So in this file, I could export the
interface of a task. And inside of this task, I should declare what kind of properties might data
of tasks should have. And in my application, I have those
properties right here. I have a completed
value of Boolean. I have the ID of number, title of string, and user
ID of number as well. So in my task, I will create completed
value of Boolean. Then I will have ID of number. Then I will have
title of string. And finally, user ID, which will be number. So now that we have
our task model, we can actually use this
model instead of debt. Well, any type that we use. So first of all, back into my service right here, I'm using the observable, which will return any data back. So here it should return
the task data back. Just be sure to
import the task here from a proper task
data model file. In here. It won't actually
return just one task, but the array of tasks. So here I will set that it
will return back task caret. And as I'm declaring that
the generic type here, this getMethod, should also know which kind of data it
will get back for us. So I will pass
again generic type here and again use that
task array with debt. We should also fix
the error here. Now from here, let's go to our home dot component
that P is file. In here. We do have our
response which we'll return back Just that any type. So here I will set again task from a specific task
model that we created. And it will be Task array. With this, we are pretty
much over with this lecture. You saw how can you
use HTTP module? How can you get the
data from your API? Pass that data from a
service to your component, and actually created
the model for the data and prepare the data to be usable
in your application. In talking about that, in the next lecture, we will do exactly that.
9. Templating: So related to this lecture, we will actually store
our tasks locally in our home component and use those tasks well to
present those on a screen. So first of all, let's store those tasks here where I'm
getting the response of data. I could actually store that response in some
kind of property. So here at the top, I will create public
property of tasks. And it will hold
the type of task Curry because it
expects that data. And by default, it will
be an empty array. Because by default we don't
know if we have any data. But once we get the data, once we get these
tasks inside of here, I will use this dark tasks
property that we just created. And I will set it equal to the response that
we're getting back, which are those tasks well-to-do from JSON
placeholder API. Now that we have these, let's go to our home,
that component, that HTML file and create some content and also
style that content. So inside of here, I will create the deal. In this div can hold
a class of tasks. This way it will be
easier later to style. Inside here, I will put
the h3 tag for a headline, which we'll see just tasks. And after the headline, I could actually create
the list of tasks. To do that, I will
create the photos task, which will hold the
class of tasks. And what should this
task actually here? Well, we could span, well, the title of the task and
I will set that in a span. I will also wrap it with the
bold text and we could type, for example, learn Angular. This is one of the
tasks, for example. Now, next to this
title of a task, it could be good to actually use also the completed
value of the task. So we could see if we
completed specific task. So here I will
again use this pen and inside I will just
use completed text. Here you can use some
kind of icon or an image, but I will use completed texts. It is easier that way. Now, let's grab this
whole task and copy it. Let's say three types, 12. So these are three tasks. Let's, let's change the
values for those tasks. Here, I will say wash a car. And also the last one
can be by a meal. That's pretty much it. In our application, we should
see something like this. Let me zoom in a bit. So we do have our
title of tasks. Each task will have its own like title and also
completed the text for it. Let's also style
these a bit now. So to style these, I will open the home dot
component dot CSS file. Inside, I will grab that
main tasks that we have. I will set the width of
the div to be 500 pixel. I will set the margin
to be 100 pixels, top and bottom out
of left and right. So we could align it
to centre in Daniel set the text align
center as well. Now each task that to help, I will grab that task. I will display that
as a flux and I will justify content inside
to be spaced between. And last thing, I will text align everything
to the left side. This way with this space between our title of a task should
be on the left side, in this completed value
should be on our right side. And finally, I will
grab that task again. And the span elements
inside that I have, I will just put a bit
on margin on those, like ten pixels, top and bottom, 0 pixels left and right. And this is what we shall now, these are the tasks. This is the list of those tasks. But obviously these
tasks are hard-coded. We're not actually using the tasks that we
got from the API. So let me show you
how can you handle the templating in Angular. To do something like that, I will go back into the HTML. We will use the
directive called MD4. Md4 is a loop that will loop
through some specific data. In our example, it will
loop through tasks data. And for each task specific, we will generate
one bundle of code like this task wrapper, this task div that we have
with the content inside. As we will need
only one of these, I will actually remove
these two tasks. This was, these were just the dummy task
so I could show it. How can we look? But now let's use that energy
for directive on a deal. I will use star then mg
for to use that loop. So here I will loop
through my tasks. So for each task I will get the variable of life
task for example, this here you can
name it as you wish. I will limit task for
a naming convention. So let's task or tasks. So now we're looping
through these, through all of the tasks. And everything in here will be, will generate it five times
because we have five tasks. So instead of for
all of those five, just showing this text, I will remove that
learn Angular. And here I will use
the task itself. And on a task, I do have property of title. So each task should have
a proper title here. And now here it is. We do have our appropriate tasks from that JSON placeholder API. You can see that all
of the tasks will have their own proper title and the completed
value next to those, which is not yet used properly. We will use it properly in the next video when we work with a specific styling for it. But before I finish this video, I forgot that we also
do have about page. So let's add some content
to this About page. For this About page, I will create one div, which will hold the
class of main content. In the inside, I really create the paragraph with
some Lorem Ipsum text. This paragraph, let me grab this text and actually
copied few times like this. Now from here I will
open up the CSS file, grab that main content
class that we have. I will set the width to
it to be 900 pixel and also margin to be 50 pixels top and bottom
out of your left and right. With this here, with our
homepage almost finished. We will also have
the about finished, well, About page
finished as well. For the About page, I don't wish to show
anything much because the whole content of the task application will
happen on a homepage. But as we already
have this About page, Let's just put some
dummy content to it. You can play around with it. You can use some images. You could, for example, set the title and even
utilize the tasks from here, also an About page. It's up to you. But for the next video, we will actually
work with styling. So you can see which
different styling we can use in Angular. And also, how can we use dynamic styling as well
for each specific element.
10. Styling: So what are those
different stylings that we can use in Angular? Well, first of all, when we generated
our application, you already saw that
you could choose a different style
sheet format like CSS, Sass, less, and so on. But also when styling your app, you have different
methods as well. So for example, if I would
open up this angular, that JSON file, in this file, there is a Styles array here. We could actually import
here external styles like from third party libraries like Bootstrap or tailwind. Next to that. In our application,
we should also have these styles that CSS file, this is a global styles file and you can see
already the comment here that you can add the
global styles to this file and also import
other styles files. This here is very
helpful when you are working with SAS, for example. So you can import all of
your own files that you have into one file next to debt. If I would go to home. Inside of the home component, we can find a CSS file, so we are able to style each component with its
own specific styling. And if I would style something specific in this
component, well, that CSS code is only
specific to debt component, so it won't be passed
to other components. And obviously there is inline styles that we
can already use in HTML. But we can also further
utilize these inline style for some specific styling for our specific
elements that we wish. So for example, I do have
these tasks on my screen, and some of those tasks
are actually completed, but I'm not indicating
that here at all. It is just completed
the text here. So now I will use that inline
styles to style only the specific tasks that are completed with the line
through these texts. So to do such a thing on
my completed text here, I can use these angle
brackets and use style here. By this, I am binding the style attribute
from this span element. Here, I will use dot and
then use text decoration, which means that I'm targeting the specific attribute
of text decoration. I mistyped here.
Text decoration. Yeah. And I will set that
to be equal at here. What I will do, I will check
if my task is completed. So I could check if it's true or just tasks
that completed. We'll also check if
the value is true. If that is the case, I will use line to
rule styling here. Mistyped again, you have. And if that is not the case, I will just use
empty string here, so no styling here at all. Now on my screen, I can actually see that
these completed, this task. He has this completed value. It is already completed
the task, which is great. How could we further, we'll work with this
task application. Well, it would be good
if we could actually complete or incomplete
one of our tasks. So for that, I will
move myself to home that component
dot txt file. And here I will
create one method. So after this engine in it, I will create a
public method because this method will be used
outside of this file. And the method will
say complete task. Method won't return
anything back, so it will be a
void method here. This complete task will expect the task to
be passed to it. And the task should have
its own proper type, which is the task model
that we already created. And what I will do, I will grab that task and a
completed value on it. And I will set it equal
to, well, just reversed. So task dot completed again with this exclamation
point at the beginning. So this means if the completed value is
false, it will be true. If it's true, then
it will be false. So that way we could complete an uncompleted task
all in one go. So how could we use
this complete task now? Well, on my home,
that component, that HTML file, I will use it right here when I click
on this completed text. First of all, let me bring this down a bit so you can
see everything clearly. So we have our styling
here and here, I will now use click event. To use click event,
we just use braces here and we have options
for different events. I will use click event, and once this text is clicked, I will use that
complete task method that there is currently an error because this complete task actually expects
a specific task. So here I will just pass the
specific task from our rule, from our task, our NG for loop. Now back into my
application here. If I would click on, for
example, this completed texts, we can see that
it kinda complete that We'll move its value
from false to true. And if the value is true, then we will have
that text decoration to be aligned through. So we are completing
our tasks here. Also, I could click again to complete
those tasks as well. So with this, you
saw how simple it is with just one
function in the bit of inline styling to have a specific styles for each
of our tasks in our array. And with this here,
we are finished. This is it, this is
our application, but we're still here. One thing to do, and
that is deployment.
11. Deployment: So when deploying the
Angular application, we hear multiple
options to do that. Also, before we deployed, there are a couple of steps
that we should take care of. For example, we should
build our application. As you know, our current
application that we hear, well, all of the components are actually TypeScript files. Typescript is something that is not readable on a browser. The browser reads JavaScript. So by building the
Angular application, we will also compile the TypeScript code into
our JavaScript code. And that is why Angular is JavaScript framework even
though it uses types. So where can we deploy
this singular application? Well, there are
multiple options. We could simply deploy it, for example, to Netlify, or we could build
some custom silver and deploy everything
together to Heroku. But I will take probably
the easier approach here, which is deployment to Firebase. That approach is also
more professional because the Firebase is very
often used with Angular. So why Firebase? Firebase and angular will, both of those are
actually Google products. By dead. Those are very well
connected together. So it is really easy to actually deploy England
application to Firebase. Firebase is a Google product, will offer many different
features to us. It can offer to us like real-time database or a fire
store, its own database. It can offer to us a hosting that we will
use in this video. Well, to publish our application
to Firebase Hosting. There are bunch of
different features and products that
Firebase users. And you will see those Wellstone when I enter actually
into the Firebase. So before we do anything here, be sure to have a
firebase account. So grab your email and
sign up to Firebase. It is free, so you can do it. Once you have your
account setup, then you can follow along with this video and actually deploy
your tasks application. So if you have your
own Firebase account, you should be redirected to this console workspace
of Firebase. So in here, we can
actually create a project. Well, a Firebase project. You can already see that I have some dummy projects from
previous tutorials, but let's focus on this one. So to create the project, click on this Add project. Obviously in, in here, we should write the name of the product so it
will lose task up. The name will be Task up, but there will be a specific id assigned to that
project actually. So it will be unique
to your, your profile. From here, I can
click on Continue, and then we're asked about
the Google Analytics. So will be used
Google Analytics so that Firebase could set up
that automatically for us. I will disable this year
because actually we don't use Google Analytics
and our task cap is very straightforward
application. So we can simply go and
create the project here. You can wait a bit, and project will
soon be created. After that, you should be redirected into the
dashboard of your project. Well, whoops, My mistake. You weren't ready directed. So you should click on these Continue button to be
resurrected. And here it is. This is actually a project. This is your project. Let's put us the wall, see what we have in this
Firebase project. This is not important
for this tutorial, but it is really good to
know because Firebase is really high product out there and it is very often used. So here, first of all, we can get started
with Firebase by deploying one of our
applications like iOS, Android, VAB, even unity and flatter applications are
supported with Firebase. Also, on the left side, we have different options. If I toggle this build, there are everything that
will our application needs. Basically, we have
specific authentication, we have database, we have
a real-time database. There are extensions, storage, hosting, and many other
things, even machine-learning. Now, this is just
about the project, but if I would go to
release and monitor, this is that part
with the analytics, it will check the performance
of the application so you can see if there are
any crashes next to debt. The analytics itself,
the Google Analytics, is fully converted here. So you will have
your own dashboard and you can follow along
with the real-time, your specific events,
your conversions, you can follow basically everything inside the
Firebase dashboard. And finally, there
is engaged section, which is mostly used
for marketing purposes. Button annex level,
I would say there is AB testing that you can set
up, reach your application. That is, add more
of that you can connect and actually have your ads directly in your
application presenting. And there is much
more to do with that. In here you can see
all of the products actually that Firebase supports, and that is quite
a lot of products. You need to know that
each of these is a basically a separate
product that is supported with this global Firebase product,
which is amazing. So I will go back to
my project overview. And we can start from here. And I liked the once again, before we do anything
with the Firebase and we connect our project
with the Firebase. We should build our application. We should compile that
TypeScript into JavaScript. To do that, you can
simply use NG build. In previous versions of Angular, you also have to use
dash, dash prod. This is a flag that
will indicate that you need to build
for production. But in this version, it will do that by default. So just use command of n g build to actually
build your project. If the build worked successfully
inside of your project, you should have a new folder called beast for distribution. And inside should be
or task application, but this time in the
JavaScript code, well, code is quite
bundled, minified, so it is hard to read, but that's pretty much it. Now we have our distribution
application, well, our application ready
to go to production. Now back into our
project overview. Inside of here I will go into this build section
and select hosting. Now, inside of hosting, we should enable it or
get started with it. So I will click
on this and there are basically the steps
that you need to take. First of all, we must make sure that we have Firebase tools installed globally in same way that we did for Angular CLI, because Firebase actually has its own CLI tool that will help us with Firebase
applications. Well, Firebase products, I do already have this
Firebase tools installed, but I will still
continue with this. So you can see the
process itself. Now in the terminal, I will actually remove this, will clear this part
of the terminal, and then I will paste that
npm install dash g for globally and Firebase to hit Enter and wait
for it to install. Now, once it was installed, I will again clear my terminal. Now, the next thing, because we have Firebase
tools installed, we can use Firebase login
method to actually login your own CLI tool V to
the Firebase on the web. So be sure to run this method. I also mistyped Firebase login. And be sure to run this method, you will be redirected to the
web version of the login. You will log in with your
proper account and you will be able to come back
here and continue working with this CLI tool. For me, I'm already
logged in with my user, so I don't really
need to do that. But what we need
to do that is you initialize the Firebase
project in our application. To do that, I must run a
Firebase in it to initialize it. So Firebase will just
ask for confirmation or we're ready to proceed
and I will go yes, here. Now in here, maybe this
is zoomed in quite a bit. Let me zoom out a bit
so you can see it. But in here, we have different Firebase
product that we can use like real-time database via
restore functions hosting. This part is what we need. Also, there are two
types of hosting. One is to host
directly from GitHub. And this, the first
one is to configure the files that we wish
to publish the hosting. And optionally we could
set up the GitHub. And I will go with death. So here I will hit
space to select it and then Enter to confirm it. Now once again here now we have option to use our
own specific project. So we can use existing project, create a new project
with Firebase tools, The Fighter based on existing Google Cloud Platform project. But I won't bother with that. We will definitely
use existing project because we already created
tasks application. And now here we should see
the list of our projects. And I will go with this task up. Now we are asked, what do you want to use
as your public directory? What they are basically
saying is which part of your role directory we
should deploy to hosting. And for debt, that will
be our deepest part. Well dist folder and task app inside because this is the actual workable
application on the web. So to do that, I will lose
here this then slash task up. In Idaho. If you can see this properly, I will zoom out a
bit even further. So this slash task up. Now we can configure this application as a
single page application. Well, Angular is a framework for
single-page applications. So I will go yes, here as well. Now, do we wish to set up automatic build and
deploy with well, deploys with gift up. And this is that optional part. So I will go no here
because we don't have GitHub repository
for this project at all. Now, this is kind of a warning or an error message like that. The file index.HTML already exist in our task application. And that is pretty much
the truth in our disk. Then slash task cap, we do have our index.HTML file, which is basically
our HTML content. But here we are asked to. We wish to overwrite that. Well, no, we still wish to keep our HTML content from
our application. And with this, we successfully initialized Firebase project. Well basically we connected our angular application
with the Firebase project. So there is only
one more thing to do to actually deploy
it to the hosting. I will clear this here. Now I will zoom a
bit. To deploy it. We can simply use
Firebase deploy. So how will Firebase actually know what it needs to deploy? While in here, when we initialize the project
with Firebase, we actually got two new files. The first file is actually the project that is connected
to this application, which is our task cap. And the Firebase dot json is the configuration
of the project. For example, what should be deployed is that
this slash task app. This is what we set up. There are rewrites
that we can do. There are headers that we can set here and so on and so on. But this is basic setup that
will tell it to Firebase, okay, this is what I wish to
deploy to the whole thing. So we can simply continue here, Firebase deploy, hit Enter, and just wait for
it to deploy it. Now once everything is
deployed, we could actually, we will actually get this dummy URL directly to our applications so
we could open it up. But I won't do that. I will go back to
my Firebase here. As we now have a setup hosting, we don't really need
to follow up with these steps because we
already did those steps. So we'll just go x here. The whole thing itself. I could refresh the page. And on a hosting site, we do have now our Firebase. Well, our angular application, we can see, well we don't have that Get Started
button anymore, but actually our application
at the bottom we will see also the release history and also different
channels that we can use. But here, if I would
click on this URL, it will open up our
application live. So this application is fully deployed to Firebase
and ready to be used. They're ready for
a world to see it. And we can see that our HTTP
calls also work because we are getting the data
from the HTTP calls. And we are also
able to complete or uncompleted that our
routing is working. When I change the route, there is a content
in a different page, but that's pretty much it. So with this here guys, we were able to finalize our task application and
actually deployed to Firebase. Now, let's all jump
to the next video so I could say a proper
thank you to you.
12. Thank You and Goodbye: Well, that's pretty much it. Thank you once again for taking this course in the first place. If you stuck to the
end of these scores, you actually have your own
angular tasks application built and deployed. Now, you can use that
tasks application for your own portfolio as we
deploy the application. So it can actually
help you throughout your career as we build
that tasks application, I honestly hope that you
learn something new, or at least that you upgrade your knowledge of it
through this application. And we worked with many
different major features of Angular components, Services, HTTP module,
routing, and so on. But what you should know
also is that there is much more going on than just
on my YouTube channel. You can actually find the
angular is central series where we go to all of the features that Angular
has to offer to us. And if you're
interested in material, that is also Angular Material
series for you as well. Now once again, before we
close this course, well, my name is Stefano marriage, and I have more
than seven years of experience in web development. Next to that, I was your
instructor through this course. And as I mentioned, next to this Skillshare courses, I also hear my YouTube
channel called numerical. So be sure to check
that out as well. Also, if you would like to watch more courses from me
here on Skillshare, you can visit my profile and select one of my courses
that I have there. For example, there is Angular
course there as well. There are other courses
for JavaScript, Bootstrap Node JS,
JS, and so on. But with this, we are
pretty much finished. Thank you all once again, thank you for
taking this course. Finishing the course, actually, also be sure to submit your own projects and
that you build through these scores in the project
section of this course. So we can all
together go to those, talk about those maybe also you have some specific questions
that I could answer, but thank you all once again, and I will see you
in my other courses. Bye-bye.
 Stefan Omerovic, Full Stack Web Developer and Instructor