Transcripts
1. Class Introduction: Want to learn three D, but
don't know where to start? Or have you ever tried opening Blender and just been
completely overwhelmed? Well, then this
course is for you. Drill. Hi, I'm Southern Shadi. And in this beginner
friendly course, getting started with Blender, I'll walk you through step by step from opening
the software for the first time to creating your very own animated
character, Essen here. Now, this is the first
class in a series of blender classes
that I am releasing, taking you from a total beginner all the way to a professional. And today's video
is designed for people who have never
opened Blender before. Now, I've spent over
a decade working in the industry of
Fortune 500 clients, and now I want to help you build that same creative career. Blender has become a major
player in animation, visual effects, and tech, and it's only growing from here. Now, whether you're
aiming to work in games, films or interactive media, this is one of the
most valuable tools you can learn to jump
start your career. So, let's get started.
2. Installing Blender: Already familiar with installing blender, you can
skip this lesson. The reason I'm
including it is because Blender releases builds
every single day, so it can sometimes be
a bit overwhelming to a new user to even
know what to download. Now, downloading
blender is very simple. Go to blender.org, go to Download and download the
latest stable version. But I want to talk
about some of the other versions you
can download as well. Now, the first one I want
to point out is LTS, which stands for
long term support. This is designed for major productions such
as video games or films that will use
the same version of the software for many years. They will continue to update
this software for stability. So if you plan to use Blender
on a long term production, might want to consider
one of these versions. Now the other area I want
to point out is that they have a blender
experimental section. Blender is an open
source project, meaning it receives code
contributions every single day. So they actually release a daily build of
blender every day, and here you can access future versions if
you want to test, try out, or provide
feedback on new features. Now, when you're ready
to click Download, make sure that you're
downloading the correct version. Here I'm downloading a
version for Windows, and Blender will do its best to guess what version you need. If it guesses wrong,
you can click here and download the correct
version for yourself.
3. Understanding the Interface: To be honest, this video
might bore you a bit because we're going
to walk through the interface of Blender, but this is where I see
most beginners fail is they want to skip the
boring basics of the intro, and then they end
up getting lost and frustrated in a more
intermediate tutorial later. So I ask that you bear with me and just walk through
the interface with me, and I promise it'll
make the rest of your learning journey
that much easier. Now, once you've
installed Blender, you will get a splash
screen pop up here, and it may ask you a
few questions here. You can go ahead and just
click off to the side because we'll go into
the edit preferences and set up those settings there's
actually a few settings I recommend tweaking
in here to make Blender a little bit
easier to use by default. First is under the
interface tab here, I recommend bumping up the
resolution scale to 1.25. Blender has a lot of
tools and features, and I believe that they're
a bit small by default. Next, we're going to come
down to the input tab. Now, you need to have
a three button mouse if you're planning
on doing three D, but if you do not, you can click Enable three button Mouse. And when you use Alt left it will serve as your
middle mouse button. I also recommend
having a number pad on your keyboard because
using the number pad, you can actually snap through all the various
views in blender. However, if you do not have
one, click Emulate Numpad, and it will turn the
numbers at the top of your keyboard into
a Numpad function. Now if we come down
to the key Map, we can actually alter the keyboard shortcuts for anything. We're just going to change
a few sections up here. By default, the space bar action is set to play the timeline, but it's much more useful
to set it on search. And then down here, I recommend turning on tab for pie menu. Now, it should autosave
your preferences, but you can also
click down here and click Save preferences as well. And so you understand
what we changed here. And the Viewport mode, if I click tab, I can now switch between any of these modes by just
dragging my mouse, which will be very handy later. And when I press Space Bar,
I can search for anything. For example, add another cube. The search bar is
really nice for beginners when you
can't remember where things are in the menus, you can always hit Spacebar, and if you get a couple
of the keywords right, you can generally find
what you're looking for. Now, as you get more
comfortable with blender, you're going to be
changing settings, panels, positions, and more and finding things that
you like to use regularly. Which is why I want to
show you that when you go to File defaults, save Startup file, you can save your file exactly as it is. And every time you open Blender, it will open that way. If you've ever worked in Adobe, this is kind of like working
with workspace presets. Look down here in the bottom right for the remainder
of the series, you will see all of my
keyboard inputs here. And that is to help you
follow along a bit easier. So if you ever get
lost with how I'm navigating, check out
in the bottom right. Let's do a quick navigation
of the interface. So here we have what is
considered the viewport. And the viewport is where we are going to be doing
all of our modeling, sculpting, texturing,
lighting, and more. It's essentially the canvas of three D. And
in that viewport, we have various viewing modes. So here you can see I have
a scene that I've created, and we're viewing this
in rendered mode. Now, you can change
the mode up here. On the right here, we have viewport shading
set to rendered. If I click here, it will
set it to materials. In material mode, we
can see the materials, but things like our lighting and HDR maps will not
affect the scene. Over here, we have solid view. This view is much
more performant in the view that you will be
working in most of the time. And in this view,
we can see all of our objects just
in a solid color. Over here is the wireframe view. This is helpful for seeing the wireframe of the models
that we are working with. Now, each of these modes, if we click into them, also
has additional options. For example, if I go
to the solid mode, I can change to MT cap and choose what I want my solid
objects to look like. Now, another feature we have up here are the overlay options. So overlays will kind of turn on and off various features
in the viewport. So if I click this here, we can see that I can turn
off the grid or the floor. I can turn off the axis if I don't want
those to be visible. Info, I can turn off
extras, for example, that'll turn off all
the lights I have there in my scene and many more. Now, the nice thing
about the overlay is I have this
quick toggle here. So if I were to switch
into render view, and I wanted to get an idea of what my final render
was going to look like, I can click this
little toggle here, and it'll just turn off
everything at once, so I can kind of get a
clean view of my image. Next, let's talk about how
to navigate your viewport. Now rolling in and out on your mouse wheel will
zoom in and out. Holding Shift and clicking
your middle mouse button will allow you to pan around
the scene from the left, right, up and down. Now, just clicking in
the middle mouse button will allow you to rotate. Now, if you have a numpad and you press period
on that numpad, you will zoom in on
your selected object, and then you will be
able to rotate around that object specifically by clicking the middle mouse wheel. Now, if you're having
a hard problem with the mouse control, you can also click the gizmo up here and drag this around. This is sometimes
preferred by beginners. The nice thing
about this Gizmo is you can click and snap
to various views. So if I click here on the
little Z axis here at the top, that will snap me into
the top down view. Alternatively, you can
use your number pads. So using one will snap
me to the front view, Control one the back view, three to the side view, Control three to the
alternating side view, seven to the top
view, and Control seven to the this is where
a lot of people really get overwhelmed in three
D. It feels different than moving around in any
type of two D software. So I recommend you maybe
just pause the video here and just get familiar
traveling around the scene. Now it would be a good
time to download one of the example project
files and you can utilize this to practice
moving around your scene. Next in the Viewboard,
let's focus on our panels. So we have two panels that can be opened by pressing in and T or by using these little arrows right here
to bring them in and out. So over here on the left, which is opened by
that's the tool panel. And this provides tools for
whatever mode we are in. Currently, we are
in object mode, so we have Gizmo tools, which we'll go through
those in a minute. If I were to tab into Edit mode, you see that those tools will change by going to sculpt mode, those tools will change
to sculpt tools. And on the right
side here, we have what we call the N panel. This is essentially
your properties, and that can be
opened and closed by pressing the N E. Again, these will change based
on the mode you are in. If I go into texture
paint mode here, you can see that I have
a tool option here which opens a bunch of
texture painting tools. We'll dive into
that a bit later. Right now, the only
thing I want you to focus on is the item panel, which tells us the selected
dimensions, scale, rotation, and location of
whatever item we have selected. Now, in my version, you may see a bunch of extra tabs
over here you don't have. It's because when
you install add ons, they are installed over here most often where you
can access them. For example, here, I
can click Shortcut VUR, which is what I am using to show you my keyboard shortcuts. And you can see that I can
change the properties here. This may seem a bit overwhelming,
but know that for now, you pretty much only
have to focus on the item up here on the top
right is your outliner. Now, this outliner
is basically like the file explorer
of your project. It shows everything
in your scene, and it also shows
where your collections are and how things
are grouped together. Now, by default, you will just
have these three options. This right here will disable
an entire collection. A collection is kind of like
a folder or a composition. So you can see how
I have moved all of my lights into this
camera collection. You can see here,
if I drag them out, I can move them out, or I
can bring them back in here. Tell me, go ahead, double click this and
call this camera. Lights. And I know
that this collection will include all of
my camera and lights. Now, if I click this checkbox, it will disable everything
in that collection. And you'll see here that the lights disappear
from my scene. These will also not render. Next to that, we
also have an eye, which is hid in viewport. This will turn the lights
off in the viewport. However, when I click Render,
those lights will still be. I want to disable
them on the render, I need to click
Disable in Renders. You'll see here that they
still appear in the Viewport. However, if I click Render here, you will see that my lights
are not working in the scene. Now, you can actually add
additional options up here. By clicking this
filter, you can turn on other things in
your outliner here. For example, if I turn on
this selectable option, I can turn on whether these
lights are selectble or not. So right now, if I want
to select a light, I can move my light
around right there. But if I click this on, I will not be able to
select that light. This is great for turning off objects you don't want
to accidentally click. Now, up here in the outliner, you can also search here. So I could search for
example for a book, and that will bring
up every object that has book in the name. I can grab that
object here and I can rename it here if I
want by double clicking, or if I hover over the viewport, I can press F two, and it will bring up that object and
name it there as well. And it will also update
over here in the outline. So if I type in dot test, we'll see that that
name has over here. Now to organize
in your outliner, we use collections, which are
essentially like folders. So if I click up here, I can
create a new collection. Let's call this one plants. And I want to move this
object into my plants folder. There's two ways I can do that. One, I can grab my object here, and if I press the innkee, I can move to a collection, and I can just select plants. However, I can also
locate it over here, either by the search menu or if I press the period button, it will grab the
selected object here, and I can just drag
that into plants. So if you ever can't find
an object in your outliner, can't remember
what you named it, you can always click
it in the Viewport and press period and
it will highlight. Like to point out that
the outliner actually has various other modes and plenty
of other advanced options. But the duration of this class, we're just going to use it to organize and rename our objects. Now, down here is our
Properties panel. This is a deep dive of
all the properties. For example, here, we have
the render properties. This is where we can
set our render engine, our sampling amounts, our
light paths, and more. Now, there are a ton of options here that can be
very overwhelming, but know that you only need
to be able to adjust a few in order to get a
good rendered image, we'll look at how
to do that later. There are other tabs here, including the output
properties tab. This allows you to set
your resolution where you want to save your
file and the file type. Render layers here, which
is for compositing, something we won't be covering
in this particular class. We have scene properties. This is where you
can set things like the units you use in
your scene if you want to use the metric or the imperial system or
your dimensions. Here we have the world scene. This is where you can import
things you might have heard of called an HDRI map. HDIs are image that you
can import that will automatically light your
scene using the image data. We'll cover how to
use this later. And there are a lot more tabs. The ones we'll be
using mostly in this class are your
object property tabs, the modifier tab, and
the material tab. And I'll show you how
to use those later. Now, down here is
an important one if you plan to do animation. I can go ahead and click
Play animation here, and it will play the animation
of my scene forward. I can click there
again, Deposit. I can play backwards, or if I have an object selected, I can utilize these to
snap in between keyframes. I can also click
and drag down here to move forward and
backwards in my timeline. And over here, you will see
the current frame I am on. So if I set this to 200, I will snap to 200 and next
to that is the frame range. So here you can see
my scene starts at frame one and ends at 2:39. This will also affect
how many frames are rendered when you go to
render your video animation. Now, you can also navigate down in the timeline with your
middle mouse button as well. You can go ahead
here and you can middle mouse click and you
can drag back and forth, or you can zoom in and
out with the mouse wheel. Now, if you ever get lost, you can go to the view frame A, or you can use the home
button as a shortcut key. Now, I'd like to bring
your attention up here. You may have noticed
these tabs up here. These tabs are preset layouts. So to change a
panel and blender, you can click and
drag on any corner. If I want to drag this into two, I can go ahead, click and drag there and split it
down the middle. If I want to change what's
displayed in this panel, I can do that up
here in the top left by clicking here and
choosing what's here. So, for example, if I wanted
to work on my materials, I would click the Shader Editor. And now I can
access my materials here and adjust them on
my character over here. But, for example, if I wanted to make my character purple, I could go ahead and change
them to purple there. Now the problem with this
is that as a beginner, this is probably
pretty overwhelming, which is why these
are so handy up. Because they allow
you to click through some default setups that you
can use for your layouts. For example, here
we have a modeling layout, a sculpting layout, a UV editing layout, a texture painting layout, and a material editing layout. These all come packaged right
in blender and open it up, and they're intended to
make it easier for you to navigate through the
various features of Blender. Now, up here on the top
left is where I can access the menus for
whatever mode I am in. So if I click Add mesh cube, I can add a cube to my scene. But I can also do that by pressing Shift A
and adding a cube. Now, blender is a very
shortcut heavy program, and this is very intimidating so if you can't
remember the shortcut, try checking the menus. And the nice thing about blender is that if you
hover over anything, it will tell you what
the shortcut is. So if I hover over add here, I can see that it's
telling me it's Shift A. However, if I grab an object and go into the
object menu here, you can see that I get
a various selection of tools and features
I can utilize. And a lot of these
will also have the keyboard shortcut
set right to the right. And if all else fails and you cannot remember where
something is in the menus, we have set our
search bar to space. So one thing about the menus is that you might notice
that they're changing. So here in object mode, I have add and object. However, if I hold tab and
switch to edit mode here, we can see that
the menus change. And now suddenly we
have things that allow us to manipulate
or edit the mesh, vertex, Edge, Base,
UV, and more. So just know that whatever
mode you are in will change the context menu up
here to provide you with the tools that you
can utilize in that mode. Now, as a beginner, you
may just want to stick to the search bar as this is
not context sensitive, and this will work across all modes to help you find
what you might be looking for.
4. Mastering Object Mode: I think this is where
people start to get a bit overwhelmed
in blender. It's because there's two ways to manipulate your
models and blender, and that comes in the form of
object mode and edit mode. And these next two
videos, we're going to dive into what
those do in depth. But in general, object
mode allows you to move, scale, and rotate your
object around the scene. It also allows you
to apply materials, modifiers,
constraints, and more, which we'll dive into later. Whereas in edit mode, we can actually go inside of the model and we
can edit the edges, the faces, and the vertices to change the look of the model. So with that being said, let's dive in and take a look
at object mode first. Now let's talk a
bit about Gizmo. Gizmos are a huge part of placing your
objects in your scene. Now, you may have
noticed here and when I had my objects selected, this little axis
indicator shows up. This is called the
Gizmo, and we can access that over here on our tool menu. Remember, press T to open
this if it is not visible. Now, the ones you want to
focus on are the move tool, the rotate tool,
and the scale tool. Move will let you move on
each axis as selected here. If I grab in the center circle, it will allow me to move from whatever angle I'm
at in the viewboard. And then you'll notice
these little squares. So this will allow me to move just on the X and the Z axis, and this will allow me just to move on the Y and the Z axis. So this is a convenient way if you don't want to
move it one direction. Now, the same thing pretty
much applies to every Gizmo. Here we have the rotate gizmo, and I can rotate across
each axis there. With the rotate Gizmo, if I click out on the white circle, I can rotate just based
on the view there. Or if I grab in the center here, I can just kind of
free rotate it from whatever angle I'm at we
have the Scale Gizmo here, and this operates just
like the move Gizmo, allowing you to scale
just on certain axis, or you can grab this right here from the center and just scale
it in and out uniformly. Now, you may notice one Gizmo down here called the
Transform Gizmo. This combines all of
them into one Gizmo. And although this is convenient, it can sometimes be difficult to select and isolate
what you want. Now, since this is
big Gunnar course, I'm going to do my best not
to use keyboard shortcuts. But three that you
should really know are GR and S. It stands for
grab, rotate, and scale. If I grab an object here, I can press G, and then
I can move that around. If I press S, I
can scale that up. And if I press R,
I can rotate that. I can also lock it to an axis. So since it's a three D object, we have a Z X and Y axis. If I press R and Z, I will only rotate around that Z axis. And that
goes for everything. If I press G and X, I will only move
along the X axis. So here, if I select my object, you can see here that I have
this small orange dot to represent the origin this
is where I will scale from, rotate from, and snap to. I can change origin
points in a few ways. I can tab into Edit mode, and I can move the object
around my origin point. Now when I tab open, you see that my origin point
stayed in position, but my object moved around it. So I'm going to go
ahead and undo that. I can also take my
origin point and search for origin to
three D geometry. And what that will do is try and center the origin
point on my object. Again, I'm going to undo that. Lastly, I can use the three D cursor to
set my origin point. Let's talk a bit about
the three D cursor. You might have noticed it kind of hanging out in scenes here. I can hold Shift, right click and move my
cursor anywhere in the scene. And what this allows me to
do is to add objects here, move objects here, or more. So I'm going to press
board slash on my Numpad. That will allow me to
focus on one object here, and I want my origin point
to be here at the bottom. So first, I'm just
going to set this off to the center to
show you as an example. If I come down here to the
bottom of my mesh here, I can shift right click there, and that three D cursor
will snap to it. Now if I search for
origin to three D cursor, we'll see that the
origin point snaps and my origin point has returned
to the bottom of the model. Now to return to my scene, I can just press the
forward slash again, and that will just bring
everything in the scene back. So pressing Ford slash
allows you to focus on one object, which
is really handy. But we can also just hide
objects when we're seeing. Let's say that I don't
want to deal with these cups while I'm
trying to place my teapot. I can press H on those cups, and they will disappear.
That just stands for hide. But if I come up here, you
can see that all it's really doing is turning off the eye that we see
in the liner here. I can just turn those back
on and off that way as well. Now, to bring all
hidden objects back, I can press Alt and that will unhide everything
hidden in the scene. Well, let's talk about
this three D cursor more. I can also snap objects. So let's say that I want
my teapot over here, but you can see that my
table's kind of lumpy. So if I move it over there, it's actually just kind of
floating above the table. Well, I can use a
three cursor for that. So I will shift
right click here. I will grab this object, and if you hold shifts, I can snap to the cursor. Alternatively, if
you don't want to try and remember that
keyboard shortcut, you can also just search
for selection to cursor, and that will move it
over to the cursor. The other thing with a cursor is that we can also add objects. So if you remember in
the previous video, we showed that you could add objects into your scene
through the ad menu. So if I click add up here, go to mesh cube, that cube will spawn in
wherever my cursor is. Now, if you ever want to reset your cursor to the
center of the scene, you can just hold Shift C, and that'll reset the
cursor exactly to zero, 00. You can also control the cursor up here under the view menu. So if I click around here and you can't remember the
keyboard shortcut, I can just tab zero into this, and it will reset it back
to the center of the scene. Now, another cool thing is that when you're working in
fields and blender, since there's
always three fields for the different coordinates, if you click at the top one
and drag down and let go, you can change the value
of them all at once. Okay, so you might have noticed that when I'm selecting
an object here, we get a nice yellow
outline around it. But I can actually
select multiple objects. If I grab multiple objects here, I can go ahead and move
all those objects at once. I'm just pressing the
GK there and move. Now, if I right click, I will cancel that action, and it will return back
to the original position. But you might notice here that when I selected
additional objects, one was highlighted in bright yellow while the
others turned orange. Whatever object is yellow
is your active object. If I hold shift and
reclick the table, you see that now it
is the active object. That can be very useful
because we can perform certain actions that
utilize the active object. Let's look at an
example. Let's use the active object to snap
some of these decor to it. So I'm going to move
this teapot up here. Let's pretend that we've just
dragged it into our scene, and we're trying to
get it onto the table. Well, what I can do is grab my teapot here and
grab the table. Now the table is
my active object. Now, if I hold Shift S, I will get my snap menu. I understand keyboard
shortcuts can be difficult, so you can also find it under
here under the Object Snap. What I want to do is snap
the selection to the active. So if I do that, you'll
see that it will snap it down to the origin
point of the table, which I have conveniently
set at the top, and then now I can move
this around my table. Let's talk a bit about
transform orientations. This references how things move along the axis in three D space. So here ICN, you can
see I have the X axis, the Y axis, and the Z axis. This is considered
a global ordinate. And by default and blender, when I grab my objects here, they will
follow that system. So the schismo will
move along the X axis, the Y axis, and so on. However, we can
change that pivot. If we come up here, we can
change this to various things. The two you need to focus
on are global and local. Now, local is different than global that follows the object. Right now, the object is
matching the global space. But let's say that I want to rotate the object
on the Z axis here. If I go back to move,
you can see that the object's local Y
axis is moved over here. This can be really
helpful for kind of fine tuning and placing
objects in your scene. So if I go back here to Global, you'll see here that
it returns back to the X and Y axis
and moving there. I can move it locally
on its own axis. Now, this may be a
difficult concept to grasp at the early
stages of using blender, but I promise this will make more sense as you
begin to use it more. Let's talk about pivots. If I grab an object here up
next to the coordinates here, we'll see that we have a
transform pivot point. By default, it will be
set to median pivot. What that means is that if I grab a selection
of objects here, it will move the Gizmo to the median center point
of all those objects. Form from that point.
Now, a great example of this is that if I use
the scale Gizmo here, we can see that I
scale everything uniformly together from
that median center point. However, there's another
pivot point that we can use called
individual origins. This will transform based on the individual
origin of every object. So if I were to scale again, you can see that everything is scaling from its own origin. This is a very helpful one. However, we probably won't
use it in this class. Now, we also have the option to pivot around
the three cursor. And this is more helpful
than you might think. If I grab the table
here, go to Object Snap, do cursor to selected, my cursor will snap to
the selected object. Now, if I grab this
chair, for example, I'm going to switch
here to top few by pressing seven,
and I go Rotate. We'll see that the chair can rotate around the table so that if I wanted to maybe set this
chair next to this chair, I could equally rotate around
the table very simply. The three D cursor can be very helpful in specific
use case scenarios. Now, next to the pivot point, we will also see that we have
the option for snapping. And by enabling that,
we can set it so that our objects snap to the grid
or various other elements. So you can see here
that we can actually snap it onto another object. And that can be very handy
for placing objects. Here I have a cube, and you can see here that under
the snap options, I have it set to snap to Vertex, and I've also set it to align
rotation to the target. I can move this cube
around and place it somewhere on my
sphere, if I wanted. Now, one useful thing
to do in object mode is that we can parent
objects to other objects. So here you see I have
a tab and I have a can, and I want that tab
to follow the C. Now, there's two ways I can do this. One, I can combine
these into one object. By grab this object here and click this object
and search for join, I can make them one object. This may not be how you always
want to do things, though. Sometimes you may want to keep
them as separate objects. For example, here, I want to
be able to have the tab have its own origin point so that I can animate
this tab if I want to. In that case, I would want to parent this object
to this object. And to do that,
what I do is grab the object that I want
to follow the other, first, then I grab the
object I want it to follow, and I can hit Control
P for parent. And you'll most often want to choose object keep transform. What this means is
that it will parent to the object and keep
its current position, which is the transform position. So if I go ahead and click that. Now when I move it around, these objects will
follow each other. Around in your project files, you will see that there
is a Bird's Nest project. Now that we've
learned how to use some of the object mode tools, I want you to go ahead and
open this Bird's Nest project, and I want you to
go to the Ad menu and try and add a object in here and see
if you can create a little scene using just the object mode tools
you've learned.
5. Mastering Edit Mode: Where the real fun begins.
We're going to dive into Edit mode and learn some
of the editing tools. This is where we can actually start modeling our character. So let's dive in
and get started. Up until this point, we've been focused on how to
manipulate objects. Well, objects are just models
in blender, and models, if I tab here into Edit mode, are made up of vertices,
edges, and faces. And this is how the
computer is able to calculate these models and render them in a way that
we can see them visually. And that's where Blenders
Edit Mode comes into play. Allows us to
manipulate that data. And there's a couple
ways we can enter it. If you remember, we
had the Pie menu. So if you hold tab, you can go and select Edit
Mode with an object, or you can just press tab and
you will enter Edit Mode. You can also come up here and enter Edit Mode
through this menu. Now, when you tab
into Edit mode, you can then begin adjusting these positions with the
move, scale and rotate. Up here, you'll see that
you have the option to select vertex, edges, or faces. And when you grab
those, you can then move those around
and edit your model. Now, it's important to
note that we can also utilize the wireframe
solid mode, material mode, and rendered mode all here in the
edit mode as well. More often than not,
you will be working in the wireframe so that you can
select through your object. You see there when
it is see through, we can grab things
on both sides at once or in the solid view here. So let's look at a
few of the tools we have over here to
work with our objects. I'm going to go ahead
here and bring this all into one window by clicking
and dragging there. Now, just like an object mode, we have the Gizmos remove,
rotate, and scale, and our local and our global
transforms work the same, and so do our pivots
and our three D cursor. So all of that's
the same as object. But the difference is
now that we can grab multiple pieces of our model
and move them specifically. So if I go here and
grab these right here, I can then begin
kind of moving out the edge of the can there
to adjust the shape. Let's say that I want
to make a small kind of dent in the can right there. Then I can come over here
and switch there with the vertex mode and
bump that in even more. Now a can looks like it's
been smashed at the top. Let's look at the
different selection modes. So we've already looked
at vertex edge and face. I'm going to go ahead
and grab face here. Now, in solid view, if I click and drag here, it will only grab the
faces that I see visible. In Wireframe view, as
you kind of saw earlier, if I click and drag here, you will see that it grabs
faces on both sides. And up here, we have various
selection modes as well. So by default, it'll
be set to select box, and that allows you to
click and drag a box. And if you want
to deselect that, you kind of either click off to the side or if you press A, that will also deselect. If you press A again, when nothing is selected,
it will select everything. The other thing you can
do is press the key, and the key will select
various objects. So you can see here
it's selecting the object piece by piece,
which can be very useful. Now, under Box select, we
have the select circle, which is essentially just
a cursor that allows us to kind of paint on
and select our geometry. And if you hold control, you can then deselect
certain portions. This one's very useful as well. And then, lastly, we
have the select Lasso, which allows you just to
draw a lasso around pieces, and it will select
everything as I mentioned, we can just use the gizmos here, and we can move these pieces
of our geometry around. However, we can also utilize this ball off up here called
proportional editing. And this can be very helpful. When I click this on here, what it is going to do when I
move is give me the circle. So I've pressed the
Giki and now I can use the mouse wheel to make this
circle bigger or smaller, which allows me to try
and proportionally kind of influence all the topology
around my selection there. Whereas, if I roll
this all the way down, you can see I'm only affecting
the faces I have selected. Can press O to turn
this on and off or you can click it
on and off up here. There's also
different follow off types here that you
can play with as well. Now, the advantage
of this is that say, I want to grab a
edge loop up here, I'll go into wireframe mode. I will grab this row
of objects here, and I will switch
back into solid view. And now if I press
the SK to scale, you can see here that I'm
creating a bubble here. But if I rotate out
that thing here, you can see that it can
make the top of the can slightly smaller
than the bottom of so this is very
useful for kind of editing large portions
of the mesh softly. And I'll talk about a few
more helpful shortcuts here. So first, if you hold
the Z k and drag, you can choose what mode
you want to be in visually. So wireframe, solid
or material view. Just tapping the Z k will change you from
solid to wireframe, something you'll
probably be doing often, so that's a good
one to remember. And then I also want to
talk about Alt clicking. So if I Alt click a line here, it will select that loop. So a loop is a single connection of faces or edges that
go around a model. You can see how that
would be very helpful. As an example here, if I
switch over to edge mode and I grab this loop right
here by Alt clicking it, I can then shift there and scale just to move in and
around that edge loop. So that's another very
helpful one to know as well. Now we're going to dive into
some of the tools over here, but there's one last
thing I want to show you, and that's how to delete
elements as well. So let's grab this face here. If I go ahead and click this
face and press the XCliq, I will open the delete menu, and I can choose what
I want to delete. So if I click Delete face, it will delete that face
there. I'm going to undo that. But let's say that I have edge loops here that I
don't want these lines. So let's say I Alt click one. If I press X and
delete the edges, it will leave a hole in our
mesh. I'm going to undo that. If I press X and dissolve edges, it will do its best to redraw that model
without that edge. Another one that
is very helpful. Let's take a look
at some of these tools over here in Edit Mode. Now, to use the Edit
tools, we're going to go ahead and use a simple up here. Not quite as exciting, but it makes it very obvious
how each tool works. Now, the first tool
I want to show you, one of the most common ones
is the extrude tool here. So I'm going to grab
the faces up here. I'm going to grab the top face here and I'm going to
click the extrude region. And this is going to give
us a tool that we can work. We click this plus
and track it up here, you'll see that it will
extrude that object. Here, we can grab the circle and move what direction
it extrudes in, and by extruding, we can just keep adding geometry
to our object. Now if I reset here, we
have the inset faces. The inset faces oftentimes works in conjunction with
the extrude tool. So here when I click Inset face, I get this little circle, and you can see here that
now I can drag that in, and it will just
inset the face on that top face, adding
more geometry. Then I could go ahead and
grab the extrude tool, move that out, click Inset face. Drag that in, click the
extrude tool, move that down. And now we have
somewhat of a kind of trash can type box here. Now, the bevel tool
here will add bevels. If I go ahead here, and
I click and drag this, you'll see how it
would add bevels to all the edges of
the faces selected. Now, if I roll up and down
on my mouse wheel there, you'll see that
it adds geometry, smoothing that out even further. Now, beneath that, we
have the loop cut tool. This right here will add a loop cut around whatever portion of the mesh that
you have selected. And it'll automatically edit
right there to the center. Now, if I click here and drag, I can decide where
I want to set it to split the mesh
that way as well. But by default, it
will always be on the center line of the loop
that you have selected. If I press A and
select everything, I'm going to select all
my faces and right click. You'll see here that I get a bunch of other editing
tools that we can utilize. I'm going to go ahead and
click subdivide here. What that will do is take
every face and subdivide it. If I twirl this menu up here, you can see that I
get more options. So I can go ahead here
and click more cuts, and then I can add geometry
there a cube that we can then use to have more control
over editing our cube. Now, here you can
see that we have a hole in our cube and
we want to fix that. So what I'm going to do
is go into Edgemde here, grab these four edges, and then click F, and that will fill
it with a face. Now, here you can see what
I have looks like one cube, but this is actually two models. If I grab my move gizmo here, you can see these are two
models that are separated. I want to join these models, and there's two
ways I can do that. One, if I come up
here to Vertex mode, I can click and drag here, select both of these
vertices and search for Merge and click at Center, and that will merge those
at the center of those two. But since all these vertices
are close to one another, I can also just grab
the entire model, I'll press A and search
for merge by distance. You see here that I can set the distance minimum
that it will merge by. I've removed eight vertices, as you saw just now taking
a look at the knife tool, all we need to do there is click and drag around
on our object, clicking every time
we want a point. We'll go ahead,
close off that loop. I'm going to hit Enter, and now you can see that we've cut geometry onto our object
and created a custom face. Now, this highlights
an issue I'd like to point out that happens
with a lot of beginners, which is that you can make
models with bad topology. Topology is how your
mesh is structured, a layout of the edges,
faces, and verses. And good topology
makes your models easier to edit,
animate and shade. Bad topology causes artifacts, weird shading or
broken deformations. So signs of good topology are that your faces
are mostly quads, which are just faces
with four vertices, or it has clean edge flows, meaning you can select loops that follow the
shape of an object. It's also important to note
that oftentimes good topology means that you have even
spacing between your faces, and there's no guns, which are faces with
five plus size. Now, topology is a
pretty advanced subject. And in our future class
covering modeling specifically, we'll dive into this in
much greater detail. And up here, we also
have a snap mode. And if I go ahead and
turn the snap mode on, you'll see that we have
some good options here. So if I go ahead and grab vertex here and grab this vertex here, I can actually snap this to other vertexes on the
object, for example. Now that we've learned some
of the edit mode tools, why don't you go ahead and
open the final hikiPject here, ab in edit mode, and maybe make some changes
to the character here. Maybe you want to
change how many hair he has or the size of the hair. Maybe you want to go ahead
and change the beak. Maybe you think he
should be taller and skinnier or
shorter and fatter. Go ahead and play around and try and make it your own design.
6. What are Modifiers?: Up, we're going to take
a look at modifiers. Now, modifiers are
essentially effects or tools that we can
drag and drop and put on our objects
to adjust them. There's a lot of things
you can do from modifiers, and we're going to
look through some of the most common ones you'll
be using in blender. Now, over here, when we
select a object and blender, you may have noticed
this wrench icon, which is the modifiers panel. Now you'll notice I have
more options down here, and that's because I
have add ons installed. By default, you'll have
these categories right here, and you can also
click here to search. And I want to point out that
one of the key advantages of modifiers is that they're generally considered
non destructive, meaning that you
can apply them to their model without actually
editing the geometry. This means that if you
delete a modifier, your geometry will go back
to the way it was before, as opposed to previously
how we saw in Edit mode. Once you edited a geometry, unless you control Z to undo it, those changes
are permanent. So let's use this robot as an example for all of
these modifiers here. So here you can see the
topology of my robot. If I go ahead here and turn
on the subdivision modifier, you'll see that that
topology gets denser. Now, you can see here that
I can turn the levels up in the viewport and that will get denser and denser as it goes. Now, it's worth noting
the more you do this, the slower it will run
in your viewport because you're adding more data
into your viewport. Now, the advantage of
using something like a subdivision modifier over
actually editing your mesh to subdivide it is that it
can help smooth out some of the harder corners on your lower pot
modeling, but go ahead. Zoom in here and
click on and off. You can see how it's
smoothing out these edges, and it's also more performing because
you can just turn it on and off in here and then only use it in
your render viewport. So you can work on
a low poly model so that your scene doesn't lag, and then just when
you hit render, it'll go ahead and
apply that subdivision. Now, next up is the
mirror modifier. Here you can see I
have half a robot, and if I turn on the
mirror modifier, it goes ahead and fills in
that other half for me. This is really nice
because if say, I want to change the length
of the fingers here, to see how it's changing
that on both sides. This means you only have
to edit half your model, texture, half your model. Render half your model. So it's a pretty performant option. Now, here you can choose what axis that it
will mirror over. By default, it will be the X, which is the one you
will use most often, and it's going to mirror
over the origin point here. So it's very important
that your origin point here is at the center of
your character and that you have a line of edges here that goes
directly across the middle. That way it can mirror properly. Now, over here we have
the merge option. What this will do is merge these connecting
vertices here so that this appears as one object to blender rather than
two separate objects. Let's take a look at this cube to show this as a
better example. But go ahead here into
Edit mode and I grab one of the vertex here
and move this over. You can see how the
mirror mode is failing, and now there is a
hole in our object. That's because the
mirror mode is going to merge
based on distance, and in this case, it
needs everything to be centered on the origin point there in order to work properly. For example, here, if I grab my geometry here and move
this off to the side, you can see that the
mirror function breaks and the object no
longer connects. But if I go ahead and turn
my distance way up here, it will continue to seek
until it can connect them. However, once you get into
larger values like this, you're likely going to
cause complications and connect parts of your
model that you don't want to. So it's best to always
have the center line of your model directly
there on your origin. Let's take a look at
the array modifier. Now, the array modifier just creates simple arrays
on your object. Now, there's a lot of
advanced options here. We're just going to focus
on the basics for today. So set the count
up here that will determine how many duplicates
are created of your object. Down here is the
relative offset, and you can see here that
it is factor X, Y, and Z. This will determine
what axis it moves on. So if I switch this over to Y, so zero and one here, you'll see that it begins
moving back on the Y axis. This factor here is determined by the size of your object. So one means that it will be exactly the edge
of your object. So if I type in two,
you'll see here that we get one chicki
width of the Y, another chickiwid and
then our object here. And you can also
stack modifiers, and the array is a perfect
example to show that. I'm going to go ahead here
and search for array, or you can come down here, click this drop down menu
and duplicate. Now what we want to
do is make this so that they duplicate this
way and form a grid. We'll set R Y here to zero. We will set two on the X factor, and you see that now we are duplicating our first
array across here, and now we have a little
grid of chickies. This is really great
if you're into motion graphics and
creating abstract designs. The bevel modifier adds a bevel where you can set
the amount of the bevel, the segments of the beble and the angle at which
the bevels kick in. The difference between this
and edit mode is that you can turn this on and off
and it's non destructive. Now, the Boolean modifier here allows you to take one object, pick another object, and
choose to intersect, unionize, or
differentiate those. Now, I recommend using
the manifold solver as it will usually
be the best option. So here you can see I have
a cube and a cylinder, which are two separate objects. Well, the Boolean modifier here, if I go ahead and turn off
the cylinder visibility, you can see that
we're using it to cut a hole on our object
using the boolean. This is a really great
thing if you want to do robotics modeling,
vehicles or more. I can also click on Union, and it will combine
those into one object. Or if I do intersect, it will show only where
the objects intersect. This is a great point
to add that again, you can stack modifiers. If I go ahead and
add a bevel here, you'll see here that
I'll begin adding beveling onto those edges. The solidify modifier here
just thickens objects, and I can choose the
thickness there. If I turn this off, you can see this is just a flat plane. This is great for
doing things like, for example, creating clothes
on a little character. Or more commonly,
it's actually used to add thickness to glass
in various renders. The decimate modifier will remove topology
from your objects. So here you can see I have 50,000 thousand faces
on this object, and I can go ahead and
bring this down and reduce it down to something
like 10,000 faces. Now, you can see here it's effectively ruined by topology. Now, I wouldn't recommend
this for objects that you plan to animate or
continue to edit, but if you have a bunch of props in your background and you just want to reduce the topology
to speed up your scene, this is an effective
way to do that. Make sure to apply
it because it won't actually reduce the geometry
until you've applied it. Now, to apply a modifier, you just click here
on the apply tab. Once I do that, the
changes will be permanent. It's important to note, though, that if you have
multiple modifiers here, the order in which you
apply them matters. Here you can see I have
an array modifier, and it is reducing the
geometry of both of these. So if I wanted to apply
these modifiers effectively, I'd want to go from
the bottom up. So go ahead here, click Apply, click Apply, and then
everything would be permanent. Now, the lattice modifier is one of my favorite
modifiers to play with. What you want to do is
add a lattice object, which you can do up here. Once that object
is in the scene, you'll want to edit that in edit mode to be about the size of your character
like I have here. After that, you can go ahead and add a lattice modifier to your character and then choose the lattice that you have
created in this field here. Now, once you have the lattice, you can come down here to the lattice Data tab and
change the resolution. So if I go ahead here and
add a few knots there, you'll see that my lattice
nail has more resolution. Fun thing about the lattice
modifier is that now when I tap in edit mode and it's
attached to our character, I can grab these and begin
playing with proportions. So I can go ahead and
scale up here and you can see how it just kind of
broadly changes our character. It's a pretty fun
tool to play with. You can also use the
lattice modifier for some fun warped
effects by moving your character through
the lattice modifier, as you see here. However, if you want
the lattice modifier to stay attached to your
character, grab the modifier, then your object, it
Control P, object, keep transform and now they will move together
and stay as one. You can also apply the lattice modifier and
make the changes permanent and delete the when we went to animate
our characters, we take things like this
rig and apply them to our character and utilize the bones to animate
our character. Now, this is a pretty
advanced process, and I'm planning on an
entire class covering this. However, I'd like to
point out that these are applied using a modifier, as well, and we will
look at how to do this in our next lesson in
a very simple way. Now that we've taken
a look at modifiers, how about you open the
robot project file blend, add a lattice modifier
to our character here, and adjust the proportions
to your liking. Remember when you're done,
you can go ahead and click Apply over on the modifier stack to make your
changes permanent.
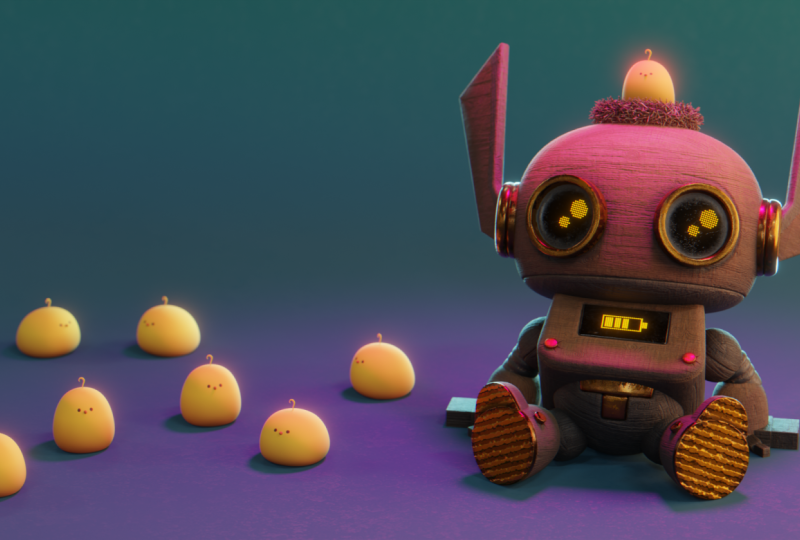
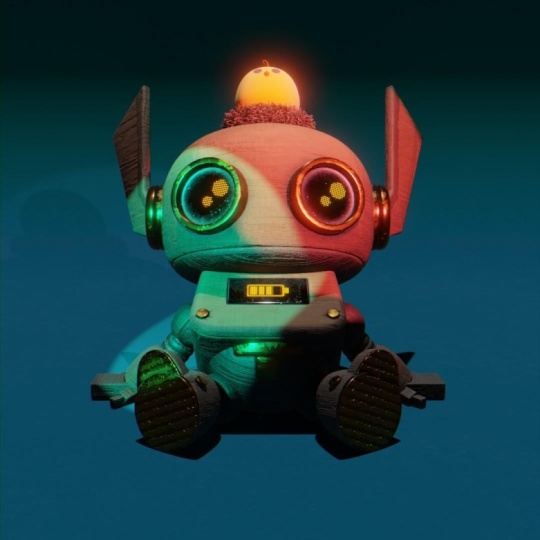
7. Model a Character: Going to take some of what
we've learned and apply it to creating the chicki
character ourselves. Now, first, I want you to
do is open a new scene here and we're going to delete the camera and just work
with the default cube. For now, I don't want
this in the way, so I'm going to click the
cube and press H to hide it. Now, if you've downloaded
the class project files, we're actually going to
use some reference images. You can just drag those
into the Viewboard or you can go ahead, open
your viewpoort here. Come up to Blenders file
browser and locate the files. I have mine here, and I have
the front view and the side. What I'm going to do is come over here and come
to my front view. So I'm going to press
one on the number pad or click this little
negative Y up here. Go to drag this in to
the front view here. Then I'm going to go
to the side view by pressing three or clicking
the little X here, and I'm going to drag
in the side view. I no longer need
this file browser, so I'm going to click this,
drag it over to close it. Now I want to snap the
pictures of the chicken here to the center so that we can use those
as a center reference. So I will go ahead and
name these up here. I'll grab the front one
and name it front ref, and I'll grab the side
one and name it side. What I'm going to
do is make sure my three D cursor centered
by hitting Shift C. Then I'm going to
snap into front view again so that I can see
my front object here. Going to grab this object,
come up to object, snap snap to cursor, and now we have our object
perfectly centered. Let's go ahead and do the same thing for the side view here. L this here, grab the side view. And this time, we'll use
the keyboard shortcut. So it's at Shift S, and we
will do selection acursor. Now we have both of
these reference images in a way that we can use them to reference
with our model. Now, if I click down here
on the data project, you can see we have a
little picture icon, and here we can
set some settings. The depth here will determine how it displays in
front of your model. We're going to click
front on both of these. That way, they are
always visible. However, what we are
going to do is click the opacity down here and turn this down to
something like 0.15. Just for 15% and do
that on both of these. Now when we rotate back and forth in front and
side view here, we will be able to
model with our cube. I'll go ahead and turn
that visibility back on and use this as a reference. Now to begin modeling, we're
going to take this layout we have here and split this
into two screens here. We're going to click
for the front view on one layout and the side
view on the other layout. Now we can edit our character
on both views at once. Now we're going to make a
very simple model here. So let's grab this object here. We're going to add a modifier, go to search
subdivision surface, and let's pump this up
to something like two. Now we can see here
that when we tab into Edit mode, we
have our cube here, but we're also displaying the shape of our sphere
that is being subdivided. So I'm going to press A
to select everything, grab the move Gizmo here, and move this up on
the Z axis here and bring the bottom of our cube to the bottom of our
character there. Now, when I select this, I want to select on
both sides here. So I'm going to go ahead
and do the wireframe mode. Now I want to click and
drag my box select up here, I can go ahead and begin moving my box to match the
shape of the character. So I'm just going
to match the front and the back edges
there, just like that. And now we have a general
shape around our character. Now let's use some of those editing tools
that we learned. So if I want to make this subdivision surface
snap to an edge, I can go ahead and tighten
up the edge loops. So I'm going to hit Control R or use the loop cut here tool. Click there in the center,
and you can see how the subdivision surface kind of
snaps to the new edge loops. I'm going to grab this edge loop here with the boss select that
I just created. Going to grab the Gizmo
here and move this down. And you can see how
it's starting to flatten out that subdivision. Perfect. That's
exactly what I wanted. Now I'm going to grab these two up here and I'm
going to drag up a little higher
so that the model itself matches the
top of our character. Now we can drag across
here in the bottom. We're going to grab
the scale tool here, and we're just going to go
ahead and scale here on the X axis just to bring the
width of the character out. Feel like we could
use another edge loop here in the center to kind of add this little chunky belly that our character has here. So let's grab the loop up tool. Click here at the center. I'll go back to
the box Seck tool. And with that selected,
I can go ahead, grab that, make sure that's selected there in
the wireframe view. We'll grab our Gizmo here. We will bring this down, grab
our scale here, grab the X, and we're going to move
this out just to give our character a little bit of
width there in the center. Now, I want the top of the
head to come in a little bit. I think that gives it a
more appealing shape. So I'm going to click
and drag up here, select that, and
I'm going to grab the circle here and just
scale this in all the way. So now you can see that our
character is starting to get that little kind
of gum drop shape. And then what we're going to do is start adjusting
the back here. So you can see that we have
almost this kind of like little tapered back.
We'll go ahead. We will grab this, take
our move gizmo there, grab it in the center
there, move that there, grab here, move that up there. Now, if I tap back out
into optic mode here, you can see that we have a simple little shape
for our chicken. Now, I want to go ahead and
add a bit of a belly there. So I'm going to tap back
into Edit mode there. And we're going to
need another loop. T instead of the tool, let's use Control R. So let's
hit Control R, click there, and now
we get some geometry. Now we can grab this
middle tool here and I'm going to turn on the
proportional editing tool here, which will adjust everything
around the edges there, and I'm going to
rotate that out there until we kind of get
this belly to poke out. So I had the general
shape there. So now what I want you to do is just go ahead and grab these and just begin kind of
moving them around until you get them into the
position that you like. Perfect. Now, when
you're adjusting them, just make sure that
you're using the outline of the
subdivision surface. And here you can see that we're getting a nice
little chicki shape. I'm pretty happy
with this shape. Continue to adjust yours
until you're happy as well. Now, you might
notice that we have all these faces that
are clearly visible. And this is called flat shading. Now, if I right
click here and click Shade Smooth or
shade Auto Smooth, what it will do is try its best to smooth out
between those faces. And this is great because
our character can stay low polyly and
render quickly, but we can still get that
smooth shading look. If you want, you can also add another level of subdivision. However, make sure that you also up it in the render view here. These are the levels
in your view port, and these are the
levels on the render. So if we were to
render it out now, it would still render low poly. So I'm going to bump both
of mine up to three. Now let's go ahead here and
look at how we can make this simple little beak
that our character has. So we are going to hit Shift
A or come to the add menu, whichever you prefer, and we are going to add a small cylinder. Now, this cylinder is too heavy for the topology
that we need. So we're going to twirl this up, and we're going to
reduce the vertices from something like 32 to 16. That'll make it
not so high poly. On object mode here,
let's go ahead and rotate this into space here. So I'm going to move this here. I'm going to press the
R key to rotate so that those lines are familiar with there and the
origin point is there. Then we're going
to press the S key and just scale down until it's about the size of our beak there and get it
into a good spot. Just pressing the R and the
Sky and the GQ to place it. You can also use the
Gizmos, if you like. And now we're going to tab into Edit mode and make some changes. But first, I want to
show you something. I open the Transform panel here, we can see that with
the cylinder selected, that we have a rotation of 65 and then it's scaled
down to 0.084. Now, this scale can
sometimes interfere with certain tools,
such as the Bevel tool. You usually want this
to be set at one if you're going to use tools
like the Bevel tool. So what we can do is
actually apply that scale. So you can apply it
under the object menu, or if you hit Control A, you can apply the
rotation in scale. By click that, we see that now this object scale rotation have permanently been set
to this position. So Blender now sees this as
an object with a scale of. Perfect. That's
exactly what we want. Now, let's grab this object
and tab into Edit mode. In the front view over here, I'm going to switch to face mode. I'm going to grab
this face here, and I'm going to
use the Bevel tool. Another way we can access
it is to hit Control B. But hit Control B and drag. You can see here that I begin creating kind of a pointed tip. If I rotate up on my
mouse wheel there, you'll see that I
will add geometry. Perfect. Now I'm going to go
back here to wireframe mode, and I'm going to switch to vertex so you can come up here, grab the vertex button. And then I'm going to
use the circle select, and I'm just going to drag
across this line back here. I'm going to right click here, and then I'm going
to open the scale Gizmo or press S and scale. Now you'll notice here
everything is scaling, and we're zoomed in
so we can't see what we actually have the
proportional editing on. Now, this is the common mistake that people make by
leaving that on. So if you ever notice your
geometry is moving funny, come up here and check if your proportional editing is on. I'm going to turn that off, and I'm going to scale this up. And you can see here that
I've given him quite a big. Now, if you want, you can
scale this beak down, make it smaller, or you can adjust it to
whatever size you want. Now, again, we're going to
grab this geometry here. I'm going to turn off
this mode up here, which is called X ray, which allows me to see
through. Click that. I'm going to right click
and hit Shade Smooth here. And now we have a little
beak on our nose. You can notice here that the
shading looks kind of funny. That's because of what we talked about earlier with topology. I'm going to rotate around in here so you can see
inside of the head. If I come in here and I
turn on the wireframe mode, you can see that
we have a big gun on the back of our beak here. Now, it's not noticeable up here because it's
a very small one, it doesn't interfere
with the shading, but it does back here. But we don't actually
need this face because it's inside
of the model anyway. We're just going to
get rid of this face. Let's press X and delete face. Now, if I tap out
into object mode here and go back
into my side view, you can see here that the
shading has been fixed. So that's why having good
topology is important. Now, if you want, I
would recommend maybe taking this beak here
and going ahead, grabbing these faces
here on wireframe mode, and maybe just pull
those a little bit further back
into your object. This will make sense
later when we animate. We don't want the beak to
separate from the object. Let's look at how we can create this little hair on
top of our character. We're going to use a new object
type called a curve type. So I'm going to add
a Bezier curve here, and you see that it's added
a curve in the bottom. I zoom in on this. This is what it looks like
from the top view. I'm just going to
revert back here. Now, what we want to do is
rotate this 90 degrees, and we can actually do that very simply with a keyboard input. So I'm going to his R I'm going to type in 90 on my Numpad. And you see that that
has rotated 90 degrees. I want to rotate it
90 degrees again, so I'm going to press R and 90. But I don't want it to rotate
back flat like we had it. So I'm going to rotate
it on the Z axis. After I've pressed
R and then 90, I can now press Z, and it will rotate there on the Z axis. However, the curve is
facing the wrong direction. But if I press the minus key, it will turn it
into negative 90. So by pressing R negative 90z, I told Blender I
wanted to rotate 90 degrees on the Z axis. Now, this might feel
overwhelming now, but this is a common way to
edit and model and blender, so I recommend you
practice and get good at working with rotating by the
degree that you want. Now I'm going to press
Enter to apply that. Now I want to apply that
to the object as well, so I press Control A
and apply the rotation. Now if they come over
here to the panel, we'll see that this is now the default rotation
of the object. So with this curve,
what we're going to do is we're going to tab
into edit mode here, and you'll see that we
get some weird controls. And that's because
this is a curve. If you've ever used Adobe software, you'll recognize this. We have the vertex points, and then it tries to draw a curve line to the other point. Just how that curve is drawn,
we have these handles here, and we can smooth out or sharpen that based on the position
of those handles. We can also grab everything
and press S to scale those. So what I'm going to do
is grab this handle here, press the Z key to lock it
and the G key to move it, and we're going to move it up to the base of our head here. Now I'm going to grab
this handle up here, press the G key, and I'm going to move
this down to the tip. You see right now that our
curve is really screwed up. What we're going to do
is rotate this here. So we'll grab this going
to press R, rotate. Press A to scale that down. I'm going to grab this
bottom curve here. This curve is way too
big for our hair, so we're going to press A
and scale this down here, and I'm going to rotate this. You see here we're starting
to get the look of a hair. Now, here's where you can
have some fun to really customize the look of your hair. What I want to do is add another subdivision
in between these two. So another point on the curve. So I'll grab both of these,
right click, subdivide. And you see here we get a new
point here in the center. I'm going to click
off, grab that. And you can use
the move Gizmo or the GK We're just going to
move this into place here. Now we can begin playing
with the handles here until you get something
that we're happy with. So I'm just looking for
just a gentle little curve. Nothing super fancy here. And I'm just grabbing those points and
moving them around. So for now, I think
this looks good. So what we want to do is add
some depth to our curve. So I'm going to press tab and switch back the
object mode here. And you can see we have
this simple curve here. I'm going to come over here
to the data property tab where we have the curve menu. We're going to twirl
down the geometry here, and then here we are
going to add a bevel. And this is just going to add some you're going to want to use really tiny numbers
here when I drag this up, you can see it gets
big very quickly. So I'm going to
just do something really small, like 0.025. Now, in my front view here, I have a taper on the original. So what I'm going to do is tab
into edit mode here again, grab this point, and you can actually adjust the taper
of each point individually. So I'm going to press Alt S, and that will allow me to scale the taper there of the curve. And then I'm going to
grab this one and press Alt S and drag and make that
a little thicker there, Alt S down here and
maybe scale that down. Can play with this
until you get a look that you're happy with. Now, lastly, over here
under the curve menu, we're going to go ahead
and click Fill Caps, because if you notice here,
at the end of the curve, it's actually a empty hole. So they click Fill caps that will go ahead
and fill that cap. G to snap back out here
in the front view, and you can see now we have
a full little character, and we're ready to
move on to texturing. But before we do that, let's go ahead and convert
this all to mesh. So the problem here is
we have a curve object, and a curve object is
different than a mesh object. So if I try to join these
two objects into one, it would not let me
because they are two different types of objects. But hit Control J, you can see I get no mesh data to join. But we want to convert this
curve up here into a mesh. So I'm going to click
Convert to mesh. Now, remember, if
you follow along, you press space bar to search. Go ahead, convert to mesh. Now this is seen as
a mesh, not a curve. And if I click this mesh and this mesh, we can
join them together. So let's click Search, join, and now all those objects
will join together. Well, you see here
that we have an error. And that's because we took off the subdivision surface when we joined all
those together. So I'm going to press Control C. There's two ways to fix this. We can either take our
object here and apply the subdivision surface
and then join them again, or what we can do
is make sure that we join them into
the main object. We'll grab the nose, the hair, and then the mesh here
and hit Control J. Now all those objects
are joined into one, and they keep the subdivision modifier applied to all of them. And now we have a little
body for a chicki that we're ready to go work
on our material for.
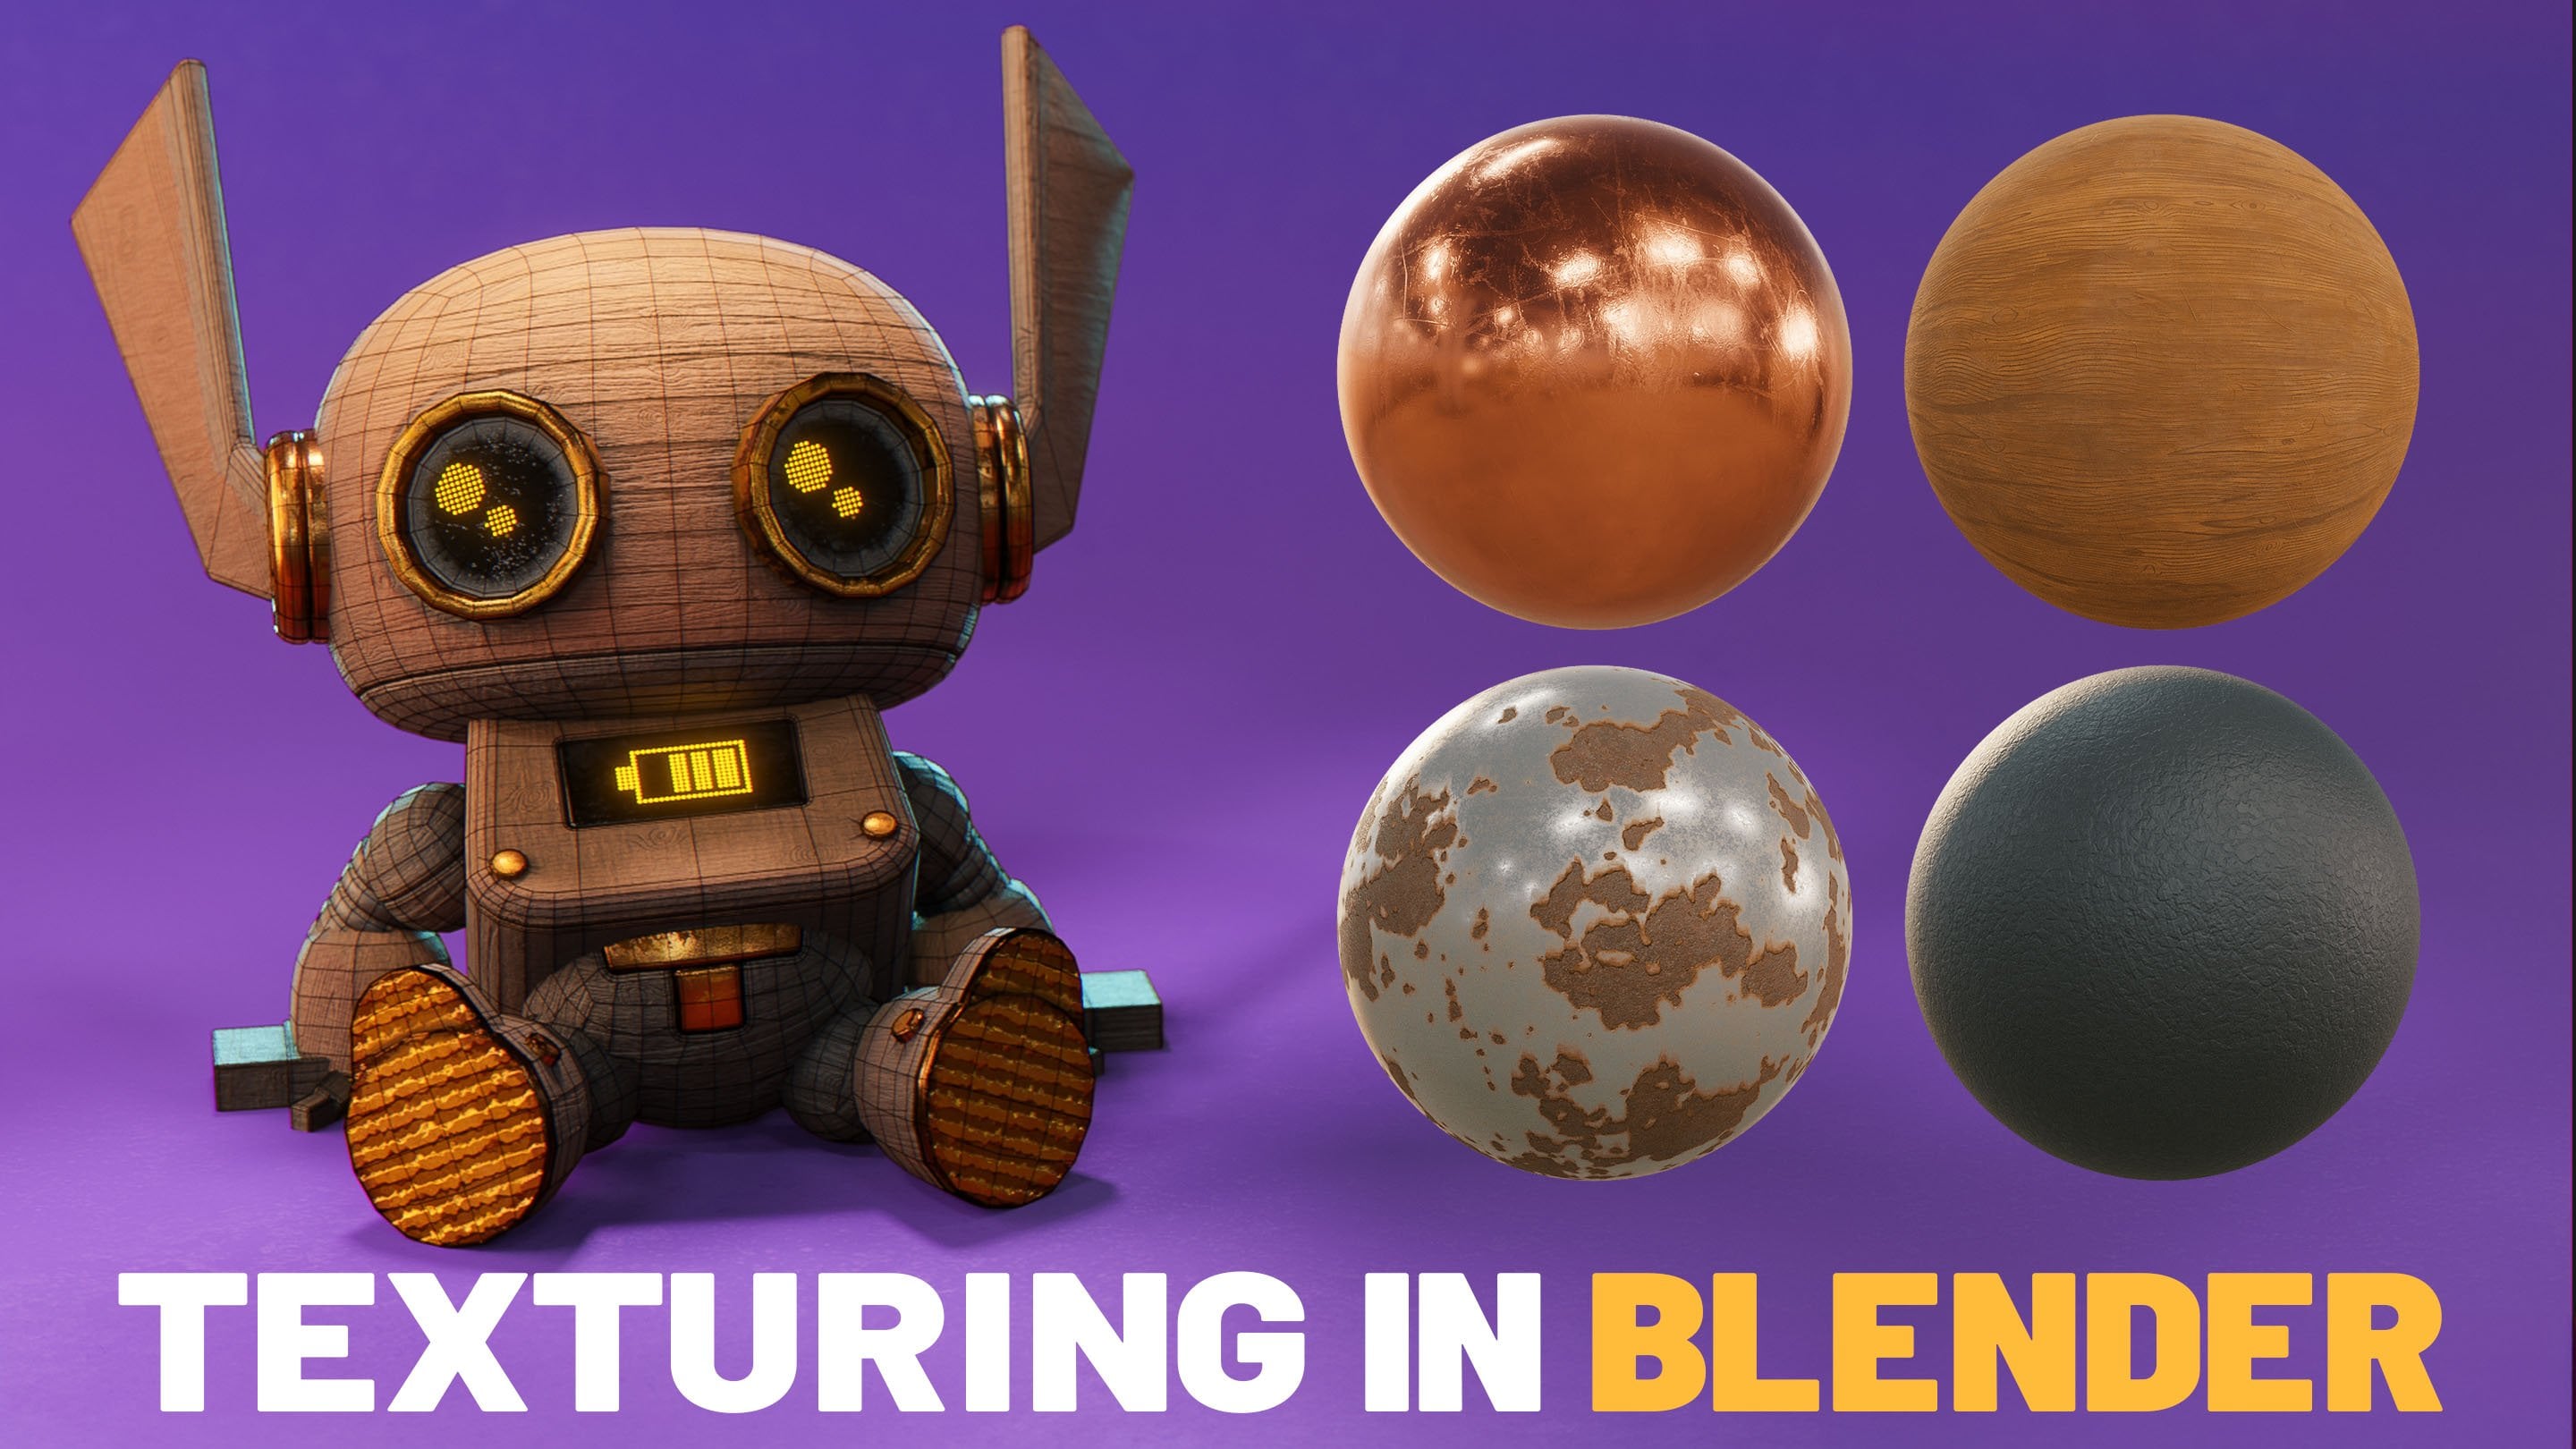
8. Learning Materials: Up to this point,
we've been focusing exclusively on
modeling and blender, but it's time to add
character and realism to our objects utilizing
Blenders material system. Now, in today's lesson, we're just going to focus on creating a simple material for our character here to get
you through the basics. Let's look at how we can apply a material to our
character here. Now, I'm going to
come up here to the top left and change
this to the Shader Editor. Now, there's two ways that we need to look at when
applying material. First is on our object, we need to come to the
material panel, and we need to click New
to create Immaterial. Let's call this hii body. Now, by default, this will
apply to the entire object. So I'm going to switch
to material view here, and you can see
here that if I go ahead and change
the colors that I am changing the
color of everything on this object. Perfect. So when working with
materials and blender, we had the material tab where
we apply the materials, and then we have
the shader window where we effect the
shaders on our object. Now blender has a ton of
shaders included in it. However, with this
principle BSDF node, you can pretty much
do everything in one material node that you
need to for a simple sense. So, for example, if I wanted
my character to be metal, I could turn the
metallic all the way up, shift over to
something like gray, and you can see here that now my character looks metallic. I'm going to go ahead and
turn the metallic off. Here we can adjust
the roughness. So the further I turn this down, the shiny our character gets, I'm going to set this
to something like 0.75. There's a lot of other
advanced settings here, we're just going to cover
some of the basics. Below that, the next one to pay attention to is the Alpha. This will change the
Alpha of your character. So the opacity. Down here is when we
start getting a bit more advanced, and
there's quite a bit. Well, let's look at two of
them. One is transmission. If I twirl this down
and turn this up, this essentially turns
our character into glass. Now, the roughness
is affecting that. So if I go ahead
and turn that down, you can see that
now our character is transparent with glass, and it's reflecting the
HDRI I have in the scene. I'm going to go ahead
and undo that there. Now, the other thing I want
to show you is the emission. Emission actually allows your
character to emit light. So I'm going to move another
character over here. And I just did that by
hitting Shift D to duplicate, and now I have two characters. And I'm going to
take this character, delete the material here, maybe add a new dark gray
material, just like that. And I want this character
to light that character. So I'm going to go ahead and insert a strength of
something like ten here. And you can see that now we are emitting light onto
our character. Emission lights are really great for things like Sci
Fi, for example, in this robot, where
I want the eyes or the neck to light up
other parts of the mesh. Those are the basics of BSDF let's look at how we can mix
some other nodes in here to create a unique
gradient to move up and down our character to make it a little bit more interesting. So I'm going to hit Shift A, click Search, and I'm going to look for a gradient texture. Going to click that there, and you see we have this color tab. If I take this color tab and plug it into the
color over here, it will then affect
our character. You can see here that we have a linear gradient moving
from the left to the right, and we're going to
add some more control over that let's go
ahead to Search, look for a color ramp. And now when I move
this color ramp here, you can see I can
control the gradient as it moves across
our character. But we want to change
the direction there. Now, if we want to adjust the
position of the gradient, we're going to want to change
the vector coordinates. Now this is getting
pretty advanced. But what you need
to know is that the vector coordinates
store the X, Y, and Z data. But by altering
that, we can change the position of the
gradient in the space. That's the basics. We're going to just do a very
simple example. Let's drag this vector
off into space, and it'll give us a search menu. I'm going to look for a
separate X, Y, and Z. Going to click that, and we're going to click
there to place our node. We're going to take the Z here and drag it into our vector. And you'll see here that our character went
entirely black. And that's because
this is looking for the information on
the overall object. So we will drag this
off one more time, and we're going to type
in a coordinant nodes, and we'll just leave
this at generated here. What this is going to do is
generate some coordinatets it can use to determine where
this exists in three space. Now, like I said, I know
this is pretty complicated, but that's all we're
going to do for now. Now we can go ahead and change the color of our character. I'm going to grab
the black here. I'm going to bump
this up, maybe choose a nice warm orange there,
grab the white here, bump this up, and I'm going to choose just a kind of softer,
pretty yellow at the top. Now, here I can change the mode, how it blends from
one to the other. I'm going to change it to HSV, and it will shift the
hue across the way. Now, you can click here to add more stops and move them around, L minus to remove them. You can play with this until you get a look
you're happy with. But next, we need to
address the beak. The beak should be orange. However, it's just adapting
the color of the body. So let's look at
how we can apply multiple materials
to one object. We're going to go ahead
here, click plus sign. Now we have two materials on our object when that
object is selected. We're going to click New and
we'll type in beak here. Now, we want to apply
this just to the beak. So if we tap into
Edit mode here, this is where we
apply our materials. So if you remember, I told you you could press
L to select an object. So I'm going to select that beak and assign that color there. If I tap back into mode here, you can see that
the beak material has been applied
to just the beak. We'll go ahead here and maybe just put a little
orange color there. And I'm going to turn the
roughness all the way up we want to add some
eyes to our character. And the simplest
way for us to do that is to apply a texture map. So let's go back to
our chicki body here. And we're going to
click and drag, put all these nodes down here. We're going to move
these off just for now. And in here, we're
going to hit Shift A, search, and we're going
to add a image texture. This is going to
allow us to create an image texture that
we can paint onto. Now, what I'm going to
do is click New here. I'm just going to leave it at the default thousand 24 picks, and I'm going to call this eyes. This down here is
just the resolution. Here you can set the color. For example, you
could maybe set it to a orange color if you wanted, but I'm just going to
leave mine on black. Going to set it to Alpha. And for the color here, I'm going to click Alpha
and turn this down. That way, we're essentially
creating a blank image. I'm going to click
new image here, and now we have an eye image. Now, if I plug this
into the base color, everything's going to go black. So let's look at what our
image texture looks like. I'll come up here,
brag this down. I'm going to open a
image editor window. I'm going to click here and
I'm going to open the eyes. We've essentially just
put a blank texture on our character now
he has no color. So what we're going
to do is combine these two colors together. So I'm going to drag
these nodes over here. We're going to hit Shift A, and we're going to search
for a mixed color node. This will allow us to
mix two colors together. So we can mix the colors we
created with the color ramp down here with the texture
we want to put on top. So we're going to grab
these Is here and put this in the bottom
because in blender, B will be on top of A. We're going to turn this
factor up to an A there. We're going to take this
color. We're going to mix it. To plug it there, and
you'll notice that our texture becomes black again. It's because we have the
factor set to 100% down here, and the factor here
will determine how these two layers
blend together. So if we grab the Alpha here, it will use that Alpha
information to mix together. So since this is blank, it will just draw on the color. Now we are going to paint
onto this eye texture, and whatever we paint on there will appear on our character. And since we have the setup,
it's actually quite simple. We're going to grab
our object here. We're going to hold tab and
drag and hit texture paint. You'll see here we get a cursor. Now, this cursor's way too big. So we can change
the size up here. I'm going to set mine
down to something like maybe 50 pixels. And that'll give us
two little eyes, maybe even smaller than that. Now, up here, we can change
the color of our paint. So I'm going to go ahead
here and I'm going to grab this here, drag
this down to black. I'm just going to give them
two little black eyes. And if I click there and there, we now have two little
black eyes on our hikibrd. Now, you'll see over here that it's actually
appeared in our texture. Now, it's important here
when you see this asterix, this means your texture
hasn't been saved. So I'm going to click Save here and then just pick a
spot to save these eyes. I'll just put them on
my desktop for now. This ensures that
next time I open blender, those eyes
will still be there. And with that, we've
created a simple material.
9. Basics of Animation: Later in the series,
there's an entire class dedicated to animation
and rigging. Well, let's look at a fun little animation we can create now. There are three ways to insert keyframes and blender, usually. First is the auto keying here. If I click on this
with the auto keying, when I move my object and
move forward in the timeline, it will automatically insert keyframes based on the
position that I have created. Now if I move back and forth, I can go ahead and see
that animation play out. I can also click and
drag these keyframes and position them if I want to
slow down that animation. I can also delete
these keyframes here by clicking and dragging
and deleting keyframes. I'm going to go
ahead here, turn off Auto key and reset the
position on my character. You can do that by pressing
Alt R and G and S. That will reset the scale
rotation and location. The other way to
insert keyframes, so if it come up here under the end panel, grab my object, I can go ahead and
right click and insert a single keyframe
to just the X axis, or I can right click answer for keyframes and do
the entire location across all three axises. Now the other way
to insert keyframes is to press the K key, and here I will get
a keyframe menu. When I turn on auto
king by default, it's just going to insert
keyframes on whatever I moved. So if I change the S there, you can see how
it's moving there. But if I want, when
I press the K key, I can choose what I want to. So if I say I only want to insert a keyframe on
the keyframe menu, and move over here to ten, move this over here,
change the scale. I can insert a keyframe
on the location. And you can see here that the scale was not
affected at all. We've only inserted
keyframes on the location. Now, animation and igging gets much more
complicated than this, and I'm skipping a
lot of the steps. But my goal is just to help you create something fun
here in the beginning. So we're going to apply a rig to this character so you can do a little animation
of the character. And to do that, we need
to learn how to use a feature in blender
called Wile Append. So if I click File Append, this will allow me to import an object from another
blender project. I'm going to click File
Append here and I'm going to navigate to the project files that you should
have downloaded. And in those files, you will
call one called hikiRig. Now when we double click
that blender file, it's going to give us a list of all the categories
in blender. Going to go ahead here
and go to object, and we're just going to
do the chicki rig here. What that's going to
do is import a rig. Now, once you've
imported the rig, it's going to import everything associated with
the rig over here. We're going to go ahead and
take all these controls and put them in their
own collection, call this controls, and
we're just going to turn this off just to keep
the scene a bit clean. All you need to focus on are your object and the chicki rig. And mine fits perfectly, but if yours does
not fit perfectly, you can grab the rig here, tab into Edit mode, and you can grab this bone, and you can move it to match the height
of your character. Now, after you've done that, you will then need to
come out to pose mode. So you'll grab this object hold down tab, go
to pose mode here. You'll come over here
to the armature. You'll turn off the
star right here. Click this one here, come down to the bone
constraints tab, take the original
length and click X. And that's just going to reset this constraint to
match the new length. It's a bit complicated to get
into what all that means. But no, that's all you
need to do to fix it. Come back over here
to this armature tab, click the star here, and then you'll only see the
controls again. Now, what we're going
to do is switch back to object mode here. We're going to grab our
character here, shift click, grab our armature
here, hit Control P, and we want to parent this to the armature with
automatic weights. Is going to try
and automatically apply the bones to the character
in the way it sees fit. So we'll click
automatic weights here. And now, if I grab
our armature here, we can tap into Pose mode, and we can see here that we can now animate our character
using these bones. Perfect, but it's a fun, simple
little setup we can use. Now, if you want to
animate your character, you will animate
it in pose mode. So let's look at a simple
animation we can do. I'm going to set
my timeline 1-24. I'm going to tab
into pose mode here. I'm going to grab this head. I'm just going to turn
on auto keyframes here. And I'm just going to bring
this down a bit here. Then I'm going to come
down to the end here. I'm going to press G again and grab what that's going to do
is insert the same keyframe, and then around
the middle marker, so we'll say around 12 or 13. What I'll do is I'll go ahead and grab that again
and just move it up. Now, when I hit Play,
we can see we have a little bouncing
animation of our bird. Now what we can do is we can actually grab these
keyframes here. We're going to use a
keyboard shortcut here. Shift E, make cyclic. What that's going to do is make it so that it
cycles forever. So if I set this
to 48 keyframes, you can see here that
animation will keep moving. Now if I tap back out
on the object mode, I can move my bird
around the scene, and he will animate
wherever he is at. But first, make sure you
turn off auto keying as not to accidentally
insert more keyframes. Perfect. Now let's
look at how we can add this character to
a scene and light it.
10. Lighting and Rendering Our Scene: Today we're going to look
at the basics of lighting, and we're going to create
a simple lighting setup for our little character here. So on this video, we're
going to dive through those, demystify them a bit, and help you render
your first image. Now, if you open the final
render template project file, you will get this little
robot scene here that we are going to use to do our final
lighting and rendering. So we're going to add the
chicki to this scene. So I'm going to come
up here to the scene. I'm going to create
a new collection, and I'm going to
name this chicki. Now if I come to file append, we're going to go to the project that had
our chicken in it, and I'm going to import
the object chicki. Now, because the rig is
attached to the chicki object, it will just import everything. If you want, you can spend some time over here
organizing this, but I'm just going to leave this as is for the sake of time. So you can see we've imported
our chicki down here. I'm going to switch to material view so that I can
see everything. Now what we want to do is move our little chicki up into the bird's nest on our
robot's head here. So I'm going to grab the
armature here and I'm going to shift click on the top of this to move
our three to cursor there. Now, if that armature
is selected, if I hold Shift S and do
selection to cursor there, you'll see that our character snaps up to the bird's nest. Now what we can do is
in side view here. I'm going to press three
to snap into side view. Remember, you can also
click the Gizmo up here. I'm going to press R to rotate and get our chicki
into position. When we hit Play, we
can see that we have a little chicken placed on the
top of our character here. So now let's look
at how we can light the scene and get it
set up to render. Now, to render the scene,
we're going to need a camera. So let's hit Shift C
to reset our cursor. We will hit Shift
A to add a camera, and now we have a
camera in our scene. Now, if I press the zero
key on the numpad or come up here to view
camera's active camera, it will then show us
our camera scene here. Now, you notice that my
render image is square. That's because over here
under the output tab, we can choose the resolution. I've chosen 1080 by 1080
to render a square image. Now we can just place the
camera anywhere we want, and we move this just
like any other Gizmo. So I can just rotate,
move this here. I'm just pressing the G
and the ar keys here, and then I'm just going to
move this back so that we can kind of see both
of our characters here and position our camera. Very simple little setup. Now, if were to come up
here and hit Render Image, you'll see that our scene is very dark, this is
because we have no light. Now, before we dive
into lighting or scene, I want you first to come up to your render properties here. Now Blender comes with a couple of different
render engines. EV is like a game engine. It's much faster and easier
on lower spec computers. However, it's not as
realistic as cycles. So why don't we set Rs to IV for the sake of
learning in this class, knowing that it
will render faster. But go ahead, set your
render engine to IV, and I want you to click
on ray tracing here. And that'll just help
with the realism. I'm going to switch to
the render view here. We're actually going to
add some lights into our scene and look at
what the lights do. So we can add lights under the object mode under
the light menu here. We'll see we have
a point, a sun, spot, and area light.
This is the point light. It is a small point in space, and it will emit light in every single direction,
360 degrees. This is an area it only emits light in the direction
of the line pointed here. We can scale this to
make our lighting softer and scale it down to
make our lighting sharper. This is a spotlight.
It has a cone, and we can adjust the shape of the cone by this arrow here. And you can see it behaves
just like you would expect a spotlight to
on a theater stage. This is a sunlight, and
this produces light in an infinite direction on
whatever angle this line is. Is because this is
intended to mimic a sun up in the sky
producing infinite light. Now, each light type has
their own unique settings, but there's three that you
want to pay attention to, which will be the
color, the power or the size, sometimes
called the angle. Let's go ahead and
change the power here. Let's change this up to
something like 5,000. You can see how much brighter
that's made the light. Here with the color, we
can change the color to give us a nice warm glow there. And then with the size here, we're changing the
size of the light. The bigger the light is, the
softer the shadows will be, the smaller the light is the
sharper the shadows will be. We also have a thing
called HDR lighting. If we come over here
under the World tab, click color here and
go for environment. See we get the option
to open a map here. Now, you can download maps from places like Plyhaven for free, and then once you do that, you
will open that image here. So let's look at one of
the ones I've downloaded. I'll go on here, DRI and
it's at Empty warehouse. And what that'll do is light my scene using that
empty warehouse. If I rotate around in my scene over here once it's loaded in, you can see that
this is actually surrounding my entire scene. Now, this is a simple way to add some lighting
to your character, and it's great for beginners, however, it has its limitations. It doesn't give you
complete creative control, but it does generally give you broad spectrum fill
lights that you can this is a really simple way for beginners just to
light their scene. However, I recommend
importing an HDRI, lowering the strength
to something like 0.15, and then adding lights
into your scene. This allows you to get
some reflections and cast lighting from the HDRI, but
still gives you control. So let's go ahead and add
some more lights here. I'm going to hit Shift A
and add an area light. That's going to create a light pointing straight down here. I'm going to go into
my front view here. I'm going to grab
this light with the G key and move this up, and then I'm going to rotate
the light using the archy, move it back over,
and press S to scale. Feel free to use
Gizmos if you're not comfortable
with the shortcuts. I'm going to go
over here and turn my camera view on by clicking
active camera there, and we're going to begin
adjusting this light. So let's go ahead and bump
the power up on this light. We just want to get some nice soft lighting off
here to the side. Then I'm going to go ahead here and change the color light, maybe something a
little warm like that. Now, if I come back
here into the top view, I'm going to move
this light back, put it behind my character, and that's giving us a nice
little bit of back lighting. Now, you can keep playing with the values here until you
get something you like. Maybe I'll bump it up to 500, and I'm going to move it off
to the side here so that we don't get this nasty shadow
there. I'm going to go ahead. Plus Shift D with that light, and that will
duplicate the light. We can bring it over
here in the top view and rotate it back. Now you can see we've begun lighting up the background
of our character. Our character here himself still looks a tad dark, though. So let's add a point light.
We'll add a point light here. We'll just use this
move skif somehow here. I'm going to move it maybe up here around in front
of the character. We'll go ahead, ****
the power here, and we're going to
move this up to maybe something around 250, and that's starting to
fill out our character. It's giving us a lot of
harsh lights, though. Let's increase the size.
I'm going to increase it to something like 1 meter
and soften up the lights. I also think it's kind of adding a bit too
much cold light. It's going to add just a
tiny bit of yellow there. And here you can see that we have a pretty simple
lighting setup. But what happens when we
want to render the scene? Well, we can render the scene
up here to render image. And now you can see that our
scene is much more visible. Now, this is a very basic
flat lighting setup. It's not very exciting. If you go ahead and open
the final render example I have utilizing cycles, you can see a more
complex lighting setup. Let's go ahead here, though, and look at our
render setting so we can learn how to
render our image. Now, since we're using EV,
it's quite a bit simpler. We go ahead and just set
the render samples here. So I'm going to set mine to
something higher like 128. I'm going to come down here to the output, set my resolution. I want it to be 1080 by 1080, and then after that, I can choose where I
want to output it. Now, you only need
to worry about this if you're
rendering in animation, which in this case,
you may want to. So I would recommend
coming up here to F video coming down
here to encoding, changing this container to impact four and leaving
that at default. Now you can choose a place
to save your animation. So I'll go ahead and say
animation on my desktop here. And if I come up here
to render animation, we will see that
it begins moving through the timeline
frame by frame. And here you can see we have a simple little animation of our chicki this is very basic. I actually recommend that
for your first project, you just go ahead and
render a single image. What I'd like you to do is pick a more interesting
camera angle and a more interesting lighting
setup and share your results. Now, we just worked with
the camera by default. But if you grab the camera here, you can come down to
the camera settings, and you can change quite a bit. But most importantly, you can change the focal length here, which will give you a different millimeter
if you want to do a crazy wide angle lens or
something really zoomed in, like a telephoto lens. And you can also click
on depth of field. So if I turn on
depth of field here and choose my bird's nest here, I can go ahead and lower my F Stop here and start to
play at the depth of field. So I'd like you to play
with the camera set play the lighting and the position and create an
interesting image here. After that, why don't
you go ahead and open the Idle animation
example here? And the idle animation
example here, you can see that I've played
around with the camera and the lighting to create
an appealing image. I'd love to see what
you can come up with. Now, I can't say
I recommend this because it may be a bit
advanced for beginners, but the robot is also
rigged, as well. If you like, you can
try and apply some of the animation techniques
we learned to him. However, bear in mind, this may be a bit too advanced at this.
11. Next Steps: Made it this far,
I just want to say congratulations because
this is the hardest part. Opening the software,
learning the interface, and getting started
with your first render can be a bit overwhelming, but it only gets
easier from here. Now, this was the first
in a series designed to take you from beginner to
professional and blender. In the upcoming
classes, we're going to deep dive into the various
topics such as modeling, texturing, animation, and more. Now, my goal is that by
the end of this series, we'll take you from opening
Blender for the first time to feeling that you can confidently work on a professional
client project. Most important thing you can
do is practice these skills. So before you go on
to the next class, I recommend you try and design your own original character or find a character
you're a fan of and recreate them using the skills
we learned in this class. Now, I'd love to see
what you create, so please make sure to
share and tag me in it.