Transcripts
1. Introduction to Adobe After Effects for Beginners: Visual effects, motion graphics, removing unwanted
people, keying, and even treed animations are all created with
Adobe After Effects. Sounds super exciting,
and you probably can't wait to get started
creating videos as well. The only problem?
Where do you begin? If you're just getting started After Effects is a
complex program. You could spend days if not weeks clicking
around or watching YouTube tutorials to eventually still not understand
what you're doing. Well, stop wasting time
because I'm here to teach you everything you got to know about Adobe After Effects. There. I'm Jordy, a
professional filmmaker and Va Vx artist for
over 15 years now. Some of you might know me from the Citicom YouTube
channel teaching After Effects to over
2.5 million subscribers. Now, this class is for beginners who would like to learn
the basics of After Effects and understand
what you're doing in well structured,
exciting lessons. I got a feeling I'm
talking about you. By the end of this
class, you'll be able to create motion graphics
and text animations, perform tracking to make
your text follow objects. Part of your video.
You'll be able to cut out specific parts of your
video using various keying and masking techniques or remove unwanted objects
and so much more. After Effects shouldn't
be overwhelming. With the right approach, it
is easy and a lot of fun. So I'm super excited
to teach you all the ins and outs of
Adobe After Effects. I hope to see you in my class.
2. User Interface: Oh, hey, there. Welcome to my class After Effects
for beginners. I am super excited
that you've joined. So let's not waste any more time and jump straight into it. The first time you'll open
up Adobe After Effects, you'll be greeted by
this welcome screen. Now, you'll see a bunch
of buttons in here, but all it does basically
is ask you to start a new project or open
an existing one. Now, unlike many other
video editing software, in After Effects, you don't, per se, have to
create a project. You can just as well
close this window. And start using After
Effects immediately. Now, this comes with a caveat. If After Effects would crash, it does mean that you would lose everything that
you've been working on. So it's good to try out
something real quick. But if you're going to
work on an actual project, it is very much advised to
also save your project. And that's the first
thing that we'll do. Saving, you can do that with Control or Command S on a Mac, or you can just go to file
on top and from there, say Save As and
choose Save As here. And I have a folder called
After Effects for beginners. This is also something that
you guys can download, which contains all
of the project files and footage that we're
going to work with. And let's name this
one Lesson two, and I know this is the
first lesson, maybe, but I'm going to count
the intro video as well. So Video two or Lesson two, doesn't matter. Hit safe. So now this is safe. Now, you will see
a ton of buttons and tools and bells and
whistles and whatnot. Don't be overwhelmed by this. We're going to take
it step by step. But the way you got
to see it is that After Effects consists
out of different panels, and each of these
panels offer you a different functionality
or a different tool. And you can see that.
When I'm actually going to click here
in this panel, it will be highlighted
in blue around it. This is my project panel. And the Project panel is where you will
collect everything. So let's do that. There are different
ways to do it. We can go over to File here
and then choose Import. We can also just
right click in here, go to Import and then choose
File or multiple files. Or the way that I
like to do it is just to simply browse to your folder. So here you can see
the project file that we've just
created Lesson two. And here I have a
folder called footage. And what I like to do
most often is just, you know, browse to my footage. Let's start with clips. And I have a bunch
of clips in here, which we're going to work
with throughout this class. But let's get started
with clip number one. Going to drag that into my project panel, and
there we have it. And I'm also going to go
back here into my explorer, head over to ethics
or Effects and take my flare one clip and drag
that into my project as well. So as you can see here, we can collect all the media files
that we want to work with. And, of course, we want to make sure that this is a
little bit organized, definitely if we're
going to work with hundreds of different
files in here, and so we can do that by
creating a new folder. There's a button down here,
a folder icon to do that. We can also just right
click Choose New folder. And let's call this
here, say footage. And I'm going to take
both of my clips, select them both, and drag
them into the footage folder. So this is really just like your operating system would work, create folders,
put files into it. Alright, so that is
the project panel. There are more
panels, of course. We got the composition
panel over here. We got the preview panel. We have some stacked as well, like the align panel, audio, the Effects
and Presets panel. Here is then panel, but basically it's
your timeline, and it's going to get
active in a moment. The way that these
panels work is that they are really just
different windows, and that means that you
can drag them around. For example, let's take
the effects and presets panel and drag it to
a different position. And you can see now that
I can dock it somewhere. If I were to dock it here
into my composition panel, you will see that it will
act as a different tab. So we have composition here, and we got effects and
presets over there, just like with the
effect controls, which is also a different panel. Now we can also, for example, dock it over here on the side, and that will make it
act as a new column. But we can also write
click in the panel title on top and say close spanel from there, and now it's gone. But don't worry, we can
always bring it back. Now, if you are familiar
with Adobe in general, like Premiere or Photoshop, Illustrator or whatnot,
you are already familiar with these spanels.
They all work the same. If this is the first time
working with an Adobe app, I really encourage
you to just drag these pannels around
and just get familiar. All times, you can go over
to the window menu on top, go over to workspace,
and from there, say, reset the default
to safe layout. And that will just reset your workspace back
to the default, and now you can see that
I have my effects and presets panel back
where it should be. And yes, that does
mean we can create custom workspaces or load in different kinds
of workspaces. Let's go back to the
Window menu here on top, go to workspace again, and you can see that
we have a lot of different kinds of workspaces. We have one for effects. We have one for
essential graphics. Let's take this one. This
is for when we want to create motion graphics and
text animations and whatnot. Basically just a safe layout of other panels and
different arranged panels. Panels, by the way,
you can always find back as well under the
Window menu again, and then here are all of
the different panels. So if you are looking
for something specific, like the paint panel, you can just activate that,
and it's right there now. We can go ahead right click and close again that panel
if you don't need it. Alright, let's go back to
the default workspace. Let's like default. Where is it right? Start
working on our clips now. So what I want to do here, I
have this clip number one, and what I can do with it
is double click on it. Do you view it in the footage
or in the layer spanel? I'm looking at the source of that clip here. I can
just play that back. So we have this woman
here walking in this awesome grass field with a beautiful
view on the ocean. And we also have a flare. This is something that I
recorded in my studio. Basically, I've just shine a light into the lens of the
camera creating this flare. Now, how do we start
editing with this? Where's my timeline? It
currently says none, so I don't really
have a timeline. Let me just close here the
layers tunnel for a moment. The way After Effects works
is with compositions. And you can see it here
in your composition panel that it asks us to create a new composition or create a new composition
from our footage. A composition is
really like a new item that we are also going to
add to the project panel, and you can see it
as a new timeline or a new sequence if you're
familiar with premiere. That means that a new composition
can also be created by just right clicking and from
here choose new composition. Just like with the folder,
we also have a button down here to create a new
composition in one click. On that, we'll open up
the composition settings. Basically, it's
going to ask you, Alright, let's create
a composition. But what are the settings
of this composition? And really, this
is going to define what kind of end video
that you want to create. We have some presets on here. For example, we can go for a
four K ultra HD composition. It shows you the resolution
and the frame rates. But you can also go
for a custom setting. You know, for example,
if I want to go really exotic, I
can go for, like, 855 by 481 for some
particular reason. The frame rate right
here, et cetera. Now, these settings might be familiar with you because I'm assuming that you've
already worked with some video editing
program like premiere, D Venture Resolve, Capcut. I don't know. It all comes down to the same thing, basically. Video settings don't change. But what is different
is the duration. And After Effects, we're
going to say, Hey, this is the duration,
the maximum duration of my timeline, of
the composition. Don't worry if you get any
of these things wrong, you can always change
it afterwards. So let's go ahead and click Cancel for now because I want to show you a second way to
create a new composition, and that is a composition by the settings of
your source clip. So we have this clip
one right here, why not just make a composition that has the same settings? You know, if you
look here on top, you can see some of
the details that has this resolution that has
this frame rate that has, you know, this length
of composition. It's 8 seconds long. So can't we just do that? Well, of course, we can just
very simply take that clip and drag it into that
new composition button. Basically what that will do
is create a new composition, and it has given the
same name as the clip itself and put that clip
into that composition. And we can rename that
composition, have it selected, hit your Enter or return
key on your keyboard, and let's type in
a different name, for example, Lesson two,
because this is Lesson two. And if we want to change
anything else from it, we can always chose
right click on it and go over to
composition settings. And here we have that same settings
window, but, of course, this time, we're
changing the settings of an existing composition. Cancel this because
the settings are goot. I'm going to add my flair
also in that composition. As you can see here, our
timeline looks like layers. After Effects is layered base. You can really see it as
the Photoshop for video. We're just stacking layers
on top of each other. And, of course,
because my flare clip is on top of my clip one, we are seeing the flare clip. It's really like putting
papers on top of each other. You're always looking
at the top paper. Also have a whole bunch
of layer settings. Let's have a look into that. So we can find it here
on the right side. So you can see all of
these different toggles. We can just click on that. You know, toggle
things on and off, which are different
layer settings. And I hate to break it to you, but we can enable
more layer settings. Down here, you can see
a button called expand or collapse a transform
Control panels, which reveal some
more settings like the modes and the track
mattes and whatnot. So don't worry too much
about all of these things. We're going to take a look at
them throughout this class. But for starters, I already
want to show you the modes. The mode is something that is used a lot in After Effects. It's basically a way that you can blend your clips together. Opening up this drop
down menu reveals a whole bunch of
different blending modes. And again, if you are familiar
with Photoshop Premiere, you know these blend modes. These are exactly the same. For example, let's
take any of these. Let's take at, for example.
And oh, look at that. We can now see through
our flare clip. And interesting is, let me
just o on that Popa Box. And interesting is that we
can still see our flare. It basically removed all
the black in the video, but still revealing the brighter
parts, the flare itself. And that's really cool
because what I've now done is added a bit more flare to my shot
using After Effects. We're already creating
something here, guys. Isn't that awesome. So play around with the mode,
see what they do. You can also stack two normal clips on top of
each other or other clips. You can really play around with this, blend them together. You can also blend three,
four, 5,000 layers together. Really fun to play around with. You could instantly create
some really fun effects by just blending
layers together. There's one more panel that
I want to take a look at, and that is the Effects
and control panel. Also something, of course,
we're going to use a lot. And it's here on the side
effects and presets. This panel holds all of
the effects that we can use to work with
in After Effects. And they are categorized. You know, we have audio effects. We have some channel effects. We got color correction
effects, distort effects. You can expand these folders, take a look at what we all have. And let's start with
something simple. Let's go over to the
color correction. And there's something
interesting in here called the U and saturation.
If I can find it. If I can't find it, we always can use the
search bar on top. Let's just type in, and here
it is U and saturation. And to use that effect,
you just take it and drag it onto the clip that you want to
apply that effect to, and I'm going to
apply it to flare 01. And immediately the effect
controls are opened up. It's in a second tab next
to your project panel. So here you can
always find it back. Basically, here you will
see all of the effects that have been applied
to a specific clip, a clip that you have selected. If I were to select my clip one, which I didn't apply and effect
two just yet, it's empty. The same if I were to not
have anything selected. But if I select flare
one, there it is, again, the U and saturation effect
that I just apply to it. So let's use this effect. Let's change the which is
the color of that flare. You can here see it.
Look at the ring here. As I change the color, the master, so we
can make it, like, more green or we can change
it to a different color, perhaps have it a bit
more red orange so that it fits more with the
clothes of this woman. Let's play this back
and look at that. Now we have a different kind of color flare. Isn't that cool? Practice this a little
bit so that you get familiar with these
first penels. You know, import some clips, create a composition, add
some effects to your clip. Maybe explore some
of these effects. You know, just drag anything you find onto a clip,
see what it does. And then I'll see you back in the next lesson where
we are going to further explore these effects and create some
animations, as well. Gonna be interesting.
See it a bit.
3. Layer Properties & Animations: Let's continue with layer
properties and also animations, which is probably one of
the most exciting things inside After Effects. So I'm going to go over
to my footage folder, and let's work on clip
number four in this lesson. I'm just going to drag that into my project panel like that, and as we've seen before
in the previous lesson to create a new timeline or
composition for that clip, I'm just going to drag it into this little comp
button down here, which will create
a new composition that has the exact
same settings, the resolution, frame rate, and the duration of
the clip itself. Now, let's explore the
properties of this layer. Layer properties can be found
back in various places. We have the property spinel, as you can see right here
on the right hand side. If you can't find it, you can always go to
the menu on top, window, and from there,
select properties. Make sure it's active. Now, we can also find
these layer properties back in the layer
itself in the timeline. We can actually expand the layer with this
button right here, and here we can find the
transform properties. Expand that again, and these are the exact same as here on top. After Effects gives
you multiple ways to change the
properties of e clip. So it's really up to
you what you enjoy the most where to change
these properties. Now, interesting is that every single layer
that you add to the timeline down here has
transformed properties, and these will always
be the exact same. We have an anchor point.
We've got a position. We've got the scale, the
rotation, and opacity. You'll find these back on every single layer that you
add to the composition. And so to change them, we can
change the value in here. For example, let's
do the position. If I change here, the
second position value, I move it up and down, or I can change the first value
to move it left to right. As you can see,
the property panel just reflects what
I'm doing down here. So you can also
change that in here, for example, the scale, we
can skilled up or down. But we can also change
a lot of these strands foreign properties in the canvas or in the composition
view itself. We can just dig the clip and move it to a
different position. We can take one of
the outsides here and change its scale,
as you can see. Interesting is that we can
have a different X or Y scale, so we can kind of
stretch the clip. If you hold down your shift
key on your keyboard, it will actually always stick
to the same aspect ratio. To rotate your clip, we're going to need
the rotation tool, and that can be found up
here in the tool bar. Here's the rotation tool. But it's good that you start to learn some of the short keys. If you hoo any of these tools, you can see what
the short key is. It's W for the rotation tool. So let's hit W, which
allows me to rotate it from the corner
that I click on. Now, it's rotating
around its anchor point, and that is this little
crossair here in the middle. That's the anchor point. And as you can see here, the anchor point
is also a value. We can change that in here. Or we can take the
anchor point tool, which is next to the
rotation tool or the wiki. Select that, and now
we can just take that anchor point and
move it somewhere else. So now if I were to take
my rotation tool again, W and rotate the clip, it will rotate around
that point now instead. Alright, but what if you want to reset any of these values? Well, we can easily do that
by just right clicking on, for example, the anchor
point and then say reset. Doing that we'll reset it
back here into the middle. Works the exact same way if I
were to reset it down here, right click, for example,
on position and say reset. Or perhaps I want to reset all of the transform properties. We've got the reset button right here on top for transform, which is the entire category, or also here in the
property spanelRset. Alright, let's do
some animations. Let's decrease the scale
of our clip like that. So what I want to do
is make this clip move from the left side
to the right side. Simple animation, but
that's where it starts. Now, in order to do that,
we're going to have to animate the position property. Now, animations are always
created inside the timeline, so that's why I don't like
to use the property spinel. I don't find it that useful, so it's up to you if you
want to use it or not. So let's focus on the timeline and the position
property in here. As you can see here
on the left side, we have a stopwatch icon, which basically says to enable animation for that specific
property. So, let's do that. Let's click that. And you can see now
that we have created a keyframe inside the timeline. And this keyframe right here holds the current value
of that position. It's currently on the right
side. So, you know what? Maybe I want to move that
here to the left side. You can just take
it and drag it. And automatically,
this keyframes now has been updated with a
new position property. Just like with walking or
driving a bike or a car, you want to go from
point A to point B, and that takes a
certain amount of time. So if our clip here sits
on the left side on the clear in time and we want to
move it to the right side, we also have to give it some
time in order to do that. So I'm going to take my play hat and move forward in time, and now I can take my clip and
move it to the right side. Automatically, a new
keyframes has been created. It'll always do
that, by the way, if you change a value, it will either update
the keyframe or it will create a new one if
there isn't already one. And so let's play this back now. As you can see, you just have created your very
first animation. The clip goes from
left to right. And just like in real life, if you get more time to
walk the same distance, you just walk slower. So let me just take
that keyframes and move it to the right side,
giving it more time. So now if I play this
back, you'll see that the animation
goes much slower. If I were to move these
keyframes closer together, the animation goes much faster. And just like that,
we can animate any property because you can see all of them have
that stopwatch. So at the same time, we could make a rotation
animation as well. I'm going to enable
animation for the rotation, and has automatically
created a new keyframes. Then let's go forward in time, and let's increase
here the rotation. You can also do that in
the property itself. Let's make the clip go upside down. Alright, and
you know what? Maybe I also want
the first keyframe here to have a different
value than just zero. This is where you got to
be careful because this is a mistake that many
beginners make. Sometimes you think you are sitting with your playhead
on the keyframes, but actually you're one
frame right next to it. And if I were to change
the value now, let's say, I want to flip it to the
other sites like that, you go back in time
and suddenly you notice that your clip
just jumps back. Like what's going on right here? And if you were to zoom
in in your timeline, which we can do
here on the bottom, just click here or just drag
that slider to zoom in, you can see here that
we have two keyframes accidentally created. So let's delete here the second
one that we have created. Let me just zoom out again. Because I want to show
you guys something. If you want to make
sure that you are standing exactly
on your keyframes, you got to hold
down your shift key as you move your
play had around, and you can see now here that it snaps to these keyframes. It snaps to them. And that way, you know that
you're sitting exactly on that keyframes and you won't
be making that mistake. So now I can just rotate it
to the left side like that. And if I were to
play it back now, you'll see that it kind of rotates while
going to the right. If I want to start the rotation
also at the beginning, just take that keyframe and
move it to the left side. Staying with the last keyframes, move it to the right side. And that's in a nutshell
how animations work. I want you to practice that a little bit, play some keyframes, do some animations with
a transform property, especially if this is
completely new to you. But it's always good to
practice that a little bit, because in the next lesson, we're going to take
a look at some more advanced key framing techniques as well as animating effects.
4. Smooth Keyframes & Effects : Let's continue with
animations in After Effects. We're going to take
a look at some more advanced key framing techniques, and then we're
going to apply that also to animating effects, which is also going to
be for this lesson. So in the previous lesson,
we have animated this clip as it rotates and
moves into position. But as we play this vacuum mode, that animation is very stiff. And just like with a
car, you cannot go 0-70 miles per hour, you slowly accelerate to it. That's basic physics,
and you want to see that back in
animations as well, because that's what makes
your animations feel natural. Let's see how we can do that. The keyframes that we're
currently looking at are called linear keyframes. They just start immediately. But I can right
click on a keyframe, or I can also select multiple keyframes at the same
time and then right click, then go over to
keyframes Assistant. And here we can find three options which are
going to be very important. Easy Ease, Easy Ease
in, and easy es out. If an animation starts, we're always going to
choose easy Es out. Might be counterintuitive
because it feels like out is like
your last keyframes, and in is your first. But the way you got to
see it is like this. Your animation goes out to the right side
of that keyframes. Right side is out,
the left side is in. So as it goes out,
we choose EZ Es out. And now you'll notice that the animation will start smooth. It still stops very immediate, so we're also going to select
the two last keyframes. Right click, go over to keyframes assistant
and then choose EZ Es in as the animation goes from left to the right into the keyframes. And now playing
this back, we get a smooth animation
starting and stopping. There are some more
natural things missing in this animation. You see, if I wave
my hand around, it's kind of blurry. This is called motion blur,
another natural phenomenon. And that's something
that we can enable as well inside After Effects. You'll see here in the later
properties that we have a toggle for motion blur. Just enable that right here. And now, as we play this back, you'll see that the rotation
and the position also leaves this blurriness to
it, which is natural. Say you have multiple
layers in here, you can choose which one has motion blur or which one not. But let's say you have
100 layers in here, A's playback is going to be very choppy because of that
motion blur, well, you can then easily toggle it off globally here on top for all the layers without
having to individually disable it for each layer just to preview what's going on. And then, of course, once you're going to start
rendering your video, once it's done, you just enable it back for
all of those layers. Alright, I'm going
to move here to the middle somewhere
of my animation, and I want to create keyframes current value right here.
So how do we do that? We've learned that we can change the value to create
a new keyframes. But what if we want
to make a keyframes of just current value as it is? Well, for that, we can
create a manual keyframes well here on the left side. We just click to create a manual keyframes and we'll do the same thing for
the rotation as well. Now, you'll notice that these keyframes kind of
look different. I can tell that these are
not the linear keyframes. Instead, these are
automatic Bzire keyframes. Because After Effects
knows that we have an ease in and an
Es out keyframes, it'll automatically do that. It will kind of smoothen
the animation a little bit. It's not that
noticeable. It is there. If you don't want
that, you just hold down your control key and click on the keyframes
to reset them back to linear keyframes. And now we don't have that
smoothing in the middle. If you want to add
more smoothing to it, you can also right click them. Go over to keyframes
assistant and choose EZ Es, which is both an ease in and an ease out
at the same time. Now, what does that mean? This means that
the animation will kind of stop a little bit in the center because it will slowly come to a halt and
then slowly start again. You know, ease in and ease out. Let's play it back, and you
can see here now that it stops here in the middle for just a moment,
but it's smooth. So smooth animations
and motion blur. And now that we
know this, we can continue with animating effects. And for that, I'm going to drag my clip number four again
into a new composition. Like that because, yes, we can create multiple
compositions in After Effects. I'm going to rename
these, though, because the first one
here is more about, like, smooth animations. And then the new one
that I just created, just hit return on your
keyboard to change the name. We're going to call this
animating Effects, like that. And perhaps, you know,
let's create a new folder. Let's call this one Comps. For compositions and put both of these compositions in there to stay a little
bit more organized. And you can see here now in our timeline that we have two tabs, the smooth animations
that we just created, and then a second tab, which
is the second composition. If you were to
close one of these, you can always reopen
them in my folder here, animating effects,
double click on it, and it will open
up itself again. We've got a clean slate, you
know, just a clip in there. And let's have a look
at what the model is doing inside of that clip. You know, she's doing this
movement with her hands, and then she's shooting
out something. So let's create some kind
of effect where she creates some sort of an energy ball perhaps and then just
shoot set out to, I don't know, a dragon that
is sitting off screen. So I want to go to the
Effects and Presets tab, and it's good you've
already kind of explore the Effects
library a bit, you know, just drag some stuff, some effects to your clips
and see what they do. I want to go over to
my distort folder. And look for the CC flow motion. This is a pretty fun effect. By the way, guys, if
you'd like to learn more information
about each effect, you can click the info
button right next to it, which will explain all of
its properties and settings. But you guys got me, so no
need to press that button. Let's drag the CC flow
motion onto our clip, which we can do in the
timeline or we can also drag it directly here in the
Canvas view onto the clip. As we've seen before, that will automatically open up
the effects controls, which hold all of
the settings of the effects that
we've applied to it. Now, interesting
is that we don't see that back in
the property span. Properties only show
the basic transform. For the effects,
we still have to go to the Effects
Controls panel. Or as we've seen before, we can also expand
the layer itself, and under there, we can
find the effects right now. Here it is CC flow
motion and all of its settings the same as we have in here in the
effects controls. So let's explore.
We get two dots. We have nod one, the
amount for the nod one, not two, and its amount. And then we got some more
settings that are mostly interested in the nod
one, and its amount. So we can change the
position of not one. You can see here
in the canvas that it's visually
changing that point. So that means that we can
also just take it right here and drag it visually
to anywhere we want. You know, let's make it
start at her finger, for example, and we can
increase the amounts. We can increase
it to have, like, the image be sucked
into that point, or we can, like, decrease it. To have some sort
of, I don't know, like a black hole or some
energy field being created. But I really like this because this is kind
of like a ball. If you move it around,
you can see it here, like an energy ball that's creating she's warping
space and time. While animating, it's oftentimes easier to just see it
without the effect. So let's bring the
amount back to zero. And let's focus
here the not one. It's a position value. It has two values X and Y. Let's enable animation,
which we can do from here, or we can also click there. It reflects, as you can see, it has created a new keyframes. Let's go forward and
time a little bit, and just take that knot
and move its position. Like so let's fall
over her finger. Automatically, a new key frame has been created as we
change the position. Let's go forward,
change that knot, forward, follow her
hand a little bit. You can do this very rough. Like, so she goes
inward here like that. And here she shoots it out. Oh. Maybe one last keyframe
here, and then it's gone. There we go. It shoots out. Maybe we need to readjust these keyframes a
bit in the timeline, move them a bit further
apart or closer together. Let's add some amount to it. Let's say, minus five to
have like this energy ball, and let's play this back,
see how that looks. Yeah, that looks pretty
cool, doesn't it? Maybe I want to bring
this last keyframes a bit closer like that so that
it hoots out a bit faster. Okay, looking good. Now,
as for the energy itself, I wanted to, like, come in
so that it's not there yet. Like she's creating the energy. So let's also create an
animation for the amount. Let's set the start to
zero, enable animation. Go a little bit forward in time, let's say until here somewhere
when it's in front of her, and then set it to minus five. So that way, we have it
slowly coming in, like so. As we've seen
before, we can right click here the end
keyframes of the amount, go to keyframes and
choose EZ Es in to make it slowly,
smoothly stop. As for the first keyframes, we actually don't
need to smoothen that because we don't see anything
at the start just yet. We just have the
amount coming in. So only the amount
we can right click, go to keyframes and
choose EZ Es outs. As we don't see the
start animation because there is
no amount to it, we don't really have
to smoothen that. Also, not the
keyframes in between. We don't have to smoothen those because we need to
follow our hands. And also we don't
have to smoothen the last key frame because this effect goes
out of the frame, as you can see,
maybe we even want to move it out a bit further. Like that. So we don't actually see the ending of
that animation. It's just out of the frame
and it goes on forever. And now you might think, let's add some motion blur to that. Well, okay, let's do that. Let's enable motion blur for
that later and play it back. And as you will see,
there is no motion blur. Well, that's because motion
blur can only be applied to transform effects where there's an actual movement going
on of the clip itself. But After Effects cannot see any movement with effects
being applied to it. Don't worry. There is
a workaround for that. In the Effects library, I'm going to look
for motion blur, and there is one called
force motion blur. And this is one you're
going to use a lot, as well, like in this case,
you're going to drag that. You can also drag it into the Effects Controls
now, by the way. So you will use this
always together with animation you've
done on effect. So now if I were
to play this back, you could already see it here, it will have motion blur. Of course, playback
will not go as smooth. It will be pretty shoppy, so you want to play it back once so that the line here
on top gets green, which indicates
that it's rendered, and then you can play
it back a second time. Well, now it has motion blurred, and it looks a whole lot better. So oftentimes I would also
just disable that effect, which you can do here with the ethics button on the
left side of it. Just disable it so that I can work more smoothly
on my animation, and when I'm happy with it, when I'm done, then I
enable that effect again, and then I can start rendering it or have
a preview first. Okay, our energy ball is
starting to look really cool. It's following our hands, and we have motion
blur going on. All of the ingredients
for a natural animation. But there are still
some things missing. You know, the animation
looks kind of choppy. In my opinion, it could
be a whole lot smoother. But for that, we're
going to have to work with layer linking. But that is for the next lesson.
5. Layers and Layer Linking: So we have just created this
here in the previous lesson, this energy ball that has been created and
then shoots out. But I don't really
like how it looks. It's pretty choppy. It doesn't look as smooth. Now, if we go back to the previous composition that we created like two lessons ago, which was this rotating clip, you can see that we have
this line right here, which represents the
of that animation. And interesting is that we
can take that, for example, the middle keyframes and move
that up to change the path. You can visually see it. This way of animating
is much better, and it will give us much
more control as well. But it's only possible to see the animation pads on
transform properties. So these are the basic
properties of eclip and not on effects properties. But there is a workaround with property and layer linking. I'm going to go back to my
animating Effects composition. And if you want to see all of your keyframes that you've
created on your layer, you can select it and then press the key on your keyboard. That's oftentimes very useful to not see all the
properties that you don't work with definitely if you have multiple
layers in here. So I'm going to delete all
of the position keyframes. So just select all of and delete them because I
cannot see the path for it, so it's not really useful. If we take a look at the
property value itself, we can see that it
has two values. It has an X and a
Y value defining, you know, where that
knot position is at. And this is something that
comes back very often. We also have that with the
normal position property. So, in essence, yes,
these are two of the exact same types
of properties. So what I'm going to do is right click in an empty
space in my timeline. Go over to New and then here, I'm going to go over
to Null Object. Let's click on that and
add it to the timeline. This null object is a nothing object.
It's really nothing. As you can see here
in the canvas, it just sits there, but
it doesn't do anything. We can't see anything. But interesting is,
like we know before, every layer has
transform properties. Let me just expand it
from here because I don't like to work with
the properties panel. Transform. There it is. That means that with
the null object, we could create an animation, see the animation you paths. And maybe what if we then link
that to the knot position? Well, let's try and do that. I'm going to go to
the beginning, take the position of
that null object, the nothing object,
place it there, start animation for the
position, move forward in time. She makes the curve. I'm going to just
move it to there. You can see the paths now. Maybe let's disable the amount
or let's select our clip, go over to the effects
controls, and for a moment, I'm going to disable
the CC flow motion, which is going to
make it a bit easier. Okay, select the null object
again. Where are we at? So here. Okay, let's bring
it inwards. Move forward. She's bringing it to here, right before she's
going to push it out to shoot the
dragon like that. Now, in essence, this was somehow the animation
that we got when we were animating the knot position itself
of the CC flow motion. Not very smooth. So what we can do now is
select one of these points, and we can take the convex tool. It's right here
under the Pen tool. Just click and hold
to show the menu, convert vertex
tool. The V shape. Take that, which allows us to click and drag on that point. And as you can see now,
we can make it curve. So now I will just go back in time and just see
how her hand flows. So maybe I want to pull
that a bit more like this and make sure that the null object
follows her finger. It goes a bit too fast. Well, here's a workaround
to it as well. Right, click the first keyframe, keyframes. Easy Ease out. Make it start a bit smoother. Her hand is also starting
smooth, accelerating. Okay. Here she
makes another turn, so I'm going to pull
the second keyframes as well so that we keep
going in this rotation. Looking good. This one, as well. We can zoom in a bit more by just scrolling
with your mouse. If you hold down your space bar, you can actually move around
in your zoomed in image. So let's see what
we have to do here. Also pull this point. Just pull on these
levers to make like a nice round arc and make sure that it kind
of follows her finger, her hand, as she
then shoots it out. So looking at this pad
here, that's zooming out, this pad looks a whole lot better than
what we had before. And this is only possible to do that on the position property. Okay, I'm going to select
my clip four again and enable the CC flow
motion effect again. And in order for this bolt right here to follow
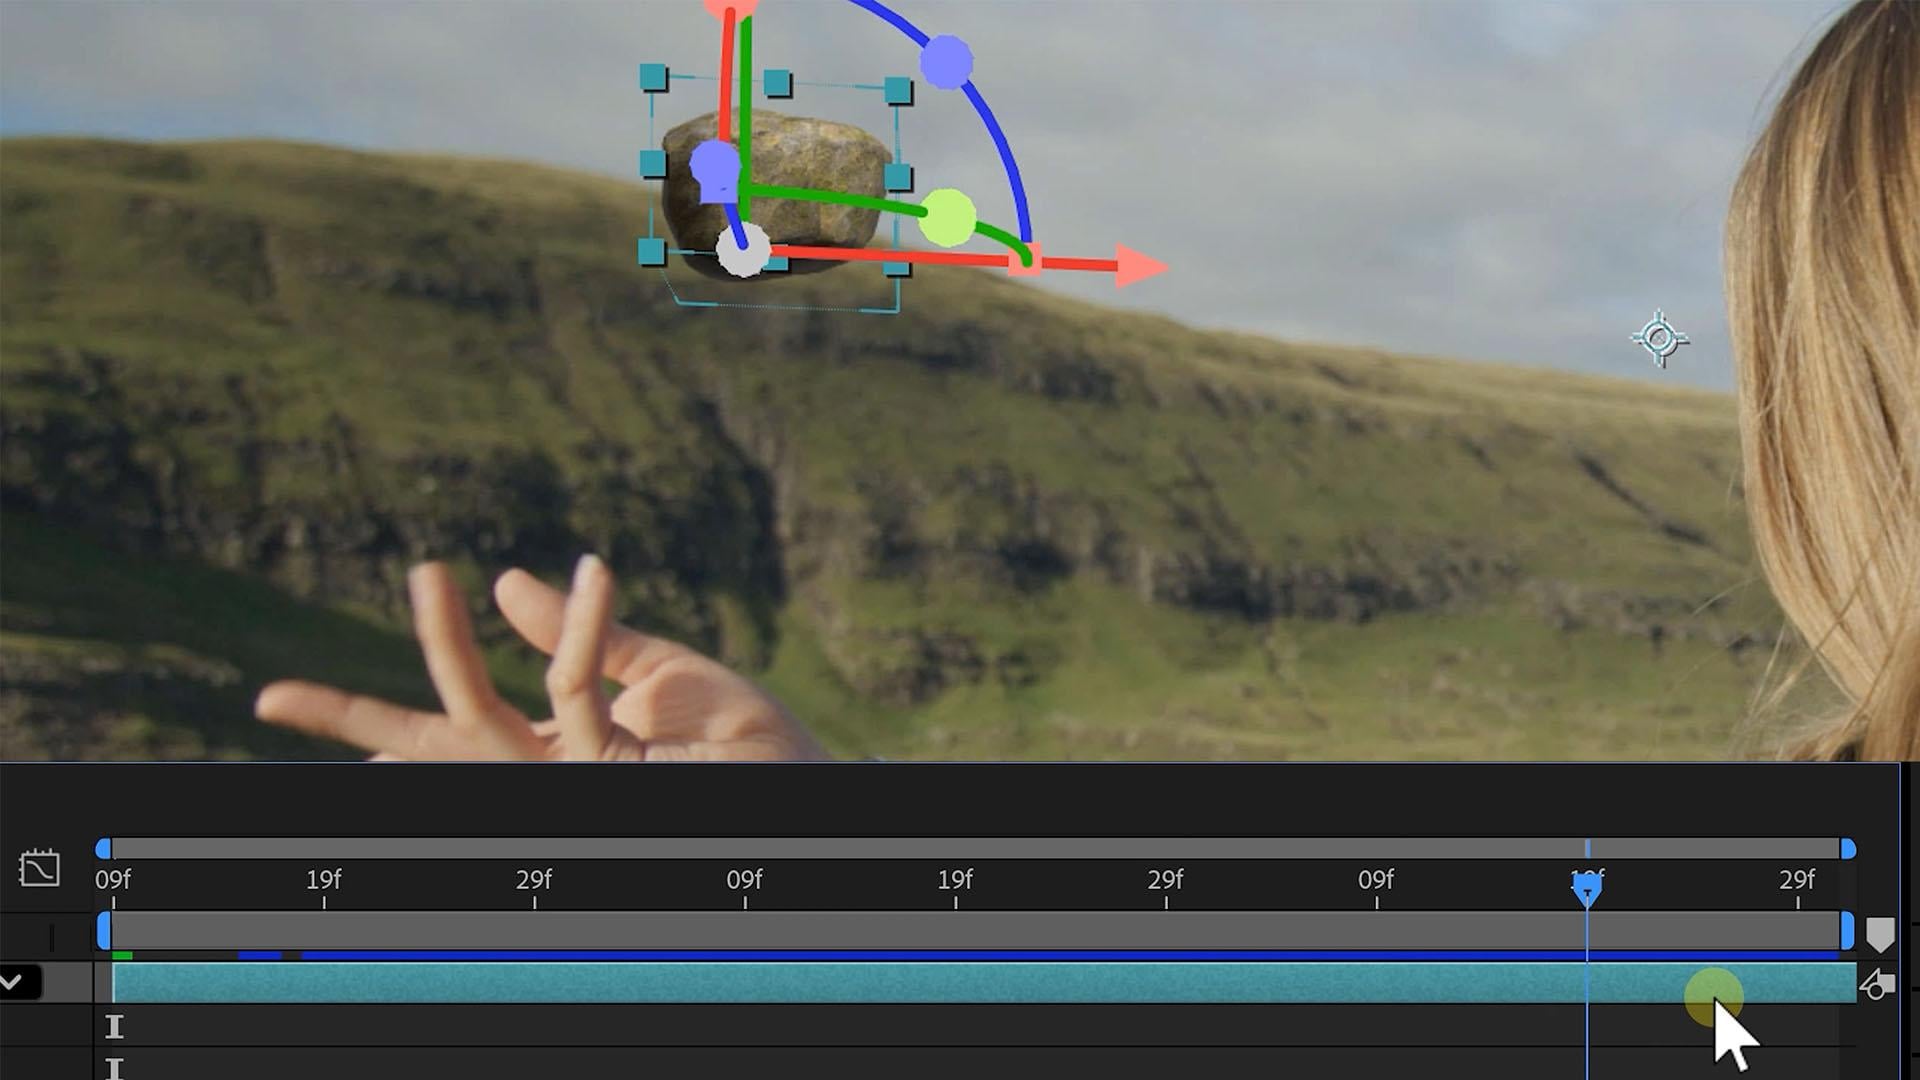
that position, we simply have to link it to it. Right next to the value, the XY value of the Nd one, we can find this PiwipTol and we can now very
simply just click on it and drag it to link it to
the position of the null. So it's taking over and you can see it now in a red color. It's taking over the position
of another property. And just like that, the bulge or the energy field is following our hands from the animation that
we just created. So that is the first
benefit of doing your animation using a null
object or a nothing object. It's actually pretty
useful for being nothing. But there's a second benefit, and that is when we want to link multiple properties
to the null object. Say that I want to
add some more flair to this energy ball, like literally a flare. I'm going to go over to
my ex and Presets panel and look for flare. If I can type it correctly, oh, my God. There it is. Lens flare. I'm just
going to take that and drag it onto
clip number four, as well. A beautiful flair. And if we take a look at
the properties, you know, we get we can choose
the lens type, maybe change that
to something else. This year, some more
bluish looks pretty cool. We can also decrease
the brightness, which will also make it smaller. If you don't want to
make it go smaller, you can also take the
blend with original, which is kind of like
an opacity property for the lens flare and
keep the same size, but just not as bright. The position on that
flare is again, defined by an X and Y
value, a position value. I can move it around like this. Now, if we weren't
using that null object, it meant that I had to manually reanimate that entire flare. And maybe I have some more
ideas for extra effect. But I also want to follow
that same path and I had to reanimate it every
single time again. But we know that we can
link properties now. So that means I can just
go into my lens flare. Let's expand that and let's make a bit more room here
in my timeline. Like, so let's go
over to flare center. Take the Pick Whip tool and also link that to the position. And just like that, it will just follow
that energy field. And the only thing left to do is animate the blendwd
original or brightness, maybe to make the flare come in as the energy ball
is being created. And here's something
interesting. I'm actually going
to start animation. Let's go for Blendwid original so that it
has one keyframes. Then with the layer selected, I'm going to press my UK twice, first is to collapse,
then to expand, which will show
all the keyframes, but only those properties
that have been animated, which gives me a
bit more room so I can make this panel
a bit smaller again. Since this is going to be my end brightness, you know, 39%, I'm just going to
take that keyframe and move it all the
way to the left, align it with the
flow motion keyframe. And we can hold down
Shift to make it snap on the same position here in the time of the other keyframes. And then here in the beginning, let's set that to 100, which means that
we don't see it. It's not opacity control. It's a blend with
original control. So it works the other way. We also want to right
collect the first keyframes, keyframes, easy is out. And then here the last one,
keyframes, easy is in. And just like that, we now have two effects creating
this energy ball. We have this flare going on. Look at that with the motion
blur looking awesome. On the end, we still
kind of see the flare. So maybe we need to
take the null object, the position, the
last position here. So just zoom out, take
that null object, and move it even further. And since it's covering
a longer distance, I might want to give it a bit more time for
that animation. Move the keyframes
a bit to the right. Let's play this back, see how it looks. Yeah.
Okay, that looks. Alright, guys, we're getting
there, layer linking. The null object is something
you're going to use very often just for
that specific purpose. I'm going to collapse
my layers here for a moment because I want to show you guys one more layer, and that is the
adjustment layer. Right click, go over
to New and in here, you'll now find
adjustment layer as well. Adjustment layer is also
kind of a nothing layer, but it is used to create adjustments to
everything what's below. And to better demonstrate that, I'm going to import
another clip. Let's go to the Project panel. I'm going to open
up my explorer, go to Effects and take
that flayer again, drag it into the project, like so, and maybe
create a new folder, call it footage, and drag my clip four and the flare
into the footage folder. The way, whenever you create a new adjustment
layer or null object, it's also added to your project panel
under a solids folder. After Effects does
that automatically. And let's drag the layer
one into the timeline. And we want it to be
above clip number four. You know, we've
seen this before, papers on top of each other, and we're
going to blend that. Let's show the blending
modes by toggling here the transfer
control panels, expand or collapse it, and change the mode to like screen or add,
something like that. If you want to make that
flare a bit brighter, you can really just
go into your effects and presets library, look for brightness
and contrast. Take that effect, drag
it onto the flare, and just increase the
brightness of that. As you can see now, that flare becomes much more brighter. You can also increase
the contrast a bit to remove some of the glare coming
from the left side. So let's go back to
that adjustment layer, which is why we're doing this. The adjustment layer is going
to add a certain effect, usually a certain type
of look or anything of that to everything below. So very often used for things
like color correction. And we can find in
the effects library, actually the lumitry effects. Lumtry Here it is lumitry color. This is the exact same color
correction effect that is used inside Adobe Premiere Pro, if you're familiar with that. Drag that onto the
adjustment layer. And now you'll see in
the effects controls all the exact same settings
we get in sits premiere. This effect holds
every color correction setting that you need to perform color grades
or corrections. In the basic correction, we can find, things like exposure, contrast,
and all of that, the temperature, maybe we want
to make this a bit warmer, then we can just do that,
increase the temperature. And it's also applying
that to the flare itself. If I were to place the flare on top of that adjustment
layer, let's do that. It will not be applied to it. You can see here that it becomes a little bit more bluish again. So the order of layers
becomes very important here. Alright, let's drag this flayer back underneath the
adjustment layer. It's going to be above
the null or below. You know, the null object
is still a nothing object, so it really doesn't
matter where it sits. That's like the
adjustment layer again, and let's explore
this a bit more. We've got some
creative controls. Here we can increase
the sharpness, perhaps a little bit, the
saturation, make it more vivid. We got things like color wheels, which is also
pretty interesting. We can add some blue into the shadows, just
push it in there. You know, make the shadows
a bit darker as well. Make it look like cinematic, but that is for a
different class. We're not going to dive too deep into color grading
and corrections. Just know that it's there
and that it's usually being applied to an
adjustment layer. So yeah, there we have it. If you're using an
adjustment layer for a specific purpose, you can also select it, hit your return key, just like in your project panel, and give that a different name. For example, color grades. And if you want to look
at the before and after, you know, you can
do that up here, disable the lumetri effect
from here or enable it again, or you can also just
enable or disable that entire layer like this. Right, I'm going to do one
more lesson about animations, which is going to be
a text animation, and it's good to repeat some of the things that we've
already done to really practice the stuff that
we're going to spend most of our time with
inside After Effects. So we'll see you guys in a bit.
6. Time Remapping: Time remapping or speed ramping, a fancy word for
putting your clips in slow motion or fast motion. Also, again, it's going to require animations
and keyframes. I'm going to browse over to my clips and look for
clip number eight and number nine and drag both of them inside
my project panel. Start with clip number
eight and I'm just going to drag it into the
new comp button, which creates a new composition
with the same settings. Now, I do want to
change a few settings because if I were to make
this clip into slow motion, you can see here that I'm at the end of the composition link, and I will not see anything beyond that if my clip
were to be in slow motion. So I'm going to right click
my clip eight composition. Go over to composition settings, and let's change the duration. Let's make it double as long. So tree is going to be six. And then we got 28
milliseconds after that. Press. Okay. And now I
can zoom out my timeline, and you can see we have
some more space here, some blank space
right next to it. Let's also disable the modes so that we have some more
space in the timeline. Are different ways to put
your clip into slow motion, and we're going to start
off with the easiest one, which is just by right
clicking on your clip, go over to time and from
there, say stretch time. You can see that we
have some options, but we're going to start
with stretch time. That gives us a pop
up box from which we can choose how much
we want to stretch this. We can choose the stretch
factor in percentages, putting that to 50. Let's hit Okay, 50%
is half the speed. Or double the speed. You know, it goes faster.
So let's play this back. You can now see how
fast the model does her movement with her hands
because it's going faster. Right click again, go
to time, time stretch, and let's set it to 200% now, which is going to be double
or double as slow, I guess. You can also change
the time, by the way. Just insert an exact duration
that you want it to be. For example, I want it
to be exactly 5 seconds, which is going to be or translate
to this stretch factor. Okay. Now, you will notice once you're going to
make it or put it into slow motion that
something is going to happen and to demonstrate
it better, you know what? I'm actually going to
set it back to 200%, make it double as slow. You will see that the
playback goes pretty choppy. And that is because our clip, if we select it here in the
project panel has 30 frames. We can see that right here,
30 frames per seconds. But I'm using that 30 frames now over double the length
of the clip itself. So that means I'm only giving my clip 15 frames per seconds. And that's why we're looking
at a very choppy video, a 15 frames per seconds video. Now, to solve that problem, we have clip number nine, which has 60 frames per seconds. So that means if you
were to stretch it, make it double as slow, we will have 30
frames per seconds, and it will still
play out smooth. But that is for later
because we have a few options to
solve that issue. After all, it's After Effects. We can do magic with this thing. There is a layer option
here called frame blending, and we actually have
a couple of options. Clicking once on it will
just enable frame blending. It's going to blend
the two frames around it together treating
this ghosting effect. Sometimes that's fine.
Sometimes that's good. You can see now here that
it plays back much faster, but it has that
ghostly look to it because it blends
those frames together, creating a fake 30
frames per seconds. But there is a
different technique to blend these layers together, and that is true pixel motion. And all you got to do is just
click on that button again, which will change
it to pixel motion. That will actually
create some new frames by generating some new
pixels in between. I'm not a big fan of
it because you can see the artifacts here that it creates an extra finger
that shouldn't be there. But hey, maybe for your
type of video, it works, so you got to see
what works best, the frame blending
or the pixel motion. Maybe it's good for, you know, stuff that happens
in the background, which has less detail
and everything, but foreground objects, as you
can see, just looks weird. So we can click on it again
to just disable it together, go away with your pop ups. So those are our two options if we don't have enough frames. Now, let's have a look
at clip number nine, which does have 60
frames per seconds. And here is where it gets a
whole lot more interesting. I'm going to drag that into
a new composition as well, and as always, you know that
I like to stay organized. Coms let's put all
the comps in there, and footage, let's put all
of the footage in there. So. And also for this here, so clip number nine, I'm going to right click.com, go over to comp settings, and let's also double that, or let's just round
it up to 10 seconds. Doesn't really
matter. There we go. Zoom out in the timeline so that we can see the blank space that
we're going to need. Now, as we drag our clip
into the new com button, remember that it will take over all of the settings of the clip. And that also means
the frame rate. So we have now created
a composition with a frame rate of 60
frames per seconds, and we actually don't
want to do that. We have a clip with 60 frames
per second so that we can use that in a composition
of 30 frames per seconds. So I'm also going to
right click that again, composition settings
and actually change my frame rate here
to 30. Hit Okay. And you will see now if I'm
going to right click my clip, go over to time,
choose time stretch, and change that to 200. It will actually play back very smooth because we have those
extra frames in between. Of course, if I will
stretch it even more, to 400, we end up with
the same problem. We are back now at 15 frames
per seconds with that clip. So I hope that that makes sense. All right, let me just hit
Control Z to undo my action. You can use Command
Z on your Mc, and I'm going to do
that one more time to set it back to the normal
speed because there's a different way to add slow motion or fast
motion to your clip, and that is by
animating that speed, also called time remapping
or speed ramping. And in order to do that, we're going to
right click again, go over to time and this time choose enable time remapping. And that will create two keyframes for the
property time remap. So what are these two keyframes? Well, this is the
beginning time and over here is the ending time,
the last keyframes. So what I can do here is move the last keyframes
to the right. What I have to do is also trim my clip outwards like this. We're actually making it longer. We're doing it more manually, and this is the exact same
as adding slow motion to it. We're giving more time to the playback with these keyframes by
spreading them apart. We've seen that before.
We can also give it less time by just taking that keyframes and
moving it back. Look at that. Obviously,
after that keyframes, there's nothing left anymore. So that's why we
are just sitting here on a still frame because this keyframe represents
the last frame of my clip and this
is the first one. So that's why you want
to make sure that these two keyframes
remain in your animation. One sits at the start
and one sits on the end. What I'm going to do next
is add some more keyframes. So let's say here
in the beginning, you want to have some slow
motion going on until here, where she makes this
movement, perhaps. So I'm just going to create
a keyframes right here. Record that point,
then move forward, it's going to be fast, and then here maybe add
a new keyframes, go back to slow motion. As this wave comes in, and as it splashes down, maybe another keyframes where we go to normal
speed or something. I don't know. So we've recorded
these points now in time. We've added them as a keyframes into the time ramp property. So that means that we can
start moving them around. So for the first part,
things have to go slow. Alright, so I'm
give it more time, move these keyframes apart. As you can see now, this
part will go slow motion. After that, we go fast because these keyframes are
now closer together, and I can even move them
even closer if I want to. Make this part go
fast like this. Then we can go back to
slow motion, perhaps. So move these keyframes
further apart. And let's see if we need some
more space here on the end. Yeah, maybe we do.
Maybe we do a bit more. And now just play back your
clip a couple of times, see if you want to move your keyframes further
apart or closer together. Maybe this goes a bit too
fast here, this part. Let's add some more spacing
here. Play that back again. Slow motion, fast,
slow motion again, and then normal speed, kind
of. Alright, looking good. And just like we've seen before, we want to gradually go
from one speed to another. So I'm going to right
click this keyframes, go over to keyframes and
choose EZ Es Ouch, perhaps. That is something you
can experiment with. Oh, looking good. Also, here, right click Easy
Ease In perhaps. You can try and see
what EZ Es does, you know, both having
smooth in and smooth out. There's never a correct
answer with After Effects. You just got to try
out a few things, look at your canvas, the composition, and
see how it looks. And also here maybe
right click EZ Es out. And the last one can just remain as it's the
end of your clip. So maybe I want to trim here my clip itself to
the end keyframes. Pull down Shift again to make
it snap to that keyframes. That's what
everything. That's why this technique is
called time remapping. We're not just
adding slow motion or fast motion to
the entire clip, but we're working
on different parts. We're making certain
parts go fast, other parts go slow, and we're mixing them together, creating transitions
between the fast parts and the slow parts. But really, this is something
you got to practice. To me, it was very overwhelming. The time remapping. I had my keyframes wrong all the time. They were messed up. So you got to practice this a little bit until you're
familiar with it, and then I'll see you
back in the next lesson for some masking techniques.
7. Masking: Oh. Hey, I'm sorry. I was just masking. You know, cutting
out a piece from a paper? Oh, you don't know. Oh, well, let me just show
you how masking is done then. I've got a brand new
project in here with a new composition
and a clip inside. Clip number seven this time, which is a still image, and we have our model
standing there on this cliff. Now, let's say
that I want to cut out a piece from that video. Well, we can do that with the
mask tool or the Pen tool. And we can find that on
top here in the tool bar, the pen tool with the
short key G. Now, very important is that you have your clip selected as
you start masking. If you have your clip deselected and I'm going to
take my pen tool, the G tool, I'm actually going to draw a shape
instead of a mask. Let me just click and make
some points like this. I just created some
sort of a rectangle, which is a new layer added to my timeline called
a shape layer. But Shape layers is for
later in this class. For now, I'm going to
delete that shape layer and instead have my
clip seven selected and then start drawing something like that rectangle or
whatever shape you like. And there we go. We have cut
out a piece from the video. It's as simple as that. And if we expand the
properties of our clip, you'll now see a new category
in here called masks. Expanding that again, we can
find our mask one in here. Expanding that again, we
get some mask options, such as the fetter, we can decrease or
increase the opacity. And we have a mask expansion. So that's already in a nutshell how masking works
and what it is. But now, where would
we use masking? Well, I've got a great
example for that. I'm going to delete my mask one. You can just select it
in here and delete it. And I'm going to
browse to my explorer inside my Images folder. You guys can also
see that if you download all of
the project files, and there's an image in
there called AI Generated. And I'm just going to drag that into my project panel like so. I'm going to double click
on it to view it in the layers window or
in the source window. And as you can see, it's the
exact same as the video, but the foreground is a
little bit different. All I did was feed in a
frame from the video into gemini and I asked it to make the foreground
more interesting. And this is what
it came up with. And that's great.
I'm going to close my layers window so that I can focus here on my
composition window. And I'm going to drag that image on top of clip number seven. The image itself is a little
bit smaller than the video. So what I want to do first
is align it with the video. And in order to do
that, I'm going to open up my opacity control, and you can either
expand the options here, go to transform to find opacity, or let me just
collapse all of that. You can also just hit the
T button on your keyboard. I know T for opacit T, I guess, makes no sense. But that's a short key. And at all times, if you want to change any
of your short keys, you can go to edit
on top and then go over to keyboard shortcuts, where you can see
all the shortcuts and also change them
to your likings. That's with every
program the same. So I'm going to
decrease the opacity a bit so that I can
see both layers. And now I can go ahead and reposition my image
and scale it, hold down shift
as we scale that. So that it retains
the aspect ratio. So I just want to
move that into place so that definitely here
it aligns with the video. That's the entire
idea behind it. And it takes some time. You
need to fumble around a bit. By the way, with
your layer selected, you can also use
your arrow keys to nudge it to the left to
the right, up and down. But something like
this should be okay. And I'm mostly looking
at the rock here. Over there, of
course, here I cannot compare because we
generated something new and also not the talent itself because we're comparing
a still image with a video, obviously. Okay, I'm going to zoom
back out. There we go. If you want to fit this
back to the frame here, you can go down here,
this little drop down menu and say fit. Let's increase the
opacity again to 100. Now, because my video
is shot on a tripod, everything is not moving
except for the talent itself. So that means I can
use anything of the image except for the talent. So let's cut out a
piece from that image. With having it selected,
very important. I'm going to take my pen
tool and I just want to draw what I want to keep
or retain in the image. I can click to create
points, create a pad, but I can also click and hold
to create that lever again and have some sort
of a smooth path going on in here, an arc. You've seen that
before when working on a position pad
during an animation? Like, so like that. I'm going to zoom out a bit more And just click to
close that entire path. Alright, it's looking good. Let's put that back to fit. And if we play this back now, we have an interesting
foreground, plus we have our model
doing our moves. Now, there's a small issue here because we've
made that cutout, we can kind of see the line of that cutout appear and here, and we can kind of hide
that by going into the mask properties and just increasing
the feather a bit. And now we cannot
see that hardline, and that is used very often. So this is one great
way to use a mask. There are so many AI
tools out there lately. You can just generate
something, put it in there, and then mask something out
of that generated image or even video to blend that
with your existing video. But masks can also be animated. And to show you
that, I'm going to open up my footage folder again, head over to my
clips and this time, select clip number
ten and clip 12. Select them both and drag
them into the project panel. And I'm just going to
drag any of these two. Doesn't really matter into the new composition button to
create a new comp for that, and let's rename that
comp to animated mask. And I'm going to drag
that into my comps folder and drag the
other two clips into my footage folder, and let's also drag that AI generated image into
the footage folder. You can make an extra
image folder if you like, so that organization
is up to you, but it's just important
that you organize. Alright. I'm also going to drag clip number ten on top
of clip number 12, because usually when
you're going to mask, you want to have two clips
or multiple clips on top of each other because that's what
masking is all about. You see, if you cut out
a piece from a paper, you can kind of see
the underlying paper. So clip number ten is
kind of this whip pen. We have the model
standing there. And then underneath
that, let me just disable that. Clip for a moment. Underneath that, we have
another kind of whip end, but more slower of
her turning around, but the camera is going
into the same direction. Now, what I want to do here
is as the camera moves, I kind of want to reveal the second video
right next to her, creating a transition, and that's where
masking comes in again. Now, interesting
is that we don't have to be at the start. We can also start
somewhere in the middle. And then from here,
create the mask. With that clip selected, take the Pentool or
the G short key, and I'm going to draw a mask, maybe zoom out a little
bit around her head. You can do this roughly, but
still a little bit detailed. Perhaps. Because after
all, we are moving, we are having this motion blur, so it doesn't have
to be that precise. And so you just click
and drag to make these arcs to fit it
around your clothes. As you create a new point, you can always take the lever from another point,
drag it around. Hold down space bar, and then move up. And I'm just going to continue to go around her with that mask. Now, if you were to
accidentally deselect your mask by just taking back
your selection tool and clicking somewhere, and you're going to
take your Pen tool again, you want to continue, you'll notice that
you actually start to create a second mask. Yes, that is possible. We can create multiple masks
on the same clip, and it will be indicated
by a different color. If that happens, don't worry too much about it,
delete these points. You can see which point you
have selected, like so, but just delete those and select the last point from
your previous mask. And once you've done that, you can continue from that mask. But masking is really the
same in every application, whether it's
Photoshop, premiere. So if you are familiar
already with this, this will go smoother. If it's the first
time you're masking, definitely practice
a bit with it. Make some cutout, see how those lovers
work and everything. Alright, we are done with
the more precise mask. We can now be more rough
with the rest, like that. I'm just going to
click around so that I can collode the mask. And that will reveal here the right side of
the underlying clip. I can either expand
the properties again, go to masks mask one. Here it is mask PAD. That's the thing that
we want to animate. Or if I'm going to
collapse all of that, I can also just hit the key
on my keyboard for mask, which will open up the mask pad. And at the current
position and time, the mask looks good, so I definitely want to
record that with a keyframes. And now it's just
a matter of going frame by frame and
adjusting the mask. And instead of scrubbing
through the timeline, I'm going to hold
down my control key and then use one of the arrows to go one frame to the left
or one frame to the right. Uh, let's start with
the right side. Going to zoom in a bit more
one frame to the right. And I want to take
this mask now. I currently have the
entire mask selected, so I'm just moving the
entire part up one frame. But sometimes you
notice that you want to select specific
points on your mask. Well, in order to do
that, for example, here on the bottom, I'm just going to deselect
the mask in here, like so like my clip again. So no, I don't have
the mask selected, but I do have my clip selected. And when I have one point
selected, after that, I can even click and drag
to select multiple points. So now I'm moving these
four points individually, and I can align them better what are close
here on the right. Point bring it forward. Let's
see how everything looks. I want to select all of
these points again here. You can also use
your arrow keys now, by the way, to nudge them. Into place, and then
that process continues. You take all of the mask points, you move it up, one frame
forward, and so on. I'll fast forward this part. Now, if you believe
that your camera Whippan is going into a
pretty steady motion, it is possible that you
can skip a few frames. So instead of going one
frame forward and adjusting, I'm actually going
to go 23 frames forward and then take
my mask and adjust it. So in my animation, let me zoom in a bit
more in my timeline. I mean, it just goes from
this point to that point. So in between, it
will also follow. And oftentimes, like I said, when that movement
is pretty smooth, it follows correctly.
So let's just do that. Let's go three frames
forward, adjust one, two, three, which saves
me a bit of time, select my clip, deselect the
mask so that I can select individual points to
adjust a bit better here, select all of them again. Go one, two, three
frames forward. Hey, perhaps the bottom ones again that I need to manually
adjust a bit better. Alright, that's the first
half of the animation, and I know this is
a tedious process. But hey, welcome
to After Effects. Now, sometimes it is easier to not yet see the image behind it. You just want to see your
mask pad, and that's it. You can then go into
the mask option here into the blending
mode of the mask itself. It's currently set to at. But if I change that to none, that will not show the cutout, but only the mask itself. And now that we are back
here in the middle, we got to work a bit backwards. So let's continue. I'm going to select all the
points here on the left side. I mean, the right
side like that, and then go one frame
back this time, or maybe three frames. Let's see if that works. I'm going to move this up and just double check if it
follows, it does. It follows. Okay, I'm going to fast
forward at this part again. And we are done. We got a ton of keyframes, but our mask has been animated. And to see the transition, all we got to do now is just set the blending
mode of the mask back to At and play that
back. Looking really cool. Now, you can see that
the edge is pretty hard, so we already know
where to change that. Let's expand the mask properties and increase the
feather a tiny bit. And oftentimes when you are increasing the fetter,
you get this halo, and that is because
you're also kind of expanding the mask a
little bit with a fetter, so you might want to decrease
the expansion a tiny bit to bite a bit more
back into your subjects. No, obviously, the more time you spend on animating that mask, making sure that each
point is exactly on par with the edge of the subject, the better
it's going to look. I mean, that's what
everything in life. Sometimes you can do
things pretty rough. Other times, you have
to be very precise. Definitely, if you don't have such a movement going
that's it for masking. You know how to
create one right now. You know how to animate one, and that's basically
all there is to it. So practice that a little bit. As I said before. Definitely,
if masking ends creating that pat with the arcs and the levers and
everything is new to you. And then I'll see you
back in the next lesson.
8. Mask Tracking: You might be thinking, Jordy, this is not what
I signed up for. So much work to
animate the mask. Well, I've got a
solution for that. We can automatically
animate the mask. So what I've got right
here in my timeline is a clip of our
model and a close up. And what I'm going to do
is make her eye glow. And for that, we're going
to have to mask out her eye and then add some effect to it,
some coloring effects. So I'm going to start by
just duplicating that clip. When it's selected, just hit Control D for duplicate
or making a copy of it. And I'm going to
rename the top one, hit the return key
on your keyboard to rename it to glowing eye. Then with that selected and being at the start
of the timeline, I'm going to draw my mask. But instead of taking
the Pen tool which allows us to create
a custom shape, I'm going to take
the shape tool, and it's currently set
to the rectangle tool. But if you click and hold, it opens up a menu
which allows us to also take something
like the Ellipse tool. And that will allow us
to create an ellipse. But if you hold down the
Shift key on your keyboard, it will snap to being
a perfect circle. And even better, if you
hold down your control key, it will create a circle mask from the center point
where you clicked. To better demonstrate, let me just hit Control Z
to undo that mask. I'm going to stand here
in the middle of the eye. Like so, click and drag, hold down the control key to make sure it's being
drawn from the center. And if needed, you can hold down the Shift key to make
it a perfect circle, but maybe it is
not needed because of the perspective
of the camera, so maybe in the lips, and I might want to nudg
this a bit more to the left. So what I can do is just take
my selection tool again. Take that mask and
just move it a bit to the left so that
it covers the eye. Now, animating this
mask so that it follows your eye has to be very precise. We don't want to see that
there's a mask drawn there, and that's where mask
tracking comes in or basically automatically
animating your mask. And in order to do
that, we just have to right click the mask
that you just created. And choose track mask. That will open up
the tracker window, which you can also just open up for the window menu on
top and then from there, choose the tracker,
which is right here. Now, we get two options.
One is the tracking itself, and then the second
is the method. Like, what do we want to track? Only the masks
position up and down, left and right will be tracked. You also want to
track the rotation. So that means the
mask can also rotate as it moves around
or also scale. Doesn't have to skew
Va a perspective, which is kind of
2.5 de tracking. Enter also two face
tracking options, one for a very rough outline and one for detailed features. In this case, I'm
actually just going to take the first
one, the position. It's round, so it doesn't
really have to rotate. Her head is also not rotating. I'm not really rotating
the camera either. I'm just kind of moving
the camera slowly around. Her head is moving a little bit, so only the position is fine. That's going to give us the
most accurate tracking. Now, of course, I always encourage you to do
that experiment. Just try out a different tracking technique
and see what it does. You can always undo your
action and do it again. Alright, then the analyzer
or the tracker option. We can go forward by one frame
by clicking this button, and you can see here that it automatically
creates a keyframes. Let me just open up the
mask pads property. For the mask pads, and you can continue doing that. You know, just click one
frame forward each time. Or we can also just play
it back and let it just continue to track
that entire video. And you can see here now how beautifully that mask
is following her eye. Definitely, with shots that
have more contrast in them, more detail in them, this option works really good. Alright, perfect. It has animated the entire
mask frame by frame, as you can see here
in the timeline, and it is following
her eye exactly. We can now go ahead and go into the Effects and preset senal, and I'm going to look for
the U and saturation. It's right there. So just drag that onto the glowing eye clip. And from there, we can
do something like change the and you can see
here what that does. Or we can also colorize it to just give it an entire
color by enabling colorize and then
change the U down here to what color
you want it to be, perhaps have it like red. I don't know. We can
increase the saturation, as well as the lightness or
the brightness, like so. Now, it doesn't
really look so good. And by the way, if you don't
want to see the mask in your canvas as you're
working on these effects, you can disable to
toggle the mask and che pad visibility with this button down here in
the composition window. Obviously, this
looks pretty bad. So we have to do a
couple of things. First of all, we might want to blend that better with
the clip down below. Let me just collapse
this for a second and toggle the modes again
from the button down here, which reveals the modes
or the blending modes. And let's take
something like at. So you can see now that it much better blends with
the existing clip. And, of course, we also
want to fetter the mask. So let's expand
it here again and increase the fetter a bit so that we don't have
that hard edge. And as we've learned before, we also want to pull back the expansion a tiny
bit as we're fettering. But hey, this is
looking pretty cool, as you can see here,
her eye is red. Awesome. But the red
glow is kind of like bleeding above her eye,
and that is normal. If we enable the mask
path again, you know, we've drawn a circle, but we also have her
eyelet in there. So actually, the mask shouldn't have been
a perfect circle. So do we have to do all this
again? Well, don't worry. You can create a mask
and then afterwards, cut out a piece from that mask. And that's exactly what
we're gonna do right now. With the clip selected and not having your
mask on selected, I'm just going to
take the pen tool and draw a second mask. But I'm going to make sure to be at the start of
my clip because we're also going to track that and perhaps zoom in a bit more, and I'm just going to draw
a mask like so around your eyelid the part that I want to remove from the other mask, and the other points can
be pretty rough, like so. Now, by default, it
will also just add that new mask as part
of the current mask. But in the option here in
the mask blending mode, instead of add, we're
going to choose subtract. So instead of adding the mask, we're going to subtract apart, and that will create a
cutout in the first mask. And so we're going
to right click mask number two and say
track mask as well. Always double check here in the tracker window which
mask has been selected, currently mask two,
which is what we want. And then you hit track forward, and it's going to do
the exact same thing. Now don't worry too much as it's going to
do its tracking. It's going to disable all
of the tracking mode, so your video might look weird once you have
applied effects to it, but that's going to solve
itself once it's done tracking. At all times, by the way,
you can just click that play button again to
stop the tracking, if you think that you might
need to adjust a bit. So you can just take
any of these points, adjust a tiny bit if needed, and then continue the tracking. Of course, you want
to avoid that as much as possible because making manual adjustments in a
tracking could be visible. And we are done. Let's go back to
the beginning here. You can see the cutout
and obviously also here, we want to fetter that mask bit. I'm going to disable
the mask pad so that I can see the
fetter better here on top. Like, so, aunt
maybe also decrease the expansion or increase
this time, a tiny bit. So now only her eye
has been targeted. Looks great. Let me set the zoom to fit.
Let's lay this back. Her eye is beautifully
glowing red, and the two masks
are tracking along. We don't even notice
that we created a mask, and that is what
this is all about. Now, maybe one last thing, let's make her eye glow come in, which we can use just normal
opacity of that entire clip. So hit the T button on your keyboard. Here
is the opacity. So sending it to zero, sets the entire layer
to zero opacity, and we can use that to
make the glow come in. So enable animation for opacity. Let's move this
keyframes a bit to the right side
because that is 100. Set it to a zero at the start. So that way, it comes in, zero, and then on the end, perhaps we can also create a
new keyframe for hundreds. Then go forward in time
and set it to a zero. So now we have a
fade out on the end and a fade in in the
beginning and in between, it just stays 100 opacity. So there we have
it mask tracking. Really fun to play around with. You can also track
faces and all of that. Definitely try and
do that with some of the example footage
or maybe something that you shot yourself. And then I'll see you
back in the next lesson.
9. Luma Keying: There are different techniques to cut out something
from your video. We've just seen masking,
which is one of those. Another technique
is called keying. And you've probably heard
about a green key before. That's where we're
going to select the green and then remove that. We're taking a key
from the green color. But a color key or a green key is not
the only way to key. Can also do a luma key. So we're working again
on this clip here where the model is doing this awesome
movement on these rocks. And interesting is that we have a very dark foreground and
a very bright background. And that indicates to me
that we can do a luma key. Luma stands for luminosity,
bright or dark, and that means that
we can just say, Hey, remove all of the bright parts. And if we go to the Effects
and Presets library, we can look for luma key. But we find out that it is
within the category obsolete. And let me just remove my search and open up the obsolete
folder entirely. Here we can find a whole
bunch of effects that are planned to be
removed eventually. So you can use these, but maybe in one of the future
updates of After Effects, these effects might be gone. That doesn't mean
that After Effects is removing features
from its program. It just means that it's
replacing them with other effects or other
tools within After Effects. Fact, if we go over
to the keying folder, which holds all the
effects to do with a key, you know, we have
the chroma key in here as well or
the key lt effect. This one here is used for green keys and blue
keys and whatnot. But what we're interested
in is the extract effect. And this is exactly the same
as the Luma key effect, but I guess that
they just made it better and renamed
it for some reason. So let's take that extract and drag it onto clip number seven. Nice about this effect is
that we can see a histogram. So this shows the bright parts and the dark parts in your clip. So here on the left
side, we have black, and then here, we have white, and you can see a clear
difference between these spikes right here represent all of
the bright areas in the shot, and this spike represent
the dark parts. Then what channel do we
like to take a key from? Is that the entire
luminosity spectrum, or is that only the red,
green, blue, or the Alpha? Well, in most cases,
like in this case, it's going to be the
entire luma spectrum. And then we get two points, the black point and
the white point where we can start
removing something from. As I change the black point, you can see here that
it starts to cut in into all of these
rocks, the black areas. You can also see
it here visually. That means that,
yes, we can also just take these points and
just move them to the right. Now, this is sometimes
easier because if I want to remove
all the dark parts, I can just move that entire indicator to the middle to here, and now I know that everything on the left side
has been keyed out. And the same works here
on the right side, and I might need to
make this window a tiny bit bigger to see
those points as well. I can just stick that and
remove all of the whites. Now, that could leave us
with a very hard edge as we can see in
the composition. And for that, we have
a softness control. So either for the whiteness
here on the bottom, the black softness or
the white softness, we can increase that or
we can also just take the bottom points
and drag that out, which will soften that edge. It's revealing back
a bit from the sky, so I might want to push
that softness back. Maybe push the keying
all the way back. And sometimes your edge might
still be a bit too much, then we have to bring
this back a bit more and maybe bite a bit
into the black areas here. And sometimes you
might think, Okay, my keying looks great. But here's a great way to see if it's
actually good or not. In my timeline, I'm going to right click in
an empty space, go over to new. We've already learned
about the null object and the adjustment layer. We also have a solid in here. The solid, we can pick
a color down here. I'm going to take pink, which is the most used color
to check how your keying is going because this
is a color that we don't often see back in a video. So you want to take
something that you don't see in your
shots, it okay. And I'm going to bring that solid below clip number seven. And now we can very
clearly see that we have been biting here
into these rocks, which have probably a highlight
from the sun on them. So I'm going to
select my clip again, and I might want to readjust until all that purple is gone. But sometimes it's just really hard to get that
purple out of there to get a good key if you're working with a shot like this
where it's just static, the only thing we got to
focus on is the model, and she looks pretty good. She has been keyed
out pretty nicely. So in order to fix
the foreground, what I can actually do
is what it's selected, hit Control D to make
a duplication of that, and we're going to
rename the top clip to four ground mask or something. And I'm going to delete the extract effect from
the foreground mask clip. Then take my mask tool,
as we've seen before, and I'm going to manually
bring back those rocks. And you can do this roughly. You can do this more precise. That's going to
depend on your clips. I'm just going to do it
fast because by now, you guys know the idea
behind this like, so just go over
that entire rock. Definitely make
sure that we have this green grass inside of the mask because that is
probably being keyed out. So you add a little bit to
close my mask like that. And you might want to fetter it. You almost always
want to do that. With it selected, you can
also just hit the F key on your keyboard to bring up the mask fetter.
And there we go. If I now enable and
disable that layer, you can see here definitely in these parts in the bottom
left that we have fixed that. So keying or cutting
out a certain part in your video often involves
multiple techniques. We do a key, but on top of that, we also do a manual mask.
So why are we doing that? I'm going to disable
the magenta or the pink layer in the back because obviously
we don't need that. I'm going to go back
to my project window. And here, we can find
a night sky JPAG image is a still photo that I took, and I'm going to drag that on
the bottom as a background. And this is a way
to change the sky, and it's a very large photo, so I want to de
scale that hold down shift to keep the
proportions zoom back in. Let's see where we
want to position that. Kind of like this
mate, maybe zoom in a bit more. I don't know. Alright, looking pretty good. So we went from a
pretty normal sky to this awesome night
sky with the stars, low sunlight and everything. We have just done a sky
replacement, obviously, using a keying effect because if we had to manually animate a mask around the talent here who's moving
her arms around, that was very tedious. So we combine two techniques. One was key and the
still part was masked. Now, there's one problem left, and that is that
the sky in the back and the foreground
doesn't really match. I can tell that the
sky was replaced. Well, for that, we're
going to have to do some color correction, and that is for the next lesson.
10. Color Correction: Color correction is
going to be one of those things that
takes years to master, but it is going to be
part of your VVX journey. When you're going to composite
different layers together, like the foreground video was
shot in the Faroe Islands, and then the night sky picture, I think, was shot a couple
of years back in Iceland. So even though they have
nothing to do with each other, we are bringing them together to create a
new kind of video, and we can see that something
off with the colors here. It doesn't feel natural, and that's where color
correction comes in. That's the first step. We're going to correct the
colors to make them match. I'm going to go
into my Effects of Crist folder and
look for lumetry. Now, since we have created a foreground mask
of these rocks, we kind of have two clips here. So does that mean
that we have to apply the lumitry color
to these two clips? Well, no, we can group them
together into one layer. And to do that, simply select layers that you want to group, right click and
choose precompose. Is going to give you a pop
up Box what you want to do. So if you have created certain animations and stuff like that, you could
say, like, Okay, move those animations
as well in the group or apply those
animations on the group. Usually, 99% of the time, you're going to choose move all attributes into
the new composition. And we're going to
give that a name. Let's call it the cliffs, because after all, it
are cliffs and hit okay. And interesting now is that you can see that this
is a composition. And if we expand
the coms folder, you can see here that a new
composition has been created. What is this about?
Well, we can put a composition inside
of a composition. If I were to double
click on clips, it will just open
up a new timeline with these two clips inside. So a composition can
either be the timeline that you work in and
eventually going to export, but it can also be a group that you will use inside
another composition. Technique is also
called nesting. And if you edit
using Premiere Pro, and there, they also call
it a nested sequence. It works the exact same way. But now that we have
that one composition, we can easily drag the lumetric color
effect to it, like so. We're currently at night,
and that means two things. It's more bluish
and it's darker. So I'm going to open up my basic correction
in lumitry color, and let's start by just
decreasing the exposure. Make it a bit darker, especially in the shadows. So perhaps I want to bring down the shadows as well, like that. We're almost going to
create a silhouette. We can still have a
little bit of highlights. That's okay because we also have still some light in the sky, but not as much anymore. And finally, I want to
decrease the temperature, make that a bit more bluish. You can definitely see that
here in the highlights. So already with these
few adjustments, we can match that layer
better to the background. Okay, what else can
we do? The background is in the back. It's
in the far back. And usually what's in the
back is out of focus. So I also want to add
some sort of a blurriness to it so that the stars
are not as sharp. Let's go to the effects and
presets and look for blur. And you'll find a ton of blurs, you want to go in here,
the blur and sharpness. And there are different ones
that we can choose from. You have some very simple blur effects like
the Gaussian blur, but you also have
the fast box blur, which I like to use more often. It has a better look
to the blurriness. There is also a camera
lens blur which you should be using but it's a
pretty heavy effect. You're going to have trouble
playing back your video, and I don't see the
difference that much. So you got to see for what
kind of project is it? Is it for a high end client. For now, let's just
go for fast box blur and drag that onto
the night sky image. And let's increase
that a tiny bit, not too much, like, I don't know, like two, maybe. It can be pretty subtle.
That looks pretty good. And just like that, we
have color corrected our shots and match these two
different clips together. So that's the color
correction part. Next up is the color great. And with the color grade, we're going to give a
specific look to the video. And this is nothing new, so I'm going to go fast over this. Right click, go over to new and adjustment
layer because we want to apply the color grad to both the cliffs
and the night sky, and I'm actually going to delete the magenta solid in there because we no
longer need that. It was more of a helping
layer with the keying. Right, adjustment layer.
I'm going to rename that to Color, great. Stay organized, guys, and we're going to take the
lumitry effect again. Lumetry There it is. Lumitry color onto
the adjustment layer. Let's go to creative. We can choose one of
the looks in here. There are a whole
bunch of presets, different kinds of
looks pre built in. There are a lot of film
stocks in here, for example, the Kodak, you can see
here what that does. But you can also pick
a different one, monochrome, go black and
white, if you prefer that. What else do we have in here? The cinyspace that's,
you know, cinematic. It's very intense. So we can decrease
the intensity, also. Got some more
controls down here, such as faded film, which is also nice to get that film look a
little bit in there. It's going to wash
out the blacks. And if you like,
you can go back to basic correction and actually
increase the temperature. And you might think, Hey,
Jordy, aren't we at night? Shouldn't the front
cliffs be more bluish? Well, yes, we did that. We first matched two colors, and now we can just
take both layers and add more warrant in there, if we like so, because we're
changing both of the layers. Your clips are
matched, it doesn't really matter what
you do in the grades. And then, of course,
you want to show off your awesome effects and color grade with that very
typical transition reveal. Let's create that as well. I'm going to go back
to my project panel because what I want to do is
take in my footage folder, clip number seven again and drag that on top of
everything else. So this is just a normal clip without having any
effects applied to it. So if we toggle it on or off, you can kind of see
the before and after. Now, we could create a mask and animate that,
but that's tedious. That's too much
work. So let's just go into the Effects
and Presets panel and look for linear
Wipe transition. Drag that onto
clip number seven. And we get some very
simple properties like a transition completion, which is going to
create that wipe, and you can also choose the wipe angle or even fetter
that line if you wish so. But we're not going to
do that. Let me just reset wipe angle,
right click, reset. And we're going to
start on the left side. Lick on the Stopwatch
to enable animation. We're going to move
forward in time. And we're going to
set that to 100. And if we press the U key
with that clip selected, we can then also see the
keyframes that were created. So that's why you most
typically want to go back to your timeline to
animate the properties. And what I also like to do always is right click
the first keyframes, choose Ease out, and then ease
in on the last keyframes. That way, it goes a bit
smoother. Look at that. The awesome reveal of the sky replacement and
the cinematic color grate. Isn't that something?
Alright, practice that a bit, do some color
correction, and then I'll see you back
in the next lesson.
11. Video Stabilization: Hey, welcome back.
We've already gone through almost half of the
class, which is really good. Congratulations for that for sticking with me for so long. Anyways, we're going
to take a look at some more automations,
inside After Effects. We've already seen
the mask tracking, which was sort of an automation, but there are a ton more. So let's explore that starting off with stabilizing
our footage. I've got right here in After
Effects is clip number 11. I put that into a
new composition. We've done that a
dozen times already, so you should know
how that works. And if we play back this clip, you can see here how it
kind of shakes a bit. It was shot handheld. And by the way, that
was not because I was scared because
of the high cliffs. It was just very windy, okay? To stabilize this shot, we're going to have to
locate the tracker window. I can already see it here
on the right hand side. If you can't locate it, you know that you
can always go to the window menu on top and then look for tracker,
which is down. So we can find a couple
of options, track camera, track motion, warp stabilizer,
and stabilized motion. We're going to work
with all of them throughout this
class, but for now, let's focus on these
two warp stabilizer and stabilized motion. The first one is the easy
mode, warp stabilizer. Let's just click on it,
which will actually apply the warp stabilizer
effect to the clip itself, and it'll do some analyzation of the motion of the camera and then apply a
stabilization to it. And it's already done, as you can see. And let's
play this back. Let's see how that looks.
The handheld motion is a whole lot smoother. What if we want this to make it seem like it was
shot on a tripod? Well, let's explore some
of the settings here. And a result, we
have smooth motion, which is currently set, but
we can also choose no motion, like the name implies,
no motion at all, so that it seems as though
it was shot from a tripod, and that works really good. Now, stabilizing your footage can be done through
different methods, and you might
already be familiar with that if you also edit in premiere or final cut
or Da Vinci resolve because they also have a
stabilization effect build in. And the warp stabilizer
is really just that. It is an effect that is also present in Adobe Premiere Pro, so it works the exact
same way in here. And under methods, we can find some different options on how we would like
to stabilize it. The subspace warp
is going to bend the pixels around to
stabilize the entire shot, but it could cause some
weird distortions, definitely, if you
have heavy motion. So that could be a reason to
maybe go for perspective, which is not going
to bend the pixels, but it's going to, like,
your image around. You also have position,
scale rotation, a very simple two
dimensional adjustment, or only just position. Now, we're going to explore this a bit further in a second, so don't worry too much
about it just yet. As for the framing, if
we're going to stabilize, that means we're
also going to have to zoom in a bit into the shots. Because if we don't set
that to stabilize only. The clip is actually
being animated. It's counter wise to
the camera shake, which makes it seem
as though it is shot from a tripod now
that there's no motion. Obviously we don't want to
see these black borders. So for framing, we're
always going to choose to crop and
also auto scale. So that is one way to stabilize your footage using
the warp stabilizer effect. Also something we can find
back within Premiere Pro. But let me just delete that
warp stabilizer effect because there is a second
way to stabilize our shot. Is through a manual tracking. Because what After
Effects is all about is taking manual control
over all the vids, the animations, the tracking, and whatnot that you're doing. Plus, it will make us
better understand what stabilizing and tracking is
actually doing to our clips. The second option
we have here in the tracker window is
the stabilize motion. Clicking on that is
going to open up the clip and its source
window into the layer clip. And let me just make some
more space for that. This time, there has not been an effect applied to my clip. In fact, to make
the tracking work, we have to look at the clip without any effect
applied to it. Maybe you've already been
working on your clip. You have applied a
bunch of effects and animations to
it, maybe, well, the stabilized motion
wants to look at the source clip without
anything applied to it. That's why we are working now in this window, the layer window. And so I currently have
one tracking point, as you can see here. I can take that and I can
drag it to somewhere else. And it is very much zoomed
in because we really want to pinpoint that to some sort
of high contrast pixel. We got to ask ourselves
the question, what do we want to track? Is that the position? Well, it's already enabled here. And we can perfectly do that
with one tracking point, up and down, left and
right. That's it. Position. But we can
also track the rotation, and enabling that will create
a second tracking point. We can also enable scale, which also it's just going to use the second
tracking point. Once we're going to track the rotation or
the scale as well, we're going to need
two tracking points. See that's moving backwards and forwards when
treating hands held two points in your clip will come closer or go further apart. Same with rotation. If you were to rotate your camera around, those two tracking points are going to rotate
against each other. And it is that data that we
need to perform the tracking. So how does this work? Well, let's zoom a bit in
on track point number one. We've got an inner square
and an outer square, and we can actually
make them bigger. Both the outer and the inner. And then we have this
little cross hair here in the middle, which is going to define the points that we want to track. Now, tracking works best
on high contrast objects, things that really stand
out against the rest. And I can see here on the
left hand side a bit of poop. There were a lot of sheep
there, so hence the poop. So I can just take
that tracking point and drag it on top of that poop. Now, the inner
square is going to define the points that
we want to track. So we can make that smaller and really make it fit
around the poop. And then we've got
the outer square, which is going to define
the searching area. So with every frame that
we're going to move forward, that poop is going
to be somewhere else because we are
moving the camera. And so it's going to look within that search area where
that poop is next. So with heavy motion, you want to make your
search area bigger, and with smaller motion, you can make it smaller. The bigger that search area is, the longer the tracking
is going to take. That is why you have
some control over that. Otherwise, you got to wait days until the tracking is done. Let's take the second
tracking point. I'm going to make this
a bit bigger like that and drag it to
the second poop. I can see laying around
here on the right side. And it's good to have
these two tracking points be separated this far
because that way, we can see the tiniest motion in the rotation as
well as the scale. Alright, let me just
adjust this a bit more, make it fit around
the second poop, as well as the search
area like this. Right, we've set our
two tracking points like this next sure to be
at the start of your clip, and now it just works
the exact same way as we did with the
mask tracking. You can go one frame
forward like that. Automatically, the tracking
points will adjust or you can just play back your entire clip and hope for the best. If you can see that
somewhere, it might go wrong. You can always hit Stop, go back a couple of
frames by holding down your control key and then going back with your arrow keys. Then I would not adjust
your tracking points. I would just make them bigger. Like this or make the search area bigger and
do those trackings again, so you go forward again. You know, maybe, let me
just demonstrate that. I'm going to make my tracking
point like super small, and my search area may
be also super small, and you will see that
this might go off a bit. I'm going to play this
back. For some reason, it's still following
pretty good. Okay, okay, here it's going
wrong. Here it's going wrong. I just hit Stop. So let's
go back frame by frame. Let's look where it goes wrong. So here you can see it
jumps to a different poop. That's because my search
area is too small. So let's keep going
back frame by frame until we're back
on the correct poop. I'm going to make
my tracking point bigger as well as
my search area, and then I'm going
to just re track. You can go one frame forward or just play
it back like that. Alright, and the
tracking has been done. You can already kind of
see all the keyframes, the animation that
it has created. But now, how can
we apply this to our clip so that it
has been stabilized. Here on the bottom, we
can find edit targets. Okay? What target would you like to apply this
tracking data to? Obviously, clip number 11. It's the only clip
in the composition, so there's nothing
else to choose. Okay. And now we can just hit Apply and it's going to ask you, do you want to apply it to X and Y or only to X or only to Y, which is up and down the
left and the right mot. Obviously we want boat, which is going to be like
99.99% of the cases. Select that and hit Okay. And now we can close the source window or
the layer window. And just like that, our
clip has been stabilized. But we can see the
black borders here on top because we're doing
a manual stabilization. So we're also going to have
to manually adjust for that. Now, the problem
is that we cannot just scale the clip up. Let's have a look at
all the keyframes, the animations that
have been created. One of the animations
is actually the scale. So either we're going to
have to adjust all of these keyframes or we're going to have to
find a workaround, such as a second transform
property, perhaps, so that we have a double
position, a double scale, a double opacity and
rotation, perhaps. Does that exist?
Well, let's have a look at the effects
and presets window. And I'm going to
search for transform. We can find it here under the
distort category transform. Drag that onto the clip. And yes, there we have it. The anchor point, position, the scale, and whatnot.
It's all in there. So now that we
have these double, these are not animated, so we can just scale up
the clip a bit more. Let me just make a bit more room so that we can see
what we're doing. Scale it up a tiny bits. Alright, looking good.
And just like that, we have stabilized our shot. Now, why are we doing
this manually while there is this automatic warp
stabilization effect, which does an even better
job, in my opinion? Well, after effect is all
about taking control. And yes, for this example, the warp stabilizer
was the best choice. But for another situation, the manual tracking is going to be better to give us
that extra control. In fact, what we've
just done is not just a stabilization
it is a tracking, and tracking is something we very often used
within After Effects, and it's also one of the
strongest features of After Effects because once
you got your tracking, we can do a whole lot more than just a
stabilization with that. But that is for the next lesson.
12. Rotoscope: In the previous
lesson, we've already explored motion tracking, but before we delve
even deeper into that, I first want to show you
guys how rotoscoping works. We're working on the
same clip as before, and what I want to do this
time is actually cut out my entire subject so that I can play something
else behind her, such as a text or
something like that. Already kind of done that with the luma key or the
extract effect, which can cut out anything that is brighter or darker
within your shots. But the problem
here is that we are pretty close to the subject, and definitely things
like her hair, which have a lot of detail are not going to be
keyed out that good. Plus, on top of that, we got bright spots
from the clouds, but also darker shots
here from these cliffs. So an extract or a luma ke
will not work in this example. Okay, so what else can we do? We can draw a mask around her manually adjust that
mask frame by frame. Okay, but her cape right there is moving a lot
because of the wind. He hair is going to
all kinds of places. This is going to be a
very tedious process. Hm, there has to be a
better way to do this. After all, After
Effects is the king for automated
tracking and whatnot. Well, luckily, there is, and that technique is
called rotoscoping. Let's go to the
start of the clip to start the rotoscoping process. And I want to go up to
my tool bar here on top and look for the
Rota Brush tool. Click on that to activate it. And then click in your clip, which will open up a pop up
menu, and it actually says, Hey, to use the Roto Brush tool, you got to open your clip
in the layer spanel. We've seen that before. So I'm just going to say,
Okay, okay, fine. Let's open up in
the layers window. So what I'm going to
do here is double click on my clip
11. You know what? I'm actually going to
take that window and docket here into the
composition window so that I have two tabs. One is my timeline view, and one is a source view. I still have my tracking
point in there because motion tracking also works on a source, but we
don't want that. So what I'm going to do actually is from the tracker window, make sure that the current track says none to remove that. So I have this brush, as you can see right
here, a green dot, and what I can do with that is select what I want to mask out, which is going to be the model. So I'm just going to draw around her like this, you
can kind of, like, paint and select what you want to add into
your selection, her legs, maybe a bit of the
grass as well here in front, like this. Okay, great. And it has made a selection. Let me zoom in a bit more on my subject because the
selection was not that great. For starters, the clips here in the back should not be added. So I'm going to do now
is hold down my Alt key, and you can see now that
my brush turns red, which allows me to select what I want to remove, like this. And you can do this
pretty precise like this, even a bit more bite into
that stuff over there. Let's go of your alt
key to select what needs to be maxed
out, like here. There a bit more from
that edge perhaps here, like this, here as well, a bit more from her booth. In between her legs, we
also want to remove that. Let's band up. You can do that by holding down your space bar. And I'm going to select a bit more from her shoulder here, like so face as well. And if you believe
that your brush is too big or too small, you want to change that size, what we can do is go
to the window menu on top and look for brushes,
and it's right there. Just click on that, which
opens up the brushes panel. I'm going to collapse my
tracker for a moment. And from there, we can
change the diameter. We can make it bigger. Or we can make it smaller, which is definitely
nice if you want to work on some of the details. Like, let's make that
small to really make sure we have this part
here selected as well. Like, so and not have this here, a bit more from your finger. You can go really
precise with this. Luckily, we only have
to do this once. All the rest is going
to be automated. A bit more from here.
Alright, looking good. Now, her hair is a little bit of a problem because it
is so much detail. Her hair waves in the wind. So how should we select that? It's not going to be
easy. Well, that's where the hair tool comes in. If we go back to the Rotor
Brush tool, click and hold, you can see here that we
have the refined Edge tool, which is the hair tool. And I'm going to make
my brush a bit bigger. Like, so perhaps. And I'm just going
to very roughly draw around the edge of her head
to select all the hair, and you can see here that
it creates a contrast area, and it's going to
use that contrast area for those details. Maybe a bit more
from here, as well. Like that. Alright, it's
looking good, looking perfect. Now, all we have to do
is just play our clip, but pay attention
at all times how the mask is going to follow your subject because
it can go wrong, and that's where
you want to adjust. So let's play this back.
Make sure that your finger hoovers your space bar
as you do that and take a look it's going pretty
good so far. Pretty good. Still Oh, no, it's
not going good. It has also removed a part
from her belly right here, so we want to bring
that back in. I'm going to take my
normal brush tool. And I'm actually going to go
back to where it went wrong. Let me just zoom in on that. Let's use the control key again. Hold that down, and then use the arrow keys to
go back one frame. And it went wrong
somewhere here. Okay, let's select that. Make sure it's part
of the selection. Go one frame forward. Add
that in there as well. One frame forward, one frame forward. Okay, it has it now. Good. Let's continue
playing this back. Keep looking at the details. I can see it goes
wrong here again. It's biting into it
for, like, one frame. And that's how you want
to adjust at all times. You can also just go
one frame forward. You don't have to play
back your clip, obviously. If you need some more time
to look at everything, just hold down control
key and then use your arrow keys to go
one frame forward. Look at the edge. Make sure that your subject is within
the entire selection, and it does a great job here, by the way, I can see here
the cliffs in the back, and it knows where the
cape is of the subject. And when you believe
it's been following pretty good, you
can hit play again. Keep an eye out on
the entire edge. You can see her hair. It's nicely being followed
by the hair brush tool. Even though you still got to be focused on what's going on, it's not an as tedious process as manually having
to animate a mask. But I see that it went
wrong here again. So let's go back a
couple of frames. You're gonna notice that it's always going to
be the same part. And you might think
by yourself, Hey, you have already drawn
a green brush over that area dozens of times now, and after effect still doesn't know that it should be
part of my selection. Yeah, it's usually like with one spot. Alright, looking good. We can foot her plate is back. I'm going to keep an eye
out in this area here. But so far, it's
looking good. Awesome. Yep, and there we have it. Our mask or Roto Brush has been animated
for the entire clip, and it's perfectly
following the subject. Congratulations, by the way, because this is one of the most used techniques
in Hollywood. They have teams of hundreds
of people doing only this, but the technology is
getting better and better. We can see that here in the Roto Brush effect
that has been applied to the clip now version number
used to work on version one, which was slow and
absolutely not accurate. Now the problem with a
rotoscope is that it's not really animated If I
select my clip down here, press the U key to
reveal the keyframes, there are no keyframes, and that means that it
will also continue to try and adjust its Roto Brush. So we're going to have to bake the rotoscope
something to remember. Down here in the bottom right, we can find the freeze button, and that is going to
lock the Roto Brush in. So hit that button and just wait it out. It
can take some time. And it's done. We
can now go back to the composition
window here on top. I'm also going to take
my normal selection tool again or hit the V
key on your keyboard. We no longer need the otobush. But what's so nice about
the Roto Brush is here, look at her hair, how beautifully that looks,
all the details. It's super nice and an
awesome tool to work with. We have some more
controls here in the Roto Brush tool
to refine the edge. Let me just zoom back
in here on the talent. We can add some
more fetter to it. If I set that to 20, you can see here what that
does to the edge. Typically go for, like,
a fetter of three, which is more than enough, maybe four have a
reduced shatter option if you see too many
pixels around the edge. Try and experiment with
that maybe like 20%, see what that does.
It smoothens it out. The contrast control
is something I typically like to lower as well to around 20% because that takes away
some of the detail. And then the shift edge, you can use that to bite a
bit more into the subject, which is kind of like
your mask expansion and decrease that or increase
that depending on your need. Now, what I'd like to do next is actually place a
text behind her, so that means that I kind of
need the background back. In order to do that, I'm just going to take my clip number 11, hit Control D to make
a duplication of that. Let's rename the bottom clip to background so that we know
what we're dealing with. Now, I'm going to delete
the Roto Brush effect from the background clip. We also duplicated that effect. So now we have the
background here, and then the foreground,
we have the subject. So we've got these two
things now separated, which is really
nice because that means that we can play
something in between. Let's go to the
textol here on top. We haven't really
worked with text yet, but it's really simple. Just take the text
tool, click somewhere, and now you can
type. Super Girl. We can then take the
selection tool again to drag that text
anywhere we want. And when it's selected, if you go to your property spinel, you can find some more
properties than we usually have. With text, you also
get font options, text size, and
everything like that. We get some alignment
options down here. We can center it like this. If you select a part of your text, so just
double click on it. To select some part of the text, you can increase the size for
one particular selection. Let's take a better font.
Let's select everything. Let's take I don't know,
what do we have here? Like Verdana, I don't let's bring these a bit closer
together, perhaps, the spacing. I mean, these are pretty
self explanatory. If you've worked with any kind of text editor, you
know what they are. But interesting now is let me take my
selection tool again. I'm going to make that
even a bit bigger. You can also just
scale it like that. I want to place this behind
the subject. Well, very easy. Just take it and put it below or in between
the two clips. And just like that, we have
a text behind the subject. Let me just make
that even bigger. Isn't that looking awesome? And I love here how her
hair has been cut out. We can see all the details there against the
background of the text. It is perfect. And
there's one problem. I mean, there are multiple
problems with these shots. I mean, we can kind of see that the text isn't really
part of the video here. So that's what
we're going to have to work on in the next lesson. We're going to have to
motion tracking again. But this time on the text, we're going to add some
shadow effects to it, as well to really make this
text be part of the shot. Gonna be really fun. I'll
see you in the next lesson.
13. Motion Tracking: We're going to continue
where we left off and focus again on
motion tracking. We've already done that when
we stabilize the footage, but motion tracking can be
used for various things. Like in this example, we have our subject cut out and
placed a text behind her. But as you can see, the text is not really moving
along with the shot. So either we can stabilize
the entire shot. That way, the text and
the shot matches as well, or we can add that handheld
motion we have onto the text. So let me select the
background clip in the timeline because that's the one that doesn't
have the rota Blush. I mean, the Roto Brush
effect applied to it. And I'm going to head over
to my tracker window. So we've seen warp stabilizer, the automatic stabilization. We've also seen
stabilized motion, which is the manual
stabilization. And now we're going to
check out the track motion. Now, funny enough,
the track motion and stabilized motion
are kind of the same and you'll see that in just a moment when I
click on Trek motion, we get exactly the same
thing a trek point. Automatically, the clip has been opened up in the layer window. That's something to be
very cautious about and something to get used to
as well in After Effects. We've done this before
in a tracker panel. This time, you'll see
that under track type, transform has been selected. If you were to
click on stabilize motion, stabilize was selected. So this time, we're going
to go for transform. So that's why these two
buttons are almost the same. As before, I'm going
to enable rotation and scale as well because I would like to have two
tracking points. And I'm going to go to
the start of my clip, and let me just hit space
so I can pin in my clip. I'm going to take one point, make that a bit
bigger and move it onto the first poop
onto the left. I'm going to make my
tracker rectangle a bit smaller because this defines
what we want to track, and then the outer rectangle
is the search area. And we'll do the
exact same thing with track 0.0. Let's
make that bigger. Move it up onto the left
hand poop, like that. Now we can now play this back from a tracker window
to start the tracking. Pay attention to
both tracking points that they retain under spot, but it seems to
look pretty good. So the idea now is that we apply this tracking onto
the text layer. That way, the text
layer will follow. Could do that, but it's
not good practice. As we've seen before,
we had to use a workaround by adding a
second transform effect. So here's how the
professionals do it. I'm going to right
click into my timeline, go over to New and
select the Null Object, which we've also seen before, this is the nothing object. And then from the
tracker window, I'm going to click here on
Edit target, which means, hey, where do you want to
apply this tracking data to? And from the layer
dropdown menu, we can choose Supergirl, which is a text layer, but I'm going to pick the Null Object. And hit Okay, the
target has been set, so now I can go over to apply. And again, X and
Y, yes, hit Okay. And in the timeline now, we've got all of the keyframes applied to the null object, and that null object will now also beautifully
stick to the grass, follow along with
the handheld motion. So that's great. And what I often like to do is just rename that null object now
to tracking data. Now, let me expand the
properties of the Supergirl, the text layer, go over
to transform properties. And we've seen
before that we can link any of these properties here with the speak whip tool to the properties of
the tracking data. But in this case,
we kind of want to take over everything. We could link every
single property to the properties of
the tracking data, but that's tedious work. Instead, what I'm
going to do is, let me just collapse all
of the properties again. I'm going to take the
Pi Whip tool from the entire layer and just say, Hey, take everything over from the tracking data or the
null object like this. You can see here now also
in this drop down menu that the tracking layer has been parented or linked
to the text layer. And if we play back the clip, you will see that
the Supergirl text is beautifully following along. And what's interesting
now is that we can take the text and position it where we want to because all of the transform properties
are still there. We can still change them, but it will still
take into account the current properties that
we are setting in here. So I can scale it
down if I like to reposition it behind
her, do whatever I like. It will stay tracked as we've linked it
to the null object. And so that is also very
interesting to know. That means that I can track multiple things to
that null object. I can create extra
shapes, more text layers, do whatever I want, and all link it to that same null object. And because tracking
is always done on the transform properties,
position, scale rotation, very easily enable motion blur by going to the text
layer here and say, Hey, enable motion blur
for that text layer, and automatically it
will have motion blur. Let me just disable
and enable that so you can see that
before and after. You can definitely
see it here in the edges of the R, for example, where we get some
motion blur going on as I toggle that option. That really makes this text
part of the entire shot. It has motion blur.
It's following along. It seems as though it is just hovering there above the cliffs. But I'm not entirely
convinced just yet. You see our model standing
right next to the text. Shouldn't she be applying
a shadow on that text? Well, I believe she should. So let's take care of
that in the next lesson.
14. Track Mattes: We're almost convinced that this text is part of the shot, but it needs a bit
more tweaking. So let's add a drop shadow
to it. That's easy, right? I'm just going to go over to my Effects and Presets window, look for drop shadow, and it's right here
under perspective. And let's drag that
onto the subject, the clip here on
top. Look at that. We have a few options. We got the distance, like how
far that hado needs to be. We can fetter that a bit, add some more softness to it, change the direction of
where that hado needs to be, and finally change the opacity, like how much shadow do we want. Okay, so that kind of works, but we have a problem. You see her shadow, let
me just zoom in on it. Her shadow is also being
applied on the background. I mean, that makes no sense. Like, her shadow
should not be on the clouds or on these
mountains in the back. It should only be on the text. So does that mean
we're going to have to mask out around the text? Well, luckily, no, because that is where track
mattes come in. Trek mats can be used to apply something only on
one specific layer. Now, for that, the layer
does have to be cut out. So something that is masked
out works, something out. But also text, obviously. So where can we find
the track Mat options? Well, it's also within
the later options, but we're going to have to
show those columns first. We know where that
button is by now. It's down here, expand or collapse the transfer
control pane. Click on it to show
the blending modes. But right next to
the blending modes, we also have the
track Mat option. And just like with the parent and link option that we've seen in
the previous lesson, we can also just use the Piquip
tool here or use the drop down menu to choose where we want to apply
the drop shadow two. So let's take the Piwip
tool and say, Hey, this should only be applied to the text, Supergirl. Like that. Now, by default, the
text layer has been toggled off because
very often track mattes are used to only
apply an effect to something but not actually
use the track mats. Let me demonstrate that
real quick to give you an idea because track mats could be a little
bit overwhelming, even though it is very simple. I'm going to reset my track mat. From a drop down menu, just set it back to no Mt. My text layer is disabled. As you can see, let's keep
that disabled for a moment. Let's say that I
only want to apply a drop shadow here on top. What I could do is without
any layer selected, I'm going to take my pen tool, and with that, I can
draw a custom shape. So I'm just going to do
that. This around her. It's through her
middle, just like that. And so what I can do now is say, Okay, well, I'm going to
use that as a track mat. So clip number 11, take the Big whip
tool for track mat and link it to that shape
that we've just created. And just like that,
you can now see that my drop shadow only
applies to that area. It's using that shape layer to define where my effects
should be applied to. Of course, in this example, we want to keep that
shape layer disabled. If we enable it, we got that weird shape just floating there,
which we don't want. Let me just reset that all back, set it back to no Mat, and I'm going to delete my shape layer because obviously we want to apply drop shadow
to the text layer. So take the Piwip tool
again, or you know what? Let's go to the drop down menu, and just from there,
select Super grill. It's the exact same
thing. And of course, we want to enable the
text layer as well. And there we have
it. The drop shadow is now applied to
that text layer. See it here, War cape
as that moves around, how that shadow
moves onto the text. Of course, with clip
number 11 selected, let me just collapse
the Rotter brush effect for a moment so that we
can focus on drop shadow. We want to tweak
that a little bit, so that it looks a
bit more realistic, maybe not as much softness,
maybe not as far, just a tiny bit like this and obviously decrease the opacity. So we just have a very tiny bit of shadow going on in there. Not too much. Alright,
this looks pretty good. Let's set the view back to fit, and let's play this back,
see how that looks. I'm noticing sort of an issue. Let me just zoom back in here
on my clip because is that the edge of my text that is
visible through my clip? These are artifacts
that could be introduced because of the
rotoscoping that we've done. In fact, with that track mat, we're applying all effects
to that tract mat, not only the drop shadow, but also our Roto Brush,
which is on the clip. That's something very
important to keep in mind. So if you are seeing artifacts like these thin lines
that are coming through, what you can always do is just make a duplication of your clip. So for clip number 11, I'm going to select
it, hit Control. D. Obviously, for that top clip, we don't want to
use a track mat, so I'm going to set
it back to none. And let's rename these
layers a bit better. So the top clip is
going to be the talent, and then the one below there is going to
be the drop shadow. So what we're doing
now is that we have a clip with a rotor
brush and a drop shadow, and we are track matting that, we're linking it
to the text layer. We're keeping the text layer enabled because we
want to see the text. That is causing issues, so I have a duplicate, which is just a
talent, nothing else, which is going to
solve those artifacts. Of course that duplicate only has the Rotor brush
effect to it, not the drop shadow because we've already used
that right here. That's the idea behind it. Let's set it back to fit. And now if you play this back, you can beautifully see this
clip without any artifacts and our drop shadow being
applied to the text. Although it's not
needed right now, I do want to show you
that there's also an invert button just right here next to the
track Mat options. And if we enable that, it will
just invert the track mat, basically applying
the dropshadow now on the background
instead of the text. So you also have the option in there invert if that is needed. That is in a nutshell
how track Mats work. Practice that a little bit, because although track Mt is just a simple one
click solution, it could be overwhelming
to wrap your head around. It was definitely for me when I started out with
After Effects. Then I'll see you back
in the next lesson when we're going to further work with text and graphics
because after all, the text is looking pretty dull. Just a white plain text
and a very simple font, we can do so much more
with text and graphics.
15. Graphics and Text: Hey, welcome back. We've already seen a ton of things
and After Effects, but there are a few
things more we got to explore such as
text and graphics. So what I have for you
here is clip number six, which is a beautiful
drone shot of these cliffs in
the Faroe Islands. And we're just going
to use this as a background so that we can put a text and graphics
animation on top of it. Make that work better
as a background. I'm going to go to my
effects and presets stab and look for two effects. The Gaussian blur, a
very simple blur effect. Let's drag that onto the clip. And also, I'm going to
look for brightness and contrast and drag that
onto the clip, as well. Then from my effect controls, the blurriness, we can increase or decrease that
if you like, so. As for the brightness, let's
decrease that and perhaps also decrease the contrast
to wash it out a bit more. But this way, the text will pop out a little bit better
against that background. Alright, let's start
with graphics, and we've already touched a bit on it with these controls here, the Pen tool or the shape tool, we can create shapes. But for that, we're going to
have to deselect our clip. If we have it selected, we're
going to create a mask. So deselect it this time, and now we can go ahead
and create a shape. And I'm just going to take the
rectangle tool for now and create some sort of
around shape like this, which is going to function for the background for the text. So we can see now that
a new shape layer has been created, and with it selected,
we can find in the properties panel also a whole bunch of
shape properties now. So only with graphics and texts, we get more than just the
transform properties. And there's a whole lot
of properties in here, as you can see. We get specific shape
properties, such as the size. We can still change
that over here. We get a roundness control to add some roundness
to the corner. We can change the stroke color
in here, the stroke width. We get some cap and join
controls and the fill color. Let's change that to
something more muted. Let's go for
something like green, cyanish, something
like that, perhaps. For the stroke, let's
pick something thinner, just a couple of pixels
white like this. Looks good. Now we're going
to see down here that we also get some shape
transform controls, and these are the exact same. We get position, scale,
rotation, and all of that, the exact same as for the layer transform
properties itself. Well, that's because when
working with a shape, you have the shape
transform properties, but you also have the layer
transform properties. So yes, we have those
double in in fact, I could go ahead and
create another graphic inside that same shape
layer because after all, you can see here
the layer content, we have the shape layer and then one rectangle
inside of that. And that is simple. We have to select the shape layer
in the timeline. If we don't have it
selected and we're going to create a
new shape like this, it will also create a new
shape layer entirely. We don't want that, so let's
delete Shape layer two. I'm going to select shape layer one and then create
the second graphic. Let's make it like a
very long rectangle. And now you will see
that it will also be added to that
same shape layer. In the properties now, we can see that we have two
rectangles in there. And that is also the
reason why we get another shape transform
control because after all, we got to reposition, rotate these shapes
separate from each other. All right, let me
just reset that. Now, what I want to do is create this thicker line down here. So let's copy some of the properties of
the rectangle one. And you know what?
Let's rename these. Unfortunately, we cannot do that from the properties panel,
which is kind of stupid. We're going to have
to do that here in the composition which
your rectangle selected, hit the return key, and
now we can rename that. So Rectangle one is going
to be the big rectangle. The other one is going to
be hit return a small line. And by the way, as we know,
we get all of the controls as well that we have in the
property spinel in here too. So you don't have to work
with the property spinel. But for shapes and
definitely when you're not in the
animation process yet, I do find it useful. Okay, let's take
the big rectangle and I'm going to
copy the size of it, especially the width property. So let's hit Control
C or Command C on the Mc to copy that value, then go back to the small line. And instead of pasting
that immediately, I want to uncheck here that proportions
have to constrain. Otherwise, the
height is also going to change its value in
proportion to the width. Then let's paste
the width like, so, hit return, and
now my line should be as white as the
big rectangle. As for the stroke, I'm just
going to make that zero because the entire fill color
can kind of be the stroke. So let's change that to white. Now, we can go ahead
and fumble this line into place by trying to
aim it to the bottom, but that's not really accurate. So instead, let's take a look at the shape transform properties. For starters the
position right here. We've got an X and a Y position. This position is always where the anchor
point is laying at. Let me just zoom in a bit
more so you can see it. This little line here
has an anchor point. We've seen that
before, the point where you rotate around, but it's also the
point that's going to define where it has
to be positioned. So if I were to set my position to zero for both the
X and the Y value, it's going to be positioned exactly in the
middle of my canvas. The middle is zero position. That is great because
it means that I'm aligned now vertically
in the middle, so I just need to change
the Y value like that. You can also take your
graphics layer and hold down the Shift key on
your keyboard to lock it in place when
you move it up and down. Then it will only move
it on the Y value. And by the way,
same if you were to move left and right, take it. Hold down your shift key, move it left to right,
and it will be locked. I'll kind of know what
you're trying to do. Is it up and down, or
is it left and right? So let's reset position back to zero I'm going to do the same thing for my
big rectangle, as well. It's not horizontal
yet in the middle. So let's set that to zero. Now, we'd like to align these
two corners a bit better. So let's select a big
rectangle perhaps and decrease the roundness
of it like this, maybe. Maybe also set it to
nine so that's the same. And we can take the small
line again and move it down. Take it, hold down Shift
key as you move it down. Yep, that is starting
to look pretty good. So we've got this big rectangle with a smaller line
on the bottom. Of course, you can
add as many graphics into your shape
layer as you want. And I also recommend
you try and do that. Maybe first recreate what I did and then create
something of yourself. But now, the text because obviously you want
some text in there. We've already seen that as well. We're just going to
take the text tool. Now, unfortunately,
we cannot just select the shape tool and hope that the text layer will
also be part of that. Text is not a shape,
so you can't add it to a shape layer,
maybe in the future. I don't know, because I do think it would be
a nice feature. Anyhow, let's type
something in here, like big Cliffs, the title
of this documentary. Let's take my selection tool and bring it into the middle. And by the way, since we have our shape layer exactly
in the middle of the canvas and we want our text to also be
exactly in the middle, what we could do is go over to the alignment window right here. I'm going to have to
scroll down a bit. And here we can choose how
we want to align that text, so we can do it
on the left side, but also exactly in the middle and also do that
vertically like this. So now the text is exactly
where it should be. Alright, the text controls. You've already kind of see this, and I don't want to go
too deep into it anymore, because after all, text
controls are self explanatory. Let's just keep
the font as it is. There are more beautiful fonts. But if I'm sharing these
project files with you, I also hope that you won't get a font error if I'm using
something very custom. So for Donna will do for now, let's make the text a
little bit bigger so that it fits and perhaps
move it a bit down. I'm holding down my shift again so that it snaps vertically. I just have to be careful. It
doesn't snap horizontally. You can also use your arrow
keys to nudge it in place. And that looks good.
I'm happy with this. Let's go ahead and animate
these graphics and text now. I'm going to go a bit
forward in time and also make some more space
down here in my timeline. Let's start with the text, and we're going to make an
animation on the position. So when it's selected,
hit the Pike on your keyboard to open
up the position property. Let's create a
keyframe for that. Next, I'm going to go
into my small line. Look for the
transform options for specifically the small
line, not the shape layer. Be careful of that. Also
create a position keyframes. Let's collapse all
of that again. Open up the big rectangle
and also create one for the transform for
the big rectangle for the position is right there. What I'm going to
do now is select these two layers and hit the U key on my keyboard to only show the properties
that have a keyframes. This works a whole lot better. So these are the
keyframes that have been created for the ending position. So what I'm going to do here
is just take all of them and move them to the right
side because at the start, I want to have
everything off screen. And now let's bring
the position of all of these elements
outside of the screen. For shape layers, if you have the same properties selected, like we have now, if
you deselect them, you can select them again by holding down your control key. So let's select both of
these position values. Unfortunately, it
doesn't work with the position of the text because it's outside
of that layer. But inside, have
these two selected, and if I change one property, it will change the both of them. So let's bring that outside
of the canvas like that, and we're going to do
the same thing for the text. Bring it outside. We have this animation now. And as we've learned
before, I want to select the last keyframes. Right click, go to keyframes assistant and choose EZ Es in. At the moment, all of them
just come in at the same time. It's pretty boring. We
have different layers, so let's show that we
have different layers. Now, for instance, we could have the rectangle come in a bit faster by moving these two keyframes
closer to each other, and also maybe let them
come in a bit earlier, be one of the first
animations to come in. And next we could add
the text animation, also make the animation
go a bit faster, move those two keyframes
up to the right. And finally, the line also make that faster that has
to come in as last. Wait, that's a big rectangle. Let's swap these two.
This is the small line. Alright, so what we end
up with now is that we first have the
backgrounds coming in, then the text of the
cliffs, and then the lines. So it's a bit more dynamic. We can kind of see
the lines now. This is something
that I often do with text animations like these.
Alright, looking good. Perhaps we want this
to go a bit faster, then you can change and
tweak these keyframes, play it back, see how it looks, and adjust as needed. And, of course, we
also want to enable motion blur for
these two layers. So just enable that from the layer properties right
there. And there we have it. There's one last thing that
I'm going to do instead of having them come in
from the left side of the canvas is have them reveal from behind a track mat. And shape layers
are a perfect thing to use for track mats. So what I'm going
to do is deselect everything in my timeline, then create a new
rectangle like this, a new shape layer, and let's create something like this.
It can be very rough. And let's rename that shape
layer to track mattes, and let's rename the other
one here to my graphics. That way we know
what the difference is between these
two shape layers. Let's also collapse these here. We don't need to work any
further on the animations. Let's locate the
track Mat options. Since we don't see them in here, it's probably
because we're going to have to toggle those options. Now, we do see them, and
what we want to do is link the text to the track mats and also the graphics
to the track mat. And once we've done
that, very interesting, we can see the
animations through the shape layer or the
track mat shape layer, but we want that to be inverted. So very simple, just toggle the invert options for the layers that have been
linked to the trakmt. And just like that, the
entire animation now gets revealed behind
that shape layer block. And that's kind of it
in a nutshell what textaGraphics animations
is all about. Practice that a little bit, try to recreate what
I just created, and then create
something of your own. And then I'll see you back
in the next lesson for some more advanced
text animations.
16. Advanced Text Animations: There are three ways to
animate text and graphics. The first one is through
its transform properties, such as the position,
scale and whatnot. The second one is
through effects. So you can add some
kind of a distort and then animate that
or the third one, and that is through
added properties. And that's what we're
going to take a look at in this lesson. Start here by creating a quick shape layer to
demonstrate something. In the property s panel, everything we see
here can be animated. So not only the normal
layer transform properties, but also the shape properties, such as the roundness, the stroke width,
and all of that, because I can tell that by the stopwatch icon next
to every property. And we can find all of
these properties back within the layer itself
here in the timeline. There it is, for
example, the stroke. We can change the
width from here, and we could animate
it if you want to. For the professional
graphic animators among us, even this is not enough. So let's design something. I'm going to delete
my entire shape layer and start all over again
from a blank *****. Let's take the
rectangle and create a similar shape as we had before in the previous
lesson, like so. And let's swap these colors
here for the stroke color. Let's take white. And
for the fill color, I actually don't
want any fill color. So instead of the solid color, we're going to set it to none, and then make the stroke
width like a bit smaller, make it more modern, and perhaps like a small
roundness to it, not too much. Alright, and let's align
the position of that shape. Zero, zero, so that it's
exactly in the middle. And, what I want to
do next is animate the stroke so that it kind of seems like
it's being drawn. But where can I do that? I don't see any option
for the stroke path? Well, that's where added
properties comes in. And if we go to the layer
in the timeline view, we can see under the contents this little Add button
right next to it. Clicking on that reveals a menu with a whole bunch
of extra properties. And I also encourage you
to play around with that, add some new properties to your shape later and
see what they do. You can create some very interesting
animations with these. But the one that
I'm interested in right now is the trim pad. Click on that and it will add its property to the layer.
Now careful, though. Added properties will never show up in your
property s panel. Another reason I'm
not too fond of that. So let's open up the trim
paths and see what we have. I'm going to collapse
my rectangle one. We've got a start
and end property, and as I change that value, you can kind of see here how
the path is being trimmed. I can animate that.
So let's do that. I'm going to stand here
a little bit back, create a keyframe for a start, which is currently at 100, so I don't see my path. Let's go forward in time
and set it to zero. And, of course, that has
been animated right now. If I want my animation
to start somewhere else, I have an offset control, so I can make it
start, let's say, over here in the
middle somewhere, then I will start from there
and draw the rectangle. So play around with it, see which properties you
can add and change. I see some fun things in there
like the Bucker and bloat, the twist, the wiggle pads, the zigzag, all fun things. But now we also have
these options with text. That is where it really
gets interesting. Oh, before I'm going to
collapse, my shape layer, let's right click the first
keyframes, Easy Ease out, and then the last
one, keyframes, Easy Ease in so that my path
plays back smooth like that. Alright, let's now collapse it, and I'm going to
create a text layer. So take the text tool. Let's type in this
rectangle and call it. Let's call it huge
cliffs this time. And let's reposition that. I'm going to use my
align tools down here to make sure it's exactly
in the middle aligned, and I want to decrease
the size a bit. Alright, looking good. So again, we have some options
here which we can animate, such as the layer transform
properties, fortunately, we cannot animate
the text options because I don't
see any stopwatch next to any of these properties. And if we expand the
layer in the timeline, you also see that we don't have that many options to animate. But we do again
see some nice menu here on the right side. This time, it's not called
ads, but it's called animate. I know After Effects is very
good with its consistencies, but clicking on that menu reveals all the
properties we can. I think with some
of these, like, why should we add a
position property? I mean, don't we
already have that? Well, these are properties
we can add specifically to a character or to a word instead of the
entire text layer. And that is where it
gets interesting. Let me take that position
property, for example. I'm going to make some more
space here in my timeline. See that a new animator
has been addited. We get a range selector, and then we have that
position property in there. And we could add more properties
into the animator one. For example, let's also
go to property here, and let's take the opacity and we also now have
the opacity in there. Now what I could do is, for
example, change the position. And yes, at first, that will just bring the entire text down. I can decrease the opacity. Let's set that to zero because this could be my
starting point, perhaps. We're doing right now
in the animator is actually creating some
sort of an offset. We're not really animating the position or the
opacity in here, we're creating an offset for the position
and the opacity. The animation is done
in the range selector. So let's expand that property and see what
we have in here. Again, we have that
start and offsets. As I increase the start, you will now see that each
character will be animated separately and is looking at these two properties
that we've just set, the position and the opacity. And so it will bring back each character back to its
position where it should be. So what we could do now is just animate that
start property. Let's go to where my rectangle is being created
somewhere right here, keyframes for start, move words and set
that to a hundreds. And as I played this back now, you can see how every
letter is nicely animated. If you'd like to
get more control over how that animation happens, you can also see an
advanced option down here. From there, we can
choose whether we want that animation to happen
on the characters, as I said before, or we
can also set it to words. So this time instead
of each character, each word will be animated. Which is two keyframes, we can further tweak how
that animation has to look without having to add
a bunch of more keyframes. Let's set that back to characters because
I really like that. We have some easing options,
so we can increase that. So we don't even have to set
an ease in and an ease out right here with these keyframes because each character
is animated separately. And if I were to smoothen
out these keyframes, only the first character and the last character in my
text would be smoothen out. So all the smoothing
options happens in there. I can set a smoothness
amount here, I can set the Ease in and
the ease out right there. Which is going to
have an impact on every character specific
get around with that, see what it does,
how we can create some nice and cool
looking animations. We currently have
one range selector, which is going to take care
of both the position and the opacity because we've added these properties inside
that animator one. But let me just collapse
that for a moment. We can go back to animates
and add another property. For example, the enable per character tree D is something
I really like as well. Now, that is not yet a property that we can animate as well. We've just made the
layer in tree D. We're going to explore that a bit more later in this class. Now take something
like the rotation and add that into an
animator two property. But since our text now has
been enabled for Tree D, we also get some more
rotation options. We can rotate it
in a tree D space. We've got the X rotation,
the white rotation, and you can see here
how beautifully each character is rotating
around its own axis. And so since we've added
that to a second animator, we also get a new
range selector, and we can create
a new animation for that specific property. So we're not bound anymore to the keyframes of
the animator one. That means that we
can have that come in a little bit later. Let's set the start
back to zero, create a keyframes, go forward
in time and set it to 100. Play this back,
see what we have. So the text is coming in,
then it kind of rotates. Okay, maybe after all we do want to align
these keyframes. Let's select the layer,
hit the U key so we can see all the properties which have keyframes and align these. Hold down your shift
key to make them snap. Let's play this back,
and here it goes. Huge glyphs. And obviously, we want to enable motion blur
for both of these layers. And we're going ourselves a beautifully
animated text graphic with some of these
added properties. Play around with
that, see which kind of fun properties you can discover and keep in mind that you can add multiple animators, because with one animator, you could animate
multiple properties, or you can separate them
into multiple animations. So that way, you can offset the keyframes a bit so that
one thing happens first, and then another
thing happens later. That's up to you. Thank
you for watching, and I'll see you back
in the next lesson.
17. Content Aware Fill: We have already seen a
ton of great things, what After Effects
can do for us, and it might be overwhelming
at first, but don't worry. After Effects just
takes time to master. So definitely after each lesson, just practice the
things that you've learned and after
a couple of weeks, you'll be an After Effects pro. Now, in this lesson,
we're kind of jumping into a new chapter because we're going to take a look
at a brand new tool, the content-aware fill. So what I have right here is a beautiful shot of our
model standing here in the middle of these
two cliffs and we have these beautiful
rocks in the background. We got this bird flying
there in the distance. It's such a beautiful. Oh, wait a second. Who is that? Who is ruining my shot? Oh, no. There's a guy with a yellow jacket in my master
shot. Well, don't worries. We're inside After Effects, and After Effects has
tools to remove that guy. Now, the first thing I
want to do is actually remove the guy with
a mask very roughly. So what I'm going to do here is select my clip in the timeline, head over to the
rectangle mask tool, and just very roughly create a mask around the
fella, like that. Then with my clip, select
it in the timeline, hit the MK to reveal
the mask pad, and we're going to create a
keyframe for the mask pad. This can be done very roughly. All we want to do is
just make sure that this fella stays
within that mask. So you can go back like
a bunch of frames, move that mask up a bit, make sure it stays
in sight like that. Looking good. Let's
see here on the end. Move that up a bit
as well. Like that. All right. And the last
thing we want to do is obviously remove this part and not remove everything else. So that's why we're
going to click the inverted button for the
mask property right here. Just like that, we got
ourselves a black hole. Locate the content-aware
fill tool, let's head over to
the menu on top, select window and then look for content-aware fill.
It's right there. Click on it, which will
open up a new panel, and it will show you
the fill target, which is good, the hole
that we just created. We can expand if we like to, but usually it's not needed if you've done a correct
job with your mask. Then what do we want to
remove? Is it an object? Is it a surface that
we want to clean, or is it an edge that
we want to blend? And in 99% of the cases, you're going to
choose for objects. You know, to me, that person is not a person. That's an object. Finally, we got an option to
do a lighting correction. I would first try it without if you see
didn't really work, enable that option and see
if it does a better job. But yeah, let's give it a try. Let's click on
Generate fill layer, and it will start analyzing your clip and filling
in that hole. There's nothing you have to do, so just put your hands up and wait for things to be done,
and it's already done. Look at that. Let's
play this back. Usually, for small
things like these, it does a very good job. We do not notice that we cut
out an object from there. Now, as amazing and
easy as this looks, unfortunately, the content-aware
fill isn't a magic tool. In many scenarios,
you will notice that something has been removed
and that's not good. But for small things like
these, it works really well. Now, we can also help the tool. So if your results
aren't that good, we have an option here to help the tool to deliver
a better result. So let me show you how
that works as well. And for that, I'm going
to delete my fill layer, which is the one that
the content-aware fill has been created, and all this is is just
a filler of that hole. So let me just delete that. And what I'm going to do
is create a couple of reference frames for
the tool to help. So let's create one
here at the start. We're going to click here
on Create Reference Frame. That will open up Photoshop. So you're going to
have to need that or have that installed as well. And I'm going to keep
this very simple for now. We could use all of
the Photoshop tools to fill in that hole
perfectly and all of that. But we can also just
use the building AI. So I'm just going to
take my selection tool, select the hole that
we have right here, and click on Generate fill, and then just say Generate. There you go. This looks good. I'm just going to
hit Control S to save this and then go
back to my a project. We have created one
reference frame for the first frame
in the video. We can go then forward in time, Let's go somewhere in the middle and say create reference frame. Again, I will again open up Photoshop, and we're going
to do the same thing. Select that hole, hit generate
fill, and hit generates. Hit controls to save that, go back to After Effects, and let's create one more reference frame here on the end, click Create reference frame, select the hole and click on
generated fill generates. And save that and go
back to After Effects. Of course, you can also
use the clone stamp and other After Effects tools to create some kind of a fill that looks better
in your scenario. But what we've just
done is created three reference frames
across the entire video. And when we now click
on generate fill layer, After Effects or
the content-aware fill tool is going to use those reference frames to create the entire fill throughout
the entire video. Now, even without the
reference frames, it already looks really good. Now it should look even better, and fortunately, it doesn't. Now we can actually see that
something is wrong in here, which is pretty funny. So yeah, it's always
kind of a surprise using these AI tools
and After Effects. Sometimes it works, sometimes
it doesn't in this case, even the reference frames
was not a good solution. So, let's just delete
everything and just generate a new fill layer without
using any reference frames. There you go. Looks
a whole lot better. So, I mean, try it
out with this shot, try it also on a different shot. Use your phone,
perhaps, just film something like your cat
and then remove your cat. See how that works with
the content-aware fill. If it doesn't do a good job. Try the reference frames.
It should work better. Uh, but, yeah, it's
always a surprise. Thank you so much for watching, and I'll see you back
in the next lesson.
18. Camera Tracking: About to step into
the world of three dimensional and After Effects. Now, After Effects has
gotten many updates over the past few years to
improve its tree D features, but also it has seen lots of
new tree D features added. And that's what we're
going to take a look at in the next couple of lessons because Tree D is
very awesome and yes, After Effects is becoming a more capable program
to do tree D stuff in. But let's take it step by step. So we're going to
start off with a very easy tree D tracking. And we head over to
the tracker window, there's one last button that
we haven't explored yet, and that is a track camera. Have here in my timeline is a drone shot where we
just fly over this road. And what I'd like to do is add a text on this
road that seems to be sitting there like in the shot that it's
been films like that. We kind of did that before
with a two D tracking, which was just a
handheld tracking. But this is a moving shot. We're actually going forward, we're moving the camera
in the T D space. So a normal motion tracking, which is just two
D doesn't work. For that, we're going to have
to do a camera tracking. So let us select the clip in the timeline to activate all the buttons in
the tracker window, and let's hit the
track camera button. And, like with many
features in After Effects, it's a waiting game. After Effects has to analyze the shot and then perform
its camera tracking. And it's done, and I make it
seem like it's super fast, but obviously I cut out the 2
minutes that I had to wait. As you can see here, it added a three D camera
effect to the clip. And all of a sudden,
we see all of these different
points in the shot. And if you overdose, we kind
of see this target disk. And if you don't see
any of these points, it just means that
you don't have your camera tracking
effect selected. If we deselect it,
they're all gone. So you got to make sure
it's selected to see them. And if we scrupthrow,
you can kind of see that these
tracking points beautifully aligned with
things it can see a shot. And now you can choose
any of these points where you'd like to place
an object or a text. Now, you can place
it on a single point or you can place it in
between three points. It will automatically mark
that by this target disc. So that's up to you. All
you got to do is just right click and then say
create text and camera. A default text has been added, and as we scrub
through the video, you can now see how
beautifully that text stays on that point and how
it's part of our video. Let's select the text
and see how we can reposition it, move
it around, perhaps. As you can see, we've got a
three dimensional text now. We can rotate it like that, rotate it on the y
axis or on the Z axis. We've explored this a little bit when we were
animating the text, but now we're taking
it to the next level. Objects need to be put in Tree D. We have a
little toggle here. You can see next
to the text that has put the text into Tree D, and we can do that for any
layer that we want to. If I turn that off, it is
just a two dimensional text, and it won't track
along my shot anymore. So you want to make sure
that that is enabled. Because I disable it
and enable it again, it also has reset its position. So I'm going to have
to click Control Z a couple of times to
bring it back in place. I'm also going to reset the
rotation, what I did here. So maybe let's select the layer, hit the archy to bring up
all your rotation values. Let's click here on orientation, right click and say reset. Let me just collapse that again. We could also see a
T D camera tracking inside the timeline. This is a virtual camera that has been created
by the camera tracking. Now, what the tracker did was analyze the shot so
that it could create a virtual camera that would represent the actual
physical camera. In this case, the drone. So it had to see which
kind of lens it had, was it a wide angle, a ti lens, maybe. But it also had to try to figure out the movement of the camera. If we expand the
TD camera tracker, let's do that for a moment, and I'm going to make
a bit more space in my timeline and go to transform, you can see a whole
bunch of keyframes for the position and
the orientation. Which is exactly
that. The movement of the physical camera, the drone in this case, has
been recreated virtually. I still find that so amazing. Unfortunately, it doesn't
do a perfect job. If I were to take my
text here and move it, so I can take one of these
axises, as you can see here, I can take the Z axis, for instance, and
move it backwards. So I would think
now that I'm moving this text to a little bit
further down the road. But now you will notice that my text starts to float a bit. You know, perhaps,
let me just bring that forward like this. You would think that the
text is sitting here now on this part of the
road. But it's not really. It's kind of floating. You
can really see it here. I'm going to zoom in
on it's floating. Let me just hit Ctrl Z a couple of times to bring
it back where it should be. That's why in most scenarios, you can only put objects on the exact spot that
you've chosen. At least, that is
for the Z axis, so moving it back and forward. If you want to move it up and down or to the left
or to the right, that is essentially
a two D adjustment, and that is perfectly fine. So I can move my text to
the left side, I mean, to the right side, for instance, and it will still
stick there perfectly. I can move it up. And it's still flowing here this
point on the road. So that is something
really important to keep in mind as you're
going to move your text. Now let's change this
text to something else. Let's name it to rod. Yeah, that's the
most creative thing I can come up with right now. And let's also decrease the size a bit so that it
actually fits on the road. I can use the X and the Y axis. And yes, I can also rotate
it on any axis that I want to because it's being rotated
around that one point, although this is
going to look pretty weird. So let's
just put that back. It was maybe hit Ctrl
Z a couple of times. Let's not rotate it.
Just know that you can. But that's it in a nutshell. That is how you can place objects like text
into the real world. And if you would like
to add more objects or texts within that same shot, what we can then do is go
back to clip number five, make sure that three D
camera tracking is selected. And we can take another point.
Let's take this one here. Right click and say create text. Then we'll create a
text on that point. The stupid pop ups
always appear. And let's take second text, rename it to two. And I'm going to
add a third text, perhaps. I got an idea. We've got a creative spark. I'm going to take this point, create text, as well,
and name it to love. Isn't that beautiful? Maybe decrease the size
of this one a little bit. So we've got the road to
love. Let's play this back. We got three texts
sitting there nicely. We're following
the road to love. So now that we know
how this works, let's take this to a whole
new level and make our text. Also, b3d because after all, right now, they're
just two dimensional. They're just flat. Let's
make them real three D, but that is for the next lesson.
19. 3D Text Animations: We're going to continue with the TD camera tracking inside After Effects because
there are a whole lot more features
that we can explore. And also, personally, I find it one of the most fun things
to play around with. So I have here clip number six in my timeline that
we're going to work on, and I've already done a
TreD camera tracking on it, which we've seen how that
works in a previous lesson. So the effect has been
applied to my clip, and we can see a whole
bunch of different points. And like before, I'm going to select one
of these points or maybe stand in between treat points so that we
can see the targets, right click and then choose
Create text and camera. And as we play this
back, the text sits there on the cliff. Perfectly. So we talked about it before where the TD
camera tracking is now a virtual camera of the actual physical
camera in the shots. But it's not really accurate, and that's going to be a
problem when we want to move objects in that Tree D
space over a solid plane. So if I want to move this
text here now on, let's say, the grass plane here on top,
that is not going to work. I'm going to have to find a point actually
here on this grass, right click and
create my text over. As long as that text is going
to float above something, it's not going to
be that noticeable. So what I want to do is
bring this text close to my virtual camera so that it can actually fly
through the text. Wouldn't that be awesome? Because after all, we have a shot where the drone
is flying backwards, so we could, in theory,
fly through the text. Well, in practical,
that will also work. I'm going to change my
text to something else. Let's rename it to cool so that we have some circles where the camera can fly through. Let me take my selection
tool again, and of course, we want to move it
in that Z space, bring it closer to the camera. But where exactly is that? We're going to have to
work a bit more precise. We cannot just guess something. Well, in my canvas and I'm going to have to make a bit
more space for that. Like this, you can see here a couple of buttons
on the right side. One of them here says one view. And what I want to do is change that one view to two views. And this allows me to look at my scene from a different angle. You can see it
highlighted a bit here in the corners of each window. If I click here
on the other one, you will see it
highlighted here. Let me just zoom out a bit. And now I can change the type of view for each
of these windows. So for the left one, let's just keep it on active
camera. You can see it here. In the second drop down menu, it's set to active camera. So we're looking through
the view of the camera. In the other one, it
is set to default. But we can change that too if we click on default
to, for example, top and that is going to give me a top view because after all, we are working in a treD space. And so that means, let
me zoom out a bit here. We can actually see the camera and right here is the text. And so if I were
to play this back, you can see the
camera going forward and backwards because that is, after all, what it's doing. It's flying backwards. So that means I can now
perfectly see where my text is sitting and
where my camera is sitting. Obviously, in that top view, you can also change it to
something else like left. So now we can see it
from the left side. Again, the camera
is moving forward. Backwards. If you want to see multiple sites
at the same time, you can also change
your views instead of two views to four views and have four of
those windows open. Automatically here
you can see that it set the top right to top view, here to the right view, and
here to the front view. From what we are doing, a two
view is more than enough, but just know that
the option is there. So I can just take my text
now and move it on the ZX, but I'm going to do
that from my left view. And I'm going to bring
it closer to the camera. Let's move it up a little bit. Of course, you can also still work in your active camera view. We can rotate it from here. Align it a bit better
with the camera, or we can also change the view. So instead of the left,
let's change that back to top to see where
that sits, looks good. Maybe set it to the right side. Look at it from a
different angle. Maybe you want to tilt the bit up the text like this.
Let's play it back. Let's see how that looks. Is the camera actually
going through the text? And yes, it does. It does, but not yet through
the O from cool. So let's move the text
up to the right side. Let's bring it down
a bit more and just try to aim that camera going
through the O from cool. Alright, that's looking cool. And I might want to bring back
my text a little bit more. Somewhere here, perhaps. Let's see how that looks. So it's going through the O, and there it sits cool. Alright. This is pretty awesome. This is something you
got to practice, though. If you have never worked
in a tree D space before, this is, again, overwhelming. I'm using that word
a lot. But it is. These are all new tools and techniques that you
got to get used to. It was really good practice
if you can just add a text into your tree D
scene and move it around, see if you can get it to a spot where you really
wanted it to be. And things like these, making a camera move through a
letter is a great exercise. If you can pull that
off, it means that you understand how a
tree D space works. Alright, I'm going to
set my views back to one view because we have a
text where it needs to be. Let me just set
that back to bit. But now, the camera is flying
through a pretty flat text. As we said before, we want to make it three
dimensional as well. It is three dimensional, but it's like a flat
three dimensional paper. So let's check out
the text properties. Maybe there's a way
to, oh, what is this? We get some more options. Well, that is because we
have set the text to treat. If you were to disable that, those treat options are gone. If you enable TreD
for your layer, you get those options back. We'll have to do a
control Z to undo those two actions because if you uncheck
TreD from a layer, it will also reset its position. Now, I'm mostly interested
in the geometry options. Unfortunately, as you can see, it is grade out, and there
are no options underneath. And that is because we are
in the wrong renderer. Afrofax is helping
you by saying, Hey, you might want to change
rendering by clicking here. And when I click on that, it will open up the
composition settings. It brings you automatically
to the TreDRnderer tab. So that means that if I'm
going to cancel that window, if I'm going to go
to my project panel, like so, right click my composition and go to
composition settings. We have explored this
window. We know what it is. We can find this treat
renderer tap here as well. And there's a setting
in here, the renderer. It's currently set
to classic Treaty. But we also have an option
Advanced and Cinema four D. And we're going to
select Advanced tree D, which is going to
enable a whole bunch of extra features such as
these geometry options. But it's also going to disable
a whole bunch of options. We can see that here on the right side what
it's going to disable. One of those things,
for instance, is the motion blur
and depth of field. So, yes, that does mean that we cannot enable motion
blur anymore. It really depends on what
you're doing in After Effects. You don't just want to
change your renderer to advanced three D with
every single project. If you're working with two
D animations or whatnot, just leave it on classic three D. Only at
the point where you want to extrude your text to make it actually
three dimensional, you want to enable advanced three D. Because that
means for motion blur, we're going to have to use
the force motion blur effect. Let's select that
one and hit Okay. Now the geometry
options are active. We can expand that option. Let me just make
a bit more space and we get an extrusion
depth effect. Look at that. We
got tree D text. And we get a few more options
like the Bevel style. Perhaps put that to angular. You can see here what
that does on the edge. You can increase that
or decrease that. And now we have an actual
three dimensional text where the camera is flying through making it look a whole lot more realistic, dynamic. We also get a few more
material options where you can further tweak a reflections and the shadows all has to look. Like the shininess, we can increase that to make
it more like metal. And like, what color does
the shadow have to be? You could take, like the
color Pi tool and maybe pick, like, a real shadow in your shot, like the
clips here in the back. I'm going to click over
there. It's a bit more blue. These options are
very limited, though, After Effects is still
not a Tree D program. It has a ton of
features for Tree D, but if you really want to get realistic quality and all that, you're going to have to work
with something like blender, for instance, which is a
dedicated T D program. So you're mostly
going to get stuck with 90s Tre D graphics where your materials and textures and lighting isn't really going
to look that realistic. Does that mean that this
tool is completely useless? Well, absolutely not with the right approach and taking manual control
over the lighting? Because, yes, that is
something that we can do. We can actually create
realistic treaty graphics. But that is for the next lesson.
20. 3D Models and Lighting: We're going to
explore a bit more of the three D features
inside After Effects, and it might get a
little bit tricky, but don't worry, we're
going to do this together. What I've got right here is our model doing this weird
movement with her hands. At the moment, it is weird, but once we're going to add a three dimensional
rock above her hand, it might seem as
she's floating that rock above her hands like
a real Earth bender. Yeah, if you're an avatar fan like me, then you're
going to find this in. When we talk about T D, the first thing we always
want to do is select a clip, go to the tracker window, and do a track camera, as we've seen in the
previous lessons. And this is going to take
a couple of minutes. So let's do a transition.
Oh, wow, it's done. And we get a whole bunch
of points where we can assign a text or a
tree D object too. Obviously, we don't
have any tracking points above her hands. We do have a few here in
the cliffs in the back, but that is way far in the
back and not above her hands. So we're going to have
to be a bit clever. From the previous lessons, we know that we cannot just drag a text or any other
tree D object to the front or to the back. Basically, move it
in a T D space. But what we can do is move it up and down left and right
in the two D space. And so when I look here at her
wrist see a whole bunch of tracking points that we can use because these do somehow
align with our hand. The only thing we got
to do is just push the object a bit to the
left and then a bit up. Now, when I click on
one of these points, let's take the red
wine right here. I can create a text. I can create a solid, and I can create a null. But it doesn't say, create a treaty rock,
what I want to do. Let's just go for
that null end camera, then. You've seen that before. The null object is
a nothing object. It sits over there, and when
I scrub through my video, you can kind of
see how that null object sticks to her wrist. And it's also rotating around that null object,
which is very important. We want to capture that same career movement as it kind of, like, rotates around her. Alright, so we've
got that in place. All we got to do now is kind of, like, swap the null object, the nothing object with a
let's go to my project panel. I don't have a rock
in here just yet. But when I browse to the footage folder that you
guys can download, as well, there is also a tree
models folder in there, and there we have a
folder called Rock. And in that folder,
we've got the rock, which is an FBX
file, a tree D file, and then we got some
textures because obviously a tree D model also needs a texture, what it
has to look like. You can find things like
this on the worldwide web. Just look for free
three D models, where you can also take a scan with your phone these days. There are many apps that
allows you to scan an object, and we've done a video about
that in the past before, where I would scan
an oil barrel, and then I would punch it
away like a superhero. So let's take that rock, the FBX three D model, and drag it into
the project panel. Here we can see a preview of it. It's just a rock. So let's just drag that
into the timeline. And the first time you do,
After effect is going to ask you a couple of settings
for your model. But don't worry too
much about this. Just hit Okay. There it is. It's a very small model there. It is so small
because it's already taking the perspective
of the virtual camera. And like I said before, the virtual camera works,
but it's not accurate. It thinks that all of
these tracking points are very far away
in the distance, but in reality, we're sitting right next to the
talent. But that's fine. We can go ahead and
select the rock, hit the SK on our keyboard
to bring up the scale, and just scale up the model. Now here we are running
into a first problem. It is scaling from
this anchor point, which we've also talked about
previously in this class. Obviously, we don't
want the rock to change in position
as we scale it. So we're going to have to
fix the anchor point first. Select your rock and
hit the A key on your keyboard to bring up
the anchor point property. And now we can move
the rock up so that the anchor point is going to sit somehow in the middle of it. Alright, and now when
we go back to scale, it will scale around
that point, much better. Now, we could go ahead and link the rock to
the null object, but then we are adding the position of the null
object to the rock. But what you want to do
is just have the rock on the same position
as the null object. So we don't want to link
it. Instead, I'm going to expand the properties
of the null object. Head over to transform, select that entire category, which holds all of the position, scale and everything,
select that and hit Control C to copy the entire
transform properties. Then I'm going to
click on my rock. Just hit Control V to paste
all of those properties. Now, the opacity of null
objects is always set to zero. So if you're going to paste
over those properties, you want to set the
opacity back to 100. Keep that in mind if you don't
see your object anymore. Alright, I can
collapse this now, and we could go ahead now
and delete the null object. We no longer need it.
It has done its job. And we also pasted the anchor point properties
of the null object, so we're going to have to redo
that again, let your rock, hit the A key for anchor
point and move it until it matches somehow with the
anchor point like this. Alright, so now if
we scrub through that rock should somehow
stay on her wrist. It is moving a bit because the tracking was
not that accurate. But we're going to make
it float above her hand, so that is not going to
be that big of an issue. We have the camera rotation in there, which is what we need. So let's select the rock
and use the up and down. Do not push it to the back or to the front, move
it up and down, left and right to bring that
above her hands, like this. And we might want to increase
the size even more like so, and that is looking pretty good. And now, if we play that back, you can kind of
see here this rock floating above her hands. Pretty awesome. But she's doing this movement
with her hands, so that might indicate
that she is kind of rotating the rock as well. So let's create a
quick animation. Let's go to the start
of the composition, select the rock, and I'm going to hit the archy for rotation. We basically get two options,
orientation and rotation. Orientation can only go up to 360 degrees so one
rotation in total for each axis. And the other rotation
properties are for each axis, but they can take multiple laps. So where it says zero X, it just basically means it
has done one full rotation. So if I were to increase X rotation all the
way to 360 degrees, which is one complete rotation. You can see here how
that zero becomes one X. All right let's find out where the vertical rotation
is, which is this one. And let's create a
keyframes for that. Let's go to the end of the clip and then move that
around like this, a couple of turns,
like this, maybe. And I'm doing it in the
direction of her fingers. So if I play this back now,
you can kind of see here. How that looks pretty awesome. We might also want to make it drift a bit on some ter angle. Let's take the rotation, but just like a
tiny bit, make it, like, floaty, like so. Doesn't have to be much,
but that looks pretty cool. And you can see here
how that rock, kind of, like, moves up and
down, be very floaty. That would never work
if you want to place that rock on a specific
spot in the scene. But having this float
above her hand, nobody will notice that the camera tracking was
absolutely not accurate. Alright, guys, we're getting
there. We're getting there. Let's take this a step further because if we take a
look at the scene, there are a whole bunch of
extra things that we can do, such as the lighting. If we take a look at the model, we have a shadow here
on her right side, on her back, and so that indicates that the sun is
coming here from the left side. If we take a look at the rock, the lighting is
coming from above because we have the shadow
here on the bottom. So I kind of want to move the
virtual lighting as well. That's going to be
very easy. We just have to add a light
to the timeline. Right click, go to New. We have seen this menu before, and you'll also find
a light in there. Clicking on it is going
to ask you, Okay, what type of light
would you like to create a spotlight
or something else? Well, in our case,
we're going to pick the environment light
because we are outdoors. We get a few more options,
but we can change those as well later on in the
properties of the light. So let's just hit Okay, and
it is added to the timeline. But definitely try and play around with these
different types of lights. They all work a bit different. They all have some
different properties. So if you're really into T D and After Effects, explore them. Light options, there are a few things that
are very important that we got to enable and
that are the cast shadows. It's currently set to off. So let's enable that,
set that to on. And next up, we want
to move the lighting. So let's go over to the
transform properties. And let's change
the rotation here. You can see here on the rock
very well what that does. Maybe let me make a
bit more space and zoom in on that rock so
that you can see it. And doing that allows me to add that shadow more to the
back of the rock as well, just like we have
here with the talent. And furthermore, you can play around with the intensity of that light to really make that rock match with your scene. Like yeah, this is already
looking a whole lot better. And by the way, this light
also works on treaty text or any other treaty object that you add into your composition. We're almost there. There's one last thing
that I want to do. It's almost looking realistic, and that is adding
some motion blur. Now, because we
are in a different renderer of the composition, we cannot add motion blur. We've seen that in
the previous lesson. So if I were to enable motion blur for the rock,
like, nothing happens. So we got to use the
force motion blur. Let's go to the Effects
and Presets window. I'm going to search for
the force motion blur. And when I try to drag
that now onto my rock, you'll see that I can that is because the
force motion blur, unfortunately, only
works on two D objects, and it's not on tree D objects. But don't worry, there's going
to be a workaround again. And these are techniques
you're going to use all the time and After
Effects, workarounds. If you want these tree
D objects to be, again, two D so that we can add
the motion blur to it, all we got to do is just
simply group them together. Now, we can't just precompose
the rock because it needs the light and it
needs the tre D camera. But what it doesn't need is the clip because the clip
is just two dimensional. The video itself has nothing
to do with the tree D. So we can group all these three D objects together,
select all of them. Right click, go
over to precompose. Let's call this precompose rock. And we're going to say,
move all the attributes into the new composition,
and then hit Okay. So now everything has
been grouped into a new composition, and
if I open that up, we can see everything
in there that we've just created and our rock being
floaty and rotating. Let's go back to clip
number two composition. Let's take the
force motion blur, and now we can apply it
to that entire group. And immediately here you can see how that applies the
motion blur to the. Let's play this back and enjoy the beautiful visual effects
that we just created. We've got ourselves a
real Earths bender. So what we learned, null objects and precomps always get
you out of trouble. Now, we've almost reached
the end of this class. There's one last thing to do, and that is obviously
export your video because with all
of this beautiful motion graphics and via Vx, we want to show
that to the world, and so that means
we're going to have to export our creation out of After Effects as a
video file that we can share. But that is obviously
for the next lesson.
21. Export your Video: You have just created a beautiful VVC shot
in After Effects, and now it's time to share that video with your
family and friends. So to take this video here
out of After Effects, we got to go to the
window menu on top and locate another
panel, as we always do. And we got to look
for the render queue, which is all the way
here on the bottom. And here we can add the compositions that
we want to export. But there's also a
short key to do that. We can even close that window. Just stand in the timeline of the video that
you want to export and hit the control
key on your keyboard. That will open up the
Render Queue window and add your
composition in there. But since it's a, yes, that means that we can add
multiple compositions in here. Let's take the rock, for
instance, here, this pre comp. We can just drag that
in there as well, and it will also be rendered. So if you have a ton of clips, you can let them render and go drink a coffee
or take a walk. But for now, let's only
focus on clip number two, that composition,
only one to render. And we get three
different settings here. We get the render settings, which is certainly
set to best settings. Then we get the output module, which is the format that
you want to render to. And finally, where you
would like to save it. And you can already set that. Click on Not Yet specify inside my After Effects for beginners folder, and we can
give that a name. Awesome rock via Vx
and then hit safe. So we got the location
set. That is good. But what kind of format
are we exporting to? Well, first of all, we got to look at the render settings. Open up that drop down menu, and you can see a
few options in here. Now, 99% of the time, you're going to go for
best settings, obviously. How your video is
going to be rendered. This has nothing to do yet
with the format of the video. Either you're going to
go for best settings, which is in most
cases, what you want, or you can go for draft settings if you just really
want to export your video as fast as possible so that you can have a
preview for yourself, but that's never going to
be used as an end product. So let's keep that
to best settings. But then, what kind of format
do you want to export to? You can again open
up the dropdown menu to choose between a
whole bunch of presets, but I also want to show
you the custom settings. You can do that by
just clicking here on the blue text of the current
format that has been. Don't want to overwhelm you with a whole bunch of
format settings, but there are two very
important formats that you do have to know about. And the first one is the H 264. It's already set
here in the format. You can find it in
the drop down menu. This is basically a
compressed video type, and you're going
to use that format to have your video
shared online, on YouTube, on social media, or even on a USBSick and give it physically to your friends and family to then open
up on their computer. It's a format to share. Here we want to click
on Format Options. And there is one setting in the format options that
I'm interested in, so you can ignore everything, but here, the target bitrates. This will define the
quality of your video, and the lower the quality, the smaller the file sizes. Other times, you don't really
care about the file size, so you can just pump that up, have better quality, but also end up with a bigger file size. As a rule of thumb,
around ten to 15 megabits per seconds is
oftentimes enough. You're going to see a few
compression artifacts, but you're going to end up
with a small file size. This will be on the lower end, but it's absolutely fine. Then if we go to 20 to 25, this is a higher quality. You're going to see
less artifacts, but you're also going to end
up with a bigger file size. Eventually, you're entering
the realm of, let's say, 35, 40, that point, you really don't care about
the file size anymore. You just want the highest
possible quality. So that's to give you some
idea about the target bitrate. But again, just
explore that yourself, try a few exports with
different bit rates. See how it ends up
is the file size or the quality good enough
or not enough for you. Alright, I'm going
to hit Okay because there's a second format
that I'd like to explore. Let's go back to the drop
down menu here on top. And instead of H 264, I'm going to Quick Time. And then let's go to
the format options for QuickTime because
there are a bunch of different codecs
that we can choose. But the only one that I'm
actually interested in is that Apple ProRes 422. So what's the difference
between this and the H 264? Well, the H 264 is
heavily compressed. It's trying to
make the file size as small as possible while still retaining a high
enough quality so you can share it online
with your friends. The ProRes Kodak is very
lightly compressed. That means you're
going to end up with a very high file size. But the quality
will be very good. So why do you want to
pick the PRS file, then? Well, this is considered
an intermediate Kodak. Don't worry too much
about that word. All it means is that you're not going to use this video
as an end product. You're going to use it
to further work on. So you're going to
export it out of After Effects and then import that again inside Premiere
or Final Cut or DaVinci, where you are going to
do color correction on or you're going to
further edit your video. A PRS video, even
though much bigger in file size will play back much smoother inside your
video editing software as with an H 264 Kodak, which is smaller it is
heavily compressed, so your video editing software
has trouble playing that back and doing further color
correction or editing on it. So those are the only two
formats you got to know. Are you going to
deliver it or are you further going to work on it in your video editing software? And that's all there is to
it. So let's select one. Let's go for the Apple ProRes. I might want to do some more
color correction on it. Hit Okay, and then just hit
Render and wait it out. It's already done. It makes
that beautiful playing sound, and now I can find it back here. Awesome rock via Vx inside my folder After
Effects for beginners. And I can play it
back from there. Look at it.
Beautiful. Let's play that again because it
looks really cool. And that's pretty much it. Now, I would like to
congratulate you, but I'm not going to
do that just yet. I want to see you
in the next lesson as well, the conclusion lesson, because in there,
I'm going to share a few exercises and
congratulate you. But that's for the next lesson.
22. Conclusion: Hey, congratulations. I am so excited that
you've sit through the entire Adobe After Effects class. This
is really something. You can be very
proud of yourself, give yourself a tap
on the shoulder. Now, you have learned a ton of new information about
this wonderful program, so it takes some time to process
all of that information. It takes years to really
master After Effects. So don't expect things to go
smooth in a couple of weeks. You got to practice,
and that starts with a great exercise
that I have for you. What I would like to
see is a video where you implement tree
techniques from this class. Start the video with
an intro animation, create a fun motion graphic
with some text and graphics, create some smooth animations, remember those smooth keyframes, and then show a clip
where you have done some sort of a keying
or masking technique. Either use the mask with
an animation on that, use a rotoscope or a luma key or maybe even a green key if you have that laying
around at home. And then finally end the video with some sort of a TD shot. You know, either place
a text into your s through a treaty camera
tracking or maybe at a treaty text where
you extrude it or maybe even an
actual treaty object. You can use the rock that
I provide or you can also download another treaty model or maybe scan it
using your phone. That's up to you
create something fun and enjoy while
you're doing so. And remember, in the future, while you are working on
some sort of a project, you can always come
back to this class and rewatch some specific lessons about what you want to make. After effect is a journey, and you got to
enjoy that journey. I'm always super excited when I see new features coming
to After Effects, then I can learn some new things and create new things as well. So go at create and
show your creation the world. And like I
always say, stay creative.