Transcripts
1. Introduction: [MUSIC] Hi, you must be
the new students. Welcome to my class. I'm Jordy, the supervisor engineer of the Unreal Engine 5. Pretty cool. That's
right behind me. Now, what should you guys
probably know me from YouTube, where we have a channel
called Cinecom and where we host tutorial
videos about Via VIX, film-making, all that
kind of juicy stuff to an audience of more than
two million subscribers. For the past year,
I've been using Unreal Engine as a tool
for my creative work, not to make games which actually the engine is traded
for in the first place. In the recent years we've seen more and more functionality coming to the Unreal
Engine that is great for us content
creators for Via VIX artists, for filmmakers. That is why I decided to make this Unreal Engine 5 class for beginners and explore some of the virtual production tools. Now by the end of this class
you'll be able to create beautiful outdoor landscapes and get complete control
over the atmosphere, the sunlight, and treat
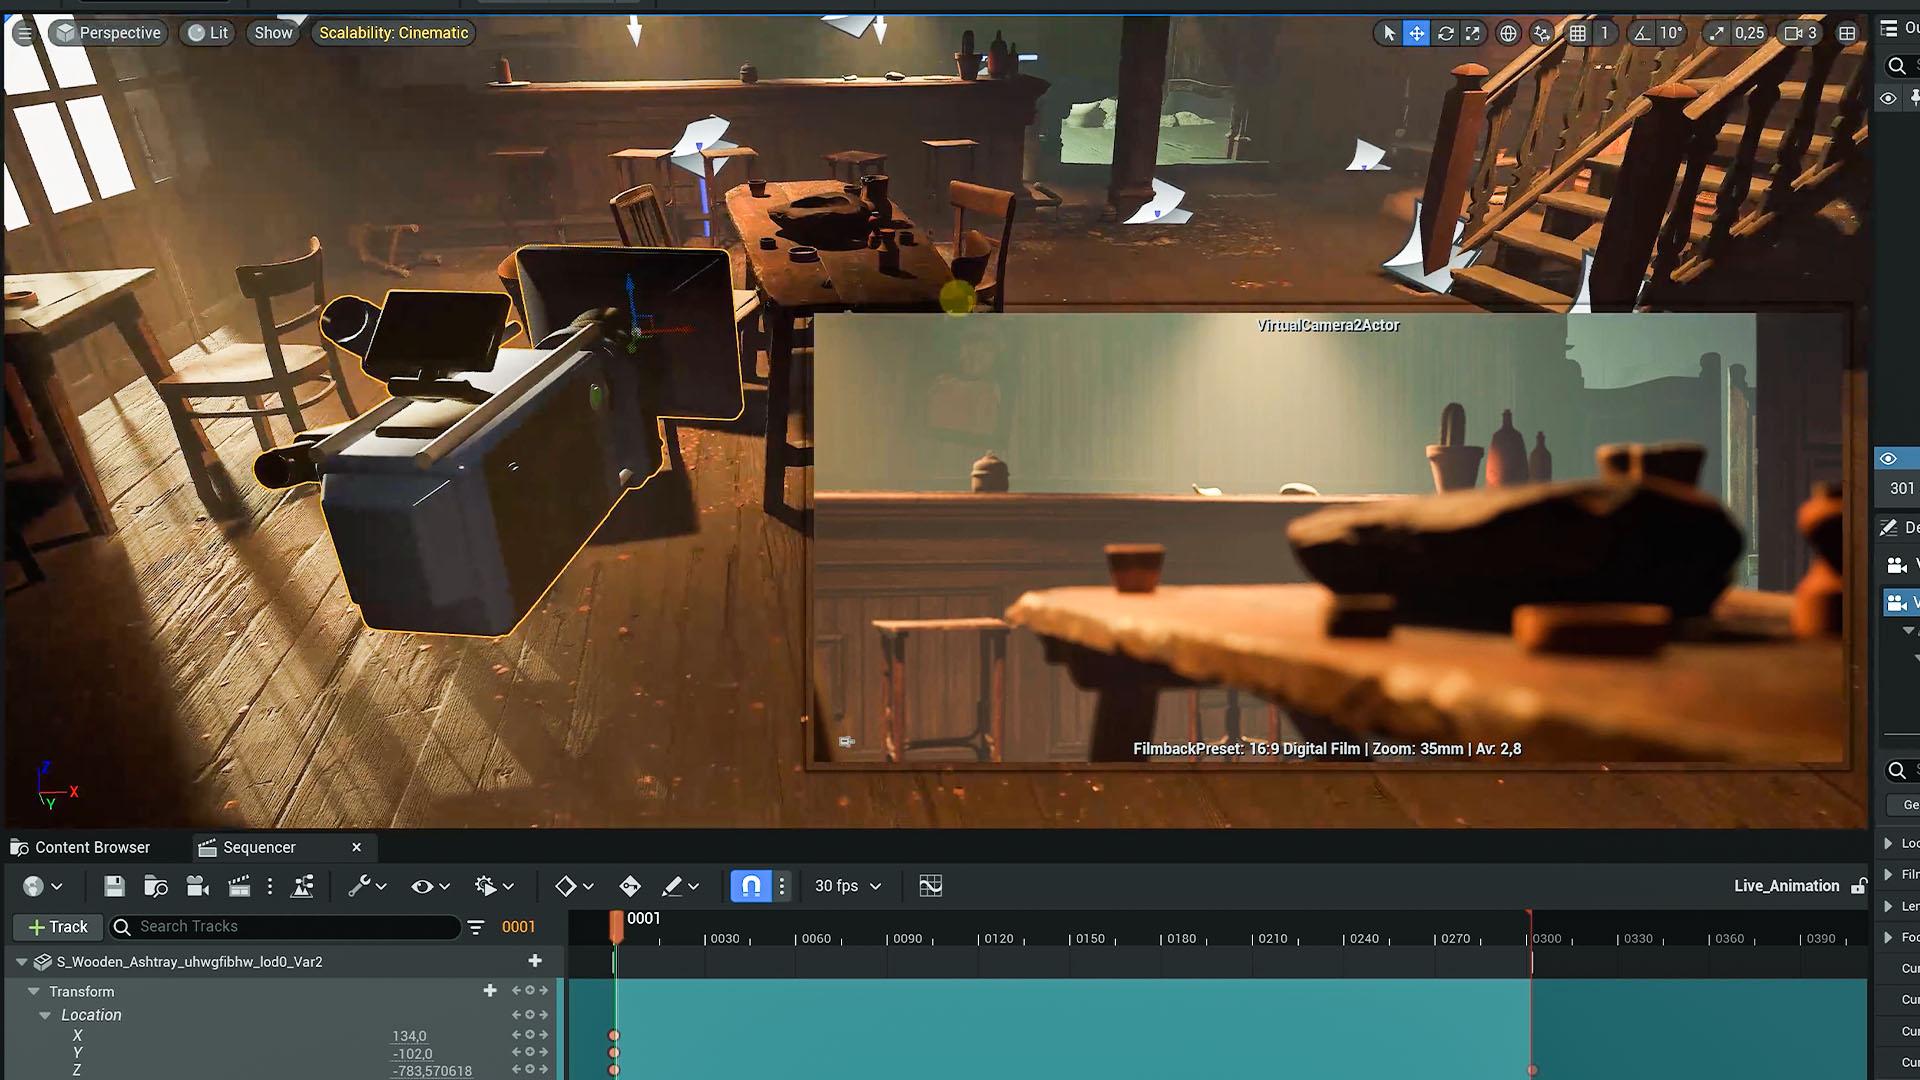
stunning beautiful shots. We're going to create an
entire interior scene as well. Set up interior lighting, create a certain mood instead of different virtual cameras, which we're going to
animate into a movie. Towards the last
lesson of this class, we're going to do live kinking. We're going to control
the virtual camera using a motion tracker and more
specific, our iPhone. We're even going
to explore some of the DMX functions where we can control literally the
lights in the real world, but also inside
the Unreal Engine. Now, I am super excited to teach you the world of Unreal Engine in this
begin of the class. It's going to be
fun and interactive , but most importantly, you are going to learn so many new things about
this beautiful program. Put on your safety helmet
and follow me into the most wonderful begin of the class for Unreal Engine 5. Come on. [MUSIC]
2. The User Interface: [NOISE] Hey guys, you've
made it to the class. Welcome. The biggest misconception
that people have about Unreal Engine is that
they think it's a program, a piece of software. Look around, you guys. Welcome in Unreal Engine 5. As you can see, this
is not a software, this is a machine. I'm the quality
assurance supervisor. I have to make sure
that the agent keeps running and there's no meltdown. I know every button, every wire, every dial, and that is why I'm here
to teach you how you can get started with
Unreal Engine 5 as well. Without further ado guys, let's put on [NOISE] your
helmet so that we're safe [NOISE] and let's dive
into Unreal Engine. Unreal Engine can
be found within the Epic Games
Launcher right here, then go over to a Library. From there we can
install different versions of Unreal Engine. We are going to work in
5, which is the latest. From there, we can
hit "Launch" to open up Unreal Engine 5. Now you'll be prompted to start a new project, which is obvious. We've got a few options
here on the left side, we can start a new project. You create a game to do
something with film and video, which is for us because this class is
focused at those who want to use Unreal Engine for virtual production film-making, or to make 3D
animations and such. You might be wondering what's
the difference between a blank project for
film and for games? Well, there are so many
options within Unreal Engine. Just look at behind me, way too many stuff. That is why a blank project for games will have
certain options and features enabled that are disabled for film and
the other way around. For that reason you want
to make sure to start a new blank project
for film and video. On the right side here,
you'll see Starter Content. You want to make
sure to enable that. Basically, what's that
going to do is just import a bunch of stuff that we
can just play around with, like 3D models and such, that we have something to work
with, to experiment with. Right here, we can choose
where to save the project and I'll just save it on my desktop
and to give that a name. Let's call this one Unreal
Engine class and hit "Create." Now it's a waiting game guys. The first time you're going
to open up a new project, it's going to take a time
to compile all the shaders, but that's only going to be the first time that you're
opening up a new project. I'm going to grab a coffee, I'll be right back. [MUSIC] One eternity later. It's open. [LAUGHTER] We can get started now
with Unreal Engine. Don't worry guys, this is only the first time that
you'll open up a project. Let me just take off
that stupid helmet. The way that you navigate inside Unreal Engine is
like you play a game. You hold down your right
mouse button and then you use the WASD keys to move
around like this, like you're playing a game. Now if you don't like that, you can always go
up to the menu, click "Edit" and then
choose Editor Preferences. From there, you'll find here on the left-hand somewhere
keyboard shortcuts, and from there you can change all the shortcuts
to your likings. Now if you've never
really played games before then this might be very weird to control
your 3D environment. Well, you can also
just use your mouse. With the scroll wheel, you can zoom in and out, with the right mouse button
you can look around, and with the left mouse button
you can move forward and backwards although I don't
find that really convenient. Now here on the right side, we can find two very
important panels, the Outliner and
the Details panel. The outliner can be seen as your layers in Photoshop
or an After Effects. You already have a bunch
of options in here like the Floor and
if we select that, we currently have here the
Floor selected in our worlds. On the bottom then,
you can see that the Details panel has become
active and the Details panel shows all of the options that the Floor layer has
such as locations. We can change that. We can change the
rotation and all. We can change the
scale and everything. These are basic properties that you should be familiar with if you've already
worked in programs like Premiere or
something like that. To undo any action
just like any program, Control Z will undo everything or we can also find here
on the right-hand side the reset button
for that program to bring it back to its
default settings. Now not every layer is an actual physical
or digital objects. It could also be something like a light source, as you
can see right here. We also have a skylight. All of these things, well,
they're exactly doable. We'll get into that
later in this class. Now here on the bottom you
can find the Content Drawer. We can click on it or we
can also hit "Control Space" to hide that or
to bring it back open. If you don't like
it that this pedal hides itself
automatically each time. You can also say here on the
right side doc and layout, and then it will stay
there permanently. Now, what is the
Content Browser? Well, here you collect all of the assets that you're
going to work with. Every 3D model that
you're going to import will be important here. It doesn't mean per se that you have to use it in your world. You can see it as
your project's panel in Premiere or in After Effects. You just collect
everything in here. We can find back here the
Starter Content folder. This was imported as we check that box when we
created the project. If we double-click on it, we can find a bunch of stuff. Like if we scroll down here, we should find somewhere Props. If we open that up, you can find a
bunch of 3D models. We have things like chairs, we've got a bench right here. We should also have a
table somewhere right there and to insert
them into our world, we simply have to drag them. We take the chair and we just
drag that into the scene. It's going to take
a little time to also render the textures, the materials and all. Once that is done, you can see your chair here in the world. Now if for some reason
you've been dragging around these panels like this and then you maybe you've
closed a few things, I don't know what, and you don't know what's going on
anymore and you're like, "What happened to
my Unreal Engine?" Well, no worries. You can always go here on top to Window. From the bottom here, say Load Layout and then click "Default Editor Layout" and that will just reset
everything back, so don't worry too
much about that. You can also of course, create your own
custom layout and you can then go back
to Window on top. You can save that layout
as a new presets. Let's focus on that chair right now because it
looks so beautiful. We can select that chair. As we do that automatically, the layer itself will be
selected in the outliner. We've seen that we can
change location and all through these
options down here, but that is not so convenient. You want to use the
tools, the widgets. You can see here, this little access widget as we select it, which allows us to move
it around on the x, y, and z-axis, which is
going to be more precise. We can also rotate it, and for that we take the
Rotate tool here on top. Select that and you can now see it that the widget changes. We can rotate that chair around. Finally, we've got a
scale option as well. From here, we can scale it in the z-axis and everything
or we can also take the middle block
which will select all of these axes to make
a uniform scaling. Now I would highly
suggest to set short keys freeze options as
you'll be using these a lot. I had these sets so I can very quickly move around between
these different options. You notice that your model
is snapping to a grid. Well, that are the options
here to the right. We've got a position grid, we've got a rotation
grid and a scaling grid. We can choose how big
that grid needs to be. For example, we can
set that to 50. Now if I'm going to
move this object, you will see that it will
snap in way bigger steps. We can make those steps
smaller again by clicking on a 50 now and sending it to
one which is very small. Now we will snap to
a very small grid or we can also make it float so that it doesn't snap by disabling this grid
option right here. Now you can see that we
can freely move that chair around without it being
snapped to any grids. That is the same thing for
the rotation and the scaling. You can play around
with these options. [NOISE] We've got a
chair, what's next? Well, we can
duplicate this chair. I'm going to zoom
out a little bit. We can copy and paste that but there's an easier way to
do that and that is simply by holding down the Alt key on your keyboard as you
reposition that chair. Look at that, we have just made a duplication of
it. It's that easy. What I want you guys to do
now is go and practice this. Move around some chairs, make some duplications, re-scale them, re-rotate them. Just make a nice and cozy scene with a table or
some chairs around. Practice that well,
and then I'll see you guys back
in the next lesson. Thanks for watching. [NOISE]
3. Materials and Lights: [NOISE] Oh, you're back. Good. I hope you practiced well because we're going to go to
the next level right now. So what I have done right
here is added two chairs. I added a round table with
this little art piece onto it. So what I want to do next, is create a wall right here, but there is no wall in
the starter content, so we're going to make
that from scratch. Well, here on the
top right here, we can click on this
new item button or to add something to the
project and from there, we can choose shapes. There are a few
options like a cube, a sphere, a cylinder, a cone, or a plane. I'm going to pick a
cube and just drag that into the scene like that, and like we've seen before
we can reposition that. I'm going to take my
scaling option to make that wall a little bit thinner
and to stretch it out, to actually make a wall of that. This is all done
using a scale tool, the position tool, and all
to bring that into place. There we go. We've got a wall. Now I'm bothered
a little bit with this thing right here that
is sticking out on my wall. Well, that is a widgets. This is great things right
here which you talked about before a little bit
they are called widgets. We can hide them for a
quick mode by pressing the "G" key on our keyboards,
then they're gone. But if we press G again
and then are like back. If you think that
they are in the way, you can always move them around. So just select them and just
move them out of the way. It doesn't matter
where they are. It really doesn't matter. They just need to be in
your scene somewhere. Just move them out, be gone. We've got our wall. I want to add like a different texture to it because right now it's just white,
pretty boring. So I'm going to go over
[NOISE] to my content drawer and from here my
starter content, we can also go through our folders here on the left
side through this panel, and I want to look for
materials because in Unreal Engine we don't
really talk about textures we talk
about materials. Materials are built
from textures. We can mix different textures together to create
a new material. We can give different properties
to materials and such. That is why we always talk about materials and use materials and Unreal Engine to give a
texture to an object. We have a few things
right in here. For example, this brick texture, let me just use that. A brick wall why not, drag that to the wall [NOISE] and "better bing better
boom" after it's loaded, we have a brick
wall. Look at that. Now let's add a light
onto that wall. So I'm going to go back
[NOISE] to my cotton drawer, and I'm going to look for
props again because there should be this wall
light right here. We can just drag that onto the
wall as well. There we go. I think it's behind
door in my wall, so let's reposition
that is right there [NOISE] and we're going
to have to rotate that. So let's rotate it at
arounds 180 degrees, and let's bring that
nicely against the wall. Now you can see here
that my light isn't really aligning well to my wall. For that we're going to have to disable the position grids so we can find [inaudible]
that a bit more so that sticks nicely to
that wall like this. Now, currently there's
no illumination coming off from that light, it's just a light
fixture for now. So like you've seen before, we're going to go back to
the arts button here on top, and this time go over to lights, and from here we can add
a light into the scene. I'm going to pick
a point lights and just drag that into
the scene like that, and you can see that a
light is also a widgets. This time you don't
want to drag that away because as you can see, this widget is actually
giving illumination. So I'm going to
position that widget into the lights like
this and automatically, you will see that it will also cast the correct
shadows and all, which is really nice. Now like we've seen before
with that light selected here, we can go over to
the Details panel and change some options from it. For example, we can
change the light color. Maybe that is not a white
light but a yellow light. I don't know, or
like a blue light which I have right here
in my backgrounds. We can change the intensity, maybe it's a much brighter
lights and we have so much more other options here to change the look
of that white. Like all those options can be changed right here in
the Details panel. It's as simple as that. I'm not going to go through
all of these details, just experiment
with that yourself. It's a light. What
can you change about a light color intensity? Radio cone, all that stuff. We'll dive deeper
into this when we are going to build an
indoor scene later on. Alright, the volume has
gone to the first lesson. [NOISE] This is a long one guys, but you've also learned
alternately with things like you've learned
the entire basics, the foundation of
this program already. Now it's important to organize. Right here is our outliner
which you've seen before, and it just a mess right now. So what I'm going to do
here is select my chair, my wall, my statue
which is on the table, and then the table itself. With all of them selected, I can hit right here on
create a new folder. It will automatically put
everything in that folder. I'm going to call this
[NOISE] the models and we can collapse or
expand that folder. We'll set these
widgets here like the atmospheric fog,
the light source, the sky sphere, the skylight, the sphere reflection, capture things that we
don't know what it is yet. But let's just put that
into a folder and call that [NOISE] stuff because
we don't know what it is ye. Then we've got a
floor and a cube. Perhaps rename that cube to wall and floor can stay
floor. That is good. Now these two things right here, I'll also put in a folder, and I'll call that structure [NOISE] because they are
part of the structure. So we've got one last thing
here which is a point light. Now this is actually part
of my light fixture, like is there a way to
make that together? Well yes there is guys. If we go back to our
models and look for that lamp right
here on the wall, we can drag that point
light into that wall. Now you can see
that it's part of that lights or at fixture. So if we take that fixture
now and move that around, you will see that
my light widgets or the point light
will move as well. The one last thing
I want to talk about is while you're
building out these scenes, is that maybe you would have
a different perspective, because right now we are in
a 3D environment weekend. We move around, and by the
way guys if you hold down your right mouse button and then scroll backwards or forwards, you can change the speed of what you're moving around
width while that's fast. Anyways, we're right here on the top-left you can
choose perspective, and from there we can
choose a top view. That gives you a wireframe of the top view and
sometimes you know, that's easier to move around
like this chair if you want it to be exactly somewhere right here or there, you can do that. By the way if you don't
like that wireframe, you can always change
that here on top. Select wireframe and then choose "lit" and that will bring back to normal scene or how it actually looks from
that same top view. You can also go
back from here to top and then change
that to bottom. Do have like a bottom view, we can also have a left view, a right view, front view, back view, I think that
is pretty obvious guys. Let's change it back
to perspective. We've seen here the
lit option on top, which will show like how the
scene looks with a light. We've got a sunlight
somewhere right there, and it's also casting shadows. But sometimes while you're
building these things, you don't really like that. You can change that
from lit to unlit. Now everything looks
very flat again, which might be easier to
work with eventually, you can always set
it back to lit. One final thing guys, I'm working on a
pretty fast beast of a computer right here. Everything goes super smooth. If your computer
already has trouble, well then it's best you check the scalability
option right here. If you click on it, it's
currently set to cinematic, which is the highest
option of all, what we can also
bring that down to epic high or even all
the way down to low. You can see that the
quality isn't really good, but that doesn't matter. It's much easier to
work in right now. But that is in a nutshell how to navigate around in
Unreal Engine and how the panels and everything
works and the different options. This is the basis. You can now start
using Unreal Engine, and the next lesson
we're going to continue with
creating a landscape.
4. Create an Atmospher: The engine is running smooth. That is good because
we are moving forward to something
more advanced. We're going to
create a landscape. Let me take my hat
off to get serious. I'm going to open up
my content browser because I want to
create a new level. By default, you'll
have a main level, which is the one that we've
just been working in. You can see this as
a composition from After Effects or a
sequence from Premier. That means that we can create
multiple levels as well. Just right-click to do that, and from there you'll see level. We can also click here on the
Add button on the top left, and then choose Level. Let's call this lesson four as it's lesson 4
that we're working on. You can actually also download this entire project
to follow along, so that is why a call like that. Let's open up lesson
4, the new level. Straightaway it's
going to ask you to save that. Let's do that. We've got a completely
empty level right now you can see here in the outliner that
there's nothing in there and the viewport is
also completely black. We're going to have to create
a new atmosphere first, and that means a sun, the actual atmosphere and all, so we have an outdoor, a natural outdoor lighting. Let's create that. There are
three things that we need. The first one is if
you go here to Add new item to the project
to that button, we're going to start by
going over to Lights, and from there choose
Directional Light. Now, the directional
light can be used as a normal directional
light like this one right here or you can also
use it as a sunlight. Now, to use it as a sunlight, we actually need to
enable an option from it. With that layer selected
here in the Details panel, you want to make sure
that atmosphere, if I can find it
somewhere right here, Atmosphere Sun Light is enabled. By default, it will actually be enabled so we don't
need to do anything. Next step, let's go back to that Add New button
right here and under Visual Effects, choose
Sky Atmosphere. Click on that and we've got a sky atmosphere
and already we have that low golden
hour, really cool. One last thing that
we want to add, go back up here and choose
under Lights, Sky Light. Basically, this is
the reflection light coming off from the
atmosphere or from the sky. Now we can't really see it yet or what it's
actually doing that is because we don't really
have an object where we can see the lighting appear on. Go to Create here on top. From Shapes add a new
plane to have a floor, seems to be right here. Let's scale it up a little bit to make that floor bigger, and then go back
up here to create a new cube and place
that in there as well. Move that up perhaps,
there we go. It's right there, the cube. Move that into place. We now have a cube on a plane, and that way we can see what the shadows
and everything do. Now, if you hold down
Control and then press L, we can see here what the
sunlight is doing and how it's casting its
shadow on that cube. At the same time there we can see in the atmosphere as well, if we move that sun down, you can see it there,
there is the sun. If you move it down, we can see how the atmosphere
is reacting onto that, and we get that golden hour, very awesome and very cool. There's one thing that
isn't really working yet and that is the skylight
here in our outliner. It's not really casting light from the
atmosphere just yet. That is because we
need to enable here at the bottom that it
should work real-time. The option is right
here, real-time capture, enabling that you can instantly see what that does
to your shadow. It's getting lifted because of the reflection or the skylight. That is the basis
that is looking good. There are two more
extra elements to make your atmosphere look
really realistic. You don't need those, but it's highly recommended that you do. Go back up to that menu
to add a new item, we're going to go over to
Visual Effects and from there choose Volumetric Clouds. Adding that will add
clouds to your atmosphere. Maybe you don't want that, but if you do, there
is the option. One last thing, go back
up here and choose under Visual effects,
Exponential Height Fog. Adding that to the
scene will drastically change it and will make
it look really good. This will add a natural fog to your scene, giving
off reflections. Now let's put all
of those layers or actually I should say
actors because they are referred to as actors inside Unreal Engine into a folder.
I'm going to select them. You can hold down
your Control key to select multiple
actors and then hit that folder to put that
into the atmosphere folder. There we go. Now there are
a few things that we can change within our atmosphere. Right now it looks natural
as it is on Earth, but as you know, I'm not normal, so let's make this
not normal as well. The first thing happens
in your sky atmosphere. This is actually trying to reproduce an actual atmosphere. You also have some
options in here. If you go over to
the Details panel, such as the Mie scattering, which are the particles in the atmosphere we change that, you can see what that does. It will scatter
more light around. We also can move up the
atmosphere, the height of that, is the atmosphere high
up in the sky or is it more down below
close to the ground? We can all change that. You see here what that
does to your scene. Your whole light reflection is starting to become
way different. We can also even
choose the roundness of Earth or maybe it's
a different planet. It's right here,
the ground radius. If we decrease that, you can see here in the
distance what that does. We're standing on
a smaller globe, which is really cool. We have some more
options for the Mie or the particles here, such as the absorption scale, like how much of
the light is being absorbed by these particles. Finally, we've got the
general absorption scale of the atmosphere itself. You can also increase that, and you can see here
what that does, again, to our scene. You can really create this alien planet if you like so by changing all
of these settings. Before I asked you
to play around with a chair and a table
in-between two lessons. I want you to do the exact
same thing right here as well after you start
the next lesson, play around with
the sky atmosphere, with the fog and everything, and see what you can create. Is there some cool planets, cool look that you can create
by changing these settings? But before you do that, let's first have a look
at some other settings. We also have the
exponential height fog. Something very important in here that you want to enable, and that is to enable
volumetric fog. Right now, it's 2D, I would say, but we can make that
more 3D or more volumetric by enabling
this option right here. This way, your sun will actually interact much better
with the fog. Of course, we have
some default options like the fog density. Do you want to make
it more foggy? What's the height of
the fog and everything? What's the opacity of the fog? We can also bring
that up or down. We can, of course, change the color of the
fog and everything. Definitely try to
play around with these options, really cool. Lastly, the same thing
goes with the clouds. We can change a few options to make our clouds appear
a little bit different. How high are those clouds? We can bring them down,
put them really low, bring them higher up. Again, play around
with these settings. Now, this was a
lot of work, guys. If we have to do this for every single new
level that we create, we're going to lose
a lot of time. I want to create a
preset off from this. Now you might be wondering, Jordi, why should I do that? If I create a new blank project, I also have an atmosphere. Why should I create my own one? Well, let me open up
the previous map. Yes, I'll save the current one. Back here with the
chair, and a table, and everything, we also
have these clouds up here. Let me just locate
my sun, there it is. When I'm going to press Control
L to move my sun around, it's actually not
going to do that. That is because
the default scene is driven by a blueprint. We'll talk about
that in a moment. You can see here in our
outliner that the sky sphere, I'm going to disable that, which are the clouds, is actually driven not by the clouds which
we added in there, but by a blueprint. Something that Unreal
Engine has created itself. That's definitely
an AI or something. I'm not sure yet. If we
open up that blueprint, we can actually do that. Let me just say, make that panel a
little bit bigger here, Edit BP Sky Sphere, we can click on that
here on the right side. We're just going to
open up the blueprint, and we can see here how
the blueprint is made up. We can see these different
nodes and this here is the programming language
within Unreal Engine, which are the blueprints. Now this is pretty
advanced, guys, so I'm not going to bother you
too much with all of this, but basically this
is going to give functionality to your scene, is going to automate
certain things, things that you can control
through these blueprints. That is very cool, but maybe for a different class, for now, we're not going to bother blueprint because we
don't need that yet. Let me just close that back, open up my content
drawer and open up my lesson 4 level again. Yes, let me just save that,
doesn't really matter. We've put a lot of
work into this. Can we save this as a preset
to use in other levels? Well, yes, we can. But in order to do that, we are going to have
to create a blueprint. No worries, guys. We're not actually
go to program stuff. We're just going to
use the blueprint as a file or a folder, a preset thing where
we can put all of our layers or actors that
make up the atmosphere in. That way we got to preset. To do that, we're going to open up the content drawer again. We're going to right-click
and choose Blueprint Class. That way we're going to
create a new blueprint, and we're going to choose
Actor because it has to be something that we can place
in our scene, an actor. Click on that, it will
create a new blueprint. Let's give that a name
custom atmosphere. There we go, and open that up by double-clicking onto it. There we go. It's
an empty blueprint. You can see here
on the tabs that we don't have any notes. There are some starting notes
but they're not being used. Actually let me just
make that window a little bit tinier like that. What we can do now
is simply select all the layers or actors
that make up my atmosphere. Hit Control C to copy them, go to my blueprint, and here on the left side
where it says components, this here is actually the
outliner for the blueprint. We can just go ahead and paste
them in here. There we go. You can see here in
the blueprint itself, we can also see our clouds in the
atmosphere and everything. That is good. We
can go ahead and save that blueprint right here. Hit the Save button,
close that window. We could go ahead now
and just remove all of these layers. Hit Delete. We don't need that
atmosphere folder either. Open up the content drawer, and simply dragging that entire blueprint
into the scene, and everything is back. Hitting Control L we could
still move our sun around. Everything is working
nicely and everything sits now inside of that
blueprint. That is great. Everything is working
as it should. If we go now over to
our custom atmosphere, just select that layer. You can see that we have
everything in there as well. Here's the sky
atmosphere, the skylight, the clouds, the fog, and the directional light. We can select them individually and then change any
settings from it. If we select the sky atmosphere, you can change the
settings of that here in the Details panel. It's nice now to just have that one file which
we can reuse. Here's the cool thing,
guys, I'm going to minimize Unreal Engine for a moment and locate my
project here on my desktop. You will find back the
same [inaudible] key that we had inside Unreal
Engine as well. Here is the content folder, and in there we have our
lesson 4 map and everything, but also our custom atmosphere. Even if you create new projects, you don't have to
create new levels, you can create new projects, you could go ahead and
just copy this file right here into your
new project file, and automatically
your custom blueprint will appear in there, and you can just reuse
that as a preset. After making such an atmosphere, you're putting pressure
on the engine. I'm going to clean up
a little bit here, and I'll see you guys
back in the next lesson when you're going to create
an actual landscape. [NOISE]
5. Create a Landscape: It is time to create that landscape that we've
been talking about. Let's hop back into
Unreal Engine, I mean, the software, not the
actual engine, of course. I'm going to start here
within my content browser. Let's first clean this up a little bit because we've got some things
going on in here. I'm going to right-click and simply say here on
top new folder. Let's give that a
name, call it levels. [NOISE] I'm going to drag in here all my levels here
that I created prior. As you drag it into
a new folder it will ask to move it there,
to copy it there. We're just going to
move it all in there, yes I want to do that. As we're making these changes
here inside Unreal Engine, when I go back here
to my desktop, you'll actually see in my project folder contents that you can find here
a folder called levels, and in there you can see the levels that I've
just dragged in there. Those two are always in sync. Let's create a new level
right now and call that one Lesson 5. I'm going to open it up. Yes, save everything. As we know, this is
now an empty level but we can drag in
our blueprint in here to bring back the atmosphere and
the sunlight and all. There we go. We can
change the sun, which control L to
reposition that, look at it. Now to create a landscape, we actually have to change our interface a little
bit, change the mode. We can find that option back
here on top, select mode. From that drop-down menu, we are currently in
the select mode, which is the normal interface to move around objects
to build a world. But we also have a
landscape mode right here. We're going to click on that. You can see that our interface is going to change a little bit. We get a new panel on the left, but also we get this
grit in our worlds, which is going to represent the landscape size that
we're going to create. From that panel here
on the left side, we can choose how big that
landscape needs to be. We've got a few presets here, like we can make that a whole
time bigger as you can see, or we can make a small
landscape like that. We can also just choose to
fill up the entire world, but always keep in mind guys, when you're doing that that your level becomes much heavier. I think that is pretty obvious. The bigger the world, the more objects you have in it, the heavier it
becomes to work in. As you've seen
before, we can always change the scalability
here on top to something to hire
medium if your computer has trouble to render
that all in real time. From there we can then
choose to create our world, but we have a second
option and that is to import a world or a heightmap from something that we've
downloaded off from the Internet and
I'll also show you guys how that works in a moment. But first, let's
create our own world. Once you've chosen the size, we can hit Create and we
get a flat landscape. Now, there isn't even
a texture onto it, just these cubes which
show us that there is no texture onto it
or actually material. We can now go ahead and use the sculpts tools here on
top to create mountains, to create craters, rivers,
it doesn't matter. The normal sculpt tool right here is the
one that we see, and if we click and hold, we can actually create
mountains as you can see. If you hold down the shift key, we can bring down that mountain, so we're going to
create a crater. This way you can
sculpt something, create your own
mountains, craters, and whatnots, you can also change the size of your brush. Obviously, here on the
bottom, we've got brush size, so we can bring that
down to you have like a smaller brush to create
smaller mountains and such. We also have a strength
option right here, so if we increase that, you'll see that we're
going to create much bigger mountains
much faster. This way we can just
start sculpting, creating something that we like. Usually what works
really good is to have some mountains here
in the backgrounds, high mountains back here and
some more smaller mountains. I'm just going to decrease
that here in the front. That way we get more of a feeling that there
is a larger distance. You can always go
down and just have a look at your landscape how
it looks from down below. Maybe those mountains here in the back could
even be bigger. Let me just increase
my brush size a little bit to do that. There we go. This is starting
to look really good. We're creating depth here guys. We got a mountain here in
the front, one right here, one there, one in the back, so we have multiple layers of height, which is really good. Now we've got a few
more options to make our mountains look
a little bit better. We can smoothen them with
a smooth tool right here. We get the same options like the brush size and the
strength of that brush. This way we can get rid
of these hard edges, these hard peaks, just make things more smooth. We also have stuff like
erosion to give more of a natural feeling
to these mountains. We can just use that as well. As well as hydro
like if it rains, it's also going to shape the mountains a
little bit different. We can use that tool as well and just go over your
landscape like this. You can see here
that we get more of an uneven surface
as we go over it. That isn't [inaudible]
how to create mountains or a landscapes. Try to experiment with it because it nothing
more than this, just go through all of these
buttons, see what they do. We also have a ramp
option right here. If we select that one, we can actually draw more
where we want to have a ramp. Let's, for example,
create one right here. We click, and then we can drag out where that
ramp needs to be. We get two points, so we can make one
higher or lower. Let's say that we want to
have a ramp right here. As we created that, we click here on add ramp
and it will actually sculpt a nice
looking ramp for us. Maybe if you are creating
skate park or something, you can use the ramp tool. That is actually a
whole lot of work, to make your own
landscape like this. You also need to be talented, not only to technically know
how to sculpt and such, but also you need to
have an artistic mind on how landscape work. That is definitely
not easy to do. Then there is the second option which is used the most often, and that is to work
with heightmaps. Heightmaps are
basically preset files that you can download
off from the Internet. If you look for heightmap, you can find numerous of heightmaps on Google or on
any other search engine. There're some need
to be purchased, but there are also
many heightmaps that are completely for free. What I'll do is go
back to my select mode right here so that I can
actually remove my landscape. As you can see here, it
hasn't been applied as a layer or as an
actor inside Unreal. I can just delete that to remove the landscape and
start from scratch. I'll go back here
to select mode, and from there choose landscape. What I have right here on my desktop is actually
such a heightmap. You can see that it's
actually just a PNG file, a photo, an image file
that consists out of dark and bright areas. This is a way to tell
Unreal Engine what should be higher or
what should be lower. The black areas are low areas and the whites are
mountains, these are higher. Of course, we get all of
these different gradients here in-between. You can see the
stripes right here and that is going to make sure
that we get nice mountains. Yes, you could also just go
into Photoshop and create your own heightmap
and see what that turns out to be
in Unreal Engine, you can definitely
experiment with that. For now, I will actually
place here this heightmap. Let me just open up my
Unreal Engine folder to make sure to go back into that content folder so
that everything is organized. Use the right-click in here, say new folder and call
that assets or something. Let me just drag in my heightmap
in there. There we go. Let's go back to Unreal
Engine, right there. In my content drawer, I should find here the
assets folder back. I don't see my heightmap in here and that is because
Unreal Engine needs to reload if we're going to move new items into the
project folder. But it actually
does the deck that, you can see here a
pop-up that says a change to source content
file has been detected. Would you like to import it? We're going to say
yes, import it. You'll now see here in my assets folder that
we have a heightmap. We can go here now over to import from file from
the landscape modes, and here we have to specify which file that
needs to be used. We click here on the three dots, locate that file into my
content folder assets. Here it is, heightmap
and hit Open. You can see here that
automatically now we get these mountains created
from the heightmap. We can then just hit
Imports. There we go. Look at that guys, we got
a realistic mountain. As you can see, this one
here looks a whole lot better than if we would
sculpt one ourselves. Definitely, with the
fog and everything, it looking really good. We can now go back the
select mode to move around, look around into our landscape, which looks really good guys. Maybe the fog is a
little bit too much, if that's the case,
we can always go into our blueprint here, select the exponential
height fog property and it bring down the density till we can see some
more mountains. Look at that. We
still don't have a texture onto our landscape.
How do we do that? Well, we know that
we can go over to our starter content right here, because in there we can find
a folder called materials and there should probably be something in here called
grass. Here it is. Like before, we
think that we can just drag it onto the landscape, unfortunately, that's not
going to do anything. That is because
materials need to be applied differently
to landscapes. With the landscape here
selected in the outliner, we go to the properties. Just like any other
mesh or model, a material is also
a property from it. We can always change
that from here. You can see here
landscape material. If we open up the
drop-down menu, we can actually see
all of the materials which are already
inside of my project, which are all coming from
that starter content. We can just go ahead
and just search for grass and it will locate
that grass material. We can just click on it, which will be applied
now to the landscape. Look at that, we got grass. We could also go back to our content drawer and just look for a material
that we like, like the bricks here. I'm just going to dock the
continent drawer for a moment, which is going to make
it a little bit easier. I'm going to drag
the bricks material onto the landscape
material property. This is a second way of
also applying a material. Of course, this is to have a brick landscape unless someone really wanted to
put effort into that. But let's go back for grass. I will just take that
again, it's right here, just drag that
onto the material. By the way, guys, let
me just go ahead and create a shape real quick. Let's create a sphere,
drag them into the scene. This worked exact same way. If we select that sphere, head over to the
details from it, we can also find again, a material option
for that as well. I'll just have to
look right here. We could also change the
material of that sphere, but also going into this option, just browsing through all
the materials that we have, such as this brick wall thing, you don't have to always
drag it to your actual mesh. Looking good, I'm
going to delete that because that was just
a demonstration. Let's make this
landscape a little bit more vibrant now
with some foliage, some plants but that is
for the next lesson.
6. Plants and Flowers: It's time to paint some flowers or some grass
or whatever you want, some foliage into our landscape. But before we can do that, I first have to enable the foliage option in
the engine. Hang on. [NOISE] It's up and running and everything
seems to be stable. The engine is still going. Right here we have our landscape that we
created previously. Now to add some foliage in here, we actually need some foliage. Let me just take
off those glasses. [NOISE] Foliage is not
something that we can find in the starter
content unfortunately, so we're going to have to bring it in from somewhere else. Well, that's somewhere
else is called the Quixel breach library. Now Quixel and Unreal Engine have been working
together and they made it possible that there is a
nice little button inside the program to bring in
assets like foliage. Let's locate that.
I'm going to go over to the Add
button here on the top-left and from there we
can find Add Quixel Contents. Click on that, which will
open up a new window, which is actually
some a marketplace, but this marketplace
is free. That's right. You can see there's a market
where you can just go and take anything that you want
without having to pay for it. This entire library, let me just make that
window a little bit bigger, is completely for free. You can see these very nice
buildings, these rocks, these subway stations
or whatever it is, forests, materials, we get decals which we'll
get into in a moment. We got some more
objects right here, some more models and
of course, plants. That's the thing that we're
interested in right now. We can also see here
on the left side we get a menu with 3D plants. We can just click on that and we get a whole bunch
of categories. I'll just say this go to it, see whatever you like and
let's download a few. I'm going to take
here the flowers. I really like those, so
I'll just click on it, which gives me a whole bunch of different flowers that
I could choose from. You know what, I actually
like this one right here. [NOISE] I didn't know
how to pronounce that. Let's me just double-click
on it to open it up here in the side panel and I'm
going to choose a quality. Do I want the low
quality of that, the high-quality or
the medium quality? Obviously, I want to have the high-quality because I've got a beast of a
computer right here. Then we just need to sign in with your Epic Games account, which you also had to login with to install Unreal Engine. I'll just do that.
I am logged in. If it's the first
time you'll do that, you'll be prompted with
a very nice message that says you get unlimited
use completely for free. Yes, I agree to that. Get it now. I got it we can now hit on the Download
button right here. It will now download
these flowers onto my local computer. Once that is done, we can click here
on the Add button. By clicking on that, it will import these
flowers into my projects. If we go back to Unreal Engine, we should find a new folder
here called Megascans, 3D_plants, and right
in here we can find that flower that I've
just downloaded. It comes with a whole bunch
of files, as you can see, don't worry too
much about those, we just want to
download for now. Let me just go back to bridge, and let's download a few more. Let's also go for, I don't know, something like grass
perhaps, these look nice. I think wild grass, why not? Hit downloads. wait until it's
downloaded and when done, we can click on the
Add button right here to also bring that
into our project. Now of course, in the future, when you're going to
start a new project, you don't have to redownload
all of these assets. You can actually go here in the left column
bar here to Local, and in there you can see everything that
you've downloaded. Apparently, I also downloaded a few other things in the past, like this branch and this
cabinet and everything. You will see all of that back. This is now stored on my local computer and so
we can just select it from there and click
on the Add button to quickly import that
into our projects. I downloaded two different
voltages right now, that is fine for me. Let me just close
the bridge now, we can see both of
these folders here now into our content browser. Now to start adding this
foliage into my scene, we're going to have to
go to the foliage mode. Before we do that, I just have to make sure that
foliage mode is working. It is. Let's go up here to Select Mode and hit on Foliage. Like with landscaping tool, we also get a new panel
here on the left side. Through here we can see all the foliage that has
already been imported. We don't have to worry
about the content browser. Let me just make that window a little bit smaller for now. Here are all the foliage plants, and we can select
which one we'd like to start painting onto
our landscape. We can select 1, 2, 3 or we can also
just hit Control A, to select all of
them and then hit the checkbox for all
of these plants. This way we've got
everything selected. Like before, we get a brush
and we can just start clicking and dragging around to start painting plants,
as you can see. We'll automatically mix all
of these plants together. If we zoom in here, we can see our plants alive. It might take a
little while to load, but you can see how
good that looks. Automatically, it's going
to randomize all of these plants together to
create a beautiful landscape. You can see immediately how
my landscape now has changed. This right here is
looking way more realistic and if
you look somewhere right here to this patch of grass which isn't
actually grass, it's just like a flat material. This is the way that
you should shape and create your mountains
and everything. Like we've seen before, we can change the brush size, make it big if you have like big patches of mountain or
something to fill them, or if you want to
work more precise, we can also decrease
that brush size. I think that is pretty obvious. Now, sometimes you just
work on plant like one flower or
something somewhere. Well, what you can then do is use a single tool right here. With selecting that one, we can just very simply click to add one single
plant in there. Now it'll always randomly place one foliage piece from everything
that you have selected. If you have something
specific in mind, you're going to have
to deselect all of these foliages right here, and then only select
one, for example, like this piece of flower,
wild grass thingy. I'm just going to
click now and now I'm sure that it's going to add
that one thing in there. I can't see it because
it's very small. There it is. Let's go to
a different mountain. Like here, all the
way in the back, I want to do something special. I'm going to select again all of my foliages and enable them all. Now here on the bottom
we can see that we have some more options
when it comes down to our grass and
flowers and everything. There's something very important in here that I want to touch. It's currently set to
the default scale, which is the realistic
scale as they were created, but we can also say
that I want to have super big or super small grass. Well, that can be set in here. The minimum scale, for example, can be set to one
and the maximum, for example, like
five times as big. What's going to happen now, if I'm going to take again
the paint brush right here, is going to randomly
change the size of these plants while I'm
going to paint them. Let's have look. Just
paint them like that. Let me zoom in here
to see it better. You can see that some
of these flowers are bigger than others. You can see it here very
well where we have, we just can take my select tool. You can see here
these flowers are much bigger than these while they sit somewhere between
one and five scale. That way you can get
more random flowers and grass painted
onto your mountains. Starting to look good guys. Let's go back to our
original grass right here. Now let's say that
we accidentally painted something that
we didn't want to. Well, of course we also have an Erase button right
here and Erase modes, which look exact same way, we just paint over it to
remove the grass. There we go. It's all gone right
now and we're going to have to
start all over again, but that was just
to demonstrate that there is also an erase tool. Let me just paint
those back or hit Control Z perhaps to just bring them back to
redo my action. Now these plants right here sit very static. They
don't really move. There's no winds and it happens to be in the real
world there is wind, so let's add some wind in there. Now to do that,
I'm going to have to enable the wind option. There we go. Wind is enabled. We can now go over to our
content browser right here, because this right here is the place where we're going
to have to enable winds. But as I said before, materials are built out
of different things, like different textures which
we can combine together, but also things like programming materials
which you notes, and that way you can give more functionality
to your materials. Now luckily, we don't
have to do that. The guys over at Quixel
already did all of their work, we just have to enable
winds. That's it. Now you're always going
to find two materials; one is for when you're
looking up close to the grass and one is for when
you're looking far away. When you are zoomed
out very far, let me just do that and just looking at your
mountain like this, there's no use to render all these grass materials
in a high-quality, that is just going to slow
down your computer and you won't even see the difference
because it's so far away. That is why it's
automatically going to load two different materials. You can see it here
happening actually. When I'm going to zoom
in you can see that my flowers and everything are going to load in a
second material, which is more high-quality,
more detailed. That is why we've got
these two options. I'm going to open up
here one material, just double-click on it, and on the right side, we get a whole bunch of options. We can change the opacity,
the translucency, the roughness and everything, but we're interested
here in winds. We'll enable that option
and then say enable winds. As we do that, we already get some
wind animation, but we can even choose how
much that wind has to be. We can increase its intensity, the height, the speed
and everything, like is there a
storm going on or is just a small
breeze or something. That is up to you that you
can change right here. For now, I'll just leave it at the default settings and you
can see here already how beautifully the
grass is waving in the wind and you can see that
it looks much more alive, much more vibrant,
much more realistic. We'll also do that for
the billboard version. You can see it here,
billboard and it's name, billboard is referred to as if you're looking from faraway, the low quality version material that is called the billboard, so I'll just double-click
on that as well and also from here enable the winds. There we go. You can
close that window again. We're going to do the same
thing as well for the flower, so open up that folder, double click here
on this material, scroll down, enable
winds. There we go. Close that, and also for its billboard
version so that if we zoom out that we can still see the flowers and
everything move. Look at that guys,
how cool this looks. There's winds. How awesome is that? Remember if you have downloaded the multiple types of foliage, then you want to
enable that wind for every material that
you have downloaded. That is how you can add foliage
to your landscape guys, so go ahead and practice
this right now. Make you're landscape
more vibrant, more alive with plants, flowers and grass, and make
sure to enable the winds. I'll see you guys back
in the next lesson when we're going to talk
about 3D models.
7. Importing 3D Models: Yeah, I know, but I have to demonstrate all of
this. I'm sorry. I have to hang up,
my student is back. Yeah. Call you later.
Bye. That was my boss. Apparently, we've been
stressing out the engine, but so far everything
is still running good. The engine is going smooth, so I don't worry about anything. Let's have a look at 3D
models inside Unreal Engine. As seen in the previous lesson, we're going to go
back to the Adds menu here and then click on "Add Quixel Content" to
open up Quixel bridge. From here, we can
find all bunch of 3D assets if we go here
to the menu on the left. There are a whole bunch of categories that we
can choose from. For our example, the landscape, we're going to click
here on "Nature" and look what that
has to offer to us. Now here's the thing,
Unreal Engine is not a 3D modeling software. We use dedicated
programs like Cinema 4D, Blender, Maya, etc., for that. The only official
options that we have is to create a
cube and a sphere, as we've seen, but
we don't really use that unless it's for
a wall or something. 3D models, we either create
them in a dedicated program, we download them
from the Internet, or we download them from
the free Quixel library. Let us look here for some
interesting rocks that we could make our landscape little bit more
interesting with. Maybe this here
looks really good. I'm going to click on it
and here on the right side, we're going to choose something
else for the quality. Now instead of
high-quality and I'm sorry that this here is
a little bit bogged. You can see tundra, what comes from unrelated
collections here, which is on top of my menu. But here on the bottom, we can see nanites and
we're going to select that. Now, nanite is
something that we can only use in Unreal Engine 5. It's one of those biggest new features in the new version. Nanite is basically
the highest quality that you can possibly get. It's going to change its
quality depending on how far away you are from
the model and I'll show you guys that in a
moment how that works. For now, just think about it to always choose nanite quality if that is available of course not all models have
that available. It needs to be specifically
built for Unreal Engine 5. Hit "Downloads" and let's
look for some more rocks. I think that once you
have selected nanite, it will be selected by
default as well for the next models so we don't have to worry
about it anymore. We can actually
just click here on the quick download
button on top. Let's download this one as well. Perhaps this rock
looks really cool too, click the "Download" button. This one too, and
one last thing here, this little patch of rocks. Here we go. What else do
we have under nature? Maybe it's something
else than rocks, I see some trees here. Now tree is something different. We are not going to
find that back in the Quixel Library just yet. Maybe it's coming to it. For now, there's a
different way to look for trees and bring them
into Unreal Engine, but I'm going to
show you guys that as well later in this lesson. For now, let's
download some branches or something to create a
more interesting scene. Perhaps this here,
download that. Here's a small branch as well,
let's download that too. I don't like these
half-capped trees or half trees so we'll
not download those. But I do like branches, so I'm going to go
download this one as well, and that should be enough. Now, going back
here to the menu, we have 3D assets, which
we are in right now, but we also have 3D
plants which you've seen in the previous
lesson, the foliage. Then we've got surfaces. Now I won't download
any surfaces, but basically these
are materials. We've already seen how we
can work with materials. You just drag them to
an object or you assign them in the Details panel
if it is for a landscape. The Starter Content Pack
already has a bunch of things, but of course here you have a lot more materials and also a much more
higher-quality materials. Now Decals, you can see
them as solo textures. So you don't really
need to apply them to a certain model or something, you can just let your
texture float and decast it onto different models. I'll definitely show you guys how that specifically works. Let me just get something
here, for example, under vegetation, let me get a decal of some
leaves or something. These are by the way,
2D flat objects, these are not 3D. Right here we've got
a bunch of leaves. Let me just download that. Now you can check out the progress of your
download if you go here to the top and click
on the "Download" button, which gives you the
cue of everything and I see that everything has
already been downloaded. No it's not, that's not true. There are two more
elements here. The Tundra Mossy Boulder and Tundra Rock Formation are
both still downloading. We'll wait for
those to complete. Now once that is
done, we can start importing them into our project. Let's go over now to
the local folder here. On the left, click on "Local" and from here now we can see the collection of
everything that has been downloaded onto our computer. Now at a certain point, you will have a lot
of 3D Assets in here. Then you can use the
filter option here on top to look more specifically for certain objects or 3D models that you
want to look for. But okay, let's import
these now into the project. I'm just going to hoover
them and here you can see the "Export Nanite" option. You just click on that to
add it to the project. I'll do the same thing
for this formation. Also this branch right here. We've got this branch as well. We've got this decal right here. Let me just add that too, get some more branches. There we go. Everything
should be imported. We can now close the
bridge and we should see all of these downloads back
here in the megascans folder. We've got them nicely
sorted by 3D Assets, Plants, and Decals. Let's start with the 3D Assets. Just open up that folder and we can see a bunch of more folders, each representing a model
that I've downloaded. Let's open up the
first one Dead Tree and you'll see that always comes with a bunch of different files, it's never one 3D model. I'm just going to
make this screen or panel a little bit bigger. On the bottom here, you can see what
object that it is. This here is a
material instance. Then we've got the static mesh, we've got three textures. The way that this is built
is that we have our mesh, which is the model itself. Then we get three textures right here and those three
textures are being mixed together in a material to create the correct look
for the texture actually. This material right
here is being applied onto the 3D model. Let me just show
that to you guys. I'm going to drag in this
dead tree into my scene, is going to load
everything as I do so. Like the first time
you're using a model, it will always load pretty slow but once it has been done, you can much more easily duplicate it and important
new models of course. There it is, It
has been imported and maybe at this
point I might want to decrease the quality
a little bit because my beast of a computer is eventually starting to
get a little bit of trouble. Let me just put this to higher something of a quality setting. Here is my branch
and in the meantime, you can see that these thumbnails
have also been loaded. Here are the three
textures by the way. You can see that it consists
out of a normal texture, a normal map, and the UV map, combining these three together
creates that material. If I select my
branch right here, we can see more of it
in the Details panel. You can see here under
Materials that that material, this one right here has
been applied to it. That is just to understand
how these things are built. We've got our branch right here. It's sticking out right now. Let me just put that flat. I'm going to press the "R" key on my
keyboard to turn that around and to lay that flat
on the ground in the grass. This is actually
looking really good. We have some more models
like here we have this dry root thing. Let's drag that into
the scene as well. Maybe this one is a
little bit too small, so let's increase
the size of that. I'm just going to move this to a different spot. There we go. We have seen this
guys with the chairs. We know how this all works, we can just place it
wherever we want. Let me just look for one
of these rocks right here. They always look
very good so we can just drag them into the scene. There we go, and position them perhaps
somewhere right here, rotate them around and just
like look for a nice spot. That makes sense. This is how you want to
build out your scene. As you put in more
objects like these, it starts to look more realistic as you
can see right here. Now, what's up with
that nanite guys, which I talked about before. Well, we can actually
go up here to the menu. Instead of Lit right here, we're going to choose
something different. All the way on the
bottom, you can see Nanite Visualization and we're going to pick out
triangles from here. This will show all
the objects that are nanite compatible or have
that nanite feature in them. If it doesn't have that
like the landscape itself, you won't see anything,
it's just black. But you can see here
how these rocks have all of these triangles. That is the quality
setting of that rock. You can see that the further
I go away from that rock, that these triangles here start to change,
they get bigger. The further they get away, the more the quality decreases. But that's a good thing
because after all, we're going to need to work
with performance as well. We want to have the
best quality possible, but unfortunately, our
computers cannot run that. That is why Unreal Engine needs to do something
in terms of performance that we can run smooth or work smooth
in Unreal Engine. Nanite is a solution. It features a high-quality
asset when you're up close and still a high-quality
assets from far away, although it has
been decreasing in quality but we
don't notice that. That adaptively changes
so that the naked eye, it's still recognizes it
as a high-quality assets. Let's disable that right
here and set it back to Lit. The next thing I want to show
you guys are the decals. Also we have those in
the megascans folder, decal's right here, the leaves. Like I said, decals
are not 3D models, they are just
materials actually. They are textures that we can project onto other elements. Let me just drag in the
material itself into the scene. There we go. Here
we have the leaves. We can just bring
it up a little bit higher to get a better
sense of what's going on and we can take the
rotation now of that object to rotate that around and that will
change its projection. As you can see
here on the floor, that is what it's
actually doing. We can just rotate
that and look for a nice spot that makes sense
to cast these leaves on. It will cast its leaves or
whatever onto everything on its paths, as you
can see right here. Now if the decals are too big like the leaves in this example, we can go into the
options right here. So in the outliner
with the leaves, select it into the
Details panel, you should find an option
here that says "Decals Size". From here, we can
change its size. Let's bring that down like this so it looks more
natural like leaves. You might need to
rotate that object a bit to get the projection right. We can see this
arrow right here, which stands for
that projection. You want to point that down
like this. There we go. The box itself here around that Decal is not really
touching the ground, so I want to bring
that down until it touches the ground and
everything else in its path. Now you can see that we
are getting these leaves. Now sometimes that makes sense. On the ground it
does make sense, but here on this branch, it doesn't really make
sense that a leaf is wrapped around it beautifully. What you want to do
is then just select that piece of wood right here. I'm going to go back to the
Details panel and instead of scrolling through all of
these options right here, I'm just going to
look for Decal. You should find an option here. It says, ''Receives decals,''
which is set, enabled, but we can disable
that and now it won't receive the
decal projection. Definitely try and play
around with that and see if these decals can
bring more life, more dynamic into your scenes. That is in a nutshell, the
megascans [inaudible]. But what if you saw
something online, some 3D model or a friend
of yours made one and said, hey, can you use that
in an Unreal Engine? Well, of course, yes,
we could also do that, but there are a few limitations and a few problems
that will occur. Let me show that to you as well. I'm going to go back to my
desktop because right here, I've got a model of a
guitar and I'm just going to drag that into
my Content folder, as we've seen before, into Assets where we also
have the heightmap in. Let me just drag
the guitar in there and go back to Unreal Engine. It should prompt me again like, hey, do you want to import that? Just say ''Import'' It's
going to give you a bunch of options like how do you
want to import this model. Nine out of 10, you just hit ''Import All'' to ''Import
Models'' in there. Chances are that you will see some errors as you
import some models. Oftentimes, you can
just ignore them, sometimes, they do make sense. That's the thing
when downloading models off from the Internet, you never know how
optimized they are, and specifically
how well they are made for Unreal Engine, because that is the problem that we're going to run in right now. Let me just go over
to my Assets folder in which I should find
my guitar right here. I'm going to drag into my scene. As you can see, it doesn't
really have a material. That is because the material was not baked into the
model and that is a problem that you're going
to find a lot when you're just downloading something
off from the Internet. Usually, textures are given with the model in
a separate folder. You have your model and
you have your textures, but if you go to import
them into Unreal Engine, it's not going to recognize those textures because
it meets a material. You're going to have to
create your own material with those textures, which is something
more advanced. This is not a solution. I'm going to delete the guitar. How can we get
assets or 3D models off from the Internet
for Unreal Engine? Well, super easy, you just
look for 3D models that are made for Unreal Engine. There's actually
a specific place where you can find those. Let's open up the
Epic Games launcher. From here, we can go
over to the Marketplace. This right here is a
marketplace with a bunch of projects, 3D
assets, blueprints, anything that you can imagine created by people
like you and me, and we can just go ahead and put them on the Marketplace
and sell them. Most downloads in here are paid, but you also have
a bunch of free. Every month, you
also get a bunch of free projects that
used to be paid. There we go, a bike that we can just download and import into Unreal Engine and it's
going to work straight away with the right
materials and everything. That is a beautiful thing
when you're looking for a model specifically
for Unreal. Now, before we go to
buy anything, guys, you do have to check here the
supported engine versions. Most assets and 3D models are
built for Unreal Engine 4, since 5 is still
an early access. However, I found out that
let's say eight out of 10, anything you buy or download for Unreal Engine 4 also
works in Unreal 5. That's definitely a good thing. Whenever something is free, you can always just try it out. Let's just try
that. This bicycle, let's hit ''Download Now'' and see if it works in Unreal 5. I've purchased it. Now,
let's add it to a project. I click on here and
it's going to say, hey, I didn't found any compatible
projects because it's going to look for an
Unreal 4 project. Well, we can just
say here on top, ''Show All Projects''
and then click on our Unreal 5 project. It's going to say, hey,
that doesn't work, it's an Unreal 5 project. Well, then you just say,
it's an Unreal 4 project, but actually, it's
an Unreal 5 project. We're tricking it
into something there. [NOISE] Let's add
this to the project. Click this button and
it's going to download and import into your
project automatically. Back to Unreal Engine. We should find the
folder now, Bicycle. Every project is, of course, made up differently
because these are just made by people like you and me, but usually, they are
organized pretty well and we should find a folder
here called Meshes. These are the 3D models. In Unreal, we talk about meshes. Double-click on
that and we should find our bike riding here. Now, since this bike has a
bunch of animations and such, we get some more meshes, but we'll just take
the standard bike mesh for now and just drag that into the scene and you
will see that we get nice materials
here on the bike. We got the tire there, the metal and everything,
all the colors, the textures are
in place because it's been made for
Unreal Engine. Now, I probably don't
have the rights to use this bike into my course, so I will actually
delete it now. [LAUGHTER] Unfortunately, I
can't give that with you, but you get the idea guys. Just go through the Marketplace, see if you can find
something interesting, and just use that
in your project. We're going to
delete by the way, entire folder or certain
assets from Unreal Engine. It's going say, hey,
these items will also be deleted from
your hard drive, so be careful with deleting
stuff from your projects. Let's hit ''Force Delete''
because I actually have used a bike in my [LAUGHTER] project, so it's just going to
flip it out of there. I'm going to go back to the Marketplace and
this time here, go to Browse on top. We're going to go
over to Megascans, which comes from that library
which we were looking into. All the downloads from
Megascans are free, you can see that
here on the bottom right, which is really cool. Here, you can see this project
with the Megascans trees. It's, unfortunately, not
inside the Quixel bridge yet, but I think it will come
in there anytime soon. For now, we have to download it through the Marketplace,
but that is no problem. We can find it here as well. We just hit here on Free. We're going to run
into the same problem when we're going to say ''Add to Project'' It's not
going to find our project, so we'll just say ''Show All'' click our Unreal 5 projects,
and select version 4.27, which is the latest
version from 4. Hit ''Add to Project''
which will now all download and be imported into my project. They're added to the project. Let's go back to Unreal Engine. Some are right here, BlackAlder
under Geometry this time. We should find back somewhere,
SimpleWind right here. Here, we can find all the trees and we can just drag
them into our scene. Some very realistic
trees as you do that. The textures have been loaded. There is our tree. You know what, this
actually looks really good in the background. Let me just move that back
somewhere right here. If we hold down the Alt key, we can make duplications
of that tree, perhaps rotate that a
little bit like so, so that it is not looking
exactly the same. Let me just go a little bit
closer here on that tree. There we go. We could make this row of trees or something. If we're going to take
a look from here, it actually looks really good,
like a real landscape with trees and everything,
really awesome guys. By default, it already has some wind going on right here. But there's something
really cool that we can do with these trees. If we actually select them, we can go here into
the Material options. We have a bunch of materials
like the actual tree itself, then the leaves, the
branches, and everything. If we select leaves,
for example, just double-click on that
to open up it's material, and like we've seen with
the foliage, the plants, we had wind options in there, we also have here some more
advanced winds options, but we also have
the seasons option. We could enable
winter from here. If we do that, it has to
load in some new textures. But as we do that, you can
see here that this tree lost it's leaves because
it's now winter. How cool is that guys? If we disable that again,
the leaves come back as this spring or
summer or something. You have a bunch of
options in there as well. Definitely have a
look around in there. But this is how you can add
trees to your scene and just make your landscape
a bit more realistic, a bit more vibrant,
a bit more alive. Now, it's time to take it to the next level and
actually start to create a landscape that looks really good and
really realistic. It's going to be
important how you place your elements
and everything, but that is for the next
lesson. Thanks for watching.
8. Realistic Environments: The problem is that the engine is starting to
have a little bit of trouble, but that is because we've
done poor optimization, so that's something
that we're going to work on right now. Here's a landscape
that we created prior, and as you can see things
are still running okay-ish, but that's because of
the beast computer. However, I do think that once I'm going to add
more stuff in here, that it's going to get
really troublesome for my little PC over there. Let's work on the optimization,. Now the first thing
that I'm going to do is actually start
creating a camera. We haven't done that before. Because I actually want to see which things can I
remove from this scene. I'm going to make a shot
from here, for example, maybe do like a little bit
of a travel like that. Well, then all the
grass here behind me doesn't make any sense. To get a better
understanding of what we actually need in our scene, we're going to
create that camera. There are two ways
of doing that, I'm going to show you both ways. Of course one of them is going to be a
better way to do it. The first one is to go back
to that Add menu here on top, and from there go
over to Cinematic, and right here we can find
it as Cine Camera Actor. We're always going to work with the cine camera actor as we are planning to make animations, render those out,
or to use it in a virtual production
environments. Let's drag this one here
into the scene. There we go. I haven't enabled my widgets, so I'm just going to press
G on my keyboard in there, and you can see the camera now. Let me just say I bring it up
a little bit. There we go. Here we get a view of what
the camera is seeing now. Already you can see that
my computer is having a little bit more trouble as I've placed that
camera in there. Which is probably
because the second viewport that we get here. If we select, by the way, something else like these rocks, that viewport is gone. But if we then select
the camera back, we can again see that viewport. Here in the bottom,
you can actually pin the preview of that. We're doing that. We
can now select a rock. It can actually move it
up and down now while seeing how that looks through
the eye of the camera. That is one way of
creating a camera, guys. We can go ahead and rotate this to get a different
view or something. We are used to these
controls by now, but it's still a little
tedious to work in such a way. I'm just going to delete
that camera like that. What I'm going to do
here is actually just use my normal view port, the way that we've been
working here the entire time to create a
framing that I like. For example, something
like this, perhaps. From this view, we're
going to create a camera. What I can do now,
is go here up to this menu all the
way on the left, these three lines,
click on that. On the bottom here, you should find
create camera here. We're going to create
a CineCameraActor. Clicking on that right now, it will create a new camera from where I was
standing right there. That is much more convenient way of creating that virtual camera. It's the same camera
by the way guys. Now we have a better
understanding of what can be removed,
so let's do that. I'm going to go over to my
foliage mode right here, and I'm going to take the
eraser to remove tool, and I'm going to
select here all of my foliages that
I have loaded in. Even if you want to
remove certain plants, you also have to select them. That way, Unreal knows which plants do you want to remove. Because maybe you
only want to take out all of these flowers in
here, but keep the grass. Well then you can make sure to only select the flowers and de-select all the
rest and then use the remove tool to remove those. We can now take
the erase tool and I was actually talking
about the wrong one. We don't use the
remove tool with the erase tool, of course. We can go ahead
and remove all of these plants here in the back, making it a bit more optimized
as we don't see them, we don't use them in new ways. Makes sure you definitely,
get everything. Everything here
on this mountain, none of this is being
used and that is just getting poor
performance to the computer, and definitely,
we're going to add more stuff in later on. Also see some weird
patches right here, I don't even know
what these are. [LAUGHTER] Probably when I was trying to explain
what these tools do. Looking much better guys,
I mean it looks the same, but maybe remove
these here as well. It looks the same, but the performance will
definitely be better. There are a couple more things that I want to do
if I go back here to my select modes and
look at my camera here. We can see that we get these weird lines here in the back. Well, that is where my
grass stops and that is, again, not really
looking so good. What I want do here is also
make the grass thin out so we get more of
a gradient from the grass and everything
over to nothing. Let us go back to the
foliage mode right here. I'm going to increase
here the erase density. As I do that, I actually have to make
multiple strokes in order to remove an
entire patch of grass. You will see that
if I do this now, still a lot of these plants
will still stay there because of my eraser tool not working that well anymore,
but that is good. This way we can create
more of a gradient. We can play around
with that density and try to get the
edge out of there. That is already starting to
look a little bit better. You definitely want to make
sure to not see these lines right here from where your
brush is actually ending. We'll try to remove
that here as well. Decrease that density again. Really work on those edges right here, try to remove them. But this is starting to look a whole lot, much better guys. I don't care too much about this line right here as
you probably don't see it, but if we go back
to our normal mode, select that camera, we
should not really see that hard edge anymore here
in the back as we can see. That is a different way
to optimize your scene, not only for better
performance but also just for better and more
realistic looks. What I can highly recommend, if you're creating one
of these landscapes, is to just work with
a reference photo. Go on Google, or maybe just
walk in a forest yourself, or in a park, take some photos, bring it with you to Unreal. Just try to recreate that scene and really
look at the details, like where is the grass? Where are the flowers? Where are the rocks
and everything? Try to recreate that. It's really good practice. Now I think that we can all
agree about the surface or the material of the landscape
not really looking so good. It looks like a
cheap video game, and that's also the reason
why we will never just use one material onto a landscape
and just go with that. You always want to
use either foliage or 3D models to create
your landscape. The only reason why we
have a material applied to this is that we can see something underneath the grass. Now, very often
we're going to work with a technique
called Stacking. And basically, what we're
going to do is just make a landscape
out of 3D models. Let me just show you
guys how that is done. We already downloaded a bunch of 3D assets or the mega
scans library prior, and we've got a bunch
of rocks in here, so let me just use
some of those. Have I already used
this? I'm not even sure. I'm just going to drag that
into my scene, there we go. Basically, what we can do
now is start stacking these. I will move them into a
certain place, there we go. Rotate them and perhaps make
them bigger, and definitely, when you're stacking
objects like this, it might be a good
idea to disable the grid for rotation and scale and everything
so that you get more finer control
over these objects. There we go, looking good. I might want to take like
a different bolder now, let's take this one. Rotate that and put
it in the back. Also perhaps scale it
up, this is again, a very good practice to get used to the controls of placing
objects and everything. As you can see, what I'm
doing here is really stacking all of these objects,
these meshes, and I'm not really leaving
much place left for the material texture of the
landscape to come true, which is exactly what I want. If you're going to take a
look now through the camera, you can see that this is
starting to look really good. What I'm going to do
here is actually place a whole lot more of
these rocks here on the site to really cover up this ugly mountain perhaps. Let us go further with that, we can make a duplication
of any of these rocks as well by holding down the
Alt key on your keyboard. You can see here that
we made a duplication, so let me just move that
into a different spots. Like we've seen with
the trees as well, if you want to make sure that
you don't see repetition in your scene always rotate
your objects like this. The back of these rocks is
something completely new, so you can definitely
work with that. Also a good idea to make
different scalings that also makes them look very
different from each other. You don't have to be afraid
that they overlap like this, just always look through your virtual camera and
see that it is still looks natural and not weird like a rock sticking out
of a different rock. But usually with all
of these details, you're never going
to notice that. What else do we have here? I see that we have another
boulder right there, you drag that into
the scene as well. Make that big, usually big boulders or
big rocks go in the back. Let's take something else again, perhaps this bunch right here, Alt drag to make a duplication, rotate that, perhaps
scale it up. There we go. You can definitely stick them into the
floor as you can see, like this rock still works really well with
the grass around it, even though that its surface is actually inside of the grounds. Definitely don't be
afraid to do that or to leave out certain
patches here, as you can see on the floor of that object here coming
through the landscapes. Let's have a look here
through the camera, see how that looks. Let me just bend that view again so you can see
what I'm actually doing. Maybe this rock here is a
little bit too prominent, so let's move that a little
bit back, like this. This is looking good. There we go. You know what? This detail here that
we created prior, I'm just going to
leave that because [LAUGHTER] isn't making
much sense anymore, but you get the idea of details. We're going to work with these more once we're going to create an indoor scene where it's
going to make much more sense. Maybe one last thing
here in the back, I want to have a
bigger bolder here. I could download something new, but for the sake of this course, let me just reuse one of these, perhaps this big rock over here. Let me just make a copy
of that to the back, I'm not sure even
where the back is. There it is. We can see
it here in the viewport. Scale it up. That's the big
rock in the back. Look at it. Maybe bring that a
little bit more to the back to really create some depth in
there, there we go. This is starting to
look really good guys, we are getting a nice landscape with some rocks in there
that we've stacked, and also the composition is
starting to look really good. Maybe from a top
view or something, it's not going to
make much sense or it looks really weird, but from the view of our
camera it actually does, which we can see here through the viewport, it's
looking really good. If we select that camera, we can see how it
traveled looks like. If we are doing
this or something, you can see that we get
this nice parallax with these rocks in the scene,
looks really good. Now one last thing
that I'd like to show you guys is when we're going to go back to our foliage
mode right here, let me just uncheck or unpin
the view of the camera, and we're going to paint
new foliage again. I'm going to take
here my paintbrush, maybe make that brush
a little bit smaller, and what we can
actually do now is also paint onto these rocks. Let me just add some flowers or grass or whatever I'm
doing here onto the rock, and you can see here that
they are now applied to it. We're not only limited
to the landscape itself, we can also draw them
on top of models. This could be particularly
very handy if we're going to make a close-up
of a tree or something, you can see here where the tree actually aligns
with the landscape, it doesn't really look good,
so we might want to add a few grass patches or
something in there. For that I'm going to make my brush really thin like that, and I'm just like
draw around it, draw around the tree like that, and this way the tree blends in way better into the scene. Now unfortunately, we
cannot really paint foliage on a vertical space, but we can really paint them well around a tree-like that. Well, we could, if
you really want to, like add a piece
of grass here on a more horizontal
piece like here. [LAUGHTER] We could
paint them on a branch or something,
that could work. I mean, there's also
foliage of leaves, and that way you can paint your own leaves to a
tree, that is up to you. But just know that you could
add foliage to 3D models as long as they are on top of them and that's on the site. This is a technique that
you guys can practice, and it's also something
I want you to do now before you're going to
hop into the next lesson, and that is to start
stacking all of these different objects that you downloaded off from
the Quicksort library. See if you can create an
interesting landscape without actually showing
the surface underneath. You know some artworks
have been made without even creating
a landscape, but just by stacking 3D
models on top of each other. It's a very easy
way to add a little of detail onto your surface,
as you can see right here. Here we can see much more things going on as we look right here, and that's of course
because all of these rocks and
everything, these trees, they are made with real photos, and that is why these
graphics look so realistic. That is in a nutshell
how you could optimize both your computer
by just removing stuff that isn't in
your camera frame, but also to optimize your scene to make it
look more realistic. Perhaps think about
adding these rocks or trees all the way in the
background in your scene, if maybe your mountain
is looking too squared, you want to take the
edge off from that. Go ahead and practice that now, create a nice little environment,
and once you're done, once you feel comfortable
about the look of your scene, then come back for
the next lesson when we're going to talk about post-processing and actually do things like color
grading a little bit, giving it a specific look. We're going to create god rays, which everyone is excited about. I'll see you guys
in the next lesson. [NOISE]
9. Post Processing: Now can I start this
lesson by saying what an amazing job that
you've been doing so far? Just think about it, when
you started this class, you knew nothing about
Unreal Engine 5, and now you are creating
these beautiful landscapes, you're playing around with the sunlight, you're
training rocks, trees and everything, and
it looks so realistic, so good job with that. Keep on going because
I'm really proud of you. In this lesson, we're going to talk about post-processing. Now, the way that I see it's
post-processing is much broader than the
post-processing volume, which is just what
elements inside Unreal, which we'll talk about soon. Post-processing to
me is everything that creates a loop
inside Unreal Engine. We have created this landscape, now we've got these rocks
and trees and everything, and we can give
different looks to it, and that's why it's
called post-processing. Now, we've already
seen some tricks with this when we created
our atmosphere here. Here's the blueprints
with all of our atmosphere
elements in there, and I'll just go over
them one more time. We have the sky atmosphere, which is the actual atmosphere, there we've got the skylight, which is a reflection
of the light bouncing back from
the atmosphere, there we've got the
volumetric clouds, which are the actual
clouds in the sky, there we've got the
exponential height fog, which is the fog we can
see here in our scene, and finally, the
directional light, which is actually the sunlight. We know that we can
change settings from within the sky atmosphere,
bringing it up, down, change the scattering of the particles in the
atmosphere and all, and that can create
different looks. But there's one thing here in
particular which is really going to make a
very big difference when you're treating
out your scenes, and that is the
exponential height fox. This is definitely
something that you should pay more attention to. It's going to make a little
bit more space here for my details panel
because we're going to work more in here
with that selected. We already know that we
can change the density of the fog introducing
more or less, but something very important that you should always enable, and that is volumetric fog. I thought that we
did enable that in the beginning of this class, but apparently we did not, or at least I forgot to. But you're going to see
now that in this scene where we have all of these
mountains and everything now, how much of a difference it's going to do when we're going to enable volumetric fog.
Let's just have a look. Look at that guys, what's happening now is
this sunlight actually interacting with
all of that fog. Without having this enabled, you can see the fog
more as a 2D elements, while as we enable that, the fog is now more 3D, actually volumetric taking up the space in the landscape, so the sunlight is going to interact a whole
lot more with that. Now we can really
start to play around with the fog to give
it a particular look. Because apart from the
density options that we have here on top to introduce
more or less fog, we could also go ahead and
change the scattering, the light scattering
on the fog particles, and that's going to give way different results as
you can see right here. Instead that there
is now less fog, there's still the
same amount of fog, but it's just scattering
the light differently. We can even give a
color to the fog, maybe there's some chemical
poison in the sky, then we can give
that some pretty green color or something, just look at that. Now, it's time to
close your windows. Or maybe it has more
like a blue color, you can see here what that does to your entire steam
looks really cool. There you have different ways of giving a particular
look to your seam. We also have the
viewing distance like how far can we look into the distance before the fog is actually going
to take over here, and you can see beautifully how the color is also going to interact with the environments. Now, one last thing here is the directional and scattering from the exponential height fog. A very interesting setting because this is the
first touch from your sunlight to the fog and we can change how
that should behave. What was really
interesting is that we can actually change
the color of that. We can click on
here, set to black, and we can make that a little
bit brighter, for instance, and perhaps like add
some red color to it. You can see here in the distance
what that actually does. This is the first touch of the sunlight here into the fog, or maybe make that more
blue or something. You can really play
around with that and see if you can create
an interesting look, like there is error
chemical clouds, not good for us, but it
is looking pretty cool. Now, with the
inscattering exponent, we can choose how
far that first touch with the sunlight has to be, or how far that chemical
cloud should come. Really cool. Definitely play
around with these settings, for now I'm just going to
reset them back to default. Now, let's have a look
at the directional light or the actual sunlight because there's something
really interesting with that that I'd
like to show you guys. I'm going to bring
my sunlight here behind the trees, there we go. What we could do now is
create these God Rays, something that we
all want to do. Definitely, if we are getting started with Unreal Engine, the first thing everyone does
is just create God Rays. That can be done here with the directional light selected, we can look for the light
shaft bloom right here, just enable that, and there we go, we
get light shafts. There will occur a problem where the sunlight is flickering so we can't really actually use that when we're looking
directly into the sun, but just look at it
if we are going to move the sun behind the trees. If we don't actually
see the sun, but just the light
peeping through, we could actually use it, and we can see these
very nice God Rays here, which of course we can increase. We can just scale up the bloom, have more God Rays, change the thresholds, and there you can see
now what that does to the tree looking really good. We're going to work with
that as well when we're going to create
our indoor scene, we'll have a window
there, and of course, when the sun is coming
through that window, we want to see these God Rays. Those are the big set of
things that we can do with our outdoor lighting or
atmosphere as I call it. Let's have a look
at a second way to do more post-processing, I'm talking about
color grading or adding some visual
effects in there. That's going to be done with
the post-processing volume which we can create
from the top here, head over to ''Visual
Effects'' and from there choose
post-processing volume, just click on it to
add it to your seam. Now, as you can see here, the post-processing
volume is a box, until when we move
inside of that box, we can actually see
what's happening. With that post-processing
volume selected, we go over to our details here and we can change a
whole bunch of options. You can see here that
we've got bloom, we got exposure settings,
chromatic aberration, and so much more also color
grading options in here, a lot of things that
we can do to really give a certain look to our seam. Let me just do something
real quick here guys, I'm going to go over to bloom, enable that, and also increase the intensity
of the bloom. As I do that, you
can see here that my entire seam gets
way more bloomy. But if I'm going to move
now out of this box, you'll see that
the bloom is gone. The bloom will only be
applied now within that box, which is often used for in
games when you're walking from one level to another or something and the
look has to change. But for us, we just want that post-processing to happen over the entire landscape where we don't have to fumble
around with the scale, we just have to look
for one specific option nice here under the
post-process volume settings, we can find infinite extent. Now, you can of course also
just use the search box on top and just look for infinite extent and
just enable that, and now if you move
outside of this box, that bloom effect
is still present. Actually we could go ahead
and just ignore that box, it's there, but we
don't need to mind it. What else can we do
apart from bloom? Let me just reset
that because it's starting to look
really ugly this way. We have exposure settings, we could set this to automatic
exposure right here, and this means that when we're going to look into the sky, you can see here that my exposure is changing,
is available loop down, it will get brighter again as my exposure is
automatically adapting. We can also set that
to manual, of course. Now it's dark and that's
because we need to enable the compensation to set a certain exposure
level like this, maybe you'll want it to be a
little bit dark like that, but now it will stay fixed. Whenever I look up in
the sky or look down, my exposure won't change, and so I'll bring it
up a little bit more. Next step we have
something called chromatic aberration,
also really cool. By enabling that and
increasing the intensity, you can see here that we can
add chromatic aberration. Oftentimes when you
want to use that, you of course do
that very subtle, just like little bit of chromatic aberration to take
the edge off, and again, making it look a little bit more realistic because after all, every lens has some
chromatic aberration. Next up we have some
camera options, but I would suggest to
set those in the camera itself because once we're going to work with multiple cameras, maybe one should have a wider opening aperture while the other might
be more closed in, that could be
different if you're going to work with
different cameras. Next up we've got lens flares, which again is something
that we're going to set specifically for each camera because sometimes we want to have a lot of flares, sometimes we don't
want that a lot, so that is specific
for each camera. See the post-processing
volume as something global, something that you
want to have across all of your different cameras, of course, your entire seam. That could, for example, be something more like
color grading. Let's check out that
option right here, such as a temperature, like what temperature
do you want it to be? We can set a certain
white balance like make the entire
seam more warmer, now it's Mexico and we
can also bring it down, now it's the North
Pole or something. [LAUGHTER] But we also have
some other controls here, let me just reset that
back into global. We can add more
saturation, for instance, if we bump this up or
decrease the saturation and make it more
like an old movie or something like that. We can increase the
contrast as well, here we have that
contrast option, make that more flat. We can really give it
a particular look, which is really cool because I start color grading this even. If you go into the
different tones, such as the shadows, mid tones, and highlights to really make specific changes in those areas. We could even load in a LUT
as you can see right here, so I color grading LUT. I don't have any right now, but here's the option
where you can just load that LUT in and it will
be applied to your seam. Or perhaps if you want to color correct your seam
more like film, then you have that
option in here as well. This here refer to the
colors of film, the slope, the toe and the shoulder, which is your s-curve or maybe you want to make them
under letter with that. But that's also a different
way to color grade your shot or your entire seam as you go through
these options. Let's scroll down even
more because we've got some more interesting
options here like film grain, we could enable that and just
increase the film grain. Let me just pump
it up really high, there you can see it now, there's film grain going on entirely over my seam These
are settings that you want to have across all
of your cameras set globally and you can even fine-tune entirely
how that drain looks, so that is really cool to
have that option in there. That is in a nutshell how the post-processing volume works and how you can give a
certain look to your seam, but keep in mind
that also things like your atmosphere, your fog, the sunlight and all,
can also help to create a specific look if you go
through those settings. We've now already
gone through most of the basics of Unreal Engine, which is really cool, let's take it a step further
now and go a little bit more advanced by creating an indoor
scene in the next lesson. We're going to stop
working in our landscape, if there's something
lastly that you want to test out or try out, do it now before we're
going to start with the next lesson and
create an indoor seam and have a look at more
of the advanced features as long as the
engine can hold it.
10. Create a Virtual Studio: All right guys, time to
take off your jacket because we're going to leave
the outdoors and go inside. This here is where we left off. We created the landscape
and everything. You've already seen a ton of the basics here
of unreal Engine. Basically, you know
all the tools right now to start creating stuff. That's what we're
going to do right now. So here in my levels folder, I'm going to right-click, choose new level,
and that is going to be less than 10 already. Let's open that up. As always, it's saying blank level without anything in there. So let's locate that
atmosphere blueprint and drag it in there. Now of course, if we are
talking about indoor scenes, we might not need an
atmosphere in the sunlight unless you're going to work with windows in your building, then it's always a good
idea to have that. You know what, even if
I would create like a subway station or something
without any windows, I always like to have
my atmosphere or my sky in there just to have
some light to work with. We know that we can't really
model inside Unreal Engine. That is why I'm going to
go back to the Add menu here and then go to Add
quicksort contents. We've seen this library before, or we can download a
bunch of 3D models, but also things like materials and details and everything. That's what we're
going to do right now. The great thing about the quicksand library
is that we can also find here on the
left side collections. You don't have to go through those but you can actually look for interesting things
like this avatar, just click on that and you can see here this
is what someone made using these assets
here down below. So you could go
ahead and download all of these assets and try to recreate one of
these scenes right here. So that is one way one doing it. We can also go back
to the Home tab right here and click
then on 3D assets. Here we actually have a
category called interior. Clicking on that we
have a whole bunch of these very old interior sets, such as these wooden chairs and doors and walls
and everything. It seems like we can create
this old bar with that, like this lunar something. So let's do that. I'm just going to download a
whole bunch of these assets, which I've actually
already done, because it actually takes a little time to
download all of this, to import it all
into your project. So to save time, I already went ahead and just press that Download
button here on top. Then I can find them all back
here in my locals folder and from there import
them into my project. Now, a couple of
things that I also did was actually
downloaded some grass, a really old grass because I think it's going
to be really cool to see some grass coming through
the planks or through the windows or something
that really makes it old. Also a whole bunch of objects
like this spoon right here, or these bottles, these
flasks and everything, there's a little cactus here
because when it comes down to interiors and definitely
like an old saloon, it would have a lot of
mess in the background. If you're creating
something more modern, it can be more tied,
more cleaned up. Again, if you don't
really know what to do, look at reference photos or videos that you can
find everywhere online. There's something that
we're also going to work with here are decals a lot. What I have right here
are some leakages. These are no materials, these are decals that we've seen previously and we
can stick them onto a wall or something
just to have more of a dirtier look to
the environments. I'm also going to look for, I'm actually going to go back
to my home tab right here, go over to decals and perhaps
look for something like debris or something just to make the floor a little
bit more dirtier. Because once you're
going to stick like wooden planks or
something onto there, we don't want it to be clean. It's an old saloon, so let's look for dirt to put on the floor like here
perhaps some ash, like someone who really didn't want it to
use the ash tray. Let's download this one here, the pile of ash and add that
now to my project as well. What else do we have
perhaps under dirt, you might see something
interesting like here, like wet soil, maybe
that could work. I always say just
download a whole bunch. You don't have to use everything
that you've downloaded. Also while you're creating
these interior sets, you're always going back and forward between your library. You download a bunch of stuff, you insert that into your scene. You might think about
something different, like hey I need a bench
or something right here, then you go back to the library, look for that bench,
import it, etc. I think that we
have enough we can close the library now and we should find everything back here in my mega Scans folder, 3D assets here are
all the folders. Now it becomes really big
guys and really unorganized. It's going to be really
hard now to look for models that
we can work with. Let's talk a little bit about the content browser filters. So I'm going to enlarge
this panel here a little bit to showcase
that better to you. But right here we have a button called create an asset filter. If we click on that, we
can create a filter. For example, we
choose static mesh, those are the 3D model. So when I click on that, it will reveal all
the static meshes here within those folders. Of course, it will only show the meshes from the folder
that I have selected. So it's not going to
show anything for my starter content
folder right now. The cool thing is that we can disable that filter
by just clicking on Static Mesh and it
will actually stay in there because we've
created that filter. So if I need to go back to it, I can just click on it again
to show all of my meshes. Let me just disable that
because I also want to make a filter for my materials. Now, here comes a problem guys. Let me just go over to
my surfaces folder, which shows all of my materials. For example, we have
this Flaked Paint Wall and let's open that up. Like we've seen, a material
always consists out of multiple textures
and what nuts to create that specific material. But if we take a look here at the name on the bottom
of that material, it's not really a material, but a material instance. The difference between
a material and a material instance is that
the instance version gives a more user-friendly
interface to the end-user to change certain
stuff about the material. So if I double-click on that, we know that we can change
here the tiling and everything and the roughness and what not from that material. To create all of these options, we need to create a
material instance, which I'm not going
to bother you with, but just know what it is and that it's there
because people from Quixel and from other
libraries will make use of material instances to give
you the better controls. So when we are going
to create that filter, let me just go back
to my main folder here of the mega
scans and create a new filter we
don't want to create a filter for material as
it won't find anything. We're going to go over to the materials sub menu here and then choose
material instance. Click on that and now it'll show all the material instances from within my
mega scans folder, which will also be the foliage, so maybe if you are
only looking for the surfaces that you've downloaded off from
the Quixel library, you're going to have
to click here on the surfaces folder to display all the
material instances from what you've downloaded. Now, decals are actually
also material instances, so we don't need to create
a separate filter for that. Just make sure to
select that folder and it will display all
of its decals right here. Now as we're going here
through our content browser, let me just set that back to Static Mesh and click
on 3D assets here, here we can see everything. These thumbnails
might be too big. Maybe you want to see or look at these meshes from
a different way. Well, we can change it as well here from the
settings menu on top. Click on that and you can see that we have a bunch
of different options, like maybe you want to
see these in a list, or maybe you want
to change that to columns where you don't
want to see the thumbnails, but you'll see more of
the metadata from it. We set that back to thumbnails like maybe
or tiles actually, we set that back to that option. Maybe the thumbnails
are too big. Well, there's also
an option for that. Go back to settings and
on the bottom here you can see thumbnail size is
currently set to medium, we can make it even bigger, set that to large or
maybe too huge like that, which gives you a much
more detailed view of what the models are about. But we can also set that
size to something like small and that way we can see more within the same window. That is in a nutshell,
how you can use your content browser
more efficient. Now let's start creating
that interior design. I'm going to start
by looking for a wall and I should find
something right here. A saloon wooden wall and just
drag that into my scene. There it is. Let me just
make some more space. There we go. Now one of the problems
that you will start to see a curve when importing
3D models like these, is that they are not
always closed entirely, such as these walls right here. If we look at the other site, you can see that we can
just peep through it. That's going to be a
problem because let me just import very
quickly here in plane. We can see better what's
going on under Shapes, plane. Just drag that into the
scene, there we go, and just make that a whole ton bigger for the wall to stand on. By the way guys,
here, this wall, if you wanted to attach
that to your surface, just select that and
hit the End key on your keyboard which
will bring it down on that surface plane. That's a nice extra
tip for you to know. Let me just cast my sun here. Let me just change
the position of my sunlight so that it actually goes now
through the wall. You can see here in the shadow that something is not right. We're casting light through the wall and that
should not be the case. Definitely not if
we're going to design four walls and a roof and
light still comes through it, that doesn't make sense. There are a bunch of ways
to fix that and there's no real right way to do it. Anything that works for you, anything that delivers
a good result is a good way to make it. That's the thing
about Unreal Engine. But I will show you
my workflow which I think is the more
convenient way of working. Now, one way which is not the correct way but I will
show it to you anyways, that is now by creating a
new cube and we can just insert that into our scene
which can block out the light. You probably already know what I'm going to do right now, and that is just make this
new wall behind my real wall. That way, we are blocking out the sun, as you can see here. Is that a good way to do this? Maybe for something small, but there's a much better
way to do that and that's through the
help of geometries. I'm going to just delete
everything here in my scene. Get rid of the wall,
get rid of this, and the plane as well. We're going to locate
the geometries and it's hidden a little bit. For that, we're
going to have to go over to the menu on top, choose Window, and from
there choose Place Actors. Click on that, which is going
to open up a new window. Basically, this allows us to find certain
things much quicker. It's the same thing as
the Add menu here on top where we can choose
to add lights or shapes. We can find those options
back in here as well. Like here are the lights and
here we have the shapes, but we actually just
have some more menus and more options in here and through
this window right there, such as the geometries
right here. Here we can find the same
things back like the box. You might think, isn't that the normal box that you were talking about before? Well, no. This is a geometry box which is apparently something
different and unreal. It comes with a whole
bunch of more options which we're going to
look at right now. Let's just start by dragging
in that box into the scene. Here we have it. A box, nothing really fancy about it. But with that selected, going here into
the Details panel, we can see that we have a
little bit more options. For instance, we can change the size of that
box very easily. Perhaps set that to 2,000s, and perhaps, I don't know, 1,000 high or
something. There we go. So we have a nice little box right here that
we could work in. This could be our studio. Well, not really,
because if we're going inside of the studio, you'll see that we
have that same problem of it not really being hollow, but we have an option for that.So with that box selected, let me just go back out
to show it to you better, we can actually find an option
in here that says Hollow. Click on that and
you will see that a new option will appear now
which is Wall Thickness. It's set to 10, which
is enough for me, but if we now go
inside of the box, look at that, we've
got a studio. How awesome is that, guys? This is a great way
to block out light, and you might be
thinking now, Jordi, I can still see light coming
through. That's right. With geometries, we have the problem that light
still comes through, but we can very
easily fix that by transforming the
geometry into a mesh. There's a very easy button for that here in
the bottom here, it says Create Static Mesh. When you click on that, it's going to ask you to save that because every
static mesh is an actual object
within our project. We can give that a
name, for instance, Studio, and then hit
Create Static Mesh. You can see now how
the light changes. It's now pitch black in
my studio, pitch dark, and if we go outside, you can still see that the
sunlight is still there. That's the way that
I'd like to work by actually creating a studio. Now, I hear you think, Jordi, what about windows? I like to have a huge window where the sunlight
can come through. How can I create
a hole in my box? Well, for that we shouldn't have actually created our
static mesh yet. So I'm going to hit
Control Z to undo that action so that my box
right here is still a brush. I'm actually talking
about geometries. We're actually talking
about a brush right here. Transcoding your box into a static mesh is the last
step that you want to do. You first want to
create your windows, your entire interior, and then you want to transform
that into a mesh. Now, to create a
window is very easy. We are just going to drag in
a second box into our scene. It's right there. We
can actually choose now that this box needs
to work as a cutout. With that selected here
into the details panel, you should find an option
called Brush Type. It's currently set to additive, but we can change
that to subtractive. By clicking on that, the box will disappear
because it's going to eat everything
away in its path, and you can see that we'll
do that as well if we're going to drag that
box into our wall. There we go, we've got a window. Of course, we can make
that bigger like that, make our wall bigger, and the light will
beautifully come through it. Now, let me just change the
sunlight so that the sun is actually shining it's
light through that window. If you look behind this, there it is, the light
through the window. That is how you can create
a studio with Windows. Now, really important
is that when you're creating a studio like this, is that you're going to place
everything in a folder. We already have two
boxes right here. I'm actually going to
select both of them, create a new folder,
and call that studio. The reason for that is
that once we're going to transform this into
a static mesh, is that we need to select
all of those brushes and then go over to
create static mesh because it needs to
combine all of these boxes together into one new element. Once we're going
to create walls, and tables, and whatnot in here, you're going to
get a real mess in your outliner so
that is why it's so important to keep everything
that creates your studio, that does not mean perhaps other geometries in your scene, but just your studio, the outer building and
the windows in it, that you place that
into one folder. Be organized. You know what to do right now. Go ahead and create
your studio box, perhaps already try and play
around with that window, and download a whole bunch of stuff from the Quixel library. When you're done with that, you come back for the
next lesson where we're actually going to build
our interior scene.
11. Design an Interior: All right, let's start building the interior set and we're going to create this old saloon
or something like that. Now creating an interior
is very straightforward. We're going to start
off with walls, and we've talked about
them previously as well. We're going to drag
them into my scene like that, rotate them around. There we go, reposition
them the way that we want, and let's duplicate this wall, hold down the Alt key on
your keyboard as you drag it out to the right side
or anywhere else, then we can go ahead and select both of them with the Shift key, select it and again, Alt, drag, and now we've got four pieces of wall right here. This is how you just want to continue to build
your interior set. You just drag and drop different 3D models and just try to create
something that looks good. Again, you can use a
reference photo or something that you
might have seen somewhere in the real life, which you grab the photo from. That could definitely
help with inspiration. Let's create that window
right here because that is something more specific. Let me just make a little bit
more room for that window. I have one right
here. There we go. Let me just rotate that around, 180 degrees, and also
bring that in place. By the way guys, we have
these three accesses right here on which we can move these panels or
objects around actually. But we can also select two
accesses at the same time. You can do that by just hovering your mouse
in between two, and now we can move this
around on the x and y-plane. But we can also
move it around on the x and the z-plain like that, or to y and the z. I never
know what the x and the y is. I think everyone has
a problem with that. [LAUGHTER] If we then press the Enter key
on your keyboard, it will again snap to the
bottom plane of your words. Definitely, also something
to play around to it. Let's place our window
somewhere in here. Something that makes
sense like that. I don't really
know, with the wall next to it. We've got a window. Now we actually need
a window through it, and we've seen in the
previous lesson that works. I'm going to go fast over this. I'm going to create a new
box that goes right here, and we're going to make
sure that that box here is set to subtractive so that we can move it here into that wall and actually
cut a piece out. There we go. Now it
actually seems like a window through which
we can see lights. It's as easy as that. Now important, let's give that a good name so we know
what we're doing. This is a window and I'm
going to drag that into my studio folder
because when we're done with our interior design, we're going to create a
mesh out of our studio. Then we're going to
bake the windows and everything [NOISE] together. Now a couple of very
important things, guys, when we are going to take a look outside here through the window, we can see this studio here. Here's also something
that isn't truly correct. Let's fix that as well. I'm going to look here
for an outer wall, I actually downloaded,
something like that. Right here I should have a wall. Let's take this one. There we go, rotate that around, and let's place that
outside now, like that. Now it seems more natural like the outside of the
building. Much better. Don't worry too
much that might be sticking out right
here into your studio. As you can see, we are working with these panels right here, so they cover up that anyways. Maybe I'll also want to
cover up the top for maybe if I'm making a shot
for more below or something. Let's duplicate that
wall, hold down Alt, drag that above R which I've set to rotate my
objects. There we go. Try to really make yourself
comfortable with all of these shortcuts and everything to quickly move around objects. As you can see, what I'm doing. Creating interiors is a
really good way to get more familiar with moving
around objects. There we go. Now it looks a whole lot
better here from the inside, we actually have a building
that we can look through. Analysis is something that
you want to continue to do. I also have this bar somewhere. Here it is. I can
drag that in as well. It's a modeler bar which you can download off from
that quick library, really cool, and
drag that to here. We can even extend that by
adding a duplicate to it. We have this corner
of the saloon bar, rotate that, and add
that next to it. If you've ever played the
same guys, is basically that. It's really fun to build
out your scenes like this. Look at that. We've got a bar, now it just needs some drinks. I have a couple of bottles
here which I can just place here on top of my bar like that. Always try to have
enough differences, so if you're planning to make a saloon-like I'm
creating right now. Don't just look for one bottle and you're going
to duplicate that around. Always look for
different bottles. Like even though these two
here are very similar, they are a little
bit different here, as you can see at the top, they have indifferent
cork on top of them, and that is eye for detail. If you do that, it just creates more realistic scenes because nothing is ever twice the same. Also good to act like
a different ball is perhaps in
there. There we go. Now talking about chairs
and tables and everything, that's going to be
the exact same thing. I have a couple of chairs
somewhere right here. You can see that I
have three chairs and two of them are very alike, but yet still they are
a little bit different. That is what makes good design. It was also really fun if I'm going to add
a table in here, and I also have a
very nice long table somewhere right here, a dirty old wooden table. It's perfect. Let's add my
chairs here around that table. There we go. Don't
place them too nicely. Definitely not for
a scene like this. Like one chair should
be a little bit further away from the table. The other one not. You know what's so typical
about these old saloons? They have three chairs. The fourth one is a
completely different chair, like this white chair right
here because one of them broke so they had to take another chair from somewhere
else. There we go. This looks way more
realistic and if you would have four of the
exact same chairs in there, definitely again for
this type of scenery. We're going to create
something more modern and of course we're
going to have four of the exact same chairs which are very clean
and everything, but that is not what
we're creating right now. We have some stools which we can set here in front of
the bar and everything, so just continue with decorating
the scene that you want. We are going to place
some stuff here on the table and everything, but that is up to you guys. You know how it works right now, it's really nothing
more than that. Now, once we're going to
start with laying down our floor which we are going
to need a texture for. There are a couple
of ways to do that. We could actually use
our studio itself. In this case there's also
no problem with doing that. Let's just go ahead and select the floor right here and
you can actually see here that with
geometries we can select different planes of the studio which was not
possible with meshes. That means if I now go and take my material instance filter and I'm going to
deselect static mesh. I'm going to look
for something woods. I thought that I
downloaded something. Let me just select
my surfaces folder here so that I'm in
the correct one. We have this cracked
wooden floor, I can just go ahead and
drag that onto that plane. It will be only applied to this plane so that
means that we can have different textures on each and every plane of that studio. The texture isn't really
looking that amazing yet. With that selected we
can actually here again, go into the settings
and you'll see that we have a bunch of surface
properties right now. We can rotate that around, you can see here
that my plunks are now into a different position. By the way, if you
are getting crazy of this surface being selected and that yellow color just covering
up your material, just press the G key
on your keyboard. It's going to hide all
of the widgets and the controls and everything but you still have it selected, so that way you can see
better what's going on. We can go to rotate
that now 45 degrees, you can better see what
that does to my floor. If these plunks
are maybe too big we also have a scale
option here and you can lock the scaling so that
two values will scale proportionally so
that you're not going to stretch your materials. Let's perhaps set that
to something like, I don't know, four, and let's see what
that does and apply. You can see that now
my plunks are bigger, just make sure it
still makes sense. Maybe these plunks are too big, let’s set that to two, which is a little
bigger than before, but this still looks
pretty natural. We could also fan it around
because maybe you want to make sure that your plunks start somewhere
that makes sense. Your first plunk should
start here with the wall, so we can use these fan
controls right here to move the floor
around and try to make sure that the edge of the first plunk or something
aligns with the wall. You can use the little arrow
to go the other way around. The way I’m pressing
here the 1-56 value, if you press the 140, it will just be bigger step, but that's just the
difference between these. But that's an easy way to
control your material. It's actually better to
do that right in here in the surface property
of our studio instead of actually
opening up that material as we've seen before you start
changing things in here. Because if we do that, we are actually changing
the material itself. So that means if I'm going to apply this to multiple surfaces, it will have the same
settings everywhere because I'm making
changes on the source. But if I'm going to make changes here on my geometry plane, I'm only going to
make changes for this specific plane that I
have selected right now. Next up is going to be
like a bigger wall on top of that because I want to create this little
balcony right here. In order to do that, I'm
going to create a box again. Just drag that into your
scene right here it is, and I'm going to go
ahead and go into my details panel to
change the size. Where is it? Right here. The x can be something like 10 because it's just a thin
wall or it's actually the Y. You see, I never know what a
difference between y and z. Let's just make that
a whole ton bigger guys because it can
be like a big wall. Perhaps a little bit
bigger like that. We can move that into place now, plays out on top of our
other wall like that. Because this one right
here it's not going to be a 3D model that we download off from the
quicksand library, we're actually going
to use this plane to give a material to it. This is starting to look good. The reason why I'm
not actually using the scale option, by the way, to change the size of that, you can see here
what that does to the texture is actually
stretching it, which is not what we want. We actually want to make the box bigger and not scaling bigger, so keep that in mind,
which is why we're using the controls here
from the details panel. Let's look for something
to add a texture to it like the flake wall. Just add that to it. Looking okay-ish. When it's changed the scale, most definitely we set that to something
like a length four. Let's see what that
does. Looks good. If you are going
to add materials to pieces of wall that we need, we're going to create new
boxes or new geometries. But for something like
the floor which can be entirely exactly the same, we can just add our
material to that. Now, what if I want to make some sort of a query
door here in the back, that means that I have to move everything aside to make room
for that new query door. There are two ways
we can do that. We can select our entire set, just move that a title the up, or we can also just move
up our entire studio. That's the big advantage
of doing adult virtually. The real studio here I can't
move this, unfortunately, but we can in a virtual world, so let's just select
an entire box, the studio, and I'm
going to move it. Where's my move tool? Right
here to the right side, and there we go, we have made room for it. As you can see here, a window state perfectly
in place because I did not select the window
or the cut out in my studio, so I can just go ahead and
move that to any place, I can change the
height, or the size, or anything from that cube, all of my cutouts will stay at the right place where my
interior designers at. Of course, we can also
move the cut-out if we select both of these right here in the studio
and the window, but, of course, usually
you don't want to do that. One last thing that
I'd like to show to you guys before
you are going to make your own interior set and that is the
pivot point problem. Let me just copy here this chair to
demonstrate. There we go. Right now the pivot point is right here on the bottom
and the middle of a table. I'm going to take
my rotation tool. It will also rotate around that pivot point and
sometimes that's fine, other times it's tedious and you want to have it in
a different spot. To do that, we're going to
take back the move tool, hold down the "Alt
key" on our keyboard, and then click and drag with, "the scroll wheel button." I know that's a weird
way of doing it, but that's how unreal
one says to do that. Again, you can always
change our shortcuts, but let's [LAUGHTER] just do
it how it's set by default. I'm holding down that
weird button as I'm dragging that anchor or
pivot point to a new spot. As you can see now, if we take the rotation tool, we can rotate around that point. Now, here's going
to be the problem. If I'm going to click away
and then re-select my table, you'll see that my
pivot point has been reset back to default, and that is because we
have not really saved it. What we've done was
a temporary way to change the pivot point and
sometimes that's fine. Sometimes we just want
to temporary be on a different spot so that we can rotate around that point, other times we want it to
be somewhere permanently. Well, to do that again, hold down "Alt key" drag your pivot point to the spot or place where
you want it to be. Let's just take the
corner, doesn't matter. Now I'm going to right-click
on my pivot points. Go over to pivot, and from there say, set as pivot offset, click on that and now
you will see if I'm going to deselect the
table and select it again, that my pivot point
is still there, and I can go ahead and
rotate around to the corner. With that, last tip
it's now up to you to create your own saloon
or maybe something else, it really doesn't matter. I'm going to go ahead
and finish my saloon, which is going to take
like three or four hours. I know it seems very
simple as you're just dragging in a bunch of 3D
models interior scene, but it actually takes a
lot of time to really find the right spot and to make
it look realistic and all. Again, that's why you could work with reference photos or videos, but this isn't an essence
what you want to do. He's dragging a bunch
of stuff and make sure that they are set
at the right spot. Go ahead and do that
right now and then come back for the next
lesson where we're going to take a look at what I have created and I'll show you around in my new interior and show you guys
what I've done. Thanks for watching. No,
I should be right here. Seriously, it takes a long time to design something like this. But you know, it's like the
seems, it's a lot of fun.
12. Interior Overview: You're back. Hi. I'm sorry for all the mess in
my engine studio. Anyways, I've been
working now for, I think, three or four hours on
my interior saloon. Let's have a look at
what I exactly did. Here it is. You might
think by yourself, Jordi, did you really spend
four hours making this? Well, there's a lot of
work that goes into it. Let's zoom into the details and just have a look at what I specifically did to
make a scene like this. First of all, right here we got a table with some
chairs around it. I already gave you guys a tip of always working with
inconsistencies. Definitely, we're working in an environment like this where there needs to be more dirt and junk around in the scenery. Of course, that's going
to be different when you're creating
imaginary worlds. We've got some stools over here at the bar and you can see, they are definitely
not aligned well. I've also rotated them around to make them appear more random. Here at the window,
I've actually also added some foliage
as you can see. These are painted in just like
we did with the landscape. That way it seems
like the grass is like growing through that
window, which is funny. There we've got the
bar itself right here. As you can see, I reuse the table that was standing
over there in the middle. But I've made sure to add a rotation to it so that
it doesn't seem the same. Let me just quickly
show that to you guys. I'm going to make a
copy of that table. What I did was have
one stand here, made a copy of it like that, and then just rotated
that 180 degrees around. Now it seems like I have
two different tables. The same thing with the
barrels that I created here in the back where we have
that little corridor. Also here, I made
sure that none of these barrels are
aligned perfectly. You can see the gap
here in-between this barrel and this one which
is not the same as these. Also when you put two barrels on top of each other,
minor details, but just make sure that they
are not standing exactly in the middle but always slightly to the left
or to the right. Try to look for
inconsistencies that make up a world or an
environment more real. As you can see here
in this corridor, it doesn't really look like
a real saloon anymore, but like an actual studio. Also on the other
side of my saloon, I still don't have
any textures here, but that's okay as long as I'm not planning to use that site, why should I put time
and effort into it? If I only want to
fill in this way right here then that
is more than enough. I also created this
balcony here on top, and those were again created
using geometries here. We've got one plane
over here and then a second one right here, which is taking care of the cut-out and I can't
even select it, it's right here,
balcony cutouts. There again, we get
a practical example of how to use these geometries. We also have some barrels
here beneath the stair. Again, if you want to
make it seem like these are different
barrels or buckets, what you want to
do is rotate them. Well, I'm going to make
a duplication of one, make sure that you
rotate the second one, and now you get a whole
different new barrel just made out of
the same material. Let me just delete these two. That's how I went further. We have some more
chairs here underneath the stair and something
very typical with chairs, you want to put them on top
of each other like this. Again, you see the
asymmetrical in here, they are not perfectly aligned, I've made an offset and
the rotation with them. Also, let's have a look here
at the cups that they have. This is like a pretty cool
detail that I've worked on. We can see here the cups which are stacked
upon each other. If we would just take a cup, there we go, and
start stacking them, you will start to see that
it looks very unnatural because they are
stacked too perfectly. What I did, again, I've rotated them a
little bit around like you would actually
see cups in your cabinets. They are always
stacked like this, a little bit slant or something
on top of each other, which just makes it look
a whole lot more real. Basically, that's
what I've done and I see that this one right
here is floating. Let me just put
that on the table. That's it for everything
that I've made. All of this came from
the QuickSort library, super easy, you just drag
and drop it into your scene. The time and the
effort is mostly spent in where
should I place it? Now let's talk about decals. I've used many decals in this scene to really
take the edge off. You can see all of these
floating widgets right here, which are actually
called billboards. These billboards right here, they represent these decals. Basically, what they
do is they just cast a certain texture onto
other materials or meshes. Let me just take a new decal just to show you how
exactly that worked. We have seen it before, but I want to show that
again to you because decals is a very important
part of Unreal Engine. Let me just take, for example, this dirt pile right here. Now, the first thing that
you'll notice is that we're going to drag
this into the scene. It wants to be applied as a
material to the geometry. I'm not sure if that
is a book or not. Anyways, I'm going to hit
Control Z to undo that action. What you want to
do is always drag any of the decals
onto an actual mesh, like for example,
this stair pole right here and then it
works, then it's okay. I'm going to place it
somewhere else right here so we can see it
better, what's going on. We can see this
arrow right here, which is the cast of the decal. Basically, that's just a flat
material as you can see. But from looking at
it from the top, it does feel like something
more three-dimensional. Anyways, we can rotate
that around and anywhere that heart
arrow is pointing to, it will be casted to. Let me just set on my
raster for the rotation. Let's say that we want to cast this onto the wall right here. What we don't want to do
is rotate that 90 degrees this way and 90
degrees that way. There we go. It can now
bring that closer to the wall and you will see that
it will be casted onto it. Now, you will always see the stripes right here
and that is because the thickness of the box that goes around the decal
cast right here. Let me just put this
back a little bit. We can use scale options to
make that box smaller as you can see and now
the casting area will be a whole bunch smaller. Let's now bring that casting
box again against that wall. There we go. It will
now reveal itself. That is definitely
something to play around with the first time
that I worked with decals. It was also a little
bit of a frustration that I just couldn't
get them right, but eventually, you will. You just need to place a lot
over your scene and it will become more clear to yourself
how exactly they work. But essentially
that is what I did. I'm going to remove this dirt on the wall as dirt
doesn't really make sense. But all of these
dirt pieces here, like this entire dirt
here on the wallpaper, let me just uncheck the
view of that for a moment, but you can see here how
that is just a decal. Of course, if you don't
want your decal to be casted onto something
like for instance, I think it was this decal
that I had right here, I didn't want it
to be applied to the pole of the stairs right here because it
would just stretch out the material and just
didn't really look good. With that selected
here, this pole, I can go into the details
panel, search for decal. Actually from there make sure
to uncheck received decals. If I check that, you can see here what
that looks like and that stretch is really looking
bad and I didn't want that, so that's the reason why
I unchecked that option. For any other mesh
in your scene or 3D object where you don't want your decals
to be casted on, make sure to uncheck
that option. I used also many
decals in the corners, and you'll see that here at this bar because if
you think about it, dirt always goes to the corners. As we walk into a room, we always push the dirt
to corners into edges. That's definitely something
to pay attention to. I also have some rubble
here around this pillar. Also here in the corner, you can see all of this dirt, which makes sense
for this scene. That's pretty much it. By the way, you could
also work with 3D models. Right here, I just
laid down some bricks, which also act as some rubble or some dirt on the
floor but of course, the big up that we have with 3D models is that they are 3D. If we look at from here, we actually see some more
volume to it rather than with the leaves and
everything here on the grounds like they
are still pretty flat. I'm also not a really big fan
of using doors as decals. You can see that these here
look very flat as well, definitely from here because these are just texture doors, but I just couldn't
find any good ones in the Quick Sale library
but since they are up there on the balcony, which I'm planning to use in the background
somewhere, it's okay. The problem is just
with using 3D models, if you want to create
something like this here, this is a decal, but if you want to make that, you actually can, I think. You can find all of
these objects back in the Quick Sale
library but you're going to spend a whole lot of time creating a simple patch
like that and then you need to wonder is it really
that visible in the back? That's up to you. How much time did you just want
to spend on to it? But I also just did here, you can find here as well, this here is a pile of rocks and it doesn't really
make much sense. You can also see here at
the transition between the rocks and the floor
isn't really that great, but it's okay because again, it's in the back. We don't see it that good. Definitely not when we're
going to work on lighting, which is for a future lesson, but this is how in a nutshell, I created my environment. I hope that was clear. It was just really
boring showing you that entire process
but here it is. One last thing that
I'd like to show you. As you can see, I found some of these picture frames in
the Quick Sale library, but unfortunately,
they are missing pictures or paintings or whatever you want
to put in there. Well, we can actually go
online and look for photos. You can also with
your camera just take new photos if you want to
and let me just locate that. I'm going to go to my desktop. I have a folder here
called Photos and I'm just going to put them into
my project folder. So here under Contents, let me just drag all of my
photos in there like that, then go back to Unreal Engine. It's should prompt me
that I have imported something and it
is not doing that. What we then have to do
is manually import them. [LAUGHTER] Let's go over
to the Adds button here on top, say Import to/Game. I'm going to locate my
Project folder photos and here just select all
my photos and hit "Open". There we go. Let's
put them in a folder. It's so weird that it
didn't want to sync up. That's the thing with Unreal, you never know what you get. [NOISE] Photos.
Wait, here it is. The Photos folder
[LAUGHTER] but it's empty. I'm not sure what just happened. Anyways, that was a
good tip as well. If it didn't automatically import and you're going to
have to do it automatically. Let's put it all in there in the Photos folder and move
there. Here we go, photos. Photos will always
be seen as textures, and we know that
Unreal Engine actually works with materials which could exist out of multiple
textures, but that's okay. All of that happens
automatically in the background. We could actually
just straightaway use these textures and let me
just show you how that works. I'm going to create
a new box under the geometry option here. Drag that into my
scene. There we go. Let's go to the Options and
just move decal here and make that a little bit
thinner, something like five. No. [LAUGHTER] Always
doing it wrong. Five on the x-axis, there we go. Let's just try and
make a surface that fits here into
my picture frame. Actually, I should have not made these picture
frames slanted just yet because now I have a lot of trouble
trying to fit it in there. It's always better to
first work straight. Have your two objects
on top of each other and then start rotating them
together always better. Let's further try and
match this surface here into my picture frame. I might need to move my
picture frame a little more, up like that. Looking good. My box
sits in the frame. We can now go ahead
and actually add the texture to it,
and you know what? I had this beautiful
picture of myself, [LAUGHTER] as you can see. But let's start with something
serious. These horses. I'm just going to drag
that onto the surface. As you can see here,
automatically, Unreal will create a material and it's going to apply
a material to it. If you open up that material, you can see here that did
something with notes, that more advanced thing that I was talking
about but it's all doing that automatically in the background,
so that is great. We don't have to worry
about that at all. There we have it, some horses and we can go ahead as we know, we can bend that or move that
to a different position. This is actually
looking pretty good. Now, I want to do a couple of
things with that painting. First of all, we want
to make sure that the photo itself is
part of the frame, so we're going to attach
them or link them together. I also want to make
sure that the decal, there's dirt right here is not applied on to the
painting itself. Now, in order to do that, we're first going to
have to transform our geometry into a
shape, a static mesh. I've already shown
you how that's done, but let's do that one more time. I have my box here, my brush selected, my
geometry, and in the options, we can choose to create a
static mesh and we're going to call that the Horses_Mesh. [NOISE] Hit Create
Mesh is going to add that into my folder but
now since that is a mesh, we can now also find options
in here under decals, receive decals, yes or no. This is an option that we didn't add when it was in geometry. So maybe the same thing here
as well with the frame. Maybe not receive that dirt. It's a nice photo. We want to see it in our scene. There we go, looking good. Now there's going to be a
problem when we want to attach this photo to the frame
because if you noticed, we can't really drag that
into the frame as there are so many layers in
my project already. How do we get started with that? Well, easy. [LAUGHTER] We just
select the picture itself and I'm going
to right-click right here on the Horses_Mesh
and I'm going to say "Attach to" right here. We could search for
that layer somewhere right here or we can
just use the picker. Click on that and
now we can click here on that frame. There we go. It's now part of it. If we now select
that frame again, you will see that my
Horses_Mesh is attached to it. If we take the
picture itself now and move that to
a different spot, they will always be linked
or attached to each other. They are now one. I'm going to do that
as well now for the other picture frames that I have right here and over there, also stick a photo in there and definitely want to have my
own face, just look at it. I want to have that in
my scene somewhere. It's going to be gorgeous. In the next lesson, we're
going to create a Meta-Human. That is something really cool, something really fun
to play around to it. After that, we're going to
light out our interior scene. Now the reason why
we're first going to make that Meta-Human, and so that we have a person
standing in that scene, which is going to be a
little bit more easier to create our interior lighting. [NOISE] I'll see you
in the next lesson. I need coffee. [NOISE]
13. Create a Metahuman: [NOISE] No. it happened guys. It eventually did happen. The engine is melting. We did something that
we shouldn't do. MetaHumans. I have to fix this. But how can I fix this? Just maybe if I press
the right button, it might come together and the engine might
restart. Come on. It's working. [NOISE] My
boss is going to kill me. There, now he can't call me. Anyways, we're going to work with MetaHuman right now, guys. MetaHuman is a way to
create 3D characters, but it's something so new
that it doesn't always really work and your computer is going to have a
hard time with this, and that's the unfortunate
thing about MetaHuman. But still I find it very
important to just have a lesson about it because I do believe
that it's the future. MetaHuman is not
on-point right now, but it probably will be in six months or a year from now, so let's have a look at how
MetaHuman works, the basics. Here's the interior
from which we left off from their
previous lesson, and I've also added
all the pictures here into the frames. There's me. We've seen how to do that in the previous lesson. Now let's have a
look at where we can import our MetaHumans. Again, we go over
to the menu here, click on "Add" and
then from there choose "Add Quixel Content". I'm going to maximize
this window, and on the left side, we
can find a MetaHumans. We get a bunch of presets. We can just go ahead
actually and choose any of these presets and import
them into Unreal Engine, and we can simply do that by just selecting any of these, for example, this one, and here click on the bottom
on Download and then Add, just like the 3D assets work. But we can also create
our own character, and let me show you
guys how that is done. We're going to click here
on top to say, Start MHC, which stands for
MetaHuman Creator, so click on that,
which is going to open up your web browser. Now the first time we're
going to open this up, it's going to ask
you to connect your Epic Games account
with MetaHuman, and of course, we want to
do that, so hit "Allow". You now want to log in, again, with your accounts. Now, MetaHuman is
still an early access, so you have to sign up
to request access to it. The good thing is that everyone who requests it can get it, fill in the form
and hit "Submit". MetaHuman is going to
load and you're going to find out that if you're going
to try this yourself too, that your computer
might have a lot of trouble with
basically everything. [LAUGHTER] That is because MetaHuman is still
in its early stages. In a couple of months from
now or a year or something, I do believe that it will be at some point where the
performance is going to be better and we won't see any more of those
meltdowns right here. So if you are having
trouble right now, don't feel bad by
skipping this lesson, or at least watch the lesson, see me do it so that you know
what MetaHuman is about, because I do believe
that in the future, it will become something bigger. Here we are. On the left side, we can find back
all those presets. These are the same
that we saw inside the bridge application
of Unreal. But of course, we can also
start creating our own. Now the idea is to
start with a preset. Look for a person
that looks like you or maybe like the person who
you would like to recreate. For example, for me,
that could be Ettore. Just simply click on
that preset MetaHuman, which is going to load it, and you are going to see this
warning message right here, which says that this character
uses some assets which will only be displayed
at LOD 0 and 1. LOD stands for level of detail, and I'm going to show you
guys what exactly that is once we're going to
load in the MetaHuman. For now, don't worry
too much about that. So with that selected,
we can click on "Next". That is going to bring us
to the Customization tab. Basically right here, we can change anything
about this character. See it as an RPG game
that you're going to play and you have to create
your character first. Well, it's the same thing, but much more advanced. On the bottom here, we can
choose to start sculpting, so clicking on that
reveals a bunch of points, which we can just drag around to change the shape of the face. This way, we can
make that person look a little bit more like
me or someone else you know. It's actually really fun to
start playing around with this as you can really change
anything that you want, like change the nose, everything, the ears, you can see that we
get many points to start shaping the character. On top here, we can see
the quality setting. It's currently set to medium. We can change that to Epic if you have the guts to do that, because yes, it will load even
slower, but let's try it. We can always change it back. From here, we can
change the skin color. I think most of these
options are pretty obvious. We can make this character older if we want to
with the texture. We can add freckles in there, change the density
of the freckles. I will first have
to select a preset and change the density of that. If we want more or less, we can go over to accents. For example, if we
want to have like more red colors
here in my cheeks, I can select the cheeks and
add more redness to it. Or perhaps my eyes, I
can make them a little bit darker, like that. Even the iris, for example, we can change the color to
something more like bluish, which are like my eyes. We can change here
to color balance. We have so much options here to really change how the
character should look. So I won't go into much detail. Even the teeth, by the way, the length to the teeth and
the color and everything [LAUGHTER] I could even give myself makeup. Let's do that. Let's go over to eyes, and I really like this here, dramatic smudge and perhaps make that something like blue or
something. I don't know. [LAUGHTER] I don't know
why that I'm doing this, but I consider it as
me in the future. Who knows? Maybe my mid-life
crisis or something. Perhaps lips, I don't know. We can give some
color to my lips. Let's go for blue as well. Fits my eyes, doesn't it? [LAUGHTER]. The heads, the hair for that, maybe some different hair.. Maybe I want to go
for, I don't know, something more like this
in the future. Who knows? There we go. This looks like nice hair that I might
want to go with. Of course, the color, the eyebrows, the
eyelashes, the beard. We can't forget about
the beard guys here. This is more me, or
maybe this here, this is more me, like an
unshaven and uneven beards. There we go. This is looking
pretty much like me. [LAUGHTER] You get
the idea, guys. Just go ahead and
play around with it. It is very user-friendly
and self-explanatory. It's just like an RPG game, you make a character. Now one last important
thing here on the top, you can click on "Studio" to set a certain or a
different lighting, also a different environment, for example, here
downtown nights, and that way you can see your character in a different
lighting environment. But yeah, that's pretty much it. Let's go ahead and
rename this character, which we can do here
from the top left. Click on this pencil
to edit Ettore, ensure how to pronounce
that to Jordy_Future. That's not me yet. We don't have to save anything. We can actually just go
ahead and close the browser. There we go, and we're
now back into bridge, and from here, now
we should be able to find our MetaHuman. If it updates at least, maybe go back out of this menu, go to Local, and I'm
back to MetaHumans. There we go. Now it's loaded. We can see a new
tab, which says, My MetaHumans, click on that, which will reveal the one
that I created, Jordy_Future. Now, what you have
to do is download that model and then import
into Unreal Engine. Fortunately, that takes
a whole lot of time. Yes, expect to wait
like half an hour at least until
everything is loaded in. So I don't want you guys to sit through the pain while
I just sit here, watch my screen and just
watch the time pass by, so I already went
ahead and actually imported this character
right here, Aoi. I downloaded it already
and I've already imported it into my project. It's right here after you have imported it and your
folder has been created, MetaHumans, and from there, you can see the
character name, Aoi. Just double-click on
that to open it up, and right here is
the blueprint class. Now here's the thing
about MetaHumans. They are within a
blueprint class, and we've already talked
about blueprint a little bit. They give functionality. That's the great thing about these MetaHumans and
why they are so great, because they are prepared, they are ready to start animate, to even do motion
captures, width, etc. and I'll even show you guys in the next lesson how you can make your characters
talk using your iPhone, which is truly amazing
and super easy to do. But for now, let's
see how we can bring this character into the scene. Simply drag that blueprint class into your scene like
that and wait it out. The first time you're
going to do this, you want to go ahead and
drink a coffee or something, wait it out for half an hour. But I've already done that,
so it's a little bit faster, and as you're doing that,
it's going to say like, hey, you're missing a
couple of plug-ins, and you can see that it's
already asking you to enable plug-ins like Live Link, which is used to motion
control this character, so you can wear this suit where you can just go like dance around and your character will also perform those
same movements. For now, I will
just hit "Dismiss". You don't have to
enable that if you don't plan on using that. There we go. Here's
our character. The first thing that
you will notice now is that the hair of my
character is gone. But once I move closer, the hair will appear, and that is the LOD or the level of detail warning that we were
getting previously. Previously, we've already
talked about nanite, where if you would zoom
out in your scene, models would
automatically change your amount of triangles
so that you will retain a good performance inside
the engine without losing quality or
visible quality. If your models are not built out of nanites but more
than a classical way, it will work with LODs, and you have several
levels of LOD. The first one is LOD
0, level of detail 0. That is when you stand
close to your character. Then if you move
out to the back, it will go to LOD 1, or level of detail 1. If you zoom out even more, it will go to LOD 2. Every model will have like nine different
variations depending on how far you are
from the character. Currently, things like
hair is not supported yet in anything
further than LOD 1. That's the reason why we have to be up close with the MetaHuman. Actually, we can preview those LODs if we
look into the mesh. Let me just quickly show
that to you because it is definitely something to better
understand what it does. So with a blueprint
selected right here, we can see the entire structure
within that blueprint, which is of course the
body and we have to face, the torso, legs, feet
and everything else. With the face here selected, we can go over to
the Skeletal Mesh. Double-click on that to open up this mesh, and from here, we have an option on the
top that says LOD Auto. We can set that to 0 to see the LOD or the first
level of detail. But we can also set that to something very high, like seven. This right here, I know it looks very ugly, but if you're standing way back, it actually looks pretty good. That's the entire reason behind LOD because you
don't want to have the best quality
for every model if your camera stands way
far back somewhere. Performance is
important as well. Let's set it back to auto
and close that window. We get the idea. Now that we have this
character in our scene, what can we do with it? Well, I find it
something very useful to start lighting
out your interior, because that way, you
have a reference, and if that reference
even looks like you, it's going to be much easier to composite ourselves in
with a green screen, which we're also
going to take a look at later in this class. So that is in a nutshell what MetaHuman is and how it works. Now, in the next lesson, we're just going to have
some fun by actually doing some motion capture
with our face and making that MetaHuman talk. It's actually super easy to do, so I'll see you in
the next lesson.
14. Face Motion Capture: Motion capturing my face and bringing that over
to the MetaHuman. How cool is that? Well, it's actually
super easy to do, so let's get started with this really fun
and short lesson. Now when we imported
the MetaHuman viewer already prompted with
a message saying, "Hey, we need some plugins in order to make the
MetaHuman work." If you have dismissed
that instead of clicking on enable
those plugins, we have to go to the plugin
window to enable them back. Let me just show
you where that is, on the top here,
click on settings. We've been here before to change the project settings
for if you want to change your key
bindings and all, and it's right
here, you can find an option called Plugins, clicking on that will open
up the Plugin Library. From here, we can just enable
any component that we need. Now by default, a
whole bunch of plugins have already been
enabled because we picked out a blank video
production project instead of a blank
game production or game development projects, which on their end is going to enable and disable
other plugins. Now by default, you don't have that motion capture
to plugin enabled, so let's look for that. Just search for
live link on top, that is a plugin that we need, and here it is, live link. Let's enable that
and you also want to enable live link control rig, which already seems
to be enabled early while I was
preparing these lessons. Then you want to click
here on restart now, every time that you're going to enable or disable plugins, you need to restart the engine, but that's okay, everything
is still running fine. With live link enabled, we can now close
the plugin library, we can now go over to
the window and top, go to Virtual Production, and from there find live link. Click on that, which will
open up a new panel, and from there we have to select the device that is going
to capture the motion. In this case, that
device is going to be the Apple iPhone. Unfortunately, it only
works with iPhone, and that is because the app
that we're going to work with is called Live Link Face, which is created by Unreal Engine to make this
whole process super easy. Of course, you can
start creating your own blueprints
and all and make sure motion capture suit from any brands
work with Unreal, the MetaHuman is already
prepared to do that, but again, you're going to need knowledge
on how blueprints work, or you just use this app and you don't need to create
any blueprints. Let's open up the Live Link Face and straight away you
should see yourself, which is weird mesh, which actually is
the motion capture. Now we're going to have to
go to settings here on top, tap on that, and you'll
see here live link on top. It certainly says Jordy iPhone, tap on it, and right here
you will find add target. Tap on that, and
you want to put in the IP address of your computer that is
running the Unreal Engine. Now there are multiple ways
to find the IP address on your computer if you have absolutely no idea
where to find that, well, here's one
way of locating it. If you go back to the settings, then go into project settings, we can scroll all the
way down here and locate UDP messaging right here. Click on it, and you'll
find here unicast endpoint, whatever you want to
make sure that this here is enabled, otherwise, things might not
work, but by default, it's already enabled so no
need to worry about that. But anyways here
unicast endpoint, there two always default
IP addresses in there, one with all the zeros
and one with 127, and then the last one here is the IP address of your computer, in my case, it's 10.0.0.60. Don't change anything here, let's just close that
window because we need to enter that IP
address into the app. Let me just do that,
10.0.0.60 there we go. Click add, and now you should see your iPhone appear
in the live link window. If it doesn't,
then it's probably like a firewall
issue or something, so try to look at your
network settings, but it should, it
should appear in there and there's nothing
else that we need to do. Just make sure that it's there. What we can now do is simply select the MetaHuman itself, and here on its settings
you'll see link face subjects, and if you open up
that drop-down menu, you should see your
iPhone in their, so you select that, and we're also going to
select link face heads. These are two different
emotion trackings, one is the face itself, the expressions,
and the other one is the head's movement. Now also in the app, you have to make sure to go
to the settings and make sure here that stream
head rotation is enabled, otherwise it won't stream
the head's movement capture. Everything is set, we can now go into the simulation modes. We are currently here
just in the editor mode, the mode in which we
build our environments, but on top of here, we could start
playing the game or go into simulation mode. Now if you click
here on the menu, we actually have some
different options on how we would like
to simulate this. We can start simulating it in a new viewport as
a standalone game. Obviously, these are for when
you're developing a game, but we are using Unreal Engine
for something different. We're usually going to
just pick simulate, click on that, and there we go, we are now in simulation
mode and look at this. [LAUGHTER] [NOISE]
This is so cool. It just works straight
out of the box and it's so fun to play around with. Look at me, that's me, that's my MetaHuman and I can
just turn my head around, it will just follow
that movement, I can talk and it will also follow my expressions and all, really fun to play around with. Now, let me talk a little bit more about this whole
simulation mode. Let me just put my
phone over there. To go out of this
simulation mode, and I can just talk to
you guys like this now inside of the
screencast, but anyways, to go out of it, simply
hit the "Escape" key on your keyboard or click the
Stop Simulation button, which will also take you out. These are the two
different modes, editor mode and simulation mode. But why is there a
simulation mode? Well, we just can't
do everything in editor modes and to showcase
that better to you, let's create an object
with some gravity. For instance, this
chair here in the back, I'm just going to zoom in
a little bit more on that. Let's say that we want
to let that chair fall, maybe that's part of our scene. Now if this chair would
fall in the editor mode, then it's just impossible
to create your environment. We don't want everything to keep falling as we are
building something. Now by default, if we go back
into simulation mode here, that chair won't
fall and that is because we haven't given
any physics to it yet. Let's go out of the
simulation mode, now with a chair selected here, we can then go into the
details panel and you should find an option here
called Physics, and here we have the option
to simulate physics. Now unfortunately,
we cannot enable that option because we haven't
set any collisions yet. You see, an object
or a 3D model, just flies through
other 3D models, it doesn't have a collision. We need to give an area to that chair to tell Unreal, "Hey, this area has to bump into other 3D models and
not go through it." Now that can be done from
within the mesh itself. If we scroll up here, we should find static
mesh right here, if we double-click on it, we should see the chair itself, and on top here you'll see
an option called Collision. Click on it, and so you
have a couple of options. I'm just going to pick the
very simple box collision, and as you will see, that will just draw a
cube around my chair, and that is going to
act as a collision box. Now obviously, you
want that to be a little bit more precise, so we could add multiple
boxes in here to go more around the legs of
that chair and everything. But for this example,
that box is fine, and also you need to
keep in mind that the more collision boxes you create or the more
complex that becomes, the heavier it will also
be for your computer, and we've seen with the
engine what that can bring, Let's save this
mesh right here so that the collision box is
saved within the mesh. Close that window, and
now we should be able to enable that simulate
physics option. There we go, and we could
even set a certain mass, and that's going to
define how heavy that object is and how
fast it should fall down. A chair, what is
that, I don't know, 20 kilograms or
something? I'm not sure. Anyways, if we go now
into the simulation mode, you'll see that the chair will drop and fall on the floor, so that's the reason why we have a simulation mode
and an editor modes. Now already good to know is that once we're going
to make an export to actually render this out
as a movie that we can use, it's something like
premiere to edit with. It's always going to run
through that simulation modes, so if you want to
film something like a chair that is
falling, don't worry, once you've set
everything correctly and it's working in
a simulation mode, you can also be sure
that it will be captured once you're going
to render out your video. That was the basics of live
link, how we can use that, and of course, the
difference between editor and simulation mode. In the next lesson, we're going to
play some lighting because let's be honest, this indoor scene
looks like crap.
15. Interior Lighting: Wow, we're already halfway
through the class. Did you realize that? ****, time flies when
you're having fun and you are already doing an amazing job so far. Just think about it. You know how to create
an awesome outdoor scene and now an indoor
scene like the saloon. How awesome is that? But unfortunately, this
saloon right here looks ugly. That's because it's
missing lights and that's what this
lesson is all about. Now before we are going to
place any lights in the scene, we're going to have to make
sure that the sunlight from outside is not casting its light through my studio to indoor and I've talked
about that before. We're going to have to transform the geometry into a mesh
in order to do that. So I have them right
here into my outliner. You can see the lower
window, the upper window, which are the cutouts
for these two and now we've got the main
box or the studio itself. So we're just going
to select all of these geometries right here, then head into the details
panel and right here you should see the option to
"Create a Static Mesh". Just click on that, and we're
going to give that a name because we're actually going to create a 3D model from this. Let's call that studio and hit "Create Static
Mesh". There we go. You can see that the
lights now are going out and that is because a mesh does not
let light through, but a geometry does. There we go, we
learned something new. Now you might think Jordi, it was so easy to work in this environment while
we still had light, you took it all away. Well, no worries we
can always go up here to the menu and
instead of Unlit, we're going to set it to Unlit. Now our environment
looks even more ugly, but don't worry, it's
just a temporary solution so that we can work further. So let's start by creating
our very first indoor light. I'm going to create one
here underneath my bar. This right here should be a nice spot to have
a light right there. So in my content browser I
actually already went ahead and download something off from the Quixel Megascans library. Let me just look
for static meshes and I should have when
you search for it, a light somewhere right here. There we go. So let's just
drag that into the scene. There it is. Now this here
is just a Static Mesh. It does not emit any light. It's just a model, that's it. If we look inside, you can
also see that there's not really a light bulb in there. That is because we have
to create that ourselves. But let's start by adding an actual light in this fixture. We can go here to
the Menu on top, say add to the project. We're going to go
over to Lights. Here we have a whole bunch of lights that we can work with. But most of the time we're only going to work with these three, which is the Point Light, Spot Light, and the
Rectangle Light. Let's use the Spot Light for
this fixture right here. Let's drag it into the scene
on top here of the light. That's going everywhere. There it is. So let's say bring that in
place, there we go. As if it seems like it's coming out of this fixture like that. You can see the cone, that is where the light
is going to fall and it's going to cast this light right
here in this environment. Now we can't really see
anything right now and that is because we are in
the unlit view modes. Let's change this
back now to lit since we actually do
have a light right now. There we go, we can see
a light being cast here, on the floor and
everything on my bar, and it sits here
in this fixture. Now it's still pretty dark. I can't really see much. So let's add a
post-processing volume in here so that we can
set a manual exposure. Maybe we should have
done that earlier. So let's quickly go here to Add Visual Effects and
then Post Process Volume. Drag that into the scene. The first thing I
want to deal with this post Processing Volume is make sure that it covers
the entire scene. So under the Unbound option or the Infinite Extent
makes sure to enable that. We have seen this previously in this class in our outdoor scene. Now we can go ahead and look for exposure somewhere, right here, we're going to set the
Metering Mode to manual and the Exposure Compensation
we're going to change that until we see
something here. Maybe set that to a 20. There we go, we can actually see something now that is good. This here is a start. We have our light this here is the arrow where it
points to and we have to make sure that it really
sticks here nicely in that light so it seems
like it's coming out. This is looking good. We have a light that
is casting lights, so if you look from a distance; Let me just turn my sun around because it's interfering with
my light. You know what? Let's make it night. There we go. This is working. If I'm going to
deselect the light, we can actually see that
light beam coming out, which is by the way created with the exponential high fog, which we have in our custom
atmosphere blueprint. If we go over to the
Exponential Height Fog right here and play
around with the density. It is right here,
the fog density, we can introduce more
or less of that cone. If there's no fog. If we set that to zero, we of course don't
have that cone and only the surfaces
are being lit up. But you know, that cone is nice, definitely in a
saloon like this, so let's just increase that. There we go. "Press G" on your keyboard to hide
all of these billboards or widgets and you know from a distance this looks
okay, this is good. But if we go up close and we're actually going to
look into the light, hey, we do see lights coming
out of this light fixture, but we don't actually
see a light bulb. So that doesn't make any sense. Well, that light bulb
is something that we have to create ourselves. Now, in order to do that,
we're going to have to go back here to the Add menu and we're going to look for shapes and
simply add a sphere in here. So let's drag that
into the scene, and that sphere is going
to be way too big, so let's say decrease
the size of that. There we go. That is going to function
as the light bulb, plus also place it nicely
here inside of the lamp. It will always take some going back and
forward, and by the way, if it's too hard to see, always disable "Lit"
and go back to "Unlit". It makes things easier. All right, This looks good. This could be a light bulb. Now let's go back
to the Lit modes. There we go. It's not really
actually casting light. It's just a sphere
sitting there mostly catching light instead
of emitting light. So that also doesn't
look really good. Well, that has to do
with the material. So right now if we
select that sphere and go here into
the details panel, you can see here
that by default, a basic shape material
has been applied, which is just a white
color that's it. But we're going to have to
give it a different material, a material that emits light. Now unfortunately, there's no one-click solution for that. We're actually going to have
to create our own material. Don't be too scared, it's actually not that hard. I'm going to disable
here my filters and go back to my a root folder,
the content folder. By the way, here
is our studio mesh for if you haven't seen
that yet, anyways, I'm going to right-click
in here or again, you can also go to the Add menu, that's the same menu. From there I'm
going to choose to create a new material and I'm going to name that
my light material. There we go. We can already
go ahead and apply that to the sphere by simply dragging it here into the materials
option. There we go. It's now been applied, but
it still doesn't emit light. That is because
we have to change some things about this material. We can either double-click
right here to open it up, or we can double-click
on the material itself in the Content
Browser. There we go. Now, don't get
scared because, yes, this year is a node, the kind of thing that
I was talking about. If you have to create a
blueprint or a material, you're going to have
to work with nodes, which is like the coding
system behind Unreal Engine. But the node structure that we're going to create right now is so easy that you
don't need to fear. Also it's a good introduction
to nodes actually, just to get an understanding
of how this could work. So we have to input
something here into all of these
properties of the material. You can see here that
we have one option called emissive color that is going to make sure that the material can give lights. So we need to input
something into the emissive color and that
is going to be a color. Let's right-click,
and that is going to reveal all of the
different functions and elements that we can
use to combine them together to create a node
structure to get functionality. But in this case, we just need a color, and that color node is
actually called a constant. A constant actually
means a value. If we take the normal
constant function right here, we can input one value such
as 10 or 20 or whatever. But you can also go
for something like a three vector constant, which is a thing that
we are going to choose. This allows us to input
three values like RGB, red, green, blue, and
together creates a color. With that note, we can
simply double-click on it to choose any color and we're
just going to make it white. There we go. Hit Okay. Now all we have to do
is drag here the note into the emissive
color, and that's it. If you now move this
window a little bit down and save that material, you will instantly see
the result, but a bim, but a boom, our light
bulb is giving light. Now you might think Jordy
is not giving enough light, I want more light
out of my material. Well, here's the thing,
materials are not used to actually create light. It emits light,
and if we move it closer here to the lamp itself, you can see that it
actually emits light, but that is not how we
should actually use it. If you want something
to actually give light, you use a light such as the spotlights that we've
previously created. Let's close here this
material window and let's organize
things a little bit better here in the outliner. This right here is
the actual lamp. We enable and disable that
you can see it disappear. In there, we actually want
to attach the sphere, which is the thing
that gives light. Let's drag that into the lamp, there we go, and
also the spotlight. This way if we now just select the lamp and move that around, you will see that
everything moves with it. These three elements
should always be attached to each other. It only gives you a
better organization, but again, also better
to move things around. So we can now go
ahead and actually make duplications of this light. Unfortunately, it will not make a duplication of
the entire group. You actually have to select here all of these three layers and then Alt drag to make a
duplicate of all of them. So now we have two lights, and that's simply
what I'm going to do in my entire scene. Just add a whole bunch of lights to give
light to the scene. Now I want to show you
guys one more thing, and for that I'm
going to go back to my unlit view mode and maybe
perhaps go here in the back. Let's add some fluorescent
lights If I go back to my mega scans and then turn on my static mesh filter
and look for lamp, I should have something in here. There we go, a fluorescent
ceiling light. Now of course, we don't want
to use a directional light in this case because
this thing is long, we need a rectangular light
and we've got that as well. Go to the Add menu on
top, go over to Lights, and from there you will find
the rectangular lights, drag that into the
scene. There it is. Now the rectangular light, we can rotate this by the way, is going to emit light here
from this inner rectangle, and the outer rectangles
are going to be it's flags, just like a film lights. So we can go ahead and go into the settings of this
light and we can actually change the barn door
angle here as you can see. There we go, making
it more focused. We can also change the
height and the width. What you want to do is make it match with the light fixture. As we're putting this light
here into this fixture, we want to make sure
that its size is also matching with that fixture. Don't make it too
big or too small, but make sure that it fits, that it makes sense
that maybe there are two fluorescent tubes in there emitting the
lights. Here we go. This is looking good, I guess. My barn doors are not the exact same size
as you can see here, so maybe I want to
close those as well. There we go. It's always
a matter of going back and forward and
seeing how it looks. Let's turn on the lit view mode again and see what it gives. There we go, plenty of
light we got right here. Maybe I want to decrease my exposure a little bit from
the post-processing volume. Let me just look for
exposure right here. Set that to 15 or
something. It looks better. Let's select that light again. Let's scroll down. We have
some more options here like the indirect lighting intensity and also the volumetric
scattering intensity. These two options
mean how much it's going to interact with a fox. So that means that also you can set that individually
per each light. You don't have to increase the global fog to get
more of these cones, but you can also set that for every individual light
by increasing here the volumetric
scattering and perhaps the intensity of
that scattering. Let me just reset these two, and of course we've got
the normal intensity, like how bright
should the light be. We can change the color
maybe to something more orangey or to
even be more precise, instead of the light's color, you should also have a
temperature setting somewhere. Let me just look for
temperature. There it goes. So instead of a light color, we can also choose a light temperature which resembles more like
the real-world. Should it be warm or should it be very white, more bluish? I mean, most of these settings really speak for themselves, and I would just say go through them and see what else that you can change to make them
fit more into your scene. One last thing that we have
to do and that is again, makes sure that there is a fluorescent tube
in that light. This time don't create a
sphere but a cylinder. So drag that into the scene. That is a way too big cylinder, so let's decrease
the size of that. There we go. Stretch it out,
rotate it around, and put it into
the light fixture. Again, set it to unlit. Sometimes that's just easier
to see what you're doing. I want to scale
that a little bit more like that position. I see that we can
actually insert three tubes in here.
That is interesting. One, two, and three. They don't give light just yet. Let's go back to Lit mode. Let's locate our material again. I'm going to deselect my filter, go back to my
content root folder, remove my search of lamp. Right here is my light material, and I can actually go
ahead and select all three of these tubes and then apply the light material to the material option right
here in my details panel. There we go, and but
a bim, but a boom, we get fluorescent tubes
and important to make sure to attach this here to
that ceiling light, this one right here too. There we go. Let me just
collapse some of these. There we go. So this here
is now my entire light. All these other actors are
attached to my light fixture, and this looks way more natural if we look
into the lights that are actual
fluorescent tubes and they're really cool. I think this looks great
if we now go out of this corridor and look
through it from the saloon, we have this hall way where
we have some light going on. But I might want to make
that a little bit more dirtier and maybe give it more of a green
tint or something. I can just change that with
the light color, of course. That is how you can
light out an interior. What I'm going to do next is just place a bunch more
lights in my scene, and in the next
lesson we're going to fine tune the look of
my interior a bit more by working more with the post-processing volume
as well as the fog to really make my scene stand out and make it look cinematic.
16. Realistic Lighting: Oh, hi. I was just calibrating the engine and always telling it that this here is the mesh, that this right here
is the shape that we created with the emission
material onto it, and here's the actual light. We get the point. I
went ahead and just put my entire interior seen full with lights as you can see, I've done nothing else
than just doing that. Let me just set that
real quick to unlit so that you can better see
what's going on in here. Here are all my fixtures. Now actually, you
don't always need to work with fixtures, of course,
definitely in places like these here you can
just have your light stand there because if you're making shots like this, you don't really
see the fixtures so keep that in mind as well. Always think about optimization. The less objects that you need, the less light that you actually
need to use, the better. Let me turn that light. Let me just set that back to lit because we are running
into a couple of problems. Even though that it's
starting to look better, it's still not looking great. That's because it's
missing fine detail. Locate the custom
atmosphere blueprint that we created in the
beginning of this class. We're going to go over
to the exponential height fog right here. There are a couple of settings in here that we can change to give a drastic different
look to our interior scene. We know what most
of these settings already do like the fog density, just simply adds more fog. Let me just set that
to something like 10 to really give you an
idea what that does. But this doesn't
really make it better. Let's have a look at
some other options. I'm going to scroll down
and I should somewhere, find this option right here, the emissive and the
extinction scale. Let's start off with
the extinction scale. This option right here is going to make sure
that the lights are going to interact more with
the fog in the atmosphere. By increasing that,
you instantly see here that we
are just getting much more illumination across the entire room just by
increasing that value, and you can also see here
that the lights are getting these strokes as they interact more with
those fog particles. This already looks
a whole lot better. Let me just remove all the
widgets or the billboards by hitting the G on my keyboards
to get a better view. Let me just reset that value again and set it back
to something like 10. Just see the before and after, how much better that is. Definitely for a
scene like this, like this old saloon,
this fog really helps. Maybe this is a
little bit too much. [LAUGHTER] Let's set that to something like six or
seven. There we go. Much better, keep
it subtle and then the next option is
the emissive color. Click on that to change
the color of the fog. Now I would never really go and really change the color like this because that would really make it, let's say artistic. [LAUGHTER] What I would do
is really keep this simple. I'm just going to keep
my color at white, maybe a tiny bit of
orange in there, but not too much, and
really bring down here the brightness to all
the way on the bottom. Then maybe a tiny bit
up, not too much. This is just going to brighten up your scene
a little bit more. Definitely, if you think
that it's way too dark, this is a great way to just
make the exposure in general, in those shadow part
just a bit more clear. Let's hit "Okay" then again, let's have a look
at the before and the after I moved to
reset that value, this is the before control Z to undo my action.
This is the after. That's up to you at how bright you want to
make your scene. But these two
settings from within the exponential height fog are super important for interiors. If we take a look
at the shadows like here with a chair and a table, these shadows are pretty hard. The same thing with the stairs
over here as well and at my bar too basically any
shadow is very hard. We want to soften those shadows. How do we do that? Well, for starters, let's select all of the
lights in the scene. I'm going to go here
into my outliner and simply search for light, which is going to bring
up my folder lights and of course in their
show all of the lights, to be even more specific, I'm going to search
for spotlights. Again very easily, select all
my spotlights individually. There we go. Make sure that
I have all of them selected. I can now make changes to
all of these lights at the same time because
these are the same actors. They are all spotlight, so they have all the
same properties. We're going to look here
in the details panel for source radius, and
it should be right here. This is going to
make sure to get more softer shadows and let
me just zoom in a bit more. For example, here
on my staircase. If you don't want to
see all the cones here in your scene if that is bothering you just
press G on your keyboard. We still have all of
our lights selected. We just don't see
the wireframes, the billboards, and everything. So it might be
better to work with. Let me just increase the
source radius to something around 30 and see
what that does. There we go. We can now
see that we've got way more natural, softer shadows. This is occurring
everywhere since we've got all the lights selected, a table is also
looking a whole lot better and as well
here at the bar, you don't want your
shadows to be too soft because after all, we're still working
with spotlights and not indirect lighting. But this is starting to
look a whole lot better and when we think
about soft shadows, let's have a look
at the sunlight coming through the window. These shadows still
look pretty hard. Now, this is a sunlight, It doesn't have a source radius, so there's a different
option in there to also get soft shadows. Let me just undo my search here on top and I'm going to go back to my custom atmosphere
and select my sunlight, which is the directional lights. Instead of source radius, we're now going to look
for the source angle. It's a minor detail,
but it is a difference. Let me just increase that to 30 perhaps
again, there we go. This is maybe too soft. Let me just set that to 10. This is starting to look better. You can see now how much of a difference this is
doing to my scene. Definitely, with all of this fog and everything with
a low sunlight, we shouldn't have
these hard shadows. This is making much more
sense and we can even choose the angle of
the soft lighting. This is really going to
have an impact here on reflections like the
chair and everything. Here's an option underneath
the source angle, we can find source soft angles. Let me just increase that to something like a
100 or something. You can see here what that does here to the reflection
of the chair. It's much less hard,
it's much softer now. These two settings are
definitely something to play around within
your sunlight, the source angle and
the source soft angle, and that is almost it actually, you can see how much better the scene is looking right now, which is these minor settings. Now the last thing in terms of look that I want to talk about and that is more in terms
of the color of the light. What I always like
to do is to work with color contrasts or
a difference in color. As you can see here, we have three different colors
going on in my scene. Even though we have
this overall warm tone, this does not per se have to do something with Unreal Engine, but just with
cinematography in general. Now what I've done
basically is creating three different
layers of lighting. We have the warm lights here on top, which
you can see here, these illuminate the room in this interior and then we've got this balcony here on top, and I've worked a little
bit more colder lights. I actually used the
color temperature. Let me just have a look at what exactly that I worked
with if I select this one one, look
for temperature. You can see that I
set these at 3,800, while these here in a normal
room are set to 2,800, which is a lot warmer. That way we're
getting some contrast with the foregrounds
and the backgrounds. To break that even more, you can also work with
practical lights. Practical lights are lights that are visible in your scene, such as this standing
lights right here. What I did with that
light was actually set to the color temperature
even warmer, set that to 2,300, and
that way we're creating even more contrast between
the global lights, the balcony lights, and in this practical light right here. To tip it off, we have this separate
room here in the back, which actually doesn't
have to do anything with the normal interior, the saloon itself, this here
is a corridor in the back. This could be like a filthy
storage room or something. We have this ugly fluorescent
light set up there, which we created in
the previous lesson. I made that green that filthy
fluorescent lighting color and that is giving me
this color contrast over my entire scene, which
is really great. If all the colors of the
lighting would be the same then the scene
would be pretty flat. Now, do make sure not to mix too much colors
with each other. You don't want to
mix pink, blue, orange, and reds and
whatever together. That is just going to
make it a clown show. Choose a particular
look like in my case, that warm look, and try to
work with that work with colder and warmer lights to retain that same look and feel. That is it for
lighting that should give you a great-looking scene. Now, let's talk about problems. There are two problems in this scene which
need to be fixed. The first one here is
you can see some of these lights have actually these red crosses through them. Well, we need to
fix that and I'll talk about that in a moment. But first, let's have a look at a second problem that we
have and that is this wall. You can see the green
lighting coming through and that is because this wall right here is a
geometry and is not a mesh. The same problem that we had
with the studio in general, where the sunlight was
casting its light through the walls of the studio because it was a geometry
and it's not a mesh. Also for this back wall here, I'm going to select that it's
right here upper wall back. Let me just delete my search
in the details panel and locate the create Static
Mesh option right here. Click on that and
this name is good. Hit create static mesh and you will now see
that the light here, It's fading away, it's not coming through
anymore and that is good. You don't per se
have to transform every geometry into
a static mesh. But if you are running
into problems like these, then you do have to, go around in your scene
and see if there are any light leak somewhere and fix that by creating
static meshes. The second problem are
these red crosses. Now, in order to start with explaining what's exactly
going on in here, I I to explain
lumen a little bit. Essentially, lumen
is the new thing within Unreal Engine 5. This is making sure that we
get real-time reflections, which was not possible before. Let me just showcase
that better to you guys. I'm going to create a
new shape right here. Just a cube is fine. Place that into my
scene, there it is. Let me just bring
that to the front. There we go. I'm going to shape this
as a bounce board, which we could use in the
real world or something. Then rotate that a
little bit. There we go. If we now bounce light into
this shape right here, it will also be reflected onto my meta-human,
and let's do that. I'm going to take a spotlights, bring that into my
scene. There we go. I'm going to rotate
that so that it points against these
bounce boards. I'm going to make that
cone a little bit smaller. To get this hard
lighting. There we go. It is being casted onto
them bounce board. As you can see, the light is not interfering with the
metahuman itself. It is casting its light
only on the bounce boards. Now let's increase the
intensity of that light. Where is that
control? Right here. I'm going to set that to
something like 50. There we go. You can see here what that
does to my metahuman. We have set that even higher
to a 100 or something. There we go. You can start
to see how my metahuman is starting to light
up more and more, and that is coming off from the reflection of
this bounce board, which is really cool. In an essence, that
does mean that we can actually
use Unreal Engine, just like you would laid out
a scene in the real world. You can use bounce boards. Sounds really cool and all, but Lumen also has
its own problems. Let me set that
even higher here. I don't know, something like
500 to really make it pop. You can already start to see my metahuman flicker
around a little bit. This right here,
what you're seeing, what it's occurring is lumen. Lumen is very nice on paper, but in reality it's still
comes with many bugs, ends with many artifacts. Definite things like hair
still has a lot of trouble to catching up these reflections to make all those calculations. Now that we understand that, let me just delete
this spotlight right here and the bounce board. And then we understand that
what's going on with Lumen, we know what's going on in
the entire scene right here because every single light
right here is doing that. In real-time, it's
changing the reflections. If I take one of these
lights and move it around to a different position,
it's going to calculate in real-time what needs to happen
with those reflections. That is the power of Lumen. But at the same time, it
also has its limitations. At a certain point,
Unreal will say, hey, these are way too many
reflections happening right now and I have trouble to
calculate this precisely. Also you're going to
notice that performance in Unreal is going to
drop tremendously. There's this rule inside
Unreal Engine that says, hey, you cannot mix more than
three lights together. Now you might think, I'm
not mixing any lights, they're all separately
standing here. Let's select all of the lights. Let's see how much they're actually interfering
with each other. We can actually, here
in the Lights folder, I can actually right-click
on it, go over to Select, and just say, All
Descendants. There we go. We'll make a selection of all the meshes inside
of that folder. Let's have a look
at all the cones. As you can see, these lights are interfering with each other. The cones here are overlapping, and that is giving
us that problem. When there are more
than three lights overlapping with each other,
Unreal will say, hey, there is a problem with this
light and it will just add this red cross through the light saying there's a
problem with this one. Does that mean that
you have to fix this? Well, no. You can ignore that error if you want to
without having to worry. It's just that the
reflection calculations will not be as precise. But is that something that
the human eye can see? If I press G on the keyboard, do you see that my lighting
reflections are not precise? I for sure can't see it. In my case, I could
ignore that issue. But the second problem
is performance. My computer is still
runs it pretty good, but once we're going
to start adding more and more lights in here, performance will start
to drop tremendously. Now there are two ways
to fix this problem. One is by changing the radius or the cones of these
lights because we don't want them to
interfere with each other. For instance, if I select
any of these lights here, you can see that they
have these cones where the lighting is going
to be casted to. You want to make
sure that one of these cones is not interfering
with a second light. This one, you can see that these two here are overlapping. We could go ahead and change
the inner cone angle, or the outer cone angle, set
that to 30 or something. In this way, they are not
interfering with each other. Well actually, they still are. If you are going to
take a look below the floor, they still will. Even if your floor
is blocking lights, Unreal is going to take a
look at the cone itself and if that cone is going
through your floor, well then they are still
interacting in some way. Also we want to decrease
the length of that cone, which we can do from the option called
Attenuation Radius. Maybe set that to
500 or something. There we go. Now they
are not going through, or at least they
are not interfering with each other anymore. That is one way of fixing it. The problem is not really
fixed because we have so many other lights in
the [LAUGHTER] scene. They're just all colliding
with each other, so I have to change the cone of every single light so they don't interfere with each other. But then again, do
we really want that? Because that is also going to change the look of our lighting. This is not an ideal solution. You can see here that I'm
losing the light on my floor. I'm just going to hit
"Control Z" to undo my actions. I don't
want to do that. I have my light, I like it, I just wanted to fix
these red crosses. We could also disable
Lumen, in a way. Not really disable it, but just say to Lumen,
hey, do your job, but just don't do it in real
time because after all, that's the problem.
The real-time issue. What I'm going to do is
select all of my lights. I'm going to perhaps search again for light.
That's always easy. Look for all the lights
in here to select them. There we go. We have now
selected all of them and we can make changes
to them all at once. You can find here an option in the Details called Mobility. We have three options, static,
stationary, and movable. It's currently set
to stationary. That means that the
lights or these actors, but the way we have
this option with meshes as well with
almost everything, that these meshes or
actors are fixed. They are stationary. They are set to one position
and they will stay there. But they have the
ability to change in properties like the intensity you can change during the scene, or perhaps the
color or the light, anything like that that
still affects Lumen in a way that it needs to
make changes in real-time. Now the third option here, movable, is the
same as stationary. The lights can be brighter or dimmer during a scene
or change color, but also move in position, so that means that this
lights can perhaps swing around or suddenly stand
on a different spot. Again, Lumen has to calculate these reflections in real-time in order for that light
to do all of that. Then there is the last option or actually the first
option, and that is static. I'm going to click on it
and instantly you can see all of these red
crosses disappear. What we're seeing now is,
this light is static. It's on a fixed position,
but also its intensity, its color, none of the properties will
change during my scene. That means that Lumen
does not have to make any real-time
calculations anymore. Now you will see an
error here on the top-left saying that the
lighting needs to be rebuilt. Basically what Unreal
is asking now is, hey, can I make my calculations
for the static lights to get really good reflections and everything and just keep that in my memory without having to change it afterwards
in real-time? Well, okay. Let's do that. Head over to the Build menu
on top, and from there, select either Build All
Levels which is going to build everything like the materials and
everything and all, but that is going to take long. We only need to build
the lighting actually, because that is what
Unreal is asking us to do. Let's click on that, which
is going to build lighting. This can take a little time,
so let's just wait for that. In the meantime, let me
answer a question that probably pops into
your mind right now, and that is why should
we then ever use stationary or the
movable option? Well, we've seen previously
that we can go into the simulation mode
if you want something like a flickering light
in the background, which can be created
using blueprints. Or you want a light
to actually move around in that simulation modes, then you need to set it to either stationary or to movable. Sometimes you want that. Perhaps that corridor lighting, that green fluorescent light
that I have in the back, maybe I wanted to flicker that because it's
a broken lights. Of course I'm not
going to set all of my lights to stationary then, but only that specific light. That means that Lumen
only needs to calculate its reflections for one
light and not all of them, and we know that
we can interfere three lights maximum
with each other. There we go. The
lighting has been built, everything is looking fine. But again, guys,
don't worry too much about that red cross,
I just explained it. Because the first time
that I saw it I was also getting crazy trying
to look for an answer. But actually, you don't have to worry about it as
long as you don't see any flickering or any weird artifacts or
anything like that, you don't actually
need to set them to static and built the lights. All right guys, thank
you for watching. [NOISE] Hello. Hey boss. The meltdown. No that was Josh. I had nothing to do
with the meltdown. That was Josh from
Unreal Engine 4. You know Josh. Yeah, okay. Bye. [NOISE] Thanks
for watching guys. See you in the next lesson.
17. The Virtual Camera: We've been building some
really cool scenes until now, but how do we actually
turn this into a movie because after all that's the whole
reason why we're here? Well, for that,
we're going to need a virtual camera to
capture the scene, and that is what this lesson
is going to be about. Now, there are a
couple of ways to create a camera in our scene. The first one is again
by going up to that add menu on top and then selecting Cinematic
and from there we can choose Cinema Camera Actor. This is the one that
you always need. Drag it into your scene. Now, the cinema
camera has a bunch of options for us to change things like the bouquet or the focus
or the exposure settings, all stuff that we're used
to with physical cameras. If this is one way of
creating a camera, what is the second way? Well, I'm just going to delete that camera because the
second way is better. I'm just going to
move my normal view into an angle where I would
like to have my camera sit. Let's perhaps say right here. This could be a nice
shot from up here. I can then go over
this little menu here on top, click on it, and you should find
an option that says create camera here. Of course, again, we're going
to choose CineCameraActor. The normal camera
actor's by the way the very basic version of that, but we would want it a
little bit more options. Click on that, and if we now
zoom out of this corner, we see our camera
there in the dark. Let's perhaps set
my view back to unlit so that we can better
see what's going on. Maybe perhaps push
that a little bit out of the wall. There we go. Now, you notice that once we
have that camera selected, we can see a preview of
what the camera is seeing, but every time that
we're going to select something
different in our scene, that preview is gone. Now, in order to make
that stay there, select your camera
and make sure to pin the preview with this
little button down here. Now I can actually select one of these chairs and move
it around while still seeing my adjustments through the view of the camera,
which is really good. Now, this view right
here is pretty small, and every time that I want
to change my framing, I need to select
that camera and use these angles right here
to move it around, to rotate it, not
really user-friendly. What we can also do is
look through the view of the camera instead of using this little
preview window, and we can do that by changing
here the perspective. Click on that and
you should find your placed cameras in
here, the CineCameraActor. Just select that
and your view will change into what the
camera is seeing. Now I can just
right-click my mouse and I just move around with the
worst keys on your keyboard, just like we do when we are moving around in
the world itself, but I'm actually controlling
the camera right now. I can place it somewhere else, like right here, for
instance, let go, then go out of the
camera view by pressing the Eject
button here on top, which is pretty funny,
and now if you move back, you can see your camera
standing over here. That is a great way to look through the
camera as you can see it. By the way, you
can always change this back to lit if you want to, you also get a better view of
what the camera is seeing, and we even have an option. If we go back to a perspective
instead of choosing the default viewport to change that to
cinematic viewport. Let's see how that looks
through the camera. Go back to the menu and
select CineCameraActor 4. As we are now in a
cinematic viewport, we get an actual view of what is being recorded
on the camera. That is a good. Let me just go back out of here and let me just change that back to default
viewport. There we go. I'm going to create a
couple of more cameras, perhaps like one close
up somewhere right here. Go back to the menu, say create camera
here's cine actor. There we go. Maybe one more. Let's take an overall total
shot or something like that, back up to the menu and say create camera here cine actor. This is always how I
create my cameras. It's much better than dragging
them into your scene. We got three cameras now in our scene and you might
be thinking like, "Jordi, how can I view all
of these three at the same time because this is not really useful?"
Well, no worries. Unreal has an option
for everything. If we go up to the
right corner here, you can see that we
have more viewports, and if I click on that, you'll see four different viewports. I can actually
select that each of these viewports needs to be
a view through the camera. It's totally set
here to the back, like it's using the
perspective by default, but if we click on that, we can change it
to camera actor 4, we can change this one
here to camera actor 5, and then the last one
here to camera actor 6. Now, I have actually
a view through all of these cameras,
and at the same time, I can also use the
bottom left viewport just as my normal controller to move around in the scene, so this is very useful. Of course, we can also set again that cinematic viewport for
each camera. There we go. Also for this one, set that to the
cinematic viewport, and every time that we do that, we need to change the cameras, which is, I think like
a book or something. I'm not sure. Let's
first set all these two cinematic
[LAUGHTER] viewports and then choose the cameras
because it's going to reset it every time that we
choose that. There we go. Now we get a view through the cinematic viewport
of every camera, and we still have like the normal scenery or the normal level that
we can work in with. We can grab any
of these cameras, move them around like that. You can see here that
it's being updated here with the camera that
I have selected. Maybe you have a second monitor and you might be thinking, "Can't I just have my normal
work area in big in here and then all of my cameras and different little viewport
on my second monitor?" Of course, like I said before, unreal things about everything. We're going to maximize
one of these frames here. You can see this button right
here that says maximize. We can either do that for every viewport or we're just going to choose the normal one in
which we are working. Go up to menu on top, select "Window", and from
there choose "Viewports". We can then open up
another viewport, let's say viewport 2, which is going to open
up a second window. This works exactly the same
as this viewport right here. We could, for example, say, hey, this one here needs
to be camera 4, this one needs to be camera 5, and this one needs
to be camera 6. Now we can just drag
this window over to my second monitor
if you have one. Or of course, you
can also maximize one of these if you're only
working with one camera, and that way you get
a full screen view of what's happening
through the camera. That is it about
camera controls, how you can create a couple
of them and how you can move them around and how
to view them properly. Now let's have a look
at some camera options. There are not that many
options and I think most of them are pretty
self-explanatory. Let's work here on this camera, for instance, or
perhaps this one here. This more close-up camera, I think it is going to
be a little bit better to demonstrate things on. With that camera selected here, you can see in our
outliner that we now have these 3D cameras. By the way, they have very
weird numbering to it. It starts from four. That is because before I
started recording this lesson, I was preparing myself and I already created
three cameras, but yours should
say 1, 2, and 3. By the way, you can
also rename these to close up [NOISE] or medium shot. Let me just quickly do that, like this is long shots. [NOISE] What do we have in here? This here is, let's say, extreme close up. There we go. These are named very wrong. [LAUGHTER] Let me put
them all into a folder. I'm going to think about
a better name for them the next lesson when these names are going
to be more important. Cameras, put them together. There we go. Where is
my cameras folder? Right here on top. Let's go ahead with that
extreme close-up, which isn't really an
extreme close-up just yet, but we're going to make
sure it's going to be one. Within the details
panel of that camera, we can find back a
couple of options, like the film back. This is the size of the film which things like
eight millimeter, 60 millimeters or
perhaps like APS-C, Full-Frame, Micro Four Thirds. That's up to you what
you want to choose. Then we've got the
lens settings, and this is something pretty
interesting actually. We can choose from a preset, such as a, is it a zoom lens or is
it one of these primes? For instance, when I choose
this 50 millimeter prime, I could actually no longer
change the focal length. You can see here
that it's locked. Well, that is because if we
open up the lens settings, if we expand that property, you can actually see
here what is being set. We are locking the minimal and the maximal focal length
with these two settings. It's both set at 50. If I would set this to
10 and 70 or something, I am able now to change what the actual focal
length should be. I can go to a maximum of 70, or I can go to a minimum of 10. The same thing goes
for the aperture. What is my minimum Fstop,
and what is my maximum? I can then choose a
value between these two, which is the current aperture. I can set this to 1.8, for instance. There we go. We get more of a shallow
depth of fields. Definitely, if we're going to
zoom in to set that to 50, you can definitely see
what's going on in here. Let me just by the way change my perspective through
the view of that camera, which is the extreme close up. This way I can move
around like that, and make a better
framing or something. That's just something to
keep in mind that you need to set what your lens is about and then you
either choose what the actual settings of
your lens are currently. I'm going to just collapse that setting again and let's look a little bit further
to focus settings. We've got a couple
of focus settings. It's certainly set to manual. That means that if we change
this value right here, we can choose where
the focus needs to be. You can see here my viewport and things are changing.
Not really useful. We can also use a picker
right here to actually select an object in the
scene like the chair, and it will actually set
its focus to that chair. It's not going to
move back, of course, it's going to keep its focus distance at that
point which I have selected. At a certain point that
chair becomes out of focus. But I can also change here
the focus method to tracking. If I do that, I can also again select an actor in my
scene. Let me just do that. With that picker, select
that same chair again, and now it's being
tracked to the chair. If I'm going to move forward, it's going to make
sure that it stays in focus the same when I'm
going to move back. Really cool. That's mostly it about the camera's
settings itself. We also have things in there
like the exposure and all. But you need to ask
ourselves the question like, "I'm I going to set the
exposure through the camera, or am I going to do that through the post-processing volume
like we've seen previously?" You have to see the
post-process volume as the global setting. This is a setting for
all of my cameras. If you have one certain
setting that needs to be set specifically for
one certain camera, then you need to set
that within the camera. Usually, I don't really touch the exposure settings
of my cameras, but just use the post-processing
volume for that. But some other things
that I might do is things like flares. We can see an option here on
the bottom that says bloom. This needs to be set
onto create flare, so we can enable that. We have a couple of
different methods to say what kind of
bloom that we want, and of course the intensity. We can increase that to get more or less bloom
going on in the scene. With bloom enabled, we can also go over to the lens flares, which should be right here. Enable that and increase
the lens flare. Of course, we have to
look into a light. Here it is. We've
got the sunlight. Here you can see we've
got nicely lens flares, and the more that I
increase that value, the more lens
flares that we get. But this might be something
that I don't want or don't want as prominent
for every camera. That's a reason to
set it in the camera itself and not in a
post-processing volume. You can also change a
color for that lens flare. Maybe there should be
like a blue tint or something really cool to play
around with that as well, and of course also
the exposure setting, not unimportant
because once it's going to work with something
like bloom and lens flares, your scene is also
going to get brighter. Again, a reason to overwrite the exposure settings of
your post-processing volume. Let me just enable that here, set the metering modes not
to automatic but to manual. You always want to choose
manual by the way, and then set the
exposure compensation to something that we can
still see something, but that it remains dark. You can see here how beautifully these lens flares follow the
movement of your camera. Unreal is always going to
look at your camera first, what are its settings
of the camera, and then it's going
to take a look at the post-processing volume. You can't override the camera with the post-processing volume, but you can override the post-processing
volume with the camera, if that makes sense. That is in a
nutshell, the camera. There's nothing
really more about it. You can go through all
of these settings. We have like chromatic
aberration as well. But we've seen these things in the post-processing volume. They are mostly the same. We just set that for each
camera individually in here. That was already it. In the next lesson we're
going to start animating these cameras and
that is where it's going to start
getting interesting. We're going to set keyframes, move them around
to make very cool dolly shots and things
like that, really awesome. I'll see you guys there.
18. Camera Animations: All right. Let's continue,
guys, with lesson, what is it, 17 or 18, perhaps? Wow, just think about it, all the cool stuff that
you've already learned. It's amazing. I got
myself a coffee, so I'm super energized
for the new lesson. I have created three
cameras and I've also named them
properly this time. We have one here which
is pointed at the table, more like a close-up. We've got one here
underneath the stairs, and we've also got one here
up the balcony over there. So three really
cool camera angles. What we want to do now is
animate these cameras, and maybe also an object in our scene.
How can we do that? Well, we're going
to go back here into our content browser because we're going to
have to create something called a Level Sequencer. Again, we can do that from the Add menu right
here or what I usually prefer is just to right-click into my
content browser, go over to Animation, and in here you should
find Level Sequence. Click on that, which is
going to create a new file. I'm going to call
that my animation. The most original name ever. Let's double-click on it
to open up that Sequencer. As you can see, we
get a timeline. If you've been working
in something like Premiere or After Effects
or anything like that, you are familiar
with these controls. Now by default, your
Sequencer is empty. That is because
basically anything that you see in
this entire scene or anything that you can see in the Outliner can be animated. If that would already
be in your Sequencer, it would just be too much. What I'd really want
you to do is add the actors in here that
you want to animate. So you want to specify those. There are two ways to do that. We can click here on
the Track button and we have a whole bunch of
things that we can do, such as the Live Link Track, which we'll talk about
in the next lesson. That's going to be
really cool by the way. But in most cases, you're
just going to go over to Actor To Sequencer. That means that you're
going to pick out something from this
drop-down menu, which actually just
represents your Outliner. You want to move that
into the Sequencer or you can also just select here the three cameras in
your Outliner and just drag those like that
into the Sequencer. There we go. I'm just going
to collapse these cameras. They are now all three here in the Sequencer as well
as an extra layer, and that is the
Camera Cuts layer. If you have accidentally removed that because it is actually
an important layer, don't worry, just
go back to Track, and from there, you can
choose Camera Cut Track. Just click on that
again and it's back. Now by clicking on the camera
icon next to every layer, we can look through that
camera here in our viewport. Here is the stairs camera. We've got the balcony camera
on top, and you know what? Let's set that back to Lit. There we go. Of course, also the table camera. Finally, we've got the
Camera Cuts angle. Currently, we don't really
have a camera defined yet, so I'll click here on
this button on "Camera", and we can choose any of
the cameras here that sit within our Sequencer. Let's start, for example, with the balcony
camera. There we go. We can now see that we
are cut to this angle. We can move forward in time. Then, for example, change that to camera
to the stairs, for example,
underneath the stairs. You can see here that
automatically a cut is being placed and we cut from
one shot to the other. We can, of course,
also move that edit up to the left or to the right to make that
shot take longer or shorter. If you want your
Sequencer to take longer by the way,
or your timeline, just increase here this value by zooming out. There we go. We are now defining more
frames that can be created. We can move up this
endpoint here to the right. There we go. Now we
have more space. Let's also drag out
the Camera Cuts layer here to take up that
entire space like that, and maybe be little bit further
down here or somewhere. You want to cut to
the table camera. Now we can cut from this angle, the balcony to the stairs, and now to the table. That is how Camera Cuts work. We can go back and
forward, et cetera. Let's now start with
animating these cameras. I'm going to go over to my first shot which is going to be the balcony
camera right here. We're going to have to
select the camera here in the Sequencer,
expand that property, which is going to show some of the basic properties
of that camera which we can animate or change, such as the aperture,
the focal length. That means that we can also zoom into our shots and everything. If you don't see the
right property in here, you can always click here on the CameraComponent here on
the right side on Track, which is going to give you more options like maybe
you want to change the Filmback or the Focus
Setting or anything like that. Unlike most editing programs
where you already see all the properties that you can animate off a certain layer, in Unreal you actually need to choose which property
that you want to track. I think that is a
good idea, otherwise, your Sequencer would
be a huge mess. By the way, let me just
enlarge this window so you can see better
what's going on in here. That's really why
we're so interested in these settings right here. I can just collapse
the CameraComponents or I can also just delete
that entire setting. Because like I said before, you can keep it clean
in here and only track those properties that
you want to animate. Let's open up the Transform
property and you can see here some of the basic
settings like Location, Rotation, and Scale. I don't really need
the scale because you can't really animate the view of the camera, maybe the camera
itself, you can, but that's not really
going to change anything. Let me just delete that as well. There we go. It's clean now. We got two things that we
might want to animate. Here on the right side, we
can see the key frames. We can create one for the X, Y, the Z, and perhaps
also for the Rotation. This works just like any other VFX or editing program. You create keyframes for
a starting position, you move forward in time, and then you just change
any of these properties. Maybe you want to
bring the camera a bit more to the front, maybe bring it down a
little bit like so, and perhaps also play
around with the Rotation. Let me just do something
like move more here into the angle of
those barn doors, if I can do that. There we go. Automatically,
keyframes are being placed as you change
these values in here. Now if I playback
here the sequence, you can see what that
camera movement does. This here is my first shot. Let's also do something now
with the stairs camera, which is the second
one that we cut to. By the way, guys, you can
always change these cuts. If you want them
to start earlier, you can just move up
that cut right there. Right now before the
animation stops, we already cut to the next shot. You can see that here.
That is up to you. You can also select any of
the keyframes or all of them, and move them up more
to the right or more to the left if you want them to
align with the Camera Cuts. But let me just collapse
here this camera, and I'm going to now
select the stairs camera, expand that property, again, perhaps remove this, and as well under the
Transform, the Scale. [NOISE] There we
go. Let's just do a very simple travel
or something. Maybe also enable the
Rotation properties, go forward in time. I usually always enable
all of the properties. I might not use all of them, but that way I have freedom
of whatever that I do. Let's move this camera up a little bit more
to the right side, and perhaps tilt a little bit. What is that? The pitch. There we go. Let's
have a look at that. A very beautiful shot. Wow. Don't forget to drink
coffee in the meantime. You don't want this to get cold. [NOISE] Let's move
these keyframes up. I want them to align
with the cuts. Over here we've got
the table camera, so I'm going to
collapse stairs camera, select my table camera to get a view of that here
in my viewport, open up that property. You know what? Maybe
let's do animate like to zoom or something,
the focal length. In order to do that, I do have to change something
here about the settings of the table camera because
it's currently set here at my Lens Settings, that it's
fixed at 50 millimeters. I might want to change
that to, let's say 40 and 60 or something. That I have some playroom
between those two values. Now I can also change
the value here. Otherwise, I wasn't
able to do that. You can see here that even
though that I'm zooming far beyond 60 millimeters, it is locked at that 60 millimeters because
of the Lens Setting. That's definitely
something to keep in mind. Let's hit the back G like
50, or perhaps start at 40. I'm going to create
a keyframe for that in the beginning, go forward in time, and change that to 60. [NOISE] Now we get
these zooming-in shots, dramatic on the table. We'll also go to Transform, and let me just delete Scale. Let's play around
with the Location as well in the
beginning of the shots, X, Y, and Z. I always do all the keyframes and
go forward in time. I want to change that
a little bit, perhaps, let's move the camera to the
left perhaps a little bit. Maybe, I don't know, a
little bit to the back. Oh yeah, we can create that. That Hitchcock
Zoom. Look at that. Wow. Isn't [LAUGHTER]
that looking great? Maybe, perhaps add a little
bit of a roll to it. There we go. A pitch, a yaw. [LAUGHTER] There we go. Let's play this back. Look how dramatic
that shot looks. [LAUGHTER] Wow. That's basically it, guys. We have now animated
our three cameras. [NOISE] We have to select
here the Camera Cuts angle, and that way we can also see
[NOISE] the Camera Cuts. Let's play this back and see
how our scene [NOISE] looks. Wow, this room from the
stairs, really fast shots. Then we've got the slower shot from underneath the stairs. Finally, we have that
Hitchcock dramatic zoom. Looking great, guys. Now, maybe this is dramatic because one of these
things are floating. Let's do that as well. Perhaps like the little
ashtray or something. I'm going to drag that
into my scene as well. There we go. Make
some more room. Let's start that animation from all the way
in the beginning. I want to work with the Location
and the Rotation again, set a keyframe for it. Oops, my keyframes are set
somewhere in the middle. Let's select them and
move them up to the left. Don't worry about that, guys. If you have your keyframes
positioned wrongly, you can always move them around. I'm going to go to
the end and I'm going to change the
properties in here. Bringing up that ashtray, and I'm going to rotate that a little bit as if it's
floating in space. The yaw, I'm just
doing something. [LAUGHTER] Let's see how
this looks. Look at that. Wow. It's already
starting in these shots, but we don't see it, so there's no use of
having [LAUGHTER] that animated in the
beginning. You know what? I'm just going to move up all of these keyframes to
here because there's no use [LAUGHTER] to have them over there in the
beginning. There we go. The ashtray is going up and it's rotating like it's alive, like it's floating in space, or some kind of magic going on. Look at that; the ashtray. This shot doesn't
make any sense, but this shot looks dramatic, and there's a reason for
it because we've got a floating ashtray.
Look at that. This is how the Sequencer works and what I want you guys
to do now is go ahead, place a couple of cameras,
animate their position, rotation, perhaps add one of your 2D objects
in there as well. Make that flow, do
whatever you want with it. I want you to get a good
feeling of the Level Sequencer. You come back for the next
level when we are going to automatically animate
all of these things. We've already seen
how we can capture our facial motion and
bring it over into Unreal. We can also capture
the motion of an iPhone and bring it
over to the camera. That way we can control
the camera with our phone. How cool is that? Well, that's for
the next lesson. Cheers. [NOISE]
19. Camera Tracking: You've already been having so much fun inside
Unreal Engine, now it's time to get frustrated. The idea is to use our phone as a camera controller
so that we can use its gyroscope to move around, forwards, backwards, even
use some controllers on our screen to actually control the virtual
camera inside Unreal. Sounds really cool on
paper, but unfortunately, all of this is so new that
it's actually super booked. I'm going to try and
show it to you guys. It's actually super easy. I just really hope that
nothing goes wrong. We're all going to
bump into a few issues and I'm also going
to show you guys how to actually solve them. What I have right here is
a live animation sequence. I'm going to open that
up. We've seen it in the previous lesson,
how this works. I've just placed some
keyframes for that ashtray, which we also
animated previously. Let me just zoom in a
little bit more on that. What I've just done is just
letting that float up. What I'm want to do
is with my camera follow the movement of that
ashtray as it goes up. But I want to have that real handheld camera motion to it, so that's where the iPhone is
going to be really useful. How do we set this up? Well, first of all,
we're going to have to go back to that live link menu. Go to the Window on top, go over to Virtual Production, and from there,
locate Live Link, click on it to
open up the panel. Now, this time on the iPhone, instead of opening the
live link face app, we're going to open up
the live link Vcam app. This one is also made
by Unreal Engine and can be downloaded for
free from the iOS App Store, hence like previously
you want to set the IP address this time
the app is going to ask you immediately for that before you can start using it. Now, don't hit Connect just yet. This is one of the first box that we're going to run into. Just open up the app, that's the only thing that
you have to do and already set the IP address
in there. That's it. We're now going to go over to source here in
the Live Link panel, and then choose a
Message Bus Source. We should be able to start
seeing our iPhone in there. If it doesn't, close the app, open it again, do that a couple of times, perhaps hard close the
app and open it back. There we go, it appears. That's one of its first box. Just open and reopen the app a couple of times and you
should see it in there. Click on it, and it's been
added to the live link. That's done. You can close
live link right now. What we're going to do
next is still not hit Connect because that is
going to break everything. What we want to do next is
create our virtual camera. Now we're not going to work with a normalcy camera actor, we're actually
going to work with a virtual production
camera actor. We can find that back here
in the Adds menu on top. Go over to Virtual Production, and in there we can find
a VirtualCamera2 Actor. This is the one that we need. Drag that into your
scene. There we go. Rotate that a little bit
and put it in place. It's not really that
important where exactly it sits because we can use the controller
or the iPhone in a moment to position the
camera better. There we go. This is fine. Now let's connect the app
to the virtual camera. We're going to go
over to the settings of that virtual camera actor. You should see here
in the components, you should see
something called Vcam, are going to select that. One of the first settings is for virtual camera and of course you want to set that to enabled. The next thing that
we're going to do is change the live link subject to the iPhone
right here. There we go. Now scroll down, still don't click on Connect because it will
give you an error. We're going to scroll down, and we're going to
locate your outputs. If you can't find this option, you just have to expand
here the output property, then expand index,
expand output, and make sure that that
is active as well. There we go, and you'll
see that your interface will change a little bit.
Don't worry too much. We can now hit Connect
on the iPhone, and if everything went
well, look at that, we can now start
controlling the camera. How cool is this, and where is that table? It's right here in front of me. There we go. There
is the ashtray. Now a couple of things guys, you can see that we have
this UI right here, and you can actually use that to control a couple of things. For instance, on top we
have the lens settings, so if we tap on that,
we can zoom out. Now if the interface is
too small on your phone, you can also just use
your mouse and click here in Unreal Engine itself to bring up
certain settings, and all that is up to you. If you have an iPad, by the way, that might be a better option since it's a little bit bigger. But for now we're
using the iPhone. If you tap it away
here on the bottom, we have that option
here to bring up these joystick controls. These allows me to move
around in this scene, go back and forward. You can see how sensitive
these controls are. We can position our
camera better now, maybe rotate it a little
bit. There we go. We can go a bit more down. It is super sensitive. Just play around with
those joysticks until you have a framing that
works well for you. A way to control the camera, I'm going to hide
those joysticks. On the right side, we have
some more options here, for example, the focus setting. We can use here the manual focus and it has a really
useful tool that is going to cut off anything from a scene
that is not on focus, really nice, so that
way we can look for the focus on that
ashtray like this. You also have an autofocus, which is that little rectangle
with a dot in the middle. If we enable that, we have this spot in the middle, which is going to make
sure that always anything in that spot is in focus. If I move my camera
up to the back, it will rack focus to
the back to a cactus or to that little
corridor over there, maybe back here to this thing or this little
bottle right there. Really cool, really useful. But now let's say that we
don't want to use autofocus, nor we want to use manual focus. We want to track
a certain object, so they move backwards
like that ashtray stays in focus as well
as if I move forward. Well, we've seen that previously in this
class where we can set the focus to track a
certain actor in our scene. Unfortunately, we can't
do that with the app, so we're going to have to do
that here in Unreal itself. What we're going to do
here is locate my camera. It's all the way down the bottom right here, the virtual camera. From there we have like
all the normal options such as we can change the
lens in here as well, and we have the focus setting. You got to notice that if
you want to change here the focus method from
manual to tracking, that nothing really happens. It's going to reset
itself every time again. The reason for that is because the iPhone is overriding that. I'm just going to lay this
iPhone down for just a moment. [LAUGHTER] It's going to
overwrite that every time. We're going to have to say like, don't overwrite the focus. Luckily we can do that, so don't worry about that. I'm going to select my Vcam
back in here and scroll down. You're going to
find a whole bunch of modifiers right here in the modifier stack and are
still one there called lens. This one here is
going to control everything from the
lens such as the focus, the zoom to focal
length and everything, the aperture, so you
want to disable that. Once you've done
that, we can select back like the roots,
the camera itself, and then go over to the
focus settings right here, and now we can set
it to tracking. Look at that. Now
we are able to use the picker to select that ashtray in the
scene. There we go. It seems like I have
selected the bowl. It's not the ashtray, so
let me just look for tray. [NOISE] I think it's
this one. There we go. That is good and we should
still see we can still track, move forward, backwards
and everything. It's really cool that
you can actually move back all the way like that, [LAUGHTER] and then
come forward again. Really nice feature. We are set. Let's do a recording now. We already have in our content browser,
like I said before, we have that live
animation sequence in which we have that bowl. If I just move that ashtray, so we just move to this side. We can just move
that ashtray up, and we can follow it like this. What you want to do
is actually record our movement of the camera
into that sequence. We can do that here
from the take recorder, which is automatically
going to be active. In fact, I can't even
close that Window. If I tried to do
that, it's going to be warning me every time, like, "Hey, you
can't close that, you don't want to do it because you have your iPhone connected", so it should be
open on your site. Here on top we have a
drop-down menu to select the sequence that we
want to record into, and it's called live
animation sequence, which I have created before
I started this lesson. For some reason, my actor to track
is against set to that ball in the back
and not to the ashtray. Those are the typical
box that you're going to run into while you're
working with Vcam. Again, look for
tray, the ashtray. I want to focus on this one
and not the bowl in the back. I hope it's good now. It's still working?
Now it's working. There we go, looking
good. We're almost there. The last step that we have to do is define what we're
going to track. We can do that from a
take recorder right here. Click on "Source", and from there choose the actor which you
are planning to track. Or we can also very simply
just go into the outliner, look for that virtual camera, drag it into the tape recorder, and now we can start recording. Normally we should
be able to use a record button here
in the app itself. You first have to unlock it and then we can
start recording. But unfortunately that
doesn't really work. It will record something, but it won't really play back my sequence where I have the
animation of the ashtray. We're going to have to use
the record button here, all the way at the bottom here, inside of my sequencer, and from there say,
start recording. As I do that, it's first going to warn me
like, "Hey dear. Are you sure you want
to start recording?" Yes, otherwise I didn't
press that button. As I do that, it's going to
count down. There we go. The countdown has started
and my ashtray is going up and I can just
follow that with my iPhone. Looks really weird if you don't know what the person
is doing. There we go. We have recorded everything, and here is one of the, I want to say first box, but we've already
encountered a couple. Here's one of the third afford box that
we're running into, and that is that we now lost
connection with Unreal. Every time that you are recording and you've
stopped recording, you want to select
your camera again, and you'll actually see here that we have two cameras now, every time that you will record, it's going to
create a new actor. I find that very
frustrating, but anyways, you want to select either one of these, [LAUGHTER]
doesn't matter. Go to Vcam, and then
just basically set the output active
off and back on. There we go. Now
everything works again. Every time that you
notice that your camera, is it really feeding through anymore or you're
tracking doesn't work, just make sure to disable and enable one of those settings
and it will restore back. But okay, we don't
need that anymore, we have already done
our recordings. I'm just going to
put my phone down. Let's have a look here
at my sequence here. What happened in here? I'm going to select
here, the camera cuts, click that camera, so that we can view
what that looks like. You can see here that
we beautifully follow that ashtray as I'm
moving my cameras. That is working
perfectly really good. The problem though that
we are having is that we still see the interface
around it, which is weird. That's because the
interface is something that we need to put on and off. Even when we are going to
render this as a movie, we will still see
this interface. Of course, we don't want that and we're going
to have to change that in the original virtual cameras. Not the one with the
lightning icon next to it, which comes from the
level sequencer, but this one here,
the original one. Go over to Vcam, scroll all the way down
here where we were before, where we set active
off and back on. We want to make sure actually
that this is set off once you are ready to do
your final rendering. Once that is being set off, you can see here now that
the entire interface is gone and everything
is still in there, so the entire camera
movement and all, we can just set our
perspective instead to default viewport to
cinematic viewport. Let's play this
back one more time. Look at that guys. We have just done a real live camera
tracking using our phone. Of course, I do have to mention that this is more of a toy. In the industry, filmmakers
don't actually use their phone to do camera
tracking and such. They use pretty expensive
equipment like a Vicon system, which costs at least
like 50 or $60,000. There's a reason for
that because of course your phone is not
that trustworthy. We are working over
the Wi-Fi here, so there are some
latency going on. It's not that precise and all, but I think it's
just really nice to make online videos
or something which, or just to learn more about Unreal Engine and how
all this tracking works without having to
purchase expensive equipment. It's time to go to
the next level with virtual production
because that's essentially what we're
doing right now, doing real-time
capturing and all. Then in the next lesson
we're going to do a real-time green keying. That's going to be super
interesting as well.
20. Offline Chroma Key: All right guys, we
are really going to enter some scary
territories right now by doing a live green
keying inside Unreal Engine 5. Now, unfortunately, there are some bugs but
I'm going to show it to you guys anyway because
I hope that in the future, Unreal will fix these issues and by then you already know
how things are done. We have our character,
our scene right here, and we want to do a green
keying or a live green keying. I'm also going to
show you both things. The first thing that
we have to do is load in our green screen chart. To do that, we are going
to need a media object. Go into your "Content
Browser", right-click, go over to media right here, and choose media player. It's like a little television. Click on that and it's
going to ask you if it also needs to create
the media texture, and yes, we want that. We just do that,
select that option, hit "Okay", give your
media player a name, let's call it Green Screen, hit "Enter" and at the same time that media texture here
is also been created. What are these two files? The media player is going
to be your source video, whether that is in offline MP4 or that it's a live stream
coming in from the camera. Then it's going to
take that image and put that onto
a media texture. You actually want to use that texture into your
compositing later on. The media player itself
is just the source media. Let's start with that. Double-click on "Media
Player" and from here we can load in
the green screen. Now let's first start with an offline file and you can
already see one right here. It automatically detected that I have an MP4 in my project, that is nothing more than this right here, Jordi Greenscreen, if I double-click on it you can see what that
file actually is, a simple MP4, and I
already went ahead and just imported that
into Unreal Engine. You can just put it into your
assets folder or something, drag it into your content
browser, just like that, and automatically it
will recognize that. We can just double-click
on it to enable that file. There we go, it sits now
inside of that media player. Since this is a
pretty short clip, I'm going to make sure that it's set to loop, otherwise, it will just play once
and as you can see now, it's just a blank screen. Hit "Loop", double-click on that file again to
load it again into the media player
and now it should stay looping that file. Great. We can now go
ahead and save this. Unfortunately, we always need to let the media player stay open. We can't close this
window or otherwise your texture won't be feeded
with the media player. They're just going to
minimize that window. As you can see now here, the media texture also
shows that video now, which is great, and we can use that texture to composite
ourselves into the scene. How do we composite
herself into the scene? Well, that is done using
the composure plugin. Again, head over to
the settings on top, we've seen it before, go over to plugins and from
there, look for composure. I already enabled that
because you need to restart the engine and we
don't want to wait for that during this class. Once enabled and Unreal
has been restarted, we can then go over to
the window menu on top, go to virtual production
where we also found live link but this
time we're going to choose composure compositing. Click on that which will open
up its dedicated window. Composure is literally that,
we're going to compose multiple layers together
to create something new. In this case, it's going to be the background or
the scenery itself, together with the
green screenshots, this almost literally works
the same as after effects. You already have your
different layers and you're working
in a composition. Let's create that
composition in here. Right-click, choose
"Create New Comp", and we're not going to
attach a blueprint to it, we're going to
keep it simple and just choose for it
empty comp shot. There we go, we have our comp. If we select that comp, you can see here that a new
window will be activated, some camera window, a preview. It's currently empty because
we don't have anything sitting in that
composition just yet. Let's right-click
here on this comp and say "Add Layer
Elements", click on it. The first thing
that we want to add to it is the media plate, which is going to be
the green screen video. Click on that, you
can see it now if we expand the comp that the
media plate sits in there. Let's right-click one
more time on the comp, say add layer elements and that is going to be a CG layer. But basically what we're going
to do is make sure to use the background scenery
as the CG elements. You can see it as the background and the foreground. Super easy. I'm going to make a folder for that because it's starting to
get a little bit messy here. Select immediate plates like the CG elements and the comp
because it will be adding those three layers into
your outline as well and I'm going to click
here on "New Folder", and let's call that Greenkey. There we go. It says
grenkey, I mean green key. Let's start with the
green screen itself. Select "Media Plate", and
go into the details panel. Right here you can find media
source and as you can see, it's asking for a texture. We can just go ahead and drag
that texture here that we created previously into
that property like so. There we go, we now have our green screen clip inside of that media plate,
which is great. Now how can we
remove that green? Because of course, that's
something that we don't need. Well, if we scroll a
little bit down here within the details panel
of that media plate, we can find the
chroma Keying option under the transform passes. If you can't see these
options here make sure to expand transform passes. Here it is chroma key. That means you can also
do other things like blue key or whatever, but it's usually going
to be green key. Right here you can
find the key colors. Click here on the plus
to add a key color. It is going to ask you,
of course, what color, and if you actually
click here on this button next to
that color option, we get a new window, which makes it easier for
us to select the color. Let's click here
on the green with the color picker and it's
gone as you can see now. We can close that window and
there we go, I unkeyed out. If you need to fine-tune
the keying itself, we can scroll down again and under material parameters again, you might want to
expand that property, you have more controls to
change the keying itself. If we increase that or decrease, you can see here what
that does to my face. This way you can more
fine-tune the keying itself. I'm still left with this
little green edge around myself and that we can remove with the pre blur kernel size or increase that to get rid
of that little line. There we go, looking good. Of course, never expect a tool like this to do
perfect green keys. There's a reason for that we use After Effects or something
like that to pull the perfect green key because those programs just have
a lot more possibilities. I would also always suggest
to do your green keying in a dedicated program and
not inside Unreal Engine. But of course, if you want
to do a live streaming, then you do need to do
that light green keying, which of course is never
going to be as good as if you would do it offline but I
think that is pretty obvious. We're set, we are keyed out. Now let's have a look
at the CG element, which should be the background. As you can see here, it says missing camera so that means
that we need to create one. Let's make a nice framing of our metahuman right here because the idea is
to stand next to it. Then we're going to go over
to this little menu on top and choose "Create Camera Here", "CineCameraActor." There we go. We have a camera and I
might want to change like zoom a little bit
more of that camera, set the focal length
to 25 or something. This is good. Let's also set the
focus to the MetaHuman. There we go. You know what, I'm actually going to jump
into my camera real quick. Let's go over to
perspective and change that to the
"CineCameraActor" and that way I can better align or change by framing using
the normal controls. Now you are going to see a
huge performance decrease. But again, we are working in an early access program here. Maybe if you're watching
this course in the future, it might be released and
these things might be fixed. But okay, we have a
framing in my ID is still stand next
to the Metahuman. Let me just eject from that camera view and I'm
going to drag my camera as well into the
green key folder to have everything organized. If we now select CG elements, you'll see that it will take
that camera automatically. Now if you have multiple
cameras and your scene it might take the wrong
one so we can define which camera specifically as
well we can just do that by selecting the CG element layer and going into the
details panel, look for composure
and look for inputs then and you should find an option here that
says "Cameras Source." It's certainly set to inherited which is the automatic thing. Or you can also say
"Override," which allows you to target
the camera actor. I only have one in
my outliner so far, so I'm going to select that. This is a second way of
selecting your camera. Now the first thing that
you might notice is that, my colors are way different than my actual scene looks right
here and you are right, that's again, one of those backs of composure and unfortunately, there's no fixed for that. I do have a tiny little fix for it but it's
not really a fix, it's more like putting
a patch on the wounds. Anyway, that bug has
to deal with lumen which is something completely
new inside Unreal Engine, and mostly has to deal
with reflections. You're going to see less of these artifacts
when you're using composure and in an outdoor
scene and in landscape, indoor, you're going to
see more of these bugs. But again, all of
this is so new, so I'm pretty sure that
all of this will be fixed once Unreal Engine 5 is
going to get released. Our inputs have been set
for both the CG elements, which is the background
or the camera view, and the media plate, which is the actual
green-screen clip. If we select the comp
layer right now, we shouldn't be seeing
these two together. Well, not really. Here's where it gets a little
bit complicated. I know that I did promise you that we're not going to dive into blueprints and
notes and everything, but there's just no
other way around it. We are going to have to
create a couple of notes, create again our own material, just like we've done with
the emissive material to make this comp work. Let's select the comp and let's go into the Details panel again. You want to look for the
Transform Compositing Passes. There are currently no layers in here for the transform passes. We're going to click here on the Plus icon to
add an element that open up that or expands that property that
has been created. Right here you can find
a material option. Open up the drop-down
menu and go over to Create new material. You can also apply an
existing material, but that's not really
going to work. Let's create a new material, and it's asking you to
choose a name for that. Let's call that
GreenKey_Composites_Material. Hit "Save". There it is. Here's
the material. It's already looking at that
material right now that's automatically being
applied in that property, but it's not really
showing much. That is because
we need to change what that material
actually has to be. Double-click on it to
open up that material. Here we have those notes again, which we are pretty scared of. But don't worry, it's
quite simple to do this, and I'll explain it
the best way possible. First things first,
we have to define what material that this is. This time, it's not
a surface material which we have set right here. We're going to change that
to a post-process material. By doing that, all of these other options will be
gone or will be disabled. That makes it easier
as well as we can only work with the
emissive color, so you can't really
go wrong with that. Now let's move a
little bit up to the side because we're
going to have to create two different
new notes in here. I'm going to right-click to
open up the Note library. We're going to look for the
TextureSampleParameter2D. This is the one that
you need. Click on it. Now the name of this note is
going to be very important. Let me just make a little
bit more room here with this window. There we go. Like one of these notes, we're going to create two
of them, should be named to the cg_element and the other
one to the media plates. Let's call this one
here media_plates1, which is the name of
my green-screen clip. We can click away, right-click, and we're going to
try that again. Look for
TextureSampleParameter2D, click on it, which is the same thing and
we're going to change the name
instead of parameter. We're going to make
sure that that is set to cg_elements1. If you rename these layers, you need to rename them
as well as here in your material.
We're almost there. We just have to say like these two layers need to
be on top of each other, just like in an editing program. To do that, we're going to
right-click again to create one more note and that has
become being cold over. You can see here
that this is a note coming off from exposure. It's specifically made for that. Click on that to
create the over note. Now it's just a very simple
matter of connecting the RGB Alpha into A, which is going to be the top
layer, and the RGB Alpha of the background into
the bottom layer or B. Don't take RGB, you
want to take RGB Alpha. Finally, take RGB Alpha as
the output and connect that into the emissive
color, and that's it. Now we can go ahead
and save that. Click on "Save"
for that material. If we make some more
room right now, there we go and select
the comp, there we are. We have our green-screen clip playing back in the scene
and it's going super slow because composer is really decreasing the performance
here of my computer. Perhaps I should set the
scalability not to cinematic now, but something like
a medium, perhaps. There we go, it's playing back. They don't worry about all
the flickering and all that's the book composure, [LAUGHTER] but
also because we've decreased the quality of course. But we're in the
scene. Look at that. Perhaps I want to put my meta
human on the other side. Let me just pin
that preview window and things really trying
to get smaller here. Let's select the
meta you and you just like shove it up a
little bit to this side. Rotate the guy. There we go. We're standing next
to each other now, look how tough I am. They're always talk
previously about that patch on the
wound or that little fixed to fix the lighting and
all in the Composer window. Well, that has to be done
in the material as well. Let's make that window a
little bit bigger here, so we have some more
space to work in. I'm going to right-click in
here and look for multiply. Multiply is a note
that really does that. It multiplies a value. I'm going to click on
it to create that note. It says like, hey, I'm
looking for two values, like you multiply A by B and this here is going
to be your outputs. It's as simple as that. What we can do here is bring the values of the CG elements,
the RGBA into multiply A, right-click again, and I'm
going to look for constants. We've already worked
with that with three vector constant to create that emissive material because we can use the
constant as a color. This time we're only going to
use constant for one value. You can see here it's
a very simple note. We can just insert
one value in here, and let's set that to one, for instance, as simple as that. We can now connect
the constant to B. What's it going to do
is multiply what's coming out of the
cg_element value with one. That's just going to
be the same thing. Meaning if you multiply
8 by 1, you get 8. But we're going
to use the output now and we're going to
connect that here to B. We're taking a little
bit of a detour instead of going directly into the B value here from the
background or the cg_element, we're first going
into the multiply, we are multiplying
that by a value, and then we're going to
output that again into the B. If we now change the multiply
to something like 0.3, like 8 times 0.3, I don't know what that is,
but it is less than eight. Let's now go ahead
and save that and you will see here
that our composure, the background, will be
decreased in exposure. That was the patch on the wound
that I was talking about. Is it going to fix the problem? No, but it might help
you a little bit. Now, you want to think
like Jordi, like, what's the use case of this now? We can do a green key and all, okay, but what can we
actually do with this? Because after all, we are
seeing this like this book. Is this useful? Well, I actually do have a very good use case
for when you're working with a green screen
and you want to compose yourself
into unreal engine, but that has to do with live
green keying or setting up your lights around
your green key to match with your environment, rather than to work with an offline file like
this MP4 right here. But that's for the next lesson. We already know how to
set up the composer and everything inside unreal engine. The only thing that we have
to change the source of the media player
to the live feed. It's going to be a short
lesson. Thanks for watching.
21. Live Chroma Key: Green keying. We're
going to continue this lesson with
a live green key. So inside Unreal Engine. I have not changed anything. We still have our composure
going on right here with the offline MP4
video clip in there. We want to swap that
out with a live camera. In order to do that, we need
to figure out a way to bring the signal of the camera
into the computer. I think the best
possible way to do that is with one of these
little things right here. You might want to come closer. This right here is
called a Cam Link. It's a little dongle which
has an input of an HDMI, which means that we can
insert the camera output in there and it transforms
out into a USB, which we can plug
into the computer. Let's do that. We can plug it in right there
into the computer. This right here is coming
off from the camera. I actually have a
wireless transmitter because the camera is
pretty far from here. But you could also just pull
the HDMI cable directly from your camera
into the Cam Link. Of course, there are many
different brands out there, so you definitely don't meet
the Cam Link for instance, but it definitely one of
the more popular dongles. All right, let's go over to
the Green Screen Studio now. Follow me guys
[NOISE]. Here we are. Genic, our standard is already standing here in the
Green Screen Studio. It's basically happening now as the camera shooting Genic
standing in front of that Green Screen while
it's transforming that signal wirelessly
over to the computer. Let's go back Genic
mixture to keep standing right here so that I can
plug you into the engine. [NOISE] We can take the
helmet off right now. It's always dangerous
in Green Screen Lands. We're going to go back to
our media player right here, which we've created in
the previous lesson. Double-click on it
in which we can assign the source media file. It's currently set
to that offline mp4, but to insert a live video feed, so coming off from
that Cam Link, we have to go up to
the menu here on top, click on that folder, then choose one of these
capture devices, video. You should see in
there Cam Link 4K. The Cam Link doesn't need
any additional software. You literally just plug it into your computer and Unreal
Engine will recognize it. I cannot speak for other
brands, of course. Click on that and if everything went
correct, there we go. We got Genic look at
that He's live in the engine and so far everything
is still running goods. Let's save that media file. Let's minimize that and let's see how it
looks in composer, but it's really, that's
all there is to it. Let's locate that comp
file, right right it is. Select that, and There we go. Genic is inside the saloon. You're a Cowboy Genic. The green key is not that perfect so we might
want to go back into the media plate layer and within the settings we can find
back the Chroma Keying. We've all done this
in a previous lesson, by the way guys. Here we can find
Key Colors again, I'm going to reset that
value to pick a new color. Let's select your background. There we go. If needed, you can always dial here
into the details of that key because I see that we are eating a little bit out
of genic sweater. We need to bring this back a little bit. That's
right, Genic. But I'm fixing it for you. I'm fixing it. Don't worry. The key looks fine. We can now go ahead and select the comp layer again and to get a live feeds of Genic standing in the saloon with
the Meta human next to him. Is this useful? That's, of course, the question. Because after all, the keying
doesn't really look good, we're getting a performance
decrease in everything. Is this something that we
can use in the real-world? Well, the way that I
see it is that this is a very good use-case of matching your light with
that MetaHuman into the scene Genic standing
next to that MetaHuman. We can go ahead and go into the Green Screen Studio
and actually change our light adapted to the scene to really
match it perfectly. Once you have that,
I would, of course, suggests to make a recording of just the camera
without a Green Screen, capture Green Screen shot and bring those two
into something like After Effects or Premiere or any other video editor to do
your green keying and there, which gives you better results and also better performance. But you'll have the
perfect lighting match. Of course, if we want
to do live streaming, then you can use this
inside Unreal Engine. When you select your comp
layer here in the outliner, you actually have this
Maximize button on the top right and
your preview window of that comp, by
clicking on that, it will maximize that frame and you can bring us into
a second monitor or something and use that as a feed forward you're
live streaming. I was going about
live Green Screening. Genic, thank you so much for standing there in the
Green Screen Studio. By the way, tell
our students how great of a job
they're doing so far. You're doing great students. Have you heard that?
You're doing great. Thank you so much
for watching guys. In the next lesson, we're going to do
something with DMX. I know, it sounds scary. [LAUGHTER]
22. Setup DMX: It seems like all of the
systems in the engine are still running good.
That is great. That means that we can
continue with the next lesson, which is about DMX. Not only a rapper from the '90s, but also a network
to control lights. I'm going to keep this
lesson short because DMX inside Unreal
Engine is super easy, but also super-complicated if you don't know
anything about DMX. DMX itself can be a
whole different course. If you have never
worked with DMX before, don't feel bad for just
skipping this lesson, or just watch it by
leaning backwards. Don't bother too much by
storing into your brain. But who knows?
Maybe in the future you are going to work with DMX. Then it's very useful to come back to this class and watch this lesson until instantly you know what I'm talking about. But in short, for those who
don't know what DMX is. Well, right here I've
got an iPad which is connected to my DMX network, and that allows me to
control the lights. For instance, if I move this
slider here up and down, you can see that it gets darker. I also have a few presets, like I can make it
dark like this, I can make it more red when there's an
error in my engine, or I can make it green
when that error is fixed. Those are all things
that I can do with DMX. I can also animate
certain scenes, make them fade from
one to another, even control moving
lights that have a pin or a tilt or something
to make them rotate around. I mean, we've all seen that
when going to a concert. That was a simple part. Now comes the hard part where
we are going to connect the channels and the
universes into Unreal Engine. First things first,
we're going to go up to the menu, Settings Plugins. We've been there
before, look for DMX. This time we're going
to need the DMX Engine. When you enable
that, automatically the DMX protocol will
also be enabled. You also want to enable
the DMX Fixtures. These three are the
plugins that we need. Once they are enabled, restart the engine and come
back into your projects. We can now go ahead
and right-click into the Content Browser, go over to DMX right there, and choose DMX
Library and give that a name like for
instance, DMX Library. There we go. Open
that file up by just double-clicking onto
it and right in here, we can insert all of the
lights that we have; the real lights
into Unreal Engine. But first things first,
we're going to have to make a few settings to the
project settings. I click on this
button right here, which is going to bring you
to the project settings. By the way, this is
the same window. Then if you would go
over to Settings here on top and then choose
Project Settings, it's the same window, however, if you press here
on that green button, it's already going
to bring you to the right page from
the left side. What I want to do here is
set an input and an output. I'm going to click
here on the plus for both the input and the output. Let's open it up,
these two indexes. From here you can
select the protocol. I am working with Art-Net, but some of you might
be working with sACN. SACN is more broadly used. That's going to depend on
what you have in your studio. Again, if you know what DMX is, this totally makes sense to you. But I have Art-Net
here at my studio, so I'm just going to
leave it at that. Then the Network Interface, and you want to select your
own computer's IP address. I have seen cases in which the DMX won't work if
you select a local host, one of these two IP addresses, which should also work
but for some reason, it doesn't always do that. Just select your own
computer's IP address, which is 10.0.0.60 in my case. I'm already going to
do the same thing here for the output, set that to 60 as well. The last important
setting is the Universe. I know that some people
might start from Universe 0, unfortunately Unreal
Engine 5 does not use 0. Like if you change that
to 0, it won't work, it will change itself back
to 1. Keep that in mind. If you have set your universe
in your studio to 0, you want to change that to 1 if you want to use that as
well inside Unreal Engine. Mine is set to 1, so I'm
going to leave it at that as well as the output. Everything has
been said, this is the only thing that
we have to do. We can now just
close that window. You'll see these
two settings here appear in the Library
Settings tab. We can now go over
to Fixtures Type. This right here is where we are going to define all
of our fixtures, just like in my iPad right here. Like here on the side, these are all of my lights,
all of my fixtures. If I tap on any of them, you will see that these sliders change and that's because well, every light has
different settings. Like some of these
might be RGB lights, so they have more control, some might only have one color, some might have effects
or something like that. The more things a light can do, the more sliders you have or better set the more
channels you have. Here in Unreal, we're
going to click on New Fixture Type and we
can give that a name. For example, that's
going to be here, let's call that Aputure_600D. That's actually
the light that is standing right there that's
illuminating me right now. On the bottom, we'd
have to choose what kind of light that is like, is that a static light or maybe it's a moving headlights, like one of those lights
which can move around for those dancing
shows and such, or a strobe or whatever. But this time it's
just a static light. We're going to keep it
simple for this lesson. Then the next column is
going to be to add a mode, so just click on that. With the mode we span a channel. If you are running an RGB light, you're going to need
three channels at least, so red, green, and blue. But in this case
we're just going to work with the Deming function, which is just going to make
the intensity bright or dark. Now so in most cases you can actually just leave
that at auto. The last thing we have to
do is add the functions, so click on the Add
Function button right here. For the first channel, what does it have to do? Well, it has to dim. If you're going to add
more functions in here, it's going to add a
second channel and by having here the auto
channels span active, it's just going to
adapt itself to how many channels or
functions that you are using. But for this example,
let's delete here the second function as
we don't need that. It has been set to dimmer and that's basically
all there is to it. The last thing we have to do is go into the Fixture Patch. On the right side are all
of my available channels, and on the left side we
have to add the fixtures to the fixture patch
in which we can find the aperture 600_D light, which I've set before
and by default might set itself to channel 1. But I'm going to look here in my iPad what channel
it actually is. Actually, you need to look at your light at which
channel that has been set. But for convenience, I'm going
to look into my iPad and I can see that my dimming function here is set to Channel 60. I'm going to change
that as well in here. Just drag that over
To channel 60. Where is it? Right there. That is it. We can
now go ahead and save that library and
close that window. Now right here on top, you'll find a new DMX button. If you click on that,
you can actually open up the channel monitor. By opening this window, you can see which channels
are already active. As you can see, I've
got much more lights here going on in the studio. But if we are going to change this value here
of the intensity, now you should be able to see, there we go, 60. You can see it change in value. That means that the reading of the Art-Net's protocol
here is working. Great. Now, how can we
control a light in the scene? Let me just close here the
monitor and we're going to add a new light into the
scene because unfortunately, it doesn't work out of the
box with normal lights. We're going to make use
of existing DMX lights. Now, where are they? They are hidden within the
engine folder structure. That should be somewhere
right here behind me. But for convenience, let's
look into Content Browser. I'm going to click here
on the Settings button in my Content Browser and from there I'm also going to enable
to show engine content. If I do that, you'll
see that a new folder will pop up in here
on the left sides, the engine folder,
something that we normally shouldn't
worry much about, but in their sits also
the plugin folders. Again, I'm going
to go to Settings, and now we can also enable
the Show Plugin Content, which is going to show you another folder within
the engine folder, which is called Plugins. We should find
somewhere in here, the DMX folder, right here. DMX fixtures contents. Let's expand that as well. Right here we can
find LightFixtures. Here we can find
some blueprints. We have a moving headlights, we have a moving matrix, we've going to moving
mirror, we've got a static light and that's actually the one that
we're interested in. We have a StaticMatrix, a Static Strobe, and a wash light. Whenever light
that you're using, you can just pick
from here and drag that into your scene like that. Maybe here in a saloon, we are going to give
a show where we have some cowboys perhaps
like singing, playing the guitar, just
having a good time. I want to have the
spotlight right here, perhaps on this chair. Because maybe the cowboy who does guitar is going
to sit here in that chair, so we have this nice
light here set up. With that light now
into our outliner, it is a blueprint. That means all the functionality has already been written for us. We don't have to do anything except for going into
the details panel, locate the DMXLibrary in which you either
want to go back to your content browser up here and just drag that DMX
Library in there. Or you can also
located it here from that drop-down menu DMX Library, the one that we
have just created. The library has been loaded in. The next thing that
we have to do is tell this light
specific what light it is because we know
that we can assign multiple lights into
our DMX Library. It works just the same as the iPad app right here,
which is by the way, Luminair or like a
DMX control board in which you also need to
set all of your fixtures in. Let's click on here
and we should find our Aperture_600 D in there. Select that, and that's it. Seriously, that's it. How can we see this
is working now? Well, we can do that
by pressing "Play". Again, we have to go
into simulation mode, and we've talked about
that before as well. If everything went well, we can now take our iPads, control the real
lights right here, but at the same time, we can also control the virtual
light in Unreal Engine. Let's change the value here. Let's make it dark. Let's turn off that light. Look at that, my light here is off and Unreal Engine
light is also off. How awesome is it to be
alive right now, guys? Let's pump up the light, make it super bright. Wow, that is bright. But also look at that, in my saloon how
bright it is in there. Wow. [LAUGHTER] This
is really cool guys. If you know what DMX is you've already been working
with that for years, probably like a new world
is going to open for you right now because
it's as simple as that. If you have RGB
lights laying around, if you have moving lights
or anything like that, you can also hook up
your virtual lights up to your Art-Net or sACN. No, does that mean that
we can also create fake lights? Yes, of course. You can of course
create dummy lights on your iPad or on your laptop, whichever thing you're using to control your lights and
you're going to set it to a channel that doesn't
exist in your real studio. You can just fake lights,
whatever you like. Now, they won't affect your real lights
here in the studio, but they will affect
your lights in Unreal Engine if you set
the channels correctly. That is in a nutshell what
DMX is about and again, if you don't know what DMX is, then this might be very
complicated to you. But if you do know what it is, then you know instantly how to go further with
this because it's the exact same thing
as you would do on your iPad or on your
computer or whatever, which you use to
control your lights. With this lesson, we're already coming to the end of this class. That's a shame. Now there's one last lesson that
I've left for you guys, or I say like a
practical lesson. That is where we're going to bring everything
that we've learned together into a
final scene capture. We're going to do live camera tracking in
front of the green screen, and at the same time we are
going to control the lights using DMX and all of that
while recording that, putting it into a
level sequence. Then we're going
to end this class by rendering it out as a movie, which is of course, the
whole reason why we're here. Thank you so much
for watching again, I'll see you in the next lesson.
23. Virtual Production Example: Hey, guys. Welcome to one of your last lessons of this class. I know it's a little bit sad, but this one is
very fun actually. We're going to bring
together some of the things that we've
learned throughout this class and put that
into a real life situation. So the idea now is to use the iPhone not as a controller, just use it as a tracker. Also, the DMX, we're going to control
that as well as we're filming myself infront
of that green screen. We're going to record
with a real camera over there in the
Green Screen Studio at the same time record an
Unreal Engine and then afterwards a
post-production like an after effects or premiere. We can lay those two shots on top of each other and
do the green queue. Let's go inside Unreal Engine
and set everything up, and this is going to
be a little bit of a recap because we've
done this before. Go over to the Window on top. We're going to go over to virtual production and
then choose Live Link because the first thing
that we want to do is link the iPhone to the engine. Go over to Source here on top. Go to Message Bus source and your iPhone should
appear in here. If it doesn't, then
that means that you haven't opened up the
app yet, so do that. We're going to go over to
the live link VCAM app. Tap on that and as
you're doing it, you should see your
iOS device pop in in the Live Link Window. Click on that to connect it. That's the only thing
that we have to do. We can now just close
the live link window. Next thing we're
going to do is go to the Add Window here
on top of the menu, then go to Virtual
Production and we're going to take the
virtual camera 2 actor. Bring that into the scene and perhaps move that
up a little bit. It's not going to be that
important because after all, the iPhone is going to
take over its movement. Now in order for
the iPhone to take over the virtual
camera's movement, we need to connect them
or linked them together. With that camera selected, go into your details panel and you want to click on VCAM, which holds all
of those options. Here on top you should see virtual camera and you
want to enable that. There we go. Then we can link here our iPhone to that camera, so from that drop-down
menu choose your iPhone. Now one last thing
that we have to do, that is scroll down
and under output. We need to make this active too. As we do that, we can then click here on the "Connect"
button. There we go. We should be connected to the Unreal Engine and your
tracking should all work. Now since we're
only going to use the iPhone as a tracking device, we don't need all of these controls in here and everything. So what I'm going to
do actually now is simply deactivate that option. There we go. You'll
find that we get this reconnecting
pop-up right here. Don't worry, your tracking
is still working. Let me just go out
of the pilot view and you should see your camera
floating around in here. There we go. Automatically, it will also create a bookmark. Don't worry about that, I'm actually just going to
delete that in the scene. As we're moving
around the iPhone, the camera is being
tracked as well. Now it's our turn to place this iPhone in the
Green Screen Studio and I'm going to need
Janick for that. So you can go ahead, grab that iPhone, and actually place it
inside of the camera. We have a special
bracket for that and that way we can mount it
sturdy onto the camera. As Janick is doing that, you might notice that
our camera is gone. Where is it? Well,
that's because he ran away with the iPhone, which is controlling
the camera of course. I'm going to click on
the virtual camera and try to find it. It's right there, apparently, in the dark. You know what, let me
set my lit view back to unlit so that I can
better see my camera. It's outside. Oh, wow. Then a couple of things
that I want to do. In order to take over the control because that's essentially what
I'm going to do, reposition that camera, we're going to have to
disable a few things. With that camera selected, go back to your VCAM and we're going to
scroll down because there are a couple of
options that we want to disable for the
iPhone to control, which we can all find back
in the modifier stack. Right in here you should
find an option called, where is it, thumbsticks. You want to disable that. As well as under I think index 5 you'll find
that the lens options, I'm going to disable
that as well. What that allows me to do is just select the
root virtual camera here on top and set a
focal length for myself. That is one thing
that we can do. For instance, set that
to 20 or something. [NOISE] I can go
into the pilot view. Automatically I've
gone into there, so I can now just right-click and use the worst keys to move around and actually create
a framing that I like. Let me just set it
back to lit to get a better understanding
of the scene. There we go. It's a framing
like this, should work. I think this looks pretty good. I'm going to eject from the
pilot view and have a look. My camera should be
at the right spot. That is perfect. Now something else
that we want to do is also set the focus. We're going to set
the focus where the actor is going to stand, but where exactly is
that going to be? Well, we're going to use
a little trick for that. I'm going to ask Janick
right now to take off the iPhone from the bracket off the camera and
actually place it on the floor where I am
going to stand later. You can see here that the camera it's floating like
a ghost around. There we go. It sits
now on the floor. Now I'm going to
mark that point, which we can actually do by
creating a simple shape. Go up to the Adds
menu here on top, go to Shapes and take
something like the cylinder, dragging it to your scene
on top of your camera. I'm going to decrease the size
a little bit of that one, but I do want to
extend that in height. There we go. This here is a spot where I'm going to stand. We've marked it. Now we can ask Janick to take the
iPhone back off the ground and position it back into the bracket
of the camera. You can see there the camera
following that beautifully. It's always funny
to see that happen. Now if we select the camera
we should see the cylinder in our shots and we can go over to the focus settings
which should be right here, focused methods,
and we can set that to manual focus distance. Let me zoom in a little bit
more in into that cylinder. Take the picker and let's
pick the cylinder like that, which should put
the cylinder into focus or a spot where
I'm going to stand. Now one problem here, guys, when we're going to
render out this movie that cylinder will
also be in my shot, which we don't want to happen. So what we're going to do
here is select that cylinder, go over to the
Details panel and I'm going to search for a hidden in. There should be an
option called under rendering actor hidden in game. Enable that and now we're
telling Unreal that object should stay in there whenever we're working
inside of Unreal, but once we're going
to render you have to hide data object. You can actually already do that in the editor view if you press the G key to hide all of these
billboards right here. That cylinder will
also be seen as a billboards and it will
be hidden from the editor. There we go. You can
always toggle back and forth between
these two views. Everything is set. We can now start recording. In order to do that,
we're going to have to go over to the Window on top, go to cinematics and choose the tape recorder if that
Window wasn't already open. Inside the tape recorder, we need to define which
things need to be recorded, which obviously is going
to be the virtual cameras. Let's drag that into
the tape recorder, as well as the DMX
which we're also going to control during
the live recording. Now, we can't just drag in
the static headlight in there because that is not
actually being animated. It's actually more our
DMX library which is going to do all of the numbers
and the magic and all. We want our DMX library to be inside of
the tape recorder. Now to do that,
we're going to have to click here on "Source", from which we can also select an actor from the outliner, but we can also select
here the DMX library. Just select that and just like
with the static headlight, we need to select the
library and to find which library that we want
to work with because yes, we can make multiple libraries. We've got only one which we created in the previous lessons, so you just select
that DMX library and finally add all the fixtures which were defined
within the library here into the tape recorder. There it is, the aperture 1200D. We can now go ahead and press
the record button inside Unreal Engine and I'm going to ask Janick
to do the same thing, but then with this
real live camera. As we're now both recording, I'm also going to ask
him to bump the camera a little bit as it's standing on a tripod because that way, we're getting a
synchronization point. We see a bump in
the real camera, but with that tracker
mounted on top of it we also see that back in
our Unreal Engine shot. That is a real good point to
sync the two shots together. Now it's time to go into
the Green Screen Studio. Let's do that guys. Let's go over to the
Green Screen Studio. No, I'm lying. This is a saloon. [LAUGHTER] That's right. I'm standing in the
saloon right now, guys, and I hope
that they're serving good drinks at the bar. I do hope so. Oh, no, a spotlight. Now I don't want to
stand in the spotlight. I'm a little bit shy when it
comes down to spotlights, so please turn that
off. Thank you. You know what, I
actually feel much more safe for inside the engine, so let me just go back
to the Unreal Engine. You can hit the "Stop" button, Janick, and I will do the same thing right here
inside Unreal Engine. Hit the "Stop"
button. There we go. Now, where is that recording? You should see a
pop-up right here, which if you click
on "Browse 2" will automatically bring you to it. But it's now faded
out, it's gone, so let's manually go to the folder where our
recording is in. That is in the content browser. I'm going to go
over to cinematics, a folder that has
automatically been created by the tape recorder, open up takes and
you should find that today date in here in which you've gathered
all of your recordings. We only have one,
which is Scene 1. Here it is, the level sequence. We can just double-click
on that to open it up. Here it is, guys. If you scrub through,
which you can see the entire camera
motion happening, which is really good,
but the DMX isn't working and that is because we need to be in simulation mode. Go on top here, we've
seen that previously. We need to be in simulation
mode to see the DMX. Let's also select the camera
cuts view. There we go. Now if we play this back we
should see our DMX working. Janick was here, I think, fumbling around a little bit. Let me just scrub a little
bit forward in time. I think right here should
be the right point, right cam inside of the frame. Here I'm talking about
how nice it is in the bar with the
drinks and everything. Somewhere right here,
the spotlight should go on and I'd probably
be a little bit afraid. I'm a little bit shy when
it comes down to spotlight, so spotlight goes back off
and I walk out of the frame. That recording went really well. We had the camera shaking
there and we've got the DMX working,
so that is great. Now it's time to render
out this movie that we've recorded so that we can place our green screenshot
on top of there, do the green keying, and have our final video. But that's for the next
lesson in which we'll discover how rendering
an Unreal Engine works.
24. Movie Rendering: Rendering, the last step of the engine and the last step
of your creative process. In this final lesson, we're going to export
our creation into an actual movie so that we can share it with friends
or upload to the web. Going over to my
Content Browser, we have a few sequences. Right here is the
folder where we have the Life Animation
Sequence and My Animation. Maybe I should have
named them better. But anyways, these are
the two level sequences that we created
previously in this class. The first one was, My Animation. When I double-click on that, you'll actually see that we
can't really play this back anymore and most of these
layers are now in red. That is because we have
the wrong level open. These were created I
think in Lesson 18. If we go back to
Content Browser, go to the levels where I have
all the different levels in here and they are
numbered by each lesson, so when you download
this project, you can also easily open up each level specifically
to the lesson. Anyways, I'm going to open
up Lesson 18 right here. Double-click on
that. There we go. Now let's go back to
sequences and open up my animation and now you will see that
everything is working. We can enable here
the Viewport for the Camera Cuts and playback the animation that
we created previously. Even though you can have multiple timelines or
multiple sequences, they are always bound to a certain world or
to a certain level. When you create a new level and a new sequence that is
built within that level, you have to make sure to
always open up that level. Now we have this beautiful
animation right here as well as the other
life animation, and we also did that
real-life recording with the green screen
studio over there. We want to render those out, export them as an actual video. How do we do that? Well, there are two
ways of doing that. First, we go back
to the sequencer. From here, we can
actually find a button on top that says "Render
this movie to a video". Now, when you're doing that, make sure to first click
here on these three dots, open that menu, and make sure to choose Movie Render Queue. Now I believe that in the
future they are going to remove the Movie Scene Capture because we don't
actually use that. It's a very quick way
of rendering something, but we can't really get the good quality out of that option. Make sure that Movie
Render Queue is enabled right here and then you
can click on that icon. A second way is also by going up to the menu on top, Window, go to Cinematics, and there you also have the Movie Render
Queue right here. If you open it up through here, you actually have an
empty render queue, but if you open that window up through this
button right here, then it will add this sequence automatically into
the queue already. If you want to add some more
levels sequences in here, you can click on the
Render button on top and then you can select
the sequences that you would like
to add to the queue, such as the Life Animation. Let's also add that one
and also this one here, the Scene 1, Take 1 level sequence, which was created with a tape recorder from
the previous lesson. We've got three sequences in the movie Render
Queue so that means that we can
actually render three different
videos out from this. They're very important. Like I said before, every sequence here is
linked to a different level. Of course, that's
not always the case, but the way that I worked, it is that way because
I created a new level for every new lesson for you
to easily follow better. For my Life Animation, I know that we actually
worked in Lesson 19. Then for the Scene 1, Take 1 capture, that was with the last lesson, so that's going to be
Lesson 23 down here. That's going to be
very important that you set the map correctly. Now it's going to ask
us for the settings. Of course, just like
any other program where we can render out from, it's going to ask us
what format do you want? What's the resolution,
the frame rate, and all those stuff. Well, for that we're
going to have to click here on Unsaved Config. Just click on that, which is going to open up a new window and from here we can
set the settings. First of all, comes
the export format, which is by default set to JPEG which we can change by
going up to the menu on top. Click on settings and add any settings in there that we would like
to change or add. There are mostly two different settings
that I would look at. One is either the Apple ProRes and the other is
the EXR Sequence. Now, normally you should
always take that ESR Sequence. EXR is a raw photo format. That means we're going
to render it out as a photo sequence just
like if you would render to a PNG sequence. You get the highest
possible quality, plus the big benefit of exporting to a photo
sequence is that, whenever your render crashes at, let's say frame 55, that you can restart to
render starting from frame 55 and you don't need to render those frames before. That's definitely going to be
very useful if you have to render for hours
or even for days. Apple ProRes is a
great alternative, but keep in mind that
if your render crashes, you need to re-render your
entire movie because you are exporting it as a
single movie file. I oftentimes take a ProRes
format if I know that my export will just take around five minutes or
10 minutes or something. For this example,
I will just also take the Apple
ProRes right here. That means that I can either
disable the JPEG sequence. I can enable that as well so
that we have double exports. That's up to you. Or we can also just delete that export setting. That's the same as disabling
it all. Moving on. We have set the format that is good within the Apple ProRes. We have some more
options such as the codec, for example. If 422 is enough for you,
then you can just pick that. Next up we're going to add a very important setting to
our conflict right here. But back to the plus settings
button on top and this time we're going to add the
anti-aliasing option to it. Now, anti-aliasing is going to give us a couple of options. First of all, we can overwrite
the default anti-aliasing. Check that box and from there we can choose a
different method. But these here on
the bottom are all real-time anti-aliasing methods, and those are great
for playing games. But when you are going to
render out your movie, you don't need to have
that real-time capability. I mean, you can go grab a coffee while you
are rendering. That's the reason why we're
going to set that to none and define a temporal sample
count of our cells. For instance, 64 sample counts. This is what's used the most if your rendering is
taking way too long. You can change that
to something like 32, which is still pretty good. For the sake of this lesson, I will also just put it at 32. That is anti-aliasing, a
very important setting. But then we have one more
super important setting, which can be found down here. All the way in the
bottom we have the Use Camera Cut for Warm-up. Before I'm going to
explain what this is, let me first expand the advanced options and talk about the render warm-up counts. By default, it's set to 32. We can increase that or even bring that all the
way down to a zero, which I would not recommend. You can just leave that at 32. Basically what that means is
that the engine will render the first 32 frames but don't actually export that.
Why is that important? Well, there are so
many things going on inside the engine such as lumen, which needs some time to make sure that everything
looks right. If you export your movie
without the warm-up, you might see flickering
going on in your scene or even your camera position might be completely
off somewhere. That's the crazy thing
about Unreal Engine and that's why it
needs this warm-up. That's good that we have
that set right here, but then there is one
more important setting. Let me just make a little
bit more space here. We have different camera
cuts here in our sequence. Now, with every camera cut, that same problem
would occur again. If we cut here from the balcony camera over
to the stairs camera, we might see a sudden flicker
for a couple of frames. Your lighting is going
to act very weird or even your camera position might be through the
floor or something. That's something you
never know with Unreal, but luckily the option is
there and we just have to enable to Use Camera
Cuts for Warm-Up. Now it's going to pre-render every single camera cut
here for 32 frames. Those were the most
important settings. Now let's go to the last
thing here, output, which is going to be
pretty self-explanatory. We can set a resolution,
for instance. Let's go for a 4K resolution. There we go. We can choose where we would like
to export that. Let me just choose my
desktop. There we go. Finally, we can give it
a name or just going to take the sequence name. Let's just leave it at that. That's fine for me. We can set a custom frame
rate if we want to. We can enable that right here. Set something else like
30 frames per second. Perhaps you want to
have some handlebars. That is all up to you. But finally, something
pretty important here, and that is Use Custom
Playback Range. If this is disabled, it will just render out
to the entire sequence. If you have that enabled, you can actually set a
starting frame count. For example, we want
to start at frame 55 because maybe your exporting
was crashed at that point, so you can continue
from frame 55. But for now, I'm just going
to disable that option and just to render out
entire sequences. Everything is looking good. The last thing that I want
to do is go up here to the top right and
say Save Preset. I'm going to click here
and save as preset. That's going to
be a preset file. I'm just going to call
it ProRes Rendering. Hit "Save" and then hit
"Accept" here on the bottom. You'll see here that
the preset has been added to my
first-level sequence. We can also set the same preset
for the other sequences, so this one and
this one as well. That is all there is to it. We can now hit the
"Render Local" button to render on your own computer and not use a network
or something. That's what the remote
setting is for. Click on that and
you'll start to see a preview if
everything went right. This is the hard
part of the engine. We have to keep an eye on it, that it won't crash, that it won't turn red,
that we don't see smoke. That is going to be important. But you'll see here
now a preview. This will always be a low-quality preview
that you see here. If there is anything
looking weird , don't worry too much. Wait until the end and you'll see how your final export looks. Right here on the bottom left, you can see the progress. We are a two percent of
the first level sequence. Here you can see the sub-sample, that 32 anti-aliasing
that we've set. So for every frame,
it's going to make 32 calculations to get
good anti-aliasing, and we get an overall view of at which frame count that
we are currently at. That's it. Now just wait it out and drink a coffee or something. Where is my mug? Right
here. It's empty. Let me just grab a new coffee. It's always dangerous
outside of the engine, so make sure to put
on your helmet. [NOISE]
25. Conclusion: [MUSIC] I'm pretty
sad right now, but I'm also happy. It's the last lesson
of this class, so I'm going to have
to say goodbye to you, but at the same time,
I'm super proud of you. You've learned so
many new things within this class,
just think about it. You are now ready to start creating stuff inside
Unreal Engine, that is just so cool. Let's take a look at where we left off in the previous lesson, we rendered our three
different levels sequences, and here they are
on our desktop. Let's have a look
at that animation with those three camera
cuts. Here it is. [MUSIC] Now I think
that came out pretty good and it's something
that you can do as well. You've learned all of these
techniques in this class and you're probably
curious as well to see that live drinking shot. Well, here it is. That's right. I'm standing in the
saloon right now, guys. I hope they're serving
good drinks there at the bar. I do hope so. Oh no, spotlights. I don't want to stand
in the spotlight, I'm a little bit shy when
it comes down to spotlight, so please turn that
off. Thank you. You know what, I actually
feel much more safer inside the engine so I'm
just going to go back to the Unreal Engine. I'm going to be honest
about this one, it doesn't look super good. The biggest reason for
that is the tracker. We're using our iPhone. Just think about it. Professional studios use
equipment that costs over $100,000 just for
tracking alone. Obviously, your phone
can't do the same thing, but it's a very cool gadget. It allows us to super easily start doing
camera tracking, and it's a great way to learn about the camera systems
inside Unreal Engine. If you have an iPhone, definitely try and use
that as a camera tracker, if not on a green screen, then definitely just
use that to add some natural handheld
motion into your shots. Now it's up to you, so put on your helmet, because you are going to work, you are going to create
either an outdoor landscape or an interior using 3D assets
from the Quixel library. Make sure to add some
virtual cameras in there, add some keyframes, and make three, four shots or something, a nice level sequence. Render that all out as a
movie and publish it here to Skillshare for me
to watch so that I can give you
feedback on your work. If you dare to tackle some of the more
advanced techniques, such as live drinking, perhaps live camera control, DMX, well, then definitely try and do that. But before you do,
make sure you put on your goggles, super important. Now, the engine is going
to get pretty hot, so you definitely want
to put on your gloves. Super important, you don't
want to burn yourself, do you? Now you are ready. You are ready to
enter the engine, the Unreal Engine 5. Jump in it, create stuff, and share it with the world, but most importantly, have
fun while doing that. Thank you so much
for watching and as always, stay creative. The engine, it's mine. [LAUGHTER] [MUSIC]
 Jordy Vandeput, Filmmaker and Youtuber