Transcripts
1. Get Creative with Clarity in Lightroom Classic & ACR -Introduction: Hello, I'm Helen Bradley. Welcome to this Graphic Design for Lunch class, Get Creative with Clarity in Adobe Lightroom and Adobe Camera Raw. In addition to teaching Illustrator and Photoshop, the graphic design for lunch series of classes also includes some photo editing and photo management classes. These are taught for both Lightroom Classic and Adobe Camera Raw as both applications share the same base code. This means that within one class, you'll simply focus on whichever application you prefer to use. Today, we're looking at using clarity, which is a mid-tone contrast enhancement tool available in both Lightroom and Adobe Camera Raw, and we're going to see how you can use this tool for creative purposes in your photo editing. Now, as you're watching these videos, you will see a prompt which lets you recommend this class to others. If you're enjoying the class, please do two things for me. Firstly, give it a thumbs up, and secondly, write just a few words about why you're enjoying this class. I ask this because these recommendations help other students at Skillshare. It helps them to say that this is a class that they might enjoy too. Now, if you'd like to leave a comment or a question for me, please do so. I read and respond to all of your comments and your questions, and I look at and respond to all of your class projects. In fact, today's class is as a response to someone who asked me if I would do a class just like this. We're going to start our exploration of clarity in Lightroom, and then we're going to progress to Adobe Camera Raw. All the images I'm working with are going to be available for download and you'll find the download links in the class project area.
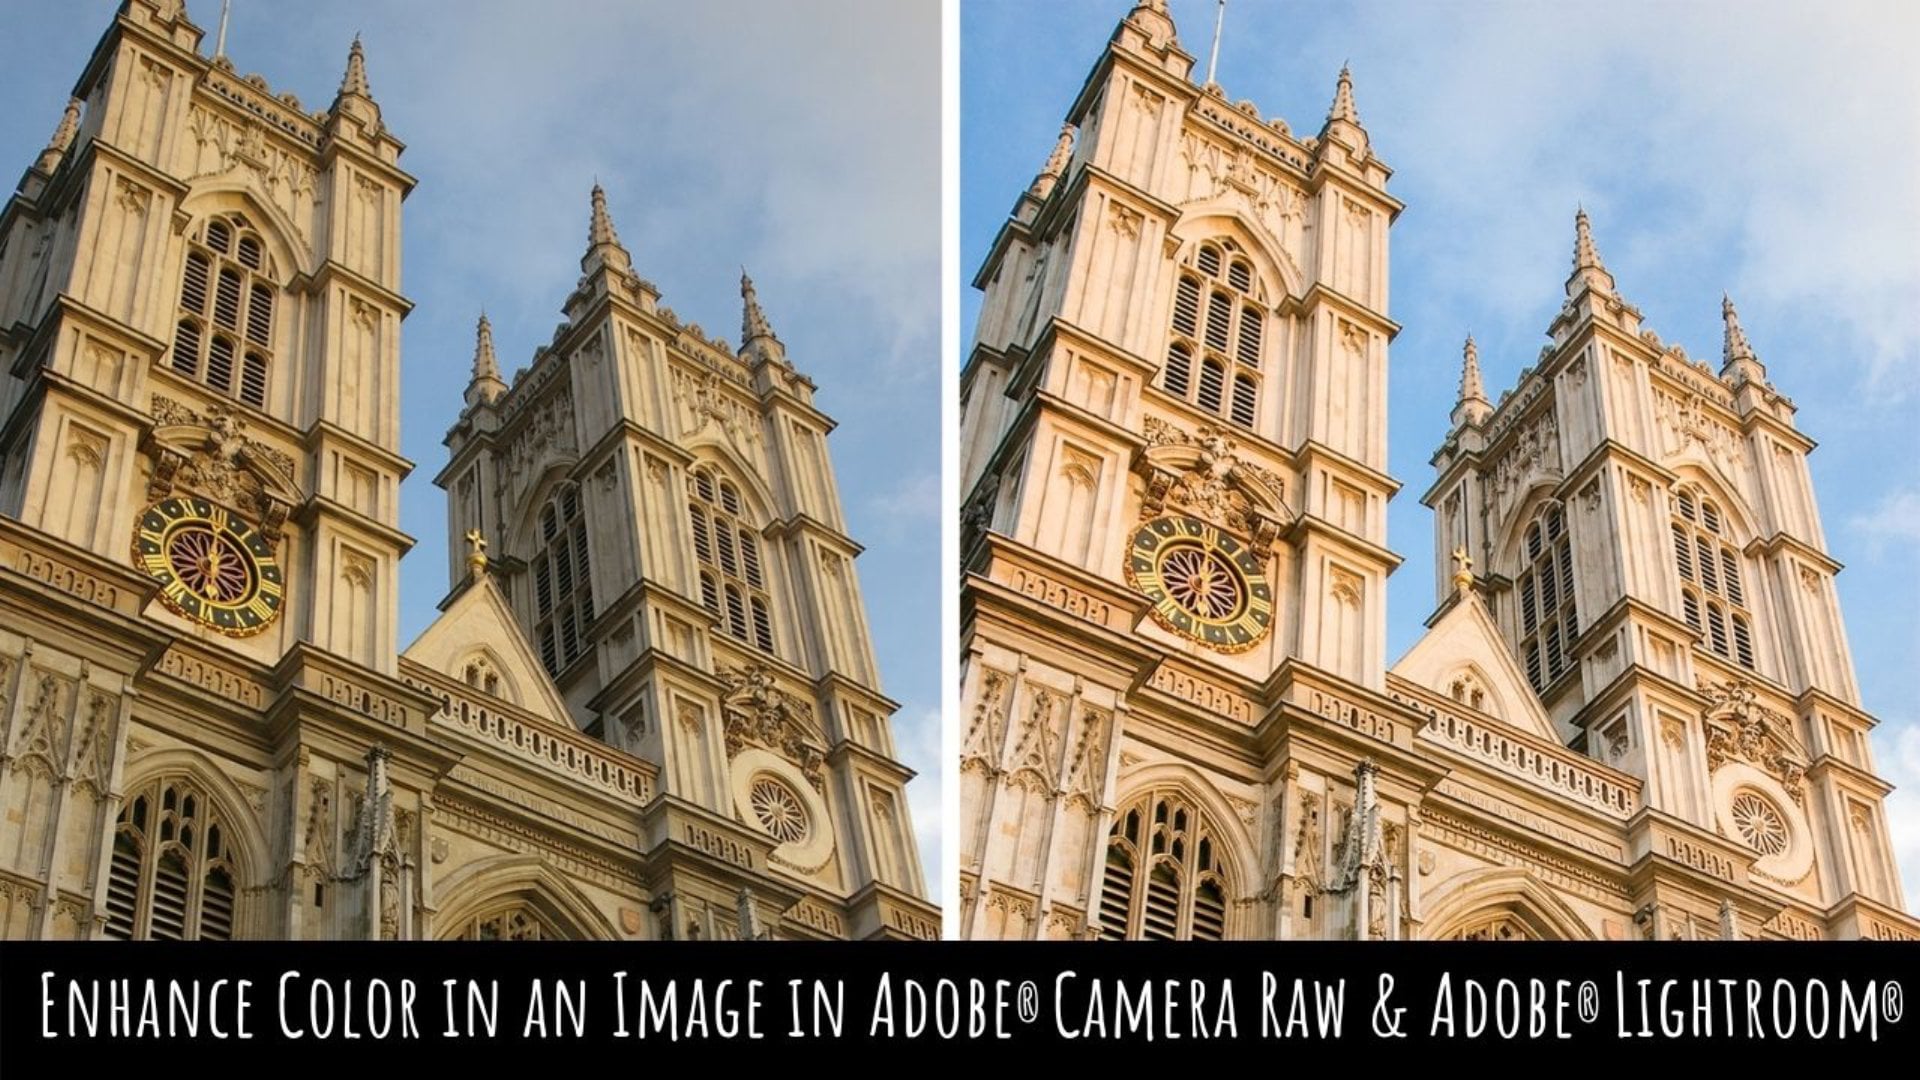
2. Pt 1 - Lightroom - Adding and Removing Clarity: We're going to look at two images, and we're going to adjust clarity in very different ways, in both of these images. This is the first one that we're going to look at, I'm going to crop this image because it really needs a bit of cropping just to focus our attention on the clock tower here. It probably also needs to be straight, and I'm just saying that it's not quite straight. We'll look at the basic panel adjustments because whatever you're going to do clarity wise, you still need to create a well adjusted image, I'm going to increase the exposure a little bit here. Let's bring down highlights so that we can get the sky back. We're going to check on the whites and blacks, I'm going to Alt or option drag on the white slider. Now, I've got some streetlights here, and it does look as if I can get them back, I'm just going to adjust for those whites and just make sure I'm just where they disappear, that's about minus 31 here on this image. For the blacks, again, I'm going to adjust dragging in a leftward direction to try and get some blacks into the image. With clarity, there are a few ways that you can use clarity in an image. You can use it here in the presence area, and this is going to affect the entire image. If we boost up the clarity here, we're going to get increased clarity, not only throughout these buildings, but also on the River Thames and in the sky, that may or may not be what you want. One option is to add a little bit of extra clarity at this point and then go and adjust for additional clarity using a different adjustment. For example, you could use the adjustment brush, because clarity is one of the options for the adjustment brush. Here, I'm going to add a little bit of additional clarity to the buildings. I'm going to set auto mask on, so that I can just run down these buildings very easily to just adjust the clarity here. You can choose to show the selected mask overlay so that you can see the area that you're adding this extra bit of clarity to, because the sky and the buildings are pretty different here the auto mask tool will work pretty well. Here I can just select the buildings that I want to add a bit of clarity to. Don't have to add it to everything if I want to just draw attention to this front most building, the houses of parliament, I can do so. There's that with some additional clarity here. Hand in hand with clarity, you may also want to bring in a little bit of extra sharpness, you could do that at the same time. If we're done with that, I'm going to click done. Down here, I'm looking at the Thames and I'd really rather, I didn't have a lot of clarity here at all. I'm going to use a graduated filter. Click on the graduated filter. You can see the clarity and adjustment here. If you're working in Adobe Camera Raw, you're going to need to have something set here or you won't be able to add a graduated filter, in Lightroom it's little less fussy and you don't actually have to have anything preset if you don't want to. I'm holding Shift as I'm dragging upwards to add this graduated filter in here and the negative clarity, so it's going to smooth the Thames out a little bit. New to Lightroom. The most recent versions of Light room is this brush where you can actually erase some of this effect from areas of the image. If I don't want to affect the bridge here, I can just remove it from the effect of that graduated filter. Now there's nothing to say that you can't add multiple graduated filters, so I could add a second one, should I wish, and just apply it to just the very edge of the image here. Again, wind down clarity on that to smooth that out just a little bit more. Clarity can be used in a positive or a negative direction. Adding clarity is going to crisp up the image. Removing clarity is going to soften it. That's something that you may want to do in, for example, wedding images. We're going to look at an image like that next in Lightroom, and then we'll go to swing across to Adobe Camera Raw.
3. Pt 2 - Lightroom Softening with Clarity: This is the second image that we're going to work on. It's from ansflesh.com. I'm going to give you the download link where you can get hold of this image. Now, it's already been adjusted pretty well. There are no blacks in the image, but because of the nature of the image, you may excuse that and say, ''Well, it's just a really nice high key image, and I don't want blacks in there at all anyway.'' We're going to just mainly focus on clarity. Now, the clarity effect we're going to create here is one that's typical for say, portraits and a lot of wedding images, and what it involves is leaving the center of the image or the focal point of the image very clear and fading away the rest of the image. Now, that's an effect here that would be a little bit more difficult to achieve even with a very wide aperture on your camera, because all the elements of this photograph are pretty much on the same plane. But you can achieve it in post-processing, and what I would suggest you do is rather than apply clarity adjustment here where it's going to be applied to the entire image, is you're going to do it using an adjustment tool such as the Radial Filter. Now, if your version of Lightroom doesn't have the Radial Filter, you could get the same effect using the adjustment brush. I'm going to drag over her hands here. I'm just going to size this Radial Filter to a nice size for covering the area I'm most interested in. Now, I need to double-check and see just what is happening here, and you'll see that right now, whatever I'm doing is affecting the outside of this mask. Let's put exposure back where it came from, and if we're affecting the outside, then we want to reduce clarity, because we want to soften the look here. Because there's a feathering on this mask, we'll be able to soften up quite a bit. You can have a look at the mask here and you'll see that there's a very soft feathering effect here. In fact, the softening effect is creeping inside the area that we created, the radial filter around. Now, these flowers are of interest too, so we could go to the brush tool here, and we could go to the erase brush, and we could just brush in here to erase the flowers from the effect of that decrease in clarity. Effectively what we're saying, is we want this flowers to be still quite crisp, and we might do the same, for example over her fingers and fingernails, just to reinforce that this is the area that we want to see nicer and sharper than the remainder of the image. I'm going to click done when I'm done. Now, you can add multiple Radial filters, so you might say, ''Well, one was fine,'' but let's make a really big one that goes around pretty much the entire image. This is a larger one than the previous one. Here we're going to do exactly the same thing. We're going to reduce clarity, but this time, the effect is going to be more around the edges and we're so doubling up in places on the effect, but we're also feathering it out nicely here. Again with this one, we may want to go and do the arrays that just to make sure that whatever we're doing is not knocking out the detail in this flowers here. Disable Show Selected Mask Overlay and click ''Done''. Having reduced the clarity on the rest of the image and throwing it well out of focus, you can also add a little bit of additional clarity in the area that you want to see focus. You could do that with the radial filter, you could even do it with the adjustment brush. Here. I'm going to do it with the adjustment brush. I'm just going to click to pin down the Adjustment Brush, let's click Show Suggested Mask Overlay, so we can see what we're doing, and I'm just painting at this stage over the flowers. Now, it's just a little bit difficult to see the paint job because the flowers are pink as well. We could select Tools and Adjustment Mask Overlay and we could make it Green, and in this case, the overlay is going to be green, so we can see where we've painted it on these pink flowers. You can always change your mask overlay color if desired. Here, what I've done is highlighted those flowers, and we can go and add a little bit of additional clarity to them, so that's reinforcing that we want these in focus and the rest of the image out of focus. Now, what people will often do in this situation with this really light image, is further enhance it by adding a white vignette around the image, and you would do that here in the effects panel. It's going to be a post crop vignette. What you're going to do is drag the vignette across to the right, and that just adds this lightening effect around the edge of the image. Now, in this case, you may want to do something like color priority or paint overlay, because if you have a look at Highlight Priority, it's tending to gray the edges of the image and gray her arms. That's not really a particularly good look. But color priority is adding a little bit more of a white look, paint overlay as well. You can experiment with those settings and just add a little bit of additional vignette. Let's see how we've come with this image. Backslash Key will show us the before or you can see that everything's really quite sharp around here. I press the Backslash Key to see the after we've thrown all of this area of the image out of focus, softened it all up, and so we're really looking at the hands. You could do that with a portrait, you can do it with a bridle bouquet. There are lots of instances where you may choose to look at this kind of effect.
4. Pt 3 - ACR Adding Detail with Clarity: There are a few typical situations where increasing clarity and making something crisper is really going to help the image and buildings are one of those situations. But so too are animals that have a lot of fine detail like this rooster here that has some amazing headdress feathers. Now I'm just going to run some quick adjustments on this image, I think the Exposure could be increased a little bit. We're going to check the white point, I'm going to hold the Alt or Option key as I drag on the white slide to just bring in some whites into the image and I'm also going to check the black point, which is pretty fine there. Now, I could bring down the highlights a little bit just to bring back a little bit of detail in the head feathers that I lost by adjusting the whites here. But clarity is really going to be where all this is at. But we don't want to throw a heap of clarity at the image using this adjustment here because we've got a really nice out of focus background. What we want to do with clarity is be a little bit more discriminating in applying it, so I'm going to do it using an Adjustment Brush. I'm clicking here on the Adjustment Brush. Now I do want to see the Mask here as I'm painting, so I'm going to click on Mask and I'm going to just click to start my painting job. Now, if I scroll down here a little bit further, you'll see that there's an Auto Mask option and for this bird, I do want Auto Mask turned on because Auto Mask is going to help me just paint over the head feathers and eliminate the masking from the greenery behind the bird because that's pretty important because I don't want to bring back detail in the background. For this job, the Adjustment Brush is just perfect, but you will want to have Auto Mask turned on. Now, like all the images used in this particular course, all of these images are available for download, some of them from unsplash.com and others are my own. This one's mine, so I'm going to give you a download link for it. Once I've selected over the bird's head feathers, I may want to at this stage turn Auto Mask off because I want to also Mask in these areas where there is some additional data that I might want to add some clarity to. If I go too far, it can just go to the Erase and I can just erase out of the areas that I didn't want to apply the effect too. I'm going to turn the Mask off and now we're going to look at Clarity. Now, I already had negative Clarity applied here, which is of course not what we want and I've got some day haze there, so let's just zero everything out. I'm going to click here on the Hamburger icon and choose Reset Local Correction Settings. Now I can add the extra Clarity that I want. I'm going to base up the clarity in this bird's head feathers and the other areas that I selected and that's going to crisp up the image quite a bit, it's really going to draw attention to the subject in this image. Now at the same time, we can reinforce the background out of focus in one of two ways. We could just paint over the background areas where we want to remove focus and we would do that by clicking to add a new brush. I'm going to click to pin this down and I'm just going to paint over these areas here. Now I've got a fairly high feather, so I'm actually going to bring my feather down a little bit and I'm going to Auto Mask here so that I can get along the edge of the bird. Now this area is in more sharp focus than pretty much anything else in the background, so what I can do here is just drop the Clarity in that area. In addition, I could add radial filters, so I'm just going to click on the Radial Filter, I'm going to drag it out and what I want to do is have it cover the bird. Now with the Radial Filter, you can read off how it's affecting the image and the effect here is on the outside edge of the filter, so it's not being applied to the middle, it's being applied to the outside edge. Here reducing clarity again is going to throw well and truly out of focus the background of the image. You can just check your Mask to see how it's affecting the image. You may want to perhaps decrease the feather here so that the transition between where the Mask is applied and where it's not applied is a little steeper, that might help in this situation. Turn off the Mask overlay so you can just see the result. You can also Brush to add bits in or remove bits off the image from the effect of that reduced Clarity. In this case, you may want to erase them, so let's just turn our Auto Mask on here it is and I'm just going to remove any of these head feathers here from the impact of that reduced Clarity. You can just go over the image and just make sure that these feathers are not part of the effect. Click on the Mask icon so you can see what's happening there and when you're done, just click away from the image. Let's say with this image, how far we've come and go to the snapshots now, I don't have any snapshots. I'm just going to click here to create a finished snapshot and I'll click "OK." I can always get back to the original art of camera image by clicking here on the Hamburger icon and choose Camera Raw Defaults. This is the image as it was when we opened it up here in Adobe Camera Raw and this is our finished version. Now it's lighter, but it's also a lot sharper in the area of interest, which is a wonderful show of head feathers that this rooster has. Think in terms of clarity as being a way of getting some additional contrast into areas of an image where you really want to add some punch or alternatively as a way of softening areas of the image where you want to remove the detail and give it a softer feel.
5. Pt 4 - ACR Soften with Clarity: This is the image we're going to use to explore the softening effect of clarity in Adobe Camera Raw. Now, it's a JPEG image which I downloaded from unsplash.com. I'm going to give you the link to download this image. We're looking at this image in the starting point for this images how it is downloaded from unsplash.com, so its pretty well adjusted. There's not a lot that this image needs in terms of adjustments. We're going to focus on clarity. Of course, if we were to adjust clarity in a negative direction, we're going to soften everything in the image right now. If we were to take it in a positive direction, then everything's getting very crisp and way over-baked if you like. I'm going to bring this back to zero because that's really where it needs to be. We're going to apply clarity in different ways so that we can be specific about what we're going to apply clarity to. We're going to choose the radial filter here in Adobe Camera Raw. I'm just going to drag out the filter. You can see that I already have an exposure setting for this filter. In fact, in Adobe Camera Raw, you must have something set for your filters before you can even apply them to your images. You can't just have nothing unlike in Lightroom. I'm just going to put this radial filter in place, and I want to zero out the settings. I'm not happy with anything that's set for it right now. I'm going to click this little hamburger icon here, and choose "Reset Local Correction Settings". In fact, you can have a radial filter with no settings. It's just that you can't draw it on if there are no settings. Very confusing stuff, but that's how it works. Right now we can see here that the effect is on the outside. If we're looking at the outside of this image, what we would want to do at this point is to reduce clarity. We want to soften the outside of the image. Now, this is something we may want to do in a few steps. We may also want to see the mask, to see just what is being affected here. We could reposition this filter to make sure that their hands were in focus, and everything else was not. You can also paint here. I'm going to click here on "Brush". I'm going to select a minus brush, and I'm just going to check the size. You can adjust that with the open and close square bracket keys. I don't want auto mask turn on so I'm just going to turn that off. I'm just going to brush over the areas that I want to erase from this effect, and what I'm saying to Adobe Camera Raw here is soften everything but leave this area sharp. That's over the hands, and probably a little bit of this woman's jewelry. Now, I can click to add a new radial filter. I can apply a second radial filter. Possibly what you would want to do is apply this at a larger size. But again with reduced clarity so that you are trying to knock out the harshness of the outside edges of the image, just leave the hands in focus. We're just going to hit this with a little bit of extra clarity reduction in a minus direction, you're removing clarity. Now, if you've got a dehaze filter, if you've got a version of Adobe Camera Raw or even Lightroom that has the dehaze filter, you could also try adding a little bit of dehaze because that's actually going to add some haze in so you're going to be softening the image in the process. For this image because there's a lot of his light jacket here, you may want to crop it. I'm just going to come in here and have a go at cropping this image. I'm going to do this for a couple of reasons. One because I think there's an excess of white suit here. But secondly, because if we crop it, and put this hand centrally in the crop area, then we can add a vignette, so I'm just going to click away from the Crop tool, and crop it in here. Let's have a look at a vignette effect, which again is going to give us a little bit of softening around the edges. Here's the post crop vignette. I'm just going to adjust it in a positive direction, which will lighten the edges of the image. You may want to experiment with the styles, highlight priority, color priority, and then there's a paint overlay effect, and just choose which is the best for this image. You may find that highlight priority tends to gray the edges. If you're not happy with that color priority might be a better bet. Let's have a look at the before and after. I'm going to snapshots here. I'm just going to create a snapshot for after. Now, I saved a snapshot of the starting image, but if I hadn't, I could click this hamburger icon, and choose "Camera Raw Defaults", and that would give me the original image. Here's the after version, softened the edges of the image. That's an effect which you can apply to wedding photos. It also works very well with portraits, particularly of women, and children.
6. Pt 5 - Project and wrap up: Your project for this class will be to process an image with a view to looking at how clarity would help improve the image. You might choose to remove clarity and soften the image in certain areas, or you may choose to add clarity to make it crisper and sharper. Post a picture of your finished processed image in the class project area. As you are watching these videos, you will have seen a prompt which lets you recommend this class to others. Please, if you enjoy the class, do two things for me. Firstly, give it a thumbs up, and secondly, write just a few words about why you enjoy the class. I ask this because these recommendations help other Skillshare students to see that this is a class that they too might want to take. If you'd like to leave a comment or a question for me, then please do so. I read and respond to all of your comments and questions, and I look at and respond to all of your class projects. My name is Helen Bradley. Thank you so much for joining me for this episode of graphic design for lunch, and I look forward to seeing you in an upcoming episode soon.
 Helen Bradley, Graphic Design for Lunch™