Transcripts
1. 01 Intro:
2. 02 Revolve to Create the Scoop: Let's go ahead and designed this tablespoon you see right here. The nice thing about this design is that it's a very practical, very useful design and also very customizable. Let's say you have a need for a one and 5/8 tablespoon. Well, you can easily just, you know, come in design something that's exactly that amount and three D printed. And you know it'll save you time from going when you have to measure something out. Always grab the one tablespoon and come back and grab the five eights Tablespoon eso Let's go ahead and jump right in. We're gonna go ahead and start with a new design. So let's go to file new design sketch, create sketch and X Y plane. Okay, we're gonna start with a circle. So the way I'm going to approach this is I'm gonna first model this scooping part here. Um and then we'll go ahead and model the handle so we'll start with Scoop, which means we'll start with a circle. So we're gonna go ahead and create a circle and we are going to want a specific diameter here, and that diameter is going to be 38.56 millimeters. Okay, Once we answer that diameter in, we're gonna go ahead and click Stop sketch, because now we're going to then create another sketch. But this time is going to be perpendicular to our first circle. So we'll go ahead and click on sketch creates catch. And this time we're gonna select a plane that's perpendicular to that circle. So we chose the X Y plane to begin with. Now we're gonna go ahead and we'll choose this X Z plane. So the red and blue plane and we'll go ahead and project the previous circle that we drew. So we're gonna go ahead and hit p for project. Hit that line there. Nice to see for a circle. And we can just zoom in a little bit and hit or click on the center line and then come out to match one of the end points here and you can see it's that same diameter circle we started with. And we're gonna go ahead and not create some more lying. So l for line, start in the center line and come right to the end of the circumference here on the bottom and create that line now we're gonna have tea for trim. And we're just gonna get rid of some unwanted lines. For example, this top park we don't need And this quarter arcade we don't need that's gonna leave us with this quarter arc of a circle. And what we're gonna do with that is will use the revolved tool to revolve that around this axis over here. So let's go ahead and click stops, catch and then go to sketch. I'm sorry, Will go to create Revolve. We're gonna select this profile in this line. So if you can try to imagine this, we're gonna take this profile and think of this axes over here. We're just gonna spin it around to give us in. Whatever area this profile touches is gonna create a solid from that. So you see, this box here asks us our profile. We've already chosen that, and now we'll click on axes over here, and we can either choose one of our axes, Um, that that it shows us or we can choose a particular line from our sketch to revolve that around. So in this case, we're gonna choose this line, and there's that revolution with the sort of hemisphere that it left us with. Give, You want it to be nobody, So I'm gonna click. Ok, um, and let's go ahead and uncheck sketch here so we can see exactly what we're left here. Um, so that's perfect. That's one hemisphere again. Let's go back to that, um, tablespoon that we're referencing. So that's basically this part here, but enclosed. So we have this particular solid and this part we have here is actually what would be considered inside of this. We're gonna go back later and add some thickness to the outside. But it's basically would be what this volume on the inside would be. And there's a way we can actually check to see what that exact volume is. So I'm going to go and expand the bodies option here and go into body one right click and choose properties. And I get this box that gives me area density mass volume, um, for mass that's showing it. Um well, it would be for steel because we have that selected as properties. Um, it's just sort of the default right now, but we're not worried about that. We just want to know volume and value we're looking that, um, 15,000 roughly 15,000 millimeters cubed Ridge Eagles, 15 milliliters, which equals one tablespoon. So that's good. You know, verify that. That's what we need. By the way, I had to Google all that. I wasn't really sure about the conversion, but once I figured that out, and then I can work my way backwards to figure out what that circumference I needed to get this amount of volume. So OK, all of this just to show you that you can verify thumb on the volume that you have, um, in particular shape. So we're gonna click, OK?
3. 03 Sketch the Handle: now we need to shell this out, right? Remember, we used Shell on the last model we made, so we're gonna go ahead and go to modify shell, Click on this top profile. And again, you remember these choices. They once And if you want to shell the inside or the outside Well, this inside is a specific volume, right? If we should add material to the inside, we're gonna be taken away from from that volume, so I don't want to that I want to show to be outside. So now I know it's gonna add thickness to the outside of this particular shape that I have . So I'm gonna give it a thickness of 1.2 again working with my or with the multipliers of my nozzle with and again, I'm using a 0.4 millimeter nozzle. So I'm want basically three shells of that meaning. In order to get this thickness, the nozzle is gonna have to do three trips around the pausing filaments which will give me a 1.2 millimeters pick. Um outside. Ah, wall that I want. So that's exactly what I want. So I'm gonna click, OK? And that left me with that volume in the middle that I wanted with the added a shell on the outside. Um, so I have my scoop. Okay, Now I want to go back and add this handle. So to do that, I'm actually just gonna go ahead and grab that first sketch. We've made something that expand my sketches here. Remember, I have this one sketch let me take out bodies. So I have this one sketch and that sketch that I made that was perpendicular to it. So I'm gonna go ahead and uncheck this sketch and then just right click and go to add it sketch for my first sketch, and that brings me back to my my circle. Now I'm gonna are for rectangle and just draw a rectangle somewhere up here, I'm going to give this of the mention of 15 by 66 0 and click. OK, click. Answer. Now, if you notice I now grab my sketch are this rectangle that I created and I could move it anywhere, right? It could place exactly where I wanted. And I can try to get lined up right here to give me the handle on that sort of works. but it's not as precise as I want to be, so I'm gonna go ahead and use my constraints. So what I will do is I'll go this catch and go down two point and place a point right on my center like And if you remember, we confined our center line just by kind of hovering over the center of that line. And we get that triangle showing that's the midpoint. And right there, I'll click my point right there and again, we have that verification that that is the mid point because the triangle stays. There is a reference. So I'm gonna now use my horizontal slash vertical constraint, and I'm gonna click on it and then choose my point that I just made right in the center point in and also quick on the center of my circle and that will now constrain that rectangle right to this origin. So I mean, hit escape. And now look, if I grab this and try to move it, it's constraint to this slide, so I can't move it up and down anymore. I could only move it left, right, So now I can try to position that I'm exactly where I need it. Or actually, if I want to be exact, Aiken, enter Dimension. So I'll hit the for dimension. And I will dimension between this point in the center line and go ahead and enter it and so will say, 17 millimeter distance. Okay, that's exactly what I'm looking for. So I'm going to click Stop sketch.
4. 04 Split Handle: and will bring back our bodies by checking the slight bulb. And so now there we go. I have my solid here of just a scoop, and here is my handle. So there's a couple ways. Weaken. Um, go about this now in order to get this handle made. So, um, the obvious option you may be thinking is we'll just hit he for extrude. Go ahead and click on this handle extruded down. It's set Teoh cut because it's going through an existing shape. So let's go ahead and change that to join, and we'll start bringing this down. Well, here's where this doesn't work. So if we wanted something that was, let's say, about four or five millimeters thick, it looks fine, as as we can see here. That's kind of exactly what we would want, but noticed the problem. If I start to bring this further down, let's say I wanted negative eight millimeters. Well, it's no longer connecting with our scoop because it's coming straight now and it's separating. So if I wanted this to sort of follow this scoop, well, here's how I'm going to try to fix this. So instead of doing a join and extruding this down. I'm gonna go to my selection, my dialog box, and I'm going to select this profile, hit control or hold control. And also this profile right here. Um, and then we're gonna go ahead and bring this down. Now, you see, finance her negative eight, you know, because this side is also going down with it. We have a selection that goes through this scoop part, and so it doesn't. It's not separating at that point. So that's good. But instead of join, what I'm going to do is check new body. So I'm gonna select nobody and click. OK, Now, you can see here that because I selected new body, if you go under the browser, we have now the scoop, and we also also have the handle. Um, so that allowed it to create two separate bodies. And there's also a problem, right? We have this section here that we don't want. Well, the reason, um, that I selected nobody's to give us the option to be able to cut this out. Okay, So and it allows me to introduce, um, some boolean operations to you. So the way we're going to do this is we're going to now go to modify combined. And it's sort of a little tricky because what we really want to do is remove what we don't want to combine. But the combined feature, it's it's really just a Boolean operation. It allows you to join or cut. Um, so we'll get to see examples of both. In this case, what I want to do is use this shape here to cut this this shape here. So used his body to cut this body. Um, that way it'll kind of leave me with this body split into, so I should have one here and one here, and so I'll show you what I mean. So we're gonna go ahead and look at our dialogue box here as far as my target body. That's the body I want to cut. I'm gonna choose this body here, and as far as my tool body, I'm gonna choose the scoop part right here, and I'm gonna go from join to cut, and you can see it gives us a preview. So the cutting tool is in pink, and it shows me that I'm cutting this body over here and it's gonna split this body into two separate bodies, which isn't gonna include this little piece here in this handle. And I also want toe select keep tools. Because if I don't, it will get rid of my scoop. Since that's my tool. All right, so click. OK. And it may not look obvious as to what was done, but if we look under our browser, we see now we went from two bodies to three. So we have our scoop. We have our handle, which is not broken into two separate bodies so that we have the main handle and the little part that we were trying to get rid of. So let's turn on body one and body to Body three. We can either just turn it off, or in this case, I know I have no need for in my sketch are in my design anymore. So I'm going to right click and go to remove, not delete. We're gonna choose remove, and there we go
5. 05 Apply Fillets: Okay, so now we're looking good. Let's say we want to go ahead and put a fill it over here on this side and this side to sort of connect this handle to our scoop. We would then go to modify fill it, man, I can choose these two sides and try to fill it it. But look what happens. It is going inwards and not out. Well, that's because it's treating this as a separate body because it is so before we can go ahead and fill it. We have to then combine these two bodies together. To do that, we're going to use the exact same tool we're going to go to modify combined. And instead of cut this time, we're gonna go to join, and we're gonna choose my target, our target body as the handle. In this case, it really doesn't matter. Um, which one? You choose us, target or tool. But we'll go ahead and choose the scoop as our tool body. And now make sure to go ahead and uncheck. Keep tools for the combined part, so we'll click. OK, for we do that. Look, that's what's going to happen here. So we have body, One body to click. OK, we lost by the one and now we have simply body. To embody two is a combination of body one and body to so here. Now for you. And check this light bulb. Everything is gone and now everything comes back. So now let's try our fill it again so f for fill it. Choose this line in this line here and we can now see what happens when we feel that we get that nice, um, graduate connection between our handle in our scoop. So let's go ahead well and give this a fillip of 30 millimeters a radius of 30 millimeters . And that looks pretty good. That's gonna make our Scooby a lot stronger and will also do the same thing with the bottom f or fill it. Come in. Give this affiliate of, say, 15 radius of 15. That looks good
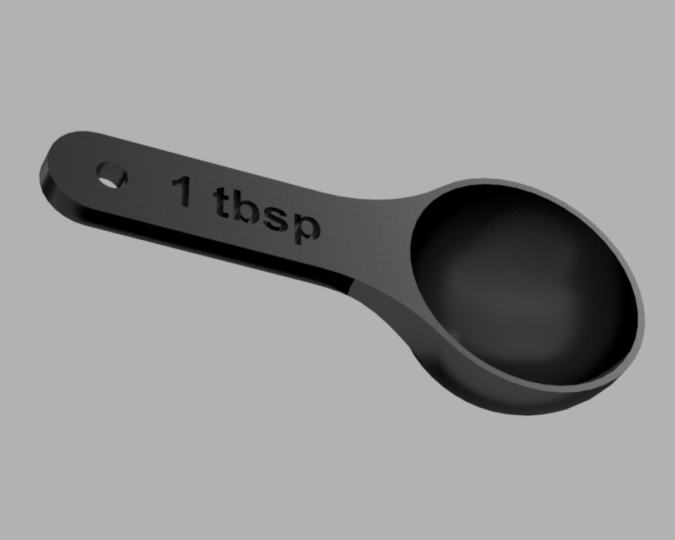
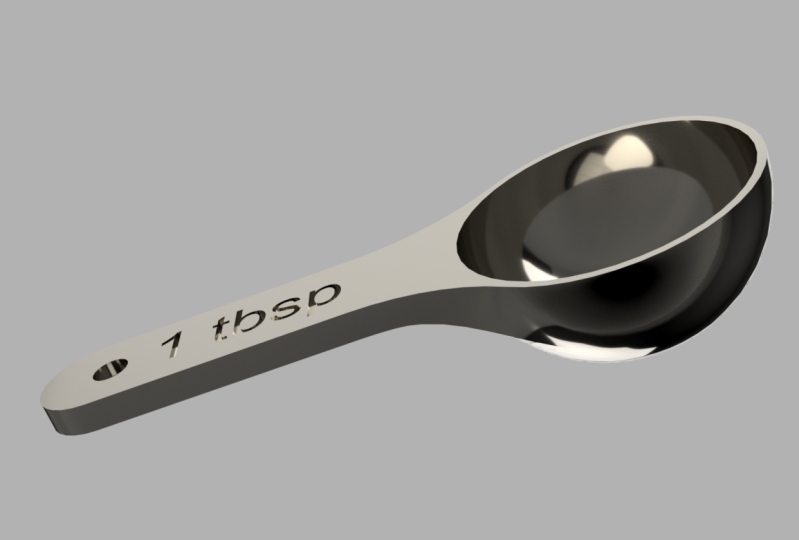
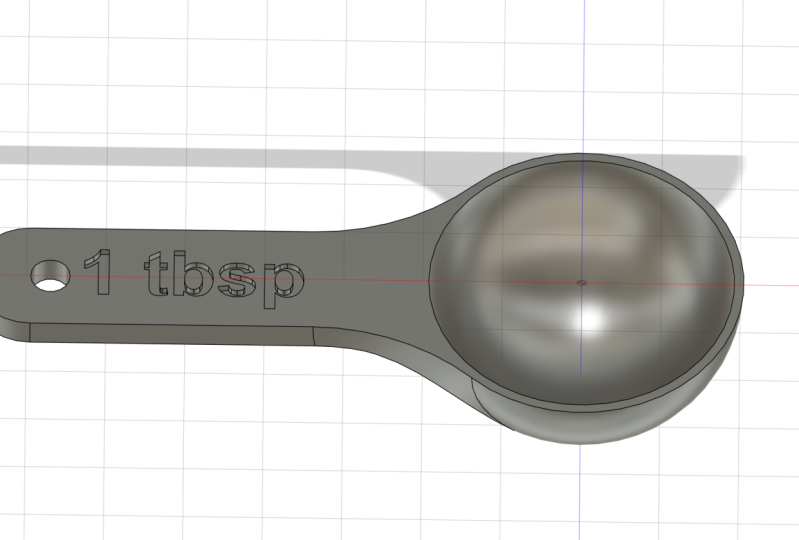
6. 06 Apply Text: All right, so let's keep going. Let's say we want a hole here so we can hang our spoon. Ah, well, that's easy to do. I just go back to that first sketch double click to head it, and we'll just We're gonna create a circle in this time is going to kind of create somewhere here anywhere. Um, give it a diameter five millimeters. And let's use that the horizontal horizontal vertical constrain again and we're gonna click on it and click on the center point of our circle along with our center point of the circle here and there we go. We've locked that in so hit escape and try to move this. Around you go, you're going to see that it's luck into that center point, and we can go ahead and hit the for dimension. Give this a dimension between this line in our circle and let's say we'll give it to the mention of 10 millimeters from that edge. That looks good. I'm gonna click stops catch. And now I can go ahead and click on this profile Haiti for extrude. Start extruding this down. I'm gonna choose all for my distance. Have it set to cut and click. OK, its on check our sketch so we can just see the model. And there we go. I could see that our circle goes all the way through. And let's go ahead and give this a fill it here. So sort of round this out sometimes is here to fill it than it is to go ahead and construct a narc, you know, and then try to extrude at through. So had f or fill it. Click thes two sides. Hands start to bring that in. Uh, looks like I'm gonna answer 7.5. That'll give me a nice circle little semicircle and Mary got that. Looks good. So one thing I'm gonna actually go back. And change is the thickness of this handle here. I'm rethinking this, and I'm kind of realizing you know what? It really doesn't need to be this thick. So easy. Way to change it with fusion is you can just go back to your timeline. Sophie, highlight on these different icons here, you can see that it will highlight on our model the different sections that were affected by So if I highlight, for example, this extrusion here that shows me that this references this whole that I made right here. So if I wanted to change that could just go back and double click on that and change it. This case, I want to change that extrusion. And when I made the thickness of this handle, So that's if I highlight this. Used to that that handle lights up some double click on that instead of negative eight. Let's make that negative four. Change that. There we go. See how easy that was changed That handle right back to that size. So that's perfect. Exactly what we need. We're gonna do one final thing, and that's gonna be to add a sketch on the surface. So I'm sorry, Not a sketch. I, uh, had some text to the surface, but we are going to start with a sketch. So let's go to sketch, create sketch, click on the surface, and we'll go ahead and go to sketch on, go to text. Okay. Notice. I have all these different sketches lit up one to, um I don't need the 1st 1 I'm just gonna take that off, and that'll show our body right through. So I'm just gonna kind of reference this line here and start sketching there. Now I'm going to give this a name of one tablespoon which is T B s p and just gonna kind of in this case, I don't need to be extremely precise, so I'm just gonna eyeball this to get it right in the center. I mean, you can put in some guides and make that is precise is you want it. But for this application, I think we're looking good right here. And you can experiment with different texts. In this case, it's set to Ariel, but you can try whatever text you want. Some texts work a lot better than others. When three d printing, I'm going to give it or make it bold because that also helps that when three D printing. So I'm going to click, OK, and I'm gonna go ahead and just choose select any area of my text it e for extrude and give this an extrusion of negative one click. OK, make sure that set to cut, which is should automatically do since you mentioned negative one. And there we go. There's our tablespoon. Uh, we have it set to one tablespoon. We have our whole for hanging it. And it's perfectly sized for a volume of one table Sport s. Oh, there you go. Go ahead and make yourself one. Everyone needs a tablespoon. And you can again practice making whatever size you need, so enjoy.
 Vladimir Mariano, I'd rather be 3D Printing