Transcripts
1. Introduction: Wouldn't you enjoy
being able to capture the essence of a person in a
few expressive brushstrokes? Hi, I'm Gabriela Shel, a concept artist
and illustrator. And today, I want to show you
a fun and easy way to paint people while actually improving your portrait painting
skills at the same time. In my professional career, I had to paint many portraits, either of fictional
characters or of real people. Portrait related tasks or commissions are one of my
favorite subjects to work on, and with time, I've had
the opportunity to try many different approaches to
improve my portrait skills. In this class, I
want to show you my favorite approach to quick
and fun portrait studies. We will be painting
Expressive Portrait Studies using big brushstrokes
and bold colors. Those studies will
help you improve your overall portrait painting
skills while being quick, useful, and most importantly,
fun at the same time. Before we jump into
the painting process, we will discuss why
art studies matter and some common ways to improve
your art skills in general. Later, we will take a
moment to discuss selecting the right reference
photos and how this can impact the
overall painting process. Lastly, I will guide you
through two real time painting demos where I explain my thought process in detail. So grab your digital
tablet or iPad, and let's dive
into the fun world of expressive portraits.
2. Class Orientation: If you've watched any
of my other classes, you know that I love to combine a bit of theory with
a lot of practice. In my previous classes
here on Skillshare, we practice our value
painting skills either with quick movie still studies in my class, tonal value studies, due value exercises for
stronger paintings, or with Expressive black and
white portraits in my class, digital oil painting, create expressive painterly
portraits and Procreate, where we practice
to see values and learn about facial
anatomy and structure. Those valuable skills can
be useful in this class. But even if you haven't
watched the other classes or even painted portraits
before, don't worry. I invite you to dive into the fun world of Loose
expressive portrait painting. In this class, we will
be painting simple, colorful portrait studies
using reference photos. At the beginning, we will
take a moment to talk about art studies in general and the different ways
there are to study art. Later, we will discuss
what to look for in good reference images to make
painting portraits easy. In the following
painting demonstrations, I will show you how I approach portrait studies from photos. You will see how I
structure the painting, how I use color, and
how I use the brushes. For the class project, I
encourage you to create your own expressive
portrait painting and upload it to the
class project section. I will take a look and
comment on each project I see personally and give
you tips and suggestions. I will be working in
Artstudio Pro on my iPad, but you can also
work in Procreate, Photoshop or any other painting
app or software you use. I will also provide you with some reference images
for you to choose from, or you can use your
own references, keeping in mind the suggestions
from the section of the class where we talk about
choosing reference photos. But the most important
thing is to have fun. Painting portrait studies
can be so much fun, and that is the most
important thing I don't want you to
forget when diving in. So in the next lesson,
we will take a moment to talk about art studies.
See you there?
3. About art studies: Before we dive into
the painting process, let's take a quick moment to talk about art
studies in general. Art studies are a great
way to improve your art. While you can obviously
improve your art by creating finished
paintings or illustrations, choosing specific elements
to study in art can be extremely beneficial and lead to much quicker improvement. Some of my other classes, I outline specific elements and how you can improve
your art skills. Art studies can take a
variety of different forms. For example, you can create a still life by placing
some objects in front of you and try to capture them as correctly as possible
on paper or canvas. And therefore, you train your hand eye coordination
and perspective. You can also use watercolor
or gouache to paint a plain air from life to capture the colors and
the mood of a landscape. You could also study
how something is built. For example, medieval armor by sketching it
from photos or even directly in a museum to understand its structure for your next character
illustration. Studies can be quick sketches, either capturing the most important
elements of something, or they can be
longer paintings to see how close we
can get to realism. We can create stylistic studies, copying an old master to see
how this artist used colors, or we can use a
photo reference to create a stylized
version of reality. Whatever it is, studies are a fundamental part of
improving your art. Can also use photo references to study virtually any element
you want to understand, be it design, character, anatomy, structure,
color scheme or more. The later will be the
subject of this class. While learning by doing
in terms of working on a bigger final project will
also lead to improvement. Short focused art studies
allow you to dive deeper into a specific topic and fully concentrate on improving
that part of the painting. Portraits are a wonderful way to improve in many areas
at the same time. I can practice my
character design skills, improve my color and
light understanding, work on improving brushstrokes, or simply work on anatomy
and structure of the face. That's why I love painting rough expressive portrait
studies from references. It teaches me how to
capture the likeness of a person while keeping
the painting simple, thus focusing on a few
well placed brushstrokes, color scheme, values,
and brushwork. As we will work with
limited brushstrokes, each one can be used to add expression or texture
to the image. But that's all quite a bit for one study, don't you agree? That brings me to my next point, the importance of choosing
a focus for your studies. While we strive to
generally improve our art, it's advisable to choose one or two specific
elements you want to work on specifically in
that particular study. If you were focusing on everything in the
reference photo, we would just be making
perfect photocopies. While those studies
can be beneficial, they also tend to be a bit overwhelming and
more time consuming. I recommend choosing
a few elements you want to focus on when
creating a study. In our class, since we will
be painting portraits, the focus could be either
the structure, for example, getting the facial
proportions right, or it could be choosing the correct colors
without picking them from the reference image. It could also be brushwork. How can you use big brushstrokes to make the illustration
look interesting? It could also be
style or character. How can you exaggerate
the facial feature slightly to make the portrait
look more interesting? In my other class,
digital oil painting, create expressive painterly
portraits and Procreate, I explain the
structure of the face. If you're interested in learning more about the
anatomy of the head, I recommend taking a look at the lesson structure
of the face, which can help with finding the right proportions when
eyeballing the portrait. In my demonstrations, I will be focusing mostly on
color and brush work. Keeping values in mind, we will dive into
expressive brushstrokes, looking for what
makes the person in the reference image unique
to capture its essence, yet without aiming
for exact likeness. I will also be
focusing on choosing the right colors without color
picking and overworking. I will be using rough
expressive brushstrokes, slowly building up the figure and narrowing everything down. While I will be
paying attention to the proportions and
likeness of the portrait, it won't be my main
focus of the study. So feel free to choose your
own focus of the study. There's only one important
thing to play around, to experiment, and to
have fun while painting. In the next lesson, we will take a short moment to talk about choosing good reference images. See you in the next lesson.
4. References: References are a very important part of the creative process. In several of my courses, I talk quite a bit
about the importance of a good reference
image for your painting. Especially when
making photo studies, the quality of your
reference image can decide whether it's
going to be a productive, fun, and successful study or
a frustrating experience. The most important
part is the lighting. Having a well lit image, especially one that isn't
too retouched or edited, can give you the necessary
information to make decisions on what to include
in your painting or not. With paintings that are too flat because of studio lighting, too edited to
properly see color, we deprive ourselves of useful information that can be used to make a
painting feel alive. Of course, you also
want the image to have relatively
good resolution. Since we are going to
be painting rough, not very detailed portraits, resolution isn't of such a
big importance in our case. The lighting nonetheless is. For portraits, I usually prefer photos with
natural lighting. In this case, you always
have reflected lighting from the background that will make sure the photos
are well lit. And in case of direct sunlight, you will have interesting
chados to paint, which will help to show
the form of the face. Avoid overly edited
photos made in studios, such as those we can see
in fashion magazines. They make painting expressive
portraits much harder. I find most of my
reference photos for photo studies either on Pinterest or
generally on the web. You can use websites like
An Splash or Pixel Bay for royalty free photos as well. For this class, I
added a collection of street photography with
different kinds of people, most of them lit
by natural light. They all have
interesting, unique faces and plenty of visual
information to choose from. You can see the
elements you like in the pass to stylize
or emphasize, making the study more
interesting and fun. I will provide a Pinterest board with the selection
of the photos. You can keep the Pinterest
board open while painting or download the image
directly to your device. From there, you can either post it on the canvas to have a side by side setup or have it
open in a separate window, for example, in apps like ISRf. There is also the function of reference photo and
Procreate and Artstudio Pro, which is also very useful, allowing you to have a
floating reference image directly in your canvas. The next lesson, we will
dive into the first demo, where I will show you one of the possible
approaches to painting rough and quick portrait
sketches. So see you there.
5. Demo 1: Let's jump to the demo. This will be a shorter,
quicker sketch. We will be focusing on colors and keeping the
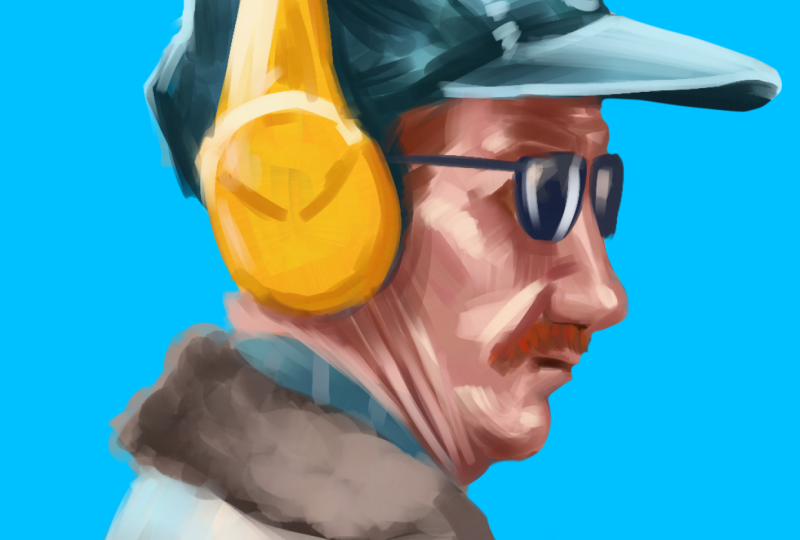
brushstrokes rough. I found this amazing photo of a man with yellow headphones. I think the shot itself
is a masterpiece. It has so much color contrast. The blue background, the
complimentary yellow in the headphones and the warm, rosy tones of his skin against the cold blue
of the background. I just love it. So I will be making a loose portrait
study of this guy. Have my reference photo
open in a separate window. I put Pro lets you
split your screen, and I think it's easier because you can just
have it next to you at the exact proportions and size you want to
paint your canvas. I use the app Vis Rf, and it's super comfy to just
drop all your references into one board and just switch between them
whenever you need one. I like to start on
a color background, as it will give me
the right information from the start about
color relationships. I have my background
on a separate layer and a new transparent layer
on top to start sketching. I use a rough square
textured brush from my painterly portrait brush pack on Artstudio Pro or Procreate. If you work in Procreate, you can use the
default Niko rule or any other textured
brush you like, which allows you to
make clear lines. So let's start with the sketch. I sketch the rough
outlines of the person. Since we are not aiming at
the perfect realist copy, if you change the proportion slightly, it's not a big deal. Feel free to exaggerate
whatever you want to. One thing that really
helps me with finding the right proportions is
focusing on the negative space. So let's say, instead
of focusing on the form of the head of
the guy or any details, I just focus on
the negative space the shape of his figure creates
against the background. I find it much easier that way to find the
right proportions. I leave my sketch quite rough and move into
color directly. I like to fill the outlines with the middle tones of
each color I see. I still work on the same
layer because, again, I don't want it to be a
perfectly polished work, and I want to imitate
the traditional way of working as much as possible. I fill the cap with a
dark blue color and roughly sketch in the lighter
parts with a lighter color. Again, very rough, very quick. You can also see that
with each brush stroke, the tone and saturation
slightly change. It's something you can
change in the adjustments. That way, I have a bigger
variety of color with each brush stroke without
having to choose it separately. You can find the adjustments
under brush adjustments. In Artstudio Pro, they
are under jitter, stroke, color, hue
and saturation. I'll leave it somewhere
between 2% and 5%. And the procreate
under brush Studio, color dynamics, and
stroke color jitter. I adjust hue and saturation, but usually try to leave
lightness as it is, as it can impact the
values too much. I add a lighter color
into the skin, as well, focusing on where the
light falls in the image, such as his cheek, nose,
and the chin area. Choosing a lighter
beige tone and also marking his red hair
with a reddish brown. I use the same colour
to mark the shadow of his eyes to start building up more color
variety in the painting. And I also use the same
color on his mustache. As I continue painting, I adjust and correct
the outline of his face and the overall
shape of his portrait. I color pick the skin color to adjust the nose and the
profile of his face. I also choose a
slightly darker color to add more shadow to the nose and use it to work on other areas of the face
that need a darker color. At this point, I start color picking the colors
directly from the canvas. It's a constant back and forth, adding darker shades, color picking and adding
on top lighter colors. I always try to move the brush in the direction
of the object surface. In this case, the direction of the skin to show plasticity. My brush is a wet brush, which means it slightly
smudges when painting. I love it as it gives a unique effect to
the brushstrokes. But you can also use
just a normal brush and color pick in the middle of two colors to
create a new color. In that way, blend
two colors together. I also like to use elastify or liquefy to adjust
proportions in the face. It's a very useful
tool which you can use to change your painting
non destructively. I'm adding some highlights to the cap by color picking
the base color of the heat and moving it in the color wheel to a lighter point of the same color tone. I add some brushstrokes of that new color to where
the light hits the head, mostly the cap and
the upper parts. I also add some
different blue tones, and without pressing
too much on the pencil, start painting over it to
softly blend the strokes. I use the same
color on the shirt. Now, let's go for the jacket. I chose a brown color
for his jacket. The fur part is darker, so I choose a
darker middle tone. The jacket part is
lighter in general, and it has quite a
bit of gray in it, as well as other colors,
if you look closely. I add some different tones, such as yellowish and pink tone colors to add more variety. Don't worry if it looks too exaggerated or too
strong at first. We will be painting over it and softening the
transition with time. Whenever I paint, I'm
figuring things out as I go. I use circular movements of the brush to insinuate
the texture of the fur. You can play around with
movement of the hand yourself to create interesting
new textures and forms. I chose a bright yellow color
to paint the headphones. The color I chose is much more saturated than the one in
the reference on purpose, as I think it will
make the portrait pop out more against
the blue background. Those are the little decisions
you can make while you paint that will add your
unique touch to your study. I work on the same layer, but you can also do it
on a separate layer if you feel more comfortable. With the lighter color, I mark the edges of
the headphones, which catch the light
to show the plasticity. At this point, I slowly start further
defining the sketch. I use a dark blue colour to mark the darkest parts of the cap to show the occlusion shadows. I vary the brush sizes regularly to match the
parts that I'm working on. I leave the brushstrokes
very rough because I really want to keep the sketch loose and have that painterly feeling. It's a really great
exercise to try to match the color you see on the
reference without color picking. It will train your brain to better understand
different tones, and I highly
recommend doing that instead of just color
picking the reference photo. Let's add the sunglasses. I chose a dark blue
colour to make it more colorful and added some reflected highlights
to it with a white colour. I really like to add
some tiny details to enhance the
feeling of realism. You can mark the seams
of the jeans cap with some rough brushstrokes and also add the broken
part of the cap on top. I really love little
imperfections and how they make the
image feel more alive. With the light blue color,
I add another layer of paint this time showing the
lightest parts of the cap. On the jacket, I correct the shape and start adding
more color variety. It has a lot of reflected
light from the blue, so I added some light flue on the back and browns
of the darker parts. You can show textile patterns
by marking small lines, insinuating the
patterns of the shirt. Sometimes it's enough to
just insinuate something, or brains have the magical capacity to fill in the picture. Once I've established
the bigger parts, I start zooming in to
work on smaller details. I like to add more shadows and lights working with
smaller brush size. Here I outline the
form and shadow of the nose and add some color
variety to his mustache. In the reference photo, you can see some bright
red hair strands, which I decided to add
to my painting as well. I also define his face and the planes of his
face somewhat more, as well as the shadows
under the sunglasses. I really recommend
rotating your brush and the inclination of your hand to match the brush direction
to the painting. That way, you create the texture and structure of the
painting in one go. I also add some
wrinkles and paint with a bigger softer
brushstrokes to connect different brushstrokes to
a more homogeneous look. You can do that by either lowering the opacity
of your brush or if your brush already has good opacity dynamics
when pressing, you can achieve that by
making very light strokes. That way, they will be half transparent and add another
layer of color on top. I also recommend zooming out regularly to have the
overall look and mind. Now, I add some lights to make the face more
tree dimensional. I added some harsh highlights on the cheek, which
I don't like. You can see me double tap
here on Canvas to go back. I use a slightly warmer color to paint the light
highlights on the cheek. The color matches
much better now. I add some more of that color into other areas of the face. I purposefully keep the reference image
smaller so that I can focus on the over light parts of the face without getting
lost in the details. When I choose a color, I like to add it to
all parts that could benefit from it
instead of working on one particular
part of the image. In this case, I
use the color from the cheeks to add some
highlights to the sunglasses. I pay attention to where
the light falls first. On his cheek bones,
to nasal label fold, the chin, and the
wrinkles on his neck. Apart from that, we also have
light falling on his cap, the headphones,
and the shoulder. I use a cooler brown tone to add some cold
shadows on his chin, under the lip and on the nose. I like to find the colors by color picking the skin
tone and then using the color wheel to
move it towards darker and less
saturated colors. That way, you can still ensure you're working with
the right base color. With a darker reddish color, I darkened the shadows
from his nose, cap, and the headphones
under his glasses. I use linear movements when painting the shadows
from the headphones. That way I simultaneously
mark the skin folds from his neck while also adding
depth due to the shadow. I really recommend paying attention to the direction
of your brushstrokes. It's such a powerful way
to improve your paintings. I started refining the jacket. I used the eraser tool to change the overall shape
of his jacket as my initial sketch was
very quick and didn't properly capture the structure and proportions of
the silhouette. I also add a bit
more of the neck, which wasn't visible
in my initial sketch. I think it's actually one of the most recognizable
elements of this person and gives him
that unique character. When I'm working on
facial features, it's sometimes
really hard to put into words what makes
a person looks unique. When painting, I oftentimes try to describe what
I see in words. For example, while I clean
the silhouette of the mouth, I would think
something like he has his lips pursed thoughtfully or he has his mouth tightened. It's not always easy to find the right word to describe
it in my opinion, but at least trying to think
about it makes finding the unique facial features
of a person much easier. I'm nearing the
end of the study. I want to leave it rough and painterly without any detailing. I will leave the background
as it is in the study, but you can add some color
variations if you like, like you can see in the
background of the photo. Don't forget to save your
painting and export to JPEG or PNG and post it on the
project section of the class. Can't wait to see
all your paintings and see you in the next demo.
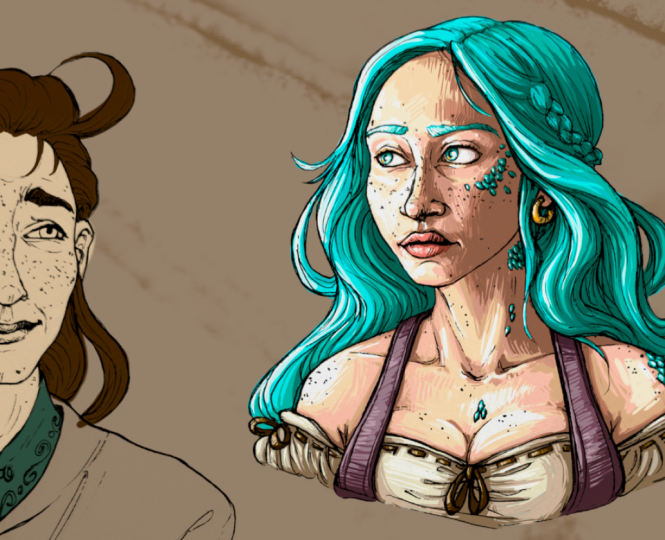
6. Demo 2: I start by opening a new reference image
in my V ref again, having the iPad
view split in two. Once again, I have a
separate background layer which I fill in with a color. I add a new transparent
layer on top, which I will be
using to paint on. I start by roughly
sketching the face. Since the painting has a
slightly more complex face, I like to mark the orientation
of the face with a line or across and then proceed to paint the outline
of the person. Once again, I orient myself on the negative spaces and roughly mark the different
elements of the figure, such as clothing, patterns, hat with simple lines. I like to sketch the facial
features very roughly, the outline of the
eyes, the nose, the faults and wrinkles, the
chin, and the facial hair. I take some time working on the sketch to capture the
character of this person. What really helps is to
try to put it into words. For example, while I'm sketching and looking
at the reference, I might be thinking something like his mouth is
slightly turned down. The lips look pursed, but the lower part of his mouth right under the lips
slightly protruding. He looks like he's
pensive and maybe even slightly annoyed
or irritated. The eyebags and
the eye direction even give him a
slightly sad look. After the sketch layer, I'm continuing with color this time on a new separate
layer below the sketch. I choose a middle tone, a pink tone, which I used to fill in the
outline of his face. As you can see, I
overlap the parts so that I don't have empty
spaces without color later on. Oh With a more saturated red, I'm marking the shadow
areas of his skin. Below the cap, the
eyes, the wrinkles, and the eyebacks,
below the nose, the lips, ears, and the neck. I use a fairly big brush size. Details or working exactly or clean isn't important
at this stage. We just want to build
up the color and slowly understand the form of the
portrait we are painting. I move on to the cap and fill it with a darker
blue green color. You can see that my colors are somewhat more saturated than in the reference image because I want them to be more colorful. But I will be bringing
the saturation slightly down later on when I will
be adding lighter colors. I also choose a slightly
greener tone than in the reference image
because I think it would look great with redder
tones of his face. Playing around that way with color accentuate and slightly switching up to hues can be a very good exercise in
color theory as well. I fill in the shirt with
the same color and use the direction of
the brushstrokes to help me create some
textured lights. With a darker color,
in this case, a dark green, I'm adding the
shadows on the clothing. You can see the darkest
spots are below the color on the cap and
in the folds of the shirt. We are building up the
values of the underpainting, so to say, before we move into more value
and color variety. I now switch back
to the face and start defining the
lighter skin patches. Those are the temples, the nose, and the folds on his cheek. I just lay the color down trying to follow the
direction of the face. You can imagine it as if you
were working on a sculpture, following with your hands the planes of the face
to create them. I try to do the same
with the brush, rotating my hand as well
as the canvas is needed. I think the wrinkles
are what makes his face so interesting
and unique, as they give him
so much character. With a dark red, I start marking the darkest
part of his face. Since we still have
the sketch layer on top of a color layer, you can see how
saturated the red is as it's slightly overlapping with the sketch I did before, but I will be removing
the sketch layer later. I jump all over the
image when I paint because I prefer working on the whole canvas
at the same time. So the level of progress is
similar all over the image. Since our light source is
mostly from the top right, I'm adding some
shadow below his cap, which covers parts
of his forehead. It also stretches more
towards the left. In this case, his right side. I also correct the outline
of his face and use the moment to add some shadows
below his lip and nose. The outlines we established in the sketch layer
aren't rules. They are just suggestions. Feel free to correct and change them during the painting
process at any time. It's our portrait, our painting, and we are free to create
whatever we want in here. I now feel confident enough in the established painting
that I can turn off the sketch layer to
focus just on the color. I now color pick the
color from the image directly and start working
out smaller details. In this case, the
bridge of the nose on his right side needs
some more shadow, as does the general
right side of his face. I purposefully choose brighter, more saturated colors when I'm painting than the reference. See it as a kind of a
natural filtration system. I use my eyes and my brain
to filter and it the colors from what I see to what I want to produce
in my painting, making the version of
reality uniquely mine. I'm constantly laying color. In this case, the
darker shade on each part that still
needs some shadows, such as below the nose, the ear, and the ear lobe, as well as
below the chin on the neck. I create a color
base for the beard, but also add darker
red there as well. Later, I will be adding
lighter parts on top, and you will still
be able to see some of the darker red shining
through the beard. I darken the eyes, and then
with the lighter color, I add back the lighter colours on the eyelids and the wrinkles. You can add so much texture just by the way you
use your brush. You don't even need any of the fancy texture
brushes for that. By cross hatching the
lines with my brush, I show the rough
texture of the skin. The left side of his face needs some darker tones to make it
look more three dimensional. So I add them with
a brownish color, again, with rough lines. We don't want to fill
it too smoothly. It will just look flat if we do. I define the ear a
bit more showing the form and how the
shadows wrap inside. I really enjoy
painting wrinkles. I think they make people look
so unique and beautiful, and this gentleman
isn't an exception. When I paint the eyes,
I try to focus on the values rather than on
the structure of the eye. As you can see, I first mark with a dark tone the
overall placement of the eyes and later added the eyelids
with a lighter color. To paint the white of the eyes, I use a bluish gray color
like the background and softly add a bit of lightness on the
corners of the eyes. As I often mentioned in
my previous classes, the whites of the eyes
isn't actually white. And since we have so much
shadow falling on it, in our case, it's even darker. With an eraser, I define the
ear and the cheek outline. I use a semi hard round
brush as an eraser, but you can even use
the same brush you're painting with erase if
you like more texture. He has some great rim lights
coming from the left in the form of cold blue
light, maybe the skylight. I choose that color and start putting it on top of all
the forms of his face, the ear, the temple, a bit under the eye, and the fold from his nose
and the nose itself. Some of it is also falling
on his chin and beard. Here you can have so
much fun with that, defining all the
structure of his face. To paint the hair, I use a base undercolor
for the beard. In this case, a bluish
gray will look red, and I add it without
much pressure, so we still can see some of
the redness shining through. On top, I layer gray
with small brushstrokes, imitating the growth direction
of the hair and beard. I usually go from bigger
brush size to a smaller After having added the
bigger masses of color, I switch to a smaller
brush size to add smaller hairs that catch the light and accentuate
the texture of the beard. His beard hair is rougher
than the hair on his head, and I want to accentuate
with sharper, well defined yet
small brushstrokes. On the head, I leave
the hair softer without that much contrast
between the hair strands, which shows that it's
less rough and wild. Let's shed some light
on the clothing. I color pick the base
color of the cap, and starting from there, I move the point on the color wheel
to choose a lighter color. I use a directional brushstrokes to accentuate the pattern on the cap and also add the color where the light
catches the folds on top. I do the same with the shirt. Here we have to
work out the color. It's striped, which presents a great opportunity to add the highlights in
the form of stripes, adding light and texture
at the same time. Do Now, I color pick the dark
green to paint his eyes. I think it will look great with the contrast of his
skin, which is reddish. I also start going more into detail to mark the
nose and the eyes. I pay attention to the form that Shadows makes
under his nose. When painting a study
from reference, it's always about
abstraction and filtering. We have so much information
on the reference image. Which of it are we going to
take into our own painting, and which of it are
we going to ignore? I pay attention to the
deep creases of his eyes. The wrinkles alone create so
much rhythm in the portrait. At this stage of the
study, I just play around. I'm all over the image and see what little areas I can improve. I correct lights here and
there or add more wrinkles. I mostly only color pick
the colors from the image, which I have established
at the beginning. I add some more shadows
on his forehead from the cap and also on the
neck to show more depth. With time, I learned to see what parts need to be worked
on while painting. For example, when adding
the highlights on the neck, I saw that the shirt next to it can use some darker shadows. I add soft highlights
to the eye, even though they aren't that visible on the reference photo, but it never fails to make
the portrait look more alive. I also add some gibberish text from the cap to add
some smaller details into the painting and also work out some smaller
details on his ear, as I feel it's still
a bit too undefined. With a lighter color, I add
some highlights to the shirt. To accentuate the
stripe pattern, I'd like to do it by sketching some simple lines on the color. Mm. In this portrait, I decided to work on the
background a bit more. On a new layer above
the background, I raise the size of my brush and paint some simple gradients. Since we added some rim lines on the left side of the face, I love to make that
particular part of the background darker to make his face stand out better
against the background. You can be creative
with the background. I love playing around with
different color variations and brushstrokes directions to
see what look I can achieve, but I tend to keep
them fairly simple, especially for quick portrait
studies like this one. I now want to add some final
details to this portrait. I start with lighter
highlights on the cap. I also add some
highlights to his nose. I want to put the focus on
the area around his nose, so I add some more light
and shadow variations in that area and work
out the folds more. I felt it wasn't three
dimensional enough, so I work on the sphere
of his nose dip, adding some soft shadows
on the lower part. I also add some
darker shadows on the shirt and some little
bits of color here and there. I insinuate the buttons
of his shirt with a simple color and add some
more stripes where as he fit. As you can see, the colors of my portrait are slightly different from the
reference image. Like the idea of shifting
them towards more red green, which I think gives a beautiful
complimentary contrast to the image. This one was fun. We could continue
working on it for a while or until we
achieve more realism, but that's not the
goal of the study. I purposefully kept it under half an hour to
put a timer's strain on myself and force myself to focus on what really matters.
And that's it. Now it's time for you to choose a reference image and have fun
painting a rough portrait. Don't forget to upload
your studies in the project section
and feel free to ask me any questions
you might have. Answer to each and every one.
7. Final Words: Congratulations on
finishing this class. I hope you learned
something new today, and most importantly, I hope you had fun
with today's class. To quickly recap what
we learned today. We discussed different
ways to make studies and the importance of art studies for improving your art skills. We talked about the fact that a great way to
improve quickly is to focus on a specific area of interest when making
photo studies. Later, we talked about
the importance of photo references and that
for portrait studies, having a good,
naturally lit photo of decent resolution can greatly impact the whole photo study. Later, I walked
you through two of my painting demos
where I showed you how I focus on color and
expressive brushwork. Now it's your turn. Choose a reference image from the Pinterest board I
added or use your own and create a fun
Expressive Portrait study and upload it to the
project section. Seeing your work always
makes me very happy, and I give feedback to
each of my students. If you're interested in learning about other topics
such as values, black and white
portraits or characters, feel free to check out my other classes here on Skillshare. Also, if you enjoyed this class, I would really appreciate it if you could
leave me a review. It really helps me
out as a teacher. I can't wait to see all
of your portrait studies. Thank you for joining my
class and happy painting.
 Gabriela Shel, Illustrator and Concept Artist