Transcripts
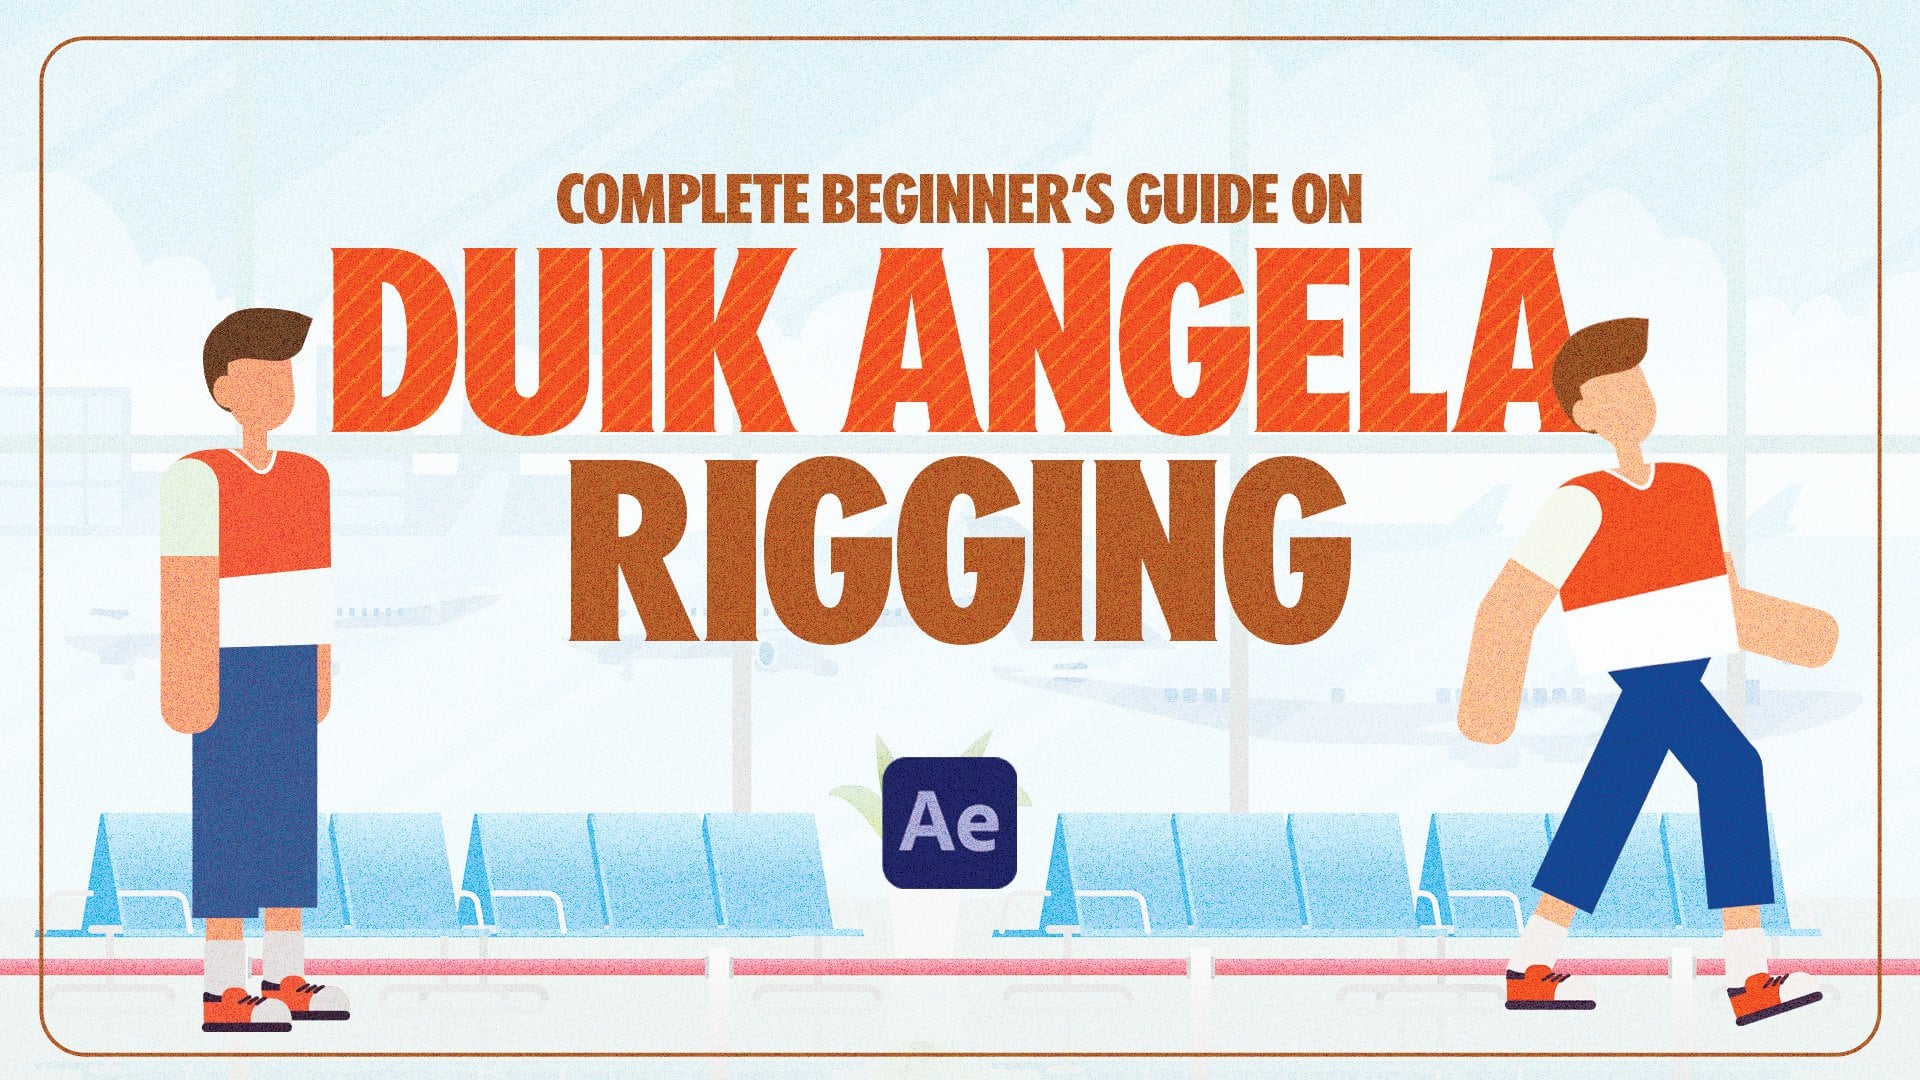
1. Intro: Hi, I'm Ho Shu from
Motion Circles. If you enjoy cozy
animation, warm colors, and those small moments
like washing coffee, slowly pouring into a cup,
this class is for you. In this class we'll start with a simple flat illustration and gently turn it into a stylized
expressive animation. Step by step, no pressure,
no complicated setups, just like taking a creative
break, bringing coffee, pouring animation to life
in a calm, satisfying way. Instead of chasing
complex techniques, we'll focus on feel. You will learn how
small animation choices like timing, spacing, easing, anticipation and overshoot
can make motion feel smooth, cozy, and follow personality, just like this coffee pot. We'll break down
core animation ideas in a way that's easy to follow, even if you're new
to After Effects. Then we'll apply them to a
real project so you can enjoy the process of seeing animation slowly coming together
step by step. You will also learn how to stylize your scenes using color, contrast and simple details to create warmth
and visual charm. I'll show you easy fo three D techniques,
along with highlights, shadows and cast shadows to add depth while keeping things
relaxed and approachable. By the end of the
class, you will have a finished animation you can feel genuinely proud
of something cozy, playful and fun to watch. More importantly, you will start building an instinct for motion, so animation feels less
technical and more like a creative ritual you
can return to anytime. This class isn't about
rushing or being perfect. It's about slowing down, enjoying the process,
and creating animation that
feels good to make. So grab a coffee,
open After Effects, and let's animate together. I can't wait to
see you in class.
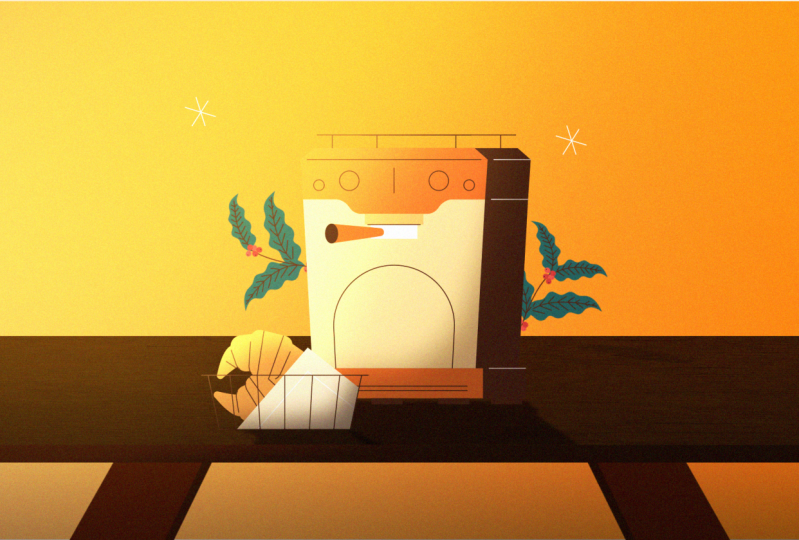
2. File Prep: Mm So basically, I already
separated all the layers here, and you can see we talk about how to separate
layers inside Illustrator. And basically, we have
a scene set up here. If we go to the
layers panel here, I'm just going to take a look. The first one is this cup here. So we don't actually
need this cup, I think. We only need one cup. And then there's what's going on here. This layer is empty, so I can actually delete this layer here. Seems like a lot of the
layers are empty here. Okay, this one is
croissant here, and then we have a
line as a ground. And then we have a
cup that's separated. Everything that I
want to animate has to be separated, right? So, over here, we
have this handle. We want to animate
this a little bit. I want to show you
how to animate in, like, a sik three D thing, and then we have this coffee
dropping here and over here. So we have this coffee
machine as one object because I don't necessarily need to
animate any parts separated. So all I need is just one
machine coming in and out. That's why I have everything
grouped together here. And then we have the start here, little secondary element here, and then we have something
going on here and here, I'll delete these
two corner elements here. We don't need that. Delete that here,
delete this one. And then we have the plan
here behind the machine, which is good. And then
we have a background. So everything looks cool. We're going to save
this illustration, and we can think
about potentially how we want to animate this. So thinking about
anticipation and overshoot, once we have this animation
principle in mind, we can actually just think about how we want to
animate this, right? So this coffee machine can just come in sliding
in from the side here, maybe do a little
bounce before it stops, and then this croissant
can slide from the left. Thinking about
reinforcing the movement, everything is on
one plane, right? So we can just shoot this machine from right
to left and then shoot this croissant from
left to right to reinforcing that
horizontal movement. And then we can have
the plants just come swinging behind
the coffee machine. Maybe just keep swinging here to add a bit more gentle movements. And then I'm thinking
this cup can just doesn't have to
go with the machine. It can just after the
machine comes in, and then we have this cup come
in and then land on here, and then we have
this handle just pull one side and go back. So that's going to be
activating the machine here, and then the coffee
can pour down. And then after the
coffee is filling up, it's the cup is going to exit the scene
on this side here. So I'm going to do
like this going away. So that's kind of
the animation in my mind right now, looking
at this thing here. It could be very fun relaxing. So that's kind of the feeling because sometimes when
you're animating, you want to set the tone. Based on the artwork you have, you want to set
the tone or like, design is about
communication, right? So you want to convey
a certain emotion, and this in terms
of this artwork, the emotion I want to convey
is more relaxing, more just, like, cool feeling or, like, very chill vibe. So that's kind of
the overall tone of voice for not
only the design, but also the animation that
I want to try to convey. So that's setting the tone here. Let's go to After Effects. We're going to create
a composition here. Let's go to new composition, call this one main comp. And then for this artwork, we can do 1080 by 1080. Duration can be 15 seconds. That's cool. Background
color is black. Click on. This is going to
be our working area here. Let me just double click on
this project panel here, and then we can pull
up this illustration. When we import, make sure we're selecting composition
retain layer sizes. Make sure we're not clicking on the illustration sequence.
Click on open here. Now we have this file here, import it, and then we need to organize
our project panel. So just do a quick cleanup
on the project panel here. I'll do a folder called Assets. I'll do a folder
called precomps. And then I'll do a
folder for 00 outputs. So I'll drop the main
cop into the outputs. I'll drop the composition
that we imported into the precomp and then this
folder inside the assets. So that's a cleanup
for the project panel. It's going inside the precomps here. So this is everything. Let me zoom in. This is everything we have
in Illustrator. Inside Illustrator. And
then we copy everything. Remember, we need to click on the first layer first and
then hold down Shift, click on the last layer, second. This way, we're
copying everything in the order that it has right now. Command C, copy, and
then let's bring everything into my main
composition here, paste in. And now you can see
there's a problem. We have this working
inside illustrator. However, it's not set up to the same size of the
composition we have. It's not set up
in tenti by 1080. So we need to try to
enlarge everything. And the problem we have is if we just go to the scale property
and enlarge everything, it's not going to enlarge it to the relative position
of every single layer. So in that case, we need
to create a null object. Let's create a new null object. And then we're going to
put this null object on the left top corner
and then we're going to enlarge it from
the left top corner. That way, we can enlarge everything with the exact
same layout we have. So let's move this now object, go to Align tool. If you can't find
it, it's going to be under Windows Align, and then we go to left
line and then top line. I drag this one a bit more here. So left line, top line, we have the null object
on the left corner. Then we need to parent everything to the null,
select everything, go to this parent link, direct this pick wood, parent it to the null here. And that way, we have the
null to control everything, and then I can go to the
scale property of the null to scale it up so that it's filling the
whole screen here. It's going to be around
maybe one, two, one, 8%. Yeah. That's good. And then I can delete the null. And this way, everything is going to be in
position that I want. If I go to the full
resolution here, you can see if I zoom in somehow it's still not very clear. This one is an illustration
from Illustrator. It should be vector based so that it should be very clear, no matter how big I zoom in. But right now there
is a problem. You can see it's kind of blurry, although I already
have full resolution. It's because there
is a function here that's called continually
rasterize here. This button here, this
little star button. For vector layer, you
see there is a pop up. On the last part, it says, For vector layer,
continuously rasterize. Essentially, after we
import the illustration, we need to check this box here. Let me select everything and then let me just
click on this box. It's going to check the continuous rasterize
for all the layers, and all of a sudden, you can see here everything is
crisp and clear now. So this is the way
that we can keep the vector based artwork within After Effects
clear and crisp. We just need to check
this button here. Sometimes, if your artwork
is not feeling crisp, not feeling so clear, you
need to check this button. So that's for this button here. Next, let me just quickly
rename the layer so that we have something
to reference as we go. This one is going to be
called the plan One. Those are very necessary steps. You can also rename it inside
Illustrator, if you want. If you rename it
inside Illustrator, it will be renamed
automatically inside After efact so you don't
have to do it again. That's good. Let me sit
everything to my preview. I'll direct this one bigger, so it's easier to see here.
3. Coffee Machine Animation: Let's get started
with animation. Basically, I want this coffee
machine to come in first. So let's go to my
coffee machine. I'll go to position
property here, and then I want to animate
inside value graph. So I'll right click
separate dimension, and then I'll click on Let's
go to zero so I can here. I'll click on this keyframe
here at one keyframe. This is going to be
my final position. So I'll go for 20 frames. Move this keyframe to 20 frame, so this is going to
be final position. And then at zero second, I want to be outside
of the frame here. So I'll just shoot
in here like this. If I just solo the background and solo the coffee machine, we'll only see these two
elements for now. That's good. And let's go inside. Let
me easy ease it F nine, go to the graph editor, make sure we're inside
the value graph here. Click on this button,
and then let's go to the position, fifth
graph to view. Let me dig this back
up a little bit more. Now, for this case, I don't need a anticipation because it's outside
of the frame. And for an animation like
this one is shooting in, I'll do this curve here, and then I'll add in some
overshoot a little bit. Let me go to the
last frame and then move three key frames forward. Maybe like four.
Let's do four frames. Command right arrow, one, two, three, four, four frames, and then hold down command, click on here to add a keyframe, and then let's do two frames. So remember the time
decay that we talk about, we'll do four frames, and then two frames.
That's time decay. And then we need to zoom in, hit on Z on the keyboard, zoom in this area
a little bit more. And then I'll drag
this first one down, so that's overshooting and
then drag the second one up, so it's oscillating back and forth from this final position. Just want to drag
it slightly here, and then we're going to modify
this handle a little bit, drag it out so that we
can form a S curve, give it a bit more easing. If I pull this one back, I'll drag this curve more. I don't want to go too much. I mean, drag the
handle for too long, otherwise, this can be
more cartoony feeling. The more dramatic, the more
cartoon it's going to feel. So for this case,
maybe I want to go for a more natural
bounce at the end. So let's see the
animation here, preview. It's nice. However, if we add
a little bounce like this, it still feels like a
bit cartoony at the end. I want to go for more,
like, a natural feeling, just a really slight
bounce at the end. I want to make it more gentle and then tone
it down even more. Let me go check this auto Zoom graph
height here so that we can zoom in really close to this overshoot keyframe,
Z on the keyboard. Just go in zoom in really close. I'll pull this one
down a bit more, pull this one down a bit more. So it's really close
to the final position. Let's see the animation here. Yeah, you see that
slight, really, really slight gentle easing
at the end overshoots. It's barely noticeable,
but you can feel that the
momentum is kind of carrying this coffee
machine forward and then bounce back a little bit so that you can
feel the weight of it. However, it's not so
bouncy because we just did a really close zoom into the overshoot and then make sure the value
is really subtle. It's not really something
that's really noticeable, but you can actually feel it there's way to
the coffee machine. So that's kind of the goal for the anticipation
and overshoot. Sometimes you want
to keep natural. You tone down the value and then soak out character to the
object to the movement. However, it's more natural. It's not like dramatic
or it's not cartoony. So that's the coffee
machine I want. That's pretty good. Next,
I'll go to the croissant. Let me just pull up
the croissant here. This is my layer here. Let
me go back to the timeline. I'll click on this solo button,
I'll solo this one here. So we have three elements in the scene turned
on the background, the coffee machine,
and the croissant. And then for the croissant,
I'll just reinforce the movement we have
left and right. I'll just slide it
in from the left. Sometimes when you're animating, you also want to think about the physical forces that's at play, and what are the forces that's
driving your animation. And those forces has to
be more realistic, right? If you are doing
something that's more of a realistic setup, although it's illustration, but more realistic kind
of illustration. So thinking about the forces, it could be someone
pushing the croissant on the table and then slide it in just like how the
coffee machine come in. So it has to kind of have
a force being at play. If you want to do, like,
a drop from the top, it could be a gravity pulling someone just
throw this one, but it doesn't
really make sense if this one just come in
from the top and then bounce on the floor on the table or something like
that, it wouldn't happen. No one in the real world
would just, you know, drop the coffee
machine on the table, and then we bounce it
doesn't even make sense. So in that case, let's
just think about the realistic
forces that's being applied on these elements and use that as a first layer of thought so that you can start thinking about the
movement that it could have. And in this case, the
really most common or, like, the first
reaction might be just these two because
we have a tabletop. We have a ground here, right? So we have a line that's
forming a ground. It could be a tabletop, and then it's sliding on
the table, right? So that's going to be
the start on the forces being played on these objects so that they can
slide on the table. And for this one, we'll
just do another slide in. So go to position and then we'll go to Right
click separate dimension. And then we click on the X position for
the final position. Let's go for 20 frames. And in this case, right now, we're just on the left
hand side of the frame. And thinking about being
on the left hand side, I just want it to be outside of the frame and
then shooting in. The traveling distance
is really short. So let's say if I add a
keyframe on 20 frames here, this is going to be
my final position. Go back to zero. I'll move
this one to the left. It's going to be my
original position. So it'll slide in
here like this. However, the traveling distance of these two keyframes
is really short. So in that case, I need to
think about the timing I have now might be too much
because we have 20 frames, and the traveling
distance is really short. So I might want to just shrink it down to around ten frames. So let's go for ten frames, command shift right
arrow and then pull this keyframe
to ten frames. It makes more sense because we only have this
short distance to cover so that we don't need 20 frames for the
animation to happen. You can use 20 frames as a starting point
for the animation, but we always want
to think about the context and the
distance is traveling. In this case, it's
a short distance. Let's string it
down to ten frames. Let's select both key
frames, F nine, easy, go to the graph editor, make sure we're inside
the value graph, hit the position, fit
the graph to view. Same thing here. I can either do a easing in from
the start shooting in, or I can do S curve here. So it depends on it can give you a slight
different animation. It depends on how you like it. In this case, I
think it will not be making much difference at the beginning because you
really cannot see here. So at first, I can
either just do this. The last one we did
we did a curve. You can try both, but I think it's not going to
make much difference. The only difference
is going to make is the overshoot here. So let's go forward
for the overshoot. Remember, we tone it
down to ten frames. So last layer for
the coffee machine, we did a four frame overshoot and then a two frame overshoot. In this case, since the
animation is only ten frames, we don't want to overpower
the actual animation. So let's do a two
frame overshoot and a one frame overshoot. So we still have
that time decay, but it's a small movement. It doesn't have to
be too exaggerated. So we're doing a
two frame overshoot and a one frame overshoot. So let me zoom in here,
hit Z on the keyboard. Zoom in really close, and then
move this one up slightly, move this one down
so we can oscillate between the final position
here, final value. I'll drag the curve out
more to form an S curve. Let's see if that
makes sense here. So the value is too small that I can't
even really see it. So I will just pull
this one up more, pull this one down a little
bit more. Let's see that. Let me just pull
this one up more, pull this one down even more. Just want to get to a point
where it's still visible, but it doesn't feel too much. Yeah, this one, now it
feels a bit too much, so I'll just pull this
one back a tiny bit. Now it's visible. It has this slight wiggle at the end, really slight wiggle. That's kind of what we want.
In terms of this setup, I want to be really
gentle and really subtle. Really slight tweak, good. I feel like even though the
movement is in ten frames, maybe the two frame one
frame setup is giving it too much of abrupt wiggle at
the end. So you know what? I want to change it
to three frames. Let's do three frames and then maybe two frames.
Let's try that. I feel like that two
and one overshoot is kind of like too much. It's a little bit jarring if you just go inside
and look really closely. So I think this one
looks better now. I'll do a three frame and then two frame setup
instead of a two and one. I think that looks pretty cool. So this is also just making sure that we are being responsible for
every single frame. We're doing easing and then overshoot all these
key frames, right? And now, we have this
coffee machine coming in. We have this croissant
coming in, which is good. And I don't want the
croissant to come in for. So I'll just offset the
layers for now. Let's see. I want this one
to come in first, and then maybe around
this time here, I'll have the croissant come in. Now, that's pretty good. If I just fit it here, you can see this
animation we have so far. Everything is coming
with some character bouncing a little bit. That's
4. Coffee Cup Settles In: M let's go to my plan here. Let me just pull
up the plan here. I'll just do a solo
button on both plans. So once the coffee
machine come in, I want the plan to kind
of reveal from the back and then wave down
like this one here. Let me go to my Effects
and Presets panel here. And let's search for CC bended. Let me just double
click on here. We'll just do CC bended Effects, and I need to set
up the start and end position of the leaf. So for the start, it has to
be at the bottom of the leaf. So click on the
start, set it here, this is going to
be the bottom, and then the end would be the top. So I'll just do here. And now I can actually
just bend it like this. So for the end position, I'm not setting it to be really close to the leaf
because if we do that, it'll be cutting it off. So I need to pull this
end position away a little bit more to reveal the whole area.
Now, that's good. So we want to animate these plans after the coffee
machine is landing here. So maybe around this time here, I'll drag these two
layers out forward a little bit more so
that is coming in from this time stamp here. Let's go to plan one. I'll just add a
keyframe for the bend. So at the beginning, the
first original position, I want everything
to be hidden behind the machine and
then go 20 frames. I'll just reveal it like this. This is going to be my final
position, which is zero. And select two keyframes. Easy, go to the graph editor. So for the anticipation, we're not seeing at the start, so I'll just drag
out an S curve here. And then for the
overshoot, in this case, this plant is really just I want it to swing
back and forth gently, so it doesn't have
to be stopping. So in this case, we're not doing a overshoot as a
traditional overshoot. We're actually adding
more movement. So it could be treated as a animation for this thing
to oscillate back and forth. So I'm thinking maybe I'm
going to add ten frames. Go for ten frames instead of
just traditional overshoot. We only do like four
frames, two frames. I wanted to go over the
position a bit more. We already moved 410 frames, add a keyframe here, and then
I can dig this one down. So it's actually
going over gently and then swinging back. So let me go to
the timeline here. I actually want this
thing to maybe move a bit more like this, move like this, and then go back to around here, and then maybe go
forward a bit more, move down, and then go
forward again, move up. It's just going to keep
oscillating in these values. You see, that's even
with ten frame, it still feel too fast. So I need to move
these keyframes out further away from each other so we can smooth out the
movement a bit more. I'm selecting
everything and then hold down option on the keyboard to drag this one
because for the plant, it's really gentle. It's
moving really slow. So we want to spread out the keyframe so it's
a timing difference. There's an issue over here. I think the value is too much. So over here from this value negative 31, two negative 56. So this value here is too much. So let's go maybe
negative 40 or something. And then the final value. So we're not stopping
at zero in this case, because when I put it to zero, I feel like the zero is not going to be my
final position. It looks weird here. It's
still not feel rested. So the final bend
position might be around negative 34 or two
negative 30, 38. I don't know. Maybe
that's going to work. And I'll pull these frames
back a little bit more to close the gap over here
in the first two keyframes. I still feel like maybe one that comes in
is still too fast, so still, I need to
pull this one back. And then we can go inside the first two key frames to make sure my curve is not
too exaggerated. Just pull this one
back so we can have a really gentle.
That's pretty gentle. So after I change
the curve, maybe, in this case, I
can move this one back to close the
timing a bit more. So now, I think that
looks okay now. So it's just going down here and then slightly
moving, moving. That's good. So that's the case. Let's just quickly do
the plan two here. Let's just do the key frame first and then let's
copy the easing. So in this case, I'll
just do a bandit, and then the start will
be the end of the plant, and then the end will
be the top, the tip. And then for this one, I'll do a keyframe over here at the beginning,
hit you on the keyboard. Let me just pull this
one all the way back. I need to move the position
in a little bit more like this and then change
the start over here. If I pull the start over here,
it's going to be hidden. We already have the bend it, and then for the
first frame here, I'll just shoot it
outside like this, go back a little bit, come forward a bit more, slightly just resting
in position here. Okay, that's cool. And then
let me go to my his copy. So I'll just copy these values and paste in the value
on these keyframes. Yeah, I think that's
okay. That's pretty cool. That feels more natural, right? And now you can tell, like,
a lot of things we do, they're all just kind
of, like, related. So it's a set of workflow
that you can actually apply to a lot of different things
even in various settings. For example, we have the same kind of animation
on similar objects, and then once we do an offset, it's actually making it
look more realistic. So I like this thing here that's waving back and
forth. That's pretty cool. I'll call that done
for the plant. And now, let's do the cup here. Let me pull this
one add in the cup. We have the cup here,
and then for the cup, I wanted to just go in
from here and then land here and then get some coffee and then move out of the way. So let's if we
analyze that motion, we have coffee machine
come in, plants come in. And then from this point, maybe I want the cup to come in. So I'll go to P for position, go right click
separate dimensions, go to position anchor point to be at the bottom of the cup. And also, I want it to move slightly to the left
so that it's in the center of the cup instead of the center of the layer.
Now, that's good. So let me hit a
keyframe on position. At the beginning, it's
going to be outside. Go for 20 frames. Go here, it's going to
be coming in like this, and then we'll do a Y
position, hit the Y position. At this point, I want it
to drop down, sit here. So let's do ten frames because it's traveling a short
distance in this case. So ten frames come drop down, then that's going to be my full animation for
now in this portion. I'm going to just
finalize this one here, easy East, and then let's
go to the graph editor, go to the position,
and then for this one, what I also want to do is I also want to add
some rotation. So let's hit Shift
R for rotation. Let me go back to the timeline again. Let me add
rotation first. So at the beginning,
when it's coming in, I want it to maybe come in like this with an angle, right? And then once it stop here, once the land, it'll
go back to zero. So something like this,
when it's coming in, there's a slight angle to it, so that's more it's kind
of making more sense. Almost like someone
is grabbing it to put it in, but you
can't see the hand. So it would have an angle to it. It gives more
realistic vibe to it. So that's good. Let me
just select everything. Easy ease it, go to
the graph editor. Let me just work on
the position first. For the position, I'll
just do an s curve, and then we need a
little bit overshoot. So let's do two
frames or maybe let's see how we can synchronize all these three different
things together. Let's do a three key
frame overshoot. So in this case, I don't want
to add too many overshoot because we already have all these three values
happening at the same time. The more key frame, the
harder the control. So in this case, I'll
do a slight overshoot. Maybe it's going
over a little bit. Let me just zoom in to go
over a slide value here, very gentle, so it's
moving in, but it's over. As it's going over, I just want a rotation overshoot on
the exposition overshoot. So basically, so it's going
to go that direction, and then maybe the
cup should come back. To positive three. So it's coming back to the
other direction when it lends, and then it's going to
land in a flat position. So there's a slight tweak in rotation here before it lens. So almost like the
cup is repositioning itself to try to go back to a flat position
before it lens. So we're adding a
slight overshoot on the rotation
and the position. So let's go to the rotation. I want to dig the curve a
little bit more. Just make it. I need to click on this, convert it to Auto Bezier, and then direct the curve to
get an S curve like this. So this is going
to be my overshoot in the cup rotation here. And then over here, I'll have
this cup just land here. I feel like this part, I might not want it to be
completely flat. Let's try to give
it an angle here. I think it makes
more sense for it to not rest because it's
within the motion here. So I'll just give it
a slight angle here. Move it down a bit more. Yeah, I think that
works. So we have this one come in. It's
going to rest like this.
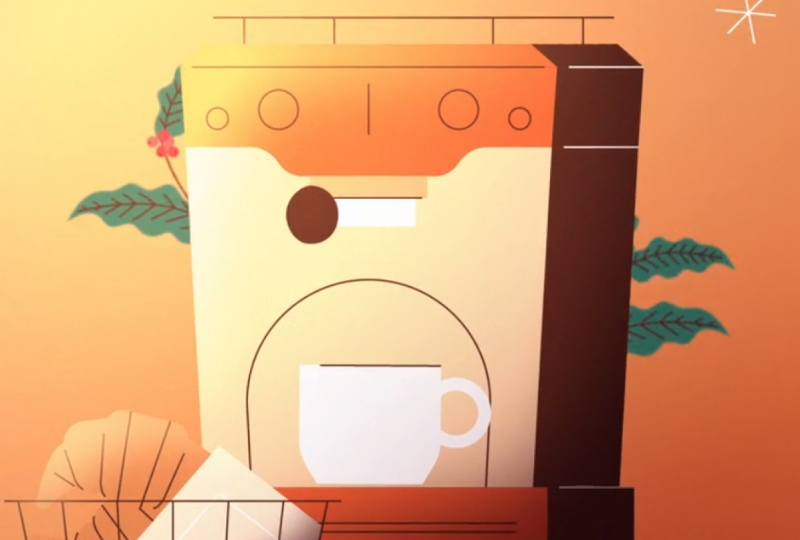
5. Handle Faux 3d Turning: After the clap lands, I want my handle to
pull on the side. Just pull on one side
and then go back, and then the coffee
start to brew, right? So that's the handle. For the handle, I want
to show you a technique to kind of do a fake
three D. So for this one, it's actually built
in Illustrator, so it's actually we can convert
it into a a shape layer. We need to animate using a shape layer for
this handle here. Let's right click and then go to create shapes from vector layer. Now, we can access all the
shapes inside this here, and then you can
see it's creating an outline and it's hiding
the original handle. In this case, we don't
need the handle anymore. So we'll just delete that and then call this one the handle. Inside this handle, go to
content. We have two groups. The first group will be just this circle
here on the side, and then the second group is
this bar on the right here. So we need to
animate the path of these shapes so that we can create more of a fake
three D feeling. To do that, let's say
the cup is landing. As the cup is landing, I want this bar to
pull to the right. So let me drag my layer
around this section here. I'm going to add a keyframe on both path of these two and
then go for 20 frames. So for the 20 frames here, I want to move this one here. So as I move, I think
it makes more sense if I just move this one all to here and then move
this one here. So we're faking a
three D dimension. Basically, this one
is going to move here to do a sake three
D thing. You see that? Almost like it's turning
in three D space, but it's actually
a path animation. So as I see this, I feel like this end part is
pulling traveling too much. So I want to pull this one
back a little bit more. Give it a three D feeling. And then once we pull that, if we want to exaggerate
the dimension a bit more, we can actually make this
circle a bit bigger because it's going to get closer to the camera right
now when it pulls, so it should become bigger. So in this case, I'll just click on this last keyframe, Zoom in. Click on this last keyframe, and then double
click on this here. One, I can actually
drag this one to be a perfect circle here
and then make it bigger. Maybe even this big. A s try like this. If I make it this big, I
need to drag the hand, I mean, the other shape outside. I need to move this
one out of the way first and then drag
this out a bit more, not selecting the circle, only selecting these
two vertex points, and then connect these
two points to here here. That's good.
Something like that. So now if I play the animation, Okay, there's some issue here. There is some
connection issue here. I need to make sure it's
actually connected here. So this is the
original position, and then this is
the final position. It's pulling this way. It's becoming bigger. It's
getting closer to the camera. And then there's a slight
issue here with this handle. Maybe I want to drag
this one here to make sure the turn is a
bit more smooth here. Yeah, that looks
better. So we have this handle pull
like this, right? That looks better. We're
pulling in three D dimension. It's pulling this side.
It's getting bigger, like this, and then
it's going to go back. So 20 frames, copy the first two
keyframes going to go back. And now, let me easy ease
it, go to the graph editor. For the path property, we can only animate it
inside the speed graph. So let's go to the speed graph. For this one, I just wanted to hang over here when it rested. So it should be mostly
flat on the side, and then a little bit
easy on the left here. A bit more easy over
here. So give it around 20% of influence
on left and right, and then in the center, when it reached the middle position, it will hang there a little bit. So we have a curve like this. Something like that.
I think that works. So that's a handle, almost
like a fake three D thing. So we have the handle here, and the handle
should come in with the coffee machine, right? So I need to extend this layer, make sure we have this handle parented
to the coffee machine. So when it's moving in,
it's already parented. It's moving with
the coffee machine. So let me parent this one
to the coffee machine here. Now, it should work better. So it's coming in and
there's pulling like that. And then after it's pulling, what will happen is normally the coffee machine
would start to brew, and then when they
start to brew, it will actually
shake a little bit. So how do we animate shaking? So for the shaking, we actually want to do it's almost like the wiggle that we did
in the other animation. But we're going to add an
expression for the shaking. And in terms of the shaking, we actually need to duplicate this coffee machine
maybe around here. So essentially, we
need one layer of the coffee machine to
shake only for maybe, like, a couple of
second, and then the rest of the coffee
machine would stay static. So in that case, I
need to separate this cut this coffee machine
into two different layers. Go to the coffee machine
and then let's do Command Shift D. So at this point, I'm not only duplicating this coffee machine,
but also cutting it. So I'm cutting this point here. The coffee machine
is not changing. The only thing
that's changing is we're adding one more layer, starting from this timeline. Going forward, we're going to control the coffee machine
using another layer. So for the shaking,
let's use an expression, and the expression
is called wiggle. So my goal is to move
this anchor point to the bottom so the coffee machine can shake based on
this anchor point. Let me go inside here. Let me just try to move
because we already have the animation in this first part of the coffee machine layer. We're just making
a duplicate of it, and then let's pull this anchor
point to the bottom here. In this case, I can actually
delete the exposition. You see? After I move the
anchor point is adding a key frame on the exposition. We can delete the
exposition because everything is controlled in
the original layer here, this coffee machine layer, and this is going to be
let me rename this one. This one is going
to be the shake. So coffee machine shake. Shake, I'll just go to rotation. I'll show you how to
do an expression. Essentially, I just
wanted to kind of rotate like
this a little bit. So I'll add an expression. The way to add
expression is hold down option and click
on the stopwatch here. So now we can do some coding. The only coding we need is
just one word called wiggle. And then for the wiggle
expression, we have bracket. And the first one is
going to be frequency. Let's say one wiggle per second. The second value is the
amount. It's going to wiggle. So basically, 110 means that it's going to wiggle
one time per second, and then each wiggle
is going to go around ten values
back and forth. It's oscillating
between in this case, rotation is ten degrees. It's going to oscillate
0-10 degrees. So I think it's going to be
too much, but let's see. So that's actually not working. We wanted to shake, so it's
going to be more dramatic. We don't want one
shake per second. It's going to be probably ten
shakes or, like, 20 shakes. Let's see 20 shakes.
And then I want the value to be really
down to, maybe one. So we have 20 shakes per second, and then it's going to
oscillate within one degree. Let's see that. That actually
works better, right? So that's more like a shaking. It's going to be 20
shakes per second and then oscillating
within one degree value. And I think that works. So that's more dramatic. If
we want to tone it down, maybe I can change it to 0.5. So oscillating between 0.5 yeah, I think that might be better. I just want 20 shakes
and then oscillating between 0.5 degree of
value in rotation. So it's kind of like doing this. The problem we have is my
coffee machine is shaking, but this handle is not shaking because remember the handle, we actually parent it
to the layer seven, which is a coffee machine
when it comes in. So if we want this
handle to shake, we actually need to parent
this handle to this. However, sometimes,
in this case, it doesn't make
sense now because if we parent the handle to this, it will not come in
with this layer. So what we need to
do is we actually need another copy
of the handle here. So it's Command
Shift D. Remember, Command D is duplicating. So Command D for duplicate, you are duplicating
an exact layer is having all the key frames. However, if I hit
Command Shift D, we are duplicating
layers and we're splitting layers at this point, so that going forward
from this timeline, can use another
same handle layer to control everything
that goes forward. And then the previous timeline, we're controlling the
handle using this layer. So this is more of
an advanced concept. It's really important. It lets you to be more
flexible with your elements. And sometimes you need the first part of the
animation to do one thing. And then if you only have
one layer to control that, it doesn't work going forward. So in that case, I
need to duplicate the exact same layer and then split it from here so
that going forward, I'm using a different layer
to control this object. So that's a really
important concept that you can do
in After Effects. It's called splitting layers. Now we're splitting the handle, and going forward, I want this handle to be parented
to the coffee shake. And the first part,
this handle is parented to the coffee machine,
it's coming in like that. And then for the second
part, after splitting, the handle is parented
to the shake, so it's shaking with
the coffee machine. That makes more
sense. We'll let it shake for 1 second, like this. At five second, we'll
have coffee pouring.
6. Coffee Pouring Animation: So let's do some coffee pouring. Let me just draw a line here. Let me go zoom in. I just need one. You know what? We have the coffee here,
just as a reference, but we need to use Pentl
to draw a line here. It's gonna give us
better control. Let me just draw a
line here to here. And then for the line, I'll
delete the fill color. I'll apply the stroke to
be this coffee colour, and then let me make the
stroke wider, maybe 18 points. And now I can delete
my coffee layer here. This one I don't need anymore. This is going to be my coffee. So for the coffee to pour in is actually pretty
straightforward. We just need to animate this
line here to go down, right? So let's go to my coffee. Name this line coffee, and then I'm going to go down, go down, go to the
shape, go to the stroke. We have a stroke control here. For the stroke, I want the
cap to be a round cap. So when it's pouring down, it should be round. So around this point here, I'll move the layer to
this timeline here, or animate the path here. So at the beginning, this
could be my final position. So I'll just move this
keyframe 20 frames forward, and then the first
original position, it'll be just over here, and then we have this
coffee pouring down here. Like this right? We need some speed here. So let's easy ease it. So when it's pouring, remember, we're going to animate inside speed graph because pass can
only work with speed graph. For the pouring, you
think about gravity, and then gravity is always
pulling something down. So it's always accelerating. When something is falling,
it's going to keep accelerating without
losing speed. In this case, pouring
means accelerating, so we need to move the right handle all
the way to the right, give it 0% influence, and then move the left
handle all the way to the right to give
it 100% influence. So it's falling, right? Falling like this. And then now I just need to maybe do
a track map to hide this. I need to hide this one
behind this white block here. So let me just
draw a layer here. Do a fill and then delete the stroke and
then move this one down. So I'm going to use
this as mat here. The coffee is going to
be just behind the mat. I mean, not showing
up around the mat. So I'll need to pull up
my track mat option, which is the second button here. On the left corner, I'm
pulling up this track mat, and then I'm going to
use this mat here, and then I'll invert the mat. So the coffee is only
showing up outside of the mat here. That's good. And then after it pours down, maybe half a second it's
going to stop, right? So let's go for a
couple of frames, not maybe like 20 frames,
and then it's going to stop. So I need to go at a keyframe and then go
for another 20 frames, and then I need this pass
to come down, right, like this because it's
going to stop the pouring. Let me just go to
the keyframe here. So this part is going
to be just stay here, and then the last
part is same thing. When it's pouring, it's
going to keep accelerating. So we'll have a curve like this. We can have this coffee
behind the cup here. Let me move the cup here. Yeah, that looks better.
After we have that pour, we're going to add in
a bit of extra things. So when it pours down, it's
going to drip a little bit, so it doesn't really finish like that when the
coffee is boring. It's going to drip
a little like, you know, coffee at the end.
So we're going to do that. So what we need to do is
let's go to the coffee again, and then let's duplicate the coffee. Hit you
on the keyboard. So we're going to
finish around here. I'm going to move this one. Delete all the keyframes. I don't need the keyframes. I just need to modify the path
here. Change it like this. So we're going to
shrink the path here, just like, do something
like this, right? Once this one goes
down like that, we'll have this thing fall. So this is going to be
the drip, drip one, we'll animate position, go forward one, two,
three, four, five, six, maybe six frames, and then move this
one down like this. So let's go to Graph Editor. Easy ease it, and
then it's going to be keep accelerating,
it's falling. So it's going to fall like that. Somehow it's showing up here. I need to make this mat bigger. Let me just make
this mat bigger. I can use this mat
for the drip as well. For the drip, it's already
mask. That's good. It's going to go down like that, something like that, and then I'm going to
copy another one. Going to be drip
two, and this one, I'll make it even smaller
in terms of the half here. I'll do it like this, maybe just a circle and
then push the layer back. I'll be like this. Make it slower. Yeah,
I think that works. So now we have this
coffee pouring, and then we have some drip here. And then after the
drip, we're going to stop the coffee machine
from shaking, right? So it's going to stop shake
from this point here. So the shaking of the coffee machine is
not working anymore, so we need to duplicate this coffee machine
again, split it here. Going forward, it's
going to stop shaking. So from here, I'm going to split the layer again and
then go to rotation, make sure we're deleting
the wiggle here. That's good. And then we need to split the
handle as well. So we need to go to the handle too and then split
it here and then parent this handle to the it is not going
to be shake anymore. Just delete the shake.
It's Coffee Machine two. So we have handle three, parent two coffee machine two. So from this point forward, it's not going to
be shaking anymore. So now let's see the full
animation we have so far. That's looking pretty
cool. Yeah, this is everything we have so far. So we covered a lot of problem solving techniques when we're going through this animation, and then we covered
anticipation overshoot. We covered effects,
band aid effects, and then we cover
this cup moving, overshooting and then
syncing with the rotation, synching the rotation with
the position property. And then we cover this handle moving in three D space
with the path property. And there's also splitting layers and then
wiggle expression. We need to move the anchor
point to the bottom here. Shaking, we're
splitting the layers, and then we have some
pouring of the coffee, and we're adding some
dripping, problem solving, just like two other layers of smaller lines and then
just dropping, right? So, something like that. That's
all the animation we have
7. Coffee Liquid Animation: M let's go inside to cover the wave warp
effects for the coffee. So let me zoom in here. We need a space that's
inside the cup. So let's go to my Pentool, and then we're going
to just basically draw a shape following this
shape of the cup here, and then we'll
leave some space at the bottom at the
bottom of the cup. I'm using Pentool just to
roughly draw a shape here, and then I'll leave
some space in the top. That should be okay. And then that could be my
inside of the cup. I'll call this one cup inside. That's good. I need something
that I can waive it. So I'll go to my rectangle to I'll
draw another shape here. Basically, I want
to fill this cup maybe around this
half of the cup. So I'll draw, like,
a rectangle here, that's bigger than this cup, and then I'll color it into this dark brown
color as a coffee. So this is going to be the area where I will use as a coffee. And then let's go to fex
and precess get wave warp. Double click with
the layer selected, double click on the wave warp. And this is how we
do a wave effects. Basically, we have
different wave type. We have sine wave. I think sine wave would be the most common
one that you use. But if you toggle these
different options, you have different shapes
here for the wave. These are not really organic. Mostly will just stay
within the sine wave. Sometimes you might
need noise wave when you are animating
some noises. And if we're doing
the sine wave, and then if we
change the height, we can change the height
of the wave here. And then if we change the width, if we make it really
big here like this, so the wave is going
to become bigger and bigger in terms of the width. So let me just try to
give it around 50, and then let me
change the direction. So if I modify the
direction here like this, it'll basically move this
wave to a diagonal direction, so the wave is more angled, and then we'll have kind of this kind of effects when we are playing like this. And then let me change the
height down a little bit, maybe like a ten or 15. I
think the 15 might work. So now we have this
wave that's going on, and then we can animate
the position of this liquid coming up as if
it's filling up the cup. Now for the wave effects, we don't need any
keyframe in order to have the wave animating because it's always moving, it's
always animating. We can change the speed here. Right now, the speed is one, so I think that
looks pretty cool. If I play it, we have a
wave animation like this. So let me go to the point where my liquid is coming
down around here. At this point here, I want
this shape to move up. So hit pee on the position. I'll just first move, sorry, not the copy inside. This is going to be
the coffee fill. So we'll have the coffee, hit pee on the
keyboard, the position, and then we'll have
it down there, and then maybe once the liquid is kind of
finishing around here, I'll have this one move up
to maybe half of the cup. And for now, I need to use alpha mat to mask
out this area here. So I'll use a cup inside as the alpha mat for
the coffee fill. Let me go to the track mat here, choose the cup inside, which is layer two, over here. So now we should have a
liquid coming up like this. And I need to move my
just pouring liquid here, this line on top of my cup
so I can see the line. This is my coffee pour. And then for this
one, I'll just move it on top of the cup
so I can see that. So once this one is
reaching the bottom there, I want my liquid to
come up like this. Move it slightly backward
to time it better. So, like this, I need to move it back a little
bit so that it's already filled up when the
pouring is stopping. So like this, I think the
speed is not fast enough. I want the speed to be faster. Let's try a speed in two. I think that might
look better like this. And then that's good. And then for the coffee poor, I also want to add the
wave warp effect so that it's not a straight line
it's marks kind of wavy. So let's go to this coffee pot and then add in the wave warp. And then for this one
to be a wave warp, let's say this one the
pouring down here, Um, I actually need to
change the direction. So let's see if I
change the direction here to more of a
vertical direction, so you can see I can actually
make this one more wavy. But since it's a
very short distance, I don't want it to be this wavy. It doesn't really make sense for the liquid to
come down like this. So I just need a really
slight wave here, make it really gentle, subtle. Maybe something around I
think even like 81 degree. I'm not changing
any other settings. I basically just doing the direction so that this thing can just have a little bit of wave while it's still
going straight down. So if you want to add more, you can change the
direction more or even change the width of the wave or not the height. I think the wave might do. But for now, let's
just do like this. I think that is going
to make it better. And then once you zoom out, we just need to make the
bottom and top edge cleaner. So let me just go here. So now, you see, it's
actually outside of my cup, so I need to let's see my mat. Where's my layer five mat here. So I need to mask out
this bottom part again. Let me go to see where my
number five layer mat is. So I have a mat over
here on the top, so I need to make
another shape here at the bottom to make sure
it's not going over my cup. In this case, I want
to draw inside my mat. This is the mat that I already
applied on the coffee pot, so I just need to essentially
go to my rectangle tool and then draw another shape here inside to cover this part here. So now, it's taking this mat with two shapes
inside the layer, and now it's not
going to go over. However, there's
still some gaps, so I need to extend it further so that it doesn't
have that gap there. Let me go inside my keyframe,
go to this point here, and then I'll drag
this one down further, so it doesn't really
have that gap over there once animating. And once we zoom out,
I think it's okay. We're going to ask some
motion blur to refine those edges later on, but I think it's
looking good for now. And then another
thing is I want to create a dimension
inside my coffee fill. So this is a fill here. I want to create a
different layer mande. And then let's change it to
a different brown color. Just go to maybe the saturation, give it a slight different tone, and then try to offset
it a little bit more. Let me create a different color so that it's easier to see here. So this is right now creating
a complete overlapping. So I need to maybe change the
height a little bit more. Let's do a five, and then let's move
underneath this one here. And then the wis can
be smaller as well. Just want to change the
setting to create an offset. So we have two waves going on, almost like one is closer and one is
actually further away. And then let me
drop my poor just in between these two so that the other one is
actually in the back so that we can create almost
like a full three D thing. Just give a different dimension to the coffee pouring down, and we can add some fun to
this pouring animation. So I think that looks
cool, should be okay. I think maybe this pouring down the fill sine wave
it's too much. I actually like it better if
I just don't have the wave, more of a straight line, so that is fitting this
graphic style better. But yeah, you can see, like,
what's your preference. The point is we can
use a wave warp on this pouring animation and
to make it more organic. But I think I like
the straight line better than the
other one because the last two drip of my coffee pour are also
more or less straight. So I'll just keep
it straight for now and then have this coffee
pot coming down like this. And then I need to turn
on this coffee fill too so that we have a
dimension over here. So that's the wave warp effects. After everything settles down, I want this coffee cup to come up and then exiting the scene. And let me save the project. For the scene setup,
I actually want to let's change the
composition setting to a larger comp
because I will need it when I start to do
the stylization. I want to give it more space
here on the left and right. Let's see if I change it to
1920 by 1080, click on Okay. And then let me scope
to my background. Hit S on the keyboard, I'll just uncheck
the scale property, and then I'll just make
the background bigger. So that's going to
be my background. After we change the background, we still need to
adjust this animation at the beginning here so that it's not inside my
frame when it's coming up. So this is going
to be sliding in. And then this is sliding in. That's good. And then
that's sliding in the cup. I want the cup also
to be outside. So I need to go to my cup layer, make sure the first frame, the exposition is
actually outside. And now we have this
pouring down animation. The coffee is brewing, pouring down, we have this
wave. Now, that's good. And after we have
this cup filled, let me just go animate this cup going outside of
exiting the scene here. So we are going to do
basically add a keyframe on all these positions
that's already animated to make sure
it's not moving. So we're going to add a keyframe over here
on all the properties. And then let's go forward First of all, I want it to come up. So let's go for
maybe ten frames. So let's do ten and
then use the position. And now you see I
just need to parent my coffee fill to the cup,
so it's moving with it. So before we do that, let
me just go to my fill. I need to and also
this cup inside. I'll just basically
select all three layers, go to the parenting link, and then parent the cup. So all three layers are
going with the cup. And now if I go for ten frames, if I move in wide position, it should already
move up. That's good. But I need to cut my coffee pour here because although it's
already stopped pouring, we still have those
graphic left in the background before
it was covered. So I need to cut the layer here, make sure it's not showing up. And then for the drip, let me also cut the drip here. So go select the three layer. Let me delete this one here. So let me cut this one layer, cut this layer so that
everything is cut off. I'm gonna have one drip here, and then the drip layer is cut off so that it's not
showing behind the cup. Now we have this cup.
We want it to move up. And then for the exposition, let me make a key frame here, and then let's go
for maybe 15 frames, one, two, three, four, five. Let's try 15 or 20 might work
as well, but let's try 15. So I just want this cup
to exit the scene here. Let me go over here. It's going to exit the scene, but before it exits the scene, I want the rotation to
rotate back a little bit, and then when it's exiting, I want it to rotate forward. So it's going to go
back a tiny bit, almost like an
anticipation like this. And then it's going to go. When it's moving out,
it's going to go forward leaning forward like this,
slightly leaning forward. So we have this cup coming in with an angle and
then leaning forward. So let's go inside
the graph editor to adjust the graph
a little bit. Let me go inside my value graph. So it's this part, the last
part that we're adjusting. At the first two key frame, the position is not moving much. So if I want, I can still add maybe two frame anticipation
before it moves away. So let me just add two
frame anticipation here. That's too much.
I need to zoom it really close because
this movement right now, the distance is very short. So let me just move it slightly. I need to zoom really close. I'm using Z on the keyboard
to keep zooming in and then have this cup coming
slightly to the right. Have an anticipation
and then drag these two handles out a bit
more to form an S curve here. We have anticipation there, and then let's go
fifth graph to view. I'm going to just
drag this thing here. Have an S curve when it's
exiting. That's good. And then now I just
need to adjust my rotation still in the value graph,
fifth graph to view. Give it some energy
form an S curve here. So now I just need to
adjust my Y position. For the Y position, I just need to give you some easing
when it's coming up. This one doesn't have because it's really gentle movements. I just wanted to have
a bit more easing. Let's try a bit
more easing here. You can still add
anticipation overshoot, but I think the movement is too small, it
doesn't do much. So I think that's already good.
8. Wind & Background: There's a couple of
things that I want to fix before we move forward. I think when this
plant is coming in, it's cutting in, so that
doesn't look very natural. I want to fix this
plant animation here. Let's go to this plant one. Let me zoom in here.
And you see there's a cut when this coffee
machine is animating on. Let's go to the Effects Control. I think I can just fix the starting point of
the bended effect. Let me just click on the
starting position and then move back a
little bit more. So that the starting of the plant is actually
not on the layer, it's a little bit further
away from the layer. And that's when we can
fix the plant coming in, it doesn't cut in anymore. And let me fix the
other plant as well. Go to the bended defect, and then click on
the star position, move the star position
back a bit more here. So now you can see
when they're waving, they're actually just
waving naturally behind the coffee machine instead of cutting
into the scene. Yeah, I like that. That
looks pretty natural. The next thing I want to animate is stars over here
in the background. Let's go animate the stars here. First, I'll just add in the position animation,
hit P on the keyboard. I want to start to move in maybe just before the coffee
machine settles. So let's hit the keyframe
on the position, go forward ten frames, and then hit the keyframe again. So this is going to be
the final position. The first set of keyframe, I'll move the wide
position up so we have this thing coming
down. That's good. And then let's go easy
ease the keyframe, go to the graph editor, fit the graph to view, and let me just
pull these handles here to have extreme easing. One is coming in. That's good. I can cut these two
layers here and then stagger the animation
a little bit so that they're not moving
in at the same time. I like the gentle movement. However, we still need
some rotation animation. So let's go to hit Shift R to pull up the
rotation on both layers. For the rotation, I just want
to add a simple expression. Hold down option
and then click on the Stopwatch time times 100. So that's going to be the
simple expression to have the rotation, keep rotating. But we see what it looks like. I just want to move them back
a bit more so that we can tie this animation with
the coffee machine better. So just before the copy
machine rests in position, I'll introduce the star here. And then the next
thing, I want to add some wind blowing in the
background to do the wind, we can actually draw
a motion path and use the trim path
effect to animate that. Let me go to my
pen tool and then I'll draw a motion path here, not a motion path,
but a shape layer or a line here,
something like this. I like this shape here. I'll just go to the fill, turn off the fill, and then
the stroke can be 2.2 pixels. It should be okay. And then
let me draw another one here. Right now it's on the
top of the layer stack. Let me draw another one here. I want to have a
little bit overlap. And then this when here, I'll have a small loop, just a smaller loop than
the first layer here. That should be okay. I can
make this loop even smaller, and maybe the starting position is higher than the first one. And then let me
draw a third one. So this one is just basically
going to go like this. It doesn't have a
loop, and then it will just be like a linear line here. Let me name this one win one, and then name this one
win two, win three. Okay, let's go to addi
tree pass effect. Good. And then for the wind, I wanted to animate on while this coffee
machine is resting as well. So I'll push the three layers around this point
here in the timeline, and then I'll just start
animating on the trend path. Let's turn off the first two. So for the first one, we can just animate the
ending position, right, to get the
animation we want. So let's get started
at the beginning. Everything will be
zero. And then at the end 20 frames forward, the end percentage
is going to be 100%. And then the start
is going to be 100%. Then let's add a
middle part here. So the middle will be 50. Let me just add a keyframe. So it's going to
go from both zero to both 50 to both 100. And then let's go to
the graph editor. I need to manipulate
the graph a little bit. Let me go to the value graph. And then for the wind, I actually want it to come
in very slowly and then easing in the middle of
around the 50% mark. So I'll just drag this
handle here out a bit more. I don't want to be total flat, so I'll just click
on this button to Adobe and then make
it flat first, but then change it to an angle
so that we have some kind of movement without being
flat in the middle there. I think that should look fine. And then I'll have the curve on both end to slightly
speed up like this. So this is going to be the
curve that I'm looking for. Let's see if that makes sense. Before we preview, I need to
change the ending keyframes, move them forward to stack them. So something like this, so we can offset the keyframe like this. It feels too fast. So I think I need more timing. Let me just select all the
keyframe, hold down option, and then dig them to
space up the keyframes, move the end keyframe
forward a little bit more. Let's see if that
makes sense here. It's pretty gentle. It's pretty slow. It might be too slow. So we're just adjusting the timing of these
keyframes to make the wind blow at the
speed that we want. I think this should work now. Yeah, I like that. So
that's looking good. I'm just going to copy the
keyframe and then paste it onto the second and
third wind here, paste it in, hit you on the keyboard to
show the keyframe. They have exactly
the same keyframe. However, I don't want them
to come up at the same time, so they will come
up one at a time, do some offset for the layers. Something like that,
I think that works. I would just need to move these winds behind
the coffee machine. Let's do that. Let's preview. Make sure we're
not interacting or overlapping the stars
with the wind here. That's going to
create some kind of messy look for the overlap, so that doesn't look very well. I either need to
move the position of the star or just change
the path of the wind. Let me just move the position of the star for now to be easy. I'll just move it on the side, so it's not overlapping
with my star here. And over here, the second one, I also need to move
the second star here. Just move it over here, push it up a bit, so it's not overlapping with my star when
the wind is blowing. So that's the wind animation. And the next thing we're
going to work on is the final part of the animation before we
start to stylize it, which is a full three D
on the coffee machine.
9. Coffee Machine Faux 3d Turning: M right now we already have a shadow area
on the coffee machine. So I just want this coffee
machine to come in and then turn on one side to reveal this shadow area
on the coffee machine. So right now, at the beginning, I want it to come
in facing front, and then it's going
to turn on the side. So to do that, we need
to animate in past. Let me just go back to
my coffee machine here. This is my coffee
machine animation. Right now, you can see,
it's a illustrator layer. So before we do the animation, we need to change it to ship
layer so that we can access the path property and
animate the vertex points. To make the illustrator
layer into shape layer, right click, go to create and then create shapes
from vector layers. Now we have a shape layer, and then it's turned off my illustrator
layers duplicating a shape layer on top of it. Now, I don't need this
illustrator layer anymore, so let's go to the shape layer. If I click on let's
drop down menu, you can see there's
a ton of group, and each group is
actually one of the shape that represent a portion
of the coffee machine. So for now, we just
need to animate the path property to manipulate the path and make f3d animation. Let me click on this
Coffee hotline, and then let's search
the path property here. Now it's going to reveal
all the path property. Let me go to 0 seconds. I think, first of
all, let me go to the end position when the
coffee machine settles. So over here, this is going
to be my final position. I need to set a key frame
for my final position. Let's go just add a keyframe on all the path property
inside all the groups. And in order to show all the keyframes or the
timeline to see better, I'm going to hold down
Tota key on the keyboard, which is a key on
the left hand side of number one, toda key. And this way I can
enlarge my timeline, and this way, I can
easily just click on these keyframes to add
keyframe. You see? And after I'm done,
I'm just going to click on the
toda key again to return to my normal
layout of After Effects. This is going to be
the final position. And then right when the
coffee machine come in, maybe around here, I
wanted to face forward. So in order to face forward, let me go zoom in here. I basically need to manipulate these vertex points to have this coffee machine
face forward. Let's click on this path here. You can see I can access
all these vertex points. And then if I click
on this point, I'm going to direct this
point to the side here, and you can see I'm
actually changing my artwork to have
these points being manipulated and to have
this face forward. Like this. I just
need to go really deep inside and make sure I'm dragging all the vertex
points, the correct one. So that we have the coffee
machine facing front. And after I'm
changing the artwork, you can see there's keyframes
automatically added. If I hit the tota key again, some of these path has been adjusted and
then there's keyframe automatically updated
to correspond the position of the coffee
machine facing forward. And that's the correct position. However, it doesn't
really make sense if we have the coffee machine
facing forward. All these elements
are on the side. So I need to also move these elements to
be more centered. Let's go inside here and
then hit on the path. Any path is going to activate all the
vertex point for us. So I need to move these circles, different elements
so that we have more of a symmetrical design here. To convey that our coffee machine is
actually facing forward. So in this case,
for these points, I'll just strike all
these points and then move them in the center. And then this single point here, I might just need to move
it back here. That's good. And these three points
here or these points here, move it in the center so
that it's more symmetrical. Nice. So everything is centered. We have a coffee
machine facing forward, and the keyframe is automatically added while I'm
just dragging the position, so you can see there's
more keyframes added basically to represent
the new position of all these different elements, facing forward and also being symmetrical in the
coffee machine. One is facing forward. So those are the key
frames that we need. Let me just select
all the keyframes. Before I do the easing, let's see the animation now. It's. We basically have this coffee machine turning on one side with all that
keyframe that we just added. That's pretty cool. And
then let's hit Tota key, select all the keyframes. And hey, F nine for eases, and you can see
right now some of these shape or path layers doesn't have the first keyframe. That doesn't matter because
it just means that they're not related to any of
these three D animation, the full three D animation
that we're doing. So these are actually
the path that's controlling different parts
of the coffee machine. Even though we don't
have any keyframes, it doesn't affect our
three D animation, right? I think it might be
just cleaner if I delete all these keyframes
now because they're not related to my animation
for the three D turning. So we might as well
just lead all these to make the keyframes cleaner. Now we only saved all the keyframe that's
affecting our three D animation. Select all the keyframes,
go to the graph editor, and then fit the graph
to view is coming in, so I would just do
extreme easing to the left like this,
and that should do it. Let me go back to my preview
and see the animation here. I think the turn is too fast, so I need to make
the turn slower. Let me hit my toda key again, and then I want to access
my keyframes here. The turning is too fast. So basically, I need to move all these key frames forward. So maybe keep it around
2.5 second or something. Let's see if that works.
So I want the turning still happen after the
coffee machine lands. Let's see if that
makes sense here. Yeah, I think it
looks better now, but I think what I want
is even make it into around three second to give it more time so that
it's more obvious. Yeah, I think that
looks better now. And the problem right now
is the handle is broken. Let's go to see
where the handle is. Right now, the handle
is still parented to my old coffee machine
Illustrator layer. I need to be parented
to the outline layer, so I need to go to
the final position where everything lands here. This is where everything
lands before it goes moving. I want this handle to be
parented to my layer 16, which is a coffee
machine outline. Now the front here, I'm going to go to the handle
it you on the keyboard. We're animating the path of the handle so that
at the beginning, when the coffee machine
is turning around here, I want the path of this
handle to be connected to my coffee machine
here, maybe like this. And if we do this, let me go to the graph editor to do the same easing as my coffee machine when it's coming in, extreme
easing like this. Now, if we play the
animation here, We'll have a turning effect with the handle turning with
the coffee machine here. We're also animating
the path property of the handle so that
it's turning as well. Just the same effect as we animated the turning of
the coffee machine here. That's a nice turn on the
handle. You see that? And then when
everything settles, it will just come up to the front of the camera
to start brewing. Yeah, I like that
turning of the handle. Looks super subtle, super nice. That's the full three
D turning animation for the coffee machine.
10. Table Faux 3d Animation: Since we already have a
full three D turning, I also want to add
some extra stuff. Right now, we don't
have any platform. The platform, it's actually just abstract line here to
convey a floor or ground. However, I want to add a tabletop so that we can
animate the table to create a parallax effect to
kind of give it more of a three D camera moving feeling without
adding a camera. So let's start doing that. For the table, let's go
create a rectangle here. So let's say if I
draw a rectangle like this and then I'll
delete the stroke, change the fill color to a darker color on the
coffee machine here. And maybe let's try to push it back behind
the coffee machine first. I think all the colors are blending, which is
not what I want, so I need to make this color lighter. Yeah,
that looks better. And this one is going
to be called table top. For the tabletop, I want to animate
the scale property and the position property. And then for the scale, I want to unlink the X and Y scale. So let me just click
on the keyframes here. And at the beginning, I want
this table to be down there. And then, first
of all, I need to remove this ground here, the line there, just
to make sure we're not confused by
our platform here. We have a tabletop.
At the beginning, we'll have it down there, and then the scale will
be just maybe bigger. Let me just move my anchor
point to the top point of my tabletop and the I can
make this table larger, and then let's go
forward maybe 1 second. And at this second, I'll
move the position up here. And then at the same
time, I want to scale the table down so that
we can turn the table. Almost like a turning
of the table like this. So we have an animation
similar to this here. And for the turning, I
actually want the turning to happen maybe slower. So let's move the
second keyframe of the scale property forward
to maybe two second here. Let's see if the
turning is slower. Like this, we're going
to create a fun effect. So let's see this
is our keyframe. Let's go easy ease it.
Go to the graph editor. Let's adjust the position first. For the position, I forget
to separate dimensions. So let me separate dimension for the position so that I
don't need the position. I can work with
value graph better for the position.
If we easy ease it. It's coming in, so I just need an extreme
easing like this. So it's easing in like this. And then for the
scale, same thing. For the scale, I did
unlink the X and Y scale, so I need to go
to my speed graph now to do extreme easing to
the left when it's coming in. Everything that's coming in is going to be just extreme easing, everything pushing to
the left, like this. And let's see if
that makes sense. I feel like the position changes is not as natural
as what I like, so I need to move this
keyframe further down to make sure we have
a gentle easing here. And then at the beginning
it's moving too fast. So I think, what if I have this wide position
just complete outside? Let's see if that makes sense. Maybe that looks better now. So we have the table
coming up and turning, and you can see it better after I add an edge of the table. So let me just go at
an edge for the table. Let me draw another
shape here and then change this color to
a darker brown color here. Now we have an
edge on the table, so I can just still
make it a bit smaller. Just want to make
the table thinner, and then this is going
to be the table edge. Let me just push this
layer all the way down here, all the way down. Just parent the table
edge to the tabletop. Here. Whenever they
are connected, just parent it so that is
moving with the tabletop. And now let's see
the animation here. You can see the table is
actually just turning, almost like a camera turn, right? That looks pretty cool. Before we move on, I
also need some leg for the table because right now there's no
support on the table. So let's draw a couple
layers for the leg. Let me just go to my
pen tool and then, draw a shape like this. This is going to be, let's say, this color here, and then
let me duplicate this layer. I'll just change the
position like this. And then I'm going to go to
at access my vertex points, make sure this is going to be the side of the table leg here. So I'll convey a three D
filling so that we have a edge. And then for the edge here, I just need to make
a darker brown color to separate the leg over there. So that's going
to be my leg one, and then let's duplicate
the two layers. Let's go to scale
property and then change everything to
negative on the scale. That's cool. And then I have this leg that's
flipped horizontally. However, I need to adjust the
position of this edge here. That's good. Now I have the leg. Let's precompose this one and call this one the table leg. Now I just need to
put this table, like underneath my tabletop. That's cool. That's going
to be the leg that we have. And then let me just part this leg to the
tabletop as well. So when it's moving, it's actually just
lifting up the leg. That's looking super cool. We have the tabletop, the leg, and then almost like
a camera move to have everything moving
in a three D space gently. That's pretty cool. And now I just want to add
a texture on my table. So let's go to my project. I already have a wooden
texture downloaded. So it looks something like this. If I drag it inside
the composition and make it bigger, this
is what it looks like. Super cool. And then
let me link the scale. I need to shrink it
down in the Y scale so that we can convey a
perspective on this thing here, something like this, it
can give us a perspective. And after we have
the size we need, we just part it to the tabletop. First of all, and
then we need to use the tabletop as the
alpha met as well. And then we also need to change the blending mode
maybe to a multiply. Once we change into multiply, we still need to turn
on the tabletop because it's automatically turning
off our layers here. So I'm going to turn it
on and then let's change the opacity to 35. So we have a very subtle
texture going on on my table. Let's see if that
makes sense here. It looks pretty cool. Let's see. We have a
table that's turning. Before we move on,
I just want to fix this tabletop here because you see when the coffee
machine come in, it's actually floating in the air instead of
sitting on the table. So I need to sync these two objects better
when they come in. Let's see how I can
adjust the table first. Let me go to my tabletop here. You on the keyboard to
show the keyframes. So I might need this
wide position to come up faster if I drag this keyframe
and push it backward. At the beginning, I probably need to have this
table come up earlier, so I need to just push this whole layer back
so that we're cutting the fronts here to
make sure my table is already in the scene before
the coffee machine come up, and then I'll direct
the key frame back and see if that works. Yeah, I think that looks better. Next thing I want to
add a camera zooming out motion without
using a camera. So what I need to do is go to
layer and then create new, go to null object. I'll use the null object to shrinking the size
of everything in my composition to mimic a camera pulling
away from the scene. Now, I just need to parent
everything that's not having a parent currently on the
layer to my null object. So I'm trying to parent this one that doesn't
have a parent yet, and then all these layers
that doesn't have a parent, I'll select them by
holding down Command. And the only thing I'm not
selecting is a background. So I'm selecting all these
parent it to the null object. So now I can use a
null object to control the scale of everything in
my scene here, like this. That's cool. And then let's
do an animation over here. At the beginning,
let's go with 110%, add a keyframe at the beginning, and then go forward
maybe two second, change it to 85%. And then for the
rest of the time, it'll just slowly zooming out. So let's change it around maybe 75% or 80% at
the nine second mark. So this is going to be a
camera zooming out like this. Let's go easy to the keyframe, F nine, go to the graph
editor, set the graph to view. I want to go to my
value graph here. This is going to be my graph. As we are zooming out, I'll change this curve
like this so that we are easing into
position over here. And I also want to click on the Auto Bzier turn
it to auto bezier, make it flat at first, and
then give it an angle so that the camera move is not
stopping, is continuous. And then at the
end, I'll drag this handle out further so
that we get easing, a very extreme easing
at the end so that my camera is slowly just zooming out,
something like that. Let's see if that works.
Yeah, I like the zooming. I think it's working
pretty well now. So that's the animation we have. I think that completes the animation setup for
the scene here. And the next thing
we're going to do just to go ahead and
stylize the scene to make it more realistic with lighting shadows
and cast shadows.
11. Scene Stylization: Next thing, let's
start stylizing the scene so that it
doesn't look so flat. First of all, let me talk about some essential principles here. Here you can see
we have a sphere. If you want to make
things look realistic, we want to introduce some
highlight and shadow, and then cast shadow as
being cast onto a surface. So if we put it really simply, all we need is to introduce
a bit of highlight on one end and then a
bit of shadow on the other end and then
maybe do on cast shadow. In this case, we
need to make sure we know where the light
source is coming from. So in this image here, we can see that the
light source is coming from the left top corner. So it's highlighting
the left part of the sphere
completely in white. And then we have a
gradual gradient shadow that's going on
on the side here. Although in terms of drawing or in terms of
making things realistic, there's a lot more to just simply the highlight
shadow and cast shadow. There's a lot more to
that, but we don't want to go too much into
the details today. For now, I will just use these three different layers
the highlight shadow and the cast shadow to stylize our scene and make it more realistic instead
of being so flat. So let's look at
how we can apply those lights and shadows
inside our composition. First of all, before I do
the lights and shadows, I want to establish some highlight and
shadow within the scene. So first thing I want to do
is go down to my background. I want to introduce a grading
color on my background. So let's go to the
effects and presets, search for grading RM, and then for the gradient RM, I'll sample this original color here and then I'll
sample this color again. Put the start on the maybe left bottom corner and then put the end ram baby
on the top right corner. However, I want to change
this color to be a little bit darker so that we have a slight variation in the background. See
something like this. So we have a slight
gradient in the background. And then what I need
to do is let me go to my layers new and then
create a solid layer. For this one, I'll change it
to around a orange color, a very light orange color,
something like this. And then we're going to
call this one light source. Okay. And now I want to
go to my lips stool to draw a circle on the left
top corner over here, serving as a less
source of my sin here. And for the mask, I'm going
to change the mask feather to a bigger percentage over here so that we have
a feathered edge. That's good. And
then let's change the blending mode to add. It's going to make this side
of the sin really right. And it's overexposed. So I need to go
to T for opacity, change down the opacity number. So let's say if we
change it to around 15%, you can see here we are introducing some
light on this side, as if there's a sun just shining on the left
inside of our scene. That's looking pretty cool.
I'll just move this one up a bit more and then make
sure we don't have this edge. Maybe I can drag this mask up so that we are feathering
out the edge over there. Feel like the percentage of the transparency
is a bit low here. Let me change it to 30%.
Yeah, something like that. And then I want to go to
my mask feather again just to make it
bigger so that we have more of a gentle glow here. So that looks pretty cool. Now, I'll just do a shadow
for the entire scene. Same thing, go to new
and then add a solid. For this one, I might want to change it to a darker red color, something like this and
call this one shadow. And for the shadow,
I'll go to draw a mask on the bottom right
corner over here like this, go to the mask feather, change it to maybe
around 800%, 800 pixels. And now we have this area where we have a
shadow that's darker, making the scene on
the right darker. We need to go to
the blending mode to change it to overlay. So now we have this part
that's serving as a shadow. We also want to
manipulate the opacity to tone it down so that
it's not too dark. Let's say if we
change it to 50%, and you can already see we
have more depth in our scene now because we have
this light sources coming from this left side, and then we have a dark shadow that's going on in
the right hand side. So now the scene setup is good. Next thing, I just want to add some grading color maybe to this table because this table right now is looking
pretty flat. So let me go to
my tabletop here. I just want to add grading
ramp to the tabletop. Let's change the color to this original color of the
table that it has right now. And then for the end color, simple this darker
color over here. And now I just want to have a slight gradient starting
from the closer to the camera, going away so that it's darker, when it's closer to the camera, and then it's lighter, when it's actually
away from the camera. So we have a gradual
gradient like this. Maybe I can change this
light color a bit darker. Something like that,
and then change this darker color even darker so that we have
this gradient that's going on as if it's actually receiving some
light from the light source, and then we have a
slight variation on the tabletop so that
it doesn't look so flat. Now I'm losing some of the
details on the texture. So I need to go to my texture, go to and then change the opacity to a higher
number, let's say, 60%. I want to be able to
see my texture better. I think that looks
pretty cool here. I like this gradient
color on the table here. And then for the scene setup, one more thing I want to do is let's go to layer new
and then add a solid, call this one bottom gradient. For this one, I want to
change it to actually maybe a darker red,
really dark like this. And then I'll just draw a rectangle mask at the bottom
edge over here like this. And then let's go
to the feather, make it maybe 200 pixels so that we're feathering
out the mask over there, just a slight gradient in the
bottom so that we can have some separation between the sky and the ground over
here. So this is before. It looks pretty flat,
pretty man made. And then once we have a gradient
in the bottom over here, I can even tone
down the opacity, change it to maybe 35% or 55%. I can maybe change this color to a completely black color. That might also work as well. Just to have some gradient
in the bottom edge over there to add some dimension
to the scene overall, I think that's looking
pretty cool now. And that's a complete
scene setup. We are adding a light source. We're adding a shadow area
on the right hand side, and then we're adding a
bottom gradient over here. And the only other
thing I did is to add a grading color
on the tabletop. So that's for the scene setup.
12. Elements Stylization: Now, we'll use this image as a guide to make
sure we're adding some highlight and shadow and some cast shadow to the
object in our scene here. First, let's go to
this croissant here. I mean, zoom in. We have
this croissant here. I'll just duplicate the
layer and then call this one the
croissant highlights. And then for the highlights, let's go to use Pinto to draw area that I want
to use as a highlight. Make sure we have the
croissant highlights selected. I'll just draw this area here. That's going to
be our highlight. And for the highlight, I need
to use a different color. Let's go to find
our fill effect. Double click, and then we can sample this light
color over here. That's going to be
our highlights. Let's go to the mask
property to change the feather to a bigger number, maybe 50 pixels so that we are blending the highlight
into our object. And then for the
highlight, normally, we're using a different
blending mode. Let's go with an ad mode. And we need to go
to the opacity, change the opacity down,
let's say, to 40%. Now, we have a pretty good looking highlight
that's going on. Maybe I need to change this mask a little
bit more so that the highlight is coming more
from the top left corner. So I'll just strike
this mask a little bit to have an
highlight in this area. That's looking pretty cool.
That's the highlight. And then let's go to duplicate this
croissant layer again. This one called this one shadow. And let's go to
the fill effects. Let's go click on the
dark brown color. And for the shadow, I'll
use pinto to draw a area, maybe this area on the right hanside corner like
this to form a shadow area. And for the mask, I also need
to go to the mask inside, change the feather to
a bigger percentage, maybe to like 40
pixels or something. That looks pretty cool.
And then for the shadow, we normally go with overlay, so let's try overlay,
if that works. That's too bright. Maybe.
Let's try multiply. I think multiply might work. So for this part, I'll
just also go to opacity, change it down to 70%. Now we have this shadow area
going on for the croissant here. That's looking
pretty cool. Now we have the croissant
shadow and highlight. Let's go ahead and work on the
other object in the scene. We can do the coffee
machine next. So here is the coffee
machine outline layer. I want to add a shadow first, so let's duplicate
the layer here. Let's call this one
coffee machine shadow. Need to go ahead and add a
mask on top of this layer. Let's go to my pen tool. Right now, you can
see this layer is a shape layer instead
of a illustrator layer. So in order to add a
mask on a shape layer, I need to click on this
mask button to create mask. Otherwise, if I don't
click on this mask, I'll create another shape
inside a shape layer. So just make sure you
click on create mask. Now I can draw a mask. Let's assume out here, let me just draw a mask here on this right side here
to form a shadow. And this area could
be my shadow area. Let's go at a fill effect here. And now you can
see my shadow area is filled in as red color. I can change it to a
darker brown here. Let's sample the color here, and then let's go to the
blending mode for the shadow. Let's try a overlay. Or maybe multiply. I
think in this case, multiply can work better. Let's go tone down
the opacity here, and then we also need to
go to the mask and change the feather of the mask to make the edge a bit
more smooth here. So you can see before and
after we add in the shadow. And we also need to
extend this layer all the way out because originally, we cut the layer over here, but since this one is a shadow, so we need to extend it all the way out
and then put it in the front of all the other coffee layers,
coffee machine layers. So that is always in the front. And then let's go create
a highlight again. So let's go to my outline, duplicate, and then put
it on top of the shadow. Call this one coffee
machine highlight. Then I'll extend the
layer all the way out. That's good. This is going
to be my highlights. And let's also draw a mask. Here, go to the penol, hit on this create mask here, and let me draw area on this left top corner
here to create a mask. And then for this one, let's
add in the fill effect. We're going to change
the color to more of a brighter yellow color
here like this one. And then let's go
inside the mask to turn up the
feather setting here, maybe change it to
100 pixels here. And then for the highlights,
let's change it to add mode. It's too bright. We can still
tone down with the opacity. Let's change it to 20%. Let's see if that works. Yeah, I think it looks pretty nice. Is adding some highlights to coffee machine,
as you can see here. This is my highlight
before and after. And then this is my
shadow before and after. Another thing I might want to do is right now you
can see the handle is on top of my coffee
machine highlight. So I might want to just drop this coffee machine highlight
on top of the handle. So that the handle
over here it's highlighted as well.
It makes more sense. If the light is coming
in this direction, the handle is going to
be highlighted as well. So that looks pretty
cool. I like that. Let's go to the cup
and stylize the cup. This is my cup layer here. Let me duplicate my
cup layer and then call this one cup shadow. For the shadow, I'll draw a
mask with my pen tool here. Just draw a mask on this right hand side
with a curve here, and then let's fill it in, and we're going to change
it to a darker brown color. Let's go to the feather setting, turn up the feather
a little bit. And then we are going to change the blending
mode to multiply, and then I need to
tone down the opacity. However, I still need to make sure this layer is on top of the cup inside and the
coffee fill and all that. So my shadow should be
just on top of everything. I'll move my shadow
layer on top of all the layers that's
inside the cup, and then I'll tone down
the opacity even more. Just give a slight shadow here. Maybe 50% will do. And then for the
color of the coffee, I want to adjust that as well because right now it
feels pretty faded. I want to make the
coffee darker. So this is a coffee
fill in the front here. Let me change this fill
color to make it darker. I'm thinking maybe just
drag it down like this. And then the back inside, like this color here, I want
to make it darker, as well. So let's go sample maybe this color here.
That looks pretty good. And then we have the cup
inside that's above it. For the cup inside, let's change the blending
mode to soft light so that we have more of a clear area to show the coffee
inside the cup. And since I want
to convey this cup is more of a glass
cup over here. So I want to add
some highlight over here on the copying
side. So let's do that. What I need to do is I'll
duplicate the copying side, and then I'll draw a
mask on top of it. They'll just go to my pen tool and then go to create mask. Over here, I'll just draw a
highlight area like this. And then this could be just
the highlight on my cup. And you can see, we're creating
this reflection going on on the glass surface of the cup to make
it more realistic. Now, let's change
this reflection to a different blending mode. Let's try add so that it
can be more noticeable so that we have a glass
reflection going on this and if we want
to make it softer, we might be able to go inside the mask here and then change the feather
setting as well. Maybe let's change
it to a two pixels, just to feather it a little bit so that the edge
is not that sharp. I think that looks pretty
cool. I like that. So that's going to be the
reflection on the cup, and then we added the
shadow on the cup as well. If we zoom out and play
the whole animation, let's see what we have now. It's already looking pretty
cool, I think, overall.
13. Cast Shadows: Now, the last thing
we need to do is to add in the cast shadow. So let's work on the cast
shadow for the croissant first. Let me navigate to
the croissant layer here. This is my croissant. Let me duplicate the
croissant layer called the Swan croissant cast shadow. So we'll have a shadow that's
casting on the surface of the table to
work on the shadow, we need an effect
called CC slant. So just search for
slant here, add it in. And then if we set
the floor here on the bottom of the croissant, we can actually just create a height that's a
negative position, and then we can slant it
a little bit like this. And this way, we can
create a shadow. And after we have the
shape of the shadow, let's just add in the fill
effect to change the color. We can change the color
to a darker brown color. Next, let's change
the blending mode to a overlay. That
looks pretty cool. I like that, and then we can maybe blur the edges of
the shadow a little bit. Let's add in a fast
box blur effects. Let's go with a
radius as two points. That's pretty cool. I like that. And the next thing
we need to make sure is that the shadow is only casting on the table instead
of going over the table. So we need to make sure we
set alpha mat for the shadow. We can go to the
track mat and select the tabletop as our alpha mat, and now it's only casting
on top of the table. And it's looking
pretty cool right now. However, we got a problem. If I play the
animation right now, you can see the problem we
have is we are zooming out of the scene here so that right now we already set the
floor for the CC slant. However, the floor of the
CC slant is not changing, but the position of my
croissant is actually changing. So you can see, we're now able to link this floor
to the croissant, so we need to use an
expression to link the floor position to the bottom edge of the croissants always using this relative position
of the croissant. That's how we can
get accurate shadow. So to do that, we need to go to layer and then add
a new null object. And then for this
one, we're going to call this floor null. For the floor null, I
need to position it at the bottom of the
croissant layer here, and then I need the floor null
to go with the croissant. So in this case, once I pair the floor
null to the croissant, you can see my null object
is always going to tie together with the bottom of my croissant wherever this
croissant layer is moving. So first, we need to get that. And then we need to go to
my cache shadow layer. We need to add a simple
expression on the floor here. That's hold down option, click on the stopwatch
on the floor. And over here, we
need to go to use this Pick Whip button to pick whip the layer of
the floor null here. We need to take this
floor null layer, and then at a dot two comp. You can see it's already
showing up here, and then brackets,
square brackets, 0.00. So over here, it
actually just means that we're going to get
the absolute position of the floor null within the
whole composition wherever it moves and tie that
absolute position to our floor coordinates so that our floor coordinates is always the absolute position of the
floor null within the scene. And now after I do
that expression, you can see my shadow
layer is working well now. If I just scrub
through the timeline, you can see it's actually tied together with my
croissant layer. And that's exactly
what I need here. So that's looking pretty cool. We're going to do
the same thing for the coffee machine here. Let's go to my coffee
machine layer. And then let's duplicate
the coffee machine. Call this one cast shadow. And then we need to move it on top of the other coffee machine, extend the layer
all the way out. This is going to
be my cast shadow. I'll use a CC slant effect here. And then let me just
do the shadow first. Let's set the floor at
the bottom of the layer, and then let's strike the height to a negative degree here. And then let's slant it a
little bit. That's good. Let's go at a full effect and then change the color
to a darker brown here, change the blending mode to
overlay here so that we have some interaction between
the croissant shadow and the coffee machine shadow. That looks pretty cool. Let's do a fast box blur to
blur out the edges. Let's do two point here. Maybe four points.
Okay, that's cool. And then I need to
add a alpha mat. So let's go to the track mat. Make sure we select the
tabletop as the alpha mat so that we're not extending over the shadow is not
extending over the table. However, we still
have that issue. If I scrub through the timeline, you can see the shadow
is moving around. It's not following
the exact position. So we need to do that
trick again here. Let's go to layer
new null object, and this one is going to be
called Coffee Machine floor. That's good. Make sure we drag this null object at the bottom of the
coffee machine here. And then we pairing the floor to the coffee machine
outline, this one here. And the problem we now have is that for this outline layer, it's only working for
the first 4 seconds, we actually need another layer. To get this position
of the coffee machine throughout the 9
seconds animation. So looking at this now, we can actually use this coffee machine shadow layer
because this layer is having the same exact
position of my coffee machine, and it has the whole
duration of the animation. So let's go to my coffee machine floor and part this to the shadow layer
here. That's good. And then you can see,
if I scrub through it, it's always going
with the bottom edge of the coffee machine wherever
the coffee machine goes. So that's exactly what I want. And now I just need to
add in the expression. Let's go to the cache shadow. Let's hold down option and
then click on the floor here. We need to use a pick whip
here to drag to link it to the coffee machine floor and
then add in dot two comp, bracket, square bracket 00. So it's getting the
exact position, the absolute position of
the coffee machine floor. Within the whole scene to add it to the floor
of my CC slant, so that's always slanting based on the floor at the bottom of the coffee machine over here. Now, if I scrape
through the timeline, I think it's looking
pretty cool, and somehow this
track mat is missing, so I need to go back to link the tabletop
as my track mat. And now, another thing I want to do is when it first come in, I actually wanted to animate a little bit for the shadow
to move a little bit. So I just want to animate
the slant of the shadow, so it'll go like this. It's going to move a little bit. So at the beginning, let's
set a key frame over here. Maybe it's going to become
this over here in 2 seconds. And at the beginning, I want it to be the other way,
like, on the right. So maybe like 160 or
150 at the beginning. Sorry. So it's going to
be 150 at the beginning, and then it's going to slightly move this way here like this. So we have a moving
of the shadow here as the coffee
machine is turning, and the shadow is moving.
That's looking pretty cool. Now let me just as ease it. Go to graph editor, drag the handle down so that we have an easing curve like this. Maybe it's moving too
much, change it to 100. So we're going to change the
beginning value to 100 for the shadow so that
we don't have that much of a noticeable
turn of the shadow. That's a bit distracting. I just wanted to turn slightly while the
coffee machine is turning. That looks pretty cool. Let's zoom out and
see what we have now. I like that, but I feel
like the edge of the table is missing its color here. It's pretty faded,
so I need to go to my table edge here and then change the
color to a darker brown. Or I can just do a
gradient ramp here. Let's do a gradient ramp. For the gradient
ramp, we can sample the color here and
then sample it again. Let's do it darker here. And then let's turn it on, maybe bottom is lighter and then the edge on
the top is darker. Maybe it's too dark. Let's
tone it back a little bit. Okay, I like that.
That's pretty cool. We added in the shadow, the highlights, and the cast shadow for these
objects in the scene. I think it is looking
pretty cool overall.
14. Final Touches: M And the next thing we just need to do some
final touch up here, add some adjustment layer,
do some color correction, add in some noise, and then we can do some lens blur as well. Let's go to add a
adjustment layer. We can call this one noise, and then we can add
in noise effect. For the noise, we can just
turn the amount to maybe 15%. If I zoom in really close, you can see it's adding
in a bit of noise. Let's add in another
adjustment layer. For this one, we just
call this one colors, and then let's go add
in a curves effect. We can just slightly drag
this curve to maybe tone up the highlights a little bit and then make sure the mid tone
is still in the center here, and then I can drag the shadow up a little bit so that my
shadow is not too dark. Just based on your taste, you can actually just
color correct with the curves adjustment slightly
to make your scene better. This before and after,
just slight adjustment. We can also add in a vibrance. Here, let's see. If
we add in a vibrance, I can change the
vibrance value up. It's going to make
this yellow color highlight really vibrant. Maybe that's not what I want. Maybe I can change it to 20 instead of turning all
the way up to 100, a slight color tweak. Next, I just want to add some
imperfection to the scene. So what I want to do is
create a new solid layer, maybe change it
to a white color. That's cool. And then
turn it off for now. With the layer
selected, I'm going to use my pen tool to draw some area in this layer
to use it as a blur map. So I'm going to
draw this corner of the coffee machine and then maybe this part of
the coffee machine here, and then maybe this
little part here. Just draw some random shapes in the scene here and
maybe this area here. So that I can use
it as a blur map. So those are the four
area in my scene that I want to use
as a blur map. And then for this one, just call this one blur map. We can go ahead and create
a new adjustment layer. For this one, we'll
call this one blur, and then we're going
to use the effect called compound blur. For the compound blur, it's going to blur out
the whole scene. However, we're going
to use a blur layer, which is a blur
map, and then we're going to change it to
effects and masks. In this case, over
here, you can see, we're using this
blur map layer to blur out certain
areas in the scene. And I think right now
the blur is too much. Let's tone it down to
five. Or maybe even two. I think even two
works, maybe one. Just tone it all the way down so that we have some blurriness, some imperfection in the scene. You can see almost like a
lens blur or something, something is out of focus. So that looks pretty cool. I like the imperfection
that is looking. If we turn it off,
this is before, everything is
perfectly in focus. And then this is after we have some area that's out of focus. That makes it more realistic, more stylized.
There you have it. This is a final of
our animation. A,
15. Congrats!: Congratulations. You just
completed the class. And look at that beautiful, cozy coffee pouring animation
you brought to life. I'm so proud of you
for sticking with it, taking your time
with the process and infusing your work with
a warm personal touch. Whether you follow along step by step or added your
own creative twist, you've created something
truly special, a little moment of calm and
satisfaction in motion. Remember how we started with a simple flat illustration
and gently build it up. Layer by layer,
easing by easing, focus on feel over perfection. That's the magic
you now unlocked. These principles of
timing, spacing, anticipation, and those soft overshoots aren't
just techniques. They are tools to make
any animation feel cozy, alive, and full of personality. Thank you for joining
me on this journey. Now, if you're happy with
your final animation, I'd love for you to share it. Please upload your project
to the project section. Seeing your work will inspire
others in the community, and I'll be popping
in to give you feedback and celebrate
what you made. Please take a moment
to leave a review. Your words will help others find this class
and learn from it. Thank you again for
animating with me. I hope to see you
in my next class.
 Hongshu Guo, Motion Designer