Transcripts
1. Intro: Hi, this is Hongshu
from Motion Circles. Welcome to this complete
beginners guide on Duik Angela. I've been animating
in After Effects for ten years now and teaching
for the past five years. In that time, I' taught over
100,000 students online. In this short course, I'll be covering everything
you need to know to get started with Dui Angela for character rigging
and animation. If you ever finish a character
in Illustrator and wonder how to bring it to life in After Effects, this class is for you. You don't need any
animation experience. We will take it step by step. Over the next hour, I'll show
you how to use Duik Angela, a free After effect plugin to rig a character and get
it walking and running. We will be working with
a character that's already built
inside Illustrator, so you can just focus on the
animation side of things. The reason I really love
teaching this is because once you learn it, you
can use it forever. Any human character you design in Illustrator, an astronaut, a dancer or version of yourself, you can bring it all to life. That's what makes this
skill so exciting. It's not just one character. It's every single character you will ever make in Illustrator. We'll start by setting up
the character Illustrator, bring them into After Effects, build a bone structure,
rig the control, automate a wap cycle, fix a common knee issue, go over the inverse kinematic
versus the four kinematic, and finish with a
walk-to-run animation. For your class project, I'll be giving you a brand new
character file to work with. Or you can use one of your
own Illustrator characters. When you're done, share it
in the project gallery. I really love to see what
everyone comes up with. If that sounds fun, I love
to have you in the class. Keep watching, and I'll see
you in the first lesson.
2. Setting up Character in AI: This is our character
called Aaron. It's a very simple
character design. I don't want to make
it too complicated, but once you know how to
do the character rigging, once you know how to rig it, you can actually design
your own character. So first, I want to talk
about this character. Basically, we need
each body part separated when you're
designing character. And you can actually make this character however you like. But at the beginning, we want it to be standing straight instead
of having a pose. So when we're rigging
the character, we need to have a straight
standing character. And all the limbs, the legs and arms need to
go straight down. And then you can also give
it a side view like this. This is probably a quarter view. You can also make it maybe turn him slightly further to
the left or to the right. Even like complete a side view is okay as long as you have the two side the limbs all created and then they're going to be probably
overlapping more. In terms of this post here, we're not having
a lot of overlap. You can see inside
my layer channel, I have all the limbs separated. So once you're designing,
you can actually just keep drawing one character. And then once everything
is drawn out, you just click on that
layer and then go to release two layer sequence. And then we need to separate all the body parts
onto its own layer. We have the body parts in this illustrator file for
better demonstration. So in terms of the body, a
couple of things we need, we need the head
for sure, and then we need the neck
to be separated. So this is a neck actually
separated from the body, and then the body
parts over here. So we have the torso, which is the hue the main body part. So this is torso, and
then we have the arm, and then the arm is going to be separated to arm and forearm. And sometimes you
can also add a hand. So it's going to be
arm, forearm and hands. So this is going to be
the right arm forearm, hands, and then left
arm, forearm hands. We don't have hands in
this demonstration, but I actually added hands
in the new illustrator file. So now after the arms, we have the legs,
and then the legs, we have the thigh, and
then we have the cuff, the cuff over here,
the thigh over here, and then we have a foot. And then what you realize is when we're designing
for each body parts, we need a round joint
between each body parts. So basically, you
can see over here, all these joints here are round because when we are making these round joints once we
go back to this character, we can actually just go. So like one of the body parts, say I have the hand
and the fore ar, and then I'm going to go
to hit R on the keyboard, change the anchor
point over here, and then just rotate this one, you can see, if we
have a round joint, we are able to seamlessly rotate the parts
without any issue. So that's the main points
of having round joints. If we don't have a round joints, and if we don't have
the anchor point in the center of
the round joints, sometimes if we have the
anchor point over here, and then once we
rotate, we're going to have some breakdown of the body. So the most important thing
over here is to be able to have a round joint that's
connecting each body part. So you can see on the arm, we have three
different joints here, and then the shoulder here
is we have this one if we select the shoulder here, and then if I hit R, change anchor point over here in
the center of this joint, I can actually move
the whole arm. And you can see over here, it doesn't have a lot of issue. When I'm moving the whole arm, the shoulder is still on there. So if I don't have this one aligned with the shoulder
with a round joint, it's going to create
some issue if I, let's say, have the
anchor point over here. Some of the rotation
is going to look off because I don't
have the wrong joints and the joint is not in the center of the
correct position. Let's select the head and
the neck R on the keyboard. I'm going to put the
anchor point over here, and now I can actually just move the head so that I
can rotate the head. And over here, same
thing with the foot, let's say if I have the foot
here and then I'm hitting R, put the anchor point over here, I can rotate the foot,
something like that. So when you're
designing character, the most important thing
is to have a round joint. If I go, hit CY, I'm going to show the outline of my character design here, and you can see all these
points are around joints, and then we have the arm here, and then this joint is in
the center of the arm, and you can see over here, I have the arm that's
connecting with the forearm, and then I have the
leg joints over here. This is the leg joints,
thigh joints over here. And over here in the middle, actually have this is the
moving point of the torso. So the moving point of the torso it's at the bottom over here. So I have a torso
joints over here, and all these circles are just perfectly aligned with
the arms over here, and then we have this
perfect circle connecting the arm and the forearm and then perfect circle connect
the forearm and and, and then over here,
we have the leg, thigh and cuff connected, and then the cuff to the foot
connected with the joints. So if I just preview
this with the outline, and you can see it's a
simple character design, but it's designed
specifically to basically give you this underlying perfect
joint. That's one thing. And then I have this guide layer over here overlaid on top of it. So on this guide layer, basically, I'm
drawing a bunch of circles to align with
the drawings here. So we're going to use these
in after effects to make sure we are putting the anchor point at
the correct position. So this is the guide
layer that I have, and then each body part is
separated on its own layer. So the right hand, also need
to label these correctly. So I'm labeling these based
on the side of the character. So this is a
character right arm, so we're naming it
right hand over here, and then we have
the right forearm, we have the right arm,
we have the head, we have the torso, we have the neck, we have the right foot, we
have the right cuff. We have the right thigh here, and then we have the
left calf, left thigh, left foot, and then left hand, left forearm, and then left arm. Although you cannot
see left arm, it's behind, but we
have it in there. Once we rig it, we are able to just make it move behind that
body over there. Right now, it's not showing
because it's straight.
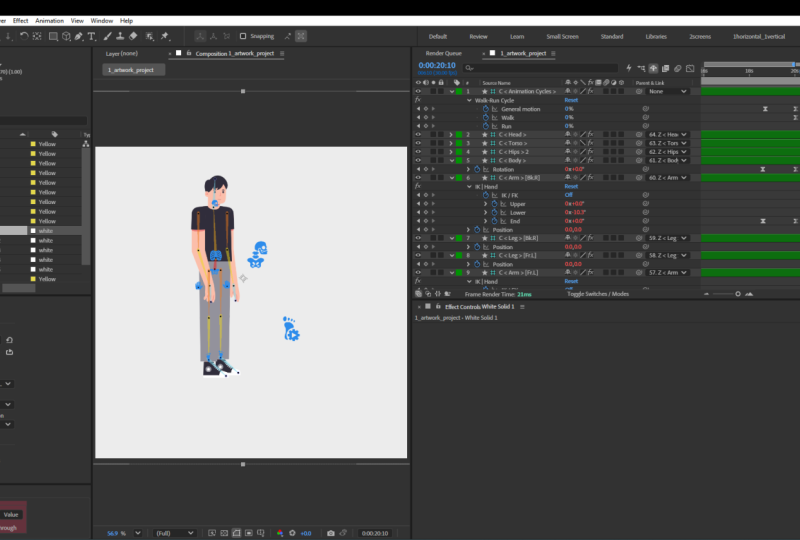
3. Import & Setup in AE: I'm going to create
19 2010 80 on, so I'm going to call
this my artwork. I'm going to give it
30 seconds duration, frame rate can be 30 frames
per second. Click Okay. And in terms of
character animation, we actually need to
modify this space a little bit because in
character animation, I'll need to see a lot of different layers because we
have so many body parts. I need to see so many different
layers in the timeline. So I actually need to put
this timeline over here to the left when I have this
green doc panel highlighted. I'm going to drop
it here so that we have our timeline on
left hand side over here. First, I'll click on This button to hide all these options. So I don't need all
these options right now. I'll just drag this one
back a little bit more. And then we have the
effects control and projects in the
middle over here. That's good. And then I don't need anything on
this side, actually. So I'm going to just drop my ease copy and effects
presets over here, move it to the right to
have them very small. So I'm going to have
this view here, so the left hand
side is my timeline. Middle is going to be my
effects control and projects, projects and effects control. And then this part is
going to be my preview, and then all the other effects align reposition anchor points, effects and presets. Everything is on this side here. So that's going to be my panel when I'm animating or
rigging a character. So now, let me just bring
the artwork inside projects. I'm going to double
click over here in the empty panel of
the Project panel. I'm going to choose composition
retain layer sizes. Make sure we're not
clicking on this sequence. It's going to mess it
up if you click on it. So just keep it retain
layer sizes, composition. Click okay. And then
I'm going to go inside. These are all the
body parts we have. So I'm going to copy
everything and then paste it onto my number
one Aaron artwork. So this is going to be
my number one artwork. The artwork layer, I
don't want to touch it, so I want to create another
one that's called bone layer. So in terms of
character rigging, it's a two, I would say, you can call it
two step process. So basically, we
need to add bones. So this character right now, think about it as a
design as a artwork. It doesn't have any bones. That's why it cannot
move. So first, we need to add bones
to the character. That's going to be the number
one process adding bones. Once we add bones, he's going to be able to move with the bones, and then we're going to rig it. So rigging character rigging
is just think about steps. First step is adding bones, and then second step is rigging. And rigging is an
automatic process. Once you have the
bones, this plug in is going to help you rig it
right away automatically. It's going to add a bunch of expression and adding
so many control layers, and then it's going
to rig automatically. So really, the only thing we
need to do is adding bones. So it's a two step process, but the second
step is automatic. So really, all you need to do is just one step, adding bones.
4. Adding Bone Structure: Now, let's create this. Go to this Aaron artwork, duplicate it Command D. I'm going to change
this one to bones. So I'm going to double
click on this Aaron bones because we're not changing
the artwork layer anymore. The artwork layer is
something that we can go back to, so we're
going to leave it there. And the second layer is
going to be Arin bones. So we're going to add
some bones to this layer. First of all, let's go open
Windows Angela, Due Angela. And this is Due
Angela. Over here. So at the beginning, you can see there's a ton of different things you
can do with this, but it's got a lot more
feature than you think, and it's actually got a lot
more feature than you need. So we actually don't
need all these. We only need a couple
clicks on this. Like I said, once you accept
the complexity of these, it's actually pretty simple. First of all, we
want to make sure go to settings over here. Need to click on this
dit setting over here. Make sure over here
is set to rookie. I think once you install, by
default, it's set to rookie. So there's different
panels over here. Rookie is going to give
you all these icons with text beside it so that
you know what that icon is. And then if you change
to a standard expert, it's going to make the
windows really small, but it's going to hide
some of the settings. Hide some of the text so that you actually don't know what's going on, what that icon means. So when we first started, we need to make sure it's rookie. I think normally, if
you just install it, it should be rookie if
you don't change it. That's good. All we need is just this second
button over here. It's looking like
a bone over here, just like a joint and a bone. This is the icon we need. If you hover over, it says bones. So we actually need this. And then we need to
create this human figure. So there's also
other ways to create different animals
because animals have different bone structure than humans and they
move differently. So we're not touching all
these different other animals. All we need is this
humanoid human structure. If I click on this, basically, have four body parts. We have the arms, legs,
the spine, and hair. Mostly, we're not using hair, so we actually only have three. We have the arms, we have the legs, and
we have the spine. That's pretty
straightforward, right? We have the arms, legs,
and the spine, so we have. And the first step, let me drop this Duik Angela
underneath here, so I'm going to just
dock it inside my panel. So the first thing
we need to do, let me just add both to this arm here,
this right arm here. So the first thing I need
to do is I need to select the so there's a guide layer over here that's
overlaying on top of it, so I need to lock the guide layer so that I
can access the arm here. I need to click on the arm here. So I'm selecting all
three arms over here. I need to move the
anchor point of each arm to the joint so
that when they're moving, they're moving based
on the anchor point. They're rotating based
on the anchor point. So to do that, let me just
click on the right ar Zoom in. I'm going to go to this pen
behind. The shortcut is Y. You can see on the Hard message. The shortcut is Y. So I'm going
to hit Y on the keyboard, select this pen behind two. And then I'm just going to drop this anchor point in the
center of the circle. It's better to be perfect, but it doesn't need
to be perfect. Like, as long as
you can see it's in the center, it should be okay. If you are a perfectionist, you can probably just
zoom it all the way in, and then another way is
if we go to guide layer, right click and then go to cre ight shapes
from vector layers, we can actually make this one a perfect circle
as a shape layer. And now, if I go to
the arms over here, I can drag this anchor point
and then hold down command snap the anchor point to the center of this shape layer because we change
it to shape layer. Once we change to
the shape layer, we can actually snap to the
center of the shape layer. I'm holding down command
on the keyboard, control on Mac, control on PC. So I'm holding down command. And then once I see that
center, I'm going to release. So I know that's
absolute center. If you want to do
absolute center, you can outline this guide
layer and then snap, but sometimes even stepping
doesn't work so well. So I'm changing to pen behind two Y and then moving this anchor point
to the center over here, I'm holding down Command. Make sure it's
stabbing. That's good. And then going to the
right hand over here. Moving this one,
holding down Command, I'm going to snap it over
here. That's the center, okay. Now, if I rotate, so I'm going to go this
rotation tool W. If I hit W, I'm going to go to
the rotation tool. See, I'm heading
down W. A rotation, I can actually just
rotate, right? So over here because
I rotate this one. It's going to rotate based on the anchor point. So
that's what we need. We need to make sure
that three parts of the right arm is rotating
based on the anchor point. So we're moving the
anchor point to the joint. That's
step number one. Moving the anchor point to the joint, very easy to understand. Now, we need to add bones. Very simple, straightforward.
Let's add some bones. To add bones, one thing
to remember is we need to select the layers from
the root to the tip. So in terms of this arm, we need to select this layer. From the root arm, which is the arm that's connected to the shoulder,
that's the root. To the forearm, I'm
holding down shift to select this forearm and
then select the right hand. So I'm holding down shift, selecting each 11 after another, going from the root to the tip. That's very important
so that the bone can grow from the
root to the tip. Number one. And then
I'm going to go to this Hmonoid structure,
click on it. And then we have an
arm structure here, but before we do that, I'm going to click on
the setting here. So for the setting, we need to make sure over here,
it says front. So this arm is
actually in the front, so that's okay.
It's a front arm. And then it's actually the
right arm of the character. So I need to click on this, change it to right arm
so that it's going to label these correctly
once it adds bones. We don't have a shoulder
here. We have an arm. We have a forearm,
we have a hand. So we have three parts that's corresponding to
the three bone structure. So I'm going to click on
again, it disappeared. So now we have the front,
we have the right. This arm is in front of the
body. It's the right arm. We have three structures. Okay. And then the only thing we need to do is hold down command
and then click on arm. Hold down command, click on arm. You don't just click on the arm because if you click on the arm, it's not going to parent
the bones to the arm. But then if you hold down
command and click on the arm, it's going to parent
the bones to the arm. So it's going to save
you some extra set. It's going to be all automatic. So I'm going to hold down
command and click on the arm. And now you see we have a bones. We have some layers over here. We have a bone that's added, and all I need to do is
just to move this tip of the bone to the tip of
the hand like this. And now, what happens is, if I go select all three and
then go to the move tool, you can see I can
move this over here, and then if I click
on this thing here, I can move this
forearm over here. If I click on this
here, I can move. Oops. If I click on the
hand, I can move the hand. So it's adding a bone
to the structure. I'm going to go back and
that's how we add a bone. It's the same process, but I'm repeating the same
process for the leg. So remember, we need to
first put the anchor point. I need to unlock the
guide layer over here. I'm locking the guide
layer. I need to put the anchor point
to the joints, right? So holding I'm using
this pen behind tool, which is why as a shortcut, I'm holding it Y on the keyboard and then move this one
to the joints over here. I'm holding on command
to snap to guide. To make sure it's
in the center, you don't have to hold down command. If it's roughly there, I
think it should be okay, but make sure you're
hitting Y to access the pen behind tool and then
put it over here like that. And for the shoes for the foot, I'm going to put it
anchor point over here. That's good. Now, I have
an anchor point, right? To these three body parts. And then we need to select it
from the roots to the tip. So the roots for the
right leg is our thigh, and then our right cuff
and then right foot. So I have three here. That's good. I'm
selecting all three, and then I'm going
to go to Honoid. I'm going to go to leg in
this time instead of arm. I'm going to click
on the options here. And for the leg, this is
actually the front leg. So it's actually in the front, so I need to click on
this one, and then it's also the right leg. It's above, it's above,
and then it's a right leg. So I'm going to do
above and right. And then we have a thigh, we
have a cuff, we have a foot. We don't have toes here,
so we don't click on toes. And then before we click on leg, we just need to
hold down command and then click on
it. Command, click. If we don't hold down command, it's not going to
paren the bones to the it's doing a lot of parenting links here
that's parenting. So it's basically parenting all these artwork to
your bone structure, and then the bone structure is going to parent each other. So once we hit Command, click on the leg, it's going to help you
save a lot of steps to parent this artwork
to the bones. So you don't need
to do it manually. Hold down command,
click on the leg, so a parent the
artwork to the bones. And now, all I need to do is, I need to move this tip of the foot to the tip of my shoe. So I need to make sure the
anchor point is kind of sitting on the tip of
the shoe over here, not this colored circle. Just make sure this
anchor point is sitting kind of on top of the
tip of shoe over there. So that's how we add bones.
5. Finishing Bone Structure: Coming back to this, I have the arm bone and
the leg bone here. So I'm going to create just
quickly another set of arm. So this one I have the left arm, where is my left arm over here, I'll just use anchor point, put it here, and then
forearm anchor point, put it here, and then the,
sorry, this is the hand. The hand is here. And
then the forearm, the anchor point is here. Okay. And then I'm going to select from the root to the tip, which is arm form, and hand. I'll go to Hamonoid arms,
and then for this one, it's going to be the back arm, the left hand, arm, form, hand, hold down command, click. And then it's going to
have a bone structure going from shoulder form, connecting everything,
right? So that's good. I'm just going to
put this one over here at the tip of the hand. That's. Then I'm going
to do the leg here, the left leg, same thing. And I'm going to
click on this one, move the anchor point over here. Click on this one, move the
anchor point over here, foot anchor point over here. Okay. And then selecting
from the left thigh to cuff till left foot, right? So go over here. Leg This one would be
the back leg, left leg, and then these structures
hold on command, and then I'm going to
move this one over here to the tip of the
foot. That's okay. And then we're going
to do the body here. So body, same thing. We need
to move the anchor point. So I'm going to move the
head anchor point over here, and then the neck
anchor point over here, and then the torso
anchor point over here. You can also create a hip. We don't have a hip
for the character. But in terms of the body, you can also add a hip over here. I'll be another round joint, kind of like over this area, connecting the torso
and the two legs. But over here our design
doesn't have a hip, so this is all we have. So we need to connect
from the root to the tip. So from torso to neck to head. So these are the three
layers you need, and then we go to humanoid,
or we go to spine. And then in the spine,
we have the head. We don't have a hip, so we're
going to deselect the hip. We're going to deselect the hip, and then for the
spine structure, we only need one structure. So sometimes you
can see the spine like this when
they're designing, some people design more
than one spine structure, so you need to add more spines. For this case, we only
have just one whole thing. Since it's a very simple
character design, so we only just need
one spine here. So we need one spine, one neck, and one head, no hip. Hold down command and
then click on this one. So you see everything
is connected over here. I just need to put this one
to the tip of my head here. Now we have successfully added all the bones to the character, in is going from the middle to the top. We have
the bones here. So the bones are in place. So this is basically
how you add it because we need to select the bones from the
root to the tip, right? So the head is a tip.
The root is the torso. So this is where the
force is coming from. And that's why it's L we
like this upside down. But it's coming from the
inside over here going up. But all the other limbs
are just going down. Only the torso is going up. So that's everything
for the bones. We have all the bones down, and we have all the bones down. So this is all we
need for the bones.
6. Rigging & Control: Character rigging, all you need is just one step
adding the bones. Everything else is automatic. So next, we're just going to rig the character
using the bones. Let me just duplicate
another layer over here. This is a bones. I don't
want to touch the bones. I'm going to duplicate this
one and then rig the bones. So I'm going to duplicate and
then call this one rigging. So this is going to be
number three, rigging. So we have the artwork,
which is the artwork. We have the bones
with the bones, and then we have the rig
also with the bones. But then now, I'm going
to select the bones, hit the select bones here. And then over here at the
bottom, we have an auto rig. So we then click
on this auto rig. And then it's going to
give you a message. You're starting to
rig the character. It's going to be pretty slow. Do we want to hide the layers? So we can click on this
one, hide layer controls. It's going to hide all these different bone structure
layer controls to make your computer go faster. If you don't hide
it, it's going to make the render
time really slow. So we need to click on this one, and then it's going to
do a bunch of things, and it's going to add
a bunch of layers, add a bunch of controls, add
a bunch of null objects. It's going to rig the
character for us. And this is just a real time of how fast or how
slow it should be. It's taking like maybe
20 seconds or something. And now we have the rig. So this is a full rig. If you go to here
on the timeline, we have these green
labeled layers. These are the control layers. So I'm going to go through
all these control layers. But all the bones we had
are just underneath here, and then it's also
adding a bunch of other layers as well. And then we still have artwork underneath over here.
This is Auto rig. This is the second step. So
essentially, this is done. We can actually using this to animate. This is
already working. If I hold this hand
here, you can see, I can move this hand now from the hand
structure over here. If I want to rotate,
I can rotate. And then if I drag
this hand over here, I can move the hand
over here like this. And then if I drag this one, I can move this
character like this. And then if I just go here, click on the neck, I
can move the head here. It's a little bit weird, but I can also move
the foot over here, make it like this foot is not bending to the
correct direction. I'm going to fix that. But you can see, we have this character
already working. It's already rigged,
and that after rigging, use this controller to control the position of each body part to basically animate
this, right? So now we already
have this control. I'm going to go through the control
individually, but first, I need to go back and reset
to original position. And before we do anything, this is already done with
the rigging process, but we need to do some
cleanup before it's actually working
conveniently or effectively. So first thing we need
to do we need to go to the let me make the smaller. I need to see my
timeline over here. Let me make the
smaller over here. And select all the
control layers, hit position on the keyboard,
hit P on the position. I need to turn on the first icon here to show all the numbers. So you can see over here right now at the mutual position, neutral position at zero second. I have all these arms and legs and arms and legs and head and shoulders, all
these structure. In a weird value. So in terms of these structures, I don't want it to have a weird value at the
beginning because it will be really hard for
me to come back to that value because I won't be
able to remember all these. So first thing we need to do
is to zero out the values at zero second so that whenever
we move some structure, we move the hand
or move anything, we are able to go back to the neutral position,
which is zero. So in this case,
this is not zero. We need to make zero. So we're going to select all these
control layers which labeled as C C over here, all these green label layers, and then we go to
this link here, third button here, and
then we go add zero. So this button here, we need to click on
this one, add zero. So basically, **** is
going to add a bunch of null objects and then link
these control layers to the null object so that
the control layer to the relative position of the control layer to the null
object is becoming zero. So that's why you can see zero. It's adding a bunch of null
object position them at the position of these controller so that once they link the
controller to the null, controller becomes zero because it's a relative
position to the null. And that's why we can
later on animate this. Let's say if I move
the hand over here, I can still go back to the
neutral position at zero. If I just put in 00,
everything is zeroed out. So that's really important. You need to add zero at the
controller after the rig. Now, we have this
character. Let me just go through some of
the settings over here. So first, let's go from this
head structure over here. If I click on this
one, this is a head, and I can actually move
this icon off of the head. So if you go to this
controller, this icon here, you can move this controller, the position of the icon on the side so that
we can move it off. Let me turn off my guide layer. Let me turn off my guide layer. See this guide outline,
I'm going to turn it off so that it's not showing. And then I can also
turn off my bowl layer. So I don't need to see
the bow layers anymore. So all I need to do
is see this bone, starting from this layer N, I'm going to lock all these bows and also
all these artworks. I'm going to lock all these, and then I'm going
to shy all these. So I don't need to
see all these now. I only need to see
my controller. So I'm locking all the bows and the artworks and then shying
all the bows and artwork. And I'm going to click on
the Shy button over here. Sorry, I forgot to make
these bows invisible. So make these eye button turn off on the bows here so that we're not seeing
the bows anymore. And then I'm going to click
on the Shy button here. So we only see the artwork, and then we only see
the controllers here. So that's how we
clean up the preview. Now, I'm just holding
down this head here and then move
the position of the icon on the side so that I can also change the
color, but it doesn't matter. I don't need to change
the color right now. So if I rotate the
neck, let's say, if I go to my rotation tool, which is W on the keyboard, I'm going to hit W. I
can rotate this head, and I can also hit W and then
rotate this head like this. This is only rotating
the head itself, but then this is rotating
the neck like this. And then for this torso here, I can go up and down with this torso control to change
the body up and down, but I couldn't drag it out too much because it's
going to separate some of the limbs over here. So normally what we do is we don't use neck
and torso control. If you hide the torso and
the neck control over here, there's actually a
body controller over here really small over here, and then we're going
to go to the icon, move it off on the side and
make it a bit bigger, maybe. This is actually
our body control. So we actually just use this one body control to
control the upper body. If we go just rotate it, it's going to rotate
the body as a whole. And then if I go position, hip P for position, move it down, it's going
to move the whole body. So this is a better
control than the torso and the neck control
because it's already combining the whole
upper body together. So normally, if you want
to control the upper body, you would go to the
body control over here, move it to the side so that
you can see it better. And now for the hand if you
want to control the hand, we can just move it like this. And then for the hand rotation, you need to hit W for the
rotation tool and then move it like this so so that you have the hand moving
up and down, right? So for the other
hand, same thing, I can move it like
this and then hit W, move the hand up like this. And sometimes, if you want to bend this arm in a
different direction, like this leg right now is bending in the
wrong direction. So what I need to do is I need to go into this controller, and then on the side, I need to change the side
to negative 100%. This way, I can bend this
leg to the other side. This is going to be a correct
position of the bend. And then for this
one, is bending okay. So you can see these are
the two leg control, and then we have
the arm control. Let's say, I want to do a arm I want this arm to
bend the other way. So I want to go to
here and then change this one to negative
100% so that I can have these both and lay on the waist to have
this pose like this. So this is a post I like. And then over here for the head, I can also use rotation to maybe move this
head up like this. And after I have
all these controls, exploring all these controls, you don't actually need
to understand all these. You only need to first of all, you need to know how to move the leg and arm to a
different direction, which is modifying
this side value here to negative value so that
it can go both directions, bend in different directions. But all the other ones,
there's so much settings. You actually don't need
to understand those like, they're pretty
intuitive, by the way. They're just, like, basically
telling you what it does. So I don't want to go through all that because
it's overwhelming. And to be honest, I don't even touch a lot
of these settings. Really simple, just want
you to understand that these controllers
are controlling different body parts and what we use to control
the upper body, how we bend the legs,
how we move the legs. And now since I've already
changed up the character, I want to move back to zero
for all the neutral position. I need to move
everything to zero. And then for the head,
it's a rotation change. So I need to also pull up the
rotation property and make sure my rotation is zero.
Everything is zeroed out. Once we zero out everything, it should be standing at
the neutral position. So this is a neutral
position of my rigging.
7. Automate Walk Cycle: So next thing we do is we
select all the layers. Let me just pull it to the zero. Let me just re
center everything, change all the settings to zero. So we have this character
standing straight now and then select all
the controller layer. So now we want it
to walk and run. So it's very simple. D can
do it automatically for you. So we select all the
controller layer, and then we go to this
play button here. It's underneath here.
It's hidden over here. So but it underneath
this automation. We just need to click on
this walk and run cycle. It's going to add more expression,
a bunch of expression, and it's going to just automatically make
this character run and walk. Click on this one. We can click on
the option to see, but it's going to be
basically parenting all the controller of each body parts to the
actual body parts. And then it's recognizing
all these different layers, the torso as a torso, the shoulder neck
controller as a neck, and then the body
controller as a body, and then the leg and
arm controller as this. And then, basically we just click on the walk and run cycle. It's going to be writing
a lot of expression. And then it's adding
one more controller, which is the animation
cycle controller, and then it's already
done its magic. So let me get if I
play it right away, let me go to ten second. Let me cut this timeline
to ten second over here. I'll just on the keyboard, and then I'm going to zoom out. So let's say if I already click on the walk cycle,
let me play right away. Let's see what happens. So it's generating this walk cycle. I can hide the visibility of this controller so that I
don't see those overlays. So now you can see
this overlay here, this is the walk cycle
animation cycle controller. I'll just move this
one to the side. Let me go to the icon property, and then I'll go to position,
move it to the left. So this is going to be my
walk cycle controller. And you can see, now, since we have it rigged, and then we added it's
underneath here, right, we added the
animation controller so that it's walking now. However, there's some issue, so we need to fix some
of the walking issue. But, like, this is
really brilliant way to quickly add a walk cycle
because traditionally, if you want to
animate a walk cycle, actually takes a lot of
time to animate this. It takes, probably
a couple hours, and you have to
know how to do it. So now DUIK is basically
generating a walk cycle for you, and not only are you
able to do a walk cycle, we can also do a
run cycle with it. So if we go to the cycle
controller underneath, we can take a look what
are the options we have. Let me just make
this Duik all the way down and then see
all these parameters. So over here, we have
animation cycle, underneath we have
this controller, which is the icon over here, and then we have this
walk cycle controller. So we have a general motion. This is controlling the general
motion of this character. So right now it's set to 100%, and then the walk
cycle is set to 100, meaning like this
character is walking. If I set the general
motion to zero, it means that basically
there's no motion. If I play this, he's going
to be just standing still. So that's general motion, basically controlling the general motion of the character, meaning either it's
walking or running. If you set it to 100%, it's going to be having motion, and then zero is no motion. So let me reset it to 100%. And then walk cycle
and run cycle. If we do like 100% run cycle
and then zero walk cycle, this character,
instead of walking, it's going to be running. Let's see. Yeah, there's less problem in the run
cycle than the walk cycle. I like that. It's
pretty interesting. So that's going to
be the run cycle. Let me start it to walk again. Let's fix some issue here. So right now, this
is a walk cycle. It's walking pretty slowly, so we can actually
make it faster. But before we do
that, I'm going to go down to this computation
setting over here. Select this drop down over
here inside the computation. You can see there's a
cycle duration and cycle, frame duration and
second duration. It basically tells you
that this walk cycle is running on a loop
within 30 frames. So if you want to loop
this character walk cycle, you have to find
the 30 frames mark and then cut one
frame at the end. So let's say right
now because I'm having 30 frames per second. So it's looping at 1 second. Meaning if I just cut it
at you can see over here, I'm using Command left arrow. 30 frame, this will
be a full walk cycle, but I need to cut one
more frame because the last frame is going to be essentially the same
as the first frame. So 30 frame is the
same as frame one. So I'm cutting off one frame
to loop this character. So I'm hitting on the keyboard. If I play this, this character
is perfectly looping. So this is the loop
point of the character. If you want to have
a looping character walking with no hiccup,
this is how you loop it. You have to find the loop
point, which is 30 frames. And if we change the
settings over here, the front settings, it's going
to change our loop point. So once we change
that, we have to come back and see where
the loop point is and then use that loop point
to loop the animation. So that's where you find
the loopoin. That's okay. The center, the last setting,
which is computation, and under here, it's
cycle duration. That's a loop point. So
that's the number one thing. And then the number two, well, after number one is
all these settings. Let's take a look at
these settings over here. We have the character over here. So this one, we're
controlling the height. If you push it down. Basically, we're just
slightly modifying the height of the character
when it's walking, so it's probably
going to make it walk up and down a
little bit more. So normally, I'll keep it at
100%. We don't touch this. And the energy is
something you can touch. So if we do like 40% energy, it's going to give
character more energy. So if we do that, you can see, now, our character
is more bouncing. It's got a lot more
energy when it's walking. Compared to the 20% energy, 20% is just, like,
walking more slowly. Is kind of not
bouncing too much. But then if you turn
out the energy, it's just basically making it
walk a lot more energetic, and you can see it's
happier, right? So that's how we
modify the energy, and then softness is basically just the controller
for the upper body. We don't touch this as
much, so just keep it 20. Mostly, we just adjust the
energy over here, make it, walking happier or not so happy. And over here, we have
a walk cycle setting. Over here, we can
change the walk speed. So let's say if I change it
to a place where we have the legs spread out and then if I make the
setting bigger, you can see, we are
spreading the legs out more and it says walk speed. So basically, the way it works is that when you're walking, you're walking the
same distance. You're walking the same distance within the same amount of time. You see the cycle
duration is not changing. So we're walking the more
distance in a set time, meaning the speed is faster. Basically, when he's
walking, the leg is spreading out more,
he's walking faster. So if I change it to 15180, and if I play this, so he's walking in larger steps
and walking faster. I like that. Looking
pretty cool, but we have some
breakdown on the leg. So we need to tone it back
down to maybe like 150. If we want to walk faster,
let's do 150 here. Still have some issue on the so that's walking
a bit faster. And there's also walking type. There's a realistic walking, and there's a dance dancing. Let's say if we change it to dancing, let's see what happens. So we have this
character walking on a double bounce walking, almost like it's like walking, dancing, walking, dancing,
double bounce, double bounce. So it's got a lot more energy. This is another way you
can add more energy. If you tone it back down to 20 and using the dancing
it might work better. So dancing is just basically
adding one more bounce to the walk cycle so that the character walking
and bouncing, almost dancing at the same time. So we have a lot less energy
since I do it back to 20, but, like, now
it's like a robot. So maybe still like
35 or 40 is better. So let's switch
back to realistic. I like the realistic
walking better instead of the dancing. Okay. And then
let's go down here. This is run cycle run speed,
same thing as walking. Once we switch it to run, we can actually just modify
the run speed to make the legs read out more so that when it's
running running faster. And over here, we have the
neck and head control, so we can choose to
when it's walking, we can actually make
the head adjustment. Let's say if we til the
head down over here, next swing over here, add more. Okay, the next swings now
rushing. So softness. So if you up the softness, use some parameter changing or fear, let's see
the animation. So I change it to 20 head swing. So meaning when he's walking, his head is going to swing
back and forth 0-20. He's going to have a
lot more head swing, and then next
softness is going to have a lot more
softness on the neck. He's like, walking and then bouncing his head. That
might be too much. So all the settings right
now that I'm changing is dynamically updating
the walk cycle. So these are not
just, like, like, we're not changing the
value of one post, we're changing the value
of the whole walk cycle. So if we set it to ten,
the entire walk cycle, his head is going to
bounce back and forth continuously 10-0.
Back and forth. So we're changing it
dynamically on the walk cycle. We're not just posing
the head on one frame. So this is all just changing dynamically on the walk cycle, not just posing on one frame. So all these endings over
here, and then the body, we can actually adjust
the torso swing. Let's say, I want the torso
to swing maybe back more, and then the spine swing, we don't have a spine control. We only have the
torso. So the hip, we don't have a hip
control. So that's fine. And we can have the body down
a little bit more or up. So the arms over here, we can have the arm
swing more over here. So let's go to the
left arm here. I have the left arm
swing out more. The angle of the arm is
wrong on the wrong side. So I need to go back
to my arm control to tweak the angle of the arm. But, like, I'm just
kind of tweaking all these settings as I like. You can see after I have more
torso, I mean, torso swing, like my character is
like walking back and forth more dramatically
on his torso. So I can dial it back to five so that it's not
bouncing that much. And then the head swing
dal it back to five. And then we have the
arm control over here. So if I just drag
it all the way out, I couldn't have this arm
like, Yeah, it's going crazy. So I don't want this
arm to go that far. So I'm just dial it back to maybe a smaller
percentage over here. So you can see these
rallies are all red, meaning they are
all parented inside this parenting chain
of this walk cycle. So you don't need to
worry about being red. After you adjust the value, it's going to dynamically
update on the walk cycle. And then the leg
over here, if I just do I think it's looking
okay right now. I just this left arm over here is breaking down,
like when it's going. I think this left arm
should bend the other way. So I need to go to
my arm control. This is my left arm control. And then the side, you can
see it set to negative 100, so I need to change
it to positive 100 so it can bend
the other way. Okay, it's not working. So let's adjust some setting
on the FK control over here. So I need to introduce
another concept before we go to adjust the FK
control here. Okay.
8. Fix Knee Popping: So I think this one right
now it's looking okay. The only thing that's bothering me is the knee that's popping. So we see the knee over here. One it's going straight to bend, it's kind of popping in and out. So strand straight bend
is kind of popping. It's too obvious, it's too much. I don't like that popping. So what I need to do is when the knees are just right
before the knees are popping, I need to adjust the
body to push it down a bit more so that the knees
are not going fully straight. So let's find a frame where the knee is fully
straight before it pops. So you see this points here, the knees are fully straight. And then this is,
it's fully straight, and this is a frame
it's kind of popping here. This knee popping. So right now over here, right before it's
popping, this is, like, already bend, but then the previous frame
is fully straight. Meaning, like, the knees
are going to pop to bend. So I need to move
the whole body down to have the knee not be so straight so
that it doesn't pop. In order to make it go down, I need to go to find
my body control. Remember, we have a body
control from last class. I just need to push the
position of this body down. So everything I update is
going to be automatically update in the walk
cycle automation. So it doesn't matter how
much value you have. It's going to be dynamic. So I'm just pushing this down here. I'm using my arrow key, push it down so that my
knee is not fully straight, so it doesn't pop
in the next frame. So I need to go and check
the previous frames, maybe it's popping a
little bit over here. I wonder if it's
going to be okay. Yeah, it's still like popping. So maybe I just need to push this body controller
down a bit more so that the knees are not fully
straight most of the time. So it doesn't pop because
when the knees are straight, it will make the knee pop and then it kind of looks weird. So I'll just push this
body controller down, so when he's walking, it's like, bending down a little bit, and then the body
is bending down so that the knees are
not popping so much. So I have this knee over here. And maybe I can have the body lean forward a
little bit instead of lean too much like the body kind of is out of
balance in the back. So I'm thinking maybe
I should move this one forward a little bit and
then up a little bit, just slightly so that I'm trying to fix the knees
popping issue here. Still some pop I mean, still some straight legs over here. I might need to push it
down further here slightly, and then what if I adjust the
rotation to have the body, like, bend over to the
back a little bit more? So I'm adjusting
the rotation here, because if I adjust
it to the front, my right knee is
going to be straight, so it's popping even more. So I'm just going to move
it back a little bit, maybe three degrees
so that my body is, like, bend backwards, and then this is not
popping so much. Yeah, I feel like the knees
are bending too much. So we just need
to find a balance where the knees are not bending too much and also not too straight so
that it doesn't pop. I think it looks better now,
but then when he's walking, the back legs are not fully extended. I feel
like he's walking. The distance of the walk is too. I just feel like
this pose is weird. I feel like the body
should be further ahead. Let me see if I move this body further more, a
lot more further. See if that's okay.
No, no, it's too much. So I just need to move
it further a little bit so that the center of
gravity in the middle. And then this knee over
here, on walking straight, I just feel like this
knee should be more straight instead of
bending too much. So let me see if I go
to my animation cycle, and then I'm going to the body over here.
This is the body swing. This is the legs over
here. The feet heights. So what if I modify
the feet height down, which will make the
feet go lower so that I continue to maybe 8% so that this leg is straighter. That's weird. Is like a zombie. So not working. Around
ten, change it back to 15. And there's also
a feet rotation. If you don't like this
feet to rotate too much. So right now when he's
walking, I think it's okay. Right now, the feet is rotating. Over here, you can see the
feet is rotating like that. So if we tone it
back a little bit, his feet is going to
be not rotating too much. It's a little bit weird. Let me change the feet
height to 25 again. Yeah. So over here is the body. So I'm just trying to adjust the body to fix the
knee pop issue. Using the body
position and rotation, and make sure the legs are not too straight when it's walking. But then I feel like over here, when he's extending the
back legs over here, I think this leg should be more straight instead of
bending too much. So I'm still trying to fix this. Maybe use, like, a rotation
or push the body higher. Yeah, I think that
might look better. You just need to kind of
tweak all these settings, especially the body setting
position and rotation. And also, I mean, for the knees, I think those are the only two you need to tweak. And now we have this walk cycle over here. It's
looking pretty cool.
9. IK vs FK: This is what we have. The only
issue right now we have is this arm that's not swinging
to the right direction. So it comes to another
one more new concept. So over here, you know what? I forgot to I forgot to make a new composition called
animation instead of, like, we should have another
composition that says for animation because I was using this rigging layer. And now I'm losing
my rigging layer. The arms is over here. I remember we have the
arm control where we drag this handle and
then we can modify the position of the arm
in the rigging process, and now it's not
working anymore. So the reason is because there's two system for the arm
to control the arm. There's one called forward kinematic and the other one
is called inverse kinematics. So IK and FK. So inverse kinematic
is the way that we use this handle to control the hand of the arm so that
when we're moving this arm, we moving this handle,
the arm is going to be controlled by the
tip of the arm, right? So this arm, this handle over here is controlled by the hand. And then when moving
this one's controlled by the tip of the arm instead
of the root of the arm. That's called inverse kinematic
because normally when you are paring things
without any rigging, when you're paring
without rigging, the normal parting
process is that you would only be able to
rotate from the joint. Let's say if you want
to rotate this arm, you would rotate from the joint, which is the anchor point. Then you're paring the
forearm to the back arm, and then you're pairing
the hand to the forearm. So that in that
case, you're only able to if I turn
off these keyframes, you're only able to rotate this thing from
the anchor point. Like this. This is a
normal paring chain, like as we pair anything,
normal paring chain. This is called
forward kinematic. We're animating forward,
we're rotating from the root of the body parts from the joint of
the body parts. However, when we're doing
character animation, we cannot work with the forward kinematic if we were to animate
the character. We have to control
the character by the hand and the feet
because in that case, if I go to my feet here, which is a leg here, leg
control is still working. So you see, this is
called inverse kinematic. Inverse meaning I'm using this feet to actually
position the body. This is called inverse
IK. This is IK. And before I do the
animation cycle, the arm and both
arms are also IK, but now the arm
IK is turned off. So meaning while we're
doing walk cycle, the arm is actually
becoming a FK system. So you see over here on the leg, this is IK enabled. This is already checked
this KFK enabled, meaning this is
IK. This IK foot. So IK is inverse kinematic, meaning we're doing inversely. We're using the tip of the limb to control
the whole body. So only this way can we
animate a walk cycle? Because if we don't
rig the character, there's no way that
we can control the feet to control the body because it will
be separated, right? And there's no way
that we can position all these different body parts on its right position
because in that case, that'll be too complicated.
That's why we're rigging it. After we rig the character
for the animation, the reason we rig it
because we need to use the inverse kinematic
way to position the foot and the
body and the hand to a certain position so that the whole body parts
are still connected. So that's inversely. But then normally when we're
doing parenting, we are actually using
a forward kinematic, which is just using the root of the joints to rotate
each body parts. So in this case,
in the walk cycle, the arms are switched
back forward kinematic. If we go to the arm over here, you can see this enable
is switched off, meaning the arm is actually
forward kinematic so that I can rotate the arm using a
normal paring chain like this, so I can swing the arm
this way here like this. And then this arm control
layer is not working because it's already
a forward kinematic instead of backward, but
the foot is working. The foot is still inverse IK. The foot is still
inverse kinematic, meaning I can position the foot, and then the leg is going
to follow the foot. And that's called the rigging. So in this case, remember, the problem we had is this arm bending in the
wrong direction before. So now I can just using
this FK system on the hand, on the left arm, and then I link all the
keyframes over here. I'm just going to dynamically
update this arm to bend this way here and
then maybe move the arm back a little bit so that it doesn't swing too
much like this. So now, once I do that, it's going to be automatically
updating the animation. So now this arm should be swinging in the
correct direction, which is bending the other
way, bending this way. So if I play the animation now, see the arm is bending
the correct direction. I think the back arm over
here is swinging too much. So I want to drag it
down maybe like this. So this is how far I want
the back arm to swing. I don't want it to
swing too high. And then when it
comes to the front, I'll just move it slightly. So it's going to be like this. Let's play the animation here. Yeah, that looks pretty cool. So now we have a walk
cycle that's correct. And remember, we want to do the duration loop here,
it's still 30 frames, so I need to cut
it at 29 frames to loop this animation hit on the keyboard to cut the
preview range here over here. And now, if I play it, it should be on
the perfect loop. So that's my walk cycle. When we're doing the
automatic walk cycle, this is the automatic
walk cycle here. Automatic walk cycle is switching the arm into
FK system automatically. So you see the arm over
here, this is checked off, meaning like Duik already know that if you're
doing a walk cycle, your hand doesn't move,
doesn't need to control. So that's why when you're
doing an automatic walk cycle, Duik is already turning
off the IK system. It's already using
the FK system. So that's why you see
this arm control. It's already checked off. But then the leg control, we still have the IK
enabled because we need the foot to go somewhere so
that we control the leg. And there's no way
you can control. Like, I think for foot, it's going to be always
the IK system. There's no way you
can control the foot using FK because
that'll be so weird. You don't swing
your foot, right? You always use your foot to do something to
walk or whatever. So that's for that very
important concept. In character
animation. The reason we rig in the first
place is because we need this IK system so
that we can control from the tip of the limb
and do, like, a move.
10. Walk to Run Animation: And now we have this walk cycle. I'm just animate do
some animation here. So let's go animate this. This part is going to
be your assignment. So we need to do a character. Let's do a character
standing still, start to walk, start
to run, and then stop. So that's the animation we're going to be doing. Very simple. We already have a system
set up very simple. So let's go to add
some key frames. You can see with
this walk cycle, we haven't add any keyframe. It's already walking, right?
There's no keyframes, so you don't need to worry
about keyframe until now. Until now, because
we need to have this character to stand
from standing to walking, and then from walk-to-run
and running to stop again. Now we just go to 1 second. Let me just zoom it
over here, D 1 second. Add some keyframe at 1 second. So I'm going to go
from general motion, move the general motion to zero so that we add a
keyframe over here. Add the keyframe on
the general motion so that it's not moving
in the first second. I'm going to hit
you on the keyboard to show the keyframe
on the timeline. So we add a keyframe
on general motion. And now I want to start
walking at 2 seconds. So I'm going to do
100 at two second. So if we just do that
at the beginning, it's going to stand over
here, and then it's going to start walking slowly like this. I don't like the way it stands because we already changed
some of the settings. So I need to change the setting back to how it stands
still at the beginning. So basically, we
need to keyframe everything that we
changed over here. So from all these settings, I need to keyframe
everything that's not zero. So all these red
values over here, if you click on it,
you see it's not zero. But then if you click
on it, it's actually zero because it's linked
to an expression, so it doesn't matter if it's
a different number here. This part it's
actually not zero. So the way I do this is, like, I see the
position and rotation. So the only thing that we change is position and rotation, right? We're not changing
any other value. We're only changing
position and rotation. So I'm just going to
be taking a look at these controller layers and see what are the
values that I changed. This position rotation, all zero didn't change
anything, so leave it there. Th the leg position over here, this value is not zero, but if you click on it,
it's actually zero. So it means that it's
linked to an expression, so it's actually just zero. You don't need to add
a keyframe over here. So over here, the arm,
we change the position. So I need to keyframe
that, and then over here, the leg, it's all zero. You see? If I click
on it, it's all zero, so no need to change anything. The head is all zero,
no need to change. The shoulder and neck all zero, the torso I'll zero. So if I click on it, it's
zero, no need to change. So this one is 30 43.
So this one is changed. So I need to add a
keyframe over here, and then the
rotation is in blue, so it means I've already
changed the rotation. So I need to add a keyframe on these values over
here to lock it. So these are the values I need to use when it's
already walking. And at the beginning, I need
to zero out this value. So over here at the beginning, I need to zero out the
value over here. So I'm going to zero out
the value over here. Everything that I see not zero, I need to zero it out. See that? So I'm zero out this value here, and I'm zero out this value. So they're all zero now, meaning they should be standing still. However, you can see the hand, the arm is still not straight. So because for the hand, we're using FK system. And then for the FK system, the control is underneath this IK hand hand
control over here. You see this FK
system over here. So we need to key
frame these as well. So I'm going to one hand, and then I'm going to add a value, add a keyframe on this hand, upper, lower end end,
a keyframe, right? And then I'm going to do
this arm, go to the FK. First, I need to unlock this
and then relock this again. Add a keyframe to this again. So if I hit you on the
keyboard on these two layers, you see I'm adding keyframe
on the FK rotation. So this is when it
starts to walk. It's already walking. And then I need to go back to 1 second. And then at this point,
I just want the hand to maybe slightly going down straight like this
and then over here. So I need to go to the left here and push it down like this. So my character is more or
less standing straight. It does have a little bend
on the arm. That's okay. It's pretty normal,
pretty natural. And you can see, I only added the lower
rotation over here, which is the lower
arm over here. It's already fixing my post. So that character is completely still not moving
in the first second. And then from the first second, it starts to do a walk cycle, slowly walking now until 2
seconds, it starts to walk. So let's play this
one. Like that. And then I can easy
ease those key frames. Let's go like F nine. Easy ease. I can easily eas
those keyframes. Yeah, and you see now start to walk from standing still. Okay. So I'll let it walk
for maybe 3 seconds. So it's going to be
walking 1 second, one, two, three, four. So I'm going to starting
around like 5 seconds, I need to have it start to run. So have it start to run. I need to go back to my
animation cycles. Over here, I just need to
key frame the walk cycle. The run cycle, and then I'm going to hit you
on the keyboard to show this over here, it
you on the keyboard. I can see the walk and
run cycle over here. So I just need to change
the walk cycle to zero and then run cycle to
100%. Oh, sorry. I need to key frame those and
then go forward 1 second. So I need to have it
happen gradually. So from five second
to six second or maybe even 7 seconds, I wanted to start running
maybe gradually in 2 seconds. So 5-7, I need to change the walk to zero and
then change the run to 100%. And there's a
problem with the run because of the settings we have. So let's see what are
the running problems. Let's play the animation for
this run cycle over here. I think first the arm
is bending too much, it's coming up too much. So I need to push the arm down. So before I push the arm down, I need to make sure that
before I start running, I need to set a keyframe, right? So I need to set a key
frame on the FK here. Just need to lock that so that it's not moving before
it starts running. I need to lock the
upper lower here, the three rotation on the arm, just right before it starts
to run. I need to lock that. And then once it starts to
run, I need to fix this. I need to push these
arms down a bit more so that it's in a
better position. So, this one looks good when
it's running like this. And then for this right arm, I can push it down so
that it doesn't run too, I mean, it doesn't run too hard. I feel like right now
it's running too hard. So I think the arm can just
go down slightly like this. Oops. Okay, I need to find
a point where the arm is extended the most and
then change it from there. So I need to figure out, I need to go frame by frame over here. I'm using command right arrow. To make sure when I'm running, I need to find the
point where my arm is like extended the most. I think this is okay, the back end is crazy. So let me delete these here. I think the value are
still having some issue. So when I'm running, I think
I like when it's running, and just going through the
gradual change of running. So I actually just
want the hand to probably just do like
a value around here. So I can just add the value from this point because
if I go further down, these values are going to
be changing even further, and then the hand is
going crazy, like this. So instead of changing
the value at the end, I'm actually just going
to find the value where I'm comfortable and then
just add a keyframe. Let's say, if I like
this post here, I'm going to just
add some value here, just add a keyframe
so that it's going to lock the value
on that keyframe, and then I'm going to
drag this keyframe all the way down so that it's always having the same
value over there. So I'm going to
just do like this. Still some issue with
the arm, so I can fine tune this left arm here. This left arm is
still having issue. I think it's pushing too hard. You need to have
it down like this, go down like this, maybe
something like this. And then another thing
is still some issue. So I need to see
where the issue is. Let me change another
setting before I fix the arm because I think it might be another problem that we have. So remember, we have
this animation cycle, and then we have
the energy here. I think we might be having too much energy so that
the arm swinging too much. So in this case, I'm going to go to before I start to walk, I'm going to add a
keyframe on the energy. And then let me hit you on the keyboard to show
the energy heat frame. And then for here, I'm going
to tone it down to 15 or 20. So now I think it should have less energy compared
to when it's walking. And now since it's running, I'm changing the
energy down to 20. So I think the only
the only frame that's having issue
is this one here. So the arm, I think it's
one that's rolling back. It's rolling back too much. So I need this back arm on the left to not go to too much. Like, it's going to be maybe
around here like this. That looks better. And then in the front, it's
going to be like this. So I'm going to delete
the keyframes over here, move it back to align with the key frame
I have over here. So it's gonna be like this. I think that looks better now. So if I play the animation, I tone down the
energy to 20 from 35, and then we fix when the left arm is going to the
back, it's going to high. So I fix the rotation of the left arm is
going to the back to this position so
that we're using those keyframes as the final
keyframe for the running. Let's see if that works
better. I think that's okay. The only thing is, I might
want the run to be faster. So I want to keyframe
over here, the run speed. Let's keyframe the
run speed over here. So let's add a keyframe
just before it's running. Oops. So this is run speed
before it's running, and then after I start to run, want to make sure our leg
is spreading out more, so you might want
to just do, like, a run like this so that
my leg is spreading out more on start to run so that we are increasing
the run speed over here. I see over here. Let's
see if that looks better. Yeah, I like that
better, actually. That looks more natural. So this is my animation now. So I'm only adjusting the hand so that the hand
when it's falling the back, it doesn't
move too high. And then when it's
going to the front, it doesn't move too high, just by adjusting the FK
rotation of both arms. And then we're toning down
the energy on the run, and then we increase
the run speed so that the leg is
spreading out more. So this is animation, let's see. We're walking and then we start to run with
something urgent, we start to run run
run run run run run. And then after we run
a couple seconds, I'm going to have a stop. So when I have a
stop, basically, I just need to go
back to my cycle and then change the
general motion from 100% at a keyframe
and then go forward 1 second or 1 second or so. So change it to zero.
And then we need to make sure all the rotation are
similar to the starting point, like all these rotation is going to be the
starting point. So I need to first
lock the rotation of the hand again before
I add the final rotation. I need to lock it because if
we don't lock this one here, it's going to start
to gradually decrease the rotation starting from this run cycle from
this keyframe, right? So we need the middle from this keyframe to this keyframe, everything in the middle
to be not changing, so it can start keep running
for a couple seconds. And after it wants to stop from starting from
this keyframe here, I want it to gradually stop. So from this keyframe, I need to have the similar I think the similar rotation
key frame at the beginning. So I'm going to copy the first
keyframe of this rotation. Just copy the first
keyframe and paste down on the end so
that we're having, like, a stop motion here. And then maybe this one here, I need to also align
this one here. This is the body control.
So the body control need to go back to
original as well, so I need to go back
to the original. So this is body control
going back to the original, and then the arm control is
going back to the original. And then we're just
basically turning the general motion down
to zero so that it stops. So now, if I play this from
here, running, running, and then and start to
having a stop here. Okay. And then I can just cut it here and loop
this animation. Walk, walk, walk, run, run, run, run, run, run, and then stop, stop, stop. And then walk, walk, walk, run, run, run.
Stop, stop, stop. Okay. Yeah, that's everything
I want to show you
11. Congrats!: Congratulations. You made it through the end of the class. We just took a character
from completely still to walking and running
all with Duik Angela. That's a real skill
you can use on any human character you
design Illustrator. If you haven't
finished your project, keep working on them and please share your project
in the gallery. I really love to see what
everyone comes up with. If you enjoy learning with
me and want to keep going, come check out the Motion
Circles YouTube channel. I post new motion design
tutorials regularly on YouTube, all free, all beginner friendly. If you're ready to leve
up your animation skill in a more systematic way, over to motioncircles.com. We have a motion design
and master course that's designed to take you
from where you are now to be a confident animator. It's a learning system that I wish I had when I was
first starting out. Thank you for spending the
hour and learning with me. I can't wait to see
what you create. I'll see you in the next class.
 Hongshu Guo, Motion Designer