Transcripts
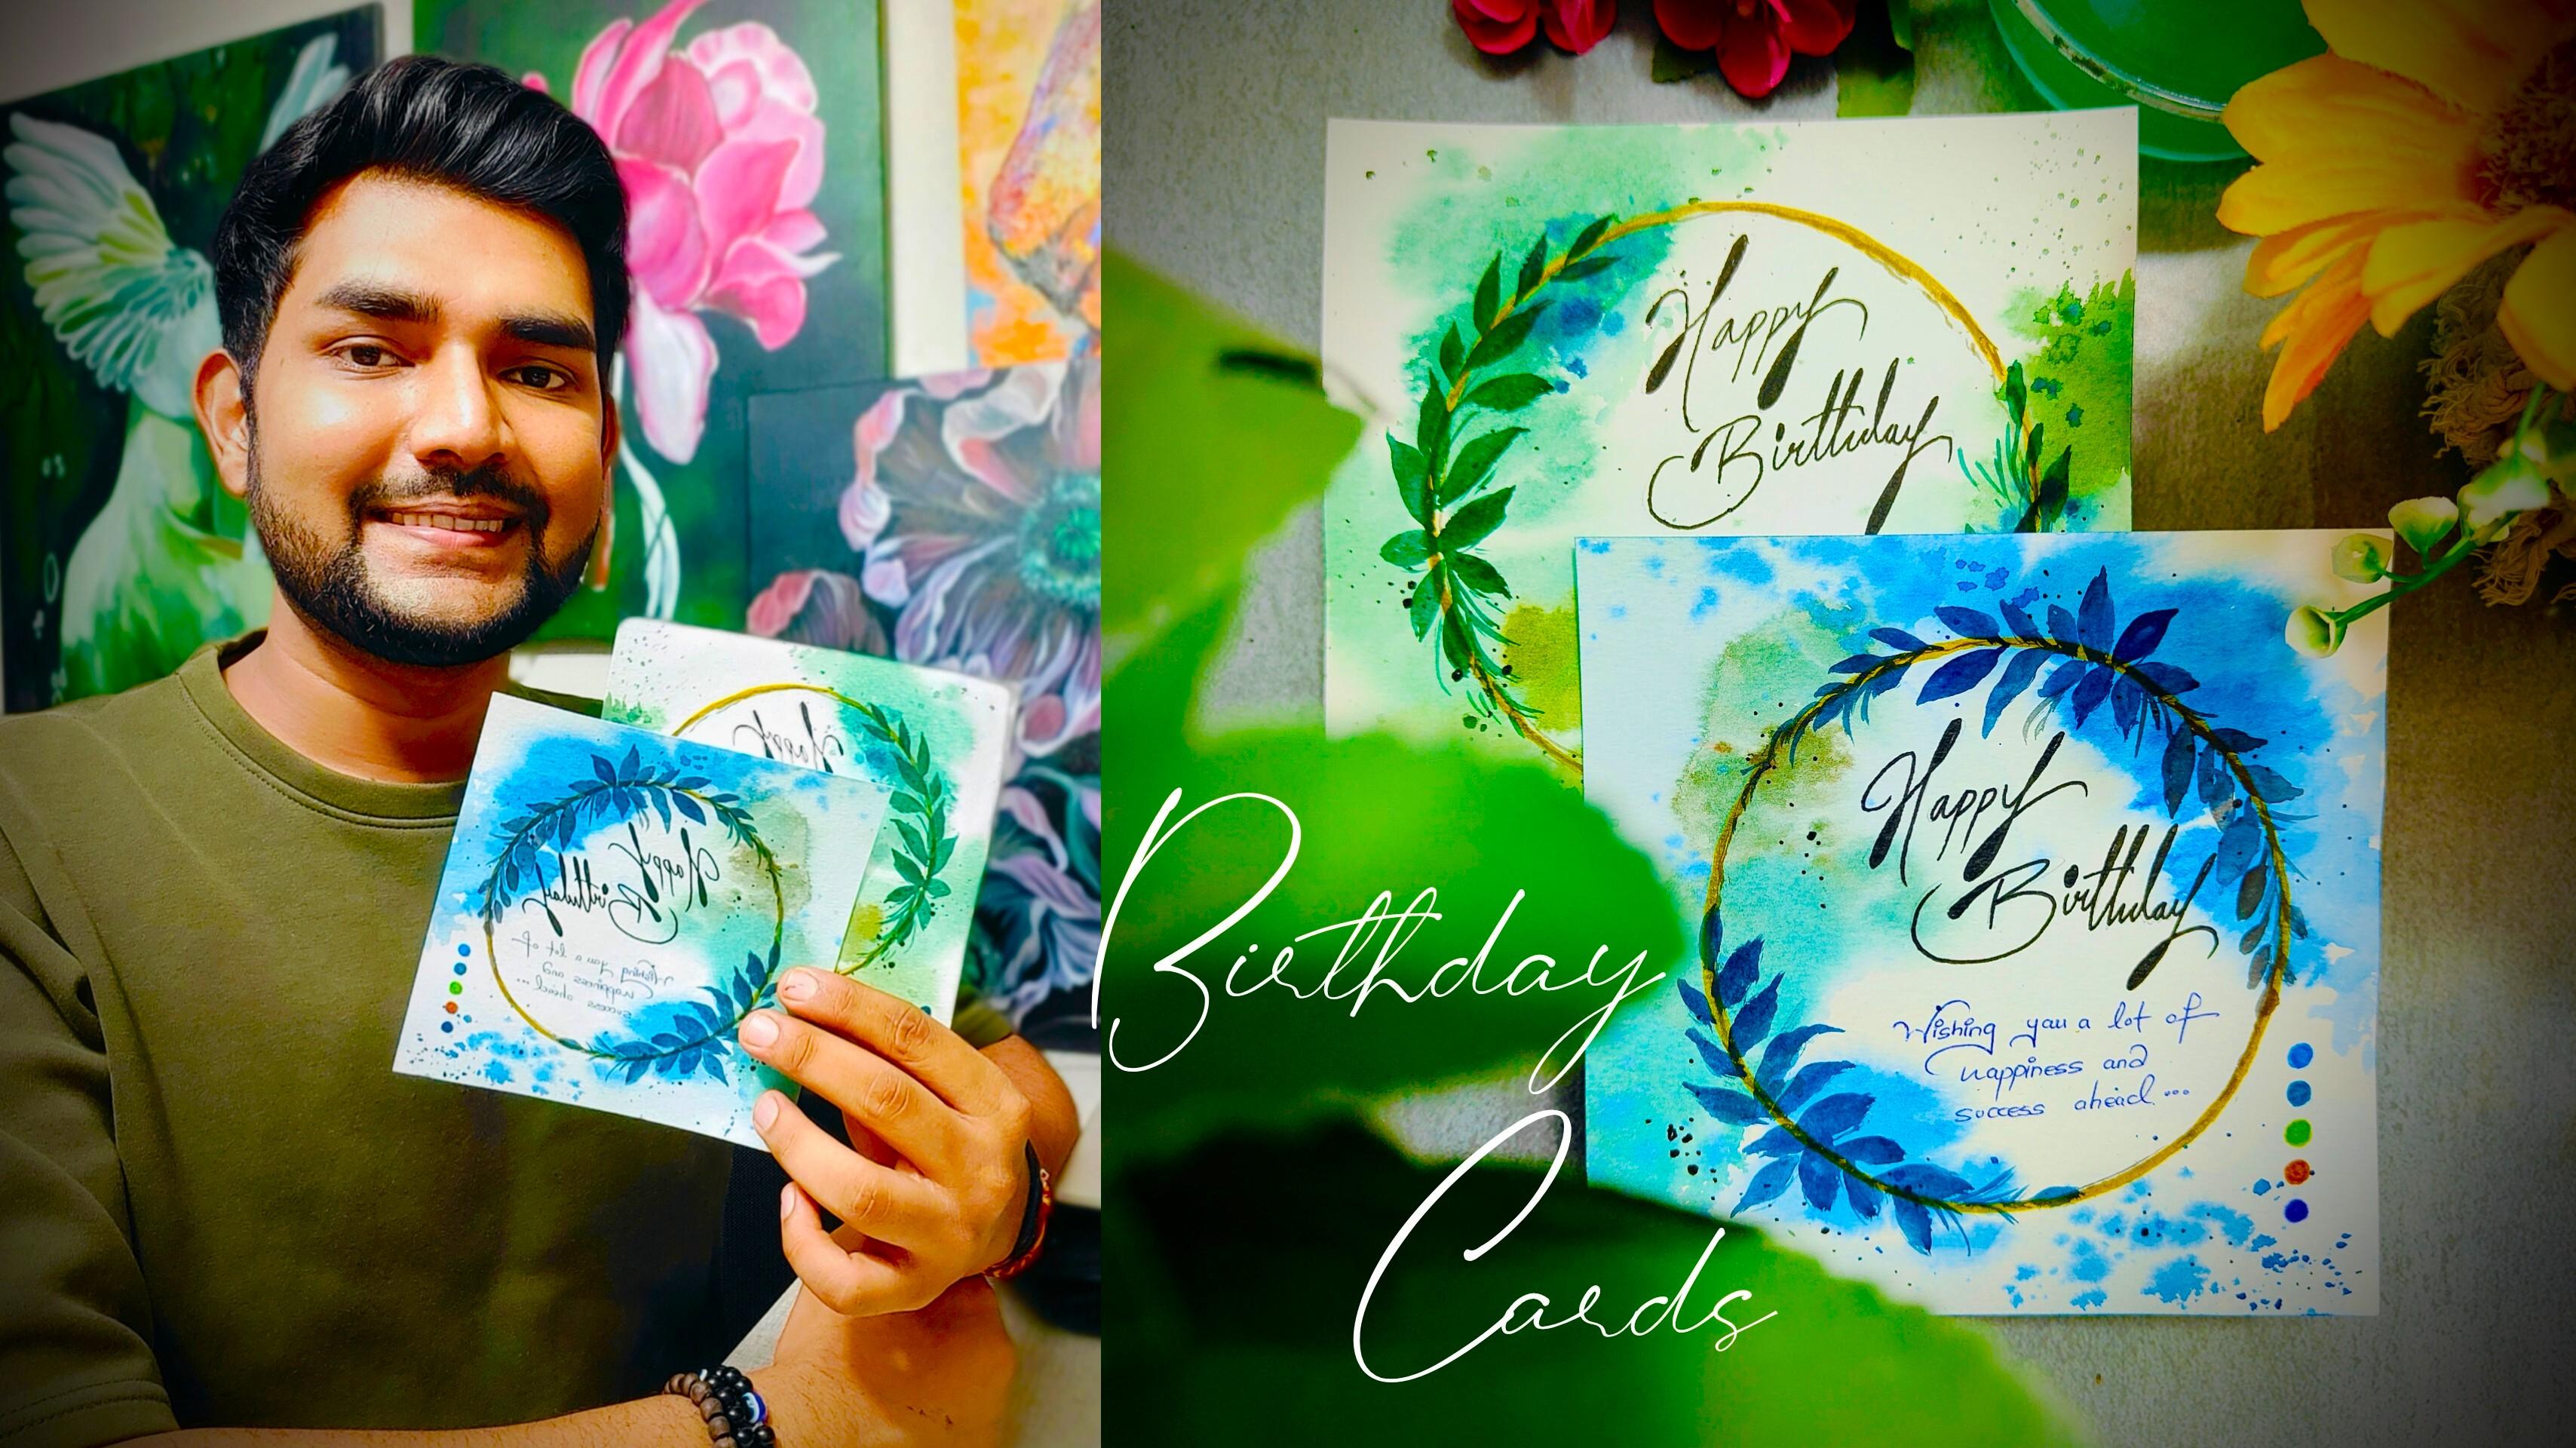
1. Welcome to the Class: When it comes to gifting, I personally love to make
handmade birthday cards. Let's create some fresh and
fun birthday cards using some easy craftwork and
the medium of watercolors. You can use these
cards to give a nice, personalized touch to your gift and make something special. He, every buddy,
you're most welcome to my new class, myself, uthwikPil. I'm a self taught, independent artist and an interior
designer by profession. I personally love to explore different art forms and styles and not stick to
one particular thing. So if you are joining
me, you'll find a variety of classes
that I create. There are two beautiful cards that we are going to create, having different color scheme. We are going to start by
understanding the class projects in detail and all the elements that we
are going to paint. Before we start with
the class project, we are going to understand
about all the art supplies that we are going to use to
create these beautiful cards. No need to worry at
all in case you are missing out on any
particular art supply. You can go for any other
good alternative as well. The first step is to
create a beautiful base, which is going to be
square for the cards. Then we are going to create a beautiful abstract background using the medium of watercolors. There's this beautiful
golden ring that we are going to create
using a nice circle, which combines with
the background, then we are going to paint
these beautiful leaves forming a nice wreath
around the circle. We are going to add a
small color palette which enhances the entire card, followed by a beautiful, happy birthday message
that we are going to write using some
beautiful calligraphy. At the end, we are
going to write a personalized message and complete the entire
birthday cards. No need to worry
about the output. Just enjoy the
process of creating. You're free to explore
and experiment with the entire card as well. Allo, it is going to be a very interesting concept
to create birthday cards, and I'm very sure that you're going to enjoy the entire class. The class is absolutely
suited for beginners and also intermediate and advanced
level artists can try it. So without any delay, grab your art supplies and join
me on this creative journey.
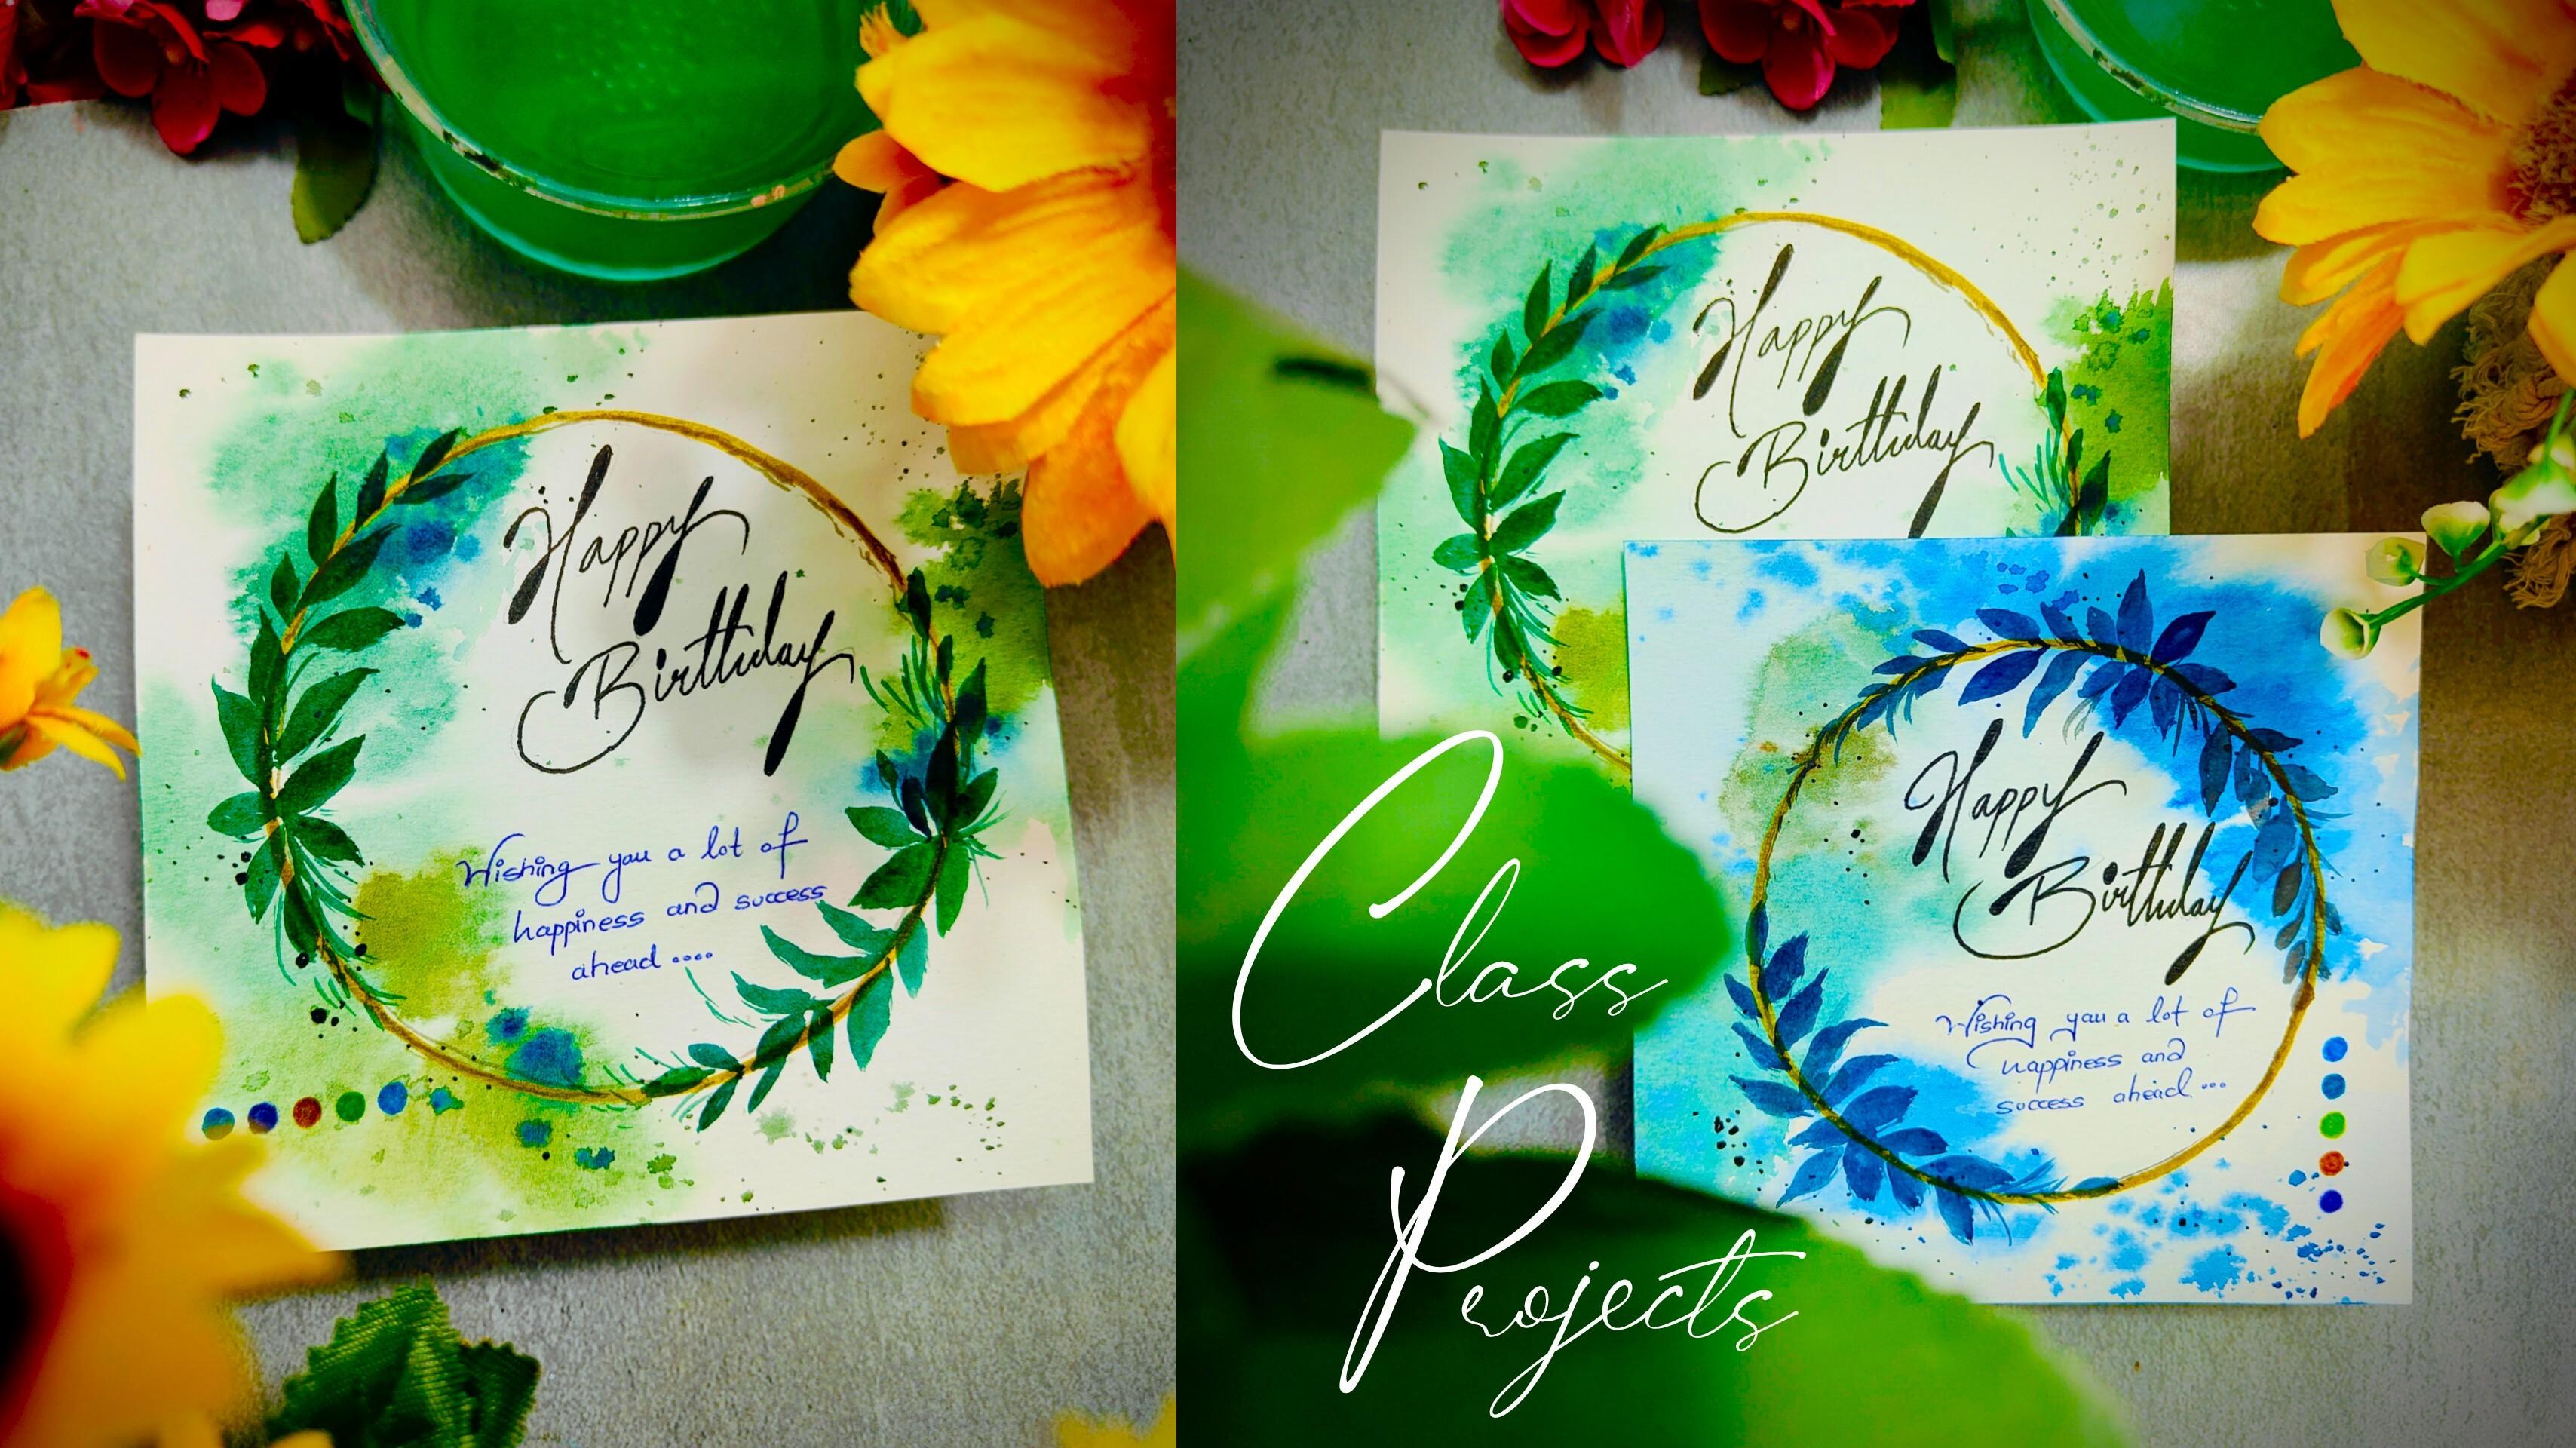
2. Details About the Class Projects: Hey, everybody. Now let us talk about the class projects
that we are going to create. No need to worry
about the output, enjoy the process of creating. I'll be giving you the details about the cards that we
are going to create. Observe them one by one and
carefully follow these steps. So as you can observe, I have
placed both the cards on the desk surface and extremely
sorry about the lighting. So let me talk about
the first card, which is having this beautiful green color scheme
that you can observe. So the first element
is going to be this beautiful abstract
background that we are going to create
using green color. There is going to be this little color palette that
we are going to add, followed by this beautiful golden circular shape that
we are going to create. Then we are going to
paint these little leaves using watercolor
in a green color. Then using some
beautiful calligraphy, we are going to write
happy birthday and a little message that you can customize according
to your convenience, it is absolutely fine. Combining all these
elements together, we are going to form
this beautiful card based on a green color scheme. So now apart from
this particular card, we are going to
have another card, which is going to have a
beautiful blue color scheme. So the elements are
going to be same. We are just going to compose
it in a different manner. We are going to
start by creating a beautiful abstract blue
background using watercolors, followed by this little
colour palette that we are going to create using
some colored sketch pens. We are going to
add this beautiful golden circle on which we are going to paint
these little leaves forming a beautiful wreath. Then we are going
to add a beautiful, happy birthday text using
some beautiful calligraphy, using a black marker. On the bottom part,
you can observe a beautiful message that we are going to write
using a blue pen. You're free to customize the message according
to the event. It is absolutely fine. So by combining all
these elements together, we are going to form these two beautiful fresh and fun cards based on happy birthday. You can change the
subject according to your convenience and
create the cards as well. And you can write it in your
own handwriting as well. I hope that you
got an exact idea about the class projects
that we are going to create. These are two beautiful birthday cards that we
are going to create, and it is not at
all compulsory for you to create it in
the exact same way. You're free to explore and experiment with the
entire class project. Now let us move
towards the next part.
3. Art Supplies: Hey, everybody. Now
let us talk about all the art supplies that you will need for
the entire class. I'll be giving you the details about the art
supplies one by one. No need to worry about having
the exact same art supply. You can go for any other
good alternative as well. So as you can observe, I have
placed all my art supplies in a systematic manner so that I can give you the
details one by one. So let us talk about the
watercolor set that I'm using. These are watercolors from Bonfll and it is just to
give you a reference, you can go for any other
good alternative as well. So now let us talk about
all the colors that you will need to create these
two beautiful cards. So the first one is brown, then we have yellow,
then we have blue, green, and dark green. These are five basic colors
that we are going to use to create the
entire class projects. In case you do not
have the exact shade, it is absolutely fine. You can use any good
alternative as well. Then the next art supply is a simple color
palette that you can observe is already having
some colors in it. So try to have enough space in your color palette so
that you can take out multiple colors and have enough space for
mixing, as well. Then the next art supply is a simple glass
container in which you can already observe
some colored water. Of course, we are going
to take some clear water. So it is important to have water whenever you're
working with watercolors. Then we have a simple tissue
napkin on which you can dab your brushes to remove excess amounts of
water and color from. You can also use a tissue paper. It is absolutely fine. Then comes another art supply, which is a simple rounder in which you can
already observe, I have fixed my pencil. So it's a simple tool
which is also known as a compass that you can use
to create a circular shape. So you can take out
a little pencil out of it and fix it, as well. And then this tool helps to
create a nice circular shape. Then the next art supply is a simple pencil that
we are going to use to write happy birthday before we write it with a black marker. Then comes a simple ruler
having a 15 centimeters dimension that we are
going to use to cut our rectangular watercolor
paper into a perfect square. Then we are going to have two markers that we
are going to use. So the first one
is from Artline, which is a simple black
marker that we are going to use to add minute details to
our card and write the text. Then there is this
metallic marker, which is completely golden. So these are two
markers that you will need to complete
the class projects. You can use any other
good alternative, as well. It is absolutely fine. Then a simple pair of scissors that we are
going to use to cut the watercolor paper and convert a rectangular shape
into a perfect square. Then comes the most
important art supply, which is the brush that we
are going to use to paint. It's a simple quill
brush of size too. You can use a round
brush as well, but a quilt brush will work better to create a nice
abstract background. Then comes the next art supply, which is a simple blue pen that we are going
to use to write some text on the bottom part
of the happy birthday text. Then comes these beautiful
colored sketch pens, having some blue,
green and brown in it. You can use any
colored sketch pen to create a little color
palette in the card. Now comes the last art supply, which is the watercolor paper
that we are going to use. So the watercolor paper that
I'm using is from Canson. It is an A five size sheet that we are going to convert
into a perfect square, and it is 300 GSM. You have to make sure that
you use a good GSM paper, which is basically
the thickness of the paper so that you can
apply heavy washes on it. You can use any other
good alternative for watercolur paper as well. So these are the two class projects that we are
going to create, having two different
color schemes, using all the art supplies that we talked about right now. I hope that you got
an exact idea about all the art supplies
that we are going to use to create these
beautiful birthday cards. Now let us move
towards the next part.
4. Card 1 - Green Leaves:
5. Card 2 - Blue Leaves: Hey, every buddy. You are most welcome to the second
birthday card, which I have named
as blue leaves. So let us start by creating a beautiful
abstract background. So I'll be using my
quill brush of size two, and we're applying
a nice thick coat of water on the entire
surface of the paper. Now simply flip the paper and apply another thick coat of
water on another surface. This will help you to
stick the entire paper to the desk surface and apply a nice thick coat of water
on the entire surface. In order to create a nice
abstract background, we are using this wet
on wet technique. In which we apply a nice coat of water initially
and then color. Now, this card is having
a beautiful blue theme. That's why I'm using a lot of blue color from
the color palette, add a little bit of water in it, and simply dab your brush
in this random manner. You'll observe that the color will automatically spread since it is having a nice coat of
water on the entire surface. No need to worry about painting
it in the exact same way, since it's an abstract
form of painting, so there might be
a little bit of difference between your
painting and mine, and it is absolutely fine. In fact, you are
free to compose and experiment with the entire
color scheme, as well. You can observe that we have created these beautiful
blue color patches. Now apart from this, we will add a little bit more color on
the left hand side as well. In case you find that your
paper is a little bit dry, you can reapply a
little bit of water. This will help you to make your color
spread in a nice way. I'll take a little bit of
brown and green together. And I'll just apply the color patches on
the left hand side. You can observe the way the color is spreading
automatically, and you'll definitely enjoy this particular step because
it is very much satisfying. Again, let me repeat that it is a mix and match of all
the colors together. So no need to worry
about perfection. Try to paint in a very
slow and steady manner, create your own
abstract background. Make sure that you leave a little bit of white
space in the center part. This will help you to write happy birthday in
a clear manner. I've taken a little bit
of more blue colour, taken some more
water in the brush, and simply tap your finger onto the brush to splatter
some color around. So you can observe the color is applied to the paper
in this dotted manner. I'll be using my black
marker from art line, and we are going to
create these little dots in an abstract manner again. There is no specific
way of applying it. You can just randomly apply
these little dots around. You can make a little
bit of bigger dots as well in certain areas
wherever you want to. You can carefully observe that these little black dots creates a beautiful contrast with the
color and the white paper. Now, apart from this,
we are going to use a simple rounder to
draw a circular shape. You can already observe it
is having a small pencil. Try to keep a little bit of distance from the paper edge and create a simple circular shape.
No need to hurry at all. Take your time and make sure that the circle
is visible to you. The pencil line is a
little bit lighter. I hope you can observe now, once the pencil line is done, we are going to use a
simple golden marker to apply it over
the pencil line. Now, this particular
golden marker creates a beautiful contrast with the white paper and the
color that we have applied. So it basically creates a nice shiny aesthetic
element to the entire card. So I've completed
the circular shape using my golden marker. You can reapply another coat to make the circle look a
little bit more darker. Now, once we are done
completing the circle, I'll take a little bit
of brown color from the color palette
using my quill brush, and using the tip
of the quill brush, you can just add these little strokes on
the entire golden line. It will make the circle look
a little bit more darker and add a little bit of depth to the entire
wreath, as well. Now, we are going to paint some beautiful blue
leaves around the circle. I'll take a little bit
of darker tone of blue, and I'm starting from
the topmost portion. You can observe the way I'm using the tip
of my quill brush to paint these little leaves on the entire surface of
the circular part. So we are starting from
smaller leaves initially, and slowly we will increase
the size of the leaves. You'll definitely enjoy
this particular step, and it is very satisfying
painting these little leaves. It is very easy and simple. You just have to use the tip of your quill brush and create these little pointy shapes coming out of the
circular line, of course. So the leaves are basically emerging from the circle line. So now you can
observe that I have slowly increased the
size of the leaves. Now as we move towards
the right hand side, we will slowly decrease the
size of the leaves as well. You can add these
little strokes as well in order to create
some little branches. Try to have less
amount of water and more color so that you can get a highly saturated blue color. And in case you want to decrease the amount of
water from the brush, just simply dab it
onto the tissue paper. This will help you to remove excess amount of
water from the brush. So now we have painted the leaves on the
top right portion. Let us paint few leaves on
the left hand side as well. These steps are absolutely same. You can paint the leaves in different sizes and slowly add them onto the
circular surface. No need to hurry at
all. Take your time and paint in a very
slow and steady manner. Try to have more amount of color and less water
in your brush. In case you find that your brush is having excess
amount of water in it, just simply dab it
onto the tissue paper. It will help you to remove excess amount of
water from the brush. So you can observe
that I have added a lot of leaves on the
left hand side, as well. I'm just creating
these little strokes coming out as branches. So we are almost done painting the leaves on the
entire circular shape. Now let us add a
little color palette using these beautiful
colored sketch pens. These are random colors. You can use any color
that you are having. In case you do not
have sketch pen, you can use crayons as well. So I'm starting to just add
these little circular shapes, having some blue, green,
purple, and brown. So this time, I am creating the color palette
in vertical manner. In the first card, we did
it in a horizontal manner. So we have added a
bunch of five colors together in a small
circular shape. So this basically creates a nice aesthetic and makes the card look a little bit
more attractive. Now comes the next part, which is adding a text message
which says happy birthday. You can write any other
message according to your event or whatever
purpose you are using it for. So I'll use a pencil
initially to create a nice reference so that in
case there is any mistake, you can rub the pencil line
and just make it correct. So using a pencil, we are
going to write happy birthday. So let us start with happy. No need to hurry at all. Try to write it in a very slow
and steady manner. You can write it
in your own way. I'm just trying to use a nice
calligraphy handwriting. In case you want to use bold letters and a
simple handwriting, it is absolutely fine. So I have written happy
birthday with pencil initially, and I'll be using my black
marker from Artline, and we will just trace
the pencil lines. You can observe the
beautiful strokes that we get using
a black marker. Right now, it's a single stroke. We will enhance the
letters so that it looks a little bit more in contrast with the background. I have written happy. Now
I'll be writing birthday. So we are done writing
both the words and let us enhance the letters by adding these black patches
in certain letters. This will help us to create a beautiful contrast with
the white paper background. Similarly, you can add
it in happy as well. So again, let me
repeat the same thing. You can write it in
your own handwriting. It is absolutely fine. I'll be using a
simple blue pen to write a beautiful message
on the bottom part. You can write the message
according to your convenience. It is absolutely fine. I'm writing wishing you a lot of happiness and success ahead. You can write any
message that you like. It is absolutely fine. So we are done
writing the message and completing the entire card. Let me take you a
little bit closer so that you can observe all
the details carefully. Combining these little
elements together, we have formed this beautiful
happy birthday card using the medium of watercolors. I hope that you enjoyed creating
both the class projects, and I'll be very excited to see it in the project gallery. And I also hope that you enjoyed the entire class and got
to learn something new. Now let us move towards
the class conclusion.
6. Class Conclusion: Everybody, you're most welcome
to the class conclusion. I hope that you enjoyed the entire class and got to learn something
new and creative. I personally love to make handmade birthday cards whenever I'm gifting any loved ones. And in case you want to use
it for a different purpose, it is absolutely fine. You just have to
change the message. One thing that I always tell my students is to practice
on a regular basis, and no need to worry
about the output. Enjoy the process of creating. I would be very
excited to see all of your class projects into
the project gallery, so do not forget to add them
into the project gallery. It's a very humble request from my side to you to
leave a review for the class as it encourages me a lot and my class can reach
many more students like you. At the end, I would like to say, keep learning, keep practicing. Thank you so much for joining the class and happy painting.
 Rutvik Patel, Artist and Instructor