Transcripts
1. Welcome to the Freelance Contracts & Documents Masterclass!: Freelancing offers
freedom, independence, and flexibility, but it also comes with a lot
of responsibility. One of the most
important parts of being a freelancer is knowing
how to protect your work, your time, and your income. In this class, we're going
to focus on documents that every freelancer needs from
resumes to cover letters, proposals, contracts,
feedback systems, and other things that
you're going to need as you move forward in
your freelancing journey. Host o kahui a freelance
designer and creator, and over the years,
I've worked with various clients
across the globe. I have learned firsthand
how important it is that you have the right tools to communicate with your clients, how to protect your business, and make things go
a lot smoother as you navigate through
multiple projects at a time. In this class, I'll be
showing practical guidance based on real experience
and not legal theory. We'll start by looking at
the freelancing reality, the pros and cons, and then the documents that you're going to need as a freelancer. Then we're going to be working through some resumes
and cover letters. With the examples
that I'll provide, you'll know exactly how to go about making your very own next. There we're going to
move into contracts, invoices, and feedback systems, as well as some dos and
don'ts when it comes to protecting yourself and
your business from clients. This class is made to be
approachable and practical. You don't need any
legal background to understand what we're
going to do in this course, just some curiosity
and a will to be a stronger and more
confident freelancer. So let's go ahead
and get started.
2. Introduction: Hello, everyone.
Welcome to the course. In this course, we're
going to look over the different
documents that you're going to need as a freelancer, what those documents are for, and how we can create
them ourselves. These documents are crucial
to freelancing success, and I'll walk you through
every bit of the steps. And that way, by the end of the course and with the
activities provided, you would be able to
have your own set of documents to use
on your next project. So without further ado,
let's get started. H
3. Pros and Cons of Freelancing: Now before we dive into how we can create the
documents, what they are, and other stuff, we first need to understand everything
about freelancing. Freelancing for those that
don't know is when you get to work on your own terms and
you are your own business. So say you are a writer, you get to go and find clients, charge them as much as you want, and you're responsible
for your own marketing, your own business
development, et cetera. There are some good things about this and some bad things. I've listed some of
the main ones here. There's more than this,
but for the sake of time, we're just going to focus
on the important ones. First good thing is flexibility. You get to freelance
from anywhere. You could be half
across the world and still working for a client
in a different country. You get to choose your hours as long as you can complete
that project in time, doesn't matter if
you spend 5 hours on one day and 1 hour in another. Flexibility is the first one. Second thing is income. Because you're not spending
money on office cost or it's not getting
spread out in a company since you are
the company itself, all of the income goes to you. And you are setting
your own prices, sometimes you will be
getting a large amount of money and you can just
scale up as you go. You choose the amount
of projects you want to do at the
same time, of course, not overdoing it, but
there are no limits as to how much money you
can make as freelancing. The next thing is diversity. As a freelancer, you're not
tied down to one position. You can do different things as long as you're qualified
for it, of course, but you get to set
your own services and offer them to
the right market. Say you are skilled in design, you can work with logo projects, website projects,
packaging, and so on forth. You don't need to go
up to your higher ups, maybe pass a few interviews
before you do that. You are in control
and you get to expand your business or make it smaller whenever
you feel like it. The next thing is that
freelancing is collaborative. You get to collab
with other people to finish a big project say
you're working on a website, you need a copywriter
to write the text. As a freelancer,
you get to do that. Maybe you can share the amount invoiced and build a
connection that way as well. This also looks great. If you have a online presence, you can tag that person you
collaborated with and just increase your
network while you're increasing your income
with those big projects. Next is skills. The more skills you have, the more clients
you're going to have and the bigger the
projects are going to be. With skills, since you are
setting your own time, you get to take on projects
that challenge you, maybe spend some time
learning new skills, and challenge yourself
every step of the way. The only risk that you
would be putting out there is the risk of not
completing that project. But if you do it
in a safe manner, which we'll talk about later, you can use the
freelancing opportunity to build upon your
skills every month, every year, and just become
better with every project. Finally, there is a lot of space for personal
development. This ties in with skills. If you want to expand your
services into a new field, you as a freelancer have that opportunity to
get qualified for it, maybe via some online courses. You can take classes as well, learn it off YouTube even, and not only grow as the freelancer but
grow as a person as well. With freelancing, there's also a huge demand for
proper time management, project management,
financing, and other stuff. So you just get to grow in so many ways when
you're freelancing. Those were the good things. There's always a
downside to freelancing. The first thing is
that you have to go and find your own clients. So when you're working
with a company, you have a marketing section. There's already a team
looking for clients, running ads, and
doing all that stuff. And then if you are
in that company, you just get to do the project. But with freelancing,
you have to do you are the marketing
team, basically. There would be some
months where you have zero clients and other months when you have
multiple or too many. And that's where the
collaboration part comes in for those months where you have just too many projects
and you could use a hand. That's the first con.
Marketing skills is something you would have to hone in order to be successful. The second thing is that
there is no routine. This could be a con
for certain people. Those people like to be at
a place every day at nine, do some meetings by 12, always have someone in the higher up telling
them what to do, and there's just a steady routine that
they'd want to have. With freelancing,
nothing's steady, nothing's 100%, and that
could be one of the cons. The next thing is security. As we said, you do have
to find your own clients and that would mean that you're not always guaranteed work. A company, like we said, someone else is securing the clients and you don't really have to worry about that. But with freelancing,
there's always that concern of what if I
don't find enough clients? What if I don't make enough
money for next month? That is a big con
of freelancing. That is why it's
really important to secure enough clients in
advance, have a good network, and put yourself out there, so you're never in that
position where you don't have enough income to
sustain your lifestyle. Next, I've listed
this as insurance. These are basically
company benefits. It counts for other stuff too. But most importantly,
you will not be getting health insurance as a freelancer like you would from a company. You would have to get your own and that can
sometimes be more expensive than if you were
to get it from a company. Next is business. Since you are the business, you want to make sure
your business model is good, it's scalable. You have a good revenue model, you have the right prices to count for the operational cost, the licensing, et cetera. Making a good business plan for your business can be a con, especially if you're
not experienced in it. But if you're not, there's
tons of resources out there and you could use those
to better your operation. We have legal stuff. There are times
where freelancers face the common issue of clients not wanting to pay or copyright issues
and all of that. Companies usually
have a legal team, but with freelancing, you don't really have that
unless you go and hire a lawyer to help you
out with the stuff. So if you don't get
paid by a client, you would have to file charges and that whole process
is very time consuming. It can get a bit annoying. So that's another con. Lastly, is out of pocket cost,
the place where you work, the Internet, the tools you use to make
that project work. These are all from your pocket. No one's paying
for those things. And that's why it's
really important to have the right
revenue model so that the project profit you make can handle all of
these out of pocket costs. Those were some
basic pros and cons. As you can see, they're even. It doesn't mean that
just because there's all these cons, you
shouldn't freelance. Freelancing in general is very rewarding and it's
definitely something you should consider if
you're not feeling fulfilled in your
company or you're just starting out and
you want to just expand your skill sets and
make money off of that. Now that we know
what freelancing is, what are the good
things and bad things, let's talk about what kind of documents do you need
and what are they for?
4. Kinds of Documents: As we mentioned, the
purpose of this course is to talk about
freelancing documents. These are documents
that you should have at hand before you
get any clients. They do take time
to create and find, especially when it comes to
some of the legal stuff. You want to make sure you are secured and that you've thought ahead of any bad things or
anything that could go wrong. These documents, it
really depends on what kind of freelancing
role you have, what kind of industry you're in. But generally, you would be having the ones that
I'm about to list. The first thing is a resume. You got to get that client
first and before you do that, you have to show that
potential client that you're capable
of completing that service and
that you're just qualified for the amount of money that they're
going to give you. Resume will include
your certification, education, previous work
experiences, any portfolios, if you have any some
additional information about maybe how many
languages you speak, what kind of software and
hardware you're familiar with, and those will all be
listed in a document. In a further lesson, we're
going to talk about what makes a good resume and what makes a bad one because we
all have resumes, but sometimes we have that resume that we
think is really good, but we're not
getting any clients. There are certain things
that you have to consider, especially in today's world, and we're going to go over
that in a further lesson. You are in the
creative industry, sometimes you can skip the
resume and just show that potential client or your
network, your portfolio. Unlike a resume, a
portfolio is more visual. If you're a web designer, it would be samples of the websites you've
designed before, going over them in a
form of case study, talking about how you
got to that design, how long it took, what
tools you use, et cetera. Thing if you're a photographer, you want to have
your photos there, list the people that
helped you with it, the models, maybe
the camera you use, the techniques and just
from a portfolio alone, the potential client can
tell how you operate, what's your process,
and what kind of style you have in
delivering that service. But if your work is not visual, you would just be okay
with having a resume. I would suggest
having both of them, a resume and a portfolio because depending on what
job you're applying to, what clients you're going after, they may be asking
for both or either. Next thing is a cover letter. A cover letter basically is
a letter where you're trying to convince the potential client to give the project to you. This could include
you talking about how many years you've worked
with this industry, what kind of
experience you have, how you're going to help
them achieve their goals, maybe show them your portfolio
in the cover letter, and it would just be a, a one page document where you would be
talking about that. Again, we're going to go
over this in another lesson, talk about what makes a good cover letter and
what makes a bad one. It is often seen as a very
tedious thing to make just because you
got to basically convince that person
to give you a chance. Sometimes you may feel like
you're going overboard, sometimes there's not
enough information, so we'll look at some examples and by the end of this course, you will have either a new
cover letter or a refined one. You got your client. Now it's time to go over the
project itself, and that's done via a document
called Statement of Work. Other times you
may see it as SOW. This document, you're going
to outline the project, the timeline, the costs, and anything else related to it. This is something that
you would have to create after talking
to that client, maybe after a
couple of meetings, or if the description they provided for you is sufficient, then you wouldn't need
to have those meetings. With the documents, you are
just confirming that you got an understanding of what the project is and you
are telling the client, it's going to take this long, it's going to take
this much dollars or whatever other currency. And having these
in written format is going to ensure that
everything goes well. And if the client is asking
for additional things, you can always refer
back to this document, remind them that the
thing that they're asking for is not in the outline
that you agreed upon. It's obviously going to
take more time, more cost, and it's always good to have
evidence of conversations. So instead of talking
about timeline, costs and all of that
via email or via chat, put it all in one
document and have it saved someplace so that
you can refer back to it. Next thing is a proposal. Proposal is a bit
different from an SOW, especially when it
comes to visual stuff. This is where you're
going to show them how you are going to transform,
say, their brand. Over here, you can include stuff about the process
that you're going to take, the tools that
you're going to use, if you want to mention those, and just visualize what you were talking about in
that previous document. When you show them a vision
of the result of the project, they're going to be very much intrigued to work
with you and it just gets them excited to just trust you and go
along with the project. Say you're working with a company that
needs a rebranding. Over here, you can show some of the previous work you've
done with rebranding, have a before and after
photo, explain the process. If you want, you could show them a little sneak peek of what their rebranding
is going to look like. Not always possible
because this is the start, but some people do that, and this is again something you want to have at hand
to refer back to. Once you send the
SOW in a proposal, this is the time for them to think about it
and see if this is what they want before going on and signing on the contract. So that's the next
thing, contract. We have the client, we have the idea, the scope, the timeline, the cost. Now we just need to get
evidence that they are giving you the green
light and they're happy with what
you've provided them. So in this contract,
you're going to rephrase everything
you've said so far, what the project is, how
long it's going to take, how you're going to invoice that cost that you agreed upon, how are you going to deliver it, and maybe you can mention the laws governing laws
in case things go wrong. And depending on your country, there's going to be
some additional fields that you're going
to need to put in. And, again, we're
going to look at some examples with contracts. There are tons of
templates out there. Writing a contract can be a bit tricky because you have to use formal wording and
just some legal stuff, which not everyone
is familiar with. So that's why we can use the Internet and make
it a bit easier. Next up is an NDA form or a
non disclosure agreement. You don't always have
to fill this up, but sometimes
clients want you to sign this contract or you
want them to sign it. With this document, you
are signing off and agreeing that
whatever discussion happened in this project, if there were any talks about certain future ideas
for the company, you will not be sharing
that with anyone else. If the company gave you certain documents for
you to do your project, you will no longer have I mean, it's not
right to share it, but this document takes your signature that you're not going to show it to anyone, talk about this company to any just keep everything
confidential. This depends on the company. Again, you don't have
to always do this, but it's nice to hear the
concerns that the client has. If they ask you to do it, just read the agreement,
if you agree with it, sign it and that way, there will be less problem in the future if
something goes wrong. With this document,
you are basically telling them that you need this much to complete the project, and apart from your
own service charges, you want to list the
stuff for the operation. If you have to build a website, you would be listing
the hosting prices, the domain prices, and
just informing them where this large amount of
money is going to be spent on. Again, being very
transparent with the client, try not to put one
general price and assume that they know what that money is going
to be used for. You want to build trust with your client as
soon as possible. In this document,
you can do that easily when it comes
to it makes it a lot easier for their finance
department to write you a check and not have to ask you a lot of questions about,
why is it this much? What about this?
What about that? Set yourself upright
and send one of these. This is outside of the project. This is just about
you as a freelancer. Because you're not
having your money handled by a finance
department and a company, you are in charge of your
own taxes, your own income, and depending on where you live, these forms will be different. I'm not going to
be talking about what forms you're
going to have to sign. If you simply search
tax forms for, say, the United States
as a freelancer, there's going to be
a bunch of stuff and you want to make sure
that you have all of these documents so that you're
up to date with any taxes, payments, regulations,
et cetera. Next is property. A lot of times this is in
the freelance contract, but there are cases where
this is a separate document, and this usually goes for
creative roles where, for example, you're a
photographer and you want to discuss the
property rights. Or the photographs
that you took. This could also be your
licensing regarding the models. If there's any copyright stuff that you have to handle
before you start the project. This is where you can do it. If you don't have that many
stuff with that project, you could just fit
that one or two line in the contract that
we mentioned before. But it's important to
discuss the rights that you would have as a
freelancer over that project. Freelancers like to have the clients sign off
on the fact that the stuff they design in the process that don't
make it to the final cut, those will belong
to the freelancer. Sometimes clients, they want everything from start to
finish to be their property. But if you want to keep those brainstorming stuff to yourself and then use
them for another project, you have to make
that clear early on. Next up is invoices. You've done your
project, you've sent it, they like it, and now
it's time to get paid. Depending on the
payment plan that you disclosed in your contract, you would be sending either
one or multiple invoices. A lot of tools out
there for invoicing, to send reminders,
collect the money, et cetera, but you can also
go ahead and make your very own in Canva
and other platforms. Now, regarding how
much you invoice, that's completely dependent on the amount of
experience you have, the amount of time it took for you to complete
that service, and if there's any
additional costs that you had to pay for the
service to go through. The final thing is
feedback and testimonials. This isn't necessarily
a document you send for people to sign. It's nice to get feedback from the client after
you've been paid, you've done your project. Not only does this make sure that you did a good job and
the client is happy with it, but it's also going to look
great on your own website or your upwork page or wherever you are
bringing clients from. Having these testimonials
make you seem more trustworthy and we'll hopefully
get more clients for you. You can either have them
fill out a Google form, they can come right
beneath your page, write a comment on your website, or you could collect
them the old fashioned way and
that way you can just put it anywhere that needs
some sort of credibility. So those were the outline of the documents that
we're going to be exploring in this course. Each part is going
to go over how we can create these documents,
where we can get them, and where we can maintain all of these documents so
that when we get a client, we just fill out
their information and get started with
the project right away.
5. What Makes a Good Resume?: The first thing you're going to need in order to land a job, any job, whether it's
freelance or not, is a resume. We're going to first talk about
what makes a good resume, what are some things
you can avoid. Later on, we're going
to craft our own. If you already have a resume, you can use the tips that
I'll show you to perhaps modify yours or add
a few things in it. First let's see what
makes a good resume. Clear formatting is something a lot of people underestimate. They tend to take it way
too far with the fonts, the layouts, they put
crazy lines in there, different colors
and all of that. But bear in mind
that these HR people or the client goes through a lot of these
applications and they just want to skim through and see
something that stands out. If you make your resume really hard to look at,
they will not look at it. So what we're talking about by formatting is the
right font size, the right fonts, and
the right layout. Going to see some
examples in a bit. But the first thing
you're going to need to have is a clear
formatting so people don't skip through
your application or request for a project. The second thing is not having any unnecessary
information. There are times
where people want to just let the viewer know everything about them
and when you waste people's time telling them things that they
don't need to know, that is something
that's going to probably make them want
to skip your application. So there's no need for them to know whether or not you
have a driver's license, where you went to kindergarten or what your hobbies are even. These are just things that you don't need
to put in there. We are going to
discuss what type of information
you're going to need instead and how personal you
can get with your resume. Next is a simple design. We talked about formatting, about the layout, the
font, and all of that. But when it comes to the
visuals of your resume, it shouldn't look like
a poster or fire. There's no need for
these random shapes, colors, three D art,
characters, all of that. Like we said, we
want to make this the easiest piece of paper that they're going to
skim through so they could immediately
just see your skills, your work history, and then
make a decision based off. Keep it simple, stay
away from crazy shapes, and we're going to take a look at some examples
of what type of shapes you can have in a resume and how
those can benefit. This just goes back
to what we were saying about clear
formatting, a simple design. When I say no graphics, that does include a headshot. I've seen some resumes where the headshot is just really
big, it's in the corner, has all these colors next to it, and then the information
is all the way around it. Now, psychologically,
when someone stars at something and
sees a human face, their attention goes
to that photo first. So they're going to see you what you look
like and all of that. But that can be a
distraction from all of the information
that's below it and say they want to spend 5
seconds per resume review, they've already lost 2 seconds
staring at your photo. So it's not recommended to have a headshot
in your resume. They usually go for having a link to your LinkedIn or
a link to your portfolio, where the client can just go over there if they want to
know what you look like, want to know more about
some personal stuff. They could just do that
if they wanted to. But at first glance, there shouldn't be that
much graphics or photos. Remember that this is
not your portfolio. That's a whole different
thing. This is your resume. Your resume should
be ideally one page. Even if you have a lot
of work experience and that just goes over
three to four pages, you should keep the
work experience that's relevant for the project that you're
trying to get. Put that on your page and just keep it at most two pages long. Like we said, the client
doesn't have a lot of time. They got tons of
freelancers to look at. You just want to
make it short and sweet straight to the point, one page is ideal. Now, no matter what job
you're applying to, you're going to need to have some relevant links for
the person to get to know you more and specifically get to know more about your
style of business, and more specifically,
they get to if they want to learn more about how
you conduct your business, some photos if needed, if
you're a photographer, some references, how you have a social
presence and all of that. The links that you're
going to need to have 100% include LinkedIn. That's the most basic thing. If you don't have LinkedIn, just take time after
this lesson. A profile. It doesn't take long at all, put in some of your basic
information and just put that link in your
resume as soon as you can. Not only will this show
the potential client that you are on these
professional platforms, but they could
also see what type of people you're
interacting with. What's your social
stance on things? What are you reposting? How often do you talk about what you think
and all of that. Twitter is also another link that pops up a lot on resumes. Now it's X, but that again, just shows the
potential clients, your thought processes,
what you think about the relevant industry
that you're applying for. It's always nice
to have in there. Of course, if your
Twitter account is full of unprofessional stuff, then you don't
want to link that. Lot of freelancers make a separate Twitter
account and with Twitter, they actually find
a lot of clients. This is optional
but recommended. Make a Twitter account for
your freelancing business, have it in your personal information section
of your resume. If it's relevant
to your industry, you are going to need to have
a link to your portfolio. Now, a portfolio doesn't always have to be some fancy website where you've bought the domain
and you're hosting it and you're paying yearly
for it to stay up. It could just be a
B hands profile, a Google site even, just somewhere where
people can see more evidence of what you're
seeing in your resume. Those are the links that
you're going to have. There may be additional
ones depending on the industry that you're
trying to get projects from. So take a look at relevant freelancers and what their profiles look like
when you go under Instagram. What kind of links do
they have in there? What did they talk about
in their Twitter account, and what does their
portfolio look like? Instagram is also another thing
while we're on the topic. You could make a Instagram for your freelancing business and
just link that there too. Remember that you
are a freelancer, but technically you
are a business. So any social proof
of your business and your activities
will help greatly in building trust with
this potential client. All right, so let's talk about the work experience section. It's really easy to
just say that you worked at X on Project X, and then you did X, Y, and Z. Now, it's not that impressive
that you did something, but more about what happened
because of what you did. Say you were logo
designer for Amazon. You're listing
your bullet points that you designed a logo, you did the brand
design and all of that. But after saying what you did, you need to have a section for the impact that that action had. For example, with this new
poster that you designed, social engagement
went up by 20%. Because everything's
digital now, there's tons of
way where you can figure out how many
likes a post had. Was it different from
the post before? And companies, if you do end
freelancing for a company, they do keep track of
these stuff anyway, so you can just ask them
get some insights from that company on how your work affected their
sales and whatnot. Now, when you're
talking about results, numbers look great on resumes. Instead of saying my posters had a tremendous effect on sales, try to add some
numbers in there. Sales went up by x percent. We brought up a new website and this many users are on
it now every 5 minutes. That clearly show your
impact in numbers. They love seeing that and you should try to get those numbers
in any way that you can. Add to those two points
that we just mentioned, instead of having a word in
there that you did this, X percent went up, try to be
as descriptive as possible. You weren't just a
brand designer who helped bring in 5,000 viewers. You were a brand designer who collaborated with X and Y teams, increased revenue by X
percent, did this and that. All of this bullet points should be at least
one to two lines. Don't try to just put
in a few words in there and expect the
client to figure out exactly what you did and how specific were your
roles in that project. Your job. Now, this
can be hard to write, but there are some
tools that I'm going to share with
you by the end of this course where they get these specifications from a few keywords
that you give it. It's powered by AI and you don't really have to
think exactly what you did. You just put in the
general idea and the AI tools will make it all nice and pretty
for your resume. Final thing is that your
resume should be easy to read. Sectioning is important and
when you look at your resume, your eyes shouldn't
shift to one place. This just goes back
to psychology. You don't want to have anything popping more than the others. Everything should be
in one level so that people can just read
it from top to bottom without any eyesores and they can easily understand
what you're talking about. Stay away from using just
really big words without any explanation and just assuming that the client can
figure out what you did. These were some things that
helped make a resume better. Now we're going to
take a look at what a good resume looks like
and what a bad one does. We can just point
out things that I mentioned ink from there.
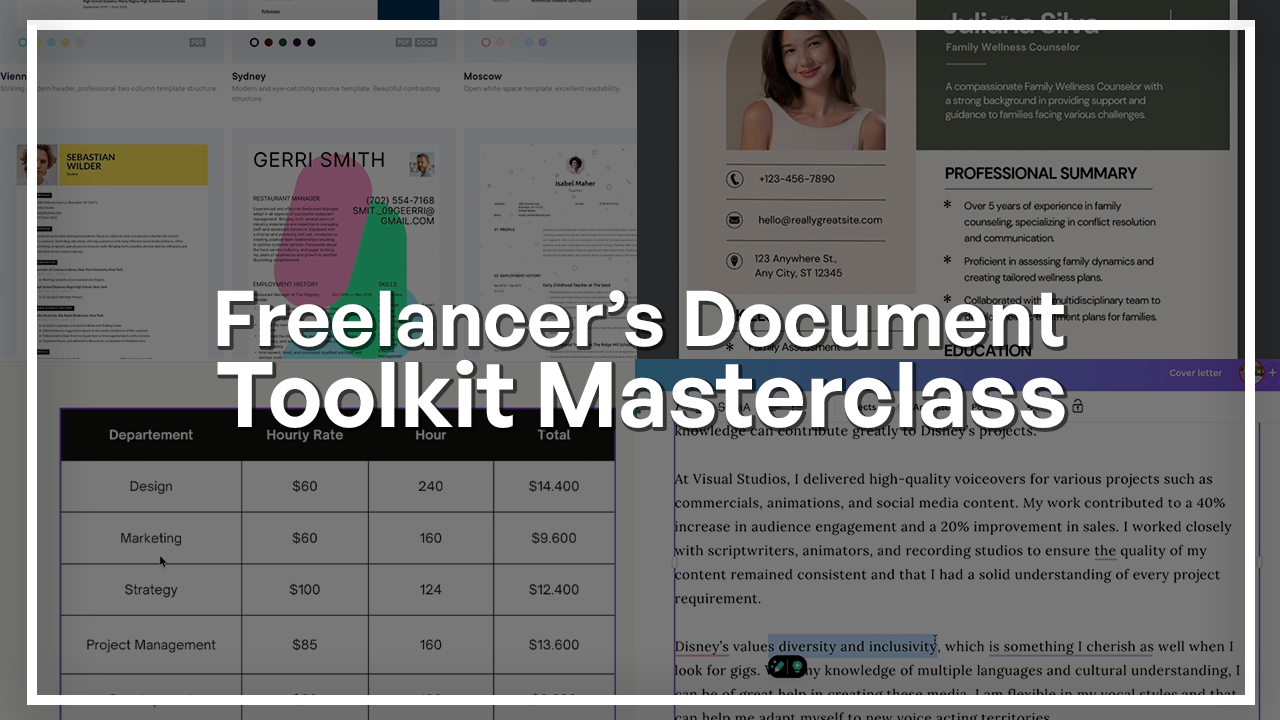
6. Resume Examples: With bad resumes, there's just so many ways that
I can show you, but I got four right here where we're just going to
look at what makes them bad and just highlight some of the stuff we
talked about earlier. This right here, it just
has the work experience, the names, the personal info
up here, and all of that. But immediately, we can see that the font is not easy to read. It may seem nice in
that person's opinion, but readability is
really important, and you got to just use some
design psychology here. Using online tools, they already have the
right fonts for you. They got the right font size, so you don't really have
to worry about that, but it's important
to know how with just changing a font into something that
you think looks nice, can result in the reader
to not be able to read your thing and just your resume
turning into an eyesore. Fonts are important. Next, notice how your
eyes immediately goes to that blue box that just contains the person's name and their
personal information. Color is not something that
you should completely avoid, but bear in mind that when you use them to a certain extent, it could end up distracting the reader from the more
important things down here. We can also see that there is no formatting in this section. There is formatting up here, but here we can't really highlight the
things that are different. For example, dates are separate from your
work description. The name of the company is
different from your title. These are things that need to be separated via the
right formatting. Font size is also another thing. The personal information,
you can barely read it, especially with the font choice. It's all scribbled up up
there and if the person does decide to hire you does
not look very professional. Next, we have this resume. I picked all of these
resumes from the Internet, so there's other stuff
that you can go and visit. Here we are getting
two distractions. The first one is a
photo on the top left and it's not even a
headshot to begin with. Let's assume this was an
adult looking sideways. If you are going to put
headshots in your resume, even though it's not
really recommended, at least make sure it's a headshot where your head
is close to the camera, you're looking in the camera and you're just in a
professional setting. After that, we have
the skill section. Again, with the color,
it's distracting the eyes from the more important things over here. That's another thing. But in terms of font
and formatting, this one is much better
than the last one. They did bold and
capitalized the sections. Work experience,
skills, organizations. These are three
separate parts of your resume and they
used formatting to do. Addition to the formatting, they edit these lines,
which is a good thing. Again, it's not
something too graphic to distract the eyes
from the resume, but it's simple enough to draw a line between these
different sections. Now, over here, we do
also have a proper font. It's not decorative or something
like the previous one. It's easy to read and you can see sometimes
they folded it. There are times they didn't. This one's bigger, this
is smaller, italicized, just setting apart
these different parts for the work experience. The top right, we
have some icons which I do not recommend. Again, this counts as
graphics can be distracting. You want them to spend more time here than these
distracting elements. Now, here is where you try to combine a portfolio
with a resume. These are completely
different things. They do both tell the client that you do service X
and you're like this, but they should be separated. This looks more like a poster
and when you look at it, the first thing you
see is that headshot especially since it's rather
professional looking, but it's way too big and
in addition to all of the shapes and intro
graphic elements, it's making the whole
thing very distracting. When you look at this from afar, you just focused on all
the shapes and colors, and that's just basic
design psychology. If you don't want people to be impressed by these
decorative elements, you should avoid using them. The thing with resume is that we just want to
have some words out there that can convince
the reader to hire. So stay away from the
colors, the shapes, the big head shots, and the icons as well. Our last example is
similar to the last one. It's a combination
of all of them. This looks like a poster. Even if you are applying
for a arts project, try not to go for
something like this. Want to seem professional. And bear in mind that a
lot of these companies nowadays don't have
a human looking at your resume initially, and they just have
these trackers where they put the
resume through, some of it gets scanned,
rejected, accepted. So if it's something that can't
be scanned automatically, it's going to be rejected, and you don't want to
do that to yourself. So those were some bad examples. Let's look at what a
good resume looks like. This right here
is a good resume. I got it from my
perfect resume.com. You check out their article. But you can see that
immediately you're just met with this even
distribution of text. There is some color, this dark blue, but it's
not an alarming color. So this is just
color psychology. Design psychology. If you
have colors that are vibrant, such as red, orange, yellow, neon colors, those are something that's going to grab the attention of the
viewer immediately. Notice the big red button, it's red, it's alarming, you're drawn to it and that's not something you
want in your resume. If you do end up using colors, go for something very neutral, very cool and just not as
distracting such as blue. This dark blue works great. You can go for dark green
or maybe gray or something. But try to avoid
distracting colors. Let's explore what else
we have over here. This is the personal
information section. They have their email, their number, their location,
and their full name. Over here, we have a
summary of what they do. And we're going
to talk about how we can write this
paragraph effectively because if you just
say that you're an amazing writer and you're
just really talented, so is everyone else. It's important to word
it better and be very specific as to what makes you different from all
the other applicants. Again, we have the lines
separating the sections. When I look at it
at first glance, I can see and
differentiate all of the texts that I'm seeing
into different sections. We have work history.
It's been formatted well where I know the dates
are on the left side. The title is bold and the
company is to dash location. That's consistent through
all of the work experience. Every one of them
has bullet points. There are the numbers
that we talked about, specifically what they
did and the result. First over here, they guided
a cross functional team. Then this is what they did. The result is resulting in a 20% increase in
overall efficiency. They said what they did
and then the result. They did not just
put this section in. We have the skill section. This is really important
for certain jobs. If you work with any programs or certain hard or soft skills, this is where you just want
to go all out and list them. We have our education here. You can see that it does
follow the same format up here where it was
company location. Here's university location. So it's easy to read.
There's good formatting. It's a simple design. Down here, we have
certifications as well. Now, depending on the type
of job you're applying to, you may have additional
sections such as if you want to be
freelance voice actor, you would want to put in the
accents that you can do, the languages that you know because it's relevant to
what you're applying. But this is a general example of what a good
resume looks like. Over the next couple of courses, we're going to go over each
section, write them together. And before we do that, I just want you guys to take
a look at your own resumes. If you have one. If you don't,
you can skip this part. But if you have your own resume, open it up and see
what points that we mentioned applies
to your resume. If it does apply to it, then we're going to fix it in
the next couple of lessons. But it's important
for you to be able to tell now that you have
all this information, what parts of your resumes
could use some modification.
7. Writing a Resume: Now let's actually
write a resume. We're going to go through
each of the sections, see how we can make them better. I'm using Canva for this lesson, but you can use any other
platform. Canvas free. The page that you
see right now is an example of a resume template that they have on there and
you can just take this in, change out the stuff
that you want, put in your own experience, and layout wise,
you're good to go. But you could also start
from a blank page, impart the text, position them, use the rulers and all of that. That's just going to be a
little bit more time consuming. There's also stuff that you can download from the Internet. In the next lesson,
we're going to go over some resources where they can help you quickly
write resumes, maybe check your
resume for any errors, and give you
additional templates. I made a new page down here, still keeping the layout, just deleting the text. We're going to be
pretending that we are a freelance voice artist. This resume needs to
get me freelance gigs. What I want to do is mention
my skills, give a summary, and we're just
going to start with the personal
information section. First, let's put in our name. I'm going to call myself Claire
Keen. Say that's my name. Now, right below the
name, we want to put the contact information and the links that we talked about. I'm going to put in a number. You don't always have
to put a phone number, but a lot of places
prefer to just call you. Just put a random number there. Then I'm going to close this up, alter option and just hold
down shift to make a copy. Claire at Keegan at
keen.com or at Gmail. The next thing we want to
put in is our LinkedIn. So links.com sshShUSRNN. The final link could
be your portfolio or a website that you're
hosting your portfolio on. So I'm just going to
put Clare site.com, say that's my personal website. Since I'm a freelance
voice actress, I'm going to also add
a social media account just so that if they
want to just see a wheel of all the
voices that I can do, that would be a lot easier. Add Claire Kean, and
these are my information. All nice and tidy. We have this line here to go
to the next section. Over here, we're going
to put in our title. I am a freelance voice artist. Now we're going to write
an overview of what I do, what I can do, and how many
experience I have, et cetera. Let's start with some adjectives that are not too general, but can also tell them that you are a good choice
for their project. I'm going to go with
dynamic and result driven voice artist with eight years of experience. Okay providing high quality
voiceovers for animations, videos, commercials
and other projects. Actually, instead of
saying other projects, let's be more specific,
that social media. Let's go to the next line, ability to enhance
client engagement and brand messaging through a
versatile style performance. My expertise lies in
different languages and delivering audios that are catered to the project need. This is a general overview. The first things that we use, the adjectives, as you can see, they're not or it's highly professional or really
experienced voice artist. We're talking dynamic because I mentioned that I'm
able to record things in different languages and I have a versatile
style of performance. That makes me dynamic. So using words like dynamic
and results driven, set two apart, try not
to use generic words. Next I mentioned my eight
years of experience. Now, if you're just starting out and you don't have
this much experience, put in something else
that is impressive. So instead of x
years of experience, say you have knowledge
of over five programs, or you won your first
award at the age of 12, something that
will show that you are just not the
basic freelancer. We have high quality
voiceovers and then I'm mentioning exactly my niche. Animations, videos,
and all of that. I will just add corporate
over here just to make it even more Niche. Anything that corporates want, whether it's animation, videos, et cetera, I'm the guy for them. Next, we have ability to enhance client
engagement, brand messaging. These are keywords that usually people seeking for
voice artists look for. They want to have
someone voice over their new commercial,
create more sales, more engagement on
their social media, and I'm just telling
them that I can do that via my versatile
style of performance. Then I'm mentioning something
about my expertise, which is the different
languages and just delivering audios
cater to the project need. It's not that long,
not that complicated, not that basic or general. This is a good example
of your summary. Now let's go down to
professional experience. I'm just going to
copy this section so I don't have to import
the text from here, just grab them all, paste
it, put it right here. Let's talk about the
companies we've worked at, going to say Visual
Studios, maybe. Over here, I was a cartoon
commercial voice artist. Just a random title, and I worked from I think
let's just put that there. Changed this to work experience, and now we get to go
over the bullet points. Let's make those bullet points. First of all, we say executed over 20 voice over projects, including commercials, infomercials, and
learning content. So this t is my statistics. I'm just going to make it
bold just so they know that. Next bullet point, let's talk about how I affected engagement. Move this down a bit. Increased client engagement
customer engagement by 45% through high quality audios
and performance, resulting in, say,
30% more sales. Again, we got the numbers, what I did, the results of that. Next step, let's do sales
and brand calls. Let's see. Okay. Professional
recording equipment. And software,
ensuring consistency. Lastly, I just
want to talk about the relationship between
me and the company. Let's write accomplished client
satisfaction by x percent through timely delivery and go with resulting in
percent repeat business. Okay, so these are
some stuff that I did. Over here, when I'm
talking about software, you could expand onto
what software if it's something very high
end and impressive. But if there's way too many or you're just using
general software, that will be listed
below in the skills. But so far, you can see that we've got the
numbers, what we did, our impact, and I just like to I'm just bolding
the statistics. You don't have to do that,
but I want you guys to see the distribution
of words and numbers. Okay. And if you're wondering where you can get these numbers, a lot of times you
can calculate it on your own because you
are the freelancer. For example, with
the repeat business, you can see that how often did this
particular client come back to you and then calculate the percent
increase over time. And you would just
put that in there. But if it's something about say customer engagement
where you wouldn't exactly know that some clients are okay sharing that with you, especially if you
email them and say that you're working
on your resume, you're working on
bettering your portfolio. I would really help if they
could tell you what impact your work had on their business and
sometimes they just do it. Other times they may
be reluctant too, but it's worth a try and you can get this impressive number. That's my company, and you will just repeat
this with the other stuff. I'm just going to keep one, but you get the general idea. Next, let's go down to the education and
certification section. So let's go here. Now, similar to how we
had the company in bold, we need to have the university or institution in bold as well. Let's go over some stuff. I'm going to do
bachelor's Degree, actually, I'm just
going to a UCLA and do bachelor's degree here
in communications, maybe. Maybe we can put in another
one for certifications. Let's go over here and
do institution first, maybe voice acting school. Let's pretend that's
an institution. And we're going to do voice
over mastery certification. Here we have to put in a date. Let's say 2011 to 2015, this certification, let's
do 2016, just a year. Now, sometimes you
may be wondering whether you need to have
education in there, especially if you don't have your bachelor's degree
yet or something. You're still in
school. Try to get some certifications in
relation to what you're doing. Are tons out there that
are free and paid. Coursera has some good ones. You can try UTI and just have those certifications on your
LinkedIn and your resume. Don't skip this part
as it's important. Now, let's go to skills. That's the part that we
want to emphasize on. I'm going to start with languages and then we're
going to go below, going to copy this put in maybe Spanish perdigs Russian. Let's say, these
are the languages I know and next to them, we want to put in the levels. Expert, say, I'm a
Native Russian speaker. Artigs an expert at and
here I'm also an expert. There we go. The
next set of skills, let's put in some voice control. And I want to talk about expertise in modulation,
pitch, and pace. And then if you know any programs, you
would list them here. I guess I'll put one
program over here. There'll be audition, and
let's do Premiere Pro. All right. So there
is our resume. Move these down a bit. We're move. Move these down. I'm just going to copy this. Later, I can expand expand. Command D, copy one here. This is our finalized resume. I'm going to work on this
more and add some stuff, and then we're going to use this same resume to
check for any errors, run it through some programs,
try to make it better, and use this when we're using the resources
that I mentioned, we're going to look at
in the next lesson. So now before we move
on to the next lesson, I want you guys to try to get your resume
looking like this. If you started from scratch, use one of the programs
that I mentioned, whether it's Canva
or something else, fill out your stuff like this. And if you already had a resume, then you can make a copy and follow what we did
in this lesson. Now let's move on to
the next one where we're going to look
at the resources, the AI tools that
are going to help us have an easier time
writing these and just tailor it to what
the clients want to see on their end. But
8. Resume Tools: All right. Now that
we have our resume, it's time to check with the power of AI to see
if it's even good enough and what score we're going
to get when they put our resume in these
applicator trackers. A lot of the companies,
especially the bigger ones, they use something called an ATS or an applicant
tracking system. Where as soon as they
get your resume, your resume goes through that system and that
system scores it out of, I believe, a certain score, and that is before a human
gets to see your resume. If you go to ATS right now, you can see that if
you go to Creative, we have it looking like this. But as soon as you go to
ATS, it's very simple. It's because these are machines reading and scanning
your resume. That's why you don't want
to have a graphic elements, a lot of popping colors
and just want to make it really,
really easy to read. When you go to professional,
it looks different, but not every company uses ATS because they
can be expensive, especially if they're
a smaller one, a startup and so on forth. If you want to be
on the safer side, try to make your resume
okay for these ATS systems. Let's go into the websites. The first one that
we're on right now is called resume dot. Only can you create a resume
with one of these templates, you can put in your information and it'll export it for you. But as you saw, we can make it catered for the ATS system, something simple,
creative and other stuff. You just choose one
of these templates and it's going to ask you
to finish your profile. Let me just put my name here. And here it gives me
a bunch of options. You just put in your
stuff that we wrote. These are stuff
that you can also import from your LinkedIn. Just go to your LinkedIn profile and then there's a
three dots at the top, where you get to export
your entire profile. If you don't want to
write everything, just do that, copy paste
it and add them here. It'll just be put
in this resume, then you get to download
it and you can see that we're already getting a score.
That's the first thing. C also look at the other stuff. I even gives you the job
tracking, interview prep. And a bunch of other
things really, and it's a pretty helpful tool. Add this tailored to job
listing feature recently. Essentially, if you
have a general resume, but you're applying
for something that is not as bold
in your resume. Say you are a graphic
designer and a voice artist, but you're applying for
a voice artist job, this tool is going
to tell you how to minimize that
graphics presence in your resume and how
to make it more catered for your
voice acting geek. That was the first website. The second one is
really popular. It's app.boonsalting.ai. Not only does it offer the
as the previous website, but it has some
additional stuff for networking for LinkedIn
and other places. It does have a job
board where you can find jobs and it has a resume cover
letter and all of that. Over here, if you just go, I'm
just going to click on it. Here we just create new resume and it gives you
this general format. Now, the good thing
about this platform is that it creates the
bullet points for you. AI. You can just look
at the score here. We are 14 because we don't
really have much of it here. But if we go to generate points for our
first work experience, you can see how this works. With the free plan, we have
four bullet points and you can see what other
stuff we've got left, but you can upgrade plans if
you choose to use this more. Let's say I'm a voice artist. A freelance voice artist and my work experience
in one sentence created voiceovers in
different languages for for carport commercials. So creative hovers in different languages for
corporate commercials. Let's generate and see
what we get. There we go. Here it has these three. We could edit them, so
don't worry about that. But notice how it tells you that statistics that we
mentioned in all of them, and I could just add them
in via the plus sign. If something's off is incorrect, I could just go
in and change it. Say my three languages were Spanish, Portuguese,
and Russian. Could edit them and even change the percentage and this just
made my work a lot easier. You can create bullet points for things like leadership
experience, project experience, and you
can even add more sections. Just bear in mind that
you only have three left. Let's go with something
completely different. Say freelance budget manager. Manage the company's budget
for a large construction. There we go. Again, we have more bullet points that we
can edit and make better. As you fill this up, you're
going to get more points. Let me add a university
degree and you can see that immediately plot it to 63
because I'm more qualified. Ja, I just go over each
one and try to get it to the green color
as much as you can. So that was our second platform. The next one is jobscan.co. The good thing about this is that it can edit your
resume and make it better. So if you have an existing one, just upload it and it's going
to give you a resume score. This one is still considering the ATS system that
we talked about, and I'm just going to upload my resume to see
what it looks like. Scan my resume, sign in. Let's put a job description. This is the resume
that I'm calling bad, just because it has all of
these distracting elements, but let me see what our thing is family wellness counselor. I'm just going to copy this. This is from Cava by the way, and just paste it here. But normally the job that you're applying to would have
a job description. So you just paste that
in there, and let's see, it's going to be 100
This got a score of 48, and you can see that it
just took out all of those elements and brought
in the important stuff. So that's a sign to not
use those graphics. Here, it's telling me
what I need to add, so hard skills,
providing support. I don't have that listed, so I should have
that searchability. There is no company
information, address, job title, and we can just go over each one and see
what you can improve. Now let's go to a new scan. Job description. I'm just going to copy
this description, pretend that's what
they're looking for and see what
we're going to get. This got 100. It's the one we made together because I added my education, the languages, certifications, the statistics, and my skills. There are still some stuff
that I could improve, such as company information and my address and the
job title well, some little things, but
it's a lot better than 48. This is a good tool to use. Next up is kick resume. This one is still
the same thing. It lets you make
resumes with AI, lets you check stuff. It also has options for
websites and cover letters. So we can go to resume Analysis. Let's upload our good resume and see what we're going to get. Now, try to use multiple
scanners before you make your final
decision about your resume. Here we can see that
I got a 72 instead of 100 and I need to find out why. Use a bunch of them and try to use the average score before
applying to these jobs. Those are the websites that
can help you write stuff. There is, of course,
the help of Chat GBT, go over the prompt
that we can use. Let's go with write me a
professional resume table for the ATS systems,
ATS regulations. And then go to the next line. I am a freelance voice
artist with eight years of experience and proficient in Russian, Spanish and Portuguese. I am an expert with Dobe
audition and Adobe Premiere Pro. Then I worked at
Visual Studios from October 20 2023 and increased
their number of sales. Then what we want
HAGPT to consider is include statistics
Professional wording, no generic wording and
make my resume stand out. All right. Here is just
writing me the stuff. You can see that I
mentioned visual studios, statistics, and all of
the other information. Whether you use HGBT or one
of the tools mentioned, there's just a lot
of stuff out there that can help you
generate a good resume. And if you have a resume, upgrade it into
something better. Now for this lesson, I
want you guys to take the resume that you either created recently or had before, put it into these websites
and see what score you get. By the way, you can
also upload resumes to hachBT Command A, copy everything, and right here, suggest improvements
for my resume. And then put a quotation mark, next line, paste
everything and quote. So it's going to give me a revised version and it
made it optimized for ATS. So I could use hachBT as well to upgrade my
stuff. So do that. Notice your scores, use the suggestions that they give you to better your resumes, and we will be on our way to work on our
cover letters next.
9. Cover Letters: Another thing that you're
going to most likely need for gaining clients
are cover letters. Now, cover letters can always be seen as these tedious things. And when you see on
that application, you just want to close the
tab and just forget about it. But having a decent cover letter that you only have to
make once and just tailor it for that company
when you're applying can increase your chances
of getting that job. Now, as a freelancer, you don't necessarily need to
have a cover letter, but if you are working
on short term projects that go under another
category and not freelancing, they will they might
require a cover letter, and it's just better to
be prepared in advance. Now, first of all, for
those that don't know, cover letters are a letter where you write about why
you think you are suitable for this job
that you're applying to where you mention a general
idea of your experience, what makes you passionate
about what you're doing, some accomplishments that
you want to put in there. It's going to be a
one page document, and it's just one, two, three paragraphs depending on how in depth you want to go. But it's always hard to
know where to start, how to not make your
cover letters generic, what words to use, what words not to use,
and all of that stuff. Let's just look at some
examples of what a cover letter looks like and what makes a
bad or good cover letter. When we search for cover
letter examples on Google, there's hundreds of
information out there, and like we said,
it's a document. You have your header and the
stuff that we mentioned. It's formatted like an email where you have your
introduction and all of that. Really what makes what differentiates a good
cover letter from a bad one is how unique it similar to a resume
if you put stuff like, I'm a professional voice artist, I'm an experienced voice artist
without being specific as to what makes you
professional or experienced, the recover letter could
be pushed aside and you will have a lower
chance of getting that job. Again, you want to use numbers, you want to use
specific company names. If you've worked with
anyone impressive, you want to address the
company or client that you're applying to in the first section,
more specifically, how you think you're going to shift their
company's project, maybe make an impact,
increase their sales, whatever it is that
you're applying to those are some things that
you want to put in there. Now that we know
what a cover letter looks like and the fact that we will most likely need it when we're working
with bigger companies, let's get started and see how we can actually write
a cover letter. Now let's start working
on our cover letter. I'm going to write this based of the resume
that we built. I'm still the freelance
voice artist who has worked at Visual Studios for eight years with eight
years of experience, and we're just going
to get straight to I'm on Canva again
and just a heads up, there are lots of
templates for you to look at to get some ideas
on the layout. Usually they don't give
you the text down here, but that's what we're
going to focus on anyways. Let's go ahead and I'll
copy this down here. And this is basically an email. Think of it as an email.
So you want to first start with addressing
whoever you're emailing. So let's go with
Deer hiring manager. If you know the manager's name, like you saw this freelance gig, the names maybe Sharon. You can put Dear Sharon. The more personalized
your cover letters are, the better chance you have
at earning their trust. So their hiring manager. I am writing to express
my interest in the let's say freelance voice
artist position at Disney. Let's say, I'm
applying to Disney. Let's go with car tune. This should be your
first sentence. You're expressing interest in the job title and the company. Now, let's go over, basically, we're writing the
summary portion from our resume where
we stated what we do, how many years of experience
we have and all of that. W over eight years of experience in the
voiceover industry, including working
at Visual Studios for let's put in four years. I am confident that my
versatile styles and language knowledge
can contribute greatly to Disney's projects. All right. So that's my
experience right away. I tell them what I
am voiceover artist. The eight years of
experience that I have, one of the biggest the
highlight of my experience, which I wrote Visual Studios for four years, could
be different for you. Now in the next paragraph, now that we've
introduced ourselves, we want to talk about what
we did in that highlight. So what happened
in Visual Studios and how did I make an impact? This goes back to what
you wrote in your resume, make sure that they correlate. If you do include
something that's not in your resume that
could look sketchy. So the highlight of your career should be in both
of these documents. At Visual Studios, I delivered high
quality voiceovers for various commercials, let's say projects
such as commercials, animations and social
media content. This is what we said
in our resume as well, Let's go and talk numbers. My work contributed to
not sure what we wrote, but let's write 40% increase
in audience engagement and let's say 20% improvement in brand recall or actually
let's write sales. Let's go into our
responsibilities more. I worked closely
with script writers, animators and recording studios
to ensure the quality of my contents remains
consistent and that I had a solid understanding
of every project requirement. All right. So that's
the highlight. Now we're going to talk
about how we can be of use to Disney or the company
that we're applying to. Let's go talk a little bit
about the company itself. You really want to make sure you sound like you know who
you're dealing with. So if you know the
company's website, and if you don't, you just type in their name and find one, a link you definitely need to go over there and see
what their values are, what sets them apart
from the other companies and mention a few of those specific details
in your cover letter. This will significantly increase your chances of
gaining their trust, and again, it sets you apart
from the other applicants. Let's go with Disney's
values in diversity, let's say, diversity
and inclusivity. And that is something I
cherish as well when I look at when I
look for gigs with my knowledge in multiple languages in
cultural understanding, I can be of great help
in creating these media I am flexible in my vocal
styles and that can help me adapt myself to new voice
acting territories. So that is us just saying
how amazing Disney is one of the values
that stood out to us and why it
matters. All right. Now, talked about ourself, our experience, the company. Now we're just going
to go and close all of this off with a
concluding paragraph. With my experience
and knowledge, I can be a great
service to the company. Please check out my website
for more details on my style of work that
you put in your website. I was I think clear.com. Then just thank you for your
consideration and time. I look forward to discussing how my skills can
be of value to your Team. Best. Claire
King. All right. This last sentence may
sound very optimistic that we're sure that they're
going to reach out to us and we get to discuss
our skills with them. But that's not a negative thing. It's actually good to sound confident in your
skills and yourself. Putting a sentence like
this or something like I look forward to meeting with you or getting on
a call with you, that does help you
stand out a bit. And there is our cover letter. So it's not that crazy in terms of layout,
design, all of that. You could put these type
of headers up there, but usually you pair your cover letter
with your resume and all of this information
is already on there. You could, however, address your hiring
manager like this. If you have the information,
usually you don't. But if you did, it's a
nice half to put over. All right, so what
are some things that we avoided when writing
our cover letter? It's pretty similar to what we talked about
with a resume, so I will not go
too much into it. But we did not use any generic stuff where there
is nothing to prove it. So instead of saying
at Visual Studios, I had a remarkable impact. I was very professional. I've accomplished
a lot of things. Specified what I did
and how my impact was in sales specifically
and audience engagement. I mentioned the
stats for my resume, and this is just something
that is specific to me. One thing that I avoided, another thing that
I avoided is going on too much detail
about yourself. Sometimes people try
to include most of their experience here and the cover letter ends up
being multiple pages. But like we mentioned before, these clients are
getting tons of applications and they just want to spend a few
seconds on each one, see what catches their eyes, and then go and continue
talking to them. You don't want to make
your documents an eyesore, so avoid making them too long, too generic, or too
crowded with graphics. Now we have all of the documents necessary when we want
to get our clients. I did not go into portfolios. That's something that we
discussed in another course. You could check those out
on the contra course. But if it matches the
industry that you're in and portfolios can help you
showcase your skills better, then it will be your resume, cover letter, and portfolio. All right, so in
the next section, we're going to talk about what happens when we got the client. So we have to talk
about proposals, contracts, NDAs and
all of that stuff. We're going to go over each one, see how we can create them, where we can get
the templates from. What are some things to
consider and all of that.
10. Freelance Contracts: So once you have your client, we have to start thinking about the contracts that we're
going to have them sign, the proposals we want to
send regarding the project, the invoices, and
all of that stuff. And that's what we're
going to talk about in this section of the course. First off, we're going
to talk contracts. Now, contracts, as we mentioned, is a document that you
send over to your client. It contains everything
regarding payment, deadline, what you're going to deliver, any sort of copyright
they're all going to be inside this
multi page document. Some people prefer
to do contracts, legal forms and all
of that separately, but it is possible to
just squeeze them into one document so that
you're just sending one thing to that
client instead of five. With contracts, unlike the
resume and cover letter, we're not actually going
to write one from scratch because every contract needs to follow the industry standard, and those standards are
available on the Internet. We're going to look
at some places where we can get the templates, and the good thing
about these template is that they give
you the basework of how you're supposed to conduct this business
through this contract, but it allows you to edit
the contract itself. You can just go ahead and
add your additional terms, maybe remove a couple of the
terms there if it doesn't apply to you and it's
all very customizable. So if you simply go
on the Internet and write freelance
contract template, I'm going to go with
free download here. There are so many from really famous places
available to you for free. So let's check out
why, for example, we got legal documents, signature and even Panda Doc. So you can download a template. Let's just try to do that. Let's go over what each of the sections talk about and
why they are important. So first of all, we have this
section before number one. And this is where you introduce yourself and the
client formally. This does not mean that you get to talk about who
you are and all that. It just talks about your
name and your address. So you are going to need
the name of your client and the office address or an address that you
can just put in there. And immediately if you see that the client is not giving
you that address, that is a red flag. Great thing about having contracts is that when
you tell the client that, okay, I'll be sending
the contract soon, if they are a shady client, they will just disappear
or they're just going to try to get you to not
send them a contract. If your client is not
okay with signing a contract or they're just hesitant, maybe they disappear, then just know that there
is something they're not telling you and normally, if it's a decent,
genuine client, they should have no problem
signing a contract. So the name and the address, next is these services. So what are you going to be
providing for this client? Is it a website remodel? Is it a voiceover audio, whatever it is, you would
put it in that blank spot. Next is compensation. How much are you going to be getting paid
for this service? You probably talked
about this beforehand. Just put the amount right here. There's no empty spot, but that's where you
would next is expenses. During the process of you
fulfilling this service, if there's any expenses, you have to decide whether
you want the client to pay it or will you pay it
and then they pay you back. Whatever arrangement you have, you want to make it
clear right here. If you did end up paying it yourself and
then they're like, I never knew there
were expenses, that's going to be a problem. Make sure you list
everything in this document. This term and termination. So how long is this contract going to be valid for
and when does it start? So it commences on Xtate and
then it terminates on Xtate. You should already
have determined how long it's going
to take for you to finish the service and what you agreed upon
with your client. So in terms of termination, I would say that couple days after you finalized everything, so the client gave you
feedback, they like it, they kept it, give it a few
more days and then terminate the contract in case they want
to come back and be like, Oh, you forgot this or can
I fix this or whatever? You want to give
it a little bit of window space before you
completely terminate. Next thing is about the
independent contractor, which is about you
as a freelancer. So it's just telling you that you're not the employee
of the client, you're a freelancer and that you do not have any
authority to enter into agreements or contracts on behalf of the client
and shall not represent that it possesses
any sort of authority. This is just stating
the fact that you're just a temporary
service provider. You are and you just can't do things on
behalf of the client. Let's say you're working on a project and then this person
comes in and it's like, Oh, can we collaborate on this? You need to let that client
know if you are going to be collaborating with
someone and you cannot make that decision on
the client's behalf. This is what it's talking about. There is going to be a certain professional relationship
between you and the client. You will be in contact a lot of times and you want to
tell them everything. Next is confidentiality. These are just some things
regarding copyrights, property information,
and all that stuff. For example, if the client is giving you information
about their company, such as maybe sales numbers, their new product
and all that stuff, you as a freelancer cannot
obviously share it with anyone because they want
to announce it themselves. So there's that and then there are some
clauses where it says, except as otherwise
permitted in this agreement. If you do want to have some additional
confidentiality clauses, you would just add them below. If you don't of these are there. You can also delete any of the sections that
don't apply to you, but these are, as we
said, the standards. So here is talking
about that information, we just set and
then we have that you cannot disclose any
information and all that stuff. These are the legal stuff, and if you're in a
certain industry where it requires extra
confidentiality, then make sure that you are in contact with the
client about it and that they state what sort of stuff they want you to
be extra careful with. Then you would have to formulate another clause and put them down here, may
have them read it. If they agree with
it, they'll sign it. Number seven is ownership
of the product. Whatever you're making,
who is going to own that? Obviously the final product is going to be for the client, but in some cases, especially in creative cases like graphic design
and all of that, some people like to
add a clause where it says that the stuff
you create in the process of this
whole agreement that do not make it
to the final cut, those would belong to
you as a designer. Let's say you designed three
logos for this client, but the client ended up
choosing logo number three, but you want to make sure
that they don't own logo one and two because they didn't use it and they
did not choose it. That's where you would put
another clause under this. I'm just going to put
in under seven A. The parties agree that all work created by the designer
in the process of performing the
services will remain the exclusive property
of the designer, where she can use it
without any restrictions. Unless you make it clear, those mid process products are going to belong
to the client, make sure you specify that you want those to belong to you. One more thing when you add words like the
designer, the client, make sure that you are introduced as such
in all the parts, especially in the first part. If you call yourself the
designer in one part, the freelancer in another, that's going to be confusing
and just unprofessional. All right. Then we
have insurance. It's about bodily
injury and all that. Doesn't really
apply to most jobs, but it's a nice have in case you have to go to
their office or something, just an extra protection. This one, it depends on you whether you want
to have it or not, but if you are working for
a client with the logo, you want to avoid working with another client with
something similar that could end up in this client's product
being lower quality. So you can put that
in and specify a period if you want
to a period of months, weeks, however long it takes. This is just so you don't create competition in terms
of that product. This one just means that
you're not going to go over to people
around that client, maybe within their company or so to get them to do
something for you, maybe come work with you in
secret or give you something. You definitely don't
want to be talking to their customers straight up. You want to conduct
your business through whoever you're
signing this contract with. This is protection
against such a. Similar to for the client, if you are an agency and
not just one freelancer, if they sign a
contract with you, you don't want them
to also work with your colleague on
the same project. So you just want to
specify that it's just between you
and that client. Warranties and mutual
representations. It's just about power to
deliver this agreement, all the obligations,
all that stuff. Then this is about you. You want to make sure you
have all the licenses, permits, and all that. This doesn't apply
to every industry, but say you are a
freelance translator, you want to make sure you
have the proper license and permit to have
the authority to do official translations so that this client doesn't get
into trouble if you didn't So you're just holding harmless
clients from any damages, liabilities, reasonable
attorney's fees and all that stuff to just some of that legal stuff
that we talked about. And this is another
important thing. So under what country's law are you writing this contract? We wherever that you're
conducting the business, you just put the country there. Some countries do have different maybe
copyright policies, taxes, policies and
all that stuff. So you want to make sure
that you are complying with that country's
regulations and laws. Then there's disputes, if there's any problem
between you guys. Here it says that it can
be resolved through in accordance with the rules of the American Arbitration
Association. You can change this
into something else if you're in
another country. Then here it's
about communication being written and
delivered by hand. You might want to
change this to email. Again, depends on
how close you are with a client if you're in
the same city or something. Definitely, you should never hold
communications regarding contracts or anything regarding your freelance business
via text messages, social media, where
client or you have the ability to just
delete or edit stuff. Keep everything via email. You could mail it
to them or go into their office and get them
to sign it in person, but that's different
for every person. All right. This is about wavering some
parts of the agreement. So if you are wavering,
just change this up. We are just making sure
that all of this is agreed upon between
the client and you. Full name, signature,
full name signature. And once you have this,
you want to just hold a PDF in a Google Drive or something for further reference, not only will it protect
you as the freelancer, to make sure you get
paid, make sure you are doing what you've
been asked to do. There's no hidden assignments that's going to come
bother you later. You will only have to do the
stuff that's listed here. Since the client signed
it, they agreed to it. In terms of copyright,
you're going to be safe because you're saying that
you have all your licenses, you're going to keep
rights of certain stuff, give the other rights
to the clients. If you're going to talk about if it's something
regarding photography, you want to talk about model
releases here as well. Tailor this document
to your industry. But on the other hand, it also protects the clients. So they could take this contract to show their finance
department where they spend this money and just show that something was done
and there's evidence of. We're going to talk
about some dos and don'ts in another lesson, but contracts are a huge do and you definitely don't
want to skip out on them. Out of these contract templates, I want you guys to download the one that you'd
prefer to use, have it on hand, and add
any additional clauses that you would want to have in regards to the industry
that you're working. Have that, save it
on your computer and download either Adobe Acrobat or make an account on Panda Doc. There's a bunch of
other stuff there, too. I believe signature
is another one. Make an account
over there and have these contracts uploaded so that the next time
you have a client, you just put in their email and this tool will do
everything else. Once you have your
contract ready, we can now go ahead and
work on our proposals.
11. Freelance Proposals: Now with proposals, things
are a bit different. In the last lesson,
we talked about laws, invoicing, copyrights,
and all that other stuff. But when it comes to proposals, you're strictly talking about how you're going to
deliver that service. So say your client
came to you with a problem or you went to
them to solve that problem, you are taking that problem
and in this document explaining how you're going to solve it with every single step. So this is something you
can just create yourself. You don't necessarily
need to have a template, but I'm going to share some with you anyway in case
you didn't know the layout what you should
include and what works best. So in a proposal, the first thing
you're going to need is your own workflow. So whatever industry you're in, you got to have a solid map that you can go through
for your project. And once you have that workflow or map set out for yourself, you're basically just
taking that and adding some personalization for
that client's document. Let's go over some
of these pages. The first place is toma dot app. This is a pretty cool platform. You get to create
things yourself or with the help of AI and
then just send it to your client via a QR code and keep track of who comes
on this presentation, how long they stayed on
there, and other stuff. You can grab one of these pitch documents and just go in there. These are the pages
on your left. I got some tools on the
right, the sharing stuff, and when you go through them, you can see that they're
pretty easy to edit. You're done with
it, you share it. You get to grab the QR code, copy the link,
change the access, and as a client, they get to see this
page where it looks like a full screen presentation of whatever you made for them. Canva also has tons
of project proposals. I'm sure most of you are
familiar with Canva, but let's just go
on one of them, customize it, and look at the
pages we're working with. There's the agenda. The first thing you should
have in these proposals is tell them a bit about how
you conduct your business, what are your values
and all of that. If you've already been in contact with that
client for a bit, you don't have to go
all out with this, but sometimes you're
not that close with the client and they don't know much about you as a freelancer. It's nice to put in who I am or who we are section in there. The amount of projects
you've done since what year have you guys been working and
all of that stuff? There's mission. Then we
have a problem section. What is the problem that the
client came to you with? We can list that down here and then talk about
your solution and the goals that should be finalized by the
end of this project. We're going to talk about
the steps that you're going to take to
reach that goal. You can list them like this, you're going to do research,
maybe experiment, optimize, put in your own workflow that should be pretty consistent
between all your projects. Then we have timeline, how long is this going
to take and what are you going to be doing in
each of these months? You can list them out as phases, maybe talk about how you're going to do X in
this whole month, half of the month
depends on you. But just try to be as transparent as possible
with your client, let them know where the time
that they're putting in is going to and where the
funding is going to as well. There's a team page,
you're just one person, you don't need that and talk
about the process more. Those timeline pieces
where you said, for example, during March, you're going to be
doing market research. Over here, you're going to be talking about that
market research. What are you going to
be doing? Where are you going to be conducting
these research? What are you hoping to find? You're going to
list all that stuff here, phase two, design. Let's say, that's
your phase two. What are you going to
be designing with? What style you're going to be using list
all of that stuff. We're definitely going to
need to talk about money again because it's
something really important. And you want to be again, transparent with where each of the funding is
going to go to. You can make a table like this and it doesn't have it here, but I do suggest having another table for any
additional services. Let's say I'm going
to zoom in here. Let's say this is logo and
you're charging 60/hour. You should have another table
if they want, for example, another version of
that same logo, it's for another say
$70, another $30. That's the add ons. If they maybe want a locomotion out of that logo you designed, you're going to be
charging X dollars more. So this just saves time that you're going to have
to be spending via email. They tell you, oh, can you lower the price? Can I
do this instead? You're just going to
be having this add ons table in your proposal. And if they ever
want anything more, they can just look at the prices there and just tell you
if they want it or not. Saves time, contact information, and a little thank you page. Canva, pretty easy to
change things around. You can share it, copy the link, download it as a PDF, send it to them
via email, again, everything via email, and
this is another good option. The last place is pitch.com. Again, we have tons of cool
looking proposals available. Let's check this one out. Looks pretty futuristic. Here is our proposal pages. So crap interiors. And one thing that I
will mention is that over all of these proposals
that you're going to send, if you tend to make them visual, try to keep a consistent style, so don't be sending one proposal where
it looks futuristic like this and the
other one where it looked minimal like the Ava, you want to make sure
you are following your own brand identity,
something you should have. We talked about that
in the contra course. You can check that out later, but try to be consistent. If you would rather not
have all these visuals, maybe the line of
work that you're in has nothing to
do with design. Maybe you're just a
freelance translator. You can make a proposal
in a text format. But the layout would
still be the same. You'd want to
introduce yourself, the problem that you're
trying to solve, what your solution is, how long it's going
to take, what are you going to
be doing in each, each of those months or weeks, the amount of money that's
going to be required, what are you going
to be using it for, some add ons and contact
information and all that. You could either do it in a document format or in
a presentation format. Either way, as long as you
have these main outlines, you should be ready to
so those are proposals, as you saw, they're less
strict compared to contracts. The client doesn't have
to sign a proposal. However, it would be nice
to get them to write in writing via email
that, it looks good. Let's get started or could
you also add this add on? I don't agree with the price. A sort of feedback that they have regarding your proposal, it's nice to have it in writing, but there's no need for them to sign anything with a proposal. Now we know what a
proposal looks like. I want you guys to go
over either one of these template websites
that I shared or just make your own
on maybe Photoshop, Canva, Adobe Express,
whatever you prefer, and make your own proposal. Find out what your brand
identity is, what's your style, and just make a template for yourself where the next
time you have a client, you just fill in
that information, maybe change the text,
add some photos. But you always have
the main concept ready for you to just send out. That way, you're not spending weeks on making the
proposal from scratch. So we got the contracts and
proposals out of the way. In the next lesson,
we're going to talk about the order of operations and some
common does and dots with any
freelance document.
12. Invoices and Feedback: The final kind of document that we're going to
need are invoices. Now, for those that don't know, invoices are basically
a document where you state your service
that you provided as items and you charge your client based
off the maybe hourly rate, a fixed rate, many platforms actually that allow you to
send and manage invoices. The first one that
I want to share with you is invoice.com. It's really efficient in
managing different clients, their information
and, of course, managing the different invoices. Here you can see a preview of what their invoice looks like. If you're using
the free version, you can have up
to three clients, but you can send as many
invoices as you want. In addition, if you
have a free account, you can't really put a logo like the ones on the top right, but that shouldn't be
that big of a deal as you're more focused on
the invoicing down here. I just made a new account just to show you how this
whole thing works. It's as we mentioned,
free, takes a little bit. They ask you about
your business, your address, and
all that stuff. But on the right side, we have
the dashboard information, how much you've made
over the listed months. How many outstanding
amounts do you have, your number of clients,
and all that stuff. But it's really as simple as making a new invoice up here. Name your invoice, the number, the currency, the
language, date. This is where you write
your client's name. Put client X, you can make
this as a new client, fill out this information and you can have up to
three with a free account. Over here is where you
would list out the parts of the projects that you
want to get paid for, if you're on a milestone status, and you would have to
define which milestone you're sending an invoice
to and if needed, talk more about it down here. Maybe you can state all
of the milestones as a reminder for the
client and then list them one that you're
getting paid for at the moment. Once you're done
filling all this up, you can save it and send
it to that client's email. Another good thing about this
is that it's going to send reminders to the client
to pay the invoice. That way, it'll be
easier on your end. You don't have to do
anything, you just have to sit back and have them pay you. There's also manual methods
of making invoices. Canva as always has
many templates. You just fill it
up, download it, but here you have to send it to the client and you have
to remind them to pay it. Now, let's talk about how much you're supposed to
charge for your service. This is for new freelancers, but if you already have a
rate that is working for you, you can just skip this. So Upwork released this new
freelance rate calculator. Upwork is a freelance platform, so they know what
they're talking about. You can use this calculator or any other calculator to
find out exactly how much you need from each
client to be able to support yourself
as a freelancer. Because as we mentioned, there is inconsistency
in freelancing. Some months, you have a lot of clients, way too much work. Other times, there
may not be as many. So you want to set yourself
up by having the right rate. So fill that out, put it in and find out what your rate is. Can also do a simple
Google search. Say I'm a logo designer, freelance rate in Malaysia. So there are tons
of articles there, and I can find out that they charge this much for a
logo design project. Many options and tools out there for you to get
started on your pricing. So that was the invoices. Whatever platform you choose, set yourself an account, or if you want to use
one of these websites like Canva or Adobe
Express Photoshop, download your templates, make
a new one if you want to, have your information ready, and that way you
would just put in the client information
each time. You use a platform like
invoicee or something else, just make sure you're
tracking every invoice, making sure they
get paid through, and just keep them for
further reference. It won't hurt. We can put it in that folder
that we talked about where you
have one for each of the clients and
their projects. You did the work, you got paid. Now let's talk about feedback. It may seem tedious, but I highly recommend emailing that same
client after you're done with the payments
and all that and just ask them for a testimonial. Just tell them that you're
working on a new website and you would like
some testimonials from previous clients. Most times there
won't be an issue with them giving
you a testimonial, so you can just not
feel bad about it. If they refuse to give
you a testimonial, you shouldn't write
one on their behalf. That could be problematic. You could instead
talk about the impact that you made in another form. Don't use them as a quote. Don't put it in quotation marks, just be like I did this and increase the sales by X percent. Testimonials are
really great because they do help you
get new clients. So no matter how
tedious it may seem, just do it and the future,
you will thank you. Now we've come to the
end of the lesson. I want you guys to make
yourself an invoice system using whichever
platform you prefer. And for the feedbacks, you can prepare a Google form where it's connected to
an Excel at Google Sheet, actually, and you
can keep track of all your testimonials
or just do it the old fashioned way
with the emailing. That concludes all the documents that you need as a freelancer.
13. Do’s and Don’ts of Freelance Contracts: So the order of sending these
documents are as follows. First off, we need to get
that job or that gig, so we're going to send
them anything that can convince them that you are the
right person for this job, and that includes your resume, cover letter, and portfolio. Sometimes a client comes to you, most times you have
to go to the client suggest your solution to the
problem that they're having. If there's an open role, you're just sending
your resume and stuff like a regular
job application. Once you have
secured that client, they're convinced
that you are skilled, you want to send
in your proposal. How are you going to
solve that problem? As we mentioned in
the last lesson, list out everything
regarding timeline, payments, your process, your workflow, and
all that stuff. Once you're happy with
everything in the proposal, you can go ahead and
send them a contract. So the contract would
be a combination of all your communication
that you did via email, the meeting notes, and it would include parts from the proposal. When they signed that contract, you've done that job, the first draft, you send it in, you're going to
get some feedback. So try to keep it via
email so that you can refer back to it and
just have it as evidence. Once you've implemented
that feedback and you're all good to go, you sent in an invoice. Maybe you can get a
testimonial number six, but you should be
getting some sort of content to put on your
website as a testimonial. That's a general order. Let's talk about
some dos and don'ts regarding all of these
documents that we talked about. I have some dos and
don'ts listed here. The one on the left is the dos, one on the right is the don'ts. Let's start with the does. First of all, I can't
stress this enough, keep all communication via
email, written format, have it on platforms if you
don't want to do email where neither you or the client can
edit or delete a message. If they do that, that could
be a problem for you. Maybe they asked you for
three logos, you designed it, and then they edited
and said that, no, I asked for two logos, but initially they
asked for three. Now it's going to be your
word against theirs. To avoid that, just
keep it all via email. Secondly, we want to use the document tools for
gathering signature. These were platforms such as signature Panda Doc
and Adobe Acrobat. There are hundreds
out there as well. Try to use those
because they not only send reminders to the
client to sign a contract. They make it very easy in case your client
isn't tech savvy and also they keep all the
documents that you've signed or received
in your account, so you can just look over them, export them into PDFs and
do with them as you please. Next is to have a Google Drive folder for
each of your project. So overall, you should have a separate Google account for all your freelance business. I can think of it as a company. And within this Google account where you have nothing
personal in there, you want to make folders
for each of the clients, if you're doing breach
of the project, but if you're doing multiple
projects for one client, then have a general
folder for that client. This way, you could have a track record of how
often you work with them, helps you gather those
stats that we talked about. And also if they come back
to you and ask that, Hey, I lost one of the local files because you send it to me again, you have it at hand and you
can just send it to them. It's also great if you wanted
to make a new portfolio. You have all of the
documents up there, all of the final products, you can just do a lot with that. Next is to split
the payments with milestones if the
payment is large. Say you're working for something that's going to cost the client $2,000 and it's going to
take say um three months. Instead of doing
all the work and getting paid after three months, you want to separate
it into milestones, going according to
the timeline that you gave that client
in the proposal. We said that in that proposal, it was three months. March was for research, April was say for sketching
and design and one fourth, you want to split the
payments and have those milestones listed in the proposal and make sure
the client agrees with it. Say you get 500 before you do anything and then another 500
when you did your research, 500 when you did the
design sketches, and this way you make
sure that you get the payment after
such a long time. Now, leaving that
large payment after you've done everything after all those months can be risky. It's no secret that a lot of
times clients disappear on freelancers and
since you don't have the legal backbone
that a company has, it's going to be hard for
you to get that money. And expensive too. Avoid doing that, even if you know the
client personally, just don't risk it. If they were asking you why
they have to do milestones, just say that it's your
way of business and it's industry standard because it is that if they want if they have any questions
they could ask you, you can send them
some resources about don't try to get the
whole payment in the end. If it's a small amount of money, that's fine, but this is
just for large payments. Next is sign then work. This goes back to not
trusting the client 100%. You don't want to do all
the work and then they just don't sign it and you don't
even get that project. This goes back to the fact that you don't have
that legal backbone. Unfortunately, a lot
of times clients trick freelancers
because they don't have power to sue or get back to them with
lawyers and all that stuff. So you will be wonderful
in that sense. Make sure that the
client signs it, that contract, and then
you start your work. Even if they're like,
I'll sign it next week. Don't start anything
until they do. That's why using
these document tools are really helpful
because they keep sending reminders that you
have this document to sign and business won't
start unless you do. So don't trust
people too easily. Next is to verify the client. If they say they're from Disney, you want to make sure they
actually are from Disney. There's a lot of sketchy
people out there, so avoid getting into trouble into legal problems because
that'll be really expensive. If you are not sure
about the client, they sound a little shady, ask for their credentials, ask for their website
for what they do, and use the excuse that
you're trying to do some market research
about the company so that you can provide
better services. Never be too shy
to ask for that. It's not that weird. If they're refusing to give
you the company website, maybe more information
about what they do, then that's a red flag. Lastly, is take testimonials. Once you've done that, perfect
project, it's beautiful. Have the client write
out how they felt about your services and
just you as the free. These are going to be really
great on your portfolio, on different website profiles. They increase your credibility
and they just make future clients be
able to trust you more because they see all these people saying
how great you are, how on time you were, and
all that other stuff. Now let's look at the bad stuff, things that you shouldn't do. First stop is to skip
out on contract. Say you know this person, you've known them since college, you don't really need to have contracts because
you know this guy, but try not to do that because people can
change in a second. They could maybe
misuse your time, try to ask you for more things
than they initially ask, and it's always nice
to have it on writing, no matter who that client is so that you can refer
back to it and just have concrete evidence of the fact that this
project is happening. Next is not having
any meeting notes. Sometimes it's hard to just talk over email
about everything. That's like 50 different emails. They may want to talk to you via Google meet or Zoom call. That's totally okay as long
as right after the meeting, you share the notes that you took and they confirm
it via email. While you're having that
meeting, write everything down. Just type it out in an email, be at a great meeting, just wanted to confirm these
meeting notes with you. If there's any questions,
let me know and you would get it in writing where they said, Oh,
yeah, that sounds good, can wait til you
start a project, or they would be like,
you forgot this, that's not true, and you
could just sort it out before you continue
working on that project. Next is trust shady clients. We've talked about
this, but if they're refusing to tell you who they
are, what the company does, give you any links,
refuse to sign contracts, that's something you
just stay away from. Getting into business
with these people can be a big problem
if things go wrong, especially when it comes to
copyright and legal stuff, you're going to have to spend
hundreds and thousands on lawyers and it's just better
to just get these clients. Next is send too many
documents at the same time. They're just going to get
lost in the client's email. You might annoy them, and
they could just goes to you. Instead of sending
your legal documents, your contracts, your invoices, all bombarding the
client at the same time, try to maybe compile
all of this stuff in a contract and just go
according to what we said here. Instead of sending them all at the same time and expecting
them to get back to you, send one of them, wait, then the other one and
make sure they get it. Sent a contract or an invoice and you don't
hear back from them, definitely reach
out to them after two to three business days
and ask for confirmation, making sure that
they saw this email. Next is improper workflow. If you're not familiar with
your own workflow and how you conduct your business and then you're just talking
to it with a client, they may think that
you're the shady one and they will just
stop the project. So make sure that you've jotted
down how you're going to be providing service
to potential clients. If you are a graphic designer and you design
logos for a living, what will you do first
upon hearing the idea? Are you going to sketch first? Are you going to
do research first? What is your process? Have
it written down somewhere, write your contract and proposals according
to that workflow. If there's no consistency, you're going to confuse
yourself and the client. Next is give full access to documents and folders
to the client. Try not to trust
people too much. They could just go in
there and delete a bunch of stuff or change a bunch of the clauses without
you figuring it out and that could be a
problem in the future. Always give temporary access to your clients unless you're signing off the entire product and you've already gotten paid. Even if you do that, I
suggest making a copy. Uh, in case they delete
something and then they lose it, and then they're like, oh,
can you send it to me again? That way you have a copy. But keep in mind the stuff
that you wrote in a contract, so you cannot share
this with anyone. You're just keeping it there for the client in case they lose
it or if they need it again. You can delete it after
a certain period. You can decide that with the
client so that you're not using storage forever for
this particular project. Next is to forget to charge
for softwares and tools. If you use a lot of
softwares for your work, say you're a video editor, you have all these programs
that you're paying X amount monthly or yearly, you want to charge
enough so that you're able to pay
for these softwares. These aren't free, as you know, so calculate how much you pay for them and how
much time you spent using them and include that in the invoice as service charge. Speaking of charging, if you charge too much or too little, you're going to seem shady and the client may not
want to work with you. It's always a good idea
to go on the Internet, see what the standard rate is according to the
region that you're in. Compare it with the
years of experience you have and the
quality of your work, and then send them the price. Those were some
dos and don'ts of freelance documents and just
freelancing in general, be sure to follow
them and always use the help of the Internet or other freelancers if
you're stuck anywhere. It's a great idea to be
on freelance forums, on maybe Redit Facebook
and just reach out to other freelancers if you come up with any
shady situations, any problems, and be inside a community where
you can gain feedback, provide feedback, and
grow collectively.
14. Class Project: Create Your Freelance Document Toolkit: Now it's time to work
on your class project. For the project, you're
going to be building your very own freelancing
document toolkit, one that you could use for yourself and further
refine for the future. Your project should include
the following a resume, a cover letter or proposal, an invoice or a feedback form, and a contract that you want
to share with your client. Don't have to be the
perfect final product. They could be
drafts, screenshots, and we're just
trying to experiment a little bit and
get you closer to building that style
that you're going to be using in your
future documents. Once you're done
with the project, you can go ahead and upload it in the class project gallery. I'll be looking at
it from time to time to provide you
with some feedback. You can also take a look
at how the other students are doing and gain some
experience from there. This toolkit will save you time and give you the
confidence you need. It will also reduce any sort of confusion that you may encounter
when you move forward. So good luck with the project, and I can't wait to
see what you guys me.
15. Congratulations! What’s Next?: You've now reached
the end of the class. Congratulations. You know which documents you
need to prepare, how to prepare them,
and when to use them when you're communicating
with your clients. Remember that good
documents don't just protect you, but
they build trust. When a client looks at your
clean resumes, cover letters, proposals, they can begin to feel more confident
when working with you. Your next step is to
refine the documents as you see fit and use
them consistently. You can also choose
to improve them or completely change them depending on the project
that you're going. If you haven't already,
make sure to upload your class project to the
class Project Gallery, I'll be happy to provide
you with some feedback. Thank you for learning
with me, and I wish you all good luck on your
freelancing journey.
 Skillademia Academy, Creative Skills for the Future