Transcripts
1. Welcome to Class: Hello, skill share.
Let's illustrate fluttery florals and
procreate together. What is prettier than florals? Possibly florals and
butterflies combined. It's a classic, romantic
and feminine combination, and I really adore
drawing this theme. If you do two, this
class is for you. In this class, I'm
going to be going through my entire
process as I put together a mini surface
design collection with the theme
butterflies and florals. I will be presenting
the theme in a way so that you can easily have
all the inspiration and knowledge to put together your own illustrations
and patterns in this theme as well in
your own unique way. First, I will share how I gather ideas and what makes up
a great mini collection. I also will be sharing two tutorials on how to
draw wildflowers and butterflies so that
you have the skills to draw unique butterflies
and wildflowers of your. I will move on to show you how I personally illustrate
and put together a placement illustration and complimentary patterns using
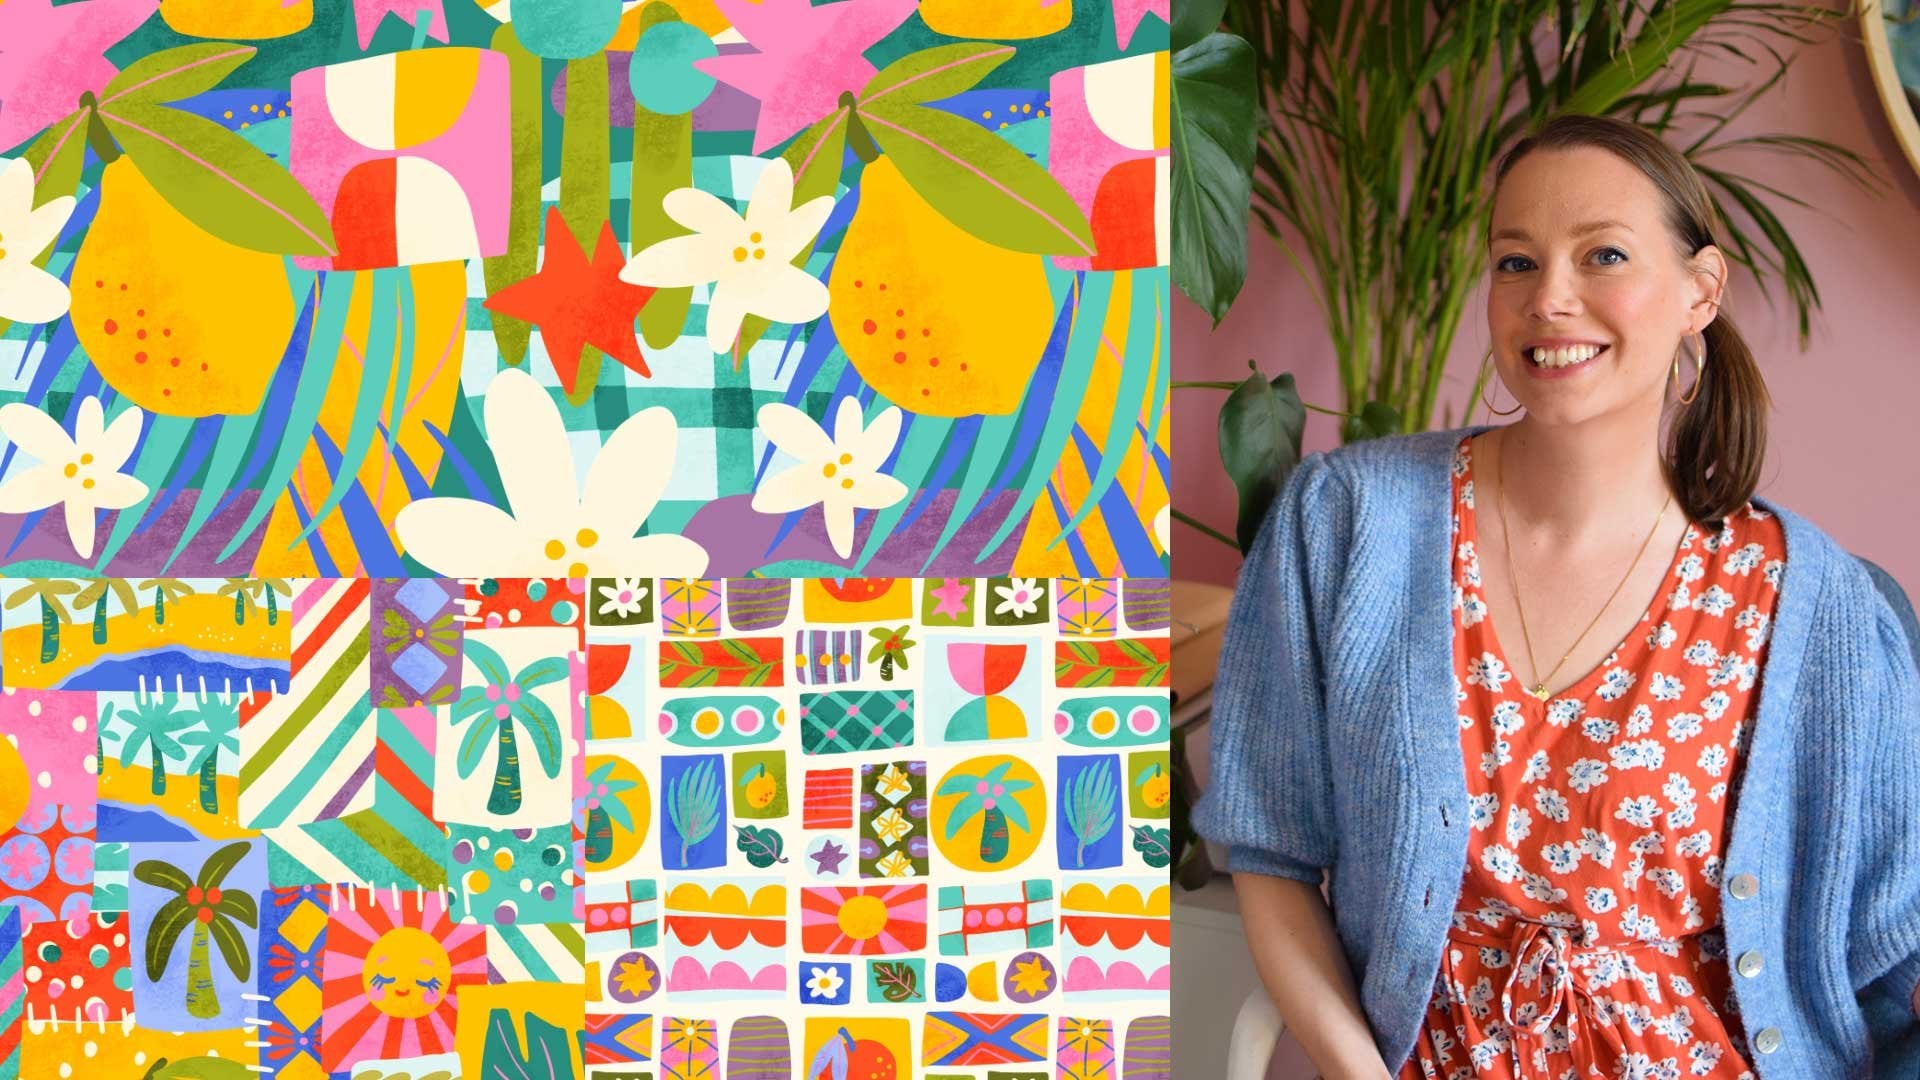
Procreate and Photoshop. Hello, everyone. I'm
Christina Hukranz an illustrator and
surface designer from Marie Fred Sweden. Welcome to my Cherry
Pink Studio in January. This is as bright and light
as it gets for right now. I've been working as a full
time illustrator since 2010, and I've been working with the licensing agent
Pink Light Studio since 2019. I've had the privilege
of working with clients such as Hobby Lobby, American Greetings,
Joanne, to name a few. And I really love working
on this classic theme. I think my portfolio is
mainly full of florals, though I like to dabble in
other surface design themes, but beautiful,
classic, feminine, pretty florals really
just feels like. Me. If this is also one
of your favorite themes, then I think you're going
to really enjoy this class. This class is great
for anyone who loves drawing florals
and butterflies, has a general grasp
of Procreate and Photoshop and would like to learn more about surface design. Following along this class and creating a mini
collection of your own, you will then have a professional surface
design collection to add to your portfolio and to send to potential
clients. So let's get started.
2. Supplies and Class Project: To follow along exactly in this class and use the
same things as me, you will be using the iPad with the Apple Pencil and
the program Procreates. I also finish all my patterns and collections in Photoshop. I'm sure that you can also adapt this process to another
program if you prefer. You are free to use whichever
digital brushes that you prefer and use
your unique style. If you need any help with that, I have several other classes
about surfat design, digital brushes and
working in Procreate. So check those out.
The class project will be to create your own
unique mini collection. You can, of course, use my
collection as inspiration, but I highly ask
of you to create your own unique
collection because I might possibly be selling
or licensing my work, and you would be copyright
infringing on my work if you copy my work and try
to sell it as well. So just to be safe, it's always great practice to create
unique artwork for your skill share
classes and always find ways to make your
work uniquely yours.
3. Intro to Fluttery Florals: Alright, before we get
started on actually drawing, I just want to share with
you some inspiration. So let's jump into Pinterest
to get tons of inspiration. And then I'm also
going to show you some examples from my
portfolio so you can get an idea of how versatile
this theme actually is. Right. So here, I'm going to be in
this little corner here just to keep it company. But let's take a look
at my portfolio, and I noticed that I haven't done any mini collections
for this theme, and I've done mainly
larger collections. But that's mainly because I usually like to work in
larger collections of six. I just feels like my my
happy what's it called? Happy medium, my whatever.
That's what I like to do. And there's so many
variations of this theme, even though you
think it's romantic, feminine florals
with butterflies, that can be done in
several different ways, and I have done a few. So here's something.
This collection is a little bit more like
vintage botanical. That's what my inspiration
was, at least. And the way that I like
to personally set up my collections is to have
placements and patterns. I think having only patterns
in a collection becomes very limiting is
not as versatile. If you start putting
placements into collections, you can open up the
world to your work to a world of different clients that aren't just
fabric companies. Then you can work with
so many other industries from greeting cards to stationary
companies or kids wear or, you know the so many industries. The list goes on. So, so this is one, and I like to have
some illustrations are just with no text. So maybe include a
little bit of text. You can also here's
an example how I've done feminine florals. This one doesn't have
any butterflies, but I could easily have included butterflies in
this as well and done, like, a happy birthday
flutter. Oh, my God. And done a happy birthday
fluttery floral collection, that's difficult to say. That's something
you keep in mind. You could do happy Mother's
Day with butterflies and florals or you could
do maybe even Easter. Maybe if you did butterflies and florals and maybe a
few eggs or something. But yeah, you can think
about creating a theme. That's especially great
to have placements if you're going to be
using something like that for happy birthday, for happy birthday cards, for gift bags, and not
just include patterns. In this specific collection, I had four placements
because I was thinking about cards and gift bags
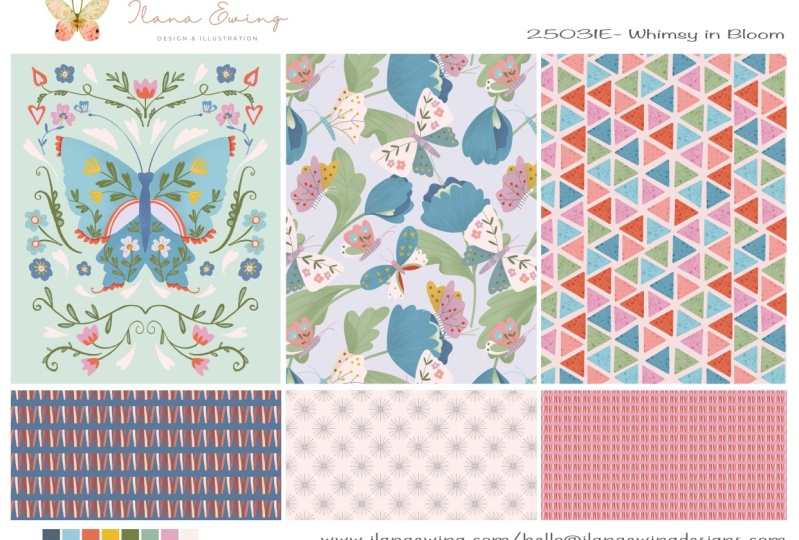
more than gift wrap. All right. So in a
mini collection, I think my standard would be one placement
and two patterns. At least, but you could
do three placements. You could do three
patterns sometimes, you don't always have
to do the same thing. It just depends on the theme
that you're working on, what kind of ideas you have, what you feel like doing. Sometimes you don't feel
like doing an illustration, and then just do patterns. But I just feel like it really
rounds off the collection, makes it so much more
versatile if you just include placements
and patterns. And then different
kinds of patterns, some that are complex. Like this one is
pretty full on and then another pattern
that's slightly simpler, but please do not include
poka dots or stripes. Do something a little
bit more developed. That's my tips. Moving
on to this one. This one's called
flutter Birthday. Yeah, this one did include
butterflies and florals. Again, I did three
placements and I did happy birthday text
or It's your Day, then I did three patterns. And I also want to mention that coordinate patterns
don't have to be full on matchy
matchy to your theme. They can just be matching
to your color palette. I think that's a
really modern take. So if you're doing
florals and butterflies, every single pattern doesn't have to have florals
and butterflies. You can do some pattern
mixing, which is really fun. So that's what I did in this
collection, too, kind of, you could say random patterns, but I try to bring
them up somewhere. Like, this pattern
in the tablecloth, in this illustration,
kind of has the same vibe as this pattern. So that's something
to consider as well. You don't have to create
coordinates that are so matchy. So if we take this in an example and create it into a mini
collection of three, I would take one of these, happy birthday designs or
placement illustrations. You could say this one, and then you'd have a
coordinate that's, like, matching to the seam, and then you could
do a coordinate that's kind of pattern mixing, that's abstract, I guess. That's an idea. Here's
another collection. Again, this one doesn't
have butterflies, but it has dragon
flies and birds, but I just wanted to give you
more examples of how I have created different
styles within my style. I still draw in the same way, but I just tweak my collections slightly
mainly so that I don't get bored to try different things to see what clients like, see what I like. So this one, I don't know. Was this more sophisticated
anthropology. And then the other
one was I don't know. What is this? I don't
I can't describe. And then here, I went, like, really modern,
like, folk art. That was really fun to
test out and create really flat images with florals. This one doesn't
have butterflies, but I could create
a second kind of collection in this style
really folk art with, like, mirrored looks and the icon patterns,
that'd be really fun. Just include some florals. So it's also a nice idea to
reuse your ideas sometimes. Like if you create a collection that feels really successful, how can you use this idea and
do something quite similar? Just like, change
the theme slightly, change the color palette, but use this as, like, a template for how you
create the next collection. I hope that makes sense.
Here's another collection full on really like, pinily I kind of used
to watercolor brushes. I really love this collection.
I think it's beautiful. Yeah, it's hard to
see because they're all This is how I used to do my sell sheets with all
the images stuck together. It looks so much better with a new sell sheet that
everything's by itself. That's like a side note. But yeah, so here's another example of how I've
done, like, it's matching. It has, like, I've drawn Everything's quite full
on in this collection. I could build this out
into a larger collection, added other coordinates that weren't florals or butterflies. Because when you
look at this, they all do kind of melt together. There's nothing that's
really coordinating in a way that gives you,
like, breathing room. So yeah, so this is one
placement with five patterns, just to give you an example of another way that I
build up a collection, I don't always do
the same thing. And last but not least, I have this collection that is called Bloom wildly more like an everyday butterfly
and floral collection. Again, I used watercolor
esque digital brushes to get that really soft feminine
kind of I wanted to get kind of toile vibes
with this one and this one. So yeah. Um, that's
a look at my work. Now I thought I would
just share with you some pintst artwork because
Pinterest is the best. So here I have a board
called birds and bugs. And there's just so
many different ways that you can translate this in, like, it can be
colorful and bright, or you can be super
romantic with, like, roses and
soft pastels and, like, painting watercolor
or you can do, like, something kind of folk arty, or you can make it
more towards kids or towards more sophisticated for adults or something more
whimsical like this. It's just I just adore
the possibilities. Um, of color palettes,
like going like, dark or light or really pink and purple and really
go for the girl thing. Or you could try to also make this something a
little bit more, I don't know if
UNI six will ever be like florals and butterflies, but you could try
if you really make bold shapes and bold
colors and not use pink. That would be pretty
amazing, I think. There's just so butterflies are so fun to draw because there's so many little details
and so many colors. You don't have to make
them look realistic. Like this artist has drawn
florals into the butterflies. Like, that's another idea
that you could run with. Here, I love these ones also. They have florals in them. Your it's just there's so much you can do
with this theme. And that's for, like, patterns. And then if you're
thinking about placements, something like this
would be beautiful. But instead of the birds, you could do butterflies. And think about this
would be beautiful for a notebook cover or
something like that, like a tin or a beautiful
decorative plate or, um, box. You can also do something
like a classic still life. This would be great
for wall art. Just place some butterflies
on those florals. I have my botanical floral class here on Skillshare that
you could check out, add some butterflies on top. You can also think about leaving space in your illustration. If you create like what is this? A frame of illustration with lots of florals
and butterflies and leave the center empty that
could be used for text. Like, for my notebook example, sometimes a notebook will write notebook or journal
or diary or 2025, if it's a planner, or even a company
could buy and create a thank you card or they can
brand it however they want. So that's another option for placement to
think about creating a beautiful border design with a text empty in the middle, like a space for text or
still life or just like a beautiful image that
takes up the entire space. Well, yeah, color
palette, just like, go for what you enjoy, what's calling out
to you if you like, the bright colors, or do you want to do something a
little bit more subdued, or do you want to try to
do something folk art, or do you want to
try to do something? Try to make it this
theme a little bit more I don't want
to say masculine. Make it a little bit
more not as girly. Mm. Now, you could try out darker colors,
not include pink. I mean, pink is best. I have a very difficult time
not including the color. Also think about I don't know. I'm just getting lost in so many other
artists' amazing work. Remember, look at inspiration to get initial ideas and get
excited about your work, but then close out Pinterest when you're designing
so that you don't accidentally
subconsciously or on purpose, copy somebody else's work. It's really important to come
up with your own designs, but it's okay to jump off of somebody else's design and
take it somewhere else. Yeah. Alright. Here's
another great example of a placement illustration. You could do one beautiful
butterfly surrounded with florals kind
maybe like mirrored. So it's really beautiful, and that would be a great design to have in your portfolio. Here's another example,
like a beautiful butterfly. Looks really decorative. And I feel like that
kind of design is easy to put on lots
of different items. It could be on, like,
a little kids t shirt, and then you would have
a coordinate pattern that would be cute on like a
pair of leggings, you know? I think that's a really
easy example of how to figure out how to pattern
mix and create a collection, and then you'd have
that other coordinate that maybe is a pattern, maybe something graphic
and that would be a border on the T shirt or something else that
goes in the collection. Feel free to use lettering in your work if
you're good at lettering. Lettering is still very
popular in artwork. Yeah, I hope that
you've gained lots of inspiration and you have some ideas for how you want to take your pattern collection. And, I mean, you can create several mini collections in different styles still using
the butterfly theme here, you can just see how many
different variations there are. It's amazing. Alright.
That's enough for me. I'm getting too excited. I can't wait to get
started on my collection. In the next section, we'll see where that takes us.
4. Project: Ideation: All right. Now that we've
gained lots of inspiration, we have some ideas
for what we want our collections to look like, it's time to get started on the class project of designing a mini
collection together. So in the following videos, you'll follow along in my full process as
I do my ideation, sketches, full color artwork, and then finish
everything in Photoshop, create patterns and
the final collection. Let's get started.
This is so exciting. Alright, welcome to Procreate. I just pulled up a screen size Canvas because I'm just going
to do some sketches, and it does not matter
what size you're using. This is just for your
own reference to get your ideas down
on digital paper. So I do this for all of my collections
because I like having, like, seeing what they're gonna look like and see
if it's going to work. So let me just choose a
color to sketch with. I'll use this, like,
dark teal and then I'll just use here the 60 pencil from Procreate
to make some sketches and I'm going to do a
collection of whoops. Gosh. A mini collection of three. I'm going to do one placement, one full on coordinate, and then a coordinate that is not matching or pattern
mixing like we talked about. Sometimes I like to start on the color palette first
to kind of visualize, but I haven't really figured out what kind of
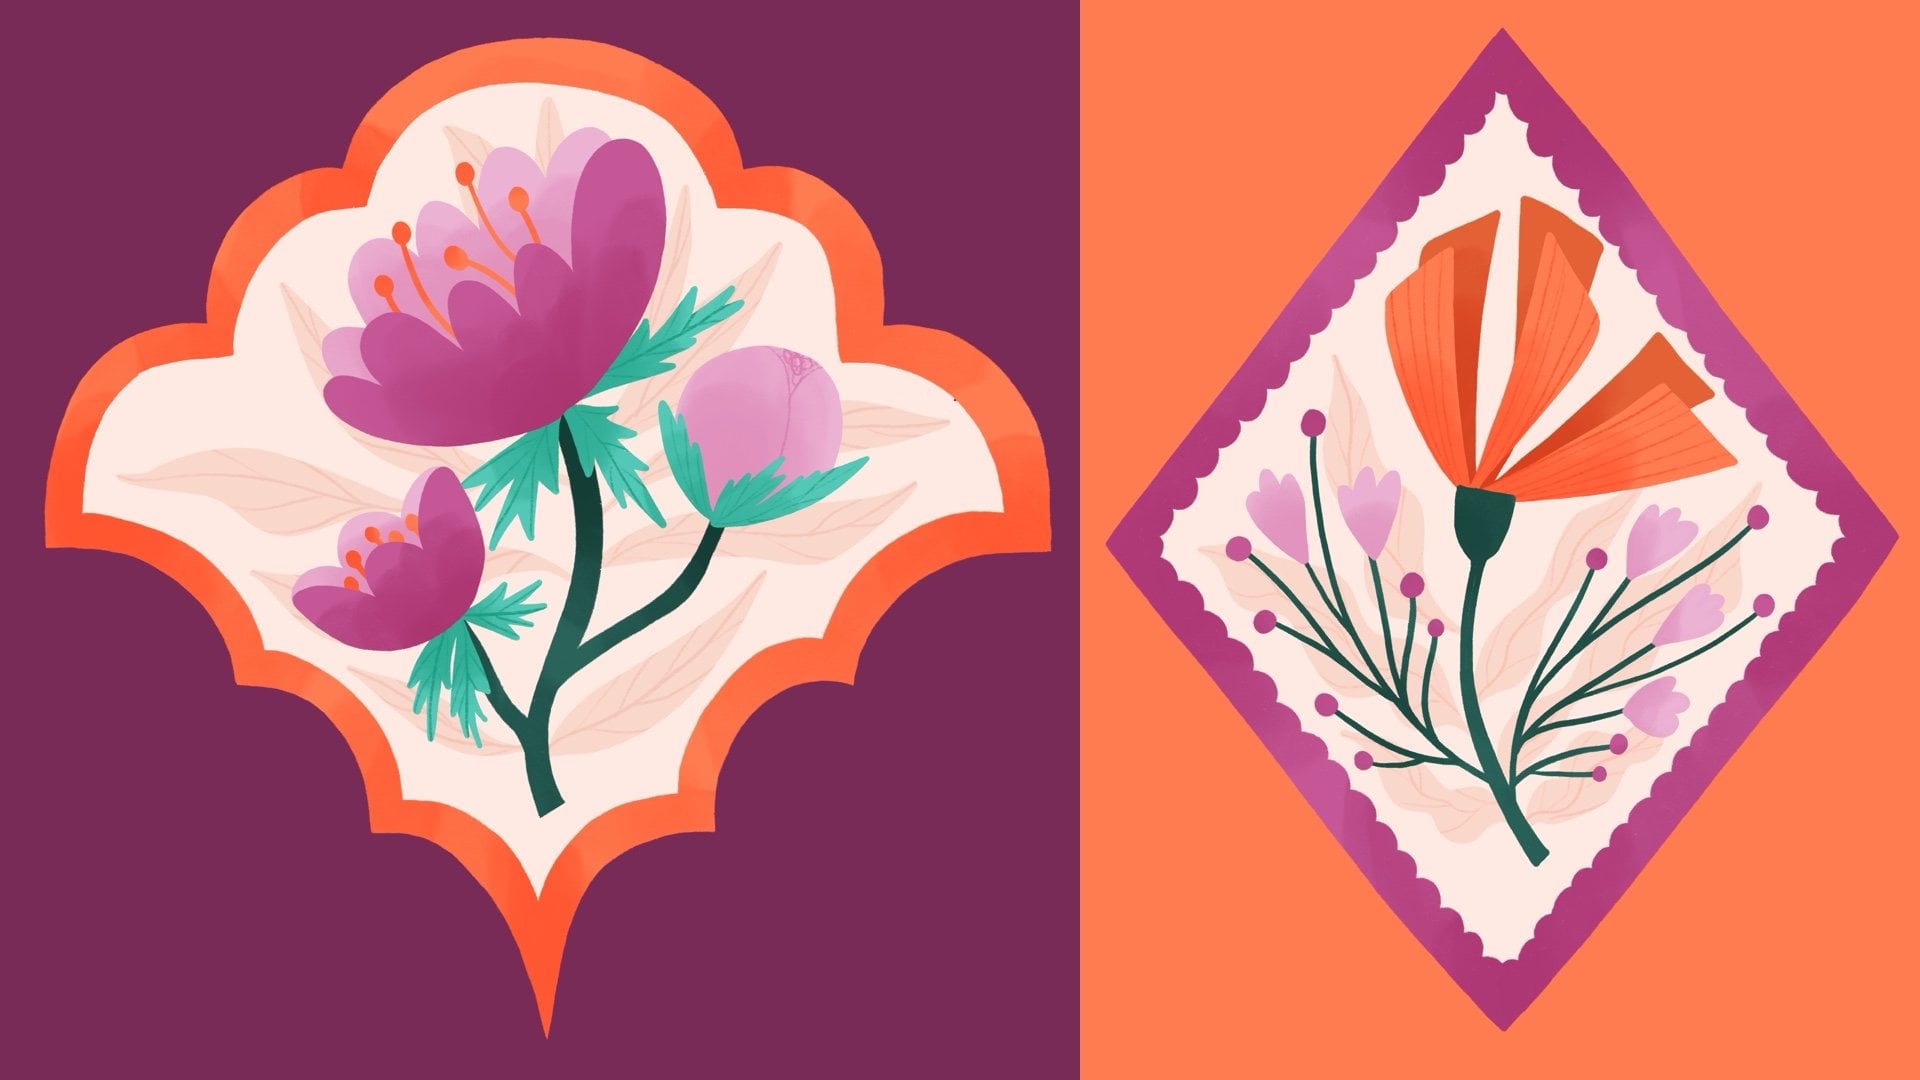
color palette I want. So I'm going to go into sketching out how
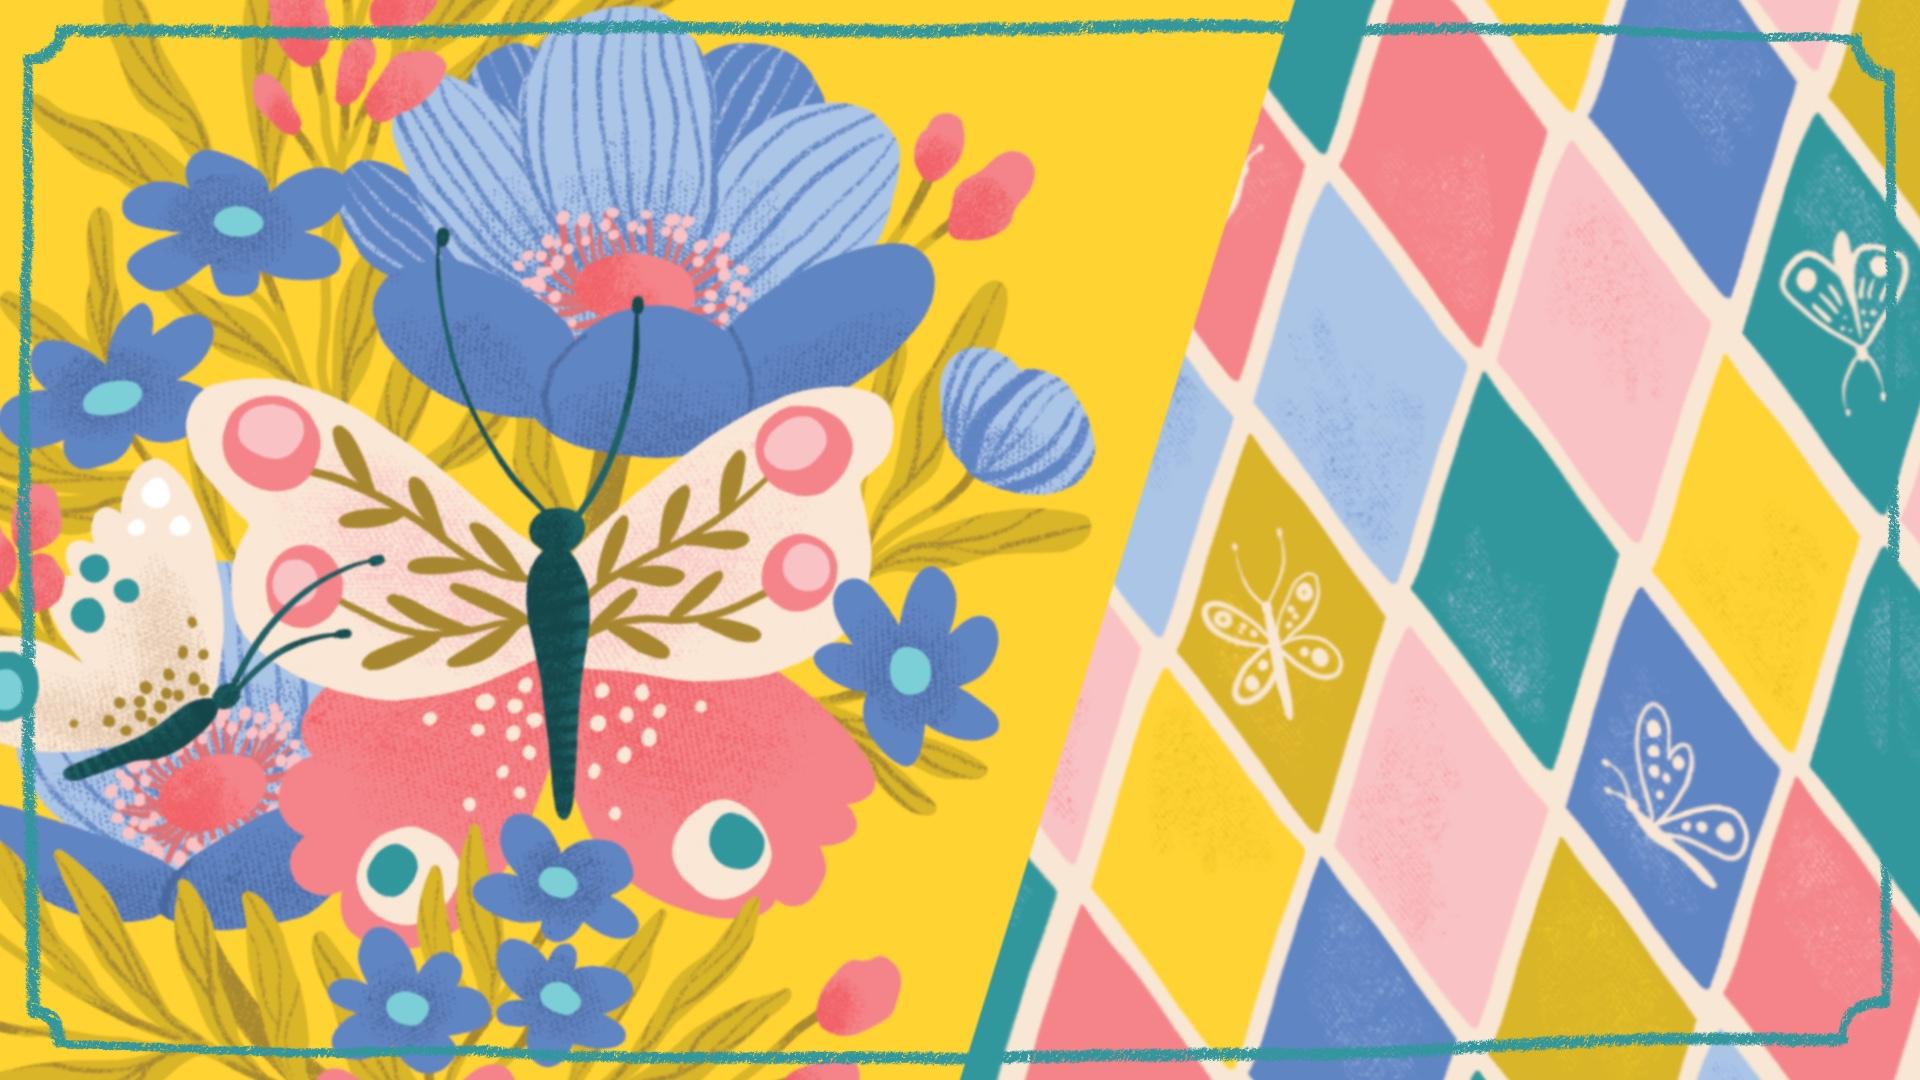
I want my designs. And I think for the my vision for the placement illustration, I don't want to do any text. I just wanted to be a full on just beautiful illustration. And I want it to kind of, like, fit into an oval on the page. I think that would
be really beautiful. And I want to do different, I think, more like
wildflower kind of flowers. I haven't I still, like I just got started,
and I haven't, like, like I said, I haven't
completely visualized it, but some kind of,
like, I don't know. Are poppies wildflowers?
So that kind of, like, a poppy,
like, two of those. One big and one small. And then we have to
have, like, branches of different vines and, like, smaller florals and then
other little details that go off out, not there, maybe, but so that
the oval has a nice shape. And then because it's
florals and butterflies, I really want to maybe just have one main butterfly or maybe
one in, like, a smaller one. So we'll have, like, the
butterfly in the center here, but not super in the center, I'm going to do quite organic
with that kind of look. Um Yeah. Okay. And then I don't know, maybe another butterfly to
the side down there just to add in more and then
I'll have to add in other little not butterflies,
floral elements. But this is just my sketch
and then I'll start to look at other items. That's my idea so far. Then I go into do the final
sketches of each image, then I refine this. The next one, I want
to have a pattern, and I like the idea of it being like a field of a
certain flower. And this one I wanted to have quite a lot of petals like this. So the background's going to
be this one specific floral. And, again, I need to figure out the color palette on that, so this is going
to really show up, and then they're gonna overlap. Mm hmm. I'm not sure what kind of, like, subtle do they have like
subtle leaves, maybe. So it's like almost the same
color as the background, maybe. I'm not sure. And then on top of that, I want to include some
different butterflies. Maybe in the in between parts, so they really stick out. With that Seems beautiful to me. And then the final one. I have it in my head that I
want to do a Harlequin print, but is that, too, just feels really random? How do we get this
to make sense? I can do the harlequin. I could include a little
detail in some of them. That could be really pretty
different multicolor, and then just a white butterfly. Maybe that would
pull it together. Wow, my diamonds are really
getting worse and worse. There's that. Now that I have my ideas down
for this mini collection. Then let's bring in some
color palette ideas. Use a studio pen. Here in my Procreate here this is like a
Christmas collection. But it has quite a
few beautiful colors that I've been enjoying using, even though it's Christmas, we can always add to it. I like the idea of
not making this, like, full on pink everything. So let's see. I like
doing background colors. So if we do a beautiful, bright yellow for the main illustration,
it could be interesting. And then maybe like a
cream for this pattern. And then it would
be all the diamonds would be the
different colors that I'm using throughout the piece. And I think nice,
like a turquoise. This one's very bright. I think I'd want to make it a little bit more sophisticated. Yeah, something like that. I think that looks
really good to me. Okay, and then we can start
to add on top of that some sketches of other colors. So let me just we can start
a color palette, as well. So here we have the yellow, and then we have the turquoise, and then we have the cream. And the turquoise, I'd
like to have, like, a darker version that
could be good for the petals or the leaves. Do I want to Yeah, and then the yellow, I could have a darker yellow, that could also be leaves. I could Joy. Yeah, using even more like darker gold that
could be good to use. I think it's always
great to have a few variations
of the same color, so it feels very put together. It feels like one color, even if you're using a lighter
or darker version of that. So I'm going to
also take another darker teali color as well. We need to bring in
some other colors, like, kind of like the idea
of bringing in this blue. So, like, a turquoise
and a blue, maybe. And then I want some pink. So pink tones, and I quite like this more
cory kind of pink. I think that would
look really beautiful with those blues
and that turquoise. I want to use purple, but purple is so
difficult to capture in digital artwork or in print. So I'm going to
skip that and just use that periwinkle blue. That could be my purple. Yeah. So that's my main
idea for colors. Let's see. I like
this pattern, wait. Whoops. Go back down here. This pattern maybe would be with the pink petals on that
could be really beautiful. And then the butterflies
would be a lighter, the light beige and then have
small details that could be in the dark gold, little speckles or maybe
that dark teal or the blue, just to give a different
color or bring in some of the yellow just to
something like that. And the teal, for the leaves, the stems and stuff. So that kind of is starting
to come together in my mind. I'm really trying to work
with contrast in my work. It's really important to
see all the elements, so it doesn't just
melt together, not use too many colors. I think a subtle, not a subtle. A small color palette really makes your work look more sophisticated
and put together. If we go to the other
the yellow illustration. I'm not sure. Like, again. If we do the flowers in
this beautiful blue, I think that looks so
nice with the yellow. And then, again, the
butterfly can be the light color and then just do the details in other
colors maybe has, like, a little pink in it this time or
something like that. And then also, the
pink can be in some of these floral elements
or the darker blue. We can bring that
into the florals. Oh, that looks so pretty. And then for the leaves,
like, the stems, maybe we'll use the golden
color to not bring in that teal at all into this piece or just a
little bit, maybe. I'm not sure if it needs
the teal, maybe in a few. Just a few, just to tie
that whole thing together. Um, yeah, and then here was
another butterfly that would be in white, too. So that would stand out. So that looks really
pretty to me. So by, I hope that I can make it look as beautiful
in the final piece. And then my final, like, kind of, kind of random. But just, like,
just something that breaks how freely this is, I want something
more structured. So then, yeah, I would go in
with my different colors, and it would be like this. I think this is where
the little color palette would look really pretty. Maybe it would be the dark room. Darker teal looks better. That? Something like that. And then maybe it would be
this cream would have to be even lighter to show up on
the a few random pieces. So that's my main idea
for my collection. Yeah. Pretty exciting. What I usually then do is save
this as an image. So I'm going to share, just take a JPEG and
I save it to my iPad. I'm also going to copy
this color palette. And then I go into my gallery and I
choose a new document. This is the one
that I usually use. I use the RGB. I do Let's do a new one 'cause I'm a teacher and I
have to teach you this. Okay, so inches, I
like doing 11 by 14. 300 DPI, I will get 71 layers on my specific
because I have the iPad Pro. The color profile, I usually
choose the RGB because I have not found that the
CMYK works very well. When sometimes when I bring the CMYK document to
Photoshop, it's compromised. I always choose RGB and
I convert it later. That's all you need
to know. Create. So then I have my document. This is what I create all my
swatches for my patterns on, and for my placement
illustrations, 11 by 14 " is a nice size. Like, it's a generous size. Most items are probably
going to be printed smaller, like notebooks are smaller, or greeting cards are
definitely smaller. And if it's ever anything like wall art
that needs to be bigger, there are printing
techniques that can blow up your artworks to a slightly larger size
without compromising the quality so that's what I do. And then I will paste in, you go add paste. So there's your
little color palette, and then I will also insert
a photo and I insert my collection so that I have that as a reference
when I start my final piece, I might even go in and choose the background
color so I know, wait, let's not do that yet. I'm going to go out of this and then duplicate
it three times. I have the three documents. Now they have all
the color palette and the reference image. Then I go in now, I will
choose the background color. You always have to click
it once again to highlight the color and then go to background colors so
that it shows up here. That's the first one. We have a yellow one. This just helps me to get excited to get started
on my collection. So there's the turquoise. Like you thought, done. And you can kind of
start to visualize how the collection looks
together, having, like, some that are darker,
some that are lighter, some that are more detailed, and some that are more airy. Like, to create a
successful collection, it takes a lot of, like, it's a lot of things
to think about. But it's fun. It's kind of like a puzzle. And then there's no
one formula that makes a collection
really successful. It's really up to the viewer, if a client has
different preferences, you have different preferences, you just have to
design for yourself, but with clients in mind
and hope for the best. So yeah, that is the start
of my mini collection, and how I usually go about creating my sketches and
go through my ideas, test different color palettes. I didn't test anything different with you
guys, but I mean, that's something you
could do several versions like just duplicate your sketch and test out
other color options. I'm just going to
go for it with this and think it through later. Also, when I could also, like, with these flowers, I haven't really decided
officially what it is. I don't want to look at
somebody else's artwork at this stage, really. So if I were to go and
gather inspiration, I would look at
photographs instead. So to do that, I
would maybe look at, let's see, wild flowers. Because I look at art all day, Pints gives me art to look at. So it's inevitable that
I would see something. But I would look at
actual flowers to get some inspiration for
different flower shapes and color combinations. Like, this is a beautiful image for those background flowers, those little small
extra ones, like, just like a twig with
some purple blobs on it. I mean, that would
be interesting. I was also thinking of poppies, And I decided poppies. Oh, okay. Maybe poppies maybe I'm
thinking of a different flower. Well, they do look
like that. Kind of. Um, yeah, so poppies. And then it doesn't matter
that maybe my color, that light blue color doesn't
isn't found in nature. Like, this is why being
an artist is so much fun. That's how I would while
when I do the final artwork, I will reference
photographs of flowers. All right. So that's how I set
up my collection. In the next sections,
we're going to get started on
the final artwork.
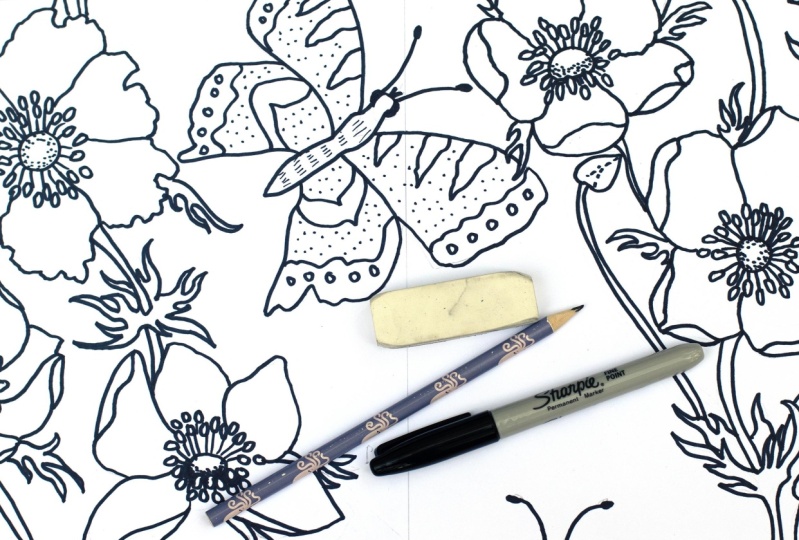
5. How to Draw Wildflowers: Alright, welcome
back to Procreate. And before I show you
my process, I want to, of course, teach you something in this class about drawing. So I want to share
with you how to draw some wild flowers. And in the previous section, I talked about poppies, but since those 5
seconds have gone past, I have realized that the flower that I was actually thinking about was anemones, and they're very
similar looking flower, but we'll go with that instead. So I'm just going to
find a good example, and I think this photograph is very clear what the
flower looks like. So I'm going to show you how I would go about tackling drawing this kind of flower. So I just brought up
a sketching pencil. This is from the Lisa
Glance Instant Artist pack. I really like her brushes, so I'm going to
use that, but you can use any pencil brush. And again, I just like
another dark color to draw. The center of the flower
is pretty much a circle. And then I out from the circle, there are these little things, and then you can do
little dots on top, which is just easy, so we'll sketch that out. And then the petals are
pretty standard petal form. I'm not I don't know. When I don't look at
one specific flower, I'm just kind of
looking at lots of the flowers seems to be
like four in the center, and then you combine
it like that. So to me, that looks really
good, a standard anome. You can add to your flower to make the petals look a little bit
more interesting. You can give them as if
they fold a little bit. So this one and this one
maybe folded up a little bit, and then the ones
on the bottom could just show that it's kind of
like show a different angle. We can also consider this photograph doesn't
have one of those. Let me find another example, more to the side. So here is more of an
example if you're going to do another variation with the flower a little
bit more closed. So here we'll have
the the center, and then we're going
to create petals that overlap that piece,
so we don't see that. And then we'll have the petals
on the other side that are a little bit more open clip
that doesn't look good. Like that. And then maybe
a little bit like this, so it's a little open like that. And again, you can
create the petals. So they look like there's
a little shading there. And then this part would
only show that middle piece. Let's see if we can find
what do the buds look like? Those look like little
balls, so that's cute. So just a little bud and then you just do
something like that. So these flowers are
really simple in my mind. To also make the
flower your own, I like in this photograph, you can see that the petals
kind of go in the center. There's a little dip. So that's something you
could add to your flowers. You could add that little feature,
which is really pretty. Could put all of
them or just a few. You could also make because you don't have since you're an artist, you can
make stuff up. The petals instead,
you can make jacket the whole thing to give them
some interest like that. Now I'm going to talk about
some coloring features that we can do with
these flowers. I'm just going to reduce them so that the sketch
isn't as prominent. Let's bring back our
first flowers here. Let's see. On a new layer with a more sick not thick brush. What was it? Like, more
What's this look like? So I would do petals. The ones that are going
to be the same color, I would do as one layer. And then I also need to change the color because now I'm confusing myself. So we'll do a light pink here, and then Oh, my gosh. We'll do a light pink there. And then I'll take
another layer underneath. I will take the darker pink, and that's where we'll do
these, like, shadowed petals. Fill that in. Okay, and
then once we have that, I'm also going to put my sketch on top so we can
see what we're doing here. And then I'm going to add
my little center circle. What color could we do that? We'll do this,
like, golden color. And then underneath that, we'll do the little lines. So we'll choose another color. Let's do this,
like, darker brown. Just do random little
some thick and thin, longer, shorter, going
in different directions, so it makes it look
really natural there. And then maybe on top of that, we can do a different color. So let's make it a
really bright yellow. That doesn't really show
up against the light pink. So what color could
we do instead? We could do this teal. I kind of like how this
brush has different shapes. It's not like a perfect circle. I like that it looks a little
bit more organic, natural. You could do a second color
to give it more depth. And then we, of course, need to add some
texture to all of this so we can do clipping
masks on top, and I'll use that color but
a little bit darker and choose a let's go to
Lisa's texture brushes. A classic brush that I used for years was the
pressure cooker one. I really like that one. So
that's a good one for whoops. For texture there, we
could on the petals, here you do another
clipping mask. I'm gonna turn off the sketch cause we don't need
that right now. I also like tea towel. So for the pink one, we can do a darker
version of that. Just to give some texture there. In the other petal,
clipping mask, we can also use a
pencil type of brush. Like, here's Lisa's pencil, and within, am I
enclipping mask yeah. You could give it details
like that to give 'cause sometimes petals have kind
of like stripes in them. So that looks nice. You can if it
becomes too intense, you can adjust the opacities, so it becomes a little
bit more subtle. For that flour, if we want, we could also do a
little texture as well, so we can use that
tea towel one. Give a nice subtle
texture there. I like the the petals
had the shading, so we can do that as well. We can take this darker pink and then make it a
little darker version. And we have to go Woops. We can use butterknife, I guess, or we can go find that other
one that we did before. And create the shading there, so it gives it more
of a three D look. And then on the bottom,
petals as well. So we need another clipping
mask on the bottom one. I think that works
with this. Like that. So that is how I would
create a textured, but still quite flat
and simple anom. There's so many different
variations of textures. If we just look at Lisa's
here in her texture brushes, there's I need to get a
new layer, of course. Loot textures like this. Or your smoky shader. Just like. And then
I love her brushes, 'cause they usually
build up really nicely. So if you press lightly, they're one shade, and then if you start pressing
darker, you can do another. So you could really make
beautiful petals like this. With this kind of
shader just depends on the look you're going for. So that one's really beautiful. Mm yeah. Light greater. Yeah, here's more
another one that's kind of like a half
tone kind of thing. Light dusting. Yeah, so,
like, simple like this. Soft dough. Yeah,
again, same thing. Like, if you use it softly, you can get soft, and then
you can get it darker. I have a whole class called Get to know your digital brushes, where I go over so
many different kinds of brushes if you
need help with that. But that's just like
a little run through. So this is some way that you
can really make your work your own by picking out specific brushes that
you like to work with. Just by looking at
my Procreate here, I've purchased way too many, and it gets confusing, but I create different
sets of brushes. I go through all the
brushes that I have and create groupings of brushes
that I really enjoy using. And they're just you
just have to play with them and get different ideas. So if you make petals
that have more of, like, a stripy look to them, like, this could be something that you could use on top of a I think this is
a procreate brush. It's called Ti lacing. There's just so many. It's
just completely up to you. I've also really liked using brushes that
kind of have this, like, little dots, too. I can give your work a
little bit of grungy look. So, I mean, yeah, this
is the part that you can really make your work
unique and have fun. Impropriate, this is the part that's just, like, insanely fun. So I hope that that was helpful. We can, I'll just group all
of these colors do group, so we can close that and
get back to our sketch. And I want to just go over a few more like the
fillers, wildflowers. If I just delete
anemones, can go back. And there's so many
different wild flowers that we can take
inspiration from. But I was trying
to think of we saw this image before in
the previous lesson. And I really like
I need a sketch. It's a six B pencil. I like the idea of having, like, fillers in the background
that could just be a twig, and then it's hard to see, really what is even going on, but that's kind of
interesting that you can just do a stick and then
put some blobs of color, and that reads as some
kind of wildflower. You can do other stems that
may be a little bit thicker, and you can do kind of, like, a bud that
hasn't quite opened up yet and some petal
sticking out on the top. Or the other like the closed anom it was kind
of like a little circle. But if you give it
some definition or maybe not like a perfect
circle, that would work. There's lots of
little shapes here. If we look in this image, there's some that kind of
look like a little tear drop. That would be pretty. And then, of course, other
flowers that we could do. I love that kind of the traditional Is this a
daisy something like that? Okay. When you can start to just kind of make up flowers as well, just with different petals. Make them messy. If they're
just gonna be filler flowers, they can kind of be
whatever you want, if you give most of your attention to the
other kinds of flowers. Yeah. That's my little tutorial on how to draw wildflowers.
6. How to Draw Butterflies: Alright, now that we've learned how to draw some wild flowers, especially the anime or
poppy type of flower, I want to share with you some ideas of how to
draw butterflies. Butterflies are so fun to draw because there are
so many variations. I mean, flowers,
that's the same thing. That's why they're so popular
to draw because there's so many different shapes and colors and textures
that you can do. And it's the same thing
with butterflies. When I write butterflies
in Pinterest, we get up a mixture of
illustrated ones and photographs, and it's right that we can look at both to get inspiration
for shapes and sizes. But just start off with, I
want to choose actual photos of butterflies because we want
to be inspired by nature. So bring up an image like this. Again, remember, unless
you're you really like depicting specific wild
butterflies and flowers, you can make up stuff. You can take inspiration and
then do whatever you want. So here I brought up another
just this pencil sketch, and the center of butterflies
are usually like a head, and then there's
some kind of body, and it can be quite slender. Sometimes there's
different shapes. It's like a little bit thicker. So it depends on what
kind of butterfly look you like or sometimes it's a little bit more shapely. So it depends. Um, here, let me move those
around so I can make three different
ones. There we go. So butterfly wings also have so many different
beautiful shapes, and there's so many that I like. I don't know. Which
one do I even choose? I really like this
kind of shape. If you really want to
make them mirrored, you can highlight select
using the Select tool. Before you press anything, you go down here and
this means copy. And then you can
press the arrow tool, and then you can flip
it horizontally, and then you have
a perfect match. That's handy if you want your butterflies to
be really precise. I usually am not that fussed, and I like to kind of have the wonkiness of
drawing something. But if you are, per se, doing like a mirrored kind of illustration,
you can, of course, use the mirror tool
or you can just mirror your illustration
yourself manually like that. All right. Let's think
of some other shapes. Like there's some that are
a little bit more pointy. And then yeah, there's like with different
shapes down here. So that's interesting. For this last one, now I don't have any room
for this. Draw too big. We can do more, like rounded. And then you can kind of,
like, make up as you go. They also have the
beautiful antenna. Some of them are quite small.
You could do really small. You can make them really,
like, exaggerated. And then it's a matter
of deciding how you want to decorate your wild
your butterflies. And this is the fun
part where we can take inspiration from nature because
they're pretty amazing. There's so many different
kinds of, like, there's circles and lines
and little, like, dots. And some of them
have an edge that's a different color and, like, little almost I don't know what do we call
that like a scallop print. You can just do lots of
different texture brushes. I really like a
mix of everything. And then, like we saw in when we're
gathering inspiration, there's so many
artists that decorate their butterflies with
flowers and things. So instead of doing something
that looks kind of natural, you can create some
kind of flower. Like, here's a
flower with petals, and you could do dots and
circles or, like, stars, and you can really just
decorate however you want to, which, again, really fun because you're an artist.
You do what you want. Mm, yeah. And here we could do different, like, more modern florals. I really like that
because it's fun. I don't know. It's
difficult to know. I also want to mention, it's really fun to draw butterflies
like this really flat. It makes your image
a lot less dynamic, so we can also
think about drawing butterflies in different angles. Here's some nice illustrations. So again, you have
the butterfly shape, and then you do the wing,
however you would like, and then you have a second
wing, you show that part, and then this would
usually be a little bit darker or lighter just
to give the contrast, and then you can have
your antenna like that. So that's really pretty. If you continue to look at different
photos of butterflies, you can find different
shapes so that you do create them with different That was
very sketchy, sorry. To give them different so
they just look dynamic. That's the kind of words
that I'm trying to find. Just want them to look
a little bit more dynamic. These are amazing. Look at those, like,
abstract shapes in there. It's just again,
oh, I love these, these look very almost like a child drew them.
That's really fun. If we're going to go back and
think about coloring these, I'm going to reduce the opacity, and then I'll put a
layer underneath, and again, choose a brush. We can use the same one
that we did before. Or now, I'll use another one. One of my favorites is the
dry ink from Procreate. If you've taken
any of my classes, that's usually what I'm using. And we'll go for a
yellow butterfly. And then, again, I like to draw the main shapes
in different layers. Here I'll make the bottom layer darker to give that
some variation. And then on top, I
will do the body. Let's do that one brown. It really dark brown. I like
to keep the body quite ****. Simple. I'm going to make
the antenna a little bit. Longer. I thought
it looked too fat, so I'm going to make
them a little bit skinnier. Yeah, I
like that better. Okay. Then we go in and
add clipping masks. So to this one, maybe for the body, I would just give it a
little bit of definition. Let me turn off the sketch. Maybe you could do some like, fuzzy lines, like,
it's kind of hairy, or you could do poka dots
or, like, proper stripes. You could give them
a little happy face, depending on the style
of your artwork. That's not very
defined, but, I mean, you could give
them a little eyes and a mouse if you're doing
something kind of cute. That's pretty ridiculous. Then we can go in again
to the other petals and first give them a little bit of texture like we did before, choose a darker version if you'd like, or
different color. And then we need to
find a good brush. So I really like that tea
towel one. That was nice. And again, I like not having
it perfect on both sides, that it's exactly perfect. So then it does give it
a little bit more life. And then on top of that, we can start adding, with a pencil, I can go
in with different colors, and I can create designs. We're different. Maybe
we'll give, like, sometimes butterflies
have those, like, big, almost, like, Is on them. Maybe I'll do that. Or
I could do that here. It's like an eye in
different colors. Something like that.
And what else? Just try different things. Here we'll go down and do the other ones or clipping
mask on the bottom petals. Are they called petals,
butterfly wings? They're called wings. Oh. So give those a little
bit darker the texture. We can do the same one or you can try different. Here powder. I remember liking that one, too. Since it's the bottom one, they can get a little
bit more textures, so it looks like
even more shadow, and then add a clipping
mask on top of that, and then yeah, add more designs quite
like the circle. Akin that one pink.
So like that. And again, just so many different designs
you can test out. If you want to go something like this that was kind of close to the reality of a
butterfly or not. But it's still quite
abstract or we could go the route where we're making flower
designs or something. So this is the part where
you can have even more fun, even more fun than we had
with with the wildflowers. With butterflies,
you can seriously, as you can see from
the inspiration that we can gather here, there's just so many
different ways of designing, different colors, so fun. I love that one with just, like, bunch of poker dots in it and stripes and this is really fun. Hmm. And this is beautiful. Thinking decorative,
the whole thing. So pretty. So I really hope that you enjoy creating lots of beautiful
butterfly designs. Remember to gather
inspiration from other artists and
from real butterflies and kind of mash it all
together in your brain and draw something that
becomes uniquely yours.
7. Project: Placement Illustration Process: Alright, friends, it's
time to get started on my placement illustration. I'm going to leave this as a time lap so you can
follow along my process, but I'm not going
to take you step by step. I hope you enjoy. Oh Alright, so that's my final illustration. I hope you enjoyed the process. I think I think I like it. I could tweak maybe this
butterfly a little bit more. Maybe it's not enough contrast, but sometimes when I zoom in, it looks nice and then zoom out. I don't know if it kind of melts too much into the flowers. I could play a little
bit more with that. But for the most part,
I think that I'm really happy with
how this turned out. I especially love the
yellow background with the darker yellow leaves and the pink and
the blue flowers. I think maybe just my
butterfly is not sticking out as well as I would
have liked. So yeah. But overall, I feel
pretty happy with this. Yeah, I love the color palette and I enjoy that the
butterflies look, kind of playful, whimsical, but not being too overly crazy. I don't know. It's hard to
do things on camera, too. I want to sit here and think
about this for a long time, but I just kind of have
to get through it. But let's see if I tweak those butterfly wings at the
end. But this is it so far. Thanks so much for watching. Let's jump into the next
section where we're going to do the butterfly pattern.
8. Project: Main Pattern Process: Alright, my friends,
now it is time to get started on my pattern. And I use the same
canvas 11 by 14, and I create all of
my motifs on this. And then later on,
I will bring this into Photoshop to make
the actual pattern. I still don't like that Procreate doesn't have
a pattern feature. It cuts off the edges, so it's not a professional
pattern that you can move around that if
you send to the company, if they move the items around, it's going to be cut
off on the edges. So Photoshop doesn't do that. That's why I use Photoshop. But of course, if you're
just getting started, creating patterns in
procreate is a nice option. But once you start getting serious about creating
your artwork, I would highly consider
using Photoshop instead. So I'm just gonna get
started on this image. And these flowers, I don't have, like, a real flower in mind. I'm just going to make these up. So I hope you enjoy
watching my process again of how I bring
this pattern for life. Okay, that's the final
sheet with motifs. And as you can see,
it's not a pattern yet, but I'm going to
upload this in layers up to Photoshop where
I will rearrange it. But before that in
the next section, I'm going to just work
on the blender pattern, the other abstract coordinate, we can call it. Okay. Bye.
9. Project: Coordinate Pattern Process: Alright, now we're working
on the final section. I'm going to try to
do a harlequin kind of diamond pattern with some simple butterflies
in the center. And again, you can watch my process creating
the small motifs. This shouldn't take very long. And again, I will finish
the pattern in Photoshop. No. All right. Now my motifs for my simple coordinate
are finished. And again, I'm going to upload this to Photoshop to finish. So I'll make sense what
I did here and why, but I just wanted
to make motifs that will hopefully
repeat very nicely. In the next section, you
can follow along as I upload all of these designs into Photoshop and create
my final collection.
10. Project: Final Collection: All right. So we're
in Photoshop now, and I have uploaded my images from Procreate
in layered PSD files. You can see over
here in the Layers panel that all the layers that I created while making
my artwork is here. So we're just going to clean
up the file a little bit. And if you need help with
this process even more, I have a whole class
called File Organization. File setup and organization,
I think it's called. Where I go over this full
process and how I organize my files and create cell sheets and all that because
I'm just going to scheme over this part. I'm going to take away,
here's my color palette. I delete that, here's
my sketch layer, so I delete that. That doesn't need
to be in the file. I go down and also I'm
going to delete my sketch. Initial sketch. Then we
just have the artwork. I'm going to highlight
all of that, copy it, and I'm going to
pull it into my sale sheet. This is a sale sheet that
I use with my agent, so that's why it has their logo. It's my logo, their logo. Room in the middle
for the artwork here, I'm just going to place it in. And then you can also
see that this document, I have created it in CMYK. My artwork was in RGB
and then it converts to CMYK in this instance
because I have chosen colors. If you've taken previous
classes from me, my color understand
color and procreate, I create color palettes
that are CMYK friendly. I mean, I'm just telling you all the different
classes I have, but I have 30 classes
here on Skillshare that I know will be
helpful for you. Okay, so that's another class I'll link all of the classes. Alright, so then I'm
going to group this. So that's a group, and I
call it artwork in layers. So if I sell this
artwork to a company, they have all the
artwork and layers. If they need to change a
little color somewhere, they can do that themselves,
but for the most part, they would contact
you if they want to make changes to artwork
because it's your artwork. Okay, so I placed that
there nicely in the middle. Why didn't it do this
Artwork in layers. And then I'm going
to change the SKU, a number that we use
to and identify, again, that file organization. Class would be great if you
need help to figure out how to keep track of all of your designs and deals
and things like that. I'm going to call this
collection flutter, I know. Very creative. And then I closed this so that my PSD file looks really clean. I'm gonna get rid of those lines that
helped just guide me. And that's my final artwork. You can see that I
did end up changing the butterfly to the
pink on the bottom. I thought that that melted
in better into the image. Still unsure, but I'm
just gonna go with this. I take a screenshot
for my records. Okay. And that's the first one done. I also take the
artwork, copy that, and I bring it into a second like a collection cell sheet. So I'm going to paste that in. I usually press Command E to flatten the whole image because you don't need
the layers in this one, and I'm just going
to put it in here. I'm sure there's a way of
making it exactly, but I mean, I'm not a photo shop genius. I'm going to change the
SKUs of this collection. I can't believe I'm
almost up to thousand. Flutter. There we go. So that's the first one. That's really quick. But that's how I
will present this to my agent who then
presents to clients. And this is what I did
before having an agent. I also created sell sheets and collections like this and
had SKUs for my artwork. Now we're going to move
on to the pattern. I, of course, usually save
all of this, as well. Let me do that just
because I'm going to freak out that something's
going to happen. This one I don't need to save because we're done with
it, so don't save. I already have the
original in my files. This one I will save. Mm. In here. I also save it as a smaller JPEG so that it's
easy to send in emails. There we go. Okay, so moving on
to the next one, we have this pattern. So how do we make
these motifs into a pattern in Photoshop?
I'm going to show you. First up, again, like I
did in the other one, I'm going to clean
up the file by removing the color palette, the sketches and other
sketches so that we just have my motifs. I'm going to copy all of that and bring
that into the cell sheet. I'm going to delete
this artwork. And then group that and write
original motifs in layers. So that's all available to
the company who purchases, if that is important to them that they need
things like that. Some companies prefer to create their
patterns themselves, so then they can have the motifs themselves and arrange it. Um, sure, they can do that. And right. So now I'm going to I'm
just going to let's say, I have two different groups. So let's see. What's this? That's a That was a sketch, too. So I'm going to just hide the flowers for right now so I can work on the butterflies. So I'm going to flatten
all the butterflies. Command E. And then I'm going to make them
individual motifs. So I'm just going to Lasso and use Command J to put
them in a new layer. And I just go and do that
on every single one. Right. So then we can
double check that I got up everything by doing the original and unchecking it. But now I can delete
that, those are all done. I'm just going to
hide those while we work on the flowers. So I can bring those up. I can just flatten that group, and I'm going to lasso
around these as well. J, Command J. And then the last
one. Command J. Alright, same thing.
We uncheck this one to make sure I got all of
them, and I can delete that. Now I'm going to save this. Save as butterfly
pattern. Alright. Because of my file system, it's so nice that I can just
give my files generic names. Otherwise, yeah, having to
come up with original names for every butterfly pattern you create, would be exhausting. So that's another reason why
a naming system is so great. So now I'm going to start
with the flowers only, and I'm going to open up
view pattern preview. I really like this
simple pattern tool. I mean, I wish that
it could do half drop patterns because I think
they are way better, but this is good enough, and you just have to put your artwork into repeat sometimes so that you
can show that you can do it, and a company might
redo it later. I mean, I think it's just nice to show it in repeat to show the company what
it could look like, and then they can do their
own tweaks to it later. Okay. I think I want
to for this space, I think I like this one the
best, or do I like this one? Maybe the smaller one is better. I don't know. Let's
try this one. I'm going to press Option
and pull it down to make a duplicate Command
T to transform, right click and
flip horizontally. So that fits in nicely
there. I like that. So that's essentially my pattern with just the
flowers. I like that. I'm going to save that
Command S. All right. And then now I'm going to
bring in all the butterflies, so I'm going to bring those in. And now I can arrange those. I think maybe I drew some
of them a little bit too big so I can reduce the size a little
bit and I can twist them around and just
make sure that they fit in nicely in these,
like, empty spaces. The only thing you have to
know about using this pattern preview tool is that you have to do all the work
inside of this box. Otherwise, it's gonna get wonky. If you have anything
outside of it, it can show you real
quick. Oh, my gosh. This little fly, like,
started to attack me. See, if you start to it will cut off stuff, so
that's not good. Alright, so everything
has to be in here. I will reduce the size, and I want to change. So this is just, like,
the fun part of just moving stuff around
until it looks nice. Um, I definitely feel
like the butterflies all need to be smaller, like that. Where's this one
go? Like up here. Maybe this one's
kind of nice there. This one's way too big. Like, like this, maybe. Um, this one, I feel like
a little bit too angled. See, sometimes they
mess up anyways. I don't know why, so I can't
explain. So this Whoops. This tool is kind
of wonky still, so I don't really
don't really know. Oh, here's another
one. That one's also too big. Make that smaller. Where does that one go? Like, on the flower then it
melts in too much. Hmm. On this one. Give
that a little ankle. Okay. See where that
goes down here, maybe. Hmm. Does this look nice? I usually like to duplicate a
few like the prominent one. Like, this one is quite big. So if I duplicate
it and flip it, then it just feels
like it repeats nicer. I can make it even. Let's see. Does
that look better? You just have to kind of, like, move stuff around until
it feels good to you. Hmm. Do we like this? It looks flattery and pretty. And sometimes it's nice to zoom out and see
what it looks like. Hmm. I'm not sure.
This is so difficult. I kind of feel like
it's empty space here. Maybe I will reuse this one. Again, I'll flip
it and see. Yeah. Then I feel like I've
used a lot of the space. It feels really full. It's feminine and kind of modern and flat,
and I don't know. It's quite cute. I like this. This space kind of feels
like, Does that look better? Kind of annoyed
how those antenna were overlapping. All right. Is this good? All right. I'm going to call it. I
think that this looks good. This is the part where you
can go a little bit crazy, but I just like
to done is better than perfection for me.
Move on to the next. This is good enough. This shows what the essence of this pattern is.
It's really pretty. So I'm going to save this and then file to make the
pattern swatch easier, you can press edit
Define Pattern. Press Okay. Now it's in your panel with
patterns, pattern panel. That's so difficult to say. Okay. So then we can
take all of these. So now you have all
the repeated motifs and in comparison to Procreate, where this is your swatch and everything outside of
that would be cut off. But here in Photoshop, you can continue to
move things around, even if you open up a new file. That's why I think it's important to use
Photoshop instead, if you're going to be sending pattern files to professional
clients and not just, like, your own website or if you're doing things for spoonflower, then it's okay to use Procreate. But if you're working
with clients, I think Photoshop
is a better option. That's just me. Let's see. All right. So we close that because that's
just something we need. I'm going to paste
in all the motifs. As you can see here, now you
can see, here's the swatch, and here it is cut off, but it's not really cut
off in the actual final. Um, it's hard to describe. This pattern tool
is kind of weird. But if you okay,
it's hard to show. It has all the
vital information. Plus, I have given the original motifs, so
they have that as well. But here you can see,
I don't know why sometimes they cut it
off and sometimes not. I really don't understand this tool, what's
going on there. But anyways, we'll make
that into a group and I call this pattern in layers. That's that and I close that as well because that's just for their reference
if they need it. Then on this here we go. We have the guide
here that I have, and above that, I'm
going to go down to this panel and press pattern, and I go and choose from the
last one that we created, and then I'm going to scale
it down usually somewhere like 67 is good to
show off the pattern. Now it's taking over
the entire cell sheet, so that's not good. So we need a clipping mask. So in between the layers here, the pattern fill and the guide, you see that finger, little hand with a finger. You press option, you
get this clipping mask, symbol, and click it and
it goes right in there. Now we can move this around until it looks nice
on the page here. You can see the pattern is repeating once,
you can see that. I'm just going to change
the number to 989. I take a screenshot
for my records. I make sure that the file looks
nice and clean over here, they have the two groups
of the pattern in layers, and they also have the
original motifs and layers. Then here's just swatch
for their reference, but they can also use that, I assume, then the
contact information. That's my second
cell sheet done. I'm just going to
save this, save as. I change the name and I
save the JPEG version. This is my full process, but it goes pretty quickly. Once you get into it, I guess the drawing part, of
course, takes the longest. We save that. Then I'm going to take this pattern
fill and the guide. I select those, copy it, and then I'm going to bring
it into our excel sheet here, paste, and then flatten, com E, transform and put it in. You can see that
this one I feel like the teal and the pinks maybe got a little bit duller in the CMYK version,
but just slightly. There we go. So
that's the second. That's the pattern finished. Pretty cute. Now we're
going to work on the final. Here we have my very
simple pattern, and here I have my butterflies, and then I have all the
different diamonds in pattern. Not in pattern in groups. So I'm going to
delete my sketches. And these butterflies, I want to put those
on separate layers, so I'm going to lasso those. I could have drawn them
on separate layers to make my life easier
here in Photoshop, but I didn't
remember to do that. Okay. Okay. And then I made my canvas
is a little bit too Small. So I need to either
make the canvas bigger or I need to make
these motifs smaller. I'm let's make the canvas bigger 'cause that just
seems easier to me. Okay, I'm going to
highlight that color, and I'm going to make W one is this crop tool? Frame tool. Crop tool, right? I'm just
going to make it bigger. Make the background same color. Okay, then we can work here. Which one's this? Make sure that autoselect is on group and then that won't
make it easier. I'm going to make sure that these fitting nicely together. Now, these ones don't fit, but we can just
place them randomly and we can see how that looks. Okay. In order for this
to then repeat nicely, I'm going to have
to crop the image. So I'm going to bring this down. That's good. Let zoom in. I want about this much space, so I'm going to go like that. And on this side,
I'll do the same. And on the top up here,
there's a little bit of space, but down there there's
a little bit more. I don't know. Would
that be good? I just give it a
little bit more. Okay, we're going to try this. This is my swatch, and I think it's going
to work. We'll see. View pattern preview. So that's repeating that side, and I'm just going
to duplicate all of those and put it here and
hopefully it will fit. So I'm going to
Can I group all of these? Well, I'm sure I can. But maybe I don't
want to repeat them. Like, this I'm slightly annoyed. I didn't think that
those were gonna be two there. Do I like that? Not really. Hmm. That's okay. Um, can I do this? Yes. So I'll do that there. Then it repeats like that. Uh huh. Nah. Let's group that and then we
can duplicate that group. Hmm. Yeah, it seems like it
doesn't have enough space, so we didn't give this
watch enough space, so we have to go
back. There we go. And then I'm gonna go out
of the pattern preview, and I need to give it a
little bit more wiggle room. So zoom in and give it a little bit
more space. Like that. Just a little Okay. And again, we need to
fill in that background. There we go. Now
we'll try that again. But we've already
duplicated that layer, so it should be
easier this time. Pattern Preview. And then we're still
on group select, so we'll move this down. See? And now when we replace
it, it fits perfectly. Ooh, that looks nice,
except for now, I have three blues right
here, so we have to fix that. Hm. And I don't like this. Yeah, we need to fix this one. Let's see. Which one is that? So it's in this one Okay, so this one, we need to
change the color of that. So which color should we do? Instead should we do this like green greening? There we go. And then, of course, that's the wrong color that's annoying. I don't like doing
all these kinds of adjustments in in Photoshop. I'm so used to doing all the
drawing in in Procreate. I need a bigger brush. Okay. I just made sure that I had
the layer on Alpha lock, which is the symbol right there. Okay. So that helped. Now we
just have this one. Oh, it's the same over here 'cause that's duplicated twice, of course, so we have to
do this one, as well. Alright? Let's see
which layer is that. No. Huh? That's in this one. What Now I feel like I don't know what I What
happened to my layer? There we go. So professional. It gets confusing when there's
so many different layers. Okay. This one we're looking
for. Is it this one? No. It's this one. And then it's this one. Yes. So, again, we're gonna choose that beautiful green gold color. And then I have to take
this one and alpha lock it and choose the
beautiful yellow color. Okay. So that is done. Now I just want to fix that these two blues are
close to each other. What color should
we do here instead? Or this one, we can change this one to the
light pink, I think. Would look nice. So
we have to figure out instead of or group, we can click this one,
see which that one is in. It's in here. This one, yes. So it's the blue one here. Highlight the pink. And then we have to do
the same thing here with that extra layer that
I did the pink on let me zoom in so I can see that I'm
actually painting everything. Here we got some blue left. Okay. There's that. And is that good? No, now it's up here too. I change this one to the
pink as well. So we do Or should this one be
the nice green again? I like that color.
So it's in here. Good. It's this one. So I'm going to do
the green gold again. Whoops. Hmm. Oh, it's
this one. Sorry. There we go. And then this
we do the yellow again. Alpha log, brush, Zoom in. Okay. So now I have a pattern
that repeats nicely. This one and this one
maybe is annoying. We could go in and do that, but I think it's right. It's playful that some of
them dabble. I like it. All right, so now we
have to figure out if we need more of these butterflies,
which I think we do. I'm going to now close out all these little groups so that I don't pay attention
to those anymore. All the diamonds or fines, we're going to look at
these little butterflies and we need to repeat
those a few times. This again, I'm going to
option and then flip it. Why should we place you down? Maybe appear in the
blue. That looks nice. I want to repeat this one. For this one, I will flip vertically. That
could look nice. Where should we put
you here maybe? Then this last one also I'll flip it because it makes it just look slightly different
and you can go Hmm. I guess there. It's kind of lame that they
both are on the same color, but it was okay. Bounces around nicely, I think. That's a nice little detail. Okay. So I haven't I don't know what's up
with this line here, but that just feels like it's a glitch. Yeah, it is. Okay. All right, so let me save this pattern 'cause I
haven't done that yet. Uh Diamond. Pattern. Again, I'm going to edit and then
press Define Pattern. Press Okay. Then there's that. I'm going to take copy
all of these layers. Because I didn't
flatten anything, I don't have to put that as a single layer or
as a group here. I'm just going to have just one layer one
group for this one. Group pattern in layers. So they have access to that, all the original layers. And then here you
can double click on this pattern and you
can choose the new one. I think this is a good
size as well for this one. We need to change
the number 990. Again, we can adjust this
a little bit so that we can until it looks good to us. Looks nice. Take a
copy for my records. I make sure that the file looks
nice and clean over here. There you go. So that's
the final pattern. And again, I'm going to save it because even though that didn't take an
incredibly long time, you still don't want to start over just because your computer goes crazy and does photoshop crashes,
that's not unheard of. Then I save for web to make a smaller There we go. And then I'm going to again, copy that pattern here
and the guide copy, bring it into the final here. And I like that. And then I have a
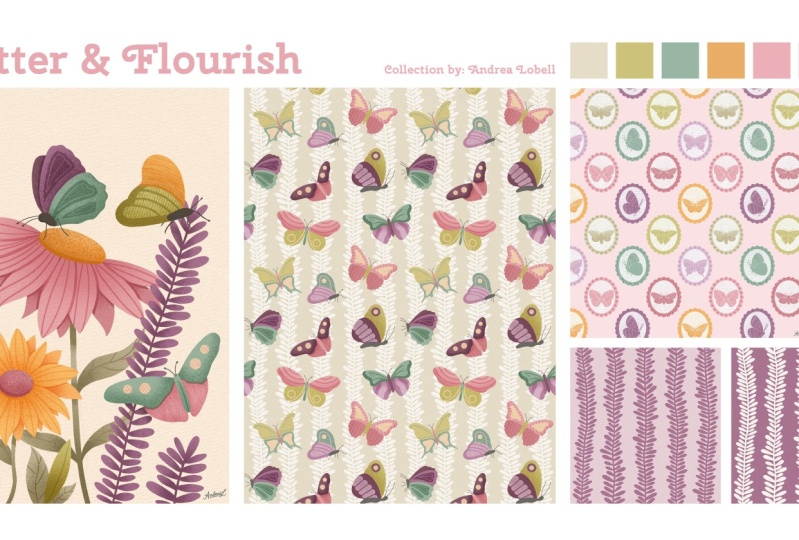
in mind cover line, so I'm going to just do that. And here's my final collection. I think it's playful
and whimsical. It's girly without being
just pink and fury. It feels kind of young, but it also doesn't feel
like it's super kids, but it could be for kids. I think it just feels
really whimsical. I'm really happy with
how it turned out. I don't think it's the
best mini collection I've ever created in my life. But sometimes that
doesn't matter. If you don't completely love it, maybe a client's going to
really like it, you know? Like, sometimes you don't have the same taste as
everybody else. So it's always important to just keep going and keep designing and you're
gonna get better, and some collections are going
to be really amazing and sometimes they're just gonna be totally just okay, like this. Or maybe you think
this is, like, the most pretty thing you've ever seen with your
eyeballs and you're wondering, Christina, what are you talking about? This looks really good. So it's hard as an
artist sometimes to see in your own work what
is really amazing or not. So, I just wanted
to mention that. Here's the final collection, and this is what I
would send to my agent. This is what I would send
to the potential clients. I would say I would save
this as well as a PSD and a smaller JPEG so that I can send that easily
and upload this to your website if you want
to have previews on a private page or this
is what you would send every month in an email to your clients to see if
they would be interested. And I have so many classes. I have that file
organization class. It's helpful to show you this
process a lot more in depth on how to create a sell sheet and how I organize
my files later. I also have a class called
How to Professionally approach buyers and how to find buyers and how to send
and pitch your work. I hope you find all of my
content that I have here on Skillshare here on
Skillshare, really helpful. I also have other classes
about surface design. So just check out
my entire catalog. There's so much for you here. I've really tried my best to cater to creating the kinds of content that would be helpful for aspiring surface designers.
11. Next Steps: Alright, that's it. Before I leave you, I really want to talk to you about a few next steps that you can take so that you can take your new knowledge and
really run with it. Really hope that this class
has made you feel more confident creating
successful mini collections, especially in the theme
of fluttery florals. But you can, of course, take everything that you
learned in this class and apply it to different
other themes from, like, wow, woodland animals or abstracts or food and
beverage items, you know? So it's very versatile, but I'm very happy that
you followed along. So after creating
this mini collection, how can you translate
that to another theme? Can you brainstorm
other themes that you can create mini collections
in this sort of style? Another thing that I would
love for you to think about is how is possibly building out this mini collection
into something larger it's great to offer small collections in your portfolio because
you can really show multiple different themes and
variations of your style, but having also
larger collections of six or eight is really
great to also have a lot of variations or lots
of examples of this theme to present to a client so they
can pick and choose. Maybe they'll buy
the full collection, maybe they'll just
buy four or two, and you can offer the other
half to another company. It's just really amazing
to offer collections, and it just looks so
good in your portfolio. It looks so put together. I love collection so much. And finally, I'd love
for you to research different other pattern
types that you could try in future pattern collections or different compositions
for illustrations that you're going to try or lettering that you want to try. Just have a running list of different things that
you'd like to add to different pattern
collections so that you don't make this cookie
cutter mini collection. And even though that's
great a few times, but if your collections
always look the same with the same types of placement and combinations of patterns
that support that placement, it's going to get
a little boring. So I think it's always
important to, like, do some research and look at your peers and what they
are creating and get their inspiration from patterns and color palettes from
the world around you. There's so much
inspiration to be had pretty much anywhere.
12. Thanks for Watching: Alright, that's it. Now
we're in the final video. I just want to take
the time to say, thank you so much for taking this class and being
a student of mine. Please remember to leave a review for this class
if you enjoyed it. It really helps my channel to get viewed by other students, and it really lets me know that you found it helpful and useful, et cetera, of course. And if you're feeling brave, I would love for you to upload your mini collection
class project to the class project section so that I can see
what you created. If you need any
help, let me know if you'd like any
specific feedback. Let me know. Otherwise,
I'll just give you general encouragement and
love on your collection. And if you'd like to see
me outside of Skillshare, you can find me on Instagram at Kristina Hultkrantz
on my website, Kristina hultkrantz.com. And I also have a really
beautiful patron community. If you are also loving
the collections, and you would like to learn
more about that and gather monthly inspiration
for collections and design a monthly
collection with me, I have something called
Collection Club, and it's just like the name. We create collections
every month together, and it's supportive and you
get very personal feedback, and I have gotten to watch other designers
grow their skills for the past two years
that we've been doing it. So if you sign up now,
there's two years of content, so amazing. And besides that, I
also have fun Friday where another little monthly drawing group where we
develop our drawing skills, and it's like, in the name
just pretty much for fun. So yeah, those are other
places to find me. But of course, make
sure to follow me here on skill share, so you'll be notified when I publish my next class. Alright. That's that's it for me. Thanks so much again
for taking this class. I'm going to go breathe
and, uh, drink water. You guys are the best. Im.
 Kristina Hultkrantz, Illustrator & Surface Pattern Designer