Transcripts
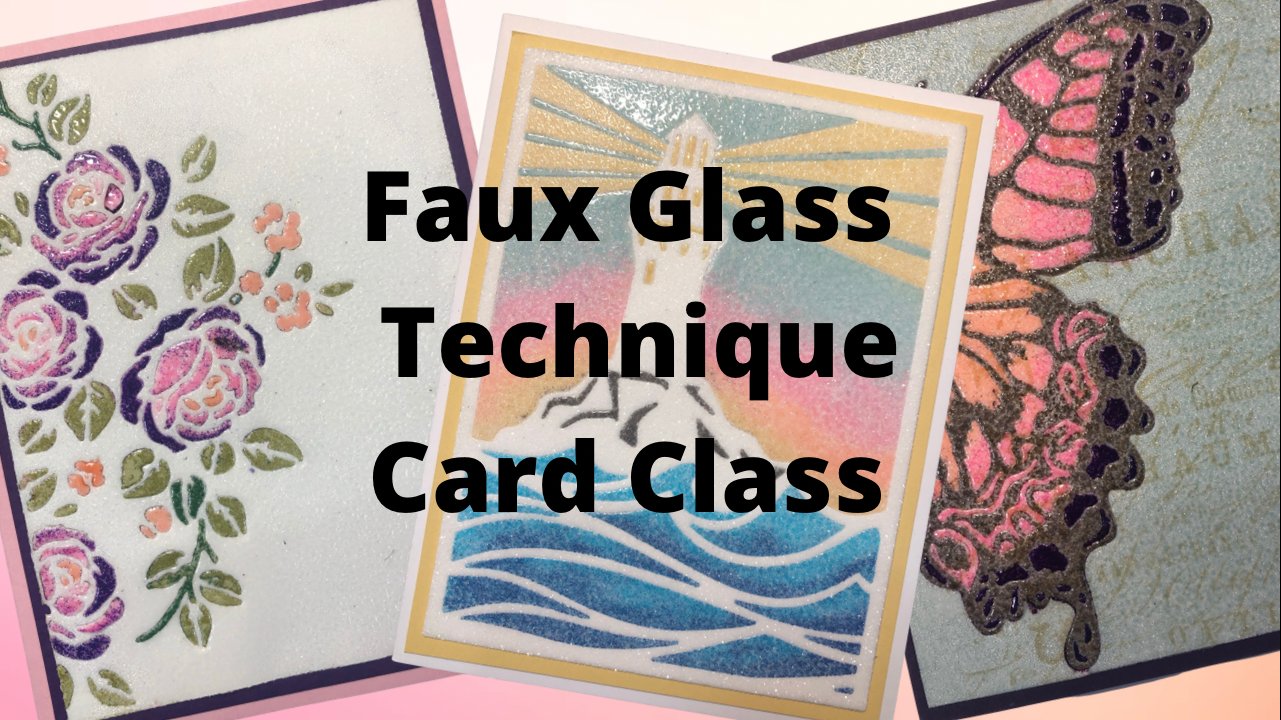
1. Floral Card Techniques with Colour Layer Stencils Introduction: Hello and welcome to fluoro card techniques
with color layer stencils. One of my favorite things to use when making cars is
color layering stamps. So I was super-excited to find these stencils that
work in a similar way. But it allows you to do
other different techniques. I'm sure I'm gonna be
teaching this class. Let's go take a look at what
we're gonna be learning. These are the four cards that we're gonna be creating
in this class. I'm gonna be using a package of stencils that will be
linked on your supply list. There's ten different flower
stencils in that package. So there's large variety of different flowers
to choose from. So you don't necessarily
have to choose the same flowers that
I chose for the class. The techniques will
work either way. We'll go through each
card step-by-step. And we're also going to I'm also going to show
you different ways that you can use
these stencils in different techniques
that you can use. You can combine them, you can alter them, and
just have fun with it. I'll also show you a simple way. Just add symphony
sentiments to your cards. All of the supplies
that are used for the class going to be on the supply
list as well as pictures of each of the cards. Some of the cards are, some of the stencils have masks for some of the larger areas
and some of them don't. So I'm going to show
you a quick way to make your own mask so that you can mask off certain areas so you don't get overlap
where you don't want it. Now let's go create some cards.
2. Pansy Card: Stenciling Image: Alright, so our very first card, we're going to create
this pansy card. So the first thing
we're gonna do is, sorry, pointed to
the wrong part. First thing we're gonna do
is the blue background. And then we're going to do the stencils and
for the pansies. So the great thing
about the stencil, it has all the different
parts to create the one image so you don't
need anything more than that. All of the stencils
for this class or in the same package as sensors.
There's ten of them. So there's lots of
different choice. So I've got just a dye
ink pad here and I'm just lightly doing
a circular motion. I'm just trying to get some
blue onto the background. I'm not trying to make it solid in any way,
shape, or form. I'm just trying to get the look basically of a sky behind it. So I don't need to do anything. Don't need to dry it
or anything that ink will dry on its own. You will need some painters tape because we want to
tape off anything. We don't want inked. I'm using some brushes
to ink this stencil. And even if you're
really careful, It's very easy to get it
into an area you don't want. The easiest way to ensure that
that doesn't happen is by using some painters
tape just to block it off this painter's tape I'm gonna reuse
throughout the class. So I'm going to go into my
darkest purple for this. For pansies, you can choose
whatever color you want. You can have fun
with the ink colors. I'm choosing to just do
very simple purple pansies. Now I'm using a
circular motion and I tried to go into a few different
directions because you'll find that sometimes the ink doesn't really want to
go one place in the, in the stencil, but if
you change direction, then it fills in
that area nicely. I'm going to take my excess ink off on a scrap piece of paper. That next ink color
that I'm gonna be using is a lighter purple color. So I don't want to have
some dark purple steel on my on my brush. When I do that, I'm just
going to take this down so it doesn't accidentally
shift on me. So what I'm gonna do is I'm
going to do the flower or sections and then I'm going to clean my stencil
off completely. And then I'm going to
do the leaf sections. I'm going to leave that
on the end there just to hold it in place while I'm
taping the other areas here. So for the background, I used just regular distressing, which is a dye ink
for the flowers. I'm going to use some oxide ink that is a dye and pigment blend. And what it's going to do, it's just going to give
a more opaque look. If you wanted it a little
bit more transparent, you could just use dying
to do that as well. It would work the same way. It would just be a little
bit more transparent. So this tape here, I'm gonna be putting it on to a piece that has
some ink on it. When I'm done with this tape, I'm going to toss it
because I'm going to have some ink on that sticky side. And I don't want to accidentally transfer it to something
else on my card. So now I'm going to do
the lighter purple. We go. I absolutely love
color layer stamps. And this is a neat way to get a similar look to
color layer stamps, but just in a different format. And you have a little
bit more variety with this because as you'll
see throughout the class, you can also use different
pastes and stuff like that. Alright, so we've got the
light color in there. Now I want to do the centers and I'm gonna
do them in a pale yellow. I'm gonna put this tape over
the purple ink just because I don't want to pick it
up with the yellow brush. If by chance, like
my paper or my a, my tape has some ink there, I'm just going to wipe it off
with a white just so that I don't mix that into the yellow. Then I've got a
smaller brush just to be able to get a
little bit more. Just because the area in the stencil for this is
really, really tiny. This part here, I could
have taped it off, but with such a small brush
and the tiny area figure, I'd had enough control that I didn't have
to worry about it. These ones here, they've been
on top of ink and you can see there's no way to get ink off of a sticky
part of tape. I'm just going to
get rid of that. I'm going to go
wash and completely dry the stencil and I will be right back.
Alright, All done. These inks that I'm using to stencil or pigment
inks or sorry, pigment dye blend inks. But they're super, super easy to clean off their water soluble. So you don't have to worry about using soap and
water to remove the ink. Just some running it under
water, rinses everything off. But the main thing because
you're going to continue working on your piece is you want to make sure to
completely dry it. We don't want to
have any moisture on that stem cell because it will reactivate the
inks underneath it. Alright, so I'm going to use. The darker of the
greens and I've got a smaller brush for this. Just because all of these
areas are really, really tiny. We're just using
circular motions. I'm leaving that little tip here and what I'm
going to end up doing, I didn't do it on my sample
card, I left those green. But I think what I'm
gonna do is just take my purple brush and just see if I can get a
little bit of purple tips. You know how sometimes
when you get buds, you'll see just a touch of
that color of the flower. Just went over that side. You see a touch of
that color flower. I just thought it might be
fun to get that in there. So just a hint, it doesn't need to be a lot. And it will mix in with the
green, but that is okay. The taping can be, it can feel a little bit tedious
as you're doing it. But I promise you,
you're going to regret it if you don't do it. So now I'm matching
this bottom part here. This bottom part also
has this part here. This here is actually
from the top in here. I don't want that one there. Alright, now I'm going
to do the lighter color because I've got darker green on my scrap
piece of paper here. I'm just going to rub
some of the excess off. And I'm gonna go in
with my lighter green. It might be counter-intuitive to do dark first and then light. But when you see leaves, usually the center
or the center of the plant is usually
the darker part. And the part that's
outer and sees more of the light is typically
with the lighter parts. So it's easy enough to go dark to light and then just
clean your brush rate off. Alright, so there we go. Lift that up. Now let's do this
part here at the top. These stencils, I mean, it's a little bit a
little bit opaque, but it's easy enough to see the note below them to know exactly where those pieces go. This one here I'm going
to do the dark again. Then it will do the light. This off here. I'm going to use those
bits to hold it in place. There we go. Let's lift this up. And Painter's tape is a
great tool to use for this is inexpensive
for an entire roll. I've used my die tape before, but it's a lot more
expensive and I'd rather not use it all up for something like this
because you do tend to use a little bit or a
lot of it for this. You could also use washi tape
that would work as well. Alright, so this piece
is totally done, but what I want to do, I'm going to clean that in a moment. You don't have to worry about
it drying on the stencil because it's always
gonna be water reactive. So I've got a mini MR. here. It's got some water in it. And then I've put some
perfect pearls in there. This is just the perfect
pearl color, perfect pearls. So it's going to be
nice and transparent. But what it does is
it just as a really, really pretty shimmer to it. So I tend to put a even
coat over the whole thing. If you get a little
bit too heavy, it's going to start to
bleed a little bit. I was okay with that. I liked the look of it
bleeding out a little bit. I just thought it makes
it look a little made it look a little bit
more interesting. But if you don't
want it to do that, then just be aware of
how much you're putting on and make sure that you're
very light handed with it. I'm doing it about I want
to say a foot away from it. There you go. So see, it's already
wicking out there. It's going to do that. And I liked the look of that and I wanted
the look of that. You don't have any control over where it's
going to do that, so you need to be
okay with that. But I just thought it looked more interesting
with the look, I'm going to wait for
that to completely dry and then I'll see you back
and we'll complete the card.
3. Pansy Card: Assembly: Alright, my image pieces dry. If you want, you can
use a heat tool or a hairdryer to dry it
a little bit faster. Or you can just let it air dry. Both of them are going to work. Just depends on your
patient's level. Really. Just gonna
leave that off because I'm going to need
it in a moment again. I've got my mat cut to size. All of the
measurements for these are on your supply list. This card size is four
and a quarter by 5.5. My purple piece is four
inches by five and a quarter. And then my pansy piece here
is 33 quarters by five. Let me put that down
and I'm actually going to give an acrylic block and just sit it on top
of that for a moment. This is what I love about it. About liquid adhesive is
if it moves or whatever, you have some time to shimmy
it in place a little bit. So I'm going to
stamp hello friend, keeping it very simple
with this one here. I'm thinking the stamp up. Then I'm just going to
stamp it in the corner. There we go. Very cute, very simple and
really a quick and easy card to create
and put together. I'm just gonna put the
block on it because it's, the glue is not quite dry.
So I'll show you this one. Very easy card to get together. And like I said before, you can have lots of fun with the different colors for
the different pansies. And create a variety of cards in really a very short
amount of time.
4. Hydrangea Card: Stenciling Image: The next card we're gonna
do is this hydrangea one. So we're actually
only going to be using distress inks
with this one. So they're a little
bit more transparent. But we are going to need to make ourselves a mask so that we don't put the leaf over
top of the flowers. Because if you were just to put, which is the right one,
you were just to put the leafs tensile here
and then stencil what? You're gonna get a leaf
over above the flowers. And that looks a little bit odd. So in order to do that, you're going to take a
piece of copy paper. And then I'm going to
use my blending brushes. And all I'm doing is just blending the ink
around the outsides. No need to take this down. All we're doing is getting
the image of the stencil. And then from there you're
going to hand cut around it. I've already done it here
and I've used this one for the sample so you can
see the green on there. So I hand cut it and then I took some Tombow multi and scribbled it all over the back and let that dry completely. So Tombow multi, when you are gluing two pieces
of paper together, it creates a permanent bond. But if you put some glue onto some card stock like this
and then let it dry, it dries like a post-it note. So it's going to be perfect
to put over your image on your card and then create a mask in order to get those
leaves on there. I've already got that done, but that's how you're
gonna do that. So for the flower, I'm going to put my hydrangea
is where I want them to go. And I'm going to tape it down. Same as the last card, anything you don't want inked with the color that
you're currently using, you are going to mask off with some tape
and I'm just tapping my car to the bottom as well
just so that it chances are it's not going to Shift
while I'm stents killing, but why take a chance? And this I'm probably not going to get it to
while I'm doing the blue. But again, why take a chance? Let's just have it masked off
so we don't need to worry. I've got a pretty blue here. I'm working mostly
around the edges. And I'm going to try keep the center a little bit lighter. And the main reason for that is because when you see
a bowl of hydrangeas, the center part is the part that's going to catch
the most light. So it's going to tend to
be a little bit lighter. The areas around the edges, those flowers are
going to tend to be visually just a little bit darker, not
actually their mean. There's typically
the same color. I do want to try
to get it a little bit heavier around the edges. Just so it looks like it's
got some dimension to it. You can tell with this one I'm not getting as much of the ink on the stencil here. It's actually there. I of course I can't
see it on my finger. It's actually
there, but it's not nearly as thick
because it doesn't have the pigment to it. So I'm not too worried about
contaminating my tape, but I am going to
still be careful and not put anything
over where Inc was. So now we're going to
match our centers. And they're very easy to see. And it's very easy to match. So this is rather
close to the edge. So I am going to tape that. I can put this one on
this piece right here. This one here can go on that. And I want to take
this edge here. Sometimes you get so focused
on what you're doing. You're not really paying
attention to where the edges of those stencils are. So now I'm going
to do the centers of the flowers for my sample. I did it quite dark. I'm gonna do the same. But once again, I'm going to
try and get it darker around the outer edges or
the outer flowers. And then lighter in
the center ones. There we go. We can
lift this up here. And I'm going to take
this piece of tape off. And now we're ready
to do our leaves. So before we do the leaves, we're going to take
our mask here. And we're going to match it to the one we have on our card. Now, I'm not worried
about this part sticking. I'm worried about
this part sticking. So I wanna make sure that
that is done correctly. I'm going to put
this leaf over here. We're basically putting it in exactly the same
spot that the card beforehand it you see, I reuse my tapes
over and over again. My eyes would get the most
use out of impossible. So I'm going to do the
light green first. I didn't mask this part here. So this is what you need
to make sure to mass. So I actually got a little
bit of that right over there. It's funny, I was so
worried about the edges. I actually I did that on this one as well and you'd think I would alert
the first time. But what I plan to do it at some point is get like a little butterfly charm
and just put that in that area so that it's
not nearly as visible. So I'm going to match
that one this time. I'm going to remember
to put the tape on that for the tape right there. And one there. Now I'm going to
do the dark color. Tape off my card base. And then we're gonna
do the other leaf. And this part here
isn't on the card. So even if I get my stencil
in there a little bit, it's not going to it's
not gonna be on my card. So I'm gonna get some of the
excess of the dark color off of my brush here. And then I'm gonna do this
the same as the first leaf. I'm going to do the
light color first. Now my mask is flipping
up a little bit here. I can either press
it down and I think maybe it doesn't have
glue on that corner. But what I'm actually
doing is I'm making sure that I'm not going like this with it because
if I do this, then I'm going to get
green underneath. There we go. Now. This a little bit right here. There we go. Our card base is done. Get all the tape off here. Now what I typically
do with these tapes, if they are still sticking, I'll just stick them to my mat. And I will go with a baby wipe and I'll clean them all
so that there's no ink on them and then dry them
with a paper towel so they're ready to use
for another card. Might as well use them
again if we have them. This here because that adhesive dries like
a post-it note. This will just pop
right up here. And I keep that with my stencil. So then I can have
that is already done. I don't need to worry about
doing it over and over again. I am going to add some sticklers to the
centers of those flowers, just to add a tiny
touch of sparkle. I could wait until the
card is completely done to do this step as well. But in the next step where
we're doing the card assembly, we're also going to
be die cutting and assembling the things here. So this minus will be drawing
while I'm doing that part. Because it's just a drop of
each the center of each. That's not going to
take very long to dry. I'm going to set
that aside to dry. And then I'll see you in
the next video and we will do some dye cutting
and assemble our card.
5. Hydrangea Card: Assembly: Alright, so if my thanks, on the front of the card, I actually die cut
it three times. And for this card I'm doing
the shadow that I'm using. I'm die cutting the top part as well for this cart
and glitter card stock. But I'm also die cutting it in the blue and
I'm going to be using that on a different card. You remember how I
have this laid out? That's not going to go to waste. You could separate the dies and then cut them individually
and not worry about it. But I didn't really. So you need to separate them. I figured I might as well
just use the part that I'm not using on this one for
one of the other cards. They just want to put it
through a couple of times. Really not for any
particular reason because this dye is new and
it cuts really, really well and it comes into
the machine really well. I've been doing a
lot of 3D folders lately and I guess I just got into the habit of running
it through three times. So I'm just going to cut a piece of the
glitter card stock. This is just a scrappy
into my half scraps. Unless they're
really, really tiny, I keep them because they're
perfect for cutting sentiments. Litter card stock. I will run it through both ways. And it did cut beautifully
through all of it. So let's move the machine and
assemble or sentiment here. Now you could, if you had
trouble getting some of these a little bit so that
you could use a dye, pick. Most of them as soon as
you press the center part, the rest of it just
falls at this. I'm talking to the
side. Like I said, we'll be using it for
one of the other cards. Alright? So all I'm gonna do for these background pieces is I'm going to glue them on
top of each other. So I am putting glue
on the whole thing just because I want to make
sure that nothing flips up. Lay it on top, and then I
like to do it on the tap it on my surface so that the
bottom is totally even. It kinda just lines it right up. Again by using liquid adhesive. If something is not
quite lined up, It's really easy
to slide in place. Same with this one here. And then let's do our glitter
right on top of that. Not the glitter part
was pretty just because it echoes the stickers that are in the center
of the flowers. I love dyes that have shadow
like this because it just is a great way to frame it and give it more
substance on occurred. I'm gluing it with
that Matt multimedia. So if I have to ship
shim it in place or if I slide it in place, in any of the glue is exposed, it's going to dry clear and
it's going to dry matte so you'll never know where
there was some glue. Alright, so let's glue. Actually, no, before we do that, let's glue this to the
front of the card. The stickers are
not totally dry, so I'm going to
try to be careful. I'm playing with fire for
sure because I tend to be the one that as soon as here's
what sticker somewhere, I put my hand in it. But I would recommend waiting till that sticklers
have completely dried. Unless you like to
live on the edge. Now I'm going to
take some ribbon. I just want to put
it on top of that. There is going to tie in
with the green and it's just going to be behind the thing. So it's not very noticeable. But it's just another
element of that green. So when I do ribbon on a card, especially if I'm
doing it so that it wraps around the black back. I do it on my surface. I could make my table longer than the piece that
I'm gluing it too. I take the backing off and then just put
my tape rate on there or my ribbon
right on there. And then by doing it on
a surface like this, it just comes right off. Trim the ribbon and then just
wrap it to the back there. This can get glued
to the card base. And then we're going to
glue the things on here. Now the thanks because
we're gluing it to the card as well as the ribbon. The ribbons got a little
bit of dimension to it, so it's going to be raised up
higher than the card base. I am putting my adhesive
over the whole thing. And I'm going to lay my die
cut where I want it to go, centering it and
making sure that it's flat on the bottom. And then I'm going to put a block here and just
let it dry that way. I'm going to let
that completely dry. But that is what the card
looks like when it's done. And like I said,
what I'm gonna do here is I'm just gonna
get a butterfly charm. Could be a butterfly dicots, something like that,
just to cover that up. Since this happens most of the time when you're
nearly done a card front, sometimes it's easier to
restart and do another one. Sometimes it's easier
to come up with a creative fix that enhances
the card because of butterfly or a b or just
some sort of bug that would be on the flower,
would totally suited. And we'll also cover that up. And then you don't
have a waste of a card front that you've
spent some time on.
6. Poppy Card: Stenciling Texture Paste: For our third card,
we're going to create this pretty puppy card. Now we're going to change
it up a little bit. We're gonna do the same
blue background for a sky as the last one, but for the flower
and for the leaf, we're going to use
some texture paste to give it some extra dimension. So let's do the sky part first. Once again, I'm not doing this
with the intent of having this completely covered
and completely blue. If I wanted a blue background, I just use some
black card stock. I'm just trying to get
the look of having a sky in the background and I'm using some mixed
media heavy stock. Anytime I do something
with some texture paste, I like to use mixed media
heavy stock just because it's going to hold the weight of texture paste as well as
its gonna do better in the moisture or with the moisture than regular
card stock would. I'm covering any piece. I don't want to get the
texture based on these are all pieces are pieces of
tape from my last card. Just clean them off and
we're really using them. So this is just
plain texture paste. I did this same technique with some crackled
texture pace and in the end I liked
the plane better. But just so you, if you're curious what it would look like with crackle paste, That's what it looks like. Card moved a little bit, so I'm just going
to hold it down. I'm working my way with the
stencil from the outside in I've got clearly
a hard part in there because it's making
those those lines in there, but it'll be fine. I'm working from the
outside in just so that I'm not
accidentally getting a little bit of the texture paste
underneath this tensile. And then once I've got
it completely filled, I just do one swipe all the way across to make sure
that it's all nice. And even we're going
to be coloring this in with some paint. So one even layer is going to
do a lot better with paint. Now, you may have noticed I just lifted my
stencil up this way. That way if it falls, it falls in exactly
the same spot. So I don't have to worry about
ruining my texture paste. I'm going to clean my
stencil completely off. And this needs to dry a 100% before we go and
stencil the leaf. If I were to do it right now, my stencil would go into the wet texture pace and would probably
leave marks in it. So I'll see you when
that's all done. It's been about a
half an hour and the texture paste
isn't totally dry, but it's got enough
of a crust on it that if I go to do
the leaf right now, I'm not going to
mess anything up. So I'm going to these pieces of tape once they've got some
texture paste on it, I typically don't use them. Over again just
because to wait for the texture pace to dry
often when you peel it back, it cracks and then you get
stuck all over a year, your desk or your
project or whatever. So I'm going to put some
texture paste in the leaf area. I'm holding this down because of the dimension from the flower. I don't want the stencil paste
to go underneath that way. So that is enough. Once again, I'm lifting
it straight up, going to let that completely
dry and I'm actually going to let it dry
completely overnight. And then we will start
painting it in the next video.
7. Poppy Card: Colouring Image: Alright, so my texture paste has dried all night and
now it's time to paint the flower and the leaf. I have some colors here. This is the main
color for my flower. I'm going to lighten it for
one layer with antique linen. And then I'm going to use
this red paint to darken it For the last layer. So first thing I need to do is put my stencil
back over top. And for this, I'm not
masking as much off because I'm going to be
using a pencil brush. So I'm not doing big
circular motions. I'm gonna be bouncing
up and down. I'm not as worried about
getting it into other areas. A little bit of the
pretty pink color. I was inspired by some pink puppies in
my garden this week, so and it doesn't need to
be super, super light. You can choose how
you want it to be. I just want it to be. So when I put the second
layer with the darker color, I want to be able to see
the difference between it. So my brush obviously has paint in it because I've
been mixing the paint here. I'm going to take
some of the excess off to stencil, tap up and down. If you move in circles, sometimes you get ink that
goes below this tensile. And we're not trying
to we're trying to avoid having a seat below the steps are
beneath the stencil. If you find that you don't get quite enough paint
on as you'd like. You could always
do a second layer. But also remember
that we have a couple other layers with different colors that are
going on as well. There we go. Now there are some areas that
are a little bit lighter. That's totally fine. If you want it to be
completely solid, you can do a second layer. Flowers have light
areas and dark areas. And this one we're going
to have some lights and darks with the
layering central part. So I'm totally fine
with they're not being, or beings in areas that
are a little bit darker. Now, I'm not waiting
for that to dry. I'm going to match up my stencil and do the next
layer right away. Now, there's little lines
on this stencil that show the outline
of the flower that make it easy to match it up. I'm going to use
my second color. The reason I'm doing
the second layer right away while it's still wet is because I want
to take a brush. After I lift this layer off, I want to take a brush and I
want to blend the two layers together just to
get a little bit more of a natural lucky
you don't have to. You could do each color in
them dry in between and have very pronounced lines
between the two colors. But I just thought,
especially for a flower, and it would be nice
if those layers were just softened
up a little bit. And because my next layer is
here and it's gonna go up, this piece is going to
be going on my mat, so I'm not worried about the paint that's going to be
on the back of my stencil, ruining a part of my card. Alright, so I'm lifting
that, I'm just going to move that over there while
I do the next step here so I can see exactly where the lights and
the darks aren't. All I'm gonna do is just
take a soft dry brush. I'm just blending those areas. You can do as much or
as little as you like. And like I said, you don't have to do this if you
don't really want to do this step or
you're not comfortable doing this step,
you don't have to. I just thought it
would look a little bit more natural as natural
as censored flowers can book. By doing this. Alright, that is as
much as I'd like. So now I'm going to
match my last layer. I keep on using this same piece of tape on my stencil here to hold it down so that
it's not going to move. I still have a little
bit of that color there. I'm just going to add a drop or two of the red to darken it. It's probably more
than I really need it. I'm not gonna be mixing
all of that in there. I'm going to get a
little bit more of the lighter color here. Now this one here is called
saltwater, saltwater taffy. There's another
paint in this line called abandoned coral. And if I had that one, I probably would be using it for this step because I think it
would be the perfect color, but I don't and I don't have it easily accessible to me
that I could get fairly quick. So. But it's still easy
enough to just darken a color and
lighten a color. There we go. Once again, I'm going to
move this to the side. Take that same brush.
I don't need to worry about it
being contaminated with the piece that's
in there before. Because it's all within
the same color tone. I'm working on the
same flower or here. But I'm just going to
lightly blend it into the color that's beside it there. That's good enough. So I am going to completely
wash off the stencil. And then while that is all I'm washing it off,
this is probably going to dry. I'm going to wash my
brushes off as well, and then I'll be
back to do the leaf. Alright, my flower
is pretty much dry. There's a couple of spots that
are a little bit damp yet, but it's close enough that I think I can
work on the next step. That is just the leaf here. And I'm going to be
painting in the stamp. This particular stencil
doesn't have a stem with it, so you're going to have to
improvise and make one. But fortunately for poppies, their stems are
funky and irregular so you don't really have to worry about
being precise with it. Once again, I'm
lightening my leaf color. I'm going to lighten it
just a little bit more. I'm using a smaller
brush for this because the leaf is a little
bit smaller than the flower. It's still not going to
take very much time at all. Alright, so I've got a
spot here where there's a light part and a dark part. I'm going to use the light
part for the first part of the stem, and I'm going to use the
dark part for the detail. I'm just matching
my stencil up here. Take some of the excess off. It's much easier to add a second layer of paint
if it needs rather than attempt to fix if it's seeps
underneath and if it seems underneath, there's
no way to fix it. So once again, by
bouncing up and down, you have less chance of
things even underneath. The two ways to prevent that is less paint on your brush
and tapping up and down. There we go. So there was a little
bit that went on my paper, but that is okay. It just kinda give us the leaf a little bit of a
fuzzy look to it. I'm going to use that
same light color. Just freehand stem here and I'm making the stem joined the bottom
of the leaf there. There we go. Then
I'm going to do the center of the leaf
while that green is wet, same as I did for the flower. Little bit darker, There's
probably going to be less contrast with
the leaf color, with the dark between
the dark and the light. I can see it but I'm not sure it'll be visible on the camera. But once again,
I'm just going to blend between the dark
and the light there. So I'm going to let
that completely dry. I'm going to wash my stencil
and my brushes again. I'll see you in the next
part and we'll put nope, I'll see you in a
moment and we'll put the center of the flower. Alright, so the last step is
the center of the flower. So I just have a
gray paint here. You could use black if you want, simply because the centers of poppies are fairly
dark and block, but I didn't want have a really dark center
and then basically that be the focal
point of the flower. So once again, just a little
bit of paint on your brush. Tap up, up and down. There we go. Voila. Alright, I'm going to let that completely dry and I'll see you back in the next video and we
will put our car together.
8. Poppy Card: Assembly: Alright, Everything is dry, so let's put the car together. So let's first put our mat. And I chose a nice pretty color that brought out the
color of the flower. And really you could
choose any shade of that flower or
even the center. You can even do
the green really. But I always find regularly that a little mat behind
it kind of just frames it. And then last but certainly
not least, this one's got, it's got space rate on
there for sentiment. So let's put it on. You don't necessarily have to. You could also put a die cut
in this corner that would work as well. But there you go. Really pretty poppy
card made with color layer stencils
and texture based.
9. Anemone Card: Stenciling Image: Our last card here
is an anemone card. I think that's how you say it. It's my guess that that's
what this flower is. I know the other
one's very well. This one I'm not absolutely
sure, so I'm just guessing. So very first step is
we're going to put some blue on that background. Once again, I'm not trying to make it
completely solid blue. I'm just adding some hint
of a suggestion of a sky. A little bit of
interests back there. Now because of the residents
and stuff in this ink, I need to heat set it. Before we move on
to the next step, we're going to be doing
some heat embossing. And if I don't
heat set this one, I put the embossing powder
on is going to stick to this whole back. Here we go. That might be overkill,
that might not be, but it's good for right now. So I'm going to put my
stencil where I want it. I need to tape it in place again for this one because
I don't want it to move while I'm
applying my ink. And I also want to
make sure 1 second, I just didn't have those
those flowers centered. There we go. I also want to make sure
that any area that I don't want Inc. and is covered, tiny get up there that
we want to cover. So I'm going to be inking with what's called shaded lilac. It's a light purple. My embossing powders
are darker than this, but I want a light base
for them to go on. And I also don't want my
flowers to get too dark. For both layers. I'm going to use this
same color, purple. There we go. We can pull this off and grab my powder should
have had about already. So there we go. And a scrap
piece of paper underneath. Don't have to worry about being too about worrying about what, taking too much of the
embossing powder out because anything that goes onto my scrap piece
of paper here, it goes right back into the
bottle so there's no waste. Let's close that up and
then melts at this power. There we go. Now we're
going to repeat. While not really repeat, we're going to stencil the
next layer onto the flower. We're going to use that
same color of ink. Matching them up. Again, it's super
easy to see exactly where those flowers are, to know where to ink up. Makes sure we don't get
our stamps in there. Now this particular stencil
does have stems and I use them for my card here, but they're really hard to line up for this
one, this part, the bottom part wasn't
hard to line up, but the extra ones that they give are a little bit
harder to line up. So for this card, I'm actually just going
to use a paintbrush and a linker to put the ink
down for the stems. And I think we're going
to get a little bit more of a natural look. So same color ink. Basically this ink
is just applying. We're not necessarily going to see the color because we're using a different
color in Boston glaze. But it's just
applying the moisture for that ink to or that
glaze to stick to. Embossing glaze is
actually transparent. So you get to see a little
bit of the things underneath. So there's a little bit
of the blue from the sky, which just makes it
a little bit more interesting in my opinion. There we go. You can see I'm using
a different brush than my regular
brushes for these. And the main reason is this
is a dye pigment blend. And you can use your
other brushes for them, but you need to completely wash them out
before you use them with distress with
regular distressing, otherwise, you're going
to contaminate your pads. So I didn't want
to have to worry about that during the class, so I just grabbed
different brushes. But it washes out
really, really easy. It just takes the
longest is waiting for the ink on your
brush to completely dry. Alright, so let's
melt the layer. Now you may or may not
be able to see there is some embossing powder
there and there. I could have brushed it
off with a dry brush. But because on the
card I'm going to add some splatters to
the black background. I think that just adds to
it, so I left it there. So I'm just going to go grab my re-entrant will be
back to the right. I have my re-encounter had a little bit about when
I was shaking it up, I guess the lid wasn't quite on it as well as it
should have been. But hopefully we've
got that cleaned up. So I'm just taking that
liner brush that I used for the stems for the last
card, for the puppy card. And I'm just going to use that. And by using this brush, I can kind of decide where
I want those stems to go. Then it just gives it a little
bit more of a natural look rather than being stuck with where the stencil had the stem placement and
tap the excess off. Melt that. There we go. This just needs to be
cleaned up quickly and then go to the next step. So some of these stencils, especially the ones that
have an area that is solid, also come with those
pieces that were cut out. So I've got those pieces here. I'm going to lay them on top of I'm going to try to figure out which one goes on top of which
one and layered on top. I've got it wrong one there. That's why we're going
to use these as masks. And then I'm going
to spray on top of, I'm going to put this ladders on top of my flowers. I got
to find the other mass. Alright, my other mask has
completely vanish and I'm sure I'm going to find it sitting somewhere
here in plain sight. Let's carry on. So I've got some
oxide sprays here. I'm just shaking them up to mix the pigment and
the die together. You'll see how it
settles on the bottom. You want to make sure to shake them up really, really well. And this is how I like
to apply this ladder. So I take the whole sprayer
out and then I just tap until I have as many
sweaters as I want. Now if I happen to get
any on that flower, they will wipe off. It's just much easier
to have a mask on it and not need to
bother doing that. Like I said, I use it for my
sample is here somewhere. So once I have as many
splatters as I want, I need to let it dry completely. There we go. I'm going to take a
tweezers to take these off. I don't want to
accidentally move them and smear one
of those splatters. And we'll let that dry
completely and I'll see you back and we'll
assemble the card.
10. Anemone Card: Assembly: Alright, our splatters are dry, so let's put our
car together. Now. On my sample, I have a lot more splatters than
what I did on this one. You can do as many or
as few as you want. There's no personal preference basically whether you
like a lot or whether you like a little other thing to remember what I did with the rancor that I
got it on my hands. Word of caution,
don't accidentally touch your nose
after you do that? Apparently, I did when I
brought my daughter to work. Thank heavens, I didn't
go into a store because a nice green swipe all over my new that I've been spending the last little
bit getting it off. Alright, I'm going to put a
block here to hold this down. I'm actually going to
weigh it down with some with a weight. So now I'm going to put
my thanks together. So this was the other piece
of the thanks that I die cut in the very,
very first card. Pretty sure it was
the first card. No second card. So
just like that one, I'm going to blue
the layers together. Now you can tell
that this one is a different color from the
one that I used on my card. But it started the one that I used on my card
started this way. So it's very easy to change the color and I'll
show you how in a moment. So by having the
same die cut and die cutting it a few times and then just
layering it on top. You eliminate any
need for pop dots, which is great for
something like this, that's really intricate. Because trying to put pop
dots on something like this. Next to impossible. So this way you get
some dimension, but you don't have to try to work with pop dots that aren't the right size
and having to cut them down. Alright, so that is
all glued together. And now I'm going to
take my scrap paper. But my dicots on there, this slit over a little bit. Now typically I would wait a little bit longer
for this to dry. What I'm going to do now
is I'm just going to press my ink pad on that die cut. Now, if there's a
little bit of blue from the sides showing the
background is the same color. So I'm not really
worried about that. I'm really worried, not worried. I'm really trying to get an even coat over the
front of my piece here. Now I'm gonna move this where there's no ink because
I don't really want my embossing powder to
stick to that ink there. So this is the same color
embossing powder that was on the stems of the flowers. Just get the excess off and
then move that to my table. But the powder back in the
container and close it. And now we're going
to melt the powder. So I'm gonna be really
careful to try not to smudge the powder on the front. Now I ended up
moving my die cut to my table here just because
it was a little bit hard to keep it
straight to heat or to aim the heat gun
in the right area. And by putting it on a
table, that's a lot easier. You just want to make sure
that it's on a surface or a mat that can handle the
heat from a heat gun. I just add one layer of the
Incan embossing powder. You could absolutely add another layer if
you wanted it to just be more built
up in more enameled. But one layer was good for me. There we go. Pretty anemone card that can be used as
a thank you card. And this antigen
can obviously be changed to whatever
you're wanting. You can change it to
anything you want. There you are. Another fun way to use
color layer stencils.
11. Floral Card Techniques with Colour Layer Stencils Class Thank You: Thank you so much
for joining me for the fluorocarbon techniques with catheter-related color
layering stencils. I hope you had fun learning the different techniques
and I hope it inspired you for some of
your future projects. I hope to see you soon.
 Artsy. Island Girl, Teacher