Transcripts
1. Introduction: Hello, and welcome to creative sketchbook
Exercises in Nature. Today we're going to
learn how to make quick, low pressure drawings and
painting outside in nature. Hi, I'm Plena Ake Porquerna, a fine artist and illustrator
who loves working outside, soaking up the views
of greenery and nature and turning what
I see into painting. And I'm so excited that you're here and ready to get creative, get some fresh air, and get a bit of
vitaminti along the way. This is a mixed media class, so we'll be using a variety of easily available art
materials paints and pens to explore these
creative exercises. So in this class, we're
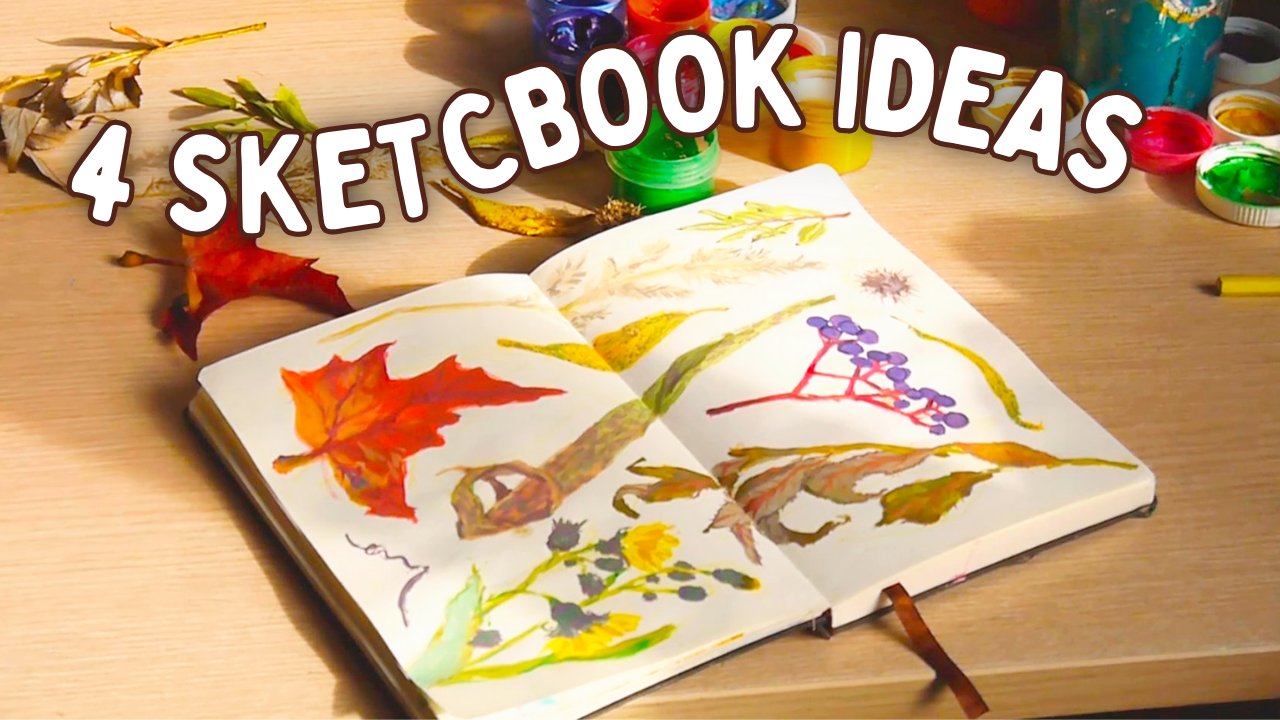
going to make art by catching leaf shadows
on paper using gel pen, print with leaves using gouache, paint leaf silhouettes and
create little blobs of color, each filled with
a flower inside. Plus as a bonus, I'll show you my
sketching process outside and additionally show my other artworks created in nature to give you a
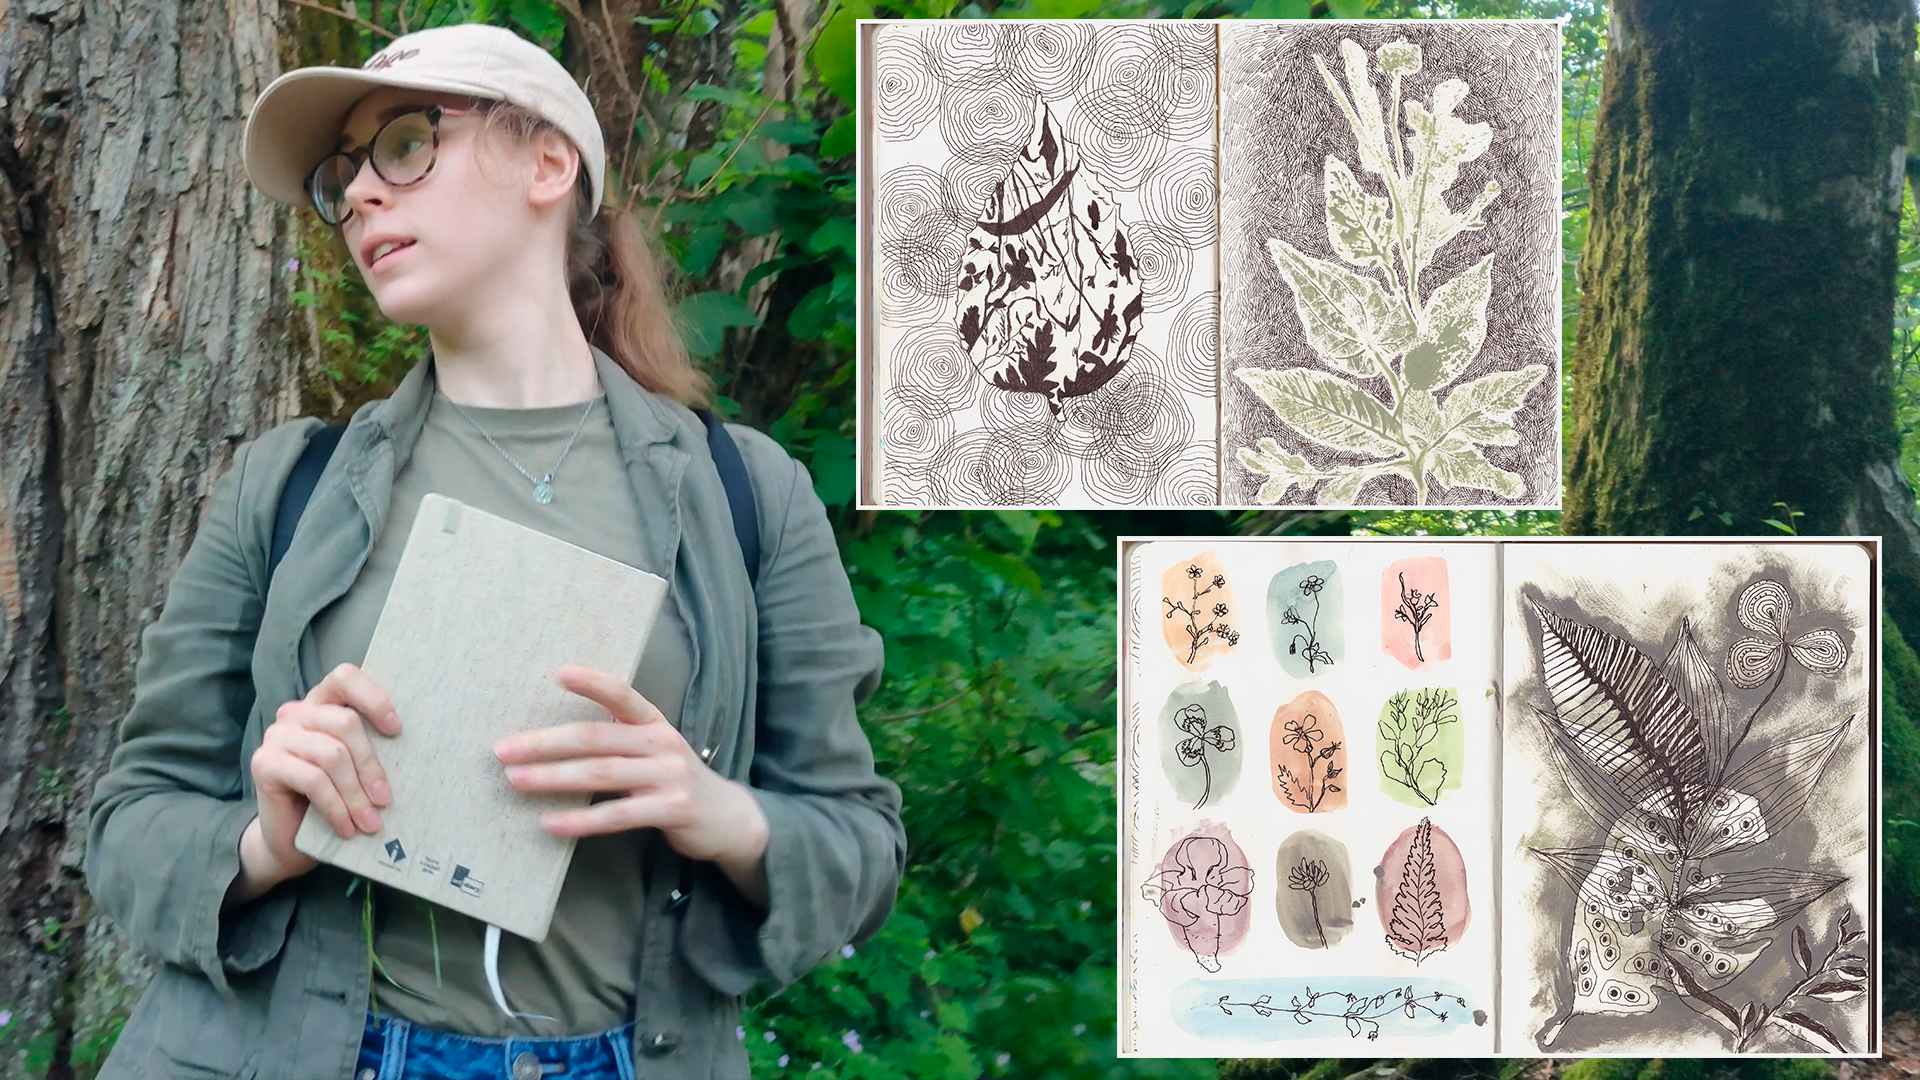
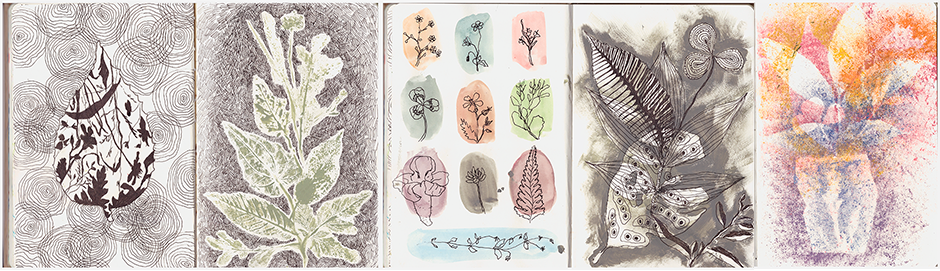
little extra inspiration. By the end of the class, you'll have a sketchbook filled with four colorful
illustrations. You can try all
four exercises or simply pick the ones
that catch your eye. There's no pressure
to do them all. This class is perfect for beginners and artists of
all levels because you don't need a
particular skill level to enjoy these fun
activities in nature. In fact, part of
the fun is letting go of your usual
way of making art and not worrying about
everything looking perfect and I don't
know, just mind blowing. And I know that going outside isn't accessible to everyone. You can absolutely
do these exercises at home with a bouquet
of flowers, for example. And if it's wintertime, you can also use some little
knick knacks like sticks or acorns or anything else you
might have collected outside. At the end of each exercise, I'll also show you some
ways you can upgrade your paintings even
further when you return home after
painting outside. And, of course, I'd love
to see what you create. So please don't forget to
upload your own pages with these exercises to the
project and resources tab. After all of your hard
work on these pieces, I'll be sure to give you
some personal feedback. So grab your paints and brushes, and let's get started.
2. Materials: Materials. Let's talk about the art supplies and tools that we'll be using
in this class. This project is all about using
whatever we have on hand, so please don't feel that you
need to buy anything new. Each exercise uses slightly
different materials, but you can always
substitute something similar if you don't have exactly the
same materials I'm using. For all the exercises, I'll be working
in my sketchbook. I'm using an A five
sketchbook with a smooth, fairly think 100%
cellulose paper. That works pretty well with
mixed media materials. In the US, that will
be half letter, and the pages have
a thickness of 180 grams/square meter or GSM. For the first exercise, we'll mainly need
a black gel pen and a pigment liner to
fill in the shapes. If you don't have
either of these, you can use a pencil
or a colored pen. For the black gel pen, I recommend Japanese
brands because they make some of the
best pens on the market, and I use a Nibal no black gel pen and
size 0.38 millimeters. For the pigment liner, I'll be using a studler
pen and size one. And for the second exercise, we'll be using guache
and soft bristle brush. B using a size ten
soft bristle brush. I keep my gouache in a small plastic container that
originally came from food, so you definitely don't
need anything fancy, and my guache isn't
professional grade, either. If you don't have guache, you can experiment with
acrylic paint, for example. But I wouldn't recommend watercolor for this
particular exercise because it doesn't transfer from the leaf quite the
same way to the paper. And of course, you'll need
a little bit of water. You can simply carry
some drinking water with you and add a few drops to the lid of your guash container or bring a separate
jar for water. Alternatively, you can
use a water brush with a building water
reservoir or container, but I don't have one of
those unfortunately. For the third exercise, we'll be using paintbrush, guash, and some napkins. You can also add
some colored pencils afterward if you'd like to
add some extra details, but that's not necessary. And for the final exercise, we'll use a combination of
gouache and a black jo pen. Now that we have
our material study, let's start with a simple
black and white exercise using shadows or
plants. See you there.
3. Catching Plant Shadows on Paper : Catching plant shadows
on paper. Let's paint. This is an incredibly simple yet delightfully beautiful idea. We're going to use the shadows of plants to create a drawing, but with a little twist. Instead of tracing the shadow
directly onto the page, we're going to contain it
within a simple leaf shape. Before we start,
here's what to expect from working with
shadows outdoors. This exercise looks
incredibly simple, but there's a couple
of things that can make it quite a
bit unpredictable. This exercise is only possible
with sun out, obviously. And you might find yourself squinting at the sun sometimes. So please be careful if
you have sensitive eyes and never look at the sun to
check if it's there, please. As well, leaves can
move in the breeze, and that is the
trickiest part, I think. So check the weather
to make sure the conditions are right for creating this bees.
But good news. You don't need special
plans for this exercise, simple shapes like
grass. Will be perfect. If it's windy or wintertime, you can trace
twigs, for example, another big plus of this
exercise that you don't need to know how to
draw or paint at all, because we're mainly going
to trace the shapes we see. So it's a really easy way
to start the practice. So I'm starting this exercise
with finding a leaf. This leave needs to be
kind of bigger shape but really simple without
lots of details. Can experiment with
smaller or bigger leaves. There are no rules. You can find flowers as well, but something that will fill
in the majority of the page, and I'm placing
it in the center. And this time to
start my practice, I'm tracing it with pencil. But you can start already with
a pen and as you can see, the line is pretty clear. There's no need to start
with a pencil if you don't like to use pencil. You
can start with a pen. Then I'm trying to find a spot under some kind
of beautiful shape of leaf or a flower
and trying to catch the shadow into this leaf shape. And this time, I'm not using a pencil as you
can see, but of course, you can use a pencil if you feel unsure because as you
see, it's quite tricky. The flower moves under the wind and it moves because I move my
sketchbook a little bit, so it's not, you know, it's quite tricky to catch
this shadow and hold it still. So maybe you can try to do this exercise first
with a pencil. Then you can trace
this line with pen or liner I'll show you
in a minute a bit of a simpler method of
how you can trace these shadows because I found placing sketchbook under
the shadow directly, it's the most
difficult one because you have to find a right
position for your sketchbook, for your hands, for the
shadow, so it doesn't move. It looks much simpler
than it does on practice. After I trace the shadow, first of all, you can
see that the shadow, the way I trace it, it's not directly 100%
copy of this shadow. It's a little bit wonky, but, you know, that's how it is. In nature, it's not
gonna be perfect, no matter how I try and especially trying to
position it one more time in the same way it was
before, just not possible. So I would advise you not
to spend your time on trying to fill in these lines right away
on a spot because, you know, the shadows
go away quickly. So rather than
spending time on that, I would advise you to continue tracing these shadows either with a pen or a pencil. If you feel unsure, use your pencil because after
tracing these lines with a pen, you'll be able to erase
all the pencil lines. So next, you see me using
a different method. This time, I'm holding the leaf in my hand so it
doesn't move at all, or at least minimize
the movement of it. But still, it is really tricky to find the right
position for your hand. So you see the shadow, but it doesn't move, and there is place for your
hand to draw this line. So next, I decided to collect a bunch of different leaves
and flowers all at once, and you can choose
simple shapes. There is no need
for complex leaves, just clover, just
simple flowers, whatever you can
find on the ground. It's wintertime, you
can use some twigs, whatever you can find outside. I think the simplest way of painting these
shadows and growing and catching the shadows on the page is to gather
all of the leaves, all the flowers that we
were able to collect. And just as you can see,
gather them in a bunch and it creates a beautiful range of different shapes on the page. And now your task is to just sketch all these shapes
before they are gone. One thing that I didn't do, but I would advise you to do it is to somehow clip the pages of your sketchbook to minimize the movement because you
can see on the video, there are slight differences. When I press the
pen on the page, you can see that the
shadows move a little bit. So to minimize it, I would
just use some clips. They don't have to be some kind of special professional clips, whatever clips you'll
be able to find. And you see the problem here. The wind just blows and
all the shadows move. It's a bit tricky, but
it's not impossible. And I don't think you
need to concentrate on making these shapes
and shadows perfect. You can draw just simple lines
in different directions. And you can see
me here trying to find a perfect spot
for the shadow to fall to fill in the empty gaps where I
haven't drawn anything yet. So the idea of this exercise
is simple, but yeah, I'll have to kind of adapt to the situation you are in
if it's really windy, I'm not sure if it's
gonna be possible, but you can just
gather a bunch of these leaves and flowers
and grass outside and then bring it home and try to do that with the lamp. Why not, right? I think that's
probably going to be even easier to do this way. So here you can see me adjusting and choosing
the right flower or the right kind of
shape to fill in the little gaps that are still
left in this leaf shape. And then I'm just trying
to trace the lines around. It depends on you
how much you want to add to this leaf shape. It could be just one flower. It could be many
different flowers. It could be the same
flower, just, you know, painted all around the leaf. The composition depends on you on the flowers
you'll be able to find. You can see me choosing
one piece of grass, then adjusting it, then
choosing a different one. So I'm trying to
find the combination that will look
beautiful that will fill in the gaps between the shapes the best
way I can find. I really like those
grasstrands with little bunches of leaves on top. Here you can see me filling in the last empty spots that
are left in this leaf shape. And I'm holding these
flowers quite close to the page so they don't
move in the wind at all. And this time, I'm just tracing the shape by holding
them close to the page, they almost don't move, so that's a plus. It was quite windy day time
I was painting these leaves. So then when all of these
shapes are drawn in, the next step is just to
fill them in one by one. And you can do that part at home on your couch without
being in the sun. But that is for this exercise. Next, I will show you how
to upgrade it in a fun way. After you come back home, you can experiment on doing different
backgrounds for this bees.
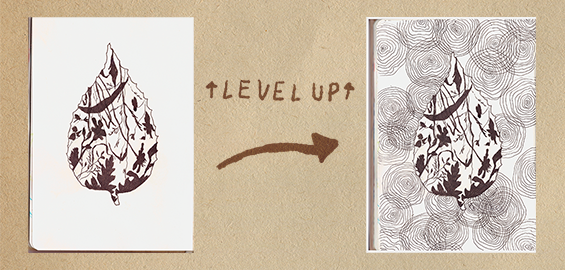
4. Level Up ↑ (Adding Depth and Detail): Level up. I created
the section to make these artworks
feel more complete by adding backgrounds
and extra details. We don't have time to add
when working outside. You can absolutely skip
the stage and move on to the next video if you want to keep the process
quick and simple, but you feel ready to take your drink a little
further to the next level, then let's get started. So now that you're home and you would like to
upgrade this piece, and add more details to it. I'll show you the way I think make a
beautiful background. And this time, I clipped my
sketchbook, as you can see, and I'm using Jal Pen for
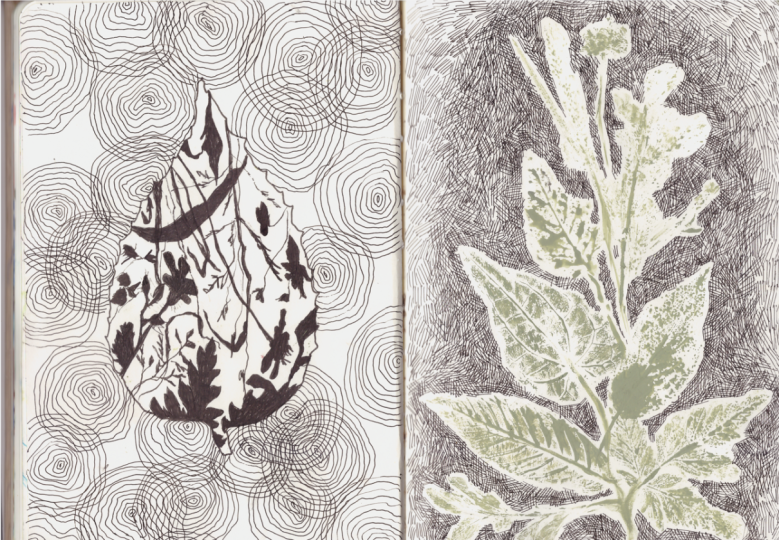
the background this time. And my idea behind this
background was to create kind of pattern of little
droplets of water. Like imagining that
this leaf shape could be in the water, and all around it, you'd see those droplets of
water in the rain. So to make this shape, you just need to
create wonky circles and try to not
make them perfect. They remind me a little
bit of dre rings. So try to make them varied
in shape and line thickness. But overall, I'm trying to create the composition
with these little circles. I'm trying to place one
circle closer closer, the next circle, a bit
further apart from it, so it all doesn't look the same. And then I'm just filling it in with more lines inside and repeating the same steps until
all of this page is done. And filled in with
these circles. By the way, you don't
have to start with the biggest circle shape and then fill it in with smaller
and smaller shapes inside. You can start with
the center and just draw bigger and bigger
circles around it. You can try different
methods of drawing these circles and see which
one you like the best. This particular background took me around 20 minutes
to complete. So keep that in
mind if you'd like to make it more detailed because it definitely
takes some time, maybe even more time than painting all these
leaves inside. And you can see that I filled
in all of these shapes of flowers and leaves and
little strands of grass, all of them with black color. So now that they
are all filled in and the leaf shape is
traced throughout as well, only then I am continuing
with the background. Personally, I'm really happy with the design of
the background. I think it definitely adds
something new to this piece, and it makes it look
complete because otherwise, my background was a
little bit dirty. Unfortunately, I just
added some lines where they didn't need to be and
there are little spots. So this way, you'll be able to cover up all
of your mistakes. But you don't have to do
this particular design. You can experiment with
just simple lines. You can make criss cross
lines, whatever you like. But here we go. I
finished the last circle, and as you can see,
I don't try to fill in all the empty calves. I think that's why it
looks more beautiful. And that's a great job. Now we're ready to move
on to the next piece. And that's our first
exercise done. Let's move on to the next one.
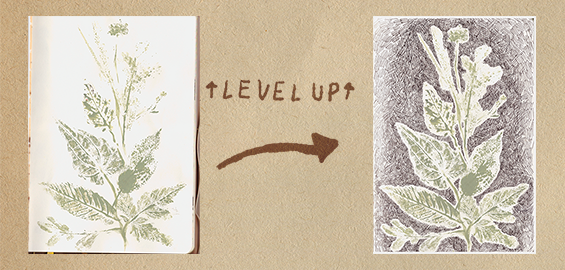
5. Printing with Leaves and Gouache: Ing with leaves and gouache. Let's start with our
next painting exercise. We're going to make prints
using leaves and flowers. The idea is simple and cin, but the results can be
truly unique with this one. There are lots of possibilities
for experimentation. But before we start,
here are a few things to keep in mind when working
with paint outdoors. This exercise can
be a bit messy, so do keep the
napkins close to you. You'll also need a
little more space to work with your gouache and somewhere to put paint
covered leaves afterwards. But the best part of this
exercise is that you can start right away without doing
any sketching beforehand. Just pick a leaf or a flower, add some paint, and see
what kind of print you get. So for this exercise, you'll need to prepare
your gouache paints and find a place to add water. So in my case, I had my
drinking water bottle, and I brought a little lid where I was able to add just
a little bit of water, so I'll be able to dip my
brush whenever I need that. And I brought my gouache
in this little container. And since I'm using this yeah, container
with gouache quite often I re mix some
of the colors. So the colors you see on the lid of this
container with gouache, those are pre mixed colors
that I did a while ago. So I decided to use them because those are
my favorite colors, this kind of sage green. And I decided to
use only one color, but you can mix different ones. And I'm using the same bunch of leaves I gathered for
the last exercise. And we'll be just printing these leaves one by
one onto the page. I just water down the
paint a little bit. So it wouldn't be dry. Otherwise, there would
be nothing on the page. So I watered it down, and I tried to paint
these leaves carefully. But as you can see,
if you take, like, little strands of grass, you'll definitely make
this process quite messy. And I wouldn't
advise you to do it the way I did it,
at least at first. You'll see me then
remembering that I brought some napkins
to avoid this mess. It's a bit of a mad move
to paint my whole hand, but I was so in the process
that I kind of went with it. And forgot that I brought
napkins that I could use. But please use some napkins. You don't have to do it on your hands to paint
your hands fully green. And as well, you can see that printing these
little shapes, it's a bit difficult. I would advise you to use simpler shapes for
this exercise. But as you can see, I use the
stem of this grass to print little stumps onto the page. I found this beautiful leaf
that is in a hard shape, and I painted the other side of the leaf because
it had more of these kind of crevices that I thought would look
beautiful on the page. But you can experiment because different sides of the leaves
will print differently. So here you can see,
there are a lot of these lines that I wanted to
be imprinted onto the page. And I think it looks beautiful. So I'm trying to add
little stem here as well. That's not necessary,
to be honest. You don't have to add these little lines to suggest
that there is a stem. Then this time to show you the difference
between the upper part of the leaf and the
lower part of the leaf, this time I'm painting the upper part to show
you that this way, you won't be able to see all of these beautiful crevices
and lines under the leaf. So I'm carefully painting
the upper side of the leaf. And again, I would
suggest you to place this leaf on the napkin
and then paint it. That would be ten
times easier to do than the way I did it. So here you can see how the other side of the
leaf would print. So, in my opinion, I like the lower part
of the leaf better. I just has more details. So finally, you can see me using a napkin to paint
all of these shapes. And again, I decided
to paint another leaf, another lower part of the leaf. And for all of these leaves, I'm using the same green paint. But again, there
are no rules here. You can use different colors. Or different leaves,
you will just have to clean your brush between
each and every leaf, and I think that's
the main difficulty. And look how beautiful this
print of the leaf turned out. And you can see how
simple it is to do the painting not on your hands, not by holding it in your hands, but by placing it on napkin
and then painting it. And then just carefully with
little tabs with my finger, I'm just trying to print each and every little
crabs of this leaf. And as you can see, I'm trying to do
this composition, starting from the
smaller leave and then moving lower
with bigger leaves. Then to fill in the composition because I could leave this composition as it
does right now, but my perfectionism didn't
allow me to do that. There was a little empty spot here that I wanted to fill in. So I decided to use this little bunch of leaves
and print it, as well. And I decided to add
stems to all these leaves so it would look like they
are growing from one stem. But I would say
that's not necessary. And again, I could leave
this composition as it is, but I decided that there
is some empty spots that I wanted to fill in in the upper part of
this composition. So I took a little bit of grass to print in the upper part. And again, I decided
to add the stem to this grass as well
using my brush. It's a really simple exercise. I think this is
the simplest one. And at last, I decided to finish this composition with a flower like a cherry on top, but I will admit it's was a bit difficult
to paint flower. I did not want to
take the paint, but let's see how
it will turn out. And it's fine. It's not perfect,
but that's okay. And at this point, I decided to leave it as it does finally, and I think it turned
out pretty cool. But if we'd like you, I can show you how you can
upgrade this painting by adding a beautiful background to it. See you in a minute. Amazing work. If you'd like to take this piece
a little further, I'll show you how to add the background and
some extra details.
6. Level up ↑ (Adding Background): Let's level up this painting. To add background to this piece, I decided to use
a black gel pen, and I'll be drawing these
simple line shapes. What my plan is to do with
this background is to fill it with criss
cross shading. It's called wowing hatching or woven shading because I'm drawing these short
parallel lines. And at first, I decided to draw these lines all
around the leaves, but just on a little distance
like half a centimeter. Or just at least a
few millimeters. So these leaves would be separated from the
background as well, because these shapes are
not printed perfectly, we just give them a little
bit more free space where they'll be a
bit more visible. And the first, I added these parallel lines all around
the leaves and the grass, and the flowers and to not
smudge the lines underneath. I am using a clot in this case. But you can use a napkin
or a different page, or you could use a sheet
of paper underneath. You don't have to
use it, by the way. It's just so I
wouldn't smudge all of the lines that I
painted with black pen because it has a tendency to smudge if it's not
dry to prevent it, I decided to use a clot and
place it underneath my hand. And I'm just filling in
these background with these short little
parallel lines until all of this background is
filled with these lines. And you can stop at the point when all this
background is finished. But I want you to continue
with cross shading before I finish just so it
has more contrast. Otherwise, there are
too many details, and I think the
contrast would really bring out these beautiful
prints of leaves, and it would make this piece more
complete, in my opinion. And this background
right here is one of the more complex
backgrounds that I did for these pieces to balance
out the simple exercise. The printing was
an easy exercise, but then drawing the background as the most difficult part
of all of these exercises, I would say, because
overall filling in the background took
me about 40 minutes. It's half the amount of time. And I understand that's a lot. So you don't need to make
it as complex as I did. As you can see, when I filled in the whole background with
these parallel lines, then I drew the
next lines across those parallel lines with
perpendicular parallel lines. And I was just continuing to add those additional cross lines, but all around the leaves first. So I wanted to make this
background a bit more dimensional and bring
out these leaves, but I didn't want to
spend time to filling in all of this background
and these cross lines. So by drawing all around the leaves, they'll
look brighter, but the rest of the background will look still interesting. And you'll see right
now in a minute. The more cross lines you draw, the darker the value gets. I make these
parallel lines quite short and quite spaced
out from each other. And this piece can
take less time if these lines would be spaced
even more from each other. So by drawing these
parallel lines at first, I'm just trying to hug these leaves to
bring them out more. And then I'm adding cross
lines to make it darker value, so it will be easier to
distinguish the shapes of leaves. And now you can see how
beautiful it looks. And you can see this
white stroke all around the leaves that I
left because I left some distance between
the leaf and the lines. And I think this just gives these leaves some
space to breathe, just some space to be and gives the whole piece
overall the structure. That's a great job. Now we can move on
to the next piece. I think this turned out to be my favorite piece of the mole, so maybe spending those
14 minutes was worth it. Great job. Now I will show
you something similar, but using a completely
different technique.
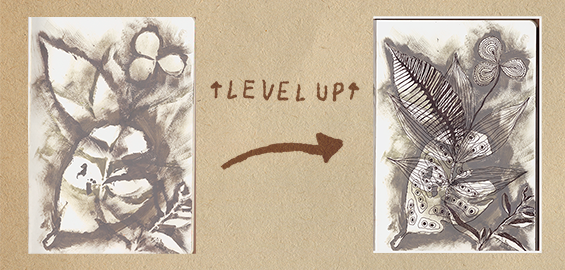
7. Painting Silhouettes: Painting silhouettes. This time, we'll be painting slots
of leaves using gouache. It's somewhat similar to
the previous exercise, but we'll be using a different
technique this time. The biggest challenge
here is probably not making a mess all over the page and everywhere
else, as well. But we'll get through this. But on the good side, you don't need to worry
about drawing at all. It's simple
straightforward exercise, and I'll show you exactly
how to do it right now. For this exercise, we'll
be using a technique that is called negative
space painting. And I'm starting by gathering some distinct shapes of leaves. And then I'm using gouache, the same green color as I used previously and paint brush, and I'm using this
leave as a mask. I'm holding the leaf
down firmly with one hand and then
with the other hand, and then I'm painting away from the center of the leaf
out onto the paper. And in this case,
I'm using brush just because that's the only thing
I have while being outside. But I'll show you at the end, a different technique
that you can use that will produce a better,
more beautiful result. As well, if you have some
kind of adhesive or a tape, you can use it to
hold these leaves, like press them down and use this adhesive to secure the leaf position because
it's a little finicky, as you can see, to
hold the leaf with one hand and to paint all around the leaves
without moving it. But it's okay. Look at how beautiful the
silhouette turned out. Then I chose a
different leaf with really beautiful distinct
shape that has some holes. And once again, I found the desired position for
this sleeve before starting. And then by holding
it with one hand, I'm painting with the other
hand away from the center. And I prefer to use a dry
brush technique here. So my preferred
option would be to not have as much water
on the paint brush. So I could make
these soft edges. As you can see, I'm trying to blend in this color
all around the leaf. And I can advise you to
use different colors. In my case, I decided
to use one color, but you don't have
to use one color. You can use different
shapes of green. You can use whatever
rainbow colors you'd like. By using this kind of darker green color,
makes the silhouette. It makes the painting
more dramatic. And for this exercise, I would choose only
flattened leaves with distinct shapes. For example, you can
choose maple leaves. Here you can see, I am painting
around the clover leaf. In this case, I would avoid small grass shapes,
small leaves. For example, here, you can see, I chose a stem with
smaller leaves, and it's not flattened. And it is so much more difficult to paint around it because if it's not flattened,
it moves around. It's much more difficult
to press it down and do not smudge all
the paint around. So I would advise you to gather only bigger shapes and
flattened flattened leaves, flattened flowers,
flattened shapes overall. It could be easier to gather these different stems and leaves and place them
in a heavy book. Then after these
leaves dried down, I think it's easier to
use this technique then, and you can learn more about the ways to preserve
these leaves and flowers in a more
professional way in my outer class
about ahibanum. But we are done with
this composition. Next I'll show you
the way you can upgrade it to make
it a bit more fun, a bit more interesting
to look at. I think it's turned
out a bit messy, so make it more interesting. Great job finishing
this exercise. This time, I'll show you a few ways to make
this exercise using different tools and add some extra details to this particular piece.
Let's get started.
8. Level Up ↑ (Developing Your Painting): Let's roll up this piece. This time, I decided to
paint inside the leaves, and I'll be using black
gel pen for this as well. And my idea for making this particular exercise particular
piece more interesting, I decided to draw different
patterns inside the leaves. So I'm starting with drawing parallel lines that come from
one side of the leaf and to the other side to the tip
of the leaf and just fill in the whole stem of leaves
with this kind of pattern. Then I'm just racing
around the other leaf, dressing around the stem, and making it thicker
so I can see it better. And then I'm filling in
both sides of the shape with kind of U shape until both of these
sides are filled in. Then by using liner, I'm filling in little
gaps between the stem, the center of the leaf, and these U shapes. And by doing this, I'm
creating little spikes. Then the other half of the leaf, I decided to fill in with additional color by
leaving a little gap, a little stroke
around the U shape, I colored in the rest of
the shape with black color. Then I'm dressing
around the next leaf. It's okay if it's not perfect. As you can see, I lost where the line was supposed
to go, but that's okay. Then I'm drawing
these little blobs, and I'm filling in one
side of the leaf and then another side
of the leaf with the same kind of wonky shapes. Next, my idea was to fill in
these shapes with circles, and then inside I'm
draw darker circles. But you don't have to repeat after me if you don't like
these patterns at all, you can create your own
patterns. You can experiment. Next time I'm dracing the
other stem with leaves. And this time I'm
just filling in with black one
side of the leave, one side of the stem, and leaving the other empty. Pretty simple, but
looks really beautiful. And now our last last leaf. It's a glower leaf. I'm
tracing all around the leaves. I'm drying the stem, and then I'm just
filling in with lines by leaving a little cap
and then drying next line, next line, next line inside to make it a bit
more interesting, I'm adding a few
dots here and there. And that's how it turned out. That definitely looks more
interesting now, for sure. Looks really
interesting. Great job. Now let's move on to
our last exercise.
9. A Different Take on the Technique: If you'll be doing
this exercise at home, I want to show you another
method of how you can execute this technique called
negative space painting. This time, I'll be using the
same shaves, by the way. I saved all of these leaves that I used in the
previous exercise, and I just collected them in my sketchbook and they dry down, and now they'll be much easier
to use in this exercise. So this time, I decided to make this composition itself
much more interesting. So I cut up one bigger leaf. I cut out both of the tips of the leaf to make the vase shape. Then to make this
technique better, I'll be using a sponge. It'll be much easier
to control the paint, and the whole
composition will turn out more beautiful, more clean. And by the way, you can use
the sponge outdoors as well. I'm using the same gouache, and I'm using a bit of water. But this time, I'll be
using different colors. And I'm starting
with lilac color. I'm watering down
it a little bit. Now I'm using the soft side of the sponge to
gather the paint. My sponge has some holes, but that's okay. That's okay. They won't be visible. And then I'm just holding
this leaf with one hand and then using a sponge to add
the paint to the page. In this case, the
leaf acts as a mask that blocks the paint from
reaching the paper or canvas. But you don't have
to use leaves. You can use shapes
created with paper. Or as a different tool, you could use toothbrush
or some variation of spray or some way of
splattering the paint. And this way, you'll
get this kind of misty outline compared
to the paint brush. Then one by one, I am finding
the perfect arrangement. And then by holding the leaf in one hand and
the sponge in other, I am printing these
leaves onto the page. And this time, I'm
choosing different colors. I started with lighter colors, and then I moved on
to darker colors. Then I decided to add
something in the empty spots, and I decided to add some kind of pattern to the ways as well. And this is the result of the same technique
with a different tool. And let's compare
the two of these. They look completely
different, to be honest. They totally look like different techniques,
to be honest. And you can fill in
these shapes with the lines the same way as I
showed in the previous video, but this time, I will leave it as it is because
I like how it looks, and that's it for
this composition. And I'll move on to
the last exercise. No.
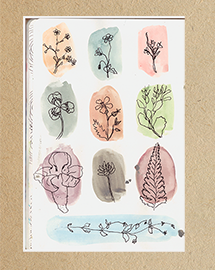
10. Colorful Shapes Filled with Flowers: Colorful shapes
filled with flowers. Our last exercise, and I
think this is my favorite. I'm going to show
you how to transform blobs of color into
little windows, each with unique flower inside. The main challenge here is
fitting all shapes onto one page without making all
the colors smoky and dirty. This exercise can also
be a little more time consuming because of all
the amount of details. The blue side is that you don't need to do any sketching again. But the result looks
really elegant and beautiful and process
is not messy this time. For the last exercise, I'm collecting different
shapes of leaves and flowers. I'm trying to find
relatively small leaves and flowers like daisies,
like a fern. And then what you'll need to do is to draw blobs of color. Kind of rectangle shapes, but not necessarily, you
can use different shapes. You can use circle shapes, you can use whatever
blobs you can think of. That doesn't really matter. This time, I am watering down
the gouache quite a lot. So it looks a bit more
like watercolor paint. And then one by one, I'm filling in the sketchbook page
with these shapes. And this time I'm using
different colors. So it looks fun, colorful,
interesting, and unique. These shapes need to be large enough to fit a drawing inside. And actually, you don't have to paint as many
shapes as I painted. You can see that I
painted nine shapes, but then I decided to
add another kind of longer rectangle shape
underneath to fill in the gap. Of course, I'm all about
filling these gaps. Then I'm placing a
collected flower leaf right next to the
blob I painted. And once I'm happy
with the layout, I'm trying to look closely at the real flower and just copy the shape with
the black pen. And this time, I'm
planning to draw just outlines without filling
it in with color later. I'm trying to fill in this
blob with thin lines to match the real plants details and just drank as
closely replicated. So look closely at leaf
veins or petal wrinkles, but you can still keep
the style minimal. And here you can see,
I decided to add another shape below
all the other shapes. Because I didn't like that
there was a gap there. And there are no rules
that these blobs need to be this exact shape,
this exact size. So you can play with that.
You can draw bigger blobs, so you'll have to paint
less of these flowers, or you can draw bigger
leaves or stems. Because as you can
see, I'm trying to find the smallest flowers,
the smallest leaves. That I can replicate exactly. And again, for this exercise, if you don't feel confident, it's okay to use
a pencil and then draw outlines later at home
because, as you can see, I'm holding sketchbook
in one hand and I'm holding the
flour in the same hand, and then I am drawing
with another hand. So it's definitely tricky. It could be a bit more advanced. So if you feel like you
need a bit more practice, you could definitely
draw these shapes with pencil and then trace
them with the pen. And then if you'd like to,
you can erase it later on. For this exercise, actually, you don't have to find
only flattened shapes. You can draw the shapes and turn them into a
simple line art. For this blob, you
can see me trying to replicate the fern shape
and as you can see, I decided to go over
this blob shape, and I think it had this
beautiful detail that these black lines are not necessarily pushed
into these blobs. But you can play around
with this composition. You can play around
with this layout of blobs and try
different things. You can play around by painting different shapes of blobs and
different sizes of blobs, as well and complete them
with different colors. And because this
exercise is such detailed and it takes a bit
more time and precision, I decided to leave the
background as this. Not touch it at all.
But if you'd like to, you could add more
shadows, more colors. You can paint in these shapes, these flowers, these
stems and leaves. You can fill them in with color. You can paint them with gouache. You can paint them
with watercolors. You can add shadows. You can add color by
using colored pencils. And in turning this page
into botanical study, it almost looks like a
gallery of different plants. And I think it could look
beautiful as a print, as well, because it has
this minimalistic style. Now, we're down to
our last flower. You can even write
down the names of the flowers right below each
and every blob of color. And as you can see, although I'm trying to precisely replicate, it's okay if your leaves
are not perfect. It's okay. If they're more simplistic. And now we're actually done
with our last exercise. There will be no additional
background for this one. So this is how it looks. I think it turned out
perfect as it is. I hope you're happy with
your piece as well, and you did a great job. Now let's move on to the bonus, where I'll tell you how to draw and paint sketches outside and a little bit more about
my process and these sketches that I drew
over the years. Decided to leave the
piece as it is and not at any embellishments because it's supposed to look
elegant and minimalist. And to me, it has
already achieved that. But as an idea, you could
add color in the flowers or add shadows behind the flowers and take the piece a little
further if you'd like to. I decided not to
do that this time. So great job finishing
all four exercises. This was quite a bit of work. You made it through all four. But before we bruh up, I wanted to show you
my sketching process. These are some slightly
more advanced techniques, but I really wanted to
share them with you as a little extra inspiration.
So I'll see you there.
11. Bonus: My Sketching Process in Nature: This is my bonus
video to give you some extra inspiration
for painting in nature. I'm going to show you
a process video of me sketching outdoors using
mixed media materials, but mostly colored pencils. I'll also show you some of the works I've created
in nature before. Hopefully, this will inspire you to try more complex sketches and artworks in the
future and explore all of the possibilities
of making art outside. So in this bonus video, I want to tell you
a little bit more about my sketching
process at first, and then I'll show you some of my sketches that I
created over the years. Now you can see me trying to find the perfect composition. And I'm doing it by
using my fingers. I am looking at how far, how close I could draw this
composition in my sketchbook. So I'm making the
rectangle out of my fingers and then trying
to see in this rectangle, trying to capture
different views and the best view that I could draw. So you don't have to create
a piece for your project. It's just here to show you all of the different ways that
you can paint outside, that you can sketch outside. So get inspired to
create outside. Do not be afraid
of experimenting and just spending some
time outside in nature. So here I found a beautiful
spot with the river. So there was nobody else there. It's not a perfect spot because I was not able to
sit comfortably. And if you're just
starting with sketching, I would suggest you to find
spots where you would be able to sit for like 30
minutes comfortably. But since I'm okay
with standing, I decided to grab some of the pencils I had
in my backpack. Don't carry lots of
supplies with me. I just carry around
the sketchbook or even smaller sketchbooks and
just a few pens or pencils. It doesn't really matter
because when painting outside, you want to use something that you'll be able to grab quickly, and that's always
there in your bag. And I think you'll probably have at least one pen and
maybe even a pencil. So you can use just those tools to create your first
sketches. In my sketchbook. And then right away,
I'm just using my pen. I understand that when you
don't feel comfortable, you'll probably use a pencil and then you'll be able
to erase some lines. But for fast sketches, I would advise you to use the material you'll
not be able to erase and be okay with it with the sketch turning
out to be ugly. Just part of the
process. That's okay. If you're spending 15
minutes on one sketch, I think it's fine if
it turns out ugly. So don't be afraid to use a tool that you'll not be able
to manipulate later, you'll not be able to raise the pen unless you submerge
the page in water. And then I'm just trying
loosely capture the composition with these sweeping motions
with these unperfect lines, and I'm just trying to capture where the
branches are where there goes and just basic lines at first without
drawing any details. Then when I kind of know where
the composition should go, I add more details
and try to fill in these details with
loose loose lines, with loose shapes
by not trying to draw each and every
general leaf on the tree, try to find a way to show that
there is a lot of leaves. In this case, I'm kind of doing this kind of wavy curly line. By using wavy curly line, I'm trying to
implicated there are a lot of leaves there
on these branches. Then since I had another
pencil in my two arsenal, I decided to add the
closer view to me. I decided to use
a pencil for that because it has thicker line. So it gives the sense
that something is closer to you if you
use a thicker line. And then I'm just continuing
to shaping the composition, and I'm adding tree trunk
and I'm shading it, and I'm coloring in the closer leaves with a
dark color blue pencil. So you can see that this is something that's closer to me, something in front of me. And this is how this
sketch turned out. And I would advise you
to write down the date, time or location, maybe some kind of
context and information, maybe whether maybe birds, maybe animals or something
that happened that day, it makes those sketches
more personal, and that is it for this sketch. And now I'll show you some
of my other sketches. So hopefully you'll find
more inspiration in different ways that you can
create sketches outside. You can create art outside.
12. Bonus: A Look Inside My Sketchbook: So in my sketches, you can see that I use a lot of colored pencils because
they're easy to carry around. It's enough with, you
know, three, two, four favorite colors
or favorite brands, and that's enough to
create a beautiful sketch. And you can see me using
different techniques for shading, for showing lines. And sometimes I carry around this container
of gouache with me, and I use gouache to
paint sketches as well. And if you don't have
a lot of time on the spot to paint
these sketches, you can just draw silhouettes, and they still could
look beautiful. So yeah, these are mostly all my sketches
drawn with pencils. And as you can see,
you can draw people as well. You can draw hands. And it's enough with
just one pencil with your favorite color
with your favorite brand. And you can just carry
around one pencil and create sketches on the go or while you're sitting on a bus or while you're
waiting somewhere, I mostly prefer
painting and drawing the nature and just
sometimes I draw. People, I really
like drawing trees. So that would be my
favorite subject. And these are one of my
older sketches as well, drawn with colored pencils. You can draw while sitting in a restaurant while
waiting for your food. And as you can see, you
can vary your line from thinner later lines to to lines to show what's closer
to you, what's further away. Or you can use markers as
well to draw these sketches. In this case, I was
using just a tube of acrylic paint
and paint brush, and I was able to create
this composition right here that create this sketch
right here with paint. So here is a sketch created
with acrylic paint. And here's a sketch
created with black pen and acrylic paint
for the background. As well, if you ever would like to create something
bigger outside in nature, then you can try painting with oil paints or wash or acrylics, whatever you'd like
to use as a medium, but creating these bigger
pieces on canvases. So these are the paintings
I created outside in nature to say is one of my
hobbies to paint outside. Do grab an easel, grab canvas and my
oil paints and just create outside of different
landscapes and views. And these are all my 12
paintings I created outside, and then I finished
the details at home, and that's how they turned out. I hope that inspired
you a little bit. And to create something unique outside and
not be afraid of messing with tools
that you have outside and bringing you a sketchbook
or even a bigger canvas. Thank you for staying with me through all of these videos. I hope you feel energized and are full
of inspiration to draw and go outside to paint
something unique and you and something real
to listen to the birds, and so can do vitamin D. But I'll see you
in my last video. Thank you for staying with
me through this whole class. I'm really grateful for that. I hope you're feeling
inspired and energized to make more cool
art outside now, and I'll see you
in my last video.
13. Final Thoughts: Final thoughts. Well done on exploring all of these
different exercises. We covered quite a few
different techniques as you followed along with me. We made art by catching shadows. We printed with leaves, we painted leaf silhouettes, created colorful shapes, and
filled them with flowers. Plus, we explored
how to make sketches and larger paintings
outside in nature. I'm really thankful and grateful that you chose to
spend this time with me. Please, I beg you
don't forget to upload your own paintings to the
project and resources tab. I'd really love to see
your experiments and maybe even some of your
own addition to my ideas, and I'll be sure to
give you some of my personal feedback
just for you. And if you enjoy this class, do have a look at my other
classes on Skillshare. I'm sure you'll love them. You can find more
inspiration for nature art in your
sketchbook in this class. And also, you can
learn how to make art directly using dried leaves
and flowers in this class. You click this button, you'll be the first
to now when I upload a new class or share any
exciting news with you. And if you could take a
moment to leave me our view, I would be forever grateful
because it really helps me to spread the joy of
painting with more people. In the meantime, thank you
so much for joining me, and I look forward to
seeing you next time. Bye for now and happy painting.
 Policorne, Illustrator & Fine Artist