Transcripts
1. Intro: I love bringing characters to life. At the heart of every great story, you will find great characters. My name is Carminys, and I am the Co-Founder of operary.com, an animation studio based in Spain. We have more than eight years of experience producing beautiful animated explanatory videos for hundreds of companies worldwide such as Intel, Deloitte, Bayer, Porsche, and many more. One of the biggest enemies of an animator is time. Customers are always in a hurry, and usually, character animation takes longer than expected. In this course, you will learn how to make these amazing character animations quickly and easily with enough plugins in After Effects. During the course, you will learn some valuable tips to speed up your work process. You can download the project files. This way, you can follow the instructions in real-time. It will be much easier for you to apply, watch or learning. This course is ideal for animators, illustrators, graphic designers, creative artists, and generally, anyone who wants to learn how to make amazing animations easily and in the shortest time possible. This is an easy to follow course. However, if you have not used After Effects before, you can take my previous course, animate your illustration's new record time, using Adobe After Effects first. Now, I tell you a bit about myself. I am an animator, illustrator, and a scriptwriter based in Spain, originally from the Dominican Republic. I love my job. I feel lucky to work full time on what I love the most. In this course, I will love to share my knowledge with you. There is no time to lose. Enroll in the course and let's get started.
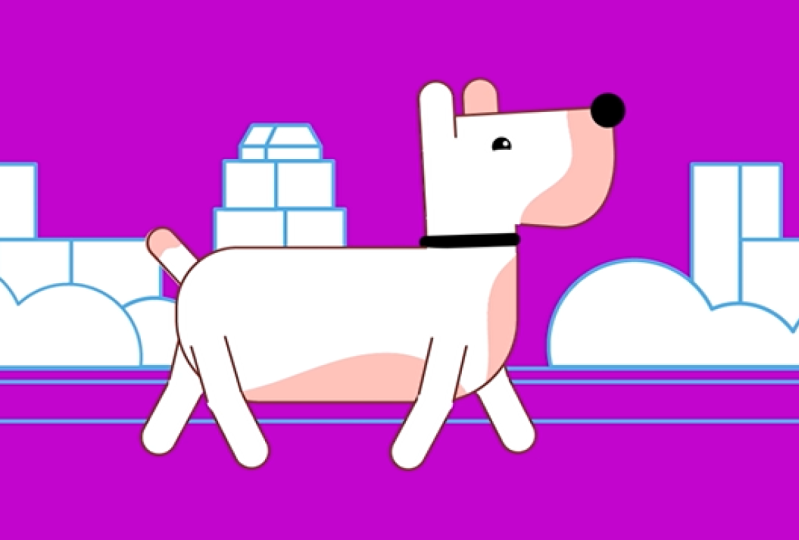
2. Getting Started: Before creating a character for animation, we must focus on the keywords that will define it. In my case, I wanted to design a lovely, and friendly puppy. Circular shapes are great to give these feelings. I wanted to make a very simple design since the simpler a character is, the more impact it's design has. Also, the simpler our design, the easier it will be for us to animate it. To design our puppy, we have used Adobe Illustrator. You can download the Illustrator file from projects and resources so that you can apply everything you learn during the course in real time. Of course, you can also create your character using your favorite illustration software. The animation process is the same regardless of whether the design has been done with Adobe Illustrator, Procreate or Photoshop. Now I'm going to explain how to prepare your designs to animate it efficiently in After Effects. To prepare the file for After Effects, we have to separate the elements you will animate into layers. The organization is essential. If you work with Photoshop or Procreate, the concept is the same: separate by layers. The first thing we can notice is that we have only designed two legs. These will allow us to save time in the animation process. Later, you will understand why. Each leg is composed of two layers. The body, the tail, the head, neck, and ears are also separated by layers. Now, let's take a look at our design. If we separate its parts, we see that practically all the layers have rounded corners. These help us create cleaner animations with less effort. As a final note, when working with Procreate, you have to export it as a PSD file.
3. First Steps & Shortcuts: Hi guys. In this lesson, we will gain touch with the After Effects interface. We will work with the standard workspace. But you can choose the option you prefer. First, we need to create a new composition. We go to Composition, New Composition. I'll pick a new 1920 by 1080 composition at 24 frames. Name it and give it 10 seconds. Now it's time to import our Adobe Illustrator design. Go to File, select Import File, and then select the desired file. When we import a layered file in the imports as an option, we must select Composition-Retain Layer Sizes. If you look at it, a composition and a folder with layers have been created. We are going to work on the composition. Let's drag the imported composition into the main composition. Now, let's take a look at the After Effects interface. The panel where we see the dog is the viewport. This panel is where we will see the results of our designs and animations. At the bottom, we can see the timeline panel. This panel is where we will spend more time creating our animations. From here, we can easily modify the transformation properties of the layer. If we look to the left, we can see the project panel. This is where all the compositions that we create and all the files that we import will appear. At the top, we can find the essential tools. Perfect. Now, we will take a look at the shortcuts that we will use during the course. They must use shortcuts referred to the layers, properties, and the tools that we will use most commonly. Let's see how to open the layer properties with a single click. Press A for the anchor point, P for the position, S for the scale, R for the rotation, and T for the opacity. Also, if we hold down the Shift key, we can open several properties simultaneously. Now, we're going to see how to access the main tools with the touch of a key. Press V for the Selection Tool, hold the space bar for the Hand Tool. Z for the Zoom Tool, W for the Rotation Tool, and Y for the Pan Behind Tool. It's about practice. At Projects and Resources, you have a PDF file available for downloads with the most useful shortcuts.
4. Character Rigging: Hi there. In this lesson, we will prepare our character to animate to simply without using any plugin. When you animate without plugins, nothing limits your movements, and the software runs faster. With a double click, we entered a dark design composition. We're going to start placing the anchor points of all the layers. The anchor points will be the reference points around which the layers will rotate when we animate them. We select the first layer of all and open opacity. Remember, the [inaudible] that we saw in the previous lesson. With the first layer selected. We go to the bottom and we the Shift key pressed, we select the last layer. In this way, all layers are selected. Next, we lower the opacity of the layer to 40 percent, for example. Let's get a little closer. By reducing the opacity, we can see better where our layers starts and end and we can also see where the intersections of the layers are. We can temporarily disable the body and background layer to work better. It is very simple, we select the perm behind tool. Select the layer and place the anchor points at the reference points around which we want the layers to rotate. If you're not sure if you have placed the anchor points in their rights place, with the rotation tool you can rotate the layer to check if the rotation works. Now, we continue to do the same with all the layers. For the head, I'm going to place the anchor point in the lower-left corner. Great, once we have all our anchor points correctly located, we activate the body and background layers again. It is unnecessary to locate the anchor points in these layers because we will not animate its rotation. Now, we select all the layers again and resets the opacity to 100 percent. Great. Now, let's see how to use the parenting technique. Right now, if we move any of the layers with the selection tool, they move independently. But we need that. For example, when the body moves, the rest of the elements follow its movement, or when the neck moves, the head and ears follow its movement. Let us start by linking the calf layer with the thigh layers. To do so drag the peak weed from the Calf 1 to the Thigh 1. If we rotate the Thigh 1 layer, we see that the Calf 1 layer also moves. From this menu here we can see the linked layers. We're going to do the same with the Calf 2 layer. Now we're going to link the thigh layers with the body layer. We also make the tail and the neck with the body. We link the head with the neck and the ears with the head, and that's it. We already have our calf to ready to animate it. Before continuing, Let's save the project. We go to file and select save. We name the project and save it.
5. Walk Cycle: Hi there. Let's start animating. To animate our puppy's legs, we will only need to create the two poses you see on the screen. If you notice, when the front leg turns in one direction, the rear leg turns in the opposite direction. Let's start by animating the legs. To work more comfortably, we will activate the option Solo in the legs layers so that the rest of the layers do not bother us. We select all the layers of the legs and open the rotation properly. Now, we will select only the first layer. First, we will animate the rotation up to Thigh 1 layer for which we need to create the first keyframe by clicking on the stopwatch, and we rotate until we achieve the desired result. We're going to do the same with the Calf 1 layer. We create a keyframe by clicking on the stopwatch and rotate, and we do the same with the other leg but in the opposite direction. From here, we can activate the rules. By clicking and dragging from the ruler above, we create a guide to ensure the above legs are at the same height. Perfect. Now, advance eight frames on the timeline. You can see the frame counter on the left. From here below, we can zoom in on the timeline. We are going to turn our legs in the opposite direction. Modifying their rotation bar, you creates a new keyframe automatically, and we do the same with the other leg. Again, we are going to try both legs are at the same height. Perfect. Now that we have created our keyframes, we will create an expression that will save us a lot of time. We need to click on the stopwatch while holding down the Alt key to apply an expression. Next, we write a loopOut pingpong expression. If we press 0 on the numpad, we can see the things to the expression loopOut pingpong, the Thigh 1 layers movement comes and goes throughout the composition, and only with your keyframes, interesting. If you notice when we apply an expression, these numbers here turn red. To save more time, we'll copy the expression that we have applied on the Thigh 1 layer rotation, and we will paste it into the other layers. Right-click on the rotation and select Copy Expression Only. Next, we select the other layers and paste the expression with Control V or Command V on Mac. If we preview, we already have our animated legs. But two legs are missing. We would deactivate the solo option of all the leg layers so you can see the rest of the layers. We select the layers Thigh 1 and Calf 1 and duplicate them with Control D or Command D on Mac. We drag them below the Body's layer. We select the Thigh 3 layer and place them on the opposite side, and a little higher. We create another guide to place the other leg at the same height. We're going to disable the background layer to see our guide better. Now we are going to duplicate the Thigh 2 and Calf 2 layers. We drag them under the Body's layer. We select a Thigh 4 layer and place it on the opposite side at the same height as the other leg. We preview, and [inaudible] , we already have our four legs animated. We are going to continue animating the body position with only two pulses. We select the Body layer and open the Position Property. We move on the timeline to frame 2 and create a new keyframe by clicking on the stopwatch. Next, we have bounced four frames onto frame 6 and we raise its position as a little. Again, we copy the expression loopOut pingpong that we applied previously on the other layer's rotation. When we copy and paste expressions between different properties, we need to select the property directly, in this case the position, and then paste it. If we preview, we already have our animated body. We're going to activate the Background layer again. The movement is a bit rough. To small feat, we select the keyframes. Right-click Keyframe Assistant and select Easy Ease. You can also apply it by selecting the keyframes and pressing F9. We preview again. Perfect. As you see, it is a very simple process. We create the animation, with just do pulses and apply the expression, loopOut pingpong.
6. Refining the Walk Cycle: Hi, there. Now, let's focus on the details. Let's start by animating the neck. Open the rotation property. We move to frame 3 in the timeline. One frame after the first keyframe created in the body, and create a new keyframe. We are going to rotate the neck slightly, so that the head is looking down. Next, advance four frames, up to frame 7, and turn the neck in the opposite direction. Select the keyframes, right click, and smooth the movement with Ease Ease. We copy the expression loop out pingpong from one of the layers with the expression applied. Select the neck layers rotation and paste it. Let's take a look. If you notice, we have done a slight displacement of one frame in the rotations animation between the body and the neck to imitate inertia, and make the animation look more natural. When the body goes up, the next turn goes up a frame later due to that inertia. Now, it is time to animate the head. Again, we do a displacement of one frame concerning the neck animation. We go to frame 4. In this case, we're going to copy the neck animation directly. To do this, we simply select the neck layer rotation property, and copy it with Control C or Command C on Mac. Next, we select the head layer and paste the animation. It is that easy. We already have the head animated. Again, we advance a frame onto frame 5 and we open the tail rotation property. We create a keyframe and apply a rotation of minus 20 degrees, for example. We advance four frames and change the value to 20 degrees. Select the keyframes, right click, and smooth the movement with Ease Ease or pressing F9. We copy the expression loop out pingpong from one of the layers that have it applied, and paste it in the tail's rotation. As you can see, it is a very simple process and the steps are repetitive. We are going to select the tail's rotation property and copy it. Next, we select the front and back ear layers, and paste the same animation. We open layers rotation to see the animation. To finish, we have to reverse the rotations animation, since the tails and ears rotation occurs in opposite directions. With the keyframes selected, we make right-click, Keyframe Assistant, and select Time-Reverse key. The animation of the ears should start at the same time as the animation of the tail. To solve it, we simply drag the selected keyframes up to frame 5. That's it. If we preview, we can see our wonderful animated puppy made in record time.
7. Background Integration: Hi there. In this lesson, we are going to integrate our poppy in a background scene. Here you can see the landscape, the sign that I have, the signs in Adobe Illustrator. It has a size of 3,140 by 180 pixels. It is still a times longer than the size we are working with in after effects. We don't need to separate the landscape by layers since we will animate it as a single object. We go to file, import file and select it as it is a single layer file, we going to leave the option import as footage. A pop up on window appears. We can leave the default option Merced layers and click "Okay." Next, we drag the file to our main composition just above the background layer. We open eats position property and create a key frame at the beginning up to the timeline. We select the layer and move it to the right so that the animation begins on our landscapes left side. Then we move to the middle of the timeline. The second five specifically. We move the landscape to the left until where our landscape ends. Let's preview. We can already see our Bobby walking through the CD. But if you look after five seconds, the landscape stays still. To solve these, we are going to create an expression. Remember that to apply an expression, we need to click on this stopwatch while holding down the Alt key. Next, we write the loop out expression. You should not be confused with expression loop out being fun that we have previously applied. With this expression, the movement restarts again and again without the need to create more keyframes. Let's take a look. Are you enjoying the course? Please follow me on Skillshare, so you won't miss any of my upcoming classes.
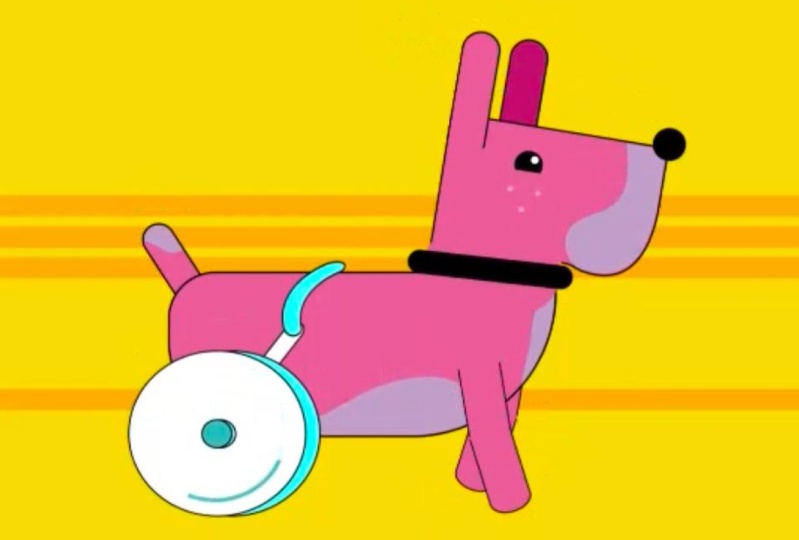
8. Even More Attractive: From this animation, we will create this animation you're seeing on the screen in a simple way. The first thing that we have to do is duplicate the composition from the project panel. With the composition selected, we press the Enter key and name the new composition to not confuse it with the previous one. Then we double-click inside the composition. We are going to import this design that we have previously prepared in Adobe Illustrator. To make this illustration, we have separated the design into two layers. Perfect. Now, let's go back to After Effects and import the file. In this case, although it is a layered file, we are going to select the import as Composition option. You may be wondering why. Because when dragging several layers within a composition, it is the best option. Select the layers and drag them into the composition. We place them in the desired place and we go to the beginning of the timeline. Sometimes when you drag layers into the composition, they are misplaced. We solve it by dragging the wheel layer on top of layer number 1 and we link both layers with the body layer. We're going to zoom in a bit to work better. Now, we are going to add a little weight to our animation. To do this, we're going to animate the scale of the wheel. First, we place the anchor points at the base of the wheel. But why at the base? Look at the final animation. When the wheel hits the ground, it squashes a bit. Now, we can animate the wheel. We want the wheel to squash when it hits the ground and to return to its normal state at the highest point of the jump. We open this scale property and deactivate the option, Constrain Proportions, by clicking on this symbol here. We set the scale to 105 for the x-axis and 95 for the y-axis to slightly squash the wheel. Place in frame 2 in the timeline, coinciding with the moments when the body is closest to the ground and create a keyframe. We advance four frames and set the values to their natural state. That is 100 and 100. When we squash or stretch an object it must always maintain the same mass as the objects in its natural state. In this case, if we add the scale in both keyframes, the total value is 200. We select the keyframes, right-click and smooth the movement with Easy Ease or pressing F9. We copy the expression loopOut pingpong from one of the layers that have its bright. We select the scale and paste it. Let's preview to see that everything works okay. I like it. Now, we will create the illusion that the wheel is rotating by creating a rotation line inside the wheel. It is essential to make sure that there is no selected layer as we will create the mask, which is not what we want to do. Let's go to Edit, Deselect All. Next, hold down the rectangle tool so that the rest of the options appear. Then we select the ellipse tool. To create a perfect circle, we must hold down the shift key while dragging. We place the circle in the center of the wheel using the selection tool. We gave our stroke a bigness of six pixels and we can color it red, for example. To animate the rotation we go to the new shape layer configuration options and select the option, add Trim Paths. We set [inaudible] to 25 percent and create an expression in the offset property. We're going to write the following expression that you've seen on the screen. By applying this expression the wheel will rotate once and a half for a second. A complete turn is 360 degrees. If we multiply it by 1.5, we obtain 540. To finish, we're going to link the shape layer with the wheel layer. Let's preview. Here we have our dear friend walking happily through the city. As you can see, we can take advantage of our animations for more than one use. In the next lesson, we will see how to change our second project looks simply.
9. Colors: Now, let's see how to change the color of our second animation. It is very simple. The first thing we are going to do is put all the layers, except the landscape and the background, in a new composition to color our puppy more easily. First, we select the layers. Right-click and select "Pre-compose". We give it a name and "Accept". Now, we have all the puppy's layers separated in one composition. To change the color, we are going to apply an effect. With the composition selected, we select "Effect", "Color Correction", "Hue/Saturation". From the Effect Control panel, we modify the color by manipulating Master Hue. If you can't see this panel, you have to go to Window and select "Effect Controls". We select "Effect" and copy it. Next, we select the landscape and background layers, and paste the Effect. Again, we modify the value of Master Hue to our liking, and that's it. We already have our two projects ready to export.
10. Render: Now that we have our projects ready, we can export them. Keep in mind that the composition that we currently have open will be exported. For this, we go to Composition and select Add to Adobe Media Encoder. Media Encoder helps post exported projects more efficiently. First, we choose a codec. In this case, we will use H264. It exports the video in MP4, the most used format for the web. Regarding the ALT for the resolution, we can choose the Match Source, high or medium bitrate option to avoid mistakes and export it in the same size we have worked on the project. Finally, we choose the location where we will export the video and give the file a name. To finish, click on the play button here. With this, everything will be ready. Once the process has finished, you can open your video and start sharing it on your social networks.
11. Project & Final Thoughts: Yes, you made it. You have reached the end of this course. Congratulations. Now, it's your turn. Applying everything you have learned, I invite you to animate your favorite animal. I am looking forward to see your work, so please upload them to the course project gallery. I invite you to visit my profile, where you can take a look at all my animation courses. Use references to get inspiration, and don't forget to practice, as is the only way to improve. But this is just the beginning guys. I will be launching much character animation courses soon. Don't forget to follow me for more. If you enjoy the course, please leave me a review. I will be very, very grateful. I hope to see you again in future courses. Thank you.
 Carminys Guzmán, Motion grapher