Transcripts
1. Intro: Hi and welcome. Evident by treaties that comfortably get a cup of coffee or tea. And we're going to start by diving into the Art Nouveau movement. So when we say Art Nouveau, we want to know what is the origin minus c inspiration that influenced the movement? What are the characteristic that makes it so distinguishable? And we want to know, so where is it found? Where can we say this was part of Art Nouveau? And last but not least, we're going to see who were the important artists that impacted undoubtedly this period. And now you might think, well, I just want to draw, well, this class is Fighter here because I wanted to share with you the creative process of designing collection that is inspired by research subject, where each element has a reason of being in the collection and how to get inspired by those research should not go with something that becomes cliche. And you really take key elements that are going to bring back all that history into your own collections. So without any further ado, let's start.
2. Art Nouveau - The Origine: Art Nouveau, which means new art in English, this movement existed between the 1890, 1910. Let's start by seeing the origin of the art nouveau movement. The movement was provoked by a few things such as, so there was this thing happening during that period, and it was the industrial world that was making everything grows so fast. I was new technology. The shape of the world was changing. A lot of artists were thinking that I was making the world looking ugly. It was also clearly inspired by the opening of the trade with Japan, which brought a largely felt fascination for everything Japanese. It was even felt in fashion. In a world where art became that standardized activity brought with the schools, there were some believed that art was actually supposed to be, quote, the product of the emotion growing from the inner spirit of the artists.
3. Art Nouveau - Inspirations: And now we get to see what were the inspiration of the art nouveau movement. The half national for nature and West. Twisting and organic shapes can even see it in the scientific drawings of deep-sea creatures and plants that were strong inspiration. And then there was the hand craftsmanship and Aesthetic Movement. The post impressionist, which was the repercussion of the Impressionist movement. And obviously the Japanese art, such as the woodblock print, which was inspiring for hits simplicity has two-dimensional image and muted cars in line.
4. Art Nouveau - Characteristics: When we said a characteristic, we're going to think about the creating every surface available. Muted colors such as dark yellowish, green, clove, pink, lavender blue, flood dimensions, swirling fluid lines. Nature-inspired mode, safe and image. As symmetrical flow and femininity in centrality.
5. AN - Where is it found: But where was it found? So it was everywhere. It was in the decorative art, architecture, stained glass and endless paintings and graphics, textile, jewelry, furniture, and inter designed and beyond. But it didn't stop there. And vote was also used a lot in graphic art, and not just during this period, even after. It was used in merchandise poster, book covers, in magazine, an announcement for a theatrical performance. The art inspired music posters, the movement was huge. An important quote, I think by John Ruskin. Object could be both useful and beautiful. So this idea reflects pretty well as far as Art Nouveau and how they were putting it everywhere and making everything beautiful.
6. AN - Artists: Some of the influential artists of this movement that are worth mentioning. And I'm sorry, in advance, if I messed up a little bit, the names we have NRI Toulouse Lautrec for the illustration and the equation lettering. Louis Comfort Tiffany for the design in glass. Gustav Klimt and Austrian painter. And then we have the artists that we're going to mainly get inspired in this project, which is Alphonse motor, well-known for his illustration and painting. Finally, we have Victor or TA in architecture, and all those artists are present in the e-book that I linked and feel free to go check it out. And it has so much information and it's free. And now, if I may recommend you to go look on Pinterest on Google for Alphonse mucho, for some reference picture because that's the guy we're going to get inspired by for this project. And suddenly I cannot put pictures of his art in the video because they are all copyrighted since it's an artist, but we are still going to get inspired by him. Therefore, yeah, I would strongly recommend tickle find a few of his images that are very inspiring. One of my favorite one is this art about the seasons. Because you have all the season represented as feminine woman's and you have all of the cars and the cars. And that's kind of the inspiration we're going to go from for the creation of this project.
7. Material - Line Drawing Flowers: Now we're going to see the construction of the flowers with an Art Nouveau twist. So to start beginning need to have a piece of paper and an erasable pencils. So an HB pencil and an eraser. And also don't forget that with this class you get access to my cheat sheets that give you some ideas of some procedure to cut PY, how to create those flowers. So they're really practical and it's just a little reminder so you can print them or just look at them from your computer. And they are downloadable in the resources.
8. Learn to draw leafs - Line drawing Basics: Hi everyone. So we are going to start by doing some leaves to start slowly and get something easy, start. And then the class is going to go from the simpler to the harder one. They are all very friendly beginner, and also the cheat sheet. So if you have problems, you can just print it and put it onto your piece of paper to have good outlines to go from end. That makes it really easy, I think. So. Yeah, I hope you'll enjoy and we'll start now. We're starting by creating a long line with a slight curve from it. Make another one grow and another one again, slightly higher. From the first branch, we put a pen on the line and we create a balloon sorts of shape inside of our leaf, we will add the veins, which is kinda the same thing that we just did for the branch, sounds like a little fractal. We now want to repeat the same thing we just did for each other tip of the branches that we created previously. We can also add another one here if you wanted to look a little bit more field. And yeah, you can be totally creative with this. That's just a very easy way to create a flat type of branches reliefs. If this is too easy for you, you can skip to the next one and the video's gonna continue a little bit just to show it a little bit more in details for anybody who wants to see it. So the center of the branch is where I start all my points so like to leave. I start from there and I finished on the other side. And for the veins of the leaf, I'm going to start my pen from that center point and I go outward. I don't do them side-by-side each veins because I just think it looks more organic when you have them at different levels. It's like this picture of the wheel of a real leaf. You can literally see they're all at different levels. And that's what makes it look real. This was pretty simple. It was just too where miced up in. Now we're gonna go see the next one.
9. Lear to draw a pointy leaf - Line drawing: We start by a simple curved line. From it, we start another curve with a kind of an S shape. And from the same point that we started this line, we will start another one with again a curved shape. And we're going to drain the extremities. Now we're going to separate the sidelines by four sections. In the first section, we can leave it as it is. The second one is going to need to have a little spike. The third one, we're going to do again the same type of spikes, but we're going to do it a little bit taller. And then for the fourth section we want to have a spike again, but about the same size as the one in the section two. Afterwards, we will want to have the exact same thing on the other side. So we're replicating the exact same steps that we just did. I then outlined the shape that I just did not have the circle, the base circle that I had an all that and I duplicated it on the side. So basically if we were to do that on piece of paper, you just if you're doing this process and you want to prepare before you're doing it on your actual illustration, you can just draw it on the side. And then you put a piece of paper on it and you just trace over the lines you just did. We are then continuing by tracing the veins that are starting from the center line all the way to the very end of our new points. And this is going to create like the little vessels that we can see in the leaves. Don't forget as long as she can always access those videos. If you need some reference while you're drawing your own illustrations, or if you prefer. I also allow the downloads of all templates to give you a reminder.
10. Learn to draw a leaning leaf - Line drawing: Hey guys, for dishonor gonna do a very simple type of leaves. So it's going to be leaning leave. We can see it often in that type of illustration or whenever is he actually illustration of nature's. Because a leaf is rarely going to be straight. Like they're not all going to be straight. They're going to be cleaning, they're going to be folding on each other. So this is a quick and easy way to achieve this result. We start with a line that looks like a hook from a Christmas ornament. To achieve the leaning visual for this leaf, we're going to need two faces on the inside of the curve will start a liner that will train a DND. Forming a point will now repeat this step on the other side, must be just did represent the front of the leaf. So it's the part that's usually going to be exposed by the sun. So if we were to apply color to this, we would want this part to be lighter than the other part. And this part in question is the inside part. This time we simply go parallel to our main line and we connect it to the top piece. This new section should be as large as the one on top. In the center. We will again add a parallel line that will separate this new space. And we now have a general shape of a leaf. To make you more leaf-like, we're going to have to repeat this step. But this time we're going to add waves into the lines. Here's an example. And this is an example of why they would roughly look like if you wanted to add a flower to this, obviously you would add all the details. This is just a rough example. Also, if you're in search of my inspiration for flowers are planned composition, I highly recommend to go checkout the work of William Morris.
11. Creating plates 1 - Strawberries: Now again start the plates. So I created a few models that you can either get inspired from or you can straight up, copy down. There's no problem. So yeah, we have those base shapes, so I'm showing you how I'm doing them here fast. So we're just creating lines that are doing kind of an ornament little illustration. So that's what we could use, for example, in corners of the illustrations or anywhere where we want to add plant and we want them to have that type of ornamental shape where they could come from, which would look a little bit, which would look a lot like what you can see in architecture for Art Nouveau. So that's what we're getting inspired from some showing you what I'm doing here. So I'm just creating lines that are curved in all this. And after that, we gonna do two examples that show how you can use them. So we're going to do a strawberry one and also the Mayflower detecting that I'm using to create those. And it just really helps you being creative. As always, I'm starting from a square that I'm drawing, just a simple square and then I'm doing a centered line. And from there on each side, I create lines that are symmetric, going interaction, curving dam. And you can do this as practice as well to get yourself inspired, get more ideas. It's a very good tool. For this first example, I want you to get inspired by the strawberry plant. So I took a few pictures of the plan that I had at home because I thought it was really pretty and it has those three little strawberries are start of strawberries that are getting those three arches here. And I think that looks really pretty. So we can get inspired by this. And also two leaves that are always buy. And they have all these little pointy parts, although I don't believe so. This is what we're going to get inspired for our first plate. We are starting the same way that we said previously. So we're starting with a square and then we're having a center line, which we'll call the a line. And then on each side so that each corners on top, we want to have those first ornamental line going in that direction. So we'll call it the ln b. And at the bottom, as you can see, I'm giving a little bit of space. I don't want them to touch the center line. So the ln b, we're going to do a smaller version, a little bit lower the line. See from that new line through you want to have two other lines that are going about that are starting at the center of that line. And you won't have to injections that are two other lines that are curved from there going outside. And one of them is going to go pointing at the bottom corner, like so. After this, we're going to start getting to the declarations, which is adding the leaves on each end of those lines. So we're adding, obviously, since our Tamar thick is the strawberries, we're going to add the strawberry type of leaves. And now from the center line. So the line a, we want to add, other than dense little lines that we're doing again does curvy effect. And we're going to go about a little bit higher than the center to give those little artifact with the law strawberries. So the stories, I didn't put them in the most often seen shape. I wanted to have more of a rounded factors to give a little bit more of a stylized touch to it. Style was compensated personal choice. You do what you want if you want to go with something that's more like the classic whack. You have the sides that are a little bit larger and then it goes more into a point. You can do that as well. It's going to look just as nice. So yeah, that's the first step. And after that we're going to go into the coloring. So you go again, if you want to stick with the Art Nouveau aesthetic, he gonna go with the same color, so an olive green, and then he can go with the powdery type of pink. So that's why I kinda went for, so here I'm showing you a demonstration that I did with procreate the app just to go faster and to show you the effect. But yes, so I think this gives a pretty good look in the goal of this exercise was to show you that from base lines, like the base plates that I gave you, you can create pretty much anything you want. So if you choose a different type of plenty kin just incorporated to those lines and it's gonna give you those type of design that you can put in corners of phages or even in bottom of your illustration. So it's really useful and it helps you create faster.
12. Creating plates 2 - Flowers of May: To start, we're going to observe this little flower, which is a very spring type of flower because it occurs during the month of May. So when we're looking at it, they really looks like a little bell. So that's what we're gonna do. We're gonna start by doing half a circle. So I start in a square just to give you the dimension. So we start at bought at this space and gonna do half a circle in the upper part. And then I'm going to add two little triangles at the bottom. Is that simple? So we're just adding like a little skirts Elizabeth, for triangles. Thus, when we want to do an oversimplified version of this low flower without shadow, without anything. Thus, what it can look like and by doing it that way, you can really have a two-dimensional type of drawings and then you can add a car and play with all that. But the base is there. For this one, I start again with a square. And we're going to have the center line like usual. But for this one, I wanted to go a little bit off of what I just showed you and show you how you can still create ornamental figures in this space and with the same type of line. And just by creating a center point, you get to see and have a good idea of what it looks like and what are the proportions and everything. So I think it's a very good technique, as I said previously, to be creative and to still keep a symmetrical, but in this case, a symmetrical look without making it look cluttered. I think this twisty line really gives the feeling of Art Nouveau because of the upper line then going down a little bit I can S, which is a characteristic of a lot of ornaments that are used in Art Nouveau architecture and decorations. So that's what I inspired myself from this one. And then for each lines which are supposed to incorporate the flowers are added. Again, those low crochets that are going down very curvy. And on each of them I'm going to, I'm going to add the little flowers and I want them to be spaced very equally like this. So I did one on one side and the other one and going a little bit down to equal the features. And at the end, we're going to add a very long one in the center.
13. Learn to draw flowers - line drawing: The flower that I wanted to show you is the iris flower. Because it's kind of difficult and there's a lot of details to do. So here's an oversimplification and we're going to start this video by a fast overview of it. And then I'm going to show you step-by-step in a slower paced. Let's start by creating a round. In the bottom center of that round, we want to start a drop life type of shape. From behind the drop, we take most of the space in the circle for our bipedal, leaving enough space on the side. So agency a crescent moon shape. Now for the side petals, we want to say as much as possible inside of the circle then station that we will break it up slightly. So it's not so much a perfect round shape. We are basically taking 1 third of the space on each side for those petals. Starting point at the bottom and into a larger mass at the top. We're adding some waves here and there. After the first part being completed, we will add a new slightly smaller circle under the previous work. Continuing our next petal inside of the circle. We go now for balloon shape. In we want those lines to be a mix of bumpy and wavy. To help ourselves with the next step, we will draw a very light pressure diamond shape starting from the bottom and around 90 degrees angles on the lines. So we want it at the bottom and also on the sides containing the next step inside of the boundaries that we just created with the diamond shape. We're going to go on each side and create sites battles, the golden look like trip shapes that are deformed like so. To finalize the appearance of a petal, we're going to need some small Indian veins that are going through tried to make them not touch each other. And you want to start at the center, at the center of the flower. We want them to be closer to each other and then go exponentially. So this was it for the tricks to create this far. So if you need a reminder, you can't download the dose, THE it's created, and you can print them and have them at your side if you want to have a physical reminder. Otherwise, there are always there on the platform for you or you can re-watch the video at any time. And I'll see you in the next lesson.
14. Drawing trees art nouveau style - Line drawing: This technique, I find it fun because it's so different from most of the way that we usually interpret trees and drawings. Obviously, you might have noticed it this way strong, inspired from the artist of reference on this project of transmitter. Also wanted to let you know before we start that if you wanted to do it on Procreate with iPad, this is a very easy method to do with this tool. Otherwise, we are going to do it the good old way. So there's two ways that I would want to suggest to you here. The first one it would be to use a picture and to trace over it. And this way you would have a very proper documentation and shapes for the trees. So it's a good way if you don't feel inspired one day in you so long to get the filling of the trees and all the visual and the complexity of the interconnected branches. To do it, you can place a picture and trace over it with a light piece of paper. And it allows you as well to erase anything, create a nice shape and interests over it after that with 59 markers to adjust and make sure that they are very dark lines. And after that, it would be easy to do the same step again, but over your illustration. So just like the hair in this style, what you want is that every branches, every piece of wax, you, every chunk of leaves that are touching each other. You want them to be all connected. So it's the same thing as the hair. You don't want the line that are cutting the circulation of this space. It has to be all open and just contours. I'm going to show it with the app for this example just to show what I'm doing. Because if I put the picture under a piece of paper, you won't see exactly what I'm doing. So that's why I wanted you to be able to see the picture and how I'm tracing over it. But it's the same principle that you would do if you wanted to do it under a piece of paper, you would trace the same way that I'm doing it on the picture now. And the final option that I wanted to offer to you, it would be pretty much the same thing that we did for the hair. So you could trace and have a lot of freedom with a marker and you create shape, you create angles and twisting lines to create the effect of trees. And a would give pretty much the same feeling and it would not look like anything else because it would be out of your imagination. So you can do it that way and then trace over it with lime. So he did the same concept that retracing overall picture. But it's from your own drawing. And as we know, everything gets better with practice. So don't feel bad if the first one you do doesn't look good, you know, just try another one and try different picture. Sometimes it can be only the picture that is too difficult or it's hard to see, are the lines that just a little bit weird the way they're connecting into mitosis, just change the picture, start over. And I'm telling you, if you do it multiple times, you get identical result that you really like.
15. Explanation of the project: Finally, we get to start the final project. So for this specific class, I wanted to give you one specific example. So I wanted us to do one model and then create around the universe that we wanted to illustrate in the inspiration that we got for the Carnot. So in this example, obviously it's about Art Nouveau. So you would have inspired yourself for more, for St, probably a forest or plant type of inspiration for the broad embroidery for the garment or something like that. In the specific circumstance where you would want to go in this universe for your creations. That's where you would want to incorporate a nice bigram, a nice illustration. Specific items, specific ideas from this period of time, from this archer movement and all that. That's where all the research were useful for. And then when you get to do your final project, you're not losing this opportunity to make your art even more powerful and to be able to transmit this inspiration to the people that are going to get to the people you're going to want to pitch your idea to either bits for a teacher or at your work. This can be a very powerful tool. This is what we're gonna do for this project. The main idea, it's going to be to create this window frame where you're going to have your illustration and around it, you're going to incorporate some elements from nature that you're going to have drawn with me. Either you can do for us, it can be planned so you can go on your own and get inspired by yourself and give that same twins that we got inspired by. And you can use the plates to create the nice arc around the frame. And you can do something that is very architectural, can get really inspired and do a beautiful project. And even if it's just for fun, this is a very good exercise to just practice and get more creative over time. Because it's just a way of thinking that she'll learn by doing this type of project. So without any further ado, we're going to start and I'm going to show you what I felt and what I created with this particular project and challenge.
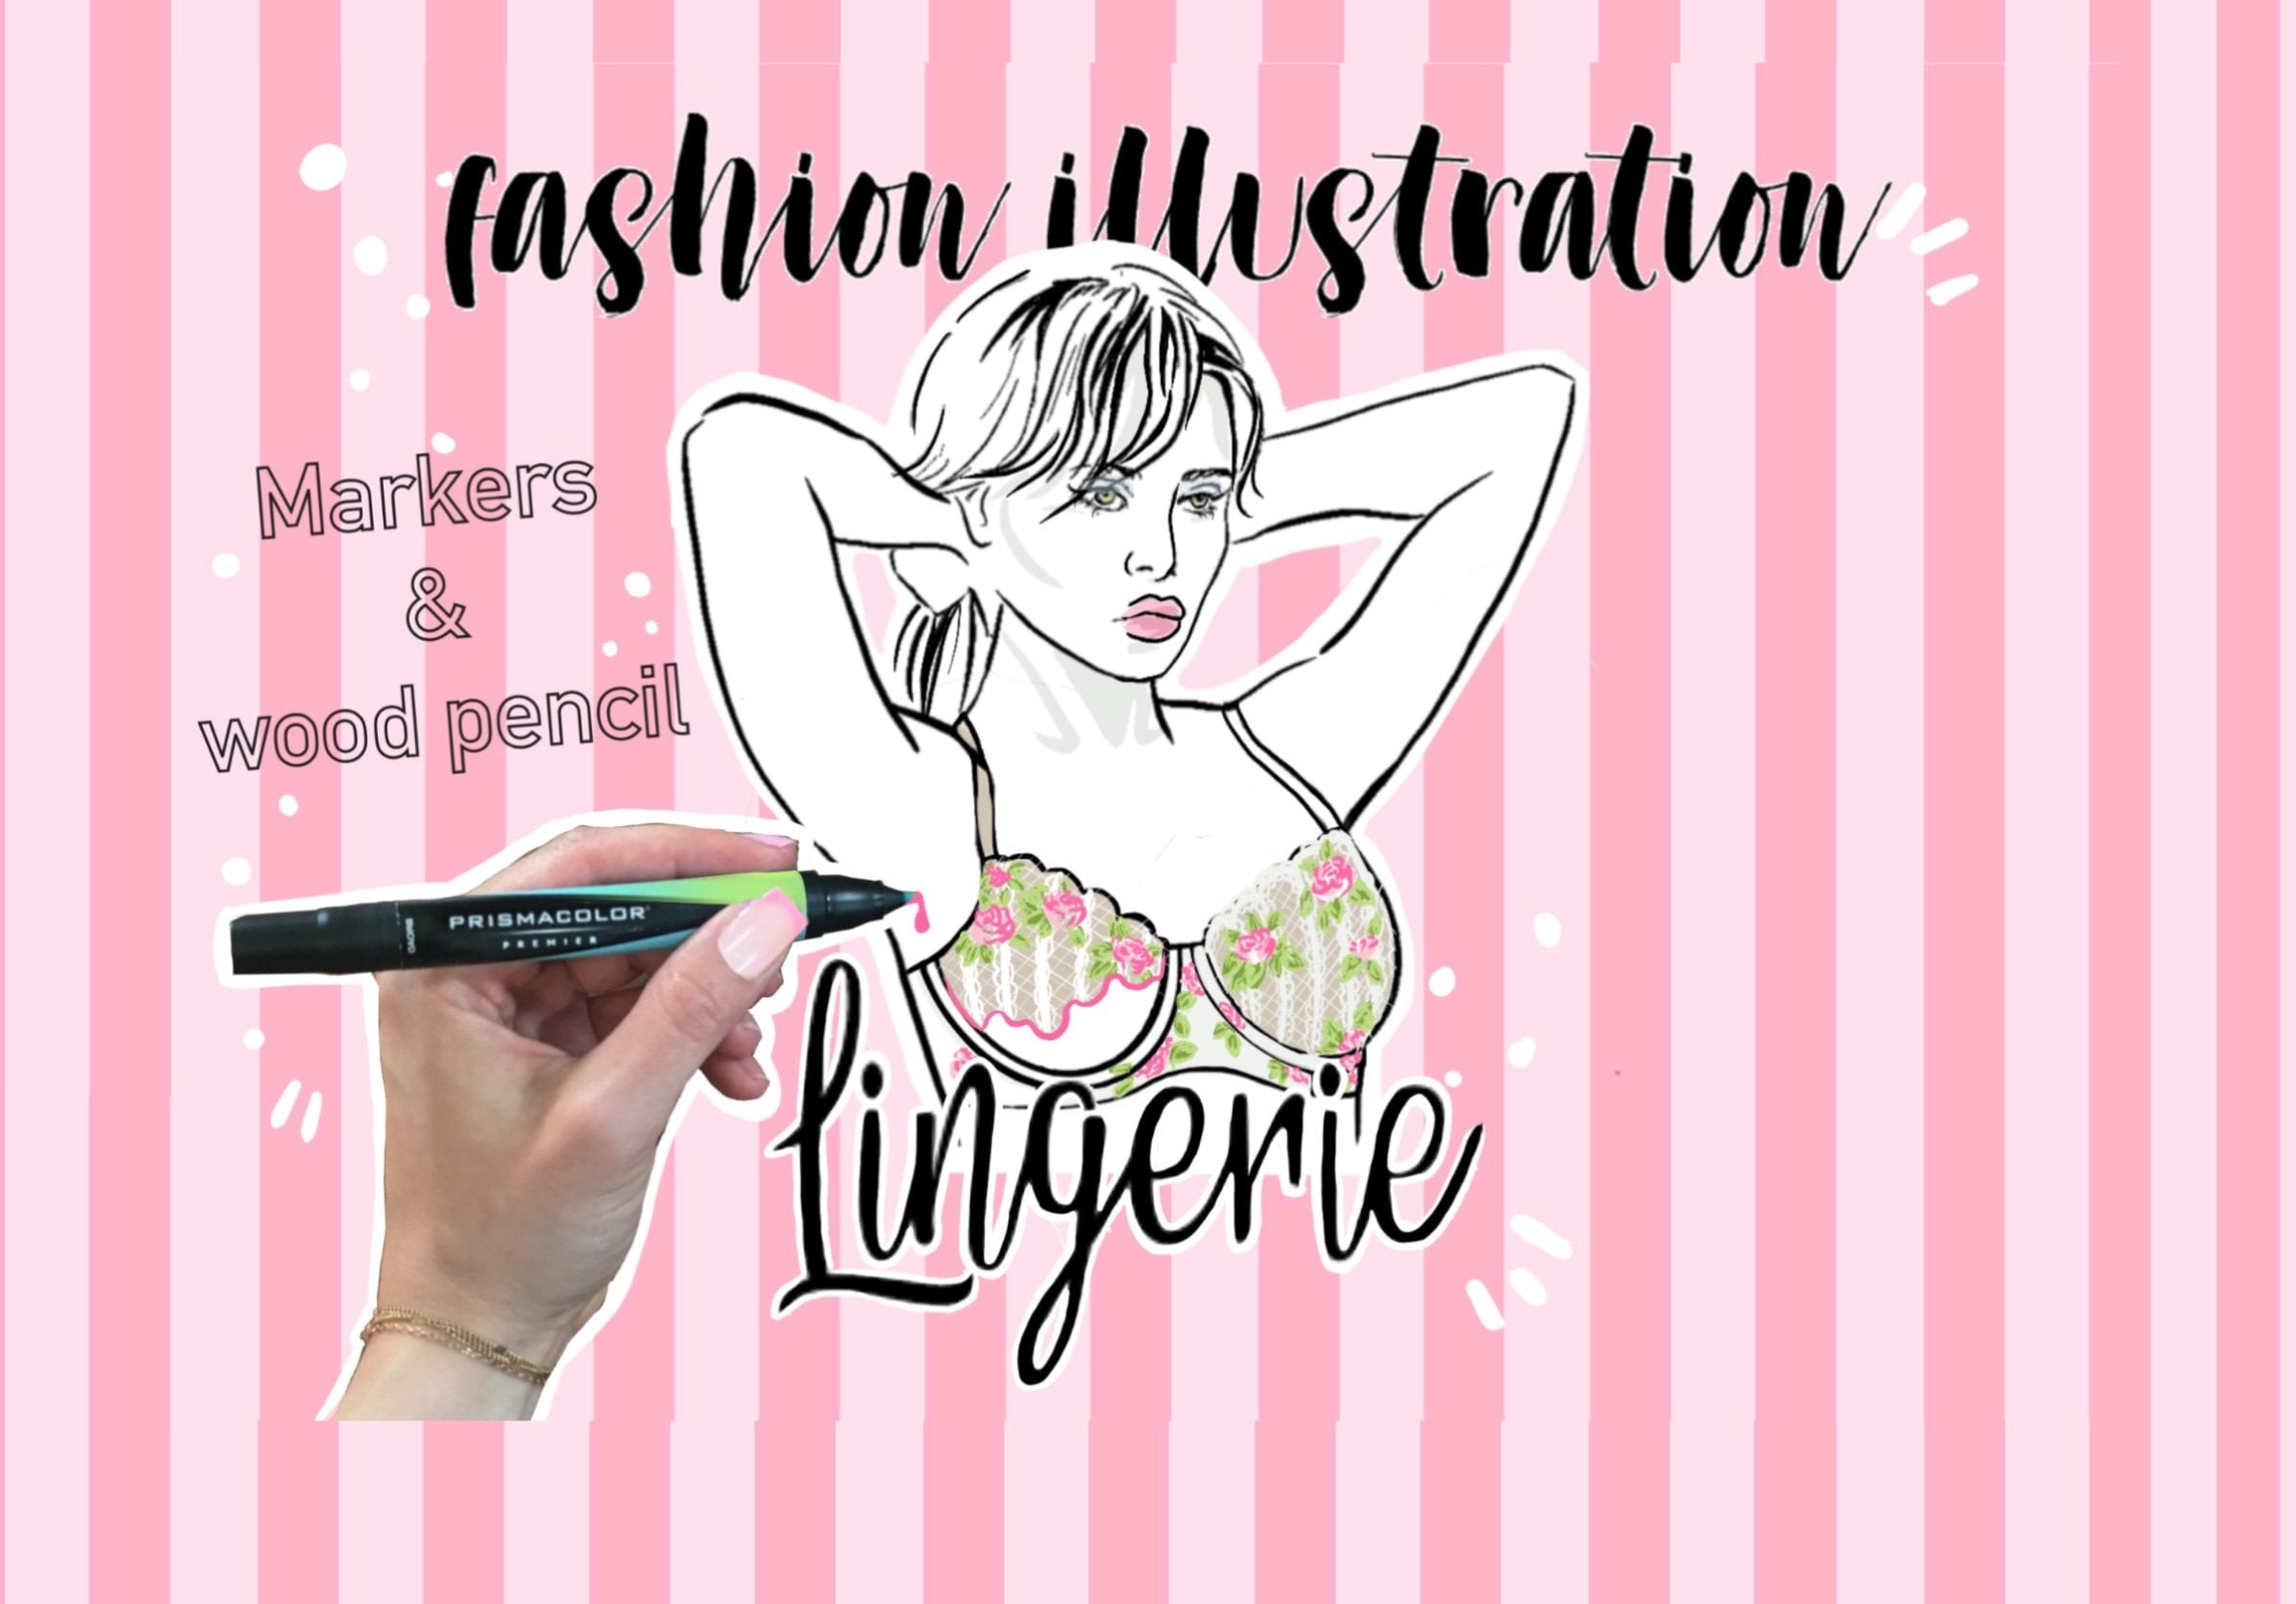
16. Peacock- In clothing, the relation with the design and inspiration -peacock: So here I just wanted to give em nunca Claritas. I really just wanted to give an easy idea of what we could do, an easy design. So just imagining a lace. But since I wanted to go the peacock inspiration, I knew that I wanted to have the eye job here. So usually does a like a little hole is that you can add in Blender EPs and be really cute three, pretty easy to do. I absolutely wanted to have that because it made me think of the feather without going too intense with the actual feather that has a very specific look, but you still reminded of the shape. So fertile look no hard Peacock who look when you have the peacock? I don't have necessarily the whole thing. But what we could do is to just get inspired by the Fellowship, for example. So if I was going for that specific example, I could have just a basic shape and you only need do that type of thing. Just try multiple things. Don't go necessarily with your first design to sketch a bunch of design and then boffin it and just get more and more close to a bunch of different variation of what you think you like. And then choose the one that seemed that it works the best like. Because usually you get, I think your first one looks really, really good. And at the end, if you had done five more and the fifth one was just completely amazing. So it's always worth trying to see if it was. The first one must have been perfect. But you might find out that your, your third version or fois version was absolutely amazing. And just for specification, if I was doing something that is really symmetrical like this, I would probably just do one side. If I was actually choosing this, I would do one side and then I would mirror it digitally to get a perfect symmetry. So this is just to see what it would look like. So right now I'm playing with luxury. So this would probably be an embroidery if I was doing this. If you don't know what an embroidery is, I have a class on Nigeria where I explain all the different type of voice and all that good stuff. So, yeah, so that would be the inspiration of peacock die. I think I would take just fast example. I can show an idea of what is an embroidery. So this is an example of laced with embroidery. We have a chord that screening design and you have usually a mesh on what this is, some onto. So this is an example of what an embroidery is. You could just add more details. Good. Go with this and then we could add line, just have it completely filled with other stuff around. Obviously doesn't have to be justice. So this is like a very, very fast little sketch obviously. But it's just to play around. And if you have an idea, it's not going to leave for the actual shape of the bird, you know, with the bird, you can if you want, you know. So here as you can see, I put a few moments just to show you where exactly I took which piece. So yeah, here you can see obviously the two diamond shape into each other. It's from this piece better inside of each other, like this. And I like the fact that the top of the head made me think of a triangle. Scientists double-checked to make the shape of the actual feather. And then for the part that you can see in the drawing that we have all the pieces outside. It's two reminders, one reminder of the feather itself. Or you can sit as all distance between each of the little feathers in the big feather. So we have this remainder here, but also the general shape of the bird, which brings us with the center point, which has two main part and then all the fillers going outward like this. So this is pretty much where I took the idea from n dice. So many other ways you can get inspired by this just here it just, there's so much details. This part of details in this bird. So there's multiple ways how you could get inspired by it. So it's really interesting. So I just wanted to show you how I thought about it and how I got to think about this design. We fast and just take an idea and sketch something without thinking too much about it and just see shapes into complex items. This is a good way to be creative and to create nice designs. What you could do after that is place it over, all over your design and see how it looks. When everything is together. See how things are merging. If it's something you would like. So here as you can see, I'm not getting the whole thing. I just wanted to show like that he can start from a concept, derived an idea from it, and then you can apply it to one of your design. So here would be luxury. And as I said, with embroidery are brought back while I was doing it, I thought that I could bring back the whole keys here, a whole key. I think that's the right name of it. And I could apply it also along the embroidery. I know some English embroidery have some time that type of little effect at De Anza, it's usually like a little cotton in something. And you're going to have embroidery that crystal hole on the edges of the piece. And it's really, really nice thoughts kind of that idea either applied here in our piece. So yeah, I didn't add Karzai told your edges show designer, I used a normal marker or gray marker like that just to sketch out the Hydra, the idea of real fast what design of the embroidery would look like. So I know this brand, some of you have told me that describe this brand was kind of hard to find. So if you're not able to find this one and you want to practice those little sketch. You can always take a marker. This exact car is really good and it's pretty much the same type of grace and this one's cool. Gray, number 3. And really good works the same way as bail. I love it, works really, really well. And if this is the type of class interests you to do lend Jerry, I also have the class on that where I show how to draw injury and all this. It's really funny, can do a lot of things. So, yeah, hope you enjoyed this little extra exercise. I was not planning to adding this class, but thought peacock was so iconic of this period, I had to do a little something about it. So I hope you enjoyed. And if you get inspired by it and you want to create your own design, please don't forget to share with me. And yeah, I hope you enjoyed the class and I'll see you in the next one.
17. AN Hair: The hair of very important part of this case, they have such a distinctive look. So to start, I'm giving the example with a picture that you're going to be able to download to the same practice. So we already have a lot to work with with this because you can see that as overly natural curls that are getting created at the end. So it's going to be easy to imagine that this into an art nouveau style. So I'm going to show you the process that I'm doing to transform this into an art nouveau look to start. And we're going to have the image on the side of the drawing that I'm going to do on the outside so you can follow me along the way if you want a general look at it first and then try to do the same thing. However, you feel more comfortable. So what I'm doing is I'm tracing roughly where I think it looks like, I mean, saturating and a little bit of curves to make them look a little bit more illustration like. So. Yeah, we're just going to fold the general shape of the head and then going with an accentuation for the above on, off their hair to show the volume and to add more curve. So at this point we're not adding too much detail are going to into the Art Nouveau salvage just really having the general shape to work with. The technique that I'm using is I'm basically tracing everything with the color. So filling the whole thing with the color and on the edge, that's where I'm going to trace. So I'm not going doing a lot of little lines. I'm doing one big line and it's like if I was filling the whole parts of air. So I want to have big blind sight theories that are kind of rough and curvy like the leaves of a plant. We really want to have those nice curves. And I want to go off of the center where all the hair are. So you can see that the center where all the mass of air, It's supposed to be at their desk, no hole. So we're going to create all of the curves and a hole on the sides. So we're going to start like this, creating nice holes and nice lines like this. I curvy and we twist them at the end. With that, we're going to have a very nice space and don't worry about it if it doesn't look exactly like you want to practice before doing it on your main illustration. To see how it goes. Practice to see what looks good, what does it look good? Because the first trial might not be exactly what you want. So do a couple of try on the side on different page. And with that you can really see what you like. And if you really like one shape that she did, he can even go and put it under your sheet of paper and retrace it on your real model. Once we're done with this step, we're going to get the contouring, which is really iconic of the Alphonse moonshot type of illustration. We can see at this point, I already looks good. You already have a good idea that this looks like Art Nouveau by treaty, by adding that nice black edge around everything, it's finishing the whole illustration. And that's kind of the same thing that we did for the tree section. So it's the same principle, but we're doing it with her. Whenever the hair are crisscrossing each other, we're not passing over. We're just going around the empty parts that we did. That's why to start by the full car is so practical because you can really see where are the holes that are going to be created. In this way, it's going to be much easier to do the black bytes. Here. We really want to follow all the lines so we don't want to go in the core portion. We really want to surround it. So I'm going just outside of the limit of colors to create dust. That nice edge with the black liner. And yeah, don't forget, don't go in the black whenever we have small portion, really be careful about it and just surround the little colorful part. Now that we're done with the hair, we going to go to the next lecture. And don't forget if you're proud of something that you've done, I would love to see it and you can share it with the class. Let's start with the next step.
18. How to design an frame: Suggest starting with a beautiful art interval frames. Wherever it suggests you and doing goal to approach this, to breed creativity is by photo bashing. Through bashing is basically like a collage of different pictures to create a new one. So my easy go to is to find architecture reference, musical instrument, vase of that specific time and period. And you break it down to one simple line, one simple curve at a time, and you mix them with each other. You scale them up, scale them down, and then you just rotate them a little bit. You place them with shutter is basically like a collage. And you just play and play over with it again and again. And it's all about iteration. If one of the look, looks bad, just throw it away and try a new one. That's what's great about this technique, is you don't have to have it perfect the first time and it's really fast to just restart over. So it's just easy to create a lot of different models and just do a bunch of different styles and looks without taking it forever. So it's just really, really fast. So that's what's great and that's why it's easy to be creative with admitted as well. Once we have a base that we find interesting enough, we will pass over it and changed it again. The goal at this stage is to play with the curves, to twist, and to really make it your own. And then we can start adding curves of nature in it, or flowers or just more decoration part. It can be reversed as well. You can start strictly from the curves of nature inspires off from the tree shapes are one of the plants that you have around the house that you absolutely love the way the curves are curving into each other and disrupting around each other. You can do it that way. This is just as good. It's different type of collage, different type of inspiration. Both of them will give you a really unique results. And that's what we want to get to. It's to get something that looks like art nouveau and got inspired. And we can see that is true connection with that art movement.
19. Final project: Step by step: Hey guys, Now we're at the final project. This is exciting, so I'm going to present it to you step-by-step, so it's going to be easy to follow. So the next lecture, they're going to be really about flowing along the where si Han is, how I did it and I give explanations along the way. So you can either start your project at the same time as me and we can go in a creative mood together, or you can watch it and then do your own. So you do as you prefer. And without any further ado, we're going to start with the first step. The first thing is to find your theme. So you want to find what is the element of nature that is going to be your inspiration. So few example could be water lilies, the season of autumn, corals, clods and so on. This so many inspiration to is fine, anything that visually attracts you in nature, designing clothes with a theme in mind. The first thing would be to sketch a few ideas of coding that will connect with the elements of nature that you chose. Find a way to integrate it like we did in the previous lecture with the peacock example, usually in college when you want to do that type of exercise and they ask you to create a collection. They're going to ask you to have at least 12 models. So 12 design dots you think could be final. I would invite you to do the same exercise because it gives you a variety of choice. And then you can choose your favorite one. And also to have a certain number that you're aiming for will help you to be more creative and think about more variation on the type of clothing you want to present for a collection. So they have to kind of work together in some ways. So it trains your brain to think in a different way. So very good exercise to do. Here are a few ways that you can do this type of recall. You can do it with Prince curves, shapes, type of fabric, the thickness or the texture, the colors that you choose, and so on. Don't be afraid to try and experiment. That's why it's called sketch. Once you have a piece that you like, you can continue to the next step for the frame he just created in relation of the elements of nature that you chose specifically for this project. Or you can use a frame that we created in the previous lecture. The steps are the same, so you already know how to do. Let your creativity go further. Silhouette, final posture from a magazine picture are used in nine head figured all that I'm providing to create the main illustration. My recommendation to you is to also find other source of inspiration for the body posture. You can also look at paintings with feminine figures, like in the Renaissance painting, for a romantic twist. Now that we have the body posture, we can add the facial expression that we want to give to our illustration. Now we're going to position this silhouette in the frame and plan the overall look that will translate this story. So the frame, the outfit, the silhouette, and the elements of nature. You can do a fast sketch of your ideas on the side to evaluate the different versions and to play with the composition. Remember that we rarely find our best creation with our first try for the hair portion, we're going to sketch them like we learned in the previous lecture. Now that everything is placed and also the hair. You want to find out how you want to bring visually all the elements of nature and his story to life in the background, to create a beautiful scene. Now you want to turn your sketch into a more finished version. I recommend putting the sketch under a new piece of paper. You can do it under light as well, or you can just have a paper that you can see through to be able to retrace it with more fine and delicate lines. For the markers, choose a color of marker that will fit the narrative of the story you create it. And the elements of nature. When we get to the chlorine portion, the colors are quite separated in this art style that we're going for. So sit like a calling drawing, the one with the little numbers. Don't want the course to merge. We wanted separation and we're going to amplify that separation after with the final end marker, which is the next step. And now friends were doing with the fine line markers. For the very small details like the face, I recommend a micron 000 five. The size is 0.2 millimeters. So this one works really well because you can do very tiny details and you can have a lot of control with it. So I particularly love those months for what concerns the rest of the illustration. With a fine line marker. I would recommend the high-tech 0.5 because it's a little bit bigger. And the point is a little bit curves are Earth iPhone that it worked extremely well to do that type of drawing. So that's all for the final and markers. Now we're going to outline everything and group elements by elements with the style that we learned. Don't forget that the hair have a clear separation with the rest of the body.
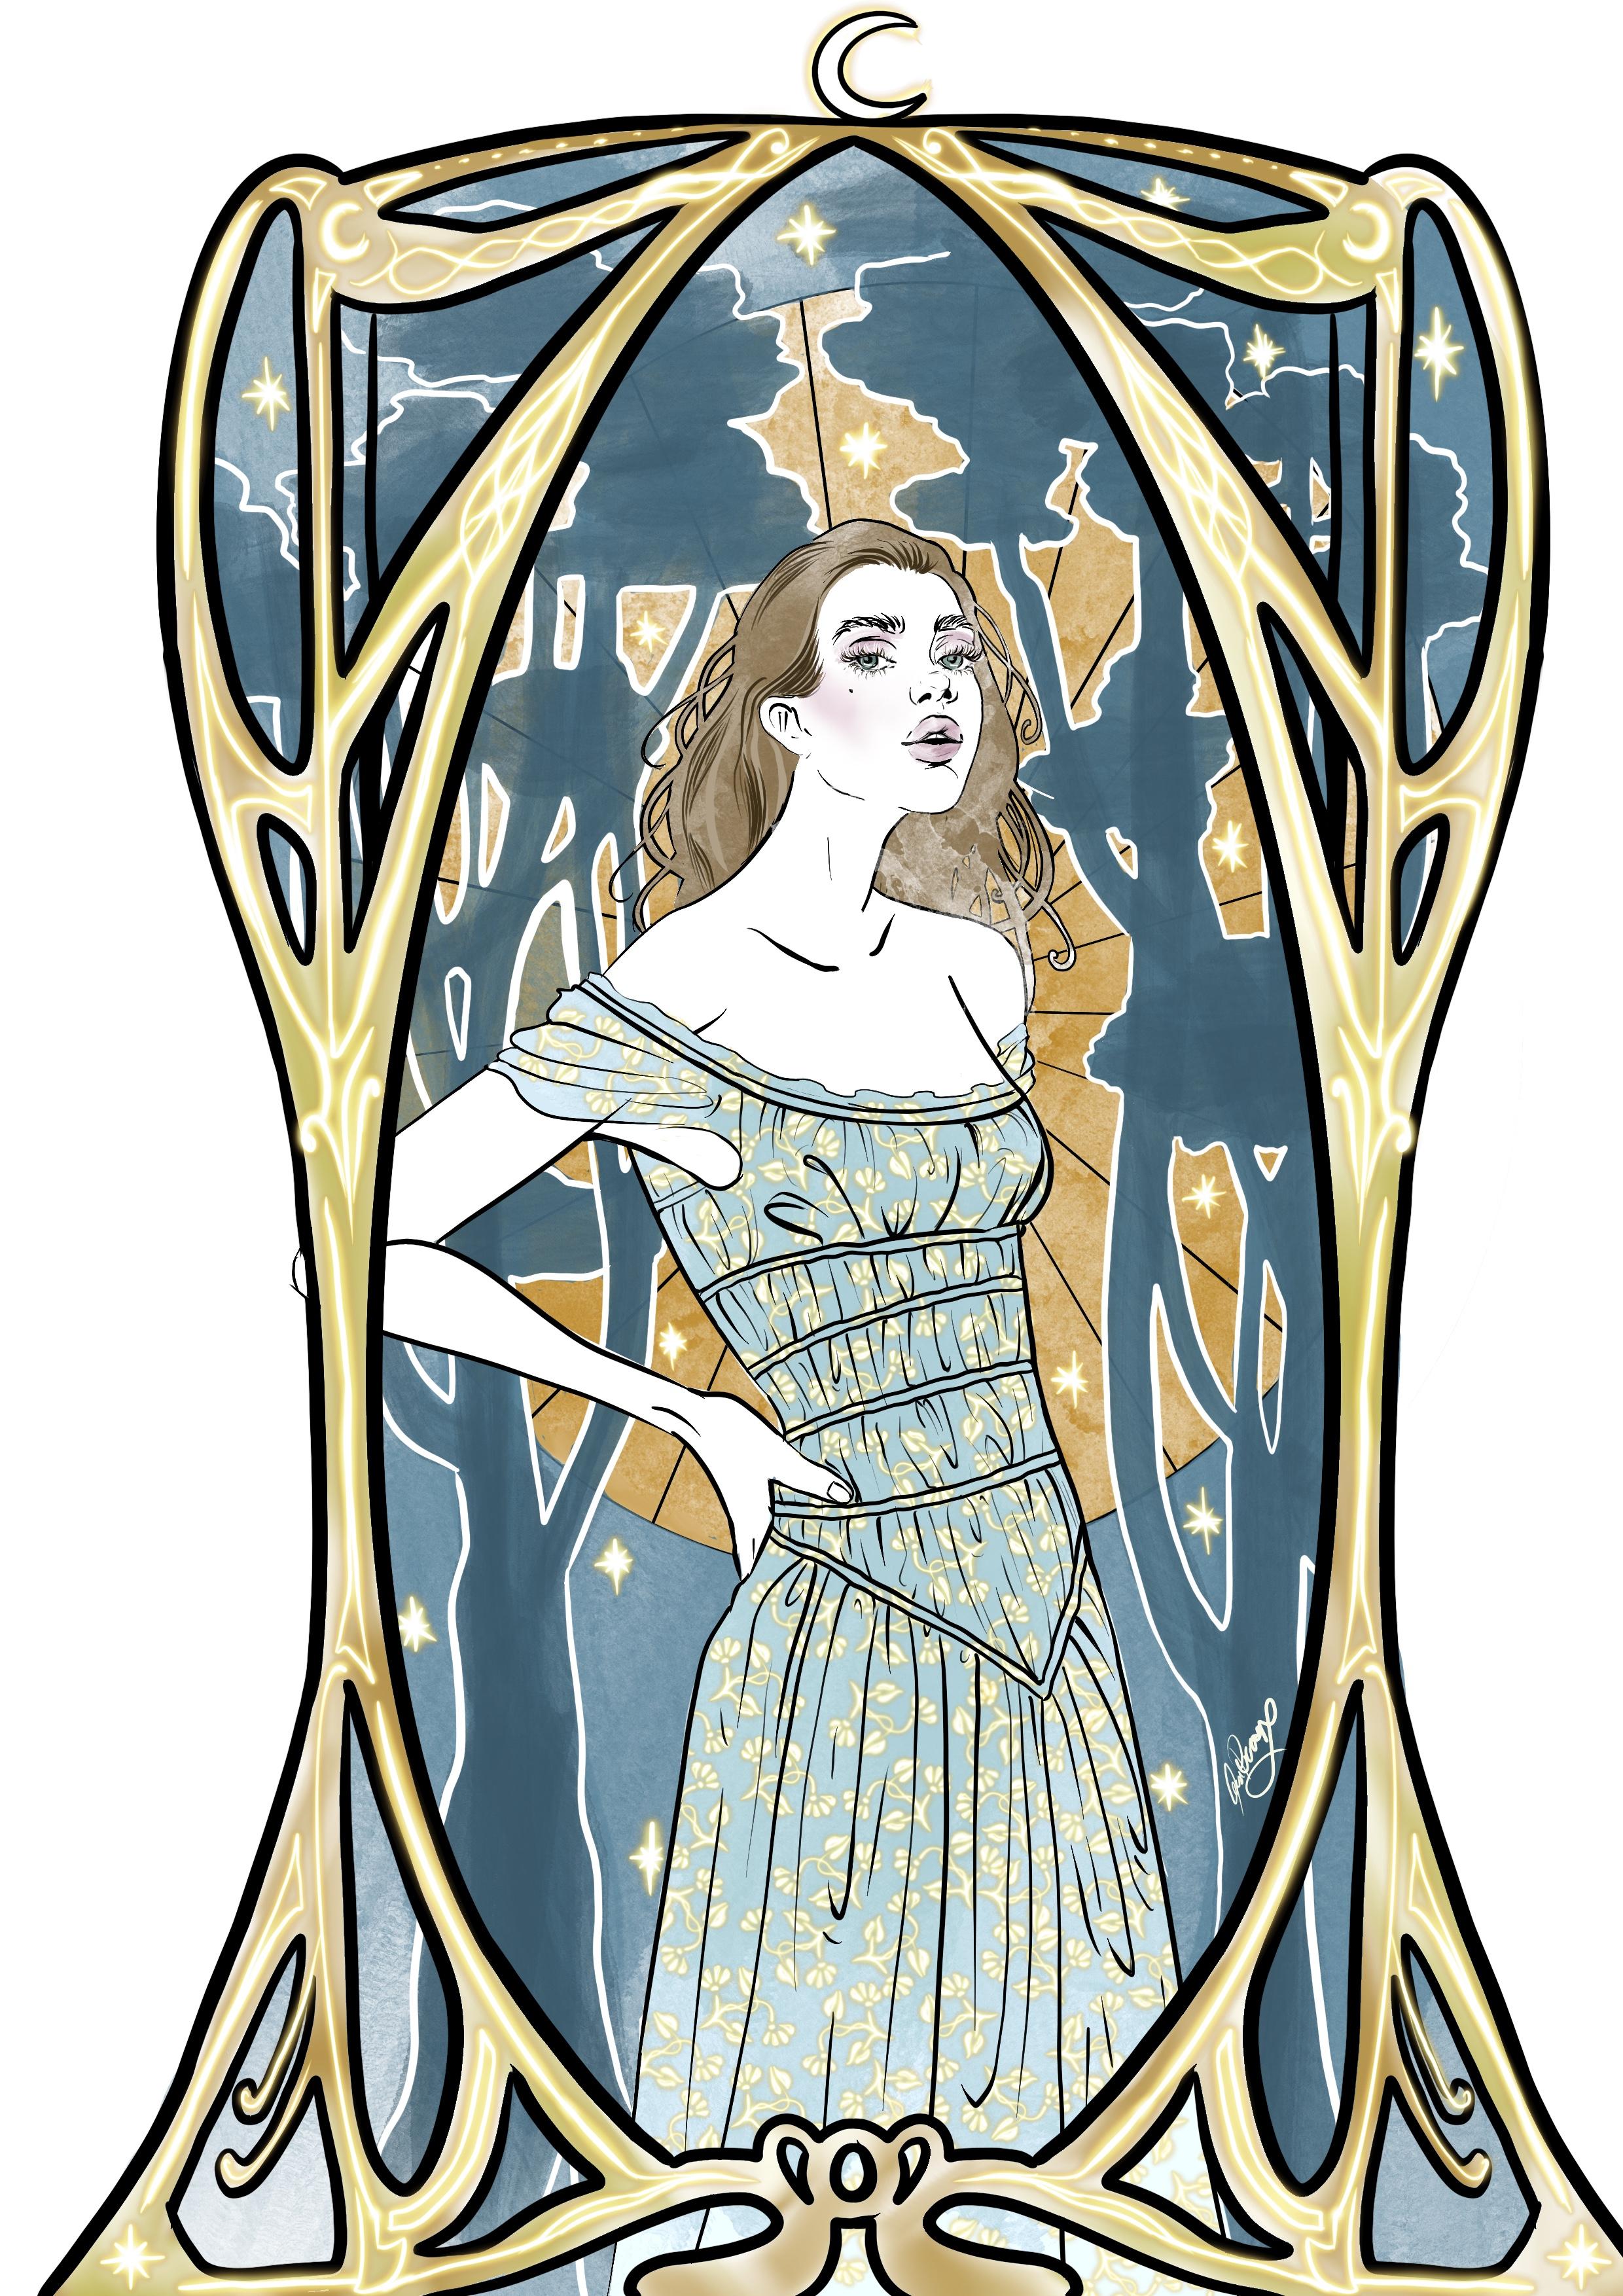
20. Project part 1. Fashion illustration with the art nouveau twist: For this project to bring back that whole very feminine in a very delicate look. I went for an inspiration that was more like cottage core. So very romantic, empire waist. So we're more under regency look but exaggerated the very romantic, very light fireworks and all that good stuff. So as hopping back into it. And to bring back the nature, I drew a pattern that was inspired with a very simplified linear type of drawings of Art Nouveau. And for the course as well, I went with very light colors and all that stuff. So that's how I choose to approach the drawing and the illustration for the coding part. And then for the background, I chose to go for something that reminded me of the blue hour in nature from where I chose the blue color of the dress. So I took more of a landscape that would be a draw. Our words blower, this slide and song is behind you, as in the picture of the science behind her. And then the tree, the light is not casting to them behind them, therefore they lose. It helped me become much darker. So that's kind of the look I'm going for, for this illustration. It's really the inspiration of dot parts of the day, which is blue hour. And that's why I have, since it's a period of the data. So I added the moon at the top. So we have all appeared. Islam me. So yeah, that's what was this little symbolism behind my illustration. It's really simple again, doing anything crazy. And yeah, I took the frame that I did with you guys in the previous part of the class. And I just integrated it to the illustration. For this project, we are creating a frame and the world that inside we want the thematic to be reflected in d elements of nature that will be in the background. Like the type of vegetation on virile meant or landscape that we're bringing to life around and behind the silhouette. When we do a project with a very strong thematic, we want a relation to the story to be still felt in the element that would be chosen in the outfit. So we're talking the prints, the curves, the shape, the types of fabric, it's thickness, texture, and cause all that types of stuff that will be in the dress, in the outfit that you will design for the steps of the project. So to start, we're going to create the frame because that's what's going to be deciding the size of our illustration. So to start, you can either take cures like we did in a previous lecture or feel free to use the one that I'm giving with this class. As you can see, I use the one that I'm giving with the class and I printed it. So I'm putting that sheet under the other piece of paper and I'm unlikely tracing it over with an HB pencil. Remember that this is a more advanced class. I'm not passing over all the beginner stuff. I already show all of that in my beginner's class for fashion illustration. So if you need to have a little review on this, feel free to go check it out. So for this one, I'm just going for a very soft look in the face and also for the illustration. So I placed mainly where I wanted to have the hair position, the position of the body, and also the silhouette of the clothes. So I'm retracing, I be traced all this before, so we would have a good base for the hair. We're going to start with the technique that we learned. So I'm gonna do the marker portion to be able to really have a good idea of where I want to have everything and have the little hair that are curling out in the Alphonse mature style. So this is the phosphide dye would like to do is the hair because this is a centerpiece in my opinion. And then all the outside can be added after, but it's really hard to do the background. And then to the heck, are you going to have to erase too many stuff? That's why I recommend to restart by the hair for the clothing part. What invite you to do if you want to go with a strong Art Nouveau automatic as well, is to go for something more feminine. Because the picture that Alphonse much I was drawing of those moments were extremely feminine version. So if we want to go all the way in and really get inspired by this, we can choose to go with very fluid clothing. Like I chose are very fluid material with a cottage core inspiration because it's so feminine, it's so delicate, it's so girly. So I thought it was perfect for this. And we have a region C5. So it's just bringing back all of that element in the illustration. So for your clothing, if you want to go on your own and create a dress, create a historical dress. You can create a costume if you want to. Go ahead and feel free to get inspired by this art movement and create a collection of your own. Or you can do just one for the practice. Or you can go simply with clothing itself. So if you were to do something with luxury like we did for the peacock, you could have just abroad in the center with a beautiful embroidery with an Art Nouveau twist in or you don't have to have the whole illustration if what you want to do is just do the clothing in a big piece with a lot of details. You can do that as well. Do something that inspires you an idea of clothing that gets to you the relation between Art Nouveau and the story you're trying to create. Once you have a shoe idea of cooling that you think would work with this, you can do a first sketch like I did. I prepared my sketch in advance, did the drawing of the clove and I printed it, or you can just have its own piece of paper. And then once I'm ready to add it inside of the frame to the very final look. It's going to look much more finished because usually when we're drawing the first sketch, It's a little bit more messy. There's more lines and all that because we're figuring things out. So that's what I recommend you to do. So once you have found a model that you want to use for this project, finished illustration, and then added inside of the frame. So redraw it with very light lines. And after that, we're going to be ready to start the chlorine portion. Before continuing to the next step, I wanted to show a few example, the curves and the folds. I thought to do a Zoom on the specific part to make it easier to understand the techniques and see the details. For the false, I wanted to present a clear example of what you can achieve if you take more your time in this step, you can say clear difference on this example where I did a very fast version and a more precise and patient drawing in the other. Here we will see what's the motion to create the curve if there is one and wet but the thickness in the line. For what regards of thickness of the lines. I will try to be consistent for the position of where for the largest section in a curved line. Where it seems the most logical to me is to put it inside of the pervious portion of a line. I'm thinking of this a little bit like if I had a very soft brush when I'm painting and I would just press a little bit harder whenever I'm getting the curve part of that line. And that would just make it thicker. So that's kind of how I'm trying to think about it. Our case though, the project was a little bit too long, so I had to split in three portion. So this resumes the first part and in the following lesson, it brings us to the next steps and also the explanation n concepts.
21. Project part 2: So I'm showing you here a small portion of the markers that I selected for this illustration. And you can see that I'm doing a test of all the different tends to make sure that it's the right cars and it's what I want. Before anything. I'm lightly erasing the pencil marks. So I'm just dabbing on it with the eraser and it should take most of it off. We just want to have a small reminder of what the drawing was. Let's continue. This is mostly a conquering portion of the class. I started by their hair because they are really light. And I wanted to make sure that this space that I needed for the hair would be reserved without any other color under it are mixing with it. I obviously to disbar to a with a thickening that we learned in the previous lesson. And don't forget that you can always re-watch a previous video. It's going to be there forever. So rewatch whenever you need a little reminder or something, It's there for you. So this is why I'm doing exactly the same steps and we're having fun by making them curl in the right area. You just have to make it look aesthetic. You don't want to put too much. You don't want it to look way too large for the head. You want them to look kind of proportionate like natural hair, but a little bit enhanced. And now for the dress, I'm going with a very powdery light type of BlueSky, which represent softness and a reminder of the last light of the day during glue hour, which also infused him in D in the illustration. If you're just has like me, a lot of folds, which you can do to go faster and create a nice effect of shadow is to pass over. So I'm trying to pass basically one time everywhere with a marker and where I think there should be a shadow. I'm going to pass quickly over it again. And the goal is to do it before the Margaret dry so you don't have a hard-shelled mutation. So you continue with your own illustration. You're going to have chose your own cars. You're going to have chose your own concept in all that we talked about previously. So don't forget that this is a direction that I'm giving you to show you an example of how to proceed for this project. And you're gonna go with cause that works the best for your concept and your illustration. To add into your fashion design. A trick to call it efficiently portions in a drawing without going out of the reserve space is to start by contouring it first, say we do a small country and then we fill the rest of the area. It gives us a clear margin. In what consist of a background. I love the darkest portion of her last. Since it's also the most intricate. It gives us more room for error by starting from the lightest color. Since if we go to find a line, it's really easy to pass over it with a darker marker. Afterwards. In this specific concept, I wanted the trees to appear darker than the rest of the image into lose completely the amount of detail possible to be seen him trees, because it is an effect that happens often and pull hour or whenever you have a sunset where you lose the details and everything becomes silhouette when you're having the sunset behind a forest or something like that. Audience this that you can see, we're really far in the illustration. So you can fall in the next lecture to have the final step.
22. Project part3: Final touch: Okay. For the 53, we are with the fine markers and a folder on dress. I know I said I wouldn't go into the basics, but I know that the eyes are something that a lot of people struggle with. So I do hear a tiny idea of what I do for the ISO. I basically start with an almond shape and I tried to put around in the center that's getting cut a little bit with the top eyelid. And with that I'm going to add up data eyelashes. So here you have a little time-lapse dot show. Briefly what I do for eyes. Usually if I'm going to do some details in the face of buried, buried delicate work. I'm going to go for the Micron, 0.2510 nanometers is the one that I found. Give me the most fine and small lines. It works extremely well for those very delicate details. When you desire a uniform thickness like is necessary for the contouring of this shapes. In this instance, my chosen benzo would be the high-tech point is 0.5. The n is round, so it gives us a very nice thickness. So it's really quite nice and it's easy to manipulate. To finish this portion, we are countering everything with a fine line marker to outline everything like we practiced. Although if what you want is to control better how thick the lines are and to have more variation. This one is really amazing. It's the black liner, zero-point, two millimeters on the color of the dress. I went for a tiny ruffle to do a solid type of edge. The inventor of the license hand is disputed. Nevertheless, it was popularized in the 1990s. And this technique is mostly used with commit to these type of techniques that I'm drawing in this illustration. It could be very easily achieved with an elastic or inelastic type of yarn that you use to so directly or you can do it with the elastic. And by applying all this fabric back in the size that you want, it's going to create a lot of small ruffles. And it's going to give this cottage core vibe. As I am drawing this, you can see that I'm using and laying mostly on my pinky finger, which gives me all the stability that I need. To be precise and have a good rotation to contour the trees and have an opaque white line. I always go to the job and pencil. So the brand is a signal and it's a uni-ball. The pigment ink is, UM, N15, three white. Another trick that I can give you if you want to do long and curvy line and make them a little bit more perfect. You can always use a curved ruler. If you don't have one, don't worry about it. This is a ruler that's really useful when into clothing patterns. In order to create the mode safe. I sketch a few idea. I wanted something that was simple and flight and very cut out. For my inspiration, I chose the white trillion because those flowers are usually found to cover the floor of a fluoresce when the ground is really healthy and North America. And once I was happy with the design of the pattern that I would want to replicate everywhere on the dress. So that was basically the idea. I wanted to create a big version that would be applied everywhere on the dress, almost like a polka dot effect, but with those little flowers to give a little bit more the effect of a night gown. So this is what I will proceed to do after. And I will do most of that work with pencil to be able to sharpen it at the maximum that I can. So I'm using an exacto as well to do that. If I can't have the the point that I need to have to do smart details. I have to admit that this take a whole lot of time when you want to do it by hand, there's always the option to do it digitally. I wanted to show you a how I would do it if I was to do this by hand. So this was it. I hope you enjoy, I hope to love doing your own project as law. And here's the final result.
23. Bonus - An other exemple explained for the concept.: I'm going to explain to you the piece that I made by reverse engineering, the concept that I use and what I thought for the details in the project. I went with this project for the spring season, inspired by the softness and delicate waking up of the forest. That's why I went for a look down with the eyes for a bit more of a softer, sleepy, feminine look. The main clause and the background are warm length of first light of the sun. The oneness is found in this luxury by sued piece with the skin card mesh of framing, a delicate and fragile the piece. I wanted to refresh the whole thing and still bring some movements. That's why I added some water at the bottom. And from this, obviously, if there's water, there's going to be life. That's why I made some Florida growth from this side, I think it would have preferred maybe now that I look at the piece after of the final results, I think it should have gone for the sink flowers that I made grow from the bottom and put the same flowers in the body suits. So that's where I would give myself a critic for this piece. I like when things are all connected with each other, I don't know why I went for a different one in this specific piece I just got inspired and the water made me think of the archives or some type of beautiful, really humid type of plant. But yeah, so it's really free and you can change it as you want. You can get inspired from what you want and that's why it's fun. You know, you can decide to put a certain type of fire and make them grow in a certain way, very curvy or with less care of, It's really up to you. And then the fun thing is after that thing, how can I incorporate this into my background and make everything a nice story that goes with each other. Further, buddy sit, I want it to represent the growth of this season in the forest and all that stuff. So I made all a plan going upward and just growing from this side and they're kind of curving into each other. And a very warm color of pink that was blooming in the center of the flower.
 Alexe P