Transcripts
1. About the Class: If your paintbrush could take you on a journey
around the world, capturing the unique essence
of each place you visit. In this series, that's
exactly what we'll do. We'll travel the world
through watercolor, capturing not just
beautiful places, but also emotion and mood that
makes each place special. We'll focus on
painting landscapes in a loose intuitive way
using flowing brushwork, bold color, and expressive
qualities of watercolor. Welcome to the first
class in my new series Expressive Watercolor
Landscapes. Hi, everyone. Welcome to my watercolor class. I'm Bianca ella, a
watercolor artist, Skillshare top teacher,
and workshop instructor. I love painting landscapes, seascapes and sit scapes, and I'm so passionate about sharing easy to
follow techniques that help you create expressive and
atmospheric paintings. I've had the privilege
of partnering with Schminka silver Bush Limited
and Arch and Mounts brands that share my passion
for inspiring creativity and making painting enjoyable and fulfilling for everyone. I truly believe that
painting is for everyone. My purpose is to inspire people to discover and pursue
their creative passion, whether you're picking
up a brush for the first time or looking
to refine your skills, I want to help you build confidence and
enjoy the process. In this class, we'll
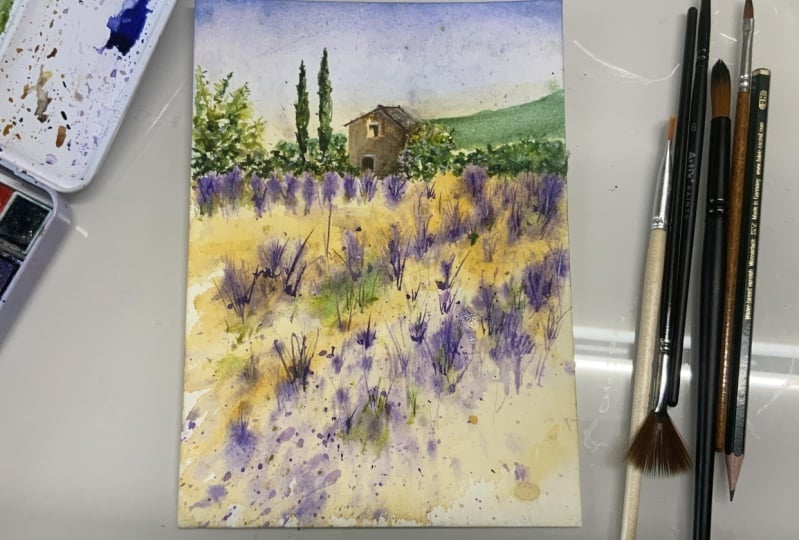
paint a dreamy field of lavender in full
bloom with soft purples, warm golden tones,
and gentle movement. You'll learn how to sketch a simple but effective
composition. Use wet on wet and
dry brush techniques to create soft textures. So just distance
layers and light with expressive stroks and learn to let go of perfection
and enjoy the process. This class is perfect for beginners who
want to loosen up, as well as for more
experienced artists who want to explore watercolor
landscapes with feeling. All you need are your
favorite materials, your curiosity, and a
little space to create. I can't wait to see
what you create, so grab your materials
and let's get started.
2. Materials: Before we start painting, let's go through
all the materials you'll need for this class and actually for the entire expressive watercolor
landscape series. First, you'll need
watercolor paper. It's really important to
use 100% cotton, 300 GSM, cold press watercolor
paper because we'll be working a lot with
wet on wet techniques. I'll be using Bao
Hong Artist grade paper size ten by 7 ", but feel free to use
any brand as long as it's 100% cotton and 300 GSM. Next, we'll need a
waterproof board to stretch and hold the
paper while it's wet. You can use something like a white board or
an acrylic board, anything waterproof and sturdy. For the brushes,
here's what I'll be using silver brush alpine
white goat hair brush. This is for wetting
the paper with water because it's
super absorbent. Renaissance sable
brush size eight. I'll be using this for painting the main washes
for the landscape, silver silk 88 ultra
round brush size six, which is perfect for
painting smaller details and Renaissance liner brush size
two for painting lines, accents and also for
signing the painting. You'll also need a
pencil and eraser for the initial sketch, and
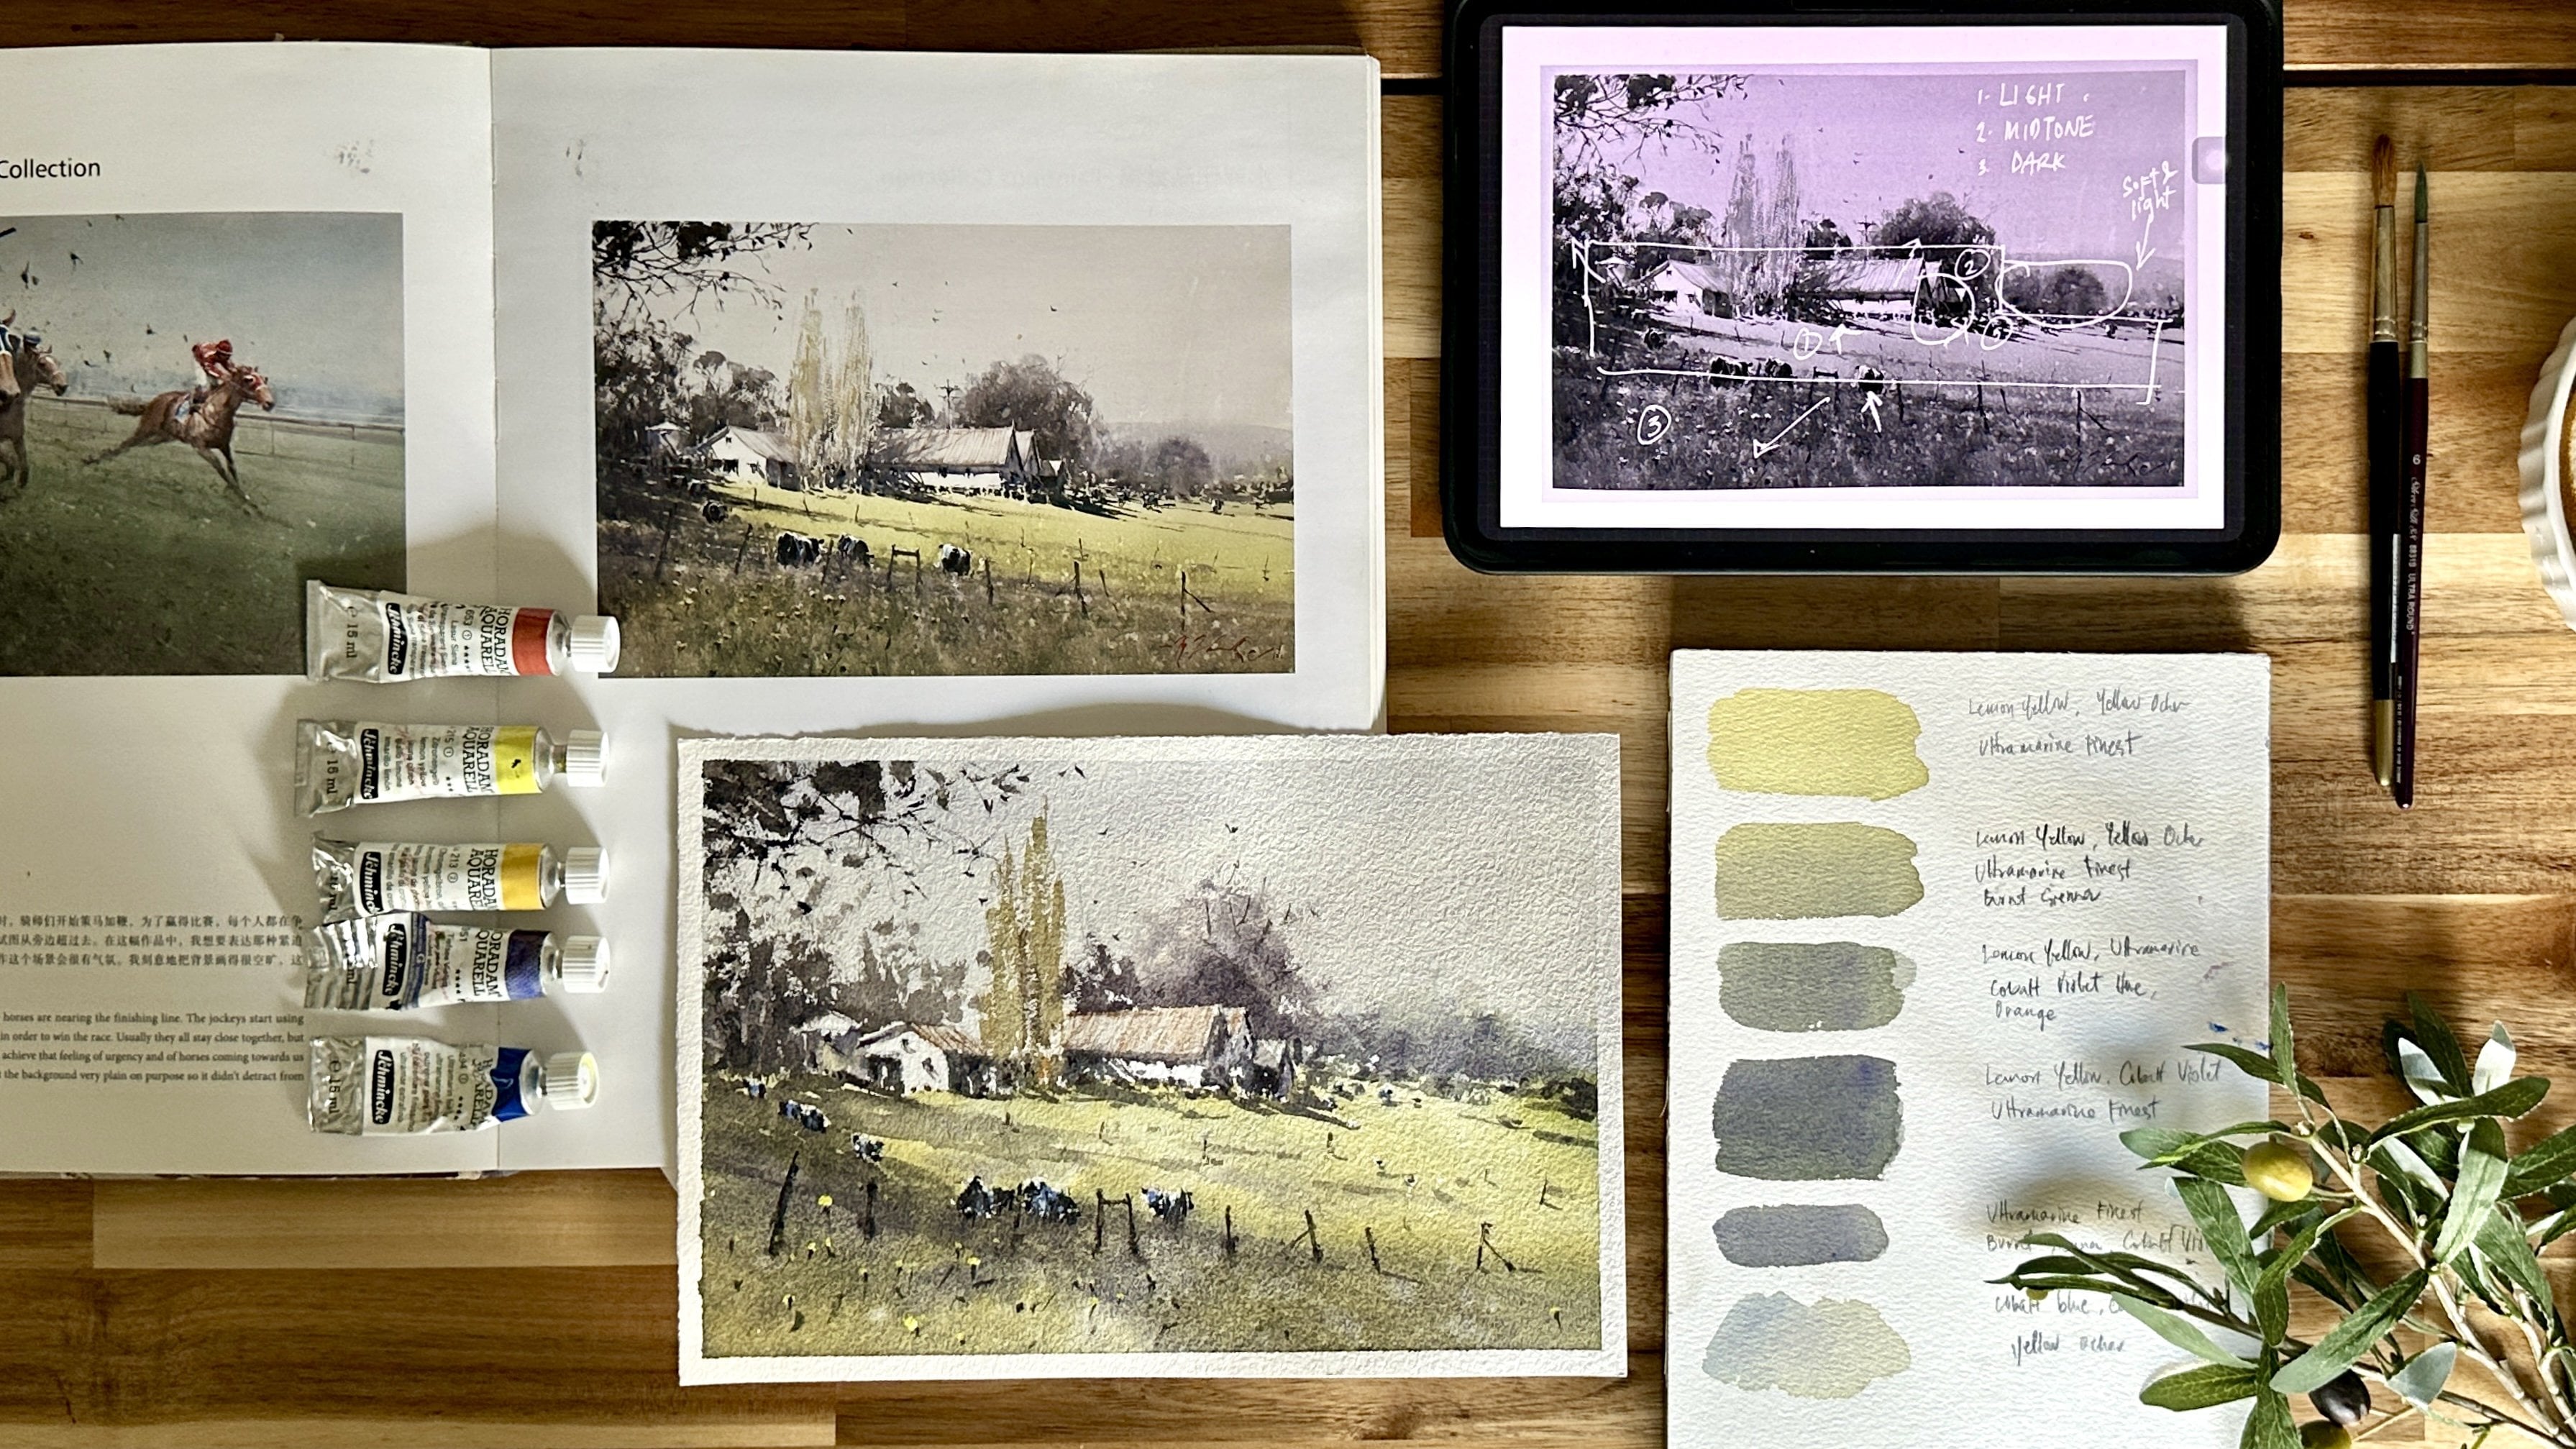
now for the paints, I'm missing ShimkaHredu
watercolors, and I've already
squeezed the colors from the tubes into my
Mijello palette. You can download
the full list of colors from the
resources section, but here's a quick overview
of what's on my palette. Naples yellow, yellow ochre, cadmium orange, burn
henna, Indian red. Berlin dark red, Berlin violet, inacridon magenta, cobalt
blue, cobalt turquoise, deep sea violet, cobalt
violet, paints gray, olive green, indigo,
deep sea blue, Prussian blue and ice blue. If you don't have ice blue, you can also use
titanium white as an alternative for creating
opaque highlights. And finally, we'll need two
cups of clean water and some towel or tissue paper for blotting
and cleaning brushes. That's everything
we'll be using. Now let's get ready to paint.
3. Pencil Sketch: Now let's start with
a pencil sketch. I'm using simple lines here just enough to guide us once
we start painting. I begin by drawing
the horizon line slightly above the middle
part of the paper. This helps create the feeling of open space in the field while still leaving enough room for the sky and
background elements. Next, I sketch a small house near the center just
above the horizon line. I start with the roof
keeping the shape simple like a triangle
on top of a rectangle. Then I build the
basic structure of the house underneath.
Nothing too detailed. We just want enough to suggest
the shape and placement. Behind the house, I lightly draw some fountains
in the distance. These can be soft curved shapes. They'll help frame
the composition and add depth to the background. Then I add a few trees
behind and beside the house, some bushy ones
here on the left, and a couple of tall, slender cypress trees to give
that classic provence feel. Now I move to the foreground
and add a few more details, a door and a small
window on the house and some tiny trees and bushes in front to give it
a sense of place. Again, I keep everything
very light and loose, just enough structure to support
the watercolor later on. Finally, for the lavender field, I draw several soft
diagonal lines starting from the rightmost part of the page and
converging downward, which helps create an
aerial perspective and leads the viewer's
eye into the scene. Plus, it gives that
lovely organized look of rose in a lavender form, and that's it for
the pencil sketch. Keep your lines
gentle and minimal, we want them to support the watercolor and
not overpower it.
4. Painting Process: Now let's begin with
the painting process. First, we need to
prepare the paper. I start by wetting the back of the paper with clean water. I make sure to cover
it thoroughly. Then I move to the front of the paper and gently
apply water there too. The goal is to wet both sides of the paper to stretch it out, preventing any warping
or buckling as we paint. After applying the water, I lay the paper flat on my waterproof board to hold
it securely while it's wet. I give it a few minutes to let the paper absorb the water. This step is very important. We want the paper to be
just the right level of wetness where it has a slight shiny surface
but no water puddles. This ensures smooth
controlled strokes once we begin painting. Once the paper is properly wet, I take a piece of tissue
and gently lay it across the sky area to
remove any excess water. This helps prevent the
paint from spreading too much and gives us
more control as we paint. Now, let's mix the sky color. For a bright blue sky, I take
some cobalt blue and a mix of a bit of cobalt violet to
create a nice saturated hue. I want the blue to be vibrant but still soften
up for blending. Using the full
belly of my brush, I paint the sky with
horizontal strokes, starting from the top
and working my way down. As I get closer to
the horizon line, I gradually dilute my paint with more water to create a
soft gradient effect. This way, the color
transitions from darker at the top to lighter as it
approaches the horizon. For the upper
portion of the sky, I add a little more cobalt
violet to deepen the tone. Then as I move closer
to the middle, I lighten the blue
by diluting it with water to create a
soft and airy feel. Next, I use yellow ochre for the area near
the horizon line, carefully applying it
with a light hand. I make sure to blend
this yellow with the blue as I move
closer to the sky. I'm very careful to
dilute the yellow ochre gently as it meets the blue to avoid any
unwanted green mixing. To ensure a smooth and seamless transition
between the colors, I take a clean damp
brush and lightly blend the edges where the
yellow meets the blue. This softens the lines and creates a nice flow
between the colors. Now let's move on to
the lavender field. Before we get started, I'll quickly test the moisture of the paper by
gently touching it. Since it's still wet, it's
the perfect time to continue. I begin by painting
the base color just below the horizon line
with yellow ochre. I start with soft
horizontal strokes using the full belly of my brush to
create an even light wash. This sets the tone for
the base of the field. Next, I reload my brush
with a juicy mix of paint, making sure the bristles
are full of creamy pigment. The key here is to make loose and expressive
brush strokes that mimic the movement of the cool breeze following
through the lavender fuel. Notice how I move quickly with fast and
spontaneous strokes. I also add extra water
to my brush to help the paint spread and create
those fluid organic strokes. The main idea here is to
be bold and fearless. Don't overthink, let go and embrace the natural
flow of the paint. You'll end up with a unique
stroke that's all your own. Let the paint move
freely across the page. You're guiding it
with your brush, but allowing it to flow
and spread in its own way. I like to add a
little extra energy to the left side by
splattering some paint. This gives the field a more
expressive dynamic feeling at the edge as though the breeze is carrying the
lavender into the air. Now I'll clean my brush and
take some coupled violet. I reload my brush, making sure to get a lot
of color on it, and I flatten the bristle so I can control my strokes better. I'd like to dab the purple
paint onto the field, being very careful not
to press too hard. This is crucial
to avoid creating a muddy mix between the
yellow ochre and the violet. I focus on dab strokes
in a diagonal direction, following the guidelines I made earlier with
a pencil sketch. This will give us
that sense of rows of lavender stretching
across the field. I also add some
splattering again, especially on the left side for that loose and
expressive effect. The splatter should follow the same direction as
the rest of the strokes, helping lead the eye toward
the left side of the field. As I paint the middle
part of the field, I begin to create upward strokes mimicking the lavender plant
standing tall in the breeze. It's important to
keep your strokes loose and free,
avoiding stiffness. This helps maintain that natural expressive feeling
throughout the painting. While I continue to
splatter some paint, I make sure the splatters follow the same direction as
the rest of the strokes, continuing to lead
towards the left as though the breeze is carrying the lavender in that direction. Now I take my liner
brush and add some fine tiny strokes
across the field. These represent the delicate details of the lavender plants, giving it a more textured feel without overwhelming
the loose style. Next, I mix up some sap green, a little yellow ochre, and Prussian blue to create nice
green tone for the field. I add these colors in
a few spots to suggest some greenery among
the lavender plants. Now I begin painting
impressions of the greeneries and grasses
using my liner brush. With light upward strokes, I dab and dance the brush
across the paper making playful organic movements to add a sense of looseness
and motion to the field. I try not to fill in too much green just enough to give
hints of growth in life. We don't want to overpower the violet tones
of the lavender. I also pay attention
to perspective. The strokes near the foreground
are a little longer, while those closer
to the horizon line are kept shorter and smaller, helping create that feeling
of depth in the landscape. Next, I grab my heat gun and
try the mountain area so we can move on to painting that part without disturbing
the earlier layers. I also take this moment to add few more tiny green strokes on the field just to
build on the texture. Now, let's mix the
color for the mountain. I use Prussian blue with a touch of green
to create a cool, muted green, and I tone it down with just a bit of buncena. I load my brush and lay it flat as I paint the shape
of the mountain, and this helps me get a nice, clean, soft edge throw. Then I mix a deeper
green color with a thicker creamier
consistency to paint the middle ground foliage just
in front of the mountain. The trick here is to
keep this paint more saturated than the
mountain color so that the layers
visually separate. I also leave a few
tiny gaps unpainted. This lets a little
light peek through and keeps the scene
feeling airy and fresh. To avoid the flat look, I play with different
tones in this area, some lighter, some darker, adding a bit of
visual variation. I even scratch a paper
with my nails in some spots to create a
rough organic texture. Now, let's work on the trees. I use my liner brush again and create loose
organic strokes. You can rub the brush gently on the paper or use
a dabbing motion. Don't be afraid to explore. Each brush creates
its own unique marks. On the left side of the paper, I wet the area just a bit
and then start layering in some yellow light greens and a dark green tone to
build up the dimension. I rub the body of the
brush gently to shape the three forms and use the tip for finer strokes on the
crowns of the trees. When painting layers of trees, it's important to vary
the paint consistency. So thin, some thick, so that the layers don't
merge into one flat shape. Now, let's paint
the cypress trees. For this, I use a dry brush technique to
keep the texture visible, add some shadows and contrast, especially a darker tone on the left side of the
tree to give it depth. Finally, we'll complete the
colors around the house. This part is really
satisfying because we're going to define the house through negative painting. That means painting
around it to shape it. As we fill in the
surrounding greenery, the structure of
the house starts to stand out beautifully. Now, let's paint a house. I start by mixing Brncena and yellow ochre together to create a warm base
for the walls. I fill in the house carefully, building the shape by
applying the color gently. On some areas, I dab a hint of pure burncenna to
make certain spots a little darker and create
a bit of variation. H Next, I take cobalt violet and mix it into the brown to create
a darker muted shade, which I use for the upper
part of the front wall. I'm just slowly filling
in the structure, defining the shape
of the house while keeping my strokes
controlled and delivered. Once I'm happy with the walls, I dry this layer
completely using my heat gun or letting
it dry naturally. It's important that the surface is dry before we add
the next details. Now I mix a very thick, dark brown paint for the roof. It needs to be thick
and creamy, not watery, so that when we lay
down our strokes, they came out solid and sharp. I carefully paint in the roof, letting the strong dark color really anchor the house
visually into the landscape. Et's add some subtle texture
to the wall now by lightly stroking on a few
lines and details just to suggest the roughness and character of the building. Then I move on to painting
the window and the door. For this, I use an
even darker brown to make them pop against
the lighter wall. Again, careful small
strokes will help define these features
without overwhelming them. To finish up the house, I adjust and refine its shape by painting
more greens around it using the technique of negative painting to carve out the outline
even more clearly. I also take a bit
of opaque paint, either a white or a
very light tint to add small highlights on the
window and door areas. This little pop of
brightness will make these features feel
alive and sun kissed. Now, let's go back to
the lavender field. Since the paper has
mostly dried by now, is a perfect moment to add finishing strokes
and small details. I load my brush with violet and start painting thin loose
strokes across the field. This suggests the
individual lavender plants. I vary the height and
spacing of the strokes, scattering some in
groups and leaving a few gaps to make it
feel natural and organic. I focus these details mostly on the foreground and on the patches that already
have purple tones. Rather than growing every
tiny lavender stem, I keep it loose and expressive. We're aiming for suggestive
strokes that hint at the lavender field rather
than rendering it tightly. To add energy, I splatter some violet paint around
the field as well. This keeps the painting
from looking too stiff and adds a bit of
playful spontaneity. Next, I step back
and take a look, checking if there are any areas
that feel a little empty. Where needed, I add a few
more loose strokes to make the field feel
fuller and livelier. Now, let's brighten
up the field a bit. I mix an opaque violet
color by blending my existing violet mix
with a little ice blue. Or you can use titanium
white, if you prefer. With this lighter
creamier violet, I add some highlighted strokes
across the lavender field, again, focusing mostly on the foreground to bring
it forward visually. Then I grab a dark
purple paint and add a few deeper accents and
thin strokes here and there, especially in the middle ground to create contrast and depth. B Finally, to finish the whole painting, I add a small pop of
color to the house, just a tiny accent to
draw the viewers eyes. And with that, our expressive lavender landscape is complete.
5. Final thoughts: Thank you for joining me
in this watercolor class. I hope you enjoy the
process and learn something new that you can
apply to your own paintings. I'd love to see your creation, so feel free to share
your paintings in the class project
section or tag me on Instagram at Bianca Reyala so I can see your work
and cheer you on. It's always inspiring
to see how you can interpret the techniques
in your own unique way. I found this class helpful, I'd really appreciate it if
you could leave a review. Your feedback helps
me continue improving my classes and also encourages
other students to join in. Plus, it's a great way to support the creative
learning community. If you enjoy this class, be sure to check out my other watercolor classes on
Skillshare where I cover a lot of topics on painting loose and
expressive landscapes. As always, paint to inspire
and paint from the heart. Your art is a reflection of your unique perspective
and creativity. So embrace the process, express yourself freely and keep sharing your
passion with the world. Thank you again for being here and I'll see you in
my other classes. H
 Bianca Rayala, Top Teacher | Watercolor Artist