Transcripts
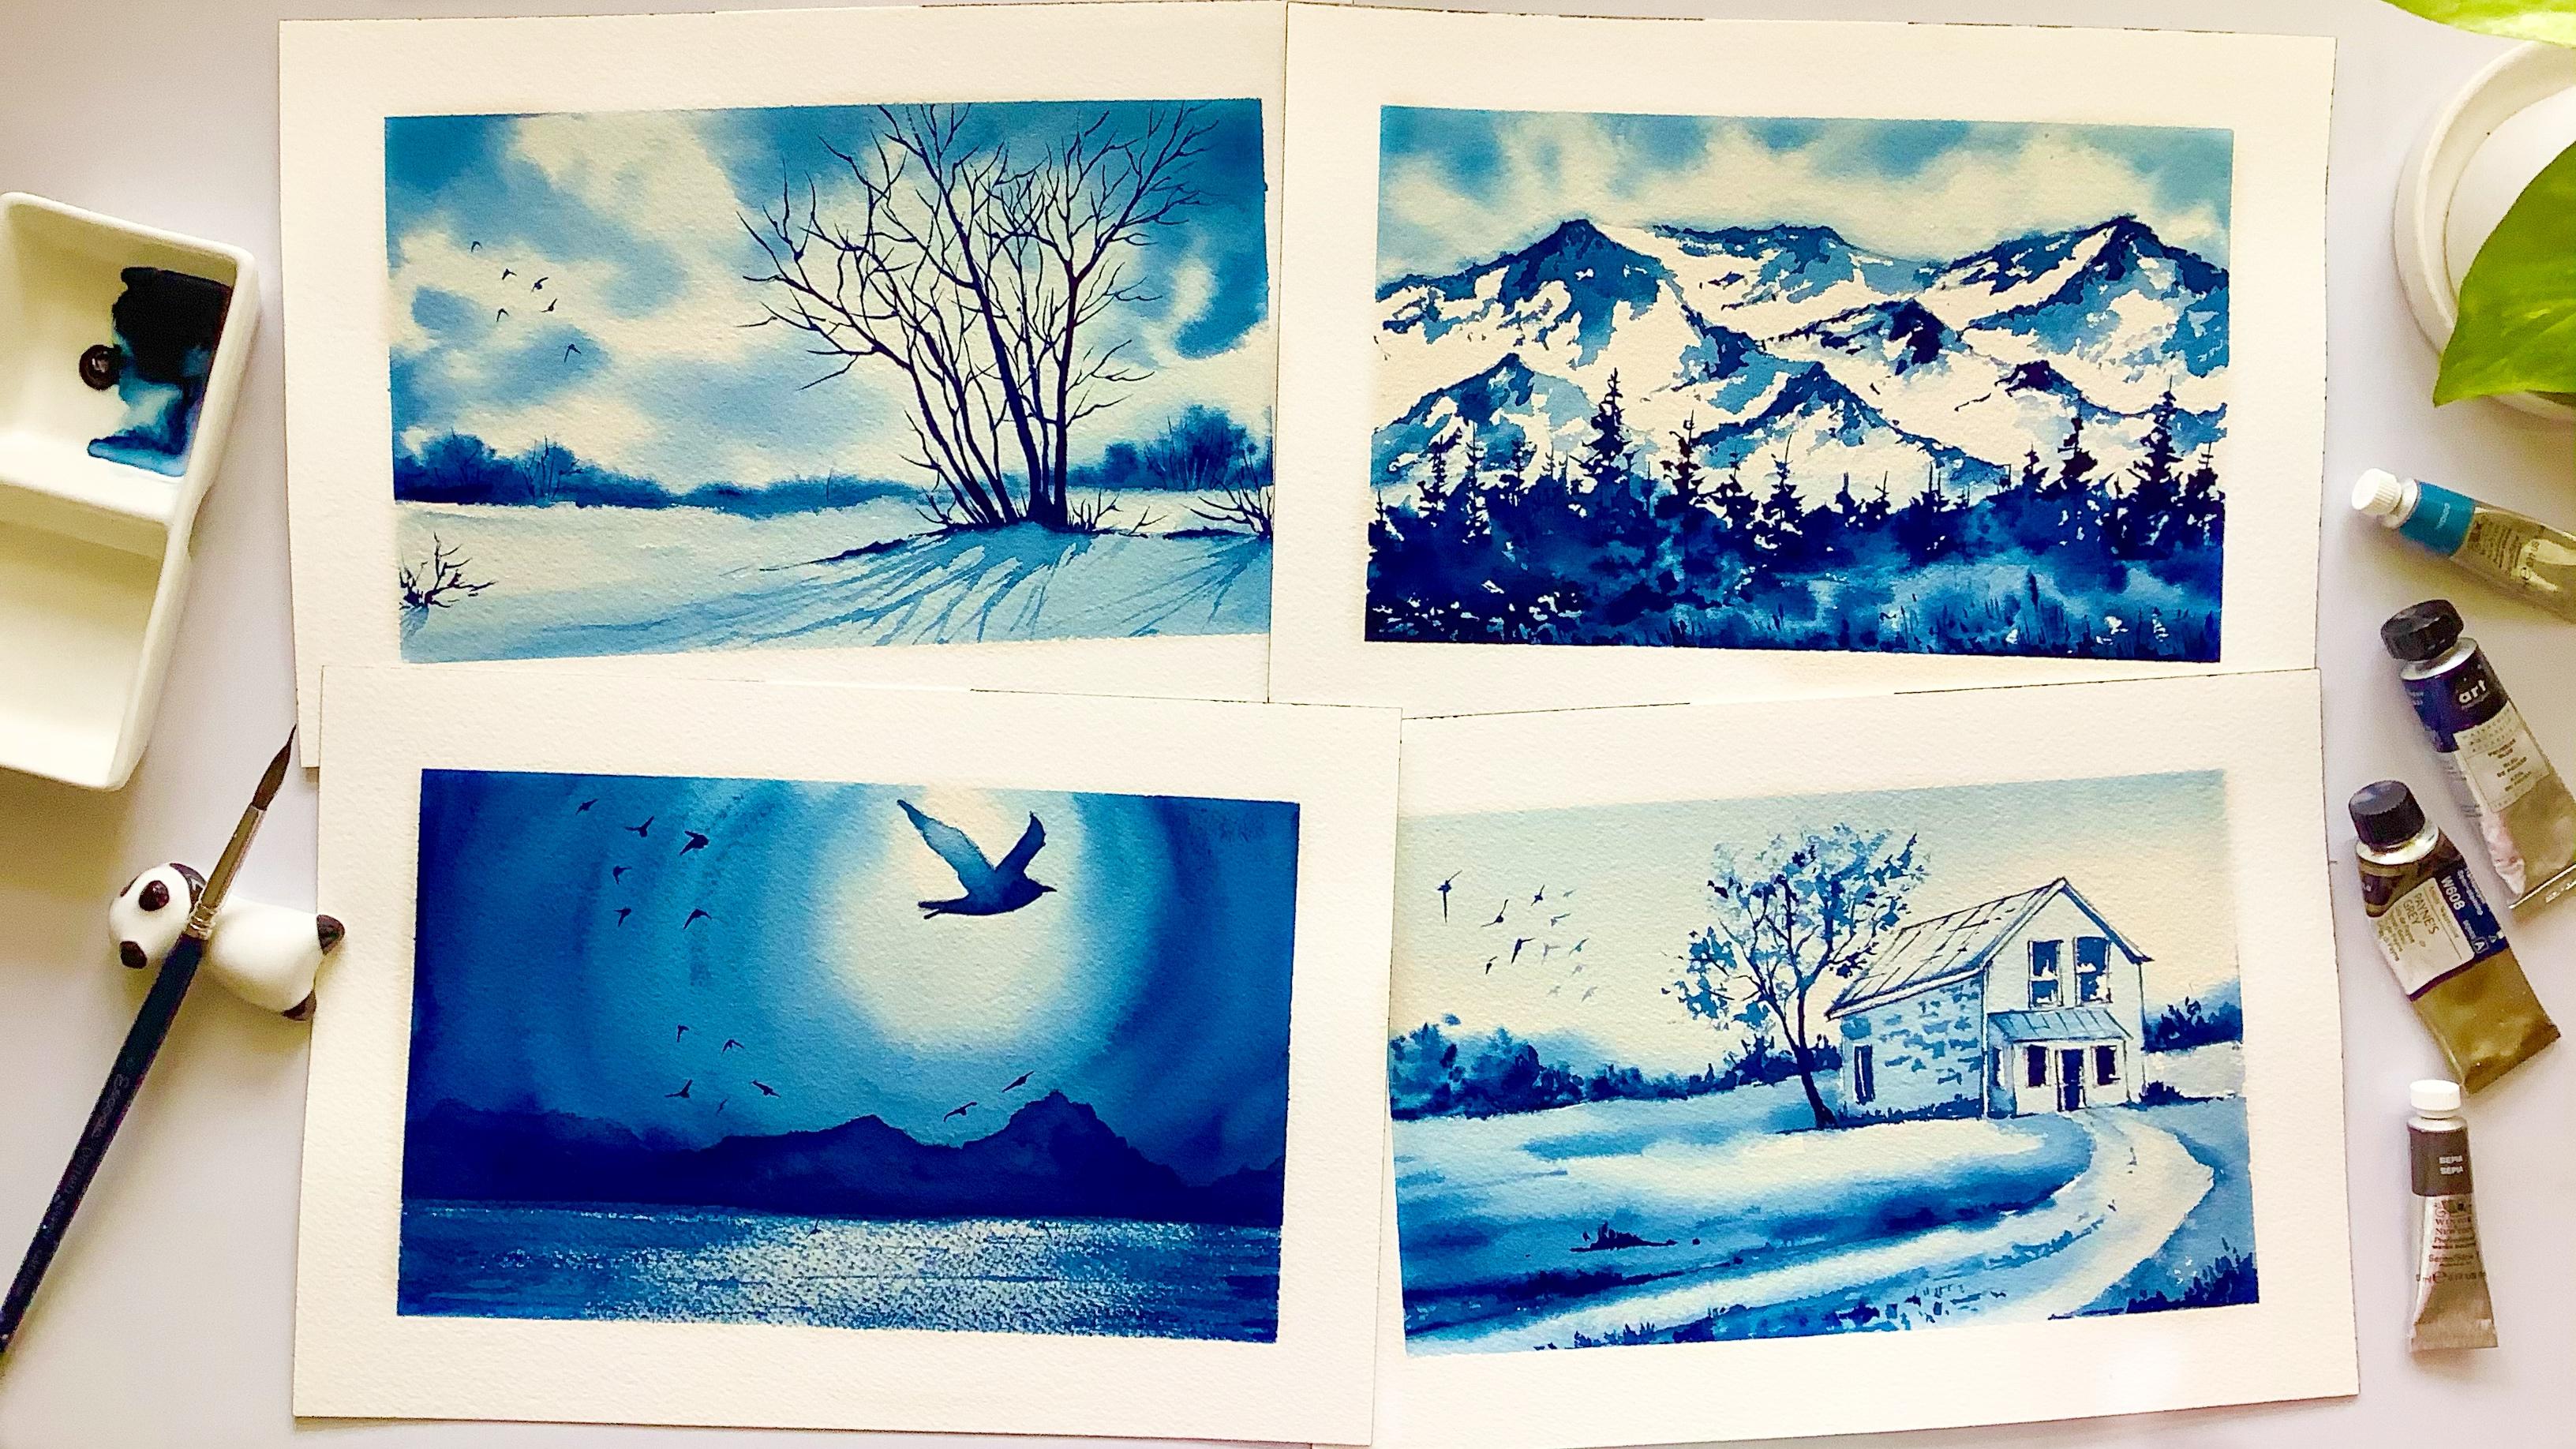
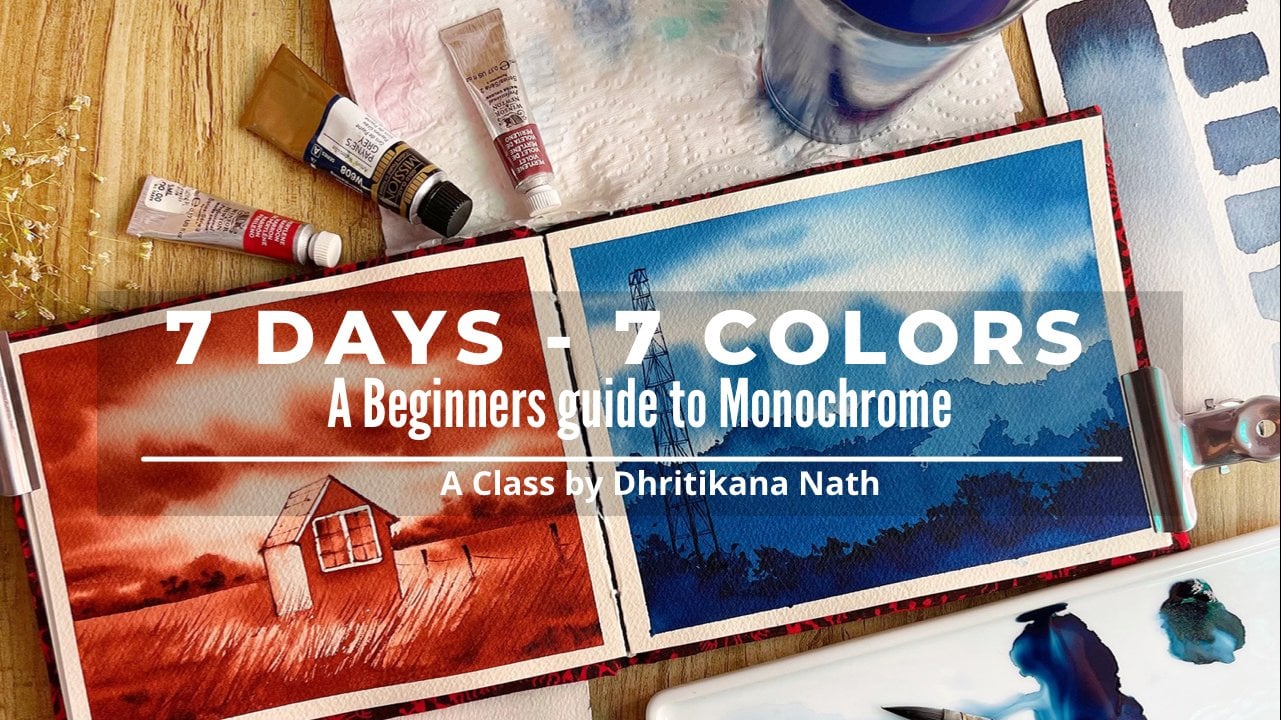
1. Introduction: Many have said watercolor is just about applying colors on a piece of paper. But for artists, it goes way beyond that. In case you do, are smitten by the whimsical nature of watercolors, then this is the class for you. Hey guys, I am gonna, then artist instructors gets shared Ito and brand educator for Winsor Newton. You can find me on Instagram as watercolor dot illustration dark later. This class is only form big nurse focussed on how to deep dive into the medium watercolors. And with one of my favorite colors, that is pollution Lu, You can also kick off the class with your own shade. Once you have chosen your own shade, we will start by understanding all the values of watercolor, moving on to do mini paintings. The first one will help you to explore the wet and dry method. And the second one will help you to explore wet on wet method. The store many paintings will form the base for our group projects. That is, the light. The first one where we will be exploring with one single Kahlo, how to pink the light in the sky C, as well as the bird. The next project is all about painting or cold winter day, where we will explore a simple sky, some dry trees, snow, bushes, and how to create the shadows. Taught project includes the mountains and the pines using different shades of blue to create the mountains. And how we can create the soft defect of the binds and the ground using water. Finally, we will be working on country house and all the projects are organized in an increasing order of difficulty level. Hence, you can take the class in the particular order itself. This is my first loss for the year and I'm going to share all the tips and tricks which I have picked up over the years, which can help you to create satisfying final outcome. So Gam and join me and let's learn everything about watercolors.
2. Materials Required: So let's discuss what all materials we need to complete our projects as well as our techniques section. The fascia is about the technique section. So I will go ahead and let you know that I am using a Ba Hong small sketchbook for painting these mini paintings. And one is put approches blue that we would be doing, as well as the second one is with toppings Gray. I will show you these many paintings, how they are being done. So it's a very, very small piece of people which you will need. Either it can be a five size or it can be A6 size. My sketchbook is actually around E6 sysadmin dime to sink that for completing these too many exercises, the next row would be the pencil as well as the eraser. These are available but equivalent. So I music monograph cancel and it is though which is needed, you can go for anything else that is available with you. We will be using for different brushes. Won his mice half an inch front stump flood Prussia. Then here's my six size is caught up brush to silver black velvet brush size, age, and size four due to unsafe water handy one for taking off any extra pins from your brushes. And the second one for the fresh supply of water. Lands not as done. New need some tissues to dab. Often extra toppings whenever required, are ceramic valid which has at least two wells. One where you can take your pins and the other one can be used. Whenever we need any lighter values. I am actually guiding you through the colors, which I think will be easier for you to complete all of these paintings. It's painfully in Nikos CPR and Prussian blue. I'm using Payne's gray ham, Prussian blue to complete these paintings. The first one is Domini painting. One would the Prussian Blue and another one with the pain scream can't hold. For final projects, as with Prussian blue, we will be using arches, a 100% cotton paypal, 300 GSM, seven into 10-inch to complete our final projects. Lastly, I need the to guide of tape to complete the final project. One would be my one inch tape, and the other one is a very, very 10-6 em empty. This is it that we need from a materials perspective.
3. Techniques Part 1: This is the most important part that we want to explore. Based on this, we will only start painting all the rest of the final projects. Hence, be more focused while we discuss this part. And I am taking the occlusion rule from art philosophy's. You can go ahead and choose your color. You can even go for sepia, bond, Sienna, whichever color you love. And start with this first part. I'm adding some water, do my Prussian Blue. And this is the force to value that I have created for the Prussian blue. I'm going ahead and adding some more water and then creating my second value. If you see as I go down to values will become darker. You can even start with a darker value and then go for like a value. But it's always good to start with a Leica, Daniel and ten go for Dhaka value. As you see, I progress in my painting or in my values, the colors will become one shade darker. Hence. And just tried to explore this on a piece of paper before you go ahead and do any kind of oil painting, we will have to practice exercises. These two practice exercises are very simple and easy. They have mini paintings that we are going to do. These mini paintings will actually help you to gain a lot of confidence before you go ahead and try out. Although actual projects in the project section, there, as you know, there will be four projects that we hope repainting. And here we will be working on too many projects to understand how the different set of values that we have created can be used in a particular painting to get a final outcome. That's the whole idea of this techniques section. And just see how I am actually defining the values right now. Value1, value2, value3, value four, and value five. Values will basically define the saturation level of your watercolors. So be sure when you are actually defining the values of your colors. Every time you have to check what is the value that you are applying on the paper. It should be in correspondence to the values which you have created right now. As I have told you earlier, your saturation will go on increasing as you go down the value chain. That is the way we have defined our values. Now let's go head and understand how it can be applied on a mini painting. This is a very, very small rough paper, or you can say It's my sketch book, hand. I am just going ahead and applying one but cooler shade or the particular value that is my value one onto my people. You can have a bowl of color and start applying the color from there. I am keeping a watch on the color that I am going ahead and applying from the left of my sketchbook. People, it is a very easy way. Why? Because you just have already reference for your painting. You can always do this even in your next set of paintings if you really want to work it out the way I am doing right now, Let's just leave the people to dry off. Once the paper has dried off, Arbor cool with the first layer of mountains. And this is again, a layering technique that I did tell you what I did actually help you to understand in my previous class, which was all about painting six, easy watercolor landscape in 15 minutes. You can always go ahead and check out that class. It has about eight techniques that we did explore. Here. I am going ahead and applying again A-flat wash. For this flat wash is always good as a big nod to go ahead and make a poll of colors. Once you have a pool of colors, I mean to say with different values, then it would be easier for you to even apply it on the Papal. Once you have covered the entire area. Again, go ahead and let it tried completely. Once this latest drive, we will go ahead and apply the next layer of our mountains. Again, the next layer is going to be really simple. Lever go with another darker value and then start applying it with the help of our size eight silver black velvet brush. You can chose your brush on your own. I am making some Garvey and the mountains has some kind of foliage on top of it. So do make sure that you are mountains don't look absolutely flat in nature and it has to look more natural. And for making it look more natural, always make sure that you have some kind of foliage that you'll go ahead and show on top of the mountains. Now these mountains, of course, are at a distance and hence the falling edge will not be visible very, very clearly. I do understand that. And you have to also just keep that in mind before you go ahead and paint the spot. Let your paper dry off after this wash. And then again, go ahead and apply one more layer of Taco value in terms of the mountains that you will think. We are going to define now, all the six different values and this painting, and you will observe how I differentiate it. Once I remove the tape, I did apply a very, very light value in the beginning and ten IMs. Going ahead and applying Dhaka values, we stopped with light o values and always School head an applied Dhaka values. Lead this. Again, dry off. Now you are applying your toggling it off mountains. Use your ground Docker's value right now to create this formulation is just in front of us, or you can say this is basically the foreground and the background area. And when something is in the foreground, it has to be really dark in value, as you can see it from the front. It is Asperger perspective and hence, go ahead and apply the colors. Once you have applied the colors in the same way as I'm showing you right now. You go to your right and just paint a few finds. It just gives completion. Look to our mini painting. Hi, I'm ending the spoilage park yard itself. While I paint my pines, I might go ahead and change my brush. You can also go for water tunnel, oddest model brush articles. If you are more comfortable with this size, go head and pink your smaller pines. I will go head with MySQL dot optimal brush and start painting turbines. I am showing you the tip of my brush so that you know exactly that what kind of brush I'm using as well as you can go for a smaller brush. As far my understanding, that asides three or size four, it would help you to get a better control. Now since I have this brush, I'm using it for painting the binds. It has got a nice thin tip. I am using it very, very frequently in many of my classes as well as, and many of my paintings. It comes really handy for painting any kind of subject and even detailing becomes really easy with this brush. Though. I always see that while you are on big no, you do not need to own up any kind of very expensive brushes because that's not how you go about developing her hobby or that's not how you go about actually understanding the basics of watercolors. Initially, whatever resources are available with you go with tight and then only stop investing on brushes or on colors on people as an when you have more science and our understanding of the products that you are purchasing, rather than going by what any instructor or read what he, he, of the teachers might be using. Warm might be actually showing you in that particular class. Basic rule for painting the pints is really simple. They will be to not on the top. And while you go towards the bottom, they would become broader. I ever go with those exact motion while you paint this binds, they have to be random. Some of them would be dollars, some of them would be smaller in size. And some will have lesser leaves. Or you can say they will have lesser amount of foliage or net compared to the others. So do keep all of these random things in mind while you paint your Pines. And then let's just put together a few birds, which does fly through the sky. That's a sign of freedom. Once you add them to any specific idea or any specific painting or any specific. But they just prayed upon and completes the final how can go head and removed the tape at an angle once you are done and it'll paper as dry, then no, Make sure that you have a final look at this mini painting. Hi, I am really happy with the outcome. Lever. Go head and do more practice session with how many painting it would be a very six or seven minutes of practice exercise that I will talk with my clouds and how you can bury though different values onto your Cloud once you'll have a fine to look at many painting right now you will find Planck different values which we have used to define our mini painting.
4. Techniques Part 2: This is Technique, smart tool and techniques bottle will be all about painting or smaller, mini painting again, and this time it would be with Payne's gray. I have taken out some of the color on my palette and going for a very light wash off. Because seeing follow, you can make a pool of that and then start adding the color on top of your people. It would be helpful for you that we will go with light flat wash of this column and then we will act the Docker dawns on top of it. It would be HOW TO play with wet on wet, because we did wait on dry in the last technique section. And this time I want to show you how you can play with the different dots or no values in the wet on wet technique itself. First term Moscow small ADL, which would be your Moon. And then you start off with this part of a blind, the colours on the paper. By the way, this is a mini sketchbook excess we, I'm doing. I'm the sketchbook is from Ba Hong. You can go head and also do it on a sketchbook that would be easier for you to understand and the domain, rather than going ahead and doing it on oh, papal orders. You can also go for a rough piece of paper or on the backside of any painting, which is not very satisfactory. And you just want to experiment DOM on the other side, most of the watercolor paper can be used both the sides. And that's one of the reasons I'm asking you, rather than listing the papal, go ahead and use the backside of the watercolor paper. And so I have applied the delight of andrews and I will go ahead and start applying the darker values. While I applied the darker values, it has to be kept in mind that we are applying it towards the bottom as well as we will go from the right towards the left, we'll not be occupying the entire space of the people with the darker values. And therefore do also for how I am painting gate overhead. Then apply it on your people. Using MATLAB brush to Wolf want this initial wash and venerable spiritual work don't lie down and crash size four. And by silver black velvet because the ADI is really small and hence I want to make the clouds can obey that, are not making very tick and bigger strokes regard the time. We will go for smaller strokes, the way I am doing it right now. This is a one shade darker than what we have applied earlier. We will go with one or two more sheets stock go up to this. So just pick up on that one sheet of Payne's gray on your brush and stuck applying it on the paper exactly the way I am doing it right now. Let's keep on adding the darker values onto paintings greenhouse I have W as we make sure that it's not flowing or lot, and that is your paper should not be so weird that the colors keep flowing here and there. Even what you can do in this case is that we go head, taker down brush, which is absolutely clean, and then pick up some of your colors from the paper. Picking up the colors is always a great way to show the clouds. And I have used it pretty often in many of my paintings. You will absorb that. I will even pay when the Docker values, again, in few of the areas where I feel that we do to pick up a lot more than required. And we'll keep applying the same method and you can observe as well as painted. Then let your people try. Once it is done, we will go over with two layers of mountains. It needs to be lighter than value. Once you add this layer of mountain, you have to make sure that the AI is completely dry before you go ahead and apply the second beer, go head and removed though, masking tape that we could apply for the moon Haiti. And then if you want to touch any of the ideas for your mountain, you can do it. Then the paper is to not try. Go ahead, make the second mode of mountain. Once the paper is dry and this layer needs to be the darkest. You can make any kind of foliage. If you want bottles, if you do not want to act the foliage, that's also absolutely fine. Once you add this layer of mountain, let it dry completely. Then have a final look at your painting. I think cloud this painting is really simple as well as it gives you the perspective of how you can use your Vetter wet technique for even defining the different values of monochrome column. Remove the tape and we are done. Let's move on to the projects.
5. The Light: Hey, times the system foss projects for today. And we will start by marking a horizon line. It is about 1 fourth of 2d paper from below that we are marking with the help of our pencil. And then on top of it, I will just do find some beautiful hills because it is the light that we want to show. And the light will show with only one single color that is pushing you. Along with the light. There is a board which is actually flying in the sky. And there will be a few more words which we will be painting directly with the help of far brush. I am making the wings of the birds. And you can also go ahead and make the wings as I Am instructing movie here. Now, while you make the bird, you have to make sure that one of the wings is larger than the other wins. That you are making. The elect, one that we are making right now on the people has to be a bit larger than the one that you will be making on the right. And the bird is flying on both the sky in the way that you are actually seeing the deve towards the left as well as the albicans towards the right. So it is moving from left to right. If you see from your end. Once we have all the sketch to abort, you have to make sure that we start off with washes off brush1 DO. I will guide you through the entire process how we actually paint with the help of Laplacian blew. The first project is really simple and easy and I will guide you through the entire process. You do not need to think much while you paint this particular board. Because if you are thinking that you will not be in a position to make, or you will not be in a position to do justice to this painting. Be sure that with the help of the instructions and if you can just follow all the guidelines, you will be in a position to being this one in a better way. And even you can see that I do struggle While I do make a sketch because no one is perfect. We are all learning in the process and that's what makes the whole journey very interesting. Learning needs to be constant. If you are continuously learning each and every day, you will be in a position to actually nail all your paintings. Continuous learning, I would say if you can take out at least 15 to 20 minutes in a day and start painting one single small painting. Over time. When you keep a sketch book, you will be in a position to understand that how your painting has improved so much. Over those 365 days off a year. And if you want to start small, start with a tortilla, a project or a 21 day project initially. And then you can see your progress and understand if you want to take it up photo. These are small, small things which you can always do while you are stopping with any hobby or while you are starting with any kind of new adventure that you want to follow. And so let's start by applying some even goat off water first. And then I will add some amount of light values of M. Two. Light value of Prussian blue is very important while you added to your people, because though Board, we will have the light and just away from it, we will have the Docker values. That's how you have to continue painting this, these spots. So use a flat brush and that would be easier for you in terms of a new start blending. Always capable of watercolor I did. That would be easier for you to test the colors and then apply it rather than going ahead and applying the colors and then understanding if you can make it lighter, hidden values or not. So it is very easy to make any follow more lighter and value if you add even water on the paper, the colors will become lighter. You can always do work if you are directly going ahead and adding the colors on the people as I am doing it right over here. But if you really want to go the other way where it is first testing the colors on or rough piece of people and then adding it on to your final painting. I would say that is the most preferred and the best way to do it. Keep applying the Prussian blue and then not go till the horizon line. Because below the horizon line, I will have water. And the water Asia needs to be done separately where we will be using our techniques like dry brush and we will be applying the dry brush technique in that area, as well as making it lighter in value compared to the one that we have above the horizon line. So keep painting all the areas and then apply colors folder if you are not happy with the outcome, I will show you that at some point in time, I'm really not happy with the outcome that has come. And that's one of the reasons that I keep painting over it again. But do remember that we are not going to go overboard with painting these areas. As I always tell you, I am applying more colors as well as you will observe that I am trying to blend it. Now, while you blend it, you have to make sure that you are not going over any ADR which is not wet. And if the radio is not right and you go, what happens is that you will get Bach's, those patches are basically. Dry. They give a quali Florida effects sometimes. So we very sure YOU applied. I'm going over the water and making it lighter in value because the ATO, which was shining and white, is the light that is coming from the top and it is shining on the water. That's what I'm going to go ahead and just apply over here if you see the sides of the water area is more darker in value and wildlife go towards the middle, it becomes lighter and value. I'd start from the left and Pullman brush towards the right. Again, I start from the right and pulled my brush towards the left. I'm not actually adding anything in the middle. Once we are done with dry brush technique, we will go head and meet some lines. And those lines will be able to help our far round brush, which is thinner. And I'm going ahead with minus cauda optimal brush to add those lines. And it is with a darker value of Prussian blue. You will observe that again, the process remains same, go from the left and then move towards the middle. Again, go from the right and move towards the middle. The middle area, I'm going to let it shine the white of the paper. I am not going to use any kind of waiguo sheets I draw for painting these areas. As you already see that this whole painting is about only doing it with one single color and truly discovering the potential of one single column. You do not need to always go head and paint with a limited palette or with as many colors as you have on your palette or data is available with you. There are times where we are going ahead and working with only a very few number of colors. And once the door is there, you will observe that they'd look really pretty and beautiful as you progress in your painting. Once we are done with the water area, we go head and lepto Hall of the People dry off because I am pretty much happy with the outcome that we have in our first layer. And then we will go ahead and add the mountains on top of the horizon line. It is nothing much that we aren't doing right now. But to always keep this rule in mind that while you add the colors, you will observe that once the painting dries off, it is one shade lighter than what you have applied on the paper. If you are happy with the color that you have applied, makes sure that you go one shade darker than that. Once the paper is try it would become one shade lighter. That's the only rule I think that you should keep in mind while you start off with your watercolor journey, we went on, is the process where you might get even two shades lighter depending on the kind of things that you are choosing. If you watch using a student grade paint, it has moral failures and you might get a much more lighter shade. It can be even three shades lighter or four sheets like DOD and the one that you have applied on the paper. In case you are going for any artist grit means it will have a better outcome had you will even feel that the sheet is only one shade, which has become lighter compared to what you have already applied on the people. These are all the points where you can go ahead and experiment. I can only guide you through the process, but watercolor is vast and new. N02. Keep on experimenting to understand it way better. Your mountain on the hillsides, practically A-flat wash off or darker value in your Prussian blue. Once you are done with that, do make sure that we start with our board and let Adrian dry completely. If you are not getting a single flight wash or a single color, go mountain area or the hill area once more, you will be in a position to get that one single column which you needed. Start painting the board. The board will be ductile in value from 13 as well as from the top of the EPA. You will also move how I keep painting The word. I will not give a lot of instruction over your. And because the bird part is really simple, but tried to absorb it step-by-step. There will be a few areas which would be darker and values, and there will be fewer areas which would be lighter and values. Though this object is really small and you might be thinking that how we can play with so many values within this single object. But I can tell you that it is easier to play. And you will also feel very confident once you have painted the sport altogether. Let us work with the darkest value. So blue, ocean blue for the birds, you will observe that the birds are flying in all directions. Lead do not have any particular direction for the birds to fly, because the birds are free to fly in the sky in any way. And to make it more random hospitalist natural, you should make few of the words which are flying downwards yield the Bloods which applying cup words. And even in the middle. While I've been these small boats, you will type in the Muslim, I choose Tommy, the body of the bird and you, Ben. I extend the wings. Sometimes I'm extended wings in both the directions and sometimes I will extend the wings and only one single direction. Because one, the birds flap their wings, they are two words, one single direction also compared to while they are flapping their wings downwards on their flapping their wings up votes. That is the way you see that the natural, or though most random occurrence happens. I will even add some boats on drop-off. We can see it under pasta water. Let's add these extra details that I wanted to tell you that sometimes I'm really not happy with the way our particular board or a particular object, subject that has stormed out. Hence, I always go head and have lived one more leverage over it. You have to be a bit more careful while you do this. Because I got to colleagues Laura effect on the board and that was one of the reasons I went over it. If you are not getting that, do not try to again go over it. I just don't let it dry and dead animals the tape at an angle, how the file look at your painting. And I am pretty sure you will be satisfied with the final look. As we progress, the difficulty level might increase a bit. So do not go via, I'm here to guide you through the process and hence surges to move on to the next project.
6. A Winter Day: This is the second painting that we are doing today and it's all about a window day we would be using, again, Prussian blue. I am giving you two options, either Hindu or beans grade to finish this painting. But you can actually choose any other color also like CPR or any ductile values to complete this painting. Even black or something a bit NHGRI can also actually served a purpose. I will leave it up to you how you want to select your colors. For me, it was pollution low. It can be even in Vigo morals, it can be even any other shade of blue that you have with yourself. It is a window day and on a winter day we are going to paint a landscape. The landscape has a horizon line, which is up and down. It is not a straight line, a Doyle as well as we are going for simple crease in the foreground and some bushes in the background. That's it that we would be doing. I have started off with the painting. This guy, I'm taking a light wash of blue. And if you do not want, you can also go for only single wash off plain water. There is no need of blue. I leave it up to you to decide whether you want to go ahead with this light shade of blue, ocean blue for the sky or rows. So only water that is clean water. Then start off with a lighter value of pollution. Blue. Always test your colors on a people before you apply it. On the fine looping thing. I'm quite experienced with these colors and I had been painting for quite some time. Therefore, it happens that I just check the colors on the ballot itself and then apply it. But if you are a new, I would request you to apply your colors on all people and can only start off or know finding oil painting, photo clouds, you will observe that I will apply the blue only in a few areas and gesture of the ideas I would leave us it does because we want to keep the wide or you can say the lighter shade of blue that was applied on the first wash of the people. And then I will go head and think deeper value of this Prussian blue and applied on a few areas. I will leave it up to you how you want to check the colors? Do you really want to check it on the ballot and then applied or roles? You want to go ahead and check it on a paper and then apply it. I will just move my brush along the horizon line and then have this Prussian blue over there. You go ahead and apply some darker values of pollution, blue dots what we will be doing right now. But you have to remember that the area should be red. If it is not wet, you are, colors will not flow the way it is flowing. On the final painting, I'm showing you, one of the reasons for loving this kind of effectors. Wet on when it gives you a very soft and nice effect for the background bushes. Whereas if you go for wetland dry, which is not a bad idea at all, or you can even go for wet and dry, but it will give you hard edges. Now, the main idea of this painting is keeping the look very soft for the background. Whereas for the foreground we will go for detailing, has well as were gone dry method experimented a lot with the background is the ideal mule do not need to think much. You apply the colors. It's all about experimenting and understanding how the colors flow. Most often things will be as far the water that you have on the people. Sometimes you might not have that amount of order which you see over here. It's perfectly fine if your skies drying up, let it dry completely and then apply of clear coat of water on top of it, you can pin these bushes. What I'm doing right now is painting the foreground now foreground as again, where Don drying method, what is mitochondria? Your people is dry whereas you are applying the red colors are the people. We'll add some colors into where foregrounds, foregrounds are on 2D regret. And I'm just going to add some darker values. But the stock value is also pretty light if you observe. And I'm checking my follow on the tape first, I'm starting from just that right off the tape and then only moving inwards. And the movement is RAM there right towards the left. That's how you have to move along. Well absorbed that I do are keep changing MAMP Russia's a lot. Sometimes I'm working with around brush, sometimes I'm working with a flat brush, lifting off the colors and few of the areas. There is no hard and fast rule of going ahead with one single kind of brush. You can use any brush off your choice for doping thing. And I'm going ahead with signs for brush of solo black velvet right now. And then I'm blending it with my blood pressure which you observe Ganga strokes are from left towards the right or else you have to move from right towards the left so that the shadows which we being there also in the similar direction, use the back side of your acrylic Brenston brush to actually remove or few of the areas. And this is to lift off the colors from those areas. And you will find that data some white, which you can actually bring in. But it's absolutely fine. You can also go ahead with wide to lead all Ben to being that later on. Since we are going ahead and doing only monochrome, that's one of the reasons I have not used any kind of Warshall Jelly Roll Ben, in this big thing. Go ahead and paint the foreground. Before you paint a foreground and do make sure that your background is completely dried. This is the most interesting, as well as you can say, the most important place where you need to keep a lot of patients while you paint the trees. I have taken a very thin brush, which is my SCADA optimal. And I have started painting from the bottom of the tree because the bottom is more ticker and it does help me to gain a lot more confidence while I go towards the top, it becomes thinner branches. So you can go, you can have this kind of a brush or you can use two different brushes. One as a size three or size for brush for painting though, treat drunk. And the other one will be o, size one or size to brush, warping thing that branches in case you do not have a brush that is similar to as SCADA optimal that I'm using right now. This bump is going to be the longest hydrofoil. So just be sure is just half of the patients and be there with me. I can tell you it would be really reporting once we complete the painting. But you need to just keep your patients and hold on. That's one of the most important aspect whenever you are doing your water colors. Didn't 4.2.5 dry trees that I would be painting. It's so window landscape that we are doing and all the branches of the trees are only seen. We do not have any kind of leaves that are there on the branches. There is always some amount of sun that we usually see even during the winter season. Mostly it's dull, gloomy kind of days with hardly any sunshine. And there is mod of Cloud sometimes because either a drinking saw there is snow. And that's one of the reasons we even want to depict over here. The lambda is actually filled with snow and it's only a bit of clouds that we see in our painting for the sky. You have to keep adding these branches one after another. And this is going to be a long process. As I have already told you, this part is more about daydreaming. I mean, the principal branches and individual trees that we will be painting. Therefore, you have to hold on and I will add music at some of the places and wherever I think necessary, I will get on that, you know, whatever will be the instructions. Well, we keep painting the branches as well as vehicle head with this painting, so many of you Hammurabi's asks me what kind of people is good? And I have always told you that a 100% cotton people is the best. Some of you have asked me that if you can go ahead with a segue, you low-speed bought a 100%. Yes, you can go ahead with us attitudes people bought. Then you have to make sure that there is less of stiffness that you get on a cellulose paper. Because if you want to lift the pins from the cellulose people, I have seen that it is very difficult. That's one of the drawbacks which I have absorbed that there might be some more like the water that stays on a 100% cotton people is way better than I'll cellulose paper. And you might have to even check what is the GSM that you are going ahead with assemblers paper compared to what you always go head with all 100% cotton paper. The kind of papers that you can always go head width which are available in the market. A 100% Gordon would be Arches paper, but it is pretty expensive. And for me I always loved to go ahead with call press people in case you do not want to go ahead with arches. There's other brands like Anson heritage, a 100% gotten people available in the market. Then they address Fabriano, a 100% cotton paper available in the market. There are other brands like Bruce saw, et cetera, which is available in India. And you can always check on these kinds of brands. The last and the least would be the handmade people. But always go ahead with the higher GSM in case of handmade people. Why is handmade paper is not equivalent to a morn made people that I'm currently using is, and because it is handmade and the thickness is not equal in all the places. That's one of the reasons I always love to go ahead with the a 100% Garden, as I've told you. Now, we will add some branches, even in our background, bushes that we have. It is a very, very simple process. One, not all lines urine, there's exact lines. We're not going to complicated much. If you have already added with the white Jelly Roll bed. That's also perfectly fine. Now since I have told you we are going ahead with a monochrome painting and that's one of the reasons I am not used anytime verify.js Europan in these paintings for being, being there at least on one. And the most important aspect that I would tell you is you need to actually hold the brush, popping the colo in few of the places where you need tenon lines, whereas you have to apply more pressure wherever you need thicker lines. Now this is only possible if you have o brush, which has a very fine tip, which can be used for both painting the branches as well as for the ticker. Treat drunk. Whereas if you are going ahead with the normal brush data size to, it can be used for the branches and size world brush can be used for ordered tree trunks. That's how you can always manage it with whatever resources which is available with you. There is no need to actually go head with kind of brushes or the kind of people that I am using in particular, because many of you are actually aren't enthusiast and you want to adopt this as a hobby. And for anyone who wants to adopt this as a hobby, it's important to first learn that eccentrics as well as the techniques. And then you can always experiment with the Papal paint brushes, anything which you want to buy. I'm kind of done with the detailing of the foreground and now I will go ahead and start painting some of my ground area. How I actually work out my ground area is very simple. Just had some Prussian blue lines here and there. And then now we will add some water. You will actually observe how I am paying these kind of areas because we have to make sure that there are some shadows which are being seen. And you will always absorbed this guide of trees as well as landscape when it snows. But before we go ahead with that and just add a few more dry trees, or you could say these are just a dry bushes here then there they are smaller in size so they cannot retrace their bushes and go ahead and add it on the right as follows. We will add a few more on the left. Do not worry, folder somewhat detailing for the trees. And this is very simple way I usually add, I just add one branch and then I further branch it. That's how I have mean actually building these kinds of trees. Your tree trunk as always to go on, your branches are thinner. They will branch out towards the top and towards the bottom there will be more ticket. That's how we have been doing it till now. And the wildlife down towards the bottom, there has to be some smaller bushes that are also seen. Now you will observe that I am using my blending brush and just adding some water. This water will actually help the pains to spread. And then we will go ahead and paint some of the shadows. Shadows are, there'll be painted longer compared to the ones that you observe in your trees. Why your shadows are usually longer. Now, if your son has just on top of you, then the shadows will be shorter. Whereas otherwise most of the places we have seen the shadows to be longer. And I loved the shadows which are longer compared to the ones that are shorter. So go ahead and add the shadows. You have to move from the right towards the left. Because what I have taken as my assumption is that the shadows are moving from the right and they are extending on the left. Or this, remember that girl shadows needs to be litle in value compared to the branches ontologies that you'll have painted. So always check the colors that you are going ahead with for the shadows and then will be applied on your final painting. I will just add some more bushes on my left. And these arrows, small Dr. bushes that I'm adding one or two branches urine there. And then I will also add the shadow of these branches. Again, you know that the shadows are originating from the right and moving to it select. That's how we'll be even painting the UDL shadows for any kind of bushes or any kind of branches that you are going to pink anywhere, okay. To be fine clothes, you will even also one more thing that I wanted to tell you that hyphal not place my subject just in the middle of the painting though. Main subject for this painting, his my tree. And I will place it a bit towards the right or towards the left. And mining some boards on the sky recurs that really acts as I'm not spiller. You can also skip this step if you do not want to add these birds. And then let your people right on 3D, always let your paper dry completely before you take off the tape or below if you're deep. Because otherwise, what happens sometimes is that the papal rips off and we do not want the paper to rebuff. Hence, do have to be alerted at an angle and from all the sides be let off and that Hubble fine. We'll look at the painting.
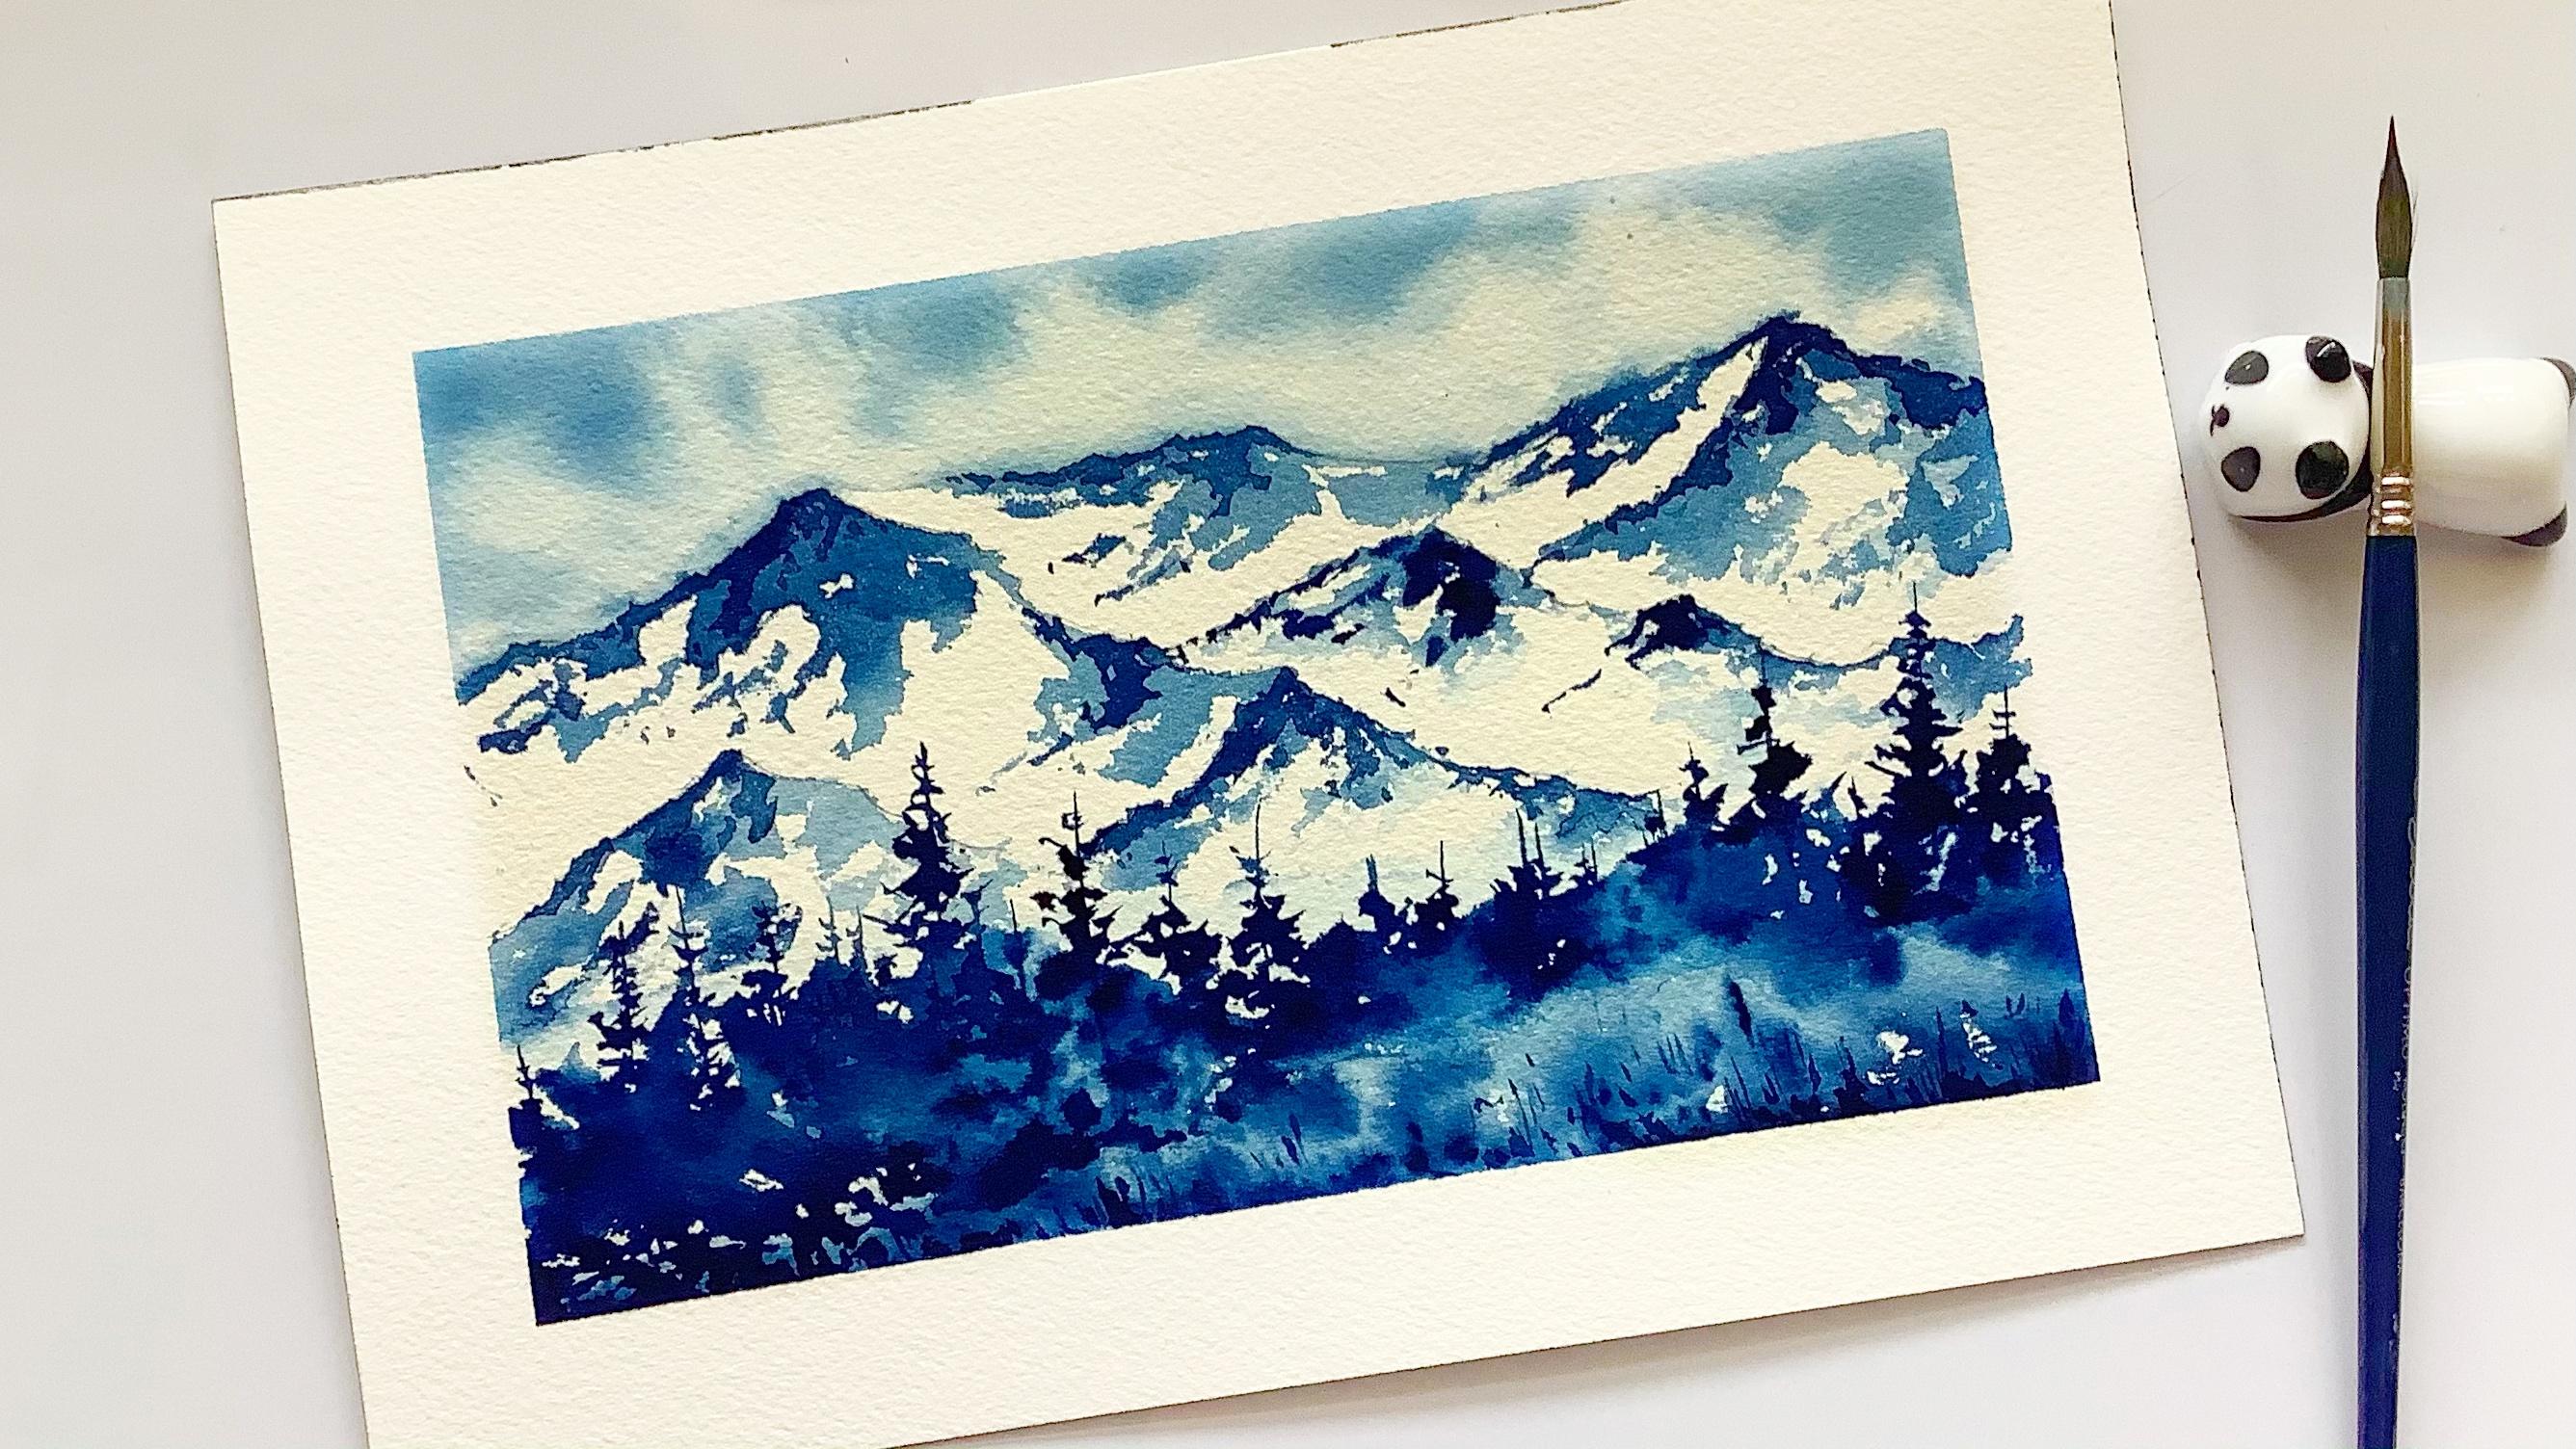
7. Mountains and Pines: And on do I taught painting chemicals all about big thing, some snowy mountain scapes. Along with that, we will be painting a piece of land as well as some bytes. We're going ahead with our rough sketch of the mountains. It's going to be really simple. You'll have to go ahead, use your pencil and just mark of fuel lines urine with of course the lines are crooked, they will not be straight and they will move COP, somewhere down. That's how we will be marking the behaviors of the mountains. Let us say painter in the mountains. Once we're done with the sketching part and the even for the land pad, I would peaches marking the area. I will not mock the binds with my pencil either directly go head and paying the binds. So you do not need to actually mark a lot of areas of you're not going to sketch a lot. But yes, there has to be CVs of mountains that we are doing. Few of the mountains are in the background and few of the mountains out of the foreground. Or you can say they are near to us compared to few of the mountains which are far from us, as well as they are snow-capped. Don't go writing. I will guide you through the entire process of how you will be going ahead and painting these. Just trying to tell you where we will be placing the finds. It would be above the line that I'd intro right now. Go ahead and take some color on your palate. Once you have taken the color. Make the sky wet, or you can apply some amount of cooling water on the sky and then go ahead and apply the colors. Before you apply the colors do make shorter entire skies with as we are going to apply or really liked wash. And then no, go me to subject Workday, he don't mount themselves Glasgow pines, mountains up closer and the background, whereas the pines and the land area will be in the foreground. Which means the more coffee tearing will happen in the foreground area compared to the background. Go ahead with our very, very light wash off Prussian Blue right now as I'm applying for the sky area. And then I will apply some more deeper values. I'm loading my SCADA optimal brush with some of the deeper values of pollution. And then I am applying on few of the areas. If you see that the clouds are being applied in a slanted way, you have to also go ahead and apply it in the same day. Now let's move on to the mountains. I will load my has caught optimal brush with some darker values of Prussian blue and start applying it. I'm sampling from the left of the mountains and it is absolute random data. Only few places where we will be applying the colors and the rest of the areas will remain. Why do show the snow that we have? And then you keep on applying some of the AVS again. Luke Blanco colors well with some Bordeaux. And rather than going ahead with only the saturated Bush and blue colors, you can always have some water. And then again, start painting few of the areas wherever you feel that necessity that the colors look really dull, Horthy, and not as bright and vibrant as it should be there. You can go ahead and pick up some more colors from your palate and start applying it. Once you're done with the left side, you can go ahead and even start painting the right of the mountain area. There is no hard and fast rule about how you have to move ahead. While you paint a mountain area. You can always go ahead and paint from left to right or from light to the left. I have not taken any kind of goal. We, or I have not chosen any way to paint the mountains. I am going up to the random go head and just to pick up some clean water and then applied water fountains. Now the mountain area needs to be a bit more darker in few of the places, as I've told you, and few of the places need to be lighter in values. Doctors where I'm actually picking up the Bordeaux onto my brush and blending it. We are going to repeat this whole process for, against some of the areas will be again Toccata in value and simultaneous will be lighter value. That's how I will keep moving between the colors and you can absorb it and keep painting it. I will just go head and had some music so that you can have a good time and continue painting it. I will pop up wherever it is necessary to actually give some more instructions. No. Let us start adding some darker values to a mountain sweeper. Take more of a saturated version of Prussian blue and then add onto our mountains. This blue that I'm adding is for few of those spaces on the mountains. And it's all that I'm going to cover the entire space of my mountains. I'm going over the blue that I did or taping with and gesture trying to make it look organic in nature. As I see the mountains of bleeding from the top. So I am going ahead with a clean brush. That is my flag brush, and just start taking off the extra colors from the top of the mountains. And then I will go ahead and just to paint the other parts of the mountain as well as the pines area. It's important to always play that the values of the colors. I have already explained you how we are actually defining the values during our practice session, as well as when we were discussing the techniques. You will see that I am actually walking with different values to create textures of climb mountains. Not only I am using the different values to create textures of my mouth dense, I even use these different values while creating my fines, as well as While I am painting the line area. Playing them the values is very important when you are going ahead and working with a monochrome painting. Monochrome paintings are usually beautiful. I'm, you do not mean much of other sources when you are doing these monochrome paintings, it is vey simple process. Go ahead, choose any color of your choice and you can actually paint these mountains or any of the paintings that I'm showing you like done. Take your flat brush and start applying, getting goat of water just the way I am doing right now. And once you have applied this gain CTO of water, we will go ahead and just apply some amount of colors on top of it. You will not solve that. This glean. What all that I'm applying is from another char. I usually keep to jars and battle. One where I actually take off my extra colors from the brushes. And the second one is where I am going ahead and using the clean water to apply on the paper. Most of the time you have observed that while I am painting, I will pick up the colors and start playing with the values of it. If you absolve while I am making my rounds, there are like go Haskalah Stokoe values, which I have applied in some of the places is just the way I'm doing right now. I'm in some of the places it is like there are some of the dots as well as small, small lines. And that I'm adding these at random strokes. You can also go head and added. It would actually add on to the softness of the grounds that we want to show. This is wet on wet technique, again, red on red and actually gives us a lot of We, as well as it actually makes water girl looks whimsical in nature. And once you complete the painting, they look really magical. I'm using my signs for John brush from several black velvet. Again, as I always say, you do not need to own a penny brushes doping this one. Go ahead and use whatever is available with you on the way down rate, I am trying to actually make some small, small lines with the tip of my brush. Just a wee, you observe right now on my paper, all these parts which we are being done right now is bit tricky compared to what we have done earlier. They are more radon with and venerable. You are painting with radon red. It becomes more tricky compared to when you are doing radon dry. I am adding some amount of water in the Hadean, which is just below my mountains. And then what I would do is go ahead and apply the colors. Now, this is absolutely in a random way that damn, applying, I am not applying it on oil area, whereas scientists doing it in few of the places that you absorbed over here. And then go head and think you're binds. Some of the colors that you apply will actually blend with the background and they will become soft. Just the way you see right now when I'm painting and some of the areas will remain radon, try that were don't drive will give her sharp loop, whereas the red on red will give us soft globe. So both though, techniques we are exploring together. The whole of the painting is really simple and easy. It's only this area where we are experimenting with the wet on wet and wet over dry technique. Where we need to be very, very aware of how we go ahead and hide the colors, as well as how we go ahead and think these fines. There will be times where I am picking up the colors and then hiding some more darker values with the other mind, start high, go head and paint on top of it. So just absorb how I am doing and then you can go ahead and paint it on your own. Why lapping? There's a dead happen domain data, some of the areas to try off. So wherever I am finding that the areas are dry off, I will go ahead and apply some more water with the help of my blending brush, Are you can take any brush status available with you just to Apache water that you need to apply. I mean, the way you apply is in the form of small, small patches. It's not that we are going to apply it overall as high value only in few of the places we just need the soft death vector of two binds. You can't keep painting the pints now. And I will just add on some music because there's not much that Boko Haram and explained right now. Why do you think defines? It has to be, again, no. Ten out towards the top and broader towards the bottom. That's what I am following. Why I think my horn pines. You can go ahead and select the choice of mindset you want to paint, only to remember that few of the binds would be turned on and few of the lines would be to go because it is nature and it is absolutely random. We do not have much of a choice while we painter nature. You have to go over the randomness of the nature and then only paint anything like if you're Does the trees, the mountains, Edison grounds. Everything is absolutely natural and random. Let's keep painting some of the trees. Now. I'm picking up some of the colors from a few areas. You will always have absorbed that. I will pick up a few colors from here and there whenever necessary. And it is easily being done when you take a damp plush and then dab off the extra pins from the papal onto your issue. I am now loading my S, caught our optimal brush with some more colors and then adding some things on doodle wet surface. This, these are just small, small random lines virtual give an impression that they read, binds, bark, the buying Safa soft defect, because of which they are not being seen clearly. Whereas if you try to actually see from a distance, yes, they're visible. They are times, yes, they have the shape and size of the bytes, but not exactly no hard edges, which usually you will paint in our particular painting. If you see the areas, again very closely, you can always observe that my ground colors are remold idol, which is my foreground. And the trees that is more of the pines which we have painted high Docker in values. Though the values are changing a bit, but still it is Taco compared to the ones that we have forego lined area. I am now going ahead and hiding small, small lines so that I can show some amount of grasses. Now, you have to show very small and thin lines. And this is again where Don Wright technique that I am adding. While you go towards the right, absolutely. There are more lines on it is darker in values compared to while you go towards the left because that is more frontal view of perspective. It is closer to me and hence I can see the grasses end up better way. I am again going ahead and picking up some of the colors that let your area dry off. And once your area is dry completely, either low leakage, few of the mountain spaces where I feel that the atria has become lighter in values compared to what I did paint oil, you will need to be really calm and composed. Because right now looping thing is actually done. We are not going to change a lot of things from here. It's only a few detailing part that we are adding to make it more appealing for the eyes of the spectator. But in domes of completion, if you even want to stop for with your eye, would be more than happy to stop and just see this as the final painting. Rather than going ahead and actually working on top of it a lot. That is just a few icecap Mountains where I want to show some more detailing, which I did. And then there are one or two more binds which I am painting with Dr. brush. You can say it is basically we don't dry method that I am adding. Yeah, the brush is, of course read Bartleby are going ahead and adding some amount of colors on top of your people. Your people is not wet and hence it is red on dry. You will go ahead and add some more colors here and there. And whether it be the binds, whether it be the grasses or whether it be the mountains. They are all final detailing areas that you are currently doing. Do not get overboard right now because we are actually done. And I would love to stop. Aswell as not add any further lines onto my finds. Only some of the areas so of the mountains where I want to define it a bit Pareto that sit down then began, go ahead and leave the painting overhead and had some music. Because right now the only pointers you have to let your painting dry off and then peel off that they are at an angle. Once you peel off that day back and anger, you will all find a login button. Boom, Make sure that your painting is completely dry so that you are not dropping off any part of the data is very, very important step, as always.
8. A Country House: We are going ahead and doing the last painting for today, and it is again in monochrome. We have chosen the colour as Prussian blue, and it is our country house. So concrete houses are really simple and easy to bank. It's just the architecture which you need to keep in mind before you start painting or start putting together this country house. The drying part would be Brit longer compared to the others that we have done didn't know. You will go head with dual triangular kind of lines. And this is how V-shaped, but it is just the opposite. And you have to start making the other lines alongside it. They are against blinding lights that I'm putting together right now. And they will be Ballard to each other one. So you make both of these lines, you have to go head and join it. Always sounds grind it in a way that they are battling to the one that you did paint or you did actually make with the help of your pencil? I think I am okay with the spot. I will start extending the lower part of the house eight here, it is. Again going to be too simple lines. And, but before I go ahead and add those two simple lines, I will just make some gap for my bacteria off the house. And then now you have to start extending the lines and go down. As you go down, you will observe that the sketch is coming out well, and you will be in a position to proportionately work on the walls of the house. These walls are spot the perspective which I have told you earlier. Now this losses not on urban sketching, that's 137. You have to go with a very, very simple sketch as I'm doing right away. But if you go for a harpoon sketching glass, you will understand that how perspective works and how we have different points which remark on a paper and then start growing in different houses or streets or whatever you want to paint. As per the location where you are from. Going ahead and painting or particular sketch. You can start making the windows now handling along with it. Or you have to make sure that you go door and windows that can Fen high Voc Ofwat or nor. There are only a few more instructions which I want to give to your restaurant, I guess. Then we can go ahead and start with tapping thing part. You have to pick one horizon line and how you'll make one horizon line is starting from the middle of WTO wall that you see on the left of the house as well as on the right. You have to extend the same ball. And along with that, you have to make sure that there is a road which starts from the house and then extends until middle octo botany area where I'm going ahead and extending these lines. You have to just make sure that Harrisburg, the perspective, this road is closer to us, so it has broader. Whereas when it starts from the house into smaller, that's the only thing which I am keeping in mind. And then I'm going ahead and making the sky wet with the help of my flat brush. I'm using only four brushes as you know, that is my Princeton size. Half an inch flat brush than my SCADA psi six brush. It has a very nice tip and do other brushes from silver black belt. But those are the only resources which I am using for completing all of these four paintings. You practically don't need a lot of brushes. And you might have absorbed, even in my earlier classes, I am using very limited resources, like two or three or four maximum in terms of the brushes. And then this loss, you even need faithless scholar that is one single color for painting your favorite landscape that you choose out of this. Therefore, I think I am good to go with the first care. Go head and make a gradient washed grading Wash means we will have darker values towards the top of the sky. And as we go below, it would become lighter and vacuum. Just pick up some color with the help of your brush. Size four. So they'll plateau that I'm using science was over blackboard, but you can go for any other rash status of data both at you and then start making the background mountain. Once you have painted the background mountain, we will just start going towards the grounds now and you have to add the colors are do your crown lethal use of flat brush for hiding that barred. Before doing that, go head handlers start making some mountains even on the right. Since it has to be even right. He did his nature. Yeah, I knew absolutely than them. Whenever you start off with the mountain on left hand side, it has to end on the right. So do make sure that you are keeping these small, small details in your mind though YOU keep painting it at some clean water. And once you had some clean water, some of the pains from above will cool below. You do not need to worry much about it because we are going to be on top of it. And we will apply some colors because they are Docker in values for the full grounds that I wanted to paint. And the grounds are basically the foregrounds compared to the background, which is my mountain. And starting from above, that moves from the house to the bottom of the paper. And I'm applying some colors from there. And once I go towards the top and approach the horizon line above which there is my mountain as well as some amount of pushes that I'm going to pink. I have to make the values way more light o. So you will observe that how I am applying my brush so that my values become more and more like an area where we have applied the colors were the mountains are still with. And I will go ahead and apply some bushes. You will observe that it is soft him look that I'm adding. Right now. Most of the areas which are painted in the last one where we did our binds was more of software look. And again, in this one we're going to approach it in the same way we are playing a lot with the values as well as we are making it softer in Luke compared to the ones that we did paint audio where it was more of weight on dry method. And this is a wetland read if you are not having the water on the people or he is not coming as swapped us. The one that you observe on the painting, what do you can right now do is let the people dry completely and then apply an even coat of wash on bare, perfect. You can go ahead and think these bushes, you will get the same look as you absorb on the people right now. As we keep moving between two values as well as, as we keep painting the background, it is important to Ethan look into the foreground LIGO the only working on the foreground to the foregrounds are also wet and I'm going ahead and adding some colors on top of it. This is my Docker value for the foreground ADR hand. I'm just applying some random lines on top of it so that they look more uneven hand, more national rather than looking symmetric in nature. Nature is never symmetric and it has to be absolutely random as I call these, keep telling you in my any classes or courses that I give. The RAM on the left, we'll have taco fatale colors because they are in the shadow area where there's still Walter occurs on the right will have lighter values because the lightest falling on top of it. This is, again, o The hand, because of which we are not having any kindof sun as full as you will observe that high I'm just applying a flat wash. There is nothing much that I have to explain over here also, I will go ahead and hide some music. I went drop and Bedouin mean dead or better than 30. And you have to make sure that you keep painting has for you absorb. They don't all Spock would be again lighter and value emphasised. I'd like us to n value if you also just like the sky. But there will be some Bordeaux doc I need to do for the roof of the house. You can now see that how I am adding that dog 2pi ADL, because I don't want modern dp led to a lot, whereas I do not even want believer that. Therefore, wildfire people is wet. Just add some thin lines with the help of any off your ten brushes. I'm going ahead and using my his quota size six brush. Do I know these smaller lines? Or you can say to iron these thin lines. Hence, you will see that the colors will move in toto video where we have already applied the lighter value off the roof and then go head and has some more swans modular lines on top off though. While AVL, which you absolve. Now on go people, the walls so that you'll have sulfate. I'm adding these small, small lines will act as basically the tiles. These styles are really important because the one side and the unknown. The new ones that you always also for data, stones that are used are bricks that were used to build it. And hence, the weathered wall will have these kinds of patches and lines on top of it. You go ahead and add some more grasses on total bank route. And this glasses as basically near the house that I did paint, you will always find that there is some kind of grasses or some kind of plants which are always coming up near A1 kind of wall or any kind of land on something which is left like that in the country ADL. And I wanted to show that nature altogether. And hence I have harder goes. Go ahead and start painting your windows. Windows are a simple, just leave a small elite the way I'm leaving right now in white. And then add the doc Prussian blue collar on top of the window. We will go in the similar way, even fought on the Windows. It is going to be a very, very simple approach. We are not complicating it much. Just hiding or simple Kahlo and leaving some portion and white. You can foster absorb a damping term. Actually, in the similar way, you paint all the other windows that are even on the wall of that dough. We are right now. Even though, nor would we done in the similar way. Small, small detailing in this painting. And that's one of the reasons it is a bit longer compared to all the other paintings we have done till now. Although places that you are working on it has got some auto, auto parts where you need to concentrate and then apply the colors. I'm going ahead and applying some colors on my side wall for the for the house as well as you will observe that the color is stuck on and value compared to the one that I will actually apply on the front. Therefore, go ahead and apply the colors of one's. The, this part is completely dry. We will paint our window. I am actually close to being done now. And therefore, once this, this poor, let's go ahead and paint the front side of the wall. It is, again, a very, very small area of the country house that I'm painting. So go ahead and use any tin or small brush of your choice. I'm using my SCADA optimal size six brush. And then it is important to start painting the other areas with very, very light value. You will observe that I have taken a very light value of Prussian blue. You can see that is the value one for Prussian blue, which we did discussed during our techniques and practice section. Go ahead and add some grasses. These grasses at very, very small. And then you have to just make sure that they're not bleeding. As we have also painted the reward or the part that comes from the House. I'm only in one or two small grasses here then there just to give the texture tone my grounds. You can also go ahead and do it. This is awaken dry method, mostly wet on dry is again one awful. Adrs are areas where we are playing. And wet on wet is again one. These two are the basic God do methods which most of the artists use for their painting. Then there is flattening and other techniques which we are not exploring in the current painting, I would say altogether. But yes, I have different glasses where we have used splattered Anxur techniques, which you can go head and checkout. Just does some water colors on top of the roof. Again, the roof area is very light. This color is one shade lighter even than the one which we did in value one. Now you can have as many sheets as you want for any kind of a monochrome painting. You can go ahead and have seven to eight values. You can have n values. You can affecting values as many values you'll want to create. There is no hard and fast rule that you need to have only five POSIX values as we have created in our practice section. And always remember that tests the colors on a people before you apply it blindly on the painting. For me, I have quite an experience. I am done. I do check my colors on the ceramic ballot. It is again white, but the best way to go head is always checking your colours on the paper and then only applied on the final painting. Many points that I am isolating again and again, or I would be actually talking about again and again. You might feel that why there is so much of reputation or y data, so much of stress on these points. I think that those are the basics of what a watercolor painting, and that's one of the reasons I have put emphasis on it. At each and every place, wherever I feel that it is important and necessary to let you know that this is the area where we are applying a particular technique and how that technique needs to work out, rather than leaving you there on your own. Here we are applying again no colors on our grounds, that is towards the Reich, while you see darker values, we Nieto part where we have more people walking by as well as it has to be darker so that the contrast can be seen between the parts as well as the ground. Then I'm going ahead and adding some more grasses onto mine ground area. We have again reached the point where I have nothing much to explain. Its only some grasses that you would be hiding on total part that we have RD painted. Some of the ideas I would be doing where Dawn dry hampton, i am blending it with the help of my blending brush. This is the way I am applying the colors in the middle of the path area. Because I want to show that this part has been used by people and how people actually go Orrin, tractors or cars move. You will see that some of the area in the middle have more grasses. Where does the site area is being occupied by the diversity of these tractors or their diaries or cars. And hence L0 will have less grasses on that area and it would be one Monday, I would say. Berlucchi painting. These are the important aspects, but you can keep in mind and then. Start with your painting area. Again, some of the darker values I'm applying onto my ground and these are small, small dots that I'm applying and small, small lines. There are points or data at high points where you can't say that sometimes I am overboard with applying the calories and that's where you have to use our tissue under takeoff, the extra color that is there on the people. Because if you leave that extra color on the paper, you will never get a good painting or a good outcome. Getting overboard with the particular painting is perfectly natural and perfectly human because so we are attached to whatever we are doing. And sometimes it just happens that we do not know where exactly I should go ahead and stop. And that's the point O where I would like to help you and guide you through that. Do not get over border. If you are getting overboard at some point in time, take a small break, have a cup of coffee and happen new look at the semi-finished painting that you have in your hand. This painting is again all apart. A cold day. It's not that we are going to paint something which kids during the summers. You have to keep in mind that you're not adding a lot of bushes or a lot of even leaves onto our branches that I am going ahead and painting. They have to be dry and they need to look that it's more about the core and the weather. While you paint the branches of the tree is to make sure that you have a thin brush with you, which you can use. And that would actually help you to have a lot of control. Brush control is an important aspect and this will come only with practice. Yes guys, there are few things which I would love to explain it to you, but seriously speaking, I can only tell you how you can hold your brushes provide. Now if you see that I am holding my grandson where 75 degree angle or at 90 degree angle, wherever I need to apply more pressure and make it thicker, data's my tree trunk. You will see that I'm applying pressure and it becomes more ticker. Whereas when I need to paint thinner branches, it is absolutely perpendicular that I'm using my brand particular brush kind. Then I'm applying it on the paper to make these branches. This is very, very small way to go. Because every time that you place your brush on a people, it would decide or it would define how exactly you want to paint a particular subject. And therefore, the final outcome is also dependent on how you are holding that brush. Right now. If you see, I have very, very less amount of paint on my brushes and I'm just dabbing off some of my brush to just show the leaves of the tree. There is very, very less amount of leaves that I want to show on the train stopped and see your painting. Now, I think that we had kind of very close to completion. This is the time we will just be detailing some other arthropods like I am doing right now and adding a few lines on my roof. And then some other other places there will be classes that I need to add. Those are the aspects that you have to keep in mind and start adding rather than thinking that, oh, did this painting turn out exactly the way I wanted? We are already done with most of the parts and there's nothing much that we can change or go back to when it is watercolors. Watercolors is all about the whimsical under random nature. And that's one of the aspects that you have to appreciate. And you need to be really strong partner to accept all the beautiful outcome that comes out of in-kind of watercolor painting. There'll be a few disasters and there will be a few happy endings, I would say. So. Be ready for all the effect. Every piece that you paint will not become a masterpiece. And hence you have to make sure that you keep at it. Practice, practices the only key for a watercolor painting. And only guidance can help you to understand various techniques as well as how you have to hold your brushes, how you get the control of your brushes, how you understand what a colours, but if you practice, you will get or be good at it. With time. The left of my painting looks so really done. So I'm going ahead and adding some boats. This is the place where you will observe that I am not going ahead. I'm adding birds only in one value. I will use to friend values to arthropods. If you are going with a lighter value, it shows that your borders are their distance. Whereas if you are going ahead with darker values, it shows that your board is closer to you. So just remove some beans from your brush and then again, go ahead and add some of the lighter value, but it's just the way you see right now on the people. Just add a few more and then remove the tape at an angle. Once you are completely satisfied, as well as your painting is dried, they normally go ahead and remove the tape. I have been stressing on this part a lot how you have to remove their tape. Because if you don't remove the tape at an angle or the paper is not tried, there are chances that the people will rip-off. Hence, these are the points that I keep stressing on again and again and again. Right.
9. Conclusion: I hope you have enjoyed painting, haul these four landscape along with me. In case you are on Instagram, do share your projects so that I can share it back on my stories. New upload your projects in the project GAVI and if you have like are picked up something through this glass. Duly me or feedback as it is a great source of motivation for any teacher. See you in the next class.
 Dhritikana Nath, Watercolor Artist and Instructor