Transcripts
1. Introduction: Welcome to the studio. It's froyle here. I'm so glad you've joined me. I've been painting and
exhibiting for 30 years. And what I'm most passionate about is giving
you and experience of creating an unleashing
your creativity. I've been running, developing creativity workshops
in-person and online for many, many years. And what I have found
is everybody is creative and with a
few simple Techniques, little bit of encouragement,
some coaching. You can create anything. You can produce absolutely
beautiful artworks, even if it's your
very first time, even if you're a brand new
beginner or Virgin artist, you can create
beautiful paintings. Creating Art can be a life-changing experience
as you connect with your own creativity and unleash
your creative expression. There's just something
so validating about creating something
from the core of who you are is a person
and saying that materialize on the
paper in front of you. In this Art class,
we're going on a creative journey using
unconventional techniques on the jelly play to create beautiful atmospheric
backgrounds and spectacular mono prints. I'm so excited about it because it's going to
be so experimental, it's going to be so PFK-1 and
your creativity is going to Seoul with the courage and excitement of creating
these beautiful prints. Now, jelly printing is a really easy application and
it's a whole lot of PFK-1. It creates a lot of mono
prints at one time. And you're going to be
so amazed at how unique, special your prints
are going to be. I'll be right there with you, run alongside you as we
experiment using acrylic paints, alcohol inks, spray inks, and a combination of all of these mediums that don't
usually go together. It could be a little messy, but it will be a whole lot of fonts as you gain
courage to stretch your artistic expression and experiment with unusual
combinations of mediums. You'll learn how to create
prints using Multiple Layers, adding texture with
different inks and how to enhance your app with
Stamps and Stencils. I'll also be teaching you
how to add laser copy to your gel prints to create unique and stunning works a lot. You can immediately
use the skills to create beautiful and
unique Abstract artworks. And by the end of the class, you will have quite a few
prints ready to use for collage to put into
other projects. Or you may even have some
ready and finished to frame. You'd be amazed at how beautiful your prints
are going to be. This class is suitable for
students of all skill levels. Anyone wanting to explore the fabulous jelly
Printing Techniques, It's perfect for beginners
because I will lead you step-by-step through each
technique, creating each layer. And we're going to be
learning together as we experiment with these different
mediums on the gel plate. These techniques
are simple while producing effective
creative expression. And there's so much
more opportunity for developing these techniques
in your own artistic style. This could be a launch
plate for you to open up a whole new door of
creative opportunities. I'm really excited to work
with you on these projects I let together and materials
and let's make Art
2. Getting Started: I'm so glad you're here and I'm so excited for this class. It's going to be
very experimental. You and I are going
on an adventure. We're going to be
using acrylic paint, some alcohol inks,
some isopropyl alcohol to create an impact
with the acrylic paint. We might even use some
acrylic inks as well. We're going to be creating
atmospheric backgrounds, beautiful papers that we can use in our collage or
mixed media projects. And I know it's going to be a
lot of PFK-1 will be taking this adventure together as
I'm creating on my jaw plate. I'm going to be trying
different ideas for you to try. Some of them might
Works, Hello, might not, but we have to be creative, adventurous and see
what we can find. I know it's going to
be a lot of fan and I know we're going to create
some beautiful prints. So let's start with the basics. What aren't materials
do you need? Well, first of all,
you need a gel plate. So here's my by a joke like it's a new job
plate isn't a beautiful, It's so nice and clean. Now, just know if you're using alcohol inks on
your gelli plate, it will stain and it
will leave marks. My beautiful gel Plate might not look so plain by
the end of the day, but I'm okay with that. Right. So I have a brayer
I roll-off sheet. I'm also a brush. We're going to be brushing a
lot of the paint on today. We need a selection
of acrylic paints. I've got some
beautiful warm tones and some fabulous
metallic paints. I'm also going to throw in
a little bit of blue gray, but I will give you a full
list of the Art Supply's. It'll be in the notes
section of the class. So make sure you
have a look at that. Also, I'll put some Amazon
links onto the page in case you want to find exactly where I get
my products from. Sometimes it just helps
to click on a button. I also have some
white, titanium white, some iridescent white, and
some an bleached titanium. So I'm going to start
with these colors. But as I said, this is quite experimental and it could change as we go along. But a full list will be in
your notes if you want to see exactly the materials that
I'm using now onto the paper. If I have some
Japanese rice paper, which is this particular brand, I have some wet strength tissue, which is just a lot stronger
than the regular tissue, are really love
using this product. I also have some
watercolor paper. This one is fairly
cost efficient. I got it from
stationary supply shop. That's the brand. Vague. What I like about this particular watercolor
paper is incredible texture. You can see how it's got that
texture map to the paper. I love it. It's really affordable. I'm surprised it's actually so good for being so affordable. It's only 190 GSM, So it's not superdense. But I really like
it for this kind of gelli printing where we're
taking background prints, a mark-making, and exploring. Because you want to use paper that you're not so
precious about, otherwise you won't allow
yourself to experiment. I also have some of
this watercolor paper. It's a lot stronger. It's a 300 gram. So it's just a lot thicker. It's not as texture, but it is quite rough. I do like the textured papers
because they capture all of the paint and I think
I just liked tactile. But if you don't like
these particular papers, you don't have to use them. It guy. You can just do you
if you want to use smooth paper or thinner paper or different types of paper, have a little experiment
and try different options. That's the only way
you're going to grow as an artist is if you
actually try things, maybe mess it up, maybe get it wrong, and
try something else. Mileage under the brush baby. That's how we get
better as artists. So let's get to splashing
some pipe around, right? So I'm going to start with
some unlatched titanium and what I'm going to do is
brush it onto the plate. And I'm going to put two colors. What kind of gone up
create almost landscape he feels with our
beautiful composition. So I'll just put the paint
on the plight like that. Easy peasy. Then I'm going to
put some bronze at the bottom of the plank. Oh man, it feels so
smooth. And so now Right? So then what I want to do is to create that
fabulous texture. We're going to be using
the isopropyl alcohol. Now, I get this from the
pharmacy or the chemist, but it says for cleaning and sterilizing
electronic items, grooming tools, earrings,
and newly PSD is basically it's just a really
high concentrated alcohol. So I'm just going to put my
finger over the bottle like that and put some of the
alcohol on the plight. Now one it's going
to do is create a fabulous kind of
watery pattern. But because it's the Alcohol
and it's not actual water, then it'll dry a lot quicker than if you're spraying water all
over your plate. So this is why
you've got to have quite thick paper
because it's going to absorb all of that
paint and fluid up. You're also going
to probably want a pretty good drawing space because we're going to be
making all her prints. Now, look at that. Isn't that just FUN? That's just beautiful,
the texture it's making. We're also going to put other layers on top
of your prints. So make sure you put it
down somewhere so it can dry it and we can add
more layers to it, right? So what I like to do
is leave all that on the plate and then
add more to it. So this time I'm going to add some gold in the
metallic alcohol inks. Oops, I just splashed
in the bitmap and I'm also gonna
give it a spray. This has got the
alcohol in it as well. And then we'll get things
moving around a bit more. And let's see how that prints. It really is a matter
of taking prints, trying things out, and then
moving on with another idea. And you don't really
get your flow until you actually
start printing. Then you find your
rhythm and you work out what's
going to work best. I like that, say I like it with a lot less paint because it's
got more movement to it. See how good it looks on
the textured watercolor. Yeah, I'm briefly like that. Okay. So this time we're going to add a little bit of the
iridescent white. I'm not going to worry too much about what's on the plate. I'm just going to keep
mixing it because all of these tones are really
gonna work well together. Let's get that on there. Let's throw a bit more
of the alcohol on there. Let's swish it around so we
get more texture happening. I might even throw some more of the Alcohol Ink on
the plight as well. Now I've got two brushes going on about some more of that, which God give it a little spray to move
some things around. Now, the more you building up on your client the video
prints are going to be. So don't stress out if your first prints
aren't looking at, right, but going to add
other layers to them. Also, the more prints you take, the more paint build-up you've gone on your plate and it's just going to look a lot
better. Stick with me. Stick with Medicaid
is gonna be great. Alright, let's have
a look at that. Say now look how FUN that is. That just looks absolutely
fabulous with us. Wispy textures and it's
beautiful colors. Yeah. It really doesn't
need to match to it because there's already quite
an amount on the plaque. This one's a little bit
of metallic copper. Notice how I'm using
similar color tones because I find that
it just works better. This time I'm putting it on the thicker watercolor paper
to see how good that looks. I do like being able to absorb all of these fabulous
colors and textures. Look at that, that
is just beautiful. I'm loving that print. I want a man. If we added some
spray dies, inks, which are water-based
ops, what do they sell? And then come and say, Great onto our mix. That would already got this. See the texture. It's creative because
it's reacting against the alcohol
on the plane. So let's add some of the
beautiful spray inks. I've got the eyes inks, dye spray is the
water-based said they're reacting to the beautiful
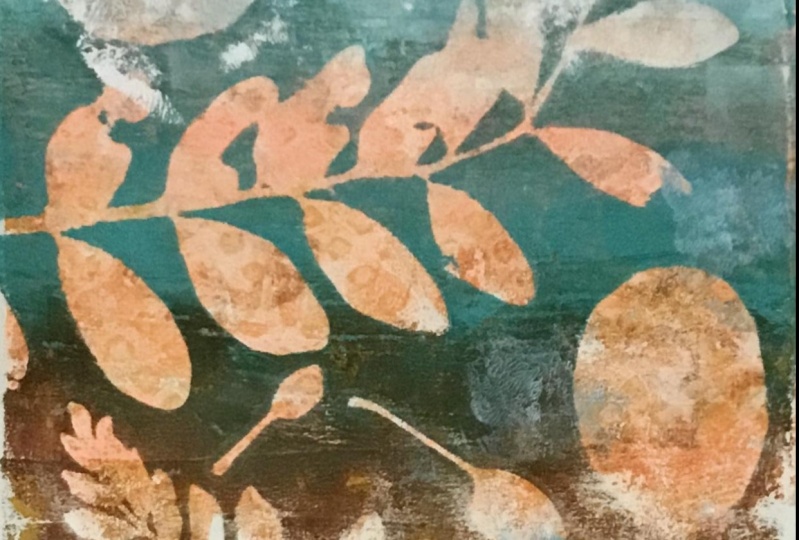
alcohol that's on that up. Just spread it over the top. This time I'm going
to pull it on some of the Japanese rice paper and see how well that absorbed
on the beautiful color. Hi, Yes, Look at that. It creates more of a
mottled pattern and I'm really enjoying that
cow, a combination. One thinking, what about
if we turn the jelly play around the other way? So it has more of a
landscape emphasis. Then with these
beautiful earthy tones, it really would look like I
beautiful dreamy landscape. I'm telling you. Then we could put perhaps and image Transfer over the top. That had looked really
cool. So let's do that. Now. If you notice, I still
have the same plate. I haven't wiped it. I haven't cleaned it, and I'm just going to add
similar colors to it. I really liked the prettiness
of the iridescent white. That looks really nice. Let's add some of the glitch. Titanium will give that a little move around on the
plight was spray some of the beautiful eyes inks on it and perhaps some of the Alcohol and let's
see how that prints. Now, all of the pipe that
was already there is still there and it will come off as you continue to pull prints. That's what I love
about gelli printing. It's just so easy
to keep creating. That could be why we end
up with so many prints. A bit of an end,
this copper bat, I should be able to
squeeze a little bit out. Oh yeah, look at that
metallic shine, love it. And perhaps some
of the eyes inks. I know we're getting really carried away now with
all our mixture. Let's perhaps put this on quite a thick piece
of paper because yes, I do have a lot of
paint on this plate. There we go. Look at all that paint. Yes. I know it's a
bit of a lot of high. No, I didn't get carried
away with this one. So we'll just keep
pulling prints. Definitely looking quite
landscape you don't, you think about we use a piece of our wet
strength tissue. Look how beautiful that looks. You can also of course, add a little dash of the spray inks when it
comes off the plate, just to add a little shimmer or to deepen some of the times. Oh, man, that's just
3. Creating Multiple Layers: I'm going to pull this one on the wet strength
tissues and see if I can get most of the
paint off the plate. Because then I'd like
to add perhaps some of these beautiful blue-gray
color that'd be really nice. Oh, that's such a nice texture. Now what I'm going to do is I'm going to let this dry
and then I'm going to pull this off the plate with another color that's going to have such a beautiful
texture to it. So I'm using my favorite iridescent
bronze Fine, The Golden. And I'm going to
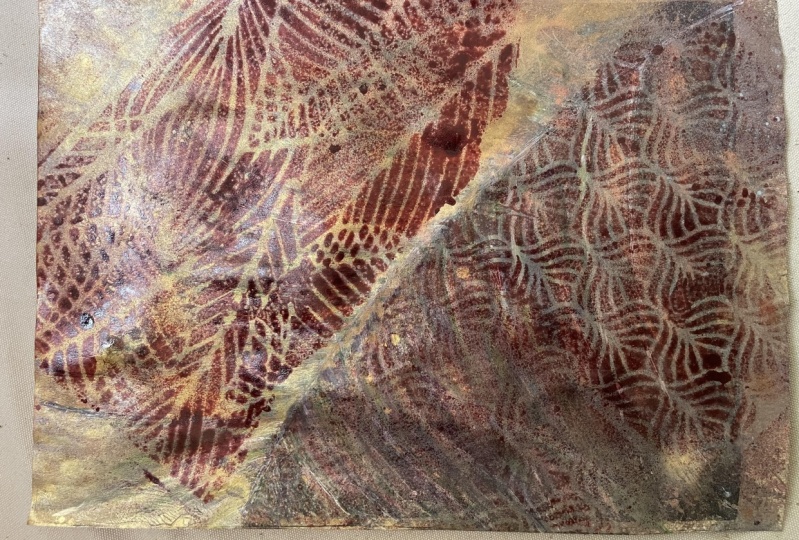
see if I can get the rest of that paint out of the gel plight sector. Beautiful color. Well it pulled quite a bit
of the fabulous paint out. Have a look at that. That just looks glorious. Look at the fabulous
texture on that. It looks like an old
weathered wool or texted paint peeling sign
of the house from Venice. That's just beautiful, bright. So I'm going to leave that
still left on the plight and that'll keep coming off
as I keep pulling the prints. Now I've got a couple of my
earlier ones that I did. Then I'm mostly dry and I'd like to give them
a second layer. Now if I look at
this print and I can see where I want
to add more color. I want need some up
there, some down here. And perhaps I might use some
of the iridescent white because it's a very light height and it won't add a whole
lot to her about it. We'll create some texture
and I might even pull up some of that underneath
paint there that'd be good. Bottom here, I think
I might add some of that beautiful blue
gray that I've got on my table. Just a little. Because I think that beautiful bronze color could work really well
with this blue-gray. That's pretty nice. So let's give it a
spray of some alcohol. Stays this way is by
spray going to be this, give it a spray. And perhaps even a little
bit of, let's say, what about some
bronze Schumer in the eyes inks because I
just liked the way you get that kind of patterning happened with the
water-based inks on top. I love it. Look how it separates
and beads up like that. It creates a fabulous texture. So I will put this
second layer on the print and see how that goes. It never quite knowing
what you're going to get until you pull
up the pace of byte. But sometimes that's
a little scary. But it is the excitement of why we love jelly
printing so much. It's so experimental and it's so exciting to see
what we can create. Now, I'm loving that I think the textures
are just beautiful. I might even add just a little deepening with the
coffee in the eyes Ink. And maybe just a little
spritz of the goldmine. I do love that. I do love a little bit of blink, but that page is now looking
absolutely beautiful, especially for what a glorious
atmospheric backgrounds. What about this one? I think it could do well with a little bit of that
blue-gray color. Maybe we'll just put
it straight down, see what it picks up. You never know sometimes what you might be able to
get off the plate. Yeah, that's beautiful. I really liked the way the blue-gray adds to the coppa and the bronze that was
already on the plight and added some more of the
iridescent white up there. And that looks pretty nice. I've got this capa
blast in the isaacs. I wonder what that'll look like. Oh, that's beautiful. That matches that
color really nicely. I'm really glad I
pulled that out. A little bit of spray. Jazz, beautiful. Say that patch there. What happens if we add
alcohol to it now? Yes. Because gotta try these
things, throw it on there. It can only not work. What's the worst thing
that can happen? It could look terrible. Well, you could always just wipe it off if you
don't like it. But I think that's
looking pretty nice. So I'm thinking that
these two prints could definitely do
with a second layer. It's rather hard to stop. A little addictive because you just want to see
what the next print is and what the
next marks going to be and how the next
paint response. I just love it. Sometimes
you just have to go over your prints a few times before they turn out
exactly how you want. Now that looks
absolutely beautiful. I think I've put it on the gel plight like
three times now. It wasn't even really
dry this time. But I wanted to suck up some of these glorious
combination that's now happening on my plate. That's because I've
just kept printing and printing and that
is just beautiful. I couldn't reproduce
that again if I even tried it so unique, It's such a beautiful
mono prints. And this one makes
me really happy. I'm gonna use this particular
straight tissue paste to keep going over the plate and picking up all
of that goes prints. Because it just looks amazing the more layers you put on
of the beautiful colors, the more Texas you pick up. They create such incredible, beautiful little
abstract paintings. Look at that. That
is just glorious. What I love about using
the spray inks with the alcohol is that kind
of incredibly textured, feathered look as it separates
there on the plight. I just love it. This is why you need to be
using watercolor paper. Soak up all the layers of paint. Just beautiful and so much FUN. So I'm going to let
all these prints dry. And then we're going to
look at and see if we want to add anything else to them. Maybe some stencils or some stamps or some
image transfers. Or let's see what we think about our beautiful
Atmospheric Backgrounds.
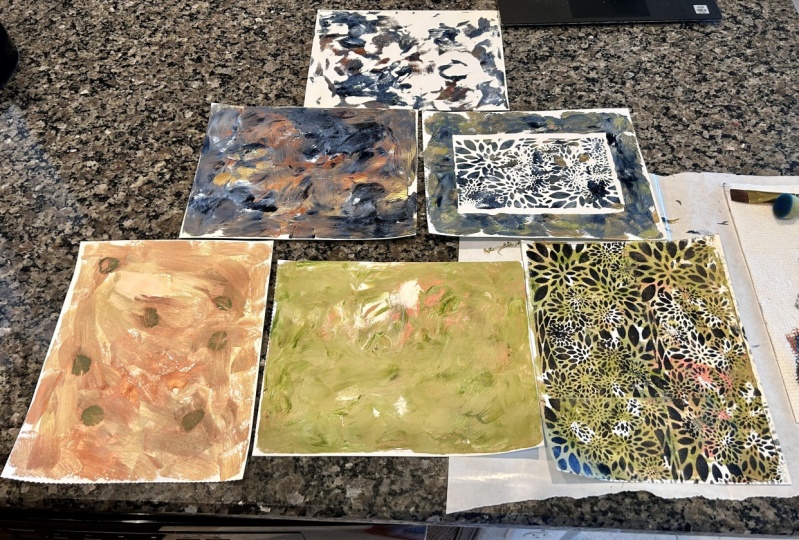
4. Adding Stamps & Stencils: Of course, I kept
printing and Printing. Look how beautiful
they turned down. I absolutely loved it. I had so much fan. I was trying different
combinations of these colors more or less
or each of the colors. And I would just kept experimenting with
different options. You don't have to
use these colors. You can use any colors. What we're experimenting
with is using the acrylic paint
and juxtaposing that against the alcohol inks and the alcohol solution with
the water-based inks, It's so much FUN. Allow yourself to experiment, make a mess, get a wrong, it really doesn't matter. You can add another
layer to your prints, and even that changes
them dramatically. The ghost prints look
absolutely fabulous, especially when you pull them up with the golden bronze,
iridescent Fine. Oh man, it's just magic. The amount of texture and beauty in the prints
and then mono prints. You can't repeat them than
one-of-a-kind, amazing, incredible handmade
papers for you to use in your mixed media projects or your collages or
anything really. So let's have a look now, what we can do with
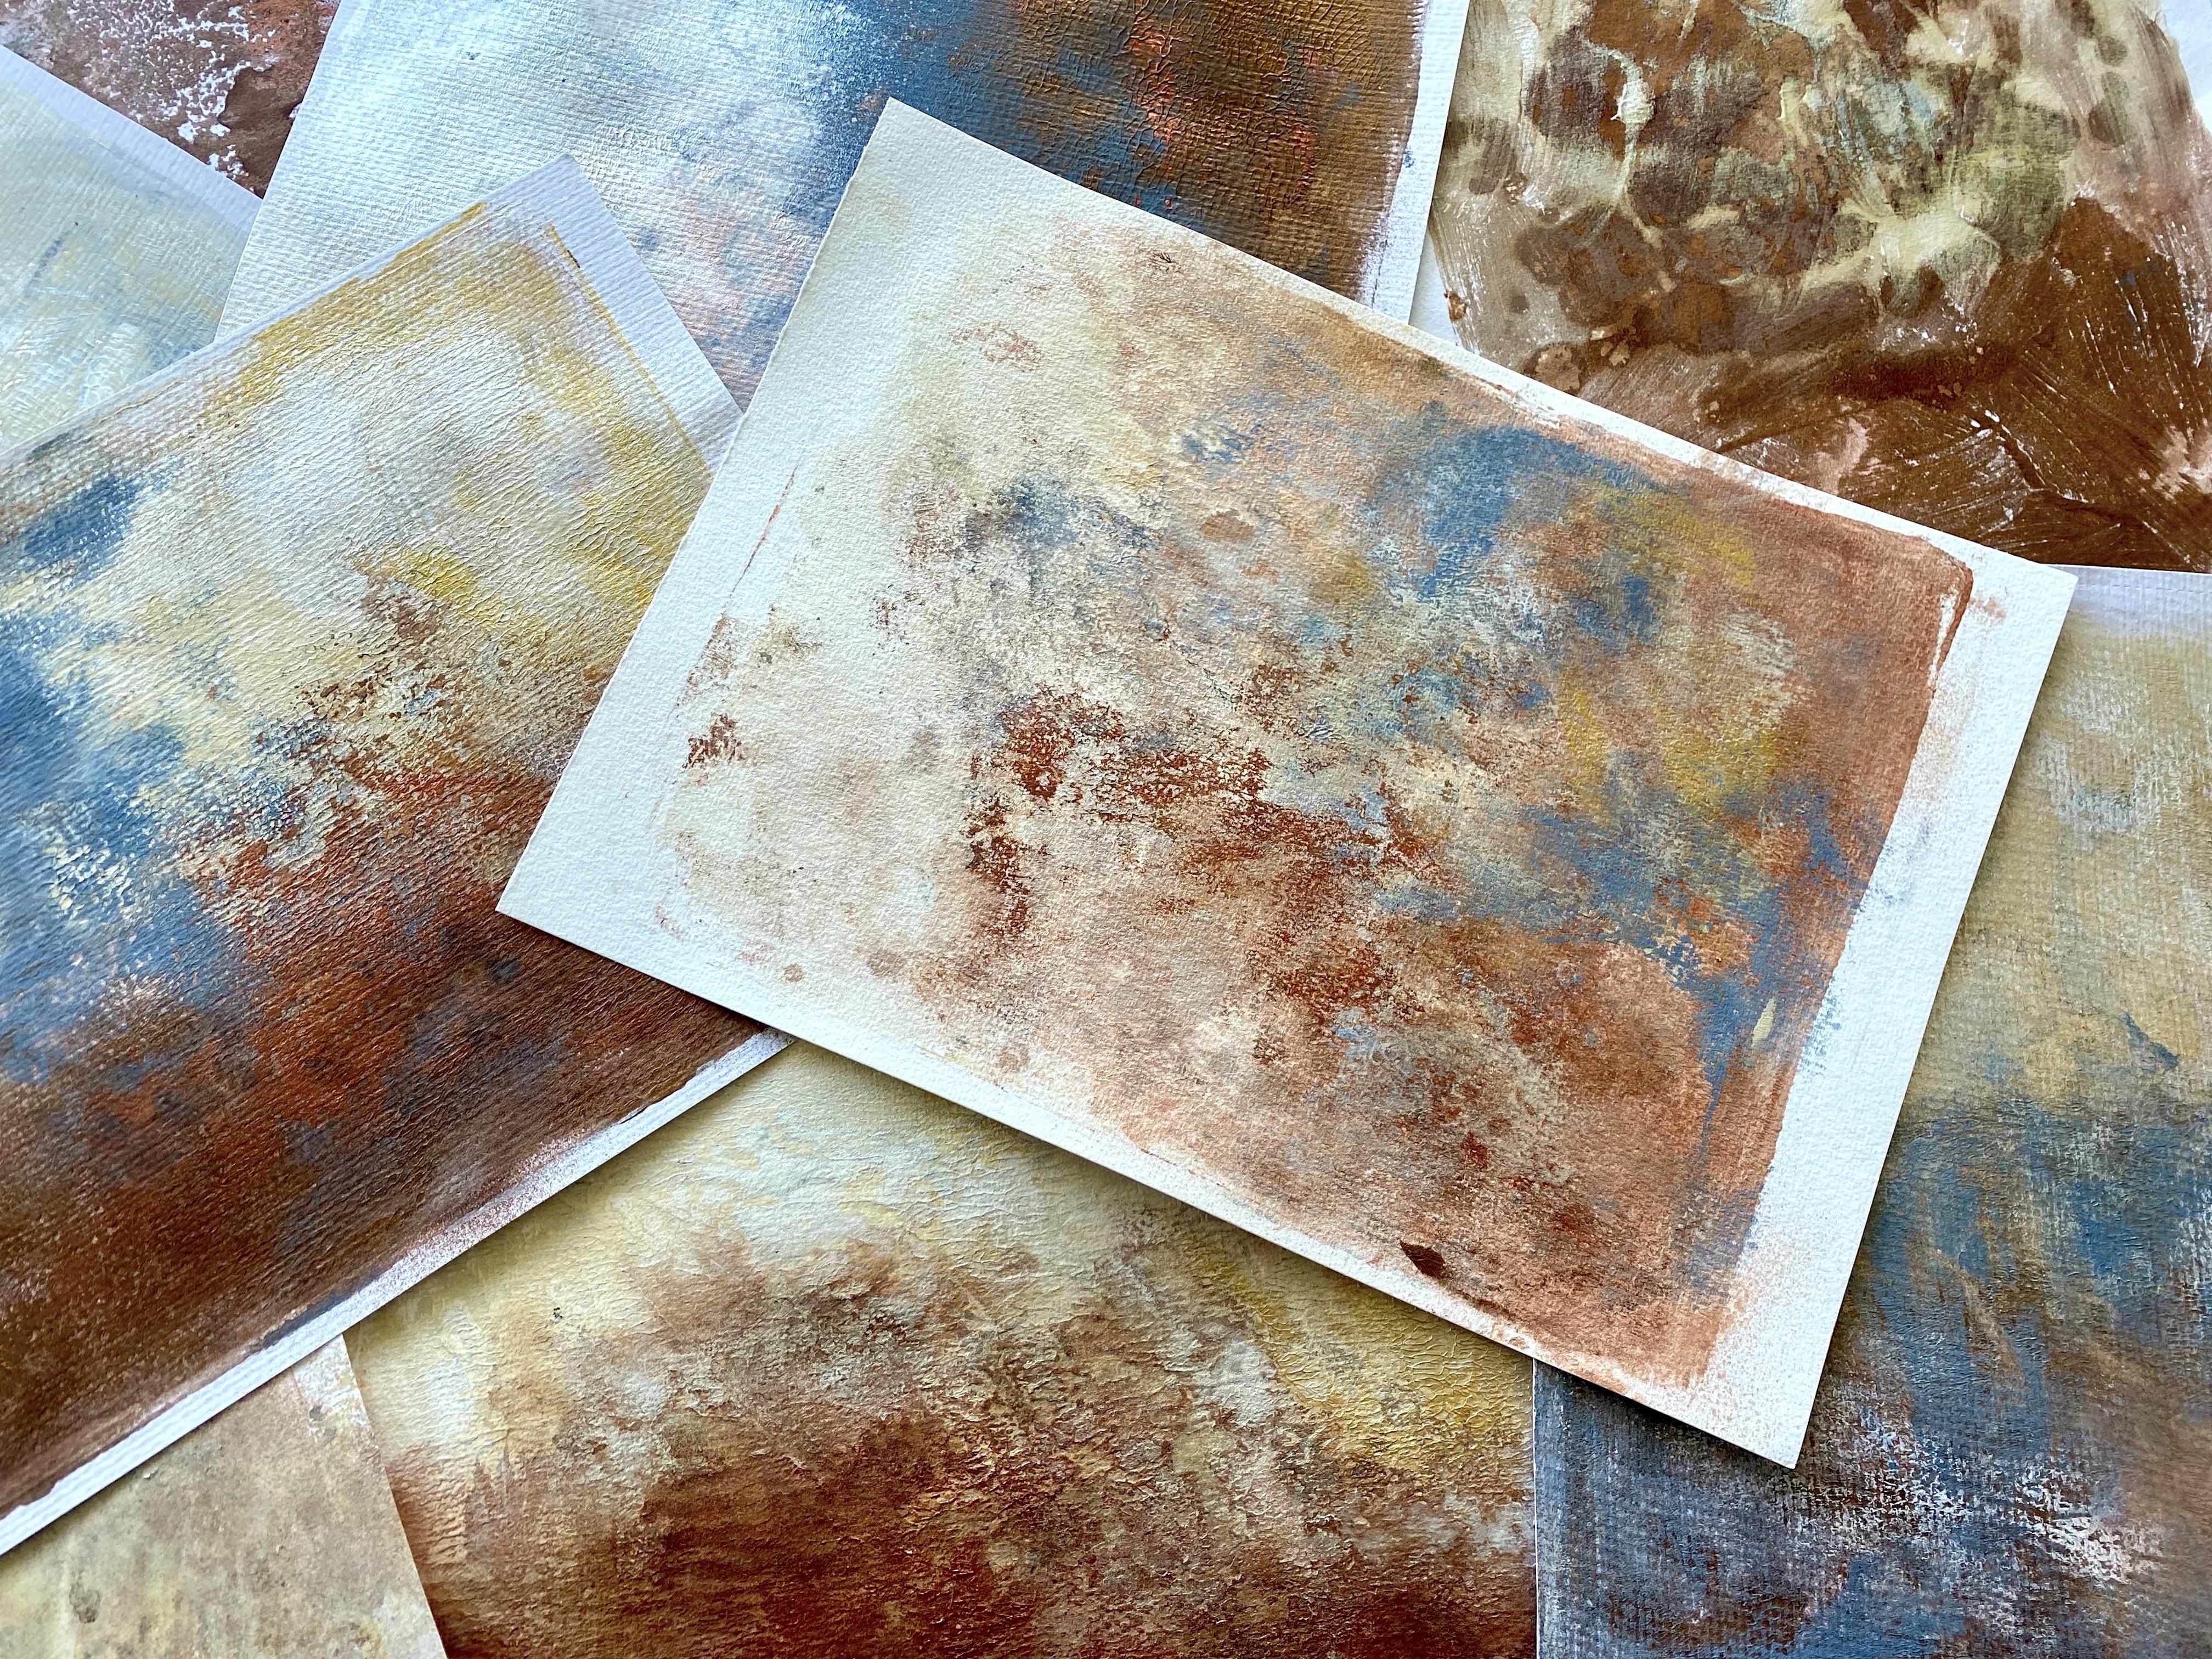
these beautiful prints. Have a look at these
glorious prints. I just loved them on so happy. Now remember, they will take two or three layers
of putting them on that fabulous paint
and Alcohol Ink and texture and spray inks to
get them looking like this. This definitely had
a couple of layers. And this one turned
out absolutely beautiful because I kept putting it on the gel plight and just touching it with paint until it built up an amount on the print that
I'm really enjoying. I love this mix of colors. Even the ghost prints look
absolutely beautiful. Look at the lovely
textured math on that, that looks glorious
sodas, that one. And landscape design one looks beautiful to
that was when I turned the gelli plate
around and did it on an landscape format
that's looking glorious. Now, what are we going
to do with these prints? I mean, you can use
them just like this. They're absolutely
beautiful by themselves. They're glorious abstract
paintings in their own right. I mean, look at this
one is just fabulous, but if you want to add some
more embellishments to them, you could make some colors. You could add some stamping
awesome Stencils onto them and turn them into even
more developed artworks. So I might just give you a little example of something
that I would do with them. Just to give you
some more ideas, we can easily put some stamps
onto one of these prints. I've got this
beautiful foam stamp tapping into some paint, some of the glorious
golden iridescent coppa. And look how
beautiful that looks. Just love it. So easy, we can transform
this glorious background into a beautiful print that
we can then add to our other artwork or
collage or anything else. I think I've got a
small one as well. These ones are from
PMI, the studio. I'll put the website into your notes if you want
to find where to get them. Love it. Look at that. I know I'm going crazy now. Somebody stopped me. That is just glorious
and so easy. I love easy, I love instant. Look how beautiful that looks. Adding a simple leaf stamp
onto the glorious background. Maybe just one more. Okay, One more,
one more week go. Here we go. Fabulous. It's the same process. If we want to put a
stencil on the page, look at the beautiful
combination of colors. This one's had definitely
three layers of paint on it. You just keep working
on them until you're happy with
how it's looking. So putting a stencils
over the top, Easy peasy, lemon squeezy. I've got a little bit of brown black paint on
this tray stencils, and I'm just dabbing it on. Adding a little bit of shape to enhance out landscapes theme. Tonight. How does that look? Look, how easy that was? It looks fabulous. And I'm loving the way it's got that pop of blue up there, the beautiful earthy tones, little bit of Cloud. All of a sudden,
it's the landscape. There are so many possibilities
with stencils and stand. It truly is absolutely endless. What you can create with these fabulous backgrounds and
a few items, Art Supplies. Now I'm thinking we could
just add a little bit of the iridescent bronze Fine to this print to make it
not so stiff looking, it's a little stiff on the page. I'm adding a tiny
bit on my brush, very stiff brush, dry brush to do a little bit of
scumbling on the tree, just touching it a little bit just to break it up so it's not so stiff looking because it just needs a little
bit of playing. Now, if you're
doing this and you put on too much and
you don't like it, you can just wipe it off again. So don't be scared to try just a little bit of
scumbling on the tray so it blends more in the
background and doesn't stand out and looks clunky. If you're not happy
with this section because you print is dry now, it's easy peasy, you can
just wipe it off with a damp cloth until you're happy. I just wanted a
little bit on there. Not too much just
to break it up. So it wasn't so
solid in that brown, black color and it just
kinda blended a bit more with the background
that makes me a lot happier. What do you think? Don't you
think that looks better? I think so. And it only took
a few seconds to do that. And that's looking much better. What about we add a stencil
with some abstract shapes. I'm really liking these crosses. And I'm thinking we
put some on with this beautiful champagne
gold Stencils, butter. Yes, look at the color. It's beautiful. Now, what I like about Stencils, but it is, it's thick, straight out of the pot. You don't have to
mix it with anything for it to get a lot. Fermat, which I often do
with my acrylic paint when I want to put a nice
big thick stencil on. And you just use
it straight like this with a palette
knife or easy peasy. Yes, I do like instant,
beautiful and thick. It's luxurious. And look at the glorious
champagne gold color. That looks absolutely fabulous. I love it, but I am always
partial to abstract. Loved the Stencils, butter, and you can get it in a
whole heap of colors. It's just so easy
to use straight out of the pot and straight
onto the beautiful print, looking glorious, love it
5. Image Transfer Magic!: So if we want to
get a little more advanced with our techniques, but using our
fabulous Backgrounds, we could create an
image Transfer. Now the most important part
of an image Transfer with the jelly Plate is to
make sure you have a good-quality
color laser print. I get mine done from an office stationary supply
shop, its commercial machine. These particular prints
always work for me. If you have a laser
printer at home, you might have
trouble because it doesn't have enough
toner In the buildup of the print because the
toner is what resist the paint on the dark sections and makes that
stick to the plate, the light areas or the white sections that
don't have any toner, just absorb all the paint and they don't stay
on the plates. Art creates that dark
and light transference of the image. You might need to run your print through your copy or twice. If you have a home laser printer
to make your image work, don't try and use inkjet prints. They just don't work on. Your image copy is the most
important part of doing it. Image Transfer, making sure you have a
good-quality lies and print. The second most
important part is the amount of paint that
you put on the plane. You don't want to match because it gets absorbed
into the paper. But you want enough so
that it leaves a print. I know it's a little tricky, but I do have other classes
here on Skillshare that go into the image Transfer
with a lot more detail. Now, my plate is beating up
because I didn't clean it after we did the
Alcohol Ink autopsies. So that's another point. After you've put the
Alcohol Ink on your plate, you might want to give
it a clean wipe it over, and then use some mineral oils or baby oil to make sure that
it's not going to dry out. Friday. Let's see how we work
with the transfer process. Remember, you need a good
quality laser colour print for the transfer process for
this particular technique. Today, it's not too bad. That's in the
brown, black color. And then I'm going to put
it straight onto one of the goes prints because I think
that'll look really nice. I liked the kind of sketchy textured paint
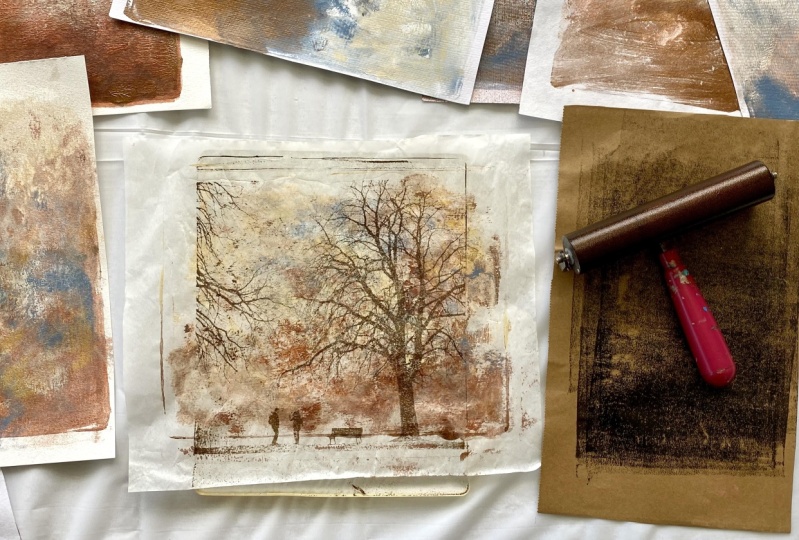
that's on the paper. Let's see how it works. This particular
ghost print is on one of the wet strength
tissue prints. So it should pull
up that Transfer. You can wait until the
image Transfer has dried and then use a Mac
medium to pull it up. I'm not good with
waiting so high. Like to just put
the paper straight on and pull the print
while it's still wet. Not too bad. It's come right off Plate, which is really good. And look how
beautiful that looks. It looks like a
watercolor painting. You can see my
little person there. It's a little
bubbly and sections because I didn't claim applied, not to worry, not to worry. I liked the texture of it. You can definitely
see that it's trees. You might not notice
the person as much, but it probably dry a bit
darker and look a bit better. I have a role. I'm pretty happy with that. I liked this sketchy
background color that's from pulling
the ghost print. There's no way I
could reproduce this. It's quite a
beautiful MammaPrint. Definitely looks
like a watercolor. He'd go, That's another
technique that you can use these beautiful
atmospheric backgrounds for having a go at
the image Transfer. Just remember what I said. The most important thing is
your color laser printer. Little bit of practice. I'm sure you'll get the
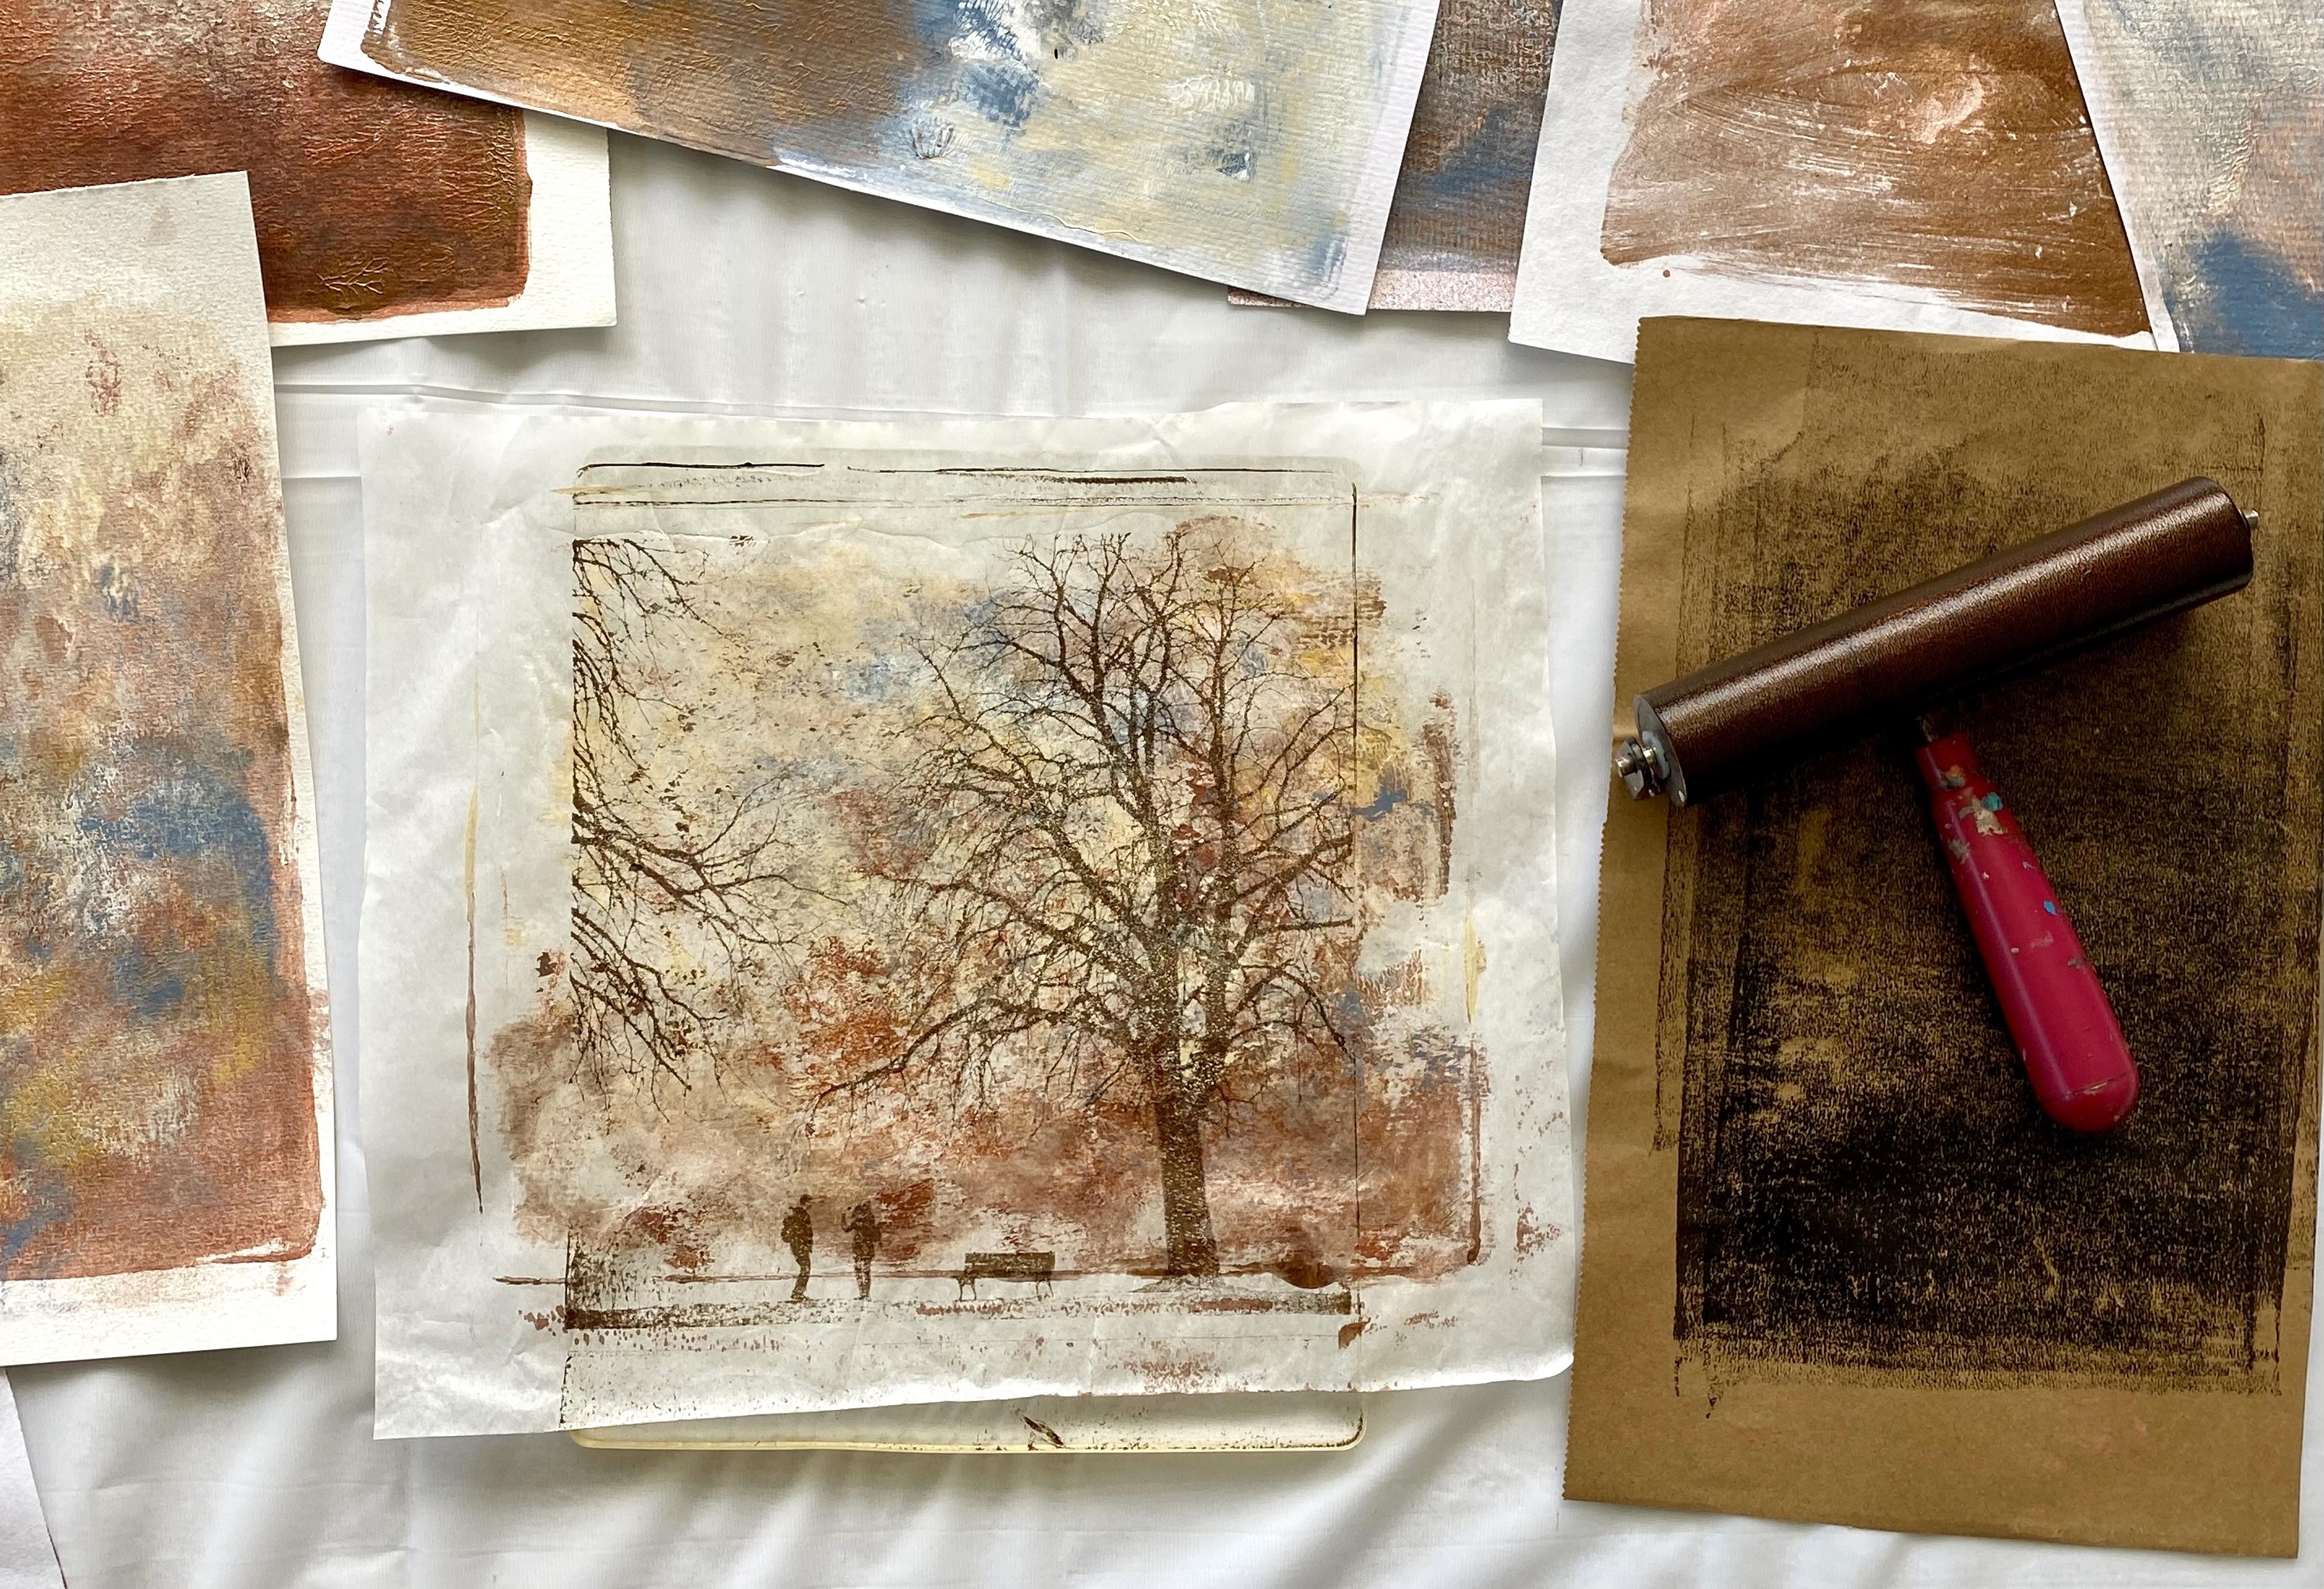
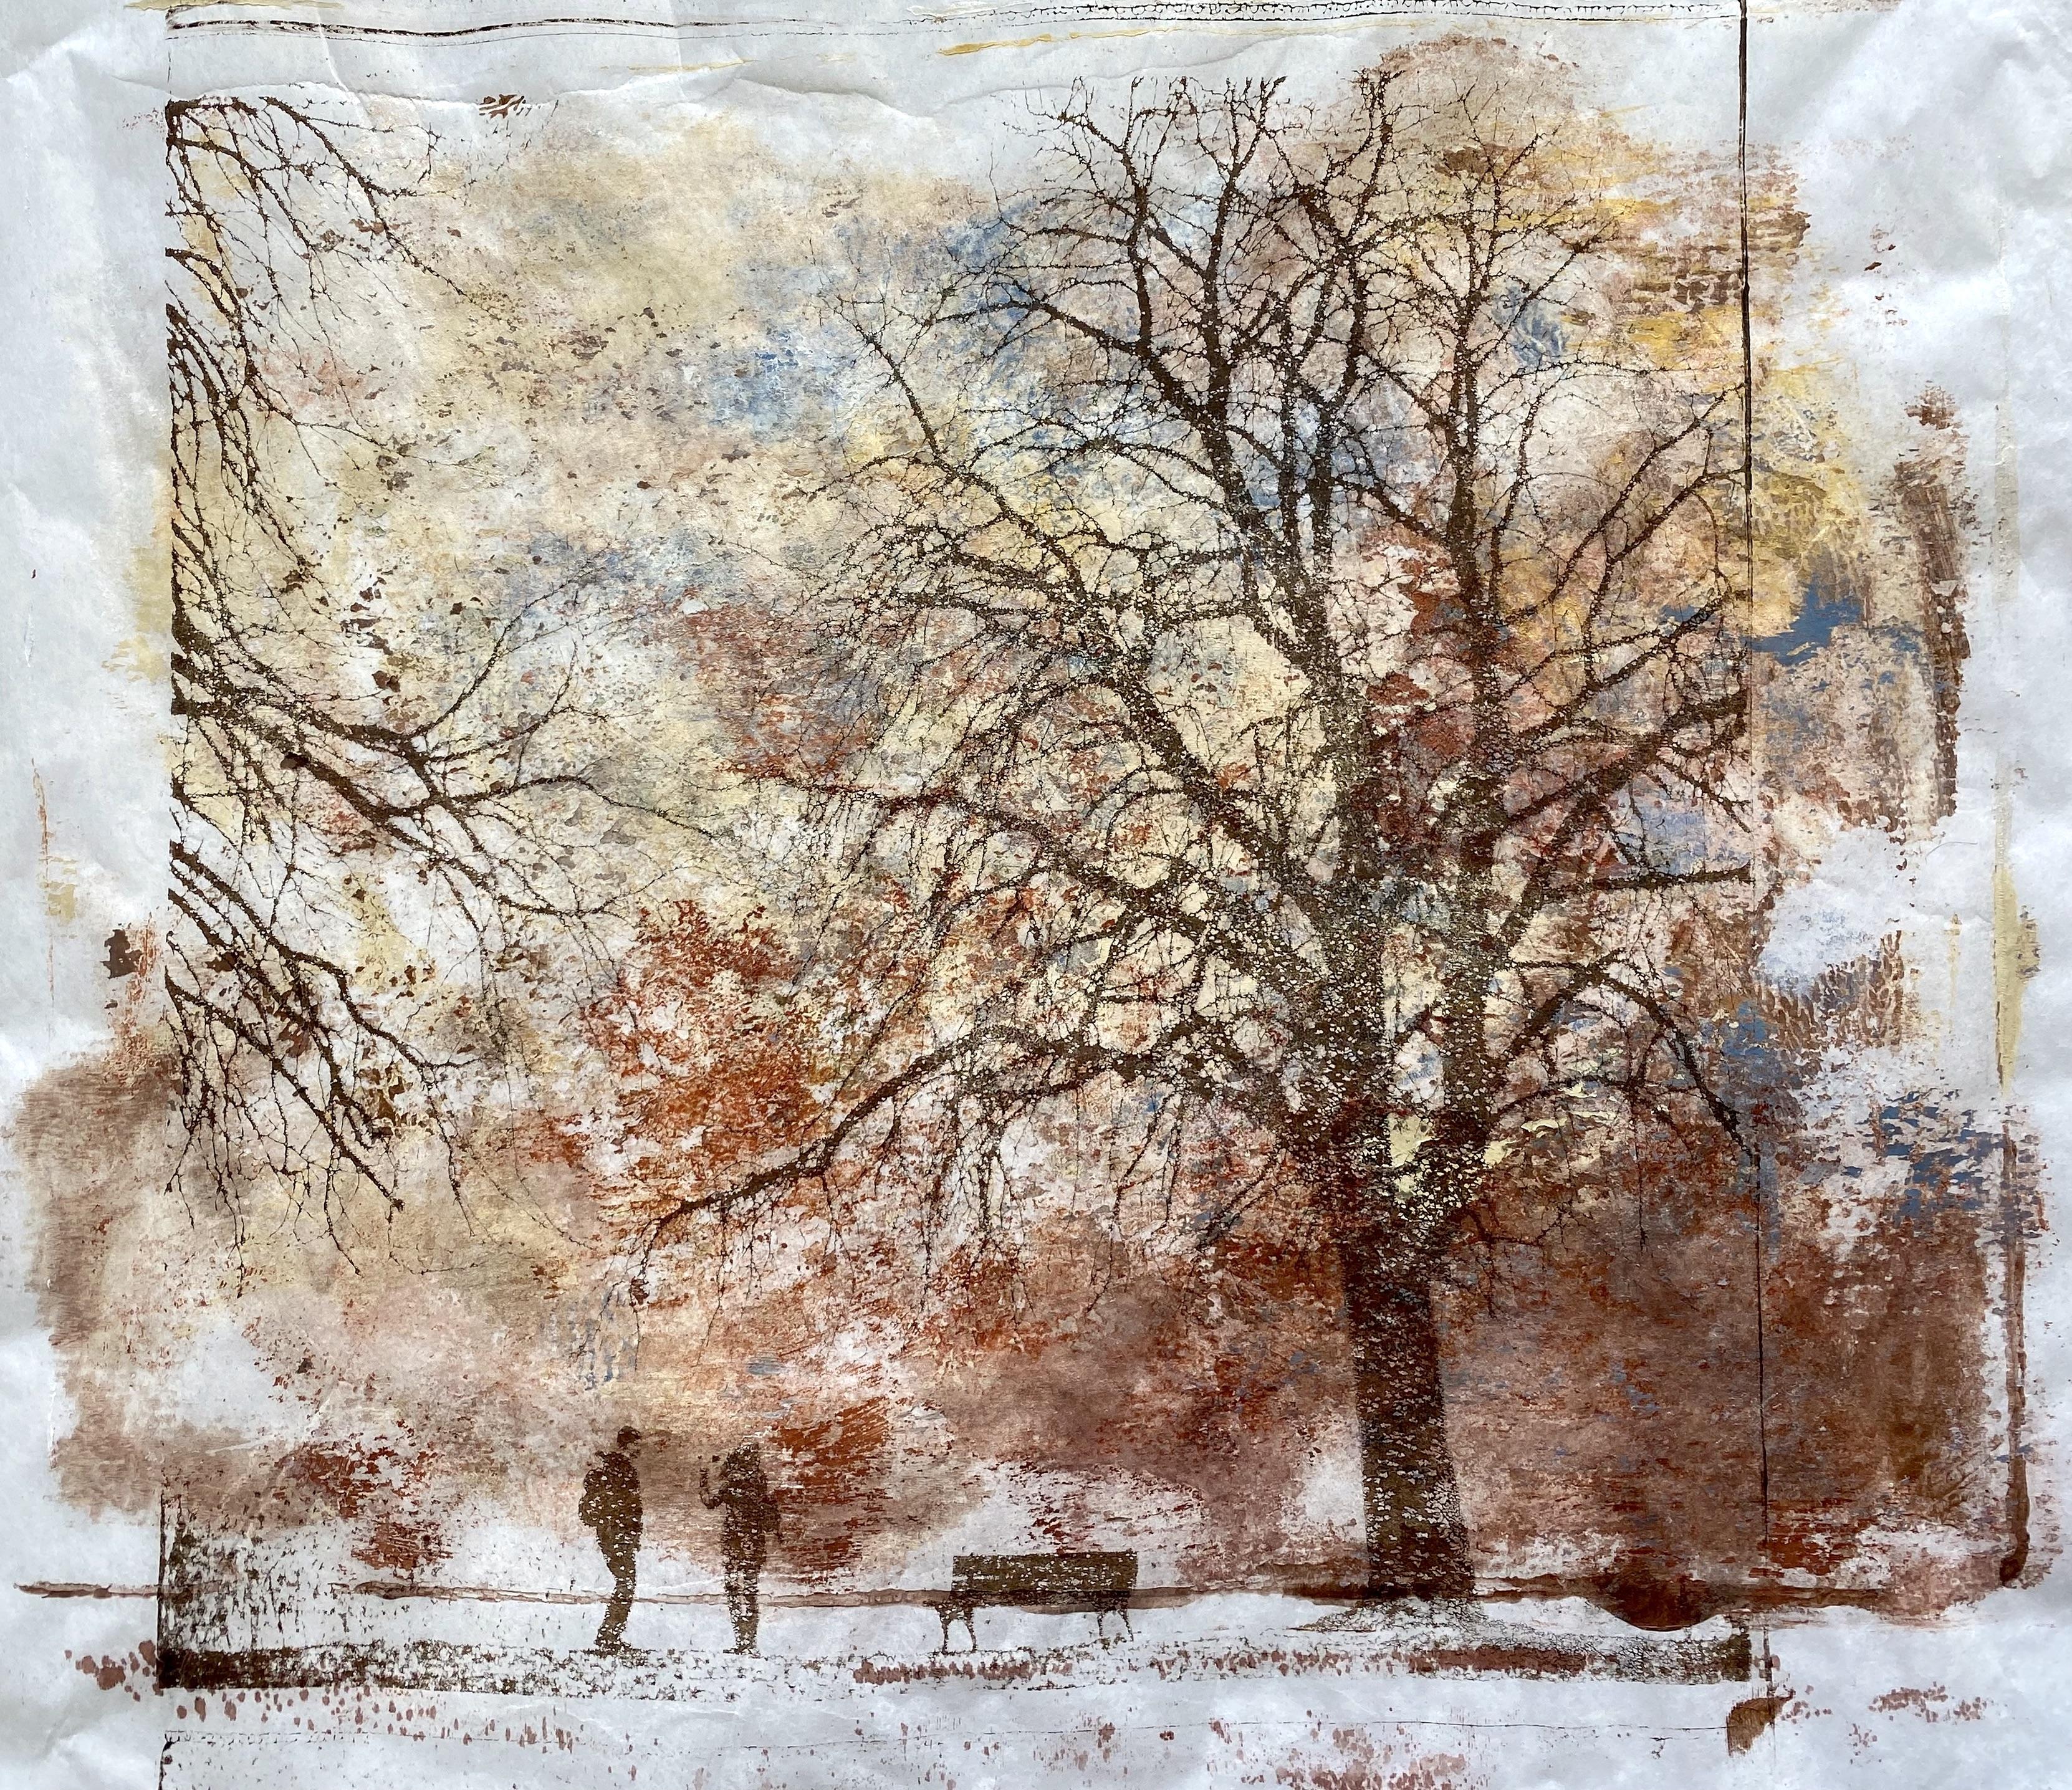
hang of it in no time. So let's just try another one on this beautiful ghost print, where this glorious tree image and a little
people at the bottom. Now that just turned
out beautiful. I'm really happy with how this looks like the little
cluster of columns up here. He said, he just doesn't want you gonna get
until you try. I liked the way there's the
lines across the bottom here and where the people
are and then park bench, that turned out really good. It actually turned out
better than I was expecting. Because once I was
pulling the print, I thought maybe I should've
made it landscape, but it actually turned out
a lot better portrait. And you can see the people
down the bottom really clearly
6. Thank You & Farewell: Thanks for joining
me in the odd class. Wasn't it just so much FUN? And how many prints
digit creative? Dye? Forget to post a peak
in the project section, I'd love to see your
favorite prints. I really loved beautiful
multilayered background, the abstract prints,
but then I also really enjoyed those
image transfers. They came up just so beautiful. Have a look at my other
Skillshare classes, especially if you
want to develop more techniques with
the image transfers. I have a few here on Skillshare. There's also some collage
making techniques. So have a look at
my other classes. I now you're going to enjoy it. If you have any
questions or if you're stuck on something or
something's not working, right. You can always
e-mail me directly, froyle it for a lot.com and I'll try and ends
all of your questions. But don't forget, keep creating, have courage, have a lot
of fan and don't give up. You can also contact me
on Facebook or Instagram, and you can have a look at my beautiful original
paintings on my website. If you want to show
me more what you'll creating common join my
private Facebook group. There's a whole lot of
beautiful people in there that just love creating and
encouraging each other. I know you'd really enjoy it. The links will be on your notes that's in the class
descriptions. I have a look at
that and I really hope to see you
again in the studio.
7. Bonus Lesson - Turning Up The Heat: Welcome back to the studio. Today, I'm creating a bonus
lesson for this class because I just want to try these fabulous experimental
techniques again, but with some different colours. I'm wanting to use a
little brighter colors. Mm, maybe get even a little
bit more experimental. But what I love is
putting the paint on the plate with the alcohol
and also the alcohol inks, maybe some acrylic sprays. I'm even going to pull out
some powdered pigments. I'm a bit excited. I'm a bit like a mad scientist. I do like to
experiment and create different types of textures
with the fabulous gel plate. Now, today, I have a 12 by nine gel elf
plate that I'm using. I'm also going to be
using this paper today, which is a watercolor paper. It's 185 grams or 90 pound hot pressed paper so
it's beautiful and smooth. And that was why I bought
this particular paper, and that's why I'm using
it for this experiment. Now, it's not super thick, but I'm hoping it's going to be thick enough for
what I want to do because I will be giving the
plate lots of loven and the paper's going to have to absorb all of the paint that
I'm going to throw on it. Now, I'm going to start
with these two colors. I have naples yellow, reddish, and naples yellow. The paint is a little stiff. It's an atiler paint. So I've put them into these watercolor containers
with some water just to soften them and make them thinner to use because I
want to get that watery, washy kind paint a
technique on the plate. That's the plan, Stan. So we're going to start
with these colors, but we obviously aren't
going to stay there. I also might pull out
some fluid paint. I know. It's going to get very
experimental today. So let's just start with
these beautiful colours, brushing it on the plate. This is a fairly new gel plate, so it is still going
to be beating up, which I totally love. I love that effect. I love the watery look and the beating effect on the plate. So I'm going to put some of
these two beautiful colors, brush it straight
onto the plate. That's how we're going to start. And then let's see where
we might want to head. Maybe a bit more of this one. It's beating up more
than I thought it would. That's really funny,
but it's going to look beautiful 'cause
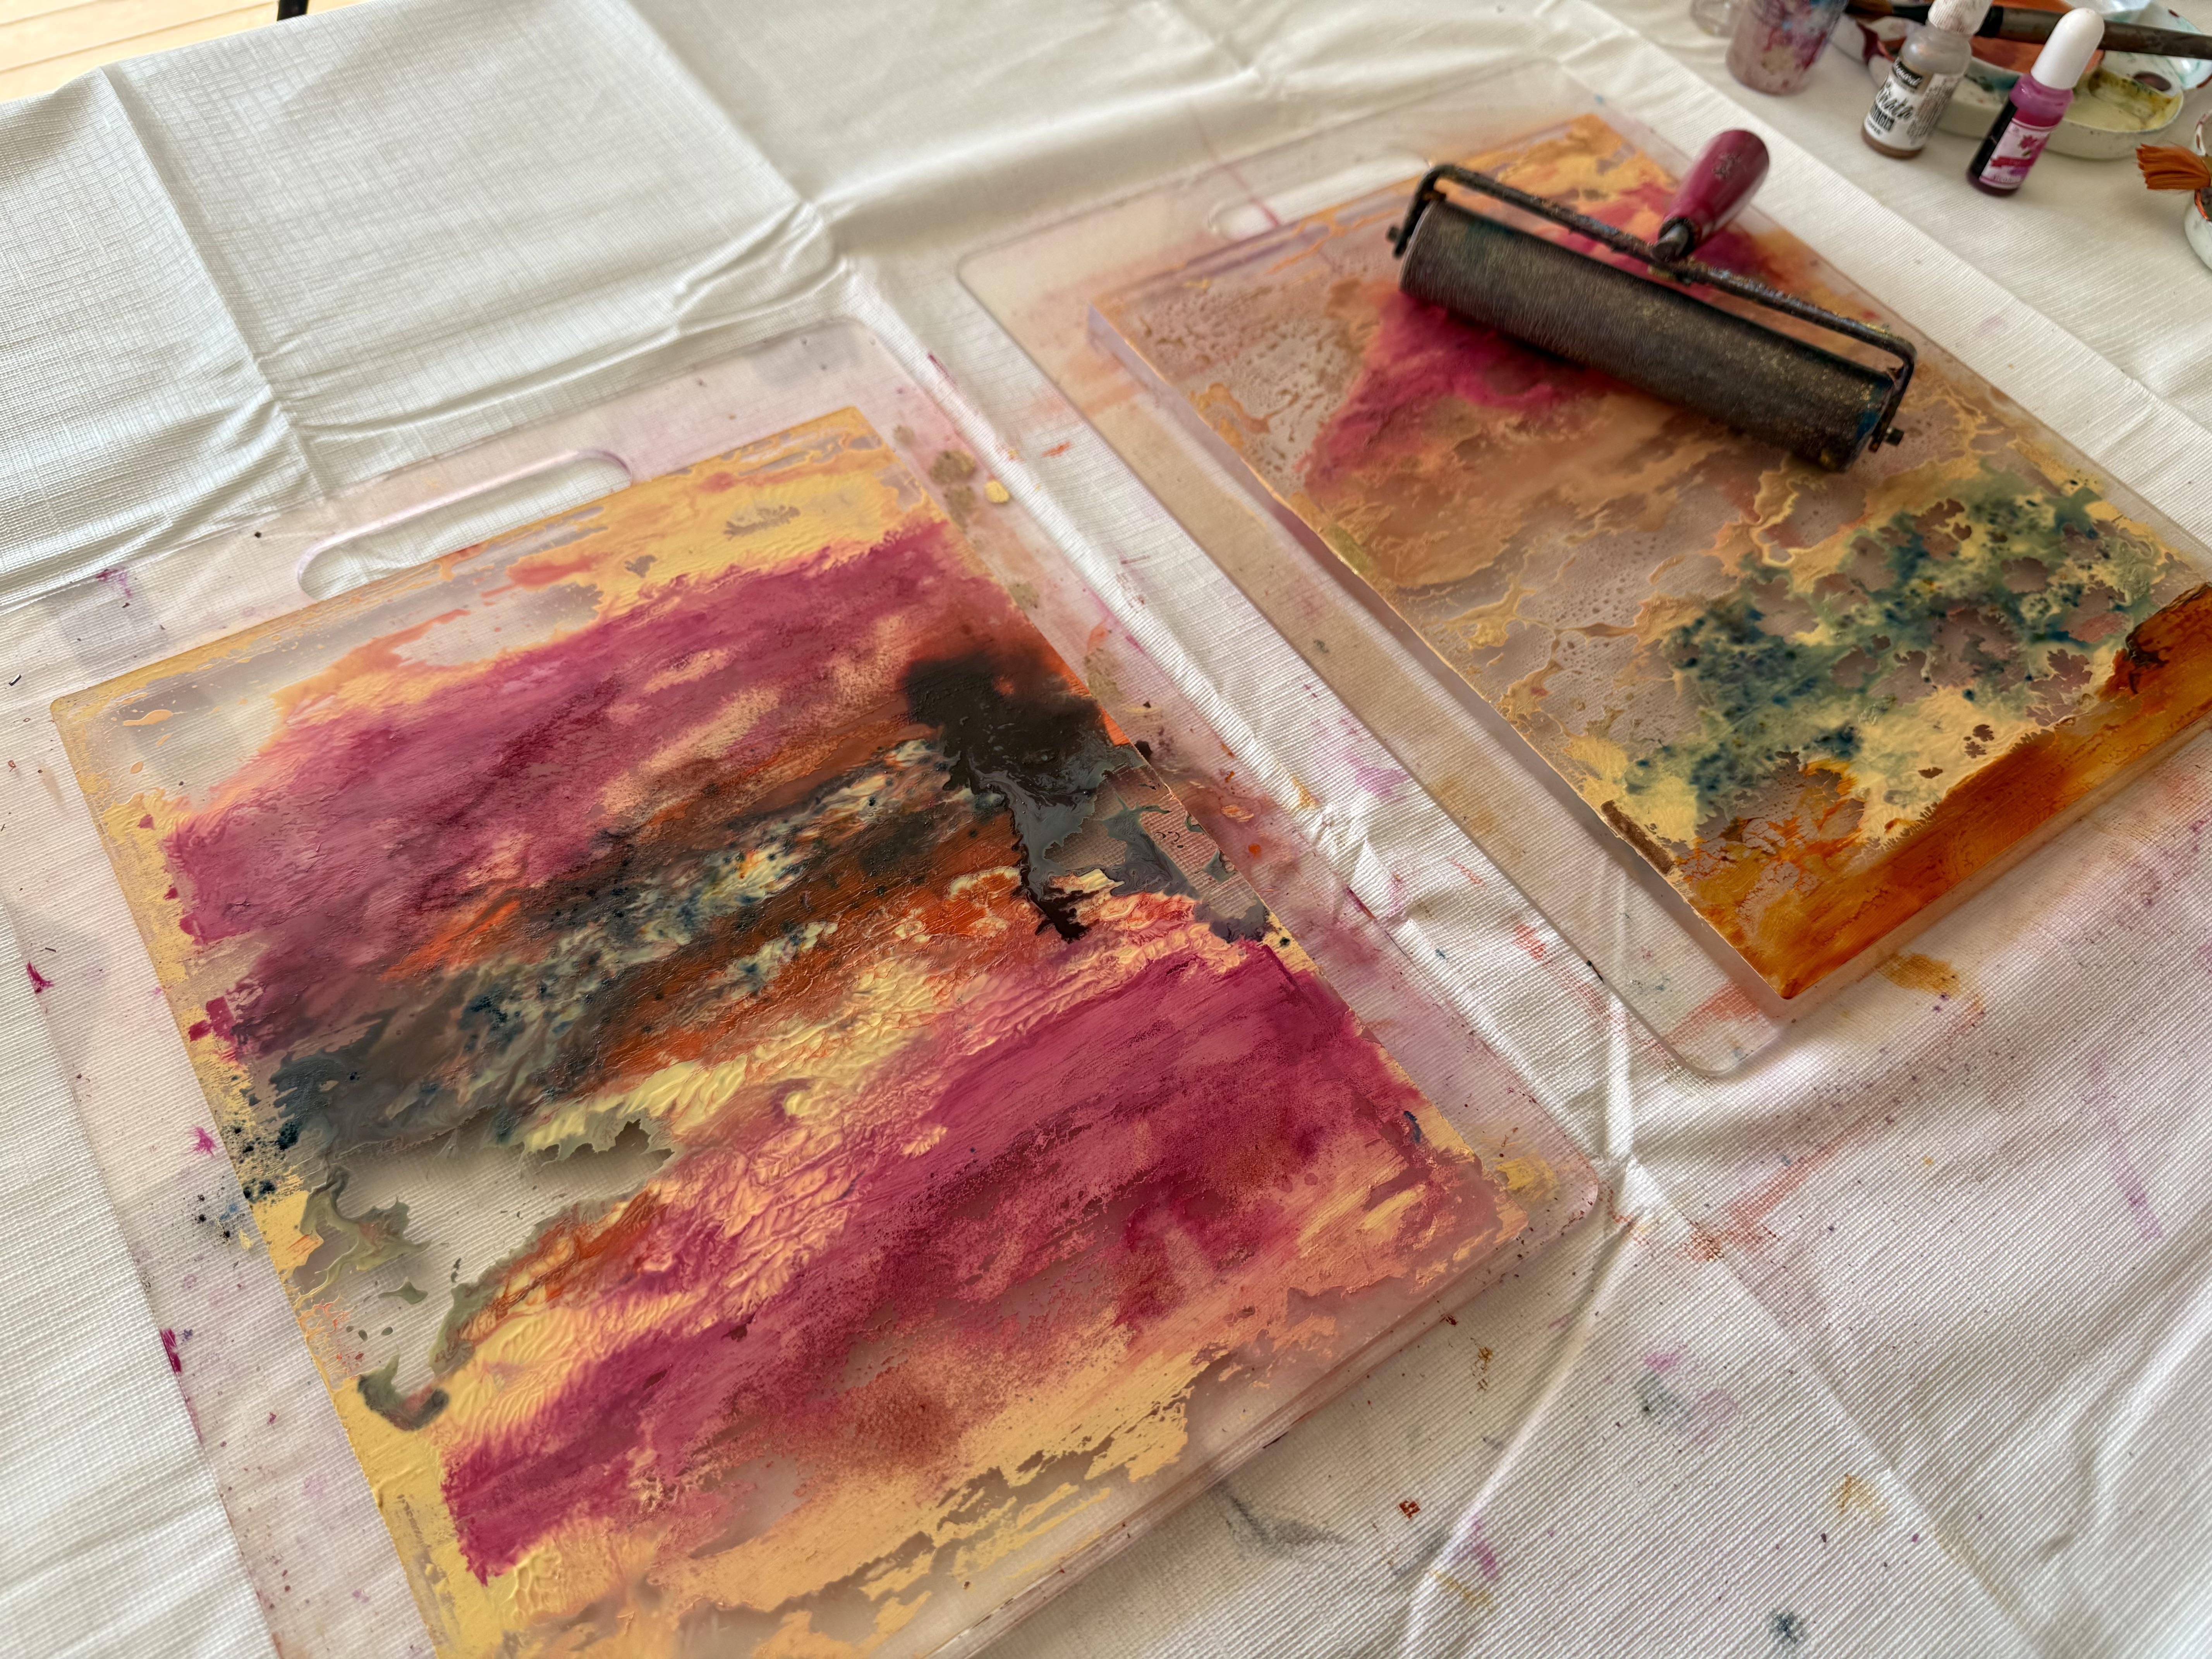
the colors are glorious. Shall we splash a little bit of maybe the magenta
in the fluid paint? So it's a lot more fluid
than the full body paint, but not as runny as what I just created by adding the
water. Look at the colors. Ah. Now, these are some of my
absolutely favorite colors. So that's why we have
to use them today because I'm just
wanting to Right. We've got some paint on there. It's beated up pretty nice. Maybe we'll add a little
bit of the ozoGld. This is another beautiful color, some of the fluid paint
into this area down here. That is going to look stunning, absolutely
stunning. Right. Now what do we want to do? Perhaps a little
bit of the izincs. Now, this is an
acrylic spray ink. It's definitely one
of my favorites, although it's a lot harder to get now because the ia zincs are actually getting
discontinued was what I heard from somebody. Heartache. That's a bit sad. So let's spray on some of the beautiful bronze
Schumer favorite colors. Right, I think we could just
pull that and see what we've got with these colors because
then we're just going Oops, it's a bit slippery. Because then we're just going to keep adding to the plate
and keep adding to these glorious colors and see what kind of experimental
prints we can create. I love doing experiments. I think it's one of
my favorite ways to create with the gel plate. Because you never quite know
what you're going to get to you pull back that print.
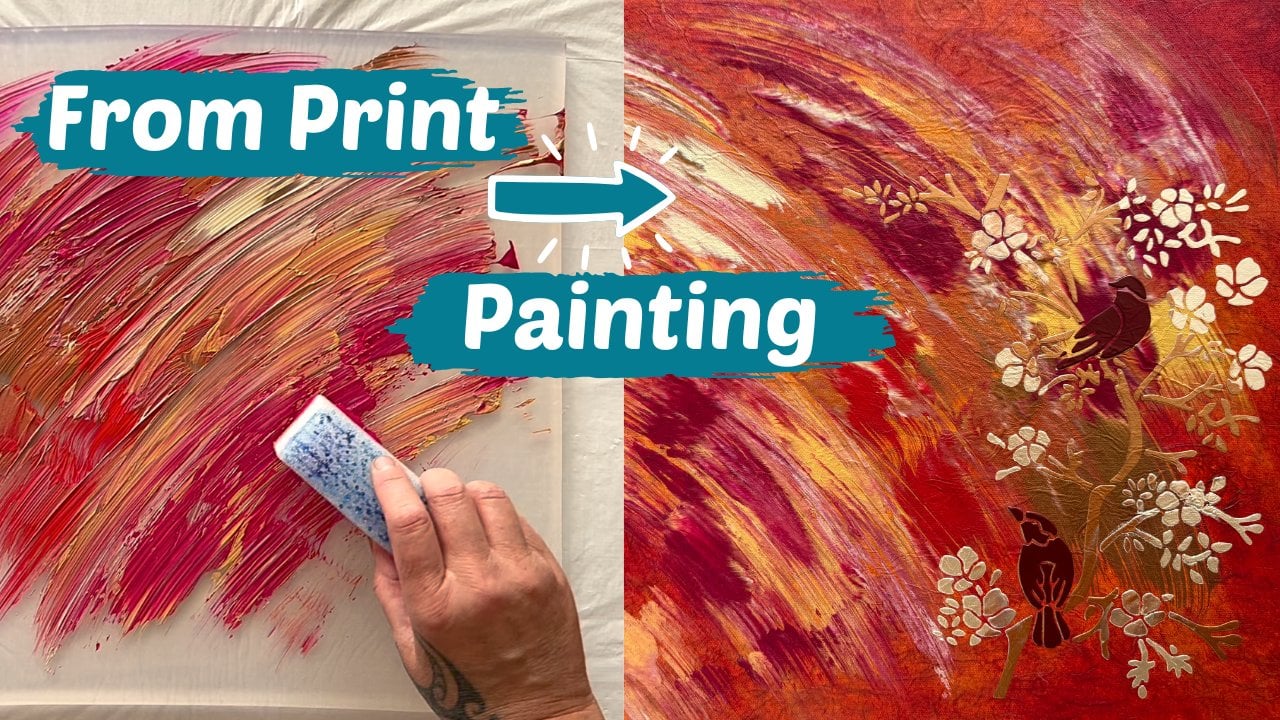
Ready? Are you ready? Tada, tada. Yes. Now that
is absolutely beautiful. And we can add to that. We can create a second layer. We can create stencils. We could add an image transfer. We could create paint. We could draw up with
even some paint markers. There's so many ways you can use these beautiful
starting prints. And they really do look like a painting because we've
literally brushed on the paint. Right. So let's add a bit
more of this glorious color. Now the paints are going
to get a little more mixed up because I'm just adding
them straight over the top. And that really is a bit of fun. I love the way it
creates those textures. Now, what do I want? Do I
want some more magenta? Okay. Let's add a little bit
of magenta onto here. But this time, let's add
some of the alcohol spray. That's got the ypropl
alcohol in it. Maybe some alcohol ink. Let's do some of that rich gold. You can't fail with gold. We might just add some more of the beautiful naples
yellow down here. Absolutely. Love
the brush marks and the textures that this kind
of application creates. It's so much fun.
Don't be afraid. Just splash it on the plate
and see what you get. Right. Alcohol inks. Are
we feeling brave? I'm feeling very brave. That's I can only not work. And it'll be alright. Let's put some of that on there. What happens if we spray Oh, some alcohol to it? I don't really know
what that did, but it might have
done something. I think it kind of just
disperses the alcohol ink. See, you can see now the alcohol coming
through the paper. On the back there, it just
creates a different texture. It creates a different mark
because the alcohol ink and the alcohol itself reacts
to the acrylic paint, and it just has a different
kind of look to it. I did say I was a mad
scientist, now, did I? Right, oh, right, oh. Let's have a look and see
what we got from that. Little experiment. Oh, yeah, baby. You can see now the alcohol ink on there on that section of it. Now, perhaps I need some more full body paint on it because it's beaded up so much, I'm losing sections of my paint, but I am very keen to do
second layers on these prints. What about we get
a little bit more dramatic with some
quinacridone violet. So this one is similar to the magenta
that I was already using. It's just a little darker. And again, it's one of
my favorite paints. So let's put some of
that on the plate. Oh, I love, love, love the look of this
with the brush marks. And then we could add some
of this at the bottom. Mm, maybe we'll add
some of the ozoGld. I like that idea, as well. That's such a beautiful color. Perhaps a little bit
more of the alcohol ink. What's that going to do? Oh, look how cool it looks. Now, that looks amazing. This time, I don't think
I'm going to spray it, I'm just gonna
leave it like that. Let's leave it like that and pull that print and
see what it does. It's kind of sitting on
top of the acrylic paint because I didn't put any alcohol on it or spread it around. It's just going to
sit on the top. And because we're pulling it with such beautiful
watercolor paper, I'm hoping it's going to
just suck up into the paper. I'm hoping. I'm always hoping. But the colors are beautiful. The paints look great, and it's just a
whole lot of fun. Let's see what that did, how the colors responded, and how the alcohol inks. Ah, that didn't do what
I thought it might do. Look, it didn't
stick to the paper. It's still on the plate. Ops these. Maybe I think I might wait for this paint
to dry and then pull it with another color because that's really interesting
what it's done there. That was just with
the alcohol ink, but I didn't spray
it with the alcohol. So let's wait for that
to dry and then pull it. Maybe with that naples yellow, oh, or else I might get
some of the rich gold. Right, so I gave that a few
minutes to dry on the plate, which is quite fascinating what the alcohol inks have done. They're stuck to
the acrylic paint. They didn't come off
on the first print. Which I think is a
whole lot of fun. So let's add some of this
naples yellow to the plate. And we'll put the paper on, let it dry and pull that print. Oh, man, that's so super fun. And let's see how beautiful
that's going to look. And then we have to
try more experiments. Now, my watercolor
paper is just a tiny bit narrower than my plate, which is kind of fun because the color goes all
the way to the edge, which I really like. So I'm going to let this dry for a few minutes before I peel it back to see what amazing beautiful print
painting we've created. So I gave the print just a couple of minutes.
It wasn't too long. I'm hoping that it's
going to be dry enough to lift up
that paint layer. Let's have a look.
Look. Ooh. I think it's going to be right. It's coming off very easily. Tara, ta. Look at
that, look at that. You can see if you get in
the angle of the light, you can see the alcohol
ink very gold and very metallic there on the plate
and which is very exciting. And it totally came off
with that paint layer. So no fear. March on. Yeah. The alcohol ink
is coming off fabulous, even when it gets stuck on
the plate the first time. So I'm going to do that again. That's just so much fun. So what shall we add this time? We've got the ozoGld. Let's have some of that.
Some of the magenta. Yeah, okay. Some of the magenta. And then let's add some of
the naples yellow, as well. Into this section. These colors are
quite beautiful. They're a little like sunset
colors, don't you think? They are working just fabulous. So are we going to splash on some more of that.
God, I think so. How can we not? My pain is still beating
up on this plate. That's okay. I don't mind that. It's creating a really
interesting texture. I wonder what would happen if we splash more of the
alcohol ink on it. Where's my alcohol ink?
What does that do? I don't know, man. It didn't really do that much, but let's put some of the gold. Oh, I've got some
copper, as well. Maybe we should try
that. Oh, look at that. Look at that. Look at that. That's fantastic. I like the way it's creating
this texture down there. Was that the alcohol
ink that did that? I don't know, but it
looks pretty cool. So let's pull that
straight away. And then if it
leaves with some of the paint on the plate or the
alcohol ink on the plate, then we know what
to do, don't we? We just let it dry and
pull another print. Oh. It's a win win. We got two for one deal. Absolutely love it. You can see from the back of
the paper here the alcohol coming through and soaking
in to the watercolor paper. Let's see what it did for us. What did we create? Oh. Beautiful. Look,
it stayed there again. Alright, we're gonna
have to pull it. But those colors are stunning, and then this print's going
to get a second layer. So I put the
beautiful rich gold, the Atilia paint color
onto the gel plate once. That layer was a lot dryer, and then I've put my paper down, and now we're ready
to pull the print. I've given it a few minutes. Not too long, but
long enough for it to dry enough on the plate to
pick up those paint layers. Well, that's the theory. Maybe I didn't wait long enough. That's a good lesson to learn. You do have to wait a
bit longer if you want your prints to pick up all of the paint that's
on the gel plate, especially when you're
getting experimental and throwing lots of different
elements onto the plate. But look at that. That's
a whole lot of fun. What a beautiful print that is. Now, this section here has those texted marks because it's kind of all beating
up with the water. This section here has got
more the acrylic paint and the alcohol ink that I've
picked up from this pool, and there's the beautiful
gold in the background. Now, that's a whole lot of fun. We could really push
that some further. If you're trying this
idea and your paint is not beating up and creating
that kind of texture, just add some more water
or mix it like this into a different container with some water if it's
a full body paint, and then it'll create those
marks on the gel plate. I really like it. I think it's beautiful,
a great texture. And then this section up here, that's the fluid paint
so that this one, which doesn't really
need any water because it's thin enough to paint
it on the plate like that. Alright, what are we doing next? So, what would it
look like if we added some different colored
alcohol inks onto the plate? As I use up what's
left in this one? Instead of just the gold, what about we splash
on some other colors? Yeah, that could
look pretty cool. Look at that. Even that by
itself looks really cool. It's that watery effect. Just a bit of water. Oh, I just love it. Right, oh. What about some of this
one, which is Fuchsia. Fuchsia is a good
color. Beautiful color. Oh, man, look at that. Is that going to
pick up in a print? I actually don't know.
That's what we're doing. We're experimenting. Oh, man, that looks amazing. What else should we add?
What about some deep purple? Oh. Now I'm getting really messy and it's
going everywhere, but let's add some
of that, as well. I don't know if this
will actually pick up. In a print. Oh, man, I think my Deep purple's done. But I know that we can roll on a paint layer and pick it up
that way, so that'll work. Should we add some gold? You know, we always
need the gold. Let's let's add a
bit of gold to that. And what about if we just
spread it around a little? Maybe it'll absorb better if we put the alcohol
on it, as well. But see what that
does. I'm pretty keen. Just to pull that off
the plate and then pick up another print
with a paint layout. I think that would
look pretty nice. The colors are beautiful. It's soaking really well
into the watercolor paper. So let's see what that does. You don't know until you try. And I love experimenting. Did it pick it up?
Oh, beautiful. It's beautiful. Look at
the textures in that. Why were you so worried? Look at the textures. That looks fantastic. You know, I'm going to have
to do that again. Let's do it again. What
I love about this kind of application is
that it's instant. We're pulling the
prints straight away. And that really is fun. We're not waiting
for them to dry. We're just pulling them up
and seeing what we get, and that's a whole lot of fun. So there's still some of the
gold alcohol ink on there. And then I've got the
ozogld in the fluid. And which one did I pull out? I pulled the magenta. Man, I loving those colors. Right oh, well, I might have a bit too much
of one color on there, so what are we going
to add this time? What about we add some
acrylic ink spray, the ic. Let's add a bit of that on
there. See what that will do. See how it just kind of
makes the paint all beat up. So more creating those texture, M loving it because I'm thinking that the ghost prints
gonna look pretty amazing. So let's just pull that. We are going to add some
second layers to these prints, and let's lift that
off the plate. Then we could put on
some more alcohol ink and then pull a print
with a paint layer. Right o. Let's do that. Let's see what we get from that. Well, it's all a bit one colour. That's not very exciting. Didn't excite me at all. I think it all just
kind of blended in. That was a bit of an
anticlimax, don't you think? So, what about if I put
some alcohol ink on it now? Oh, yeah, baby. That's a bit
more fun, don't you think? And then what happens if we
spray it with the alcohol? You know this is highly
experimental, right? Oh, that could be fun. That's running a little.
Yeah, I like that. Let's spray a bit more. That gets the
alcohol ink moving. Oh, yes. That looks great. Then we get a whole lot
more texture going on. Loving that. What about
if we add a little bit of our fuchsia? What will that do? We'll just put a bit
of that in there. It doesn't do much
because it actually looks too similar to
the background color, but the golds looking
beautiful and putting that other color on did kind
of just help move it around. I know. Well, that was cool. Oops, we better do something
with the gel plate now. There was quite a beautiful
color and pattern left on the plate after I pulled
up that other print. So I just rolled over with
the beautiful rich gold, put my paper down, and now a few minutes later, it should be ready to pull up. It's a little bit fun with all these different
mediums on the plate. Ooh. You do have to wait
for it to dry properly. Loving this one,
loving this one. Look at that
beautiful texture and coverage of the glorious
gold in the background. That's just soaked up. Absolutely
beautiful. I love that. I love all the paint, application and brush marks
and the watery texture. And you can see some
of the fabulous gold, alcohol inks well on there, loving it. That is gorgeous. Now, what we might do next is pull back those prints
that we've already done and put a second layer because then we can get
even more experimental. Right, so I think this
is the first print. It's nice and dry, anyway. It's got a nice color to it. It's got a good tone. It's got great texture. You can see where
I've pulled it off. The wet paint it has all
these textural marks. Lovely. But why would we
leave it alone? It's dry now. We could do anything to it with all of these
beautiful colors. So I'm thinking, let's
add some more paint down the bottom here and maybe a
bit of drama up the top here, just a little something. Just a little
something, something. How about a little bit
of the naples yellow? My watery version
I used it all up, so we might just have
to spray it some more. To get that fabulous
watery texture happening. But we'll put that on
the plate to start with. And then what do
we want up here? Well, we don't want
exactly the same colors, but I do want to add
a little drama to it. So maybe maybe we'll add
a little bit more of this thicker naples yellow up
here because I'm thinking, what about if we added some
more of the alcohol ink on it to create some texture on top of this paint because it
pulls off straight away. And then I thought this could be a little crazy.
But why stop now? Why I've pulled out some
Linda's gang magical shakers. They're basically a
powdered pigment, and I'd love to see what
these would do on the plate. And if we spray them, I'm pretty sure that they would
have an incredible color. Now, these are in a fabulous
little shaker container. It's just like adding
salt to your dinner. Oh. That's pretty exciting.
We've got that on. It's going to print
in those areas. So what about if we added a little bit of
our Look at that. A little bit of our
powdered pigment on there, and I say a little bit
and add a whole heap. Do we want alcohol or water?
Well, either would work. I'm thinking. We'll go with the alcohol because
it dries faster. Then maybe it won't be
so saturated and runny. But I don't know,
because disclaimer, I've never tried this
before on the plate. But it can only not work. Let's just get a bit of movement happening because it's fluid. It's going to move around a bit. What do you think?
What do you think? Let's put it on there
and see what it does. If the alcohol doesn't work so great with
the powdered pigment, then we can just put water. It would work just as well. It just makes everything
a lot wetter, because, of course, the upropy
alcohol dries way faster. But what did that do? I don't know, man. It might
not look any good at all, but we don't know unless we try. And if it doesn't work any good, M, we can paint over it. We can use it for
collage paper anyway. It doesn't have to
be a perfect print. It could become anything
in the creative process. Tara, Tara. What did that do? What did it do? That
created a fabulous texture. I'm pretty happy with that. Look, I like it much
better because it's got far more interesting texture now on it on that second layer. That is pretty fun.
What's on my plate? Oh, there's a bit
left on the plate. I'm gonna leave
that, and I'm gonna roll over and add some
more paint to it. Right? So I pulled this
second one up off the floor. I don't know if it
was the second print, but it was the second one that
I picked up off the floor. And this is what
we're starting with. What shall we add? Hmm. Maybe a little bit. We don't want to use that color because there's already
a ton of that on there. I'm thinking the naples
yellow is still going to have the most
contrasting effect. So let's add some more of that. Let's add some water this
time and see if we can't get a little bit more
movement happening with that beautiful
powdered pigment idea. The paint's a lot thicker, so I definitely need
to add some water, but I did like the
way this colour created that texture on
top of the last print. I thought that
looked pretty cool. Now, after this print, I might let the paint dry and
then pour the ghost print. Maybe Baby? What about if we added some of the alcohol ink?
What would that do? I don't know. We
might not see it so much because of the dark
color that we're going over, but let's add it anyway. We got nothing
clues. Why stop now. Oh, what about some orange? Orange might be alright, too. Let's add a little bit
of orange in here. And then we could
put some maybe let's put some pigment on that or we should move
it around a little. Oh, man. Now things are
getting really crazy. Let's move that paint
around a little because it's a little a lot stiffer
being the full body. And then I've got some
in the magical shakers. Oppressionisti ink. What color is that gonna be? Pretty dark. We're
getting dramatic. Just saying. Oh, look at that. Yes. That's dramatic. Now, it looks like
pepper on your dinner. That should we try
it with the Oh, it moves a lot more
with the water? I know it's all getting
saturated now. Oh, man. Look what we've done. Look what we've done. We're going to put
it on straight on top of the previous print. I have got no idea how
it's going to turn out. Now we got everything going on. We've got the acrylic paint. We've got the alcohol inks, and we've got powdered pigment. Oh, man. We've got fluid paint, we've got full body paint. We've got it all going on. Dare I even look to
see what I've done? Look at that. That looks like a pretty
stunning landscape. Now, if let me
just look at that. That looks amazing.
Right. I'm going to leave that exactly like that. I'm going to wait for it to dry, and then I'm going to pull
that with white or gold, maybe because the gold, you'll see through,
we're gonna do that. Push that up there.
Well, what about this? This looks absolutely amazing, but we need some gold on it. Of course we do. Oh,
what about some copper? Okay. I've got some copper. Alcohol inks. What
about we just put Oh, yes, a little bit of
copper through there. That's pretty nice. Maybe
up there. Little bit. That's pretty beautiful. And then we'll just
run that like that. Maybe we'll run it like that. If we give it some
more alcohol, we will. Give it a bit more of a squirt. Run it like that. Through
all those textures, and that baby is going
to look beautiful. That powdered pigment telling.
It looks pretty good. And it's got all of
that fabulous texture. So I put this back
onto the floor to dry. And then when that lovely
wet mess here is dry. I'm gonna pull that
print, as well. This looks absolutely beautiful. I really hope it prints up well, but there's a lot of wet paint
because I sprayed it with water. Quite a lot. And alcohol and pounded pigment and alcohol inks
and acrylic paint. So, this beautiful
full gel plate of luscious colors and textures is going to take quite a
bit of time to dry. So I'm going to put it aside, and I'm going to pull out my second plate gus
'cause I can't stop now. And I just picked
up this one from off the floor of
drying. It's beautiful. It turned out well, it's got some great textures on it, but, of course, now I've
pulled that I've pulled out the
powdered pigments. I'm a bit excited for that. Shall we use the
naples yellow again? Well, that seems to be working. Well, my brush has got a bit of orange on
it, not to worry. Now, I don't want to
cover it entirely. I just want to add some
textural elements. So do you think I can do
that? That's the question. See the difference with
the thick full body paint? It's not beating up
on my plate like it was before when I had
mixed it with water. I do like that texture, but that's how you
get it. Super easy. Just mix your full
body paint with water, and it creates that
fabulous beading look. Now, I'm thinking why I'm using the full body paint is
because I want to just create a base layer on the plate
because I'm going to put on some more
of those alcohol inks and that powdered pigment, and I just want to lift
that up off the plate on this just to
create more texture. So I'm thinking that the
full body paint will create a good base for that alcohol
ink and that pigment to sit. And then, as you saw before, what's left on the
plate is amazing, and that will create
another beautiful print. So shall we go with
this color again? I'm thinking, I
like the fuchsia. Let's splash that on. Then we might splash on you
could use the rich gold, but it just doesn't
seem to pick up. Well, off the plate
with the first one, it does with the second one. So let's just put
it on there anyway, and we're going to add
the alcohol to it, which gives it a
bit of movement, although I did think that the war tarp gave it much
more movement. Look at that. That already looks amazing. What are we going to do here? Well, we need to break up
this paint for a start. And then I could add
some copper down here. That doesn't look like
copper. It looks like brown. I don't lay their color. Right. We're not using that one. What about this one? This
one says copper, as well. Man, that wasn't copper. They're lying to me. That
looks more like copper. Let's add some of
that onto there. Then some alcohol to
break it up a bit. See my paints now starting to create that
beautiful texture. And then, yes, I love this idea of my little
pepper pepper marks. We could put the other
one up here, okay. Oops came out a bit much then. Then if we add some more
water to get it moving, let's get everything moving. Oh, man. Look at that. Look at that. Oh, Oh, what about some
acrylic ink, okay? Oops. This one's
bronze. In the acrylic. Broonz shimmer my
favorite Izinc spray. That's on there, as
well. Look, that looks stunning in itself. So we're just gonna put a
bit of it onto this one, and then whatever's left, we'll let dry and
we'll pull that print. You really could just
keep going and trying different combinations
of the paint and the inks and the alcohol
and the alcohol inks. And the powdered pigments. You could just try different
color combinations and see what you get. Look at that and then
that's fabulous. Yes, we're pulling that
print. Let's just move that. And then if you don't like something when
you pull the print up, like, I actually really
like this section. You can just wipe it back off. Look at that. That's fantastic. I like that section there, so I want to keep that color. Let's just wipe that off there, but then the rest of it's okay. Get that off there.
That looks beautiful. Look at that. That's
so interesting. Beautiful colors and textures, so many possibilities, so many
beautiful prints to make. Now, both my plates are drying. So I'm these two prints
here that I really like, but I might add a
bit more to them, and seeing as I don't
have a gel plate, 'cause they're both sitting with thick, beautiful, luscious, but very wet paint on them, wonder what it would
look like if I just added the alcohol ink. That's pretty cool. I'm
filling in the gaps. Hey, I'm liking this.
That's super easy, too. Super super easy. So I'm just going to have a
play with these two prints, add a few more textures to them, a few more colors. I'm definitely going to
splash on some of that. Powdered pigment because
that was a bit fun. But this alcohol inks that's pretty cool. That's
working really well. I'm just smudging
it with my fingers. It does get sucked up pretty quick because it is
watercolur paper, and usually you
put alcohol ink on a non porous substrate like upo paper or
something like that. You don't usually put
it on watercolor paper, but why would we want
to do anything usual? Oh, I'm not thinking that we would want to
do it like usual. So. But that looks
pretty beautiful. I'm liking that, and that
was super easy to do. Little bit of alcohol
ink on there. What about if we add Oh,
man, just keeps going. If we put some alcohol
on it, what does it do? At the texture.
That was fantastic. I know. You've got
to experiment. Pull out your prints
that you weren't happy with the first time you printed them on the gel plate
and have a little clay, put some alcohol ink on them, give them a spray
with some alcohol. You could probably use a brush. I'm just using my finger because it's here,
it's attached. And it's attached to me. But you could
perhaps use a brush. Oh, I really like the
way it does that. Oh, that's a bit
of fun. Okay, what about we put a little bit of tiny bit of fluid paint down here with
a little bit of orange. I don't want to cover
my print too much. So, add some water
to the actual fluid. See how you're just kind of creating a glaze over the top, filling in all the white
areas that didn't print. Oh, man, that's fantastic. That worked. And then if you
spray it with the water, it creates that watery
effect, loving it. Look how much better
that is now. Super easy. What about if we put some of
the beautiful gold on now? You know, we could put
the alcohol on first, a bit of spray, and then
drop in some of the gold. Oh, I didn't do what
I thought it might. I thought it might,
like, all bleed out, but it didn't probably because
it's on watercolor paper, and it's a little porous, but it looks pretty
darn beautiful. So that is a winner. We're gonna win a
chicken dinner. That looks fabulous. Alright
I'll leave that alone. I really like that. Created
that beautiful texture on it. The glorious gold of
the alcohol inks. And the color filled in
all the white space. Yeah, winter loving that. Alright. What are we going
to do with this one? We might add a little
something to it. What are the colors, God? What about we just add a bit
of that orange that whoops, maybe not too much orange, MO, there. Sounds a bit much. 'cause it looks pretty
nice on the other piece. I do like the consistency of
using all the same colors, and also, they're just
here in front of me. So maybe I'm just being lazy. Oh, man. That really
that's too much. Don't put too much on. 'cause you can't see
your beautiful print. So no stress. Easy peasy wipe it back
off with a baper white. Run it over the whole thing,
and then take off Oops, what you don't want, which
is super, super easy. Look at that. See, don't panic. That's fine. That's
a really nice color. That's made the tone all
work together nicely. Let's add some of that
powdered pigment, okay? 'Cause that's pretty dramatic. I like this color now with
the slight orange tint to it. Much better. Right oat. Where's the Shaker
shaker Pepper. Where's the pepper
shaker. There it is. Water? Oh. Wow, that's dramatic. Of course, the more you spray, the more it's going
to bleed out. I'm loving it just like that. I'm leaving telling you,
I'm leaving it alone. I might add a little
bit of color in here with this alcohol inks. I'm a bit loving this today. Loving this alcohol ink today. Think I might have to
pull this out again. Although I think
I do need to get some more colors, but
that's pretty nice. I'm liking that.
We'll just fill in this space here.
How easy is this? What about some
copper this time? Let's add some copper up here. And then I think we're done. I'm pretty happy with it. I think it's a
pretty nice print. More like a painting
now, really? Would the alcohol
do? Not that much. Moves it around a little bit. Creates a bit more texture. Those colors are pretty nice. Right. Eventually,
the gel plates will dry and I'll pull
those other prints. Have a look at all of
my fabulous prints. Wasn't that just so much fun? Now, remember, have
courage, be brave. And if it doesn't go the way you want with
the first print, then put another layer on top. Experiment. Try
different mediums and see what fabulous jelly
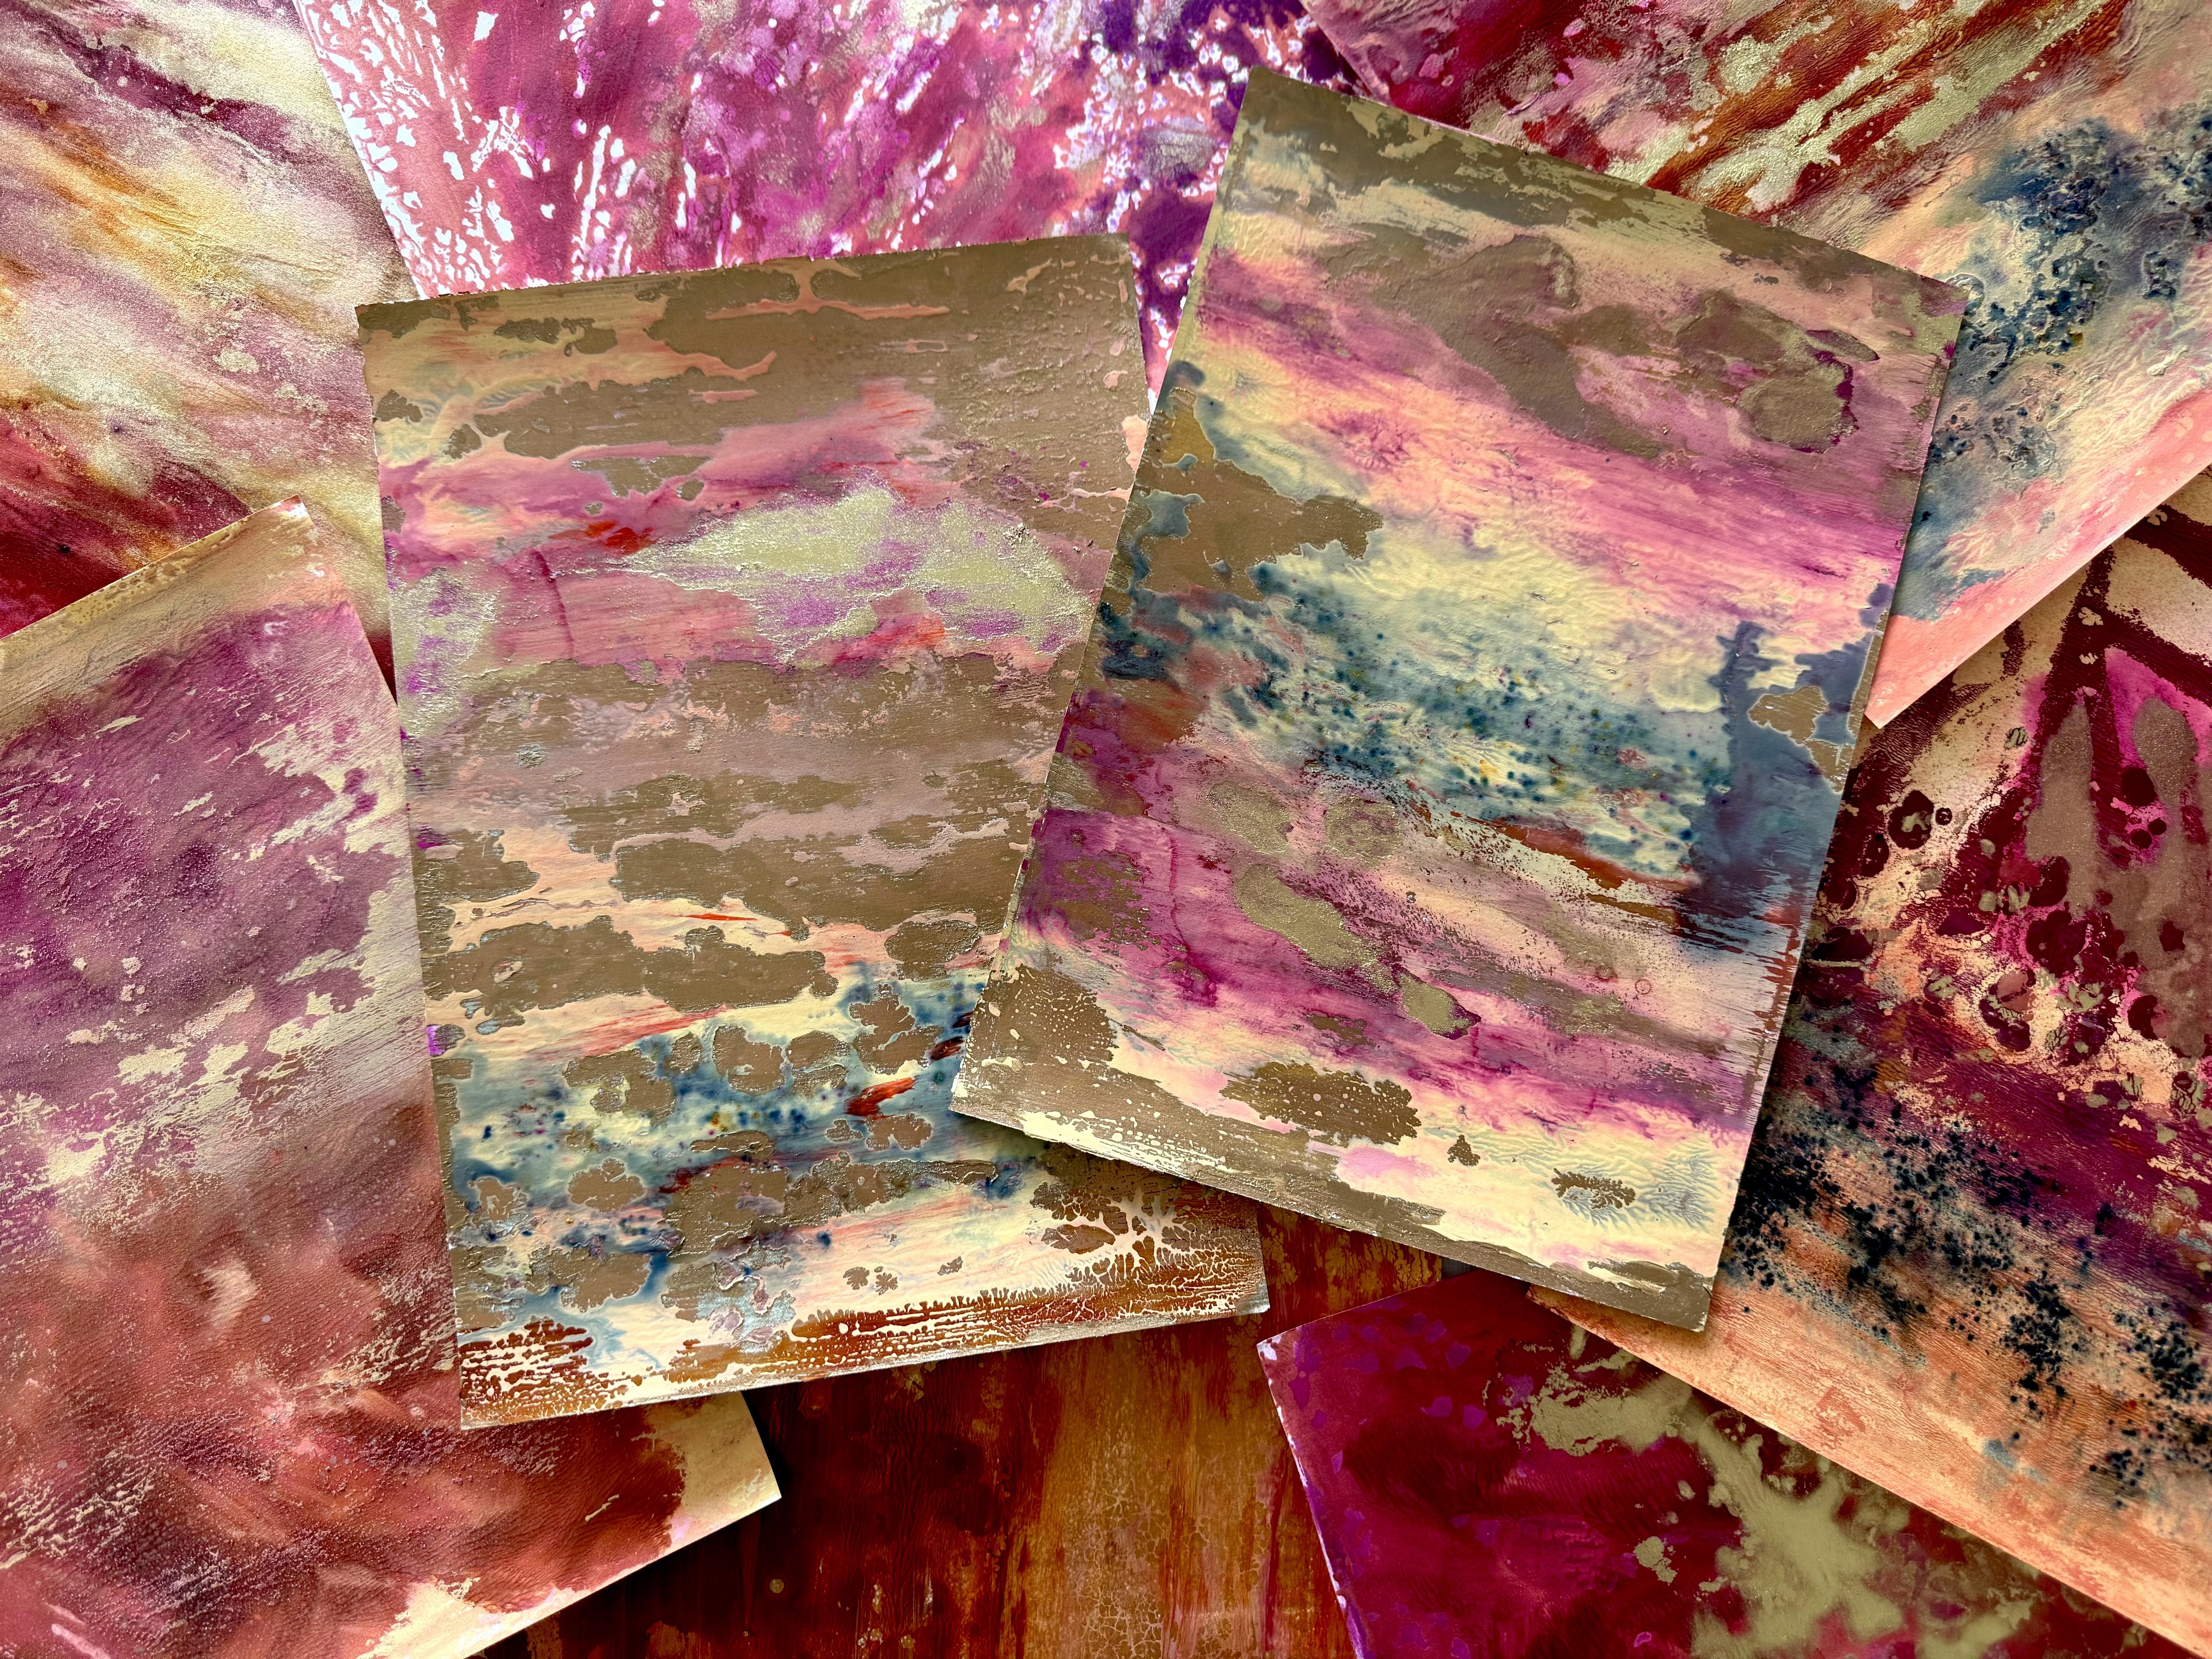
prints you can create. Now, some of these
have turned out absolutely spectacular,
I must say. I Look at this one. With all of the
fabulous textures, I just love it. You can see the splashy
texture of the watery paint. You can even see some
of the alcohol ink. That looks fabulous. I love
the brushed on technique. This one I added the alcohol ink after it with the second layer, and I think it would make a
fabulous background paper. The watercolor has
held up really well. And I think they would be a fabulous start for
another collage, adding some elements
or adding it into a different art piece,
that's going to work. This was just one print, the first print, and I love it. I love the freshness. It's got a real energy to it. I even love the white paper that I've left coming through. There's the alcohol ink down the bottom and through
there and the gold. Now, talking about
the alcohol ink, I was using this no
name brand alcohol ink because I bought it cheap
and I was experimenting, but alcohol ink is actually dye mixed with alcohol
in the little bottles. So it has a high
tendency to fade. It's fugitive. So you really need
to think about that. If you're creating
something that you want to sell or you want
it to be archival, or you want it to remain
exactly how it is, you may not want to use
these alcohol inks, especially no named
brand cheap ones. The Jaqardpinata. Alcohol inks are a much
better brand to use. And the metallic ones, the gold that I was
using is pigment based, so that one's not going to fade. So just think about that
with what you're creating. All of these are
fabulous prints today, I was just having
a whole lot of fun and creating probably
for collage paper. So they'll get ripped up and used for
something in layers, so I'm not particularly worried about the alcohol inks fading, but it is something
to think about. Also, the alcohol ink will
stain your gel plate. Oh, you can't see it. But. But if I move all those, now you can see
how there's, like, a pink color now on my
beautiful gel elf plate, it has stained it
from the alcohol ink. That doesn't bother me, and it doesn't affect your
jelly printing, not at all. So don't worry about that, but just know, it will do that. If that's going to
bother you, then again, don't use the magical
alcohol inks, but you're missing out
on a whole lot of fun. Look at how fabulous
these prints are. I just love them. Now,
the other thing I wanted to say was the
powdered pigment. When you leave it on
the paper like this, it has a good chance
of reconstituting. If it gets wet, it'll
turn to paint again, or it could flake off if you leave it kind of dusty
like I have with this one. So what I like to do is
use a spray varnish. And this one I'm using
here is a gloss varnish, 'cause I do like things shiny. And spray it on a
nice even coat. Easy peasy, very
quick, very simple. And now the powdered pigment won't reconstitute,
it won't flake off. It won't become like
paint if it got wet. Or if you're using it for collage and you're
gluing it down, you don't want that smudging
into what you're creating. So just another
helpful tip there. Now, these two prints here were the last two
prints that I took. The plates did eventually dry, and I rolled on my favorite
golden idscent bronze fine onto the gel plate and
put my paper down. Then I did have to leave
it for quite some time. But because I am who I am, I didn't leave it long enough. And when I pulled
up the prints, oh, man, some of it had
stuck to the geopke. But no stress. I put on a
bit more of the alcohol ink. I put a few little
touch ups on them, and look how stunningly
beautiful they are now. I do think these are
actually my favorite prints, my prints of the day. Though, I do have so many, I'm loving these, too. So I think the best suggestion is maybe leave the
print overnight or an extended period of time if you're going to add
so much acrylic pane,
 Froyle Davies, Mixed Media Artist