Transcripts
1. Introduction : Using Inspect element especially for Web Developers: Greetings everyone. I am Susan for them. And today we will learn some useful tips and tricks using the Google Chrome Inspect Element. These tapes, I'll be useful to everyone, but especially did those working on website development. So here's what's included. We will quickly learn about the inbuilt color picker with inspect element, no need for any Chrome extensions. Also for many, this beaker does not work, so we will learn to fix them. So web developers, did you have trouble finding ID with tiding elements? We will learn a quick trick on how you can use inspect element on them. We will then find now deceived passport using the inspect element. And lastly, we will figure out how we can change text and images from a live website. Also understand how the data can be manipulated using these tools. Thus, the only objective of this course is to give you some essential information on Inspect Element and how you can use them. What will you learn in this course? This course will give you hand-picked useful information on Google inspect element and how you can use them while developing your website also gives you a Cassius side that not everything you see on the internet vireo. So be careful. What skills or coding knowledge is required for this lesson. Everything in this course is clearly explained. All you need to know is how to use Google Chrome. In addition, if you are a web developer, having an idea of using CSS will give you an extra benefit. Conclusion, after this course, you should be getting some idea about using inspect element and how it can contribute to your oral designing and web development process. So let's get started.
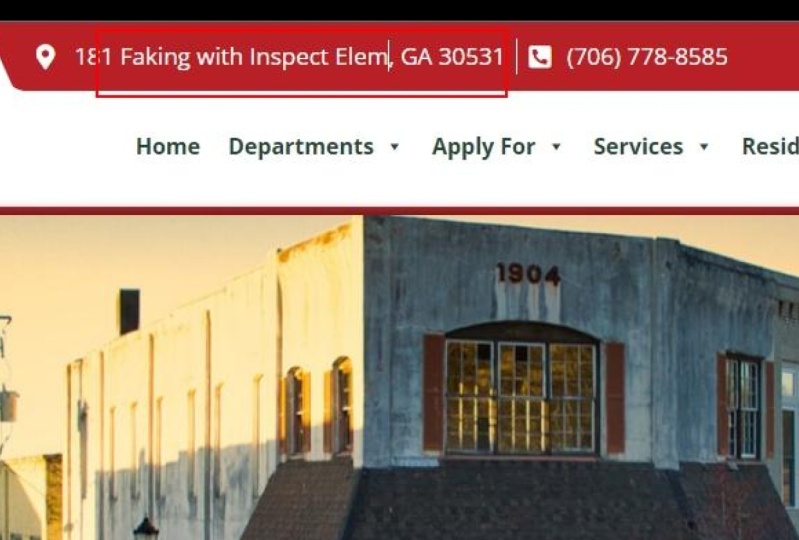
2. Useful Inspect Element Tips and Tricks Useful for Web Developers: Greetings everyone. In today's tutorial, we will quickly learn some of the useful tips and tricks to use inspect element. This can be very useful to everyone. And if you are into website design, then this can be very handy. So let's get started. To begin with. Let's open our browser. So if you are designing anything or want to find the color you see on the screen, then you can do it with inspect element. Of course, you can use a Chrome extension for it. But why bother when we have a built-in color picker? Let me quickly search for some color sets. So here are the options. Let me pick this up. Suppose I want to find the colors it is using, so I can adapt it to my InDesign. In order to do that, simply right-click and go to Inspect Element on this styles. If you see any colors, it's fine. If not, simply add color and white or any color, really doesn't matter. Now this will bring this color picker, click on it, and now you can find the color. Click here and over to the color you want to use. Sometimes this does not work, as you can see, in order to make this work, you will have to take this dark section either to the left or to the right. To do that, click here, I will take it to the left side and again, click on this color picker. Click here. And you can see it's working. Choose any color you want. You will find the Higgs and RGBA details and then use it as accordingly. Then you can simply move the dark at the bottom. This works on most of the websites. Let me quickly check another side. So as you can see, it's working All good. Now, if you are a web developer and you must be using inspect element to make the CSS changes and many more. But at times it's difficult to use CSS for hiding elements. For example, in this side, if I click on music and if I want to make changes to this menu, and as soon as I click on Inspect Element, this disappears. But no worries, we can pause it and use the Inspect Element tool for that. Go to George's and then click on hiding menu and keep your mouse there and press F8. Now what happens is it causes the screen as you can see, and you can easily use this Inspect Element. So here's the menu ID and I can make the necessary changes. And after you are done, simply closes and everything will be all normal. Now another simple uses of Inspect Element could be finding this saved password. Suppose you have logged into some paces and forgot about the password. Then using inspect element, you can find the password you used. For example, I have a saved password on this Brave browser, but it works exactly the same on Chrome as well. Now suppose if I go to this website, you can see there's a safe password. Not all website will have this option. In such case, you can simply right-click, Inspect, click here, and Hoover do this password. Now in input type, double-click on password and change it to text and Enter. So you can see the password is revealed. This trick will convert all the black dots to the text. For example, if I go to Facebook and if it is saved like this. And you want to find the password used, simply right-click Inspect, overdo the password, and then change the input type to text. And it will work. All great. Now the last part of this tutorial, it can be very handy, especially if you are a web developer or are looking to develop a website. This can also be used to make some changes to a live website and see how it will look like. Many developers use themes for their website and before purchasing it, you'd want to see how the demo would look like with your own logo, images, and text. This can be very useful to show it to your client as well. Let's go to theme forest ordinate as an example and look for a theme. For now, I will try with enfold. Here is a theme. Click on it. And let's check the live preview. Now suppose you want to create a website using one of his demos, or you want your client to saw the website? Let me pick one demo website. Okay, this one. The site looks good, but I want to see how it will look with my own images, logo, and text. For that, simply right-click and go to Inspect. Go to console. Copy this code. This will be provided and pasted at the bottom and Enter. Now you can make any ticks changes on this website. Close this. Now I will make some changes to the text. So make all the changes to the texts of the site. However, please, because yes, while making changes to the menu, as it might open the link and everything will be refreshed. So I'll leave it as it is. After the exchanges. You can remove the top part. Rightly, Inspect Element. Click here, highlight this, all. So click here, right-click and delete the element. Now it's gone. Now let's replace it with our own logo. I would like to use this logo. If you have your images online, you can simply use the email address. For example, I will right-click and copy the image address. Click here, and on the logo. Now here is the exact link. Replace it with your own link and enter. Similarly to change the banner, do the same, you must know how to replace images and others. To use this tool effectively, you might have to look up and down a search for JPEG, PNG or Web API by pressing Control plus F. Anyway, I like to use this e-mail as a banner. Can post this online anywhere and get a link. I will go to snip board dot io, picker file. Once uploaded, click on the link and right-click on the email and get its URL. Copy the image address, and now replace it on the website. Since this has three banners, I'll use the same for all. You can then take the screenshot and show it to your clients. Or can as well save it. Simply press Control S on the keyboard given a name and save. This saving option, however, may not be as effective. So it's advised to take a screenshot. So anyway, this is running from the C drive, as you can see. Let me close all the browsers. And here's the saved as the ML file. And it works all fine with our own logo and images and text. You can use the same code on any of your website and make the necessary changes before actually working on the back-end. So I really hope all these tips and tricks are helpful. Thank you very much.
3. Copy text from images from websites using a Google Chrome Extension: Greetings everyone. In today's tutorial, we
will quickly learn about a Chrome extension
that can copy text from an e-mail,
something like this. Let's get started using
the Chrome extension. We can copy text from
images from websites. However, please note
that it may not work on all the sides and may
not be a 100% correct. Anyway, let's open our site. Let's learn something.com. You can see this is an email's also this is an e-mail and we
cannot copy text from them. So to copy text,
google project nafta. This is the one. Click on it. To
Chrome Add extension. The extension has been added. You can pin it if you
want to see it here. Now let me reopen Chrome and go to the site here let's
learn something.com. You can see if this is colored, that means data can be
copied on the site. You can see I can
copy this text. Let me paste it to the Notepad. As mentioned earlier, the copy text may
not be as perfect. However, you can either
manually correct it or use grammarly extensions to
make the necessary changes. Hope this video is useful. Thank you very much.
4. How to edit any website’s text using inspect element and save it permanently to your PC’s browser?: Greetings everyone. In today's tutorial, we will quickly lit how people can use Inspect Element permanently, save it at that particular BC AD disguise formation. So something like this, this will stay Parramatta it to this particular browser unless receipt or opening Incognito mode. So let's get started. So to get started, let's open up a browser and install Chrome extension. Simply search for a permanent inspect element. This is the one. Click on it to Chrome. Add extension. So the extension has been added. Click here and be the extension. So it is visible here. See if you don't really need, the extension will not be visible anyway. Now let's go to our sample website direction Cutler do.com. So this is the website. By the way, you can try with any website you want. Let's make some changes to the text of this website for that, rightly got the website, click on Inspect Element or to console. Copy this code which will be provided based heat added. If you know CSS that you can use that to big changes to color text. It visits a subtract anyway, which close the console. Now with the earlier code, can't make any changes to the text you want. After making all the changes or get right-click Inspect Element, go to COX-1. Copy this code again, and pasted. Now, change the true to false. Edit and close this console. Now you will not be able to change the text of this website. After that, simply click on this extension. Click on Save pays. Please click a few times to make sure it's saved. So the base should have. Let's see if it is working or not. Refresh the space. You can see all the changes in the text are still here. Let me try to open it in another window. You can still see all the changes that were made. Let's quickly try out facebook.com. So as you can see, it's working on Facebook D2. Even if I open a new browser, it's working. Let me close the Chrome browser and open it again. Facebook.com and erosion cup and the darker. So you can see all the changes are still here. However, please note, if you clear the browser or open Incognito mode, everything will be back to the orginal. Does this basically means it's only saved to the browser and your PC only and will not reflect on other computers. And if you want to reset it, simply click on the extension and click on reset all and refresh. So everything on the space has been reverted. You will need to do the same for other business as well. And a very important note, we have seen many people use this trick for sewing fig, YouTube wordings and other affiliate earnings. So please be aware before making any Egyptian, as it's very easy to get tricked. Anyway, we hope you learned something new. Thank you very much.
5. How to reset chrome inspector and as well change the dock position: Greetings everyone. In this video, we will quickly learn how you can reset or restore the Chrome Developer Tools to defaults. And as we'll move the dark position. So basically you can move your dark to right, bottom, left, and even undock are separated. So let's get started. Now for some reason, if you Dave tool setup has changed, then you can simply restore it to default. For that. Let me open Chrome, right-click and go to Inspect, highlight anywhere on the tool and press F1 on your keyboard. Now scroll down and you will see restaurant defaults and reload, click on it. And your DevTools is now restored to defaults. You can also change the position of the Chrome Developer Tools. Click on these three dots and choose where you'd want to keep the dark. Currently it's in the right position. This gives the dark at the bottom. This will keep the dark to the left, or click here to separate the dark. Anyway, I'd like to keep it at the bottom of this lesion was useful. Thank you very much.
6. Example of using Inspect Element on YouTube: Greetings everyone. So before starting anything, let me quickly go to our YouTube channel. Hey, let's learn something. So here you can see the revenue, the earnings for the month of May in case you have any doubts. Let me quickly rephrase it. So here is it. Whatever you saw here was a lie. So basically, the only objective of this tutorial is to where everyone and make you understand that not everything you see on line Israel, but of course there are many genuine people who are very true. Anyway, I will showcase how it is done using inspect element. Let's get started. As you must know, Google Chrome offers lots of div tools, and one of them is inspect element. I can right-click and inspect element. And this works on most of the sites. If I go to console and copy this code and pasted at the bottom and enter and close this element. Now, everything on this website is editable. You can do all the necessary changes and then you can simply show it as a screenshot or as a video. Now to show it's authentic, especially in the video, I reference it again and quickly make all the changes like this. And later edited on the video editor. Please note, I had already changed the earnings for this channel anyway. So now this does look very real, doesn't it? This Inspect Element trick works on most of the websites. Let's open our website. Let's learn something.com. Right-click and go to the inspect element, go to console and copy this code and paste the code. Now you can make any changes to the text of the website. So this is how people online might confuse you. So just be a little cost years of whatever you see online. But you just be careful. I really hope district was interesting. Thank you very much.
 Saujan Man Pradhan, WordPress Designer and Graphic Designer