Transcripts
1. Introduction to Create Your First eBook Using Canva: An entrepreneur, business owner, or just someone who loves to share their knowledge, creating an e-book is going to be one of the best ways for you to not only use it as possibly a lead magnet, but monetize your knowledge and get to share something that you absolutely love and you want other people to know about. Hi, I'm also Lena and I'm an entrepreneur of two years and I felt myself for businesses. Yes, for businesses. And one of them is creating e-books for other entrepreneurs because this is one of the best ways to monetize your knowledge and to get people into your business without you having to constantly create other content. Creating an e-book gives it one time for you to create it. And then literally you can just use that on repeat. And the best part about it is that you don't need to have any prior experience with creating e-books, writing, or anything like that. Because I'm going to walk you through step-by-step, everything that you need to know in order to create your first e-book.
2. Class Project: Okay, So if you are here with me and you would like to do the class project and I 100% recommend doing this because it will actually get you to take those steps and get moving forward. A lot of people at perfectionism get in the way and I don't want that to be you. So do this class project because it's going to help you so much. We are taking the bulk of what slows people down and putting that into your class project. So at the end of this class project, you will have a complete outline of what you are going to write your e-book about and the design of your e-book completed. So these are the two things, like I said, that usually stop people. So if you just follow this course step-by-step and you do these things alongside me. You will have these two completely finished and you'll be already halfway done writing your e-book.
3. Your Why: The very first thing that I want you to really get clear for yourself is why you are creating this e-book. If you're like me and you're an entrepreneur or you have a business of your own. This is one of the best ways, like I said, to create a lead magnet or a trip wire, which is a low priced product that you can just sell on repeat that gets people in and starts filtering them through your business funnel. If you're not an entrepreneur and you just want to be able to monetize your knowledge and you want to share it. I want you to really look into why you want to share this knowledge and where you want to share this knowledge. And then I also want you to look at why this e-book. So figure out your why. Make it something that coming to you. Whether or not that's, you want to have it as you lead magnet, whether or not you want to share your knowledge with other people around you. You want somebody else to learn something that you wish that you knew sooner, whatever your why is, I want you to make it clear and I want you to write it down that way. You have this as motivation throughout this course.
4. Topic Selection: We're going to focus on the topic selection, the outline, and everything that we can do outside of Canva before we dive into Canva. So I want you to have something around you that you can either write on, you can open up a Word document, whatever is the best for you, that you can write down your ideas and you can have it ready for when we move on. For the very first thing that we are getting into Is topic selection. So try to think about what is your business about? What is it that you have that you want to share with people? Is it about other business? Is it about finance? Is it about jewelry? Is it about artistry? Is about painting? And then to take it a step further, I want you to look at what do you want people to learn. So if you are a business owner or an entrepreneur, what are you already offering? So if you have your offer, this takes them from one to 100. How can your e-book take them from steps one to five or one to ten. If you don't already have an offer, think about what do you want to offer to people? This could be, we'll go with painting. You are teaching abstract painting. What steps can you take out of your process? And just briefly explain in an e-book. And you can take this format and apply it to any topic, anything that you want to talk about. And this is going to help you create your e-book. So I want you to walk away from this video knowing what topic you want to talk about. You don't need to have an outline yet. We'll do that in the next few sections. But I want you to really look into what is the theme or topic that you want to share.
5. Outline: Since you already have your topic and your title, now we're going to get into the outline. So what is it that you chose for your title? And how can you break that down into the top five or 10, however many you chose steps or main concepts. If you didn't choose a number for your title, this could be anywhere between five and 10 because you really don't want it to be overwhelming for the person who is reading this e-book, you want it to be enough and you wanted to be clear and concise and not overwhelming at this point, get a rough outline which is not going to be perfect. It's not going to be finished until you've already finished the eBook. Anything within the evoke, you can tweak and change as you go. The most important thing is that you are taking steps, moving forward and not getting stuck within your outline as well. After you have these couple of concepts, you're also going to want to include an introduction or About Me page at the very beginning. You're also going to include overview of what you're talking about, why you think it's important and why it's really valuable to them. And then at the end, you want to include either a conclusion or an upsell. If you have something to upsell, if you don't want to upsell, then that's fine. You don't need to. But this is one of the ways that you get people to move through your funnel is by having an upsell at the end. That way they can go deeper with this topic. So write down your main 510 key concepts. You can always add more later. And then right down at the beginning, introduction or about me, your overview and y and then the conclusion and upsell.
6. What is Canva: Now let's jump into Canva. So if you have never seen Canva before and you don't know what it is, is a site that helps you design anything that you want to design, any graphic design, things like social media content, books, presentations, anything that you can think of, you can usually design it in Canada. You don't have to have the paid version in order to use most of the features. However, I have the paid version. So it may look a little bit different depending on whether or not you have the free or the paid version. In the paid version as well, you have access to all of their pictures and photos. So if you wanted to use royalty-free photos inside of your e-book, which I highly recommend, then you can get the paid version or we will go into a different site that you can use later. That is also free. I like having it all in one place so that way I don't have to go looking. But if that doesn't matter to you and you want to be more cost efficient with it, then you can go get them on a different website, which again we'll go over later. So this is the Canva homepage. Up here, you will have your home button, any of these templates, features, and areas where you can learn. Most people don't know about this area where you can actually learn and dive more into Canvas. So if you are wanting to learn something about how to create graphic design or social media marketing. You can click into here and go learn from Canva. And then as you can see this front page, you can click Presentation, Instagram post A4 document poster, Instagram story. There are so many different areas for you to click into. I usually always just go up to the right-hand corner here and go to Create a design because I already know what I want to create. But if you wanted to take a look around by all means. And then on the left-hand side here, you also have all of your quick functions. So you can click into all your designs. You can click into shared with you. You can go to your brand kit, which your brand kit is actually where you can upload your fonts, your colors, Andrew logos, so that way you don't have to keep going and looking for it with each new design that you create. There's a lot of cool features with Canva. So this was just a brief overview of what Canada is the free versus paid version. Why I personally like the paid version better and all the other features. And next we will get into setting up your e-book.
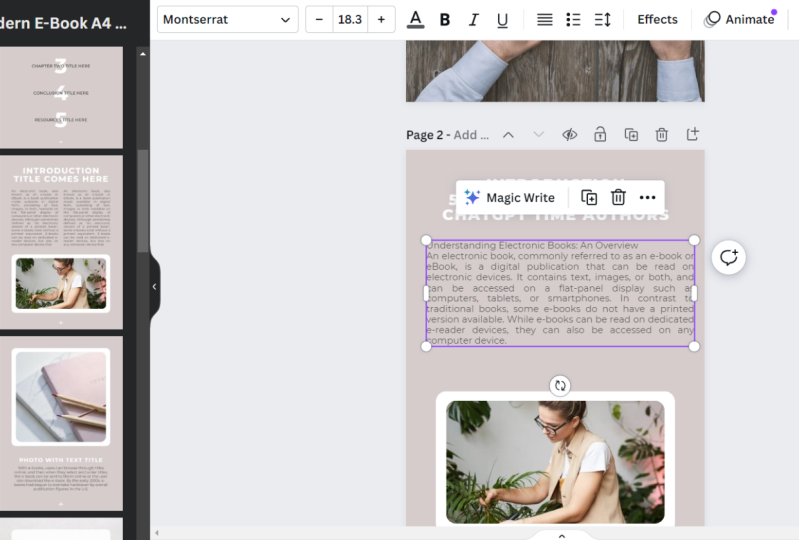
7. Setting Up: The very first thing that you're going to want to do when you get into Canvas in order to create your e-book is go up to this, Create a design. At the very top right corner. It will show you all of these different formats for you to choose from and you're going to choose the A4 document. Your A4 document is your regular sized page. If you were to print it out, it would be as if you created it in a Word document, does very helpful for me, especially because of the fonts. You can actually use them at 12, 13, or 14, depending on if you wanted a smaller font or a bigger font, it helps you keep it clear and concise across all platforms. So another portion that we're gonna do in this one, choosing whether or not to wing it or to choose a template. I am personally a little bit design challenge. I know what I can do if somebody else starts at for me. So I love going into the templates and just looking around to see what I could possibly use. As you can see, I've used a couple of them on the left hand over here. It will also give you some suggested ones based on what you've used before. And then it can give you different cover pages, all results, and you can look through them or you can search. So depending on if you're creating a journal, you can look for journal pages or you can just look through the regular e-book templates. Also on the left-hand side here, we have other options. We have elements, which is, if you wanted to add something into your page, you click on it. This is something that you get with paid. So since I have these as my brand colors, as soon as I click it, it comes out as my main pink. And then you can play around with it, move it around. And you don't have to know exactly what you're doing at first, honestly, the more that you test it out and the more that you play around with it, the more familiar you are going to get with it. And even if you feel like your design challenge, like I am, That's completely okay. Again, you can use templates. You don't need to create it from scratch. But over time, you may find that you want to move some things around. And that is a great way to learn how to design your own stuff. So as you can see in this elements, they have lines and shapes, different graphics, photos, videos. Even again, the photos and videos are a paid benefit. There are some photos that are able to be used if you're using the free version, but you have all full access, unlimited access. If you have the paid version, they have different audios that you can use. They have charts, frames for pictures, picture grids if you want them to be a specific portion of your design things. And then you can go into uploads. These are pictures that you can upload yourself. And then they have a specific area for photos as well that you can browse through or you can search. And then you have your text options. So I have, again, this is my brands text. So I have my headers, my subheading, and my body text. And then I haven't gone through a lot of these extras because I really don't need them. But you can always play around with different styles, audio, video, background charts, folders, and any of these other integrations.
8. Design: Now we're going to get into your e-book design. The lets hop over to Canada. And even if you don't use these templates specifically, you can always get inspiration from them and then add different elements onto your page based off of that. So if you're not using Pro and you can't use the templates, don't worry, you can still get inspiration from them and add the separate elements. So in here, I'm going to act as though I don't have any of these previous templates. And I'm going to type in e-book. So I have found in chosen a template that I really liked. I liked the extra pages that are in here. It says the contents than About Me page. And then I can just change the rest of what is in here to fit. But I really like the way that it was laid out. So that's what I chose. And then I can always add other pages too. You can duplicate pages, things like that. And then also you're going to want to personalize this to your brand. So any of the text that's already in here for your template, you're going to want to change to your brand fonts. Whichever ones they are. So change the fonts to fit your brand, change the size and also change up the colors and things like that. So that way this fits with your brand and not just somebody else's. And remember that you can always change this as you go. It doesn't need to be perfect right now. Go ahead and do that and then just know that you will come back to it later and change the fonts, change the colors, that kind of thing. But go ahead and set up your very first few pages. So if you're starting with a blank page, I usually like to put a little grid on the back here. Just so that way it's a lot easier to put any pictures that are there. You can just drag and drop bomb. And then I'm gonna grab some elements and put them on here as well. Remember it doesn't have to be perfect. You can always change it as you go. I'm going to grab some different text. I like to put a heading and then a smaller sub-heading. And then I also just wanna see if it looks better on the picture or if it'll look better on the square, which I think it looks better on the square, but that's just me. And again, you can just go ahead and play around with this until you find what you like. You can look at the templates to get different inspiration. And then I always make sure to put a little copyright symbol at the bottom here with the year and my name or the name of your business, whichever one that I'm going to go into the photos. And then you can also double-click and drag it to get the correct crop that you want. And then you can go ahead and change any of the effects, the filters to adjust the actual photo. And you can drag and drop if you want a different picture. And it'll just overwrite it. So I'm going to play around with this and create a couple of different examples to show you. And I want you to do that too. So what you actually get used to Canva and moving around all the little parts. So create your cover, create your first couple of pages. Again, if you're stuck, look at inspiration from those templates and I'll see you in the next video.
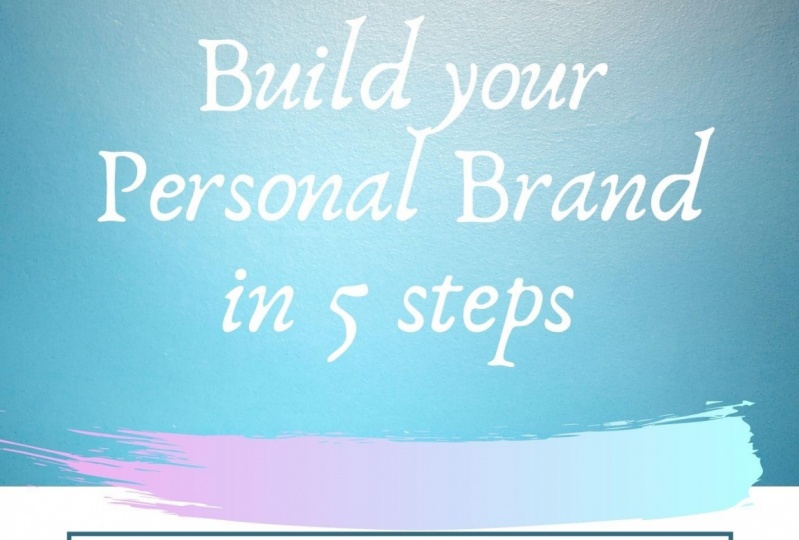
9. A Look into eBook Design Theory: As you can see here, I have created a couple of different possible covers for this design. And these are just different ways that you can test out what your eye really likes to see. So for me, out of these four, I really like the second one and this third one because of the colors, the way that the wording is, it just seems a lot more simple to me and that is what I prefer. But some people prefer to have some more color, this cursive, or even these other splashes of color. It's really up to you and what you prefer. So let me show you one of my ebooks that I've actually created. It's called simply human-designed basic. So this is the book that I've created. And you can see here, so this is actually a picture. If I deleted it, you would see that it's a grid. So this is a picture and you can see that I really like the way that this one is set up, which is again, why I liked this page 2. And I have the title, a brief overview of what it is. I have this branded. So that way you can see that this is from the setup for success resource library. So it's something that you can get for free. And there's a couple of different things in there. But that is a way that I brand it to make sure that everybody knows it's from this area, et cetera. And then this is actually a picture that I have created as well. You can see my branding in here, same thing at the bottom here for this entire book. But you can also see that the colors are aligned. And again, the more that you play around with this and you do it to, the easier it will get, the more advanced you will get. So you can see that I have a cover page. And then this first page is the introduction. And then the next one is how to use this workbook. I like making my ebooks workbooks because again, the more people that are implementing, the easier it is for them to retain information, at least for me. So I go through and let you know how to use this workbook. And then you can also see in the first page and the second page how there's variance. Though, I had creative with this and I put part of it over here, part of it down here kind of in columns because that's a little bit easier to read for me. And also if it's hard to rewrite now it's because I'm zoomed out to 53%. If you zoom in, you can see it more closely. You can go to a 100 percent to see what that would look like, actually looking at it up close. But I personally like to view it from afar because it's easier for me to create it if I'm looking at the whole thing versus very close in. So you can see that I've also labeled the page numbers which I had to put in myself. And every single page is branded as well. And then I've also made these other different graphics. You don't have to make your own graphics. You can just put in different pictures and we'll go over pictures in the next video for me. And one of the things that I look for an e-book is that it is balanced. So it's balanced between how much words are on the page and the design aspect. So even if you don't have any charts explaining what you are talking about, that's okay. As long as you have something that is there to offset the wording. So on this first page, I have a lot of words on this page, but I also have a good portion of it being just a picture. Yes, it still looks a little bit complicated because human design is complicated. But this flows really well. And it looks simpler because again, it's white, it's plain and for me I like that. So we have the cover page, the first page, which is the introduction, who I am and the why of this workbook, how to use this workbook, and some background information and overview. And then we get into the sections like the need to know vocabulary. And then Section one happens. I don't have a content outline. You can if you want to, if you have more things that are going into your e-book, but honestly, e-books really don't need your contents. From my personal perspective. As long as it's set out in a way that is clear and is able to be followed easily. And this is the same format that I have for every section. Again, I have a column and then I have pictures explaining what I'm talking about. I have another column, it's on the other side now, so it gives a little bit of variance. And then I have more pictures explaining and arrows pointing to everything so that way it is illustrated. And when I'm talking about, because that was a big thing for me. And then I have implementation. And as you can see, this is the exact same setup on page 6 as is on page one. You don't need to have a ton of variation throughout your entire e-book. If you're writing something that is, let's say 25 pages or so, you can use the same six or seven pages in order to create the sections. If you have the sections structured the same way, it makes it so much easier to read because then the people who are reading it will get to know it a little bit better. So you can see I have left side is the writing, right side is the writing and then implementation. And then I have few implementation pages, and then I have the left side. So now we're intersection to either the left side is the writing, the right side is the writing. And then implementation again and some more implementation pages. And it just goes the same way throughout the entire thing. So you can see how I'm keeping it at least clear, concise, and designed thoroughly throughout so that it's easier to read, easier to follow, and you know what's happening. So next we'll talk about finding pictures for your e-book and how to put those into your campus.
10. Finding Pictures: So now I'm going to show you where to find pictures that are able to be used. It's royalty-free, copyright-free because these artists get exposure by their pictures being used. These are stock photos that you can just look for, search for, and use in your designs. So if you go to unsplash.com, in here, you will see that top, there are different categories for you to choose from. There's a search bar. If you're searching for something specific, you can sign in and actually create an account with them that way you can save photos and download them and all that good stuff. And then you can also just search directly from this middle page. So whichever one is easiest for you, go ahead and type in your topic theme. Again, for me, this is abstract art. So you can look into any of these photos. And all of these photos are free. So if you want to look at it closer, if you wanted to download it, it's up at the top right, if you wanted to save it or add it to a collection. And when you download these, you can upload them into Canva in that little uploads section that we saw, I'll show you in here. In, on the very left, in the uploads, you can go to Upload Media and then you can choose where to upload from. So I like this one, this rainbow one. So I am going to download this. And then it will also pop up this little citation attribution link for you. So if you just click the Copy to Clipboard and then you upload it into here. You can also create a separate page, keeps track of all of your artists that you use and you can add that at the end. I personally would rather put them in where I'm using the photo. It's up to you. So if I was using this photo right here, I'm just going to drag and drop, click on it, put it in, and tweak it a little bit. Create a new text box. I usually just like to take the ones that I already have and copy paste on there. And then you can put this wherever you want on the page. I usually like to put it at the bottom of the photo or you can even run it up the side, which is a creative way to have shadows as well. And then I have it at a size 10. So I have it smaller than the rest of the text because it's not the main portion of what you need to see. But again, you can look at it a lot closer so you can still see that it is legible. And again, you can create a different page that just references on page 1 on the cover. This is the photo, this is who it's by, etc. Whatever you feel most comfortable with and whatever you want you include in your e-book.
11. Add Your Outline: By now, you already have your working outline, you already have your title, you already have the basic design of your e-book and you are ready to input the information. So if you haven't yet already, I want you to go into your cover page, or you would add the title and Azure copyright at the bottom. And then the second page, I want you to just label it, the About Me or the overview, whichever one you want to do first. That way you know exactly what you're doing on each page. And then in the next few pages, I want you to choose and set up how you're going to explain your concepts. So again, having the title on there, select Step number 1, XYZ, whatever your step number one is, just let them know like this is step one and this is the explanation. So right, this is step one. And then go to the next page. This is step 2, next page, and so on. And you can just duplicate those patients as you go. That way. You keep it clear, concise, and consistent. And then for the conclusion page, right, whatever you wanted to label as your wrap up, whether that is actually calling it a wrap-up or calling it a conclusion or summary, whatever you wanna do with it. And then I also want to remind you, please do not get stuck in feeling like it has to be perfect because it doesn't have to be perfect right now. It's not finished, it's not getting sent out to publishers. You are still the one that is going to be designing this. And if you're doing this all on one day, sometimes it's good to just set it aside and come back to it the next day for fresh eyes that way you can see and tweak it and more as you go. This is going to be the returning theme for your entire eBook. As you create it, you may even tweak the title. You may tweak the outline. You may add more steps, you might take some away. You could tweak the design or the layout. You will switch around some pages, you'll add another picture, take a picture way. It really is not set in stone and you can change things along the way. The main point is that I want you to keep taking steps. Don't let perfectionism kill your creativity. Do what you can, do, what you feel called to step away from it and come back later.
12. Write the eBook: So after all of that, congratulations, you have just created two thirds of your e-book. So what now? Right, the e-book. Now that you have a clear outline, you have a clear title, you have a clear destination for where your words are going. You know exactly how much you want to write in those pages. You know the steps that you want to cover. It's already two-thirds of the way done for you. All you have to do now is go into it and actually write it. So the same way that you would talk to somebody else, Let's say your friend asked you to elaborate on step one. What would you say? Write that down. Write down what you would say to either yourself or somebody that you know, because this is going to help you get that writing out of you. So that way you can elaborate on this topic. And before you know it, you're going to have a completed e-book. And then you can also get some feedback, you know, in the discussion from other class students that are here with you, you can ask your friends, you could send it off to your family and then get some feedback and make tweaks. So that way you are ready to use it. If you have any questions, if you're stuck on something, if you are stuck in Canvas, if you're stuck in your outline, whatever it is, please ask for help. Put it in the discussion. Reach out to your fellow students, reach out to me and we will help you get there. Because creating your e-book as again, something that you can just create once and sell over and over and over again, or use over and over and over again. It's so worth it to put in the effort right here, right now in order to create what you want to create and then have it forever to use. So I hope you'll love this course and I am so excited to see your finished products in your finished e-books. If you feel comfortable, share the cover or any of the parts of your process in the project gallery. I'm so excited to see it.
 Lillith Elaina, Let's Turn Your Dreams into Reality