Transcripts
1. Introduction: Hi, I'm Alexander Read. I'm a mixed media artist in jewelry designer. I love teaching hands on learning both here in my studio and also on skill share. Welcome to my class and caustic painting, basic wax tools and techniques. You might be wondering what isn't caustic and cost. It comes from the Greek word and Kosta coasts, and it means to heat or burn in, uh, the other word for it is hot wax painting, and it uses melted bees wax combined with colored pigments, and then you apply this hot mixture to a rigid surface usually would. So this class is intended to give beginners a foundation in and cost a painting or experience artists who are looking to try a new medium. We're gonna start with a brief overview into the origins of encaustic painting and learn how it was rediscovered in the 20th century and then going to show you how to make your own and caustic medium from bees wax how to color it to making caustic paint what substrates for the best to paint on and some basic tools and techniques for working within cost of paint. What you gonna learn? This class is gonna give you the skills and confidence to paint not only with a paintbrush but also with a blowtorch and whether your preferred subject matter is realistic. Er, abstract. You're gonna love the richness and depth of color you can achieve with hot wax painting. I can't wait to see your projects. I got lots to cover, so let's just jump straight into the class and get started with encaustic painting. See you there.
2. Encaustic Origins: the first part of class looks into the origins of encaustic painting. So what is encaustic and caustic is a Greek word, meaning to heat or burn in comes to the word and cost two coasts and cost. Two consists of natural bees wax and damar resin, which is crystallized tree sap. The medium can be used alone for its transparency or adhesive. Qualities were used. Pigmented pigments could be added to the medium or purchase colored with traditional gardens. Pigments. The medium is melted and applied with a brush or any tool the artist's wishes to create from each layers, then reheated to fuse it to the previous layer. Encaustic paintings practiced by Greek artists as far back as the fifth century BC Most of our knowledge of the early uses of in cost it come from the Roman historian. Plenty of the elder whose national history written in first Century A D was a monumental encyclopedia of art and science. An ancient Greece that's main preservation property of encaustic was instrumental for weather proofing Greek ships. Pig menting. The wax also gave rise to the decorating the ships with iconography. Homer mentions the painted ships. The Greek warriors who fought at Troy according to Plenty and caustic, had a variety of applications for the painting and portrait's and scenes of mythology on panels for the coloring of marble and terra cotta, and for work on ivory, probably the tinting Vince iced lines, most notably known as the FAM Portrait's. These are the only surviving costing paintings from ancient times. The portrait painted either in the prime of life for after death, replaced over the person's mummy as memorial. The custom of Funeral Portrait's did not begin until after the conquest of Egypt by Rome and last about two centuries. The portrait represent converging influence of Egyptian religious ritual, Greek aesthetic and Roman fashions and social ranking. Many of these pieces have survived her own time, and their color has remained as fresh is any recently completed work. In comparison, most Renaissance paintings were only about 500 years old and are cracking and need extensive restoration. By using X ray radiograph e, you can look to understand different materials manufacturing techniques later alterations and condition issues. The X ray radiograph of the Porsche, the young man illustrates tool marks characteristic of the encaustic technique. The pigmented wax has worked warm, and you can see the individual brushstrokes. The background is made with a wide brush, while the face is heavily worked with small tools to create the delicate shading in the flesh tones. But with the great period of economic instability that followed the decline of the Roman Empire and the change and cultural values caused and caustic to fall into disuse, some and caustic use, particularly the painting of icons, was carried on his latest seventh century. But for the most part it became a lost art. It was replaced by egg tempera, which was cheaper, faster and less demanding to work with. The roots of modern on caustic painting go back to the 18th century, when antiquarians, excited by the archaeological discovery of the buried city of Pompeii strove to rediscover the techniques of ancient painters and caustic was further stored in the 19th century as a way to solve the problem of dampness faced by mural painters in northern climates. Although the practice did not become widespread, there were some amazing successes, such as John Lafarge's murals for Trinity Church in Boston. This was the first really mural painting in America and marks a milestone in art. Fars is considered the follow the American Your own movement, he said. Then caustic is particularly suited to color work, producing a softer, shinier surface than oil. With rich colorations and smooth texture. It is, moreover, stable and long lasting. Moving on to the 20th century, the painter for its fast student Paul Plea and, lastly convinced Get the Ball house rediscovered. The technique of encaustic painting, the availability of portable electric heating implements and other tools made the use and caustic far more accessible than it had been in the past. Numerous artists were drawn, experiment with and apply it to their own individual styles. The pop art movement in the sixties showed many artists experimenting with encaustic painting. Jasper Johns, Robert Rauschenberg, Linda Bengal is Robert Morris. Nancy Graves are prominent among the many artists who turned in caustic into a modernist and cross disciplinary medium, extending its use from painting to collage, assemblage, sculpture and printmaking. In fact, it was this painting by Jasper Johns numbers and color that first introduced me to the world of encaustic painting. I was on a field trip with my high school art class and I was totally blown away when I saw this painting in person, the richness of the color and the depth and the layers. I've never seen anything like it, and that's what got me excited about caustic painting. In 2001 the artist Joanne Mattera published The Art of Encaustic Painting, which became the first modern reference book on caustic painting, has helped to popularize the ancient technique and make it accessible artists of all levels . Since that pivotal book was published, the modern and caustic painting world has grown by leaps and bounds. There are conferences, associations and even magazines from caustic artists all over the world. Are you ready to learn this ancient technique made new again? If so, follow on with the next part of this class.
3. Making Encaustic Medium: the first part I'm gonna cover is studio safety. So some things to keep in mind when working with encaustic paint. It's hot. If you have a window in your studio, it's a good idea to keep it open. And also maybe use a small desk fan to create a cross breeze to keep the air circulating. You want to protect your clothing by wearing an apron. It's a good idea where shoes not sandals. In case you drip hot wax on yourself. I'd also suggest telling your hair back and wearing short sleeves. When working with hot wax, you'll want to put down wood panels on your work surface. This protects it from the hot wax and also allows for easy cleanup by scraping up the wax strips into your mud pout with a metal scraper. You'll also want to have a fire extinguisher nearby, just in case so, looking at materials that you need to making caustic medium, you'll need to ingredients. Damar resin, which is the crystallized tree sap. It looks just like brought candy. Make sure not to use Damar resin, though it's not the same thing. And second green is be used wax, which can either be natural and it contains pollen or white filtered. Keep in mind that natural. Give a yellow tinto all your paint colors, which is good for an antique look. Wax comes in many forms. The most common isn't blocks. You can put it in the freezer and break off pieces of it with a hammer bit easier that way . Pellets also melt very quickly. If you change the ratio of Damar resin to bees wax, it shifts the melting point higher and makes the wax more durable, which is harder to touch. Wax mounts a 200 F, which is 93 C, so try not to go above that temperature. If you notice any smoke, it all turned down the temperature immediately. The easiest thing to do is use an adjustable thermostat on your electric deep frying pan or electric Pancrate grill. If you don't trust the thermostat to be accurate, you can use a surface thermometer to keep track of the temperature, straining the impurities. Damar Resin contains bits of tree bark and insects. Think fly an amber or Jurassic Park, so once it dissolves into the melted wax, you'll need to strain it as the tomorrow resin dissolves. It gets very sticky or tacky, kind of like candy making. I suggest you melt only half the bees wax. It will save you ladling time. You can use a fine filter, paints trainer or line it with cheesecloth. To filter impurities. You can use wooden clothes pegs to attach the stranger to a metal saucepan. Use paper towels to wipe up any left orbits in the bottom of the pan. Once filtered, you can add the remaining bees. Wax to the mixture to melt. Remember to keep your wax pots and utensils separate from your kitchen ones. Containers for your medium. You can ladle the encaustic medium into clean metal tins, such as tuna or cat food. Tins have been cleaned well. It's good to have different sizes of tins. Smaller tech contain different paint colors and larger for white paint or clear and caustic medium. To make storage amounts of medium, you can ladle it into silicon muffin trays or use silicon muffin tray inserts and regular metal muffin trays. Once the medium is cooled, you can use your freezer to speed this up. You can pop out the medium pucks and store them in Ziploc bags, pre made and caustic medium. So if you don't want to go to the trouble of making your own caustic medium, you can always buy it pre made again. This comes in different forms. Blocks, tins, pellets. You'll also want to check the ratio of bees wax to damar resin. Most are 5 to 1 or 8 to 1 ratios with bees wax always being the greater ratio to making caustic medium. You need two ingredients. Bees wax and tomorrow resin. Here I'm starting with about 1/4 cup of damar resin crystals. There are two types of bees. Wax natural containing Poland, which is yellow in color and filtered, which is white. The filtered bees wax is the best to get the truth. Paint colors. These winds comes in several forms. Here you can see blocks and pellets. I usually order the blocks since it's more cost effective and then melted down into smaller wax pucks. Using a silicone muffin tray, pellets melt very quickly, which is good if you're in a hurry to get painting. To melt the wax, set your temperature to about 200 F or 93 Celsius on your electric deep frying pan. Be careful not to overheat your wax or it'll smoke, and you don't want to breathe that in. I'm starting with 1/2 pound of wax measured using a kitchen scale to melt. This is to achieve my 8 to 1 ratio of wax to damar resin. Tomorrow, risen shifts the melting point and ask your ability to the wax. Once the wax melts, this could take up to about 15 20 minutes. You can add in the Damar resin and stir well as the crystal dissolved. They become very sticky, almost like candy making, and this can take up to 10 15 minutes to dissolve as well. Once the dissolved, you need to strain out the impurities out of the encaustic medium. Damar resin is crystallized Treece up, so it may contain bits of barker insects. Here I'm ladling the medium into a paint strainer to get the big pieces. The metal pan is heating on the pancake griddle to keep the medium hot and liquid. Once the frying pan is empty, you can take a paper tell toe wipe up the bits that are left over in the bottom of the pan . Found that I still have a lot of particles, my medium. So I used a piece of cheesecloth to re filter it again. Once the medium is filtered for a second time, if necessary, you can add the other half pound of bees. Wax true, medium to melt. After an additional 15 to 20 minutes, the wax has melted, and you now have an caustic medium in 8 to 1 ratio of wax to Damar resin. Then you can ladle it into your empty clean metal tins or silicon muffin tray.
4. Colouring Medium: coloring of oil paints you concolor. You're clear and caustic. Meeting with oil paints. Just don't go above more than 50% paint to 50% medium. It's OK to have more medium. You can block the excess oil out of the oil paint by squirting the paint onto a paper towel and letting it sit for at least eight hours or overnight. You can use either student grade or professional artists. Grade Paints. Professional cancer Contains more concentrated pigment. If you want to dilute a color, you can add more and caustic medium. This is good for making blazes, which are transparent coats of paint. I'd suggest. Use metal tins toe, hold the medium, add the paint and stir well to dissolve. You can use a wooden clothes peg to hold on to the 10 and I'll be demonstrating how to do this later on. In this video coloring with dry pigments, wear a dust mask. When you're working with dry pigments, you don't want to breathe these in. Some of them are quite toxic. Dry pigments are expensive again, depending on the origin of the pigment, I suggest try to get a sample size a little, goes a long way mixing colors. You can mix your oil paints before adding them to the medium. I suggest using a disposable paper palette or freezer paper and a palette knife to mix the paint together thoroughly. Then you can scrape into the medium once finished mixing. If you're mixing small amounts of colors, I'd suggest using the top of a metal lid. When painting use only natural bristle paintbrushes. The synthetic ones will melt in the heat. Metal pallets will stay hot to allow the mixing than caustic paints directly on their surface. The aluminum plate is meant to go on top of an electric griddle. Both the heated palette in the hot box have their own sources of heat. The light silver color allows the true colors to be seen when mixing and caustic paints. If you don't actually take the trouble of mixing your own colors, you can purchase premixed artist greed and caustic paints. These come in different forms sticks, tins, slabs and blocks of all sizes. Commercial encaustic paint has super concentrated pigment load, which is great for making glazes again. A little goes a long way. These are pricey, though depending on the pigment. Source. we're gonna color inner, caustic, medium using oil paints. I'm using small tins for the primary colors blue, red and yellow and a larger tin for white and keeping 1 10 just for clear and caustic median. You don't wanna have more than 50% oil paint to 50% caustic medium, and you can remove some of the oil by squirting out the paint onto a paper towel and letting it sit for at least eight hours to overnight. So, well, that's sitting. I'll quickly show you how to clean and caustic paint off your paintbrushes using para Finl axe. This isn't entirely necessary to do as the brushes are fine left in the salt and caustic paint, but sometimes it's faster to be able to clean off your brush, rather just letting the wax to melt off it just don't use para from wax to make and caustic paint. It's extremely brittle and not archival. Here I heat the parapet on my palette. I'm using an anodized aluminum sheet from cost ACOs and just keep melting the paint off the brush and wiping out onto a paper towel. That's it. The palate wipes clean with paper towels when it's warm. After the oil paint has been blotted, you can use a wooden crafts stick to add it to the hot and caustic medium and stir well to dissolve it. I use a wooden clothes peg as a handle to hold onto the metal tin while I'm stirring the paint. Repeat all of these steps for the remaining primary colors and the white paint. Keep one container just for clear and caustic medium.
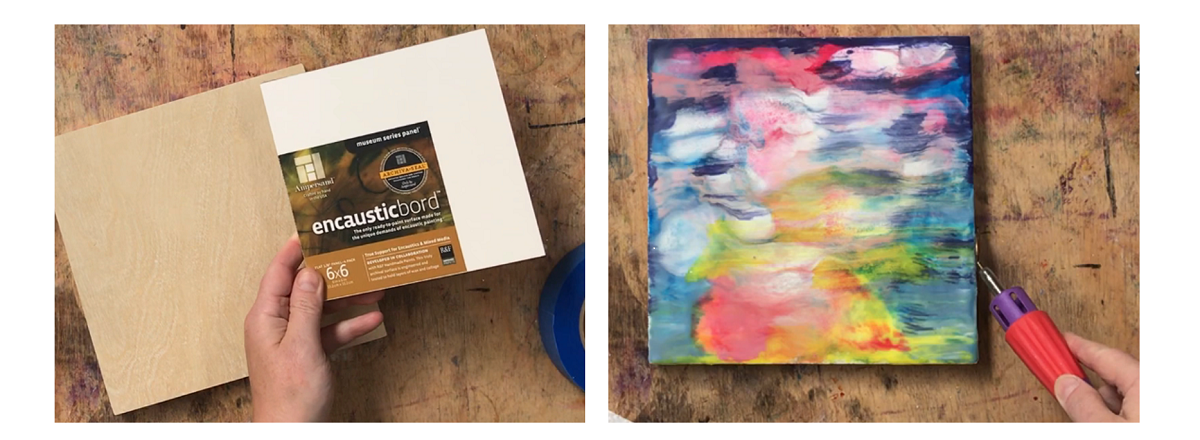
5. Painting Substrates: painting substrates. Encaustic paint is on a flexible surface. It can crack or snap off. If brittle, it's best sitting. Caustic paint is applied to a rigid surface. It should also be applied to a porous surface. If it is too slick, the encaustic paint may not adhere. Wood is an excellent surface, and this could be in different forms, either. Solid pine panels about 3/4 of an inch thick plywood panels in different various thicknesses. Wooden cradle board with often has birch as the top panel. You can also use MDF, which is medium density fibreboard. If you wanted, just so the surface to be white, you need to use an encaustic. Jess. Oh, the standard acrylic based Jessica is not porous enough prepared substrates. You can purchase pre made substrates that are made specifically for encaustic painting and percent and caustic board comes in both cradle boards and panels in different sizes and thicknesses. The surface is coated with a poorest white clay. It is very smooth, and a uniform surfaced. This is an eight by eight inch would cradle board, which has a birch wood panel on top. It is lightly colored and porous, so it holds encaustic paint well. These are a set of an ampersand and caustic board, six by six inch panels. The surface is coated with white absorbent clay, which holds and caustic paint very well here. I'm gonna keep the edges of my cradle board paint free, so I'll use painter's masking tape to cover all the edges of the encaustic. Paint drips over. It'll stick to the tape, not the wood.
6. Using Hot Tools: flammable tools. There are different types of torches you can use with encaustic painting. The beauty and blowtorch is the most powerful. It has an adjustable knob to control the men of gas. More gas, the hotter the flame, using quick, fast passes to melt the wax. You can find this in the hardware store near the plumbing section, and it's usually used for welding pipes. The kitchen torches quite small. You need to fill it first with beauty in full before using. The flame is not quite as hot. It may also have a sliding vent to give it more air to increase the heat of the flame. You can find this in the kitchen supply store, as it's usually used to toast creme Relais desserts. The butane refills can also be found in camping stores. Hot air tools. The scrapbook Heat gun is used to heat and bossing powder for greeting cards. It plugs in and generates a constant heat with blowing air. Less there than haired are but much harder, and it can be found in craft stores. The pain stripper or commercial heat gun has two settings hot and hotter. Be careful using this one as you can accidentally burn right through your painting to your would substrate. It is a paint stripper. After all. How do your tools air? Good. Since they only use electricity, there's no need to refill fuel with, um, iron tools. Iron tools are quite different than standard laundry irons. There's no holes for the steam to come out. Just a flat hot metal surface iron tools of different sizes. They're good for cleaning up. The edges of paintings are creating large, melted planes on a painting. Quilting irons could be found in fabric stores. The tack irons can be found in photography or framing stores, and the encaustic iron is carried online by specialty art shops. Hot stylist tools. Hot stylist tools usually have interchangeable tips. Wood burning tools also come with cutting tips. Stylised tips allow over different types of brushstrokes and calligraphy tips, which stay hot with encaustic paint. Normal bristled paintbrush is, well, cool as the wax schools. What burning tools can be found in craft stores and the hot pens or Silas Tools Air carried online by specialty art shops. Scraping tools. A metal paint scraper is great for cleaning up wax strips on your work surface. Those wax strips could be added to your mud pot and use later. For dark paint colors like black thes could be found in hardware stores. Pottery carving tools, especially the needle tool, are good for moving to breathe in your painting surface, like lose paint. Brush bristles. These could be found in craft stores and pottery supply stores. The first step to preparing your wooden cradle board for encaustic painting is to paint a coat of clear and caustic medium. The key thing to remember is diffused with heat, with every layer paint you put down on the board. Try to keep your breast rose close together, and even some overlap is okay. And remember to use a natural bristle paintbrush, not synthetic, or it can melt. Here. I'm using a scrapbook in Boston. Heat gun to fuse and melt the encaustic medium. The smooths out the brush strokes and helps to eliminate air bubbles. On the surface. You can see the medium change color. The wood looks wet in places as it melts, Infuses after the first coat of medium. Rotate the board 1/4 turn and paint a second coat of medium thes 1st 2 coats set the stage for successful painting. Each layer will bond well to the next layer, which is bonded to the wood. The bottom. Also, if you totally hate your painting in the end and want to stay, are art over, your board will be in good condition if you have to remove all the top players of the encaustic paint off of it. This time I'm using a blowtorch to fuse the medium layers. You need to move the flame quickly and all over the board. Otherwise, you can cause hot spots and burn right down to the wood substrate. The heat gun does take longer and has blowing air That could disturb the surface, but it's good to use if you're fusing something delicate or want to keep the texture of the brushstrokes. After using the blowtorch, the medium will take longer to cool. This is a good time to do a cleanup on your work surface. Use a metal paint scraper to scrape up the drips and add them to your mud pot. I call it a mud pot because once you start adding leftover paint drips to it, the color in the end will resemble mud. You can use this mud and caustic medium to mix with dark paint colors like black, so not to waste it later on. Now that you have two colors of clear and caustic medium fused, you can paint a ground color. I used white because it allows all colors painted on top of it to be brightened distinct. But you can use any color for a ground you need to paint fairly quickly, since once the encaustic paint is removed from the heat source, it'll start to cool and solidify. I used a kitchen torch to fuse the white paint layer. The kitchen torch gives a much smaller flame than the blowtorch, but you can adjust the flame very much. Once the white paint ISF used paint another layer of clear and caustic medium over the top and fuse. This gives a protective barrier to the paint and stops it from mixing with subsequent paint . Layers is thes layers that given caustic paintings there reald depth, lots and lots of layers. You can use a needle tool to remove any stray paint, bristles or other debris from the surface of your painting. Just take it out and reheat the area to smooth out the whole. Just be careful not to overheat the area or you'll make a bigger hole in your painting.
7. Fusing Layers: as mentioned before. Once you're painting with encaustic paint, it'll start to cool quickly and solidify. You can see as I make more brush strokes with the red paint. It stops being smooth, and you can see the texture from the brush. If you want to make your paint color more transparent to create a glaze, you can start adding more clear and caustic medium to your paint. This reduces the amount of pigment suspended in the medium. Try to do all your mixing on your palette so you don't cross contaminate your paint colors . Here you can see the extra medium has lightened the red paint color. If you want to make tints, you can use white paint to make pastel colors. It's easy to start with the white and add the dark color to it slowly, rather the other way around. Adding white paint also increases the opacity of the paint color. Remember, diffuse your paint layers before moving on to the next color. Otherwise, that colors will mix together or bleed into the next layer. You can do this intentionally to get a very fluid or dreamy look to the mixed colors. If you want to keep a layer separate. Remember to use a coat of clear and caustic medium over it and fuse. Glazes can also create optical mixing, like using colored filters and photography, or looking through a stained glass window. Here, the blue glaze over the red paint looks purple after heating the paint with the blowtorch, you can pick up the board and manually move the paint around while it's still hot. Tipping it side to side can make the paint flow in interesting ways, like marbling paint on silk or paper. Just be careful not to tip all your paint off your board.
8. Class Project: class project. Your class project will be to create a small and caustic panting with at least three colors . First, you're gonna prepare the wooden cradle board. You can take the edges if you want. With two coats of clear and caustic medium, remember to rotate. Infuse between each layer. You'll paint a base ground coat of white encaustic paint and then fuse. Coat this with another coat of clear and caustic medium on top. Fuse again. From there, you can paint additional colors on top. Remember, diffuse between each layer and continue building up the paint layers. Try painting a layer without fusing that makes the colors together. You want to add at least three or four layers of paint. Also unclear. Medium to build a real depth on one last coat of clear medium over the entire painting. When you're finished, remember, diffuse after one or two days, even buff the painting surface with a lint free cloth or old nylons to make it shine. Remember to upload your painting to the class projects and shared on instagram with the hashtag ready to wax on for this private class, I'll just be adding more layers of painted high speed. Enjoy the show. When you've decided that your painting is complete, paint a final top coat of clear, caustic medium and fuse. This will help to protect your painting surface and lets you buff your painting to a shine once it has cured.
9. Caring for Encaustic: after the encaustic paint is cooled, it could be slightly warm to the touch. You can remove the painter's masking tape. You can now see how crisp the edges the paint are around the surface of the cradle board. If you're all worried about the chipping off the edge of the paint, you can smooth the edges down. Using a hot iron tool, run the tool briskly along the edge at a 45 degree angle to the board and the paint. This will give a nice, beveled edge to your painting. Don't leave the iron long on any single place on the painting. This may overheat the paint and cause it to puddle. Let the encaustic paintings sit for at least two days to let the paint cure. Once it has cured, you can buffer polish the surface of a painting, using a lint free cloth like an old T shirt or a pair of nylons with a bit of elbow grease . You can get a high shine on the surface of your painting, and you could always bring this shine back with a polish and caustic paintings. Over time, develop a bloom over them. It gives a slightly hazy look, and this bloom can be removed by polishing
10. Final Thoughts: thank you for taking my class and caustic painting, basic wax tools and techniques. We covered a lot of tips and tools on short amount of time, and I know that everything from choosing the right torch to creating layers of color will help you create satisfying art that'll show real growth in your skills. My next in cost two classes will be focused on adding new techniques to your toolbox. Stay tuned for upcoming classes on collage, mark making and model printing. However, use your skills and information. I'd love to see what you make. So upload to the Project section and connect with me an instagram at Lexi Reed studio. And if you've enjoyed this class, don't forget to leave a pause to review. And I hope you'll learn again with me soon. Thank you and have a great day.
 Alexandra Reid, Mixed-Media Artist