Transcripts
1. Introduction: [MUSIC] Welcome to combining embroidery with
watercolor on paper. I'm Michelle, a mix media and textile artist with a
passion for sewing. I'm the founder of [inaudible]. My art has been exhibited both locally and
internationally, and I'm known for combining
textiles with paint. I'm so excited to be here teaching this fun
beginners class. In today's class, you'll learn everything you need
to know to get you started with embroidery
and watercolor on paper. For our project today, I've chosen a succulents
and cacti theme. This will allow us to
get wildly creative with our design
choices of color, stitch, shapes, and textures. Here in class, we'll
look at art supplies, and I'll walk you
through the basics to complete your watercolor
under-painting. We'll dive into color
and design choices. I'll show you how to draw
and then paint your design. You'll be guided through
embroidery supplies, including threads, needles,
and paper selection. I'll teach you 12 stitches. You'll get to practice
these stitches, and then you'll go
on and embellish your painting with
beautiful embroidery. I've got loads of tips
to share with you during class to make the project easy. What you learn in class
will challenge you and grow your mix
media creativity. Once you realize the
design applications of stitch in art, the only limit really
is your imagination. But be warned,
this is addictive. I've made a bonus
video at the end showing you some extra stitches. I also show you a quick way
to turn practice stitch samples to a book
for easy reference. I'm so happy you're
joining me for combining watercolor and
embroidery on paper. There's loads to do in class, so come on, let's
go and get started.
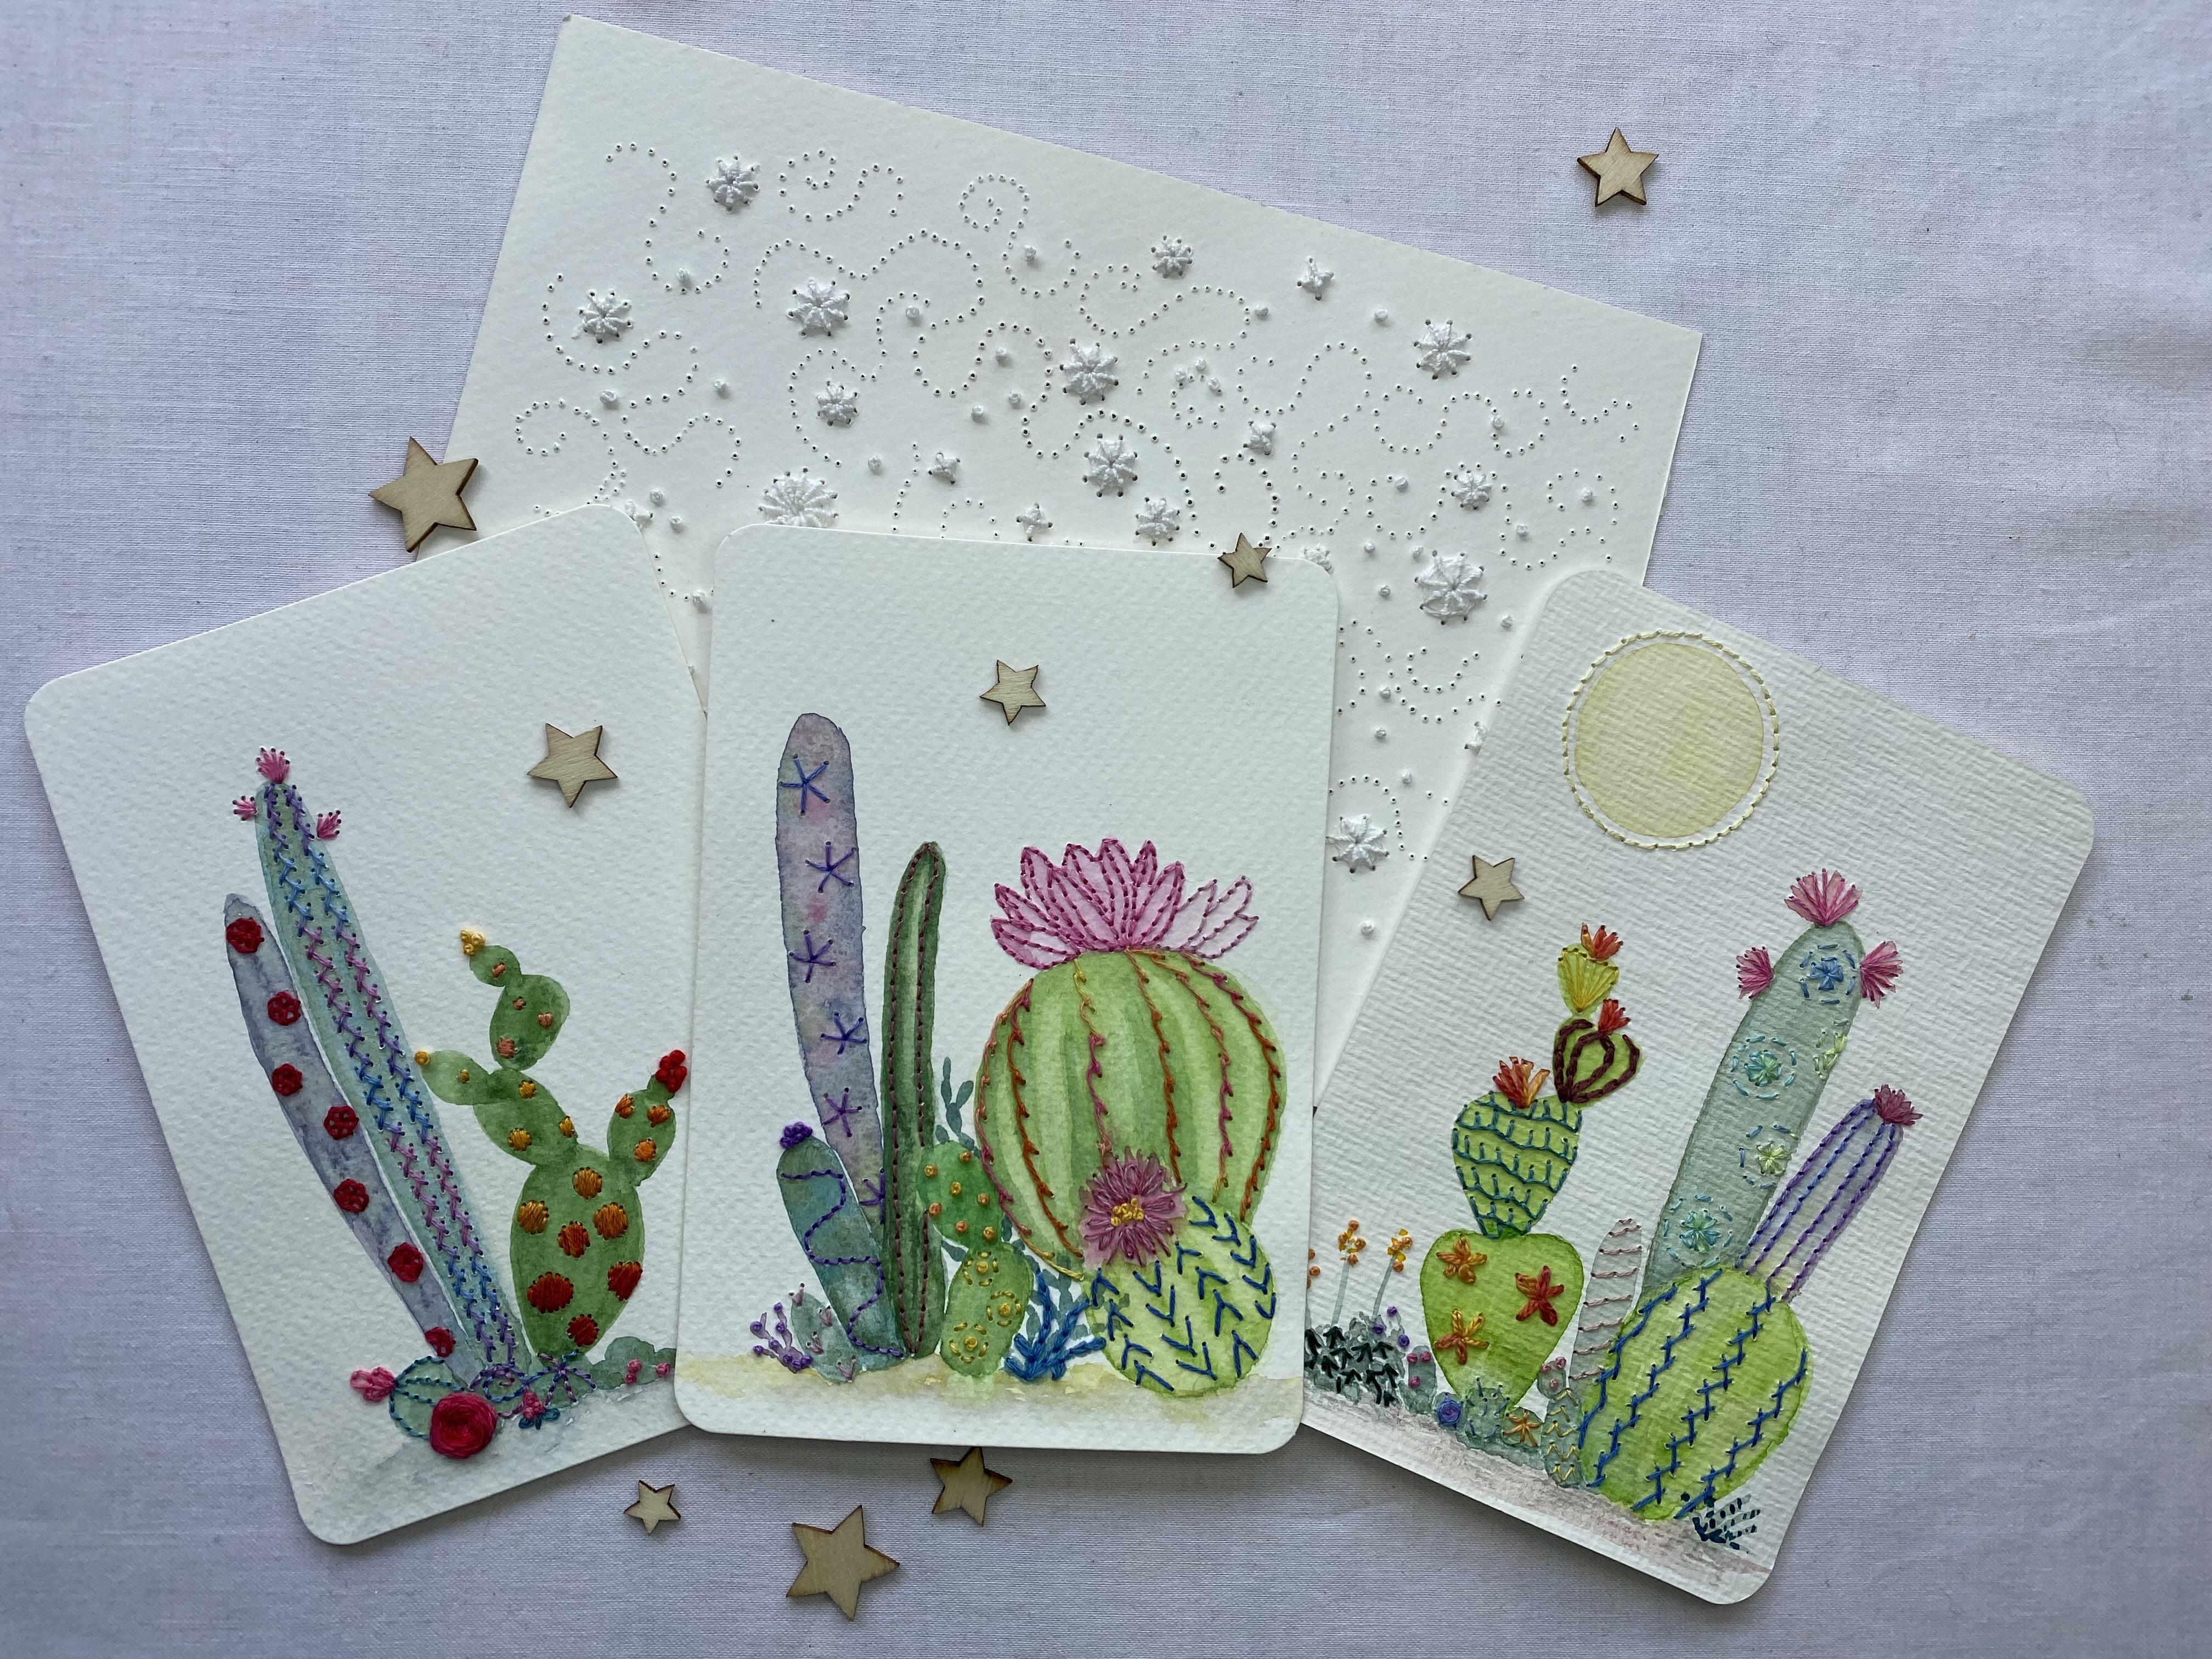
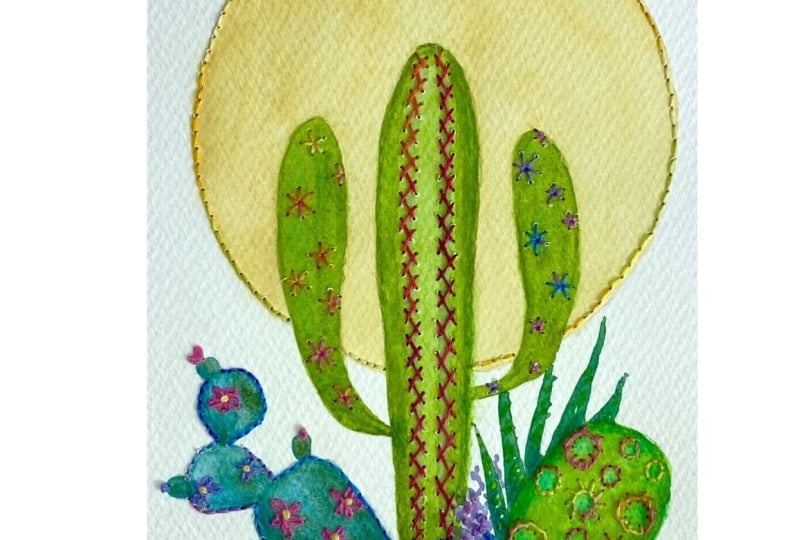
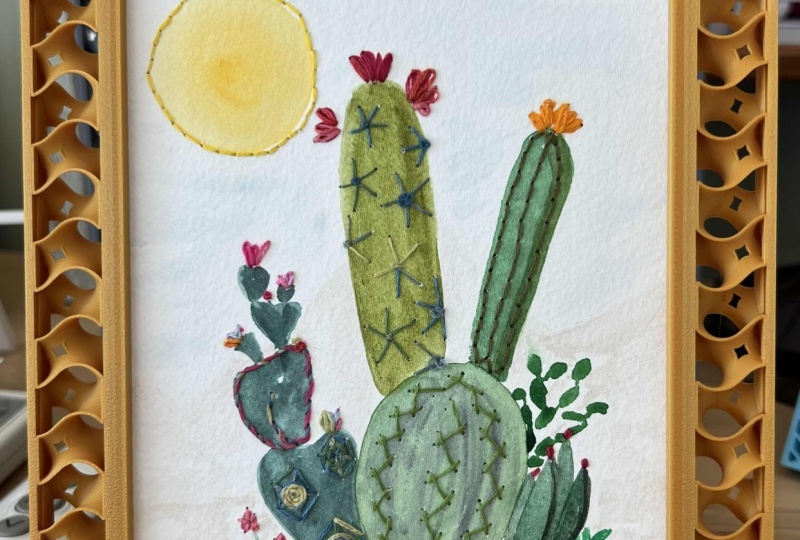
2. Project: [MUSIC] Hello. Let's take a look at
the class project. The succulents and cacti
theme was chosen as a fun way to bring
the new skills you learn into one piece of art. I chose it because the
structure of cacti and succulents are easy
to draw and to paint, they come in a variety
of shapes and color which are the perfect backdrop for multiple
embroidery stitches, and also I thought they
add up a fun element. If however succulents
aren't your thing, by all means create
your own design. Just remember the resources I've provided are based on
the succulents theme. Let's have a quick look at
some designs I've created and I'll show you the piece I
made for my actual project. First of all, I'm
going to show you some examples of
under-paintings. These are ones that
I've painted up, but I haven't actually
embroidered on yet. It's just to give you an idea of what an underpainting
looks like. This one has some
metallic paint in it. You can see that when
you're working with busy designs and
colorful thread, the underpainting doesn't need
to be that well-developed. You bring in those elements
with your stitching. Now we come into
the one that I've started looking at some stitch, testing out some colors to see what might go with
what color paint. When I was working on
the idea for this class, I tested out some stitching
elements and I'll show you. I was testing out
different kinds of paper, so different sizes, always the same weight, 300 gsm or 140 pounds. I had some postcards
and I tried those. I quite like those. I had a lot of fun doing them. Then I tried a
slightly larger design and really jam-packed it. Probably a little bit overdone, but I was testing out different stitches to
see how they looked. This is my project. It's the one that I
created for this class. I have provided you with some line drawings in
the Resources part, so there's a few of those drawings you
need to choose from, or you can simply take
elements from them and combine them together
and create your own design, or you can just
totally draw your own. [MUSIC] You can
be thinking along those lines as you're
working through the parts of the class where we come up with our design and then
we go on to draw it, paint it, and then stitch it. [MUSIC].
3. Watercolour Supplies: [MUSIC] You're going to need two
receptacles to hold water, and water to go in them. I like to use this
glass jar so I can see the color of the
water and I know when it's time to change it. Two those with some water. [NOISE] You're going to
need two paint brushes. Mine are round and they come to a nice pointed tip or you can use whatever type
of brush you have, whatever you're
comfortable with. When you're first learning
watercolor though the most popular brush is
the round, pointed brush. [NOISE] Then you're going to need a HB pencil to
draw your design. It goes without saying that
you'll need an eraser. I prefer a kneaded eraser because I think
they're like magic. They are malleable, you can move them into
whatever shape you like. You can use them by rolling
them over the paper, by tapping them on the paper, or as you would an
ordinary eraser. Then you just need them and the graphite
disappears like magic. You're also going
to need a palette. This one is a China one, and it's good for
mixing because you can see the transparency
of your paint. You can see how much
pigment is in there. It's much better than plastic
clearly because you don't get that bubbling
effect as much. You get an idea of what your paint's going to look
like on the paper. If you don't have one of these, you can use the palette that comes with your little paint set if you're using a paint set, [NOISE] or a China plate, a white China plate
works really well. You just find a nice size one. You can make good
size puddles of paint on a dinner size plate. You are going to
need some paint. Now, paint for watercolor
comes in pens like this. This is a little travel
set and is a Sakura Koi. This one is student gray. Other types of pens are
these half pans sets. This one is one I've
put together myself by squeezing paint
out of the tube. I think that's a Windsor and Newton set by the looks of it. [NOISE] Paint also
comes in tubes, and you might just have the primaries there's
no problem with that, yellow, red, and blue. You can mix all the colors you need from those three tubes. That's another way
for paint to come. [NOISE] You're going
to need some paper. Because you're learning there is no need to spend a huge amount, so if you have some
large paper sheets at home already for watercolor that's fine go
ahead and use them. I would however
recommend that you don't use anything
bigger than this size A5 which is 148 millimeters
by 210 millimeters, which is 5.8 inches
by 8.3 inches. This is a good size to learn on. When you're first learning to stitch on paper, it's awkward. Though a smaller piece of
paper is easier to begin with. This paper is a medium tooth cold-pressed and that would
be my recommendation. However, if you have smooth paper there
is nothing wrong with using smooth paper. If you have a rough paper as
long as the text is not too roughy it will be a little
more difficult to stitch on, your stitches won't sit as nicely if you have a
really rough paper. I pulled these out to show you, these are little
watercolor postcards, and they're quite a
good size to work on. This one is exactly
the same and it's slightly better quality paper [NOISE] and has
nice rounded edges. I've made a few little
pictures on these, and I've embroidered, and I've enjoyed working on
them very much. The weight of the paper
is very important. I recommend 300 GSM which I think is equivalent
to 140 pound. If you go below that when you're painting be careful not to use too much water. The lower the poundage or
the grams per square meter, the more flimsy the paper is, and the less it will stand
up to the water which is a problem when we're going to go on and stitch over
our paintings. If your paper buckles too much it'll be
hard to stitch on. I wouldn't go below 200 GSM, and if you're using
something around that weight just be careful
not to use too much water. You're also going to need some scissors or a paper trimmer because we're going to be cutting paper into strips
like this so that we can do our practice stitching samples before we actually
stitch on our picture. Paper towel. This is good for taking excess water and
pigment off your brush, and also keep a completely
clean fresh piece right by me when I'm
painting so that if I spill some
paint on my paper, gently wet your paper
towel and dab your paint. You can usually get
the paint out and if you're lucky you won't
even have a stain there, but you have to be quick. A paper towel is your friend. One thing that I
haven't put on the list which I use but
it's not essential. I had this recycled
little spray bottle [NOISE] and I use it to activate the paints on my palette when I'm
setting up to paint. I spray them and I get organized and by the
time I'm ready to paint, the paint has activated nicely. That is everything
that you'll need for the painting part
of our project.
4. Embroidery Supplies: [MUSIC] You're going to need for the class basically what you see
in front of you here, the pin cushion is optional. I like it to store my needles in when I'm not
using them because my husband has actually
stood on needles. I'd rather have them
in a pin cushion than in the bottom of his feet. That's optional for you, but for me it's a must. I have a little needle book
which I store needles in. These are my favorite number for straw or milliners needles. They're a little bit bent because I'm a bit
hard on needles. I think if I'm using the needle rather than an old
piece of paper, I tend to get bends in
them after a while. They're good needle, they
have a decent size I and then not any thicker at the I end than they are in the
middle of the needle, which is important when you're
pushing holes into paper. You don't want to have
a really fat hole. This is a packet
of straw needles or milliners needles
in the number four. A tail hole is what I use
to piece the paper with. It's quite good for
poking holes in. I tend to use it a
lot because trying to do it with the needle makes your fingers sore after a while. If you don't have a Talis hole, you can make one with a cork. This is the champagne
cork, yummy, yummy. I have poked a needle in the
air I've chosen a needle that I like the size
of the holes it makes and pushed it
in from the eye end. If I can't find my talis
hole I will use this, it works quite well. Needle thread is, if you require some help
threading a needle, these little guys are cool. A little pair of
embroidery scissors. If you don't have
something like that, you can actually use
the bigger scissors. These just fit nicely into a little carry kit, that's all. I have a HB mechanical
pencil that I use for marking designs
on my underpainting. Sometimes if I want to try something out or I
need a guideline, I will carefully draw it
in with the HB pencil, and I carry the
kneaded eraser and a little tin with me to
lift the graphite with. This is also
optional, a thimble. I hardly ever use one, but some people use
them all the time. That's all of the
haberdashery basics. If we move those out of the way, we can have a look at, this is a cutting mat. Self-healing, cheap one. I like using this because it's quite sturdy and I often see of an evening and work in my
lab so I can poke the holes in without poking this
great big hole into my leg. If you don't have one of these, I suggest you could use some corrugated
cardboard from a box. Just cut some sheets and if
one is not thick enough, maybe two or three together. If you're going to be working
with something like that, I definitely do it onto a table. You don't want to injure
yourself when you're doing that. Another option for supporting your paper while you're piercing
holes is some dense fan. This is a piece out of
my needle filtering kit and it works beautifully
for poking holes into. Now we come to the
pretty things. Embroidery floss,
which is yummy, yummy, yummy and comes in
beautiful colors. The most common brands I'm
aware of are DMC and Anchor. They're the most common
ones here in Australia. These ones are variegated. I really like variegated
thread because it adds a design
element for free. You don't have to
work very hard to get some pretty variation in your stitches just
from the thread. These ones here are just the same thing that I've wound onto cardboard bobby pins. This one is DMC metallic thread. I thought I would show you. It's not easy to work with, it's stranded like the cottons, but it's a little
harder to work with. But it does add a lovely
blingy element to your work. This one is a number
eight per cotton. It's a very handy replacement for stranded embroidery floss. However, it is a twisted thread, not a stranded thread, so you don't split this thread. What you see there is the thickness that you
would be stitching with. It comes in a variety of colors and some of
them are very guided. It's worth knowing about
these lovely machine threads, which are all metallics, is to have a look in
your sign department at your craft store or
you're sewing store. There are a lot thinner. Or some of them are a lot
thinner than embroidery floss. But again, it can add a nice little bling
bling element to your piece so they're
worth knowing about. Then lastly, there are these yarns which are made
for crochet or knitting. [MUSIC] I think they're really cooler because they give you a piece of bling that you might want to work into a project. Things like these are worth
keeping an eye out for.
5. Bonus Project Supplies: [MUSIC] Supplies for the bonus
project at the end. You're going to
need what's here. The first thing is you will be using some of
your watercolor paper. But it will be what you have previously been stitching
on for your stitch samples. You will need a couple
of pieces of cardboard. Something recycled is fine. This is an off-cut from a
project I did ages ago. It just needs to be the same size as your cards that we're
going to turn into a book. You need some paper. Now I just grab out a paper pad, but any paper scraps are fine. We're going to be backing
these cards with the paper. If you've got a patent one, that's fine, but you
can use graph paper, wrapping paper, brown
paper, anything you've got. I just happened to have this
little pad sitting handy, so I grabbed that. Then you're going to need
something to glue the paper to the back of the cards
as stitch samples. I recommend either a
PVA acid-free glue, something like
acid-free glue stick. This one says it's a photo one but does say acid-free on it. Also double-sided tape which
will work just as well. I'm a big fan of
double-sided tape. Getting into all sorts of
trouble when I play with glue, but tape is fine. You're going to need
some steady thread. Yes, it is dental floss. [LAUGHTER] It is a
good steady thread. If you don't have dental floss. By the way, if you
using dental floss, it's better if it doesn't have one of those flavors on it, although it's not the end
of the world if it does, it just means that
your little project might smell a bit minty. If you don't have dental floss, something like a good
heavy linen thread or an upholstery thread, you'll need a needle with an eye big enough to hold your thread. These are for dolls, these are for doll making, so they've got a decent eye on them and a nice size to use. You need a paper punch
or a hole puncher. This is, I believe, a six-millimeter
quarter-inch punch. You just need one of those. You will need some scissors that's to cut your papers with. You're also going to
need two buttons, one with the shank. I've got a couple of shank
buttons here to show you. A shank is just a bead
that sticks down like that. Just one of those. You're going to need one
ordinary flat button. It does not matter
whether it has four holes like that one
or two holes like that. Just a button that will fit
on your card, not too huge. Something like that is fine. That's it. That's all you
need for the bonus project. [MUSIC]
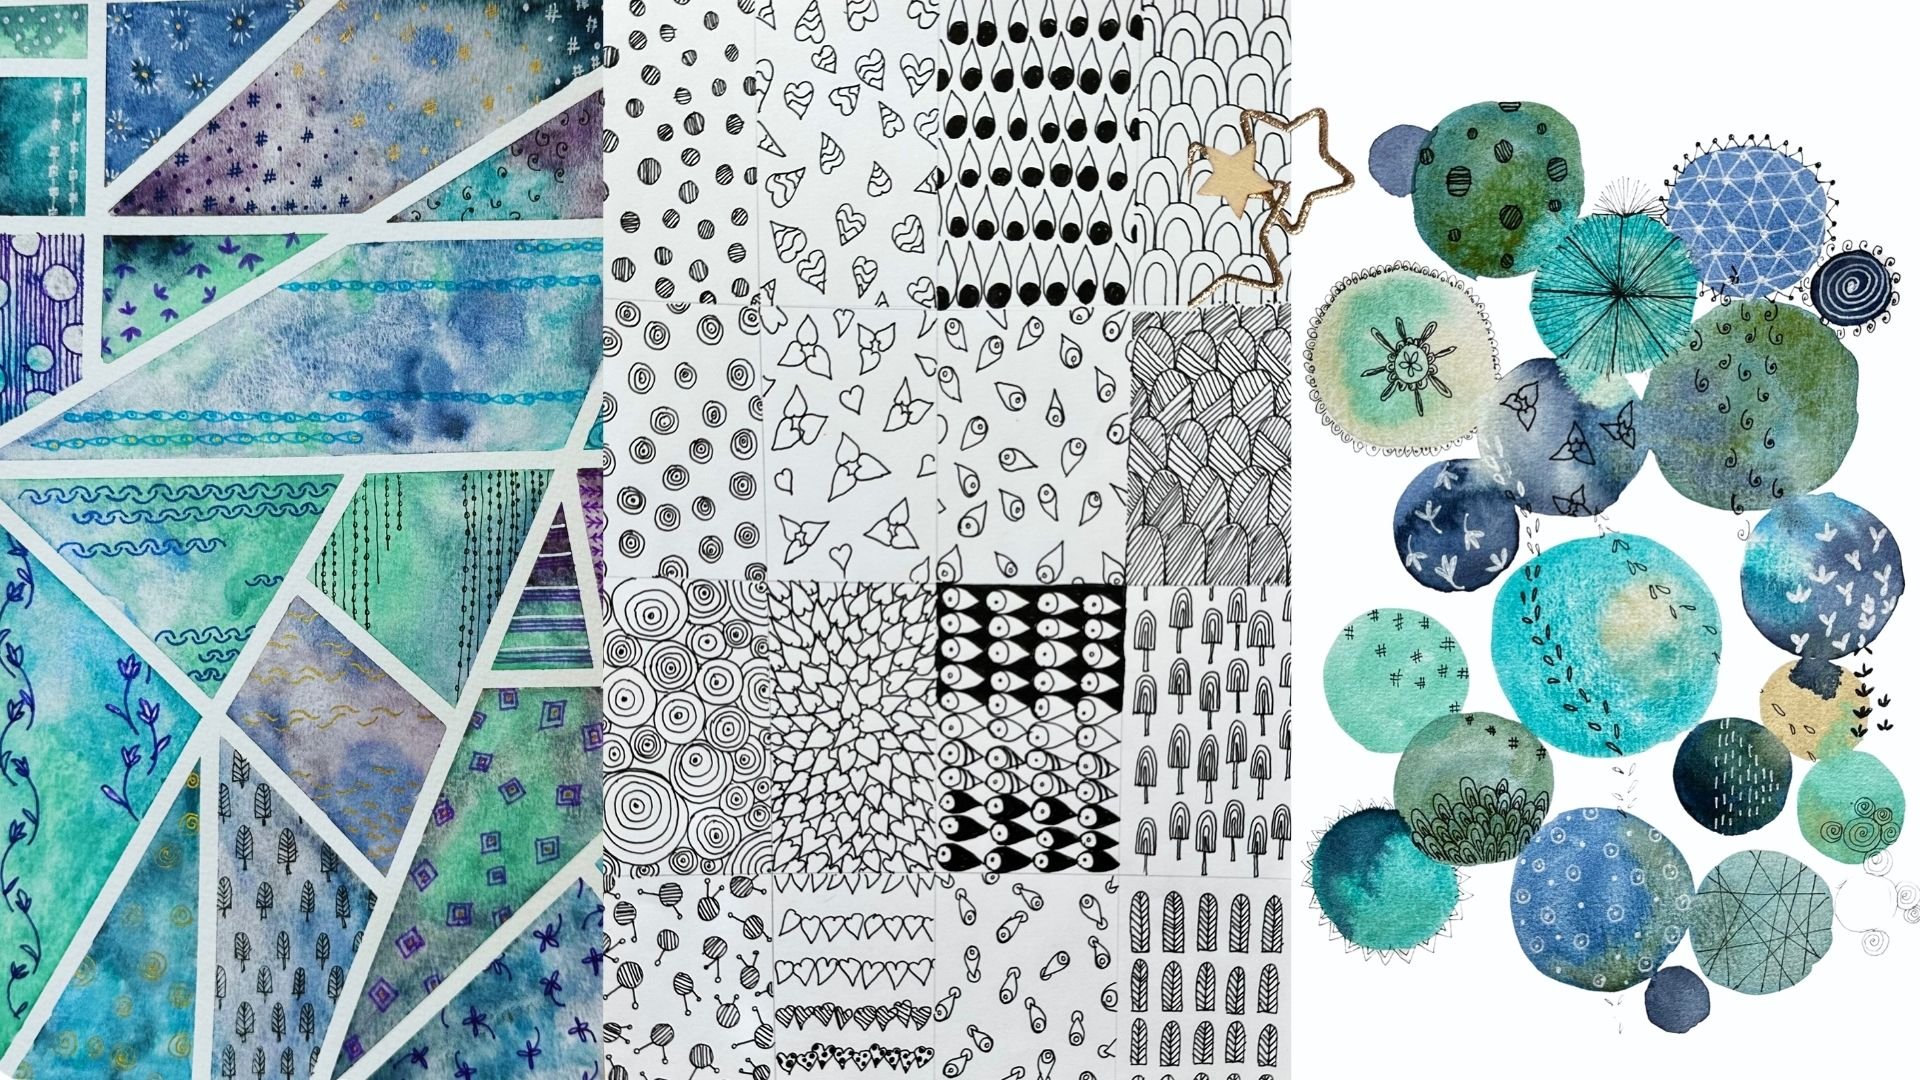
6. Design Inspirations: [MUSIC] Hi, where do we find
inspiration for our designs? Well, you might have
a plant collection like mine of
succulents and cacti, you might be growing
some in your garden, your neighbor might have some succulents and
cacti in their garden, or if you're choosing to do
a different type of design, there may be some other
inspirational plants that you would like to work on. I encourage you to go for a walk around
your neighborhood, have a look in people's gardens, look in your own garden, you could visit a park
or a botanical garden, you could look on the Internet, you could do a Google search, you could try sites
like Pexels and Pixe B where you can find
royalty-free images, or you could do my
most favorite search of all, a Pinterest search. I call Pinterest the world's
biggest free magazine. I have actually curated a board for us on Pinterest
for this class. It includes stitch
information and I have saved designs that I think will translate
well to stitch on paper. I have saved photos of succulents and cacti and
other inspirational images, so I encourage you to have a
look at that board as well. With all the choices that are around you in the natural world, you shouldn't have any
trouble at all coming up with some design elements for your project that we're
going to be working on. Have a look around you, collect up some
thoughts and ideas and think about color selection, and get ready to meet me in the next class where
we're going to move on to design, composing,
and drawing. I'll see you then. [MUSIC]
7. Composition & Drawing: [MUSIC] In front of me, I have a sheet of paper that I have quickly done
three thumbnails on. After I've had a look at
my design inspirations. I wanted to have a
little play to see what composition I
might like to go with. With composition,
I'll try and keep in mind the grid for
the rule of thirds, where you have horizontal lines two and vertical lines two and then you imagine your
paper is three squares, three squares, three
squares either way. The idea being that
the human eye is more pleased by elements that fall either on the lower third
of the page in the center, to the left, or to the right, or when you're
designing a landscape. Landscape horizon lines are
usually the lower third, or you can have
more foreground and an upper third horizon line. This design is a bit like that, I have looked at what it
might look like having my main focus slightly
to the left of the page. This one, I've gone
completely outside the rules and I have put my
focus in the center. Sometimes this works just
because it looks different. Framing it with a circular
shape at the back, which would be the sun. Having your tallest element in the center and then balancing either side
with smaller elements. This one is a
landscape design which I just thought I would
throw in just to see and I have drawn a ball with suggestions of
planted succulents in it. So we've got a tall
one, different shapes, and then maybe some
cascading ones off the edge. I've done that. I've had a look at it and
just to be a bit different, I think I will go with this particular style just because it's a little different. It's up to you what design
you would like to do. For those of you who aren't
confident with drawing, I have provided some
outline drawings in the resources area. If you go to the resources under the Resources tab you'll find it there and you can either
copy it straight out, or you can take elements
and put them in however you like whatever design you want
to incorporate them into. But I would encourage you to have a go at
drawing yourself. You might surprise
yourself if you are a beginner at just
what you can do. Let me just move my thumbnail and we'll hop straight
into drawing. Because I've decided that I want to have a circular
shape in the back, I'm going to go straight onto the page with
my trusty coaster, which has drawn mini round
circles for me in the past. It's not completely
even but I don't mind and I'll just go around
it for the sun shape. Now I'm just letting
you know that my drawing will be much
darker than I would normally do so that you can
actually see what I draw. But when you do yours, please don't be so heavy-handed because you will
have a hard time getting the graphite off the page and when you
work with watercolor, you try to remove
as much graphite as you can so that you just see a faint outline
before you paint. If you got over
graphite with paint, it's there to stay
and you can see it through your painting usually. I have my circular shape
and now I'm just going to draw in my cactus shape. He's fairly big fellow and I want a couple of arms to
come off the side of him and I think we'll do like this and then maybe
an uneven one, I like this idea. Then perhaps we'll put a barrel type cactus
off to this side. So perhaps something like this. You can see, I'm just
doing simple shapes that's all you need to do. These are very simple
drawings because they're really just a background
for our stitching. They don't need to
be really fancy. Now in here I think
I might put a sand severe type plant and maybe one in there and maybe one out there and maybe just a
little peek over the corner. In here I think just
some [inaudible] shapes of little succulent and you don't have to be
too fussy with this. You'll get the idea.
You just put a few in and you'll know when
you come to paint, just to dab a bit of paint
here and there to look like a little plant,
but you get the idea. Then perhaps so over here, I really like prickly pears. They're very
interesting to look at. I think I'll have a
prickly pear shape. They grow in strange ways
where they pop off here and there and maybe he's
got a little bulb on the side of him there and
maybe this one has one here, and perhaps this one here, which gives us somewhere we
might put flowers later. I'm not really happy
with this shape, so I'll just change
that a little bit. Then I think I'll just draw
in a rock or two like this. Perhaps here there could be
a roundy and another roundy. They're just little flat type of cacti that I'm drawing there. Now, I'm not putting any
more detail than that in. I can choose to add more when I come
to paint if I want to. But that's pretty much what you do and then
you just go along and take out any lines that you don't want in your
design at all. I don't want the line of the
sun going through there. Prior to painting you're going to come back
to your drawing and lift up the graphite
with an eraser. You can roll it. You
can dab it like that. I'm trying to leave some of the design there so
that you can see it. Go ahead and get
your design ready. Lift up some of your graphite as much as you're comfortable with and you can still see
the design for painting. Just a word about transferring a design for those
of you who are going to be using the designs
that I've provided under the Resources tab and
you want to know how to get your design onto
your watercolor paper. The easiest method, apart from trying to
hold it up to a window, if you have a light box, that works really well too. But most of us always have a graphite pencil handy and basically that
is all you need. The way to do it,
and we'll just say, this is going to be your design. On the reverse side after
you've printed out your design, you just go along with your graphite pencil
and lay down plenty of graphite on the reverse
side where the lines are. We want to make the marks to transfer it onto your
watercolor paper. Of course the other way I
suppose you could do it easy if you have graphite
paper available to you, you can do that too. This works really well if you
have a softer lead pencil, like a two, or 3B, or a 6B, then you will get plenty of
graphite across that way. Get a good coverage
down like that. Then you position your
design where you want it on your watercolor paper and you simply use either a pencil, or a colored pencil so you can see where you've
been and you go around the lines just
gently don't push too hard because if you do
you'll get grooves in your watercolor paper and that's something we all want to avoid. But I'll just do a
little bit so you can see the transfer
and what happens. Keeping hold of the paper, just pull it back
to there and you can see we're getting
our lines across and they're nicely faint so that when you actually
come to paint, there's not an awful lot
of graphite it have to pick up and you just continue on that way and transfer your design
across to your paper. You can put in tiny little bits of things
like this if you need to. But quite honestly, you could probably just make those
marks yourself with a pencil. But putting your
bigger placement [MUSIC] item and it's
coming across quite nicely and that is
probably the easiest way I know of transferring a
design onto watercolor paper. [MUSIC]
8. Colour Basics For Watercolour: [MUSIC] I just wanted to have a little bit
of a talk about color. I think we need to talk
about it because I know some people will only have
three colors of paint, which is the primaries, red, blue, and yellow. We'll touch on mixing
colors for our project. We're not going to go too far into it because color theory is a whole field of exploration, and there are courses
available on Skillshare that address color theory
and mixing colors, creating color swatches,
that sort of thing. I just want to briefly talk about how to avoid getting
mud when you mix your colors, and also to mention that for the people that have
pre-made palettes, you've probably got one
or two greens in those. Generally speaking, those greens aren't terribly
realistic and they usually need a little
bit of help in achieving a more
realistic green color that you would find in nature. There's nothing wrong with just using straight from the palette, but we'll briefly
touch on how to adjust greens a little to get a
bit more realistic color, because of our theme being
succulents and cacti, I assume that some people will be using those natural colors, and others of you might choose to go really wild
and why out with your own invention of what cacti and succulents might
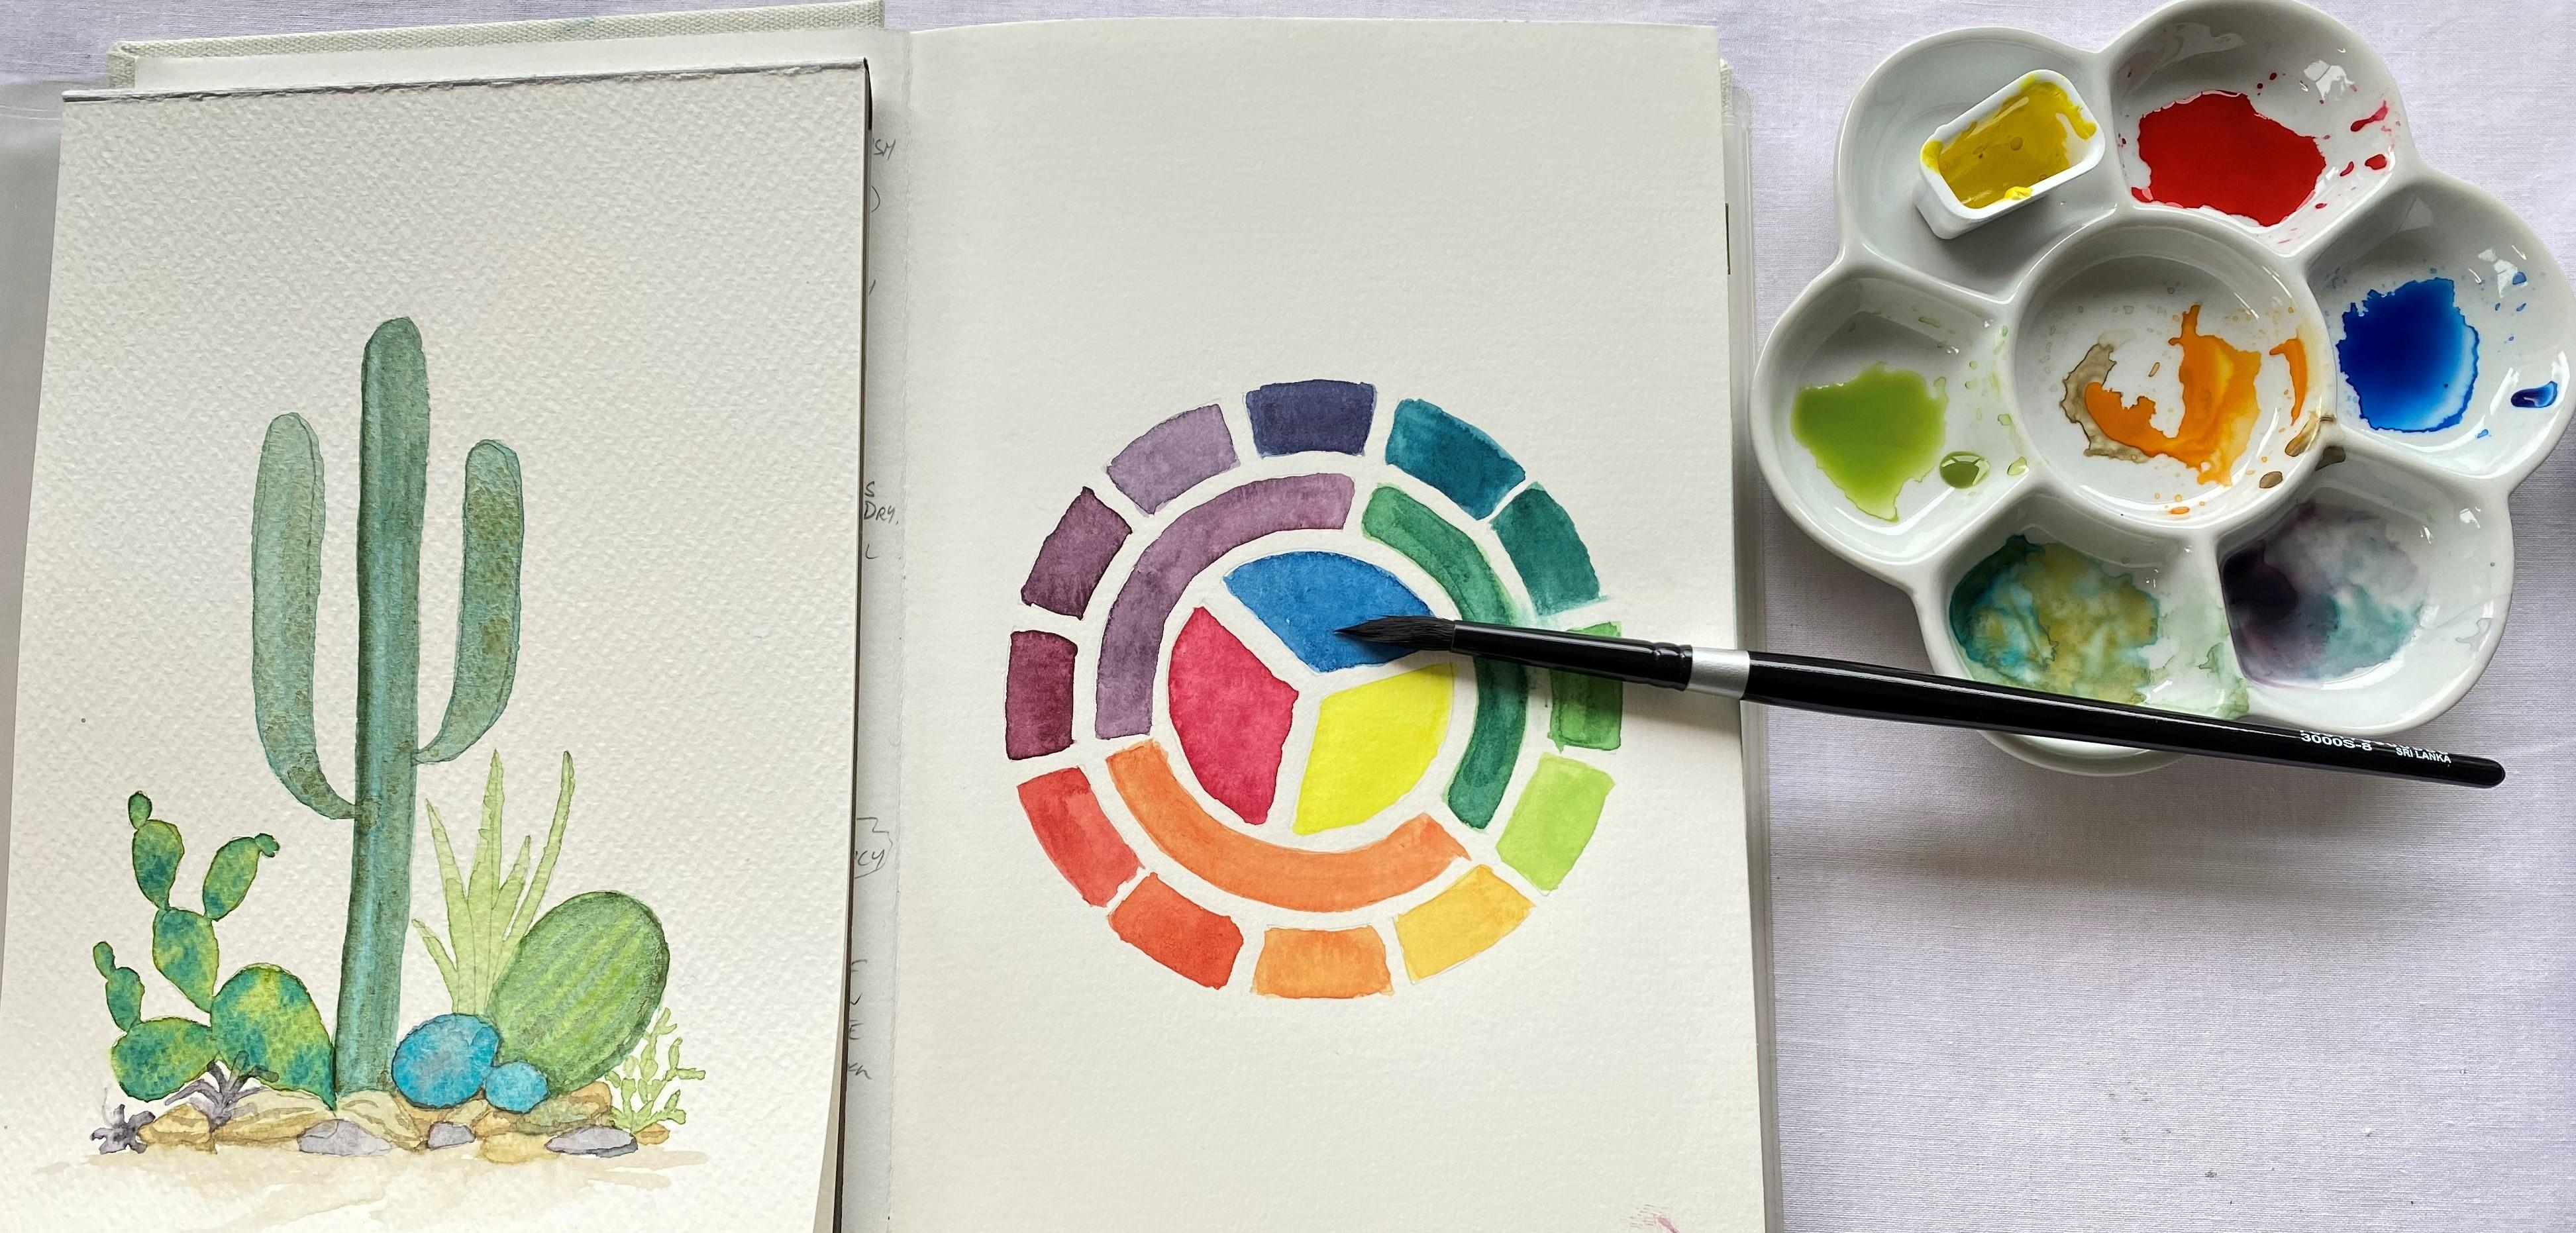
look like in your imagination. [NOISE] Just going to talk
around the color wheel. I'm just showing you this
very tatty old color wheel that I made some years ago. Just so that you can get an idea of what happens
when we mix colors. This here really is referring
to this little ring here. We have in the middle
the three primaries. Then on the next ring we
have what happens when we mix yellow and red together, we get an orange color. If we move one step further, it shows you what happens if
you increase the amount of red to the amount of
yellow or the amount of yellow and less red. So you get variations
of orange from a scalar looking color through
to a orange-yellow color. The same can be said for mixing red and blue,
we get purple. If you put more red
to blue in your mix, you get a more red violet color. If you put more
blue in your mix, you get a blue-violet color
and the shades in between, and over this side here, it's the same with mixing your yellow and blue to get green. By varying the amount
of yellow in the mix, you'll get lime to emit green. By increasing the amount of
blue in the mix you will get, I guess it's more like a
[inaudible] even looking green, and a blue-green with
more blue in the mix. So basically that's what
happens with the color wheel. When we talk about color, there are some
terms that we use. When we talk about hue. We're talking about color
in its most basic form. So blue, green, yellow,
that type of thing. Value is the
lightness of the hue. In watercolor we adjust the
value of color with water. We don't generally put
whiting because then our colors lose the transparency and become more like a goulash. Intensity refers
to the brilliance or the saturation of the mix. So how much pigment you
have got in the mix, and in watercolor, saturation is dulled by adding a complimentary
color to the mix. So that's a color opposite
on the color wheel. If we look at these big wheel, if we are looking
at red and green, if you want to reduce the
intensity of the green. So if you have a pre-made green, it is not a
natural-looking color. You can tone it down a little
bit by adding a red to it. Just start with a little bit and mix till you get a
color that you like. The sign would be
saved with blue. If you want to tone
down a blue or an orange then you add a
blue or orange to the mix, so you just go for the
opposite on the color wheel. Temperature refers to whether
a color is warm or cool. Generally speaking, blue is cool and the
orange-reds are warm. You can have, for
instance, let's go purple. You can have a cool violet
which has more blue in it, or you can have a warm violet
which has more red in it. The warmth of a
color is something we talk about or the
temperature of the color. In watercolor, I have
said we don't use white. The white is always the
white of our paper, and black is considered to
be the sum of all colors. When you do watercolor, you very rarely use a black. There are blacks available, but they tend to have a very
harsh and unnatural look. Generally people who
paint in watercolor mix their own by using the
near darkest colors in the palette and mixing them together to
get something that reads as a black on a
painting or a dark color. The other thing we should
probably talk about is harmony in color. Analagous colors
are those that are next to each other
on the color wheel. They can sit quite
nicely together. A lot of what I have
been talking about is actually written
on these color wheel. But they're very handy
because you can move them around and get information. It will tell you adding red to red-violet will give you a more pinkish,
things like that. So you spin the
wheel and you get more information
about color mixing. On the back, there's also
here more information. It gets really, really in-depth, but we're not going that far. The only other thing
I really wanted to talk about was
complimentary colors. This little triangle
thing in the middle. If you position the
arrow to yellow, it will tell me that
the complimentary color is the purples and violets. If I spin it to green, it tells me that we're into the purple for complementaries. Move it around. If your shade of
green is this color, the complementaries would be
in the red to pink range. This nice teal, you're
looking at, red-orange range. Having gone through
the color wheel, then people that have red, blue, and yellow paint will know
that if they're trying to achieve a green then they're going for a blue and yellow mix. If they're trying
to find a purple, they're going for a
red and blue mix, and if you're trying
to find an orange, you're going for a
yellow and red mix. Then perhaps have
a little play and see what variations you can get. Then you can mix some of the other colors
together and see, just see how far
you can push it. If you push it too far, eventually end up with mud. Get friendly with your palette and just have a little play on some scrap paper and
choose the colors that you think you might like
to use for your painting. We will then do some
warm-up exercises, some brushstrokes before we
get into actual painting. Just one other thing I wanted
to say was that if you restrict your palette
to just a few choices, it's a lot easier to make
decisions when you're painting and usually come out with something that's
quite harmonious. Having said that, if you're a real color person, go for it. [MUSIC] There is nothing wrong with having
rainbow colors. I think that we've all
made some rainbow colors. [MUSIC]
9. Watercolour Basics Part 1: [MUSIC] In this class we're going to have
some fun with paint. We're going to explore
brushstrokes and the types of marks that we can make
with our chosen brushes. During this time, you'll get a little more
comfortable with the ratio of water
to pigment in mixes. It's an opportunity to loosen up a bit before we start
on our actual project. In the second half
of this class, we're going to visit some
watercolor techniques. These are basic techniques so we're going to look
at wet on dry, wet on wet, gradients,
and glazing. I'll also talk a
little bit about the properties of
water flow on paper. I want you to go and find
all of your supplies and a comfortable spot
and meet me back here to start practicing. We're going to do
a little bit of brush stroke practice before we get into our underpainting. I'll just pick up
one of your brushes. I'm going to start
with a number 4. I've just divided my page into two so that I can have a play, mix up some color, just a nice fluid mix, with a bit of pigment in it and it doesn't
matter which color because this is just practice and for you to get
familiar with your tools. The first thing I've done
is load up my brush and I will just dip it on
my paper towel a bit. I just want to make sure that there's not too
much water in it. I'm just going to have a play
and see what I can achieve. The first thing I'm going to
do is just do some lines. This is all about warming up, seeing what marks you can
make with your brush. I've put extra pigment
on so now I'm just going to push down come up, push down come up, push down come up. This exercise is called pulse. It's about trying to achieve a line and a fat part. Just to see what marks you
can make with your brush. Now I'm just going
to practice painting a shape. I'm filling it in. Just getting [NOISE]
comfortable with your tools. I hear the birds outside my
window are very busy today. It's spring here. We've had a lot of
rain and it has brought out the birds,
which is lovely. Try another shape now, I'm just going to see how
I go making a square. [NOISE] Just getting used to the feel of the brush in my hand and moving the
paint around the page. I'm going to go back to
lines and I'm going to see how thick a line I can
create with this brush now. How much pigment stays in
my brush for how long? Go back to your thin lines. Then if I raise my hand up I
can get a really thin line. Not too straight, but thin, just how much of a point I can
get this brush to come to. Now we can go the other way. Horizontal lines. Again, I'm using my
pinky finger to rest on the page to lift my hand up so that I can get
some thin lines. Now let's try thick
horizontal line. I might just see what
happens if I do that and that and that. I'm just pushing my brush
down onto the page, just flat to see what
marks that makes. It's just experimenting
and warming up. These are good exercises to
do before you start painting, especially if you're
not familiar with the brushes that you're
using or they're new to you. Now I'm going to
go the other way here and just create some
fat lines over the top. From one brush, you
can actually get quite a variation in line forms. This pulse exercise I have
never really mastered, but I keep trying to get better. If I sat and did it
all day, perhaps. I might just do one
more shape here. I was going to do a leaf shape, wonky old leaf. I'll
have another go. There we are and bring
it in the middle. [NOISE] I'm going to rinse
that brush out now and I'm going to change [NOISE]
either to my larger brush, which is my number 8 round
and have a play with that. I'm going to do exactly
the same thing. I might change colors though, just to be a bit
more interesting. Mix up a little
bit of a mix here. That'll be all pigment and
a little bit more pigment. Now just dab it on here
to get excess water out. I'm going to do exactly
the same thing. Just practicing, see how much of a fine line I
can get with my brush. A little bit more pigment
would be good in it and we'll go horizontal pigment. Now it's getting darker
and easier for you to see. I'll go horizontal again. Now let's see what a
thick line I can get. You can fill them a much bigger
area with a bigger brush, of course, which makes sense. Now, let's see what
I get if I do this. These can make really
quick petals on a flower. You can even make really quick leaves by doing
this and it's a bit of fun. Let's try the pulse exercise. A little bit more evident
when you use a feather brush, one more time. What else can I try? I can try a leaf shape, I guess, and a circle shape, or maybe I'll put a square in here because that'll
fit in here. Wonky old square and circle shape here. It's just a matter of
playing with your tools, getting comfortable with them, getting used to mixing the
pigment and water ratio that you're comfortable with
or that you're looking for for the particular pace
you're working on. One more little space here
to do some fine lines. I recommend you get your brushes and paints out
and have a little play. Do your brush
exercises to warm up. [MUSIC] We're going
to have a look next at some techniques. We'll look at wet on wet, wet on dry, and some glazing, which are pretty basic
watercolor techniques.
10. Watercolour Basics Part 2: [MUSIC] We're going to do some little exercises just for some basic
watercolor techniques, and one of the first things
I wanted to show you was what happens with
the flow of wetness. This little area here, I have pre-painted and
is starting to dry off. It has a slight
sheen to the paper, which means it's
still a bit wet. One of the first things I
teach you in watercolor is that the greater wetness
will always flow to the dryer area in an effort
to balance the water so if I drop this right next
to here and it is a lot wetter as you can see
to the one next to it, the theory is that it should flow into the one next to it. We need to put down a
little more water with it. There guys. It's
a little bit wet, I'm going to suck
some of that up. But that is the basic principle they teach us when we
start to learn with watercolors and let that
dry off and we'll have another go towards the end
and see if we can repeat it. Now, wet on dry can refer
to wet paint on dry paper, which is what we're
going to do first, we just take a bit of green. This is considered a wet
paint on dry surface, so it's wet on dry. Now I have pre-painted and let dry a little
square of turquoise there. Let's just put some wet
paint over the top of it. Probably a little more pigment would show up a
little bit better, but that is also wet on dry so I can refer to either the paper or either
the top of dry paint. Now, wet on wet can refer
to water on the paper, which is what I'm doing now and just dropping in some
pigment to see what happens. This is wet pigment
on wet paper, but it's wet with water. Then you will say that it flows into the water and dissipates. You get these nice
interesting blooms. It can also refer to
if we pick up some of these nice turquoise for a little bit of
that on the paper. So we've got a wet
paint on there. Maybe a little bit
more pigment in it. Just so that you can
see a bit better. [NOISE] We'll drop in some
of this dark color here, just like we did
before in the water. I haven't got enough
water on my brush and a bit more pigment. Again, you see what happens as the wet paint mingles with the wet paint
that's already there, disperses out similar to this, but tries up differently on a painted background so we
can get mixes in our colors this way and it's all mixing
on the paper and you get these nice blooms which pure
seem watercolor don't really like but the [NOISE] modern watercolors
really likes them. But that's too wet on wet. Now a gradient is
where you pick up a nice amount of pigment
and put it on your paper, put your paper nice and wet, a little bit more
pigment on here. Then you [NOISE] don't pick up any more pigment at all but
you just put a damp brush, bring it along like this, and if you have your
paper on a lane, it can help better, but you end up with an ombre
effect where it builds a gradient [NOISE] and flows out and becomes
paler towards the end. So that's a gradient. Glazing is done on the dry paint and I'm just checking to
see that my bits of paint there are
dry and it refers to painting another
color over the top. Now, let me try with a bit of purple to see what happens. The idea with glazing is that you can change the
color underneath, but you do it carefully without disturbing the paint underneath. Now that's become a
more violety color. We'll do it one more time. Glazing is something
that people sometimes do with a painting if they're not happy with a certain area, they want to change the color. Maybe they want to warm it
up a little and they might use a warm color and just glaze a certain area or they
may choose to change the whole painting
by putting one color over the whole
painting and changing the color temperature
or the look of the painting completely. For the purposes
that we're doing, you might choose to either glaze something in an underpainting just to change the
look of it a bit. Let's go with something like this yellowy color to see what happens if we put
this over the top. Let's glaze it over
with this and you can see how you can still see
the color underneath, but it has changed
the look of it. That is glazing. Let's try again with this little bit off, staying too close I've
got now because I didn't quite clean my brush
properly, but that's okay. We just have to wait
for that to dry off a little bit before we try putting another color next to it that's wetter
to see what happens. Here we go with our
color experiment here with the flow of wetness. This is a large wet area
and I'm going to put a tiny little wet area next
to it to see what happens. There you go, it sucked
into the greater area. That's the water seeking to find a balance and what
I was taught was it will continue to do that
until the two areas become more or less equal in terms of the amount
of water in them. That's just a fun thing to know that you can try
when you're painting. Maybe there's one more thing I just want to show you here. Let's just put down a
little bit of paint. This is a quite a colorful page now with all those
different colors happening. What I wanted to
show you was what happens if you drop water in and you see the water
pushes the pigment aside. That's something to know. If you've got a bigger area, you can use a fine
mister spray bottle and just give it a little
spray and you'll get these blooms forming that don't actually use
paint to do it. Just using water. One last thing too, is that when your
paint is still wet, you can actually sprinkle
a little crystals of salt. I'm not going to do that, but you can and the salt draws
out the water of course, and lays little speckles
of pigment in its wake, so it enhances the areas where the water has
been sucked out. The pigment is a little bit
darker in little speckles, and you wait for it to dry and then you brush the salt off. So that's another thing
that you can try. Go head and play with
your watercolors and have a practice of
doing these techniques. Wet on dry, wet
on wet gradients. You can even play
with the flow of wetness if you like,
that's always calm. Try a little bit of glazing. Even spray a little
bit of water or drop a little bit of water
with your brush and have a go. Don't forget to
upload pictures of your practice paces
because that's all very interesting for you
to look back on to see how you've built your
skills through this class. I'll see you in the next lesson, where we're going to be painting our
underpainting together.
11. Let's Paint: Activate your painting,
get ready to start work. Normally with watercolor,
if you're right-handed, you would start on the
left-hand side and work across. I try to do that. I often get excited
about some part of a painting where I have an idea and I start
in the wrong spot. The reason that we try to work one way to the
other is we're using a wet medium and you will get your hands stuck in it
if you're not careful. I'm going to start with
my number eight brush. I'm going to start over here
with these prickly pear. I'm going to use, I'll just mix up a little
bit of cascade green, which is one of my favorites. Let's say, Daniel Smith color. It has a tendency to separate
out into green and blue, so there's a little bit of
magic that can happen with it. I just make a little
puddle there of that. I'm just going to hop
in and make a start. This is wet on dry
that I'm doing now. I'm just working the paint around and you can see that
there's a little bit of separation happening there
already into blue and green, which I just think is
a very pretty color. Get a bit of magic without
having to do much work. Little nobby bit
here at this side. And we'll just continue. One thing to remember about watercolor is that
it will always dry lighter than it appears
on your page when it's wet, so you may want to make
your mix a little more intense or you can actually wait until it's dry and
if you're not happy, you can go back
and glaze over it. Try and get it worked
in before it gets too dry or you'll end up with blooms where
you don't want them. Now, I'm not going to paint a background color
on this at all. I'm just going to have that
big sunny in behind mine. I prefer not to put backgrounds on them when I'm embroidering. I think there's enough going
on with the embroidery. That's just the way I'm going to approach it unless you
want to do your own thing, by all means go ahead. It's my first one done. Now, I could maybe drop
in a little bit of color, but because I'm very fond of that cascade green and
the way it separates, I'm not going to. Now this big guy here, I'm not sure what color
I want to do him yet. I might move over to the
edge here and do this one, which is what I
told you not to do. I'll just have to
remember not to put my hand in my paint. I want to use some
serpentine green here. This is also a
Daniel Smith color. I'm just mixing it
up a little here to see if that's the
color that I want. It's not quite what
I had in mind. I might pick up a bit of this, I think it's called migraine. It's a Schminckle
color and add it in and just lush in that mix a little bit so it becomes
a bit more liming. Because I like the idea of
this nice bright color here. We're just going to put
this painting here. Again, I'm using wet on dry. I feel like I might drop
some color into this one, so just bring it around. If I want to drop color in, I need the paint to
be reasonably wet, so I just add a little bit more to it and work
it around a bit more. Bring it a little bit
darker on the edges. Add a little dimension. Now I'm just going to
pick up put in some of this acri color
which now has a bit of green in it from where I had a bit of green on my brush. Then we want to just touch
it in here and there, create some interest
in this fellow here, and let that spread by itself. Now, I'm not going to touch the one behind
it just yet because if I do the wet of this and
the wet of that will create a capillary
action and one will flow into the other so I will just avoid that
for the moment. We'll look at this
big fellow here. I am thinking that I
might actually use this serpentine green and add a little bit more into that mix so it changes
it a little bit. It's not quiet,
serpentine green and it's still got a hint
of that lime in it. Let's see what we get when
we put that on the paint. I quite like that. Now when you paint, you can turn your page. I'm trying to keep this
the right way up so that you guys can see it
as I'm painting. Also because I'm using paper that's at the lower
range of the market, not that expensive
I'm trying not to rub too much at it
and not to work it too much because I don't
want pilling on my page. That can happen if you
overwork the paper with too much water when
you rub too hard. I'm just using gentle strokes. Now I'm just deciding
whether I might like to drop something
in there as well. And I'm thinking that maybe I am going to try with a little
bit of cascade green and just see what
happens if I just make the suggestion of a
couple of lines in here. Now, we'll go on and
finish this big dude. Again, it's wet on dry. In fact, it's probably the main technique that we use
for this kind of painting. Now, I've drawn some
little foliage down here. And I'm just trying
to lay the paper be there so I can come back
in and drop some paint there. I need to keep working
this so I don't get lines. It's amazing how quickly the
paint will dry on the paper. You need to keep your
eye on it all the time. You know when it's starting
to dry because it loses that shine that you
get with the water. I suppose the other thing I
should mention too is that I haven't taped my paper down. I very rarely do that. I know if I'm going to
be using a lot of water, painting something where
I'm using a lot of water, then I might tape it to a board. I'm just going to put
in those lines again. They will dissipate out
a bit, but that's fine. I don't mind that at all. I quite like that look, and I'll go back to our serpentine and migraine
mix and come back in here and finish this
arm on this big cactus. I'm just going to drop in some extra color here and there. I will add in some
more cascade green. Just do those
little lines again. Well, it came out a bit more
blobby, but that's okay. I don't mind that either. I'm going to just a little tap there and a little tip
there just to show where he joins and I
might just darken up this a little bit here and
because I've put wet over dry, just need to use a damp
brush to coax that out a little to avoid getting
a hard line there. This is starting to
look interesting. Now I have a little rock over here and what I
intend to do with the ground type things is let me see if I can show
you what I'm talking about. You might see on this one, they're there but they're just
an anchor for the plants. I will probably mix
up galaxy brown. Let's just have a look
and see what we get. Yes, that's quite nice. I'll just have a bit of that. I want to fairly watery mix. I don't want it
to be too strong. Just as a contrast to that one, we might try a little bit
of this galaxy black. But again, it'll have to
be a really watery mix. I'm going to change my
brush over as well. I use a smaller brush for this. Let me just see if I
like this color first. It's quite nice, but
it's very watery. It might need a little
more pigment in it. Much is put a little on the ER, and I don't mind if that
bleeds a little bit into it with the
green that's fine, I don't mind that at all. I [NOISE] want to soften
it down a little, and let it run a little bit out, let me see what this
color looks like. This is the galaxy black color, these are Winsor, and Newton and they're fairly new granulating paint along the lines of
a Daniel Smith, there is still
little more pigment, not quite that much. Suck that up, it's
a little bit too much, that's better. My interest on droppings, and bits in here, and hopefully we get something that looks a
little bit more like a rock. Back to that nice galaxy brown, and just putting a
little under here, that's going to bleed out
into it a little bit, and I don't mind that at all. It just softens it a bit, and I can come back and
do a bit more work there after when this is dry
it off a bit more. Now, [NOISE] I'll just
going to run around a damp paintbrush along the edge here, just like that. Now I've got these
two little guys here which are being
contemplating, and they're actually meant to
be little round succulent. I'm thinking that I might
want to balance this up a little bit by adding a little bit more cascade
green over this side. I will get some cascade
green happening again to see how we go. Yeah. Just started lot
till I have a look, and see what I think, and I think that
in here as well, and I'm ought not to add
just a little bit of blue in there, that's better. Now I've bounced off
the blue in here, which sort of ties it
together a little bit. This guy bothers me because
he's a little bit too much of a contrast
to the other rocks or I'm going to
glaze him when he drives with a bit
of the brown color. This thing in here, I think I need a dark
green like this, but it's not quite right. Let's turned it
down quite nicely, and that's kind of a
color I was looking for. The last thing I'll
do will be the sun, but there's a
little guy in here, and I just want to think a bit about what color I
might like to make him, just wanted to have a look
at a blue-violet color, just maybe if it's
something different. It's a little bit
on the cool side, so maybe if I add a little
bit of a magenta to it. This will be a purply
blue color this one, just for something a
little bit different, and I'm just putting
in little bubbles, destroying them all together, and I can actually come
back in here if I want to, and adding some knots
when on embroidering, just to make it a little
bit more interesting. I could actually choose
a contrasting color, and just do some little knots in there to fill up
some of the gaps. These little succulents come in so many different colors, and there are a lot of fun, and you can make
things up yourself. There's no harm there, and I just put a little
bit behind that one to say it looks like he's
peeping through there. Now, I think I feel like I need to balance that a little bit, so I might just put in
tiny little speckles here, something is growing there, but we don't know
exactly what it is, and we might have, maybe a little be at
peeping up over here. You can fill in bits, and pieces as you
go if that's what you want to do,
just make things. I think that I will
call the plants are done on going to revisit
this rocky bit here, because I'm not quite
happy with that, and I think what I'll do is just give it a
little glaze over. Not completely, but just
in a couple of places, it is lovely brownie color, which I'm really liking. I didn't think too hard
about it to begin with, but it has added
something to my rock, I'm just going to bring
that down a little. Now I have to decide what I
want to do with this sum, I will start with
a lighter color. Sometimes I use this color, which is like a creamy color, it's Ashaninka, Naples yellow, and it's not bad for a son, so let's just put a little
bit down, and have a think. I could mix a little bit of
this brownie color with it, I just need to test
that out on something, just see if I like it, so I'm just going
to prove wrong. They're caught on our
heading [NOISE] mind. As you can see it's all a
bit of a try it, and see. I'm just wetting this
paint to move it out a little because I'm not sure
that that's what I want. I'm just softening
it out a little, and it's been a really, really soft washes this down. I'm going to turn my paper now because it's a little hard
when you're doing circles, you have to keep
the paint moving, you have to keep
it wet otherwise, you'll end up with
harsh lines [NOISE]. Is going to add a little water here to keep my paint moving, and I can add into it. Starting to dry out on me, is being sunny here today, and my studio is quite warm. [NOISE] I have got a bit of a
line happening here, I might be able to spread it. I hope it. What I'm going to
do is let that dry, and then decide whether
to glaze over it again, because I tried a couple
of different colors. In there we've got a
bit of difference in the paint that's in
there, which is okay. By the time you've finished
with days weaving embroidery, he needed all issues
sort of disappear into the background [MUSIC]. I'm just going to let that dry, and come back to it. [MUSIC]
12. Tips And Tricks For Embroidery: [MUSIC] Hi, we're about to
start stitching and as a couple of things I wanted to talk to
you about first before we actually get into it. The first thing is to
remind you that there is the stitch guide that I've provided for you under
the Resources tab. The second thing is
we're going to need some paper to stitch on, and these might hurt
you here but we're actually going to be using
our watercolor paper. The reason for that is it's the correct weight
for stitching on, it'll be much easier for you, and you won't set yourself
up for frustration. The paper that I'm using is from that pad I showed you
in the supplies video, and I have cut strips off that paper that are
two inches wide. Your paper may be slightly
different size and you might want to
minimize the wastage, so you might cut slightly different size strips but don't make them too big. It'll be too hard for you as a beginner with
stitching on paper. I wanted to revisit
needles with you again. I just wanted to show you a stitch card and to
suggest that if you're going up to a thicker thread, you want to be looking
at the eyes on an embroidery needle are a
little wider at one end, not so bad as like a shinier Laura
tapestry which is huge. If you're having
trouble sourcing a straw needle, look for sharps. They do have a slightly
wider progression up the shank of the needle, but it's not too huge. When you're working on paper, you do need a good
sharp pointed needle. The other thing I wanted
to talk about was these guys always start
with clean hands. Unlike fabric, paper can't be washed and the band-aid on here, this little sticking plaster
is there to remind me to tell you that beware
of needle ******. The minute you ***** your
finger with a needle, remove your hand from your work. I have been caught so many times thinking I've had a
quick look and gone, oh, no blood, that's fine
and I've kept working, and then suddenly the blood
appears on your paper. You can't get it off guys if
you can't wash your paper, you can only dab at it. It can have a guy with a bit of paper towel and a
little bit of water, but you always seem to be
left with this little bit of a brownish stain threads. Remember me saying that metallic thread is
difficult to work with. The reason that it's
difficult to work with is you can see here
it comes apart, it's also very stiff because of the
metallic nature of it and it breaks so easily. It wears on the
needle very easily, it's made of a cotton
filament which has been wrapped with very
fine metal thread. It takes a bit of
getting used to and you have to always beware of your thread wearing at the eye part of the needle and also as it comes
through the paper. Don't work with long
length of this, it's a waste of time and money. You'll just have to
keep very threading the needle because
it wears so quickly. All thread has a grain. It's manufactured in such a way that when you run it
through your fingers, you will feel that one
part of it goes through smoothly against your fingers and if you run it the other way, it feels slightly rough. Machines sewing
thread comes threaded onto the spool or reel
so that as you use it, it comes off with a
smooth grain facing you, or I guess is the word I'm trying to think of
the right word. It feeds so that as
you're sewing with it, you're using the smooth grain
against your fabric and not the rough grain which
will wear with time. With embroidery floss, it also has a grain, but when we buy it, we buy it in scans or hanks like this and we don't know which way it's been wound because we don't know which end is
going to be sticking out that we're going to select
to pull our thread out. You can actually
test the gray now, some people can feel it
and some people can't, but it's worth mentioning so that you can check for yourself. You run your thread
through your fingers like that couple of times, and try and feel usually just
with a thumb and a finger, and then turn it the other
way and try and feel. Now I can feel that it's
rougher going that way. I must have picked the right end of this gain to begin with. It's smoother to me that way and I would prefer to work with the grain smooth than rough because you're
pulling through paper. If you have a rough edge, it's going to fluff the
thread as you use it. I would always check
one of the things to stop it from twisting it as you're using it is to do what? Is often referred to as loving your thread which
is stroking it a few times before you actually thread your
needle and begin to work. If I have a really crinkly
thread, I will do that. I will run my fingers
down my thread, that's a trick that
I was taught as a child when I first
started sewing. Now the other thing is you're presented with thread like this. I'll just snip a little bit
off so that I can show you. You may not want to use
the whole thickness. You will tease it apart
and then you will look to see how many
strands you want to use. Now, I use two strands, so I've separated
my two strands. Now, in order to avoid getting
into a tangle with this, I hope the two ends and this is again what I
was showing as a child, put one finger in there
and then just draw it through all the way to the end. You end up with
your thread exactly how you want it
ready to work with, and you can just set
the other piece aside. That is how you separate thread. Now, the thread has a grain, we know how to find the grain, we know how to separate
off our thread, and then my funny
little bowl here. This has a little
tiny bit of water in the bottom and it's damp on a sponge and I use that to wet the ends of my thread
because I sell my work. I'm not going to use spit, you damped the ends, and then it's easier
to thread your needle. I also have pasted
dry sponge there. If my things are a bit too wet, I just draw them on that. Now, once you've
threaded a needle, you have a decision to make. I work with my thread, threaded through like this. You will see me
as we go through, I often pull an
unthreaded accidentally. You can actually
pull it all the way down and work doubled like this. If you were going to
do that and you only wanted to use two
strands of thread, you would just work with a long single strand because when you bring it
down like that and double it, then you end up with
your two strands. If you work like that, you won't accidentally pull your thread out of your needle, but you will get where up here where the thread goes through the
needle and sometimes your thread can break this. It's personal choice, what
you might like to do. The next thing I wanted
to talk to you about was making holes in the paper. When I make holes, I use this board. It's nice and steady and I
just press down and make my holes eyeball where I want to go unless I need
to be really precise. If I was doing some
geometric design, I might measure it out. I do it like that and I always put that little bit
of tubing on the end because this thing is wicked and you don't want to make
holes and yourself with that. I have a line of holes in here, if I come back with this
needle, it's on here, I can make them bigger
and this is how I work. I make the holes small to begin with and when I'm
about to stitch them, I come back and park
the holes bigger. I don't do the whole
design at once, there's a couple of
reasons for that. One is that gives me the ability to perhaps
reposition a hole if I haven't got it quite right and
it's much easier to hide a tiny hole than
it is a bigger one. The other reason
is that if you're working on something
complicated and you only make the hole
bigger on the section that you're working
on at the time, it's much easier to see
where you're working. You can see on the backside of this card that it makes bubbles. We always paste from
the front of the card, those are my tips for
piercing holes in paper. Now, what happens if
you damage your paper? Is it a lost cause? Well, strictly speaking, it is a bit
problematic but there are a couple of things
that you can try. If you've put a
lot of hours into something and you want
to try and salvage it, this is a very fine
white washi tape. It has a paper backing
on it that peels off and it can actually
be repaired type. I try to wait until I've
just about finished with my design if I'm
trying to salvage something because once
you put the type down, if you still got work
to do in that area, it can be hard to pull
the needle through and your thread
might get gummed up. You can try a little bit
of acid-free glue the same at the end if you
want to, but again, you'd have to be really
careful that you waited till the end because it's almost impossible to
poke holes through glue without it
tearing your paper. There's also bookbinders tape which is a cloth tape and is the best thing of all
to use for repairing paper tears because you
can actually stitch on it. That's what it's made for. It's not very expensive. I just don't happen to
have any at the moment, all is not lost if
you've made a small hole or an area that's a little bit flexible if
it's lost its strength, that's what I'm trying to say. There are some things
you can try before you decide that it's
not salvageable. Finally, the last thing I wanted to talk to you about was these guys, it's just beads. These are just
little seed beads, you can buy them in
crafts stores and these ones are
called bugle beach. You can actually add
them into your designs. When you're stitching, these
things incorporate really well and sometimes
you might want a little bit of
blame, and that's it. I think we're ready now to
start learning to stitch. Just remember you're in
charge if you need to stop, just pause the video. If you're having
a little trouble with one of the stitches, pause the video and
take your time. This is meant to be an enjoyable learning
experience and once you have learned how
to stitch on paper, you'll find that it's a
very relaxing past-time. [MUSIC] I'll meet you in the classroom bring your supplies and
we'll get stitching. I'll see you there. [MUSIC]
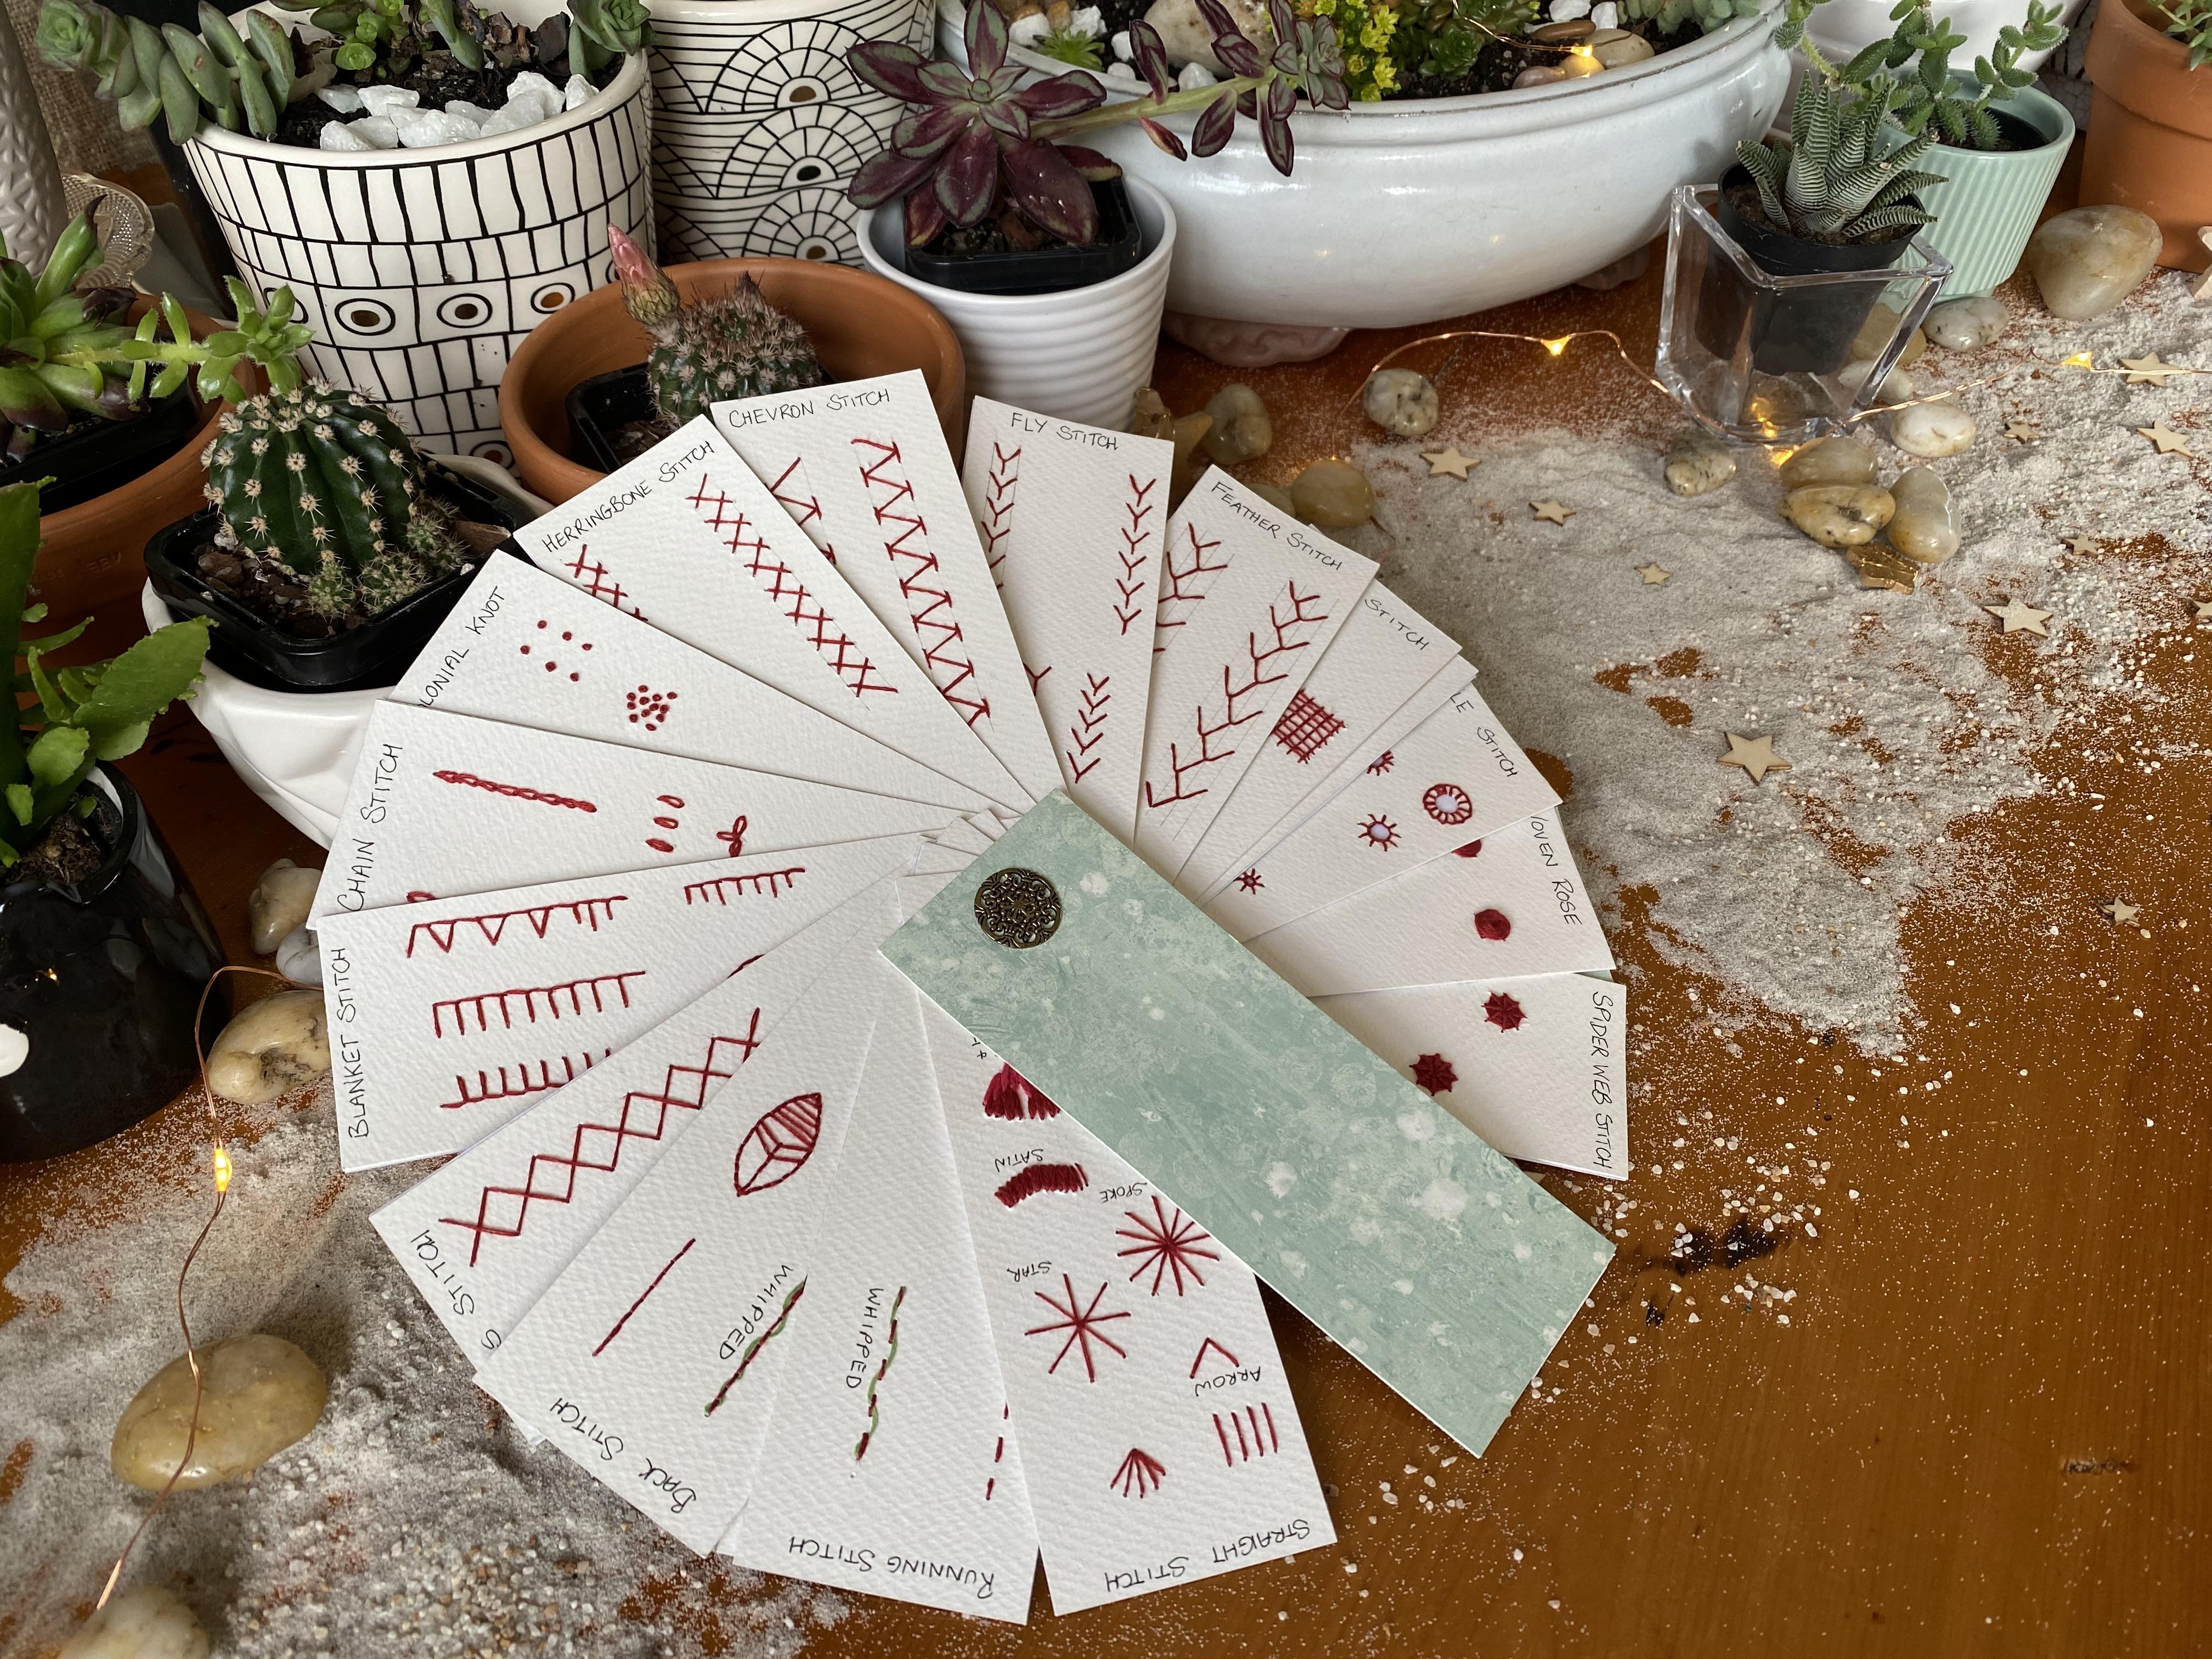
13. Straigh Stitch: [MUSIC] We need to address thread length so that
you don't get in a tangle. What I was taught was, around about a length from your fingertip to your
elbow is a good length. If you are working double, of course, you
would double that. The next thing I wanted to address was how
to knot a thread. Now, there's many
ways to do this. I just thought I would
show you how I do it the way I was taught. Sometimes I just moisten my
fingers in my little bowl, is to grasp the
end of the thread, roll it around
your finger so you have like a little
bit of a crossover, push that thread forward, and then you just roll
it off your finger, and it comes through
into a knot, grasp the end and pull it
down and tighten it up. You don't have to
have the end moist. It just makes it a
little easier to roll it off your finger when you're
learning to grasp it. There, roll it
around your finger. You end up with that
little bit of a crossover. You push it over and you're rolling it so that as it
comes off your finger, that tail goes through the loop. I'll lay it down so you can see the tail
is through the loop. Then as you do it, you just pull it down
and it becomes a knot. The other way is to hold
it across like that, bring your needle through,
and you will have made a small knot. I'm going to demonstrate how
to do the straight stitch. The straight stitch
forms the basis for a lot of other stitches
in embroidery. I'll show you how to do
the basic stitch first and then I'll just put
down a few things on my stitch sample
card so that you can get the idea of how it is a building block
for other stitches. A small knot in the end. We start on the
back of the card. I have pre-made my holes
in my card using the O. Now I'll just make the slightly bigger with
the tip of my needle. Coming up at the top
through to the front, pull your knot and just
hold it with your finger. Go back down in the next hole where you want
to position your stitch, just watch out you don't
pierce your finger though. Then I split my thread and
tight my needle through it, creating this loop that
secures my thread, and that's one stitch. Then you go back across to
the next hole and come down. [MUSIC] You have to keep in mind
that it's a base stitch and how you can
create patterns with it. At the end of your row, on the back, it looks
something like that. To secure off, I take my needle under one of
my previous stitches, create a small loop, put the needle
back through there and pull it tight like that. I do that a second time just to ensure that my threads aren't going to come
undone like that. Then you just snip off
the end like that. Start, hold the end
of your thread, take it back through
the next hole, through the loop
and come up into the next hole up the top here. Then I can come up here, and by doing this pattern, you can create something that
looks like a small plant. It just depends how you
position your stitches. When we stitch on paper, we make use of holes we already
have as much as possible because the paper becomes weak if you place too many
holes too close together. So always keeping that in mind, if you can reuse a hole that's already in
the paper, you do. Again, to end off, underneath the stitch
through that loop, just pull your stitch up tight and then pull
your loop tight, and one more time
just to make sure it doesn't come undone. Pulling it up firmly and
snipping off your thread. We've done some
straight in a row. We've done a little fan shape. This one can form something
like an arrow head, which is sometimes
called arrow stitch. I wanted to show you this
one because you can go on, add more holes across here and it becomes
the zigzag stitch. This one is straight stitches
that form a star shape. You just take a small
circle shape and then you just position your
holes opposite each other because you're
going to come straight across. Easy if I go to this next hole. [MUSIC] Straight down and you've
created a star shape. Just a simple way of
using a straight stitch. Now we're going to
work straight stitch around a circle to create
spikes in a bicycle wheel. This can create a simple flower. It's also the basis
for other stitches. Choose a spot to go down, it doesn't really matter where, somewhere on this circle
on the outer side. Split your stitch on the back. Make that securing loop again. Now, it's just simple to keep working clockwise
around the circle. [MUSIC] The hole in the center will get a little bit larger but
that doesn't matter. It's part of the
feature of the flower, becomes like a small eyelet. If you don't like it, as
we move on I'll teach you a knot stitch and
you can go back in and put a knot in the
center if you want. Certain stitch on fabric is
worked very close together. We have the problem
here on paper that you really wouldn't want to go much closer together
with your holes. You can see those holes. I wouldn't go any closer
than I have there. It becomes a little
bit dangerous because if you pull too tight, you will have a soaring matching
on the paper and you can actually pull the middle
piece completely through. Tension on these stitches needs to keep them flat
to the surface, like here, without being too
tight that you're actually pulling on the substrate and
the paper and curling it. Let me do a few stitches there so that you
can have a look. That will come up on the top and will go down
in the bottom hole. On fabric, this would be called satin stitch and the threads could actually be lying
right next to each other. Here I've got two
strands of thread. I'm just going to pull
that off, my needle, and we'll put on four strands of thread
that might fill it up. I'm going to start
over a little, come through, go down. When you work with
multiple threads you need to manipulate them so they lie flat. Let's see. Can we get them together? [NOISE] I see. Also because I have
made a curvy line, the top is closer than
the bottom together, so let's see what happens
when we do the next stitch. Another trick you
can do is to go back into the same hole on the bottom to get
them closer together. So that's starting
to look a bit more like a satin stitch now. But the idea of
showing you this is that it can be used as a filler. I prefer it to be lying
nice and spaced out, but I guess I have got used
to how stitch on paper looks. An example of what you can do
it and of course you could continue on here
towards filled up, you can go back and work
across back the other way, if you want to, to
make it thicker. Just make use of the holes
that are already there. Try not to pull too hard. But you can see
that very easily, this could become one cut
line if you're not careful. This leaf shape was
just to show you how this at all the
stitch really is. Come up here and take one stitch down. First stitch, then we'll go
out to the outside edge and take one stitch down into
the center there and meet, and them one there and meet. As you can see, you can make
this into a shape of a leaf. You just come down. If you want to, you can go back and join it up in the middle. Now here's a trick, when you're working with
paper sometimes it's hard to find out where to go
back through when you've put multiple stitches
in one whole. One of the tricks I use
is to go like that, put my needle down and then put my finger where I want to
come up from the other side, because you can't see it. Just wander down either side
creating your leaf shape. Now, the other thing is
could be is a small tree. You could also go
around the edge with a backstitch once
you learn how to do it. Around this edge here and
around this edge here. I'm just going to move
down the leaf shape a little bit more because I
put holes closer together and that was just to
demonstrate the difference between working your holes further apart and closer together to see what
it looked like. Now, I don't like where
I positioned that one, so I can actually go back up through that hole and
move that thread. So I'll take it up one because
I didn't like it there, and that will give me
a little bit more of a angle to it which to me
looks more like a leaf line. These holes are very
close together, so I do have to be
a little careful. I want to pull my
thread so it sits. There is a little twist in it. Just give it that little
tag and the knot comes out. You can see they're just there. The holes were too close together and they've
pulled into one. That happens, you just need to be a little more
careful than I was when you're placing the
holes for your stitching. You get a different
look depending on how far apart you
put your stitches, how thick your thread is. Those are the variables. Straight stitch creates the
base for many other stitches. I went ahead and stitched
this little one, which is the exactly the same
as doing this one up here. It's a five spoke. We'll come back to this. I just wanted to work it on our example card so that
you knew how the base went. I also went and filled in a little bit more
with a certain stitch, working the same types
of straight stitch. Some of them are angled
though reusing the holes. If I bring this up here, but you can see the holes
are quite close together. Which is why I chose not to
put any more holes in that to angle my thread across
a little bit in different places to
fill in the gaps. Now I have started here working
on long and short stitch. If I bring this up closer, you can see the pink and red, and they are worked into
each other a little bit. The idea is that if you use similar color family but
slightly different shades, you could work it
on a flower petal and gets shaded into it, or you could use completely
contrasting light, white and purple,
say a pansy that has a variegation in its
petal and use that. Again, now you have to be careful because it is
very much like clicking a certain stitch and reuse holes to get your stitches
closer together, otherwise you risk
tearing the paper. I will start with my thread, which is all six strands, pre-knotted, ready to go. I'll start probably
on the end here. Let's see what we
get. Working with six strands of thread
is a little hard. It's quite thick, especially on a small piece of card like this. That one would be a short stitch and then next to it you would
work a long stitch. I'm coming back up
from underneath, positioning your long
stitch next to it. You see, no matter
how careful you are, you'll get a few gaps now. You can try and close that up by working another stitch here. One of the tricks I've
discovered over time is that you can actually
come underneath. I'll just show you that. It's not strictly working
along in short stitch, but working on paper
with embroidery, you have to figure out ways
of getting what you need. I've got a hole
pre-punched here to something for a
different stitch, but I'm going to make use of it. So I'm just going
to come across it a slight angle and hide that underneath that
long stitch there. Sorry, I've filled
in that gap a bit. You can see how that works. This one should be a short stitch and I think it was meant
to go in that hole. Again, I've got a gap there. Maybe it wasn't
integral in that whole. Never mind. We'll go
back to this one. Let me bring it underneath here and see if we can close that
gap a little bit. Now I've got this little bit
of a cross happening here, so what I'm going to do
is go into this hole and come back the other way and
go into that hole there. You begin to be
able to manipulate, use stitching to work for you, beginning to get some long
and some short there. The next one here should
be a short stitch. I'm going to use this hole
here which I've already used. I'm just going to leave
that needle there and pick up this
one so I can show you the second row where you would attempt to
blend your stitches. [MUSIC] Now if you feel you're
getting too hard to line, you can actually make a
different hole further up here, so I might do that. [MUSIC] The idea, as I said, is to blend your
stitches one into the other alternating between
the long and the short. You get a reasonable
coverage that way. It looks a little messy
on the back though. You do have to be careful because your paper
will get weak. I can see mine is a
little bit [MUSIC] bendable now where
it wasn't before. That is the basis of
long and short stitch.
14. Running Stitch: [MUSIC] Running stitch. I've pre-pierced the paper, I'm just going to make the
hole slightly bigger to get started so that we
can see what we're doing. Running stitch resembles
machine stitching. Starting from the underneath, come to the front, take one stitch
down, and of course, we're going to loop the end so that we don't pull
our stitch through. Then you come one stitch, length forward on the back
like that and then you take a stitch like that and you just continue on
in that manner to the end. So one stitch down and come up, again to the back, so the front and the
back look identical, really, except that where you
see this one on the back, you don't see it on the front. Hence the name
running because it looks like little lines
running down a page. That's the running stitch. Now, I'm just going to work
another row over here and show you what else you
can do with this stitch. We'll go back the other way. It really does resemble a
machine stitch, particularly, if you make the
stitches small enough, they look like a
small machine stitch. It's also used a lot
for slow stitching, which is, if you can see
on my little needle book, that is running stitch called boro stitching as
well in Japanese, turn and it's quite
a good basic stitch. For covering ground
pretty quickly, I'm just going to end off
this thread here on the back. Pulling up most
teachers nice and firm, pulling my notch in and
again to knot off my thread. Again, I have a thread here with a knot
in the end of it. It's a different color,
so you can see this can be worked with the same
color thread or not, depends on what you like. Now, because we're
working on paper, normally we wouldn't come
up in this hole here. If we were working on fabric, we would come up
halfway through, but the hole's already there,
so I'm going to use it. You take your needle under this stitch and you work it back under this one,
backwards and forwards. Now you can pull it tight, you can leave it a little loose, it's up to you, but it creates a bit
of a declaration. Now, if my running
stitches were closer together I'd have more
of a curve in my thread. When you get to the
end, on fabric, we would poke a hole in here, but I'm just going
to reuse that hole there and take my
thread to the back. That is called whipped
running stitch. You can also come back the
other way if you want to. You could start again
up here and cross over, again under crossover and have a loop sitting
on this side. [MUSIC] That thing,
you would have a double whipped running stitch. That's just a couple of
examples of running stitch.
15. Backstitch: [MUSIC] This is backstitch. I've pre-made my holes, and with this one you start
one stitch length down. Coming up from the back, starting one stitch length
down, secure your thread. Go back up one stitch length. You can see we're creating the stitch backwards
if you like, which is what back stitch is. Now, I'm just going to
pop my needle through my split thread to secure my
loop. We have one stitch. We come down one
stitch length to the next hole and
come up and then we go back up into the
hole from the bottom of the previous stitch and you've
got two stitches together. Then on the reversed,
on the backside, you go down one stitch length
and you come back into the previous hole and you
just continue working that way down one
stitch on the back, up one stitch on the front. Down one stitch on the back, and up one stitch on the front. All the way to the end, wherever you're working at. Now, this stitch is really good for going around in a circle. I often use it to create
little round circle dots. I then go back to
either embroider other things in the dots or just filling the dark completely
and I use the back stitch as a guide to the shape
of the circle. It's good for going round
other curved shapes. I do have a leaf-shaped
marked out on here because I'm going to show you something with
that in a moment. We're just in there
off there tying my special little knot through the stitch, through the loop. For knot number 2, it's nice and secure and I
will cut the thread. [NOISE] That's a little
leaf shape there. I've put a vein halfway down it for a purpose to show you
something in a moment. I'll backstitch this leaf. I'll just keep working around in this way and I'll come
back in a moment. I'm still working. Coming back with each top stitch and forward
with each bottom stitch, in and out until I get
to the last here and I reuse that hole which I've used now for the third
stitch going into it. What I wanted to
show you here was that backstitch is a
good stitch to use. You want it to cover an
area with more stitching. It's good to have a
base that you can loop your thread through
and incur stitches that actually don't
go through the paper, so that is what you can
use this backstitch for. For example, if I take
my thread up to the top, I can infect looper thread
through that one where I don't need to go through the
paper and I can bring it up and hook it
round one of these. Then I can bring it back through one of those in the center. You can see that it
can actually work. It will stitches backwards and forwards like this
and you can actually make them closer
together than you would normally be able to do
when you work on paper. I'll just do a couple
more so you can see what I mean but I just gives you the option to fill in an area without creating too
many holes in the paper. You end up with your own
type of decorative stitch. Then you could go
back and work on the opposite side but you
can come up and create a pattern by doing it like that or you can just leave like one single
stitch and take it across, so that you get one
thread here and then come up maybe along under there, so that your thread lies
alongside the middle. Choose your spot. Come
back through over here. There's ways of
filling in to create. This one's a little
bit more denser and you can figure
out what you like, what you don't like with the
pattern and make it to fit. Another thing you could
do, come up higher. If you don't like that style, you can actually
take your thread up and through preexisting
holes in the side. But I think the main thing
is that when you do that, when you loop through a stitch, don't pull too tight on it
because you will displace it. You just put enough
tension on it to hold it where you want it. I'll bring this one up here, take it back next to that one and you begin
to create veins. Another thing you can do, I'm just going to take
that through to the back and just leave it and
pick up this green one. You can actually come
up through the holes that are already there and go from side to side like this. You could actually work
them as crosses as well. You could come up here, go down here, come up
here, go down here. You could then create a
crisscross design in your leaf. [MUSIC] There's lots ways of filling in. When you work on paper, you just have to be
a bit more creative than you do when you're
working on fabric.
16. Blanket Stitch: [MUSIC] This stitch
is blanket stitch. It was developed to secure the ends or the
edges of blankets. So where a woolen
blanket was finished, it was finished with this
stitch because it has a locking stitch across the bottom and held
everything nicely secure. So that's the basic form of blanket stitch and you
might still see that on some of those old
army issue blankets from the Second World War. If you've seen any of those, the ones here in Australia, were done with this
blanket stitch edging. There's some variations
on this stitch on here. You can get a different stitch by creating shorter
and longer verticals. You can do what's called
a close blanket stitch by angling one way and then
back the other way, creating that triangle look. You can work into
a circle shape. You can do scalloped
edges with it. This is just showing you what happens if you put a few
more of those in a row. For this stitch, we come up from the back on the bottom row. Now all my holes are pre-made just to make it a little bit
quicker for me to show you. But essentially they're
a backwards L-shape is how you work it. For every hole that's
on the bottom, there should be a
corresponding one on the top directly opposite it, except for the very first stitch because that's where
you're starting from. You come up there, you have to hold the
thread out of your way, go into the top row. [MUSIC] Then on the underside, you have to come up in
that backwards L-shape. Then you gently pull your
thread up and lock your stitch. Again, go up to the top row, come up on the bottom row, inside the loop,
there's the loop. Then you pull it and lock your
stitch up to the top row, down to the bottom row so straight down on the
underneath side. Make sure you come up on
the inside of your loop, pull it up, and
lock your thread. Let me just continue
in that way. Top row, bottom row, on the inside of the loop, all the way to the end
of where you're working. Top row and now bottom
row. Pull your thread. Bottom row. I think I'm going to have
enough thread to get all the way to the end, but I will show you how
you end this off side. Top row, bottom row, and to end off you lock your stitch up nice
and tight and you go back down over the top of that loop thread and secure
it back to the bottom. It's not going anywhere there. Then you can tie it
off on the bottom. I just make sure you've got
your threads nice and tight. Pull it up, a couple of knots, lock it up, trim
that thread off. There you have it. Well, I've pulled it a bit
too tight the wrong way, but you can ease it back. Just use your needle
and ease it back. So that is blanket stitch. I am sure there are
many other variations. I know that you can do a mirror
image, stitch to stitch. If you're clever, you can put these vertical stitch in here and have two
interlocking rows. You can just imagine it would be like that and have
two interlocking rows. Pinterest searches
[MUSIC] will bring up some wonderful variations
for different stitches. I think that is probably
the easiest place to look for what you can
do with basic stitches. That's the blanket stitch.
17. Stem Stitch: [MUSIC] We're going to
do stem stitch now. This is what it looks like
when it's done and it's useful for being stems on flowers,
branches on trees. Also good for writing in thread or outlining things
takes a curve quite nicely. To start this stitch off, come up from the back [NOISE] and I've prepared my
holes to make it quicker. But what you do is you come
forward stitch length, and then you go back to about
the center of that stitch, and that's one stitch. I forward a stitch underneath, you want to go [NOISE]
come up back one stitch, and just adjust your
attention as you go so that the stitch sits
nicely against the paper. Forward one stitch
underneath you come up back one stitch [NOISE]
forward one stitch, and then underneath you
come back one stitch, and in case I
haven't been clear, I skip a hole, go to the next hole. That's considered
my stitch length, and then underneath I go back to the hall that I skipped and go through there and
bring it across. I skip a hole down a hole, and go back underneath and come up in that hole
that you skipped, all the way to the end
wherever you're stitching. Just like that. Up again, in that
hole that I skipped, and then to end off, you just go back
underneath and tie off. My holes are not very even. I have a tendency just
to eyeball things. You might be a little bit
more pedantic than me. I like the organic
look that you get from eyeballing [MUSIC] and
then we have our stem stitch.
18. Chain Stitch: [MUSIC] This is
the chain stitch, I've pre-made my holes, the length of what I think I would like my stitches to be. This is what chain
stitch looks like, it's an interlocking chain, it can be worked in singles, it can be worked in singles that are put together
as a pattern, you can actually add
to this pattern by putting little knots or
little straight stitches, and you can keep going in a row, imagine a row of those. This here is called
a lazy daisy, which is just made up of single chain stitches placed however you would like them, you could have a
six petaled daisy, a seven petaled daisy or a
five petaled like I've done, and you could work a
small knot in the center. For this stitch, we come up on the backside at the
start of the row, bring your needle
through to the front, take your thread
down to the back, and keep hold of the loop, don't lose your loop, then you come down to the
next hole and come up, and then you very
carefully pull up your thread until it's
sitting in a nice shape. Working with embroidery floss, sometimes the floss separates, so sometimes you need to just pull one out a
little bit to seat the threads back down and
then you go back down that hole holding
onto your loop, thread on the side, and on the backside you come
forward to the next hole. Down one stitch, then
you come back up, and you catch inside that loop, back down in that same hole, holding your thread to the side so that
you create a loop, come back through the
hole in the bottom, one stitch down, gently sit your stitch, and you can see we're
starting to make this chain. You just continue in that way, back down that hall that
you just came out of, down a stitch length
on the bottom, up through that hole, pull up your little loop. This stitch can be worked
in a twisted manner, I'm not going to show you that, you can explore that for
yourself on Pinterest, you can actually thread a whip stitch through the
same as we did for backstitch and
running stitch, you can actually do an
overcast stitch across it, overcast is when you
come up and over, up and over, you're wrapping the stitches. Probably the most
handy thing though is to know that it can be
worked as a single, and the single one
has a lot of uses, you can tuck it into patterns
all over the place with other stitches and it
looks really great. I'm almost to the end, come back one stitch
down on the bottom, and then pull up your loop, help to keep it sit
nice as it goes down, and this is the last loop, we come up through here, one stitch down, and we want to be
able to secure it, so we go back into the same
hole that we just came out of and then you tie
off on the back. If you want to work just
a single chain stitch, I will quickly show you
a couple of holes here, you come up, make
your loop like this, come up one stitch
down through the loop, help the stitch to sit nicely, and then you just go
back down into that hole over the loop to secure it, and that's your single
chain stitch [MUSIC].
19. Cross Stitch: [MUSIC] Now, we're going
to do cross stitch. As you can see, the
stitches form a cross. The easiest way if you're
doing a row of cross stitch is to work in one direction
diagonally first, and then come back
the other way, which is what I'm
going to do here. But first of all, what
I want to show you is just one cross, a single, so you get the idea. Now, you can see, I'm poking these holes and just eyeballing, so that may not be
perfectly even. You come up from the back
and go diagonally across. I'm just going to
catch my thread underneath so that I don't
pull the knot through. Then you go straight
up above the stitch. You just came
diagonally across from, and then you go back
diagonally and down, and that is just one cross. You could work your cross
stitches individually like that all the way across your page if that's
what you want to do. I'm just going to demonstrate working them in a complete row. [NOISE] Because this doesn't matter which side
you're looking at it, it's the same both ways. I'm just going to
work it this way, so I'll come up
through this hole. Again, I've pre-made
the holes to make it a bit quicker diagonally across. I'm just going to
catch my knot again so that my thread doesn't pop
through the hole. There we go. Go straight up to hole above, and go diagonally across. You just work that way all the
way to the end of the row. I can get my needle in the hole, and it might help if I open
those holes out of it. Diagonally across,
straight up on the back. Diagonally across on the front, straight up on the back. Diagonally across on the front, straight up on the back until you get to
the end of the row. One more, and I'll be there. Then you do the direct opposite, so you come up in that
hole, straight up. Then we're going to work back
into these bottom holes, achieving the cross as we go. Oops, wrong hole. You go straight up on the
back diagonally across, straight up on the back, diagonally across,
straight up on the back, and diagonally across, again, all the way to the
end of the row. Now, this stitch can be
worked in a stacked manner, so you can stack them
on top of each other. You can work them
horizontally or vertically. You can do a single
one on its own. You can also come back. I'll just show you this
so you can come back, and then work a straight
stitch in between. You can do that
with another color and just work all the way
to the end of the row. That's just a variation on it. You can also make a cross
stitch star with it by going back and doing the
other direction across, but keeping it into
a square shape. [MUSIC] That's just some
variations on the cross stitch, and you have those in
your stitch guide.
20. Colonial Knot Stitch: [MUSIC] This stitch is
called colonial knot, and strictly speaking, it is not exactly
how you would work a colonial knot because
I add in an extra wrap. The reason I do that
is because knots on paper often pulled through the hole so I like it to
be a little bit thicker. Knot stitch is really handy for making tiny little
flowers if you like. The centers of
larger flowers and just adding in a little bit of texture where
you might like it. These colonial knots, I think the first
one here, this one, might have been worked as you're meant to and
I'll show you that one first and then we'll go on and I'll show you
how I've modified it. A colonial knot you bring up your thread and then you
take hold of the thread in the left hand and you scoop your needle underneath
and then you come over the top and around the
other way and it creates that figure of eight
around the needle. You have to stitch
your needle back in the hole and you
pull up your thread. Now on fabric you would not put your needle back in exactly the same hole you
would go very close to it, but we can't do that on paper. You have to pull up your
loop so it's sitting nice and flush and then you pull your needle through to the back. Now you can see
if I tag on that, it's likely to pull
through the hole, which is why I've modified this a little bit and I
now do it this way. Holding your thread with
your left hand, scoop under, and then bring your thread over, that's the traditional
way of doing it. Now I put another
wrap around it and sometimes two if I'm working
with a really fine thread, then you just put
tension on your needle, sorry, on your
thread and pull it up around the needle
nice and firmly, pick up your paper, push your needle
through to the back. It's just slightly bigger
than the first one I worked. If you don't put enough
tension on your thread when it's wrapped around
your needle before you pull your needle through
to the reverse side, you can end up with loose
little loops on the top. Sometimes it's not a bad look. Sometimes it's useful,
especially if you're working on a field of
flowers or something. It could add a little bit of
extra texture and dimension. Just be aware that if you do get that little loopy
bit on the top it's really because you haven't pulled your thread tight
enough to your needle. Again, holding your
thread in the left hand, needle over, scoop it under, wrap it round, poke it back into the hole, and then pull up your
tension on your thread, secure your thread
with your thumb as you push your needle
through to the back. When you first start
doing these it feels a little bit awkward but you
will get there in the end, it's just a little practice. This is traditionally
a candle-wicking knot. Scoop under either
bring you thread up. Sorry, let's do that again. Scoop under the thread, bring the thread over
the top and around, then bring it around
one more time, put your needle in your hole where you're
going to go down, pull up your thread, pick up your paper and secure your thread so that it
stays with the tension on it as you pull your needle through and then just
bring it up like that, you can manipulate the knot a little bit so that it
sits the way you want it. Very last one, Here we go. Thread in the left hand, needle over and
under the thread, wrap over the top, then do one wrap around, needle back in the hole, pull your thread up, keep the tension on it, pick up your card, push your
needle through to the back. Yeah, and that is
the colonial knot. [MUSIC]
21. Herringbone Stitch: [MUSIC] This is
herringbone stitch. Herringbone stitch is worked
between two parallel lines. It's worked from the top down. I've got some
premade holes here. I just eyeballed my lines are not that straight but
we'll see what we end up with. On the backside coming up, come across diagonally
and then you go back. One stitch for one
hole on the back. You go up diagonally
to the top line. Again you go back on the top
line to the previous hole. Then diagonally across and
back to the previous hole. You just keep working
in that manner, all the way across to
the end of the row. I'll just keep going here, diagonally across
and back one stitch. Diagonally across to the
top and back one stitch. Diagonally across to the
bottom and back one stitch. [NOISE] I use this stitch
sometimes when I'm doing the barrel cactus
because I think it looks good as implied
ridges on the cactus. There's probably
other ways of working which you can probably stack up. You could have a look on
Pinterest and see if you can find any other ways
to work the stitch. [NOISE] In combination with
other stitches, you could actually
combine knots in here, so you could see
little knots up there, or you could see them in there. There are different things
you can do with it. You could also do a running or a back stitch along
the lines to enclose it. It's just a matter of coming up with things that you
like experimenting. [MUSIC] Then when you get to the end, you just take it
down where you are. You don't need to come back. Then it matches one
end to the other. If you are pierced, that's what we would do here. That's the thing
about stitching. [MUSIC]
22. Chevron Stitch: [MUSIC] This is Chevron stitch and Chevron stitch is
the natural progression after working in [inaudible]
because it's very similar. It has a zigzag motion, but it does have little feet on the bottom of it and it is worked forwards and back,
similar to [inaudible]. I've pre-made my holes
and you can see here, you start from the top and you come across
to a central hole. Then underneath, you
come up in a hole here, and you go back down in this one and you come back into
the central hole. The holes are punched in
little groups of three, little bit of space in between, and then directly opposite
on the next line above. You have three holes again
with small spaces in-between, and then you come down to
three holes in a line, again, these small
spaces up again. Three holes in a row, you get the idea. Let's have a go at this. Up from the bottom, down into the middle hole. One hole forward
underneath, like this, come back to the back hole, and then before you pull
your thread out tight, come up again in
the middle hole. That just stops you from
splitting a top stitch and then go up diagonally into the middle
hole, come forward. One hole, go back to
the back hole here. She is right out of the way, don't pull it all the way up. Come back into the center hole. Now pull tight, down into the center hole. Forward one stitch underneath. Back to the back hole
of that fourth stitch. Before you pull tight, you come up into the center hole again and then pull it tight, get your tension right, and come back up to the top
line to the center hole. Forward one stitch, back down in the back hole keeping your thread
out of the way. Pull it almost all the way up, and then come back up in
a center hole like that. Pull down on its way to see the stitch down into
the center hole. Forward to the next hole along, back to the back hole. Before you pull it
all the way up, come up in that center hole and try not to split the
stitch like I just did. I'll see if I can get it out
of there, that's better. To the center hole,
forward one stitch. Back to the back hole. Before you pull your
thread all the way up, come up in the middle one. Now pull it up down here
into the center one, forward one stitch,
back one stitch. Before you pull it up, come up in the center.
Now pull it up. Down in the center hole, forward one hole, and back one hole. Try and pull it all
the way just yet. Come up in the center.
Now, pull it up. [MUSIC] We're at the end of this row, so we just take it down. Matching the other
end, my stitches, my holes are not too even
but as I said before, I like to eyeball things. Then you just end off [MUSIC]
and that is Chevron stitch.
23. Fly Stitch: [NOISE] This is fly stitch. It looks like a Y. It can be worked vertically
or horizontally. It can be worked in
gradation of sizing. Here, you could put two
to illustrate stitches, and you almost have
like a piece of wheat. It can be worked horizontally this way where
the arms of the Ys connect. It can also be
worked in a circle, and I'll show you how
that's done in a moment. That's what those threads for. I'll finish that
off and show you. I'm going to work it
now just like this. The other thing I
could say about fly stitch is you can
vary the look of it by changing the length
of this stripe patch, so you can have it
really short and it looks just like an arrowhead. There are quite a few
variations on it. I've given you a few
in your stitch guide, but it's one of the ones that
you would research again on Pinterest or on Google to see what else you
can come up with. I've left the line set so
you can see parallel lines. Normally, if you were
going to do that, you would rub the lines out, but I left in there so you
could have a look and see. Although I've
marked these holes, I haven't opened them up. Yes. Maybe I'll just open a
nice ones to get started. Y come up on the left-hand side and go
down in the opposite hole, and you come up from the
bottom in the center hole. Pull your Y down, and you go down in
the end of the Y. Here, I've chosen to
try and keep even with the bottom of
the first stitch I did so you come up
on the left side, down in the opposite hole, and then come up
in the same top. Take you through
it over the top of the loop and down into the Y. That'll laid I
suppose you recall. Again, I've kept it in line with the
bottom stitch of the Y. Across, making a loop, holding onto a bit
of your thumb, come up into the center. Pull it up, take you
through it over the top, and go down in the center
again, creating that leg. Up on the left-hand side. Over to the right-hand
parallel hole, up in the center, down over the loop, and into the leg. Up on the left-hand side, across to the right-hand hole, which is parallel, and up into the center hole, and then down into there. Up on the left-hand side, across to the right-hand hole, and up into the center hole, and then down. To finish off, you just secure your loop and tie
up on the bottom. If you were making a short leg, you could go back through
into that same hole, and then you could see that
a fly stitch is really like an open chain stitch is popping the top of the
chain which is now open. That's how you do a
straight run of fly stitch. Now, I want to show
you how to finish off this stitch in a circle. This is worked like this. It's exactly the same stitch. You come up on the left, all to loop, go down
into the right. Well, it's not parallel
because it's in a circle, but into the other arm, you come up into the
anchoring stitch, which takes you over your loop. Then this time, we take it
all the way to the center, and that's how you get this. Let's do another one. You go on the left-hand side to the right-hand side up in the center hole and down into
the center of the design. I first learned to stitch
when I was quite little, maybe eight, something
like that, and boy, did I do some wonky circles until I realized
that if you've got a cotton reel and held it down and drew
a circle around it, you could actually get a
much better circular shape. I came across some of my work from my
childhood recently, and I had to laugh at my
wonky fly stitch circles. I have a charm of their own. That's basically how you do it. When you come to make
your circle for this, you can use, like I
said a cotton reel. Do you call it a spool? We call it a reel and
just draw around it. It's a really good size, and then just try and well, again, I'm lazy, I eyeballed, just try and evenly space some
holes around there. Away you go. The center. You might go hole in the center. You radiate out from that and then you make
it an inner row. You just have to work out where your spacings
are going to be, and try and keep it, so that when you get to the end, it's not your
spacing fairly even. [MUSIC] That's the stitch that I have always loved
even when I worked at one. Then this is the
sampler that I have made in my last stitch on it.
24. Feather Stitch: [MUSIC] This is feather
stitch [MUSIC]. It's a little bit
like fly stitch because it has the
arms of the Y, but instead of coming
straight down, you go across and
create another one. This stitch is worked
across four lines. It's probably easier if you see it as being
whipped across four lines. I've left them ruled on there
so you can have a look. They're here as well and
I've pre-made my holes. Let's start and work through it. Now this stitch has
many variations on it. I've written a few into
your stitch guide for you, but we are only going to explore this way because it's complicated enough
if you're a beginner. Once you get comfortable
working at them, there are many variations
of it available. It can be worked in double, semi-double either side, and triple either side. There is a closed
variation over, so have a look I'll say
again on Pinterest. When you're ready, you can explore some more
variations of this stitch. We come up from the bottom, go across as you would the
fly stitch, like that, then you come back up
into that center hole, so this Y, [inaudible] your stitch, but instead of going down, we come across here to this one, and then we come back up
in the center of this. You will see that I'm holding the loop before I
pull down on it. Then we're going back across
to the left side down, and just hold onto your loop
and come up in the center. Braid it creating another Y. Across to the right, hold your loop down, come up in the middle. So it looks a lot more
complicated than it actually is. Once you get your head around the fact that you're
moving left and right. So I'll cross back to the left, keep holding the thread, come up in the center hole, either to the right, up in that center hole. Now our work needs stitches really big so you can see them. But they can be
worked quite tiny. This little pin
cushion that I made has the feather stitch goes that way worked across the
same there as a decoration. So it has a lot of uses. Years ago it used to be used
a lot on baby's clothes, babies nighties, and things
with delicate stitching, looked fabulous, it used
to often be worked with one single strand and often white or pestel thread on white. That's probably where
it originated as a decoration for babies clothes. When it's worked smaller, it does look very pretty. So that goes to the left, come up in that center, hold the stitch up, back across to the right, through that center, back across to the left, through that center hole. I've Managed to twist my thread. Back across to the right, through the center hole, back across to the left, through that center
hole, to the right side, through the center hole, i have it to the left side, now to end off. It is just like
the fly stitch or even a chain stitch where we are going to
come over that loop. If you're working on fabric, you will take a small stitch. But because we're on paper, the less holds the
better we're going to go back into the hole that we just came out of and secure
that loop like that. Then of course you just
tie off on the bottom, and that is the feather stitch. That's the 12 stitch out of the 12 stitches that I
was going to show you. There are another five stitches to come in the bonus
video at the end, so you may want to watch
the bonus stitches before you do your embroidery
on your painting, or you may just
choose to wait until the end and have a look
at those as a bonus. But I'll just let you
know that they are there. That's stitching. [MUSIC]
25. Embroidery Project Part 1: [MUSIC] We are up to
stitching on our painting. You have your design choices
to make that red color. What I have brought out here are some warm colors and I've chosen a lot of variegated just because
it'll add some interest. I'm not exactly sure what
I'm going to be doing yet, I've got a selection of green. I generally wouldn't need to use too much green in a
picture like this because there is quite a bit
of green already in here but I may want to add some little knots in here to just suggest
some greenery. I'm thinking that I will
use this variegated yellowy limey green and orange
color around the sun. Then I like the looks of this lovely luscious red
on this lovely green, and possibly some of that on here and then maybe
some of this color, either here or perhaps this one, which brings in the
pinky movie tones. I may put some flowers
on the large cacti, but I haven't decided yet. That's what my thread
choices are at the moment. They're not carved in stone, no. I built my colors basically around this thread
because I love the contrast with the green. I've decided I'm going to start with the sun while I still contemplate what I might like to put on the rest of
this little picture. I've snipped off some of my thread and have teased the ends apart so that I
can pull off two strands. Then I lay the thread
I'm not using aside. Now I'm going to have a
feel for the grain of the thread and it
feels smoother to me going this way so this way
should go through first. My needle is ready and now I get the oar out and start
making some holes. I want to come up here. I like to do my
stitching just along the inside edge here. Just eyeballing it as I go. I will go around and
poke some holes. I'm going to start over
here because I'll get a big bit done before I have to do these little fiddly bits. I've decided on backstitch. Coming up, one stitch forward, going back, securing my thread through the knot from the back. Away we go. Come forward one
and back one, you remember? I already like the color there
of the green on the sun, it just adds something
a little different. This thread will change
as I work my way around. Now you start to
get the effect of the variegated thread
as it starts to change. It's really super cool. This is sun done. Look at the pretty
variegation in the thread, it looks to me very attractive. Next on here, I think
I'm going to work on these barrel-shaped cactus. Because I dropped in color, I could say there is
little circle spots. I've just lightly gone around them with some graphite
to see whether I like it or not and then I've lifted the graphite
just a little bit so it doesn't smudge
everywhere and I'm going to throw it up on this
variegated thread. I'm thinking I will do some
blanket stitch variation. Maybe not all of them, some of them may be some
blanket stitch and some of them may be just
some backstitch. I'm going to make some
holes and get started. I see the blanket stitch
would probably look quite good around
this big one here. [NOISE] I will make some holes. Now I've only made
one row of holes and blanket stitch
requires two so what I'm going to
do is actually stop my stitches by poking holes and use the
others as a guide. Coming up from the
back and going into this one and then I need to make
another little hole here. Come up from the
back into that one, down into that one, then I need to make
another hole around here, down here, and let's make a little hole here. I'm liking this thread, this color thread on the green
I think it's very pretty. That one here but I
think I'll come up here, go down there then come up here. You have to be very confident
when you make holes like this because really
there's no going back. That one is there, once the
hole is there it's there. Then up in there. [NOISE] One of these I think I
need to come up there. Now this is where we'll get a little bit interesting because the cactus is going around towards
the back of it. This needs to be a
little bit smaller here and trying to follow the
contours of the plant. So far, let's see how we go. That one is there so I think maybe linger will come up, [NOISE] and one there so I think will come up here. [NOISE] Put this here and so you may just here, I think. Here, we're going to come up where we
started, through that hole. Through it down, and
then go back down. I've scripped that first
stitch in there just to make it sit nicely,
so here we are, so that our first
funny little blanket stitch flowery thing, and I might go over to this one now and do a
little bit of back stitch. I think they don't all
need to be blanket stitch. I think it would
be way too much on this little plant so I'm going to vary it a little by just putting in
some back stitch, so I've put my
holes in, come up. I want to go back one, I want to go forward one. Just a word about carrying your thread across the
back of your design. It's all right to do
it in short spaces, but I wouldn't carry a
thread say from either here to way over here because you'll get caught in it on the back
and you'll keep pulling it, and eventually you
will tear your paper. I think it's better
to end off and restart rather than carry
thread too far across the back. Apart from that, it
uses a lot of thread. The last thing you want
to do is to have put a lot of work into something
and then just tear it. I know I've spoken about
being able to make some small meaning
to small tears, but there would be
nothing you could do for a really big tear. It would just be something that you would
have to throw away. Which would be really
unfortunate because those things tend to happen after you've
put in hours of work, so it has one little
backstitch spot. Now I like to have things
sitting odd, not too even. I could do the reverse blanket stitch where I work it
around and make it open. Maybe I'll do that, so let's put on our
holes in to get started, you want the base ones. This is really like
doing an islet stitch, but without the hole
punched in the middle. I'm going to make
a hole over here. I'm not going to make
these stitches too long. We're going down that one and
we're coming up that one, good, and then
we're going to make another hole here so I'm
going to down that one. Holding my thread out of
the way and I'm going to come up directly
underneath it like this. I just continue around this
circle in the same manner. This one here, this one here so I need a little hole here. [NOISE] I make a hole, hold my thread out of the way, go down, and then on the back, come up and lock my stitching. Keep going around the
circle down the hole, come up quickly underneath it. Keep working around, and this has had a little bit of a spiral effect happen to it because I've twisted it as
I've gone around the circle, so instead of it
seating dead straight, it has a little bit
of a skew to it, which has made it
quite interesting. [NOISE] We come back here I want a little
hole up here. Then we're going to come
back up into the hole of our first stitch which is there, lock that thread in, and go back down that hole
over that loop like that. Here we go that
looks quite cute, it's like a mini just sum. I think now this one would be a buttonhole
stitch one like this so go around and
make my place hole. Just try not to put them
too close together. It's a little bit
too close there. Let's hope it doesn't tear, and carry the thread across. Starting here, I
need to put a hole above this one to make that backwards L shape
of the blanket stitch. I'm going to come
up on that hole of that first stitch and bring it back down over the
thread to lock it down into that
little hole there. Their little interesting is a little bit out of shape because he wasn't
actually a circle. He was more of an oval. But I love the
organicness of that. Different buttonhole stitch and some backstitch on that fellow
and he looks very funky. [MUSIC]
26. Embroidery Project Part 2: [MUSIC] I have been having
to think about what's next, and I have decided
that I will just do a little bit of embroidery
in this area here. I think I'm going to do
some colonial knots. I have chosen this colored
variegated thread. I've already put a few
holes in there and I'm just going to make some
little knots in there. We'll just see how we like that. This thread is very interesting because it
goes from blue to purple. It should look
very nice in here. Now, I've just made that a
single wrap just to say, I might need to go around, make my figure of eight, and then go around
once more to give it a little bit more dimension. Remembering what I said
about colonial knots, if you only do the
figure of eight, they sometimes pull through when you put tension on your thread. I just take it easy. If that's what you're doing
and see how you get on. I'll go one more wrap
and down into that hole. Pulling up top and I'm
putting my thread through. It certainly has given it a little bit of a
different look there. With the blue and
the purple together, starting to move into the purple shade on
this thread now. We'll get a little bit of
a look at what happens with the variegation.
I quite like that. I'm just going to
work some more of these knots over in this area. I might bring in another
color thread as well. But at the moment, I'm going
to stick with this one. Start down here and
I might lighten it up a little bit as
I move up that plant. I'll just continue on. Now, decided I'm going
to change my thread. I'll introduce some of these
fun with a bit of pink in it because I think it
just needs a little lift. That's going to be
what I do next. I'm happy with that. Now, I don't think it
needs anything else there. I'll just wait and see
when I do this guy whether I might put
another couple in here. But at this stage, I'm quite
happy with how that looks. Now, I do like the second
thread that I use there. I think it might look nice over here and just warm this
side up a little bit. I just need to decide whether there's enough pink
happening. Yes, there is. Because it's the pink that I'm interested in and the moth. I'll just continue using this thread and put some little
knots over this side now. On this little guy here
I'm thinking I might do some lazy daisies
which is your chain stitch worked into
a flower shape. I have decided, I'm going to
start with pink on there. Because what I'm
trying to do is tie the colors in on both sides, putting some pink there. Then I may introduce
another color. Perhaps this color or I may even go with something
with a bit of yellow in it. I'm just contemplating that at the moment but I'll
get started with this. What I might like to do is just mark where I
think I might do. A center there and
maybe one over here and perhaps a
tiny one down here. That will get me started. Now, I'm just going to
take that graphite up a little and I'm just going
to make the holes in there. Now, that I know I'm happy
with that placement, I'm just making my
center holes to work from and I'll start
on this one first. I'm coming up
through that center. I'm just keeping hold
of that knot for now, I'll catch it on the
way back through. I want to bring one
petal out here. I make a hole there. Take my needle back down. Now, I'm going to
catch my loop to make sure it doesn't come out. I have now, gone
through my knot. Now, keeping that loop open, I'm going to come up this
hole that I just made here. Should meet my stitch down until I'm happy with the
position and then park my needle back
through that hole, securing that loop down with the thread
over the top of it. Then you just shimmy
your stitch a little. It's not like working
on fabric, on paper. You can't tag hard. You have to gently
work your way there. I'm just working out. I might put one over here now. I'm just going to poke a hole there and come up
through the middle again and then getting your
thread out of the way. Take your needle
back down that hole. Keeping your loop open, come up through the
outer hole there, throwing your thread out nicely. Then when you're happy
with the position of it, just take your thread back
through the hole over the top of the thread
loop and secure it. Here we go. Now, I think one up there, come up through that
hole in the center. Bring your thread through and draw your thread to the
left-hand side out of the way. Poke your needle down
the hole in the center, bring it up through the
other hole you created. Then destroy your thread down until you're happy with
the loop you've created. Take your thread back down
either the top of that loop, and then just adjust your
stitch however, you need to. That one's a little
bit on the fat side, so I just pulled it down again and just adjust it until I'm
happy, it's a bit better. Now, I think we need one here, up from the bottom. Again, I know you know
how to do this now, this is not the first
time you've seen this. It's not your first
rodeo as they say. After I've worked this one, I'll just continue
on and we'll come back towards the end of
filling this guy in. This is the last
one I'm going to do here and I'm going to
position this one here, come up through the center, back down through the center. Come up that little hole
and inside your loop, pull up your thread, secure over the top of
it and back down. There is a lazy daisy. I've gone ahead and put my
lazy daisy stitches on and I made some colonial
knot buds just there. This one is a lazy daisy. Well, more like two detach
chains to make a bud there. Now, I think they need some
yellow in the centers. Then it'll tie nicely in with this side and balance
is the design, so I'll just go ahead
and put those in. [MUSIC] Now, you can see they
have their centers and I'm very happy that the
colors are now balanced. I quite like the daisy
design on there. I think that I'm calling
that guy down there. I'm still contemplating
something here but that might be
the last thing I do. Now, I'm trying to
decide whether I need to do anything on this plant here, which I call a sensorvera. If I was to do
anything on there, it would only be maybe just a little bit of straight
stitches across. I don't think it needs
too much but I'll think about that one and I'll go on to the big guy in the middle. I'm itching to use this thread. I absolutely love it. I'm thinking that I will do a herringbone stitch
here and here. Not a really wide one, just keeping it small
and I'll just follow those lines in the paint. I'll think about what
I might do here. I just wait to see what
the central part of that cactus looks like and
then I'll make a decision. The first thing I'm going
to do is work out my holes. Sometimes [MUSIC] I do the
whole line and sometimes by just a few to get me started and then I just do it
organically as I go. [MUSIC]
27. Embroidery Project Part 3: [MUSIC] I'm putting herringbone
stitch on this card, and I've gone ahead
and pre-made my holes. I'm going to do two rows. It's diagonally across, and then back one stitch, diagonally across,
and back one stitch, diagonally across, back one stitch and so
you keep going. Now, when I made my holes, I just eyeballed them. There'll be some
differences in spacing. I really like that organic look that you get from that though. I'm just going to
continue with this, and I'll come back to
you when I've finished the rows so that we can
talk about what's next. That's the end of
those two rows. I always just check some, when you're stitching your needle kicks up little
bits of the paper, and exposes white, rather than the color
of the paint so I just massage that back. I ended my needle if I need to. I'm really happy with that. I like the way that looks. I think that's very interesting. It suggests cactus spikes. I'm very happy with that. Now, I'm contemplating these two arms
here of the cacti, and thinking that I should do something
different on those. Just for a little variety. I'll just think about
that for a moment, and have a look at maybe a different
color thread as well. We could use some of this one, which is the one
that I used here, and put that on that side. Over here, we could
introduce a little bit more of the moiety color, maybe something like this. I do like that. I think, that sort this
side to this side, and this side to this side. The other option is to
continue with the same thread, that I was using so let
me have a look at this. We know that works because
I've already done it but I just don't want to be too
predictable until this time. I think I might go with
the two different threads, just for something interesting, and I will think
about what stitches. Whatever I do on this side I'll probably do on this
side to balance it but just use the two
different color threads to create a bit of interest. I'm just thinking in terms of, whether I want to continue with a stitch that
follows in lines, or whether I want to go circles
or something like that, or I could just do
little stars right here. I've had a little bit
of think about it, and you might be able
to see that I have drawn some circle shapes. I've done them
light on this side, just so that I can
have a look at it. I also laid some thread in
lines, just to have a look. I've decided that I like
the circle shapes better. I'm going to go ahead
and just do straight stitch little star shapes in
the circles on this side. Then I'll decide whether I
do the same on this side or whether I change
the circle design. Well, I tend to do circles, but whether I actually use the same stitch or
not, on that side. We're going to lift
that graphite. I'm going to use this pinky moiety bluey thread on this side and then I'll make a decision about this
side but I think, I will probably
go with this one, on this side because that seems to be the way I
like to do these designs, rather than more monochromatic. I like to make them
all very boho. But just mark the centers, so that I can find them. When I get to them, when I seam up the centers,
I'm just eyeballing. It's roughly where I
think centers will be. I might put 1/2 one up here, so I'll just put a little
hole on the top there. I think I will start
from the bottom, and I will come up. That's my first one there. [NOISE] I'll just make the bicycle spoke things, [NOISE] that we
used for weaving. Works perfectly for these two. Now I'm just going
to catch my knot so that I don't end up
pulling it through. This lifted a little bit
and split the thread, and run it through so that it won't pull through that hole. Come back up in the center. These ones are really tiny. You can make these,
however, you want, however many spokes
you want to put on it, whatever is aesthetically
pleasing to you. Because that one is tiny, I'm just going to
leave it like that and move on up to here. [NOISE] You can see that this is not done with any
great accuracy. It's all about for me, the look, when I look at it,
how I like to see it. [NOISE] Now, we place
little star shapes. You can actually, come back, and works in back stitch around them to close the
mean if you want to but I'm not going to own this
design because we've got this one here that has
closed ages on it. I'm just going to
leave them open, as a little bit of interest, something a bit different. You getting the idea. [NOISE] You can see it is just straight
stitch up and down, and just choosing where you
want to put your spokes. That's all, those little
guys down on there now, and I'm quite happy with that. I think it's a nice balance. Creates a little
bit of interest. It plays well off this because
it's created with lines. Still thinking about, what I might do
in those circles. I had thought that I
might do polka knots, but I think it might be
a little bit too heavy. One of the other
things I could do is purely just this little back
stitch in circular shapes. Or just contemplate
that for a minute. Sometimes, you get
to a point where you lack a bit of inspiration, and you know it's time to put it down for a while and
come back later. I think I might
do more of these, I really like that balance, that are using the
different color thread. [MUSIC] Find the hole, and find the little
circles that I drew, there's one there, one here. I'll call that
side down as well. [MUSIC]
28. Embroidery Project Part 4: [MUSIC] Next I think, I might like to put some backstitch around the
outside edge of this guy. I don't usually do that, but I just feel like it needs to be a little
bit contained maybe. Of course, I always risk not locking it, because of that, what I think I'll do is tie the thread that I was
thinking about using, which is this end. I might just lay it around the outside edge to have a
look and see what I think. You can see that making these decisions is always
coming up with an idea and then try to test it
out as best you can without putting holes in your paper because
once you do that, that's the point of no
return and at this stage, I've done quite a bit
of embroidery on here, so it would be a shame to
end up not locking it. I'm just trying to get a sense of what it would look like. I think I like that. Make my holes. I'm thinking a little backstitch will be around the edges here. Come in one hole forward, going back one hole underneath. Lock your thread through. You knot so that it
doesn't pop out. Now, we're coming forward
underneath with each stitch, and backwards on the
top with each stitch. While I was sewing, I decided that I would change
the thread around this one to the pinky purply bluey one. Want of a better description, and just to change a little bit. That's how it looks. I'm quite happy with this. The next thing I'm going
to do is down here, which will be part of it. I'm just going to
think about sizing, which I think maybe like that. You can see, I'm free handing and it's not
a perfect circle, but by now you're used to
me and my organic shapes. Now, I have to
decide on a thread. I am thinking I might use
some more of this one, which was this one here just to bring in a little
bit more of a blue, which will bounce
from here, as well. Again it will bounce here, here, and here, and hopefully, will balance quite nicely. You will remember how this goes. It's a spoke stitch because
we're going to be weaving. It doesn't matter
whether you come up from the center or from the top. I'm going to come
up from the top, down through the center, just to keep the knot out at the center and then
I'm going to split the thread to secure
my thread like that. Then I'm going to work
my way around the clock. Surrounded but now I'm
stopping to have a look at the color combination and I think it's going to
work quite nicely. I finished with my spokes, now, I'm going to keep going
with these threads. I'm going to wrap it around a spoke in the center
to secure it, and come back up in the center. Now, you remember this stitch, we come up in the center and
we go around one backwards, like that, and then
we go under two. You go round the one
you just went back over and forward one, and then you just
keep going that way. You go back around the one you just came under and forward, and you just keep pushing the stitches down to the middle. We just went around this one, so we go back over it and under that one
and under the next one. Back over that one and then under the
one in front of it, and just keep working
around the spoke. You've got it. I'm
sure you've got it. You will have practiced this, when you did your
practice stitches. Maybe I should just remind you guys that you
can actually make this work go faster if you
use more than two threads, but I prefer to work
with two threads. Feel free to choose your threads the way you like to work or how you
want to do it, and I'll check back
in with you when I get this one finished. I'm actually going
to finish there, even though there's a
little bit of tiny bit of space left on those ones because I'm locking that little
star shape that it makes. I'm going to call
that one done and sit back and have a look
at my design and see if it's finished or
whether there is some other element that I
think might improve it. Very close to finish, I'm not quite sure whether
I actually am finished. Let's have a look and
see what we think. I'm having a little moment here where I think I might
like to put just a tiny little bit more of
this darker color in here to create just that
little bit of balance. Just one more look, now, I've put a few knots
in there and I'm just checking out the balance on the actual design and whether the play of
colors balances nicely. I feel that it does. You could go on and add
more in, if you want to. I'm happy with the
composition the way it is. I'm just thinking about
what I've left unstitched. I've very rarely stitched
the whole thing. I find it's a little
bit too much, especially when you're using
these brighter colors. I'm happy to leave
these few rocks and these little ones here as just a suggestion of
plants just here. This one here, I contemplated putting
some zigzag across it, but I think by leaving it plain, it allows this guy to
stand out a little bit. I'm going to call mine finished. I hope you've enjoyed
embroidering along with me and I'm really looking forward
to seeing your designs, your choices, your colors. The most fun thing
as a teacher is to see what your students can actually do with the information that
you have given them. Don't forget to
upload a photo of your finished project in the project gallery so that
we can all have a look. I'm really looking forward to
seeing all of your designs. [MUSIC]
29. Woven Stitch: [MUSIC] This is woven stitch. As you can see, it comes
out in like a wave. I have already
started by putting down just some stripe stitches, and they are the
ones we're going to weave over the top of. It's a good stitch for
covering large areas. Imagine, perhaps you
would like to make a band of woven on a vase, on a painting, or something like that. If you want to have your
stitches closer together, the best way to achieve that on paper is to use a
thicker thread, so it's something
like an embroidery wove would work quite well. If you have a look
here on this side, I wouldn't try and put
stitches any cross stitch other than that because you
risk tearing the paper. These are just the
straight stitches like we worked on the very
first stitch we tried, and this one is just going
to be up from the bottom, and then you're just
going to wave under and over and under and
over and under. Then you're going to go down the corresponding
hole on the other side. Then you're going to come back, so you go up into the next
hole next to that one. This time, where you went under you go over
creating the wave, and so you go back the
other way like that, and down the hole. It's a good stitch for
covering large areas and with a chunkier thread, because I'm only using
two strands here, it will look much different
to what it does here. It will be less open. Now, over, under, over, under, over, under. You can't really make a
mistake here as long as you check what your last stitch was, and do the opposite one as
you come back the other way. Here, I would just double-check here. Which way did I go? I was under so I go over, under, over, under, over, under. I've ended up with
one extra hole here, so we'll go across and make
hole on the other side. I see, I've gone a
little bit wonky because I eyeballed
it as usually. That one's under, so we go over, under, over, under, over, and under. We'll just put a
sneaky little hole here so that we can
finish off on the back. That's your woven stitch. [MUSIC] If you're
more pedantic than I am, you probably [inaudible]. But I do like organic
looking thing, so it doesn't bother
me [inaudible]. That is woven stitch.
30. French Knot Stitch: [MUSIC] This is a French knot, it's a bit different to a colonial knot or not over
the results are very similar. I just thought I'd
show it to you because you may
have heard of it. It's worked a little
differently when you work on paper because we can't take a stitch really close to go down so we go back
through the same hole, the same as the colonial knot. You come up from the back. This time with the thread
facing towards you, you take two wraps
around the needle, pack into the whole
pull it up tight, and then go down the hole. It gives you a very
small knot and you have to be careful that
you don't pull it through. Of course, I wrap
more than two wraps. We come up, needle toward you, 1,2,3 into the hole, pull it up, and push down. Now you will get the same thing happening with the French
knot as you will with the colonial knot
if you don't keep that tension and pull up this
thread around your needle. That's the French knot and
if I pop over to here, you can actually use it
to make patterns with, so I'll go round and
round and one more. Pull it up. The more
wraps you put on there, it's actually really called a Boolean knot not
a French knot. But working on paper, you have to modify things because it's not the same
as working on fabric. Needle towards you, wrap 1,2,3, put it into the hole, pull it up. Nice and firmly. Keep your finger
on there to keep the tension on it,
sorry your thumb, and then pull the thread
through. Just like that. One, 2, 3. Pull it up, push it down. [NOISE] Keeping your
attention on there, I can't see the
hole, there it is. Last time here and you see then I just wanted to do a colonial not because
that's usually what I do. One, 2,3 into the hole. Keep the tension on it
and there you have it. Now down here, we've got
French knots with stocks. The way this is worked
is you come up, stretch your thread, needle towards you, 1,2, and 3 wraps. Now take your needle up and
sit it in the hole up there. Pull up the tension
on your thread and pocket through that
hall. I might do one more. We'll come up here, needle towards you, 1,2,3 wraps. Slide it up to
where you want to. Put the needle in that hole. Try to keep the tension
on your thread, while you pick up your
card and draw it through. They can be used like
dandelion stalks, not dandelion stalks, like a dandelion flower. You could make out
of that if you put few in a circular shape. But it's just a fun thing. [MUSIC] That is a French knot.
31. Eyelet Stitch: [MUSIC] This is eyelet stitch. It's blanket stitch that has been worked around
a hole in fabric, but we're working
on paper so you can see the holes in my paper. I've used a quarter inch or six millimeter hole punch
to make those holes. Down here, I can't remember
what size that is but it's a weeny little hole punch that I've used to make those
holes down there. In this example, the locking stitch for
blanket stitch has been worked around the
outer part of the circle. In this instance here, it has been worked around the
inner part of the circle. By flipping it one
way or the other, you get a different look. These look really good if
you put them together in little groupings and they
can represent flowers. I've used them in bookmaking. I'm very fond of making
little journals, and I like to create interests where you
look through to another page and you
can see something, but not quite so
it draws you in. Also I've used it
on a framed piece where through the holes, there has been something to create another
dimension of interest. This is very simply done. You punch a hole
in the paper and then your evenly
space some holes around the outside edge, just whatever distance
away you want. It can look different. Whether you work your stitches closer together
or further apart, that will change the
look of it, as well. To work this stitch, we're going to come up in one of the outer holes here
with the knotted thread. Then we're going across
to the next hole. We're holding onto our loop and bringing our
needle up through the punched hole in the paper and sitting
a locking stitch. Don't worry about the speed, we fix it when we
get all the way around through that
hole in the outer ring, through the punched
hole and the loop. You just work around
pulling up your stitches, easing them up to the edge of the paper through that
hole at the outside edge, and up through the punched hole and through the loop
in your thread. Continue to work around. Just pull up on a thread, sit it up nice and close to the edge of the paper
inside the hole through the top hole, through the big hole, through the loop, and around, bringing it round
through that outer hole, through the hole in the middle, and through the
loop of the thread. Pull it up, and then we're
back to the beginning. To fix this little bit, you just took your
thread through it. Take it through the big hole to the back and it brings it
down where it should be. Then on the backside, you just finish off your thread. Take it through one of
those sparks you've created and tie it off. This time, we're
going to reverse it. We have to come up
on the outside here, but we're going to start with
the outside to the bottom, whereas on this one, I started up on the top so that I could get my locking
stitch sitting in here. Now, this time, I want
my locking stitch on the outside side starting
down the bottom of the hole, if that makes any
sense to you at all. You take your needle
through the large hole. We keep hold of your
loop and you come up in the next outer hole. Now, this is just very straightforward
through the big hole, up through the hole
on the outer circle. We just keep working around through that outer hole, through the big hole
holding onto your loop, bring your thread up
through that small hole. Just keep going around until you meet your
thread at the other side, through the big hole, through that last little
hole, through your loop. Bring it up now. Here, we're going to go through the big hole
and we're going to go through that hole where we first started like this, pull it up. Now, we're going to go
back through that hole to secure that loop. You just need to manipulate your stitches a little bit
just to get them to sit. Here we are, we've been
all the way around and we have another eyelet
saw on the back again, just finish off through
one of those sparks. There you have it,
eyelet stitch.
32. Woven Rose Stitch: [MUSIC] This is called the woven rose. It's a lovely way to get some
dimension on your pieces. It's usually worked with wool embroidery thread when
it's worked on fabric. But it works quite well
with embroidery floss. This is just two
strands of floss. It would be quicker to work
if you used a thicker thread. But I have an aversion
to when the thread separates and you can sometimes
get loose looking pieces. I decided I would work this
with two strands to show you. It's worked on a spoke. It's a five spoke because it's woven so you
need an odd number. To start this, you create
your spoke stitch, which is really just
straight stitch worked around into a circle. Just come up in the next one, following the clock around, back to the center. You just keep going around
again and back to the center. Now, if you want to continue with the
thread you're using, which I probably can, you need to come up
through the center again. If you come straight back up your thread spoke
will come undone. What you do is you
wrap it around one of these convenient
little red spokes here on the back
and then you come back up in the same time. Then you just work your
needle around, it's weaving. Under one, over the next one, under one, over the next one, under one, and around
and around you go over, under, over and under. You just keep going like this all the way until
you fill up the spokes. We'll come back at the end and I'll talk to
you about finishing off. Now I haven't quite
made it to the end yet, but I've run out of thread. What I do is just take it down, make a hole in the card, take it down through and
just tie it off underneath. Now I've left that very short. I'll just do a sneaky little
loop through like that. You can get rid of that
tile out of the way, and pick up a threaded
needle ready to go. Now I just need to figure
out if I came down there, which is here and we're
working around this way. I'll come back up in the
same area underneath it and just continue on. Because we're weaving over, this will disappear
in the weave. Either under. You just have to
make sure you're still working the same way. [NOISE] The joys of working on paper when you get
caught on it all the time. Now you can see
that the spokes are a little bit uneven
but it doesn't match up because you just keep filling up until you can't
fill up anymore. The ones that are almost full, you just have to add
extra stitches to those until the others catch up. Just add into. I find it hard to find the
little spokes but I'm going to say that that will be my last
stitch around the outside there and just take it down through a hole where one of the spokes is which
is what I've just done. There you have it. A woven rose. You just finish off on the back. [MUSIC].
33. Spider Web Stitch: This is spider web stitch. It's worked on a
eight pointed spoke. You just create the
spokes the same as we did for the woven rows. What makes this
stitch is each of the spokes gets woven over by the thread as you continue
working around the circle and in-between the thread
stays flat to the paper. You get these raised
area of spokes. It can look a little bit like a starfish and
also like flowers. It's a fans stitch. It's a little bit monotonous
because it's waving. You come up through the center and you go under the first
spoke in front of you. Put your thread to the center, bring it back over and go under that spoke and under
the one in front of you. That's basically all
you're going to be doing repeatedly
all the way around. We'll come back over
the one we've just been under and go under
the next one as well. Just keep working
over under too. Back over and under too. If you come back
over and under too. Back over and under too. Back over and under too. Back over and under too spokes. Just keep working a thread up, drawing it up, back
over and under too. Back over and under too. Stitches often worked with
embroidery wool as well. It gives a chunkier look, but it looks quite nice done a in embroidery
floss as well. Back over and under too. Back over and under too. Back over and under too. I'll come back to at the end
so you can see how it looks. You keep going until it
gets really tight and you can't fit anymore
on your spokes. You go under the last one
and then you come back over it and you just poke
a needle down the whole. But that spoke comes through, take it to the back and tie
it off and you finished. There you have it,
spider web stitch.
34. 3 Beading Stitches: This is running
stitch with beads. It's pretty simple. Come up from the back, like you normally would,
thread on a bead. Go back down. Then you just
position your bead, how you would like it to sit. And come up from
the back and add in a bead position your bead . Pull on your thread, come up from the back, add your bead. And you just keep working
across to the end. When selecting beads to
use with embroidery, you need to look at the size of the eye in the bead and make sure that it will
fit your needle size. Running stitch with beads. For this variation
on a running stitch, we just work two rows of running stitch side-by-side with the stitches sitting
evenly or parallel. Then you come up and
take your thread under. Add a bead. Over add a bead under. It's very simple. So I've just come under. I'm adding a bead. Go back up. Pick up your next bead. I find it easier if I
slide the bead down to the base before I
take the next loop, then go under the
next two downwards. So effectively you're working in a zigzag, and then pick
up your next bead. You just keep working all the
way to the end of the row. That's woven running
stitch with beads. You could do the same
with smaller seed beads. You could come back
the other way, adding a seed bead and a seed
bead to close the loop. Next I'm going to
show you how to do blanket stitch with beading. Adding beads to blanket stitch
is really quite simple. You come up from
the bottom and then you add a bead to your thread. I find it easier to slide
the beads down as I go. Then you take your
locking stitch as you would for working
the blanket stitch. Their very effective. You continue working all the
way to the end of your row. I did want to show you this
funny needle I'm using to stitch with because
I'm putting it on seed beads. Seed beads have a very tiny
hole in them and you'll have trouble getting the eye of the
needle through them, especially with embroidery
thread on the end. These are called big eye
beading needles, and they're from Beadalon. And what's interesting
about these is they're like two
strands of wire that and in the center of them If I get another
needle out, the way I thread these is, I poke a ordinary sewing
needle in the middle of them and you can see
the eye is that size. I leave the needle
in there while I get the thread through
and then I pull the needle out
because they can be hard to thread unless you open
up the eye in the middle. And they are quite flexible. Wire, but they're
perfect for doing this. You just can't use them to
make holes in the paper. You have to pre make your holes. And that's three ways
of incorporating
00:05:42.830 --> 00:05:45.244
beading into simple stitches. For working on paper. I think it has so
many applications and I was really excited
to share it with you. I hope you enjoyed
this little video.
35. Bonus Project Introduction: [MUSIC] The spider web stitch was our last stitch. If you've been following
along with me and creating your practice
pieces on these cards, like this, you now
have 17 of them. I'm going to show you in the next video how
to make them into a little resource
booklet so that you have them to refer
to in the future. If you want to
refresh your memory, you can also, on these cards, make any small notes
that you might want to keep on there just to refresh your memory about
different things that you've learned or
discovered as you've been testing out these
stitches [MUSIC] Go ahead and gather your supplies and we'll make our booklet in the next
video. I'll see you there.
36. Bonus Project Stitch Book: [MUSIC] Have a look
at making a fan book. You've got all your lovely cards with all your embroidery
stitches on them. The first thing we need to do is trim our paper to fit
the back of our card. You may have
different size cards, so you will have to work
at your measurements. But if you did the same as me, I have cut my paper exactly
to the size of my cards. What I want you to do is cut your paper to size to fit yours and stick them onto the
back of your cards. I'm going to use double sided
tape to stick mine down. You're also going to need
two pieces of cardboard. I've kept mine
slightly larger than my stitch cards just to give them a little
bit of protection. My size is six inch
by two and a quarter, which is 15.3 centimeters
by 5.7 centimeters. It'll just protect the cards
a little bit on each side. Go ahead and stick
down your papers to the back of your card and we'll come back and
look at the next step. Now you've glued your papers to the back of your stitch
cards while they've drawing, we can go on and work on the
cover section because we have to work out
where we want to put the buttons on the cardboard. They will be the hinge
part of that book. You can see I've
got a mark here. How I come to that
spot is that I set my button there and
decided that I wanted it to be in about a
quarter of an inch. First of all, I set my
ruler a quarter of an inch. Then I turned my button upside
down because it sits flat. I held my button against the ruler and then
holding it down. I've lifted the ruler up and I can see that it's
five eighths of an inch to where I want
the shank to be sitting. I took the button away, knew that I wanted five
eighths of an inch. Then I looked at the
measurement of the card, which is two and
a quarter inches and halfway between
that is one and eighth. That's where I've put my
mark for my shank button. Then we need to punch
a hole in here. But it will be easier to mark where the
bottom button has to go. By poking a hole through there. I don't have my whole handy, but I do have a
wicked needle here. I'm going to poke
the cards like that. Now I have a mark on both of them where I
want to punch a hole. I just get my trusty hole punch and line it up over where I want the hole to go [NOISE] and punch and do the
same with this one. It's lining it up [NOISE]
and punching a hole in. Hopefully they'll line
up reasonably well. Now we know that the shank
buttons going there. On the back, this button
is going to sit here. Our cards ready. The next thing we have
to do is punch holes to match in our stitch cards. Once they're dry,
we can go ahead and line them up inside here and work out where
we want the holes to go. I'm going to use the
same method to do that with a needle just to
put in the center. Then I'll be able
to line the punch up and just punch the holes. I want the cards
to see inside just a little bit so that
they are protected. But make sure you have
them going the right way. I had the wrong way. I wont to be able to read on the front edge what stitch it is so that when I've found the bulk out it's
simple to find it. Now I've got that sitting
where I think I want it. It's got a little margin
all the way around. Then I'm just going to take my needle and poke
a hole in that one. I've got the first one marked, which means that I will be
able to then line them up, and poke through them easily. Like that. You don't need
to do a big pile of them. You can just do one at a time. You just go through and
do that and then you come back with your paper punch, holding it the right way, and just punch a
hole either the top. Then you just line it up inside your cardboard
outer cover like that. Go ahead and do that. Then we can meet up
for the last bit, which is to attach the buttons that holds
it all together. Now you have all the
holes punched in your cards and in
your two covers. Make sure you have all of
your cards together and the edges with the
writing on facing the right way that you can see them as you
find new book out. Put your covers, make sure you've got them the
way you want them over the outside so that you've got a group like that and just
set it down for a minute. Now, I'm going to
use embroidery. No I'm going to
use dental floss. Floss. So immediately I say
embroidery and I wanted to use four thicknesses
through my needle. [NOISE] Make sure
you have plenty. You may be using dental floss or you might be using a
tough linen thread, or some upholstery
thread or button thread. Dental floss is something
that is used in doll making and it lasts a
long time because it's nylon. I'm just going to
throw it up my needle if I can get both ends in. I'm just going to tie
a knot in the end. I'm picking up my shank button, threading through and then
we're doing the trick, splitting your thread
and hooking it around. You can trim this if you want to but it will sit down in that little hole and it shouldn't be too
much of a problem, but I will just take
a little bit off it. Here we go. That's
secure on there now, it's not going to fall off. Pick up your bundle of papers, thread your needle
through to the back. Sit the button in the hole, turn your book over, bring your flat button to your needle and thread it
through and then back. Now, if you have a
full hole button, you only need to go through two of the
holes on the button. It works better if you go the
opposite on the diagonal. Then we take it through
to the front now just make sure you go through all of your pages right
through to the front. Because I'm working with wax thread it will get
a little tangled so you just have to play
with it a bit to straighten it out so
that it threads through. [NOISE] Excuse the squeakiness. Then you come through
your button shank again and take it
through to the back. Come through your
button on the back, and back through all of
your papers to the front. I think I'll go one more
time I'll finish off on the back through there. Now we have to tighten it
up which will be a bit of a trick because we've got so many threads
through there now. But if you pull on
your threads like I just did you should be
able to tighten it up. If you've got any that
have kicked out just give them a little bit of a shimmy. Just keep working until
you pull it all up nice and firmly like that. When you're happy
with the way it's sitting then you
can tie it off now. I'm inclined to run the thread underneath that
button a couple of times to create a little bit of a buffer so there is less wear on
your thread in there. Then we're just going to cut off the needle bit put
that out of the way, and split your threads you
can find which ones go where, and then take them around the
button and tie off a knot. The entire knot going the other way underneath your
button like that. Then I'll bring it around
this way and I'll tie one more knot like that. Then I'm just pulling
up on the thread and I'll get my little
scissors in as far as I can under there to
cut the thread. [NOISE] One, and then that one. Now we have our
finished stitch book which fans out beautifully. The top cover will
come all the way around so that you can see
exactly what you've got. You can look at
each and everyone, any notes you may have made. Now you know how simple it is to make one you'll be able to make further stitch books as you develop your stitch library. The only thing that
remains now is an option for closing
this end because it is a little bit thicker
on this end and that's because all the stitching is
down there on mine anyway. Probably the simplest
thing I could suggest that would work would be a hair band or an elastic hair tie we call
them here your ponytail. You could use
decorative elastic, you can use ribbon. I'm a big fan of recycling, so I pulled this piece
of raffia out of my little stash of bits and pieces and tested
it out on here. I quite liked it. If I was going to
leave it there, I would put a couple of stitches through the back
just to make sure it doesn't get lost and
it stays there and I can just tie my little book
back up again if I want to. But that's something
you could consider too because now you know
how to stitch on paper. What I have decided on for mine is this little
piece of red ribbon with a bell on it that I
have been saving for some time that came off
a Christmas chocolate, came off a lint
Christmas teddy bear. Because we nearly
to Christmas now, I thought I would put it on here because it looks
very jolly and merry. I think it sets my little
book off very nicely, and so that it doesn't get
lost I am going to put a couple of stitches in the back to hold it to the back cover. Thank you very much
for joining me in this bonus section of our class. I hope you enjoyed
making your stitch book. I hope you will go ahead and make fairly stitch
books in the future. They're great little asset. They fit quite neatly into a small sign pouch if
you're carrying one around. Thank you very much
for joining me and I hope you enjoy your stitch book.
37. Final Thoughts : [MUSIC] Congratulations,
you made it to the end. You learn new skills and created a beautiful
class project. I hope you have loads
of ideas in mind for what you can do next
with your new skills. It's been a really big class. We covered a lot, starting with basic watercolor techniques that you can build on over time. We looked at color and
designs for your projects. You learn 12 embroidery stitches and all my tips for
working on paper. You painted and embroidered a gorgeous design
using your new skills. If you worked through
the bonus videos, you also created a neat
little stitch reference guide which will be useful for
you for years to come. [MUSIC] If you need any
help or have questions, please post on the
discussion board. I'll be checking regularly, and I'll do my best to help. Please remember to share your work in the
project gallery. Include photos of your
process and the final piece. I'm so looking forward to
seeing your creations. If you post to Instagram, please tag me so I can see your work and share it.
My tag is @brunybear. If there is one thing you
take away from this class, I hope that it's how
versatile embroidery is when combined
with other media. It certainly opened new
windows of creativity for me, and I hope it has for you too. If you enjoyed the class, I would be so grateful if
you would leave me a review. It really means a lot
to hear your feedback. To follow me on Skillshare, click the "follow" link. I'm planning lots
of new classes, and if you follow me, you'll be the first to know when the classes are available. Thank you again for joining
me in this art adventure, and I hope to see you soon. [MUSIC]
 Michelle Watson, Brunybear Art - Mixed Media & Textile