Transcripts
1. Introduction: Hello and welcome to this
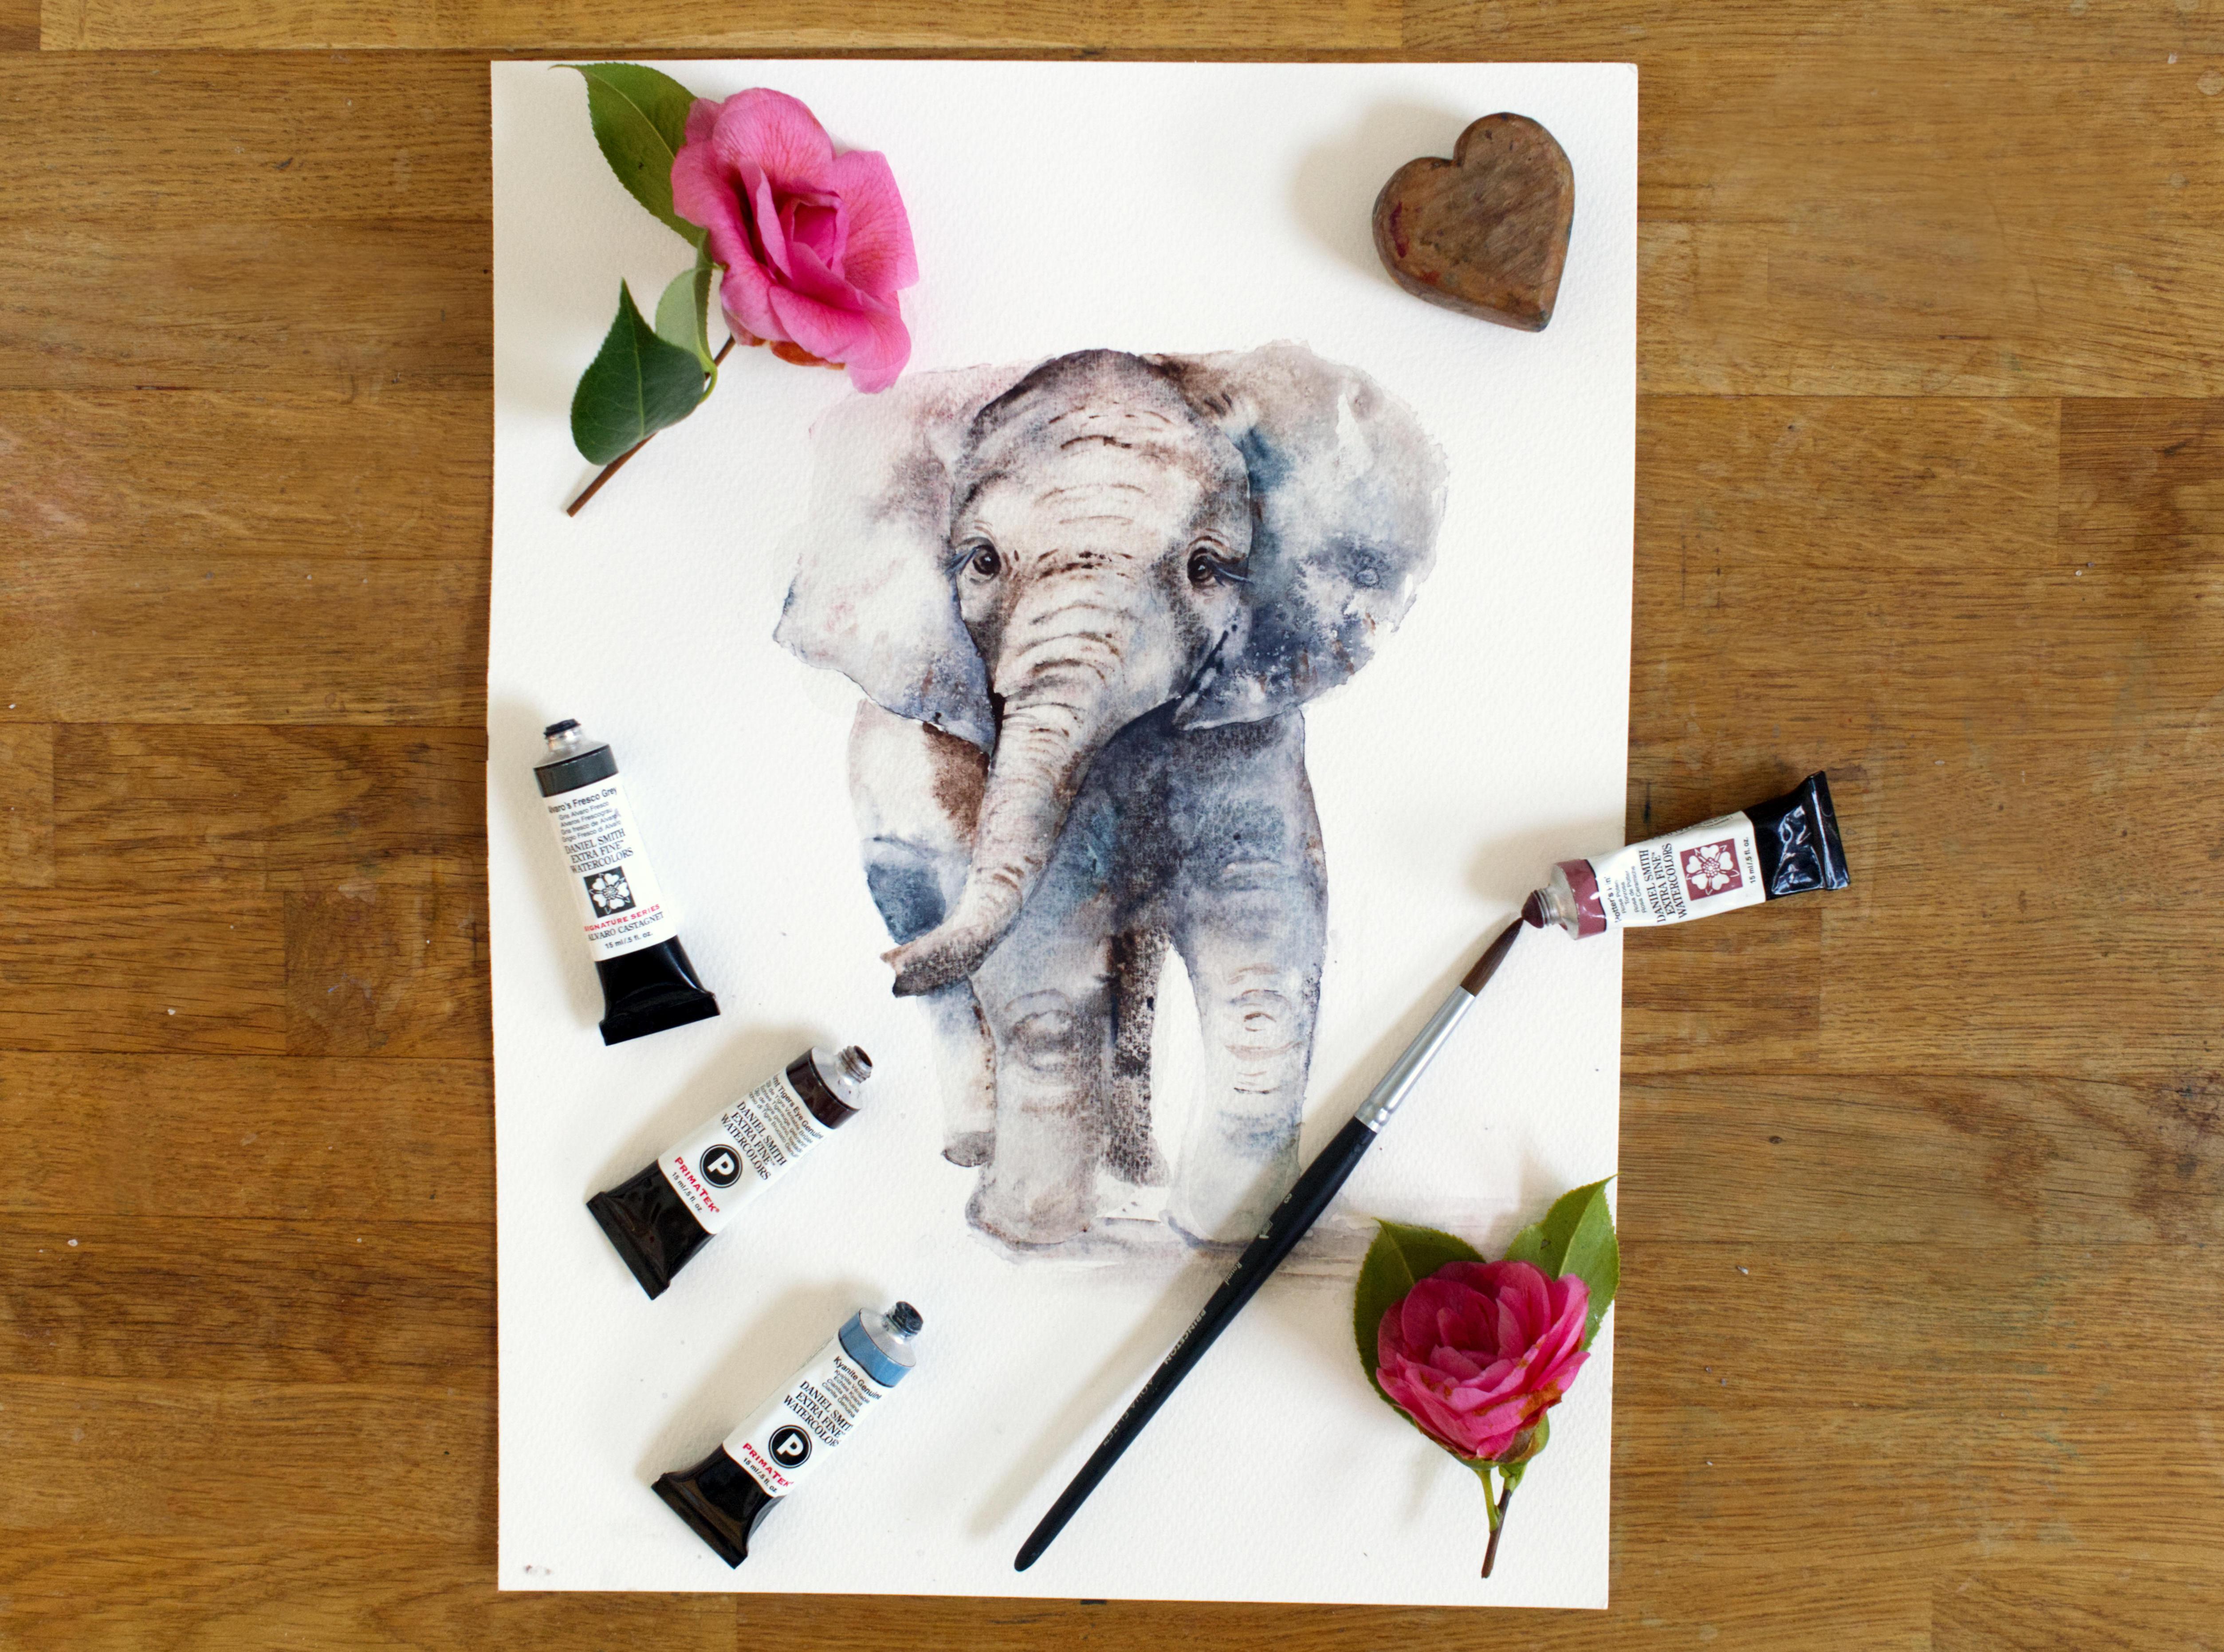
intermediate watercolor class. Today we're going to be
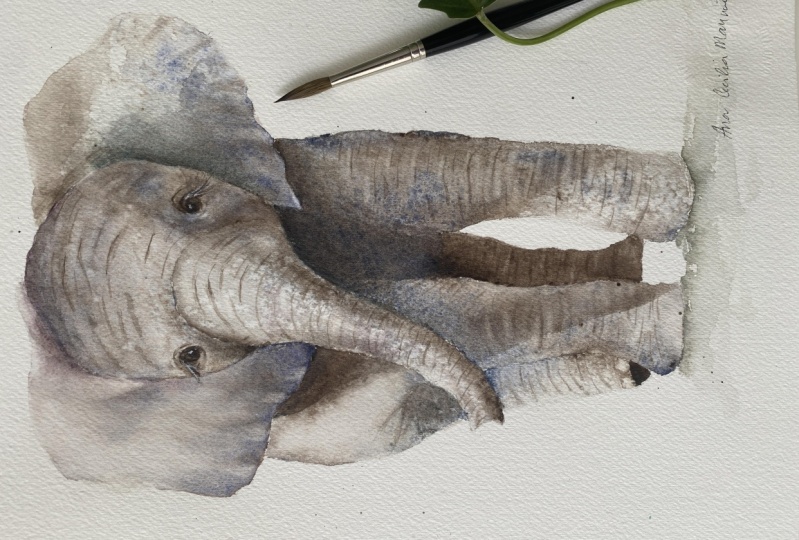
painting these cute elephant. Now you might be looking
at her and thinking, gosh, she looks complicated. But trust me, when I say, she's a lot easier than
you would imagine. And I know you're gonna
love curating here. I'm Jane Davis. I live, paint, teach, and walk my lovely spaniels in the beautiful South Downs
National Park, England. Over the last 15 years, I've taught myself the
free flow technique that you see today. Not having been to art school, finding my own way has been
fun and sometimes daunting, but has allowed me to
develop my own style. This has led me to teaching others either on a
one-to-one basis or as part of a group in a wonderful studio in the
heart of the South Downs. Also run a successful
commission-based business, painting pet portraits and wildlife art in my
own home studio. In all my classes, you will follow
along in real-time. What I can guide you
to keeping your work loose and fresh
without over fussing, or have over 20 classes
available on Skillshare. Now, if you're
just starting out, my three beginner
classes will guide you. Then you'll find over
20 masterclasses covering a wide range
of beautiful subjects. In each one, share the techniques that I use in
my own professional work. We have a lot of fun together and you'll gain the
understanding and confidence to
incorporate everything you learned into your own work. Plus our share a few of
my tips and tricks along the way to as ever, I've provided you with a
lovely reference photo of her along with a
downloadable template for you to print out. The template gives you a stress free drawing so you can
just enjoy painting. I'll be showing you two
easy techniques to keeping your elephant lovely and loose with all that
wonderful light. I'll be guiding you through secreting areas off and adding two layers where needed to create that
depth and interest. Of course, I'll share many
of my professional tips, tricks and usings as we work our way through
this class together. You're gonna love this. If you'd like to learn
more about me, my work, please pop over to my website at Jane Davis
watercolors.com.uk. This can be found
on my profile page, along with links to my
Instagram and Facebook pages. I'm very active on my
social media pages. Or I love sharing my art, especially on stories
with many ideas, works in progress and
tells us day-to-day life. I really hope you will share all your paintings on the
projects resources pages. As I love seeing your most PTs. And don't forget,
I'm here to help if you get stuck or
have any questions. I want you to experience
that buzz of painting in his liberating wet on
wet, loose style. So come and join me.
2. Materials: So welcome along to this
little elephant class. I'm not entirely sure what's
taken me so long to do this object because
it's so satisfying. So I'm going to run through
all the materials I'm using today and I'm going to start
as normal with my paints, which are all all
Daniel Smith paint. Some little word
on your selection. If I'm honest, it doesn't
really matter too much. Find a paint or
colors that you like. I know, I always say this
if you follow me along, but it really is true. If you haven't got these
colors, please don't worry. Um, some granulating paint
that would be quite fun because this elephant
relies on a lot of texture. But the salt can also
do that for you, which mine hasn't worked
out quite so well. But you'll find out how as
we go along in the class, why why that didn't work? So yes, please don't worry
that say the elephant, this is the colors
are actually quite different to the
reference photo. So you can be more realistic
or you can go wacky, it doesn't matter,
it really doesn't. So starting from the
top with my selection, I've got kyanite,
genuine potters, pink. Just a word actually. I do have a slightly warmer side and
a slightly cooler side. So that might might want to say it might influence
your choice of color. And I've got Olive
Rose, fresco, gray. I hope I'm not butchering
the pronunciation too badly. Butter. That's that one. Got birds
die or burnt tigers. I a genuine, one of my
all-time favorites. I've got bloodstain genuine, a nice color actually in one, I've forgotten how nice it is. And I've got just a tiny
little bit of white gouache, which is just for the eyes and a little bit of
further eyelashes. Now the paper I'm using today is blocking vids and
this is 200 pound, but I haven't stretched it, as you can probably see, it's gotten a little bit of a warp. But it's quite fun just to pick up a piece of paper and paint to avoid having to worry about
stretching it to be only two. Again, this elephant
doesn't matter too much. You can see how wobbly it is. It doesn't matter too much
because any watermarks are paddling will give you some
interesting marks and say, It's all about the texture
on this, this class. So that's paper. Obviously a pot of water. I've
got a little bit of salt. Some this has been crushed to slightly smaller pieces and
slightly larger pieces. I've got just this is my
little trustee heart. It's pretty bad
in each height is anything you have
That's an inch higher. You can pop onto your piece of paper or board that just
gives you a slight tilt. It's not helpful
but not necessary, not, not such a
necessity in this class. Rubber and I've even done even broken out a fairly new for me pizza kitchen towel. And I got a pen tool, and I've got three brushes. I've got a number, a
number two, little round. I've got my eradicated brush, which is lovely for
taking light out, especially sort of creases.
The greedy for that. And I've got a number
or number eight round. Again, doesn't matter if you haven't got exactly the same. Almost a little a
brush could have been helpful on the eyes. So don't worry too much if you haven't got
exactly the same as me, just brushes you're
familiar with and comfortable using those down. A hairdryer is handy
if you're in a store, you're wanting to get on. So it helps. Drying. There's lots of little areas
we section off and dry, so it's quite helpful a
hairdryer but just be won't let it almost dry
before you hair joy. I think that's it. Oh, and before you
go and painter, just if you're new to this or these materials can be
found in the projects and resources pages along with a downloadable template so you can cut that out,
draw around it. You've got your elephant
to, to enjoy painting.
3. Sketching Out: I've already drawn out
this lovely little lady. And I'm gonna give
you just a few tips on the best way to
sketch her out. Now, there is the
downloadable template, which is obviously very handy because you can
just draw around her. And then you have the
right proportions. Everything's ready. You don't have to worry too much about your drawing if
you're not confident. But when you do, you'll end up with
rather blunt edges. So when you take
this template away, just go around the edges,
crisp anything up. Obviously you need to
put the detail inside. You just want a picture while drawing you're pleased
with and you like, because it's always a
confidence boost if you start off on the
right, right footing. This line here is
quite an important one because we section the trunk
from the main head off. So that's worth getting
in the inside airline. The eyes. This little bit here. Say just, just make sure
you've got a nice sketch. Now in the reference photo, her trunk actually stayed within the body if you
if you get what I mean, But I've actually put it
just a little bit out. That makes, hopefully makes
the painting gives us, gives it a little
bit more sent to over losing their
trunk in the body. And the other thing is to try
and keep your pencil marks as light as you can because this is quite
a soft painting in it. It really does rely on some these lovely
Lost and Found AGC. So you don't want in your final pieces still to be able to see
the pencil line. Now I've done mine quite strong. So you can just see you
can see her clearly. But on yours I would
go as light as you possibly can, just
so you can see it. But you don't use the lines
aren't aren't too strong. I don't think there's any other, other little things that are helpful and sketching it out. So, um, let's go and painter.
4. Ears: Okay, so it's onto the fun bit. Let's pick up our big
brush, wake it up. Then to just take
a little bit of excess water off and
we're going to wet. We're going to start
on the left hand ear or less than whites aren't good. But the left hand
here, and we're going to wet it all down. So make sure you stay within those nice lines if
you can see them. Hopefully you've got your lines. Lovely enlight. Just go carefully round. No hurry at this point. But just say to stay within your carefully
drawn out lines. We want this nice and wet. Now if you bob your
head up and down, you'll be able to see that
it's nice and soaked. You don't want it
actually sitting in puddles but all matched. If you get what I
mean, if it's too dry, your paint won't move in here, just just stick where it is. Dr. My head up and down, I can see that that's lovely and wet. And we're going to pick
up I've got the gray. I'm just going to call them by their very generic
colors rather than getting too hung up on
the exact names of them. I hope that makes sense. So pick up a gray, blue. I'm going to have a
little bit of pink. Pink is exploding out. The trouble, some of the
troubles with using a tube. So you can sometimes squish the edges and that sometimes
sucks it back in again. Or we're probably just use this. But if this does happen, sometimes I will pop it into a little plate or
a little scrap of paper and this use it
from scrap of paper. So you don't want
to waste any of these lovely paint, right? We're just going to be placing
paint right on that edge, that just where the
head meets the ear. And we're just going
to allow is really important to allow
that paint to move. And if it's not wet enough, you'll find that it's just
gets a bit sticky and most will stay where it is. Just picked up. The tigers on which the brown, I'm going to put a little bit
there because I know that the tigers i is a lovely
granulating color. And it's all about
texturing this, this painting, a
little bit of blue. See, I've got a touch
too much water in there. What I can do just by doing a bit of kitchen roll
and just touch the edge. I don't know if you can
see that on the camera, but it's just being sucked up. Back down again. Because I'm working on
unstretched piece of paper. It's also going to have
to buckle and some water will run into, into some parts. But I think with this one, as part of the fun, I think we are relying
on just texture. Be quite bold. Just have a little table. Should all run over in time. A little bit tigers, I said we can encourage
that to move. And for that, we don't
really need to do too much more because we really
want to keep this so loose and just fishy
the left-hand here. We want that to be just so you can kind of
get a hint of it. Pop a little bit of salt down. Tigers, I hope a better they're clean your brush
and clean your brush in between your different colors because it can get contaminated. Don't want to put blue there. Let's put a little tiny, tiny bit of pink up there
just so you can see the edge. So once we've got
those lines out, you can just get a gauge of
some color. You know what? I think I'm almost
there on that one. Just gonna put a little
bit of the gray, want a bit heaviness. And I've actually, I've got
the blood stone genuine. Let's let's put
some of these down. Almost go with a 55 tube hand and gets a little
bit confusing when you start going up to five, just going to put a bit of
bloodstain genuine in there because I can okay. I'm going to leave that. Now. We will need to keep an eye because I wanted to put
some salt in here and that, that really does again
add to this painting. So it's quite important we catch that just at
the right time. If I duck my head, I can
see it's almost there. It needs to be just where
it's starting to go dry. You'll see the sheen. Is it just practice, you'll get used to the stages and be able
to eyeball it and say, Oh yes, that's just about right. It worth practicing on little scraps of paper
if you're unsure, haven't used salt a lot. Because then it will give you just sort of muscle
memory and knowing and being able to look
at it and go, Yeah. My T in there. Okay. So I'm just saying I'm going to just a little bit wet still. So I'm going to have to do
a bit multitasking because we're going to move on
to the right handy. And I want this to be slightly warmer this side and
slightly cooler this side. It's not very obvious, but I'm going to use
the gray, the blue, probably just the
blood zone genuine, which has its own say I was going to use
just names of colors, was no bits, bit of a
unique one, that one. So I'm going to put
I'm actually going to put a nice amount of paint. I haven't
wet the ear down. I'm just placing to paint
along a line where we, where we started the dotted adding color to this
left-hand here, we're just going to be putting neat paint quite a lot because this is
going to have to travel all the way over to
the edge of that ear. So don't be, if you're, if you tend to be
admittedly more of a timid, delicate painting and just
be a little bit bolder. And vice versa. If you feel quite bold
with your colors, than just, maybe just
be a little cautious, little bit too much. So we start here, isn't it? Just a little bit like
Goldilocks thing? I'm just going to pick
up a little bit too. I guess I put that
on top because I know this will give me
a nice bit of texture. Okay, I've got a nice
thick line and we can always add a little
bit more paint if, if I've not been quite bold enough for the amount of paint I've put down
on this strip. We can always add a
little bit more later. So don't worry too much. Put those down again
before we start. Okay. So clean your brush. Just just take a little
bit of excess moisture from your kitchen roll kinda
layer brush on its side. And we're going to
touch this line. We're going to do a
bit of scrubbing. So you want to be you could almost do this with
your eyes closed, but obviously you're not going to know where the
end of the year is, but try not to think about it. It just doing a little bit of like you're maybe trying to
get something off the page, a little bit of scrubbing,
little bit to the side. The minute it looks
something like that, I would say I would almost
be inclined to leave it. Just make sure you've got
a little bit to the edges. Just so again, once those
pencil marks are rubbed out, you can see a
little bit of edge. I'm going to leave that. I'm going to see how it goes. Hopefully some water would
run back in this graze. Great for doing
sort of watermarks. Obviously ideal if you
don't like your watermarks, but for this elephant
is brilliant. Okay, I've just
talked to my head up. I'm looking for this to be dry. It's getting there. Actually, this little
area here is almost dry. I might pop a little bit of salt in there and I'm going to keep an eye on how that
sort of performance. But even now when you
step away from your ears, you can start to see that
appearing currently and it's just having the confidence alleviates the biggest thing. I'm going to put a little bit, and you can see that and
go a little bit there because I can see
that starting to dry. I really want to
put some down here, but at the moment
is a big puddle. So I don't want to
put any soap there. This is actually
starting to dry. Again, my ear, this has got all sorts of stages of dryness, wetness, whichever way round. This is quite wet.
This is quite dry. So I'm going to
splatter the salt where I can see it
starting to go off. I've got a bit of
a mixture in here of some bigger pieces and some finer pieces is giving me again a
bit more randomness. Okay? So it's just gonna
be a case really of watching your own piece
and pop in the salt down where you'd like you may
not want to put too much. So it's again, a
little bit up to you. I'm going to just carry
on watching that and placing my salt and allowing that to completely those two a two years to completely
dry before we carry on.
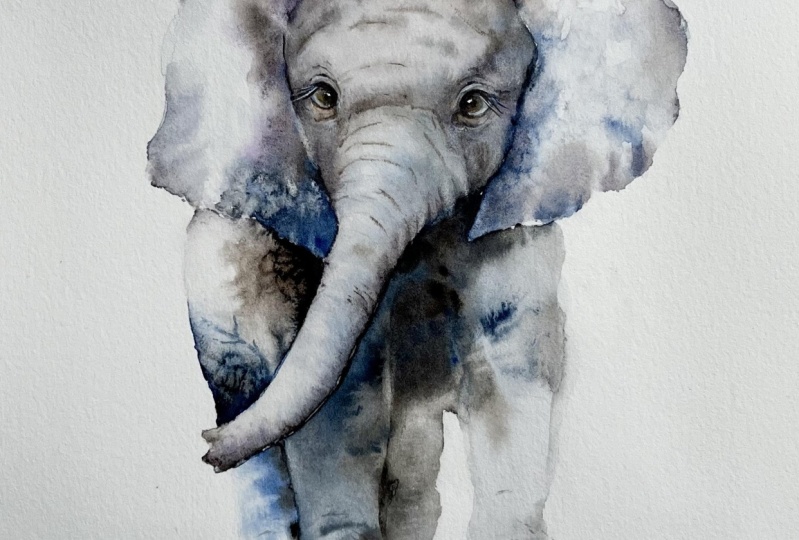
5. Head First Layer: I'm pleased with
how this has dried. Salt could have worked
a bit better here, but I'm always too
eager when I'm doing these classes to
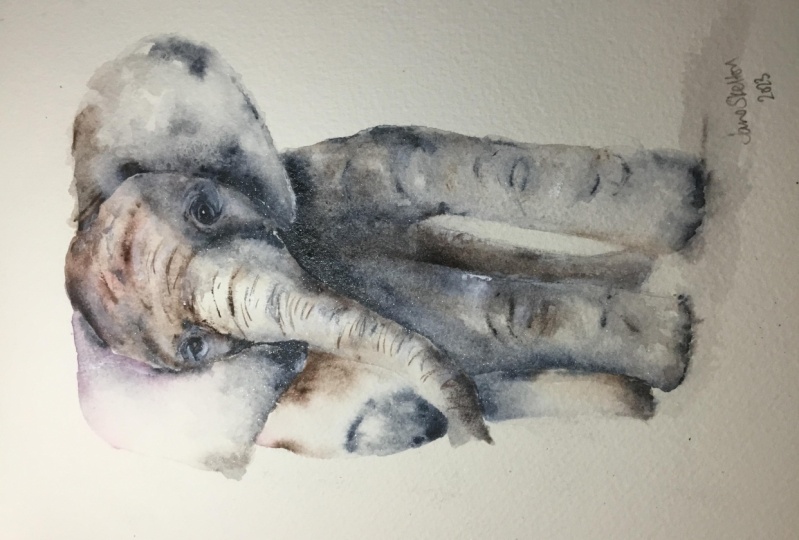
put that salt down. But let me show you. So on several practice
pieces you can see some of the salts worked in different places if
I'm honest, better. So now I'm pleased
with it. Right? Okay, so we're going
to wet the main head. So this line here
that we spoke about, so we're going to
wet with inside it. And then what I will do, which was helpful and other
classes I'm going to put just for you to have to
see where I've wet down, I'm going to use
the hint of color. You can see we're
going to wet this, wrap around the eyes and
missing the eyes out. So if you look at
your reference photo, There's obviously the
eyeball and she has quite a nice chunk of
make-up around it. So i'm I'm including that
chunk of makeup as the I hope that makes sense.
Don't worry too much. If you don't quite know what I, I'm going on about, just go around the main
part of the eye. What you perceive
as the main part. Say this pink is just for you
to see what I've went down. So you should have a nice, clean piece of paper. It's nice and wet. Okay. Again, make sure
it's nice and wet. Not pedaling, but almost that will allow all
that paint to to move. Once it's nice and wet. I'm going to keep hold
of the pink actually. The little bit of tigers I
have the bloodstain genuine. We're going to start at the top. But a little bit as I've
already got a bit of pink ball, a little bit of pink up there. Let's have a little
bit of tigers. I am again, I'm just placing I'm not doing
any brushstrokes, I'm just tapping that coloring then allowing think
that's the biggest thing. Just allow it to
move. Soon as you. What we want to do is keep
this quite nice and light. So the minute you think
wolf that looks night, then, um, move on. A little bit more
brown in the tigers i with bloodstain genuine. Let's have a little
bit gray actually. Let's put some of these down. Too many to Bastogne genuine
and a little bit of a gray. And I'm going to tap,
you can see long hair. She's got a very obvious
sort of darker areas. We want to sort of get
that, emphasize that. Use a bit more. Let's turn up there was a
bit heavy with the grader, but again, you can easily
suck these colors up. By which I mean, you
can clean your brush. Pot the brush tip down on the color that you think may
have been a bit stronger, you'll find it whizzes
backup the brush. Just squint your eyes. You can see that quite
clearly when you squint on that reference photo. Now, all we're doing, we're
just popping that down and the rest will
gently merging. So don't don't get too worried
that you've left a white, white is gap there. We also do another
layer over here. So what isn't quite right on this layer can be
rectified on the second. So I'm going to
put the gray down. I don't want to put to my
tooth cooler colors over here. I'm going to pick up my tigers. I, I can see I've got a little bit of a puddle
of water before I start. Just going to suck that up. Okay. The tigers, I a
little bit the same, just going to tap and
allow one of these where that's obviously going up
against that dry line that can almost be or will be one of the lines along her trunk. So if you've got a
quieter you're worried, you've got a quite
a strong line here. Don't worry because that's all part of the plan as they say. Jessica and to have
pick up pink again, bit of pink, bit at the
target dose, the brown. I'm just going to use
back-and-forth just very gently that it's
almost a bit too much. So I'm just going
to go back over it portion of that color out. I just wanted to keep this
band quite nice and light really. This band here. I'm going to start building up. Just above the eye. You can see there's a line
there which we sketched in. So let's just put a
little bit of color there to start strengthening that. This firstly, just about putting some of that
contrast or color down. Squint your eyes, see
what your eye can go. Might put a little
bit too much there, but it's gonna be okay. All right. I just want to if you gain if you squint your eyes up
just a little bit of color. I've got a little bit of
blood stain genuine in here, a little bit of
strength down there. And actually I
probably don't want to do too much more to say, but in one more layer over this. So if you do too much
on the first layer, the risky is you put in, you put on the second layer, you then add more and you
lose that sort of freshness. Ever so easy to lose. So I'm going to leave it there, but I actually going to
put a little bit of salt on there because I want to I want to try and move
this a little bit or to just give a little
bit more interests, it's gone a little
bit monotone for me. I'm a little bit of salt, I think will help. Just going to pop that down in the middle of her forehead. See how we go from there. Okay. That really needs to dry because these little layers we were doing the the main
legs and the chest. But the risk is when
we start wetting this area down and moving things around this little
corner here can run in. So we need this layer to
dry before we move on.
6. Legs: Okay, so we're going to do the main body I
suppose, and the legs. I'm leaving the Salton. We can rub that out. When we come to do the, the
next second layer over that, it just gives it a
little bit more time to dry because it Yeah, When you think it's dried, it quite often isn't quite
so well worth leaving the salt on for as long as
you possibly can. Okay. Bigger brush. And we're going to
pick up the gray, blue and the brown. We're going to
start with a gray. We're going to do a stripe. So not dissimilar to how we
did the right-hand here. Think about religion rights. And we're going to put a nice
big amount of paint down. Wake up your brush if it's
been sat for a little bit, why you've let things dry? Again, if you're
using air tubes, make sure that's
nice and woken up. We're going to put a nice, big amount of paint. You don't have to be
very accurate where you're putting this line. Because all going to go it's
all going to be wet down. They're all going
to move around. You're just doing a little
mini palette, I suppose. Strong Hooker, a bit of
the blue down there. Touch too much, maybe. See, I've got a bit of a lump. Pick that up, might be
a little bit too much. Back. The brush. A little bit of tigers I gain, tigers died quite soft. You can be a little bit
bolder with the targets. I were gonna go right down, right down into that back leg. A couple a little bit of that. Blue they're a
little bit in there. We'll talk as I. Okay. You want to
be fairly quick at this because you don't
want these histories for your painting somewhere. Maybe it's a little bit hotter. You, so you don't
want these to dry? Um, well, I just put these down. No particular order. Can you go a nice, sweet. And we're going to start
on the right-hand side. So we're going to touch
that right-hand side. Again. We're going to
wet all down the leg. If you miss a little bits out, don't worry too much. Yet. Again, it gives you a
little bit of texture. Try to stay within
the lines and I've just seen I haven't already. And again, down to the back leg. Be mindful, that back leg
obviously stops a little bit, a little bit shorter
than the front one. And this is where he just
give you a little bit, go around, try and get that
to just the move over, right? Or you might need to
pick up the little brush to do that and get that right into the creases
that side, the ear. It's quite dark up there isn't. And again, make sure it goes right up against
that trunk as well. If you feel you haven't
gotten enough paint, you can always add a little
bit more at this stage. But it's a case of just leaving it to do
its own thing really. We can give it if you feel
you a little bit of tilt, that's why we've got fat
and give it a bit of a tilt to see if that can
make something happen. It's just having the
courage really to leave it. Um, yeah, let's see
how that goes again. We need to be mindful. It
doesn't completely dry this. So then we start again,
same sort of thing. And start on the left-hand leg. Out. Good old Russell, round. Again. Be nice and loose. Now my colors got a
little bit washed out, so it's not quite as, as bold as I want it to be. So I can just pick,
pick up my colors game. I can put a little bit of a
bit of bloodstain genuine. And again, just tap it along that main line where we where
you put the stripe down. Just tap that. Be mindful, that back leg
is going to be darker. And don't worry if this
runs in to the front leg, that's fine because in
the finishing off bits we just put, just take a little
bit of color out, so it just defines it. Now it's very easy as
ever to overwork this. And you'll find the
colors, keep on spreading. So where you think you
haven't got enough color, you'll find all sorts of merges. And you probably have more
than you more down anything. I've just put a little
bit of color there, a little bit bloodstain
January for the knee. Just going to put a
little bit of gray, nice and coolest side right
up against that edge. And just tap. Maybe
you don't need it. I say do have to be little bit mindful of looking
at your own piece. And if you're sitting to stand up for a second
and have a look, It's nice to get away
from your piece of work. Maybe my fault, I've got
this on a slight tilt, so I've started to get some
bubbles of water down here. So you can again, you can
either do it with the brush, which doesn't take
up as much water, will take some up. We can use rather soggy
Pizza Kitchen all, but you can then
suck up a little bit water this way as well. Then we can take the
little support away. And so some of that water will run back up again and again. We'll leave, give you some
little bit of interest. Um, I'm just sort of
standing up above it, but sticking okay, actually, I might put I'm gonna put a little bit
of bloodstain, genuine. Just really want to skip
this lovely dark and right up against
that ear as well. The right-hand ear
just underneath. Say as long as this is all wet, you can keep adding
little bits of color. But the minute you start a
little bit start to go dry. You really want to
put your brush down? I really, again, I want to
put some salt in here because this just gives so much
texture, the salt. And I need to get that
at the right stage. And try not to be too eager like I have done in other parts here. So I'm just going to hang on a minute and let
this get to that. That's just that right
stage and put salt down. And hopefully that
will work a bit better than some of the
other parts have done. Well, I've been a bit eager
to put it down and show you. Just rounding up the
feet a little bit, just have a little
look, see if you've got anything that looks a
little bit too ragged. You can just neaten up but
don't get too careful. Actually, this little back
leg can run into the font. Doesn't matter either. Actually does touch, doesn't it? So I haven't actually
allowed that to running. Yeah, I know. If I continue doing
this, I will ruin it. So I'm going to put my brush down and I'm just going to watch that and put the salt down
when I feel my pieces ready.
7. Upper Body: Now I'm going to do a
little bit of cheating here because I haven't quite
allowed this to dry, which is absolutely fine. I'm just going to do this
little piece because I'm not, I've got no risk of any of this running into digital
part because of the trunk. Hope that makes
sense. But what I'm always cautious of and
what I would probably do is allow that to completely
dry before I do this because there's a risk of putting you're putting
your hand in it, but I am a little
limited to light. Today we're on painting. I'm doing this at midwinter, so light is a little bit
limited at the moment. Okay, so what we're going to do, we're going to do this
little back of the body. So we're actually going
to just completely wet this area down. So a little like the
ear, the left hand here, we're going to wet right
up against the trunk. A little caffeine handy when I'm doing these classes because I've got cameras hanging poles to stop my head from
appearing. Little candy. There's some parts are
apologize for that. Okay. Again, you want that in
a really nice and wet. We're going to pick up my tigers life, a little
bit of burnt tigers. And we're going to
pop that right in that crease and
allow try your very best to just allow it to move. So I'm just trying to
be so careful not to put my hand in the
in the wet paint. I go I know. I'm like so you can see on your reference
photo they're very obvious. Dark patch we're trying to put into dry is a really
lovely thing. Keep this as light as you can. We'll put a tiny bit, we'll do that now while
I'm talking about it. A little bit of pink,
just a tiny hint of pink. They're not very thinky. Let's try again. Just so once those pencil
marks have been rubbed out, you can see that
where the body end. But I don't want to do too much. I want that to really
stay love in light. And then I'm going
to pick up the gray, a little bit of the
blue, again, tap that. You see the dark area which is a little bit underneath
the back leg, isn't it? It's where it's
creased. And again, I'm just going to allow that. We can as it moves. And if it moves a
little bit too much, like that's doing,
absolutely no problem. Just dry your brush. We will just guide
it back down again. Say Isn't that just don't think he's not
to get too panicky. I think it's very easy to go. Oh my goodness, it's running. I'm going to lose control. Just be very gentle.
Everything's just done. Very corny word, isn't it? But try to be very
mindful of it. Just be, be present. Now there's a lovely
crease that runs. Let's do that in the gray. We don't want to do
bloodstain genuine. You can see it's a
nice little crease. It runs over here. I'm actually going to
just put that line there. Over there. Should play because
that's all damped. That's you'd just blend.
It looks a little harsh. Any point you can just again, just gently tinker some of
that out and soften it. About whiteness drawing nicely. Again, you can add
salt or not salt. I have and haven't in various malpractice
pieces and some of this isn't working terribly
well because I've been, been, been eager to put it down to the class filmed
in the light. I'm going to put a little
bit here and see if we can get this to work
like my other pieces. Mighty, Whoa, I'm going
to put that down. Again. This all needs to dry. I can't start the dealer back leg because
again, it all touches. This is still damp, so we
just need to allow it to dry. Basically, I don't need to
ramble on anymore, really. Just allow it to dry.
8. Back Leg: Okay, now I've cheated a little bit and put
a hairdryer over it, which is not really helped. My soapbox butter. Hopefully you can be
a bit more patient. So we're going to do
the little back leg. And again, we're going to do exactly the same
as this law part. We're going to just wet it down. Hopefully you can see your
lines. It's tricky, isn't it? If you do the lines
very soft there. So I disappear, he
can't quite see. We'd be worth it. Keeping those nice petrol marks, nice and soft light. We want to again pick up
the blue and the gray. We want to really
tally the two colors. So the color that's
under this on top here, and it just needs to give a
little bit of continuity. Again, don't do batch
literally just pop and leave little bit of tigers I interests
right on the edge, just allow it to vary. It's not a very large
area and we want to try and preserve the light. I've just picked up my
little brush trying to neaten up our line. I'm just going to pop a
little bit of tigers. I end the buds. Don't put that underneath. You. See, there he's she's walking and you can see she's got a
little pad there. Make sure that's nice and round. Again. That's moving a little bit. But what we can do is just to gently encourage it back down. Sometimes you just
have to watch it for a minute and monitor it. Rather than actually fiddling. Just watch and see how
it, how it performs. And you can always sort of
step in, gently tinker. Okay, that's, that's dried. Dried well, again, it really does need to
that a little bit. It needs to dry again
because if we start other parts I'm a little bit
we need to do the trunk. The trunk is connected. So if we wet, the trunk is going to run
into that back leg. So either just give it
just give a little minute. You can then hairdryer
if you want to quicken the process up, but just just allow it to dry a little bit before you
do the hairdryers, it can just blow any sort of
nice patterning you've got.
9. Trunk: Okay. She's coming on
nicely, isn't she? So we're going to do the trunk. Just be mindful of your water. If it gets a little bit MCI, it will slightly tailored
to you, your paper, so keep it nice and clean. So again, we're going
to wet the whole trunk. So again, little like we do. Make sure your brush
is nice and clean. I'm sure I must have done that on purpose just so you
can see where our wet down. Okay. Just make that nice
and wet all the way down. Again, make sure you're
nice and neat at the bottom. I'm Vout. Probably your head. You see where it's
where it's sum. We need to put the
water, make sure you've got it all
nice and covered. Ideally, you don't
want any dry patches is here but go right
up against that. The head color just so it would it may gently blend and if it doesn't,
it doesn't matter. They say we will do another
layer over the trunk and head to soften it all. So okay, so we're gonna
put a little bit mindful. We are trying to keep this a
little bit cooler or warmer. On the left-hand side, a little bit cooler
on the right. So I'm just going to, as this has gone a little bit heavier and I've lost
a little bit of light. I'm going to be a bit more
careful here to try to retain some light. Makes sense. But I'm sure you've probably
done a a nicer job than me. Tap, Escape all just
tapping, nice and loose. That's probably enough. Up the brown, I've got tigers. I actually going to have a little bit in a
bloodstain, genuine. It's a lovely color. This is one of my very first
Daniel Smith paint. I loved it that often
use it these days, but I was rummaging around
trying to find colors to paint her and she
start seeing perfect. The bottom. Little bit wet sitting. If he's paddling and you
put paint on the puddle, tend to just sort of sit and float on top and
doesn't, won't move. So sometimes if your
paint isn't moving, it can be a case you've
got the paper too wet. Normally other way round. But occasionally. I just want to add a
little bit of blue. I'm entirely sure why sometimes you have to
trust your instincts. I think this is a little bit warmer than some of my practice pieces on the head. So I just want to incorporate
little bit of blue here just to just
to cool it off. And again, this side as
well, right-hand side. Because we're going to do
another layer here in a minute. I don't want to do too much
because I don't again, I don't want to lose that
light if you pop your paints down and you brush and have
a little squint, look away. You'll probably see that's
an a, there's enough, they're almost
isn't there without being having to
put to much more. So I'm going to leave that say because
I'm aware I'm good. We're going to put
another layer here. We can then add some
of those nice stripes, but not, not on this layer. So just again, just
allow it to dry.
10. Eyes: Right, Let's put some
icing because that always pause the
painting together. So what we're going to do when you aren't
going to pick up, I'm going to use the
bloodstream genuine and we're going to do you could look
at your reference photo. What I was trying
to explain when we were I'm wetting the
first layer down. There's a there's a ring and then there's
obviously the eyeball. So what we're going to
do, we're going to do the payload, including
the eyeball. All we're going to do
literally is too wet and wet. The other one. And we're just putting I'm using a little bit
of bloodstain genuine. You could almost paint
this in as long as it's not too dark. Just want to have
a little bit of, feels a little bit cool. I'm going to pop
up a little bit of tigers IN them as well. So all you got is a pale wash, which includes the darker I'm marking and then we
will paint in the eyeball. Hope that makes
sense. Let's just use the tiger's
eyes for this one. Because I'd be slightly warmer. You know what we've
got to do now? We've just got to let it dry. The trouble of
watercolor, isn't it? It would actually be really fun to paint two of these together side-by-side because
the little areas you're allowing to dry, you could then carry
on with the other one. With that one, it will stop you over
fiddling the one-piece. And two is quite fun. You have two pieces
almost done in the same time as it takes
two to one, I think. Yeah. Just say let that dry. Now again. Pick up. I'm gonna use the
bloodstain genuine, obviously my little
brush and we're going to paint in the eye ball. Literally just a painting. Ever took a good look at
that reference photo. Scroll a little bit bigger. See what you're looking at. And what we're
actually going to do. Well that's still
a little bit damp. There's we're going to almost
put some makeup on her. We're going to go
carefully an outline. It's gonna look a little bit. I'm stuck on at the moment, but it will soften. We're going to do another line because she's got a lot of
creases which make up that. Hawaii that gives us the tank, the character with an elephant. All these wrinkles. So you get something
looking like that. And then I could do the
same the other side. You could rub salt off. Actually, I'm putting my
hand in lots of salt here. The eyeball. Then we're
gonna go very carefully. Say I'm working a little bit along the way away from this. So it's a bit tricky for
me to be very precise, but hopefully you can be sitting or you can get
a little bit closer, you can nice and accurate. And again, just another sort of swing round of a more creases. Yep. I think that's what going
to try and get any closer. I made when I switch
off the camera, I may just tinker with so I
can get a little bit closer. So it looks at fractionally
different youth. Why? Because as I say, I'm doing this from a bit of a distance, feel like I'm being
a bit in the dark, but that's the general
look we're going for. And again, that needs to dry. So when we write
this down again, we can go right up
against these hard lines. We've got no, they were
all soften and we can put those lovely sort of
created all down her trunk. So the next bits,
the fun bit as well.
11. Head Second Layer: Right? Oh, this is nice and dry. So I'm actually going
to get rid of some of the salt on the
head and the trunk. Better. Brush it all off. Crispy. Leave what's a nicer
salt markings and Nate Yeah. I tried to get them
down to two soon. I will put up some of my
practice elephants where you can see where the salts
worked a little bit better. But never mind. Let's
pick up your big brush. And we're going to wet
the whole head and trunk. And we're going to,
if I start here, we're going to go right
up against that eye. So the eye crease. You see what I mean?
Sorry, um, this one here. So you're not you're
going to leave a little white ring, almost. Hope that makes sense. I'll do the other one again. It's this crease here. There is a really
dark little patch here which I'm
going to leave out. So I'm not going to wet it
and use that little triangle. We still want your
reference photo. It's actually part of
her body, I think. Write down you want all
nice and wet. Go gentle. Let, let, let your brush fall up against the following
fall on the paper. What you don't want to do,
especially if you've got some lovely sort of
mark say you don't want to lost all those
around and blend them. You want to keep your
brush nice and light. Okay, So on this layout, we're just strengthening
and adding a little bit of color or interests that
you feel you need. A lot of this will look
probably different than mine. So you have to be a little
bit of a judge of your, of your own piece at this stage. So mind's gone a little brown. So I'm going to be
using a little bit of the cooler colors to just
a cooler down a bit. Vice-versa, if you've
gone a little bit cooler, you might want to add a
little bit more brown, but you just, you almost
squinting your eyes, looking at your reference
photo and picking out the only the dark areas
don't go into any light. That way you will
keep it all looking lovely and fresh
and light field. And as they say so I'm going
to start by just tapping. She's definitely darker here on the on her right hand
side, isn't she? So I want to start adding
just that bit of depth there. Kc squint at your
reference photo. If you actually flip your
eyes back and forth, they sort of
superimposed themselves. So you can see where
you need the dark. And then you can go in into the trunk a little
bit just so if you've got any very predominant lines
that will sort of soften. Here's a nice little chunk of light there, isn't that a chunk? Chunk, a dark shadow there? I might pick up the bloodstain
genuine because I don't want to get it to
cool on her head, but I need a little bit more strengthened
the top of her head. Yeah, that's better. Looking a little wishy-washy. Well, I'm here. Little bit more
color just there. Either way, a bigger brush. I'm actually going to
pick up my little brush. There's some lovely
creases go into the year so you can use a
little bit of that color or add a little bit of
color on your brush and just go ahead and put those in. Just a especially on
the right-hand side. Keep it, keep it lighter on the left everything you
really want to keep everything on the left-hand
side, lighter and okay. What do I need to do? I need to she asked to define
that line there, which is probably
this is her sort of top of her tropical
ice as it was skull here. So you just want to try and
emphasize that a little bit. All about this second stage, just adding that
little bit of depth. And by doing a second layer, you'll find your paint
won't move as much. So that's how you gain a
little bit of control. If I was to do this
on the first layer, the paint would
move a lot quicker. Nice and dark. You step away, have a little
look, see what you think. We need to be mindful. We need to put some of
those lines in as well. And actually my trunk
is beginning to dry, so I'm actually going to
add a little bit more, little bit more water so
I can continue long, as, long as most of your
painting is wet, you can add a little
bit more water and then you can have a little bit more time
to carry on playing. That's better. Good. I put a hairdryer over it. If you hairdryer piece
obviously warmed the paper up, so it's going to going to
dry a little bit quicker. Let's put those down. I'm just going to keep
her keep hold of. And it said the tigers
I brown and blood tone January now I want to start
getting some of those creases in so you can put your hand
and just gently arc over. It's a little bit damp. There will be nice
and soft so we're not putting too much to me. So hard lines in if you allow
that to dry completely, they look a little
bit stuck onto me. Then I liked my
work quite loose, so you may like
that and if you can always put these on when
they completely dry, if you want them to be a
little bit more obvious. Quite like mine being soft. No, right or wrong
if you like that, look, that's not wrong. Try not to get
them to evenly try to be quite random with them. Try not to do two uniformed. The group sum together
and maybe leave, leave some out,
change the color. Down here, just very
quick brush, brush marks. So you step away, have a
look, see how you're doing. Don't go overboard with them. And that one's
gone a little bit. She looked at my
reference photo, there isn't a line there, so let's get rid of that. Clean my brush just
gently soften that one. And it's gone. Again with this actually, I've probably gone a
little bit too far over again. I can just soften. Yeah, I think she's
looking quite cute. So what I'm gonna do, the eyes still look a little
bit stuck on. So we're going to add
this begins to dry. I'm just going to wet the
inside of that white portion. Then we're touching
the inner eye makeup, then you see how
that softens it. Again. You can take any color out. You may feel like
that one again. I put a little bit too much
color in, in the first layer. So what I might try and do, she assist its tip, I can just squeeze
a little bit out. Yeah, that's better. Well, with tigers because I know that's a nice soft color. Again, just put a few
little lines back in there. And as it begins to dry off, your lines will be a
little bit harder. You can carry on adding them. You get some very soft lines
from where you started. When we first started
putting them in. You get a nice little variation between some strong lines and very soft lines down here. So tempting isn't to go around
and do them all. Versa. It doesn't not sure it's
the best look line here. She's just again, just
looking at your own piece, getting a little bit of the
hawk there to soften the eye, the mini rate to look away
from it the minute you think, oh, that's looking quite nice. I would say stop because it's, this elephant really depends
on it being largely enlight. So the more you fiddle
and the more you get down the blender it will be. So I would suggest Look at the moment step
away, see what you think. You'll probably find you there. So let's put, I'm
going to put my brush down and finishing off bits. We can add little, some soft lines if you still feel
you need some lines. We need to do those
lovely eyelashes. And we'll just do some little tinkering bits which will pull it all together. My advice would be to step away. And yeah, and we'll do
the finishing off bits, which will give you that lovely little
finishing off bits.
12. Finishing Off: Okay, once she's beautifully dry and make sure she really
is lovely and dry, we can rub some of these pencil lines out
so that gives us a nice, You see where we're
going with it. So I say, be really
mindful of that is dry. I can stop here. You can see where that
ear, it just loses. That edge, doesn't it? Disappears. It's lovely. Yes, around the edges mainly. And any any salts you've got the remaining den
brush that off as well. I think I've got
too much on there. Trying to find my marks. We get Central again. Lovely. I'm going to start by putting those eyelashes
on because I think that's really going to give it that little fun when you put those little catch
light in as well. So let's do that as our first, First Eagle to incur brush. And you want to, I'm going
to wake up my whites. If that's been sitting
on your desk as well, then give it a little
loss on wake it up. In your brush. I'm going to use the grave
for the Eyes, eyelashes. I say scrolling to
your your picture so you can see where
they're going. Just wanted right to the
edge and just flick outward. You've got, if you
feel more comfortable with a smaller brush than do choose probably quite
big for these eyelashes. The other side, they just need to dry. But then we're going
to put some little bit of white over the top of them. But what we can do while
we're at the eyes wake up, yeah, Thank give you quite a
nice fit, nice and creamy. We're going to put
some catch lights in. Although the reference
voted doesn't show it, I think it's nice to add
in a little little dot. Make sure you go
in that dark area, not the outside because the
outside is actually part of her skin is not actually an eye is just
surrounding around the eye. It looks better. Just seeing with my eyelashes
a dry I think they're just about dry because
it's quite thick. I replied and quite thick layer. So I'm going to start the
gain on the right-hand side. Theory should be dry. And you
just again, flick that out. Let's made her look
a little bit better, isn't it? A bit more character. Okay. I'm going to pop that down
and we're going to try and work methodically round. I'm actually just going
to grab myself a bit of dry kitchen roll up. We're going to take
any light out there you feel you need. Now if your ears are
got a little heavy on this left-hand side, you can then Jerry gently take
some color out, but mine, that's worked well on
that on that side, so I don't need any
color taking out. But what we will do, there's a really nice
little bit of light here where her ear creases with just age
again, very gently. If you've using
similar colors to me, you'll find they lift
out ever so easily. So you can just scratch
it with your finger. It stops. It stops. You take in too
much out, I think a little switch and then
go on to the other side. It doesn't matter
where those lines are. These crops a little few
of those out as well. You can see it running. Almost, say if you
squint your eyes, you can see that's running
from the top of her head? No. So the line is it of light. Take a little bit out and the head just the carry
it through. Again. You can either squish, it will take a little bit
out with a kitchen roll. I'm gonna, again, with
the edges of the years, I'm quite happy with
mine, but they again, a little bit like be taken out. And we're going to take a
little bit out if you can. She asked here as well, just above the eye
where the ear is. Again, just gently. Very easy to take too much out. Again, I might just use my
finger to squish that light. And this I found was
a nice little bit to take out as well. So we're just going to
take a tiny little bit about just underneath the eye. Quite underneath the
eye. Around the eye. I'm going into the
ear just so you lose the hard line
of the ear than the, um, the board with
the body, the face. I've applied the paint
quite thickly here. Papa little, little
lump of paint. If you said a little dab
with the kitchen roll because that's
quite thick there. We can yeah, that's better. That they got into
doing too much more. I think that's just enough. I look away from it. That's nice. Again, we can take a little
bit of light out with a wide accreted the ear. And we can put some of those creases in by taking
light out very gently again, because it's very
easy to lift out too much color and you'll be left with these very stark line. So try squeezing with your finger and see how
that looks before you. Before you use your kitchen
roll. Just very subtle. You don't want it too obvious. Again, little bit
of light out here. Finishing off bits.
There's no hurry, nothing is drawing on you. You can just take your time. And sometimes it's worth repeat
this a lot in my classes, but stepping away, sometimes
before they do the finishing off bits can be helpful because it's more obvious
what needs doing. Okay, I'm working
my way round again. If you've got any heavy lines, you may want to take
something out there. Kneecaps are quite nice
if you've got a little bit strong there or
you can put them in, you can put some little
kneecap lines in. Should be doing this
with an I eradicate it. Let's pick up my eradicated
because this would be ideal. Ideal for this. Again, you can put some
lines in that phase out. Just, just be careful
you don't do too many, just try to be random as well. Just pick out a few. We're going to put some
various offline Dean as well for the kneecaps. We're going to paint
some in there. Again, step away, have a
look, see how it's looking. I think I don't think I
want to put too many more. Let's take She's swap
brushes that I read. Kate is lovely and it takes
the color out really well. Sometimes it takes out too well. So I'm gonna go back
to my softer brush and just very gently. Just touch and to
squish, move my finger. Just just breaks up some of
that heaviness in there. There. That's enough.
Back to the trunk. Look nice bit of light
here isn't this? And you can feel trunk gone a little bit remedy
you can smooth out some of the roughness
if that makes sense. Which again, you can
go back to, you. Go back to my eradicated
or just a little brush, whatever you find this
helpful for taking color out, you may not have one of
these, just a small brush. Again, you're
squinting your eyes and you're looking
for the light. So you're just
taking a little bit. So I'm going to fill this
little corner in in a minute, so I don't want to fill
it with that too much, but a little bit of light out
of the bottom of this ear. Sticking with my eradicate her. Enough. Going up here I'm a little
bit around the cheek, just the lymph and that
cheekbone a little bit. The paint's gone a
little bit too far up, but I can just very gently
take it out of the eye. That lines are gone a little
bit hard, but we will, again, we will put some sort of a softer lines
in, in a minute. But you found these flicks overlook a little bit
hard, then you can soften. Those. Are gone round. I'm
almost sounds like I'm taking a little
bit out here. Top of the forehead, get some creases in there. Yeah. Again, to step away and have a look. I think she
looks. All right. Let's put that down. Let's find in a clean piece
of kitchen roll again. There. Now I just want to put a few
lines around the eye again. So back to my little brush. And I think I'm
going to use tigers because I don't
want it too hard, just wanted to keep
lovely and soft. But we could do a few
more over the top. Again, just very gently. Keep it nice and light. Too much paint on your brush. You don't want because he's
very easy to make them look like they're stuck
on if you go too thick. I got some wonderful
wrinkled suddenly. Again, you can put a few more. Um, I feel I've probably
got enough creases, but you can again put a few
in if you wanted a few more, he didn't put enough in before. You can always soften
edges of these. So if you put a line down, it
looks a little bit strong. You can just go underneath
or over the top of it and just soften
one of the edges. I think she's doing. All right. She's coming together. A little line here,
inside the eye. Alright. That's enough fiddling around
the eye because that can be a dangerous place to be. Quick and easy, mess it up. So still with a
brown and tigers, I actually going to pop out a little bit of paint
on my edge of my brush. Just going to see if I can
put a few little lines. They're really soft. Almost not there. That's enough. Again, we're going
to do the similar to the kneecap as well. So we're going to put a
few around the kneecap. Some can be a little bit
heavier if you want. One are quite
prominent, aren't they? Any other lines you think
you want to put it in? But to say you can quickly
get carried away with them. So keep stepping away and having a look,
see what you think. And if you're not sure, again, you can leave it for a day, come back and reassess. She may find you got enough. If you haven't,
you can always add them harder to take them out. I just want to actually, what I was taking light
out could have come here back back of the body where that that crease
we put in over the top. Just going to take that line out there light and up to there. And then did a
little bit of light. Just says that leg follows
up. That makes sense. So it looks like the Lake
continues past that trunk. See what I mean. So it continues by
taking the light out. I've I've made the
leg here as well. Okay. And the other little
bit we need to do, if you're obviously we put this big stripe in here and allowed or that color to blend. So if it's blended
a little bit too much and you've lost any definition of your
back leg to front leg. You can just take a
little bit of color out. Mine, isn't it? I'm
quite happy with mine. I will just take a bit of color as you can
see what I mean. Um, say, be careful because
you can start, start to overfill and
take too much light out and we'll get a little bit fiddle
and overworked. Always my recommendation,
if you're in any doubt, then stop and have a look. I think I think
she's pretty good. Actually. I'd like to add a little bit more
salt marks like some of my previous practice pieces. But for the overall painting, I think she's she's
just about there. I don't think
there's any anymore fiddling I want to do again. Oh, I know what we haven't done the ground for something
in the back of my mind. Let's put that in.
Again. You don't have to put the ground in if you don't, and you can pick up. Let's do the tigers I, and let's do the gray. But when your brush and
you're gonna go underneath the little line underneath the feet and you're just
going to wipe sideways. Just a real I don't want
to put too much detail in. I just want a real
gentle impression. There's she's actually
standing on something. She's a little bit grounded
to want to put too much in. Again to step away. See, we think think
that's Bobby enough. And without fail, I start
to fill again, right? Yes, That's enough.
Put those down. And that little corner so I'm
skipping ahead of myself. That's a little dark area there, isn't there which
is actually I think he's inside of her body. Literally just going
to paint that in. Just like that. You can actually put out a
little bit of paint for me. Do a couple more creases. Lovely. I think she is. They're all bursae. I would I would
always look at it the next day and do any any
tinkering I feel is needed. But sometimes you can look at
your painting for too long. We've been here on our probably our and a little bit and
you almost don't see it. So when you put it away, come back to it the next day, some things are blindingly obvious what you need
to do or not do. So yeah, I hope you
enjoyed it and as ever, please do share these because
I know where we say this, but I love seeing these
projects being posted up. So thank you for joining me.
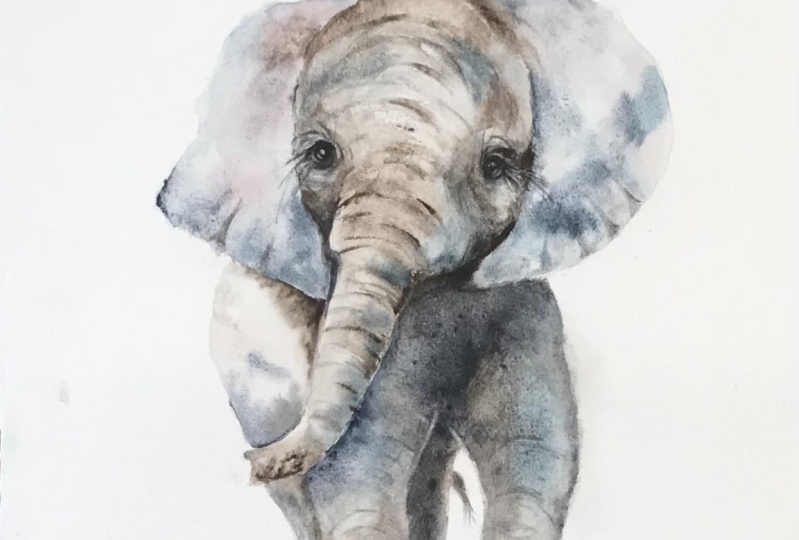
13. Next Day Tweaks: Okay, so although I was really pleased with my little
elephant when I've used her the next day I was like some of these It'll the
legs were a little bit. This could be darker. This has probably moved over a little bit too much
digital area here. So what I'm going to
do, I'm going to just wet this whole area down again and just have
a little tinker. And I hope this might be helpful for you because
this is a sort of thing I would probably do on a pet portrait or
commissioned pieces, reevaluate next day and
have a little play. So let, let me show you
what I would probably do. So I've got my bigger brush, I'm going to wet it down
so it's nice and wet. So in theory we're just doing a third layer over second layer. Sorry, we needed one thing. Okay, so I'm going to wet very carefully like
we did with the head. Just keep everything
really lovely lights. I'm just letting
that brush full. Now. I'm only going
to do the front legs. I'm quite happy with that back. I'm going to stay
carefully when my lines. I think when I was figuring
the main part of the class, I was struggling
with the daylight, so on my light was desperately going all the way down into just a
little bit here. There's this little area
here which is a bit dark for my liking and I've
dropped a ball there. Never mind. Okay, you just work your
way back up. Way back up. Yours might be absolutely fine, but I say I thought this
might be really helpful exercise for you to watch
it if nothing else. Okay. So i've I've
only I've kept this back leg as
it were as it was, So I haven't wet that down. So now none of that
paint has actually moved because because okay, so now this is nice and wet. I can have a little play. I can sort of take a
little bit of color out. Just very gently. It's all
done with a very light brush. But you can say, I can
sort of start on sculpt. I suppose it's what I'm doing. And take little
bits of color out. And I can add bits
of color in if, if need be as well. So my main issue, I think this leg felt like
it just got a little thin, not just the color
had crept over this. When I added a
little more strength under the ear at some point, it just quit a little
bit too far over. So I'm just going to push
it back again really. Maybe some of these I'm lying to a little
bit heavy to say. I was probably especially
on the finishing off bits. I was probably a
little bit rushed and pushed for time with the light. So I might have
been a little heavy handed with some of
my rubbings out. Okay. And sometimes just re-wetting in areas and we'll soften bits. And you almost
don't need to add. We'll do much more sometimes
that's all you need to do. I want to add just a little
bit more color there. So I'm going to have the brown, which is the burnt tigers. I'm just going to pop a little bit of color down
there just to see if we can get a bit more interest, really, the legs looks
a bit blend to me. I have a bit of the mudstone and Bobby, it's a little warm. Maybe. Let's add a little
bit of coolness. Suchi, let's have the great tap, a little bit of gray in there. Over the top of
the brown tigers. Okay, and pick up
my little brush. I can add just a bit more,
a little bit more strength. There might be
quite nice to have. Now I can see where those
fresh pair of eyes, It's amazing, isn't it? I didn't see that when
I left that piece. When I'd finished, I came
back to it the next day. It seemed very obvious. It's always worth before
you say, Oh, I'm done, leave it for a day or even
just a few hours it can that can be enough and come
back and go and look. You may find there's
nothing wrong with it. But it's always, I
always tend to have a, another tinker must have met. So it's sort of squint
your eyes again, see if there's
anything that I need. Squint my eyes. You're probably yours is probably fine too. This is more of a demo for you rather than
you having to do, do this on your piece. Because I've wet
this down again. I'm losing some of
that definition in on those wrinkles so I can
pop those back in again. That's what I mean by everything softened when you wet an area
down, it will soften again. But it will also get rid of
some of the harder marks. You might need to need to
put them back in again. Actually, I don't think I
actually took any color that awaited ideas to pull
that back again. Trying to look, trying, trying to look away
from it again to see if that looks okay. So sort of wrinkles in there aren't there. So it's trying. If I can pull a little bit of
almost a little bit heavy. Always liked here isn't. My bigger brush. Will make sure that it stays
light in this corner here. We've got quite a puddle
going on here as well. Suck that up. My kitchen roll. Just going to pick
up the tigers. I, again, this is my
foot a little bit nicer. Just squinting your
eyes and looking, and looking at a reference
photo and going back to your your piece and assessing. The bigger one. Probably my rather
bad sketching out. But there's around. Sometimes I'm all
about the shape and that's lost a little
bit of shape there. So I'm just going to nudge
them out a little bit. You see what I mean is
you gotta, as he is, she She's starting to lift
the leg off the ground. She's starting to get
some sort of curve here. Let's see if we can get that
back in it too far out. But you can see by me doing this how easy is to alter things. Although people say watercolors
really hard and you can't go back and tinker. I personally think he can. You just have to be a bit
mindful and gentle with it? Yeah, that looks better. Being mindful that some of these still losing some of
these lovely creases. There is always the
risk, of course, if doing this you can, you can ruin it by over
overthinking and overdoing. But hopefully that's yes, I think that's that's
definitely helped us. And also the other little thing I thought when I
looked at again, is just the very silly
little minor thing really. It's just the end of the trunk. Could have just had a tiny
little bit of definition there because it lost
it really there. So I'll just wet that
tiny little section down. Like a no or just the tigers. I actually scan another
soft little, a soft color. Let's just, let's just
draw the eye, isn't it? So the eye can see
that there's a top to the trunk and just
gently tease it out. And the other little
thing, again, I took color out here and again, probably a little heavy handed. So I just need to see him. I can round that up a bit. What I might do, actually
wet all this down. I'm gonna be careful
not to touch the trunk which we've
just worked down. I've just wet down. What just trying to lift a
little bit of color out. It's got a little heavy there. Push some of it back a bit. Let's go heavy on the edge, probably more than
ys on the sides. It's a bit heavy on the
left-hand side. Round that up. Make sure that leg kinda
makes sense for those. The list, the bottom
bid a ligand, then it goes up underneath the trunk and pops
out at the top. But you want to make
sure that line is, if you were to draw a line, that would make sense,
if that makes sense. Okay. I think before
I overbid London, I say always the risk
is over fiddling and running and getting a little bit muddy so you have to be careful. I hope that has helped. I don't think there's
any other issues. I could see. I like
this ear and the salt. Again, I can't rectify that node salt and
salt marks better. It was just the bottom there, that tiny little bit of trunk. So I hope that's given you a little
bit of insight on maybe you how I would work and how I would tackle a commission piece or
your own piece and say looking at it the
next day and reassessing.
14. Final Thoughts: So I hope you enjoyed the class. Wasn't she a joy to paint? I hope you enjoyed
these two techniques and were able to
resist fiddling. How did you soak go
is all about timing. So well-worth practicing
on scraps of paper. If it didn't work
as well for you. As always, it's worth stepping away for a
couple of hours and looking at her with
a fresh pair of eyes is amazing what you see. So we look forward to seeing
you in the next class.
 Jane Davies, Professional Artist and Teacher