Transcripts
1. Introduction: Assalamu. My name is Wide Mu Takin. I am an entrepreneur and have founded several creative
based companies. I have done hundreds
of design projects and work with dozens of
clients around the world. I am also an academic
lecturer and corporate consultant in
computer graphics disciplines. For more than two decades, I have been teaching
graphic design to the entre, animation, video editing and
motion graphics, architectural visualization,
digital painting, web design, game
development, et cetera. Va is an online application that has forever changed the face
of the design industry. Canva has made it possible for anyone to create stunning
designs quickly, even if they are not a designer, while still giving
professional designers plenty of room to channel
their creativity. With Canva, you can create graphic designs for
print and digital media, create presentations,
edit videos, and add admission, write
content, even built websites. If you want to master Canva quickly from
beginner to advance, then this online course
series is the answer. Throughout this course series, you will be guided
step by step to master and utilize all of
the features of Canva. As for this course alone, this is the third in the series
and is a continuation of the second course
titled Creating Websites and Working
with Dogs using Canva. Here you will learn various animation and
video features in Canva from creating an
emissions per page, then an emissions per element, and then creating custom
path following an emissions. Next, you will learn video editing techniques
in Canva like trimming, splitting, and editing
transitions between videos. Lastly, you will
learn how to combine animation features with video features in
a single project. For the final project, you will need to create
a short video about nature using all the techniques
discussed in this course. The video should have
an animated title, Animated lower thirds and transition effects
between video clips. Since this is the third
course in the series, you will need to take the
first and second course before taking this one. Then, because Canva is
an online application, you will also need a computer
and an Internet connection. Throughout the course,
I will be using a PC with Windows ten
operating system. All of the keyboard
shortcuts that'll be demonstrating
will be off the PC. If you are using a computer, you can still follow the lesson as I will be using Canvas. User interface
moves off the time which is consistent across
different platforms. The only difference is
the keyboard shortcuts. In general, you will need
to replace the control key with the command key and the
L key with the option key. This course series is
perfect if you are a hobbyists who are stolen
design from the basics. Also, if you are a teacher or a student who needs a
free design application, if you run a business, this Go series can
be very valuable as Canva can help you create marketing materials
quickly and easily. If you are a
professional designer, you'll find that canvas
library and easy to use interface can help you speed
up your work considerably. But not at this course. If you are a content
creator who wants to take advantage of the
leaders AI technology, this course does not yet
cover canvas AI features. However, the lessons
in this course, we'll lay the groundwork for the future course
where we will discuss the AI features by taking
this online course series. In Shall Law, you and all your business will be able to use canvas
faithful potential. Creating designs of any kind will no longer be
a burden for you. Instead it will be your
age over the competition. So don't wait any longer. Take this course
now and continue your journey to
mastering Kanvas Mom.
2. Page animation: Starting from this video
and next several videos, we will focus on the animation and video features in Canva. For this lesson video, we will cover the basics, which is creating animations
for the entire design page. And then learn how to preview and finally export the result. I am currently using the
toy store design project from the past lesson. Feel free to use other templates provided by Kva or
use your own design. To access the page
animation feature, you first need to select
the background object. At the top, you will see a
button that says Animate. Press this button to open
the page animation panel. In this panel, you can select
various animation presets. Keep in mind that the
animation presets in this panel affect all the
elements in your design. Va divides its presets
into several categories. If you hover your mouse
over one of the presets, Kva will immediately display a preview of it
in the main area. If you click to
activate a preset, then the parameters associated with that preset will
appear below it. The most basic parameter is where the admission
will be applied. Is it at the beginning
or re entry, or is it at the end or
on exit, or is it both? We will see the
difference in a moment. Some presets also have
additional parameters, such as controlling the speed and parameters to set
the movement direction. But keep in mind that these additional parameters
are paid features. If you use them, you'll be asked to upgrade to
Canva Pro or Team. For now left, try activating
the preset called Disco, and we enable the both option. The name of the active
animation preset will be displayed above. That is if the background
object is active. In case you change
your mind and want to remove all animations
from this design page. You can open the page animation
panel again then press the bottom as remove
all animations. For now we want to use
the animation feature. I re enable the disco preset
as well as the both option. Before you download the
animation as a video, it's a good idea to
preview it first. For this you can
press the button below that looks like
the photo screen symbol. Or you can also press the
shortcut control, Lp. Here is what the
animations look like. Because we use both options, there are two
animations that occur, namely on Enter and exit. Again, on enter means the
initial animation which occurs from a blank page until the entire design is
perfectly formed. In contrast, the exit
animation is the animation at the end which dismantles our design back
into a blank page. To exit the preview mode, you can press this button and
then just click anywhere. Alternatively, you can also press the escape key
on the keyboard. If you are satisfied
with the preview, you can download a video file. To do that, we need to
press the Share button. Then click the download button. Make sure the file type
option is MP four video. You do not want to
use PNG or Jpeg as this will only produce steel
images without an emission. Alternatively, you can also export the animation G format. But keep in mind that
the format is only suitable for images with
a small number of colors. It just so happens that
this design has few colors as all the design elements are vectors with a flat color style. If you have a design like this, it is still suitable to
be exploited as a G file. But if your resign
has photo elements or perhaps graphic elements with many different
gradations of color, you should not use a G file and use MP four video instead. If you press the
download button, can prepare or process the file. Once you have downloaded
the video file, you can use loss it in video editing software
such as Premiere, final cut, Fins,
resolve, et cetera.
3. Element animation: In this video, we will discuss how to create
emissions per element, as well as some other preview
methods provided by Canva. Creating an emissions for an entire page can
save us a lot of time, but sometimes we just need to set an emission to
certain design element. For this, we need to select
the design element first, then click on the
Animate button. You can see now besides being able to access the
page animation spannel, we can also access a tab
called Element Animations. All animation presets
in the spannel are local or will only
affect reactive element. Just for example, for
this steady bear, we want to give it a
baseline animation. You can also specify the type of animation you want to
apply whether on enter, on exit, or both. We discussed the difference
in the previous video. For now, we will use the both
option for all emissions. This is so that we can see the effect later when
we discuss duration. Next, for this balloon element, we can give it a rise emission. The purple balloon is the same. We can give it rise mission. Finally, for the truck element, we can give it up in animation. Now to preview the animation, besides pressing
the button below, you can also press the
play button above. This is the state of
our animation so far. To exit the screen, you can press the closed
button above or press the escape key on your keyboard
or just click anywhere. At this point, you
might be wondering, applying animations one
by one is too laborious. Isn't there a faster way to
apply animation P element? The answer is yes. But only if the types of animations you want to
apply are the same. Let's say we want to apply the pop animation preset
to these three elements. First, we need to select all the elements that
would be affected. We can use the shift
method for this. Next upon the animation panel. Then select the preset
you want to use. I want to use the pop preset. Don't forget to select
the both option. Another example, we can
apply the base line preset for the two text
elements and their backgrounds. Create a selection box until all three
elements are selected. Then open the animation panel and select the baseline preset. Also enable both
option. All right. Another method to preview animations is to
use the timeline. First you need to press
this small arrow button. Currently, the bar that appears below shows a list of pages. To turn it into a timeline, we need to press this
Duration button. This button is a togal. To switch the bar
above it between a list of pages
or to a timeline. In timeline mode, you can press this Play button on the left
to preview the animations. Or you can click drag
the small triangle above the time line to
navigate the time manually. This dragging technique
is called scrubbing. Just to recap, we have learned three methods to pre view
animations in canvas. The first is to use
the preview button on the bottom right or
its shortcut control out. The second is to use the
play button at the top. And the third is to
utilize the timeline, either by pressing
the play button or with the scrubbing technique.
4. Duration and timing: In this lesson video, we will cover more
advanced techniques for animation that
involve time control. We will start by discussing
how to set the duration and then discuss how to set when each element is an emitted. We will be using
the design project from the previous sin. At this point, you may have
noticed that the animation created by Canva for this
page is 5 seconds long. In total, we can see
the number five S at the top and also at the bottom if the
timeline mode is active. The next question is what
if we want to change it? For example, we want to make it 6 seconds or perhaps
shorten it to 4 seconds. For this, simply hover the mouse over the right border of
the clip in the timeline, then drag it to
the right until it is as far or as
long as you want. If you drag it to the left, the duration will
become shorter. Another method to select the
background element first, then press the button that
has this clock symbol here you can either drag the slider or type in
the numbers directly. By default, Canva will consider the number
you enter as seconds. If you want to input
a number in minutes, you need to use
the colon format. Let's say you want a
duration of 1.5 minutes. You can type one, then
then 30, then press Enter. You should note that changing
the duration will not affect the mission speed of
the elements in the page. I have mentioned before
that the speed setting is a Pat feature that you can access through the
emission S panel. However, changing
the duration will affect when the exit
animation will run. Let's just make the duration 10 seconds so it doesn't
take too long to preview. We can try scrubbing
the timeline again. Previously, when the
duration was 5 seconds, the exit animation started or triggered at around
the four second. Now when the duration
becomes 10 seconds, the on exit animation starts
at around the ninth second. If you look carefully, the animation of each element does not run simultaneously, but gradually or sequentially. By default, Canva determines the animation order of elements
based on their location. Simply put, Va will
scan the position of elements from left to right
and from top to bottom. Similar to how
text line by line. For clarity, we can select all elements
by pressing control. A Va will start checking the elements from
the top left corner and move towards the right. The yellow balloon will be
the first to be animated. Then after that, the
tay bear is animated. Then the purple balloon, then the paper wheel, then the truck, and so on. At this point, you
might be wondering what if we want to set the
animation order ourselves? For example, we want the
teddy bear to appear later after the truck
has finished animating. This way, it will look like that the bear is coming
out of the truck. To do this, we have to use a
feature called show Timing. Unfortunately, at the time
I recorded this video, the show timing feature was only available in a
video project type. It was not accessible in a
regular design project type. Perhaps this will change by the time you
watch this video. To try out the feature, we first press control A to
select all the elements, then press control C to Capitan. Next, we want to start
a new video project. So make sure we open
a video category. We can try to choose a square
video project size so that at least it has the same ratio
as our previous project. An example is this
video clutch set. Although the size is
slightly different at 800 by 800 pixels, we don't need to
give this project a name as we will
delete it later. Once the project is open, press control V to paste. Let's read just the scale of all the design elements so
that they fit the page area. From this example,
we can conclude that Canva will retain
the animation of the design elements
if we perform copy and paste and
even if we scale them. All right, at first glance, this video project and the previous design
project look the same. However, if you
right click on one of the elements such
as this teddy bear, you'll see the show
timing option. Again, this feature is not available in regular
design projects. If you click on it can be show a special clip
above the main clip. This clip represents the
duration of bar element. We can click Dirk, its
left border towards the right until when the
truck is finished animating. You can also adjust the timing of the other design
elements if you want. Once you are done, you can
try to preview the animation. As you can see now the teddy bear seems to
emerge from inside the truck. We will discuss
video projects and video editing techniques in more depth in
ofuence after this.
5. Stickers and custom animation: In this video, we will
discuss animated graphics, also known as
stickers in Canvas. Then we will also discuss how to animate objects that move
along a custom path. If you open the element step, you'll see a category
called stickers. It category also appears when you open a
graphics category. Basically, stickers are a
type of graphic element that has animation and is
saved in G file format. I personally do not agree
with how Canva named them. It should just be called animated graphics because when people hear the word sticker, what they image is a printed product that has
glue on its back side. For example, let's try to
find an animated butterfly. Usually canvas search
results are less precise. When we use the
keyword stickers, it would be better if we
use the keyword animated. Instead, we type in the search
box, butterfly animated. Let's pick this blue
butterfly sticker to insert a sticker
element into our design. It is basically the same as
any other graphic element. We can click it
or click brag it. In the version of Kva where
I recorded this video, the sticker feature
is still very basic. It can only display an animation that keeps
repeating itself. We cannot change the speed, We cannot clip it, we cannot
pause it at a certain time. In fact, you cannot
even rotate it. You can only perform scale
and change its position. Hopefully, a lot of these
limitations have been solved in a version of Kva you are using when
watching this video. One of the new
animation features in Canva that you can use
is custom animation. Basically, with this feature, you can move graphic elements along a path that
you draw manually. You should note
that this feature is not bound only to
sticker elements. You can also apply
to other graphics, both raster and vector types. For now, I will use this
butterfly sticker as an example. After we have selected
the elements, we want to animate upon
the animate panel. In the element animation step, you can see the Create
an animation button. Click the button,
this is important. You need to click,
drag the sticker to simulate the movement
you want to apply to. It. Can record the movement you make and save it as
an animation path. Now you can see the
butterfly sticker flying along the path
we just created. For the smoothness
of the motion, there are three options you can choose from the original option, we'll use the recorded
motion as it is. If our hands are shaking a
bit while rowing the path, then so will the animation. The smooth option will make
the path line smoother. The steady option will
make it even smoother. Now even though we cannot rotate the sticker
object manually, we can still make
its orientation dynamically follow the
direction of the path. To do that, we need to enable this orient element
to path option. If it moves backward, just use the flip vertical
option to correct it. This is the animation results. So far, the speed parameter, as the name suggests, can be used to control
the animation speed. If we set this to the
leftmost position, the animation will run from the beginning of the
clip to the end. If we change the clip duration, the animation will
automatically adapt. If you change it to
a faster setting, the animation will
finish before the end of the clip at the bottom. We can also add repetitive
type animation effects for the rotate animation effect. In particular, it can only work if you turn off the
Oriental path option. For example, we can enable
the flicker effect. Now the butterfly fed out
and fed in back and forth. To change the speed of
the flicker effect, you need to press the preset
button again, then slider. Unfortunately, this
is a pit feature. I will have to
skip this for now. If you want to
remove the effect, you can press the remove
animation button. Then if you want to remove the custom animation or
the follow path animation, you can press the
delete path button below for a final node. If you're using a
video project type, you can also set the timing of the custom animation by using
the show timing feature. Again, this feature is not available if you are using
regular project type. For example, you can set
the butterfly top after all the ontraanimations of the
toy objects are completed. This is what the
result looks like.
6. Video editing basics: In this video, we will cover the basic techniques of
editing videos in Canva. We will start with the zooming
technique on a timeline, then the trimming technique, and finally the
splitting technique. We can start a new
video project by selecting its category
on canvas main page. Let's just select
the leftmost option. The size of this video project
is 1920 by 1080 pixels, also known as full HD. For this lesson, you can upload your own
video if you want. We have covered how to upload
files in previous chapters. I assume you already know
how to do that by now. If you want to follow
exactly what I did, you can find videos in the Canva library with
the keyword nature. Let's try this video. Click on it to insert
it into the Ferus page. If the video looks smaller
than a canvas area. This is because by default the video has a resolution
smaller than full HD. In the case of this video, it looks like it has an HD size, or 12 D by 720 pixels. We can scale the video
while holding down the Alk so that it uses its center
point as the scale reference. Now if you want to insert a
new video after this one, you shouldn't click on the
video directly because this will overlay the new video on top of the previous one. What you want to do
is first click on this button to
create a new page. With this page active, you can't click on another video to insert it into the canvas. Let's see this one also, so there is no empty
area on the page. Another way to add a video after an existing video
is to click Drag directly to the plus
button in a timeline, for example, let's click Drag. This video time line is
already long and complex. You may need to zoom in
and out on the timeline. For this, you can utilize
the zoom slider below. By default, this slider is used to zoom in and out
of the canvas area. We can click here and select the Fit option to go back to see the entire video
area on the canvas. To change the function of the
to zoom the timeline area, you need to press this button. Now we can g the slider around to just the zoom level
of the timeline. Note that this
button is a togal. Restore its function
as a canvas area zoom. Simply click on a button. Again, this is the
canvas zoom mode and this is the time
line zoom mode. For now, I return a value to 100% Let's go back to
the first clip or page. We select a video. At the top we can see a
button that says Play Back. If you press this button, the video playback
panel will open. Here you can set how
fast the video will run. The default value is one. If we increase the
value above one, the video will play faster. If we lower it below one, the video will play slower. Two things you need to keep
in mind is that changing the speed value will affect the duration of the
current clip or pitch. Secondly, if you
make the speed to slow the video playback
will look choppy. Let's just return this to one so that the speed
becomes normal. Furthermore, these two
options are useful if we intend to export the video project
as a presentation. This one is useful if you want the video to look or
repeat continuously, That is, when the presentation is on the corresponding page. The second option is
to have the video run immediately without
waiting the play button to be pressed again. These two options are
only relevant if we export the video project
as a presentation. Next we will discuss
the clipping technique, also known as trimming. We often record long videos, but not everything we
need or want to use. This is when trimming can
be useful to perform. Trimming, make sure the video you want credit is selected. Then you can press
the clipping icon, which has a skier symbol. Here you can specify
the starting and ending points of the
video you want to use. In this condition,
the left and right parts that look blurry
will be ignored by Canva. These blurred areas are
not actually deleted. If we click done, the duration of this page becomes shorter. If you press the
clipping icon again, you can see that the parts that we ignored are still here. So we can restore the starting
point and ending point to display the complete duration of the original video
without any problem. Another method to perform trimming is directly
in the timeline area. To do that, simply click
and drag the left border of the video to the right or the right border of
the video to the left. This is different
from how we change the duration of
animated graphics. We can freely set the duration
of animated graphics, but for video files, their default durations are the limit of how long we can
display them in a timeline. We cannot continuously pull the border out to
extend the duration. All right, next we will discuss the technique
or what can vocal split. This splitting technique can be useful when we need
to insert a video in between other videos when we want to do some quick
trimming at a certain point. For example, we want to split
the video at this point. First, make sure the playhead or the triangle pointer is at the location where
we want to split. Then press on the keyboard, or if you forget the shortcut, you can right click
ins split page. Once it's split
in two like this, you can select one of them, then press delete to remove it. Remember that blotting
part of the video in canvas has a similar
effect to trimming. This means that we can
still restore the video to its original state by pulling one of the
borders outwards. Let me undo this so we can still have the other
half of the video. Let's say we want to insert this video in the
middle of this video. We can first move
the playhead to the location where we
want to split the video. Then press, then just
click and the video on the left and release
it when it is on the location where
we split before. All right, I'll do
it for now until we are back to just having
three videos or pages. We will continue discussing more video editing techniques
in your next lesson.
7. Adding transitions and audio: In this lesson video, we are going to discuss how
to add transition to videos, and then after that
we will discuss how to add and work
with audio elements. The term transitions refers to effects that
we please between two different video
clips to make the changes look
smooth or interesting. By now, you may already
know that in Canvas, the term videos and pages
are interchangeable. To create the transition, you need to hover your
mouse cursor over the gap between two
videos or pages. You'll see two buttons appear. You can use the plus button when you want to
insert a new page, and you can use a second button when you want to
add a transition. If you press it, Canva will open a panel called Transitions. Here you can choose from the various transition
effects provided by. By default, the active
preset is none, which means there are
no transition effects. The most camillus transition
preset is dissolved. You can preview it by
hovering your moves over it. Essentially, the
dissolved transition makes use of
transparency changes. If you enable this preset, you can set the duration
of the transition. Now let's try the slight preset. Basically, the slight transition uses a shifting animation. Besides, the
duration preset also gives us parameters to set
the direction of movement. Feel free to try and experiment with other
transition presets. Once you are done, you can press this Play button to pre
view the transition. If a transition exists
between two pages, you will see a rectangular icon with a small arrow like this. To reopen the transition spanel, you need to press this icon. If you want to remove
the transition, you can choose the non option. Let's say you like a
particular transition effect, such as the solve. And you want to apply
this transition effect to all the gaps between
pages in your project. To do that, you can press this Apply Between
All Pages button. This feature will save you time, especially if you have a
lot of videos or pages, and you want to apply
uniform transition effects to all of them at once. Next, we will learn
how to add audio. You can upload your own
audio file to canvas. If you do that, you can
find the audio file in the upload step,
the audio category. For now, we will just use
the audio provided by Canva. Basically, the way we add audio elements is similar to the way we add
graphic elements. We can open the element step, then choose the audio category. Let's try to search for
audio with the keyword C. You can see that most of the audio
provided by Canva is sad, but you can still find ones
that are free here and there. Take this one for example. Before you insert
the audio element, you can press the Play button on the thumbnail
to listen to it. First, you can insert the audio into the project
by click dragging, or you can just
click and release. With the click release method, the audio element
will be placed on a location where the
playhead is now. Unlike video, the audio position
is not tied to the page. The audio duration can extend over or through
multiple pages at once. You can also slide
it around freely, regardless of the
location of the pages. However, the audio
element still cannot exceed the stop and limits
of the project duration. The audio element
will seem to be truncated if we push it beyond the project
duration limit. All right, let's try inserting
another audio element, for example, this free one. If we try to place two or more audio
elements overlapping, El automatically place each audio element
in its own channel. If they do not overlap, they can be placed in the
same channel as with video. You can also perform trimming and splitting on audio elements. You can trim them by click, dragging on its right
or left border. And you can perform
splitting by first setting the location of the
playhead and then pressing the letter
S on the keyboard, or by right clicking, and then selecting
the split command. For now, I undo it and set all the audio to
be on one channel only to preview audio elements. You cannot use the
scrubbing technique, at least this is the case in a version of Canva
that I'm using. You need to press
the play button to be able to preview
the audio element. That you cannot listen to
the audio of my project because I didn't record the sound coming out
from the system. This is so that the
sound doesn't interfere with my voice recorded
through the microphone. But you will be able to hear the sound of these
audio elements on your own computer if you press the play button in a timeline
before ending this video, there are two tapes I
would like to share which relate to the video and
audio previewing process. The first is in terms
of moving the playhead. Rather than hovering
your mouse over the triangle symbol first
and then click dragging it. You can do this faster. If you click directly on a video or audio
element in a timeline, the playhead will immediately jump to the location
where we clicked. The second tape is that you
can use the Spacebar key on your keyboard as a shortcut
to execute this Play button. But remember, the Spacebar
key shortcut only applies if you select a video or audio element
in the timeline. Or at least you click on an
empty area in the time line. If you select a video
element in a canvas area, pressing space bar will
only play the video, not the playhead
in the timeline. That is something you need
to pay attention to if you want to use the Spacebar key
to preview the timeline.
8. Combining animation and video: In this video, we will create a simple video project
where we combine an emission features
with video features. We will be utilizing a lot of techniques that we
have done before. But apart from that, there are also some
new techniques and tips that we will cover. You shouldn't skip this lesson. We don't need to
create a new project from scratch to save time. Let's just use
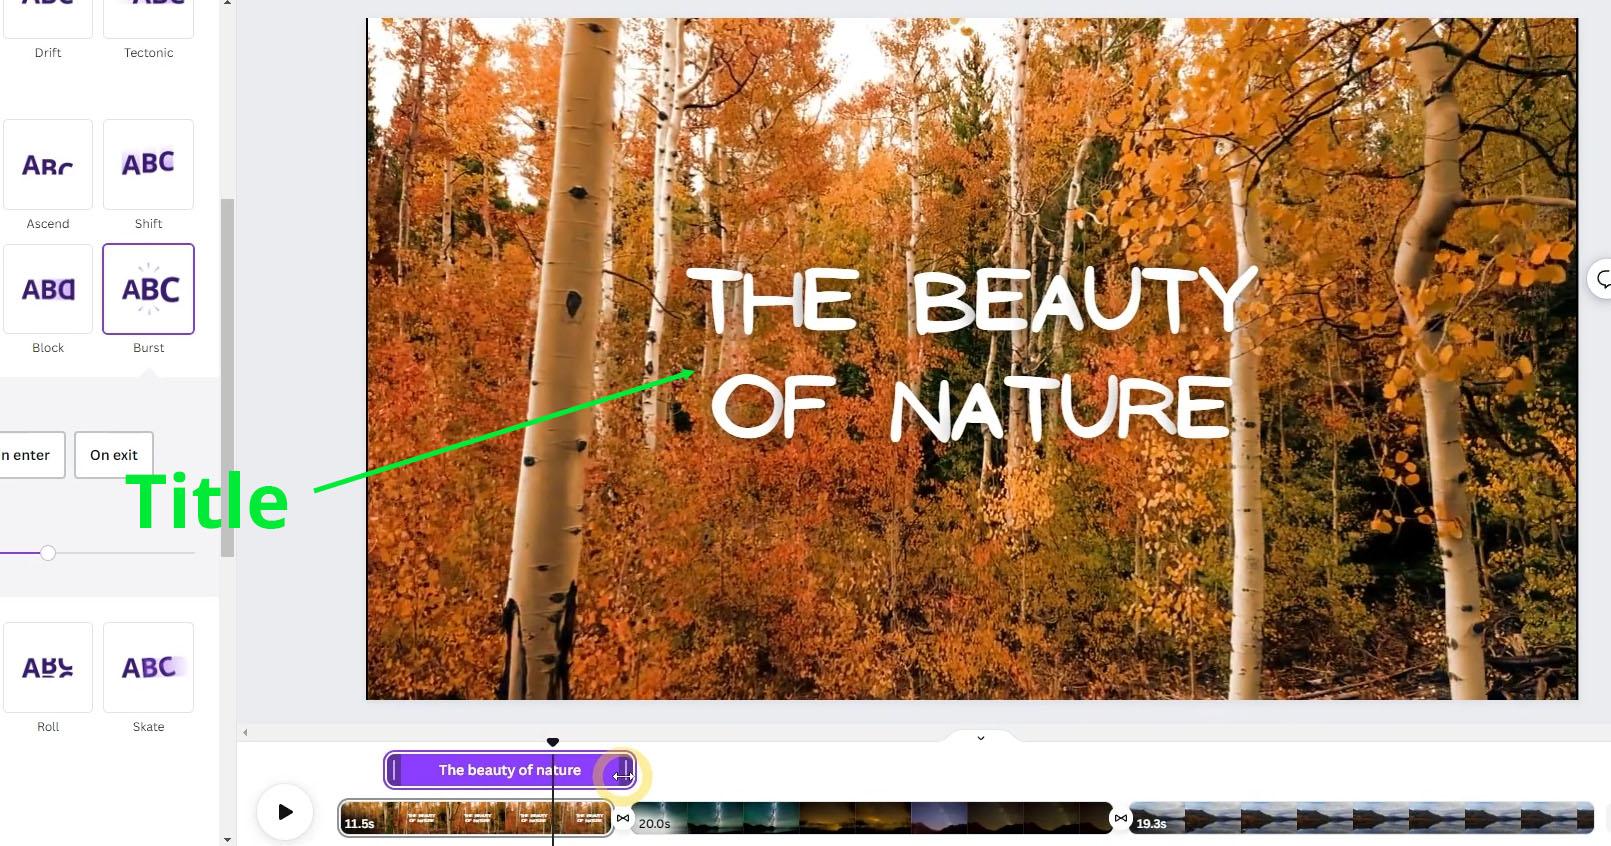
this video project from the previous lesson. First, we want to add a title
text to the first page. Make sure the page is active. Then go to the text step. You can use any of the text combinations
below if you want. For now, I add a
regular heading type using the click release method so that the element is centered, then type the beauty, then then type of nature. Press escape once, so that all
the elements are selected. Move it up slightly until it
snaps to the center line. Then upon the color panel
inches wide for phone type. Feel free to use
any phone you like. I will use a phone
called an Ones. Then to make the
text more clear, we can add an effect. This effect will add a subtle
dark color around the text. We need to increase the
intensity value to the maximum, which is 100 so that the
surrounding color is very dark and the
white text color becomes more prominent. All right, next we want to add an animation to this title
text upon the animate panel. If the text element is active, V will display a special animation
category called writing. The animation presets within
this category are unique in that they are designed
specifically for text elements. For example, the type
writer preset will make the text appear as if it
was type letter by letter. You can use the per word option if you are using a
pit canva count. Another example is to shift preset in addition to
its speed and direction. This preset can apply its
animation per letter, per word, or per line. But as before, these features
are all pit features. For now, I want to use
a preset code burst. Make sure you use
both option, okay. Right now, the on enter animation runs
from the beginning of the page and the on exit animation runs at
the end of the page. We want the text animation
to start running after 2 seconds and around
the ninth second. Since this is a video type
project, we can write, click on the text object
and select Show Timing, Then break the playhead until the timing is at
around 2 seconds. Then move the animation
border on the left so that it is close to the
position of the playhead. Move the playhead so that
it is at the ninth second. Then move the right border of the text element so that it is at the current
playhead location. So that is how we can
set the animation timing more precisely by utilizing
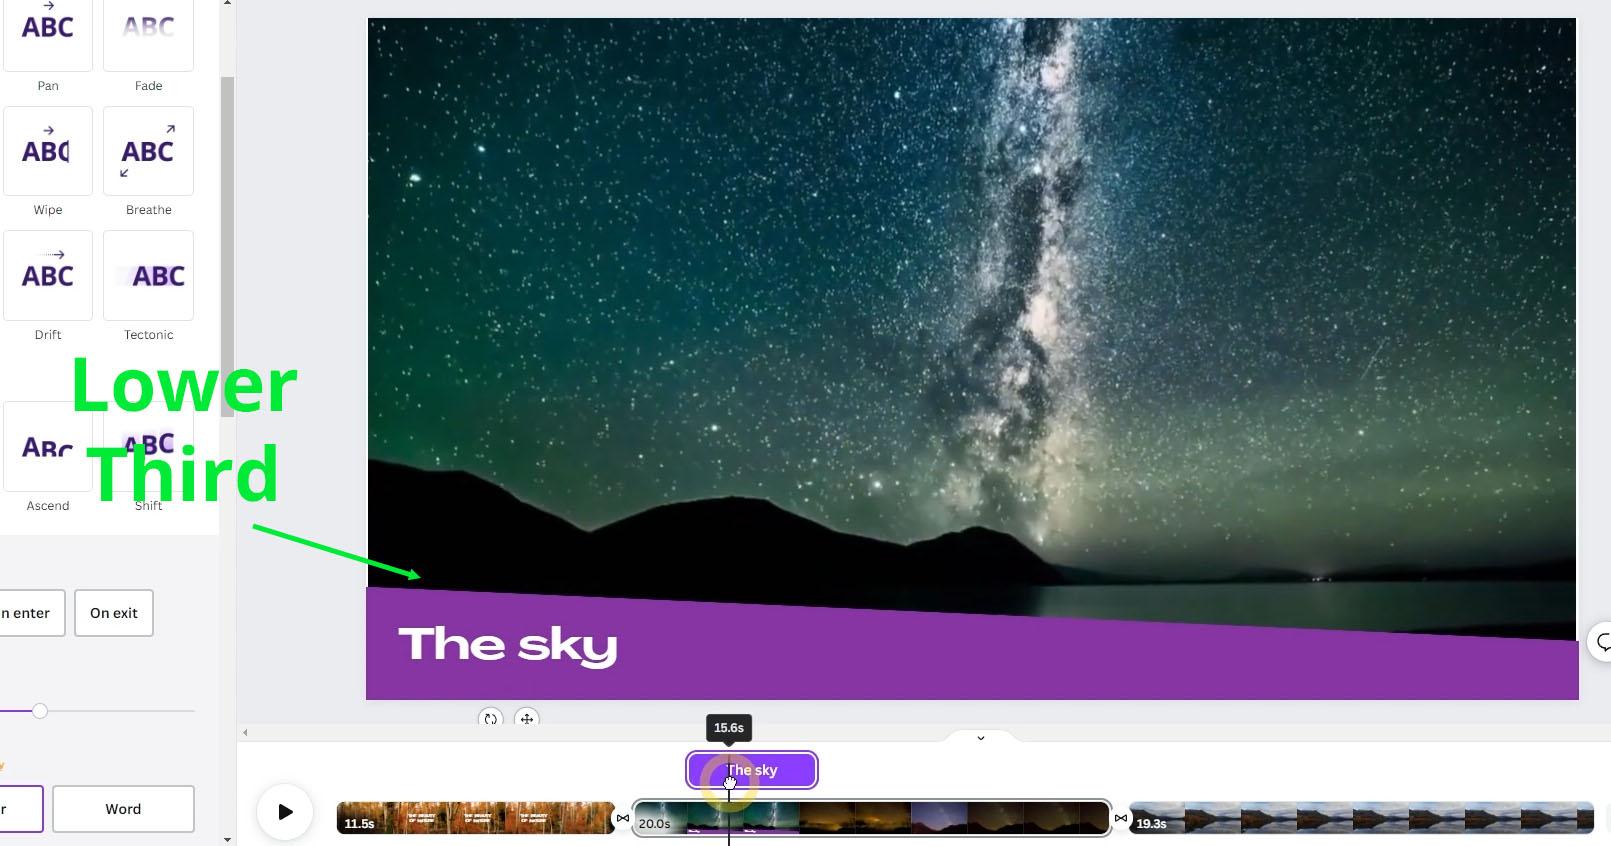
the playhead in the timeline. Next on the second page, we want to add text and graphics in the lower
area of the video. Generally, text and
graphics displayed in the lower area of a video
are called the lower third. The first element we want to
add is rectangular shape. You can use the usual method of going to the elements
step and so on. But I want to show you an alternative method to
quickly add a rectangle, which is by pressing the
letter R on the keyboard. As you can see, Canva
has just created this rectangle for us to
change the color of the shape. You can pick a color from the various colors,
ingredients below. If you want to choose a
custom color right away, you can press the color
box on the top left. Just choose the color you like. I choose purple. All
right, next break. The control box on the left while holding
down the out key. Rotate the element slightly, then move it down until it looks like
more or less like this. The next step is we want to add text on top of this
rectangle shape. Go to the text step and
click or click drag the subheading set type
the text, the sky. Then change the
alignment to left, change the color to white. For the phone type,
I will use a phone called a grand, grand position, this text element in
the bottom left corner, but keep it within the
page outer border. Feel free to arrange
both rectangle and the text until you're
happy with how they look. Now it is time to animate
these lower third objects. Let's select rectangle
at the bottom. For this object,
we want to apply an animation preset
called Baseline. Use the both option. We can preview the animation by scrubbing in the timeline. You can see that the enter
animation is blocked. Goes inside the duration
of the transition effect. Also the on exit animation
is moving upwards. It would be better if
it is moving down. Let's focus on fixing
the on enter animation. First, let's assume that we want the animation to start at the
second second of the page. If we move the playhead to
the left border of the page, we can see that the page
starts at 11.5 seconds. We just move the
playhead to the right to round 13.5 seconds. It's okay if it's
not too precise, unable to show timing
feature again. If it is closed then move start border of the animation
to the playhead position. Also, we don't want to lower third element to block the
video behind it for too long. We just limit the
duration to 6 seconds. 13.5 plus six equals
19.5 seconds. Next break the end
of the animation, so that it is at the
playhead position. Finally, we want
the exit animation to not move up but
move back down. For this in the animation panel, in a base line three set, you can find the reverse
exit animation option. If we activate this, the exit animation will be an inverted version of the on enter or in other
words, move downwards. Okay. Next, strike
the text element in the animation spannel. You can choose an animation
three set you like. I'll just apply the
type or animation. Make sure the both
option is active. Then for the timing slide, the playhead to run 14 seconds break the start border of the
animation to that position. For the end of the mission, we can move it to
around 19 seconds. Currently, the
rectangle element will show up first followed
by the text element. Meanwhile, when
exiting, the text will disappear first followed
by a rectangle below it. If you have many
pages and on each of those pages you want to
apply a uniform lower third, you can use the cap commands. First, select the rectangle
and text elements. Press control C, then
select the next page. Then press control of V. Since the video on
this page is about lakes, we can change the
text to the lakes. Now one drawback of Canva, or at least in the version
I am currently using, is that when you copy and piece elements from one
page to the next, the timing information
is not included. Only the type of an emission
preset is duplicated. So you have to adjust the
timing again just like before. Since the method is exactly the same as what we did
on the second page. I'm not going to explain
it again to save time. Hopefully this condition has improved in a version of
Canva that you are using.
9. The next step: Congratulations,
you have completed this course from
start to finish. You have learned a
lot in this course, but there are still a
lot of things you can do with Va that we haven't
touched on yet. As you may already
know, this course is the third in the series. If you want to master even
more of canvas features, you should check out
the rest of the series. You can pick any of these
courses that appeal to you, but I highly recommend that
you watch the next one, Mastering Presentation
and Whiteboard in Canva. The curriculum minus
course is designed to be a continuation of the
course you just completed. Also because it covers a lot of things that
will be useful to, to prepare you for
the next courses. You can search for the
course yourself at skill share or just use this link I provided
on the screen. I hope this course
series can have a positive impact in
your life and career. See you at the next one, Salam.
 Widhi Muttaqien, CG expert & entrepreneur